Indian lifestyle brand Noise has announced the launch of a new smartwatch, Noise ColorFit Ultra 3. The device is claimed to feature the largest AMOLED dial of 1.96. The smartwatch has a metallic body with a functional crown for navigation. In addition to this, it is IP68 rated for water and dust resistance. The fitness tracker further includes Gesture Control, Smart DND, Two options for menu, Auto Sports Detection and Tru Sync.
In This Article
Noise ColorFit Ultra 3 price in India and availability
The price of the Noise ColorFit Ultra 3 starts at 4,499 and goes up to Rs 5,499 depending on the strap type you choose. The watch with Silicon strap (Lifestyle Edition) in Jet Black and Teal Blue is priced at Rs 4,99. The one with a Leather strap (Classic Edition) is available in Classic Black, Classic Dark Brown and Classic Tan Brown is priced at Rs 4,999. Lastly the Metal strap (Elite Edition) in Jet black and Glossy Silver comes with a price tag of Rs 5,499.The device will be available for purchase via Amazon, gonoise.com and across offline channels including yet not limited to Reliance, Croma, Vijay Sales, Poorvika Mobiles, and others.
Noise ColorFit Ultra 3 features
The Noise ColorFit Ultra 3 features a 1.96-inch AMOLED display with 410×502 pixels of resolution. It also offers 500 nits of brightness. The device comes with more than 150 watch faces and 4 Always on Display options. The watch is IP68 water and dust resistance for durability.Noise smartwatch comes equipped with single chip BT with Tru Sync technology, for connectivity. The watch also allows Bluetooth calling features and lower battery consumption with BT v5.3. Users can call from a dial-pad, access recent calls and save up to 10 contacts on the watch using Noise Buzz.There is a smart DND on the watch that let the device text when the user is asleep and is functioned to not vibrate/ ring with new notifications during that period. The two menu UI option allows users to choose between a list view and a grid view. The smartwatch is integrated with Gesture Control technology offering unique customisations such as Tap to wake and palm control to turn off the display.The Noise ColorFit Ultra 3 includes a host of features under the Noise Health Suite and an inbuilt Productivity Suite. The smart wearable has over 100 sports modes. The device is claimed to last up to 7 days on a single charge.
For the latest gadget and tech news, and gadget reviews, follow us on Twitter, Facebook and Instagram. For newest tech & gadget videos subscribe to our YouTube Channel. You can also stay up to date using the Gadget Bridge Android App. You can find the latest car and bike news here.
A death-timer is now shown on Google Analytics Universal. The time to relocate to GA4 has come, if you haven’t done. The tech giant unveiled Google Analytics 4 to handle “evolving measurement standards and help businesses succeed.” The cross-platform analytics tool GA4 uses an event-based data model rather than solely relying on cookies to provide user-centric measurement.The company made the announcement last year, “We will begin sunsetting Universal Analytics — the previous generation of Analytics — next year. All standard Universal Analytics properties will stop processing new hits on July 1, 2023.”Now, as soon as you launch Analytics on your desktop, a 60-day countdown metre appears. The new Google Analytics 4 offers, in the company’s opinion, better privacy protections than the previous generation with more thorough and detailed restrictions for data gathering and usage. To safeguard clients and their user’s data, it will no longer save IP addresses. It will make it possible to track a wide variety of user activities, including clicks, page views, app opens, and more, to help you better understand how users interact with your app and website. The event-based measurement model with the new Google Analytics 4 (GA4) will let you get a comprehensive understanding of the client lifecycle which isn’t broken up by platform or set up into separate sessions.Google states that the event-based model lets you automatically tag some of the events on your site with no additional coding required. In addition to page views, you can measure many common web events like scrolls, downloads, video views and more with the flip of a toggle in the admin settings for your property. One can also manage and minimize the collection of user-level data — like cookies and metadata — while preserving key measurement functionality.Expanded Google Ads integrations integrate with your combined web and app data, which will make it simple to use Analytics insights to improve your campaigns.Additionally, the company has integrated Display & Video 360 and Search Ads 360 into Google Analytics 4, which is available to all customers. In order to improve campaign effectiveness, one can activate their Analytics data, such as conversions and audiences, in the Google Marketing Platform purchasing tools, whether they are standard or 360.All standard Universal Analytics properties will halt processing new hits on July 1, 2023, and for 360 Universal Analytics properties on July 1, 2024. After then, you’ll be able to access your previously processed data in Universal Analytics for at least six months. According to the company before Universal Analytics stops processing new hits, upgrade to Google Analytics 4 as soon as possible to begin accumulating the necessary historical data. For the latest gadget and tech news, and gadget reviews, follow us on Twitter, Facebook and Instagram. For newest tech & gadget videos subscribe to our YouTube Channel. You can also stay up to date using the Gadget Bridge Android App. You can find the latest car and bike news here.
A proxy server is a gateway between your device and the websites you visit on the Internet. A proxy masks your IP Address while engaging with the websites you visit using your device. This helps in keeping your device secure and it does not give malicious entities access to your device’s IP. A proxy server can also be used as a firewall or for controlling the amount of traffic on a network. In this article, we show you how to configure and use Android Proxy settings on your device.Read Also:How to Install an XAPK / APK File on Android – Full 2023 Guide
In This Article
Here’s how you can configure Proxy Settings on Android
Step 1: Go to Settings and select Connections.Step 2: Tap on WiFi, then tap on the gear icon next to your WiFi network.Step 3: Tap on ‘View More’.Step 4: Tap on Proxy and select Manual.Step 5: Enter the proxy server information. If you’re on your school or college’s network you may be given a PAC file for automatic configuration.Step 6: Enter the proxy server’s information. This includes the proxy hostname, proxy port, and bypass list. If you are setting up a proxy for your home network, you will find the proxy hostname and proxy port in the configuration email sent to you by the service provider. You can use other proxy addresses if you want to access certain websites that are blocked on the network. The ‘Bypass proxy for’ section is for websites that will bypass this proxy server. You can add multiple websites to this list.Step 7: Hit ‘Save’.Step 8: Check if your proxy server has changed by visiting this website.
How to use a Proxy on Android?
If you are connected to your school or college’s WiFi network, it is likely that it doesn’t let you access social media and other websites. You can manually set up a different proxy server (as shown above) to bypass the ban. A proxy only works on a WiFi network and not on mobile data. One proxy server works for only one WiFi network. If you connect to another network, you will need to set up the proxy server again. Furthermore, you can only use it to access webpages using your phone’s web browser. A manual proxy server does not work on the apps on your phone. It is advised you use a VPN to use apps for this purpose.
Frequently Asked Questions
Does Android have proxy settings?
Yes, you can access the proxy settings for any network on Android by going to Settings>Connections>WiFi Network>View More.
How do I use a proxy on a mobile app?
Unfortunately, proxies don’t work on mobile apps. You will have to root your device to push all internet traffic, including apps on your device, through a chosen proxy server. You can use a VPN to achieve the same result for apps.
This is how you can configure and use a proxy server on Android. As mentioned earlier, a manual proxy server only works for the internet traffic on your phone’s web browser. Apps can choose to override this server. After configuring the proxy settings on Android, make sure you authenticate the proxy by entering the username and password. Here is our list of the 10 best proxy sites for safe and anonymous browsing.For the latest gadget and tech news, and gadget reviews, follow us on Twitter, Facebook and Instagram. For newest tech & gadget videos subscribe to our YouTube Channel. You can also stay up to date using the Gadget Bridge Android App. You can find the latest car and bike news here.
A US-based consumer electronics company Westinghouse announced great offers and discounts ahead of Flipkart’s Big Saving Days Sale and Amazon’s Great Summer Sale. According to the company, it will be participating in both the sale where it will be putting up its entire range of semi-automatic and fully-automatic washing machines on sale. Both the sales on Flipkart and Amazon are set to begin on May 4 and will go on till May 10 in the country. The Westinghouse washing machines come with a smart panel with over 12 functions to choose from, fuzzy logic, memory back up, anti-vibration, shockproof, air dry program, smart tub, rust-free body and much more.The White Westinghouse washing machines will be available at a starting price of Rs 5290 during the Flipkart Big Saving Days Sale and Amazon Great Summer Sale. The company will be offering 5 percent unlimited cashback on Flipkart Axis Bank Credit cards. There will be a 10 percent instant discount with an SBI credit card and EMI and flat INR 100 cashback on Paytm wallet transactions on Flipkart and Amazon. Customers can save 10 percent on ICICI Bank and Kotak Mahindra Bank Credit and Debit cards and EMIs.One of the entry-level models, CSW6000N will be offered at Rs 6,999 during both sales. The Washing Machine has a capacity of 6 Kgs. It comes with a maximum rotational speed of 1400 RPM and features motor power of 90W, an IPX4 Waterproof rating and two wash programs.On the other hand, the Westinghouse washing machine with model number HDF10500 will be available at a discounted price of Rs 22,999.The front-load machine has a capacity of 10.5 Kgs. It has a maximum spin speed of 1200 RPM. The washing machine features an LED digital display and comes with an IPX4 waterproof rating. The device includes Variable Spin, Variable temperature, Time Delay 3-24 hrs, Running time indicator, Child Lock, Error alarm, Error message indication, Error lock indication, Tub Clean and much more.On the other hand, the 7.5 Kg washer comes with a wash and spin power of 325W and 160W respectively with 3 wash programs will be offered at Rs 5,290.Prices for White Westinghouse machines during sales are listed below:
The Big Saving Days Sale on Flipkart will start on May 4 and end on May 10. Members of Flipkart Plus will be able to start shopping 24 hours earlier. Poco today unveiled a few deals for the approaching sale occasion. The POCO X, C and M series will reportedly be offered at a significant discount, according to the manufacturer.During the Big Saving Days Sale on Flipkart, Poco will provide its most recent smartphone at a discounted price.Some of the smartphones on Flipkart’s list of discounted models for the Big Saving Days Sale include the Poco X5 5G, Poco M5, Poco X5 Pro 5G, Poco C51, Poco C55, and Poco C50.Also Read:Google Pixel 7 Series price in India reduced ahead of Flipkart Big Saving Days SaleA significant reduction of Rs 4,000 will be applied to the Poco X5 5G during the sale period, which was originally priced at Rs 18,999. With deals from SBI and ICICI banks, the phone is available for Rs 14,999. The phone is equipped with a Qualcomm Snapdragon 695 SoC. It comes pre-installed with Android 12. Additionally, it has an AMOLED screen with 120Hz refresh support. There is also a 5,000mAh battery that supports 33W fast charging.While the Poco M5 will now cost Rs 8,999 instead of Rs 12,499 after receiving a Rs 3,500 discount. The gadget has a 90Hz display and a 5,000mAh battery that supports 18W rapid charging. The MediaTek Helio G99 SoC, which has eight cores, will power the device. Utilising internal storage, the phone’s Turbo RAM feature effectively increases the RAM.On the other hand, Poco C51 and Poco C55 will come at a discounted price of Rs 6,999 and Rs 7,999 after a cost reduction of Rs 1,500.The Poco C50, which was initially priced at Rs. 6,499., will now be available for Rs. 5,499. The MediaTek Helio A22 SoC powers the device. A 5,000mAh battery and a waterdrop notch display are also included. Additionally, the smartphone has an 8MP dual AI camera that supports 1080p @ 30fps video recording. The phone also utilises Android 12 Go Edition.From its original price of Rs 22,999, the Poco X5 Pro 5G is now available for Rs 20,999. The phone comes pre-installed with MIUI 14-based Android 12 and is run by an octa-core Qualcomm Snapdragon 778G SoC. The mid-range smartphone has a triple back camera array with a 108-megapixel sensor and an AMOLED display with a 120Hz adaptive refresh rate.
For the latest gadget and tech news, and gadget reviews, follow us on Twitter, Facebook and Instagram. For newest tech & gadget videos subscribe to our YouTube Channel. You can also stay up to date using the Gadget Bridge Android App. You can find the latest car and bike news here.
Garena Free Fire is a battle royale game with regular awards and tournaments to keep players interested. If you play Garena Free Fire, you should be aware of the redeem codes that are released on a daily basis. However, because the battle royale game is banned in India, players from other countries can use the Free Fire Redeem codes daily. If you’re unfamiliar with the Garena Free Fire redeem codes or don’t know how to get them, we’ve put together a step-by-step guide to help you redeem them. Check out Garena Free Fire Redeem Codes for 3 May 2023.The Free Fire redeem codes are a great way to get free stuff. These are 12-digit codes that contain alphabets and numbers, as well as an expiration date and time. Because the Garena FF redeem codes cannot be used more than once, you should hurry to the redemption page to claim your free reward before someone else does. To get a free reward, all you have to do is go to reward.ff.garena.com/en, which is the official redemption page. Also, keep an eye on this space for daily updates on Garena Free Fire redemption codes and rewards.
In This Article
Garena Free Fire Redeem Codes Today 3 May 2023
Updating Soon…
How to Get Free Fire Redeem Codes for Garena on 3 May 2023?
Have you participated in the Amazon Quiz today? If not then participate in the 3 May 2023 Amazon Quiz as it has already gone live on the app. The daily quiz can be played from 12 AM to 11:59 every day on the mobile app platform. Today e-commerce is giving the chance to win Rs 5,000 Amazon Pay Balance.Every day Amazon brings a fresh quiz for its customers. By participating in the quiz the participants can win an Amazon Pay Balance of up to Rs 50,000. The quiz can only be played on the mobile app as it is not available for the desktop platform. The quiz contains five easy questions and you have to answer all the questions correctly. The participants will then be shortlisted for a lucky draw to select a winner. Whereas the results are declared at the end of the month. Check out today’s Amazon quiz answers to win Rs 5,000.Amazon Quiz Today Prize – Rs 5,000 Amazon Pay BalanceQuiz Date – 3 May 2023Daily Timing – 12 AM to 11:59 PMWinner Announcement – Today 12 PM
In This Article
Amazon Quiz Answers Today 3 May 2023
Question 1: Humza Yousaf has been elected as the next leader of the ______ National Party.Answer: ScottishQuestion 2: In 2023, Marylebone Cricket Club (MCC) conferred Honorary Life Membership to which woman cricketer from India?
Answer: Jhulan GoswamiQuestion 3: Which Emmy award-winning series was majorly filmed at Highclere Castle?
Answer: Downton AbbeyQuestion 4: Which continent does not have any native species of this bird?Answer: AustraliaQuestion 5: Which is considered as the oldest stroke in this sport?Answer: Breadstroke
How To Play Amazon Quiz
Only app users are eligible to play the Amazon quiz every morning from 12 AM to 11:59 PM. The quiz is not available on the desktop. For those who are unaware of how to play the Amazon quiz below are the steps, you can follow to take the quiz.
Firstly download the Amazon app from Google Play Store or App Store
Now fill in the required information through the Sign Up option.
You need to log in to the Amazon app and scroll down on the home screen to find the Amazon Quiz banner.
Tap on the Amazon Quiz banner and tap on the Start button to start the Quiz.
Now you will get 5 questions and you need to answer them correctly. One wrong answer will eliminate you from the Quiz.
After answering all the questions correctly you are now eligible for a Lucky Draw.
The winner’s name will be announced today at 12 PM.
All Android users must be aware of the APK format for the apps on their devices. When downloading (or sideloading) an app from a third-party source, you need to download its APK file first. APK format is recognised by the Android platform and is used to install the app on your device. Similar to APK is another file format, called XAPK. XAPK files can also be used to install certain apps on your device. The only problem is that Android does not recognise this format on its platform. So, how does one go about installing an XAPK file on their Android device? Read this article to find out.Read Also:Google Pixel 7a to launch in India on May 11, the company confirmed
In This Article
What is an XAPK file?
An XAPK file is not all that different from an APK file. The purpose of both these file formats is to install an app on your phone. The XAPK format is preferred for apps with a large APK file that exceeds the 100MP Google Play Store limit. An XAPK file consists of the original APK file and additional app data. This additional app data is stored in an ‘OBB’ folder within the file. You won’t find any XAPK files in the Google Play Store. You will have to resort to third-party marketplaces to download them.
How to Install an XAPK File on Android
Step 1: Download an XAPK file from a trusted third-party app marketplace.Step 2: Launch Google Files or your phone’s native File Manager.Step 3: Find the XAPK that you just downloaded. Tap the ellipses and select ‘Rename’.Step 4: Chance the file extension from ‘.XAPK’ to ‘.ZIP’. By doing this, you are changing the format of the file to something that your phone can read.Step 5: Tap the ZIP file and extract it to the folder of your choice.Step 6: Open the folder where you extracted the XAPK/ZIP file. Tap on the ‘Android’ folder and copy the OBB folder within it.Step 7: Paste this folder into your phone’s internal storage.Step 8: Go back to the folder where you extracted the XAPK/ZIP file. Launch the APK file.Step 9: Give your phone the necessary permission to install the APK file.Step 10: Tap on Install. The APK file will be installed on your device.
Frequently Asked Questions
What is an XAPK file?
An XAPK file is a package that contains an APK file along with additional app data. XAPK format is meant for apps that exceed the stipulated file size.
How do I open an XAPK file?
Since Android does not recognise the XAPK format, you need to convert it to a ZIP file first and then open its contents. You can convert it into a ZIP file by changing its file extension from ‘.xapk’ to ‘zip’.
If you’re looking for an alternative to Twitter, there are a few options out there for you. Gab Social was launched in 2016 as a direct alternative to Twitter and other mainstream social media platforms. The app for Gab Social is not available on Google Play Store and can only be downloaded from third-party sources. In this article, we show you how to install the Gab Social app on iOS and Android devices.Read Also:14 mobile apps linked to terrorist groups banned in India
In This Article
Install Gab on Android
Here’s how you can install the Gab app on your Android smartphone.Step 1: Launch the Google Chrome app on your Android smartphone.Step 2: Type www.gab.com in the address bar and hit Enter.Step 3: Tap on the ellipses (three dots) at the top right corner of the screen.Step 4: Select ‘Install app’.Step 5: In the following popup box, hit install.Step 6: Give Google Chrome permission to install third-party apps on your device.Gab Social will be installed on your Android device.
Install Gab on iOS
Here’s how you can install the Gab app on your iPhone.Step 1: Launch the Safari browser on your iPhone.Step 2: Type www.gab.com in the address bar and hit Enter.Step 3: Tap on the Share icon at the bottom of the screen.Step 4: Select ‘Add to Homescreen’.Step 5: Enter a name for the shortcut and hit ‘Add’ at the top right corner of the screen.Gab Social will be installed on your iPhone.
Frequently Asked Questions
When was Gab Social launched?
Gab Social was launched in 2016 as an alternative to mainstream social media websites like Twitter and Facebook.
How To Install the Gab iOS and Android App?
Gab Social app is not available on Google Play Store and can be downloaded directly from the Gab website.
This is how you can download the Gab Social app on iOS and Android devices. If you are downloading a third-party app using Google Chrome for the first time, you will need to authenticate the installation by giving Chrome permission to install third-party apps on your device. This is because apps downloaded from third-party sources may not have the ideal security certification and may pose a risk to your device.For the latest gadget and tech news, and gadget reviews, follow us on Twitter, Facebook and Instagram. For newest tech & gadget videos subscribe to our YouTube Channel. You can also stay up to date using the Gadget Bridge Android App. You can find the latest car and bike news here.
Today Google announced the launch date for Pixel 7a in India. The upcoming smartphone is planned to debut on May 11 on Flipkart. Besides this, the price of the Google Pixel 7 and Pixel 7 Pro are getting a significant price cut of up to Rs 5,000. Both phones will be available at reduced prices during Flipkart’s Big Saving Days Sale.Google Pixel 7 was launched in India at Rs 59,999 but is currently listed at Rs 49,999. During the Flipkart Big Saving Days Sale, the device can be purchased for Rs 44,999. On the other hand Pixel 7 Pro which debuted in India at Rs 84,999. The phone is now available at Rs 65,999 but during the sale period, it will be available at Rs 65,999. The sale will begin on May 4 and will run till May 10. However, the Plus Member can access the sale a day before the sale begins on the platform.Pixel 7 comes in Snow, Obsidian, and Lemongrass colour options. Whereas Pixel 7 Pro is offered in Hazel, Obsidian, and Snow.Both smartphones run on Android 13. The Pixel 7 features a 6.32-inch full-HD+ OLED display with a 90Hz refresh rate. Whereas the Pixel 7 Pro includes a 6.7-inch Quad-HD LTPO OLED display with a 120Hz refresh rate. The devices are powered by an octa-core Tensor G2 SoC.The Pixel 7 features a dual rear camera setup that includes a 50MP primary and a 12MP ultrawide lens. Whereas the Pro variant comes with an additional 48MP telephoto lens with 30X Super Zoom and 5X optical zoom. The device includes a 10.8MP selfie camera.The Pixel 7 houses a 4,270mAh battery and the Pixel 7 Pro comes with a battery capacity 4,926mAh. Both handsets support 30W wired charging along with fast wireless charging.
Also Read: Google Pixel 7a to launch in India on May 11, the company confirmedApart from this, the company has announced to launch Google Pixel 7a in India on May 11.The device is the successor to the Pixel Pixel 6a. It is likely to come with a 6.1-inch full-HD+ OLED display with a 90Hz refresh rate. It may be powered by a sensor G2 SoC, paired with 8GB of LPDDR5 RAM and 128GB of UFS 3.1 storage. It is likely to include a dual rear camera setup consisting of a 64-megapixel primary sensor with optical image stabilization (OIS) support and a 12-megapixel ultra-wide lens. In addition to this, there will be a 10.8-megapixel front-facing camera for taking selfies. The Pixel 7a could also sport a 4,400mAh battery with 20W wired charging support.
For the latest gadget and tech news, and gadget reviews, follow us on Twitter, Facebook and Instagram. For newest tech & gadget videos subscribe to our YouTube Channel. You can also stay up to date using the Gadget Bridge Android App. You can find the latest car and bike news here.
The popular German brand, Blaupunkt, has announced to launch a brand-new Android TV in India. The company has revealed to introduce the new Blaupunkt Sigma Series. The device will be available during the upcoming Flipkart Big Savings Days Sale. The company will also participate in the Sale where all its TV models will be available at discounted prices. The 40-inch Android TV Sigma Series will include a bezel-less design. It will include a dual 40W speaker with Surround Sound.The launch of the Blaupunkt 40-inch Android TV Sigma Series is going to take place during Flipkart Big Saving Days Sale. The sale will commence with early access on May 4 and will go on till May 10.The Blaupunkt 40-inch Android TV Sigma Series comes with a Bezel-less design and offers 300 nits of brightness. It has two bottom-firing built-in speakers with a sound output of 40W and Surround Sound Technology. In addition to this, it will include a YouTube remote which has dedicated shortcut keys to access content on Amazon Video, Zee5, Sony LIV, and Voot. The device is compatible with laptops, mobile devices, and PCs. The Android TV has a RAM of 512 MB and a ROM of 4 GB.Apart from this all the models of Blaupunkt will be offered at a massive discount during the Flipkart Big Saving Days Sale. There will be up to 75% on TVs and appliances. They can also take advantage of benefits such as 5% unlimited cashback with Flipkart Axis Bank Credit Card and a 10% instant discount when using an SBI card.As per the company, all Blaupunkt Smart TV models will be available at “significant discounts”, starting at Rs 6,499. Buyers can avail of an instant discount of 10% using the SBI card and unlimited cashback with Flipkart Axis Bank Credit Card.The offerings include the 32-inch (32CSA7101) Cybersound LED Smart TV priced at Rs 9,499 the 42-inch Cybersound 4K LED Smart TV priced at Rs 16,999, the 43-inch Cybersound Ultra HD Smart TV priced at Rs 24,999, the 50-inch Cybersound Ultra HD 4K LED Smart Android TV with Dolby MS12 available at Rs 27,999, the 55-inch Cybersound LED Smart TV priced at Rs 29,999, and the 65-inch Cybersound 4K LED Smart TV priced at Rs 45,999.On the launch of the new model CEO of Super Plastronics Pvt. Ltd, Mr. Avneet Singh Marwah said, “We are excited to introduce the all-new Blaupunkt Sigma Series 40-inch Android TV as part of our collaboration with Flipkart’s Big Saving Days Sale. This TV exemplifies our commitment to providing cutting-edge technology and an immersive viewing experience to our customers. With its Android operating system, users can enjoy a seamless smart TV experience with access to a wide range of apps and content. The Sigma Series 40-inch TV combines sleek design with superior performance, offering stunning visuals and enhanced sound quality. We believe that this launch will redefine home entertainment and provide an unmatched TV viewing experience to our valued customers.”
For the latest gadget and tech news, and gadget reviews, follow us on Twitter, Facebook and Instagram. For newest tech & gadget videos subscribe to our YouTube Channel. You can also stay up to date using the Gadget Bridge Android App. You can find the latest car and bike news here.
A faulty touchscreen pretty much renders your smartphone useless. There’s not much you can do on your smartphone if the touchscreen does not work. Sure, you can still access some functions using voice commands or an external keyboard, but these are just temporary fixes to a pressing issue. Before taking your phone to a professional repair centre, there are some things you can do at home to recover its touchscreen. In this article, we bring you the top 12 ways to fix an unresponsive touchscreen on an Android phone.Read Also:How to reset your Twitter password on Android and iPhone?
In This Article
Restart your phone
If your phone’s touchscreen started malfunctioning out of the blue without any signs of physical damage, the issue is most likely software-related. The touchscreen may stop responding at times due to a background glitch. The easiest way to resolve these glitches is by quickly rebooting your phone. Simply long-press the side key to reveal the power options. Select ‘Restart’ from the list of options. If long pressing the side key triggers the voice assistant on your device, press the side and Volume Up keys to reveal power options.
Restart the phone in Safe Mode
It is common for corrupt third-party apps to mess with the basic functioning of your phone. Before you perform a factory reset or uninstall certain apps from your device, it is a good idea to restart your phone in Safe Mode to confirm whether third-party apps are an issue. Restarting your phone in Safe Mode limits the activity of third-party apps and runs only the basic system apps on the device. If you are facing the touchscreen in Safe Mode as well, it means that third-party apps are not to blame.To enter Safe Mode, press and hold the power button and volume down button. Once the power menu pops up on the screen, press and hold the power icon until the Safe Mode option shows up.
Run a system diagnosis
Your Android smartphone is equipped with certain diagnosis tools for different parts of the device. You can run a check for touchscreen issues as well. These checks can be triggered by entering certain codes on the dialer app. To run a touchscreen check on a Samsung phone, launch the Dialer app and enter *#0*#. Run the different tests on your touchscreen to diagnose the issue. If you own a smartphone from a different manufacturer, simply Google the test codes for that device.
Use the Display Tester app
The Display Tester app performs a thorough test on your phone’s touchscreen and diagnoses dead pixels with ease. Install the Display Tester app from the Google Play Store. Launch the app and switch to the ‘Tests’. Run all the available tests on your device to figure out what is wrong with it.
Increase touch sensitivity
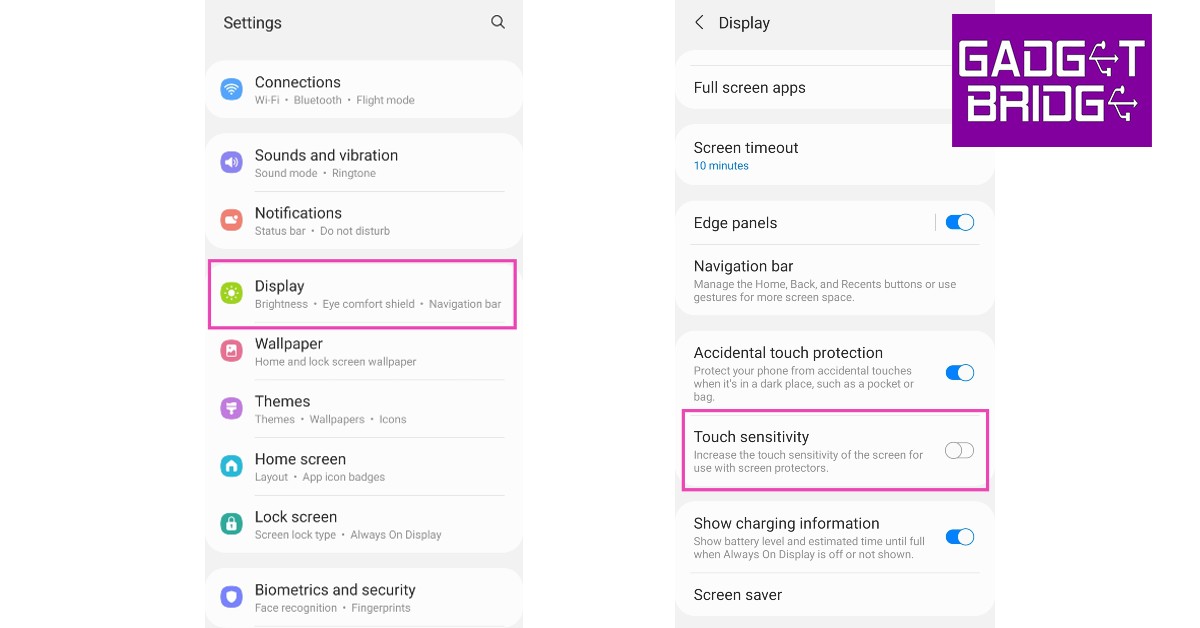
If your touchscreen started being unresponsive after you installed a screen protector on it, you need to increase the touch sensitivity of your device. With heightened sensitivity, your phone’s touchscreen can pick up the faint touches that would otherwise go unnoticed because of the screen protector getting in the way. You can increase the touchscreen sensitivity by going to Settings>Display and turning the toggle bar on for ‘Touch sensitivity.’
Clean the touch screen
Sometimes, dust particles can collect around your smartphone’s display, causing it to malfunction. If you use a screen protector on your phone, grime can collect around its borders. Thoroughly clean the display to ensure that dust build-up is not the reason behind this issue. First, wipe the display with a clean and microfibre cloth. Then, spray an isopropyl alcohol-based cleaning mixture on the display and thoroughly with it off with the microfibre cloth.
Turn off Developer Mode
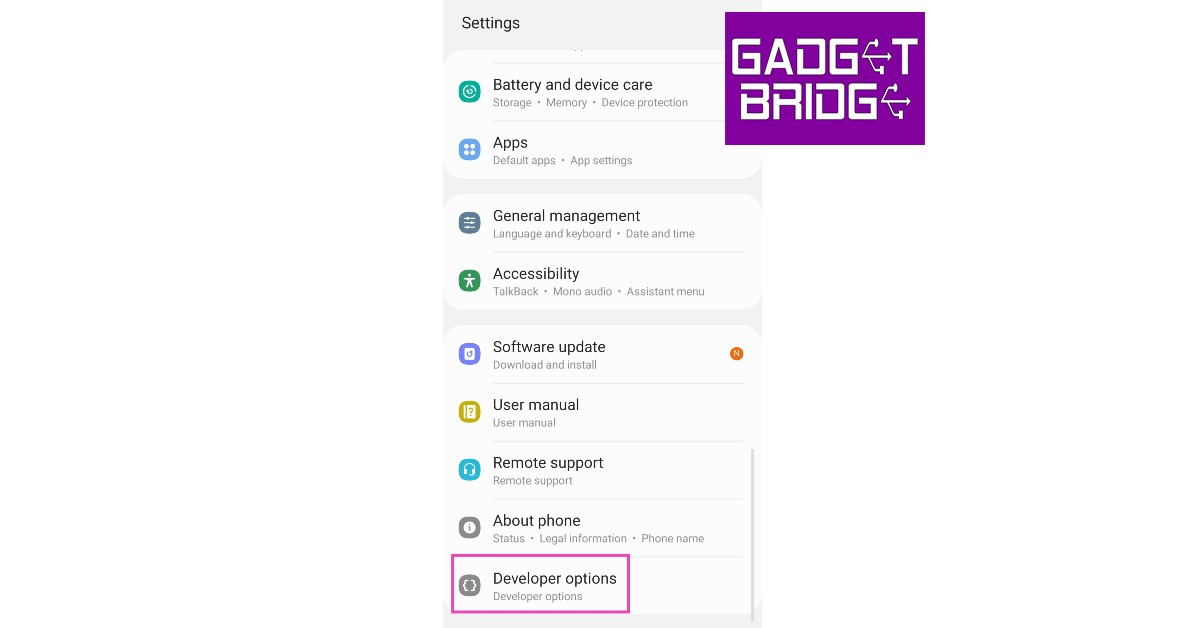
The Developer Mode on your phone can be activated by tapping the build number seven times. It unlocks a host of options, giving you greater control over the functioning of your phone. However, over a period of time, it can create certain malfunctions. If your phone’s touchscreen becomes unresponsive all of a sudden, try turning off the Developer Mode. Here’s how.
Step 1: Go to Settings.
Step 2: Scroll all the way down and tap on Developer Options.
Step 3: Switch off the toggle bar for Developer Options.
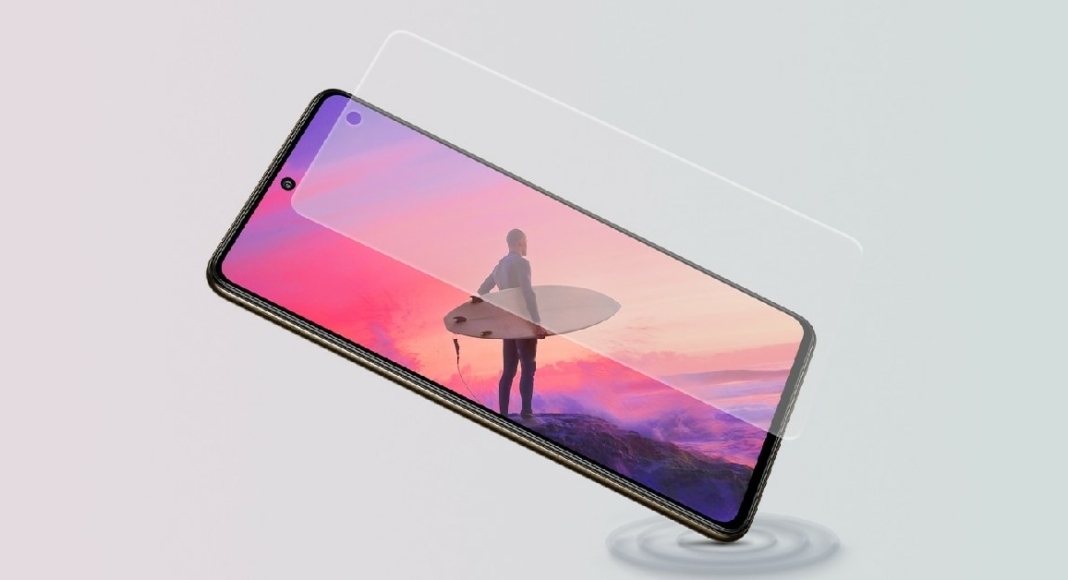
Remove the screen protector
If increasing the touch sensitivity of your device does not restore the normal functioning of the touchscreen, remove the screen protector. Before buying a screen protector, make sure that is it compatible with your smartphone. If it isn’t, it can render the touchscreen unusable. Certain screen protectors prevent the under-display fingerprint scanner from working correctly. If you are using an old screen protector, the air bubbles inside it can often cause the touchscreen to not register the touch gestures.
Water damage? Let your phone dry
If your phone’s touchscreen isn’t working due to water-related damage, there are a few methods you can employ to fix it. First, turn your phone off instantly and do not launch it until all traces of water have been removed from the device. The best way to absorb all water from your smartphone is by covering it with packets of silicate. You can read our complete guide to removing water from your smartphone here.
Take out the memory card
Not all touchscreen malfunctions are related to hardware issues. Sometimes, corrupted files in the smartphone’s memory can lead to the phone becoming unresponsive at random times. To make sure whether this is the case, take out the memory card along with the SIM and restart your phone. If the issue resolves itself, format the memory card and insert it again.
Update your phone’s OS
You may need to update your Android phone’s OS to fix its unresponsive touchscreen if the problem arises out of a software bug. Here’s how you can go about it.
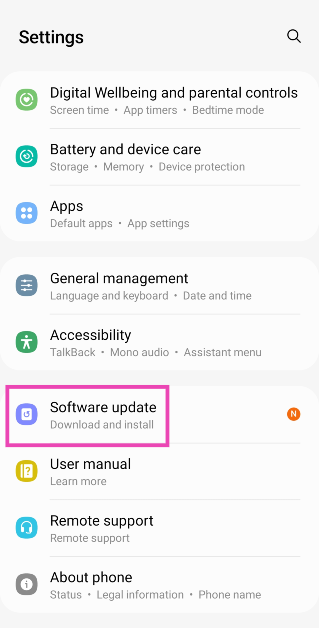
Step 1: Go to Settings and select Software update.
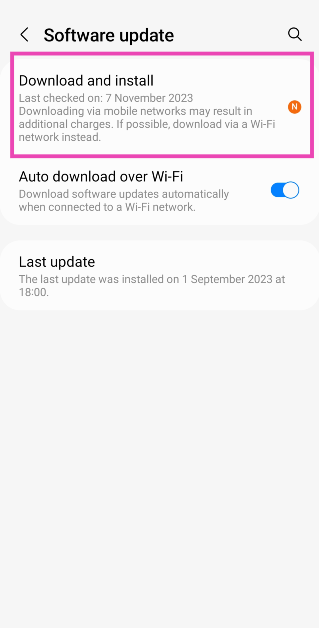
Step 2: Tap on Download and install.
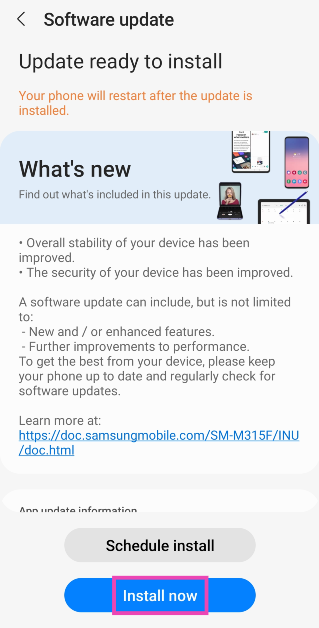
Step 3: Select Install now.
Perform a factory reset
Step 1: Go to Settings, scroll down and select General Management.
Step 2: Tap on Reset.
Step 3: Select Factory data reset.
Step 4: Scroll down and tap on Reset.
Frequently Asked Questions
How do I fix my phone’s unresponsive touchscreen?
If your phone’s touchscreen stopped responding without taking any physical damage, run the device in Safe Mode to check if it’s a third-party app-related issue. You can also use apps like Display Tester to check for any dead pixels.
What causes the touchscreen to stop working?
Your phone’s touchscreen may stop working after taking physical damage or accidentally getting dipped in water. It can also become unresponsive due to a software glitch or because of the presence of dead pixels.
How can I use my phone without touching the screen?
These are the best 12 ways to fix an unresponsive touchscreen on an Android phone. If these fixes do not work for you, take your phone to an authorised repair centre for further diagnosis. If your phone is under warranty, you can get a free screen replacement if there are no signs of physical or water damage on your phone.
Google today officially stated that the Pixel 7a’s launch date in India has been scheduled for May 11. The device will be available for purchase via Flipkart in the country the company revealed. Note that the device will debut on the second day of the upcoming Google I/O event that will begin on May 10. Ahead of the official announcement the upcoming Pixel phone has already been seen online a few times, revealing the pricing, design as well as specification.Google Pixel 7a is all set to launch in India on May 11 which was quite expected and was being speculated as the Google I/O, the company’s annual flagship event is set to begin on May 10 where we are expected to see important announcements. The smartphone is the successor to the Pixel 6A and the low-cost option to the flagship Pixel 7 that was launched last year.
In This Article
Google Pixel 7a specification and design expected
The launch was teased via a teaser poster. A smartphone has been teased in a blue colour variant. The phone was previously spotted on several certification sites and other platforms, therefore, suggesting the key specs, design and pricing. Pixel 7A’s images were leaked via tipster on Twitter. He shared the phone in two colour options of Arctic Blue and Charcoal Black. The phone can be seen with a rectangular camera model horizontally placed on the back panel having an LED flash unit. The company’s Logo is also visible on the rear at the centre.
The Pixel 7A is expected to feature a 6.1-inch full-HD+ OLED. The screen will come with a refresh rate of 90Hz. The device is likely to be powered by the Tensor G2 SoC, paired with 8GB of LPDDR5 RAM and 128GB of UFS 3.1 storage. It is said to include a dual rear camera setup. The system is speculated to consist of a 64-megapixel primary sensor with optical image stabilization (OIS) support and a 12-megapixel ultra-wide lens. In addition to this, there will be a 10.8-megapixel front-facing camera for taking selfies and video calling. Reportedly the handset may include a 4,400mAh battery with 20W wired charging support.
If you want to accelerate the process of learning a language, you must practice writing it as well. Luckily, the keyboard on your smartphone makes it easier to type in a second language using predictive text. Japanese learners who find it hard to grapple with the script will find typing on an onscreen keyboard way easier than physically writing the language. In this article, we bring you the top 3 ways to type Japanese characters on your iPhone and Android phone.Read Also:How to reset your Twitter password on Android and iPhone?
In This Article
Type Japanese Characters on your Android Phone
Gboard (Google Keyboard) is the default keyboard in most Android smartphones. This keyboard is extremely versatile and has integrated support for the major languages of the world. Here’s how you can type Japanese characters on Gboard.Step 1: Go to Settings and select General Management.Step 2: Tap on ‘Keyboard list and default’ and select Gboard as the default keyboard.Step 3: Go back and tap on ‘Gboard settings’.Step 4: Tap on ‘Languages’.Step 5: Select ‘Add Keyboard’.Step 6: Scroll down and select ‘Japanese’.Step 7: Select the keyboard layout and tap on ‘Ok’. Japanese will be added to the list of languages supported by Gboard.Step 8: To type in Japanese, go to a text box and long-press the spacebar on Gboard.Step 9: Select Japanese from the list. The keyboard will now display Japanese characters and you will be able to type them on the screen.
Type Japanese Characters on your iPhone
Use these steps to add Japanese characters to the default keyboard on your iPhone.Step 1: Go to Settings and select General.Step 2: Select ‘Keyboard’ and tap on ‘Keyboards’.Step 3: Tap on ‘Add new Keyboard’.Step 4: Scroll down and select Japanese.Step 5: Choose the Japanese writing system for your keyboard. By default, you get the option to add ‘Kana’ and ‘Romaji’. You can add both of them to the keyboard.Step 6: To type in Japanese, go to a text box and tap the globe icon on the keyboard. Select Japanese from the list of languages.
Type Japanese Characters using Microsoft SwiftKey keyboard
If you’re a SwiftKey user, you will be pleased to know that Microsoft’s keyboard app has support for most major languages across the world, including Japanese. Here’s how you can type in Japanese on the Microsoft SwiftKey keyboard.Step 1: Go to Settings and select General Management.Step 2: Select ‘Keyboard list and default’ and set SwiftKey as your default keyboard. If you don’t find SwiftKey on the list, download it from Google Play Store.Step 3: Tap on ‘Microsoft SwiftKey Settings’.Step 4: Select ‘Languages’.Step 5: Tap on ‘All Languages’ and select Japanese.Step 6: SwiftKey will download the language pack and integrate it with the keyboard.
Frequently Asked Questions
How do I type in Japanese on my phone?
To type in Japanese on your phone’s onscreen keyboard, simply go to Settings>General Settings and add Japanese to the list of languages on your keyboard.
Which keyboard offers Japanese typing on Android?
Google Keyboard and Microsoft SwiftKey Keyboard offer Japanese support on Android. You can also download special third-party keyboard apps to exclusively type in Japanese.
How do I type in Japanese on WhatsApp?
Once you switch to Japanese on your onscreen keyboard, you will be able to type Japanese characters on any app, including WhatsApp. To change WhatsApp’s app language to Japanese, go to WhatsApp>Settings>App Language and select Japanese from the list.Read Also:14 mobile apps linked to terrorist groups banned in India
Conclusion
This is how you can type Japanese characters on your iPhone or Android phone. You can easily switch back and forth between languages on your onscreen keyboard by tapping on the globe icon or long-pressing the spacebar. If there’s another Japanese keyboard app that you like to use, let us know in the comments!For the latest gadget and tech news, and gadget reviews, follow us on Twitter, Facebook and Instagram. For newest tech & gadget videos subscribe to our YouTube Channel. You can also stay up to date using the Gadget Bridge Android App. You can find the latest car and bike news here.
Samsung has officially announced the Fab Grab Fest 2023 on its website. Customers can benefit from discounts and cashback on a variety of Samsung digital appliances, as well as Galaxy smartphones, tablets, laptops, accessories, and wearables. The festival offers will be accessible on Samsung.com and at Samsung Exclusive Stores located all throughout the nation. Select deals are live now as early access to the sale is open, however, the sale will go live on May 4.During the Fab Grab Fest, select models of the Galaxy S Series, A Series, M Series, F Series, and Flip 3 smartphones will be discounted by up to 57%, and select models of the Galaxy Tablets will be discounted by up to 40%.Additionally, the company will offer discounts of up to 45% on consumer electronics items and up to 59% on monitors.Get additional cashback of up to 22.5% on credit and debit cards from renowned banks. The HDFC and ICICI Bank customers can also receive an additional cashback of up to 14%.Also Read:You can now easily share files between Windows PC and Android devices using Google’s Nearby Share feature
Samsung Fab Grab Fest Offers and Discounts
The Galaxy F14, Galaxy F23, flagship Galaxy S21 FE 5G, Galaxy Z Flip3, and recently released Galaxy M14 will all be discounted by up to 57%, according to Samsung. The company will be providing discounts of up to 29% on Samsung laptops such as the Galaxy Book2, Galaxy Book Go, and the recently released Galaxy Book3 and Galaxy Book3 Pro 360. You can save up to 40% on Samsung tablets, accessories, and wearables such as the Galaxy S6 Lite WiFi, Galaxy A8 WiFi, and Galaxy Watch4.Select Samsung TV models, including the flagship Neo QLED and The Frame TVs and the Crystal UHD series, will be discounted by up to 45%. The “Fab Grab Fest” 2023 will also provide never-before discounts and offers on a variety of electronic devices, including air conditioners, refrigerators, washing machines, microwaves, and monitors.The most expensive Side-By-Side refrigerators from Samsung will be discounted up to 40%. The customers can also get 32-inch Samsung smart TV worth Rs 15,990 when they purchase certain Side-By-Side refrigerators, in addition to an additional 40% savings. Up to 30 percent off will be available on select models of washing machine models, as well as a free 28-litre microwave oven.There will be up to 35 percent off on other digital appliances like microwaves and up to 40 percent off on select models of Air Conditioners. According to Samsung, debit and credit cards from ICICI, Axis, Kotak, and other top banks will also be eligible for an additional cashback of up to 22.5% with a maximum of Rs 25,000. In addition to this, consumers buying two or more of Samsung’s latest range of WindFree ACs can get an additional 10% off on the final price.Apart from discounts and offers 1st-time buyers on Samsung Shop App can avail of benefits up to Rs 2000 on select Galaxy devices & up to 3000 on Select TV & home appliances. ShopApp welcome vouchers can be availed over and above the Fab Grab Fest offers.There will be an additional 10% cashback over and above fab Grab Fest offers if the transaction is made through a Samsung Axis bank credit card.Customers making two or more purchases from categories including accessories listed under the Buy More Save More offer on Samsung.com and Samsung Shop App are eligible to get an additional 5 percent off.
For the latest gadget and tech news, and gadget reviews, follow us on Twitter, Facebook and Instagram. For newest tech & gadget videos subscribe to our YouTube Channel. You can also stay up to date using the Gadget Bridge Android App. You can find the latest car and bike news here.
After roughly two years, Amazon released the fifth-generation Echo Dot speaker in India a few weeks ago. The device, which has improved functionalities but a mostly similar form factor to the 4th Gen Alexa-powered speaker, is its replacement. It is asserted that the entry-level smart speaker sounds better. Additionally, it has motion detection, ultrasound sensors, and temperature sensors. Our edition of the Echo Dot 5 costs Rs 5,499; can it live up to the expectations? Read our Amazon Echo Dot 5th Gen review to find out.
In This Article
Amazon Echo Dot 5th Gen Review: Design
Hey, that looks exactly like the previous generation model, we thought when we first saw the Amazon Echo Dot 5th Gen speaker. To distinguish between the two generations, there is a small difference, though. The 3.5mm audio jack, which was a not needed addition in our opinion, has been eliminated by the business from the fifth generation.Amazon Echo Dot 5th Gen features a spherical design, which looks neat and has four physical buttons on the top. There is an action button to turn on/off the Accelerometer, a mute mic button and two to control the volume. We have the blue colour variant, however, it is available in two more colours – white and black. Since it lacks a battery, it cannot be used on the go; instead, it must be constantly plugged in to function.The dedicated light on the speaker’s bottom illuminates in various colours to show whether Alexa is listening, on mute, trying to connect to WiFi, or in setting mode. The bottom of the speaker is flat and covered with rubber for a better grip. The power socket is still there, despite the absence of the 3.5mm headphone jack, as we have mentioned.
Amazon Echo Dot 5th Gen Review: Performance
The device has an accelerometer that allows you to snooze the alarm, play/pause music, and even stop the timer by tapping on the top of the device. Actually, it’s quite good. More often than we anticipated, we found ourselves unintentionally stopping the music. Therefore, the action button saves the day. When the button is pressed, the accelerometer is not activated. Alexa can be asked to play or pause music instead, which is more effective. In the App settings, you can also disable the play and pause music tap gesture, but you can still keep it on to stop alarms and timers. However, the tap gesture many times failed during our testing, which was a bit odd.Most of the time the tap gesture never worked to resume the music if it accidentally gets paused. We had to tap it multiple times.Let’s discuss ultrasound motion detection, another improvement over the 4th generation Echo Dot. Yes, the Echo Dot 5 has motion detection. The built-in microphones capture background noise that can be tweaked to meet your needs. For instance, you can programme it to automatically turn off the lights in the room when no one is present and turn them on when it senses someone is around. All you need to do is visit the Alexa App to personalise this. An option for ultrasonic motion detection is available in the settings. You may adjust the sensitivity range here and many other things if you turn that on.Additionally, it has a built-in temperature sensor, and just like ultrasound motion detection, you can programme a routine for this as well. The air conditioner will automatically turn on if the room temperature exceeds your preset level. You can also set a threshold to switch off the air conditioning. If your AC is a Smart AC, you must manually switch it off.The Echo Dot 5 has a 1.73-inch audio driver. The smart speaker has excellent bass quality. You can easily use it to operate your Smart home equipment in addition to listening to music.Wi-Fi connections at 2.4GHz and 5GHz are available for connectivity. It takes several minutes to connect initially to the Wifi but the connectivity is stable and has a good range. It works with Alexa App, which is available on both Apple App Store and Google Play Store. We only used the App while setting up the device and to link appliances and music streaming services. Also, the Echo Dot supports music streaming services like Amazon Prime Music, Jiosaavan, Spotify, Hungama and more.In terms of cost, the Amazon Echo Dot 5 is available for Rs 5,499. which is more expensive than the previous generation, which costs only Rs 4,499 today.
Verdict
The real question is whether you would spend an extra Rs 1,000 to get the tap feature, ultrasound motion detection, and temperature sensor built-in. If you ask us, we will say “Maybe.” The tap functionality did not impress us because it frequently failed and because our listening pleasure was ruined by unintended touches.The temperature sensor, however, is a welcome addition, but again, if you have a Smart AC at home or at work, this feature is not much of use. The Echo Dot 5’s audio quality has become much better, and there’s no denying that the bass on this model is excellent. At just Rs 4,499, the 4th generation is, in our opinion, is a great investment. The Echo Dot 5 is a superb option if you want to replace your 4th generation or older device and want new-age sensors.Price: Rs 5,499Buy HereAmazon Echo Dot 5th Gen Pros
Garena Free Fire is a battle royale game with regular awards and tournaments to keep players interested. If you play Garena Free Fire, you should be aware of the redeem codes that are released on a daily basis. However, because the battle royale game is banned in India, players from other countries can use the Free Fire Redeem codes daily. If you’re unfamiliar with the Garena Free Fire redeem codes or don’t know how to get them, we’ve put together a step-by-step guide to help you redeem them. Check out Garena Free Fire Redeem Codes for 2 May 2023.The Free Fire redeem codes are a great way to get free stuff. These are 12-digit codes that contain alphabets and numbers, as well as an expiration date and time. Because the Garena FF redeem codes cannot be used more than once, you should hurry to the redemption page to claim your free reward before someone else does. To get a free reward, all you have to do is go to reward.ff.garena.com/en, which is the official redemption page. Also, keep an eye on this space for daily updates on Garena Free Fire redemption codes and rewards.
Daily Amazon brings a fresh quiz for its customers with exciting rewards on its platform. The Amazon quiz can be played every day from 12 AM to 11:59. 2 May 2023 Amazon Quiz has gone live on its platform and the e-commerce platform Amazon is today giving you a chance to win Rs 1,000 Amazon Pay Balance.To participate all you need to do is log in to your Amazon app on your device and give answers. Daily a new set of questions are presented to the participants which gives them a chance to win exciting prizes. The questionnaire consists of five easy questions that are usually based on general knowledge and current affairs. You can submit the correct answers and can win an Amazon Pay Balance of up to Rs 50,000. It should be noted that the quiz is not accessible on the web platform instead you have to participate only through the dedicated app.Amazon Quiz Today Prize – Rs 1,000 Amazon Pay BalanceQuiz Date – 2 May 2023Daily Timing – 12 AM to 11:59 PMWinner Announcement – Today 12 PM
In This Article
Amazon Quiz Answers Today 2 May 2023
Question 1: In April 2023, who became the highest wicket-taker in the T20I format?
Answer: Shakib Al Hasan
Question 2: India built the Buzi Bridge in which African country?
Answer: MozambiqueQuestion 3: Fumio Kishida, who visited India in March 2023, is the PM of which country?Answer: JapanQuestion 4: What island are these animals native to?
Answer: MadagascarQuestion 5: What is the name of the highest building located in this city?Answer: CN Tower
How To Play Amazon Quiz
Only app users are eligible to play the Amazon quiz every morning from 12 AM to 11:59 PM. The quiz is not available on the desktop. For those who are unaware of how to play the Amazon quiz below are the steps, you can follow to take the quiz.
Firstly download the Amazon app from Google Play Store or App Store
Now fill in the required information through the Sign Up option.
You need to log in to the Amazon app and scroll down on the home screen to find the Amazon Quiz banner.
Tap on the Amazon Quiz banner and tap on the Start button to start the Quiz.
Now you will get 5 questions and you need to answer them correctly. One wrong answer will eliminate you from the Quiz.
After answering all the questions correctly you are now eligible for a Lucky Draw.
The winner’s name will be announced today at 12 PM.
If you ever forget your Twitter password, you don’t need to worry about losing your account. Twitter makes it easy to reset your password once it is able to verify your identity. You can reset your Twitter password using your email or your phone number. For the latter, your phone number needs to be registered to your account. So, without further ado, here are the two ways you can reset your Twitter password on Android and iPhone.Read Also:Infinix Smart 7 HD with 5,000mAh battery launched in India
In This Article
How to reset your Twitter password via email
Step 1: Launch the Twitter app on your phone and tap on ‘Log in’.Step 2: Tap on ‘Forgot password?’Step 3: Enter your email or username in the relevant field. You can also use your phone number if it is linked to only one account.Step 4: Choose the email where you want to receive the confirmation code to verify your identity. Tap on ‘Next’.Step 5: Check your email inbox for the verification code. Enter it on the Twitter app.Step 6: Your password will be reset and you will now be asked to create a new password.Step 7: Set a new password for Twitter and tap on ‘Change Password’.
How to reset your Twitter password via text
Step 1: Launch the Twitter app on your phone and tap on ‘Log in’. Step 2: Tap on ‘Forgot password?’Step 3: Enter your registered email, phone number, or Twitter username.Step 4: Enter your phone number and hit ‘Search’.Step 5: Twitter will show you a few digits of your registered number. If you still have access to this number, tap on ‘Continue’.Step 6: A reset code will be sent to your number. Enter it in the Twitter app and tap on ‘Submit’.Step 7: Your Twitter password will be reset. You can now create a new password for your account.
Frequently Asked Questions
I tried resetting my Twitter password but still can’t log into my account. What should I do?
If you can’t get access to your Twitter account even after resetting your password, you may have been locked out of your account due to a security issue. It is also possible that you received a temporary ban. Check your email for any ban notifications and contact Twitter Support for more information.
I’m not receiving any verification codes from Twitter, what should I do?
If you are unable to receive the verification code via text, check if you are using the phone number that is registered on the Twitter app. Make sure you are receiving ample network coverage and that the Twitter number isn’t blocked.
Why do I keep getting password reset emails?
If you keep getting password recovery codes from Twitter, it means someone is trying to gain access to your account. Do not share the verification code with anyone as it will give them access to your account. You can also beef up the security by adding two-factor authentication to your account.Read Also:How to use WhatsApp without a phone number?
Conclusion
These are the two ways you can reset your Twitter password on Android and iPhone. If you know your password and simply want to change it, you don’t need a verification code to do so. Simply go to Settings>Your Account>Change your password and type your current password followed by the new password of your choice. To add extra protection to your account, set up two-factor authentication for Twitter. Here is how you can do it for free.For the latest gadget and tech news, and gadget reviews, follow us on Twitter, Facebook and Instagram. For newest tech & gadget videos subscribe to our YouTube Channel. You can also stay up to date using the Gadget Bridge Android App. You can find the latest car and bike news here.
The Government of India has banned 14 mobile apps in the country. These applications were mostly utilised in Jammu and Kashmir for the dissemination of terror. Some terrorist groups were using these apps for fostering terrorism in J&K. On the advice of security and intelligence agencies, the decision to ban the apps was made.
Below is the list of mobile apps that have been banned in India:
Crypviser
Enigma
Safeswiss
Wickrme
Mediafire
Briar
BChat
Nandbox
Conion
IMO
Element
Second line
Zangi
Threema
As we mentioned earlier the action was taken on the recommendation of intelligence agencies. The request for banning these apps was made known to the relevant ministry along with a list of apps that constitute a threat to national security. The 14 mobile apps have been banned under Section 69A of the Information Technology Act of 2000. According to sources, these applications were used by terror groups linked to Pakistan in Jammu and Kashmir to stay in touch with their supporters and Over Ground Workers (OGW) and to receive orders from Pakistan. “Agencies keep track of channels used by Overground workers (OGWs) and terrorists to communicate among themselves. While tracking down one of the communication, agencies found that the mobile application does not have representatives in India and it is difficult to track down activities happening on the app. Thereafter, with the help of other intelligence agencies operating in the valley, a list of such apps was prepared that pose a threat to national security and do not follow Indian laws,” according to ANI.In the past, more than 200 apps, including TikTok, PUBG Mobile, and others, were banned in India. A quick recap: 59 Chinese apps were subject to the initial ban. TikTok, Shareit, Shein, WeChat, Club Factory, and more apps were on the list at that time. Under Section 69A of the Information Technology Act, more than 118 apps, including PUBG, were blacklisted in the second round.
For the latest gadget and tech news, and gadget reviews, follow us on Twitter, Facebook and Instagram. For newest tech & gadget videos subscribe to our YouTube Channel. You can also stay up to date using the Gadget Bridge Android App. You can find the latest car and bike news here.
WhatsApp is constantly updating its features to provide the best possible user experience. Recently the company was spotted testing a Lock chat feature to boost privacy on its platform. In a new development, the instant messaging platform is working on a data transfer feature. A new WhatsApp chat transfer feature is currently rolling out to allow users to move user’s accounts to another device without using Google Drive, and it is available to some lucky beta testers.According to a report by WaBetainfo, a new chat transfer feature is now available to selected beta testers (WhatsApp beta for Android 2.23.9.19 update) and is likely to be available to more users over the coming weeks. Reportedly the users won’t need to back up their chat history to Google Drive if they are willing to transfer their accounts to new Android devices.Image Courtesy: WaBetaInfoAccording to a shared screenshot, the chat transfer option is available within WhatsApp Settings > Chats. It will enable users to migrate their chat history to a new Android device. One must scan the QR code after choosing this option to start the process of transferring our chat history to the new Android device.The new chat transfer feature will offer the option to avoid manually backing up chats history to Google Drive, in case the chat history is large. Users can move their chat history from an old Android smartphone to a new Android device by just scanning the QR code. This eliminates the need for backup and restoration procedures as the migration is automatic.Also Read:WhatsApp released Lock Chats feature to boost privacy: Details inside“In case this feature is not available for your WhatsApp account, there is nothing wrong with your device: WhatsApp often releases new features gradually to a limited number of beta testers before making them available to everyone. This approach helps WhatsApp to identify and fix any issues or bugs with the feature before it is widely released.”As per the report, the chat transfer feature is currently available to some selected beta testers that install the latest update of WhatsApp beta for Android from the Google Play Store. The company is likely to roll out the feature to more users over the coming week.
For the latest gadget and tech news, and gadget reviews, follow us on Twitter, Facebook and Instagram. For newest tech & gadget videos subscribe to our YouTube Channel. You can also stay up to date using the Gadget Bridge Android App. You can find the latest car and bike news here.
One of the biggest hurdles in making long-lasting devices is the battery unit. Simply put, batteries aren’t designed to last. Even a good battery unit will wear off and depreciate in quality. This is because a battery generates power through the movements of the ions within it, causing the electrodes to wear out over time. Sometimes, your phone may randomly turn off due to lack of power even though the battery indicator shows some charge left on the device. This is not your battery’s fault. Your smartphone tracks the charge on your battery and displays it on the screen. If this process isn’t carried out correctly, your phone may display the incorrect amount of charge on the screen. Luckily, it can be fixed. In this article, we show you how to calibrate the battery on your Android phone or tablet.Read Also:Samsung to bring more health monitoring features based on Skin Temperature Sensor
In This Article
Here’s how you can calibrate the battery on Android
Step 1: Discharge the battery from your Android device. Let it turn off.Step 2: Turn your device back on. If the battery on your device isn’t calibrated, the battery indicator on the display will show some charge left. Your device will turn off pretty quickly.Step 3: Without turning on your device, put it on charge. You will see the battery indicator on the screen. Let it charge to 100%.Step 4: Once the indicator displays that your phone is fully charged, unplug it from the charger and turn it on.Step 5: Check if the battery indicator on the display shows 100% charge. If it doesn’t put your phone on charge. Keep it connected to the charger until the indicator shows 100% charge or comes very close to 100%.Step 6: Once your Android phone or tablet hits 100% charge, let it drain out again. Leave the display unlocked to help the battery drain out faster.Step 7: Charge your phone to 100% without turning it on. When it is fully charged, remove the charging cable and turn it on. Your battery should be calibrated.
Calibrate the battery on a Samsung device
If you own a Samsung smartphone, there’s another way you can calibrate its battery. Here’s how.Step 1: Let your device’s battery drop down to 5%. Step 2: Launch the dialer app and type *#0228#.Step 3: Tap on Quick Start. Let your phone restart.Step 4: Once your phone restarts, check if its battery percentage has dropped.Step 5: Plug the charger in and let your device charge to 100%.Step 6: Restart your phone and unplug the charger.Step 7: Carry out this process 2-3 times.Step 8: Finally, let your phone charge to 100%. Launch the dialer app and type *#9900#.Step 9: Tap on Batterystats Reset.Step 10: Restart your device.Your device’s battery will be calibrated following this procedure.Read Also:The Tech Behind Crypto Casinos
Calibrate the battery on a rooted Android phone or tablet
If your Android phone has root access, you can use a bunch of battery calibration apps to do the job for you. Here’s how.Step 1: Drain your phone’s battery and let it turn off.Step 2: Without plugging in the charger, turn on your device and let it turn off by itself again.Step 3: Plug in the charger and let your phone charge to 100% without turning it on.Step 4: Unplug your charger and turn on the phone.Step 5: Notice the percentage displayed by the battery indicator. It is likely that it doesn’t display a 100% charge. Plug in the charger again and juice up your device until it says 100%.Step 6: Unplug the charger once the battery hits 100%. Restart your device. If the battery indicator doesn’t say 100%, plug the charger back in until it does.Step 7: Keep repeating this process until the device says 100% upon restart. Let it get as close to 100% as possible.Step 8: Install the battery calibration app once your phone hits 100%. Restart your phone.Step 9: Launch the app and calibrate the battery.Step 10: Once the battery has been calibrated, drain your phone until it turns off.Step 11: Charge your phone to 100% without turning it on. Your phone’s battery will be calibrated.
Use a third-party app without root (Battery Calibration Pro)
Step 1:Install the Battery Calibration Pro app on your Android device.
Step 2:Launch the app and select Check Root. If your device is not rooted, select Go Ahead.
Step 3: Plug your phone into the charger and charge it to 100%.
Step 4: Without taking out the charger, hit Calibrate.
Step 5:Restart your device. If there is a decrease in battery percentage, charge it to 100%.
Step 6: Once the phone is fully charged, unplug the charger. Use the phone until its battery is completely drained.
Step 7: Once the device dies, plug in the charger and charge it to 100% without turning it on.
Step 8: Turn on the device and charge it to 100% again.
Frequently Asked Questions
Is Android battery calibration necessary?
Battery calibration on Android is necessary when the battery’s performance is inconsistent with the amount of charge displayed on the screen. If your phone suddenly dies even when the battery indicator displays an optimum amount of charge left on the device, you need to calibrate the battery.
Does battery calibration help the performance?
No, battery calibration does not help in improving the battery performance in any way. It simply helps your phone track the battery status more accurately.
What is the benefit of battery calibration?
Battery calibration gives you a better idea of how much charge is left on your phone. If your phone randomly turns off even when the battery indicator shows some charge left, you need to calibrate the battery of your device.Read Also:My Dream11 Withdrawal Failed, What Should I Do Next?
Conclusion
This is how you can calibrate the battery on your Android phone or tablet. You can also calibrate the battery by deleting the ‘BatteryStats.Bin’ file on your device, but it will require jailbreaking your device first. Since it achieves the same results, manually calibrating your battery without jailbreaking the device is a much better option.
Indian lifestyle brand Noise today announced the expansion of its smartwatch portfolio with the launch of the new NoiseFit Force Plus. The newly launched fitness tracker comes with a rugged round dial and impact-resistant build. The device features a 1.46-inch AMOLED display and has a shortcut button for easy navigation.Amit Khatri, Co-founder, Noise commented on the launch, “Innovation is the guiding force behind everything we do at Noise, and the new NoiseFit Force Plus is an embodiment of this value. As a forerunner in democratizing industry-leading innovation, our products represent the brand’s commitment to creating a fully-connected experience for new-age users, in all scenarios. Built for extremes, we are certain the new smartwatch will prove to be an ideal choice for users looking for a tech companion in their adventures.”Also Read:Infinix Smart 7 HD with 5,000mAh battery launched in India
In This Article
NoiseFit Force Plus features
NoiseFit Force Plus comes with a rugged-looking 1.46-inch AMOLED display offering 466×466 pixels of resolution. The screen offers 550 nits of peak brightness and also includes more than 100 watch faces. It has a shortcut button which instantly directs you to the sports mode. The device is IP67 rated for water and dust resistance making the watch extremely durable.The NoiseFit Force Plus includes an advanced calling feature, Tru Sync and has a single-chip Bluetooth 5.3 making it easy to use and pair. It comes with a bunch of fitness and health monitoring features. The device offers over 130 sports modes and includes an array of wellness features under Noise Health Suite that can keep track of all your vitals including heart rate, SpO2, sleep monitor, stress measurement, breath practice and female cycle tracker.In addition to this, the smartwatch allows users to call from a dial-pad, access recent calls and save up to 10 contacts on the watch using Noise Buzz. Users can also keep their daily reminders and weather forecast handy, with the help of its inbuilt Productivity Suite. According to the company it provides 7 days of battery life on a single charge.
Android and iOS are the two biggest mobile operating systems in the world. While there may be a few other OS out there, they occupy far too little market share to be considered in the same discussion as Android and iOS. These two operating systems have their own app markets, Google Play Store and App Store. While most mainstream apps are available on both platforms, there are some exclusive niche apps that can only be found on one of the platforms. If you’re an iOS user looking for Android-exclusive apps, here are some ways you can get Android apps on your iPhone.Read Also:My Dream11 Withdrawal Failed, What Should I Do Next?
In This Article
Use Apowermirror
While there is no direct way to install Android apps on an iPhone, you can still utilise some workarounds to carry out this task. One of the best ways you can use Android apps on your iPhone is by mirroring your Android phone’s display on your iPhone. Apowermirror allows you to cast your phone’s display across different platforms. The only prerequisite for using this app is that both devices must be connected to the same WiFi network. Once that is taken care of, follow these steps.Step 1: Download and install Apowermirror on your Android and iOS devices.Step 2: Tap on the blue icon that says ‘Mirror’ on your Android device.Step 3: Apowermirror will begin searching for other devices on the network. Select your iPhone from the list to begin mirroring your Android phone’s display.
Use an Android emulator
This may be a far-fetched way to run Android apps on your iPhone, but it works. Emulators like iAndroid allow you to simulate the Android environment on your iPhone, which means you can use all the Android apps on your iOS device. The only catch is that you will need to jailbreak your iPhone to install an Android emulator on it. Jailbreaking your iPhone compromises the security of your device and prevents you from installing any software updates on it. It also instantly nulls the warranty of your device.
Find an iOS version of the Android app
This may seem too obvious a solution, but most Android apps have an iOS version for iPhone as well. The app market for both operating systems is pretty evenly matched. If you cannot find the iOS version of an Android app, try looking for similar apps on the App Store. This will rarely ever be an issue because almost every mainstream app is available on iOS. However, some niche apps may be absent on Apple’s platform. We ran into this problem while looking for some specific video editing apps on the App Store. If you cannot find an app by its exact name, try searching for the publisher. It is possible that the app may be listed under a different name on iOS.
Frequently Asked Questions
Can I run Android apps on an iPhone?
Yes, you can run Android apps on your iPhone by using a screen mirroring app on an Android emulator. To use an Android emulator on your iPhone, you will first need to jailbreak your device.
Can APK files run on iOS?
APK files are strictly based on Android OS and cannot run on any iOS device.
Hong Kong-based smartphone maker Infinix has officially announced a new smartphone in the Indian market. The company has introduced the Infinix Smart 7 HD smartphone powered by Unisoc SC9863A1 SoC. It houses a 5,000mAh battery and features an AI-powered dual rear camera setup. The affordable smartphone also includes an FHD+ IPS display that supports a standard 60Hz refresh rate.
In This Article
Infinix Smart 7 HD price in India, sale details
Infinix Smart 7 HD price in India is set at Rs 5,999 for the lone 2GB RAM with 64GB storage option. The entry-level device will be offered in three colour options – Black, Jade White, and Silk Black. The smartphone is scheduled to go on sale from May 4 via Flipkart at 12 noon. The launch offer includes 5 per cent cashback on transactions made via Flipkart Axis Bank cards. The company will also provide easy EMI options starting at Rs 211.
Infinix Smart 7 HD specifications
The Infinix Smart 7 HD features a 6.6-inch full-HD+ IPS display with a waterdrop-style notch and has 720 x 1,612 pixels of resolution. The screen comes with a refresh rate of 60Hz and a touch sampling rate of 120Hz. It also has a peak brightness of up to 500 nits. The budget smartphone operates on Android 12 (Go Edition) based XOS 12. Under the hood, there is octa-core Unisoc SC9863A1 SoC, paired with 2GB of RAM with an expansion up to 4GB using unused internal storage. It comes with up to 64GB of internal storage that can be expanded up to 1TB using a microSD card.Also Read:Samsung to bring more health monitoring features based on Skin Temperature SensorThe Infinix Smart 7 HD features an AI-powered dual rear camera setup that includes an 8-megapixel primary sensor along with a dual LED flash. In addition to this, the phone sports a 5-megapixel front-facing camera for taking selfies and video calling.The Infinix smartphone boasts a 5,000mAh battery that is claimed to offer a call time of up to 39 hours, playtime of up to 50 hours and 30 hours of standby time when completely charged. There is an ultra power saving mode which is claimed to offer 2 hours of call time at 5 percent remaining battery life. In terms of connectivity, there is 4G LTE, Wifi, USB Type-C port, Bluetooth 4.2, and OTG. The Smart 7 HD includes a fingerprint sensor for biometrics, an ambient light sensor, an e-compass, a gyroscope, and a proximity sensor.
For the latest gadget and tech news, and gadget reviews, follow us on Twitter, Facebook and Instagram. For newest tech & gadget videos subscribe to our YouTube Channel. You can also stay up to date using the Gadget Bridge Android App. You can find the latest car and bike news here.


 as Google has started sunsetting Universal Analytics")

 Step 2:
 Step 3:
 Step 4:
 Step 5:
 Step 7:


 Step 2:
 Step 4:
 Step 5:
 Step 6:
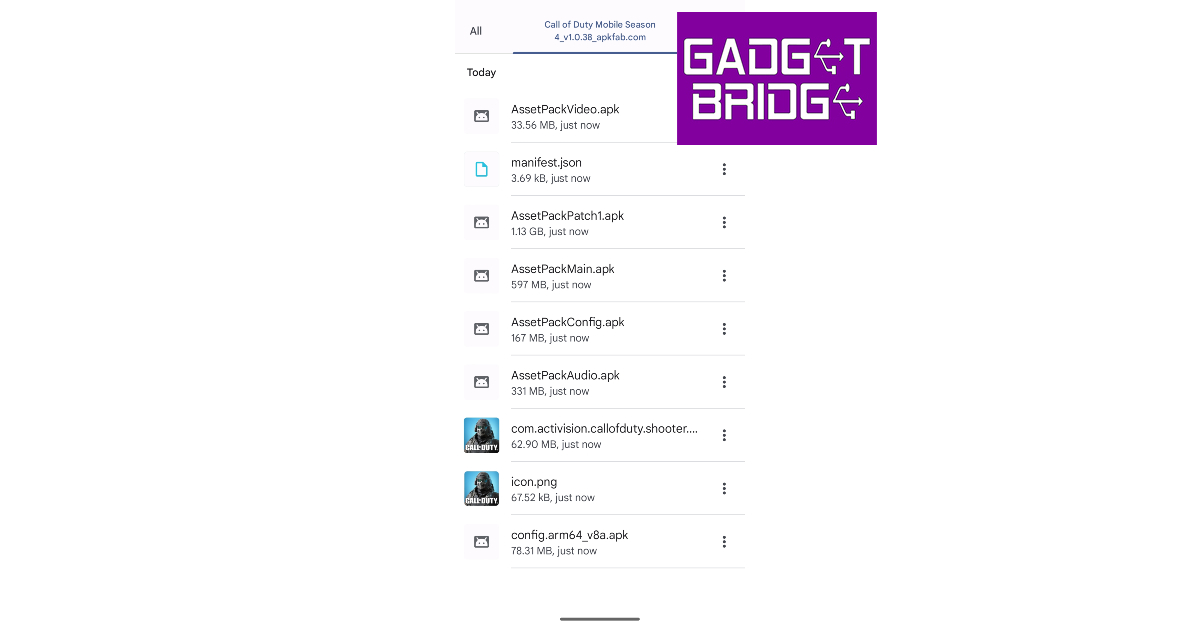 Step 9:
 Step 10:

 Step 4:
 Step 5:
 Step 6:
 Step 2:
  Step 4:
 Step 5:


")


 Step 3: Switch off the toggle bar for Developer Options.


 Not all touchscreen malfunctions are related to hardware issues. Sometimes, corrupted files in the smartphone’s memory can lead to the phone becoming unresponsive at random times. To make sure whether this is the case, take out the memory card along with the SIM and restart your phone. If the issue resolves itself, format the memory card and insert it again.
 Step 2: Tap on Download and install.
 Step 3: Select Install now.
 Step 2: Tap on Reset.
 Step 3: Select Factory data reset.
 Step 4: Scroll down and tap on Reset.


 Step 2:
 Step 3:
  Step 4:
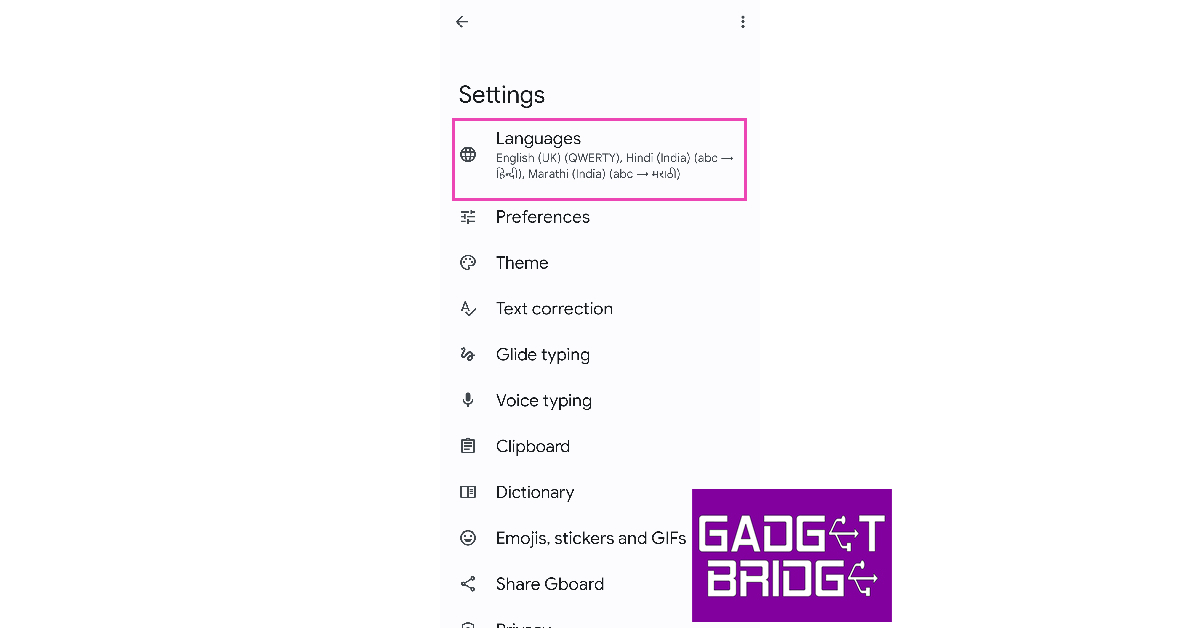 Step 5:
 Step 6:
 Step 7:
  Step 8:
 Step 2:
 Step 3:
 Step 4:
 Step 5:
 Step 6:
 Step 3:
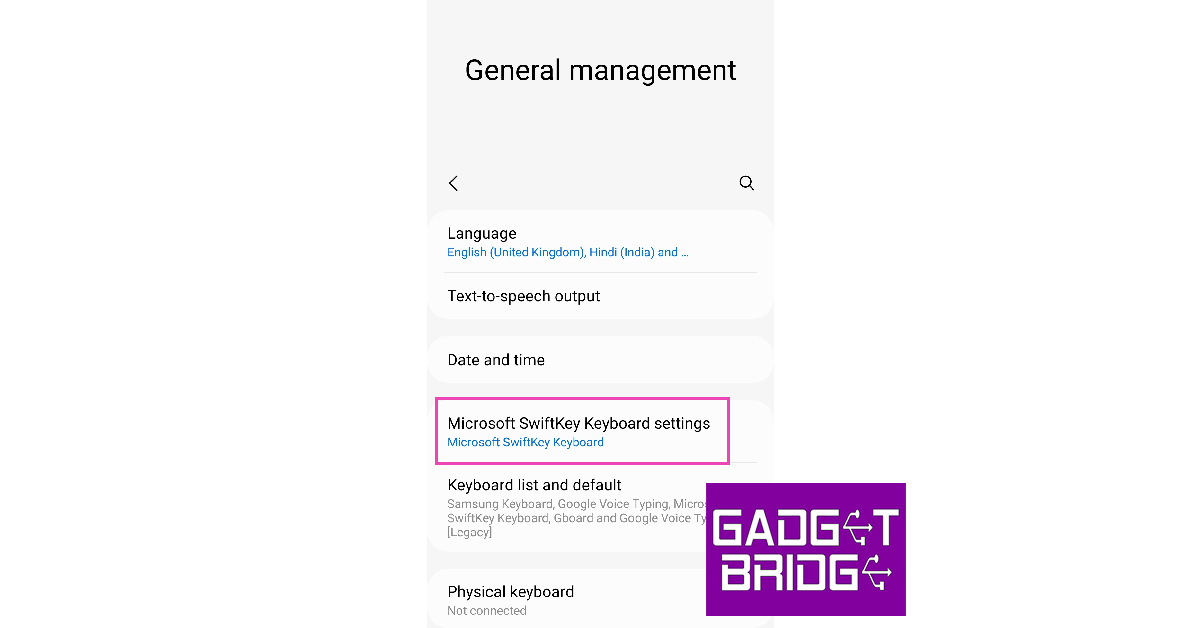 Step 4:
 Step 5:
 Step 6:


 Step 2:
 Step 3:
 Step 4:
  Step 5:
 Step 6:
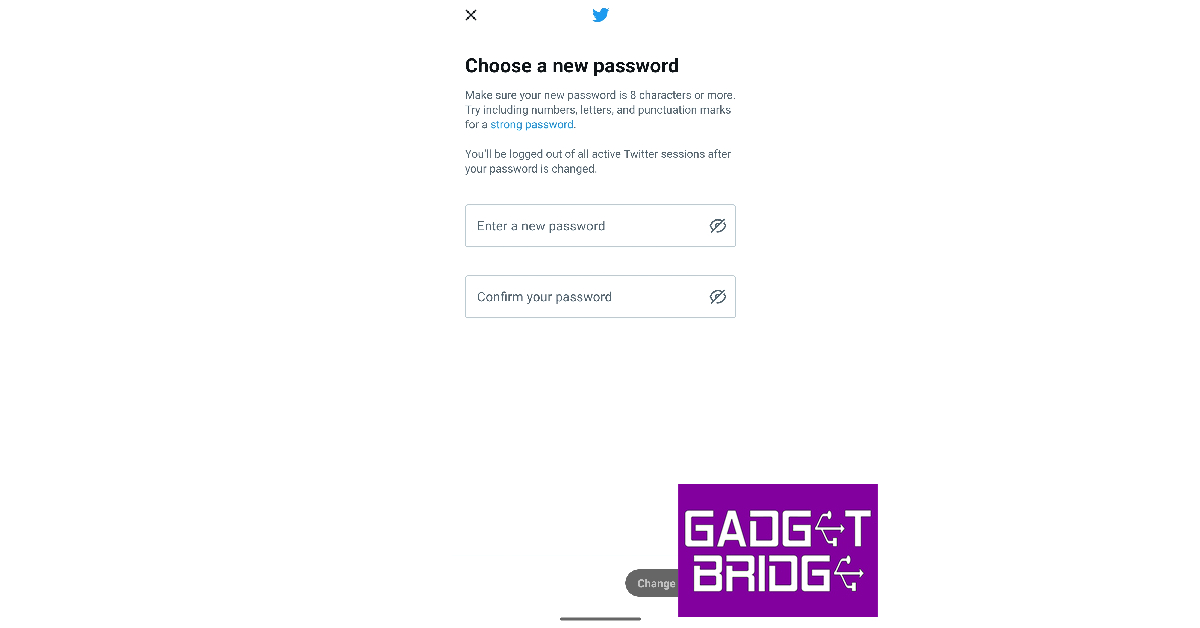 Step 7:


 Step 1:
 Step 4:
 Step 10:
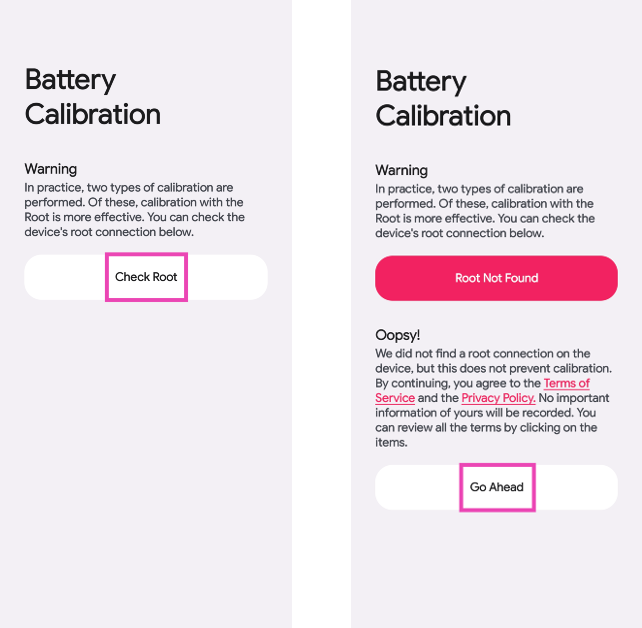 Step 3: Plug your phone into the charger and charge it to 100%.
Step 4: Without taking out the charger, hit Calibrate.
Step 3: Plug your phone into the charger and charge it to 100%.
Step 4: Without taking out the charger, hit Calibrate.
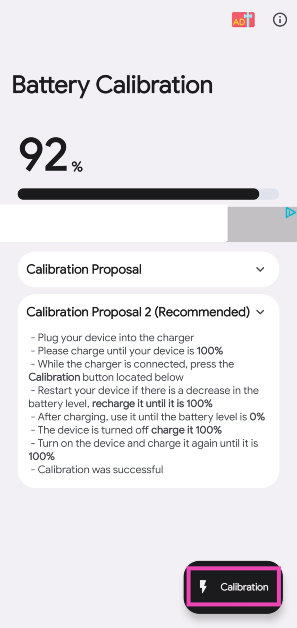 Step 5: Restart your device. If there is a decrease in battery percentage, charge it to 100%.
Step 6: Once the phone is fully charged, unplug the charger. Use the phone until its battery is completely drained.
Step 7: Once the device dies, plug in the charger and charge it to 100% without turning it on.
Step 8: Turn on the device and charge it to 100% again.
Step 5: Restart your device. If there is a decrease in battery percentage, charge it to 100%.
Step 6: Once the phone is fully charged, unplug the charger. Use the phone until its battery is completely drained.
Step 7: Once the device dies, plug in the charger and charge it to 100% without turning it on.
Step 8: Turn on the device and charge it to 100% again.


