Every iPhone user should know how to lock apps on their device. Not only does it preserve your personal data while handing over your device to someone else, but it also makes sure your financial and private apps remain secure in case you lose your iPhone. Apps like WhatsApp have this feature baked into them. For those who don’t, use these 4 methods.
Read Also: Xiaomi Smarter Living 2024: New vacuum cleaner, earphones and tablet arriving
In This Article
Which method should you use?
There are a few ways you can go about locking apps on your iPhone, but not every method is suited to your needs. There is only one native way to protect your apps using Face ID, but it only works for selected apps. You can use it to lock WhatsApp, but other messengers may not be covered by it. If you’re handing your iPhone to someone else and don’t want them accessing the contents of your device, you can use Guided Access. Guided Access pins one app to the screen and requires a Passcode/Face ID/Touch ID to go back to the home screen.
There are a few third-party app lockers available for iOS, but we do not recommend using them. Some of these tools only work after the iPhone has been jailbroken. Not only is this a security risk, but it also voids your device’s warranty. Other apps may push malware and invasive ads on your device, which is not a good tradeoff to make.
How to lock apps using Face ID
Step 1: Tap and hold the app you want to lock.
Step 2: Select Require Face ID from the pop-up menu.
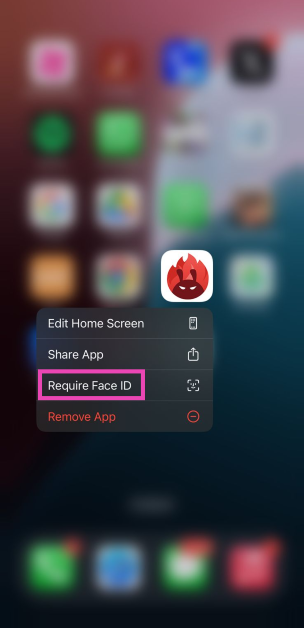
Step 3: Confirm your selection in the pop-up box.
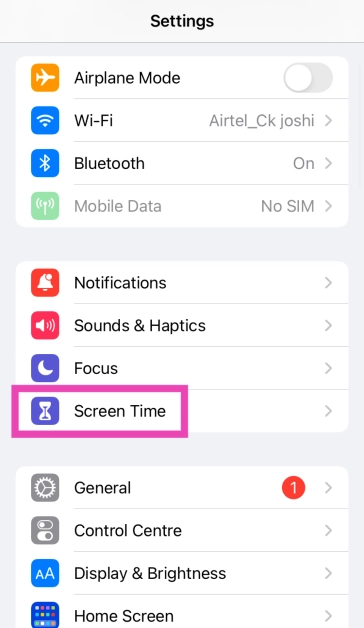
How to lock apps in iPhone using your Passcode
Step 1: Go to Settings and select Screen Time.
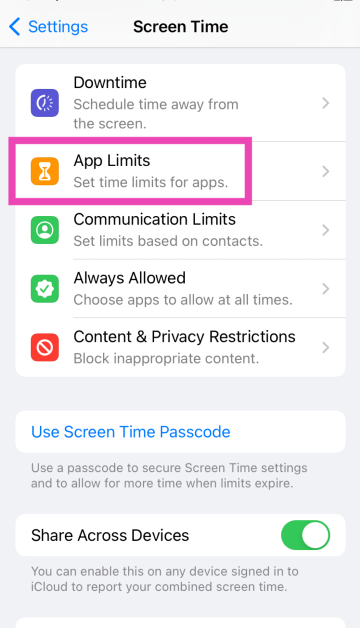
Step 2: Tap on Use Screen Time Passcode and set up a unique passcode to lock your apps.
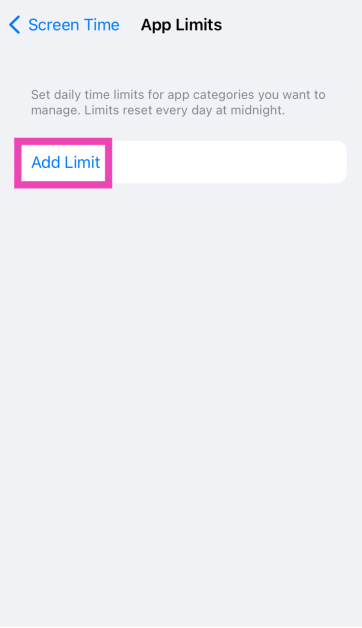
Step 3: Tap on App Limits.
Step 4: Select Add Limit.
Step 5: Select the apps you wish to lock. Go through the categories to view the apps.
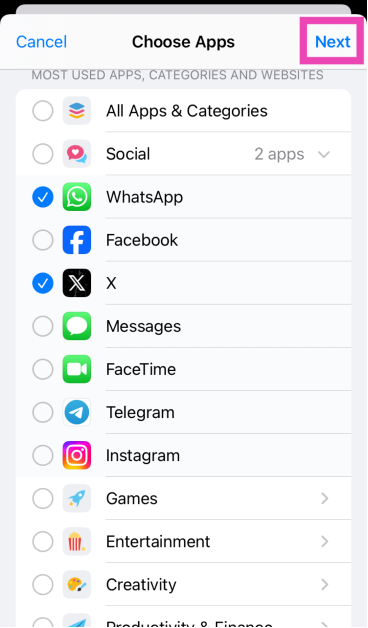
Step 6: Hit Next.
Step 7: Set the timer to 1 minute and tap on Add at the top right corner of the screen.
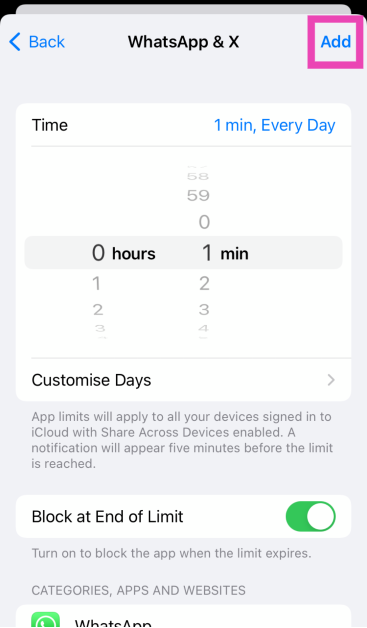
Your selected apps will be locked after 1 minute of activity. Once the activity limit is breached, you can unlock the app for periods of 15 minutes, an hour, or an entire day. The app will not ask you for the passcode within the selected usage window.
How to lock apps from settings
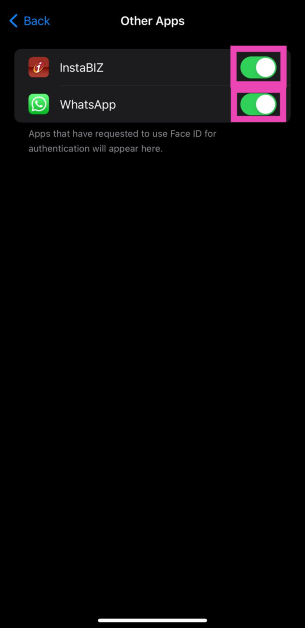
A better way to lock apps on your iPhone is by using Face ID. This method is available for selected apps only. Here’s how you can use it.
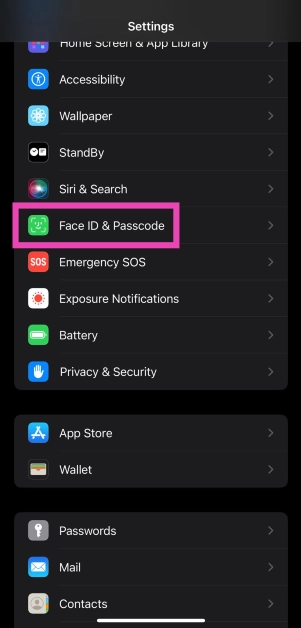
Step 1: Go to Settings and select Face ID & Passcode.
Step 2: In the ‘Use Face ID for’ section, select Other Apps.
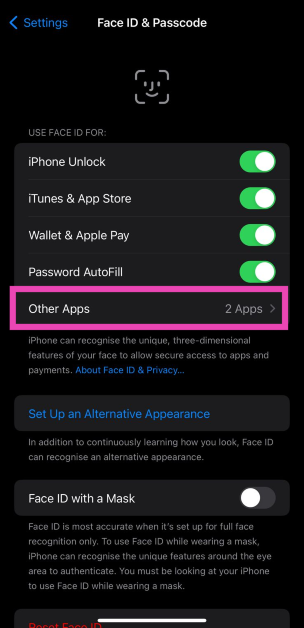
Step 3: Turn on the toggle switch for the app you want to lock using Face ID.
How to lock apps using Guided Access
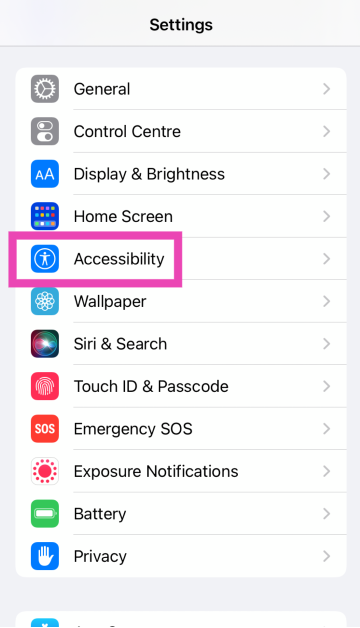
Step 1: Go to Settings and select Accessibility.
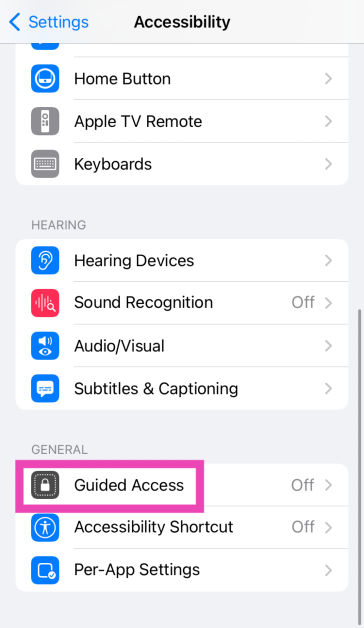
Step 2: Tap on Guided Access.
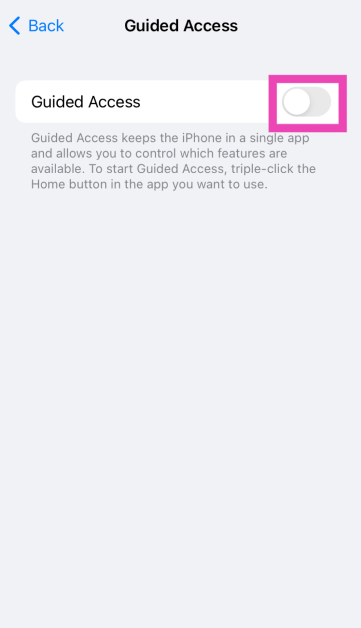
Step 3: Turn on its toggle switch. Tap on Passcode Settings.
Step 4: Tap on Set Guided Access Passcode and set up a passcode. You can also choose to use Face ID/Touch ID.
Step 5: Launch an app and triple-press the home button/side key to enable Guided Access.
To leave the current app, you will need to enter the Passcode/Touch ID/Face ID.
Frequently Asked Questions (FAQs)
How do I lock an app on my iPhone?
Long-press the app on the home screen and select ‘Require Face ID’ to lock it. Confirm your selection in the pop-up box.
How do I hide an app on my iPhone?
Long-press the app’s icon on the home page, tap on ‘Require Face ID’, and select ‘Hide and Require Face ID’.
How do I lock my iPhone apps using Face ID?
Go to Settings>Face ID and passcode>Other Apps and turn on the toggle switch for the app you want to lock.
How do I lock a note on my iPhone?
Go to Settings>Notes>Password and set up a password or use Touch ID/Face ID/Passcode. Launch the Notes app on your iPhone and select the note you wish to lock. Hit the ellipses and select ‘Lock’.
How do I pin an app to the iPhone’s screen?
You can use Guided Access to pin an app to the screen of your iPhone. Once enabled, you will need to provide your Passcode/Face ID/Touch ID to go back to the home screen.
Read Also: Top 3 Ways to Lock Apps on Android (2024)
Final Thoughts
These are the top 4 ways to lock or password-protect apps on an iPhone. To add an extra layer of security, turn on two-factor authentication for your social media and messaging apps. If you know any other way to lock apps on your device, let us know in the comments!


")


")
")
")


")


")


")


")


")