
- Change user settings without their permission or prevent the ability for users to disable or uninstall any app or service unless authorised by a parent or guardian through a parental control app or by authorised administrators through enterprise management software;
- Workaround Android built-in privacy controls and notifications; or
- Change or leverage the user interface in a way that is deceptive or otherwise violates Google Play Developer Policies.
Bad news: Google will remove all Android call recording apps from Play Store on May 11

Do you have any call recording apps on your phone? Then this information is for you. According to Google’s most recent change in developer policies, all call recording apps will be prohibited. As a result, all third-party apps on the Google Play Store will stop working as of May 11. However, the recording feature that comes pre-installed on some phones will not be affected by this change.
According to a post on the Google Play Console support website, due to a change in the policy of the Accessibility API, which is used to provide call recording functionality, Google will prohibit all call recording apps on the Google Play Store. For the sake of privacy and security, this is done. It’s important to keep in mind that call recording laws differ dramatically from country to country. In India, for example, call recording is not permitted.
As per the policy change, the Accessibility UPI now cannot be used to:
Amazon Quiz Answers Today 22 April 2022: Participate to win Rs 20,000 Amazon Pay Balance

22 April 2022 Amazon Quiz has gone live on its mobile app platform. Customers from different parts of the country are participating in the daily quiz. The daily quiz is conducted by the company brings an opportunity for the customers to win exciting prizes. The quiz begins from 12 AM to 11:59 PM. In today’s quiz participants have a chance to win Rs 20,000 Amazon Pay Balance by answering all the questions correctly.
Every day Amazon brings a fresh set of questions for its customers that contains five easy questions. Amazon quiz brings an opportunity for its customers to win Amazon Pay Balance ranging from Rs 1,000 to Rs 50,000. which consists of five questions related to general knowledge and current affairs.
The participants need to answer all the questions correctly and their names will be selected for a lucky draw. The winner will be announced at the end of the month. One wrong answer could eliminate you from the quiz. If you manage to answer all the questions correctly you can stand a chance to win Rs 20,000 Amazon Pay Balance today. Only app users are eligible to participate in the Quiz. Check Out 22 April 2022 Amazon Quiz Answers.
Amazon Quiz Today Prize – Rs 20,000 Amazon Pay Balance
Quiz Date – 22 April 2022
Daily Timing – 12 AM to 11:59 PM
Winner Announcement – Today at 12 PM
In This Article
Amazon Quiz Answers Today 22 April 2022
Question 1: Bartholomew Ogbeche, winner of the ISL 2021-22 Golden Boot, represented which side this season?
Answer: Hyderabad FCQuestion 2: The Tom Holland starer ‘Unchartered’, also stars which famous actor in the role of Victor Sullivan?
Answer: Mark WahlbergQuestion 3: BA.2 is the latest subvariant of which strain of the SARS-CoV-2 virus causes COVID-19?
Answer: OmicronQuestion 4: This company is headquartered in which German city?
Answer: MunichQuestion 5: This famous scientist won the Nobel Prize for _______ in 1921. Fill in the blanks
Answer: PhysicsHow To Play Amazon Quiz
Only app users are eligible to play the Amazon quiz every morning from 12 AM to 11:59 PM. The quiz is not available on the desktop. For those who are unaware of how to play the Amazon quiz below are the steps, you can follow to take the quiz.- Firstly download the Amazon app from Google Play Store or App Store
- Now fill in the required information through the Sign Up option.
- You need to log in to the Amazon app and scroll down on the home screen to find the Amazon Quiz banner.
- Tap on the Amazon Quiz banner and tap on the Start button to start the Quiz.
- Now you will get 5 questions and you need to answer them correctly. One wrong answer will eliminate you from the Quiz.
- After answering all the questions correctly you are now eligible for a Lucky Draw.
- The winner’s name will be announced today at 12 PM.
How to Block Websites or Apps on iPhone: 2 Smart Solutions

Let’s be honest – raising a child can sometimes be a full-time job. For instance, if your kids are teenagers or young adults, then you need to make some extra efforts to monitor the use of their smart devices. That’s why it is recommended to block apps on iPhone to make sure your kids won’t be exposed to any inappropriate content at an early age. Don’t worry – in this post, I’m going to let you know how to block websites on iPhone by applying website blocker, including an official one and a third-party tool.
 You can now enter the passcode of your iPhone to get dedicated content restriction features. Here, you can go to the “Web Content” restrictions feature to enable an automatic filter or tap on the “Add Website” button to add specific websites manually.
 That’s it! Now, to block websites on iPhone, you just have to enter URLs of the designated websites and add them to the blocking list.

 Here, you can simply enable the “Content & Privacy” feature and go to the “Allowed Apps” screen. You can now just disable any app that you don’t want to run on the iOS device, and it would automatically be blocked on it.

 To learn how to block websites on iPhone with the help of Wondershare FamiSafe, you can simply follow these steps:

 To proceed, you need to grant all the vital permissions to the FamiSafe app, letting it track and monitor the target device.
Afterwards, you also have to go to your phone’s settings to check the downloaded profiles and install the FamiSafe profile on it.
To proceed, you need to grant all the vital permissions to the FamiSafe app, letting it track and monitor the target device.
Afterwards, you also have to go to your phone’s settings to check the downloaded profiles and install the FamiSafe profile on it.
 Lastly, you just have to go to your phone’s Settings > Safari > Content Blocker and allow FamiSafe to block content on it.

 Besides that, FamiSafe also has a dedicated Web Filter option that would let you manually enter the website that you wish to block. You can also filter content based on certain keywords here.
 There are tons of other features that you can further access on FamiSafe. For instance, you can instantly turn on a Safe Search option on the device, set up screen limits, and enable all kinds of restrictions on it.

In This Article
Part 1: How to Block Websites and Apps on iPhone with its Parental Control Feature?
One of the best things about iOS devices is that they come with inbuilt parental control settings. While the inbuilt app or website blocking feature of iOS devices is not that reliable, you can give it a try to meet your basic requirements. Using it, you can set up content restrictions on the target iOS device that your kids can only bypass by entering its dedicated password. Therefore, if you know your kids won’t be able to guess the passcode or bypass it, then you can learn how to block websites on iPhone by following these instructions.Block Any Website on an iOS Device
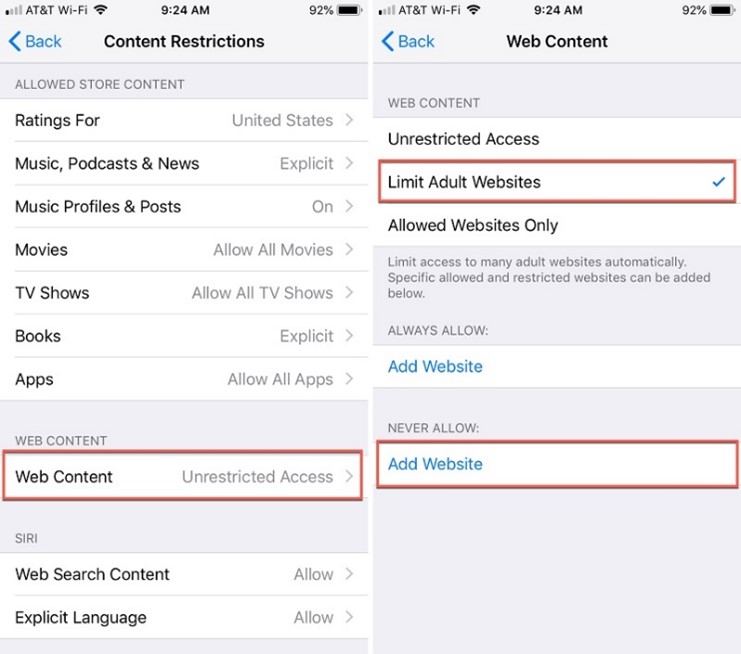
To block certain websites on an iOS device, you can just go to its Settings > Screen Time and tap on the “Content & Privacy Restrictions” feature.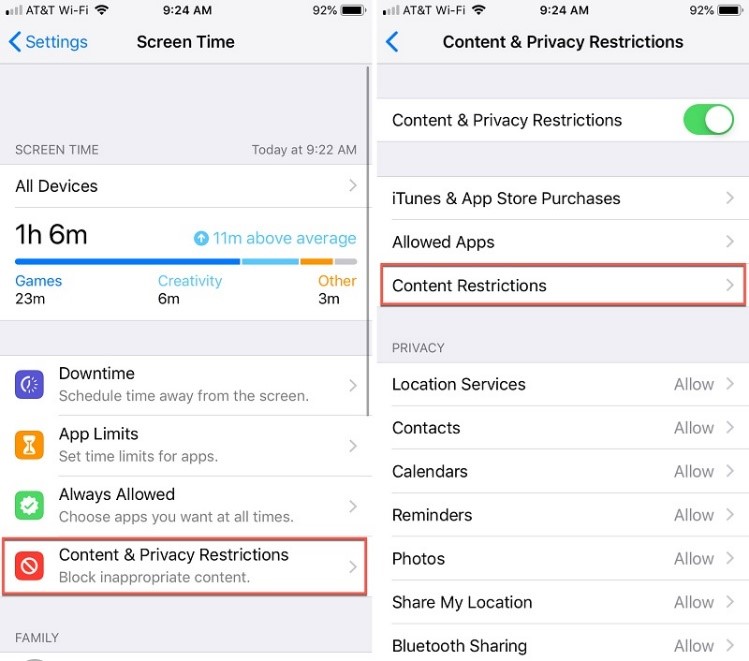 You can now enter the passcode of your iPhone to get dedicated content restriction features. Here, you can go to the “Web Content” restrictions feature to enable an automatic filter or tap on the “Add Website” button to add specific websites manually.
 That’s it! Now, to block websites on iPhone, you just have to enter URLs of the designated websites and add them to the blocking list.

How to Block Apps on iPhone?
Similarly, you can also take the assistance of the Screen Time feature to block apps on iPhone. To access it, you can just go to its Settings > Screen Time > Content & Privacy Restrictions and set up a dedicated Screen Time passcode. Here, you can simply enable the “Content & Privacy” feature and go to the “Allowed Apps” screen. You can now just disable any app that you don’t want to run on the iOS device, and it would automatically be blocked on it.

Limitations
- The native Screen Time lock on an iPhone can easily be bypassed by your kids.
- If the target iOS device has been restored, then its Screen Time restrictions will also reset.
Part 2: How to Block Websites/Apps on iPhone more Effectively with FamiSafe?
Since the native website or app blocker feature of iOS devices has so many limitations and can easily be bypassed, you can consider using FamiSafe instead. Developed by Wondershare, it is one of the most reliable parental control and device monitoring tools for iOS and Android devices out there. Using it, you can not only set restrictions on the target device but can also access its activities remotely.- After linking both the devices, you can easily block websites or apps on the target iOS device.
- If you want, you can also check the detailed activities on the target phone (like the screen time for apps and websites, phone activities, etc.).
- Parents can also use options like Safe Search and automatic Content Filtering to make sure their kids won’t access any inappropriate content.
- FamiSafe also offers dedicated features to set time-based restrictions on the target iOS device.
- Besides that, FamiSafe also offers tons of other features like live location tracking, geofencing, explicit content detection, browser history, and more.
 To learn how to block websites on iPhone with the help of Wondershare FamiSafe, you can simply follow these steps:
Step 1: Set up Your FamiSafe Account
Whenever you want to block apps on iPhone, you can just install the FamiSafe app on your device (iPhone or Android) or visit its official website. Here, you can enter your email ID and other details to set up your FamiSafe account and get an active subscription. Once you have completed the setup process, FamiSafe would display a one-time generated code that you can later use to pair both the devices.
Step 2: Install FamiSafe on the Target Device and Link it
Great! Now, whenever you want to block apps on iPhone, you can just install the FamiSafe app on the target iOS device. You can now just log in to your email ID and set up your kid’s profile by entering some basic details. Furthermore, to link the target iOS device with your account, you need to enter a unique pairing code on the app. To proceed, you need to grant all the vital permissions to the FamiSafe app, letting it track and monitor the target device.
Afterwards, you also have to go to your phone’s settings to check the downloaded profiles and install the FamiSafe profile on it.
To proceed, you need to grant all the vital permissions to the FamiSafe app, letting it track and monitor the target device.
Afterwards, you also have to go to your phone’s settings to check the downloaded profiles and install the FamiSafe profile on it.
 Lastly, you just have to go to your phone’s Settings > Safari > Content Blocker and allow FamiSafe to block content on it.

Step 3: Set up Restrictions and Monitor the Target Device
That’s it! After setting up the app on the target device, you can go to the FamiSafe app on your device (iOS or Android). To block apps on iPhone, just go to the “App Blocker” feature of FamiSafe and manually block (or unblock) any app of your choice. Besides that, FamiSafe also has a dedicated Web Filter option that would let you manually enter the website that you wish to block. You can also filter content based on certain keywords here.
 There are tons of other features that you can further access on FamiSafe. For instance, you can instantly turn on a Safe Search option on the device, set up screen limits, and enable all kinds of restrictions on it.

Conclusion
That’s it a wrap, everyone! I’m sure that after reading this guide, you can easily learn how to block websites on iPhone like a pro. As you can see, I have listed two dedicated solutions to block apps or websites on iPhone. Since the native parental control feature of iPhones is not that reliable, I would recommend using FamiSafe instead. It will let you block certain websites or apps on the target iPhone from your iOS/Android device and set up all kinds of content restrictions on it that won’t be bypassed by your kids. For the latest gadget and tech news, and gadget reviews, follow us on Twitter, Facebook and Instagram. For newest tech & gadget videos subscribe to our YouTube Channel. You can also stay up to date using the Gadget Bridge Android App. You can find the latest car and bike news here.Online Privacy is Possible if You Follow These Tips

Those concerned about their privacy online aren’t paranoid. The reality is that big businesses and criminals profit from people’s personal information online. Whether it’s a major search engine learning about its users to sell more advertising or a hacker committing fraud through identity theft, everyone who has ever used the internet should be thinking about online privacy.
With the internet of things and smart gadgets, we are more connected than ever. Even if we don’t use social media, those that do can unintentionally increase our digital footprint online. It may seem like privacy online is impossible, but it’s not.
Follow these 7 tips every time you go online to help protect your identity and your privacy.
 A virtual private network covers your tracks online. It hides your IP address, which is a number that uniquely identifies your device when you go online.
Once associated only with criminals, many people now use VPNs routinely to shield themselves from fraudsters, scammers, data-hungry internet service providers (ISPs) and search providers, and marketers.
While a VPN hides your device name, it also hides your location, which can make it easier to access websites and services overseas – such as some movie and radio streaming services – that are normally location-specific.
A virtual private network covers your tracks online. It hides your IP address, which is a number that uniquely identifies your device when you go online.
Once associated only with criminals, many people now use VPNs routinely to shield themselves from fraudsters, scammers, data-hungry internet service providers (ISPs) and search providers, and marketers.
While a VPN hides your device name, it also hides your location, which can make it easier to access websites and services overseas – such as some movie and radio streaming services – that are normally location-specific.
 This is a simple tip that will help you keep yourself safe online. Log out whenever you have finished with a service online. Then log out of your device before leaving it. This is particularly important if other people use your device.
If you don’t log out of a web service, the next person to use your device could enter that service – for example, Amazon or your online banking – as you. Logging out of your machine can prevent unauthorized access to your online activity, as long as a password is required to log back in.
Use a strong password to protect access to your device. The best password is a complete sentence or a long, seemingly nonsensical string of characters. Include at least one number, one symbol, and one capital letter. Avoid something that people will identify with you, such as the names of your children, a memorable birthday, or a favorite sports team.
This is a simple tip that will help you keep yourself safe online. Log out whenever you have finished with a service online. Then log out of your device before leaving it. This is particularly important if other people use your device.
If you don’t log out of a web service, the next person to use your device could enter that service – for example, Amazon or your online banking – as you. Logging out of your machine can prevent unauthorized access to your online activity, as long as a password is required to log back in.
Use a strong password to protect access to your device. The best password is a complete sentence or a long, seemingly nonsensical string of characters. Include at least one number, one symbol, and one capital letter. Avoid something that people will identify with you, such as the names of your children, a memorable birthday, or a favorite sports team.
In This Article
1. Use a Virtual Private Network (VPN)
 A virtual private network covers your tracks online. It hides your IP address, which is a number that uniquely identifies your device when you go online.
Once associated only with criminals, many people now use VPNs routinely to shield themselves from fraudsters, scammers, data-hungry internet service providers (ISPs) and search providers, and marketers.
While a VPN hides your device name, it also hides your location, which can make it easier to access websites and services overseas – such as some movie and radio streaming services – that are normally location-specific.
A virtual private network covers your tracks online. It hides your IP address, which is a number that uniquely identifies your device when you go online.
Once associated only with criminals, many people now use VPNs routinely to shield themselves from fraudsters, scammers, data-hungry internet service providers (ISPs) and search providers, and marketers.
While a VPN hides your device name, it also hides your location, which can make it easier to access websites and services overseas – such as some movie and radio streaming services – that are normally location-specific.
2. Activate Your Firewall and Virus Checker
A firewall monitors data going toward your device and any data attempting to leave your device. This is an essential part of internet safety. Without a firewall, you are prone to fake attachments in emails (trojans) that could damage your device, restrict access, or threaten your security and privacy. If you use Windows, it comes with a firewall as standard. Make sure it’s turned on. If you’re still concerned about your device’s safety and security, it may be well worth investing in a firewall beyond the free versions to enhance your protection. A virus checker monitors and routinely checks all the files on your device to identify potential threats. It will then prompt you to reject them, delete them, or quarantine them to keep your data safe and protect other devices on your network. Along with a firewall, a virus checker is essential to keep your device running safely.3. Notice Identify Scammers
Despite firewalls and virus checkers, malicious files may still get through from time to time. And sometimes criminals aren’t trying to infiltrate your data through software and files but through you. In these cases, you can protect yourself by learning to identify fraudulent and suspicious activity and knowing what to do about it. Spam refers to unsolicited marketing sent indiscriminately, far and wide. It is often a gateway to fraudulent activity, unwanted marketing, and scams, including bogus products and services. You can identify spam and scams by:- a) their typically terrible spelling and grammar,
- b) the use of variations on real business names (such as TheFacebook, instead of Facebook), and
- c) pressure tactics that demand recipients act urgently.
4. Look for HTTPS or a Padlock Symbol for Transactions
If you are performing a financial transaction online, look for at least one of two signs that your session is secure. The web address should have an S after the http. Https signifies that the page is secure. Any information you send via that page will be encrypted. Without a secure connection, third parties may be able to see and intercept your data. For ease, secure websites also display a padlock in the address bar. If you see a padlock, you know that any data sent from that page, such as your contact details or card details, will be sent encrypted. This makes it much more difficult for anyone to steal that data.5. Log Out and Use Passwords
 This is a simple tip that will help you keep yourself safe online. Log out whenever you have finished with a service online. Then log out of your device before leaving it. This is particularly important if other people use your device.
If you don’t log out of a web service, the next person to use your device could enter that service – for example, Amazon or your online banking – as you. Logging out of your machine can prevent unauthorized access to your online activity, as long as a password is required to log back in.
Use a strong password to protect access to your device. The best password is a complete sentence or a long, seemingly nonsensical string of characters. Include at least one number, one symbol, and one capital letter. Avoid something that people will identify with you, such as the names of your children, a memorable birthday, or a favorite sports team.
This is a simple tip that will help you keep yourself safe online. Log out whenever you have finished with a service online. Then log out of your device before leaving it. This is particularly important if other people use your device.
If you don’t log out of a web service, the next person to use your device could enter that service – for example, Amazon or your online banking – as you. Logging out of your machine can prevent unauthorized access to your online activity, as long as a password is required to log back in.
Use a strong password to protect access to your device. The best password is a complete sentence or a long, seemingly nonsensical string of characters. Include at least one number, one symbol, and one capital letter. Avoid something that people will identify with you, such as the names of your children, a memorable birthday, or a favorite sports team.
6. Delete Your Browsing History and Cookies
Most search engines store your search activity to provide you with a better search service and, in some cases, to market products and services to you more accurately. To protect your online privacy, you’ll want to get rid of this history regularly. In your browser settings, you will normally find the option to delete your browser history and cookies. Do it. When browsing, only accept necessary cookies. Delete them regularly. Alternatively, use a browser such as DuckDuckGo, which prides itself on never tracking your searches or storing your search history. This does not make you invisible online, but it will help protect your online privacy.7. Avoid Public and/or Unsecured Wifi
If you’re concerned about online privacy, avoid connecting to public wifi, such as you may find in a cafe or hotel. Also, if you can connect to the internet without a password, it’s not secure and neither are your subsequent searches, conversations, or transactions. Only use private, secure wifi connections that demand passwords for access. These 7 tips should help keep you safe online. In an age in which we are increasingly connected, these tips will help you find balance – keeping safe without impacting your freedom. For the latest gadget and tech news, and gadget reviews, follow us on Twitter, Facebook and Instagram. For newest tech & gadget videos subscribe to our YouTube Channel. You can also stay up to date using the Gadget Bridge Android App. You can find the latest car and bike news here.New State Mobile April Update is now available, brings new weapons and customisation option

The April Update for New State Mobile is now available on Android and iOS. Krafton has made popular BR: Extreme Mode available on the Erangel map, as well as a new Survivor Pass, the new MCX weapon, and a variety of other weapons and items.
New State Mobile’s collaboration with Among Us is now live in-game, in addition to these updates. Players can embrace their inner Impostor through an Among Us-themed mini-game, a suite of new in-game items, newly added props on the Troi map, and more through May 19.
New State Mobile’s collaboration with Among Us is now live in-game, in addition to these updates. Players can now embrace their inner Impostor with an Among Us-themed mini-game, a suite of new in-game items, newly added props on the Troi map, and more from April 21 to May 19 in New State Mobile. A plethora of weapon customization options and new items have been added to the game with the April Update.
Here is a complete list of the April Update’s other major additions to the game:
The MCX is a new weapon that has been added to the game. It is the most powerful weapon yet. The weapon is a rapid-firing AR that fires 5.56mm ammo and comes with the option of adding an enhanced suppressor to give players a stealthier option in addition to its impressive damage output. The front attachment slot will be removed in exchange for the improved suppressor, and the recoil will be increased.
BR: Extreme Mode is now available in Erangel, where 48 players can engage in battle with an abundance of initial starting items such as the Skorpion, a level one helmet and vest, a First Aid Kit, Bandages, a Pain Killer, Energy Drinks, a Smoke Grenade, and 500 Drone Credits. After a maximum of 15 minutes, the last player standing wins the Chicken Dinner! To commemorate the launch of Erangel Extreme, players will receive double tier points for each victory in the new mode, so bring your A-game.
The DSR-1 and Crossbow both have a customization slot that allows the DSR-1 to use a Tank Flash Hider and the Crossbow to use magnetic bomb ammunition. For guns like the M416 and Beryl M762, a Grenade Launcher Attachment has been added. A 10x Deca Vision scope is now available in the Drone Store for players, and it can be adjusted from 3x to 10x. A Poison Grenade and a new healing item, the T-RS, will be introduced to the game. Use the Poison Grenade to smoke out players who are hiding in one spot or to counter a Smoke Grenade, then use the T-RS to recover HP and boost to 100%.
Lastly, the April Update brings a new Survivor Pass to New State Mobile, with Marion from the Hunters faction. By completing all of the Story Missions, players can earn Marion’s costumes and character appearance.
For the latest gadget and tech news, and gadget reviews, follow us on Twitter, Facebook and Instagram. For newest tech & gadget videos subscribe to our YouTube Channel. You can also stay up to date using the Gadget Bridge Android App. You can find the latest car and bike news here.
Comparison: Redmi 10A vs Samsung Galaxy M02

The Redmi 10A, Xiaomi’s latest budget smartphone, has been released in India. In a similar price range, the device competes with the Samsung Galaxy M02. The device has a single 13-megapixel camera on the back. The phone has a 5,000mAh battery and is powered by the MediaTek Helio G25 SoC. We compared the Redmi 10A to the Samsung Galaxy M02 to see how the Redmi stacks up against Samsung’s budget smartphone.
In This Article
Display
Redmi 10A: 6.53-inch HD+ display Samsung Galaxy M02: 6.5-inch HD+ Infinity-V DisplayProcessor
Redmi 10A: MediaTek Helio G25 processor Samsung Galaxy M02: MediaTek MT6739WW Quad-core processorRear camera(s)
Redmi 10A: single 13-megapixel camera Samsung Galaxy M02: Dual rear camera setup that includes a 13-megapixel primary sensor and a 2-megapixel macro lensSelfie camera
Redmi 10A: 5-megapixel sensor Samsung Galaxy M02: 5-megapixel selfie cameraRAM and storage
Redmi 10A: 3GB RAM with 32GB storage/4GB RAM with 64GB storage Samsung Galaxy M02: 2GB RAM with 32GB storage and 3GB with 32GB storage optionsBattery
Redmi 10A: 5,000mAh battery Samsung Galaxy M02: 5,000mAh batteryOperating system
Redmi 10A: MIUI 12.5 on top of Android Samsung Galaxy M02: One UI on top of Android 10Price
Redmi 10A: Rs 8,499 Samsung Galaxy M02: Rs 6,999Our Take
Although Samsung is a strong competitor to the Redmi smartphone, one significant advantage that the Redmi has over the M02 is that it is a year newer. It also has LPDDR4X RAM and a MediaTek Helio G25 processor, which is energy efficient. There is also a fingerprint sensor included. The Redmi 10A runs the latest Android 11 OS, which is an upgrade over the Android 10 OS found on the Galaxy M02. So, if you’re looking for a good affordable smartphone, the latest Redmi 10A is a good option. For the latest gadget and tech news, and gadget reviews, follow us on Twitter, Facebook and Instagram. For newest tech & gadget videos subscribe to our YouTube Channel. You can also stay up to date using the Gadget Bridge Android App. You can find the latest car and bike news here.How to Enable Dark Mode in Snapchat on Android and iOS?

The dark mode, also known as the night mode, is a display setting on your smartphone which gives it a dark coloured theme. It shows text and other content in a light colour on a dark background, instead of the default dark coloured content shown on a light background. The idea behind the dark mode is to reduce blue light exposure to the eyes so that health problems like eyestrain and headaches that come with prolonged screen time may be avoided. While enabling dark mode in Snapchat iOS is a cakewalk, however, Snapchat’s Android version does not yet support it. But there’s no need to worry, as there is a workaround for that as well. Here is a step-by-step guide on how to enable dark mode in Snapchat on Android as well as iPhone.
Step 1: Open the Snapchat application from your iPhone, tap on your Bitmoji (My Profile) icon in the top left corner of the interface and tap on the Settings icon in the top right corner.
Step 2: Under the My Account section, go to App Appearance.
Step 3: You will be provided with three options. Select the Always Dark option to enable the dark mode and that’s it!
Read also: How To Change Your Snapchat Username In 2022?
Step 2: If you have the latest version of Snapchat installed on your Android device, you would need to downgrade the app to its version 10.72.0.0 or below, since the forced dark mode feature does not apply on the newer versions of Snapchat.
Download Snapchat version 10.72.0.0 from here.
Read also: Snapchat introduced Dynamic Stories to its Discover feed in India
Step 3: Go to the Settings app from your Android device, scroll down to the last and click on the About phone option.
Step 4: Tap on Software information
Step 5: Tap on the Build number option seven times. Your Android device will then enter into the Developer mode.
Step 6: Move back to the Settings home page and tap on the ‘Developer options’ option that now appears on the last.
Step 7: The list of settings provided in the Developer options section is quite long. You may have to scroll down a couple of times to reach the Force Dark mode option and toggle it on.
This will force apps like Snapchat (its older version) which does not support dark mode natively, to successfully enable the same within their apps. Android achieves this by inverting the colours of such apps, which however will not affect the legibility of any content displayed within them.
In this way, you can enable dark mode in Snapchat on any Android device. As of now, this is the only walk around for achieving the same within Android while it remains a cakewalk in iOS devices like iPhones.
In case you know of any other method to enable dark mode in Snapchat on Android or on iOS, we would be absolutely delighted to hear it. Do write to us in the comments section below.
For the latest gadget and tech news, and gadget reviews, follow us on Twitter, Facebook and Instagram. For newest tech & gadget videos subscribe to our YouTube Channel. You can also stay up to date using the Gadget Bridge Android App. You can find the latest car and bike news here.
In This Article
How to Enable Dark Mode in Snapchat on iPhone
 Step 1: Open the Snapchat application from your iPhone, tap on your Bitmoji (My Profile) icon in the top left corner of the interface and tap on the Settings icon in the top right corner.
Step 2: Under the My Account section, go to App Appearance.
Step 3: You will be provided with three options. Select the Always Dark option to enable the dark mode and that’s it!
Read also: How To Change Your Snapchat Username In 2022?
Step 1: Open the Snapchat application from your iPhone, tap on your Bitmoji (My Profile) icon in the top left corner of the interface and tap on the Settings icon in the top right corner.
Step 2: Under the My Account section, go to App Appearance.
Step 3: You will be provided with three options. Select the Always Dark option to enable the dark mode and that’s it!
Read also: How To Change Your Snapchat Username In 2022?
How to Enable Dark Mode in Snapchat on Android
Step 1: Switch on the Dark mode of your phone from the Quick Settings panel or from the Settings app. Step 2: If you have the latest version of Snapchat installed on your Android device, you would need to downgrade the app to its version 10.72.0.0 or below, since the forced dark mode feature does not apply on the newer versions of Snapchat.
Download Snapchat version 10.72.0.0 from here.
Step 2: If you have the latest version of Snapchat installed on your Android device, you would need to downgrade the app to its version 10.72.0.0 or below, since the forced dark mode feature does not apply on the newer versions of Snapchat.
Download Snapchat version 10.72.0.0 from here.
 Read also: Snapchat introduced Dynamic Stories to its Discover feed in India
Step 3: Go to the Settings app from your Android device, scroll down to the last and click on the About phone option.
Read also: Snapchat introduced Dynamic Stories to its Discover feed in India
Step 3: Go to the Settings app from your Android device, scroll down to the last and click on the About phone option.
 Step 4: Tap on Software information
 Step 5: Tap on the Build number option seven times. Your Android device will then enter into the Developer mode.
 Step 6: Move back to the Settings home page and tap on the ‘Developer options’ option that now appears on the last.
 Step 7: The list of settings provided in the Developer options section is quite long. You may have to scroll down a couple of times to reach the Force Dark mode option and toggle it on.
 This will force apps like Snapchat (its older version) which does not support dark mode natively, to successfully enable the same within their apps. Android achieves this by inverting the colours of such apps, which however will not affect the legibility of any content displayed within them.
In this way, you can enable dark mode in Snapchat on any Android device. As of now, this is the only walk around for achieving the same within Android while it remains a cakewalk in iOS devices like iPhones.
In case you know of any other method to enable dark mode in Snapchat on Android or on iOS, we would be absolutely delighted to hear it. Do write to us in the comments section below.
For the latest gadget and tech news, and gadget reviews, follow us on Twitter, Facebook and Instagram. For newest tech & gadget videos subscribe to our YouTube Channel. You can also stay up to date using the Gadget Bridge Android App. You can find the latest car and bike news here.
This will force apps like Snapchat (its older version) which does not support dark mode natively, to successfully enable the same within their apps. Android achieves this by inverting the colours of such apps, which however will not affect the legibility of any content displayed within them.
In this way, you can enable dark mode in Snapchat on any Android device. As of now, this is the only walk around for achieving the same within Android while it remains a cakewalk in iOS devices like iPhones.
In case you know of any other method to enable dark mode in Snapchat on Android or on iOS, we would be absolutely delighted to hear it. Do write to us in the comments section below.
For the latest gadget and tech news, and gadget reviews, follow us on Twitter, Facebook and Instagram. For newest tech & gadget videos subscribe to our YouTube Channel. You can also stay up to date using the Gadget Bridge Android App. You can find the latest car and bike news here. iPhone users can now use the Switch to Android app to move their data to Android smartphones

The Switch to Android app is now available for iOS users. This app is beneficial for users who want to move their data from their iPhones to Android smartphones. Currently, the app is available for free to download on Apple’s platform. To transfer files from an Android smartphone to an iPhone, Apple even has an identical app called Move to iOS. Google’s Switch to Android app allows you to move your most important data types – photos, videos, contacts, and calendar events – to a new Android device quickly and securely without the use of cumbersome cables.
The Switch to Android app is listed on the App Store as being 39MB in size. It allows users to wirelessly move data from iPhones to Android phones, including photos, videos, and contacts, among other things. In addition to this, the application also enables users to disable iMessage in order to receive text messages on their Android phones.
 One can easily download the Switch to Android app from the App Store. iPhones running iOS 12.0 or later, as well as Apple iPod Touches running iOS 12.0 or later, are required to run the app. Moreover, the platform supports a variety of languages, including English, Arabic, Dutch, German, Hindi, and Spanish. So that the users can easily export contacts, calendars, photos, and videos from an iPhone to an Android device without the use of a cable.
For data transfer, the new app will at first support Google Pixel phones, but more smartphone brands will be added at a later stage. To carry out the data transfer from an iPhone to an Android device, users must enable a list of permissions in the Switch to Android app.
Other important steps in setting up your device are also covered by the app, such as turning off iMessage so you don’t miss text messages from friends and family. Moreover, a cable could also be used to move photos and videos stored in iCloud, DRM-free music, non-iTunes music, call logs, alarms, device settings, audio, wallpapers, and free apps.
As we mentioned earlier, Apple already has a Move to iOS app that automatically migrates content from an Android device to an iPhone.
For the latest gadget and tech news, and gadget reviews, follow us on Twitter, Facebook and Instagram. For newest tech & gadget videos subscribe to our YouTube Channel. You can also stay up to date using the Gadget Bridge Android App. You can find the latest car and bike news here.
One can easily download the Switch to Android app from the App Store. iPhones running iOS 12.0 or later, as well as Apple iPod Touches running iOS 12.0 or later, are required to run the app. Moreover, the platform supports a variety of languages, including English, Arabic, Dutch, German, Hindi, and Spanish. So that the users can easily export contacts, calendars, photos, and videos from an iPhone to an Android device without the use of a cable.
For data transfer, the new app will at first support Google Pixel phones, but more smartphone brands will be added at a later stage. To carry out the data transfer from an iPhone to an Android device, users must enable a list of permissions in the Switch to Android app.
Other important steps in setting up your device are also covered by the app, such as turning off iMessage so you don’t miss text messages from friends and family. Moreover, a cable could also be used to move photos and videos stored in iCloud, DRM-free music, non-iTunes music, call logs, alarms, device settings, audio, wallpapers, and free apps.
As we mentioned earlier, Apple already has a Move to iOS app that automatically migrates content from an Android device to an iPhone.
For the latest gadget and tech news, and gadget reviews, follow us on Twitter, Facebook and Instagram. For newest tech & gadget videos subscribe to our YouTube Channel. You can also stay up to date using the Gadget Bridge Android App. You can find the latest car and bike news here.
 One can easily download the Switch to Android app from the App Store. iPhones running iOS 12.0 or later, as well as Apple iPod Touches running iOS 12.0 or later, are required to run the app. Moreover, the platform supports a variety of languages, including English, Arabic, Dutch, German, Hindi, and Spanish. So that the users can easily export contacts, calendars, photos, and videos from an iPhone to an Android device without the use of a cable.
For data transfer, the new app will at first support Google Pixel phones, but more smartphone brands will be added at a later stage. To carry out the data transfer from an iPhone to an Android device, users must enable a list of permissions in the Switch to Android app.
Other important steps in setting up your device are also covered by the app, such as turning off iMessage so you don’t miss text messages from friends and family. Moreover, a cable could also be used to move photos and videos stored in iCloud, DRM-free music, non-iTunes music, call logs, alarms, device settings, audio, wallpapers, and free apps.
As we mentioned earlier, Apple already has a Move to iOS app that automatically migrates content from an Android device to an iPhone.
For the latest gadget and tech news, and gadget reviews, follow us on Twitter, Facebook and Instagram. For newest tech & gadget videos subscribe to our YouTube Channel. You can also stay up to date using the Gadget Bridge Android App. You can find the latest car and bike news here.
One can easily download the Switch to Android app from the App Store. iPhones running iOS 12.0 or later, as well as Apple iPod Touches running iOS 12.0 or later, are required to run the app. Moreover, the platform supports a variety of languages, including English, Arabic, Dutch, German, Hindi, and Spanish. So that the users can easily export contacts, calendars, photos, and videos from an iPhone to an Android device without the use of a cable.
For data transfer, the new app will at first support Google Pixel phones, but more smartphone brands will be added at a later stage. To carry out the data transfer from an iPhone to an Android device, users must enable a list of permissions in the Switch to Android app.
Other important steps in setting up your device are also covered by the app, such as turning off iMessage so you don’t miss text messages from friends and family. Moreover, a cable could also be used to move photos and videos stored in iCloud, DRM-free music, non-iTunes music, call logs, alarms, device settings, audio, wallpapers, and free apps.
As we mentioned earlier, Apple already has a Move to iOS app that automatically migrates content from an Android device to an iPhone.
For the latest gadget and tech news, and gadget reviews, follow us on Twitter, Facebook and Instagram. For newest tech & gadget videos subscribe to our YouTube Channel. You can also stay up to date using the Gadget Bridge Android App. You can find the latest car and bike news here. Garena Free Fire Redeem Codes for 21 April: Here is how to claim them

Garena Free Fire is a battle royale game with regular awards and tournaments to keep players interested. If you play Garena Free Fire, you should be aware of the redeem codes that are released on a daily basis. However, because the battle royale game is banned in India, players from other countries can use the Free Fire Redeem codes daily. If you’re unfamiliar with the Garena Free Fire redeem codes or don’t know how to get them, we’ve put together a step-by-step guide to help you redeem them.
The Free Fire redeem codes are a great way to get free stuff. These are 12-digit codes that contain alphabets and numbers, as well as an expiration date and time. Because the Garena FF redeem codes cannot be used more than once, you should hurry to the redemption page to claim your free reward before someone else does. To get a free reward, all you have to do is go to reward.ff.garena.com/en, which is the official redemption page. Also, keep an eye on this space for daily updates on Garena Free Fire redemption codes and rewards.
In This Article
Garena Free Fire Redeem Codes for April 21
- FG6H 68G7 6YTA
- GQ5B N3M4 LTO9
- 876Y TXRA DCQV
- B2K3 ORG9 8U7Y
- FJ6U 876T G345
- 6UPJ 09GI UJ76
- A5QR F12B 3N4R
- KOG9 V87C 6X5S
- RWFE V4B5 N67L
- U8J9 B8G7 FDYT
- WGN5 M6YU LJP9
- 87FD 6S5T RF6V
- E34B N5MT YLHN
- O9B8 V7C6 D5SR
- FE4B N56Y UJNB
- GFR5 67U8 HYT5
- DQE2 ER3F E8GH
- FJU7 65ZR EAD8
- F3GL 56OY G87V
- 6TGW 3BN4 56LY
How to Get Free Fire Redeem Codes for Garena on April 21?
- Visit the Garena Free Fire game’s official website at reward.ff.garena.com.
- Use your Facebook, Google, VK, Apple ID, Huawei ID, or Twitter account to log in.
- You’ll be taken to a valid redemption code (s)
- Copy and paste the 12-digit redemption code into the text box.
- On the screen, a dialogue box will appear.
- ‘Ok’ should be selected.
Redmi 10 Power with 6,000mAh battery launched in India

Xiaomi has announced the launch of yet another pocket-friendly smartphone in the Indian market under its sub-brand Redmi. The company has introduced Redmi 10 Power in the country which is the successor to the Redmi 9 that was launched last year. The device features an LCD display and comes with a 50-megapixel dual-camera setup on the back. There is a massive 6,000mAh battery inside the phone and it comes integrated with a Snapdragon 680 SoC. Alongside, the company has also introduced Redmi 10A under its budget segment.
In This Article