In its latest update, WhatsApp introduced a bunch of features, some of which were highly requested by users over the years. These include in-chat polls, increased group capacity, and the ability to host up to 32 people in a video chat. WhatsApp also introduced ‘Communities’, which took many people by surprise. ‘Communities’ is one of the bigger features that WhatsApp has rolled out in a while. Today, we bring you a full step-by-step guide on how to create a WhatsApp Community.Read Also: Xiaomi partners with Blinkit for instant delivery of Mi Air Purifier 3
What is a WhatsApp Community?
A WhatsApp Community is where you can manage several different groups at once. Different groups can be clubbed together under one umbrella and managed together. This feature comes in handy when you moderate related groups and want to manage them in one place. For example, WhatsApp groups of different classes in a school can be brought together to form a ‘community’ of the school that they are a part of. Any announcements related to the school can be posted to the community where participants of all the groups can look them up.Similarly, groups of teams at a workplace can be brought together as one community and managed in one place. One WhatsApp Community can accommodate up to 50 groups and 5000 members. Admins can post announcements in the ‘community announcement’ group for all the members to see.
Here’s how you can create a WhatsApp Community
Step 1: Open WhatsApp on your smartphone and swipe to the Community tab on the far left.Step 2: Tap on ‘Start your Community.’Step 3: Enter the Community name and Community description in the relevant fields. You can also upload an image as the Community thumbnail. Tap the forward arrow icon once you’re done.Step 4: After entering the Community name and description, you can add pre-existing groups or create a new group. Tap on ‘Add an existing group’ to add groups that you’re an admin of.Step 5: Tap the tick icon to create the Community.Read Also: Hero Electronix launches Qubo Dashcam 4K at an introductory price of Rs 9,990
Conclusion
This is how you can create a WhatsApp Community. If you’re an admin of multiple groups, Communities makes it easy to manage them in one place. You no longer need to copy/paste announcements manually into the groups. You can simply post them in the announcement group of the Community. Members of a community can request to join other groups that are a part of it.
The newest line of Latitude laptops from Dell has been made available for business use. For the review this time, we have the Dell Latitude 7430. The new Dell Latitude laptop comes with the most recent 12th-generation Intel Core CPUs. Is the brand-new Dell Latitude 7430 laptop the greatest buy? Learn more in this review!
Dell Latitude 7430 review: Design and Display
The Dell Latitude 7430 is extremely thin and lightweight. This machine is incredibly strong despite its relatively low weight, which indicates that it is long-lasting. The device is also available as a 2-in-1 laptop. Yes, you can use it in many modes, including tablet mode, tent mode, and conventional laptop mode. This gives you a bit more flexibility because you can use it as a laptop, a tablet, or in a few other modes for watching movies and conveniently browsing the web.Silver and black are the only two colour options available for the system. The model in the silver colour choice is made out of aluminium, while the model in the black colour option is made of carbon fibre and is the one we are reviewing now. The carbon-finish look is a good touch, and the laptop has a really sturdy feel to it. Given that the majority of the device’s target market is businessmen, Dell has given the laptop a matte feel so that it provides a secure grip without drawing fingerprints and smudges. The rubber feet at the bottom raise and elevate the laptop sufficiently from a flat surface to enable more effective airflow, preventing the laptop from overheating.There is a good selection of ports on the Dell Latitude 7430 that a customer would require. A USB Type-C connector with Thunderbolt 4 power delivery, cooling vents, and one universal audio jack are located on the left side of the laptop. A wedge-shaped lock slot, an HDMI 2.0 connector, a USB Type-A port with powershare, a second USB Type-C port with Thunderbolt 4 and power supply, and an optional SIM card tray for systems with mobile internet are all found on the right side of the device.The device supports Wi-Fi 6E and Bluetooth 5.2 for wireless connectivity.The Dell Latitude 7430 has somewhat wide top and bottom bezels in contrast to its narrow side bezels. The system’s top-mounted camera shutter can be manually opened and closed for privacy. For improved video conferencing, the camera notch has a Full HD camera and IR sensor that are distinct. For added security, the camera also supports face unlock sign-in.The two bottom-firing speakers and the venting holes for better thermals are located at the footing.The 14-inch Full HD IPS touch screen of the Dell Latitude 7430 has a 1,920 x 1,080 pixel resolution. In addition, the screen has a 16:9 aspect ratio, and the pixel density is 157 ppi. While the screen is clear and bright, it also offers good viewing angles and the colour tones are not affected when viewed from the sides. This device is adequate for gaming, multi-media consumption, and other comparable tasks. The screen on the Latitude 7430 is clearly viewable outside as well, and we found that putting it at 50 to 70 percent in a well-lit room was pleasant for our eyes.Additionally, the display has an anti-glare coating that makes it simple to use when several light sources are immediately reflecting on it. Thus, Latitude’s screen outperforms the majority of its rivals in this pricing range.A large-buttoned keyboard that is resistant to dust and water is available. Keep in mind that the keyboard lacks a number keypad to provide for compactness. Key travel is long, and key separation is generally good. It has a good tactile feel for typing and gaming. The full-sized keys are a joy to type on, and the keypads are not wobbly.A big touchpad is available to boost productivity. Additionally, its clicking mechanism performs excellently. Most of your daily tasks can be easily handled by it. However, we still like a mouse over a touchpad.The Dell Latitude 7430 offers an express connect feature with a multi-network connection that enables simultaneous connections to two networks through LAN or dual-band WiFi.
Dell Latitude 7430 review: Performance
Okay, let’s talk about performance. The Dell Latitude 7430 offers the latest 12th Gen Intel Core i5-1235U processor, up to 32GB of DDR memory, and up to 1TB of SSD storage, giving it all the power you need for your task. We have the 16GB DDR4 Memory option. Everything functions as quickly as you would anticipate given the newest hardware. It’s not too difficult to open up this laptop; only a few screws need to be undone. The Intel Iris Xe Graphics, which is the integrated GPU, is sufficient for casual gaming. AAA games can also be played, but only on low settings.Even after several gaming sessions, the thermals here met our expectations because it was completely comfortable to put our hands on the keyboard deck.For your daily usage, which involves opening up more than 30 Chrome tabs and carrying out other duties like participating in online meetings, this configuration will provide enough performance. We did not experience any problems with the heating system or strange fan noises either.The larger 58Wh battery is included with the gadget. Depending on usage, it could last for up to 12 hours when fully charged, which is also fantastic. A 65W charger is also included in the shipment box.The laptop has two speakers that support Waves MaxxAudio Pro. Surprisingly high-quality sound is produced by the speakers on the Dell Latitude 7430.
Verdict
As we wrap up this evaluation, it should come as no surprise that we give the Dell Latitude 7430 a strong recommendation. In addition to its functionality, the device boasts a fantastic display and sturdy construction, which makes recommending it simple. The Dell Latitude 7430 is the best choice right away if you appreciate the 2-in-1 form factor because, as we already mentioned, it has a wide range of alternatives.
Dell Latitude 7430 Pros
Compact and Lightweight
Latest hardware
Windows 11
PDFelement is a powerful, versatile tool that can be used to edit PDF documents on all major platforms. Whether you are working on a Windows, Mac, iOS, or Android device, this software offers fast, easy-to-use tools that make it simple to modify any text or image in your PDF files. With features like OCR and form filling built right in with pdf filler, PDFelement offers a comprehensive set of editing capabilities for even the most demanding users.
When it comes to dealing with large amounts of PDF files, manual processing can be incredibly time-consuming and tedious. Luckily, there is a better way: the batch PDF function in the latest version of the PDFelement Pdf editor app. This powerful tool lets you easily and quickly process multiple documents simultaneously, saving you time and effort. Whether you need to convert several documents to different formats, customize their contents, or compress them for easier sharing, PDFelement has got you covered. Best of all, its powerful functionality is easy to use thanks to its intuitive interface and drag-and-drop functionality. Whether you’re an individual user or a professional team, you’ll have no trouble getting your work done quickly and easily with this top-notch free pdf editor.
How PDFelement batch prints PDF
Printing PDF documents in batches at once can now be done easily, thanks to PDFelement’s new feature. With just a few clicks, you can print out all of the important documents to you, whether they be reports, forms, or other files. Not only is this process quick and easy, but it is also very efficient due to its streamlined nature of printing many items at once, thus helping improve your daily productivity.
Step 1: Access the Batch Tool
-Start by opening PDFelement.
-Choose the ‘Batch Process’ option on the Home Window to open the Batch Process window.
Step 2: Print PDF in Batch
-A window labeled ‘Batch Process’ should now appear on your screen.
-Scroll to the bottom of this page and select the ‘Print’ option.
-To upload your PDF files, click the “Add Files” button below.
-After you’ve added your files, select “More Settings” at the bottom of the screen to adjust your printing preferences.Step 3: Set the Print Settings
-Choose “More Settings” to open the ‘Print Settings’ window, where you can select options such as Page Size, Printer Copies, Page Mode and Orientation.
-After you have chosen your selections, press the ‘Apply’ button.
-Click ‘Apply’ in the main ‘Batch Process’ window to start printing.
How PDFelement batch converts PDF
Step 1: Access the Batch Tool
-To convert a large number of PDF files all at once, you will need to use the batch conversion tool available in PDFelement. This powerful and easy-to-use feature lets you quickly process multiple files and change them into various formats with just a few simple clicks.
-To access the batch tool, go to “Tool” and choose “Batch Process.”
-From here, you can specify which documents you’d like to convert and then choose your desired output format from a list of preconfigured options.
Step 2: Select Convert
-Select the “Convert” option from within the batch processing options.
-From here, you’ll be able to choose from 11 different conversion featuresStep 3: Batch convert PDF
-To begin converting your PDF files in batch, add them to the pop-up window and click “Apply.”
With its powerful batch conversion feature, you can easily batch convert your PDFs to JPG, PNG, Word, Excel, text, or HTML. Whether you’re working with a single file or thousands of documents at once, PDFelement makes it easy and fast to get your data in the format that you need.
Other batch features of Wonderhshare PDFelement
Batch compress:
This unique tool allows you to quickly and easily optimize the size of your PDF documents, saving valuable space on your computer or other storage devices like flash drives and external hard drives. Whether you’re working with multiple documents at once or simply need to periodically clean up old or unused files, batch compression is an essential feature to keep in mind.
Batch OCR:
With this feature, you can easily and quickly convert multiple PDF files from scanned or image-based documents into a full-text searchable format. And because this process runs in the background, you can continue working on other projects while your files undergo OCR processing. Additionally, the batch OCR feature takes advantage of advanced image processing algorithms to help ensure that all text and images in your PDF files are accurately captured, even if they contain pictures or complex formatting.Batch edit:
With this feature, users can make changes to entire groups of documents, saving time and effort in the process. Whether you need to make simple text edits or perform more complex tasks like adding images or changing document layouts, batch editing makes it easy and fast to get the job done.
Batch encrypt:
This feature makes it easy and convenient to protect your sensitive information from unauthorized access. Whether you need to prevent data theft or meet compliance requirements, batch encryption can help make your workflow more efficient and secure.
Verdict
If you’re looking for a powerful and easy-to-use PDF editor, then Wondershare PDFelement is your tool. With its intuitive interface and essential batch-processing features, it’s a must-have for anyone working with large quantities of PDF files. Whether you need to convert multiple files from one format to another, create multiple brand-new documents from scratch, or even compress your entire library in a single go, PDFelement has you covered. In addition, this tool also comes with advanced OCR features that allow you to scan paper documents directly into editable digital formats. Plus, its robust security tools give you the power to protect your sensitive data with just a few clicks.
As a batch processing tool, PDFelement provides several functions to make our work more convenient. The batch PDF function of Wondershare PDFelement has been greatly improved in the latest version, making it more powerful and easy to use. You can drag and drop to batch process PDFs, convert, create, print, and compress multiple PDF files conveniently. In addition, other features such as batch OCR, batch editing, and batch encryption are also available in Wondershare PDFelement. What’s more, the latest version of PDFelement has also made significant improvements in terms of UI/UX design and performance.
So if you want a fast and reliable way to get more done with your PDF files, look no further than Wondershare PDFelement!
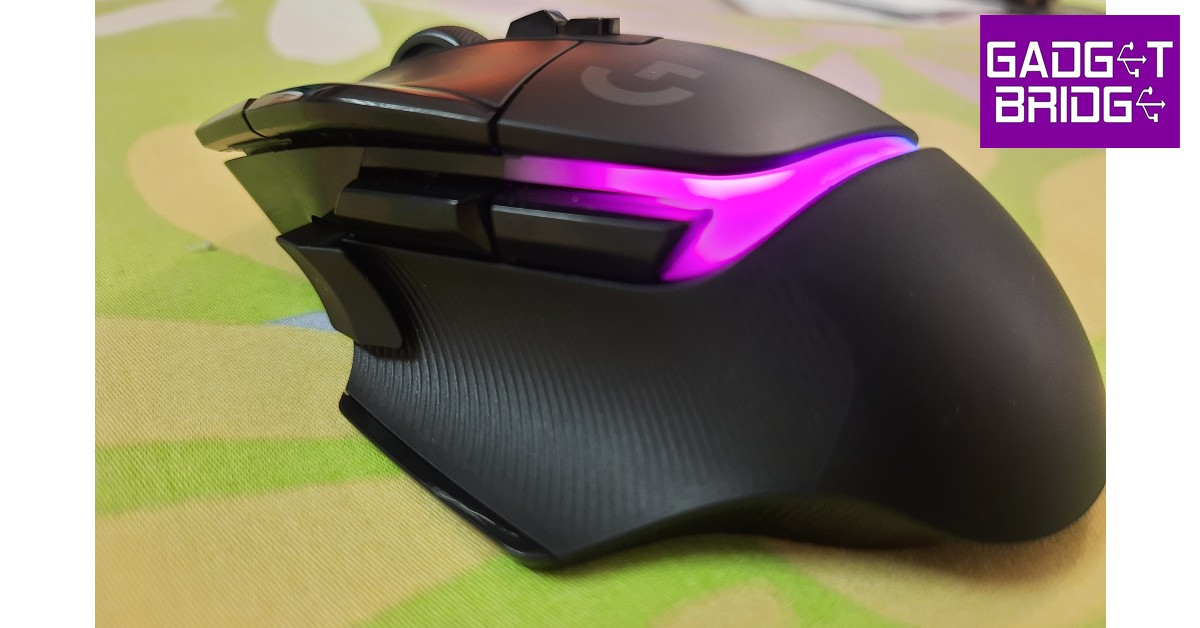
Logitech G502, along with all its variants, enjoys massive popularity among gamers and is regarded by many as the best gaming mouse out there. With the success that Logitech has had in the gaming mouse category, it is no wonder that users were excited about the newly launched Logitech G502 X Plus. This new version of the G502 makes some tweaks to the design and comes with updated specs that will appeal to serious gamers. But does it take away from the iconic appeal of the G502 series? We used the Logitech G502 X Plus for about a week and may have some answers for you in this review. Read Also: TPV announces “Evnia by Philips” range of gaming monitors
Logitech G502 X Plus review: Design
The Logitech G502 X Plus comes in a rectangular box which is quite firm and compact. Inside the box, you’ll find the wireless mouse, a DPI-shift button cover, a USB-C charging cable, a LIGHTSPEED USB-A receiver, a USB extension adapter, some user documentation, and a Logitech sticker. Pulling the wireless mouse out of the box, we noticed some changes in design right off the bat. The RGB lightstrip runs across the palm rest and divides the mouse into three panels. This lightstrip can be customised using the G Hub app (more on that later) to display different colours along its 8-LED array. If you’re worried about unnecessary battery consumption, the ‘Active play detection’ feature automatically turns off the lights when your hand covers the mouse. The thumb rest panel retains the rubber texture but now features a simple line design rather than the triangle pattern on its predecessor. The sniper key up front which is also used as a DPI-shifter can be flipped to reduce any accidental clicks. There’s also an additional key provided in the box which mutes the click altogether. The scroll wheel feels sleeker and contributes to the lighter weight of the G502 X Plus. The gap in front of the scroll wheel has also been filled up. The new low-friction PTFE feet are a welcome addition. The mouse gets a much better glide and works on even more challenging surfaces because of it.The total weight of the Logitech G502 X Plus is 106 grams. Gaming mice over the years have evolved to become lighter and lighter, and Logitech clearly does not want to be left behind in this aspect. Despite its lighter weight compared to its predecessors, there are a bunch of gaming mice on the market that are lighter than the G502 X Plus.Other than the changes mentioned above, the Logitech G502 X Plus retains the signature look of the series. There are 13 customisable buttons on this mouse and the overall design is pretty ergonomic and caters to different hand sizes. If you are a fan of what Logitech has produced so far, you definitely won’t be disappointed by the G502 X Plus.
Logitech G502 X Plus: Performance
While the design of the G502 X Plus is certainly impressive, the performance is what has made the G502 series legendary over the years. We are happy to report that the Logitech G502 X Plus keeps up the reputation that comes with its name. We used the mouse extensively over the period of a week of gaming and casual purposes and have nothing but nice things to say. Firstly, the Logitech G502 X Plus presents no problem connecting to the computer. All you need to do is plug in the USB receiver and flick the power switch at the bottom of the mouse and you’re good to go. There’s no option for Bluetooth connectivity, which means you cannot connect the mouse to more than one device. With its pro-grade connectivity, the G502 X Plus generates a 68% faster response rate compared to its predecessors. The comparatively lighter design and low-friction PTFE feet came into play while handling the mouse during our gaming sessions. We tried using the G502 X Plus on various surfaces and it was up to the task every time. Logitech has retained the Hero 25K sensor on the G502 X Plus (if it ain’t broke don’t fix it!) and it delivers the superior tracking that we have come to expect from it. The lighter design makes it easier to control during intense gaming sessions and it doesn’t cause much stress if you’ve been using it for hours. We still hope Logitech sheds some more weight from the mouse in its future iterations. The tactile response we got from the buttons was amazing. The new Lightforce switches produce better speed levels and instantaneous responses while maintaining the crispiness of the feedback that we all love. On top of that, all 13 buttons on this mouse can be customised through the G Hub app. The G7 and G8 keys placed to the left of the left click are tuned to alter the DPI levels by default. This function came in really handy when switching from gaming to regular controls. While playing FPS games like Counter-Strike, Valorant, and Destiny, the seamless movements and responses we got from the mouse were incredible. The mouse caters well to palm grip and claw grip. However, if you have small hands you may have to reach a bit to access the sniper button. But for average and larger hand sizes, the G502 X Plus works really well. Logitech has also worked on bumping the battery life on the G502 X Plus. The Lightspeed technology manages to get the most out of the device and utilises the power quite smartly. With the RGB lighting turned off, the G502 X Plus offers up to 130 hours of battery life. If you do not want to compromise on the aesthetics, you can get up to 37 hours of battery life with the RGB lights always turned on. The mouse can also work while being charged, so it won’t be much of an issue.Read Also:What Changes Will VR Bring To Online Casinos
Verdict
After using it for a week, we can safely say that the Logitech G502 X Plus is unmatched in its performance. While the weight could certainly have been lighter, we got used to it pretty quickly and it didn’t take anything away from the performance. However, a price tag of Rs 15,495 means you will have to splurge for this device. Firstly, if you are not going to use it for gaming, you should look into productive mice like the Logitech MX Master 3S (our review here). However, if you’re looking to add to your gaming rig and want the best mouse out there, the Logitech G502 X Plus should be at the top of your list. If you can compromise on the RGB lighting without losing any of the essential features, the Logitech G502 X Lightspeed is a slightly affordable alternative at Rs 12,995. The G502 lineup also features the Logitech G502 X Wired gaming mouse which costs just Rs 6.650.
Pros
Attractive design featuring the RGB lightstripPTFE feet reduce the friction between the mouse and the surface New Lightforce switches offer a great response rate
Reliance Jio has launched its True 5G service across the Delhi-NCR region, including Delhi, Gurugram, Noida, Ghaziabad, Faridabad and other major locations. With this launch, Reliance Jio becomes the first major network to provide 5G services across the Delhi-NCR region. Jio is also ramping up the rollout in other parts of the country, taking in a larger number of users in its ‘Jio Welcome Offer.’ Read Also:Top Simple Ways to Backup Bookmarks and Passwords on ChromeJio’s 5G network will cover all important localities and like residential areas, hospitals, schools, colleges & universities, government buildings, high streets, malls & markets, high footfall areas such as tourist spots and hotels, tech-parks, roads, highways and metros.Lakhs of Jio users in Delhi are already enjoying the ‘Jio Welcome Offer’ which allows them to use unlimited data at a speed of up to 1 Gbps+ at no additional cost. Jio claims this is largely because of its stand-alone 5G architecture with zero dependency on the 4G network. A mix of 5G spectrum across 700 MHz, 3500 MHz, and 26 GHz has also facilitated a faster rollout. Jio also employs ‘Carrier Aggregation’ that seamlessly combines these 5G frequencies into a single robust “data highway.”Now that Jio’s 5G network covers all of Delhi-NCR, the service provider will be taking on more 5G users. You can sign up for Jio 5G on the MyJio app. Read our article here for a detailed guide on how you can use Jio 5G on your smartphone. Read Also: How to find new trending songs for Instagram reels?Commenting on this occasion, a Jio Spokesperson said, “Covering majority of the National Capital and NCR region is a matter of pride for us. Jio is expanding its True-5G reach at a rapid pace and has already rolled out a large portion of the planned True-5G network in this area. It is the only operator to be present across Delhi-NCR region with True-5G services. The reason Jio engineers are working round the clock to deliver True5G to every Indian is because of the transformational power of this technology and the exponential benefits it can deliver to every citizen.”
YouTube Music and Spotify are both very popular music streaming apps with an endless library of songs, albums, and podcasts. Even when it comes to the user interface, there is not much that separates the two apps. However, there is one feature that gives Spotify a small advantage over its rival. Unlike YouTube Music, Spotify has a Sleep Timer option that automatically shuts off music playback after a certain period of time. This is particularly designed for people who like to fall asleep while listening to music but don’t want to wake up with a depleted battery. You can set up the duration after which Spotify will stop the music playback. While YouTube Music does not have this option, there are a few workarounds that will help you achieve the same result. In this article, we bring you the top simple ways to set a sleep timer on YouTube Music on Android and iPhone. Read Also: 7 Ways To Utilize Instagram For Product Promotion In 2023
How to get Sleep Timer for YouTube Music on Android
Setting up a sleep timer for YouTube Music can be done with the help of a third-party app on Android. There are plenty of third-party apps that are specifically designed for this task. Sleep Timer (Turn music off) or Sleep Timer (Music and Screen) are two of the most popular timer apps for music players. Here’s how you can set up a timer using the former. Step 1: Download and install the Sleep Timer (Turn music off) app from the Google Play Store.Step 2: Drag the bar around the timer to set the time after which you want the music to shut off. Step 3: Tap on ‘Start and player’ and select YouTube Music from the popup box. Start playing music on the app. The playback will stop after the time runs out.
How to get Sleep Timer for YouTube Music on iPhone
You don’t need to download a third-party app to set up a sleep timer on YouTube Music on an iPhone. Here’s how you can do it.Step 1: Start playing music on YouTube Music.Step 2: Open the clock app on your iPhone.Step 3: Tap on ‘Timer.’Step 4: Tap on ‘When the timer ends’ and select ‘Stop playing.’YouTube Music will stop playing music when the time you’ve set on the clock app runs out. Read Also: TPV announces “Evnia by Philips” range of gaming monitors
Conclusion
This is how you can set up a sleep timer on YouTube Music on Android and iPhone. If you use YouTube Music on a Mac, the default sleep timer will also work for the app. All you need to do is go to System Preferences>Battery>Power Adapter and set up a time on the slider after which the display will shut off and your Mac will enter sleep mode. Once the Mac enters sleep mode, the music playback will automatically be paused. Windows users can use a Sleep Timer plugin for Google Chrome to pause playback on YouTube Music after a certain period of time.
With rising air pollution levels and deteriorating air quality, Xiaomi has ramped up its deliveries of the Mi Air Purifier 3 by partnering up with Blinkit. Customers can get the Mi Purifier 3 delivered to their homes within 10 minutes by ordering it on the Blinkit app. Users can purchase the air purifier from the app starting from November 17. Currently, the service is only being rolled out in New Delhi, Noida, Gurugram, and Ghaziabad.Read Also: Google Play introduces UPI Autopay option for subscription-based purchases
Mi Air Purifier 3: Comes with Triple Layer Filtration and PM sensor
The Mi Air Purifier 3 offers powerful air filtration that reduces harmful substances in the air and keeps pollution levels low in an indoor setting. This is carried out by 360° Triple Layer Filtration and True HEPA Filter. The Particulate Matter sensor is capable of detecting suspended particles as small as 0.1 microns. It also provides an accurate measurement of the AQI levels. The Mi Air Purifier 3 can provide a clean airflow in an area of up to 484 sq. ft. with a CADR of 380m³/hr. The air purifier also sports an OLED high-resolution touch display which displays information on PM 2.5 levels, temperature, humidity, and WiFi connection. The compact design and size ensure that the air purifier does not occupy too much space. Xiaomi claims the air purifier can provide 6333 litres of clean air per minute. The device can be controlled by the Mi Home App. Air filter replacement and other maintenance can be carried out at the price of Rs 2,499. Its low energy consumption, efficient performance, and sleek design make the Mi Air Purifier 3 a nice addition to every household. The air purifier is currently priced at Rs 10,499.
Hero Electronix has launched the Qubo Dashcam 4K, adding to its Auto Tech portfolio in India. Earlier, the company had launched Qubo Smart Dashcam, announcing its arrival in the Auto Tech segment in India. The Qubo Dashcam 4K can record footage in 4K resolution and also comes packed with other safety features. The dashcam was launched at an introductory price of Rs 9,990. The higher-end model which comes with a rear cam as well is priced at Rs 12,990.Read Also: Qualcomm announcements at Snapdragon Summit 2022 – Day 1
Qubo Dashcam 4K: Comes with ADAS, 2.8” LCD screen, and more
Qubo Dashcam 4K marks its entry as one of the most feature-packed dashcams in the market. The dashcam comes with ADAS (Advanced Driver Assistance Systems) features like lane departure warning, forward vehicle motion detection, and vehicle ahead alert. The Sony IMX 415 lens and SIGMASTAR SSC8629G ensure high-quality recordings even in low-light conditions. On top of that, the dashcam also sports an inbuilt GPS and is capable of taking time-lapse videos. The ‘Loop recording’ feature overwrites old footage to save storage space and the ‘Emergency event recording lock’ automatically saves the video in case of an event. Users can also control recording time with the ‘Record on Demand’ feature. The parking mode captures surrounding footage while the car is parked. The dashcam also comes with H 265 Codec support to allow a seamless transfer of recorded footage without any drop in quality. Users can share the footage with friends and family with the easy-to-use Qubo Pro app.The 2.8-inch LCD screen on the front camera unit displays the live stream visuals. The dual recording variant also comes with a secondary camera that can record 1080p footage. This unit can be used as a rear cam or cabin cam. Both cameras are WiFi compatible and have LED indicators. The dashcam can withstand temperatures ranging from -5 to 65 degrees Celcius, making it optimum for Indian conditions.Read Also: IoT in Healthcare: How is IoT Used in MedTech?Commenting on the launch, Nikhil Rajpal, CEO, Hero Electronix said: “After the success, we witnessed foraying into the auto tech segment, we wanted to continue expanding the line with further feature-rich products. The Dashcam Pro 4K is a result of just that. Equipped with the best-in-class features, and superior connectivity, it will be a boon for content creators who wish to record content while traveling and share it with their followers on the go. We are certain that it will be well received by our customers which will result in our overall aim of driving deep tech adoption in India.”
While it’s difficult to predict the future in general, it might be even harder to predict the future of technology. In the past 30 years alone, we’ve gone from the clunky grey computers that weighed about twenty pounds to stronger, faster computers that fit on our wrists. And the amount they can do far surpasses the models from just a decade ago. So, that’s why when we start talking about the advent of virtual reality and the Metaverse, it’s hard to make solid predictions about where the technology will go. However, things begin to look a little clearer when it comes to specific changes we might see because of VR. We’ll be talking about an industry that has grown exponentially because of computers and promises to do so again with the help of virtual reality. Let’s take a look at some of the changes we expect to come to online casinos because of VR.
A Reinvigorated Atmosphere
The casino as a whole has gone through quite a lot of changes. It started in small buildings, moved out to huge physical locations across the world and became synonymous with Las Vegas, and then moved onto the World Wide Web. From there we have seen gambling on screens of all sizes both in our homes and in our pockets. The move to mobile gaming was a particularly big one for gambling and casinos as it gave players the option to experience their favourite games anywhere. However, virtual reality promises to change everything once again.
While listing the best devices to play online poker, live dealer games, and even sports betting is up for debate, we think VR headsets will be on top of a lot of people’s list as it blends the atmosphere of a live casino with the convenience of mobile gaming. There are many benefits to mobile cash games, but being able to break down the game from a digital table can’t be overvalued. Take poker for example.
With a headset, you’ll be able to sit down at a table to play a few hands within minutes of putting the device on. Pair this with having a 360-degree view of the table and an ability to verbally communicate with the dealer and other players, and you have a quick, easy, convenient, yet authentic way to experience poker. Imagine the same treatment but for watching a football game or horse race. The same can be said for any other casino game out there. Speaking of games, our next point will be about the number of games rather than the quality of the environment.
Courtesy: “wheel of fortune casino game” by jsugalski is licensed under CC BY-NC-ND 2.0.
Expanding Game Options
VR has already been making waves with players who are eagerly looking for some of the best VR experiences out there right now, but we think its influence could do more than bring about a few new remakes and gimmicks. With a stable pool of VR developers and customers interested to see where the technology could go, we expect a whole new genre of casino games catered to the hardware.
Don’t get us wrong, there will still be virtual roulette tables where players can throw the dice and an option to not only bet on but view live sports from the stands, but there will also be new experiences only made possible by VR. Who knows? If virtual reality becomes the norm, we could see hybrid dice and card games that are developed in VR make their way to physical casinos and not the other way around. It’s just an outcome we expect after the intense creative process that goes into developing games for virtual reality.
Courtesy: “Future Interfaces 2014” by NYC Media Lab is licensed under CC BY-SA 2.0.
A User Interface To Promote Multitasking
We might have saved the best for last as having an active user interface while in the casino is a very real possibility with virtual reality. Similar to contemporary smart contact technology, user interfaces in online casinos could show you how much everyone has wagered at a poker game, show players the odds at slot machines as they walk by, and alert people when they’ve hit winning/spending limits for the day. This could help customers focus on the action instead of crunching numbers or rechecking how much everyone at the table has ponied up for a bet. With a user interface, everything could be far more streamlined, and could even offer services like online shopping for when the action takes a lull.
For these, and so many other reasons, we think virtual reality will change online casinos forever. Luckily, it looks like the changes will largely be appreciated by players, so look forward to what changes we see shortly.
For the latest gadget and tech news, and gadget reviews, follow us on Twitter, Facebook and Instagram. For newest tech & gadget videos subscribe to our YouTube Channel. You can also stay up to date using the Gadget Bridge Android App. You can find the latest car and bike news here.
There is a reason why Google Chrome is one of the most popular web browsers in the world. When it comes to ease of access and an enhanced web browsing experience, there aren’t any better browsers than Chrome. One of the better features of Chrome is that it lets you back up your bookmarks and passwords to your Google account. This can come in quite handy when you switch your device and need to customise Chrome according to your liking. By backing up your data, you can easily pick up where you left off on your previous device. In this article, we bring you the top simple ways to create a backup of your bookmarks and passwords on Google Chrome.Read Also: How to See your Liked Posts on Instagram?
Backup your Bookmarks and Passwords using Chrome Sync
One of the advantages of backing up your passwords and bookmarks using Chrome Sync is that you can access your data from another device simply by logging into your Google Account. This also comes in handy if you want to use the saved bookmarks and passwords on your smartphone. Step 1: Click on your profile icon on the Chrome toolbar. You can find it at the top left corner of the browser window.Step 2: Make sure you’re logged in. Then click on ‘Turn on sync.’Step 3: In the following window, select Settings.Step 4: Click on ‘Manage what you sync.’ You can either sync everything or customise what you sync. If you just want to sync your bookmarks and passwords, choose the latter and select Bookmarks and Passwords from the list below.Step 5: Go to the previous window and select ‘Confirm.’ Chrome will start syncing your data and you will be able to access them from another device after you sign in using your Google Account.
Make a local backup of your bookmarks and passwords
If you do not wish to back up your bookmarks and passwords online, you can create a local backup on your device. This method comes in handy if you don’t use a Google Account for Chrome. The process is pretty simple and won’t take much of your time.Step 1: Click on the ellipses (three dots) at the top right corner of the browser window. Step 2: Scroll and select Bookmark manager from the ‘Bookmarks’ category. Alternatively, you can press Ctrl+Shift+O to open the Bookmark manager directly. Step 3: Click on the ellipses (three dots) at the upper right corner of the Bookmarks page.Step 4: Select ‘Export bookmarks’ and specify a location to export them.Your bookmarks will be saved as an HTML document in your preferred location.To make a local backup of your passwords, follow these steps.Step 1: Click on the ellipses (three dots) at the top right corner of the browser window.Step 2: Select Settings.Step 3: Select Autofill from the side menu and click on ‘Password Manager.’Step 4: Click the ellipses next to Saved Passwords and select ‘Export Passwords.’Step 5: You will be asked to enter your computer’s password for verification. After that, you can select the location where you want to store your passwords. Your passwords will be saved in your preferred location.Read Also: IoT in Healthcare: How is IoT Used in MedTech?
Conclusion
This is how you can create a backup of your bookmarks and passwords in Chrome. If you use Chrome with a Google Account, making an online backup of your passwords and bookmarks is a good idea. You will be able to access them whenever you log into Chrome on another device using your Google Account. However, if you use Chrome without a Google Account, you can always create a local backup of your passwords and bookmarks.


 Step 3: Enter the Community name and Community description in the relevant fields. You can also upload an image as the Community thumbnail. Tap the forward arrow icon once you’re done.
 Step 4: After entering the Community name and description, you can add pre-existing groups or create a new group. Tap on ‘Add an existing group’ to add groups that you’re an admin of.
 Step 5: Tap the tick icon to create the Community.
 Read Also: Hero Electronix launches Qubo Dashcam 4K at an introductory price of Rs 9,990


 Step 3: Set the Print Settings
-Choose “More Settings” to open the ‘Print Settings’ window, where you can select options such as Page Size, Printer Copies, Page Mode and Orientation.
-After you have chosen your selections, press the ‘Apply’ button.
-Click ‘Apply’ in the main ‘Batch Process’ window to start printing.
Step 3: Set the Print Settings
-Choose “More Settings” to open the ‘Print Settings’ window, where you can select options such as Page Size, Printer Copies, Page Mode and Orientation.
-After you have chosen your selections, press the ‘Apply’ button.
-Click ‘Apply’ in the main ‘Batch Process’ window to start printing.
 Step 3: Batch convert PDF
-To begin converting your PDF files in batch, add them to the pop-up window and click “Apply.”
With its powerful batch conversion feature, you can easily batch convert your PDFs to JPG, PNG, Word, Excel, text, or HTML. Whether you’re working with a single file or thousands of documents at once, PDFelement makes it easy and fast to get your data in the format that you need.
Step 3: Batch convert PDF
-To begin converting your PDF files in batch, add them to the pop-up window and click “Apply.”
With its powerful batch conversion feature, you can easily batch convert your PDFs to JPG, PNG, Word, Excel, text, or HTML. Whether you’re working with a single file or thousands of documents at once, PDFelement makes it easy and fast to get your data in the format that you need.
 Batch edit:
With this feature, users can make changes to entire groups of documents, saving time and effort in the process. Whether you need to make simple text edits or perform more complex tasks like adding images or changing document layouts, batch editing makes it easy and fast to get the job done.
Batch encrypt:
This feature makes it easy and convenient to protect your sensitive information from unauthorized access. Whether you need to prevent data theft or meet compliance requirements, batch encryption can help make your workflow more efficient and secure.
Batch edit:
With this feature, users can make changes to entire groups of documents, saving time and effort in the process. Whether you need to make simple text edits or perform more complex tasks like adding images or changing document layouts, batch editing makes it easy and fast to get the job done.
Batch encrypt:
This feature makes it easy and convenient to protect your sensitive information from unauthorized access. Whether you need to prevent data theft or meet compliance requirements, batch encryption can help make your workflow more efficient and secure.


 Step 3:
 Step 4:
 Step 5:
 Step 3:
 Step 3:
 Step 4:
 Step 5: