Creating a Gmail account is a pretty simple process and does not take a long time to set up. However, it can be a pretty daunting task for elderly people, or someone who isn’t well accustomed to the Internet and computers. If you’re looking to create a Gmail account for yourself or someone else, we’ve got you covered. In this article, we show you how to set up a new Gmail account for yourself or others.Read Also: iQoo Neo 7 powered by MediaTek Dimensity 9000+ SoC launched
Here’s how you can set up a Gmail account
Step 1: Go to www.mail.google.com and click on ‘Create Account.’ If you are already signed in, you will need to sign out before you create a new account.Step 2: Google will prompt you to select who you’re making the account for. If you’re making the account for your child, you can control the privacy settings and other parental controls. If you’re making the account for another adult, simply select ‘For personal use’.Step 3: Enter the First and Last name. In the following fields, you will need to enter a unique email address that isn’t already taken and also set the password for the account.Step 4: Once you’ve filled in the necessary details, click on ‘Next’.Step 5: Google will prompt you to link your phone number with your email account. Enter your number and fill in the OTP you receive to confirm it. If you’re making the account for someone else, make sure you fill in their phone number and make them send you the code.Step 6: After entering your phone number, you will need to fill in your birthdate and gender. Once that’s finished, click on Next.Step 7: Your Gmail account will be successfully created. Click on ‘I agree’ to the Terms and Conditions after going through them. After that, you can start using your email.Read Also: Top Simple Ways to Use Chrome Extensions on an Android Mobile Browser
Conclusion
This is how you can set up a new Gmail account for yourself or another person. It is a pretty straightforward process and won’t take much of your time. If you do not want to link your phone number to your email account, you can try using some other clients. You can also use temp mail if you want a throwaway email account to sign up for a service.
It wouldn’t be far-fetched to say that Xiaomi has had a major influence on the entry-level smartphone market in India. A category which was previously glossed over in favour of affordable, midrange, and premium smartphones, has now had new life breathed into it ever since the arrival of Xiaomi. Xiaomi’s Redmi range of smartphones is known to offer incredible specs for the price along with striking design elements. The Redmi A1 is no different. Priced at just Rs 6,499, we had to see for ourselves what one of the most affordable smartphones in the market has to offer. Here is our Redmi A1 review.Read Also: iQoo Neo 7 powered by MediaTek Dimensity 9000+ SoC launched
Redmi A1 review: Design and Display
Inside the box, you get the smartphone, a 10W power adapter, a micro USB cable, a SIM ejector tool, and a Quick Start Guide. Taking it out of the box, this is not a compact smartphone by any means. With dimensions of 164.9 x 76.8 x 9.1 mm, the Redmi A1 matches even midrange smartphones in size. Holding the phone in your hand, it doesn’t feel like one of the cheapest ones on the market. Perhaps a sign of how far the entry-level category has come.The overall design has been dialled down and kept simple. The back panel is made out of plastic and has a textured finish which feels pretty nice while holding the phone in your palm. The dual cameras are housed in a small squarish unit at the top right part of the back panel along with a dual-LED flash. The Redmi A1 is available in three colours – light green, light blue, and black. We used the light green variant for this review and the rustic colour goes well with the minimal design of the smartphone. The micro USB port and the 3.5mm headphone jack are housed at the bottom of the phone. On the ride side, you’ll find the volume rocker along with the power key. The SIM tray finds its way to the left. The speaker grille is placed at the top of the phone. There is no fingerprint sensor on the device. Moving on, the Redmi A1 boasts a 6.52-inch IPS LCD display that has a resolution of 700 x 1600p. A lot of people who upgrade from a feature phone look for a big display, and Redmi A1 cuts no corners when it comes to that. Redmi could have easily provided a smaller display while slightly bumping up other specs, but they went for a 6.5-inch screen size.The display is quite satisfactory if you want to watch SD content on it. There is a ceiling that the display hits quite early and there’s not a lot more you can get out of it. We watched content on YouTube, Netflix, and Hotstar, and the results were on par for an entry-level smartphone. Nothing too special, but great for the price. The display also has a refresh rate of 60Hz and a peak brightness of 400 nits. The scrolling experience is decent but the haptic feedback has been dialled up quite a bit. You may have to spend some time customising the phone to sort that out.
Redmi A1 review: Performance and Cameras
The Redmi A1 is powered by the MediaTek MT6761 Helio A22 processor. This processor delivers a decent performance when it comes to basic tasks like browsing the internet, making video calls, using navigation, and more. The storage space offered is 32 GB along with an option of 2/3 GB RAM. We used the 32 GB + 2 GB model for this review. One of the things to note here is that the Redmi A1 runs on Android 12 GO, which is an OS specially designed by Google for low-end smartphones. You’ll barely find traces of MIUI on top of this OS. The UI is pretty clean and there are no bloatware apps on the phone apart from Facebook Lite. The smartphone is also equipped with a PowerVR GE8320 GPU, and we put it to the test by playing some light games like Candy Crush, Subway Surfers, and Clash Royale. After being pleased with the smartphone’s performance, we played Garena Free Fire Max on it. While there were some expected lags, the phone did well to provide a satisfactory gaming experience. You won’t get the smoothest controls or high-quality graphics on the Redmi A1, but that is to be expected from a smartphone at this price point. On the Geekbench Test, the smartphone returned a score of 140 points on the Single-core test and 501 points on the Multi-core test.Moving on, the Redmi A1 receives a 5,000 mAh battery pack, which on a phone with minimal hardware and a stripped-down OS lasts a long time. The smartphone easily lasted two days on moderate use which included taking pictures, watching almost two hours of content every day, texting on WhatsApp, browsing the web, and listening to music. More conservative use can easily push the battery backup to 3 days. The 10W charger can fully charge the smartphone in under 3 hours.When it comes to cameras, the Redmi A1 offers an 8MP primary shooter along with a depth sensor. You also get dual-LED flash housed in the rear camera unit and a 5MP selfie camera in the waterdrop notch on the display. The rear camera unit performs well in well-lit conditions but is certainly not up to the task in limited lighting. We won’t hold it against the Redmi A1, as no other entry-level smartphone can provide that feature. The pictures we took in natural daylight came out pretty well. The colours were vibrant, and the camera did a pretty good job of capturing the essential details. However, the pictures of subjects taken in direct sunlight came out a bit overexposed and we were not able to make out the sky in the background at all. The Redmi A1 can also record 1080p videos at 30fps from the rear as well as the front camera. You can also record time-lapse videos. There is also an option to record a ‘Short Video’, which is essentially there for shooting videos meant to be uploaded on TikTok or Instagram. The 5MP front camera captures decent selfies without adding any artificial effects on top, which is a good thing. Overall, we were quite pleased with the camera performance, given that it is an entry-level smartphone. Read Also: JioBook is now available for purchase via Reliance Digital’s website at Rs 15,799
Verdict
After a week of thorough use, the Redmi A1 held up quite well. We would strongly suggest it to buyers who are making the switch from a feature phone. Xiaomi has managed to squeeze in all the essential features buyers expect from an entry-level smartphone without compromising on performance. At Rs 6,499, the Redmi A1 could be the ideal buy.
Pros
Camera performanceBattery lifeClean design
Cons
The display could have been a little more fluidMicro USB charging
If you can’t figure out what gift you should give to a loved one, Amazon gives you an incredible way out. You can simply send an Amazon gift card of any amount as a gift, which the recipient can use to buy anything from the website. You can send an e-gift card through email, or a physical one that can be customised however you like. You can attach personalised messages to gift cards as well. In this article, we show you how to buy a gift card on Amazon.Read Also: How to Use Vanish Mode on Instagram? When should you use it?
Here’s how you can buy an Amazon gift card
Step 1: Go to the Amazon website and select ‘Gift cards’ from the top menu.Step 2: Choose the type of gift card you want. Step 3: Select the gift card amount. You can also enter the amount of your choice.Step 4: Fill in other details like Your Name, Recipient’s email, Date of Delivery, Quantity, and additional message. Step 5: Click on ‘Add to cart’ and then select ‘Proceed to checkout.’Step 6: Fill in the payment information and select ‘Continue’.Step 7: Select ‘Place your order.’After you’ve made the payment, the gift card will be delivered to the recipient.Read Also: Best ways to Fix ‘Sleep Tracking Not Working’ on Apple Watch
Frequently Asked Questions
How will I know if the recipient has received the e-gift card?
Amazon will notify you with an email when the recipient receives your e-gift card. You can also check the order status on the Your Orders page.
I sent the e-gift card to the wrong email address what should I do?
You can always update the email address as long as the recipient has not redeemed the gift card. Once the gift card has been redeemed, there is nothing you can do. Amazon does not provide refunds for gift cards.
How long does it take an e-gift card to deliver?
Typically, it takes 5 minutes to deliver an e-gift card. You can always check the gift card delivery status on the Your Orders page.
Do Amazon gift cards have an expiry date?
No, Amazon gift cards do not have an expiry date and carry no fees. You can redeem them any time you want.
Can I use the Amazon gift card to buy someone from Amazon in another country?
This is how you can buy a gift card on Amazon. Once you’ve made a gift card purchase you cannot change it. Only Print-at-Home gift card orders can be cancelled. After you’ve made the purchase, make sure the gift card gets delivered to the recipient by checking the Your Orders page.
WhatsApp allegedly rolled out avatars for a select group of Android beta testers. According to a WABetaInfo report, WhatsApp users can now use Facebook-like avatars as their profile pictures and stickers thanks to the upgrade. WhatsApp has updated to version 2.22.23.9 with the introduction of a new beta update for Android users.A new way to express oneself on WhatsApp, avatars are now being sent out to a select group of lucky beta testers on WhatsApp beta for Android. According to WABetaInfo, you can customise your identity with avatars by creating a digital expression in WhatsApp Settings. Some fortunate beta testers can now create an avatar with WhatsApp beta for Android version 2.22.23.9.Image Courtesy: WABetaInfoAccording to the screenshot included in the article, after customising an avatar, WhatsApp will instantly create a new sticker pack so that you can share stickers with your friends and family. You can also select an avatar to use as your WhatsApp profile picture. Open WhatsApp Settings if you want to check if the feature is accessible for your account. If you find a new section here named “Avatar,” it means you may immediately start generating an avatar right now.According to the report, since this function has only recently been made available to select users, you might run into a few minor difficulties when setting an avatar. If this happens, try again until you’ve chosen the avatar’s ideal appearance.Some privileged beta testers have received the option to create an avatar after updating WhatsApp beta for Android from the Play Store. As always, don’t panic if you don’t have this capability; more users will be able to configure an avatar over the next several weeks, so keep your WhatsApp version updated in the meanwhile.
For the latest gadget and tech news, and gadget reviews, follow us on Twitter, Facebook and Instagram. For newest tech & gadget videos subscribe to our YouTube Channel. You can also stay up to date using the Gadget Bridge Android App. You can find the latest car and bike news here.
22 October 2022 Amazon Quiz has gone live. Customers from different parts of the country are participating in the daily quiz. The quiz begins from 12 AM to 11:59 PM. Those participating in the quiz can win exciting prizes by answering all the questions correctly. Today participants have a chance to win a Rs 2500 Amazon Pay Balance.Amazon quiz brings an opportunity for its customers to win Amazon Pay Balance ranging from Rs 1,000 to Rs 50,000. The Quiz can be played from 12 AM to 11:59 PM. The e-commerce platform brings a fresh quiz on a daily basis which consists of five questions related to general knowledge and current affairs. The participants need to answer all the questions correctly and their names will be selected for a lucky draw. The winner will be announced at the end of the month.One wrong answer could eliminate you from the quiz. If you manage to answer all the questions correctly you can stand a chance to win a Rs 2500 Amazon Pay Balance today. Only app users are eligible to participate in the Quiz. Check Out 22 October 2022 Amazon Quiz Answers.Amazon Quiz Today Prize – Rs 2500Amazon Pay BalanceQuiz Date – 22 October 2022Daily Timing – 12 AM to 11:59 PMWinner Announcement – Today 12 PM
Amazon Quiz Answers Today 22 October 2022
Question 1: Leandro Trossard recently scored a hat-trick in a Premier League game against which club, in a match that ended 3-3?Answer: LiverpoolQuestion 2: Who would be seen returning in the character of Neytiri in the movie Avatar 2?
Answer: Zoe Saldana
Question 3: The airport in which city was recently renamed after Bhagat Singh?
Answer: ChandigarhQuestion 4: This statue represents which famous explorer?Answer: Christopher ColombusQuestion 5: This is the flag of which US state?
Answer: Texas
How To Play Amazon Quiz
Only app users are eligible to play the Amazon quiz every morning from 12 AM to 11:59 PM. The quiz is not available on the desktop. For those who are unaware of how to play the Amazon quiz below are the steps, you can follow to take the quiz.
Firstly download the Amazon app from Google Play Store or App Store
Now fill in the required information through the Sign Up option.
You need to log in to the Amazon app and scroll down on the home screen to find the Amazon Quiz banner.
Tap on the Amazon Quiz banner and tap on the Start button to start the Quiz.
Now you will get 5 questions and you need to answer them correctly. One wrong answer will eliminate you from the Quiz.
After answering all the questions correctly you are now eligible for a Lucky Draw.
The winner’s name will be announced today at 12 PM.
Garmin Venu Sq 2 series has officially debuted in India. Two variants of the new Venu Sq 2 series are available from the firm- Garmin Venu Sq 2 Music Edition and Garmin Venu Sq 2. Both the smartwatches come with touchscreen AMOLED displays and can be synced with Spotify or Amazon Music playlists. The Music Edition is said to store up to 500 songs.
Garmin Venu Sq 2 Series price in India
The regular variant of the Garmin Venu Sq 2 costs Rs 27,990 in India. Whereas the Garmin Venu Sq 2 Music Edition comes at Rs 33,490. The standard model will be available in the colours Cool Mint, Shadow Grey, and White while the Music edition will come in French Grey, Black, and Ivory shades.In terms of availability, beginning on October 28, both variants will be sold in India via Flipkart, Amazon, Tata Cliq, Nykaa, and Synergizer. The fitness tracker will also be sold through Croma, Helio Watch, and Garmin brand stores in the country.
Garmin Venu Sq 2 Series specifications
The Garmin Venu Sq 2 Series is made of aluminium and has a square-shaped dial. A 1.43-inch touchscreen AMOLED display with a 320 × 360 pixel resolution is featured on the watches. The screen size is said to be bigger than last year’s model.Several watch faces are already pre-installed on it. In addition, customers have the choice to design their own watch face using the Garmin Connect software. There is a new 4th gen heart rate monitoring sensor included in the Garmin Venu Sq 2 for accuracy. In addition, users may track their sleep and stress levels, with data available in the Garmin Connect app. Additionally, Garmin has added a new Health Snapshot feature that records vital statistics for a 2-minute period, including heart rate, heart rate variability, blood oxygen saturation (SpO2), respiration, and stress, either directly on the watch or through the Garmin Connect app.Over 25 built-in sports modes are supported, including HIIT, cardio, swimming in a pool, jogging, and cycling. More than 1,600 exercises can be used to design one’s own custom programme, which can then be downloaded directly to the watch from a selection of additional predefined workouts.Users of the Garmin Venu Sq 2 Music Edition can save 500 songs on the gadget. According to the company, users may also link the Garmin Venu Sq 2 with their Spotify or Amazon Music playlists.According to claims, the Garmin Venu Sq 2’s battery life can last up to 11 days on a single charge. The Battery Saver Smartwatch mode will offer an extra day’s worth of power.
For the latest gadget and tech news, and gadget reviews, follow us on Twitter, Facebook and Instagram. For newest tech & gadget videos subscribe to our YouTube Channel. You can also stay up to date using the Gadget Bridge Android App. You can find the latest car and bike news here.
The iQoo Neo 7, was unveiled in China as the company’s latest premium smartphone. The device features a Samsung E5 AMOLED display with a 120Hz refresh rate. In addition to this, it is powered by MediaTek Dimensity 9000+ SoC. The smartphone packs a 5,000mAh battery and supports 120W flash charging. There is a 50MP Sony IMX766V primary sensor with OIS on the phone as well.
iQoo Neo 7 price details
iQoo Neo 7 comes in four variants, the 8GB RAM with 128GB storage model is priced at CNY 2,699, or around Rs 30,800. The 8GB RAM and 256GB of storage cost CNY 2,799 which converts to Rs 32,000. The price of the 12GB RAM with 256GB storage model is set at CNY 2,999 which comes to around Rs 34,000. Lastly, the most expensive 12GB RAM with 512GB storage option will be available with a price tag of CNY 3,299 which is around Rs 37,700. The device will come in three colour options of Geometric Black, Impression Blue, and Pop Orange. Pre-orders can be placed for it at the moment in China.
iQoo Neo 7 specifications
iQoo Neo 7 is highlighted with a 6.78-inch full-HD+ Samsung E5 AMOLED display. The screen supports up to 120Hz refresh rate, a 20:8 aspect ratio, and a 93.11 percent screen-to-body ratio. The display supports HDR and has a max brightness of 1500 nits. The device runs on OriginOS Ocean, an Android 13-based operating system. Under the hood, there is an octa-core 4nm MediaTek Dimensity 9000+ SoC with a Mali-G710 GPU and up to 12GB of LPDDR5 RAM. Additionally, the phone has 512GB of UFS3.1 internal storage.The new iQoo Neo 7 has a triple rear camera configuration with an OIS-enabled 50-megapixel Sony IMX766V main sensor. A 2-megapixel macro camera with an f/2.4 aperture and an 8-megapixel ultra-wide lens are also included in the camera arrangement. There is a 16-megapixel selfie camera with an f/2.45 apertureA 5,000mAh battery within the iQoo Neo 7 supports 120W flash charging. Additionally, the phone has a dual X-axis linear motor. Additionally, it incorporates a liquid cooling system for controlling heat and an independent display chip Pro+. The iQoo Neo 7 offers 4G, Wi-Fi, Bluetooth v5.3, OTG, NFC, GPS, and a USB Type-C port as choices for connectivity. An accelerometer, ambient light sensor, in-display fingerprint sensor, e-compass, gyroscope, proximity sensor, infrared remote control, and pressure sensor are among the sensors provided on the phone.
For the latest gadget and tech news, and gadget reviews, follow us on Twitter, Facebook and Instagram. For newest tech & gadget videos subscribe to our YouTube Channel. You can also stay up to date using the Gadget Bridge Android App. You can find the latest car and bike news here.
If you use Google Chrome on your desktop, you probably cannot imagine browsing the Internet without the helpful Chrome extensions that come along with the browser. There are tons of extensions that you can download from the Chrome Web Store. Unfortunately, Google Chrome does not offer extensions along with its Android browser. However, there are a few workarounds to this issue. In this article, we bring you the top simple ways to use Chrome extensions on an Android mobile browser.Read Also: Samsung announced the launch of the Pickle Mode Microwave in India
Use Chrome extensions on your Android mobile using Kiwi Browser
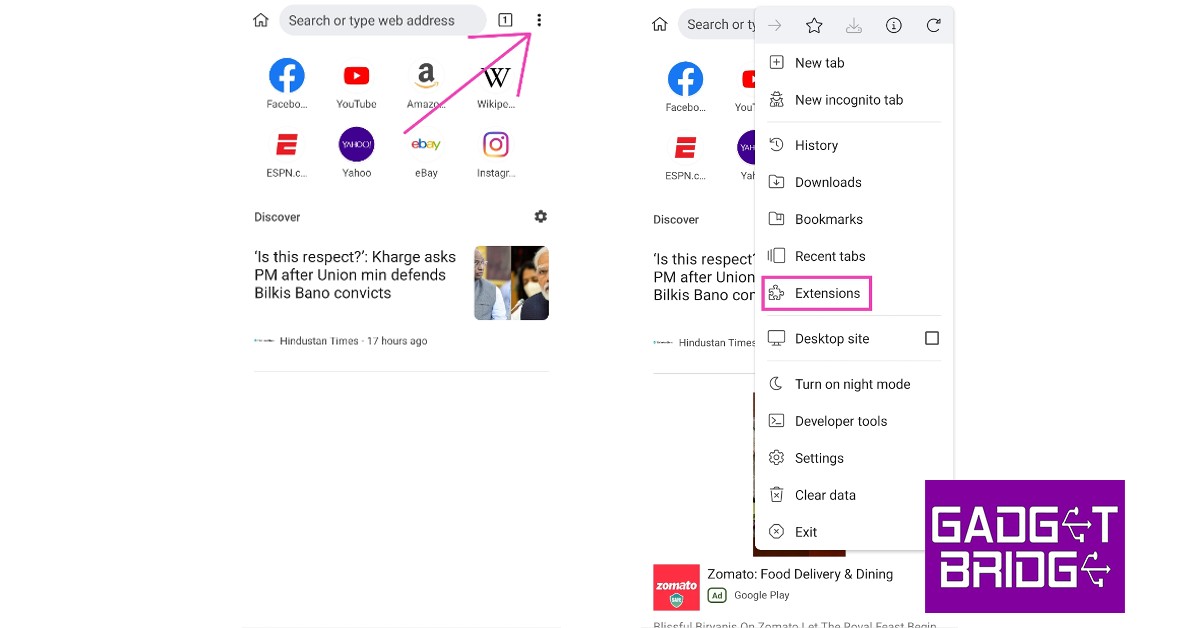
While you may not be able to use extensions on Google Chrome for Android, there are several Chromium-based browsers that offer that feature. A Chromium-based browser makes use of the open-source code for Chrome listed publicly by Google. This means that a Chromium browser will function like Chrome and may provide some additional features of its own. Kiwi Browser is one of the top-rated Chromium-based browsers for Android and lets its users use extensions on its platform. Here’s how you can use it.Step 1: Install the Kiwi Browser on your Android smartphone from the Google Play Store.Step 2: Open the browser, tap the ellipses (three dots) at the top right corner of the screen, and select Extensions.Step 3: Make sure the toggle bar for ‘Developer Mode’ is turned on. Tap on ‘+ (from store)’. You will be redirected to the Chrome Web Store. You can also type and enter https://chrome.google.com/webstore/category/extensions to go to the Chrome Web Store Directly. Step 4: Once you’re at the Chrome Web Store, search for the Extension you want to use. Enter the name of the Extension in the search box at the top right part of the window.Step 5: Tap on the Extension you want and select ‘Add to Chrome’. You will be asked to confirm your choice. Tap OK.Your extension will be installed and can be managed from the Extensions tab in the menu.
Get Chrome Extensions on your Android mobile using Yandex Browser
Yandex is another popular Chromium-based Android browser that allows you to use Chrome Extensions. The process to use extensions on Yandex is similar to Kiwi’s. The only difference is that Yandex does not have a dedicated Extensions tab in its menu like Kiwi. So, to download an extension you will need to type https://chrome.google.com/webstore/category/extensions in the address bar. Everything else is similar to the process mentioned above. Read Also: Comparing PC and mobile online casino play
Conclusion
These are the top simple ways to use Chrome extensions on an Android mobile browser. You can download Adblock to have an ad-less web browsing experience on your mobile browser. Adblock also works on YouTube as well, so you will not need to subscribe to YouTube Premium to get rid of the annoying ads. If any of these methods worked out for you, let us know in the comments!
While Instagram is one of the most used social media platforms in the world, its messenger isn’t as highly rated as that of Facebook and other platforms. In order to get more people to use Instagram Messenger as the primary mode of communication, the social media platform has made several changes to its IM service. This includes incorporating Vanish Mode from Facebook Messenger. In this article, we explain what Vanish Mode on Instagram is, how you can use it, and when you should use it.Read Also: Top 10 wireless headphones and TWS with the longest battery life
What is Vanish Mode on Instagram?
First rolled out for Facebook Messenger in 2020, Vanish Mode was later incorporated into Instagram Messenger as well. To put it simply, Vanish Mode is similar to Snapchat’s ephemeral messaging where the messages self-destruct after the chat has ended. Any message you send once Vanish Mode has been turned on will disappear as soon as it is read by the receiver.Once Vanish Mode has been turned on, Instagram notifies both parties whenever either one of them takes a screenshot of the conversation. Another thing you need to know is that Vanish Mode cannot be used retroactively. Any messages you send before turning on Vanish Mode will stay in the chat unless you ‘unsend’ them. If the receiver takes a screenshot of those messages, you will not be notified.
How to use Vanish Mode?
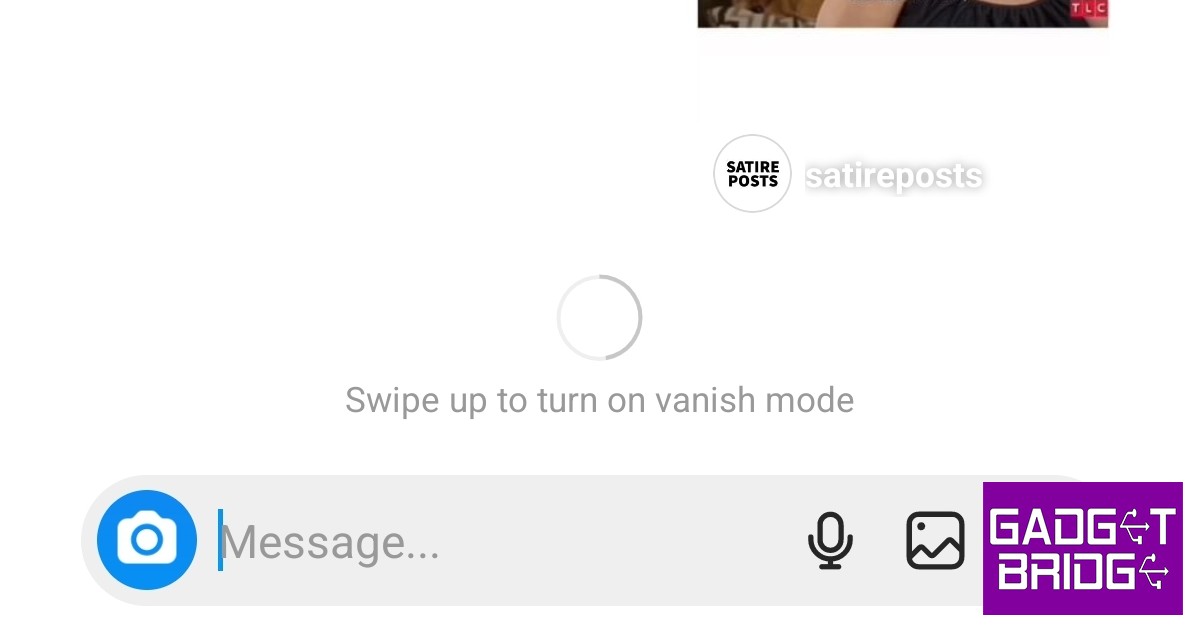
Before you start using Vanish Mode, you need to make sure your Instagram Messenger is updated. If it isn’t updated, Instagram will prompt you to update Messenger as soon as you try turning on Vanish Mode. Vanish Mode cannot be used in group texts. On top of that, both parties must follow each other to make use of Vanish Mode. Here’s how you can enable it.Step 1: Open the Instagram app and swipe right to the DM window.Step 2: Open the conversation in which you want to use Vanish Mode.Step 3: Scroll down to the very bottom of the conversation and swipe up.Step 4: Drag and hold the screen until it says ‘Release to turn on vanish mode’. Step 5: Release the screen to activate Vanish Mode. Once Vanish Mode is activated, the chat window will turn dark. If it doesn’t turn dark, it means that Vanish Mode failed to activate and you need to try again.Swipe up and release again to disable Vanish Mode.
When should you use Vanish Mode?
Since most people like to keep a record of their conversations, using Vanish Mode at all times is certainly not ideal. However, it is a very useful feature for securing private conversations and making sure no one else can view them apart from the receiver. The message notifications you receive from chats that are in Vanish Mode do not contain the contents of the text. This comes in handy when you’re in public and do not want people around you to view any message that pops up on the screen.Since you get notified any time someone takes a screenshot, the chances of your conversations getting ‘leaked’ are reduced as well. If you are sharing some sensitive information that you do not want anyone else other than the receiver to access, make sure you turn on Vanish Mode first.Read Also: Motorola Edge 30 Ultra 12GB variant is now available in India
Conclusion
Vanish Mode doesn’t just apply to texts. Any media, emojis, emojis, or voice notes you send in Vanish Mode get deleted as soon as they are viewed. A lot of people can take undue advantage of this feature, so make sure you report any inappropriate messages to Instagram. You can also unfollow or block them to keep them from using the Vanish Mode.
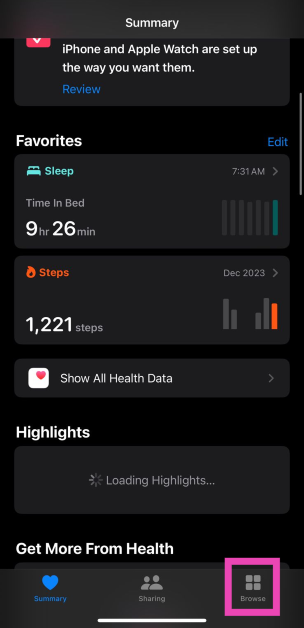
Sleep tracking is one of the essential features of the Apple Watch. Your Apple Watch tracks your sleep by recording your breathing pattern and using signals from the accelerometer and heart sensor. This data is then used to map the phases of your sleep and determine how long you spent in REM sleep, Core sleep, and Light sleep. Oftentimes, your Apple Watch may stop tracking your sleep activity all of a sudden. This may be due to a number of reasons. In this article, we bring you the best ways to fix the ‘Sleep tracking not working’ issue on Apple Watch.Read Also:Comparing PC and mobile online casino play
Make sure your Apple Watch is set as the data source on the Health app
Step 1: Launch the Health app on your iPhone.Step 2: Scroll down and select Sleep.Step 3: Scroll down and tap on Data Sources & Access.Step 4: Tap on Edit and set your Apple Watch as the primary data source.Step 5: Select Done.
Make sure Sleep Tracking is enabled on your Apple Watch
Step 1: Go to the Settings on your Apple Watch.Step 2: Scroll down and select Sleep.Step 3: Enable Sleep Tracking.
Turn off Track Time in Bed with iPhone
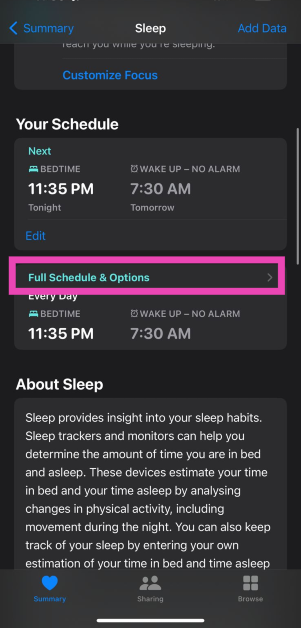
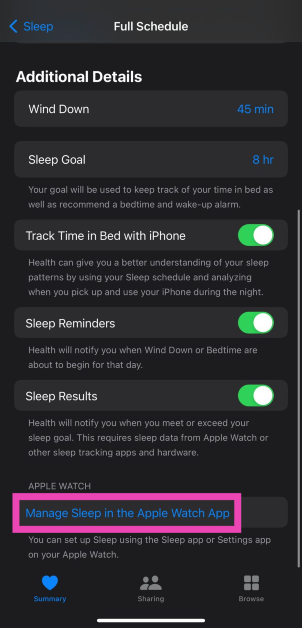
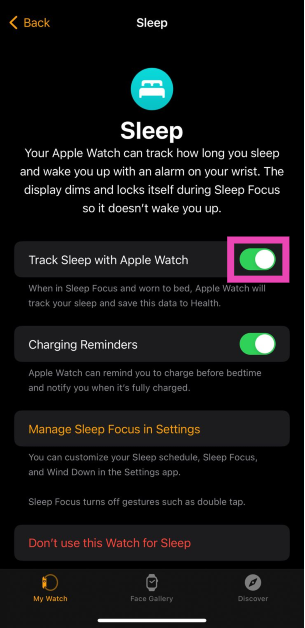
Your iPhone also tracks your sleep pattern by analysing how often you use your phone at night. The data produced isn’t reliable and lacks any representation of your sleep stages. In order to get a thorough analysis of your sleep, you need to make sure that the Health app hasn’t defaulted to using your iPhone as the sleep tracker. Here’s how you can do that.Step 1: Launch the Health app on your iPhone, scroll down, and select Sleep.Step 2: Tap on Full Schedule and Options.Step 3: Scroll down and turn the toggle bar off for Track Time in Bed With iPhone.Step 4: Scroll down some more and select Manage Sleep in the Apple Watch App.Step 5: Turn the toggle bar on for Track Sleep with Apple Watch.
Third-party sleep trackingapps can sometimes hinder the functioning of the native Sleep app on your Apple Watch. If the native Sleep app isn’t tracking your sleep pattern correctly, try uninstalling the third-party sleep tracking apps. Here is how you can do that.Step 1: Launch the Watch app and go to the My Watch tab. Scroll down to the Installed on Apple Watch section.Step 2: Tap on the third-party sleep tracking app and turn the toggle bar off for Show App on Apple Watch.
Delete the Current Schedule and Create a New One
Step 1:Launch the Health app on your iPhone and select Browse.
Step 2: Tap on Sleep and select Full Schedule & Options.
Step 3: Hit the Edit button under the sleep schedule and select Delete Schedule.
Step 4: Now, select Set Your First Schedule and create a new sleep schedule.
Step 5: Turn on the toggle switches for Sleep Schedule and Use Schedule for Sleep Focus.
Step 6: Select Manage Sleepin the Apple Watch app.
Step 7: Turn on the toggle switch for Track Sleep with Apple Watch.
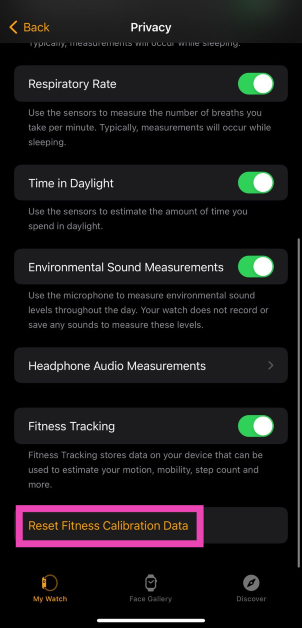
Reset your Apple Watch’s Fitness Calibration Data
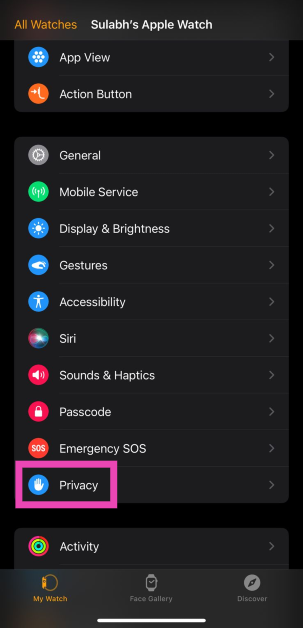
Step 1:Launch the Watch app on your iPhone.
Step 2: Switch to the My Watch tab.
Step 3: Select Privacy.
Step 4: Tap on Reset Fitness Calibration Data.
Update the watchOS
If the sleep tracker on your Apple Watch doesn’t work because of any recent bugs, it will be quickly fixed in the subsequent update. Make sure the watchOS is updated at all times. Once you’ve installed the update, force restart your Apple Watch by pressing the crown and side buttons until the watch resets.
Frequently Asked Questions (FAQs)
What is REM sleep on Apple Watch?
REM (Rapid Eye Movement) sleep is the stage of the sleeping process where you’re dreaming. The brain activity in this stage resembles that of a conscious brain.
How does the Apple Watch track sleep?
The Apple Watch uses its heart rate sensor and accelerometer to monitor and track your sleeping pattern.
What are the different sleep stages on the Apple Watch?
These are the 8 best ways to fix the ‘Sleep tracking not working’ issue on your Apple Watch. We hope that these methods were of help. If none of the above methods worked for you, you can try unpairing your Apple Watch from your phone and then re-pairing it. If it still doesn’t work, try performing a complete reset of the Apple Watch. It is also possible that one of the sensors on your watch isn’t working. Take your Apple Watch to the repair centre for further diagnosis.


 Step 2: Google will prompt you to select who you’re making the account for. If you’re making the account for your child, you can control the privacy settings and other parental controls. If you’re making the account for another adult, simply select ‘For personal use’.
Step 3: Enter the First and Last name. In the following fields, you will need to enter a unique email address that isn’t already taken and also set the password for the account.
Step 2: Google will prompt you to select who you’re making the account for. If you’re making the account for your child, you can control the privacy settings and other parental controls. If you’re making the account for another adult, simply select ‘For personal use’.
Step 3: Enter the First and Last name. In the following fields, you will need to enter a unique email address that isn’t already taken and also set the password for the account.
 Step 4: Once you’ve filled in the necessary details, click on ‘Next’.
Step 5: Google will prompt you to link your phone number with your email account. Enter your number and fill in the OTP you receive to confirm it. If you’re making the account for someone else, make sure you fill in their phone number and make them send you the code.
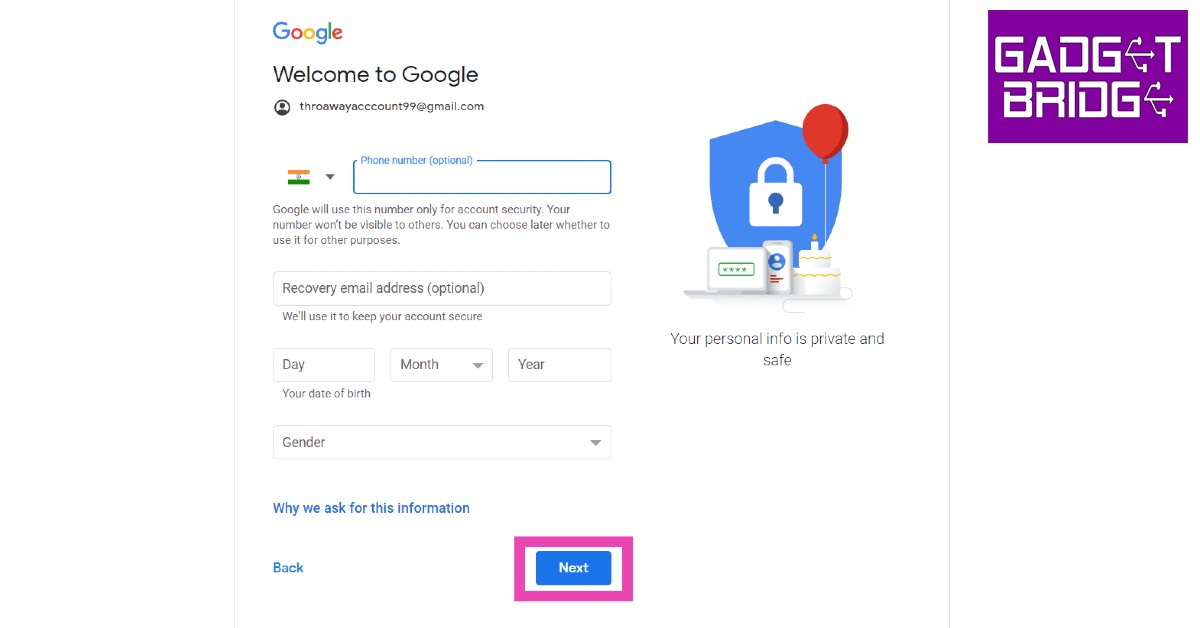
Step 6: After entering your phone number, you will need to fill in your birthdate and gender. Once that’s finished, click on Next.
Step 4: Once you’ve filled in the necessary details, click on ‘Next’.
Step 5: Google will prompt you to link your phone number with your email account. Enter your number and fill in the OTP you receive to confirm it. If you’re making the account for someone else, make sure you fill in their phone number and make them send you the code.
Step 6: After entering your phone number, you will need to fill in your birthdate and gender. Once that’s finished, click on Next.
 Step 7: Your Gmail account will be successfully created. Click on ‘I agree’ to the Terms and Conditions after going through them. After that, you can start using your email.
Read Also: Top Simple Ways to Use Chrome Extensions on an Android Mobile Browser
Step 7: Your Gmail account will be successfully created. Click on ‘I agree’ to the Terms and Conditions after going through them. After that, you can start using your email.
Read Also: Top Simple Ways to Use Chrome Extensions on an Android Mobile Browser


 Step 2:
  Step 3:
  Step 4:
  Step 6:


 Step 3:
  Step 4:
 Step 5:


 Step 4:
  Step 5:

 Step 4:
 Step 3:
 Step 2: Tap on Sleep and select Full Schedule & Options.
 Step 3: Hit the Edit button under the sleep schedule and select Delete Schedule.
 Step 4: Now, select Set Your First Schedule and create a new sleep schedule.
Step 5: Turn on the toggle switches for Sleep Schedule and Use Schedule for Sleep Focus.
Step 6: Select Manage Sleep in the Apple Watch app.
Step 4: Now, select Set Your First Schedule and create a new sleep schedule.
Step 5: Turn on the toggle switches for Sleep Schedule and Use Schedule for Sleep Focus.
Step 6: Select Manage Sleep in the Apple Watch app.
 Step 7: Turn on the toggle switch for Track Sleep with Apple Watch.
 Step 4: Tap on Reset Fitness Calibration Data.