Do you need help remembering names, dates, or where you parked your car? You’re not alone. Many seek ways to keep our brains sharp and improve our cognitive abilities. One of the best ways to do that is by solving puzzles. But don’t worry; you don’t have to be a genius to get started. Thanks to the vast array of online puzzles, you can train your brain and have fun simultaneously.
The beauty of online puzzles is that they are accessible from anywhere with an internet connection. This means you can enjoy a brain workout during your lunch break, on the train, or even in bed before you sleep.
Whether you’re a Sudoku pro, a crossword enthusiast, or just looking for something new and challenging, we’ve compiled a list of the best online puzzles to help you give your grey matter a workout. So, please grab a cup of coffee, sit back, and let’s get puzzled!
Top Online Puzzle Game Picks For You
Crossword is a classic word puzzle game that has been around for over a century. It involves filling in words based on clues that intersect with each other. Crosswords may seem like a fun way to pass the time, but they offer many benefits for your brain.
How does Crossword help your brain?
One of the main benefits of playing crosswords is that it helps to improve your vocabulary. As you encounter new words in the clues and answers, you expand your language knowledge. This can be especially helpful for those learning a new language or improving their communication skills.
Another benefit of playing crosswords is that it can help to reduce stress and anxiety. Focusing on a puzzle can be a great way to distract yourself from everyday worries and promote relaxation. Additionally, the sense of accomplishment you feel when you finish a challenging puzzle can boost your mood and self-confidence.
Jigsaw puzzles have long been a beloved pastime for people of all ages, and good reason. They are not only enjoyable and satisfying to complete, but they can also provide a range of benefits for your brain. “I’m a Puzzle” is a website that offers a diverse selection of jigsaw puzzles that can help train your brain and improve your cognitive abilities.
How I’m a puzzle helps your brain?
One of the primary benefits of completing jigsaw puzzles is that it can help to improve your spatial awareness and visual-spatial reasoning skills. By piecing together the different shapes and colours of the puzzle pieces, you’re engaging your brain in a challenging and rewarding activity that requires you to think critically and strategically.
In addition to boosting your spatial reasoning skills, completing jigsaw puzzles can also help to enhance your memory and concentration. As you focus on finding the right piece and completing the puzzle, you also strengthen your ability to concentrate and recall information.
Brain teasers are a puzzle that challenges your cognitive abilities and problem-solving skills. They can come in many forms, from riddles and puzzles to mathematical equations and logic problems. Regardless of the specific type, brain teasers offer a fun and engaging way to train your brain and improve cognitive function.
How do brain teasers helps your brain?
One of the primary benefits of solving brain teasers is that it can help to improve your critical thinking and reasoning skills. Working through a challenging puzzle or riddle engages your brain in a thought-provoking activity that requires you to think creatively and strategically.
In addition to improving your critical thinking skills, solving brain teasers can also help to enhance your memory and concentration. As you work to solve a problem or remember a sequence of numbers or letters, you’re strengthening your ability to concentrate and recall information.
Logic games are puzzle games that challenge your ability to think critically and solve problems. They can come in many forms, from classic games like chess and Sudoku to newer games like logic puzzles and strategy games. Regardless of the specific type, logic games offer a fun and engaging way to train your brain and improve your cognitive abilities.
How will Logic Puzzle Games help train your brain?
One of the primary benefits of playing logic puzzle games is that they can improve your logical reasoning skills. You are working through complex puzzles or games that require you to think logically and strategically, strengthening your ability to solve problems and connect between different pieces of information.
In addition to improving your logical reasoning skills, playing logic games can also help to enhance your memory and concentration. As you focus on finding the right move or solution to a puzzle, you also strengthen your ability to concentrate and recall information.
Logic puzzles can range in difficulty from easy to incredibly challenging, and there’s a game out there for everyone, regardless of their skill level. Whether you’re looking for a quick and simple game or a more complex puzzle to work through, logic games offer a fun and rewarding way to train your brain.
Sudoku has been a popular puzzle game for years, and for a good reason. Not only is it fun and addictive, but it also offers many benefits for your brain. Sudoku is a number puzzle game that requires you to fill a 9×9 grid with numbers so that each row, column, and 3×3 subgrid contains all the digits from 1 to 9. It may seem simple initially, but progressing to more challenging puzzles becomes an excellent exercise for your brain.
How Sudoku Trains Your Brain?
Sudoku requires a combination of logic and critical thinking skills. It helps to improve your problem-solving skills, concentration, and memory.
In addition, Sudoku can help to reduce stress and anxiety. The game’s repetitive nature can help calm your mind and promote relaxation, which can be particularly helpful in today’s fast-paced world.
Whether you’re a seasoned Sudoku player or just starting, it’s a game worth adding to your daily routine. Start with easier puzzles and work your way up to more challenging ones. You’ll be amazed at how quickly your brain adapts and improves. So, the next time you’re looking for a brain workout, grab a pencil and a Sudoku puzzle, and get to work!
Final Thoughts
There are a variety of brain games and puzzles that can help improve your cognitive function. From Sudoku and crosswords to jigsaw puzzles and logic games, each game offers unique benefits for enhancing cognitive skills such as memory, spatial reasoning, concentration, and problem-solving abilities. Incorporating these brain games into your routine can be a fun and engaging way to train your brain and improve your overall cognitive health.
For the latest
gadget and tech news, and
gadget reviews, follow us on
Twitter,
Facebook and
Instagram. For newest
tech & gadget videos subscribe to our
YouTube Channel. You can also stay up to date using the
Gadget Bridge Android App. You can find the latest
car and bike news here.


 Step 4: On your smartphone, launch the Link to Windows app and select ‘Link phone and PC’.
 Step 5: Select ‘Continue’ and scan the QR code on your PC from your smartphone.
 Step 6: To pair manually, tap on ‘Link manually’ on your PC and tap on ‘Try another way’ on your smartphone.
 Step 7: Sign in to your Microsoft account on your smartphone.
Step 8: On your PC, click on Create PIN code.
Step 7: Sign in to your Microsoft account on your smartphone.
Step 8: On your PC, click on Create PIN code.
 Step 9: Enter the PIN code in the Link to Windows app on your smartphone.
 Step 10: Give the necessary permission to the Link to Windows app on your smartphone and hit ‘Done’ once you’re finished.
 Step 11: Click on ‘Continue’ on the Phone Link app on your PC.
Step 12: Use the sidebar on the Phone Link app to connect your smartphone and PC via Bluetooth. Once connected, you will be able to make and receive calls from your PC.
Step 11: Click on ‘Continue’ on the Phone Link app on your PC.
Step 12: Use the sidebar on the Phone Link app to connect your smartphone and PC via Bluetooth. Once connected, you will be able to make and receive calls from your PC.
 Read Also: Best Easy Ways to Change Your Ringtone on Android and iPhone


")


 Step 3:
 Step 3:
 Step 2:
 Step 3:
 Step 4:
 Step 2:
 Step 3:
 Step 3:
 Step 4:
  Step 6:
 Step 2:
 Step 3:
 Step 4:
 Step 1:

 Step 2:
 Step 3:
 Step 4:
 Step 5:
 Step 6:
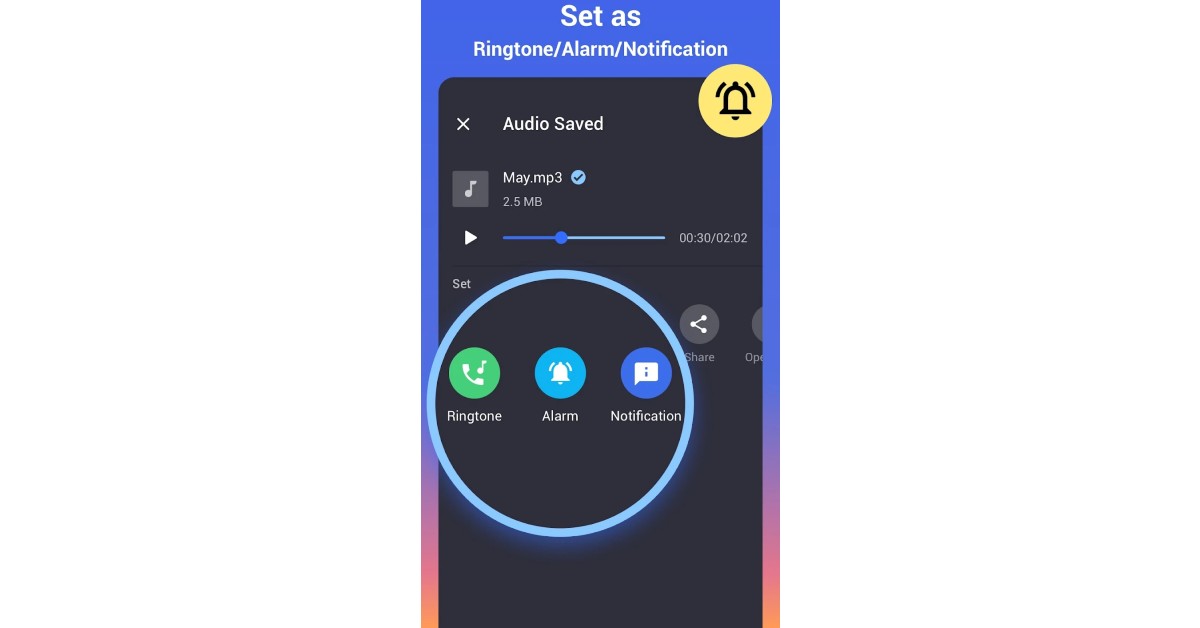
 Step 3:
 Step 4:
 Step 5:
 Step 3:
 Step 4:
 Step 5:
 Step 2: Tap on ‘Install unknown apps’.
 Step 3:
 Step 2:
 Step 3:
 Step 4:


 Step 3:
 Step 4:
 Step 6:

 Step 3:
 Step 4:
 Step 5:
 Step 6:
  Step 7:
 Step 8:
 Step 9:
 Step 10:
 Step 13:

 Step 2:
 Step 3:
 Step 4:
 Step 5:
 Step 10:
 Step 2:
 Step 3:
 Step 5:
 Step 6:
 Step 7:


 Step 5:
 Step 2:
 Step 2:
  Step 3:
 Step 4:
  Step 5:
 Step 4:
 Step 5:
 Step 3:
 Step 4:


 Step 4:
 Step 3:

 Step 3:
 Step 4:
 Step 5:
 Step 3:
 Step 4:
 Step 5:
 Step 3:
 Step 5:
 Step 6:
 Step 2:
 Step 3:
 Step 4:
 Step 3:
 Step 5:
 Step 6:
 Step 3:
 Step 4:
 Step 5:
 Step 6:
 Step 8:
 Step 3:
 Step 4:


