If you want to create a bootable USB drive, you need to burn an ISO file to it. You may be wondering if you can simply copy the ISO file and paste it to the USB drive as you do with other kinds of data. The answer is no. While you may be successful in copying the ISO file, it won’t make the drive bootable. You will need to burn the file to the storage device in order to do so. So, here are the top 4 ways to burn an ISO file to a USB drive.Read Also:How to Disable the new ‘Calling’ feature on X (Twitter)? Top 2 Ways
Before you begin
If you have an extra pen drive lying around, burning it with an ISO file is not a bad idea. However, you should know that doing so will get rid of any data stored on it. Back up the data currently on the drive before you begin any other process. For good measure, format the USB drive to the FAT32 file system. You can learn how to do that in this article.To burn an ISO file to the pen drive, you will need a third-party tool. Rufus is one of the best tools around, although you can use other tools like EaseUS and iSumsoft ShapeISO as well. If you’re on a Windows 10 PC you can also use the Windows ToGo tool. This tool is not available on Windows 11. You can also use Windows Media Creation tool, but it may be too complicated for beginners.
Burn an ISO file to a USB Drive using Windows ToGo
Step 1: Plug in the USB drive.Step 2: Go to the Control Panel and select Windows ToGo.Step 3: Select your USB drive from the list.Step 4: Click on Add search location.Step 5: Select the ISO file you want to burn to the USB drive.Step 6: You can choose a password for the file.Step 7: Hit Next.Windows ToGo will burn the ISO file to your USB drive.
Use Rufus
Step 1: Plug the USB drive into your PC.Step 2: Launch the Rufus tool. Select your USB drive in the Device category.Step 3: Click the dropdown menu under Boot selection and select Disk or ISO image.Step 4: Hit Select and choose your ISO file.Step 5: Click on Start.Rufus will burn the ISO file to your USB drive.
Burn an ISO file to a USB Drive on a Mac
Step 1: Plug the USB drive into the Mac.Step 2: Open the Applications folder on the dock.Step 3: Go to Utilities>Terminal.Step 4: Enter the following command to list the names of all the drives:
diskutil list
Step 5: Identify the name of the USB drive. It should be called something like /dev/disk0, /dev/disk1, /dev/disk2, etc.Step 6: Use the following command to unmount it:
diskutil unmountDisk /dev/disk2
Step 7: Use the following command to burn the ISO file to the USB drive:
Step 8: Once the ISO file has been burned to the USB drive, use this command to eject it:
diskutil eject /dev/disk2
Burn an ISO file to a USB drive on Linux
Step 1:Launch the UNetbootin app.Step 2: Check the circle for Diskimage.Step 3: Hit the ellipses in the bottom-right section.Step 4: Locate the ISO file and hit Open.Step 5: In the Type section, choose USB drive.Step 6: In the Drive section, select your USB drive.Step 7: Hit OK.
Frequently Asked Questions (FAQs)
Is the Windows ToGo tool available on Windows 11?
Microsoft discontinued the Windows ToGo tool on Windows 11. You can find it on some editions of Windows 10.
Which tool should I use to burn a bootable ISO file to a USB drive?
For Windows, use the Rufus tool to burn a bootable ISO file to a USB. You can also use tools like EaseUS and iSumsoft ShapeISO for this task.
What is an ISO file?
An ISO file or ISO image is a file that consists of an image or copy of the contents or data of an external disk. You can burn an ISO file on any disk.Read Also:Top 8 Routers under $200 in the USA (2024)
Conclusion
These are the top 4 ways to burn an ISO file on a USB. Make sure you back up the data in the pen drive before trying to make it bootable. If you know any other way to carry out this task, let us know in the comments!
In a bid to make its messenger more comprehensive, X has introduced the new ‘calling’ feature for non-premium users. This feature has been available for premium subscribers for several months. If you already use IM apps like WhatsApp, Telegram, and Facebook Messenger for audio and video calling, there is nothing X has to offer that may sway you its way. Instead, you may not want strangers to contact you on X/Twitter in the first place. If you don’t want anything to do with the ‘calling’ feature on X/Twitter, here are the 2 ways to disable it on Android and iOS.Read Also:Top 8 Routers under $200 in the USA (2024)
X/Twitter calls are enabled on your device by default
X has been testing its calling feature for several months now. Initially introduced to premium users on iOS, the feature was tested for several weeks before being launched on the Android platform earlier this year. Now, it is being rolled out for regular, non-premium users as well. X/Twitter calls are only available on mobile devices, where they are also turned on by default. If you found this out the hard way, read along to learn how you can disable them.You can limit who gets to contact you via an audio or video call on X. Letting anyone call you on X would be a naive choice, given how the platform has a tendency to attract a large volume of trolls. You can choose to limit your call interactions with people you follow, your phone contacts, or verified users. If you want nothing to do with this feature, you can also choose to deny X access to your phone contacts, microphone, and dialer.
Disable Calling on X (Android)
Step 1:Launch the X (Twitter) app on your Android phone.Step 2: Hit the messages icon at the bottom right corner of the screen.Step 3: Hit the settings icon at the top right corner of the screen.Step 4: Turn off the toggle switch for Enable audio and video calling.
Disable Calling on X (iOS)
Step 1:Launch the X (Twitter) appon your iPhone.Step 2: Tap the messages icon at the bottom right corner of the screen to access your inbox.Step 3: Hit the cog wheel icon at the top right corner of the screen to access settings.Step 4: Turn off the toggle switch for Enable audio and video calling.Step 5: Hit Done at the top right corner of the screen.
Frequently Asked Questions (FAQs)
How do I turn off or disable the calling feature on X/Twitter?
Go to Messages>Settings and turn off the toggle switch for Enable audio and video calling.
Who can call me on X/Twitter?
You can choose to allow anyone on X/Twitter to call you on the platform or limit it to people you follow, people in your address book (phone contacts), or verified users.
This is how you can turn off or disable the calling feature on X/Twitter. If you want to go the extra mile, you can take away microphone, contacts, and phone permissions from X/Twitter using app settings on your phone. What do you think of this new feature on X? Let us know in the comments!
Garena Free Fire is a battle royale game with regular awards and tournaments to keep players interested. If you play Garena Free Fire, you should be aware of the redeem codes that are released on a daily basis. However, because the battle royale game is banned in India, players from other countries can use the Free Fire Redeem codes daily. If you’re unfamiliar with the Garena Free Fire redeem codes or don’t know how to get them, we’ve put together a step-by-step guide to help you redeem them. Check out Garena Free Fire Redeem Codes for 1 March 2024.The Free Fire redeem codes are a great way to get free stuff. These are 12-digit codes that contain alphabets and numbers, as well as an expiration date and time. Because the Garena FF redeem codes cannot be used more than once, you should hurry to the redemption page to claim your free reward before someone else does. To get a free reward, all you have to do is go to reward.ff.garena.com/en, which is the official redemption page. Also, keep an eye on this space for daily updates on Garena Free Fire redemption codes and rewards.Also Read: Sennheiser Accentum Plus wireless headphones with Hybrid Adaptive Noise Cancellation launched
An ordinary entry-level router is not enough to cover a large house with WiFi connectivity. What you’re looking for is a mesh router or any other premium router that has a greater functional range. If you enjoy online gaming or live streaming, investing in a powerful WiFi router is one of the best things you can do. Today, we bring you our picks for the top 8 routers priced under $200 in the USA.Read Also:Here is a list of Xiaomi devices that will soon receive the HyperOS upgrade in India
TP-Link Deco X20 (3 Pack)
Price: $159.99 on AmazonThe 3-pack TP-Link Deco X20 mesh router system is powered by WiFi 6 and covers up to 5,800 sqft with its signal range. The Deco X20 V3 supports speeds of up to 1,200 Mbps on a 5GHz band and 574 Mbps on a 2.4GHz band. The three router units can be placed in different parts of your house, which would ordinarily be outside the reach of a traditional router. They offer seamless connectivity as you walk around the house, without needing to reconnect every time you wander into the range of a different router unit.
Netgear Nighthawk RAX54S
Price: $209 on AmazonThe Netgear Nighthawk RAX54S router costs just over $200 on Amazon, but it is often available at discounted prices. This router is powered by a triple-core 1.5GHz processor and supports WiFi6. Offering 6-speed connectivity, the Netgear Nighthawk RAX54S provides speeds of up to 574 Mbps + 4,800 Mbps. The router also has 5 Gigabit ports that let you connect other wired devices for smooth file transfer. It can connect with over 20 devices at once and has a functional range that’s enough to cover big homes.
Eero 6 (3 Pack)
Price: $199.99 on Eero.comThe 3-pack Eero 6 mesh WiFi router consists of 1 router and 2 extender units. It has a functional range of 4,500 sqft and can connect more than 75 devices. With WiFi6 support, the Eero 6 offers speeds of up to 500 Mbps. Its built-in ‘Zigbee’ smart home hub connects your smart home devices with Alexa. The mesh WiFi tech and vast functional range ensure that there are no dead spots in your house. If you don’t want to buy the mesh network, a single unit of the Eero 6 costs $89.99.
TP-Link Deco X55
Price: $169.99 on AmazonThe 3-pack TP-Link Deco X55 has a functional range of up to 6,500 sqft. The AI-driven mesh ensures that the WiFi connectivity on your device is uninterrupted no matter where you go within your house. All three units work together to form one network, which means the transition as you leave the range of one unit is seamless. WiFi6 connectivity allows Deco X55 speeds of up to 3.0 Gbps. There are 3 Gigabit ports on the device for enhanced connectivity. To make things more accessible, the router can also be controlled via Alexa.
ASUS RT-AX82U (AX5400)
Price: $176.99 on AmazonThe RT-AX82U dual band WiFi6 gaming router by Asus provides speeds of up to 5,400 Mbps. The router’s companion app has a helpful Mobile Game Mode which reduces the latency and lag by a considerable factor. Since it is a gaming router, the RT-AX82U features a cutting-edge design along with flashy RGB lighting. The RGB lighting can be customised from the router’s companion app. The dedicated gaming port on the router prioritises the wired device connected to it. You can plug in your gaming PC and enjoy ultra-fast speeds using this port.
Wyze Mesh Router (2 Pack)
Price: $179.98 on Wyze.comThe Wyze WiFi6 mesh router is one of the best in the business. It offers speeds of up to 1 Gbps with a functional range of 1,500 sq ft per router. Buying a 2-pack mesh router means you can double this range and keep the dead spots at bay. This mesh router can support over 50 connected devices. Its metal bottom chassis makes sure that the router effectively dissipates the heat and remains cool in high-pressure situations. Powering this router is the Qualcomm ARM Cortex A53 Dual-Core 1GHz CPU.
Synology RT2600AC
Price: $149.99 on AmazonThe Synology RT2600AC is one of the best routers you can buy in the USA for under $200. This router can create up to 5 networks and 15 WiFi SSIDs to distribute and prioritise different devices. It also allows you to create a guest network which you can share with your friends and neighbours. Using this network, you can give them access to your Chromecast or AirPlay device. On top of that, the Synology RT2600AC has a number of filters to block malicious, inappropriate, and offensive content. It is powered by a 1.7GHz dual-core processor and supports speeds of up to 2.53 Gbps.
Netgear Nighthawk RAX43
Price: $199.99 on AmazonEnding this list is the Netgear Nighthawk RAX43 – one of the best routers under $200 in the USA. This WiFi6 router supports speeds of up to 574 Mbps + 3,603 Mbps. It has a functional range of up to 2,000 sq ft and can pair with 25 devices. The RAX43 is equipped with four 1 Gigabit ports for computers, gaming consoles, streaming players, and more. Upon purchasing this router, you get a 30-day free trial of Netgear Armour Cybersecurity and Netgear Parental Controls. To top it all off, Netgear offers a 1-year limited hardware warranty on this router.Read Also:Oppo F25 Pro 5G with 5,000mAh battery and 67W SuperVOOC charging support launched in India
Conclusion
These are the top 8 WiFi routers under $200 in the USA right now. If you think we missed out on a product that deserves to be on this list, give it a shout-out in the comments! We’d love to hear from you. Use an online price tracking tool to check if the product is likely to be available at a discounted price later.
Xiaomi has announced the list of its devices that are eligible to receive the HyperOS update in the coming months.
Xiaomi 13 Pro and Xiaomi Pad 6 are among the first ones on the list that are ready to get the latest operating system.
Xiaomi on Thursday announced the release schedule for Xiaomi HyperOS in India. HyperOS is the company’s latest operating system with a human-centred design intended for linked personal devices like tablets and smartphones currently in use. In addition to this, the Chinese tech brand has also disclosed the list of devices that are eligible to receive the HyperOS update globally in H1 2024.Xiaomi has officially unveiled the HyperOS interface in India. The firm has also disclosed the schedule for the nation’s rollout of the new operating system for its existing devices. Note that the upcoming Xiaomi devices will be running the latest operating system straight out of the box. A list of devices that will receive the HyperOS update internationally in H1 2024 has been confirmed by Xiaomi as well.Recently Xiaomi revealed that the HyperOS upgrade will be available for the Xiaomi 13, Xiaomi 13T, Xiaomi 12, and the Xiaomi 12T series globally in the first half of 2024.As of now, Xiaomi 13 Pro, Xiaomi Pad 6, Redmi 12 5G, Redmi 12C, Redmi 11 Prime, and Redmi Pad are the first ones on the list to receive the HyperOS upgrade in India.The second batch includes the Xiaomi 12 Pro, Redmi Note 13 Pro+, Redmi Note 13 Pro, Redmi Note 13, Redmi Note 12 Pro+, Redmi Note 12 Pro, and Redmi Note 12 that are scheduled to receive the update in March.The Xiaomi 11 Ultra, Xiaomi 11T Pro, Mi 11X, Xiaomi 11i HyperCharge, Xiaomi 11 Lite, Xiaomi 11i, Mi 10, Xiaomi Pad 5, Redmi 13C series, Redmi 12, Redmi Note 11 series, Redmi 11 Prime 5G, and Redmi K50i are the next on the list that are slated to get the HyperOS update in Q2 2024.Also Read:Oppo F25 Pro 5G with 5,000mAh battery and 67W SuperVOOC charging support launched in IndiaHyperOS, according to the business Xiaomi, was created for users who are increasingly requesting seamless connectivity and interoperability between their many personal devices.Its goals are to enable seamless connectivity across all devices by bringing all ecosystem devices together into a single, integrated system architecture, delivering optimal device performance, and guaranteeing a consistent user experience.Also Read:Viewsonic PX749-4K projector designed for Xbox launched in IndiaThe independently created Xiaomi Vela system is also a part of Xiaomi HyperOS’s core. All devices can operate at optimal efficiency because of their accurate system resource management skills and outstanding interoperability.
The smartphone comes with an AI-powered triple rear camera setup.
The handset supports three years of OS updates with four years of security updates.
Oppo has launched a brand new mid-range smartphone- Oppo F25 Pro 5G in the Indian market. The device features a 120Hz FHD+ Display. It comes with ColorOS 14.0 out of the box. The handset has a triple rear camera setup that includes a 64-megapixel primary sensor. Additionally, there is a 32-megapixel selfie camera. The phone packs a 5,000mAh battery with support for 67W SuperVOOC fast charging.
Oppo F25 Pro 5G specifications
Oppo F25 Pro 5G is powered by an octa-core MediaTek Dimensity 7050 SoC paired with Mali-G68 MC4 GPU. It comes with 8GB of LPDDR4x RAM expandable up to 16GB through RAM Expansion to handle multiple apps and games without closing background processes prematurely. For the software it comes preinstalled with ColorOS 14.0 based on Android 14 which will get three years of OS updates with four years of security updates.The device features a 6.7-inch full-HD+ display with 1,080×2,412 pixels of resolution. The screen supports 10-bit colour technology allows for over 1 billion hues and tones for natural gradients in visuals, while its peak brightness of 1100 nits ensures HDR content with vivid details. It comes with a 93.4% screen-to-body ratio and supports a 120Hz refresh rate. The Panda Glass protects the screen and is doubly reinforced to increase its scratch resistance and longevity. PC-GF, a polycarbonate resin blended with glass fibre as a reinforcing material, is used to construct the device’s body. It is dustproof and resistant to water jets coming from all directions, with an IP65 classification.In order to guarantee long-term reliability, the F25 Pro 5G has reportedly passed extensive testing and quality checks. These tests included 1,00,000 volume key hits, 2,00,000 power button presses, and 20,000 occurrences of plugging and disconnecting the USB-C cable.For photos and videos, Oppo F15 Pro 5G is highlighted with a triple rear camera setup that includes a 64MP OV64B 1/2” sensor, an 8MP Sony IMX355 112° ultra-wide camera and a 2MP OV02B10 macro camera. For selfies, it includes a 32MP IMX615 camera sensor with a 21mm focal length.Also Read:Viewsonic PX749-4K projector designed for Xbox launched in IndiaThe cameras on the phone support 4K video recording to both front and rear cameras. In addition to this, it includes AI Smart Image Matting that enables one-tap extraction of subjects from photos and turns them into a transparent PNG that can be inserted into other images for effortless recreation and sharing as memes and photos. The AI can also handle multi-subject recognition within a single photo with precision and efficiency. Photography AI also removes facial imperfections in portraits by the front camera.Poco F25 Pro is backed by a 5000mAh battery with 67W SUPERVOOC Flash Charge that juices the smartphone to 30% with a 10-minute charge, while it reaches 100% in just 48 minutes.Also Read:OnePlus 12R Genshin Impact Edition officially launched in India
Oppo F25 Pro 5G price in India and sale details
The Oppo F25 Pro 5G price in India is set at:
8GB RAM + 128GB storage- Rs 23,999
8GB RAM + 256GB storage- Rs 28,999
The device will go on sale on March 5 through Oppo’s website, Amazon, Flipkart and other retail stores in the country.Launch offersEnjoy up to 10% instant cashback with leading bank cards, including SBI Cards and ICICI Bank.– Avail of no-cost EMI for up to 9 months.– Customers have the flexibility to choose their EMI instalment and tenure at their convenience.– Benefit from zero down payment schemes.– Access low down payment options from top financiers like Bajaj Finserv, TVS Credit, Home Credit, HDB Financial Services, and IDFC First Bank– Receive 180 days of screen damage protection for added peace of mind.
Viewsonic has announced the launch of a new PX749-4K projector in India today.
The projector comes with a 240Hz refresh rate.
It has 4000 ANSI Lumens and is compatible with Xbox.
Viewsonic, a company known for making visual products like monitors, displays and projectors has launched a complete Home entertainment projector-PX749-4K in India. For a more engaging gaming experience, the device can be used with Xbox consoles. It is capable of a 240Hz refresh rate and 4.2 ms ultra-fast input.Muneer Ahmad, Vice President of Sales and Marketing, ViewSonic India, said, “We are committed to providing comprehensive visual solutions that enhance the viewing experience meeting the needs of our consumers. Adding the PX749-4K projector to our PX series we are setting a new standard for immersive home theatre entertainment as this is more advanced than its predecessor. With this addition, we are also giving our users an add-on experience of gaming. With the PX749-4K, we are pushing the boundaries of innovation, empowering gaming and home entertainment enthusiasts to immerse themselves.”Also Read: OnePlus 12R Genshin Impact Edition officially launched in IndiaThe Viewsonic PX749-4K projector has a refresh rate of 240Hz and an ultra-fast input of 4.2ms. It is certified exclusively as “Designed for Xbox.” Therefore it is compatible with Xbox CEC in addition to Xbox content resolution. The projector comes equipped with a premium Harman Kardon speaker. The PX748-4K projector has been improved to generate 4,000 ANSI Lumens, ensuring vivid and clear cinematic experiences even in bright settings. With its 1.3x optical zoom, side projection capabilities, and warping adjustability, allowing it to turn into a 300-inch screen. The PX749-4K ensures an engaging gaming experience or a cinematic experience that will enthral your audience whether you’re watching in your home theatre.Also Read:Moto G24 Power Review: Should you buy it?Because it can be controlled over LAN and has a 12V trigger output, it can be easily integrated into any current ecosystem and is a perfect addition to any smart home setup. In addition to offering exceptional colour accuracy and brightness, the projector supports HDR and HLG content, guaranteeing that every image has a vibrant, detailed quality.This projector includes dual HDMI 2.0 connectors, USB-A, 3.5mm audio output, RJ34, and RS232 interfaces for connectivity.The Viewsonic PX749-4K projector has been launched in India with a price tag of Rs 2,99,000.
OnePlus 12R Genshin Impact Edition was introduced in India.
The latest edition of OnePlus 12R comes in a lovely purple colour option
The phone is shipped with a a collectible gift box that includes merchandise and accessories.
The Chinese smartphone brand has announced the Genshin Impact Edition of the OnePlus 12R smartphone in India. The device made its global debut during the Mobile World Congress 2024. It is inspired by the character Keqing, it is available in the shade “Electro Violet.” It comes with a customised operating system and the game has been optimised for the new smartphone.
OnePlus 12R Genshin Impact Edition price in India, sale details
OnePlus 12R Genshin Impact Edition price in India has been set at Rs 49,999 for the single 16GB RAM with 256GB storage variant. The latest edition of OnePlus 12R comes in a lovely purple colour option which is inspired by the character Keqing.On March 19, OnePlus India, Amazon India, and a few OnePlus Experience Stores will begin selling the smartphone.Customers can get the latest updates on this limited special edition OnePlus 12R by opting to ‘Notify Me’ on oneplus.in starting 28th February and on Amazon.in starting 5th March.Buyers purchasing the Genshin Impact Edition can avail an instant bank discount of ₹1,000 with OneCard and an exchange bonus of up to ₹4,000.Also Read:OnePlus 12 Review: A True Flagship SmartphoneConsumers purchasing the OnePlus 12R Genshin Impact Edition can also avail of No-Cost EMI for up to 9 months and Bajaj Finance schemes.In addition to this, they can also buy the Genshin Impact Edition of OnePlus 12R with OnePlus Easy Upgrades and get 35% assured value at the end of the 24 months.
OnePlus 12R Genshin Impact Edition Specifications
The OnePlus 12R Genshin Impact Edition is a special collaboration between OnePlus and HoYoverse. It features Keqing from Genshin Impact. The phone has a violet back panel and an Electro Violet colourway inspired by Keqing’s appearance in the game. In addition to this, silvery white feather designs grace the AG matte glass cover, while the text “KEQING” and Keqing’s trademark lightning stiletto design are displayed at the base of the back cover in an Electro Element.The device comes with a 6.78-inch 1.5K LTPO 4.0 AMOLED screen with 1,264×2,780 pixels of resolution. The display supports up to 120Hz refresh rate and up to 4500 nits peak brightness. The screen has Gorilla Glass Victus 2 protection. Under the hood, there is a Qualcomm Snapdragon 8 Gen 2 SoC.The phone’s operating system has been modified, and the Genshin Impact game’s elements are included. It includes customised system app icons, an Electro Element charging animation, and an exclusive Always-On Display. The phone also features personalised power-on and fingerprint unlock animations.Additionally, users are greeted with an exclusive Keqing visual and live wallpaper every time the phone is unlocked, featuring Keqing’s characteristic grace, confidence, and determined gaze.Also Read: OnePlus 12R Review: Flagship-grade performance at a mid-range priceThe phone is packaged in an exclusive gift box with highly collectable merchandise and accessories for fans of Genshin Impact. The accessories include a violet USB Type-C charging cable with a violet LED light and a 90° design for convenience, a violet charging adapter with Electro Element and Lightning Stiletto logos, and a Lightning Stiletto-shaped SIM tray ejector.It has a 50MP Sony IMX890 primary sensor, an 8MP ultra-wide camera and a 2MP macro camera. It features a 16MP front camera for selfies.The OnePlus 12R is backed by a 5,500mAh battery with 100W SUPERVOOC charging technology.
If you have an old USB drive lying around, you may want to consider recycling it. To bring it back to regular functionality, you need to clear out the junk that it is holding. The easiest way to do this is by formatting the drive. While formatting the drive, you also get to decide its file system. If FAT32 is your preferred file system, here are the top 4 ways you can format your Windows USB drive to it on Windows 10 and 11.Read Also:Moto G24 Power Review: Should you buy it?
What is the difference between FAT32 and NTFS?
FAT32 and NTFS are two different kinds of file systems for your USB drive. These systems determine how the data is stored on the device. How additional file information like permissions and filenames is attached to the data is also dictated by the file system. Out of FAT32 and NTFS, the latter is a newer file system. However, FAT32 has a higher compatibility with other devices across different ecosystems.Most Windows PCs choose to format your USB drive to FAT32 by default. You can change the file system to NTFS in the format window. While FAT32 is a very reliable file system that works on almost every device, it doesn’t offer encryption support and is considered outdated by many users.
Format a USB Drive to FAT32 on Windows 10/11
Step 1: Go to This PC and right-click on the USB drive.Step 2: Click on Format.Step 3: In the Format window, FAT32 will be listed as the default file system. If it isn’t click on the drop-down menu under File System and select it.Step 4: Hit Start.The USB drive will be formatted in FAT32 format.
Use Disk Management to format a USB drive to FAT32
Step 1: Right-click on the Start button on the taskbar and select Disk Management.Step 2: Right-click on the USB drive and select Format.Step 3: Select FAT32 as the File system and hit OK.
Use Command Prompt
You will require administrator privileges on your PC for this method.Step 1: Search for Command Prompt in the taskbar and select Run as Administrator from the results.Step 2: Check the letter of the USB drive on your PC.Step 3: Type the following command in Command Prompt:
format /FS:FAT32 (letter of the USB drive):
Use Windows Powershell
Step 1: Type Powershell into the search field in the taskbar and run it as administrator.Step 2: Enter the following command to format your USB drive in FAT32:
format /FS:FAT32 (letter of the USB drive):
Frequently Asked Questions (FAQs)
How do I format a USB drive to FAT32 in Windows 10/11?
Go to ‘This PC’ and right-click on the USB drive. Select Format and make sure you choose FAT32 in the ‘File system’ section. Once that’s done, hit ‘Start’.
How do I format a USB drive to FAT32 in Command Prompt?
Run Command Prompt as administrator, and type the following command – “format /FS:FAT32 (letter of the USB drive):”. Make sure you enter the right letter for the USB drive or you’ll end up formatting some other drive on your PC.
These are the top 4 ways to format a USB drive to FAT32 in Windows 10 or 11. If you know any other way to carry out this task, let us know in the comments! If you want to recover your data from a formatted USB drive, use tools like Drill Disk and Recoverit.
Motorola has come a long way and month on month they are launching good to great smartphones. The Moto G24 Power is the new device that the firm has introduced in India. The MediaTek Helio G85 SoC powers the smartphone. With a 50-megapixel primary sensor at the centre of its dual rear camera setup, it has a 6,000mAh battery that supports 33W TurboPower fast charging. The phone also features a 90Hz dynamic refresh rate hole-punch display. It is constructed of acrylic glass and features an IP52 water-repellent design. In the nation, it comes with a starting price of Rs 8,999. We’ve been testing the Moto G24 Power for over a week now, so let’s see how it held up in our review.
Moto G24 Power Review: Design and Display
First, let’s discuss the form factor. The Moto G24 Power boasts a well-made design and is lightweight and compact. In terms of appearance, the business is dominating. Although it has a plastic back that resembles glass, the material is PMMA with a shimmering appearance. Unlike a glossy surface in general, fingerprints and smudges are more difficult to remove from the back panel. The famous Moto Batwing logo and a dual camera module are also located on the phone’s back. This phone’s softly curved back makes it quite pleasant to grasp in the hand. It has flat sides, which have rounded corners, made up of polycarbonate, yet is very premium.Because of the phone’s ergonomic dimensions and well-distributed weight, even those with little hands won’t experience any problems using it. Moreover, the power and volume buttons on the right side of the frame have a nice tactile feel, which contributes to the device’s easy accessibility and pleasurable use. The fingerprint scanner doubles as the power button. A SIM slot on the left side accommodates two nano SIM cards and a USB card for up to 1TB of additional storage. On the top frame is a 3.5mm audio jack, while on the bottom border are the speaker grille, USB Type-C port, and microphone.On the top centre is a somewhat larger punch-hole selfie camera. It also has a significant chin and narrow bezels. Motorola has added Panda Glass to the smartphone’s front panel to boost durability.The screen of the Moto G24 Power is a 6.56-inch HD+ IPS LCD. The display features a 120Hz touch sampling rate, 90Hz refresh rate, and a peak brightness of 537 nits.The screen appears beautiful, and the colour is lively with a decent contrast ratio and overall saturation levels that are pretty excellent. The fonts and icons are also crisp and clear. Although the screen brightness is adequate for usage indoors, it is insufficiently bright for use outdoors in direct sunlight. For casual media viewing, the display is fine. It is certified Widevine L1 in fact. Despite having an HD screen, full HD streaming is possible.Nonetheless, support for 90Hz refresh rates is available, which has significant implications, particularly while using social media. The capability for a 90Hz refresh rate improves the viewing experience by making the display fluid.The downward-firing stereo speaker is sufficiently powerful and clear. But if it had had two speakers, that would have been awesome. However, the business has offered stereo speakers with Dolby Atmos at this price range.
Moto G24 Power Review: Performance and Cameras
The Moto G24 Power’s octa-core MediaTek Helio G85 SoC and up to 8GB of LPDR4x RAM provide powerful performance. Up to 16GB of additional RAM can be added to the onboard memory using RAM Boost technology. It also has a 128GB eMMC 5.1 storage capacity, which can be increased to 1TB with a microSD card.Well, it’s fun to multitask, and launching and closing apps is speedy. The 90Hz refresh rate contributes to the smooth scrolling of the user interface.Also Read:itel A70 Review: A decent budget smartphone If you love playing Call of Duty or BGMI, you can play games on a low setting. Keep in mind that this is still not a smartphone that can play demanding video games. Other lightweight games like Candy Crush, Subway Surfers, and others can run smoothly on it with ease.Regarding the software, it is advantageous that Android 14 with My UX on top is included. Security updates for three years will be provided by the company. Bloatware apps and incredibly intrusive games exist, but fortunately, you can delete anything that is not required.Yes, how could we forget that you get access to all the Moto-exclusive features, such as the gesture controls for the flashlight and camera?Regarding the cameras, the Moto G24 Power has a dual rear camera arrangement with an f/1.8 aperture and a 50-megapixel primary sensor using Quad Pixel technology. There is also a 2-megapixel macro lens with an f/2.4 aperture. A 16-megapixel front camera with an f/2.45 aperture has been handling selfies.The main sensors produce really good images. When the lighting is favourable, the 50-megapixel camera captures pictures with decent quality. It generates images that are crisp, bright, and clear with natural colours and a good dynamic range. The 2-megapixel macro should function properly if you use it in areas with adequate illumination.The skin tone of the selfies is decent, and they only have good dynamic range when taken in well-lit areas.When zoomed in, we saw that details are retained nicely; aside from that, we like how the phone generally handles human skin tone, especially in portrait mode photos. Our skin tone is a little more natural, but even in terms of edge detection and the background blur, we say superb stuff. Videos can be recorded in 1080p. The good news is that, for this price, video stabilisation is supported and functions well.These are some samples of the photos we took using this smartphone.shot from primary cameracloseup shotPortrait shotNotable features include a 33W TurboPower fast charging system and a 6,000mAh battery. That should last you at least two days with normal usage. The phone’s battery life fluctuated during our tests, lasting anywhere from two days with light use to over a day with intensive use.Also Read:Infinix Smart 8 Review: Incredible value for money
Verdict
Despite being less than Rs 10,000, the Moto G24 Power has a good design and build. Even with its 6,000mAh battery, the phone doesn’t feel heavy. It has an IP52 rating and a water-repellent construction as well. Out of the box, this is running Android 14. Although it is generally clean, the user interface is laden with several undesirable programmes. You get good camera functionality and output for the price. Although not flawless, the games can be played. There were frequent lags when we were gaming. It has an FM radio, which is a plus.The massive 6,000mah battery that comes with it may run the device for 1.5–2 days, or longer, depending on usage. It also includes a 33W rapid charger. Generally, smartphones priced under Rs 10,000 lack support for fast charging. For a starting price of Rs 8,999, the smartphone distinguishes itself from the competition with these features.
Garena Free Fire is a battle royale game with regular awards and tournaments to keep players interested. If you play Garena Free Fire, you should be aware of the redeem codes that are released on a daily basis. However, because the battle royale game is banned in India, players from other countries can use the Free Fire Redeem codes daily. If you’re unfamiliar with the Garena Free Fire redeem codes or don’t know how to get them, we’ve put together a step-by-step guide to help you redeem them. Check out Garena Free Fire Redeem Codes for 29 February 2024.The Free Fire redeem codes are a great way to get free stuff. These are 12-digit codes that contain alphabets and numbers, as well as an expiration date and time. Because the Garena FF redeem codes cannot be used more than once, you should hurry to the redemption page to claim your free reward before someone else does. To get a free reward, all you have to do is go to reward.ff.garena.com/en, which is the official redemption page. Also, keep an eye on this space for daily updates on Garena Free Fire redemption codes and rewards.Also Read: Sennheiser Accentum Plus wireless headphones with Hybrid Adaptive Noise Cancellation launched
Garena Free Fire Redeem Codes Today 29 February 2024
For users who have been on Facebook for several years, the platform also serves as an archive of their pictures and media. If you’re looking for a specific older picture, it is a good idea to check if you uploaded it on Facebook. If you ever end up losing your old pictures, you can always download them from Facebook. The platform makes it easy to download your profile data, including the media you uploaded to your posts, stories, reels, and more. So, let’s take a look at how you can download all your Facebook photos on PC and Android.Read Also:Top 4 Ways to Access Archived Emails in Outlook (2024)
What are your options?
Luckily, Facebook offers a native way to download all of your profile information either locally or to a different destination. You don’t need to rely on third-party apps and websites to do the same. The option to download your profile info is tucked away in the Accounts Centre and can be accessed by going to Settings and privacy>Settings>See more in Accounts Centre.You can also download an individual picture on Facebook without accessing your entire profile info. However, if you want to download an individual Facebook video, you will need to seek the help of a third-party service. Photos on Facebook may offer a native download option but videos do not. Websites like Fdown.net, Snapsave, and Savefrom let you download any video from the platform to your device.
Download All Photos from your Facebook Profile (PC)
Step 1: Open Facebook on your PC’s web browser and log into your profile.Step 2: Hit the Profile icon at the top right corner of the screen and select Settings and privacy.Step 3: Click on Settings.Step 4: Open the Accounts Centre by clicking See more in its sidebar section.Step 5: Click on Your information and permissions.Step 6: Select Download your information.Step 7: Click on Download or transfer information.Step 8: Select the account or profilefrom which you want to download the images.Step 9: Hit Next.Step 10: In the following window, click on Specific types of information.Step 11: Click on See All under Your Facebook activity.Step 12: Select Posts, Pages, Stories, and Reels. This should cover all of the media you’ve uploaded on your profile.Step 13: Hit Next.Step 14: If you want to download the photos locally to your device, select Download to device and hit Next.Step 15: Click on Date range and select All time. Select your preferred media quality as well.Step 16: Click on Format and select JSON if you want to browse the files on your PC instead of a web browser.Step 17: Hit Create files.The download request will be sent to Facebook. The download activity can be tracked from the Accounts Centre.
Download All Photos from your Facebook Profile (Android)
Step 1: Launch the Facebook app on your Android smartphone and hit your profile icon at the top right corner of the screen.Step 2: Tap on Settings and privacy and go to Settings.Step 3: Tap on See more in Accounts Centre.Step 4: Select Your information and permissions.Step 6: Tap on Download your information.Step 7: Tap on Download or transfer information.Step 8: Select the account or profile from which you want to download the images.Step 9: Hit Next.Step 10: On the following page, click on Specific types of information.Step 11: Click on See more under Your Facebook activity.Step 12: Select Posts, Pages, Stories, and Reels. This should cover all of the media you’ve uploaded on your profile.Step 13: Tap Next.Step 14: If you want to download the photos locally to your device, select Download to device and tap Next.Step 15: Tap on Date range and select All time. Select your preferred media quality as well.Step 16: Tap on Format and select JSON if you want to browse the files on your phone instead of a web browser.Step 17: Tap on Create files.
Frequently Asked Questions (FAQs)
How do I download a picture from Facebook?
Open the picture, select the ellipses at the top-right corner of the screen and hit Save Photo/Download.
How do I download a photo album from Facebook?
Go to your profile, select Photos, open the album, hit the ellipses, and select Download album.
How do I download all of my pictures on Facebook?
You will need to go to the Accounts Centre and select Your information and permissions>Download your information to get started on downloading your Facebook data.Read Also:Nothing Phone 2a will look like this: Design revealed
Conclusion
This is how you can download all your Facebook photos on your PC and Android smartphone. The iPhone app for Facebook follows the same process as its Android counterpart. Instead of creating a local backup of your images, you can also choose to transfer them to another destination. If you found this article helpful, let us know in the comments!
Today Samsung announced the availability of a new 6GB RAM, 128GB storage variant for Galaxy A15 5G in India.
The smartphone was already available in two RAM and storage options.
Samsung released the Galaxy A15 5G in India in December of last year. The company today introduced a new memory variant for the smartphone. The device will now be available in three varieties since it was initially offered in two different configurations. The handset features an AMOLED screen which supports a refresh rate of Hz. The phone comes with a 50-megapixel triple rear camera setup. It packs a 5,000mAh battery as well.Samsung Galaxy A15 5G will now be available in a new 6GB RAM with 128GB storage option priced at Rs 17,999. The device already comes with 8GB RAM with 128GB storage priced at Rs 19,499. There is another 8GB RAM with 256GB storage model which comes with a price tag of Rs 22,499.Consumers can avail bank cashback worth Rs 1500 on Galaxy A15 5G 6GB RAM with 128GB storage variant bringing the price down to Rs 16,499. Galaxy A15 5G is available across retail stores, Samsung.com, and other online players. The phone comes in Blue Black, Blue and Light Blue colour options.Also Read:Meta rolls out Save on Threads features, allowing bookmark favourite postsThe Samsung Galaxy A15 5G is highlighted with a 6.5-inch full-HD+ Super AMOLED screen with 1,080×2,408 pixels of resolution. The display comes with a 90Hz refresh rate and 800 nits of peak brightness. The phones run on One UI 5 on top of Android 13. The company is said to provide up to 4 years of software upgrades and five years of security fixes. The device is powered by an unnamed octa-core chipset with up to 8GB of RAM and up to 256GB of internal storage.Galaxy A15 5G features a triple rear camera setup led by a 50-megapixel primary camera with optical image stabilisation (OIS), a 5-megapixel secondary sensor and a 2-megapixel lens. In addition to this, it includes a 13-megapixel front-facing camera for selfies and video calling.Also Read:Nothing Phone 2a will look like this: Design revealedThe Samsung phone is backed by a 5,000mAh battery with 25W fast charging support. In terms of connectivity, there is 5G, Wi-Fi, Bluetooth, GPS, a 3.5mm headphone jack, and a USB Type-C port for charging. The sensors on both phones include accelerometers, a gyro sensor, a geomagnetic sensor, a light sensor, a virtual proximity sensor and a side-mounted fingerprint scanner.
Text-based conversation app linked to Instagram Threads has released saved post features to all the users. The users will be able to use Save on Threads to bookmark their favourite posts for later. The feature was undergoing user testing and will be widely available to all the users on the platformUsers of Threads will soon be able to favourite their favourite posts thanks to a new feature Save on Threads. With the current widespread rollout, more users should soon be able to access the feature on their app.Instagram Head Adam Mosseri posted on Threads to announce the rollout. He said, “We’re rolling out Save on Threads more broadly starting today, so you can bookmark your favourite posts for later.” Adam Mosseri has also confirmed that saving posts on Threads could affect the algorithm and feed on the social media platform. Also, bookmarking helps you stay organised with the posts you’re viewing on the platform.To save a post on Threads, select Save from the list of options by clicking on the three-dot menu that is located in the upper-right corner of each post. As soon as you save a post on Threads a message verifying that the post has been saved will show up at the top of the page. In order to access your Saved Threads post all you have to do is go to the settings menu, navigate to your profile, tap the double horizontal line icon, and then select Saved. The process of saving Threads posts is easy and convenient just like how we save posts and access posts on Instagram.Apart from this Threads was also recently spotted testing a new feature that would display trending postings to some users in a manner akin to X’s trending page. Reportedly the company is working on a new Today’s Topics section that will show real-time trending posts. But on Threads, the trending topics don’t need to have a hashtag or a tag attached to them.The topics with a heading are displayed as plain text, along with what seems to be a top post that covers the subject matter. Mosseri claims that AI decides on both the heading and the subjects.Head Adam Mosseri also shared a post announcing the testing of this feature. He said, “Today’s topics on Threads will be on the search page and in the For You feed. The topics are determined by our AI systems based on what people are engaging with right now on Threads.”
Archiving emails is easy, but looking for the Archived folder can be a tricky task. If you’re used to Gmail’s layout and are new to Outlook, it may take some time getting used to things. Or maybe you’re used to the Outlook app for Windows and are out of your element on Android. Today, we bring you the top 4 ways to find and access archived emails in Microsoft Outlook.Read Also:Nothing Phone 2a will look like this: Design revealed
Why you should archive your emails
No one likes a messy email inbox. With the barrage of newsletters, junk, and spam that users receive in their inboxes every day, keeping track of important emails can be quite a challenge. Unsubscribing from promotional mail and mass deleting spam are good techniques to manage your inbox, but even when you’re left with important emails, the inbox can seem daunting to look at.This is where the ‘Archived’ folder comes in. You can use this folder to stash older emails that are important but not urgently required. This keeps your inbox from having a cluttered look and makes sure the necessary emails are still around. This is a much better option than deleting the emails to bring a cleaner look to your inbox.Archiving an email on Outlook is easy. All you need to do is right-click the email and select ‘Archive’ from the list of options. If you’re an Android user, you need to long-press the email, tap the ellipses (three dots) at the top-right corner of the screen, select ‘Move to folder’, and tap on ‘Archive’.
Access Archived Emails on the Outlook Website
Step 1: Go to www.outlook.live.com and sign in using your Outlook/Microsoft Account.Step 2: Click on Archive in the left sidebar to view all your archived emails.
Access Archived Emails in the Outlook app
Step 1:Launch the Outlook app on your Windows PC.Step 2: Click the arrow icon next to your email account.Step 3: Select Archive.
Use Windows Mail to access Archived Outlook Emails
The native ‘Mail’ app on your Windows PC lets you access your Outlook emails. Here’s how you can view your archived emails on it.Step 1: Hit the Start button on the taskbar and select Mail.Step 2: Sign into the Mail app using your Outlook account.Step 3: Click the folder icon in the left sidebar.Step 4: Select Archive.
Access Archived Outlook Emails in the Android app
Step 1:Launch the Outlook app on your Android phone.Step 2: Hit the profile icon at the top left corner of the screen.Step 3: Select Archive from the list.
Frequently Asked Questions (FAQs)
How do I archive an email on Outlook?
To archive an email, simply right-click on it and select ‘Archive’. Android users need to long press the email, tap the ellipses at the top right corner of the screen, and select Move to folder>Archive.
How do I view the ‘Archive’ folder on Outlook?
The ‘Archive’ folder can generally be found in the left sidebar. On the Windows Outlook app, you need to click the arrow icon next to your email to view the folder. Android users simply need to tap the profile icon at the top left corner of the screen to access it.
These are the top 4 ways to find and access archived emails on Outlook. If you can’t find the folder in the Outlook app for Windows and Android, try updating the app to its latest version. Once that’s done, follow the steps mentioned above to view your archived emails.
Nothing Phone 2a design has been revealed by the company before the March 5 launch.
The company has released a teaser unveiling the design of the upcoming smartphone.
The device is also being showcased at MWC 2024.
Before the March 5 launch event for the Nothing Phone 2a in India, the device was on display worldwide at MWC 2024. In addition to this, the company has also revealed the device through an official teaser posted on its social media channel. Currently, this is one of the most anticipated smartphones and there has been a lot of buzz about it as the upcoming Nothing smartphone will be a more affordable, more subdued version of the Nothing Phone 2 which was released last year. Here is everything that we know about it.On March 5, Nothing Phone (2a) will launch internationally and in India. Ahead of the official release, the company has not only officially unveiled its design but has also been put on display at the ongoing mega tech event Mobile World Congress which is being held in Barcelona, Spain. The official renderings corroborate the prior, leaked images and include several notable design changes.The Nothing Phone 2a is teased in its White colour option, although a Black version is also anticipated. Its transparent body reminded us of the Nothing Phone 2. But this one has fewer glyphs compared to their older siblings. The glyph interface is limited to the device’s upper portion.
See the world through fresh eyes.
Phone (2a) is a product of daring design decisions and meticulous engineering.
And, the biggest design change it received is the dual-camera arrangement, now positioned in the centre and surrounded by three LED lights. One of these units is positioned vertically on the right side of the rear panel, while the other two are arranged in circular patterns.Although it lacks a full-fledged Glyph interface it has a transparent back panel with patterns. It also has flat corners.The Nothing Phone 2a is confirmed to run on a MediaTek Dimensity 7200 Pro SoC reportedly combined with 12GB of RAM and an extra 8GB of virtual RAM.Recently, Nothing CEO Carl Pei verified that Phone 2a handsets supplied in India will be produced here only.Also Read:New generative AI-based features coming to Android devices, including smartwatchesAdditionally, the Nothing Phone 2a’s key specifications were leaked earlier. It’s anticipated that the phone will ship with NothingOS 2.5 and run Android 14. Finally, a 6.7-inch full-HD+ OLED display with a refresh rate of 120Hz is anticipated to be included with the device.Also Read:Krafton’s latest Indian-themed game Garuda Saga launched A 50-megapixel primary and a 50-megapixel ultra-wide angle lens are expected to be included in the dual rear camera configuration of the Nothing Phone 2a. It may also have a 32-megapixel front-facing camera for taking selfies. The battery’s capacity is unclear, but it may charge at 45W wired fast charging.
The most common problems are often the trickiest to fix. This is because it is hard to figure out what’s causing the malfunction to occur. While something as general as not being able to make a phone call may seem easy to fix, trying to find the root cause of the problem requires delving into different aspects of your phone. In this article, we bring you the top 11 ways to fix an Android phone that can’t make or receive phone calls.Read Also:Krafton’s latest Indian-themed game Garuda Saga launched
Why won’t my Android phone make or receive calls?
Whenever you face a network and connectivity issue on your smartphone, it is a good idea to check if it is because of one of the usual suspects. The lack of optimum balance and talk time can render all calling services on your phone moot. The incoming calls to your phone number are also suspended when it hasn’t been recharged in a long time.Software issues rarely affect your phone’s network connectivity, but it is possible you may have turned on the Airplane or Flight Mode on your phone and forgotten about it. The same goes for DND and Call Barring. You need to check all the supplementary services for your number to make sure they aren’t causing this issue.Lastly, it is also possible that your SIM card has been phased out by the network provider. This only happens with really old SIM cards that are more than a decade old. Luckily, the process of replacing a SIM card is very easy and doesn’t require more than a few minutes to get reactivated. All you need to do is visit your network provider’s service centre with the proper documentation and request a new SIM card.
Restart your phone
The first thing you should do when you hit a network-related problem is to give your phone a quick restart. Not only does this refresh the network, but it also resolves any background glitches that may be causing your phone to malfunction. Press and hold the side key to access the power menu and hit ‘Restart’. If pressing the Side key triggers the voice assistant, long-press the Volume Up key and Side key simultaneously. You can also access the power menu by tapping the power icon in the Quick Settings Menu.
Make sure the SIM card is inserted properly
Use the SIM ejector tool to pop out the SIM tray and re-insert the SIM card after wiping it clean. Give the tray a thorough wipe, too. Make sure the SIM card is positioned correctly on the tray. If you’re using a very old card, you may need to get a replacement.
Turn off Airplane Mode
Your phone disables the cellular network connection once Airplane Mode is turned on. In this mode, you cannot make or receive any calls on your Android phone. To turn it off, swipe down from the status bar and tap the tile with an airplane on it. On some phones, it may be called ‘Flight Mode’.
Turn off Do Not Disturb
If your phone is in Do Not Disturb mode, it won’t notify you about incoming calls. DND mode only allows calls from whitelisted callers. Other calls only get through when the caller rings you multiple times. To disable DND, swipe down from the status bar and hit the Do Not Disturb tile. You can also disable it by going to Settings>Notifications>Do Not Disturb and turning off the toggle switch.
Make sure you’re in an area with optimal network reception
If you’re in an area with poor signal strength, the call services on your phone will fail to function. Elevators, basements, and high elevation areas are some of the places where you may face this issue. Move to an open area with better network reception to make or accept a call.
Restart your phone in Safe Mode
The third-party apps on your phone can often disrupt its regular functioning. Sometimes, the apps downloaded from sketchy sources push malware on your device, causing erratic behaviour. To confirm if this is the case, restart your phone in safe mode. Go to the power menu, long-press the power off icon, and hit ‘Safe Mode’. This will restart your phone and disable all the third-party apps. If you’re still unable to make or receive calls, it means the third-party apps on your phone are not causing the issue.
Disable and re-enable SIM
Step 1: Go to Settings and select Connections.Step 2: Tap on SIM manager.Step 3: Turn off the toggle switch for your SIM card.Step 4: Wait for a few seconds and then turn the switch back on.
Turn off WiFi calling
If the WiFi connection is experiencing issues, WiFi calling can impede your cellular phone calls. You can either turn it off by tapping its tile in the Quick Settings Menu or disable it from settings. Here’s how.Step 1: Go to Settings and select Connections.Step 2: Turn off the toggle switch for WiFi Calling.
Clear Dialer’s cache
Step 1: Go to Settings and select Apps.Step 2: Select the dialer app.Step 3: Tap on Storage.Step 4: Hit Clear Cache.
Reset network settings
Step 1: Go to Settings and General Management.Step 2: Tap on Reset.Step 3: Select Reset mobile network settings.Step 4: Hit Reset settings.
Update your phone’s OS
Step 1: Go to Settings and select Software update.Step 2: Tap on Download and install.Step 3: Select Install now.
Frequently Asked Questions (FAQs)
Why won’t my Android phone make any calls?
A SIM malfunction can cause your Android phone to stop making or receiving calls. Apart from that, all cellular network-related services are paused when Airplane Mode is turned on.
Why is my Android phone automatically rejecting calls?
Enabling Do Not Disturb can lead to incoming calls getting rejected automatically on your Android phone. Swipe down from the status bar and hit the DND tile to disable it.
Why is SIM not receiving calls?
Your phone stops receiving calls when the validity of the calling pack/talk time expires. Recharge your phone to restore incoming call service.
What does resetting the network settings do on Android?
Performing a network settings reset unpairs all your connected Bluetooth devices and WiFi networks. It restores all network settings to factory default. The personal data on your phone remains untouched.
These are the top 11 ways to fix an Android phone that can’t make or receive calls. To maintain connectivity, make sure your phone number has the optimum balance and talk time validity. If you know of any other way to fix this issue, let us know in the comments!
Google has rolled out 9 new Android features that rely on generative AI.
Users will get new casting controls for Spotify and AI-generated captions for images.
Tech Giant Google has rolled out nine new generative artificial intelligence (AI)-based features for Android devices. The upcoming features will be accessible for tablets, smartphones, smartwatches, and automobiles intended for use with other products, including the Messages app, Android Auto, and Wear OS.Google has pushed out additional features for smartphones, Android Auto, and Wear OS, albeit they are still under beta testing. The majority of the new capabilities are AI-based and intended for use with different devices. The company via blog post made the announcement which said, “Today, we’re rolling out Android updates to help you simplify your day and get more done — whether on your phone, tablet or Wear OS smartwatch or in your Android Auto-compatible car.”Android Auto may automatically summarise lengthy texts or active group discussions with the help of generative artificial intelligence (AI). Users will be able to send messages, share ETA or start a call by tapping once. In addition to this, it will also recommend pertinent responses and actions.Users will be able to listen to auto-generated AI descriptions of photos, online images and pictures included in messages with image captions in Lookout on Android. This feature is being rolled out globally in English and has been designed with blind and low-vision communities.Also Read:Nubia Flip 5G foldable phone introduced at MWC 2024Google’s latest update will now also bring enhanced screen reader support for Lens in Maps. This functionality will aid in exploring nearby and identifying places like ATMs, restaurants and transit stations. One can also point their camera at the surroundings and TalkBack will read out the details about the location, including its business hours, rating, and driving directions.On the other hand, users can now use their finger or stylus to add handwritten annotations to Google Docs from their Android phone or tablet thanks to Google Docs markups. With a selection of markup tools to choose from, like different pen colours and highlighters, reviewing documents and providing feedback is fast, flexible and easy.Spotify now provides more screen-casting settings thanks to Google. The output switcher on Android’s home screen lets you move effortlessly between your devices when playing YouTube music on Android’s home screen: your phone’s speaker, headphones, smart speakers, or TV. You may now use Spotify in the same way. Thus, Spotify Connect devices will now be displayed on the output switcher when you are playing media on Spotify.Also Read:Krafton’s latest Indian-themed game Garuda Saga launchedThrough Health Connect, users are now able to see a more complete picture of their health right in the redesigned Fitbit app through Health Connect– with data from their favourite wearables and apps like AllTrails, Oura Ring and MyFitnessPal. To see data from connected apps next to your Fitbit data, go to the You tab in the Fitbit app on your Android phone. In the Today tab, you can see data like exercise, steps, calories burned, floors climbed and distance travelled from Health Connect-compatible apps.One can now also access boarding passes, event tickets, gym memberships, loyalty cards and more from their wrist with Google Wallet passes now available on Wear OS watches. Choose which passes to hide or display so they’re ready to use right when you need them.Users may leave their phones in their pockets and check their wrists to make sure they catch their bus, train or ferry using public transit directions on Google Maps for Wear OS. Get compass-guided navigation directions to your destination after checking out the departure times directly from your smartwatch. If you prefer your phone, you can also mirror directions to your watch and navigate hands-free.You may access Gemini directly in Google Messages on your Android phone starting this week in English beta. Chat with Gemini to draft messages, brainstorm ideas, plan events or simply have a fun conversation without leaving the Messages app.
Garena Free Fire is a battle royale game with regular awards and tournaments to keep players interested. If you play Garena Free Fire, you should be aware of the redeem codes that are released on a daily basis. However, because the battle royale game is banned in India, players from other countries can use the Free Fire Redeem codes daily. If you’re unfamiliar with the Garena Free Fire redeem codes or don’t know how to get them, we’ve put together a step-by-step guide to help you redeem them. Check out Garena Free Fire Redeem Codes for 28 February 2024.The Free Fire redeem codes are a great way to get free stuff. These are 12-digit codes that contain alphabets and numbers, as well as an expiration date and time. Because the Garena FF redeem codes cannot be used more than once, you should hurry to the redemption page to claim your free reward before someone else does. To get a free reward, all you have to do is go to reward.ff.garena.com/en, which is the official redemption page. Also, keep an eye on this space for daily updates on Garena Free Fire redemption codes and rewards.Also Read: Sennheiser Accentum Plus wireless headphones with Hybrid Adaptive Noise Cancellation launched
Garena Free Fire Redeem Codes Today 28 February 2024
The Krafton India team and Alchemist Games worked together to curate characters and elements inspired by Indian themes.
About three weeks have passed since the game’s first announcement and the pre-registration period began on February 5th.
BGMI developer Krafton has launched its new game called Garuda Saga. It is a roguelike mobile game, tailored exclusively for the Indian audience.Anuj Sahani, Head of KRAFTON Incubator Program & Garuda Saga Lead, “Garuda Saga is a uniquely engaging game and tailoring it for the Indian audience has been an exhilarating adventure. With close collaboration between Alchemist Games and the Krafton India team, we’ve intricately woven the vibrant essence of India into every aspect of the game, from its storyline to its characters, truly bringing Garuda Saga to life. We look forward to delivering more unforgettable gaming experiences that captivate and inspire players throughout India.”Krafton India and Alchemist Games have teamed up to introduce a new game in an effort to increase their market share in the nation. Krafton has announced the launch of its first India-themed game namely Garuda Saga. The game is now available to download and play on Android and iOS for Indian users.About three weeks have passed since the game’s first announcement and the pre-registration period began on February 5th.Also Read:Nubia Flip 5G foldable phone introduced at MWC 2024According to Krafton, its India team worked with Alchemist Games, a South Korean mobile game production company to curate characters and elements inspired by Indian themes. Players can customise their RPG experience in Garuda Saga to fit their own play style. Drawing inspiration from rich Indian themes, players assume the role of Garuda. Equipped with a reliable bow and unmatched speed, Garuda progresses through levels, conquering monsters, and acquiring new skills with each victory.Also Read:Motorola’s complete lineup of smartphones will have Corning Gorilla GlassKipum Jun, CEO, Alchemist Games said, “Collaborating with KRAFTON for Garuda Saga has been a journey of discovery and innovation. Garuda Saga’s charm lies in blend of Indian themes layered with fun gameplay mechanics. We look forward to the community experiencing the magic of Garuda Saga and to creating more groundbreaking games that resonate with Indian players.”
Nubia has launched a pocket-sized foldable design- Nubia Flip 5G.
It features a 6.9-inch 120Hz internal display.
It houses a 4310mAh battery with 33W charging support.
The handset has a 50MP AI dual camera.
The ZTE-owned smartphone brand Nubia has unveiled its first foldable- Nubia Flip 5G at the Mobile World Congress 2024. It is anticipated to compete alongside Samsung, Motorola, Oppo and Tecno’s foldable devices in the market. The newly launched clamshell design phone features a 120 Hz foldable OLED display. Qualcomm’s Snapdragon 7 Gen 1 powers the phone. The handset includes a dual rear camera setup led by a 50-megapixel sensor.
Nubia Flip 5G pricing and sale details
The Nubia Flip 5G will retail for $599, or approximately Rs 50,000. The latest foldable phone will be available in two colour options- Black and Gold. Nubia hasn’t yet disclosed the new flip phone’s availability information, but it is likely to be released soon.
Nubia Flip 5G specifications
Nubia Flip 5G flaunts a 6.9-inch FHD+ AMOLED foldable display with 2790 x 1188 pixels of resolution. The primary display supports a 120Hz refresh rate. It also comes with a 1.43-inch AMOLED circular cover display with 466×466 pixels of resolution. Users won’t need to unfold their phones to access various apps thanks to the circular cover screen. It makes use of a dual-rail suspended hinge.Also Read:Motorola’s complete lineup of smartphones will have Corning Gorilla GlassUnder the hood, there is a Qualcomm Snapdragon 7 Gen 1 (4nm) Mobile Platform with Adreno 644 GPU. It includes up to 8GB RAM and 256GB UFS 3.1 storage. It operates on Android 13. For photos and videos, there is a dual rear camera setup that includes a 50-megapixel primary sensor and a 2-megapixel depth sensor with f/2.2 aperture along with an LED flash. It has an impressive 16-megapixel front-facing camera for selfies and video chats.Also Read:OnePlus Watch 2 with WearOS 4 and RTOS launched in IndiaIt has a 4,310mAh battery that can be charged at 33 watts. It comes with a side-mounted fingerprint sensor for authentication. In terms of connectivity, there is 5G SA/NSA, Dual 4G VoLTE, Wi-Fi 6 802.11 ax, Bluetooth 5.3, GPS/GLONASS, USB Type-C, and NFC.
Samsung’s compact offering in its flagship Galaxy S24 Series should be the go-to choice for users who want a one-handed usage experience without sacrificing the device’s performance. The ‘compact’ monicker is a bit of a stretch nowadays as even the Galaxy S24 flaunts a big 6.2-inch display and sports dimensions of 147mm x 70.6mm x 7.6mm. But, if you’re looking for a small flagship, this is as good as it gets. The India variant of the Samsung Galaxy S24 carries one key change under the hood. Instead of the Snapdragon 8 Gen 3 SoC as the Ultra variant, it is equipped with Samsung’s in-house Exynos 2400 chipset. Find out what this difference means for the Samsung Galaxy S24 in our review of the smartphone.Read Also:Motorola’s complete lineup of smartphones will have Corning Gorilla Glass
Samsung Galaxy S24 review: Design and Display
Inside the Samsung Galaxy S24 retail package, you get the smartphone, a SIM ejector, a USB Type-C cable, and a quick start guide. The smartphone is available in three colours – Amber Yellow, Cobalt Violet, and Onyx Black. Ordering the device directly from Samsung’s official website unlocks two more colour options – Sapphire Blue and Jade Green.We used the Amber Yellow colour variant of the Samsung Galaxy S24 for this review. The very light shade of yellow with its pastel aesthetic feels a little boring on a smartphone that costs Rs 80,000. The same can be said about the other shades on offer.The form factor of the Galaxy S24 remains mostly unchanged from last year’s S23 Series. The vertical layout for the individual camera cutouts is Samsung’s design language for the second year in a row. The flat edges of the aluminium frame lend it an iPhone-like feel. Unlike its ‘Ultra’ counterpart, this titanium-free frame rocks rounded corners and a polished finish.The left edge of the aluminium frame houses the volume rocker keys and the power button. The SIM card slot, primary microphone, USB Type-C port, and primary speaker are positioned at the bottom edge. Up top lie the secondary microphone and speaker. A small punch-hole cutout at the centre of the display contains the selfie camera.The 6.2-inch Dynamic LTPO AMOLED 2X display on the Galaxy S24 is the best in the business. The touch response offered by this 120Hz panel remains unmatched by its Android peers. With a compact form factor, this display is an absolute delight to use. Under direct sunlight, it can push its brightness to a staggering 2,600 nits.Widevine L1 support means that you can consume high-definition content on this device across all the major streaming platforms. The colours produced on the screen are vivid and punchy and the images are incredibly detailed. We were particularly pleased by the intensity of the display and how quickly it adapted to the surrounding light. The stereo speaker setup does a good job of producing a balanced audio output.Samsung Galaxy S24 is rated IP68 dust and water resistance. This rating is something we’ve come to expect from most flagships. The smartphone can handle being submerged up to 1.5m for 30 minutes. The front and back panels are protected by Gorilla Glass Victus 2 and can easily absorb light knocks.
Samsung Galaxy S24 review: Performance and Cameras
This year’s Indian variant of the Samsung Galaxy S24 is powered by the company’s in-house Exynos 2400 SoC instead of Qualcomm’s 2024 flagship Snapdragon 8 Gen 3 chipset. The latter is only available in the S24 Series sold in the USA, Canada, and China. In India, the S8G3 SoC only powers the Ultra variant of the Galaxy S24 (our review here).The reputation of Exynos chipset is certainly not on par with their Snapdragon peers, something Samsung’s European users can easily attest to. However, on paper, the Exynos 2400 processor produces impressive results; scoring 2,085 points in the single-core test and 6,572 points in the multi-core test on Geekbench 6. In comparison, the Ultra variant scored 2,165 and 6,416 points respectively.Benchmark results don’t always tell the full story. We ran a series of tasks on the Galaxy S24 and it handled them with ease. Routine tasks like video calling, photo editing, web browsing, and video recording, presented no problems. Even with multiple apps active in the background, the smartphone did not appear to be slugging even for a moment. When it comes to everyday tasks, the difference between the Exynos 2400 and Snapdragon 8 Gen 3 chipsets is unnoticeable.The gaming performance of the Galaxy S24 is excellent, although not on par with the Ultra variant. The smartphone can play games like Call of Duty Mobile and Asphalt 9 at the highest settings. The vapour chamber does a good job of dissipating the heat and keeping the internal temperature down, but the back panel does tend to warm up after hitting 30-40 minutes of consistent gameplay. The smartphone also heats up while video recording for an extended period of time in outdoor conditions. In both situations, the heating was more noticeable around the camera array. This is something we did not experience in the Ultra variant.Samsung’s suite of AI tools, dubbed Galaxy AI, has been grabbing a lot of headlines this year after the tech giant unveiled it at the grand ‘Unboxed’ event last month. The good news is that these tools are available across all three Galaxy S24 variants and will be rolled out for last year’s Galaxy S and Z series next month. We’ve discussed these features at length in our review of the S24 Ultra, so do give it a read!While some features of the Galaxy AI may cater to a niche group of users, the entire package is far from a gimmick. Our favourite of the lot, Generative Photo Editor, lets users move the objects in a picture. The AI tool fills the empty spaces left behind by the displaced objects with relevant imagery that doesn’t seem out of place. You’d think this feature would be a hit or miss, but it is surprising how reliable it is. You can use this feature on downloaded images as well. Also, it needs to be said that the Ultra variant is slightly faster than the regular Galaxy S24 at generative photo editing.The translation tool in Samsung Keyboard’s ‘Chat Assist’ features lets you auto-translate messages on any chat thread seamlessly. The live translator for cellular voice calls works smoothly too. The smartphone lets you mute the caller’s voice, so you only hear the translated message. There is a small lag despite the live translation, but you get used to it pretty quickly. Perhaps, the only ‘gimmick’ in the entire Galaxy AI suite is the ‘Writing Style’ tool, which lets you change the tone of your texts. It feels quite contrived at the moment, but we hope that is not the case in its future iterations.Circle to Search and Generative AI Wallpapers are two features that we hope to see on more Android phones this year. The Pixel 8 Series already has the latter and will be getting Circle to Search pretty soon. If you’re familiar with Google Lens’ ‘Search Screen’ feature, then you already know everything about ‘Circle to Search’. The latter just makes the tool more accessible. Instead of summoning Google Assistant, you can simply long-press the home button (or the navigation handle) and search what’s on your screen.Generative AI WallpapersThe overall software experience offered by Android 14-based One UI 6 is clean and beautiful. Apart from Netflix and Facebook, there is no bloatware to be found in this device. If you end up buying this smartphone, we highly recommend using Samsung’s Good Lock app for a diverse range of personalisation options. This app isn’t natively installed in the device, you will have to download it from the Galaxy Store. Once installed, you get access to a good library of free and paid themes, along with personalisation options for the Always On Display, lock screen, Samsung Keyboard, navigation bar, and more.Equipped with a 4,000 mAh battery pack, the Galaxy S24 offers a standard one-day power backup. While the Ultra variant lasts over a day, it has the advantage of accommodating a larger battery pack. During the review period, used the Samsung Galaxy S24 for instant messaging, video calling, browsing social media, emailing, watching videos, and even gaming. The smartphone left us with a respectable 20% charge at the end of each day. The battery performance tends to get better after using the device for a couple of days. On the downside, the peak wired charging speed is limited to 25W, which means it takes over an hour to fully charge the S24.Moving on, the Galaxy S24’s camera performance is absolutely stellar, despite lacking the Ultra variant’s camera specs. Instead of the 200MP primary shooter found on the S24 Ultra, the S24 gets a 50MP sensor. The 12MP ultrawide and the 10MP 3x telephoto lenses remain the same, but as is tradition, the two lower variants of the Galaxy S Series miss out on the periscope telephoto lens.In outdoor lighting conditions, the images taken with the 50MP primary shooter are packed with a lot of detail and finely processed to reproduce natural, vivid colours. We were stuck with a bit of an overcast sky this past week, but the S24 remained unfazed by the diffused lighting. We had no complaints about the colour richness and dynamic range in the images. In limited lighting, the Night Mode in the default camera app does a splendid job of brightening the subject, removing the grain, and injecting the appropriate colours in the images. We were particularly pleased with the colour tuning for the night sky.Primary Shooter: Without Night Mode vs With Night ModeThe 12MP ultrawide camera produces solid images with a colour richness that is on par with the primary shooter. This camera even manages to capture distant reflections with their sharpness relatively intact. Something you can’t say about a lot of ultrawide cameras in this segment. It retains its rock-solid performance in limited lighting as well, where it relies on the Night Mode to smoothen the grain in the images.Ultrawide ShotUltrawide Camera: Without Night Mode vs With Night ModeThe 10MP 3x telephoto lens can be summoned when you need to zoom into far-away objects. The 3x optical zoom is reliable and produces well-composed images with a good amount of detail. Even at 10x digital zoom, we were happy with the way the images were processed and smoothed out. However, you do tend to hit the point of diminishing returns pretty quickly.1x vs 3x10x vs 30xThe 12MP selfie camera takes good pictures with popping colours. The camera app has some fun filters for you to use in case you don’t want to install a third-party app. This 12MP front-facing camera can record 4K videos at 30/60 fps. The main camera can record impressive 8K videos at 30fps.Portrait Mode: 1x vs 3x3x Optical ZoomRead Also:Best Ways to Make a Furnace in Minecraft? (2024)
Verdict
As far as compact smartphones go, there is no reason why you should pick anything other than the Samsung Galaxy S24. It rocks one of the best display panels we’ve seen on an Android smartphone and offers a snappy performance across the board. The lack of Qualcomm’s Snapdragon 8 Gen 3 SoC sure hurts a little, but the Exynos 2400 chipset crushes whatever task you throw at it. The difference in performance between the two chipsets is very minute and barely noticeable to the casual eye. At Rs 80,000 the Samsung Galaxy S24 is a very good deal.
In the latter part of the year, Gorilla Glass protection will be incorporated into the Motorola smartphones.
The company also introduced Smart Connect which makes it simple for customers to pair Lenovo laptops with Motorola devices.
Lenovo-owned smartphone brand Motorola at MWC 2024, announced its new partnership with Corning. As per the deal, Gorilla Glass will feature on every Motorola smartphone that launches in the second half of 2024 and beyond. This will cover tablets and smartphones that come out this year. Additionally, the business launched Smart Connect, a piece of software that creates a single ecosystem connecting tablets, PCs, and cellphones.Motorola said, “At Motorola, we’re dedicated to delivering cutting-edge technology, and ensuring it is accessible across all franchises. Today, to further our commitment to durability, we’re excited to announce that the entire 2024 portfolio of Motorola devices will feature Corning Gorilla Glass, starting in the second half of this year.”This is thought to be the best glass protection available for current smartphone displays. Gorilla Glass was developed by Corning Incorporated and is already a feature of many Motorola smartphones. As per the smartphone maker including Gorilla Glass on a selection of Lenovo laptops and tablets, this relationship expands on Lenovo and Corning’s previous work together in the laptop and tablet markets.Leading smartphone makers trust Corning Incorporated from all around for offering remarkable resistance to scratches and drops while maintaining sensitive touch sensitivity and immersive user experiences.Also Read:OnePlus Watch 2 with WearOS 4 and RTOS launched in IndiaMotorola’s Head of Customer Experience, Ruben Castano said, “Consumers today continue to demand reliability and durability without compromising on sleek, modern design. By using Corning Gorilla Glass across all Motorola franchises, we aim to lead the industry by ensuring that every consumer has access to the durability and peace of mind that comes with this cutting-edge technology.”Also Read:Samsung presented the Galaxy Ring at MWC 2024, BarcelonaBesides this Lenovo and Motorola have also introduced Smart Connect, a software solution that unifies digital ecosystems to create a multi-device experience. It connects essential devices like PCs, tablets, and phones with ease, preventing interruptions when switching between compatible devices. Instead of buying more devices with the same operating system to suit their demands, customers can seamlessly switch between tasks and maintain an uninterrupted workflow on their existing devices.
One of the most essential things you need in Minecraft is a Furnace. A furnace smelts objects like Iron Ore and Clay into useful items like Iron Ingots and Bricks. But, its most important purpose is to cook food and ensure your survival. You can use the furnace to cook raw meats. Apart from these important uses, a furnace can also be used as a light source on dark nights. Today, we bring you the best ways to make a Furnace in Minecraft.Read Also:Top 3 Ways to Reset a Ring Doorbell (2024)
Ingredients needed to make a Furnace
Here are all the ingredients you need to make this item in Minecraft.
Crafting Table: Chop wood and turn it into planks in the crafting area. Use four planks to make a crafting table.
8 Cobblestones: First, make a pickaxe using two sticks and three planks in the Crafting Table. Use it to mine Cobblestone from stones in the mountainsides. To make a furnace, you will need 8 Cobblestones. Make sure the Cobblestones are not cracked or mossy.
Make a furnace in Minecraft
Step 1: Right-click on the Crafting Table to open it.Step 2: Fill every square in the Crafting Table except the middle one with Cobblestones. You will require 8 Cobblestones for this.Step 3: Once the Furnace appears in the results area, drag it to your inventory.
Make a Blast Furnace in Minecraft
Step 1: Open the Crafting Table.Step 2: Drag 3 Iron Ingots and put them in the top row.Step 3: Put the Furnace in the middle box on the second row.Step 4: Place 2 Iron Ingots on either side of the Furnace in the second row.Step 5: Place 3 Smooth Stones in the bottom row.Step 6: Once the Blast Furnace appears in quick results, drag it to your inventory.
How to Smelt using a Furnace?
Now that you’ve made a Furnace, you can use it to smelt and cook things. It converts Iron Ore to Iron Ingots, Sand to Glass, Clay to Brick, Raw Food to Cooked Food, and more. Here’s how you can use it.Step 1:Right-click the Furnace to open it.Step 2: Add the item you wish to smelt or cook in the top box.Step 3: You need fuel to smelt and cook things so add a fuel item in the bottom box. You can use items like Coal and Wood as fuel for the furnace.Step 4: Make sure the furnace doesn’t run out of fuel while it is smelting objects. Add more fuel whenever necessary.Step 5: Once the smelting process is complete, the final object will appear in the box on the right.
Frequently Asked Questions (FAQs)
How do I make a Furnace in Minecraft?
Stack 8 Cobblestones inside all the squares in the Crafting Table apart from the middle one. The Furnace will appear in the results area after a while.
How do I make a Potion of Weakness in Minecraft?
Open the Brewing Stand, add Blaze Powder to the box on the left, a water bottle in one of the boxes at the bottom, and Fermented Spider Eye in the topmost box. The Potion of Weakness will be ready in a few seconds.
This is how you can make a Furnace in Minecraft. If you know any other way to go about this task, let us know in the comments! While you’re here, read this article to learn how to create a potion of weakness and a splash/lingering potion of weakness in Minecraft.
When it comes to video doorbells and home surveillance devices, Ring is one of the best in the game. The company has a diverse portfolio covering wired and battery-operated door cams. While some may not be a fan of a subscription model for their doorbells, Ring’s cutting-edge smart features like motion detection zones are hard to pass on. Today, we bring you the top 3 ways to reset your Ring doorbell.Read Also:OnePlus Watch 2 with WearOS 4 and RTOS launched in India
Why you should reset your Ring doorbell
While troubleshooting your Ring doorbell for a connectivity or functional problem, you should consider performing a factory reset. This restores your doorbell to the settings that it had out of the box. A factory reset is a rock-solid method for checking whether the problem you’re facing is hardware or software-related. If the issue persists after the reset, there’s not much you can do to reprogram it to normalcy.When you factory reset your Ring doorbell, your user account is removed from the device. All of the device settings, including the saved WiFi password, will be erased from it. However, you can choose to keep your saved videos on your account. If you want to erase them too, select ‘Delete Events’ while performing the reset through the Ring app. Once the doorbell has been reset, the initial setup process will need to be carried out again.
Reset an older Ring doorbell
Step 1: Remove the screws from the bottom of the doorbell using the screwdriver that was provided in the box. You can also use a T6 Torx-head screwdriver for this task.Step 2: Remove the faceplate once the screws are undone.Step 3: Flip the doorbell around and press the orange button at the back for 10-15 seconds.Step 4: Release the button once the LED light around the camera starts flashing.Step 5: To set up the doorbell again, scan the QR code on the device using the Ring app on your smartphone.
Reset a newer Ring doorbell
Step 1: Use a T15 Torx-head screwdriver to remove the screw at the bottom of the doorbell.Step 2: Remove the faceplate.Step 3: Locate the orange reset button in the front panel.Step 4: Press and hold the reset button for 10-15 seconds.Step 5: Once you see the LED flashing on the doorbell, it means that it has been reset and is now in setup mode. Use the Ring app to set it up.
Use the Ring app to reset the doorbell
Step 1:Launch the Ring app on your smartphone.Step 2: Hit the menu icon at the top right corner of the screen.Step 3: Tap on Devices and select your doorbell from the list.Step 4: Tap on Device Settings.Step 5: Go to General Settings.Step 6: Select Remove This Device.
Frequently Asked Questions (FAQs)
How much does a Ring subscription cost?
The Ring Protect Basic plan costs $3.99/month, the Protect Plus plan is priced at $10/month while the Protect Pro plan fetches $20/month.
How much does a Ring doorbell cost?
The Wired Doorbell Pro from Ring costs $229.99, while the Elite Video Doorbell fetches $349.99. Ring also has a selection of entry-level video doorbells as well as battery-operated wireless video doorbells.
How do I reset my Ring doorbell?
Launch the Ring app, go to Menu>Devices>Your doorbell>Device Settings>General Settings and select ‘Remove This Device’.Read Also:Top 8 Ways to Fix Low Call Volume on iPhone (2024)These are the top 3 ways to reset your Ring doorbell. If you know of any other way to carry out this task, let us know in the comments! To pair your doorbell with your smartphone, scan the QR code at the back using the official Ring app. The doorbell relies on a home WiFi connection to function properly.


 Step 1: Plug in the USB drive.
Step 2: Go to the Control Panel and select Windows ToGo.
Step 3: Select your USB drive from the list.
Step 4: Click on Add search location.
Step 5: Select the ISO file you want to burn to the USB drive.
Step 6: You can choose a password for the file.
Step 7: Hit Next.
Windows ToGo will burn the ISO file to your USB drive.
Step 1: Plug in the USB drive.
Step 2: Go to the Control Panel and select Windows ToGo.
Step 3: Select your USB drive from the list.
Step 4: Click on Add search location.
Step 5: Select the ISO file you want to burn to the USB drive.
Step 6: You can choose a password for the file.
Step 7: Hit Next.
Windows ToGo will burn the ISO file to your USB drive.
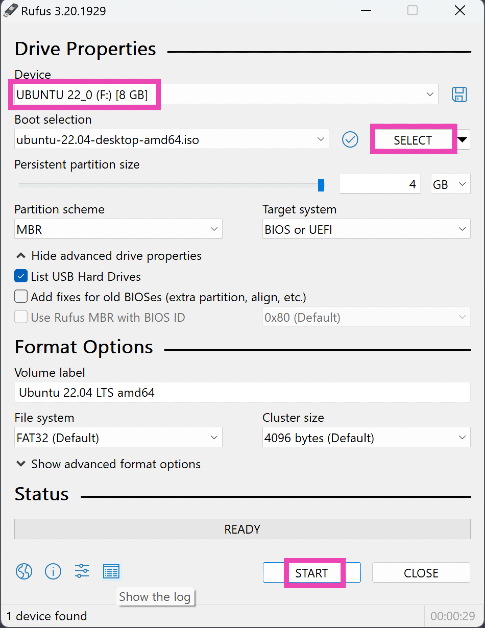 Step 1: Plug the USB drive into your PC.
Step 2: Launch the Rufus tool. Select your USB drive in the Device category.
Step 3: Click the dropdown menu under Boot selection and select Disk or ISO image.
Step 4: Hit Select and choose your ISO file.
Step 5: Click on Start.
Rufus will burn the ISO file to your USB drive.
Step 1: Plug the USB drive into your PC.
Step 2: Launch the Rufus tool. Select your USB drive in the Device category.
Step 3: Click the dropdown menu under Boot selection and select Disk or ISO image.
Step 4: Hit Select and choose your ISO file.
Step 5: Click on Start.
Rufus will burn the ISO file to your USB drive.
 Step 1: Plug the USB drive into the Mac.
Step 2: Open the Applications folder on the dock.
Step 3: Go to Utilities>Terminal.
Step 4: Enter the following command to list the names of all the drives:
Step 1: Plug the USB drive into the Mac.
Step 2: Open the Applications folder on the dock.
Step 3: Go to Utilities>Terminal.
Step 4: Enter the following command to list the names of all the drives:
 Step 1: Launch the UNetbootin app.
Step 2: Check the circle for Diskimage.
Step 3: Hit the ellipses in the bottom-right section.
Step 4: Locate the ISO file and hit Open.
Step 5: In the Type section, choose USB drive.
Step 6: In the Drive section, select your USB drive.
Step 7: Hit OK.
Step 1: Launch the UNetbootin app.
Step 2: Check the circle for Diskimage.
Step 3: Hit the ellipses in the bottom-right section.
Step 4: Locate the ISO file and hit Open.
Step 5: In the Type section, choose USB drive.
Step 6: In the Drive section, select your USB drive.
Step 7: Hit OK.
? Top 2 Ways")
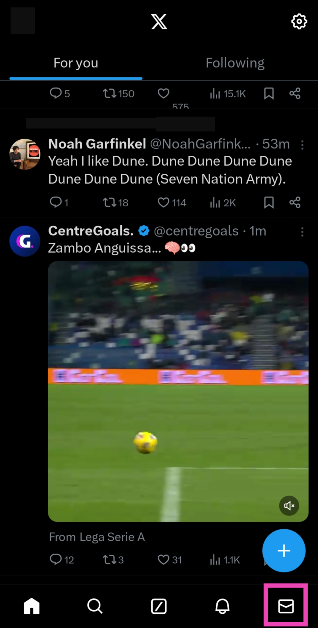 Step 3:
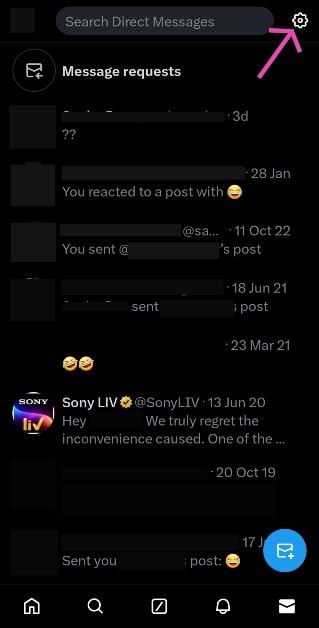 Step 4:
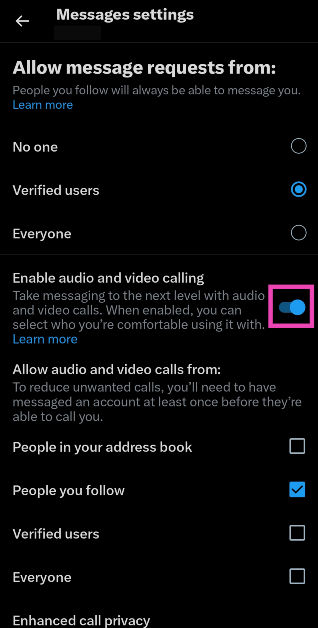
 Step 3:
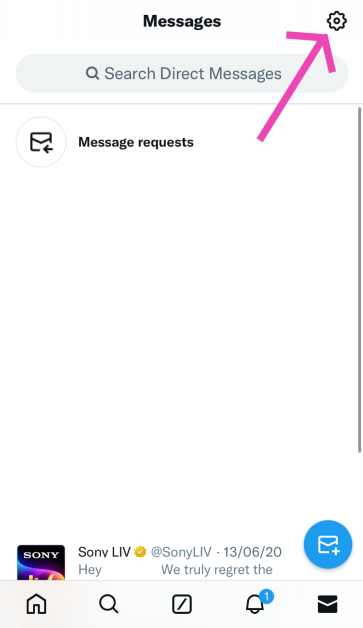 Step 4:
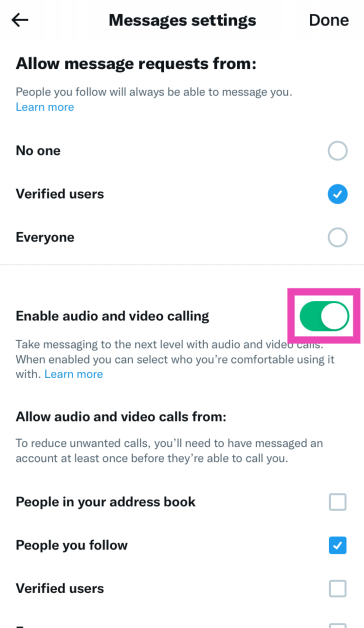 Step 5:
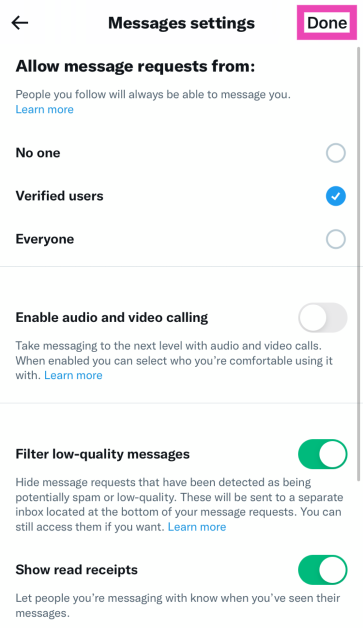

")

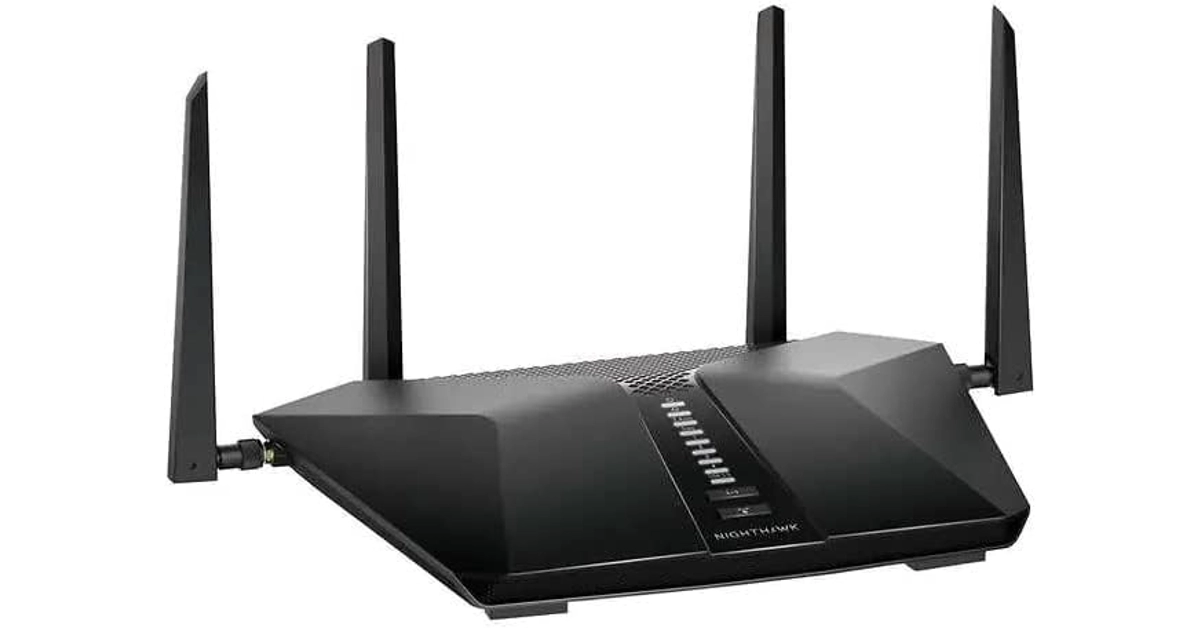
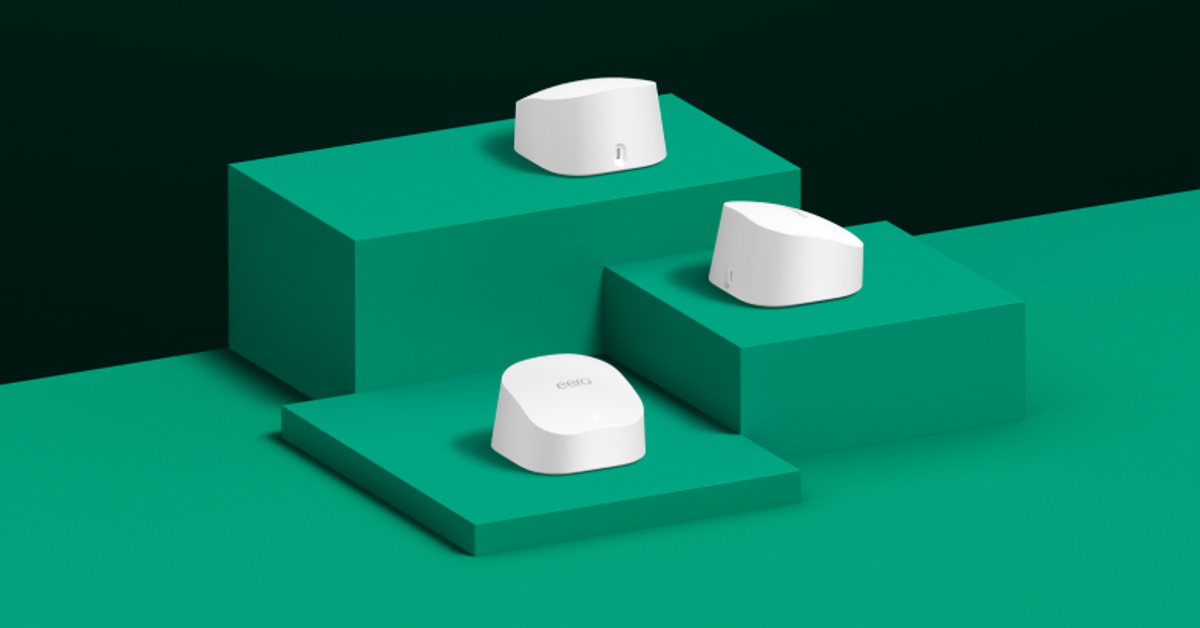
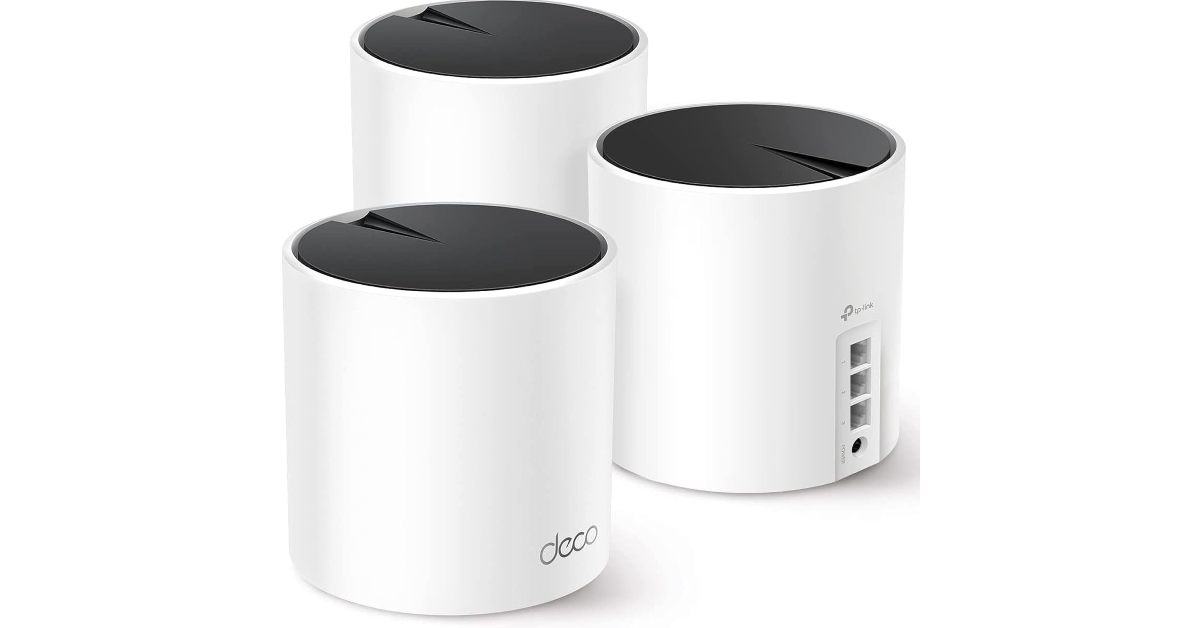
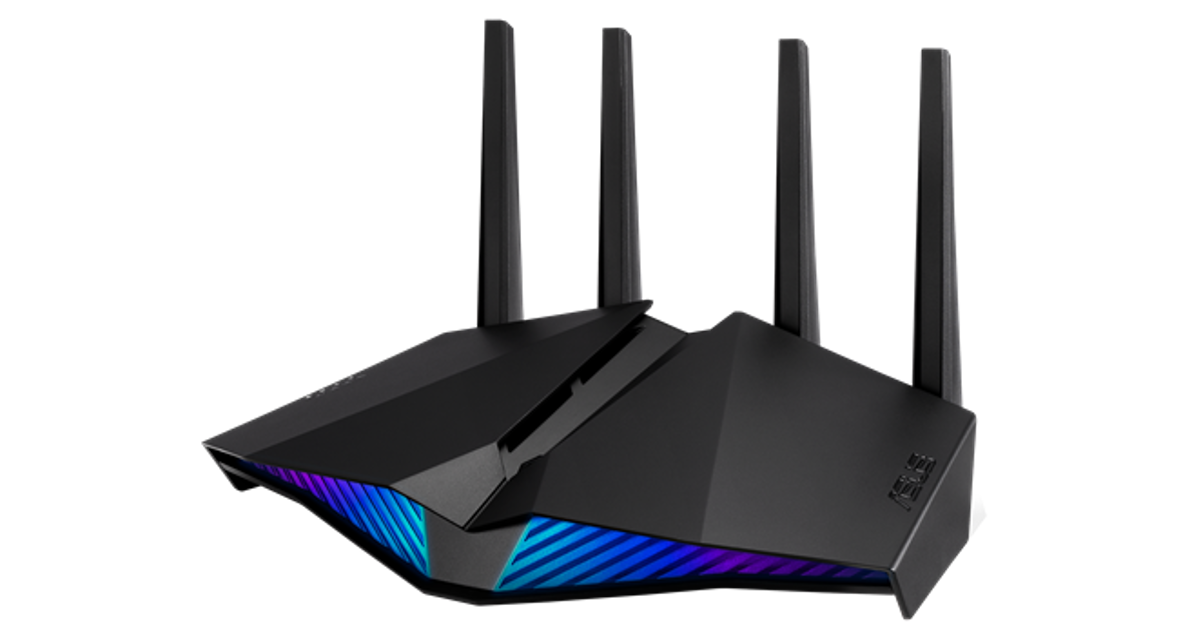

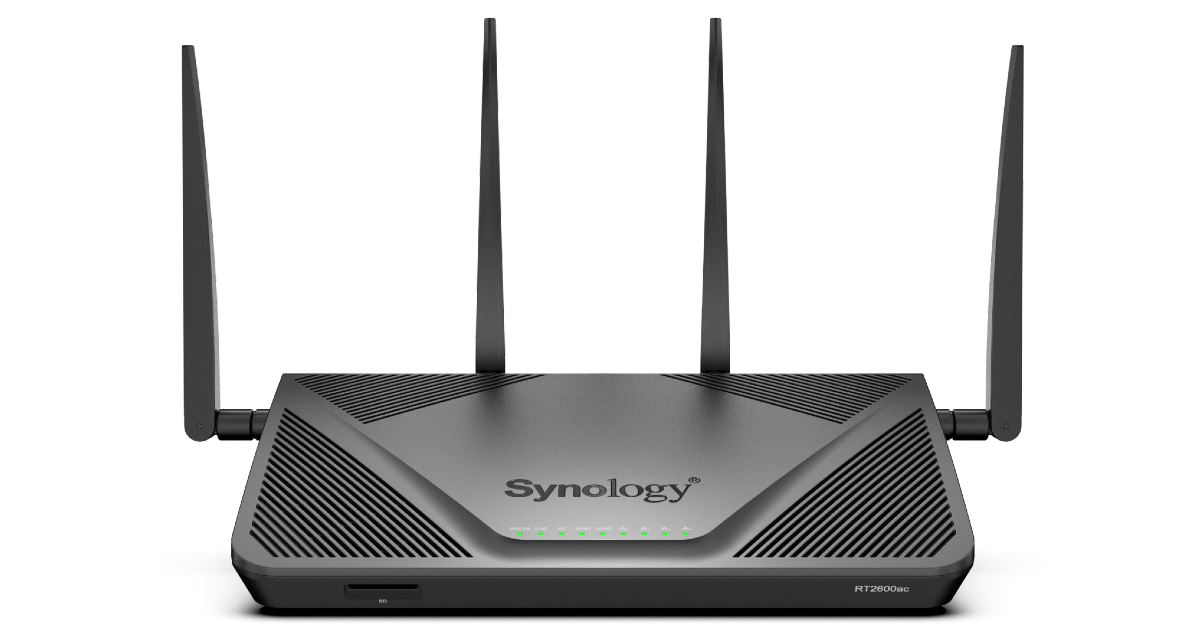
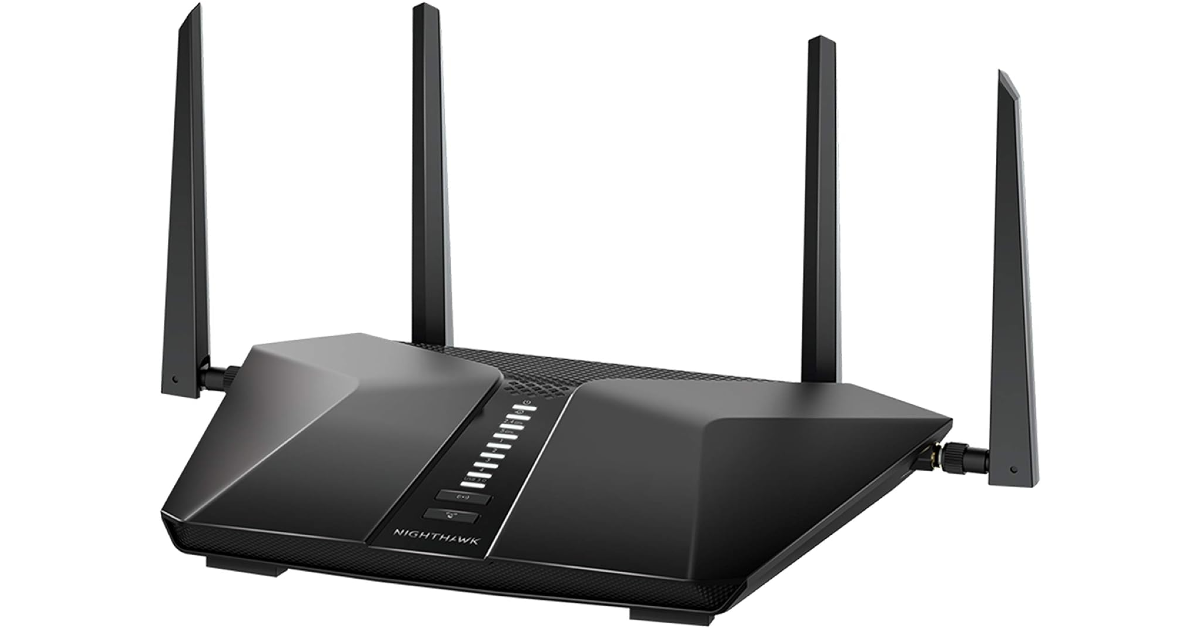


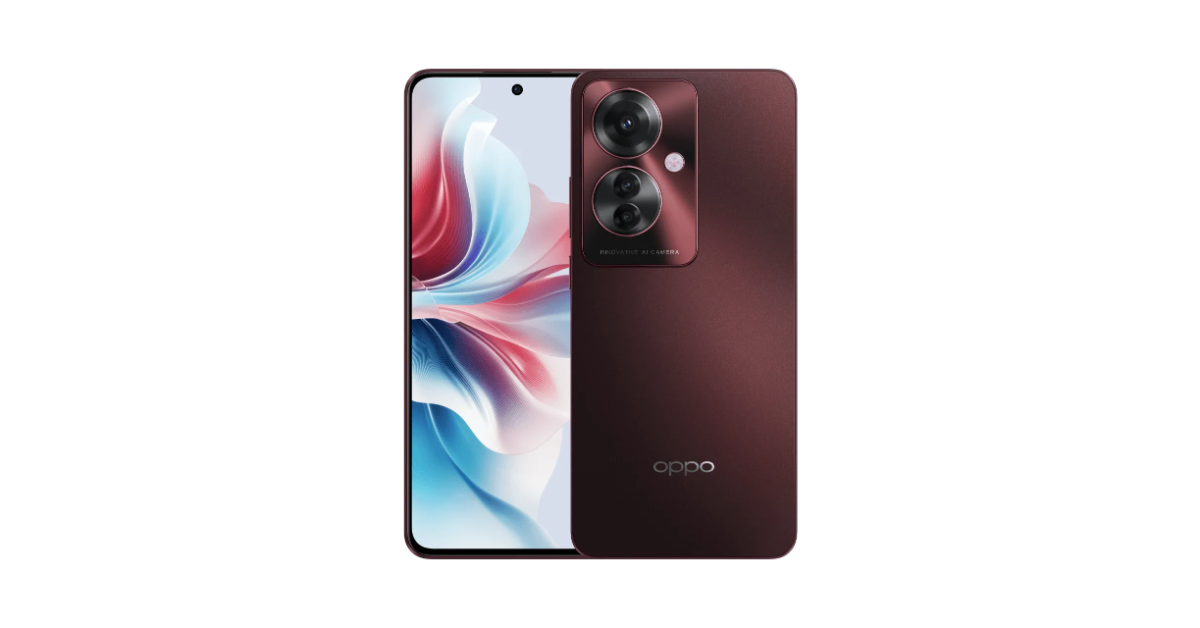
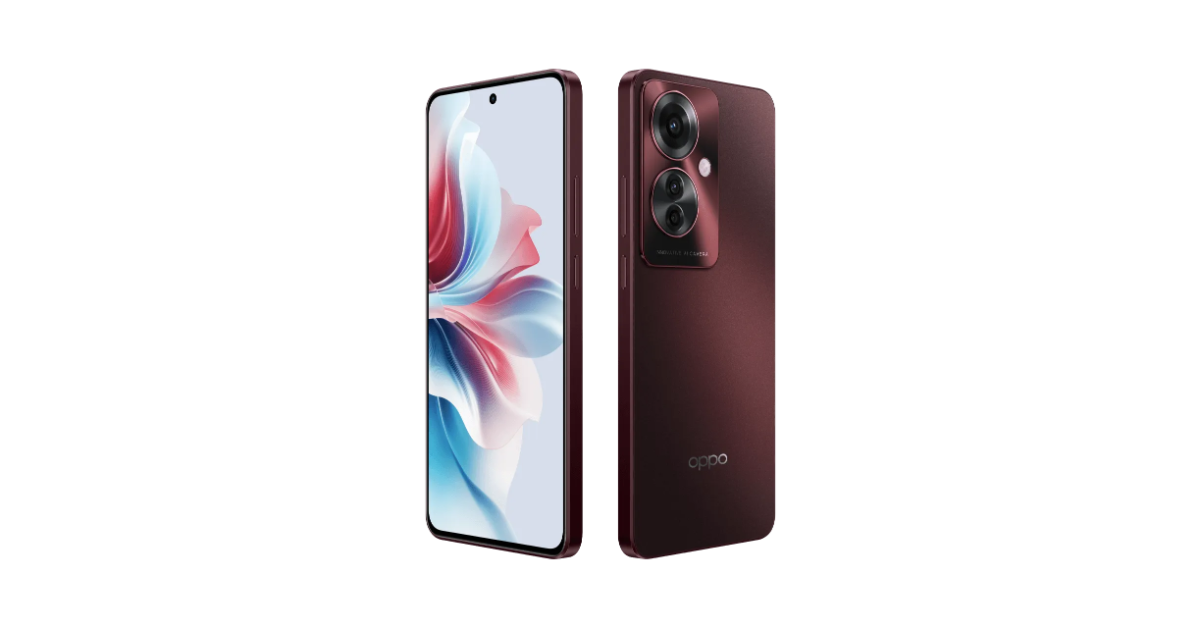 Launch offers


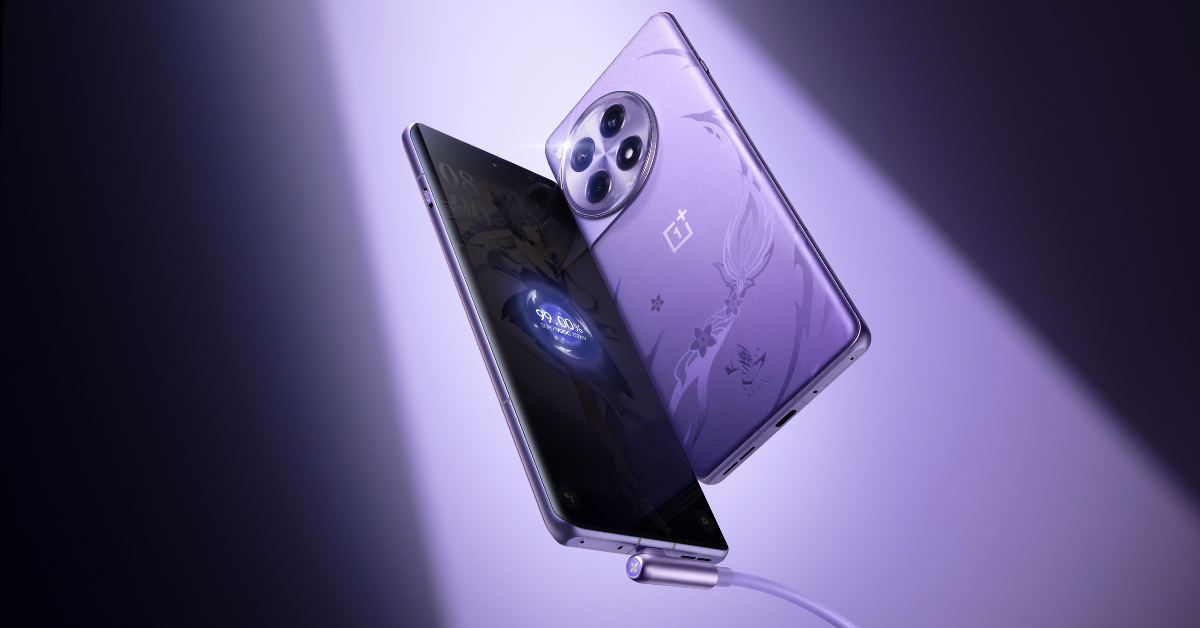
")
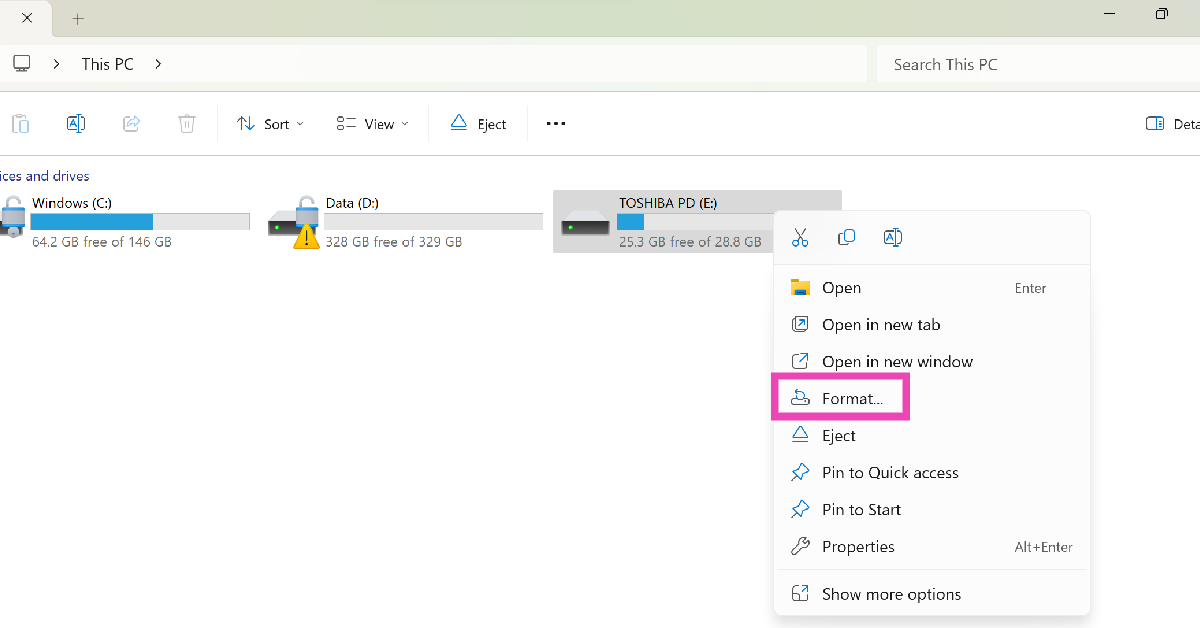 Step 3:
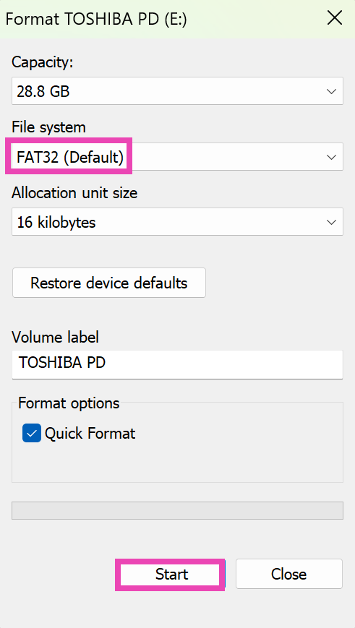
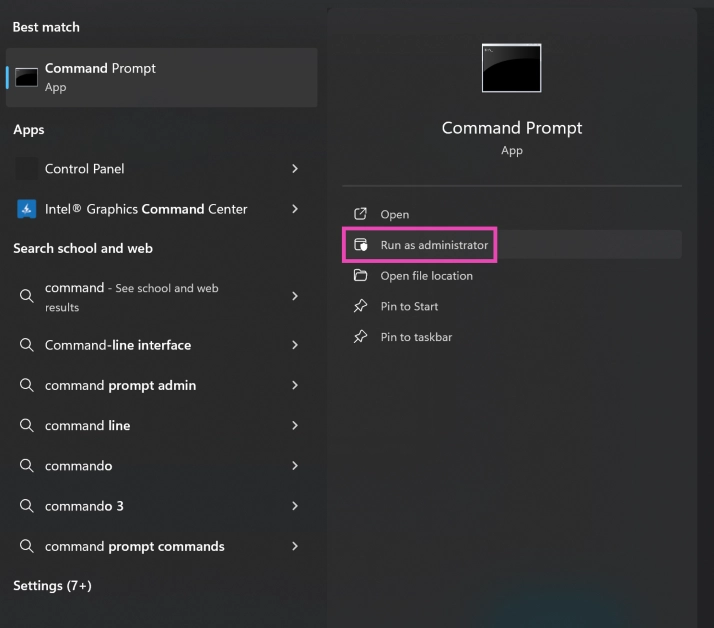 Step 2:
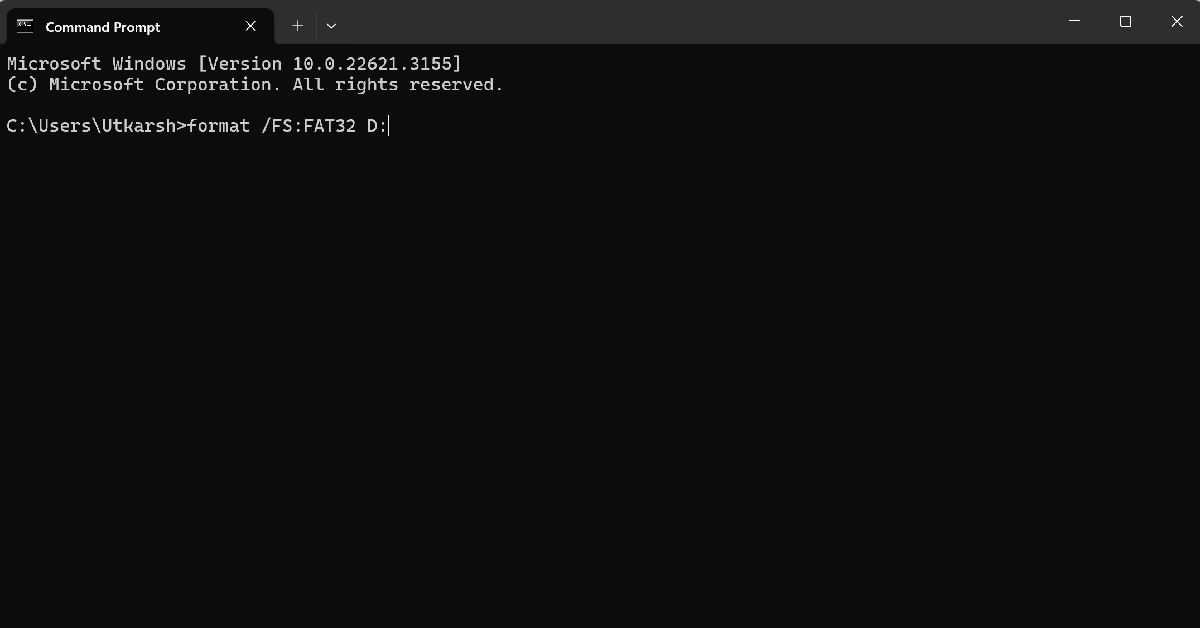
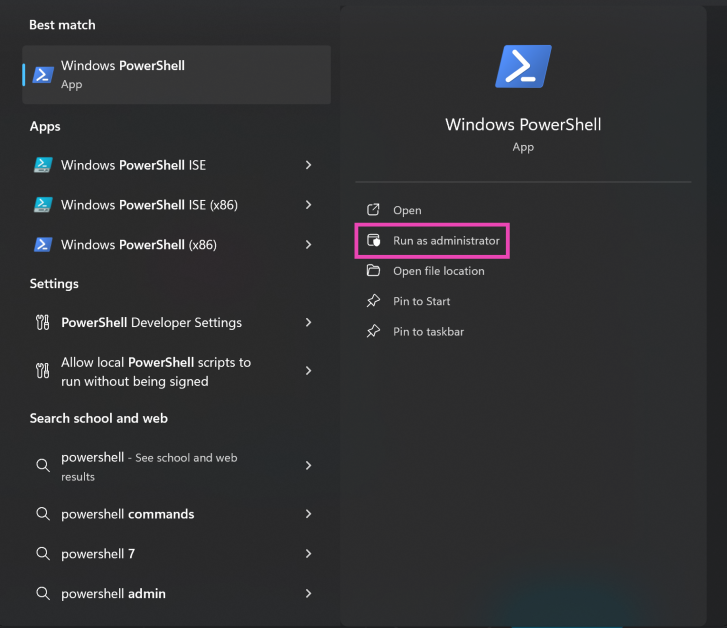 Step 2:

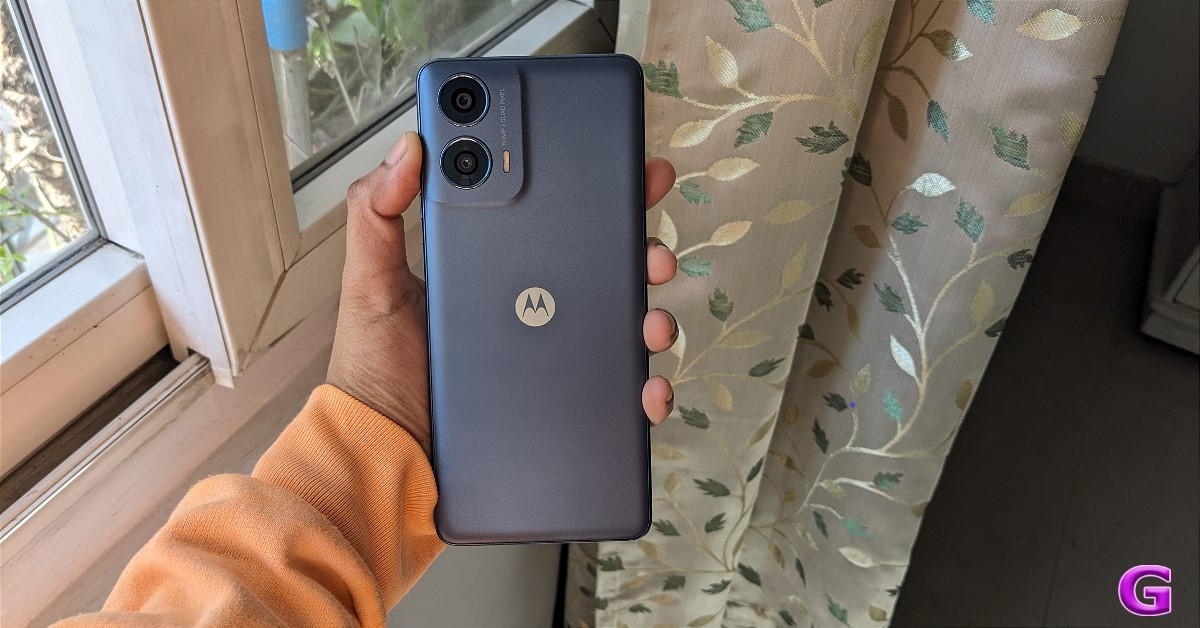
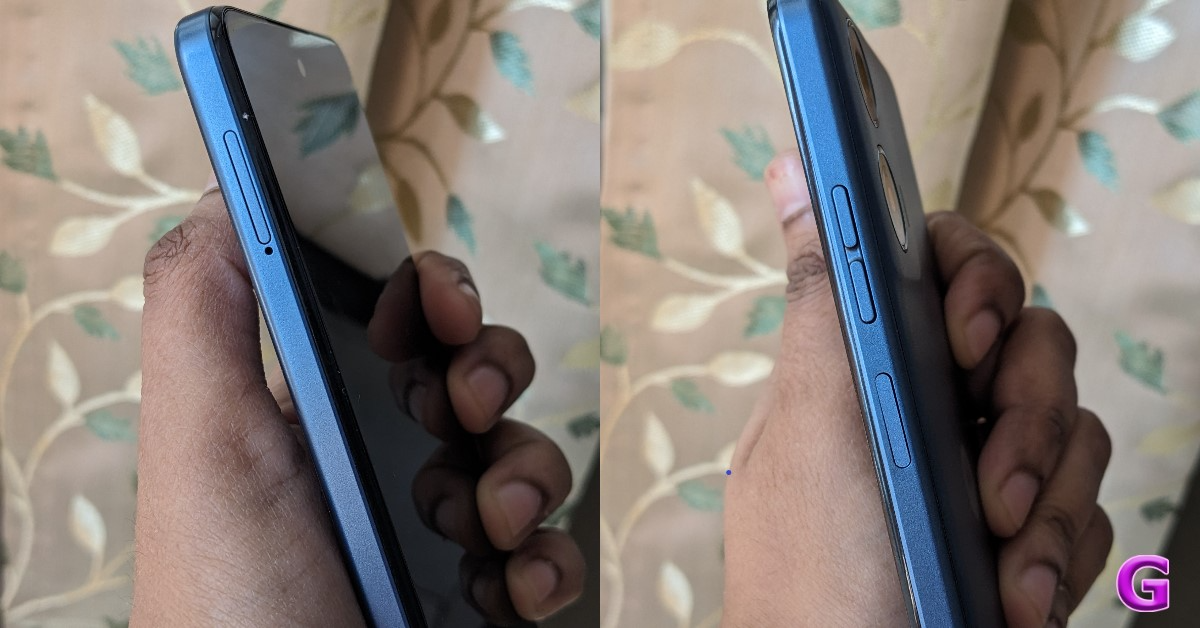
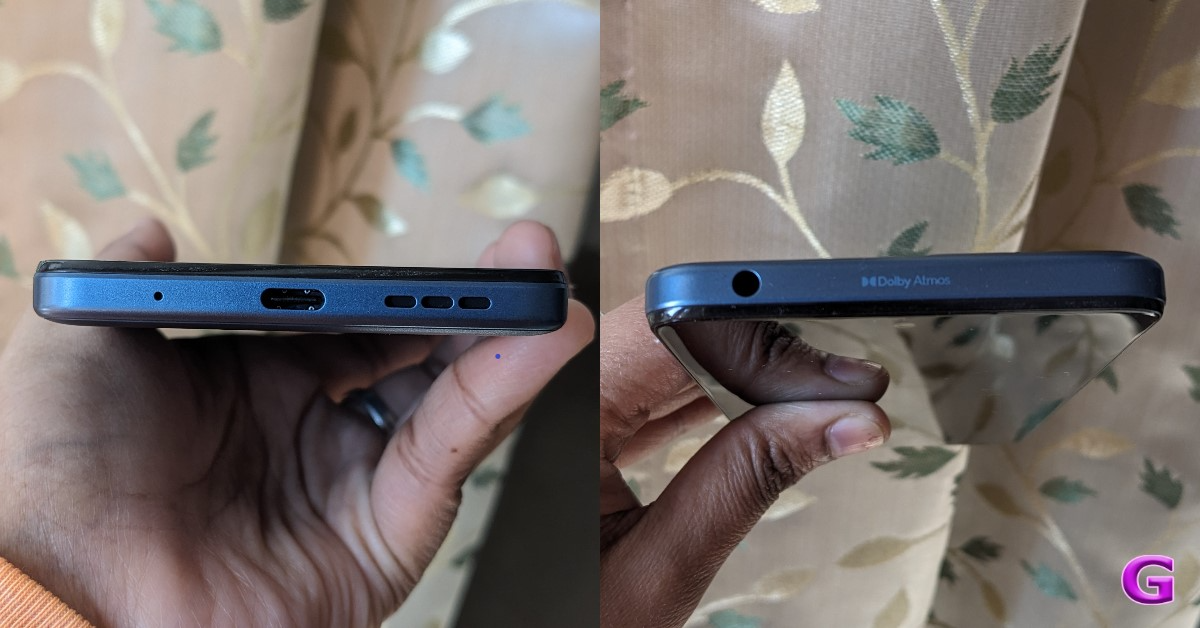
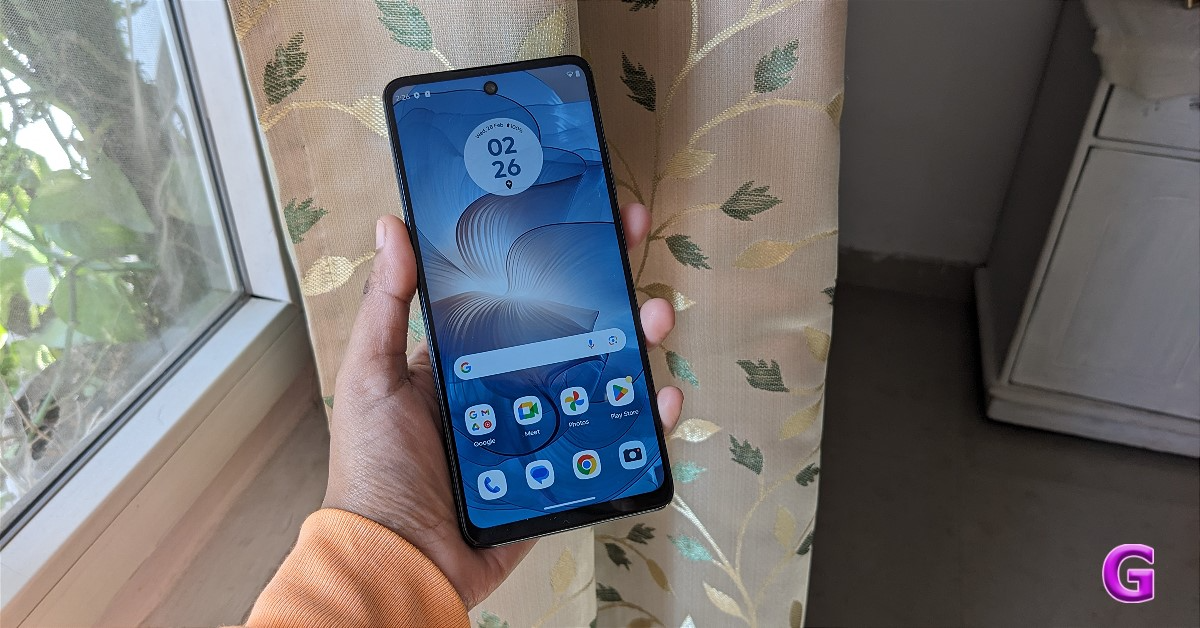
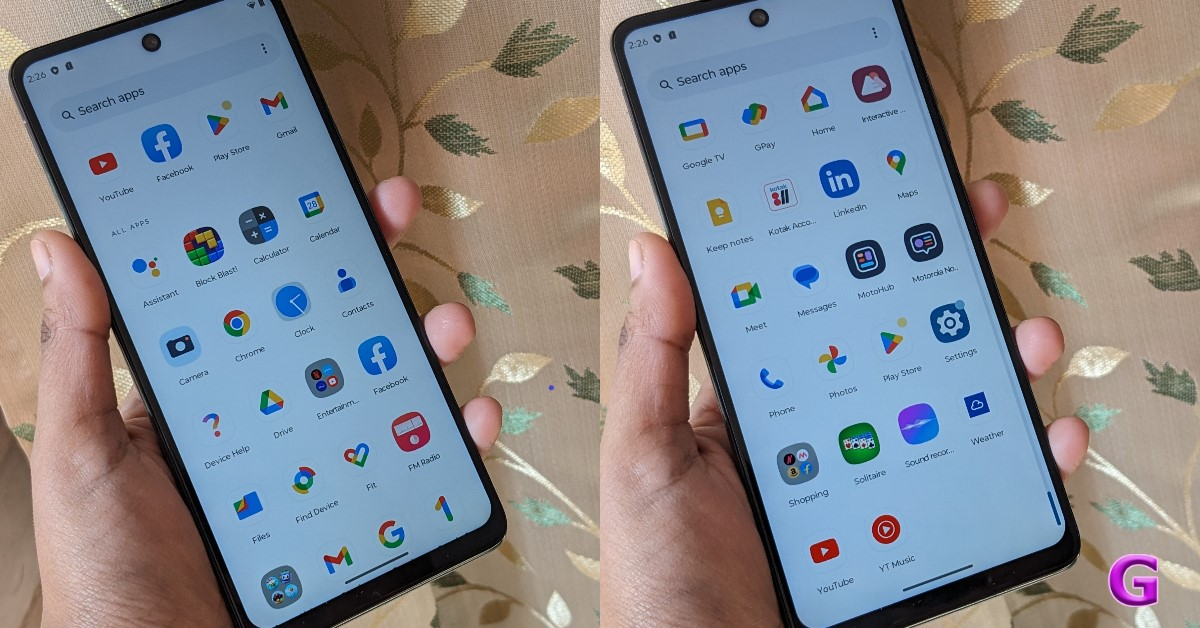
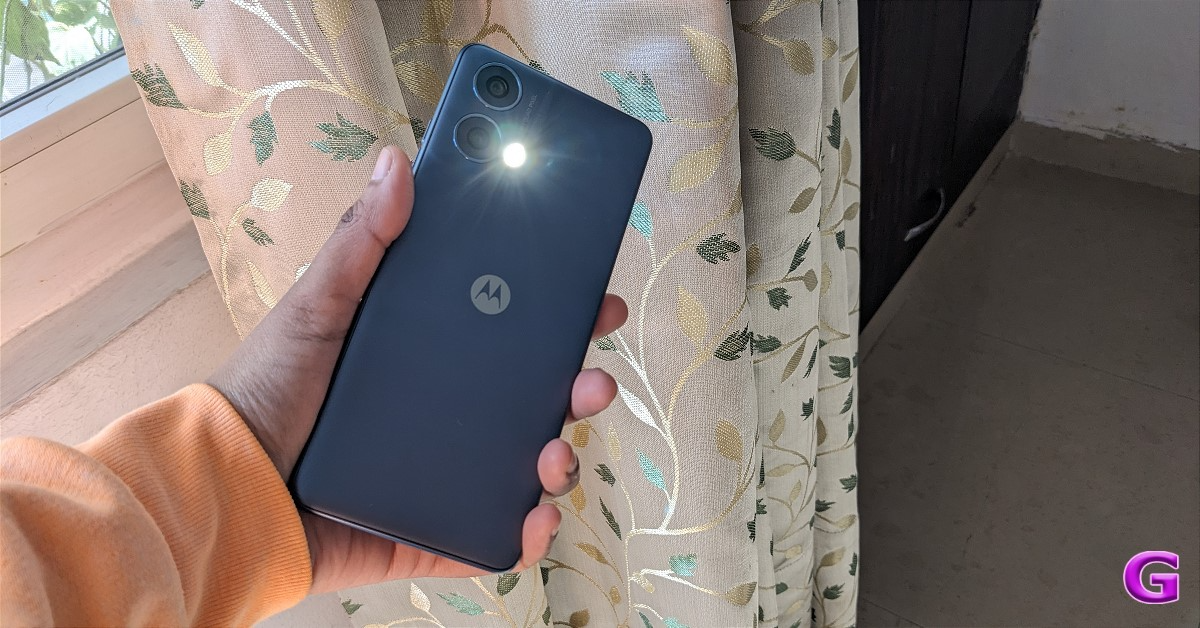
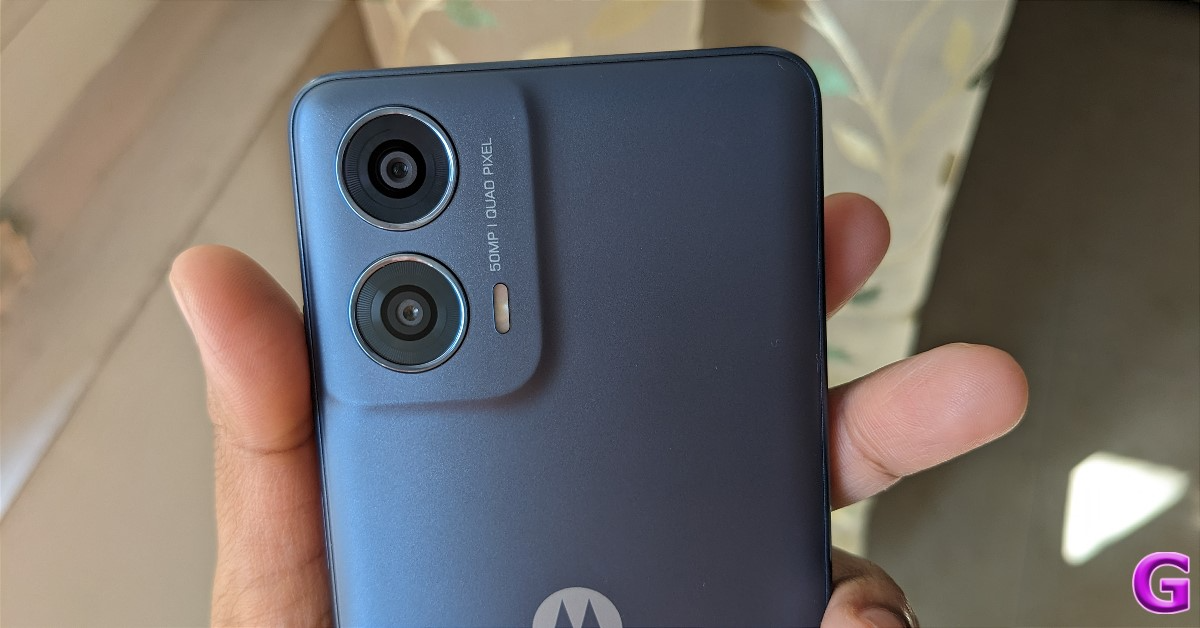


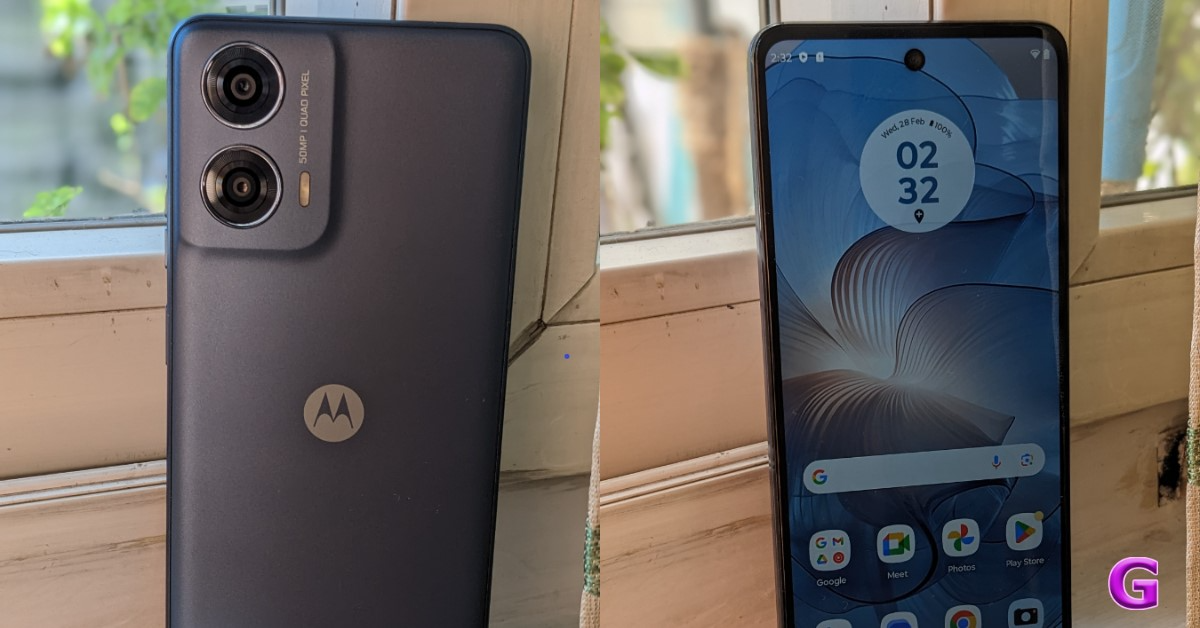


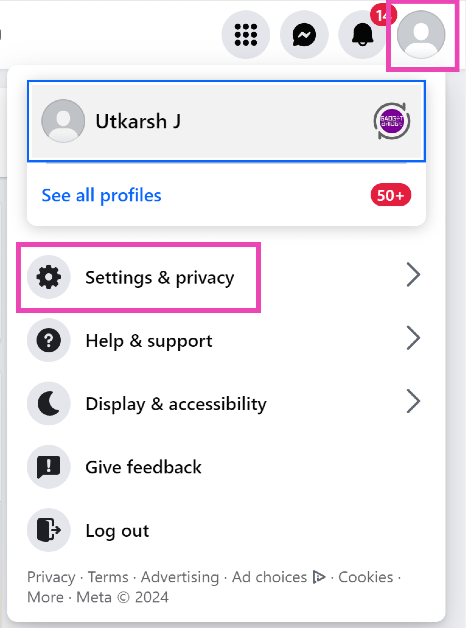 Step 3:
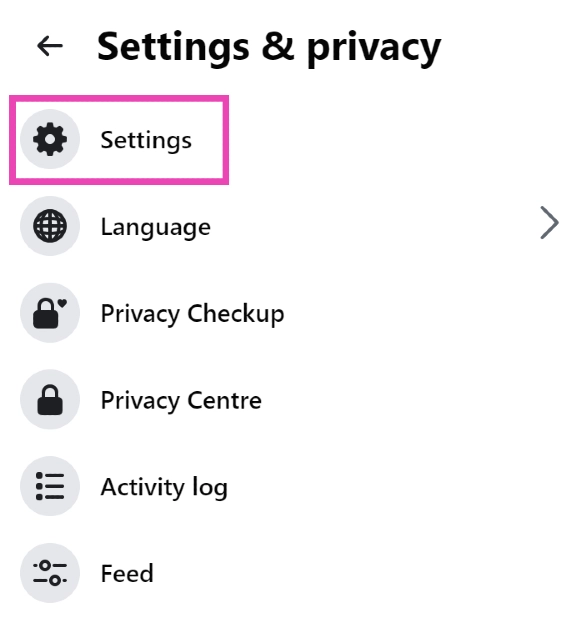 Step 4:
 Step 5:
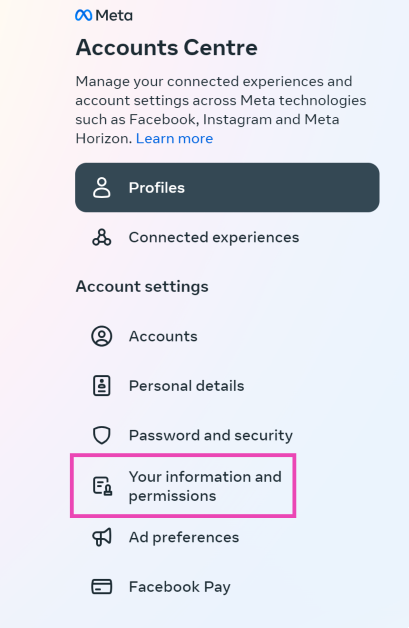 Step 6:
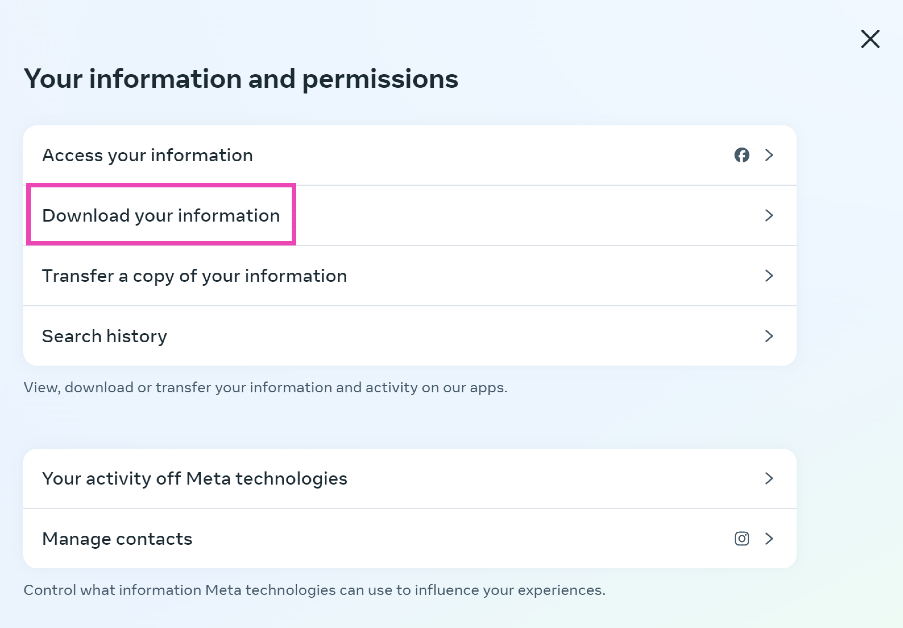 Step 7:
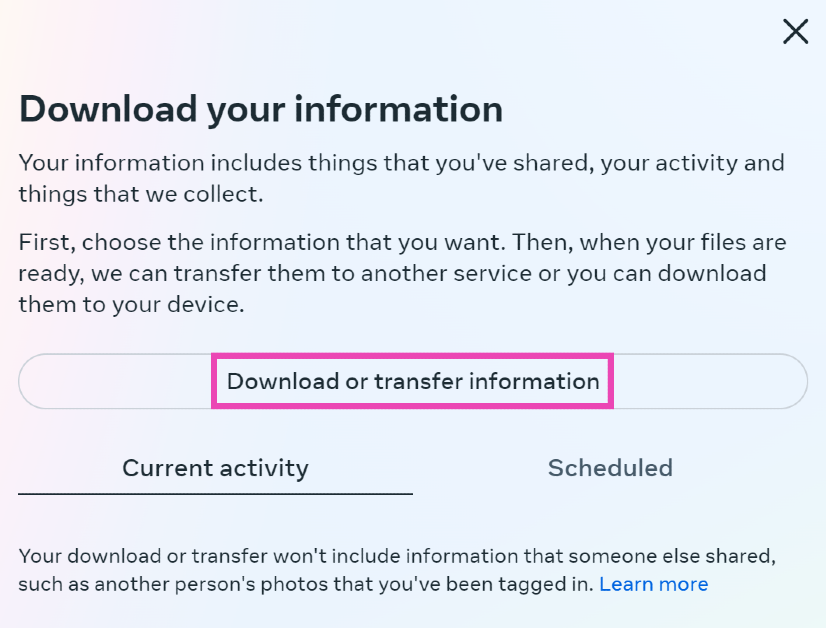 Step 8:
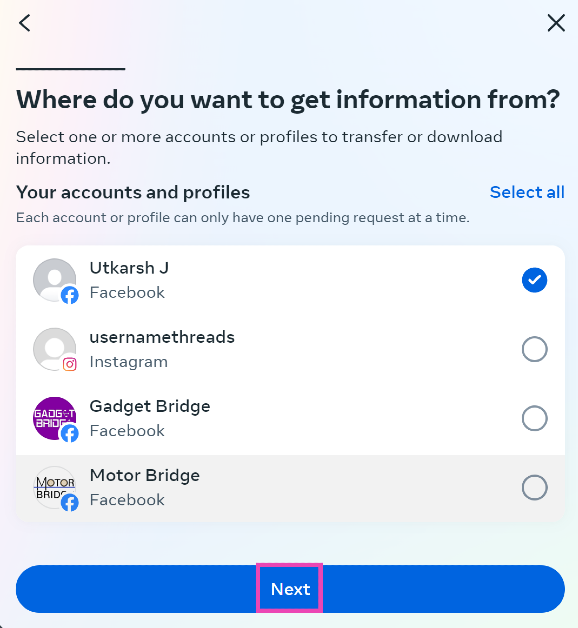 Step 9:
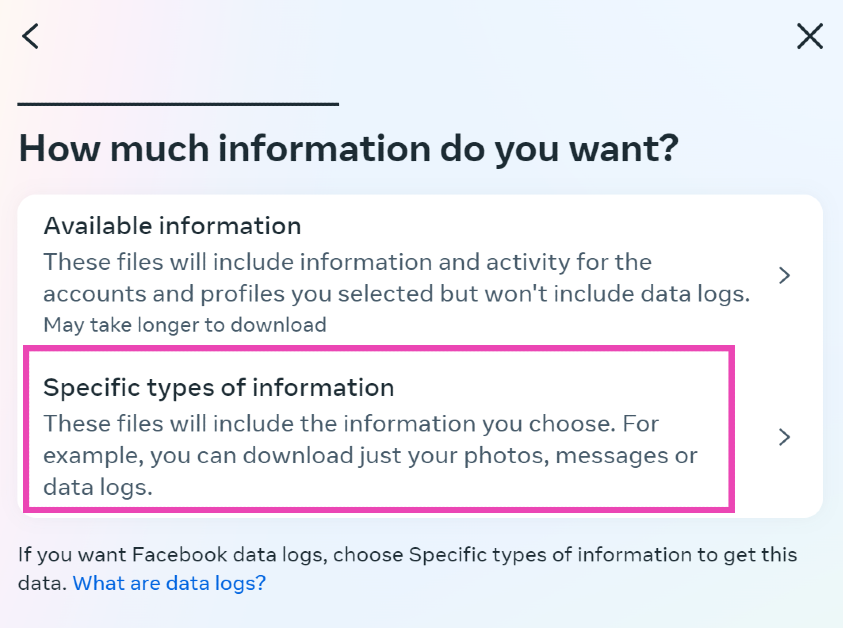 Step 11:
 Step 12:
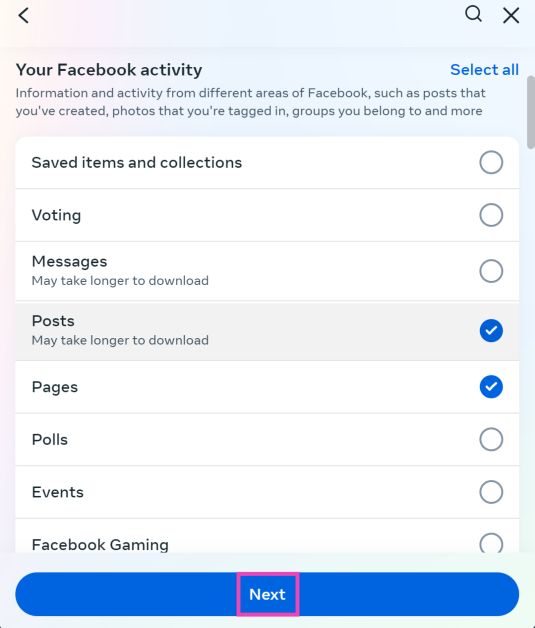 Step 13:
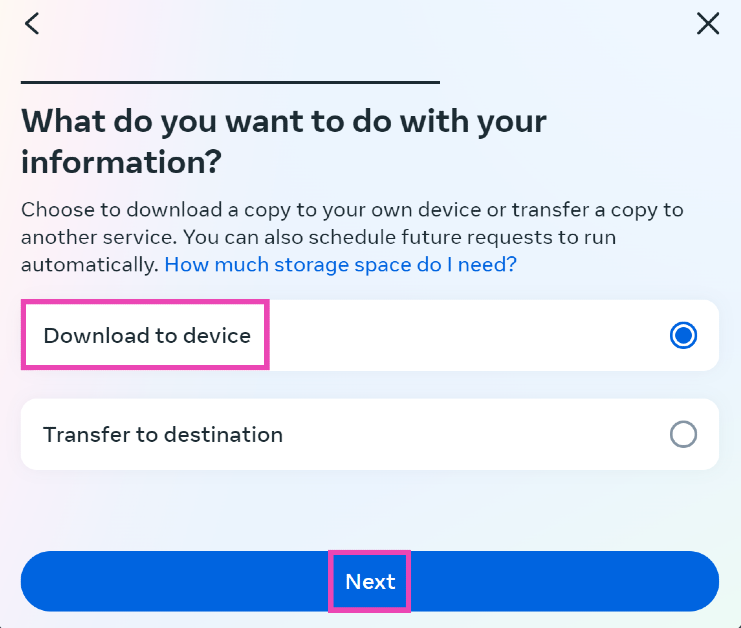 Step 15:
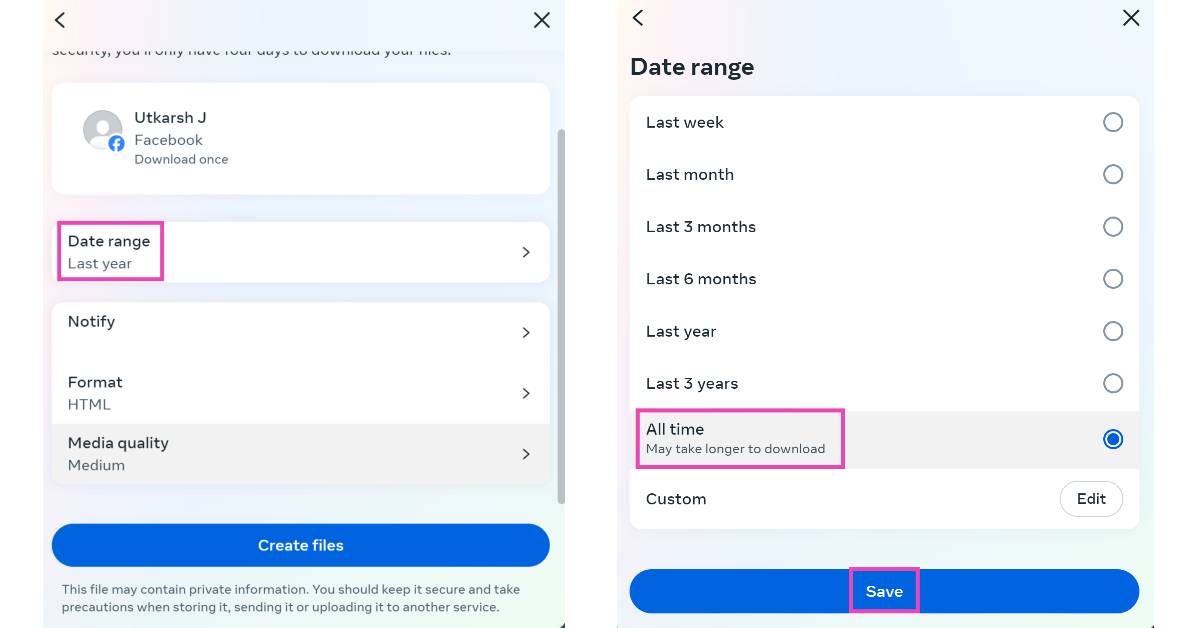 Step 16:
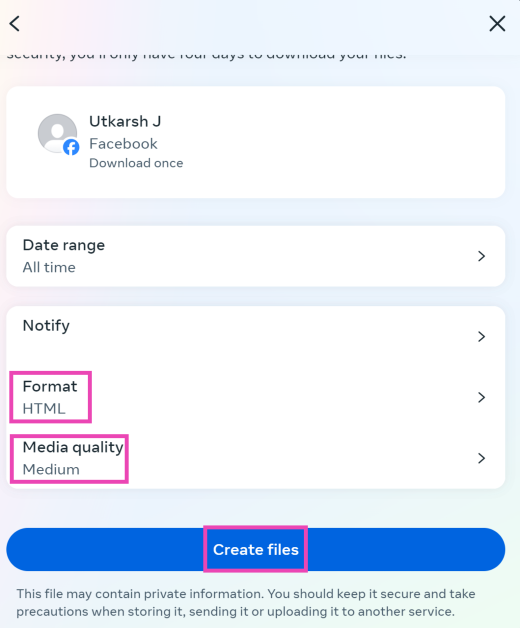
 Step 2:
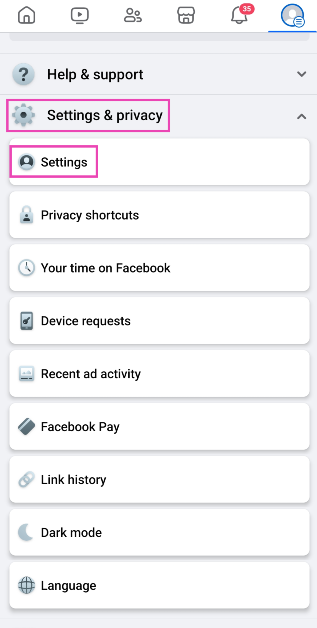 Step 3:
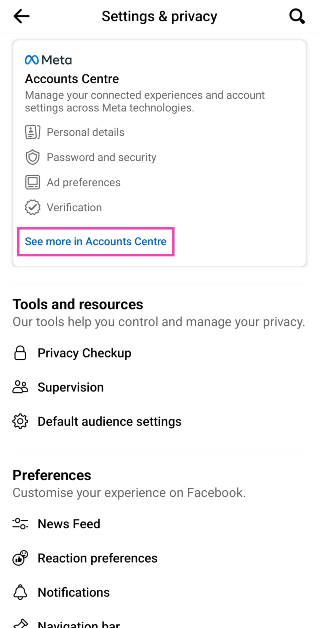 Step 4:
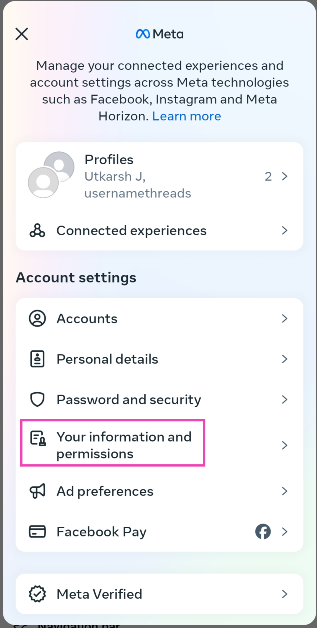 Step 6:
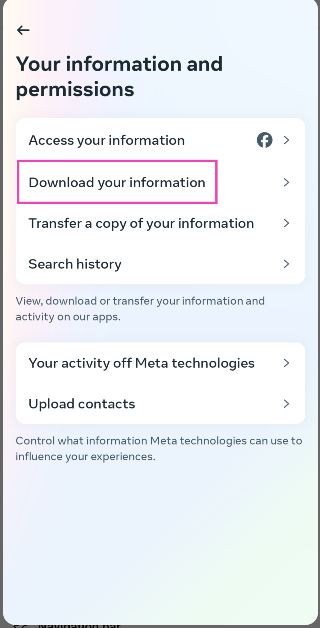 Step 7:
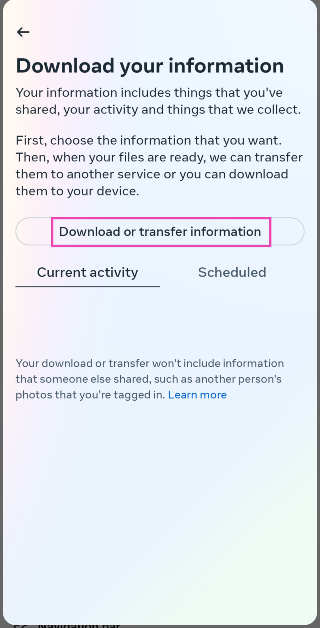 Step 8:
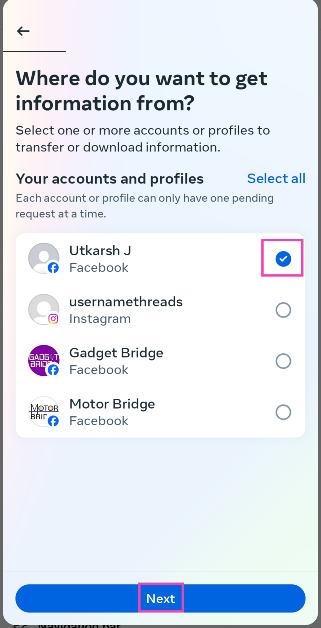 Step 9:
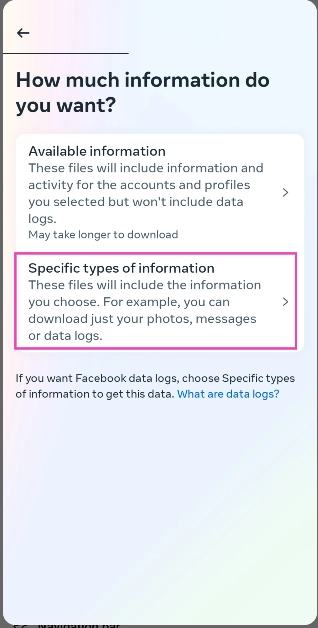 Step 11:
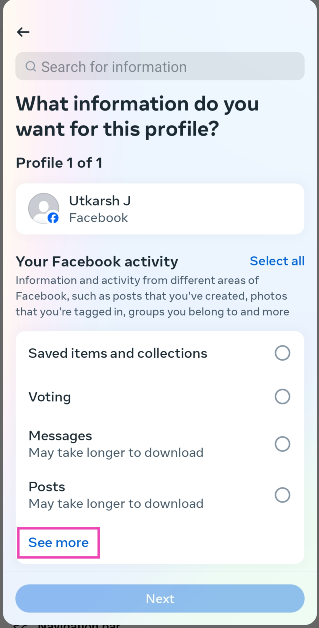 Step 12:
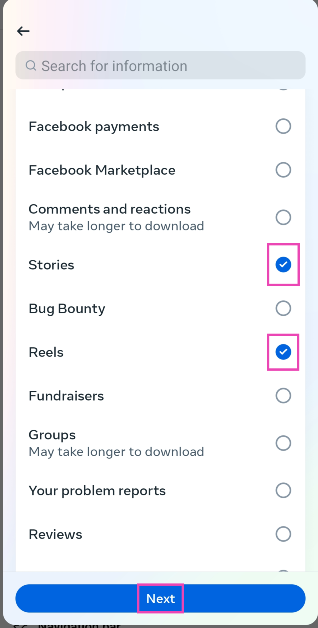 Step 13:
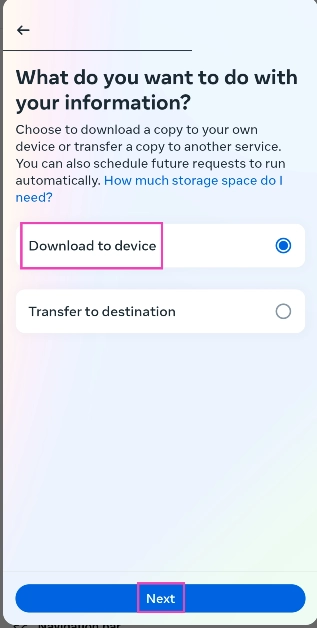 Step 15:
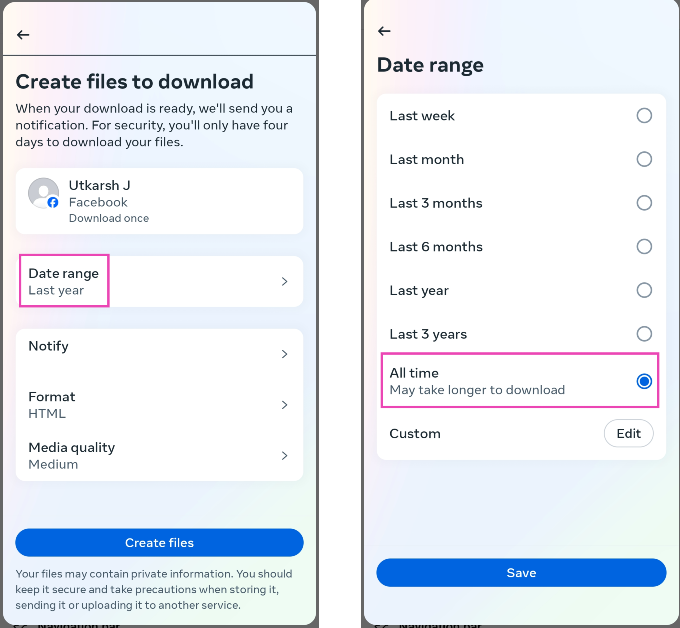 Step 16:
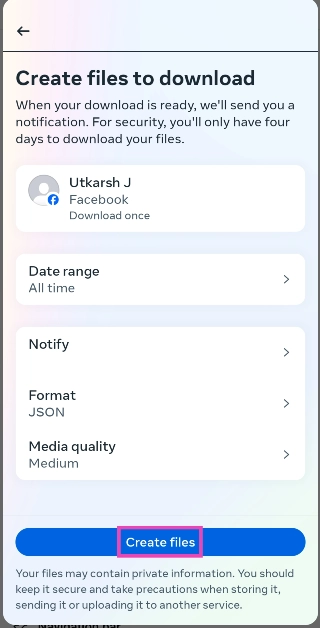


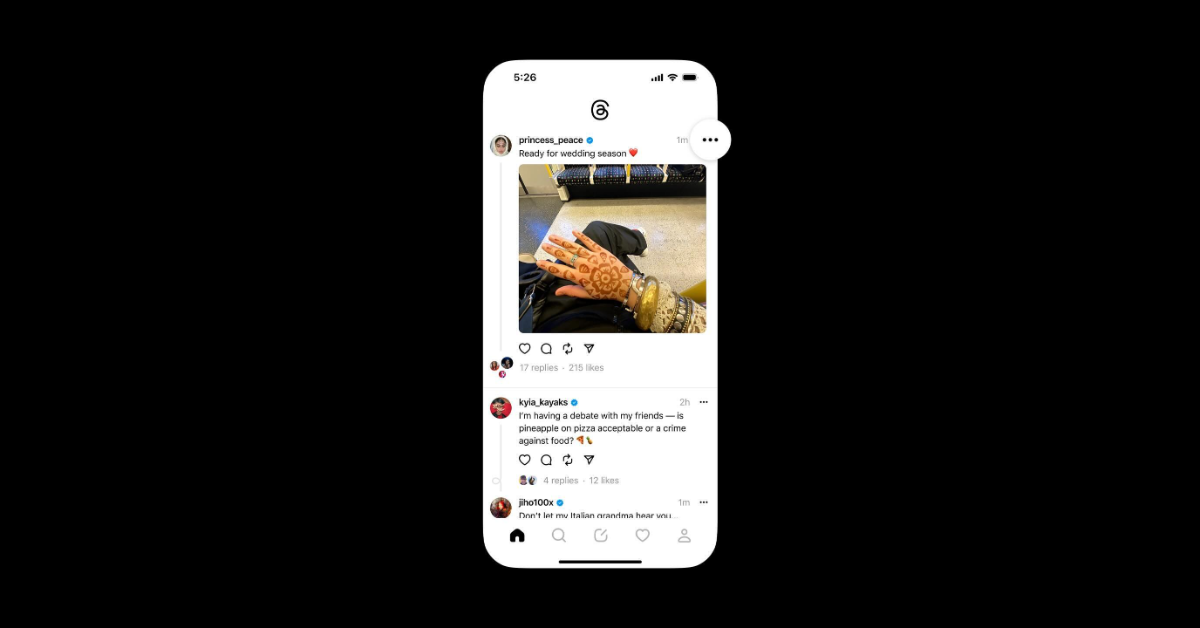
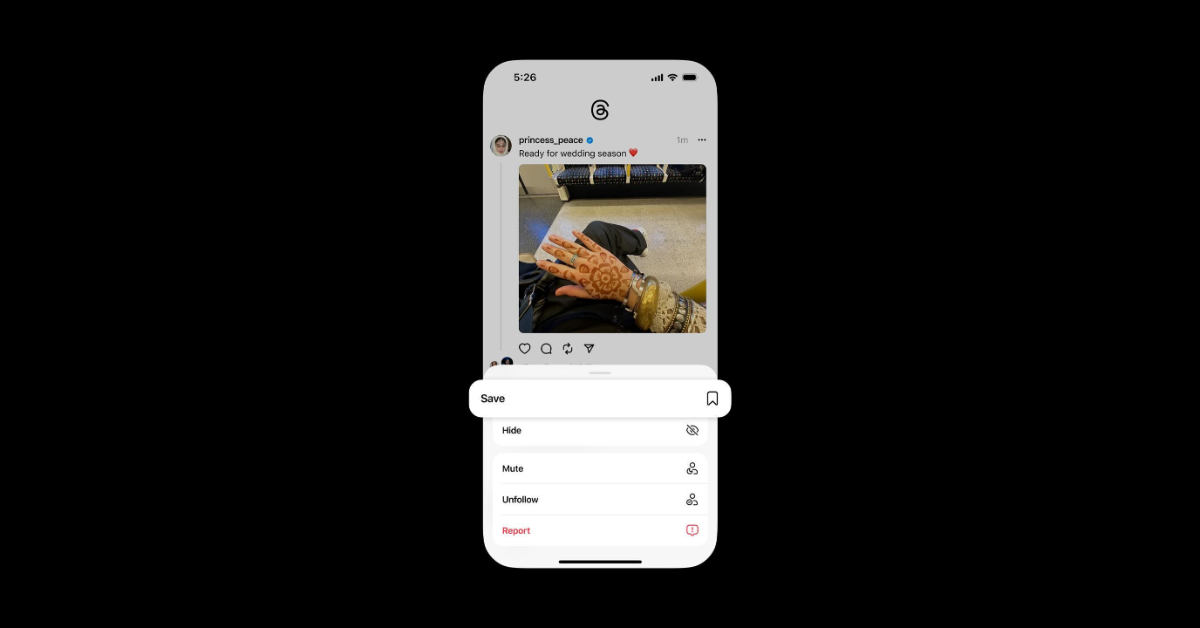
")
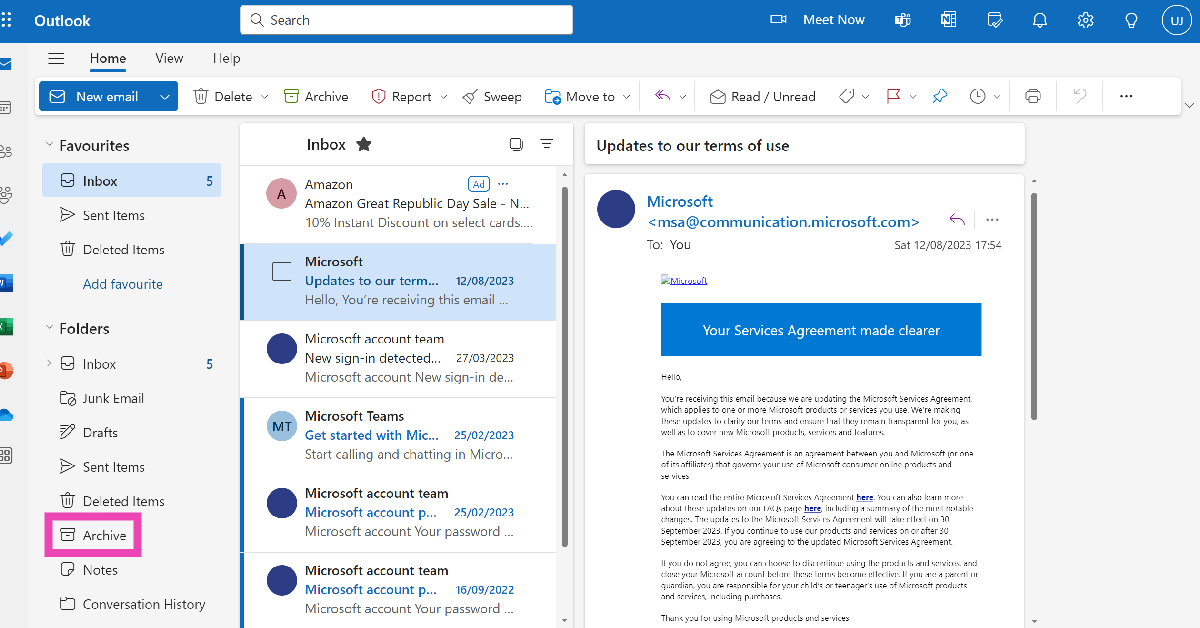
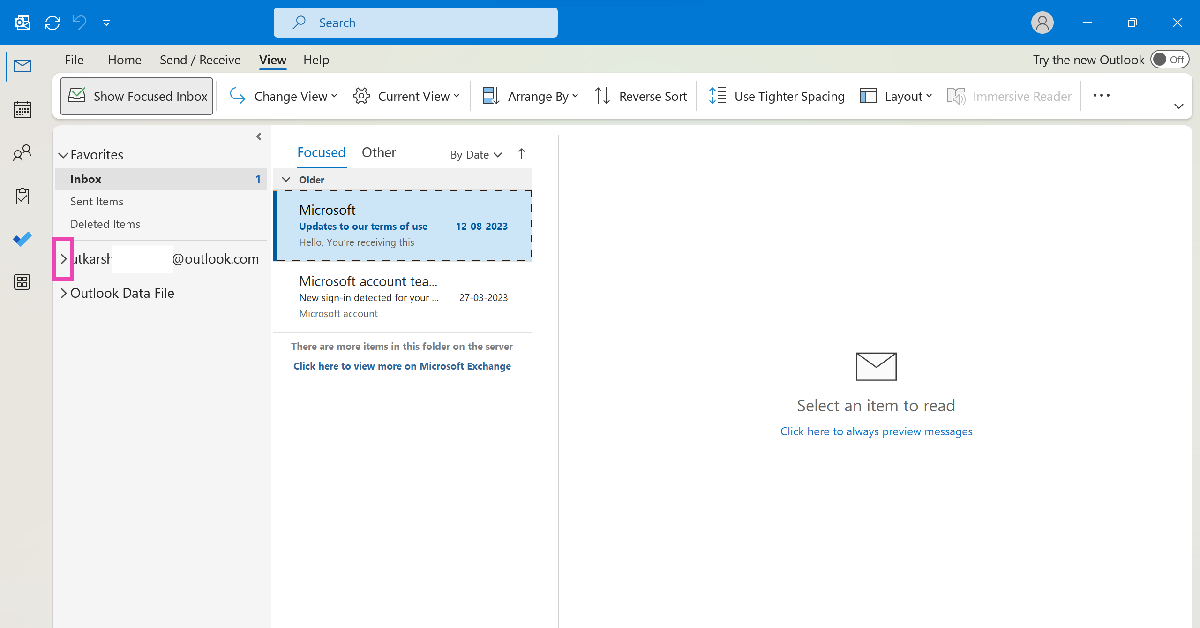 Step 3:
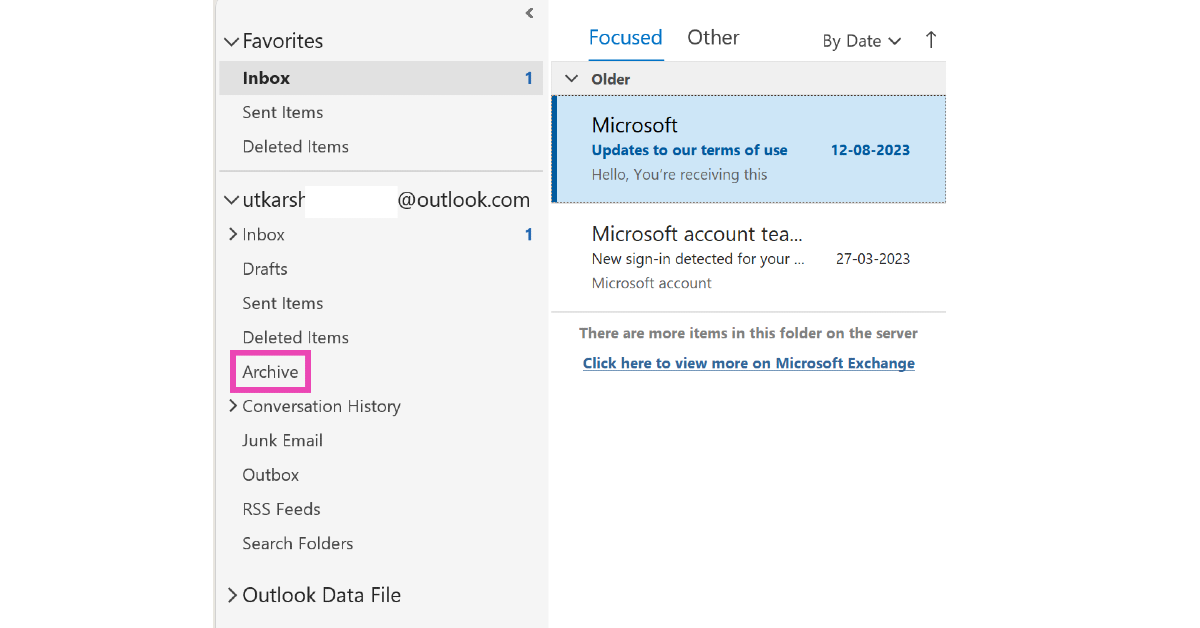
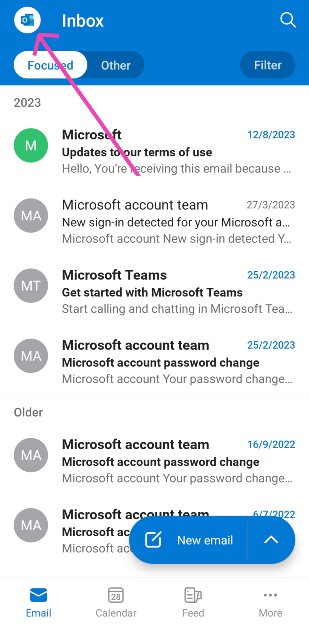 Step 3:


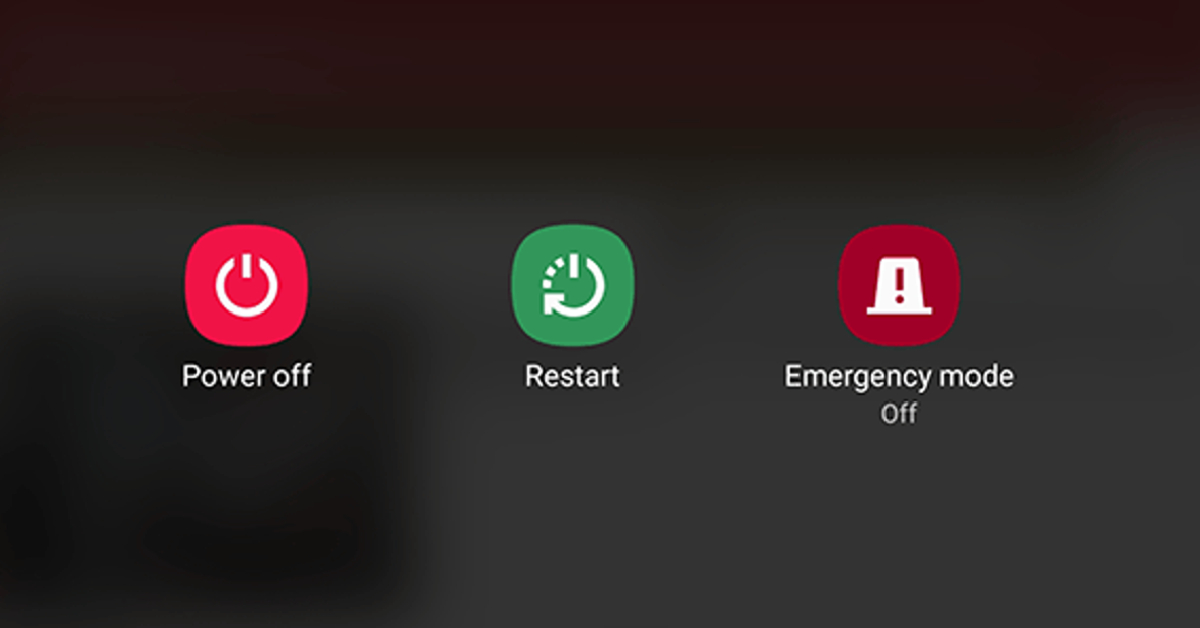


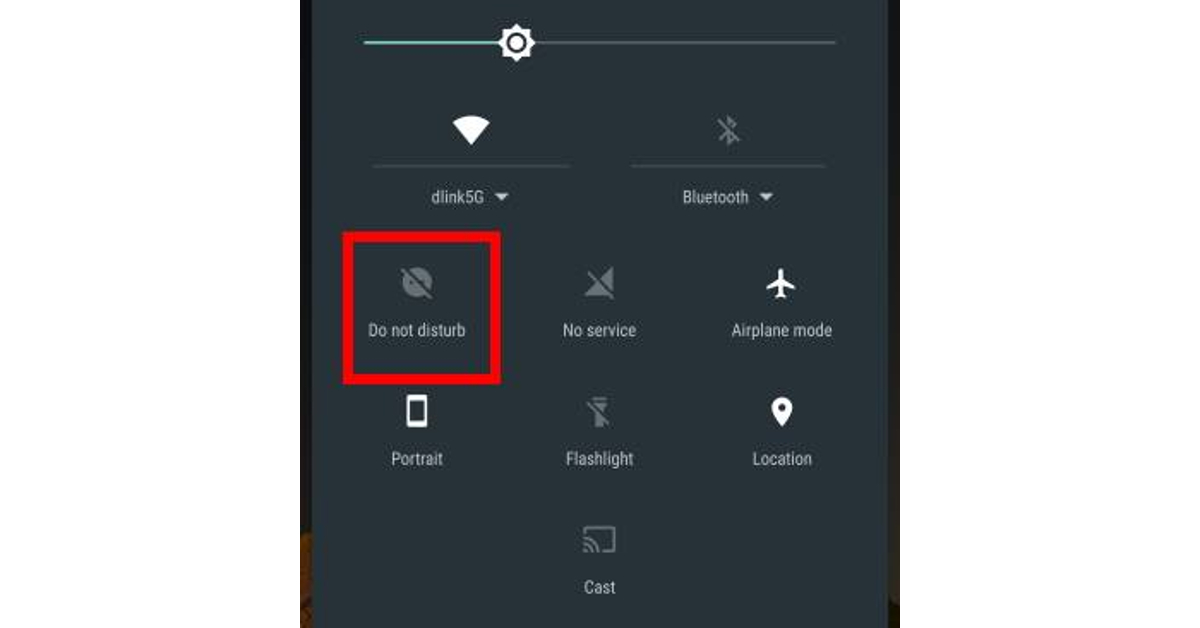 If your phone is in Do Not Disturb mode, it won’t notify you about incoming calls. DND mode only allows calls from whitelisted callers. Other calls only get through when the caller rings you multiple times. To disable DND, swipe down from the status bar and hit the Do Not Disturb tile. You can also disable it by going to Settings>Notifications>Do Not Disturb and turning off the toggle switch.
 If you’re in an area with poor signal strength, the call services on your phone will fail to function. Elevators, basements, and high elevation areas are some of the places where you may face this issue. Move to an open area with better network reception to make or accept a call.
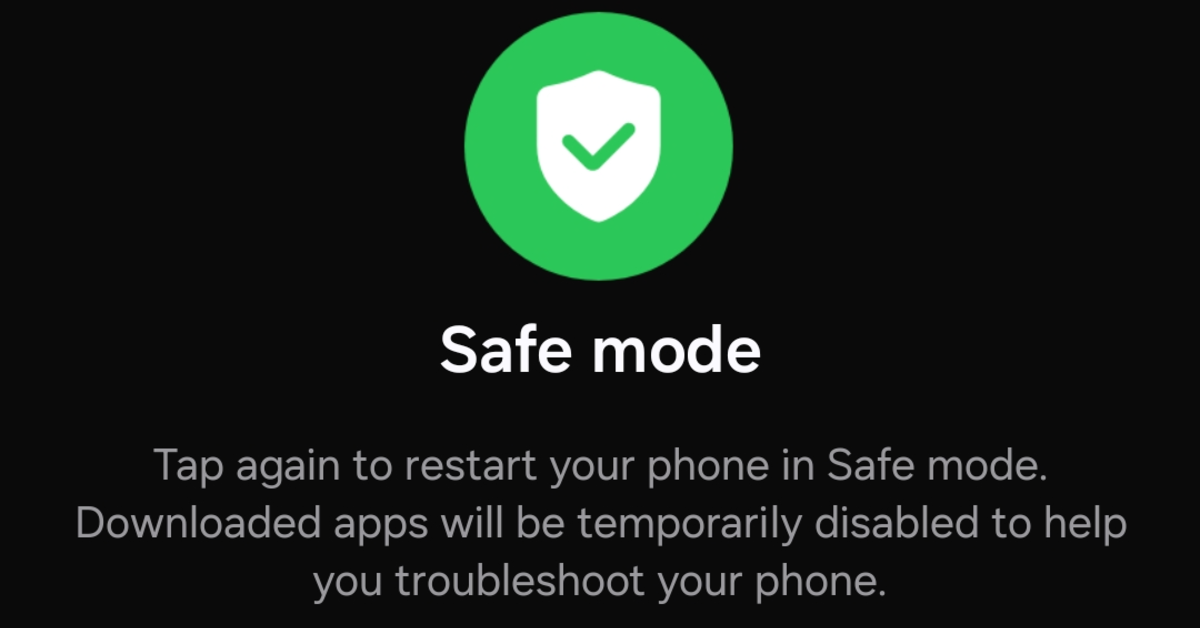 The third-party apps on your phone can often disrupt its regular functioning. Sometimes, the apps downloaded from sketchy sources push malware on your device, causing erratic behaviour. To confirm if this is the case, restart your phone in safe mode. Go to the power menu, long-press the power off icon, and hit ‘Safe Mode’. This will restart your phone and disable all the third-party apps. If you’re still unable to make or receive calls, it means the third-party apps on your phone are not causing the issue.
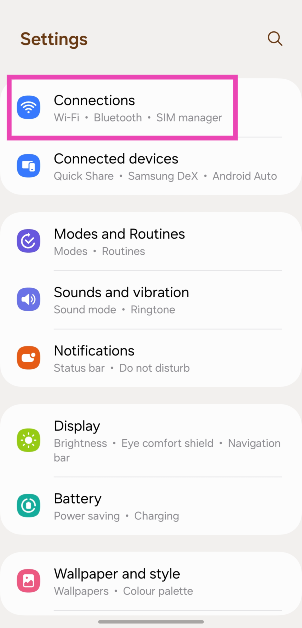 Step 2:
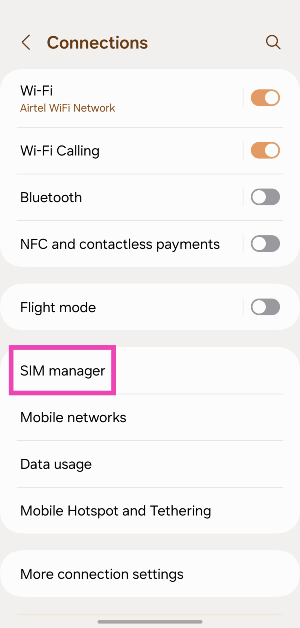 Step 3:
  Step 4:
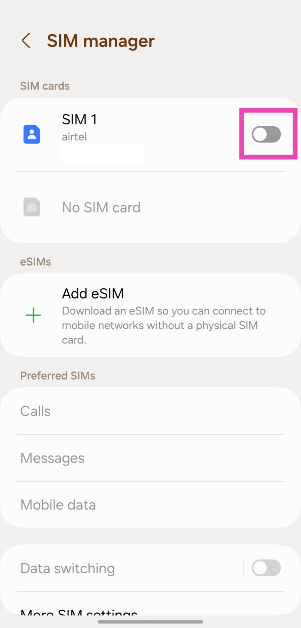
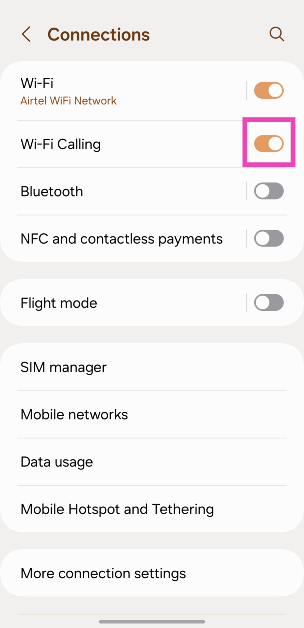
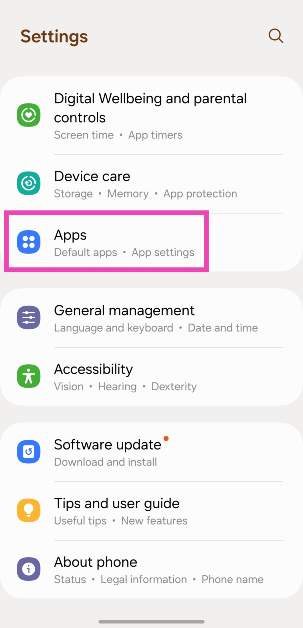 Step 2:
 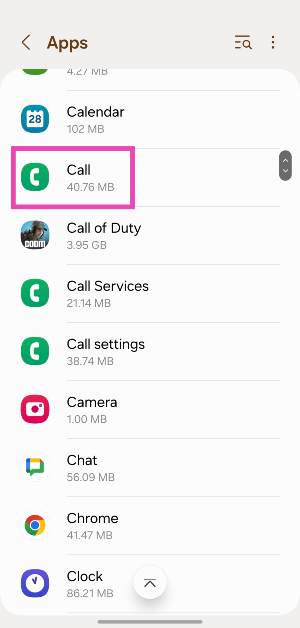 Step 3:
 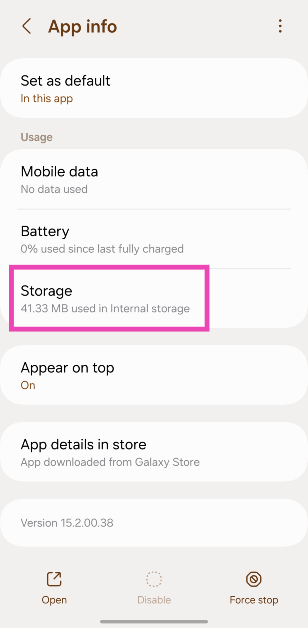 Step 4:
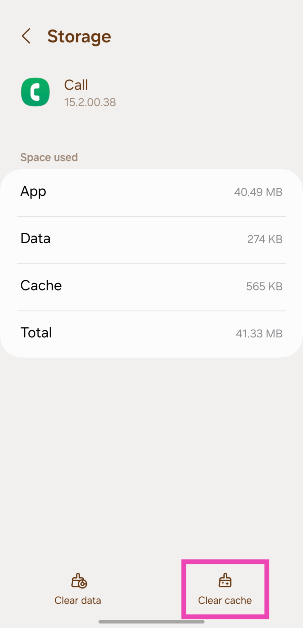
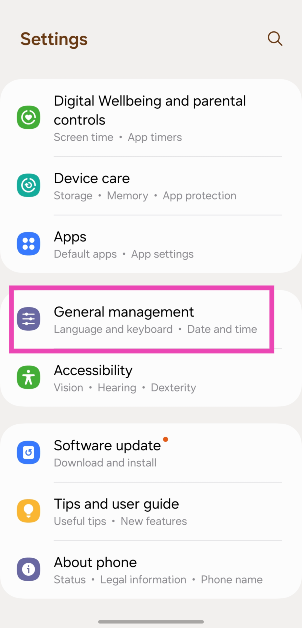 Step 2:
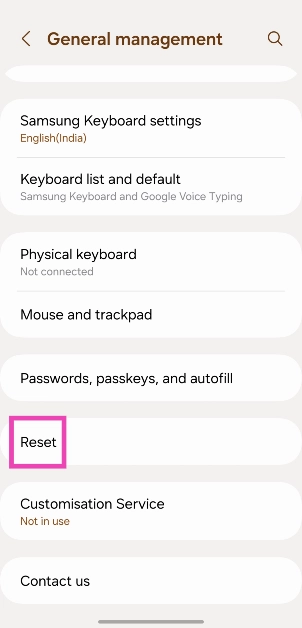 Step 3:
 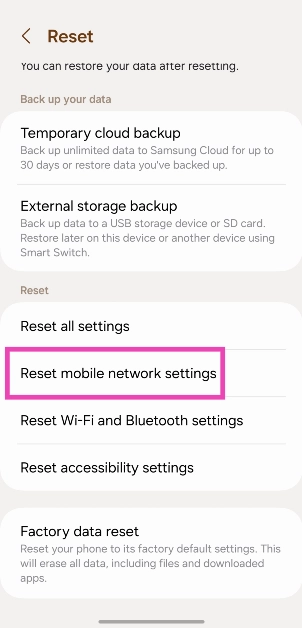 Step 4:
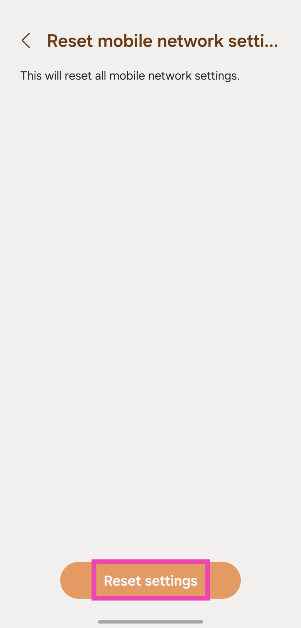
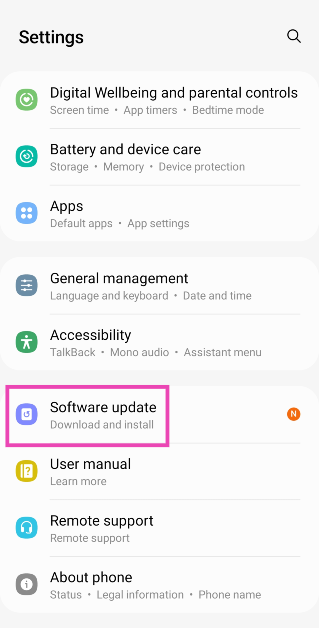 Step 2:
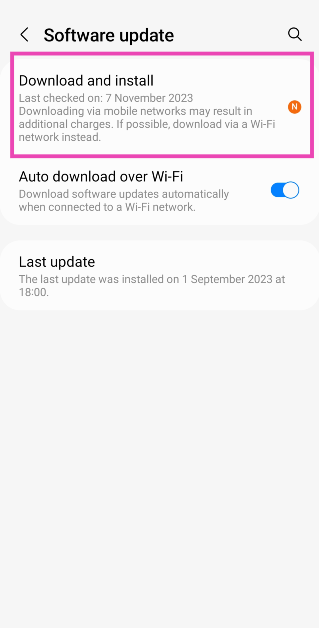 Step 3:
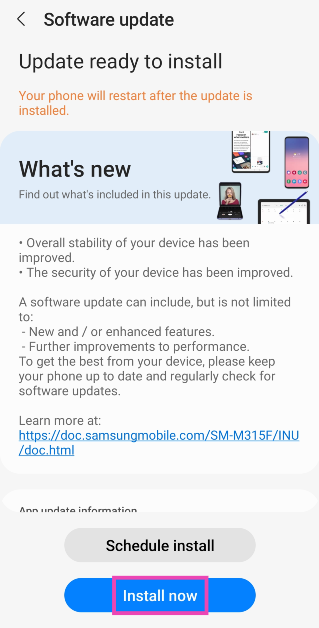


")
 Step 1:
 Step 1:
")
 Step 1:
  Step 1:
 Step 1: Launch