Garena Free Fire is a battle royale game with regular awards and tournaments to keep players interested. If you play Garena Free Fire, you should be aware of the redeem codes that are released on a daily basis. However, because the battle royale game is banned in India, players from other countries can use the Free Fire Redeem codes daily. If you’re unfamiliar with the Garena Free Fire redeem codes or don’t know how to get them, we’ve put together a step-by-step guide to help you redeem them. Check out Garena Free Fire Redeem Codes for 16 January 2024.
The Free Fire redeem codes are a great way to get free stuff. These are 12-digit codes that contain alphabets and numbers, as well as an expiration date and time. Because the Garena FF redeem codes cannot be used more than once, you should hurry to the redemption page to claim your free reward before someone else does. To get a free reward, all you have to do is go to reward.ff.garena.com/en, which is the official redemption page. Also, keep an eye on this space for daily updates on Garena Free Fire redemption codes and rewards.
In This Article
Garena Free Fire Redeem Codes Today 16 January 2024
MCPW2D1U3XA3
BR43FMAPYEZZ
FFCMCPSGC9XZ
UVX9PYZV54AC
MCPW3D28VZD6
V427K98RUCHZ
FFICJGW9NKYT
XUW3FNK7AV8N
FF10617KGUF9
NPYFATT3HGSQ
XZJZE25WEFJJ
6KWMFJVMQQYG
MCPW2D2WKWF2
FFCMCPSJ99S3
EYH2W3XK8UPG
ZZZ76NT3PDSH
HNC95435FAGJ
FFCMCPSUYUY7E
FFCMCPSEN5MX
FF11NJN5YS3E
How to Get Free Fire Redeem Codes for Garena on 16 January 2024?
Google Maps is undoubtedly the best navigation and web mapping platform around, and for good reason too. If you’ve got the app on your phone, you can never truly be lost. With just one tap, you can see where you are – down to the exact coordinates. Going to unknown places is also not a hassle, all you need to do is enter your destination and the app will guide you there. But what if you need to find the postal address of a place to send mail? Google Maps can help you with that as well. Today, we bring you the top 2 ways to find the postal address of any location on Google Maps.
Things to keep in mind while looking up the address of a location on Google Maps
If you’re looking for the address of a residential location, always drop the pin within the territory of the building on the map and not at the border or the road.
Double-check the location by using street view.
If you’re looking up the address of a business or a vendor, search for their contact number on the public listing. Call the number to find out the correct address.
The address of some places may not be listed on the app. Other places may have an incomplete address. Check the address of places near the location to get a faint idea.
Find the postal address of any place or location using Google Maps on a PC
Step 5: The address will be mentioned in the header of the page. For the full address, switch to the Overview tab.
Frequently Asked Questions (FAQs)
How do I find my current location on Google Maps?
Launch the Google Maps app on your phone and hit the Recentre (aim) button at the bottom left section of the screen. The blue dot on the map denotes your current location.
Is it possible to find the exact address of a location on Google Maps?
To find the exact address of a location on Google Maps, drop a pin on it and swipe up on the screen to see the details related to it. The full address of the location will be listed under the Overview tab.
How do I blur my house from Google Street View?
Find your house in Google Street View and hit the ellipses to report a problem. On the following page, drag the image to place your house in the red box and submit a blurring request.
These are the top 2 easy ways to find the postal address of any location on Google Maps. Pulling up the full details about the location will also give you the postal code of the area. If you have any questions about this issue, let us know in the comments!
Smartphones and GPS have completely eliminated the need for asking strangers for directions. If you suspect you’re lost, simply enter your destination on the map and your smartphone will guide you there. The same goes for finding public restrooms near you. If you’re in an unfamiliar place and feel nature calling, all you need to do is whip out your phone and choose your pick from the facilities near your location. Today, we bring you the top 5 ways to find public restrooms near your current location on iPhone and Android.
Do you need a third-party app to find restrooms near you?
The simple answer is no. You don’t even need to launch any app on your phone to find a nearby toilet. You can use your device’s voice assistant (Siri or Google Assistant) to pull up all the results and list them on the map. Google Maps has the most exhaustive list of public facilities, covering almost every location near you. If you can’t find a restroom, you may want to broaden your search and look for hotels and public lodging. Upon request, they may let you use their restroom facilities.
Looking up restrooms online can be a bit like playing roulette. Even though most listings have the appropriate rating next to them, they may not have what you’re looking for. For example, some users may require the toilet to be wheelchair accessible and offer a handicap stall. Others may need to use a toilet for its diaper changing station. If your needs are more specific, there are some great third-party apps that you can use. More on that later.
Step 2: Tap on the search bar and enter ‘Restrooms’.
Step 3: Select Restrooms (Search Nearby).
Step 4: All the restrooms near you will be marked on the map.
Step 5: Pull up the list to go through all the results.
Use Google Assistant or Siri on your Android phone or iPhone
If you’re in a bit of a hurry, instead of going through the map app on your phone, you can simply call the services of the voice assistant. Android users can use Google Assistant by simply saying “Hey Google, find public restrooms near me”. Similarly, iPhone users can trigger Siri by asking “Hey Siri, find public restrooms near me”. The voice assistants will pull up the results on Google Maps and Apple Maps respectively.
Perform a Google Search
Don’t want to use the Voice Assistant? Perform a simple Google search instead. Simply search for ‘Public restrooms near me’ and give the web browser access to your current location. Google will present the results along with the option to search for directions and look up the reviews.
Use a third-party app
Apps like Toilet Finder and Flush can help you easily locate public restrooms near you. These apps have hundreds of thousands of public and private restrooms in their libraries, with proper user reviews and additional features. These apps can let you know whether the toilet has a handicap stall or a diaper changing station. If a restroom is pay-to-use, the fee will be mentioned in the app.
Frequently Asked Questions (FAQs)
How do I find public restrooms near me?
Use Google Maps or Apple Maps to perform a quick search for public restrooms near you. You can also use your phone’s voice assistant or perform a simple Google search.
How do I find out if a public restroom near me has a handicap stall?
Use third-party apps like Flush and Toilet Finder to know if the restrooms near you are equipped with amenities like a handicap stall and diaper changing station.
How do I look up the reviews of toilets near me?
Search for restrooms near you on Google Maps or Apple Maps, pull up the list of results and tap on an entry to check its reviews.
These are the top 5 ways to find public restrooms near your current location on iPhone and Android (2024). Make sure the location services on your phone are turned on before trying these methods. If you know any other way to look up public restrooms around your location, let us know in the comments!
Having a call recording warning play out as soon as you hit the record button on a call can be very counterproductive. When someone is recording a phone call, they are most likely trying to be discreet in order to the get most information out of the other person on record. An announcement that the call is being recorded can completely obliterate this task and even ward off the person from whom you’re trying to get the necessary information. If you want to ditch the call recording warning and announcements on your Android phone, check out these 7 super easy methods.
Why can’t I record a call without the warning announcement?
Most Android phones these days ship with the Google Phone app as their default dialer. While this doesn’t seem like a big deal, it comes with one big catch. Google’s default dialer app notifies the other person on the call whenever you hit the record button. This is rightfully a dealbreaker for a lot of people. The good news is that the workaround is just as easy. Instead of the Google Phone app, use the native dialer app on your phone.
Complications arise when you’re using a smartphone that runs the stock Android, leaving you with no other options but the Google Phone app. Sometimes, the call you want to record may be happening over a VoIP or messaging app like WhatsApp or Telegram. Since your phone’s dialer is not involved in those situations, you’re going to have to explore other options. Luckily, we have got you covered for every conceivable situation.
Use TTSLexx to record calls without warning or announcement on the Google Phone app
Step 1:Install the TTSLexx app from Google Play Store.
Step 2: Go to Settings and select Shorcuts and Accessibility>Accessiblity.
Step 3: Tap on Text-to-speech output.
Step 4: Tap on Preferred Engine and select TTSLexx. Save the changes.
Step 5: Go back to Settings and select Apps.
Step 6: Scroll down to Google Phone and select it.
Step 7: Go to Storage and select Clear Data and Clear Cache.
Step 8:Restart your phone.
Use the OEM’s dialer app to record calls without warning or announcement on Android
Certain smartphone manufacturers like Oppo, OnePlus, iQOO, and Vivo provide their own phone dialer app alongside the one from Google. Since the call recording warning is only announced on Google’s Phone app, you can use the native one to skip them. Once you launch the auto dialer app, set it as the default phone app. When the call is connected, hit the record button.
Use TrueCaller to disable call recording warning or announcement
TrueCaller offers a call recording feature that doesn’t place a warning when you hit ‘Record’. Here’s how you can use it.
Step 2: Go to Settings and turn on the toggle switch for Call Recording.
Step 3:Initiate and call and wait for the receiver to pick it up.
Step 4: Hit the Record button. The caller will be put on hold for 3 seconds, after which the recording will start.
Use a third-party dialer app
There are several dialer apps on the Google Play Store that can record your calls without notifying the person on the other line. Drupe is one of the best dialers around for this task. Here’s how you can use it.
Step 1:Download and installdrupe from the Google Play Store.
Step 2: Make drupe your default phone app.
Step 3:Launch the dialer and give it the necessary permissions.
Step 4: Go to drupe’s settings and select Call Screen.
Step 5: Turn on the toggle switch for Enable Call Recording.
Step 6:Dial a number and wait for the receiver to pick up the call.
Step 7: Hit the Record button.
Use a third-party app to record WhatsApp calls on your Android phone
All the methods we’ve mentioned so far only work for cellular calling. But what if you want to record a call on WhatsApp? You’re going to need a dedicated call recording app. Cube ACR is one such app. Here’s how you can use it.
Step 1:Install the Cube ACR app from the Google Play Store.
Step 2:Launch the app and give it the necessary permissions.
Step 3: You will be prompted to install the Cube ACR Helper app. Hit Install Helper.
Step 4: Give the Cube ACR Helper app the necessary permissions.
Step 5: Once the app has been set up, Cube ACR will automatically record all your calls as soon as the other person picks up. The recordings can be viewed within the app.
Record your phone’s screen
Your phone’s native screen recorder can also record your calls. It does not place any recording announcement or warning. Since the screen recorder is able to draw audio from your device, it can easily record any call. Select its tile from the Quick Start Menu and make sure it is recording your device’s screen. Now, place the call you want to record. Once you’re done, hit the ‘Stop’ button.
Use another phone
If these methods don’t work for you, simply put your call on loudspeaker and use another phone to record it. This rudimentary method is perfect for when the native dialer app on your phone does not have a call recording feature and you don’t want to install a third-party app. The quality of the recording will not be as good as the other ones, but it will be passable.
Frequently Asked Questions (FAQs)
How do I disable call recording announcements on Android?
Use your smartphone’s native dialer app instead of Google Phone to disable the call recording warning announcement on Android. A third-party dialer like druke works as well.
How do I record a WhatsApp call on my Android phone?
WhatsApp calls can be recorded by using a dedicated call recording app like Cube ACR. This app works for other IM apps as well.
Where can I find my call recordings?
Use the File Manager to find all your recorded calls in the ‘Call Recordings’ folder in your phone’s internal storage. Some OEMs may have the option to access them within the Phone app itself.
These are the top 7 ways to record calls on your Android phone without a warning or announcement. Once you’ve recorded a call, you can use an online tool to remove the background noise on the recording and even generate its transcript. If you know any other way to remove the warning message while recording a call, let us know in the comments!
Google Photos is a great tool to store and back up your images across all your devices. If you use one account for Google Photos, you can access all your pictures anywhere. You can share an album with other people, lock sensitive images, and archive old media. If someone wants to see photos from a particular event, you can easily share a link to the album with them. Strangely enough, Google Photos does not offer the option to embed images and albums into your website and emails. But we know a couple of tricks you can use to get around this issue. Read along to find out.
Why you should consider embedding pictures instead of attaching them
If you want your email or website to keep the attention of the reader, eye-catching images are what you need. Of course, you can always attach an image with your email, but the reader likely won’t go back and forth between the images and the body of the email while reading it. A much better idea is to embed the images in the relevant parts of the email. For example, if your email is regarding an event, you can post its flyer in the middle of the text, so the reader gets a visual grasp on the topic at hand.
To increase the readability of your email, make sure the dimensions of the image are appropriate and do not require scrolling the page. If your image exceeds the file limit imposed by Gmail, you can always compress it to a smaller size. Adding a caption and alt text to the image goes a long way too. In case the reader isn’t able to load the image, the alt text will do a good job of relaying the nature of the picture.
Embed a Google Photos album on your website
Step 1: Go to Google Photos on your PC and select the album that you want to embed.
Step 2: Hit the share icon at the top of the screen.
Step 6: If you want, you can make changes to the dimensions of the images and the way the images are displayed on the album.
Step 7:Copy the embed code.
Step 8: Now, go to your website/blog’s dashboard and click on Add media.
Step 9: Click on Insert Embed Code.
Step 10: Click on Insert Into Post.
Embed Google Photos in your email
Step 1: Log into your Gmail account and click on Compose.
Step 2: Click on the Photos icon in the compose window.
Step 3: Select the photos that you want to embed.
Step 4: Select Inline.
Step 5: Click on Insert.
Frequently Asked Questions (FAQs)
How do I embed Google Photos into my website?
Copy the link to the photo/album, generate its embed code, and paste the HTML link into your website to embed the media.
Is it possible to embed a picture into my email?
Gmail users can embed pictures from their Google Photos account into their email. Simply click on the photos icon in the email composition window and select the picture from Google Photos’ library. Instead of ‘Add as an attachment’ click on ‘Inline’ to embed them.
I can’t embed pictures into my email due to the file size limit. What should I do?
Compress your images to an acceptable size using an online tool and try embedding them again.
These are the top 2 ways to embed Google Photos into your website and emails. Embedding images into your emails is great if the picture is relevant to the text next to it. It works best for referential purposes. However, if you simply want to send someone a picture, you should send it as an attachment. If you know any other way to embed images into your website and emails, let us know in the comments!
Nothing Phone 2 was launched last year at a starting price of Rs 44,999.
The device will be discounted during the upcoming Flipkart Republic Day Sale.
In addition to this, the CMF Power 5W GaN charger will also be sold at a discounted price.
Just ahead of Flipkart’s Republic Day Sale, Nothing has announced great offers on Phone 2. The company will be offering up to Rs 1,000 off on its latest smartphone. In addition to this, the firm has also revealed additional offers, including a bank discount on the purchase of the device. Flipkart will kick off the Republic Day Sale on January 14. During the sale period, major smartphone brands will be offering exciting deals on their products. Just before the annual sale begins, Nothing has revealed deals and discount offers for Flipkart customers on Nothing Phone 2, which can only be availed of during the sale period.
The company announced Nothing Phone 2 in India last year in July. It was made available in three RAM and storage configurations. The company will be offering up to Rs 10,000 off on all its products during the upcoming Flipkart Republic Day sale. According to the company, 12GB of RAM with a 256GB storage option will be available for just Rs 34,999. As of now, the device is listed at Rs 44,999 on the e-commerce platform. The offer price will be available only during the sale.
Similarly, other variants are also expected to get a temporary price cut.
Aside from this, the CMF Power 5W GaN charger, which was launched at Rs 2,999, will be offered at a discounted price of Rs 1,999 during the annual sale.
Additionally, the company has also announced an additional bank offer to entice customers. There will be up to Rs 2,000 off if the purchase is made using ICICI bank cards. Moreover, Nothing will also offer an extra exchange discount of up to Rs 3,000.
Note that the Nothing Phone 2, launched in July last year, received a price cut in December. The price of the phone has been reduced by Rs 5,000. The 8GB RAM with 128GB storage variant was launched at Rs 44,999 and is currently listed at Rs 39,999 after a price cut. Similarly, the 12GB RAM with 256GB storage and the 12GB RAM with 512GB storage options are available at Rs 44,999 and Rs 49,999, respectively. Both variants were earlier introduced at Rs 49,999 and Rs 54,999, respectively.
Garena Free Fire is a battle royale game with regular awards and tournaments to keep players interested. If you play Garena Free Fire, you should be aware of the redeem codes that are released on a daily basis. However, because the battle royale game is banned in India, players from other countries can use the Free Fire Redeem codes daily. If you’re unfamiliar with the Garena Free Fire redeem codes or don’t know how to get them, we’ve put together a step-by-step guide to help you redeem them. Check out Garena Free Fire Redeem Codes for 13 January 2024.
The Free Fire redeem codes are a great way to get free stuff. These are 12-digit codes that contain alphabets and numbers, as well as an expiration date and time. Because the Garena FF redeem codes cannot be used more than once, you should hurry to the redemption page to claim your free reward before someone else does. To get a free reward, all you have to do is go to reward.ff.garena.com/en, which is the official redemption page. Also, keep an eye on this space for daily updates on Garena Free Fire redemption codes and rewards.
In This Article
Garena Free Fire Redeem Codes Today 13 January 2024
YXY3EGTLHGJX
FF11DAKX4WHV
WLSGJXS5KFYR
FF11NJN5YS3E
ZRJAPH294KV5
Y6ACLK7KUD1N
W0JJAFV3TU5E
MCPTFNXZF4TA
FF11HHGCGK3B
FF11WFNPP956
FF10GCGXRNHY
8F3QZKNTLWBZ
FF10617KGUF9
FF119MB3PFA5
X99TK56XDJ4X
B3G7A22TWDR7X
4ST1ZTBE2RP9
J3ZKQ57Z2P2P
8F3QZKNTLWBZ
WEYVGQC3CT8
ZYPPXWRWIAHD
SARG886AV5GR
FF1164XNJZ2V
B6IYCTNH4PV3
X99TK56XDJ4X
3IBBMSL7AK8G
FF7MUY4ME6SC
GCNVA2PDRGRZ
How to Get Free Fire Redeem Codes for Garena on 13 January 2024?
Have you ever come across a YouTube playlist and felt that it was missing some good tunes? Or maybe you were going through a lecture series and noticed it didn’t cover some essential topics. Since not everyone can add to a playlist, the only way to make it comprehensive is by copying its content to a new playlist created by you and then adding new videos to it. Earlier, YouTube used to have a very handy feature to copy a playlist Strangely enough, that option is no longer available. But there are still a couple of workarounds that will help you accomplish this task. Here are the top 2 ways to copy and merge YouTube playlists.
Let’s be honest, if you’re looking up a playlist on YouTube, it is most likely a music one. The platform pre-dates streaming services like Spotify and Apple Music, which means there are an endless number of playlists to browse through. If you want to transfer an existing music playlist to your account, use YouTube Music. If you’re a YouTube Premium subscriber, this method is even more suited to you.
There are a couple of online tools you can use for this task as well. But it involves giving the third-party tool access to your Google account. If you’re not cool with that, stick to the first method. However, a third-party tool makes it easy to merge playlists and select the content you want. Check out both the methods down below and see which one you like more!
Use the YouTube Music hack to copy and merge YouTube playlists
Step 1: Open the YouTube Playlist that you want to copy or merge.
Step 2: Click the address bar and swap out ‘www’ for ‘music’. For example, if the URL of the playlist is www.youtube.com/abc, change it to music.youtube.com/abc.
Step 3: The playlist will open in YouTube Music.
Step 4: Hit the ellipses.
Step 5: Select Save to playlist.
Step 6: Make a new playlist if you want to copy the contents or the current playlist. If you want to merge it with another playlist, select it from the list.
Use an online tool to copy and merge YouTube playlists
Step 3: Enter the URL of the playlist you wish to copy.
Step 4: Click on Fetch YouTube Playlist.
Step 5: Select Create a new playlist to copy the contents of the playlist you selected. Click on Add to an existing playlist to merge it.
Step 6: Hit the checkbox next to the videos you do not want to merge or copy.
Step 7: Select Create Playlist/Copy Playlist.
Step 8:Sign out when you’re done.
Frequently Asked Questions (FAQs)
Is there a way to copy and merge YouTube playlists?
You can either use an online tool to copy/merge a YouTube playlist or swap the ‘www’ in its URL with ‘music’. This will open the playlist in YouTube Music where it can be added to a new or existing playlist.
How do I add collaborators to my playlist on YouTube?
To add collaborators to a playlist, hit the ellipses next to it and select Edit. Turn on the toggle switch for ‘Collaborators can add videos to this playlist’. Now copy the link in the dialogue box and share it with the collaborators.
How do I transfer my Spotify playlist to YouTube Music?
Use a third-party tool like Tune My Music to transfer your Spotify playlists to YouTube Music. Read this article to learn the step-by-step process.
These are the top 2 ways to copy and merge YouTube playlists. If you face any trouble loading the playlist in the merging tool, copy its URL using the share button and not the address box on the browser. Refresh the page and try again. If you know any other way to carry out this task, let us know in the comments!
In India, Oppo Reno 11 Series is powered by Mediatek processors.
The series includes two smartphones, the Oppo Reno 11 Pro 5G and the Reno 11 5G.
Both the phones come pre-installed with ColorOS 14.
Oppo has officially unveiled its new camera smartphone series, the Oppo Reno 11 Series, in India today. The company has introduced the Oppo Reno 11 Pro 5G and Reno 11 5G. Unlike its Chinese equivalent, the Indian model of the Reno 11 comes with a MediaTek Dimensity 7050 SoC. Whereas, MediaTek Dimensity 8200 SoC powers the Pro model. A 5,000mAh battery is packed inside the vanilla model, and a 4,600mAh battery is equipped by the Pro model in India. In addition to this, both phones feature a 6.7-inch AMOLED display with a 120Hz dynamic refresh rate.
In This Article
Oppo Reno 11 Series price in India, sale details
The price of the Oppo Reno 11 Pro 5G is set at Rs 39,999 for the 12GB RAM with 256GB storage option. Whereas the Oppo Reno 11 5G will come with a price tag of Rs 29,999 for the 8GB RAM with 128GB storage option and Rs 31,999 for the 12GB RAM with 256GB storage option. The vanilla variant will be available in two colour options: Pearl White and Rock Grey. On the other hand, the Pro Varaint is being offered in Rock Grey and Wave Green colour options.
Customers can avail of the following offers on the first sale of the OPPO Reno11 Pro 5G:
Customers can enjoy a cashback of up to INR 4,000 on Flipkart, OPPO e-Store, and mainline retailers with leading bank cards like SBI Cards, ICICI Bank, One Card, IDFC First Bank, and Bank of Baroda credit cards, coupled with no-cost EMI for up to 9 months.
Customers will have the option to decide on an EMI installment and tenure at their convenience.
Additionally, customers can enjoy the benefits of zero-down payment and low-down payment schemes from leading financiers like Bajaj Finserv, TVS Credit, Home Credit, HDB Financial Services, and IDFC First Bank.
Loyal OPPO customers can avail of an exchange and loyalty bonus of up to INR 4,000 online and offline.
Customers can opt to pay through UPI and avail of an instant 7.5% cashback on the purchase of Reno11 Pro 5G.
Buy the Reno11 Pro 5G and get the OPPO Enco Air2 Pro for just INR 2,999.
The Reno 11 Pro 5G is scheduled to go on sale in India on January 18. Whereas the Reno 11 5G will be available for purchase on January 25. The devices will be available on Flipkart, the OPPO e-Store, and across mainline retail outlets.
Oppo Reno 11 Pro
Oppo Reno 11 Pro specifications
Oppo Reno 11 Pro features a 6.74-inch 1.5K OLED curved display with 1,240×2,772 pixels of resolution. The device supports up to 120 Hz refresh rate, up to 240 Hz touch sampling rate, 450 ppi pixel density, and 1,600 nits of peak brightness. It operates on Android 14-based ColorOS 14.
The Oppo Reno 11 Pro comes with a 32-megapixel RGBW Sony IMX709 front-facing camera for selfies. There is a triple rear camera setup, which includes a 50-megapixel primary Sony IMX890 sensor with OIS, a 32-megapixel telephoto lens, and an 8-megapixel ultra-wide camera.
The Reno 11 Series features OPPO’s cutting-edge HyperTone Image Engine, which uses deep pixel fusion to process lossless photos in the RAW domain. As a result, images are rendered with sharp details, accurate colours, and an extended dynamic range for a perfect balance between light and shadows.
The smartphone sports a 4,600mAh battery with 80W SuperVOOC support.
The handset includes 5G, 4G LTE, Wi-Fi 6, Bluetooth 5.3, GPS/A-GPS, NFC, OTG, and a USB Type-C port for connectivity. Also, there is an under-display fingerprint sensor and other sensors, including an accelerometer, geomagnetic sensor, light sensor, under-screen proximity sensor, gravity sensor, colour temperature sensor, IR control, and gyroscope.
Oppo Reno 11
Oppo Reno 11 specifications
The Oppo Reno 11 comes with a 6.70-inch OLED curved display with 1,080×2,412 pixels of resolution. The screen supports an adaptive refresh rate (1Hz to 120Hz), 394 ppi pixel density, and 950 nits peak brightness.
Under the hood, there is a MediaTek Dimensity 7050 SoC with LPDDR5x RAM and UFS 4.0 storage. The device features a triple rear camera setup that includes a 50-megapixel Sony LYT600 sensor (26mm focal length and OIS), a 32-megapixel telephoto lens, and an 8-megapixel ultra-wide camera.
The Oppo Reno 11 is backed by a 5,000mAh battery that comes with 67W SuperVOOC support.
Poco’s affordable C Series got a new addition to its lineup last year. The Poco C65 made its India debut last month at a starting price of Rs 8,499 (4GB RAM + 128GB storage). The 6GB RAM + 128GB storage variant costs Rs 9,499 while the 8GB RAM + 256GB storage variant fetches Rs 10,999. These prices place the smartphone very close to the M6 5G (which we reviewed earlier) in Poco’s India catalogue. If you’re thinking the Poco C65 looks similar to the Redmi 13C, you’d be correct. The C65 is essentially a rebadged version of its Redmi counterpart. We used the smartphone for a week and put it through rigorous testing. Check out our Poco C65 review to see how it fared.
Inside the signature yellow Poco box, you get the smartphone, a 10W power adapter, a USB Type-C charging cable, a SIM ejector tool, and a quick start guide. There is no plastic cover for the smartphone inside the retail package neither does it come with a protective covering for the screen. The smartphone is available in two colour variants – Pastel Blue and Matte Black.
Poco has stuck to the wide form factor on the C65. Its back panel and frame are made entirely out of plastic, which is pretty much the norm in this price segment. We are pretty happy with the quality of materials used on the smartphone. The plastic back panel does not feel flimsy, which often is the case with a lot of budget phones. It has a matte finish to it and does not attract any fingerprints or smudges. The top section of the back panel gets a glossy finish and houses the camera cutouts.
The two camera cutouts contain three rear lenses. The primary shooter is placed in the upper housing while the auxiliary lens and macro sensor are positioned in the bottom unit. A small LED flash is placed on the right side of the cutouts and further along the right, you will find the Poco branding.
The right side of the plastic frame houses the volume rocker keys and the side button. The side button also doubles up as a fingerprint scanner. The bottom edge gets the microphone, USB port, and the speaker grille. The hybrid SIM slot is positioned on the left edge of the frame, which is otherwise keyless. Up top, you get the 3.5mm headphone jack. No stereo speaker or IR blaster for the C65. The selfie camera on the display is housed in a waterdrop notch.
The 6.74-inch IPS LCD is one of the biggest highlights of this smartphone. This 90Hz display is great for content watching. The smartphone’s wide form factor makes it even more pleasant to watch videos on it. With Widevine L1 support, you can access HD content across most major streaming platforms. The 720 x 1660p resolution of the display is optimum in this price range and it does justice to the HD content that is played on it. We were satisfied with the viewing angles as well. The images produced on the screen were contrasty, vivid, and packed with a good amount of detail.
Poco C65 review: Performance and Cameras
Powering this nifty little device is the MediaTek Helio G85 SoC. We aren’t big fans of the Helio chipsets, but they find their way into a lot of budget and entry-level smartphones. The Helio G85 is a three-year-old processor which does not support 5G connectivity. And there lies our biggest issue with the smartphone. For lightning-fast internet connectivity, Poco’s M6 smartphones make a much better option, albeit costing a small premium.
The general performance of the Poco C65 is well above average. The display provides a decent touch response, making browsing through apps and switching between tasks effortless and breezy. 600 nits of peak brightness fares well outdoors, even under direct sunlight. During the review period, we used the Poco C65 to check emails, attend video calls and meetings, browse the web, play videos across different streaming platforms, navigation, instant messaging, and even a bit of gaming. We were pleased to see that the smartphone handled these tasks pretty well. In the Geekbench 6 benchmark test, the C65 returned a single-core score of 436 points and a multi-core score of 1,387 points.
We played Free Fire Max and Call of Duty Mobile on the Poco C65. The gameplay lacked fluidity and the touch response was less than ideal. The single speaker on the smartphone isn’t able to replicate the proper audio needed to elevate the gaming experience either. While holding the phone in landscape orientation, it is pretty easy to muffle the speaker grille with the palm. The phone did not overheat even after 40 minutes of gameplay, but it must be noted that we were testing the device in the thick of the winter season.
OS duties on the Poco C65 are handled by Android 13-based MIUI 14. Xiaomi’s OS skin for Poco looks pretty neat on the device. We like the categorisation of the app drawer into different genres, the colour-coded app arrangement, and the range of home screen customisations. Our favourite part of using this OS is the seamless way in which it executes the hidden folder feature. To access all your hidden apps, all you need to do is swipe right twice on the app drawer and enter the password. The only downside of this OS is the tremendous volume of bloatware it ships with. We highly recommend taking the time to delete every bloatware app from the device and managing the pesky notifications.
The 5,000 mAh battery pack easily powers the smartphone for an entire day. We were even able to push the battery backup to a day and a half with more conservative usage. Using the device as our daily driver, we were clocking a daily Screen On Time of 5-6 hours on the Poco C65 during the review period. The smartphone supports 18W fast charging but ships with a 10W power adapter, which is weird. This 10W adapter takes 2 hours and 30 minutes to fully charge the device. Spending some extra cash on an 18W adapter would make your experience much better.
In terms of camera performance, the Poco C65 puts up a decent display. The primary 50MP shooter takes good shots in outdoor daylight conditions. The colours are tuned nicely although they don’t truly ‘pop’. The contrast and HDR on the pictures is satisfactory as well. We took a couple of shots indoors and were happy with the results. The camera does a good job of lighting up the subject and capturing all the important details. However, when you zoom in by 2x, the lack of details and ‘softness’ in the final images becomes discernible.
Indoor Shot
We took some shots in limited lighting with the Night Mode turned on and were satisfied with the result. This is not to say that the pictures were ideal by any means, but for a smartphone priced under Rs 10,000, the Poco C65 did well to manage the grain in the images. The pictures still had some softness to them, but the biggest compliment we can give to the camera is that you won’t completely ignore it when you have to take a picture at night.
Night Mode
In Portrait Mode, the camera does a good job of separating the subject from the background. This is where the 0.08MP auxiliary lens comes into play. It gathers important data related to depth and helps the main sensor to take good portrait shots. The application of the blur effect is a little off, but the overall portrait shots were good. The 2MP macro lens, however, is something we could do without, since the final results lacked the colour richness we are used to.
Portrait Mode
The 8MP selfie camera up front takes good shots in optimum lighting. It also does a decent job on video calls. The artificial skin brightening and smoothening effects have been kept to a minimum by default, which we like. The front and rear cameras can record 1080p videos at 30fps.
The Poco C65 is a decent smartphone that can give you tremendous mileage as a daily driver. The Rs 8,500 price tag looks great considering the device’s physical quality, form factor, display, and camera performance. However, the biggest miss on this smartphone is the lack of 5G connectivity. If that is something you consider essential on a device, we would suggest having a look at the Poco M6 and M6 Pro 5G (check out the review here).
From online payments to restaurant menus, QR codes are everywhere. When these codes first arrived on the scene, you had to install a third-party app to read them. Now, your smartphone can perform that task natively in more ways than one. Certain apps (like PayTM, Google Pay, etc.) do not rely on your phone’s native camera app to read a payment code. These apps typically have a scanner built inside them. But what if you come across a QR code in the wild? Don’t worry, we’ve got you covered. Here are the top 7 ways to scan QR codes with Google.
Before you begin, decide which method is best for you
There are multiple ways you can use to scan a QR code using Google on your Android smartphone. While all of these methods use Google Lens, some may be more suited to your situation than others. The most significant deciding factor is if the QR code is saved in your phone’s gallery or pasted on a physical surface. While both situations can be resolved with Google Lens, the process is slightly different. QR codes in your phone’s storage can easily be read by Google Lens. The Google Photos app has a very helpful ‘Lens’ plug-in that will help you read them. If you don’t use Google Photos as your default gallery app, the regular Google app can also help you with all things QR. If the QR code is not stored in your phone, you can scan it using Google Lens or your phone’s native camera app. If you’re working on your PC, Google Chrome offers a handy option to scan a code using Google Lens.
Scan QR Codes using Google Lens
Step 1:Launch the Google app on your Android smartphone.
Scan an image saved in your phone’s gallery using Google Lens
Step 1:Launch the Google app on your Android smartphone.
Step 2: Hit the lens icon next to the search bar.
Step 3: Tap on the image preview icon at the bottom left section of the screen.
Step 4: This will open your phone’s gallery. Select the image containing the QR code.
Step 5: Google Lens will scan the QR code and present the result.
Use the Google Photos app to scan a QR Code in your phone’s gallery
Step 1:Launch the Google Photos app on your Android smartphone.
Step 2: Open the image containing the QR code.
Step 3: Tap on Lens in the bottom menu. Alternatively, you can select Search from the popup toolbar.
Step 4: Google Lens will scan the QR code and display the result.
Use Google Lens on your PC
Step 1: Make sure the QR code is saved as an image on your PC.
Step 2: Go to Google’s homepage and click the Lens icon.
Step 3: Click on Upload a file and upload the QR code image from your PC’s internal storage.
Step 4: Google Lens will scan the code for you. Click on Website to go to the link embedded in the QR code.
Add the Google Lens shortcut to Chrome
Step 1:Launch Google Chrome on your PC and click the ellipses at the top right corner of the screen.
Step 2: Go to More Tools and select Customize Chrome.
Step 3: Scroll down and click on Toolbar.
Step 4: Turn on the toggle switch next to Search with Google Lens.
Step 5: Go the web page containing the QR code.
Step 6: Click the Google Lens icon next to the address bar.
Step 7: Use the cursor to select the QR code.
Step 8: The data encoded in the QR code will be displayed in the sidebar.
Frequently Asked Questions (FAQs)
How do I scan a QR code on my Android phone using Google?
Launch the Google app and tap the lens icon to scan any QR code. Point your camera towards the code and tap on the result that pops up on the screen.
How do I scan a QR code on my laptop?
Launch the camera app on your laptop and go to Settings>Related Settings>Try out new experimental features. Restart the camera app and switch to the ‘barcode’ tab to scan a QR code.
How do I scan a QR code stored in my phone’s gallery?
To scan a QR code that is stored in your phone’s gallery, open it in Google Photos and hit the Lens option at the bottom of the screen.
Can I scan a QR code using Google Lens on my PC?
Yes, you can use Google Lens on your PC to scan a code. Go to Google’s homepage, click the Lens icon, and upload the code from your PC’s internal memory. In the search results page, click on ‘Website’ to land on the page embedded in the code.
How do I scan a QR code using my PC or laptop’s webcam?
Launch the camera app and click the barcode icon below the shutter button. Move the QR Code in front of the camera to scan it.
These are the top 7 ways to scan QR codes on your Android smartphone using Google. If you don’t want to go the Google route, you can use third-party apps like QR Code Scanner and QR & Barcode Reader. If you know any other way to go about this task, let us know in the comments!
Samsung has announced a limited-time Rs 2,000 instant discount on Galaxy A05s.
The discount is applicable to all the models.
Samsung has officially announced an exciting offer on Galaxy A05s in India. In October last year, the device was launched at a starting price of Rs 13,499. But for a limited period, the South Korean electronics giant is offering an instant discount of Rs 2,000 on all the models of the smartphone. The device is powered by a Qualcomm Snapdragon 680 SoC. It runs on Android 13 with OneUI. It also packs a 5,000mAh battery.
As a special offer, customers will be able to purchase Galaxy A05s with an instant discount of Rs 2000. Originally priced at Rs 13499 for 4GB RAM with 128GB variant and Rs 14999 for 6GB RAM with 128GB variant, consumers can now own the phones for just Rs 11499 and Rs 12999, respectively.
The smartphone is offered in three colour options: black, light green, and light violet.
The Samsung Galaxy A05s features a 6.7-inch full-HD+ PLS LCD with 1,080×2,4000 pixels of resolution. The display comes with 90-Hz refresh rate support. The smartphone is powered by an octa-core Snapdragon 680 SoC with up to 6GB of RAM and a 128GB storage option. The storage can be expanded up to 1TB using a microSD card. The device has an Adreno 610 GPU for graphics. The device comes with One UI 5.1 with Android 13 out-of-the-box.
In terms of optics, the Galaxy A05s comes with a triple rear camera set up vertically at the left corner, along with a circular LED flash unit. The camera setup includes a 50-megapixel primary shooter with an f/1.8 aperture. Furthermore, the system includes a secondary 2-megapixel macro lens with an f/2.4 aperture and a tertiary 2-megapixel depth sensor with an f/2.4 aperture. For selfies, the smartphone features a 13-megapixel front-facing camera with an f/2.0 aperture housed inside a centre-aligned waterdrop notch.
The Samsung Galaxy A05s is backed by a 5,000mAh battery with 25W charging support. In terms of connectivity, the phone includes a 3.5mm audio jack, 4G LTE, dual-band Wi-Fi, Bluetooth 5.1, GPS, and a USB Type-C port. Along with a fingerprint sensor, the handset also includes an accelerometer, a light sensor, and a proximity sensor.
The Oppo Reno 11 Series features a sleek design highlighted by a 50-megapixel triple rear camera setup.
Oppo Reno 11 and Oppo Reno 11 Pro run on ColorOS 14 on top of Android 14.
The Indian models are expected to come with different processors and battery capacities.
Oppo is all geared up to launch its latest Reno series in India. The company will officially launch the Oppo Reno 11 series in India today. Under the lineup, the company will unveil the Oppo Reno 11 and Reno 11 Pro. Since the Oppo Reno 11 series was recently revealed in China, consumers don’t need to speculate about its specifications. However, the Oppo Reno 11 Series pricing was recently tipped. Let’s quickly have a look at the tipped pricing and specification details.
The Oppo Reno 11 and Oppo Reno 11 Pro will be launched in India today at 11 a.m. However, the lack of a live stream link on Oppo’s official YouTube channel raises the possibility that there isn’t going to be an event and that the brand will simply release the smartphones and reveal the pricing.
The Oppo Reno 11 series debuted earlier in China, and it is expected that identical versions will be available in India. But as per a tipster, the Oppo Reno 11 India models will have different processors from their Chinese equivalents. The Oppo Reno 11 is expected to be powered by a MediaTek Dimensity 7050 SoC. Whereas, MediaTek Dimensity 8200 SoC will power the Pro model.
A 5,000mAh battery is likely to be packed inside the vanilla model, and a 4,600mAh battery is expected to be backed by the Pro model in India.
Note that the Reno 11 and Reno 11 Pro in China are powered by MediaTek Dimensity 8200 and Snapdragon 8+ Gen 1 SoCs, respectively. The Oppo Reno 11 and Oppo Reno 11 Pro in China have 4,800mAh and 4,700mAh batteries, respectively, with 67W and 80W fast charging support.
In China, the Oppo Reno 11 Pro features a 6.74-inch 1.5K OLED curved display with 1,240×2,772 pixels of resolution. The display supports up to a 120-Hz refresh rate. Whereas, the Oppo Reno 11 features a 6.70-inch OLED curved display with 1,080×2,412 pixels of resolution and supports an adaptive refresh rate (1Hz to 120Hz).
Both phones include a triple rear camera setup that is led by a 50-megapixel primary sensor with OIS and includes the same 32-megapixel RGBW Sony IMX709 front-facing camera for selfies.
In terms of pricing, the Oppo Reno 11 Pro is expected to be priced at about Rs 35,000 in India. On the other hand, the Oppo Reno 11 may cost Rs 28,000.
Garena Free Fire is a battle royale game with regular awards and tournaments to keep players interested. If you play Garena Free Fire, you should be aware of the redeem codes that are released on a daily basis. However, because the battle royale game is banned in India, players from other countries can use the Free Fire Redeem codes daily. If you’re unfamiliar with the Garena Free Fire redeem codes or don’t know how to get them, we’ve put together a step-by-step guide to help you redeem them. Check out Garena Free Fire Redeem Codes for 12 January 2024.
The Free Fire redeem codes are a great way to get free stuff. These are 12-digit codes that contain alphabets and numbers, as well as an expiration date and time. Because the Garena FF redeem codes cannot be used more than once, you should hurry to the redemption page to claim your free reward before someone else does. To get a free reward, all you have to do is go to reward.ff.garena.com/en, which is the official redemption page. Also, keep an eye on this space for daily updates on Garena Free Fire redemption codes and rewards.
In This Article
Garena Free Fire Redeem Codes Today 12 January 2024
HNC95435FAGJ
MCPW2D1U3XA3
BR43FMAPYEZZ
FFCMCPSGC9XZ
UVX9PYZV54AC
MHM5D8ZQZP22
FFCMCPSJ99S3
EYH2W3XK8UPG
FFCMCPSEN5MX
FF11NJN5YS3E
FF10617KGUF9
NPYFATT3HGSQ
ZZZ76NT3PDSH
XZJZE25WEFJJ
6KWMFJVMQQYG
MCPW2D2WKWF2
MCPW3D28VZD6
V427K98RUCHZ
FFCMCPSUYUY7E
How to Get Free Fire Redeem Codes for Garena on 12 January 2024?
Intel has introduced Core 14th Gen mobile and desktop processors.
The HX-series comes with 50% additional E-cores in the Intel CoreTM i7-14700HX processors, which boost creator performance.
With eight Performance Cores (P-cores) and sixteen Efficient Cores (E-cores), the Intel Core i9-14900HX is the flagship processor of the new HX series.
Intel unveiled the complete array of its Core 14th Gen mobile and desktop processors at the CES 2024. Intel Core mobile processor Series 1 family, led by the Intel Core 7 processor 150U. Whereas new HX-series mobile processors led by the Intel Core i9-14900HX are targeted for gamers, creators, and professionals who need both higher levels of compute performance and require the mobility that a laptop provides.
The Intel Core i9-14900HX is the flagship model in the mobile chipset family. It has been designed for enthusiast laptops that require high performance. It has 24 cores (eight Performance cores and sixteen Efficiency cores) and 32 threads with a maximum turbo clock of 5.8 GHz.
According to the company, when compared to the AMD Ryzen 9 7945X3D the chipset offers up to 17 per cent better gaming performance (as measured by a higher average frame rate) and up to 51 per cent faster multitasking performance.
In addition to this, the Intel Core i7-14700HX CPUs also have 50% extra E-cores, bringing those to 20 cores (eight P-cores, 12 E-cores) and 28 threads.
The HX series processors offer overclocking capabilities including Intel Extreme Utility (XTU) and Intel Extreme Memory Profile (XMP) support. New Intel Application Optimization (APO) support on the HX series, with six new gaming titles (eight total) supported since the initial Intel Core 14th Gen desktop launch in October 2023.
For the best display and data experiences Thunderbolt 5 offers 80 gigabits per second (Gbps) of bi-directional bandwidth, and bandwidth boost offers up to 120 Gbps, in addition to Thunderbolt 4 delivering bandwidth of 40 Gbps for PC connectivity to multiple 4K monitors and accessories. For wireless connectivity, it will include Intel Wi-Fi 6E (Gig+) and new discrete Intel Wi-Fi 7 (5 Gig) for multi-gigabit speeds in more areas along with support for Bluetooth 5.4 and Bluetooth 5.3, this latest version of Bluetooth connectivity.
Poco X6 Pro comes with MediaTek Dimensity 8300 Ultra SoC.
Poco X6 is powered by the Snapdragon 7s Gen 2 chip.
Both devices support 67W fast charging.
Today Poco officially announced the launch of a new smartphone series in India and globally- Poco X6 Series. The newly arrived lineup includes two smartphones Poco X6 5G and Poco X6 Pro 5G. The Pro variant is the first smartphone to come to India powered by MediaTek Dimensity 8300 Ultra SoC. In addition to this, it runs on new HyperOS software. Whereas the vanilla model equips the Snapdragon 7s Gen 2 chip.
Both POCO X6 and X6 Pro are open for pre-booking from 8 PM. The open sale will begin on January 16 at noon via Flipkart in the country.
There will be a discount of Rs 2,000 if any of the smartphones is purchased via ICICI Credit/Debit cards and EMI. Alternatively, customers can enjoy the same discount of Rs 2,000 through the product exchange offer, ensuring a compelling deal for tech enthusiasts.
Poco X6 Pro, Poco X6 specifications
Poco X6 Pro, Poco X6 features a similar display; a 6.67-inch AMOLED display with a resolution of 1.5K – 2712 x 1220. The display panel has a screen-to-body ratio of 94.27% and pixel density of 446 PPI. It has a color gamut of 100% DCI-P3 (typ), showcasing a color depth of over 68.7 Billion+ colours. The display also features a refresh rate of 120Hz and supports Dolby Vision. Additionally, the devices come with an in-display fingerprint sensor. The smartphones are protected by Corning Gorilla Glass and an IP54 rating.
Both the phones run on the new HyperOS on top of Android 14. The vanilla model is powered by Snapdragon 7s Gen 2 SoC whereas the Pro model comes with MediaTek Dimensity 8300-Ultra SoC.
Both the Poco X6 Pro and Poco X6 features a triple rear camera setup that includes a 64-megapixel main camera lens with OIS, an 8-megapixel ultra-wide-angle lens and a 2-megapixel macro camera. For selfies, the handset includes a 16-megapixel front-facing camera.
The Poco X6 Pro is fuelled by a 5,000mAh battery on the other hand the Poco X6 packs a 5,100mAh battery. Both mobile phones can be charged at 67W.
In terms of connectivity, there is 5G, 4G LTE, Bluetooth, NFC, GPS, and a USB Type-C port for charging. The 3.5mm jack is missing on the pro model whereas the standard model has. The sensors on the phones include an accelerometer, gyroscope, proximity sensor and e-compass.
The stainless steel 5000mm2 VC Cooling system is a feature on the Poco X6 Pro. The device also incorporates Wild Boost 2.0 for steady and fluid gameplay for extended periods. Additionally, it adjusts the frequency of RAM to help reduce overall power consumption.
The TMAX45 party speaker delivers a total output of 1000W.
The speaker features – a 6.5-inch Double Woofer and double Tweeter.
It comes with a built-in handle for easy movement.
Panasonic has announced the launch of a new party speaker in India. The company has introduced a Panasonic TMAX45 Party Speaker. The audio device delivers 1,000W of sound output. It comes equipped with a double woofer along with a double tweeter. In addition, it features seven colour illumination and two flashing lights. It also has a built-in handle for mobility and a metal mesh speaker grill.
In This Article
Panasonic TMAX45 Party Speaker price in India and availability
Panasonic TMAX45 Party Speaker has been launched in India with a price tag of Rs 30,000. It can be purchased via all Panasonic brand shops, Panasonic’s D2C platform (store.in.panasonic.com), major retail outlets across the country, and popular e-commerce portals.
Panasonic TMAX45 Party Speaker specifications and features
The Panasonic TMAX45 Party Speaker boasts a compact size with a sleek design. It features 7-colour illumination lights that can provide the ideal ambience to enhance any party. You can position the TMAX45 either vertically or horizontally depending on your needs.
The party speaker has a rugged design and a built-in handle for mobility. The party speaker features seven colour illumination options to match the multiple sound modes ranging from Rock, Jazz, Samba, Pop and Flat. It also equips a 6.5-inch double woofer, double tweeter and bass reflex ports for intense sound quality across all frequencies.
Along with Bluetooth and USB connectivity options that let you easily link your smartphone. It can also be connected to a TV via optical cable. The device also comes with Guitar Input capabilities, so you and your friends can enjoy a diverse selection of music together. Users can also plug in their microphone into the mic jack and have karaoke nights with friends or connect their guitar to the guitar jack and use the TMAX as a guitar amp to have awesome jam sessions.
Additionally, even larger gatherings are possible with the ability to connect multiple TMAX45 units via wire.
Fumiyasu Fujimori, Managing Director, Panasonic Marketing India, PLSIND said, “The name “Panasonic” has been associated with sound since the launch of our first speaker in 1955. Panasonic refers to our goal of bringing the best quality sound to customers around the world. It comes from the root words “Pan,” meaning universal, and “Sonic,” referring to sound. Till date, we as an organisation are committed towards creating technologically advanced products and solutions that elevate everyday life moments. TMAX45 party speaker is yet another extension to this commitment. It is a one-stop-audio solution for immersive, portable, and stylish audio solution that amplifies the overall social (gathering) experience to create lasting memories.”
After the monumental year that 2023 had been for AI chatbots and language models, CES 2024 was expected to be all about AI. And boy did it deliver. From an AI robot that can feed your pets to an AI pillow that can fix your snoring, this year’s CES had it all. As is tradition, the tech mega event also featured some crazy, eccentric gadgets that are not afraid to be gaudy and over the top. For those who missed the play-by-play, we thought we’d quickly round up the best tech on display. So, without further ado, here are our picks for the top 12 gadgets at CES 2024.
There’s plenty of weird, whacky tech to be seen at CES, but most importantly it is the launching pad for some of the most exciting releases of the year. MSI’s new range of gaming laptops belongs to the latter camp. The Titan, Stealth, and Cyborg laptops are designed to handle AI tasks on top of producing a stellar gaming performance. The Titan and Stealth are powered by the 14th Gen Intel Core i9 processors and NVIDIA GeForce RTX 40 Series GPUs. The new Stealth 18 AI Studio rocks the latest Intel Core Ultra processor.
Clicks for iPhone
Miss the feeling of typing on a QWERTY keyboard like the good ol’ Blackberry days? The Clicks iPhone case might be the device for you. The idea is simple – a QWERTY keyboard integrated into a plastic case that can easily slap onto your iPhone. The lightning/USB connector on the case slides into your iPhone’s charging port, powering the backlit keyboard. What we really like about Clicks is that it also supports keyboard shortcuts for your iPhone.
Samsung Music Frame
Samsung’s Frame TV wasn’t just a one-off product in the series. The company has taken the wall art approach on its newest home speaker as well. The ‘tech that doesn’t look like tech’ genre of design is something we would love to see more of in 2024. The Music Frame was showcased with a record player print on the front panel, but Samsung says users will be able to customise this panel and use it like a photo frame. It features two built-in woofers and tweeters and can function in WiFi and Bluetooth modes. The Q-Symphony technology enables it to function as a surround speaker for your Samsung TV.
Nanoleaf Skylight
This modular ceiling fixture gives the user complete control over their ceiling’s lighting setup. Nanoleaf Skylight takes inspiration from the company’s wall light panels. Its functioning remains the same – the Skylight connects to your home WiFi, letting you control whether you want a standard white light to fill the room or choose from over 16 million dynamic colours for ambient lighting. It also gets ‘smart’ features like the Rhythm Music Visualiser, Screen Mirror, dynamic lighting Scenes, and Group Scenes.
Lenovo Thinkbook 13x Gen 4 SPE Concept
The Lenovo Thinkbook 13x Gen 4 SPE is one concept product that we really want to see in the stores. This unique notebook uses E Ink Prism technology for its back panel, enabling users to create attractive patterns and designs for the exterior cover. Mimicking the look of a laptop skin, the colour-changing top remains active even when the notebook is switched off. The impact on the battery life is negligible, as E Ink does not draw a lot of power. Lenovo showcased four design schemes for the back panel at CES 2024, including a dynamic clock and multi-system interaction theme.
LG Signature OLED T
Over the years, we’ve seen some crazy TVs at CES 2024, but nothing comes close to the LG Signature OLED T. This sleek, transparent TV disappears when it is turned off. Yes, you read that right. The OLED T replaces the ‘Why?’ aspect of technology with ‘Why not?’ The visuals produced on this 77-inch OLED display are as stunning as ever. If you want it to function as a regular TV, the OLED T allows you to lift up the contrast screen with one push of a button. However, the lack of Micro Lens Array (MLA) tech is a big miss, especially when you take into consideration that it will be one of LG’s priciest TVs when it gets released later this year.
C Seed N1 Foldable TV
Speaking of eccentric TVs, the C Seed’s Micro LED Foldable TV was another crazy showcase at CES 2024. Measuring a staggering 137 inches, the N1 TV takes up a lot of space but when it is not in use, it can completely fold into its stand. It takes 60 seconds for the TV to rise to its height of 7.8 metres and another 25 seconds to fully unfold. This process is fully automated. The TV’s Adaptive Gap Calibration tech ensures that the picture quality is seamless and unobstructed by the folding panels. A staggering price of $200,000 means we certainly won’t be seeing it in a lot of living rooms.
Garmin Lily 2 Smartwatch
Garmin Lily 2 was one of the best gadgets launched at CES 2024. Priced at $250, this smartwatch continues the Garmin tradition of attractive styling infused with state-of-the-art tech. The unique patterned lenses on the metal case reveal the touchscreen with a quick turn of the wrist or a tap on the screen. Users get to choose from Italian leather, nylon, and silicone bands. Garmin also lets users customise their smartwatch by choosing the band and bezel combo. The Lily 2 is decked with smart features like energy and health monitoring, sleep and fitness tracking, connected GPS, and contactless payments.
Ballie
We have seen Samsung’s Ballie robot before (CES 2020), but now it comes with AI integration, making it one of the best gadgets showcased at CES 2024. The game-changing AI features have significantly increased the range of this home assistant robot’s functionality. Ballie studies users’ patterns and habits and revises its services accordingly. Its projector can gauge the distance of the wall, posture and eye level of the user, and surrounding lighting conditions to perfectly project images on the screen. On top of that, it can control your home appliances and even feed your pet while you’re away. There is no official word on Ballie’s release date yet, but we hope this concept comes to fruition soon.
Amazfit Helio Ring
Designed for athletes, the Amazfit Helio Ring made its debut at CES 2024. Made out of skin-friendly titanium alloy, the Helio Ring can track the mental and physical condition of the athlete with incredible accuracy. It offers water resistance of up to 10ATM. The size 10 variant of the ring weighs 3.8g while the size 12 version is just 0.2g heavier. On a single charge, the Amazfit Helio Ring offers a battery life of 5 days. The Electrodermal Activity (EDA) sensors on this ring can track stress indicators like sweat to gauge the mental condition of the user. Easily one of the best gadgets at CES 2024.
Motion Pillow
As we mentioned earlier, CES 2024 was all about AI-integrated tech. But the Motion Pillow was something we did not see coming. This AI pillow can monitor your snoring patterns and inflate itself to open an airway. It can also track your sleep cycle and other sleep-related data. Its companion app makes it easy to analyse your sleeping pattern. The pillow records your snoring phases and timestamps them accordingly. Sales for the Motion Pillow will go live on January 13. Although it is listed at $699, the pillow will retail for $420 at launch.
Rabbit R1
The Rabbit R1 AI device was one of our favourite pieces of tech at CES 2024. This pocket-sized device can control your home devices, play music on Spotify, order a cab on Uber, and perform other daily tasks that typically require a smartphone. Instead of luring developers to design apps for its platform, Rabbit uses its LAM (Large Action Model) to use the existing apps on your smartphone. You can train your R1 to work an app and then simply give it commands to carry out a particular task. Think of a smarter Alexa that can control any app on your phone and even carry out niche tasks. The Rabbit R1 can be pre-ordered right now, with deliveries expected to roll out by March.
These were our picks for the top 12 gadgets at CES 2024. Most of the devices showcased at the event will hit the stores later this year. Think we missed something? Let us know your favourites in the comments! Also, stay tuned for our CES 2024 EV roundup on Motorbridge.com!
Poco X6 and Poco X6 Pro will succeed Poco X5 and Poco X5 Pro, respectively.
Poco X6 will use a Snapdragon 7s Gen 2 SoC, while Poco X6 Pro will be powered by a MediaTek Dimensity 8300 Ultra SoC.
Poco is all set to launch a new smartphone series in India. The Poco X6 Series India launch is scheduled to take place today. Not only will it debut in India, but the firm will also announce the global launch today. The upcoming series will include two smartphones, the Poco X6 and the Poco X6 Pro, that are going to succeed the Poco X5 and Poco X5 Pro launched last year. Prior to the launch, both phones had been spotted on various certification sites and had been leaked, suggesting the design and key details of the phones. The Poco X6 is rumoured to be a rebadged version of the Redmi Note 13 Pro 5G. Whereas the Pro model is expected to be a rebranded variant of the Redmi K70E.
In This Article
Here is how to watch the Poco X6 Series global launch livestream
The Poco X6 Series is going to launch in India today. The company will be hosting an online launch event that will be broadcast live at 5.30 p.m. The launch event will be live-streamed through Poco’s official YouTube channel in addition to multiple social media platforms, including Facebook and Twitter.
You may watch it live right here on our website, as we have embedded the link below.
Poco X6 Series price in India is expected
The company has not yet revealed any information regarding the Poco M5’s specifications or pricing. As we said, the price specs and design details of the phones had already leaked on the web before the official announcement. It has been tipped that the Poco X6 Pro’s 12GB RAM with 512GB storage model will cost AED 1,299, or approximately Rs 29,500. It is likely to come in three colour options: black, grey, and yellow.
The company has already confirmed Flipkart’s availability post-launch.
Recently, an unboxing video of the Poco X6 5G surfaced online that gave us an up-close look at the design. The smartphone’s retail box includes a 67W charger, a USB Type-C to 3.5mm adapter, and a SIM-ejector tool.
It appears to come with a dual-tone design. The back of the phone will have a glass panel. In addition to this, it features a triple-camera sensor module. Reportedly, the camera setup will include a 64-megapixel primary camera, an 8-megapixel secondary sensor, and a 2-megapixel sensor. Additionally, a front-facing 8-megapixel camera may be included.
The device is also said to come with a 6.67-inch AMOLED display with 1.5K resolution and a refresh rate of 120Hz.
It is stated to boast a 5,100 mAh battery. The Poco X6 may also run on MIUI 14, an Android 13-based operating system.
It is confirmed that the Poco X6 will use a Snapdragon 7s Gen 2 SoC. On the other hand, the Poco X6 Pro will be powered by a MediaTek Dimensity 8300 Ultra SoC. The Pro model is tipped to boast a 6.67-inch display. The company has also revealed that the handset will come with a new HyperOS out-of-the-box. It further confirmed that the device will also sport a triple rear camera set up with a 64-megapixel primary sensor with optical image stabilisation (OIS) and a 2x lossless in-sensor zoom.
Garena Free Fire is a battle royale game with regular awards and tournaments to keep players interested. If you play Garena Free Fire, you should be aware of the redeem codes that are released on a daily basis. However, because the battle royale game is banned in India, players from other countries can use the Free Fire Redeem codes daily. If you’re unfamiliar with the Garena Free Fire redeem codes or don’t know how to get them, we’ve put together a step-by-step guide to help you redeem them. Check out Garena Free Fire Redeem Codes for 11 January 2024.
The Free Fire redeem codes are a great way to get free stuff. These are 12-digit codes that contain alphabets and numbers, as well as an expiration date and time. Because the Garena FF redeem codes cannot be used more than once, you should hurry to the redemption page to claim your free reward before someone else does. To get a free reward, all you have to do is go to reward.ff.garena.com/en, which is the official redemption page. Also, keep an eye on this space for daily updates on Garena Free Fire redemption codes and rewards.
In This Article
Garena Free Fire Redeem Codes Today 11 January 2024
FF9MJ31CXKRG
FFCO8BS5JW2D
FFICJGW9NKYT
FFAC2YXE6RF2
FFICJGW9NKYT
XUW3FNK7AV8N
How to Get Free Fire Redeem Codes for Garena on 11 January 2024?
Smartphone displays are all about personalisation. At a time when most smartphones look alike from the front, setting up a unique wallpaper with a complementary icon pack can inject your device with much-needed personality. If you want to stand out from the pack, GIF/live wallpapers are the way to go. The only downside is that they will drain the battery slightly faster. If that doesn’t bother you, here are the top 4 ways to set an animated GIF as a wallpaper on Android and iOS devices.
Things to keep in mind before choosing a GIF for your wallpaper
Turning a GIF into a wallpaper for your smartphone is not an easy task. Sure, several online marketplaces let you download custom live wallpapers, but their libraries are generally restricted to bland, cookie-cutter items. If you want something unique for your phone’s display you can either create a GIF yourself or explore platforms like Giphy.
While picking a GIF, there are certain things you need to keep in mind. The most important of them all is the resolution of the file. A pixelated GIF is never a good look for your device. Always download HD GIFs, but make sure their file size isn’t too bulky or you’ll end up slowing down your phone’s speed.
Another thing you should consider while downloading a GIF is its speed. A fast-paced GIF is too distracting to be turned into a wallpaper. You want something that slowly unfolds itself without being too flashy. A looping GIF is perfect for this situation. Certain apps can help you fix the speed of the downloaded GIF. We have mentioned our favourite pick later in the article.
Set a GIF as a wallpaper on Android
Step 1: Download the GIF on your Android smartphone. If don’t have a particular GIF in mind, you can browse apps like Giphy for ideas.
Step 2: Go to your device’s gallery and open the GIF.
Step 3: Hit the ellipses at the bottom right corner of the screen and select Set as Wallpaper.
Step 4: Crop the GIF and select whether you want it to be the lockscreen wallpaper, homescreen wallpaper, or both.
Step 5: Hit the tick icon at the top right corner of the screen when you’re done.
Use a third-party app for Android
If your Android smartphone does not support setting GIFs as wallpapers, use the GIF Live Wallpaper app.
Step 1: Download a GIF on your smartphone. Make sure its dimensions are similar to your home screen.
Step 2: Select the GIF you want to set as your wallpaper.
Step 3: Hit the ellipses at the top right corner of the screen.
Step 4: Select Convert to Live Photo.
Step 5: Now, go to Settings and select Wallpaper.
Step 6: Select Choose a New Wallpaper.
Step 7: Tap on Live Photos.
Step 8: Select the GIF you just downloaded. Press and hold the screen to view the animation.
Step 9: Tap on Set.
Frequently Asked Questions (FAQs)
Can I set a GIF as a wallpaper on my Android phone?
Android smartphones support Live Wallpapers, which means you can set a GIF as wallpaper on your device. Use the native gallery app or a third-party app like GIF Live Wallpaper.
Why am I not able to set a GIF as my Android phone’s wallpaper?
If your phone’s native gallery app is unable to set a GIF as wallpaper, use the GIF Live Wallpaper app. Import the GIF into the app, edit its speed and dimensions, and hit the tick icon when you’re done.
How do I make a GIF my iPhone wallpaper?
Download the GIF on your iPhone, then go to Settings>Wallpaper>Choose a New Wallpaper>Live Photos and select the GIF.
These are the top 4 ways to set an animated GIF as a wallpaper on your Android or iOS device. While downloading a GIF on your iPhone, make sure you save it as a Live Photo or your device won’t recognise it as an animated file while setting up the wallpaper. If you know any other way to turn a GIF into a wallpaper, let us know in the comments!
AMD has introduced AMD Ryzen 8000G Series desktop processors.
The all-in-one desktop processors come with a dedicated AI neural processing unit (NPU).
This will unleash AI capabilities for consumers and improve productivity, efficiency, and advanced collaboration.
AMD has announced an all-new AMD Ryzen 8000G desktop processor series with dedicated NPU for AI at CES 2024. The new desktop processor series includes AMD Ryzen 7 8700G and AMD Ryzen 5 8600G are especially designed for gamers and creators. The latest processors are built on top of AMD “Zen 4” architecture featuring up to eight cores and 16 threads. Both the processors offer Radeon 700M graphics.
Jack Huynh, senior vice president and general manager, of the Computing and Graphics Group at AMD said, “AMD continues to lead the AI hardware revolution by offering the broadest portfolio of processors with dedicated AI engines in the x86 market. Last year at CES, we introduced the first dedicated AI engine in an x86 processor for the mobile market. This year, we are expanding our AI leadership to desktop computing through our Ryzen 8000G Series processors. We’re excited to lead the AI PC era together with our close OEM and ecosystem partners.”
The AMD “Zen 4” architecture serves as the foundation for the 8000G Series CPUs. The all-in-one desktop processor is said to deliver powerful performance for demanding tasks like gaming and content creation.
There are two processors under the series: The AMD Ryzen 7 8700G has 16 threads, 8 cores, and 24MB of cache. The processor is paired with Radeon 780M graphics. On the other hand, AMD Ryzen 5 8600G has six cores, twelve threads, 22MB of cache, and Radeon 760M graphics. Both the desktop processors include AMD Ryzen AI technology, including the first NPU on a desktop PC processor. This technology is specially designed to accelerate your computer’s ability to run AI software, optimize AI workloads, improve AI processing efficiencies, and unlock exciting experiences like AI-powered noise cancellation.
The Radeon 700M graphics allows impressive visual fidelity, providing a smooth AAA 1080p gaming experience at an affordable price point, and in small form factors. In addition to this, there is AMD EXPO technology on both the processors allowing for greater memory frequencies and advanced timings to unlock smoother frame rates. Precision Boost Overdrive (PBO) allows one-touch overclocking, giving users an extra CPU boost with increased power limits.
As per the company AMD Ryzen 8000G Series desktop processors are expected to be available to DIY customers, SI partners starting January 31st, 2024. OEM systems are expected to arrive in Q2 2024.
Apart from this AMD has also updated its Ryzen 5000 series of processors with the addition of AMD Ryzen 7 5700X3D, AMD Ryzen 7 5700, AMD Ryzen 5 5600GT, and AMD Ryzen 5 5500GT.
The AMD Ryzen 7 5700X3D is based on Zen 3 architecture. It has up to 4.1GHz clock speed. The Ryzen 5000 series processors include 3D V-Cache technology to deliver an astonishing 100MB of on-chip memory, providing power and productivity gains for games and applications at any setting and any resolution.
The new Ryzen 5000 Series desktop processors are expected to be available to DIY customers and SI partners starting January 31st, 2024.
Just a few years back, buying a pair of wireless gaming earbuds meant splurging some extra cash on a product that was leagues below wired gaming headsets in the same price bracket. Thankfully, that is not the case anymore. This is largely due to several Indian brands stepping up and putting out affordable gaming TWS products that provide a bang for the buck. Boult is one of the first names that come to mind. Last year, the audio outfit launched the ‘Astra’ TWS which features a low latency rate of 45ms. These wireless earbuds are currently priced at Rs 1,199. When the Astra crossed our desk, we were quite surprised by its bold, unique design. Interested to check out its performance, we used the TWS for a week. Here is our in-depth review of the Boult Astra.
Inside the Boult Astra retail package, you get the TWS charging case with earbuds inside, two extra pairs of silicone ear tips, a USB Type-A to Type-C charging cable, and a user manual. There are three colour options on offer – Black Gloss, Smoke Metal, and Opal, White.
The wide charging case has a spaceship-like design, which brings a lot of flair and personality to the product. The black colour variant looks like a Batmobile, with the LED lighting around the lid resembling the brake lights. A glossy black strip meanders around the bump on the top panel, offering a contrasting feel to the matte finish on the rest of the case. There are two USB Type-C ports on either side of the hinge, which is more of a styling choice rather than a functional one since you can only use one USB port at a time to charge the TWS. If one port stops working, you can always use the second one.
We were pleased with the quality of materials used in this product. Even though it is entirely made out of plastic, the charging case is not flimsy at all. The hinge feels sturdy and offers a very satisfying snap when the lid is shut. The breathing LED lights around the lid are styled very tastefully and do not feel gaudy at all. In our opinion, the Astra is one of the best-looking wireless earbuds in its price category.
The immaculate styling continues inside the case as well. Flipping the lid open, you will find the earbuds nestled comfortably in their cutouts, with a glossy bump encasing them. The arrow lighting pattern on the inner panel slowly lights up as the earbuds go into pairing mode. It plays into the futuristic look that Boult is going for on the TWS.
The earbuds are made out of plastic and have a glossy finish to them. The in-ear design offers a comfortable, snug fit. The zig-zag pattern of the stems makes them easy to hold and adjust without triggering the touch controls. This is a big plus point in our book because accidental touches often mar the entire TWS experience for us.
We used the Boult Astra while working out and hiking during the review period. Rated IPX5 for dust and water resistance, the wireless earbuds were undeterred by sweat and minor splashes of water. Despite the glossy finish on the inner panel of the earbuds, the fit remained airtight even when things got sweaty.
Boult Astra review: Performance
Delivering the audio output on Boult Astra are 13mm dynamic drivers. Bluetooth 5.3 support provides a stable connection and fast pairing with ‘Blink & Pair’ tech. After the initial pairing process, all you need to do is flip open the lid for the earbuds to connect to your device.
Moving on to the most important part of the review – the sound quality. After being floored with the Astra’s flashy design, we had high hopes for its audio performance. And it did not disappoint. We were happy with the clear mids and highs that formed the soundstage. The bass is slightly boosted but it does not throw a blanket over the other elements. In fact, it is quite smooth and delivers the ‘thumping’ effect quite nicely.
Bass enthusiasts will certainly enjoy the audio tuning on these earbuds. The soundstage is far from neutral, but it is a whole lot of fun. Usually, entry-level earbuds either sound tinny or have an overblown low-end. The Astra strikes a nice balance among the frequencies and produces a well-rounded output. Even though it is branded as a ‘gaming’ TWS, it can easily go toe to toe with any ‘music’ earbuds in the category.
Talking about the gaming performance, the Astra has a 45ms latency, which isn’t the lowest we have seen in this segment, but it is certainly optimum. We played a handful of FPS games like BGMI and Call of Duty Mobile with the Astra in our ears. Not once did we experience any latency issues. The action on the display was perfectly in sync with the audio feedback. We were also pleased with the crispness of audio that the Astra produced. To top it all off, the detail in the output was impeccable as well. Even the faintest of steps were reproduced by the earbuds.
While we had no complaints with the Astra’s audio performance, its microphones leave a lot more to be desired. The audio relayed to the recipient on calls is boxy and lacks a lot of detail. Even though the TWS uses Quad Mic ENC, the noise level could have been maintained better. Taking a call outdoors meant unpairing the TWS and relying on the phone’s microphone.
The battery performance on Boult Astra is pretty standard. The earbuds offer 6-7 hours of playtime on a full charge, with an additional 48 hours in the charging case. With quick charging onboard, plugging the TWS into the charger for 10 minutes provides 1.5 hours of playtime. There is no companion app for Boult’s TWS products yet, but we hope there is one on the way.
Boult Astra is a well-rounded TWS product that is just as good for listening to music as it is for gaming. Gaming earbuds tend to go overboard with the design, but the Astra manages to strike the right balance between catchy and tasteful. If you’re not a fan of flashy RGBs, you’ll enjoy this one. Its sound quality punches above its weight, offering some of the best tuning we’ve seen in this segment. The shoddy microphone and lack of a companion app let it down a little, but at the price of Rs 1,199, the Boult Astra is an absolute steal.
No one likes picking up calls from unknown numbers. The last thing you want is to get stuck in a conversation with a person you are trying to avoid. If you don’t like the mystery behind an unknown or private number, there are some steps you can take to find out the identity of the caller. These methods also work for robocalls, telemarketers, scammers, and other kinds of spam. With the right approach, you can block unnecessary calls to your number to a great degree. So, without further ado, let’s jump right into it.
Want to hide your phone number while calling someone?
Before we get to unmasking private callers, you may want to know how they are able to hide their number in the first place. Depending on your location, this can be done in several different ways. The most common method that people use is adding the *67 dial code before the number they wish to call. This method only works in the USA, Canada, and a few other countries. On an Android phone, you can hide your Caller ID by going to the default Phone app and selecting Settings>Supplementary services>Show your Caller ID>Never.
Some network providers issue special private numbers to their users at an extra cost. These numbers are hard to obtain (as requests are frequently denied) and even harder to unmask (since the network provider is encrypting your details). If you’re constantly being harassed by a caller using a private number, you can always report them to the police.
Use the *69 dialer code to find out which private number called you
In the USA, dialling *69 on your phone connects you to the last number that called you. This also works for private numbers. When you receive a call from a private number, make sure you dial *69 right away, before someone else calls you. Some network providers may charge you a small premium for the service, while others may limit its usage to just 30 minutes after a call is received. You can also use online lookup services like FreePeopleSearch to get more detailed information about the caller. Other countries have their own unique dialer codes to trigger the ‘last call return’ feature. Users in the UK can dial 1471, while users in the Philippines use *999. Some service providers in Canada and Australia use *69, just like the USA.
Use TrueCaller
If you’re from India, you must be aware of TrueCaller. This Caller ID app detects the number calling you and displays the name of the caller on the screen, even if the call is placed using a private number. Once you install TrueCaller, it will function as the default dialer app on your phone. All calls from scammers, robocallers, and telemarketers are marked as spam. The great thing is that you can also manually reverse-search a number on the app.
Turn on Caller ID and spam protection on the native dialer app
If you don’t want to use a third-party app like TrueCaller, you can check if your phone’s native dialer app offers Caller ID services. Turning on this feature will identify the name registered to the phone number and flag any spam calls.
Step 1:Launch the native Dialer app on your smartphone.
Step 2: Hit the ellipses at the top right corner of the screen.
Step 3: Tap on Settings.
Step 4: Turn on the toggle switch for Caller ID and spam protection.
Use TrapCall to unmask private calls
TrapCall is a great app to find out who called you from a private, blocked, restricted or unknown number. This app can reveal all *67 numbers with ease. It supports all the major network providers like AT&T, Verizon Wireless, T-Mobile, Sprint, US Cellular, MetroPCS, and Cricket. Not only does TrapCall let you know the name of the caller, but it also sends you the address information linked to the phone number. You can also deploy other handy services like call blocking, spam protection, and reverse looking. Subscribing to the premium plan also unlocks the app’s call-recording feature.
Request your network provider for detailed call logs
If everything else fails, you can try requesting your network provider for advanced call logs. You may need to dial the customer care helpline or visit a nearby service centre. Before you go through the call logs, check your phone for the date and time of the call received from the private number. Now, match this data with the entries on the log to find out the number that called you.
Frequently Asked Questions (FAQs)
How do I find out which private number called me?
To find out which private number called you, simply dial *69 on your phone after receiving the call. You can also use apps like TrueCaller TrapCall to find the identity of the caller before receiving the call.
How do I block all spam calls to my phone?
While there is no way to block all spam calls to your phone, apps like TrueCaller can instantly recognise a spam caller and flag them for you. You can choose to automatically hang up on them. Some native dialer apps may offer this feature as well.
How do I hide my phone number while calling someone?
Use your network provider’s supplementary services to hide your Caller ID before making a call. If you’re in the US, dial *67 before a number to mask your Caller ID.
These are the top 5 ways to find out which private number called you. Saving the unknown number to your phone and looking it up on WhatsApp can also reveal information like the caller’s name. This depends on the privacy settings of the profile. If you’re lucky, you may be able to see their profile picture. If you know any other method to unmask a private caller, let us know in the comments!
Alienware 27 360Hz QDOLED Gaming Monitor (AW2725DF) comes with a 360Hz refresh rate.
Both the gaming monitors will go on sale in North America soon.
Dell has updated its Alienware Series gaming monitors. The company has introduced Alienware 32 4K QD-OLED Gaming Monitor (AW3225QF) and Alienware 27 360Hz QDOLED Gaming Monitor (AW2725DF) at CES 2024. The former one is World’s first 4K QD-OLED gaming monitor with Dolby Vision HDR whereas the latter one offers a 360Hz refresh rate with QHD resolution.
In This Article
Alienware 32 4K QD-OLED Gaming Monitor (AW3225QF)
As the name suggests the World’s first 4K QD-OLED gaming monitor, the Alienware 32 4K QD-OLED Gaming Monitor is 32 inches in size. The display features a fast 240Hz native refresh rate along with 0.03ms grey-to-grey response time. It also provides 99% and 99.3% of DCI-P3 gamut respectively and Delta E < 2 color accuracy. The gaming monitors also come with Dolby Vision HDR and VESA DisplayHDR True Black 400 support.
The Dolby Vision HDR is said to provide realistic pictures with greater contrast, brighter colours, finer details, and incredible brightness. VESA AdaptiveSync and NVIDIA G-SYNC G-SYNC are Compatible and validated by NVIDIA so that you get smoother gameplay without any screen tearing or stuttering.
With the latest next-generation gaming consoles supporting 4K resolution, gamers will be able to achieve a 120Hz performance thanks to the HDMI 2.1 FRL (Fixed Rate Link), which comes standard with VRR compatibility and auto low-latency for superior controller responsiveness. Furthermore, Dolby Atmos speakers or any other soundbar with an eARC connector can be used with eARC compatibility.
As per the company, the price of the Alienware 32 4K QD-OLED Gaming Monitor (AW3225QF) will start at $1,199.99 (US) / $1,499.99 (CA). It is said to be available in North America on January 11.
Alienware 27 360Hz QDOLED Gaming Monitor (AW2725DF) on the other hand, is the world’s first 360Hz QD-OLED gaming monitor with 360Hz refresh rate and QD-OLED infinite contrast in QHD resolution (2560×1440). The screen supports 99% and 99.3% of DCI-P3 gamut respectively and Delta E < 2 color accuracy. It offers 0.03ms gray-to-gray response time that enables clear motion and near-instantaneous pixel response. Moreover, VESA DisplayHDR True Black 400 offers remarkable deep colour and clarity. It comes integrated with AMD FreeSync Premium Pro and VESA AdaptiveSync technology that puts an end to choppy gameplay and broken frames with fluid, artifact-free performance at virtually any framerate.
The Alienware 27 360Hz QD-OLED Gaming Monitor (AW2725DF) will also go on sale in North America on January 11 starting at $899.99 (US) / $1,199.99 (CA).


")
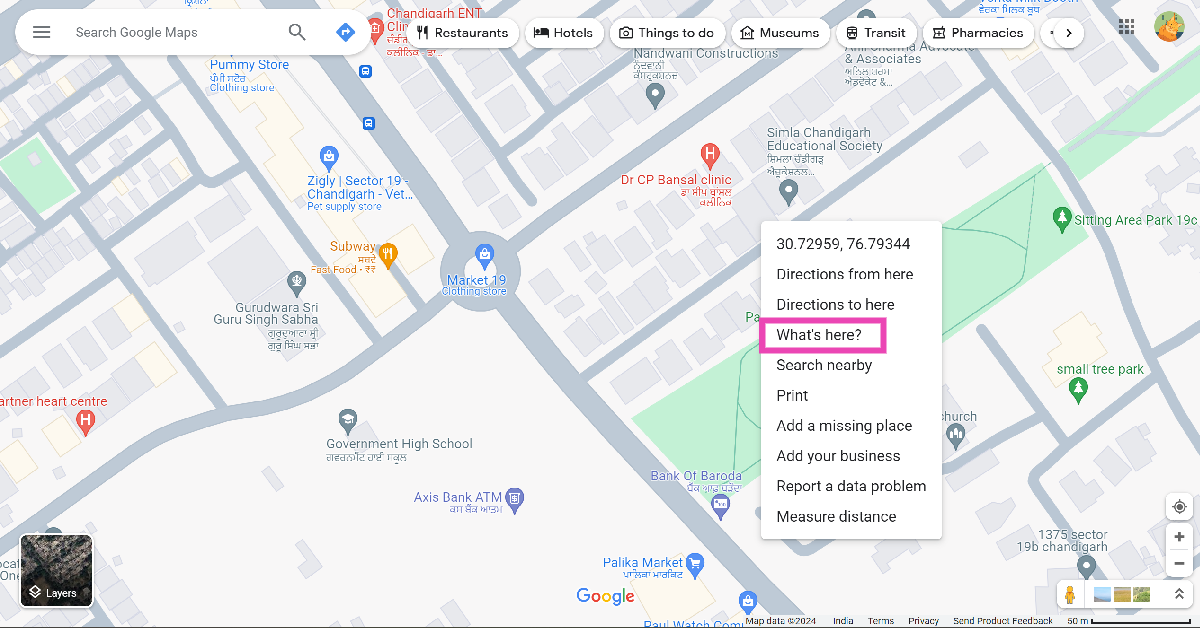
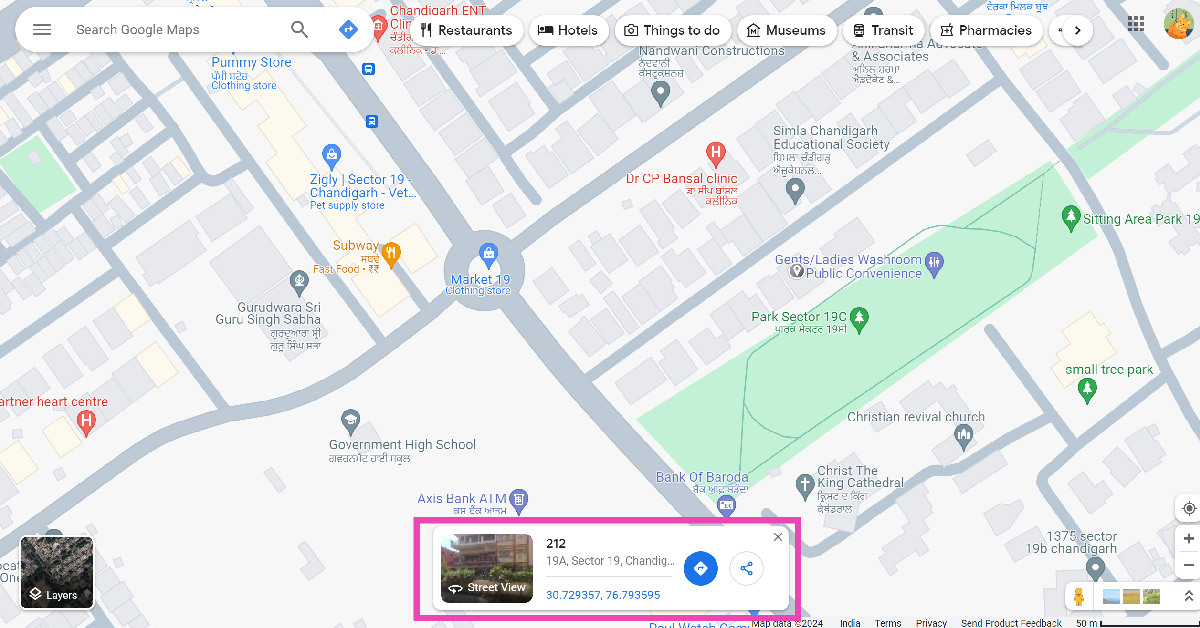


")
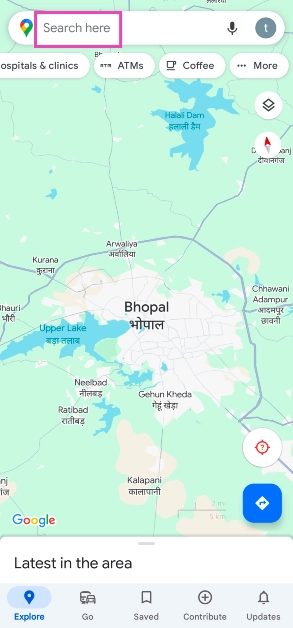
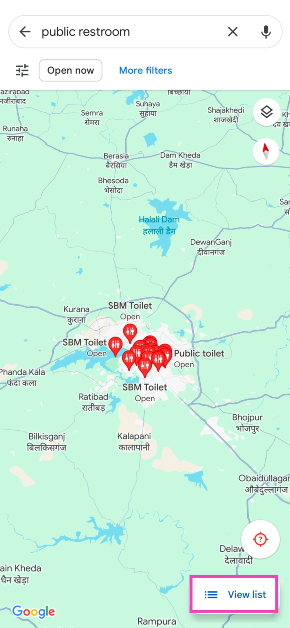
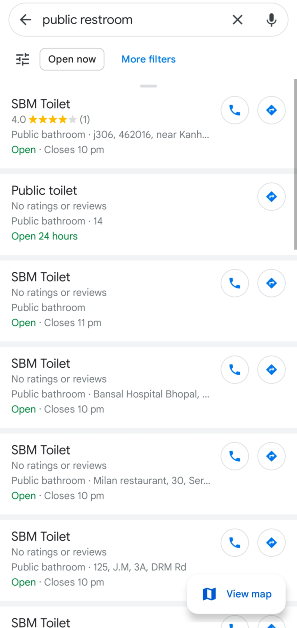
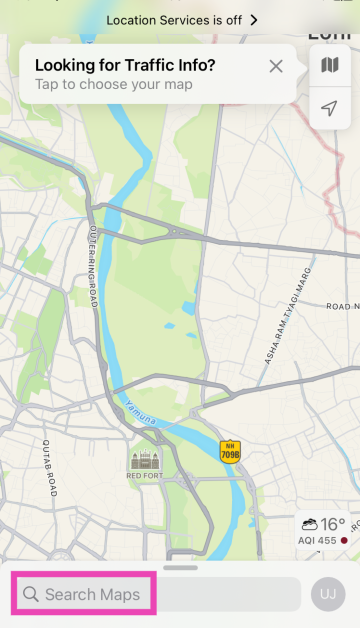
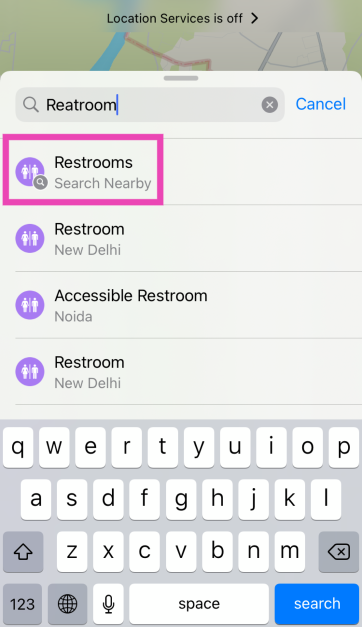


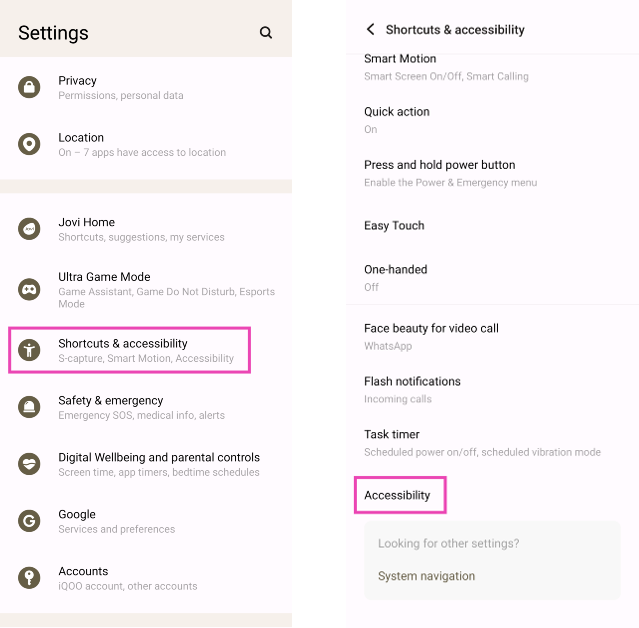

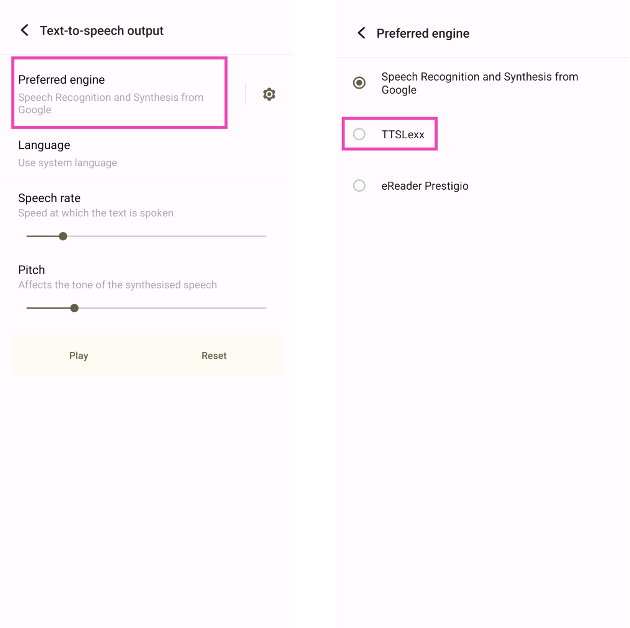
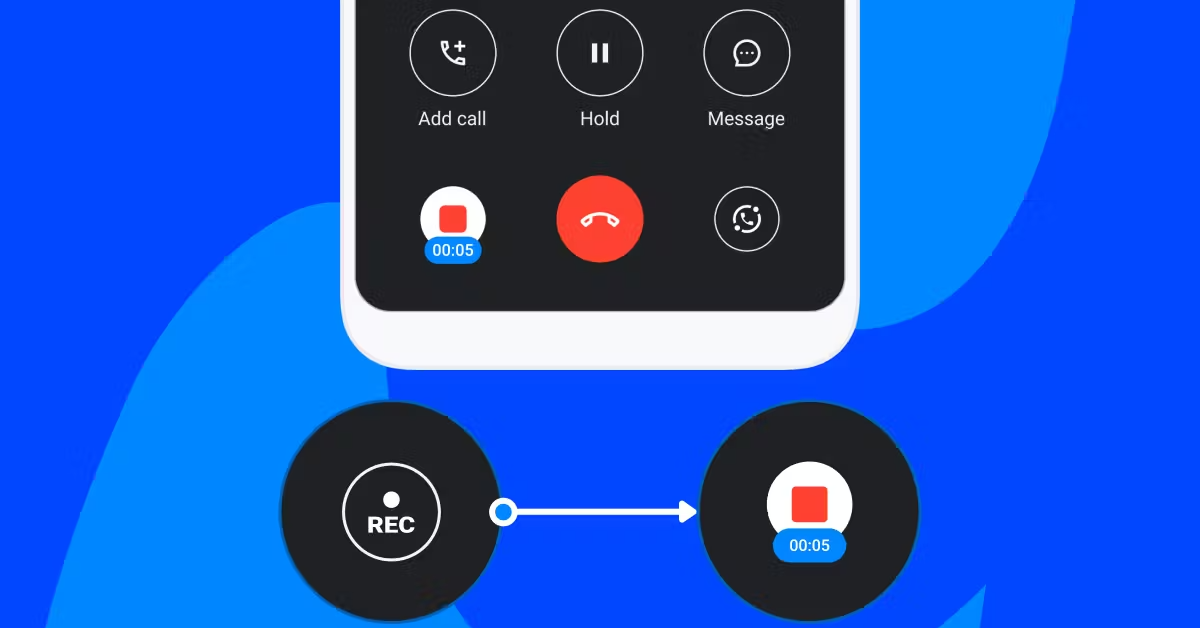
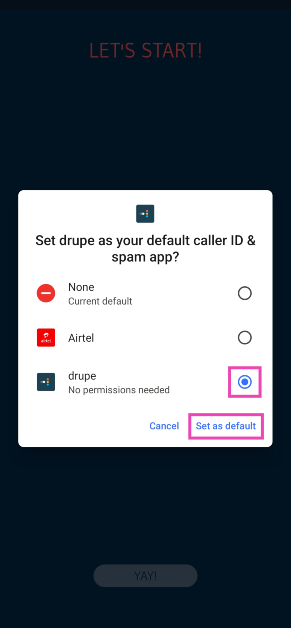
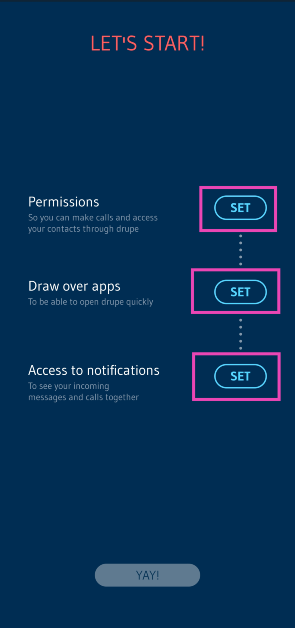
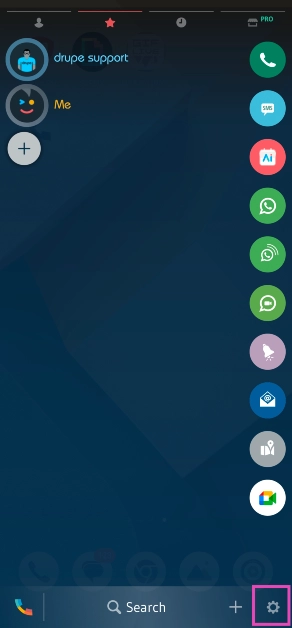
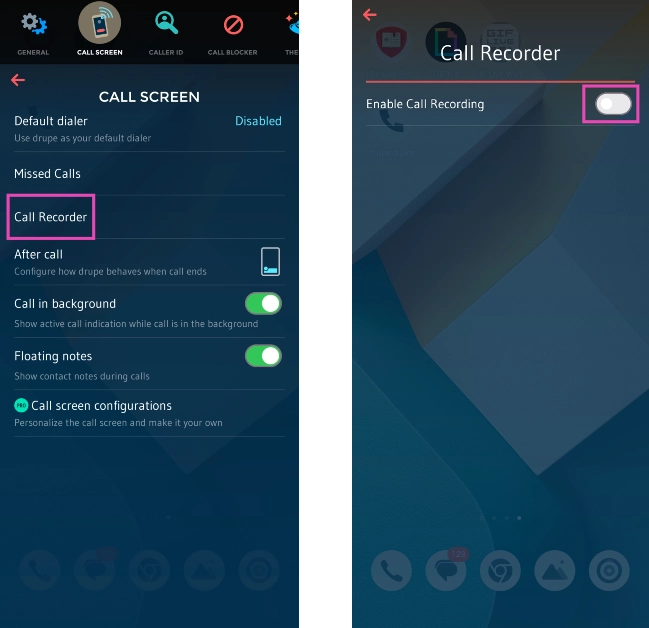
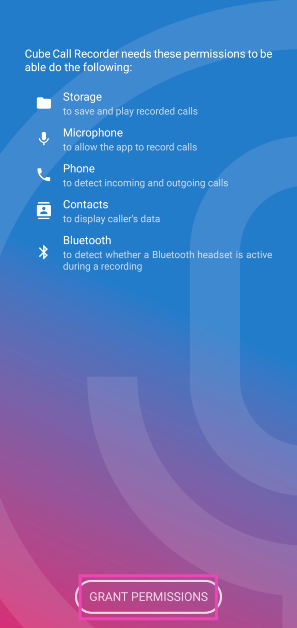
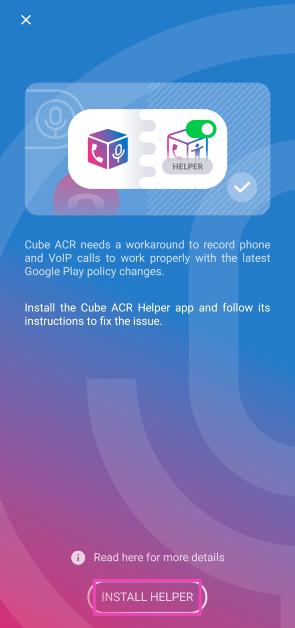


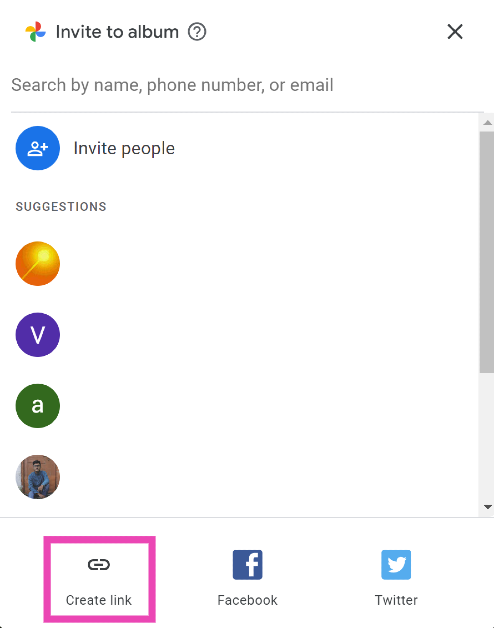
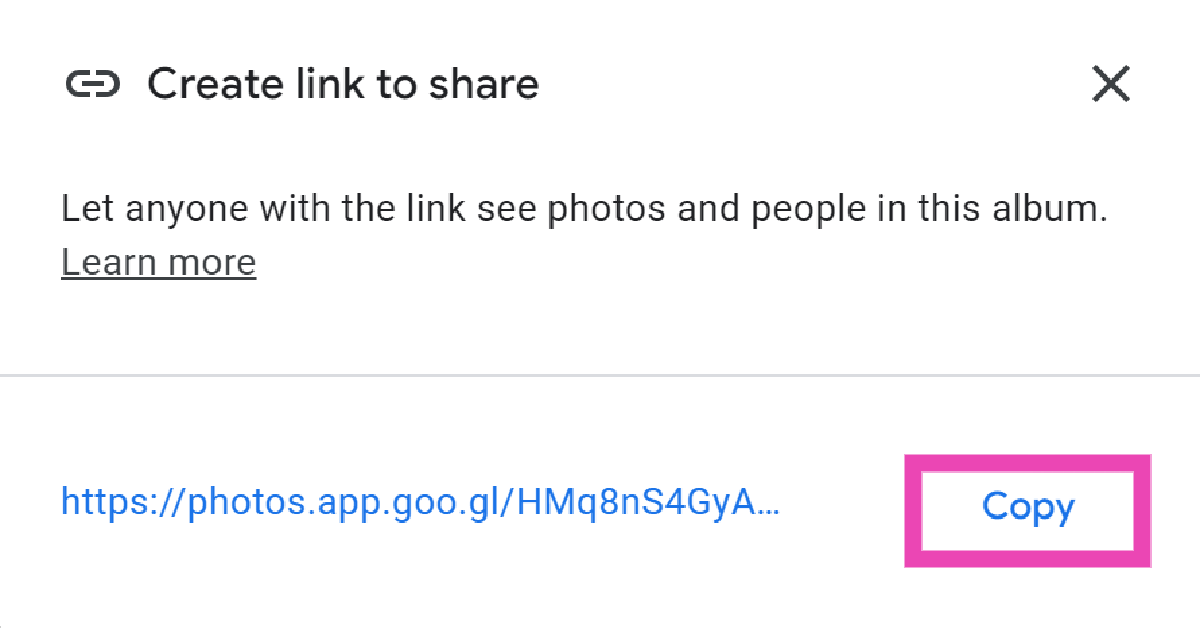
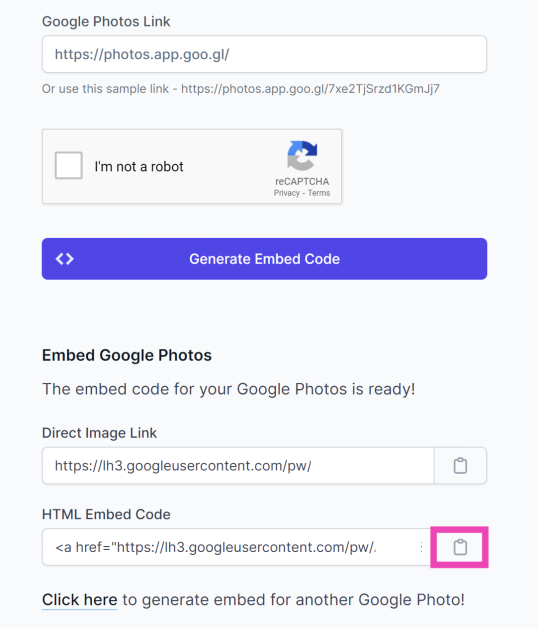
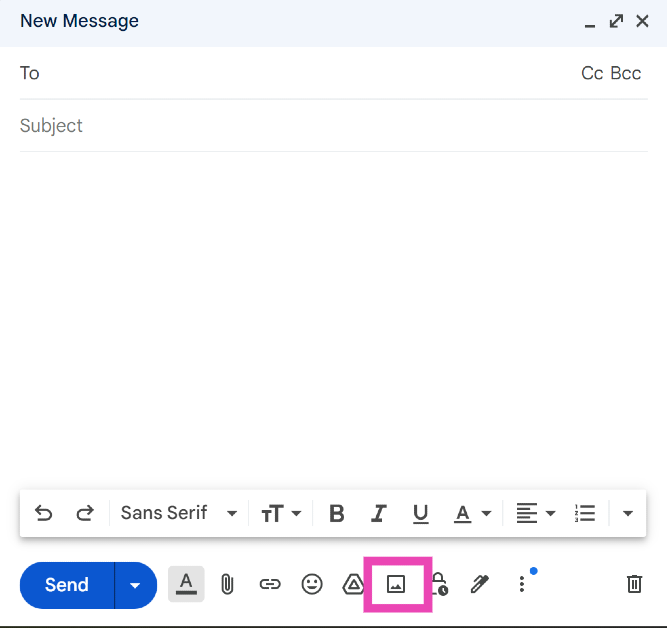
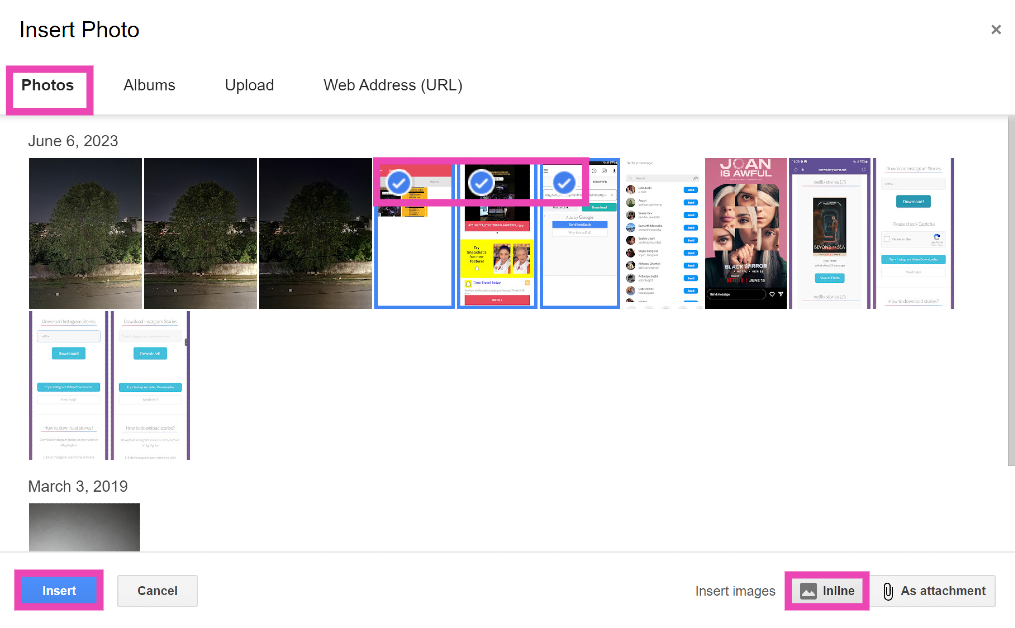


![[Working] Top 2 ways to copy and merge YouTube playlists? (2024)](https://www.gadgetbridge.com/wp-content/uploads/2024/01/youtube-768x402.webp "[Working] Top 2 ways to copy and merge YouTube playlists? (2024)")


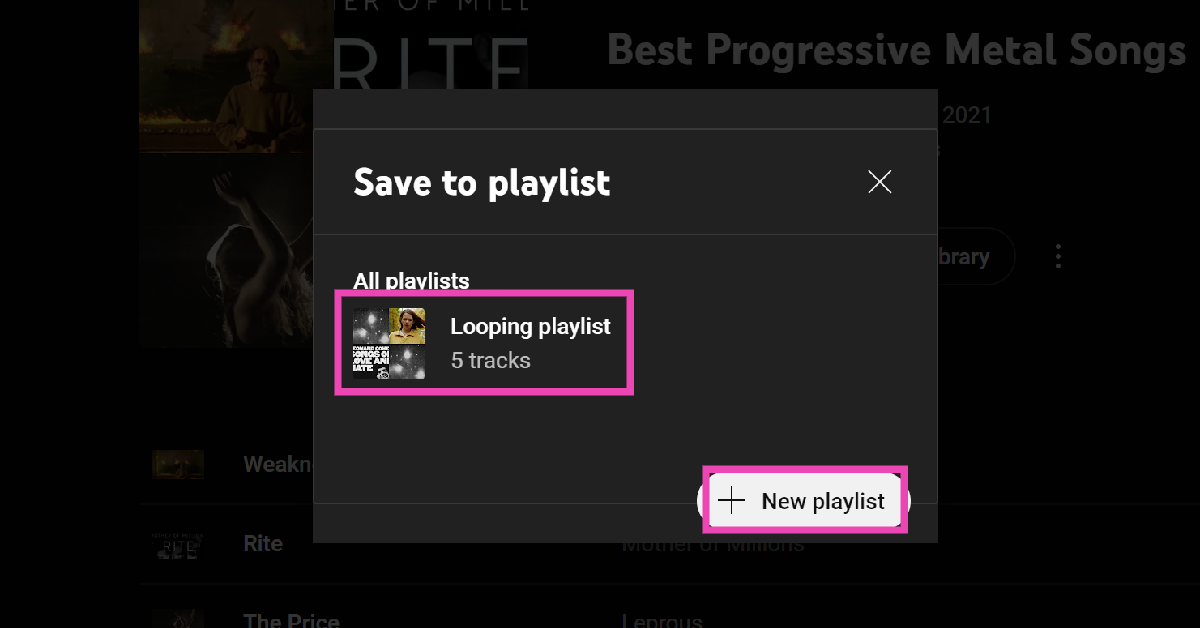

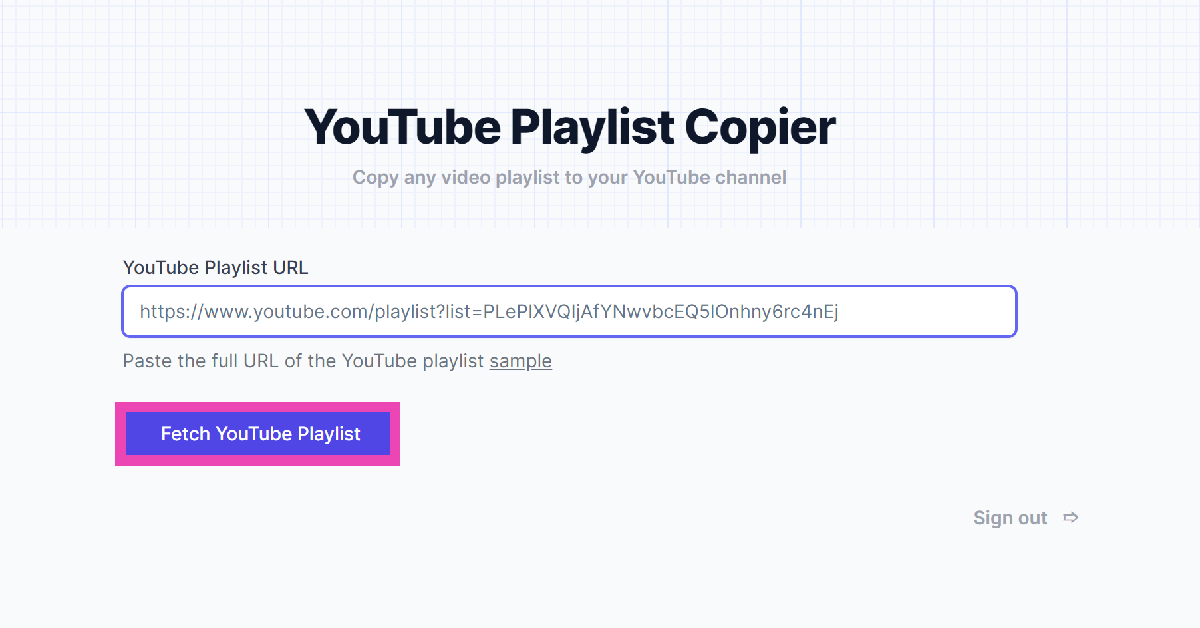
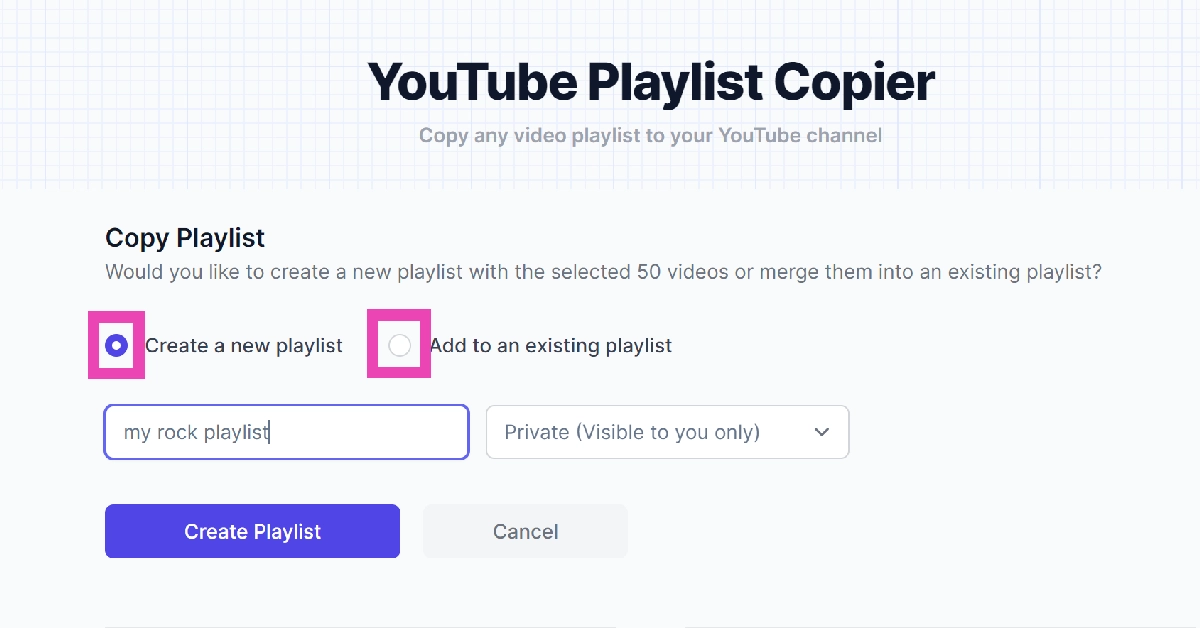

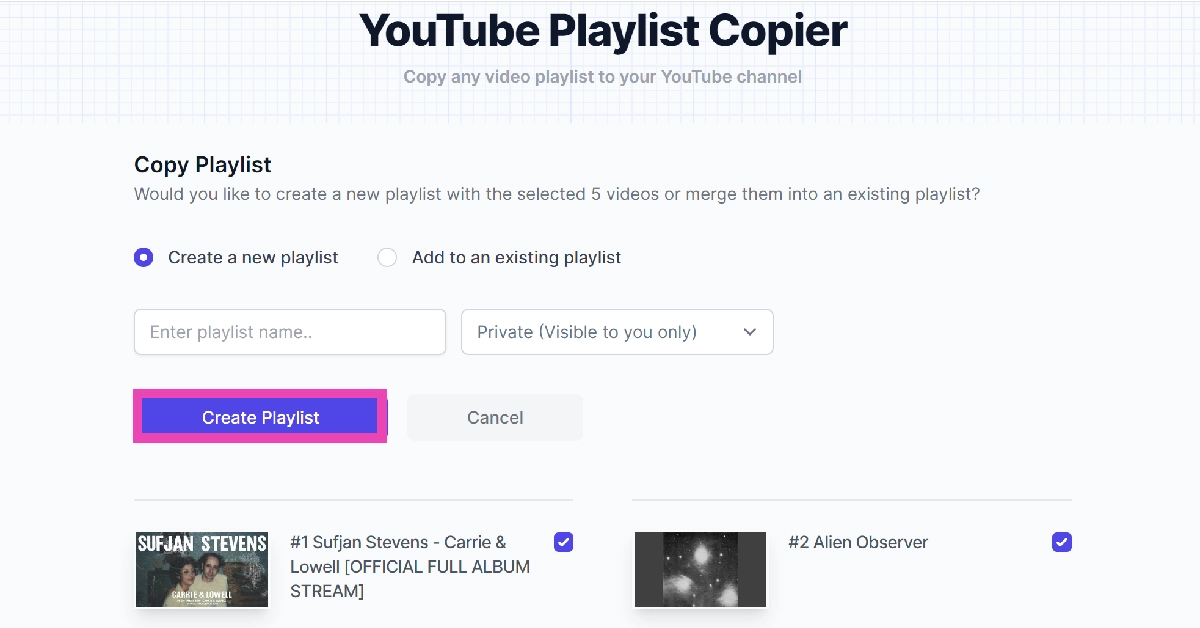

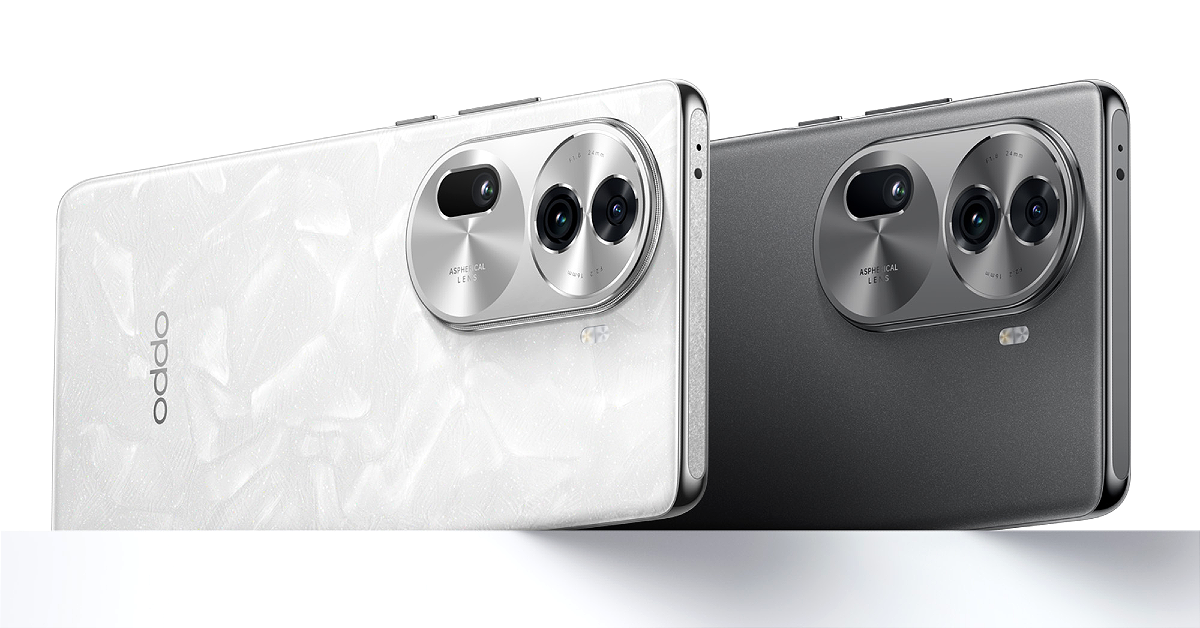
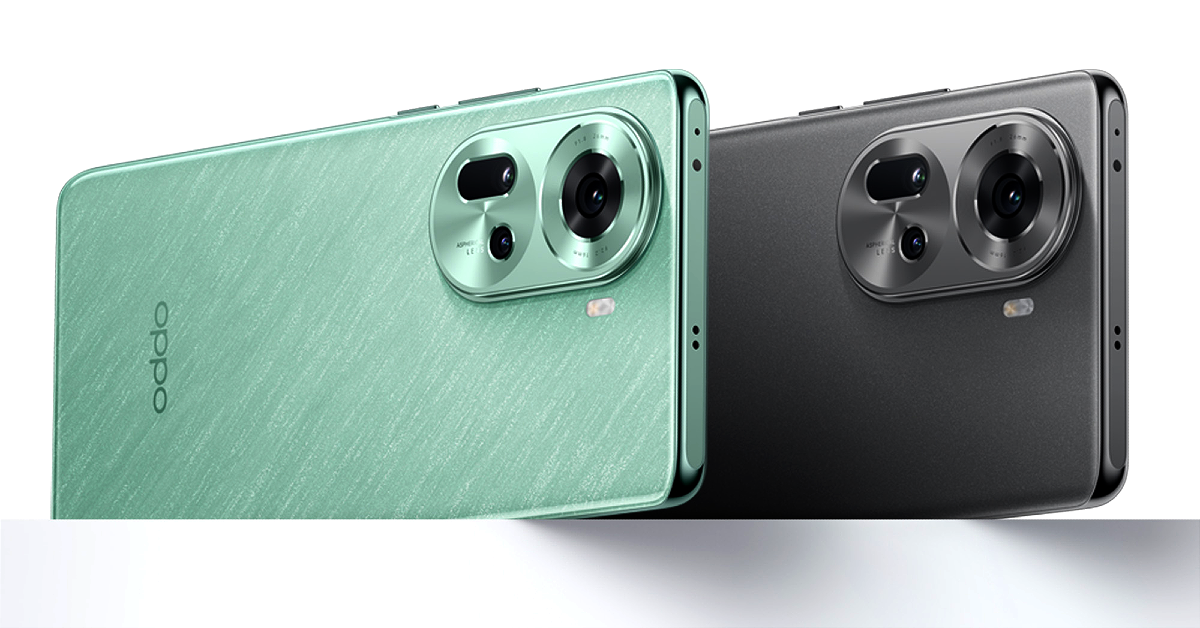

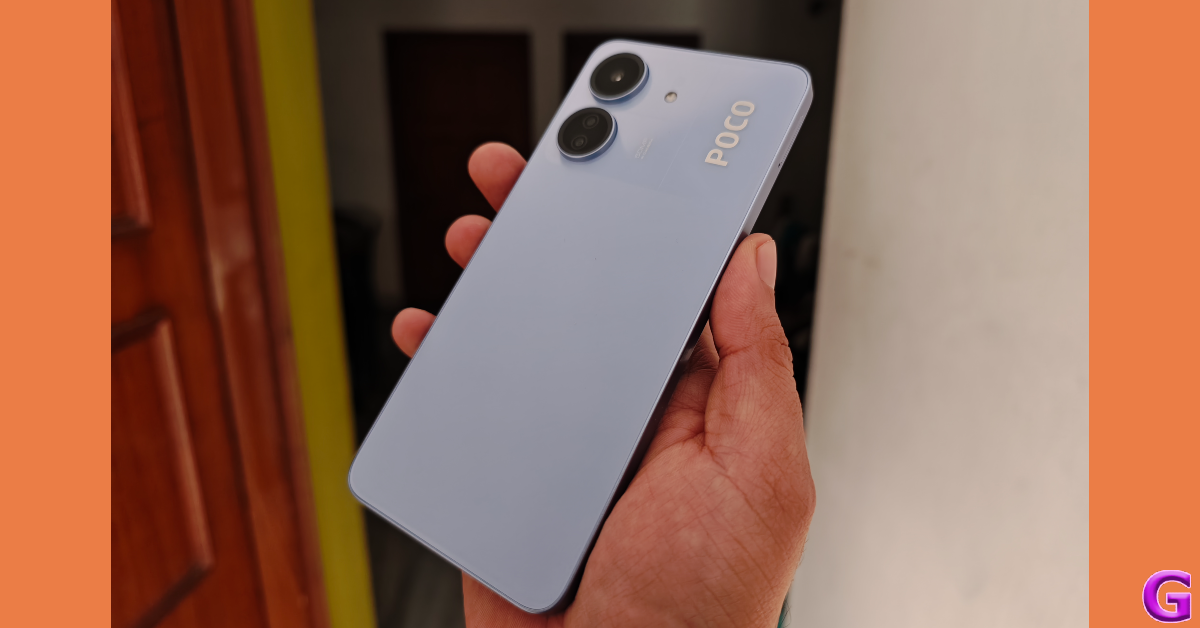
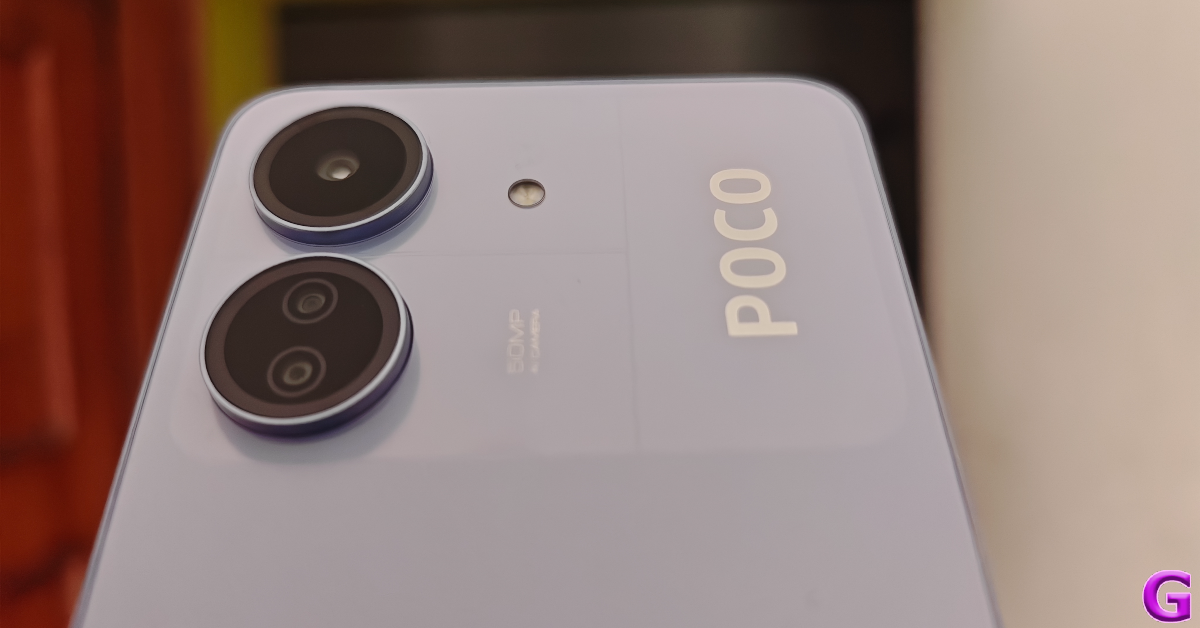
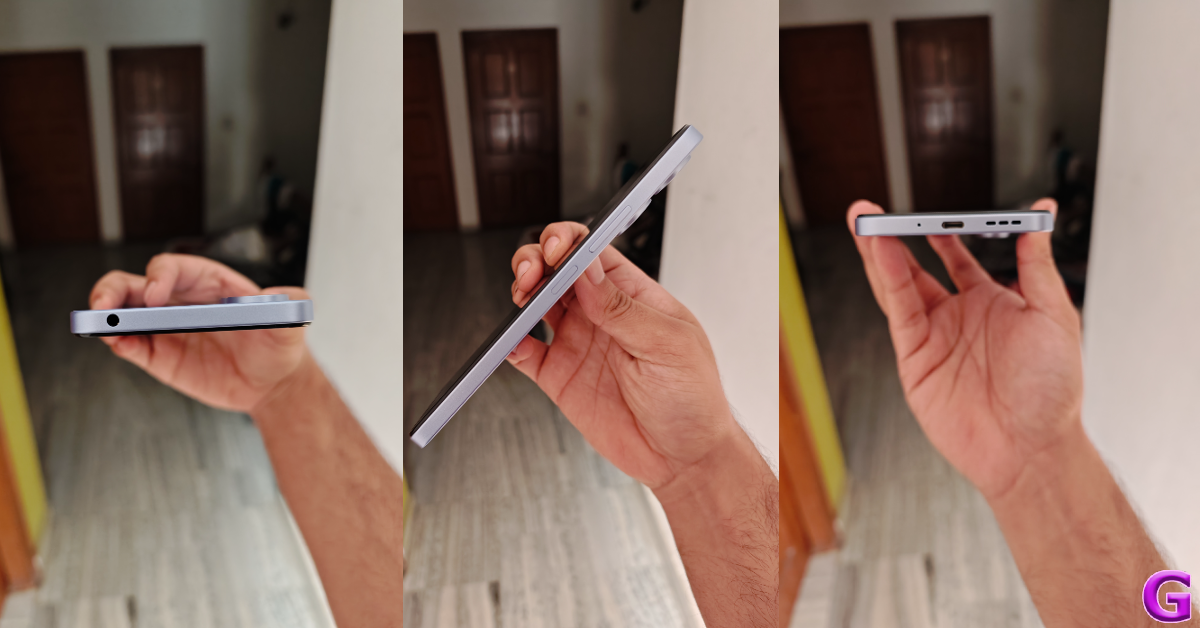
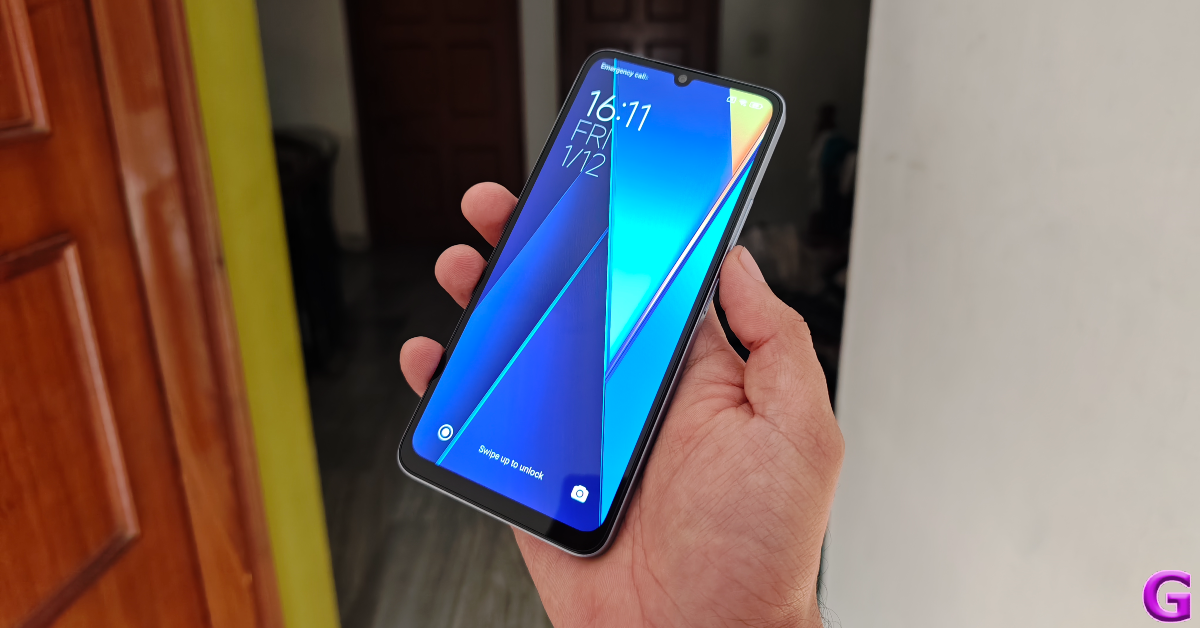
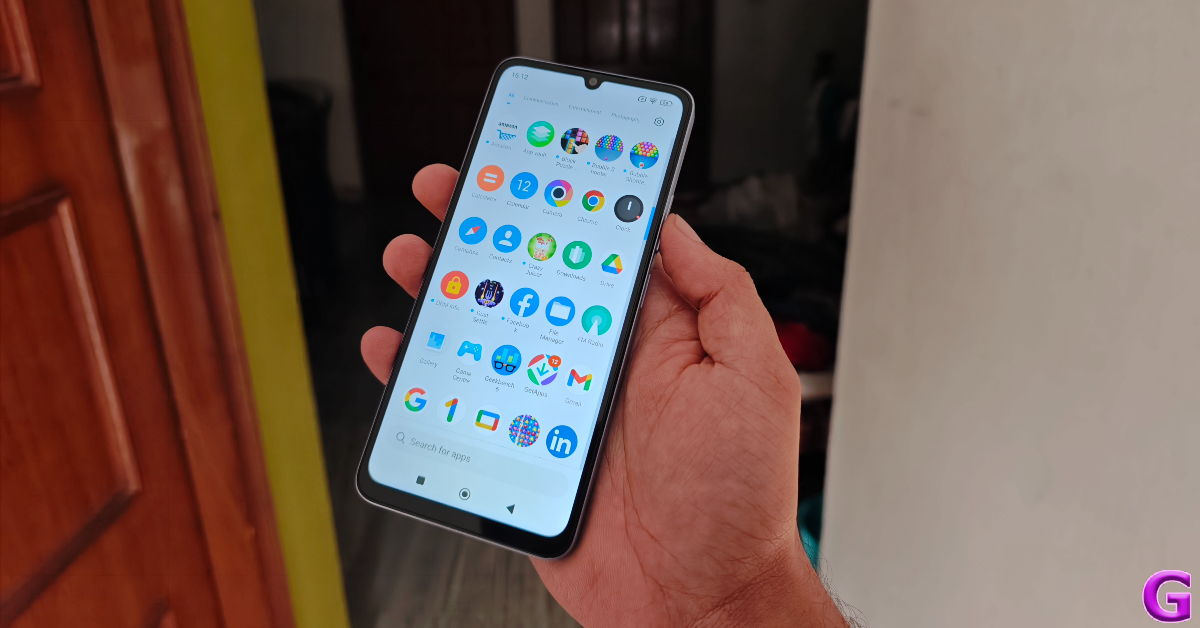

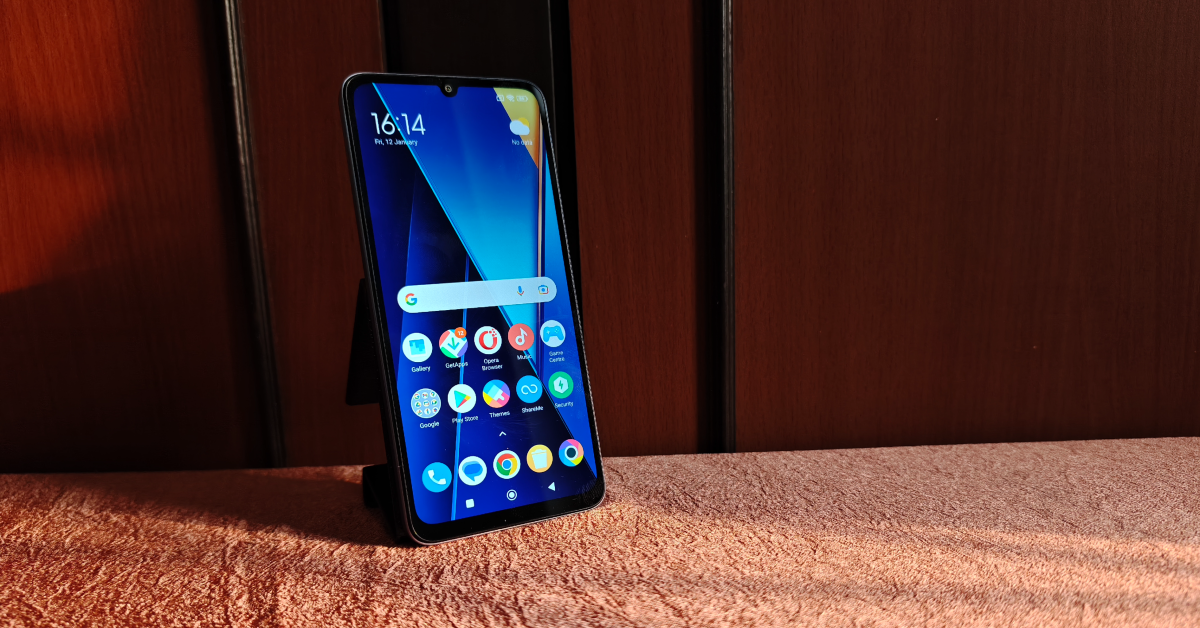


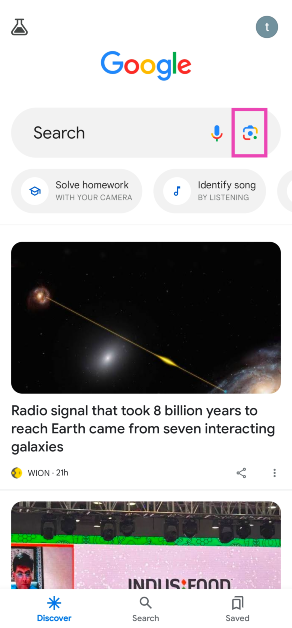
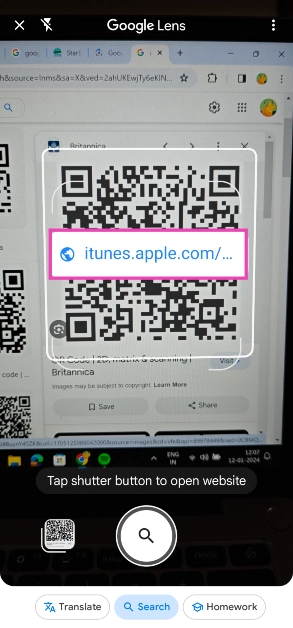
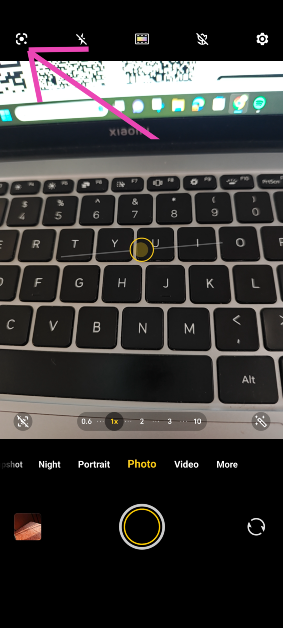
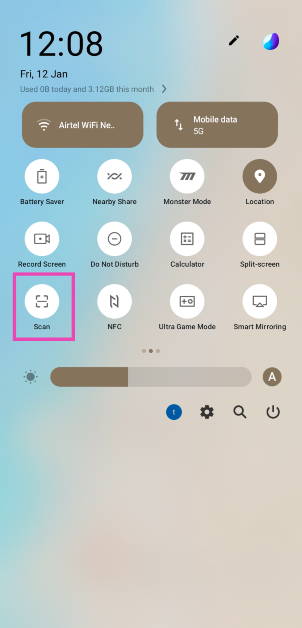

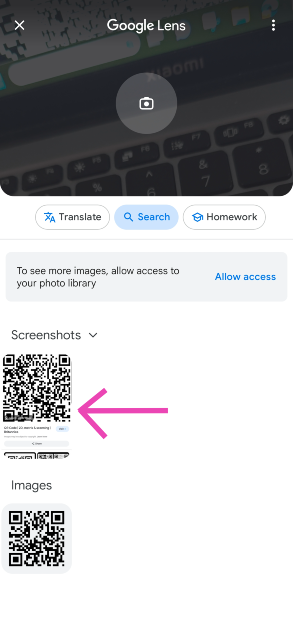
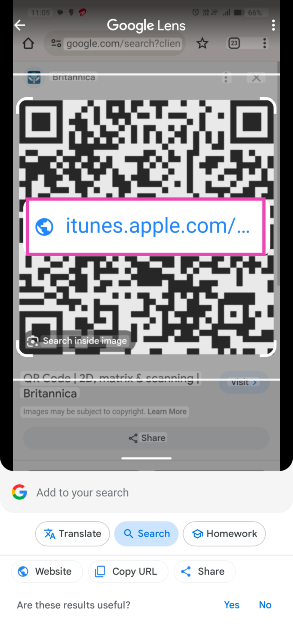
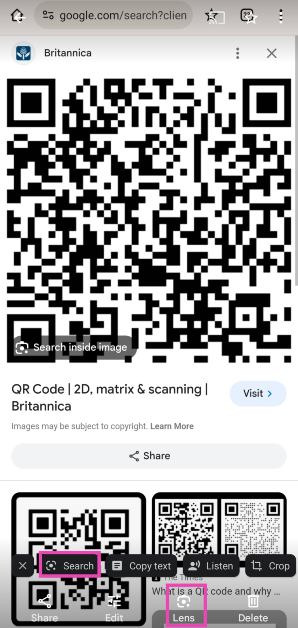

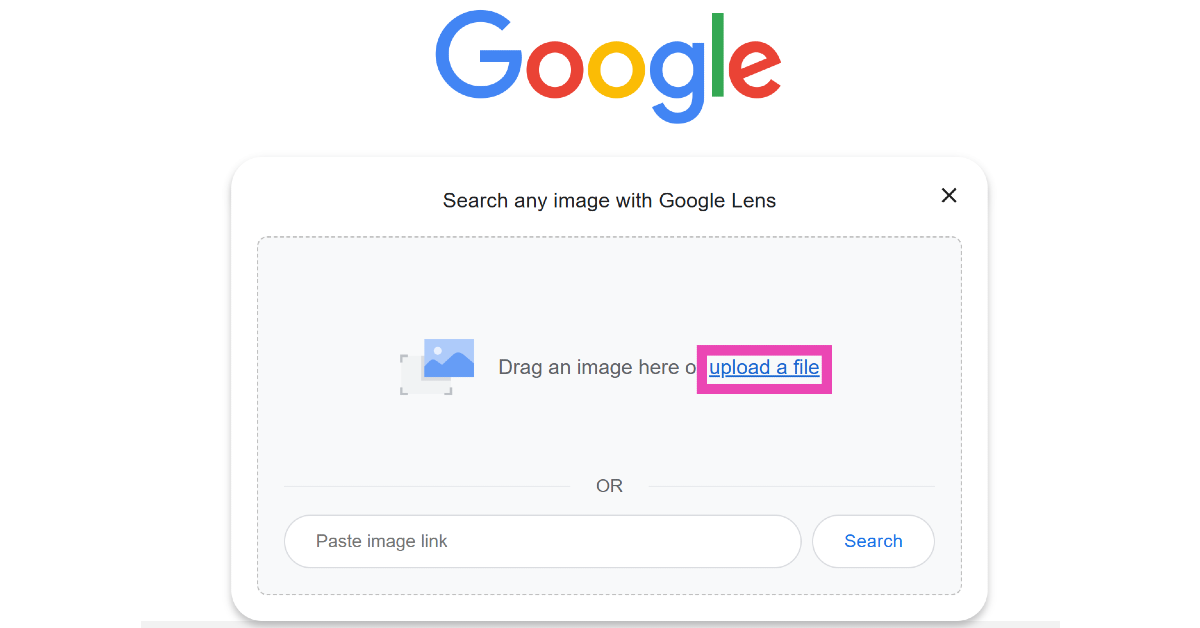
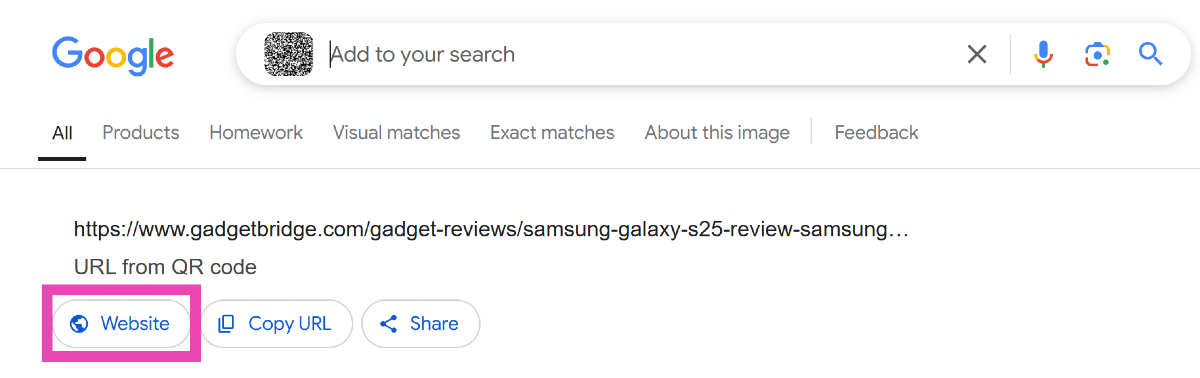
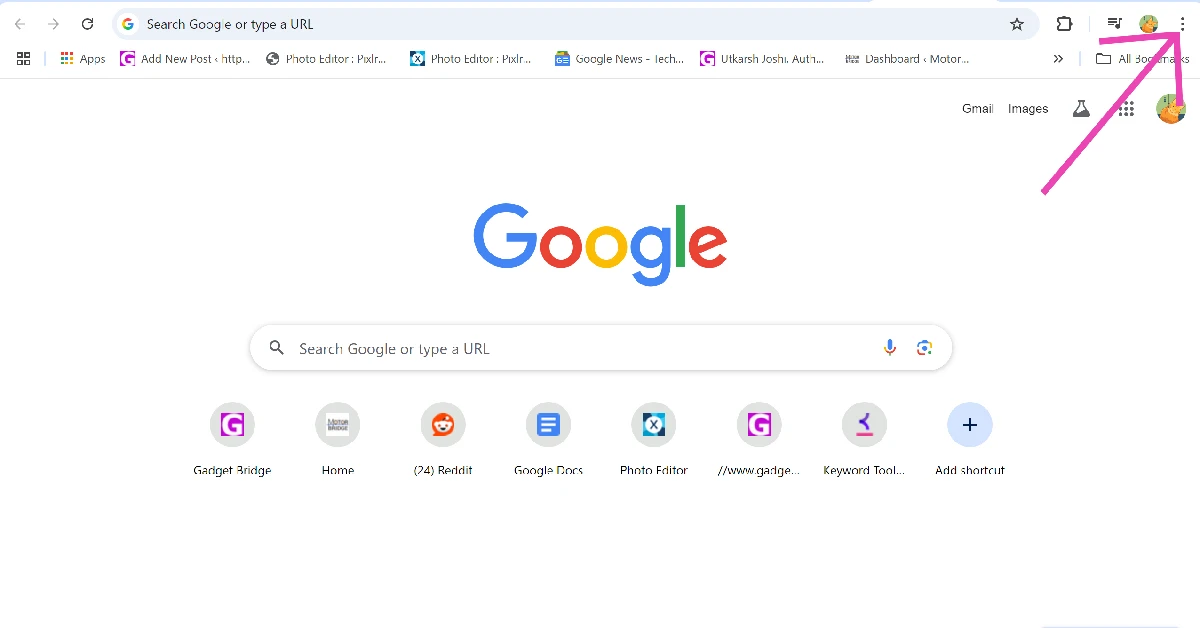
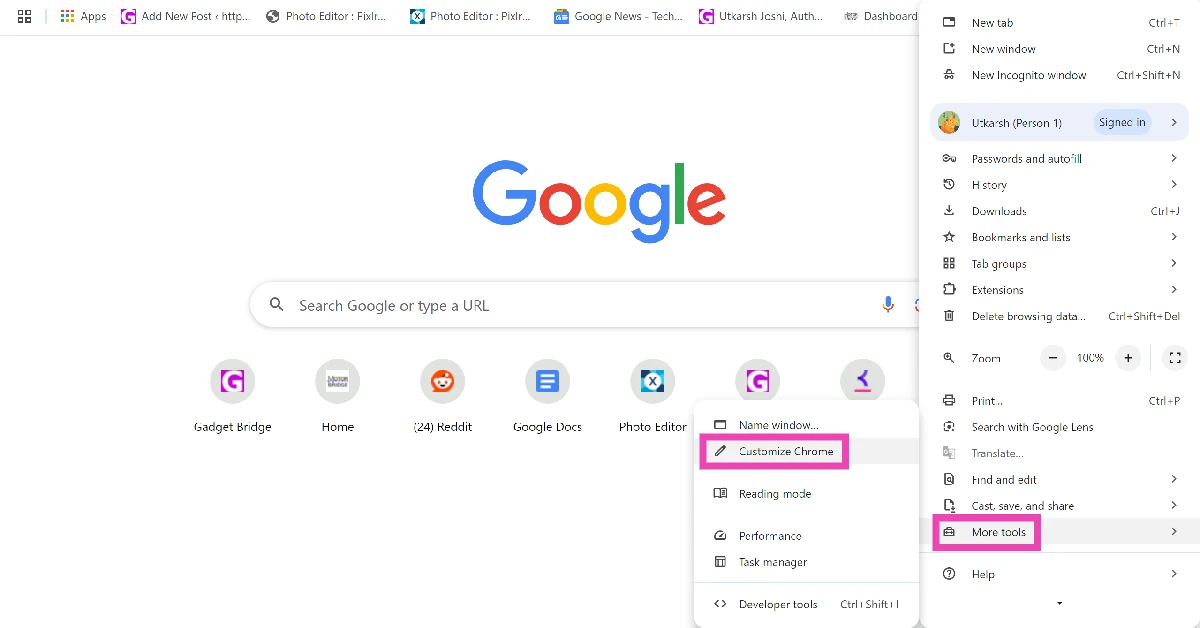
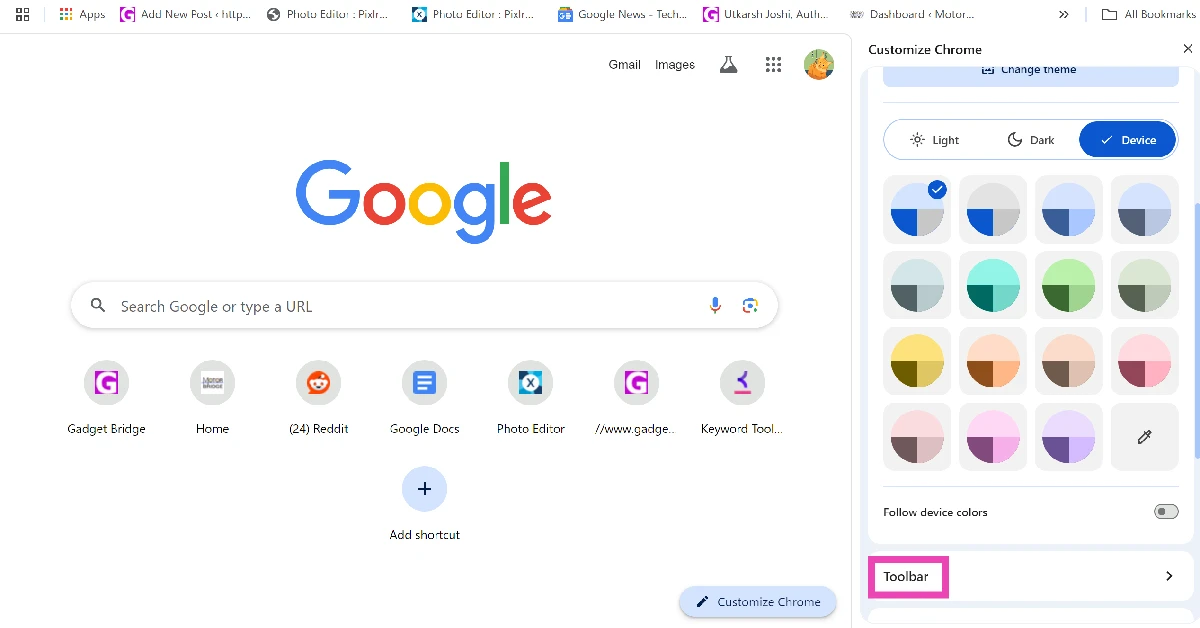
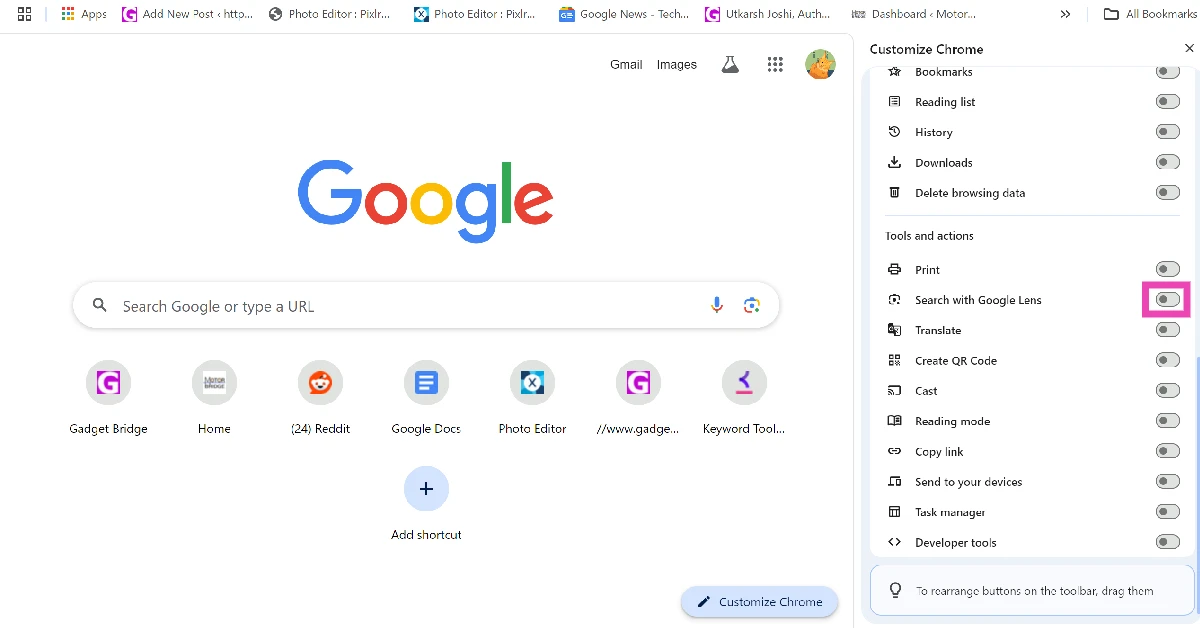
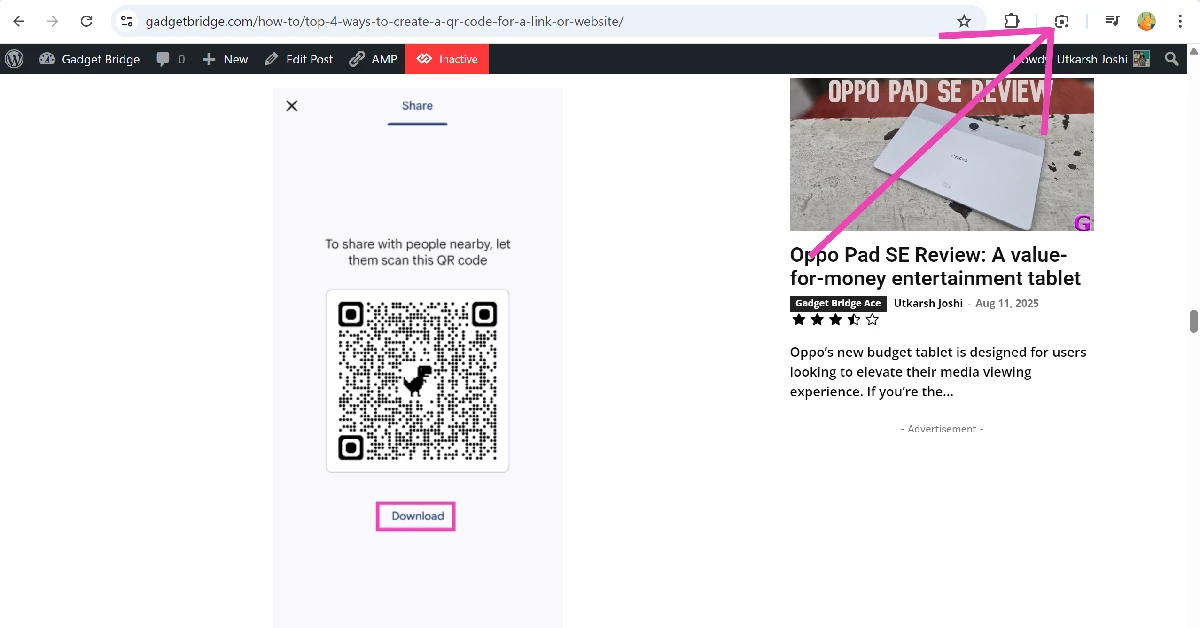
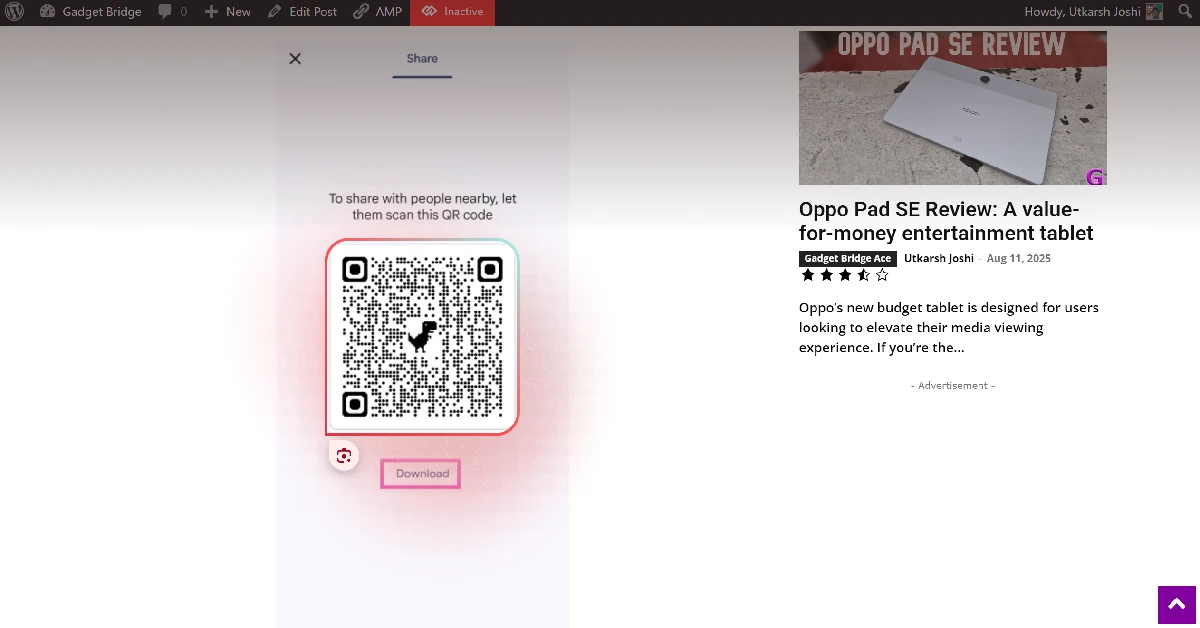
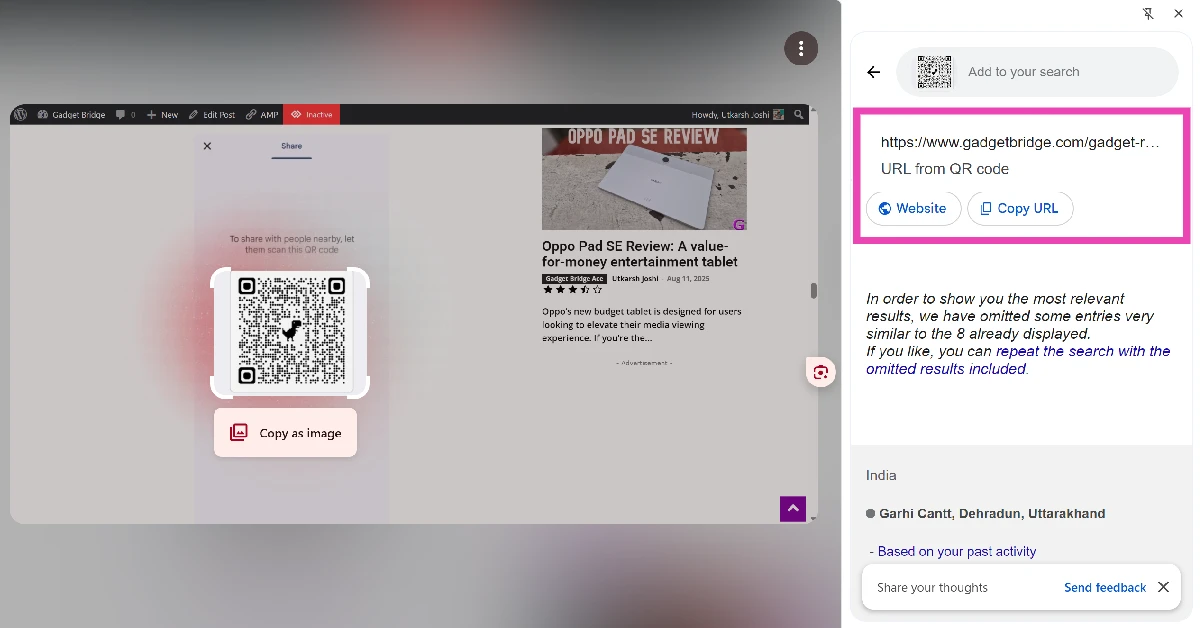


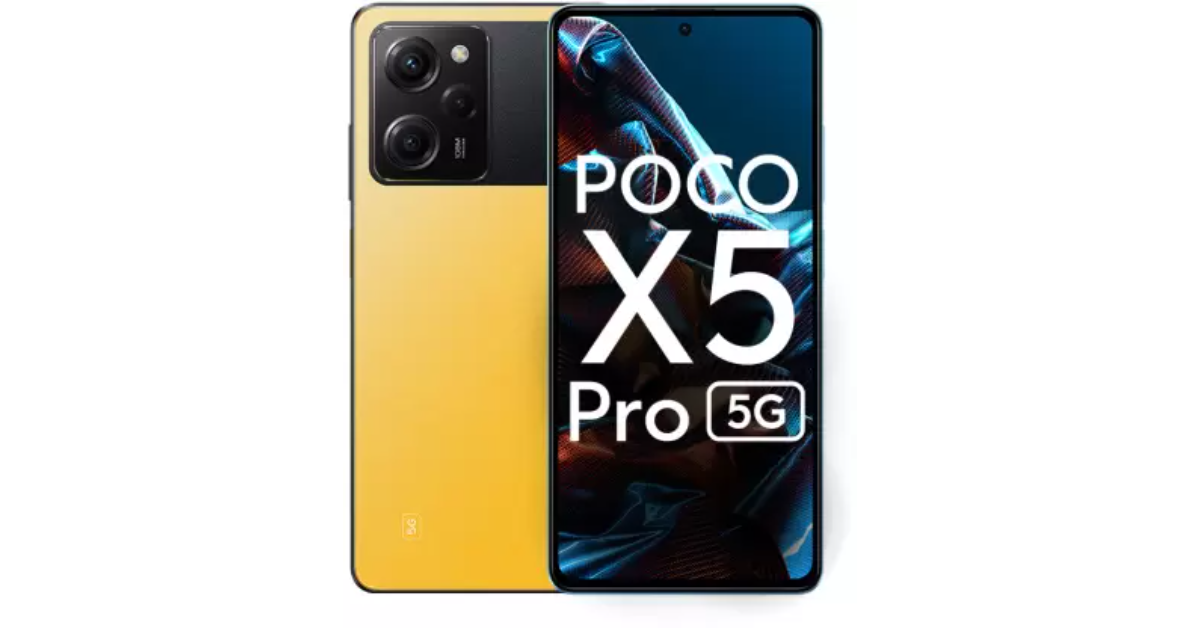


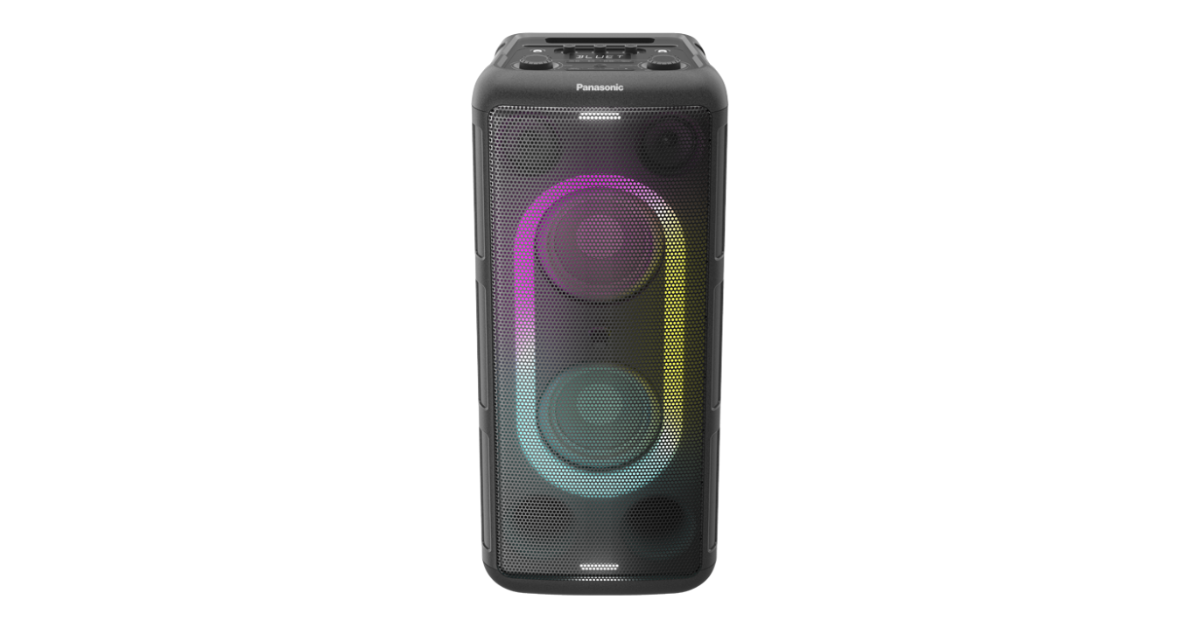


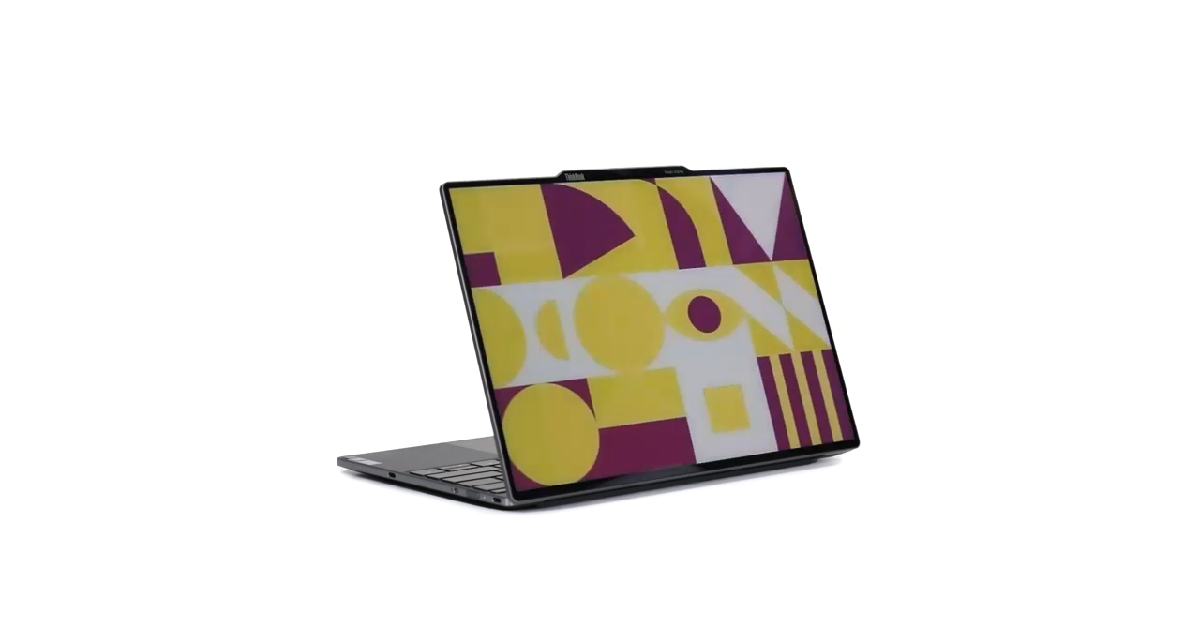


")

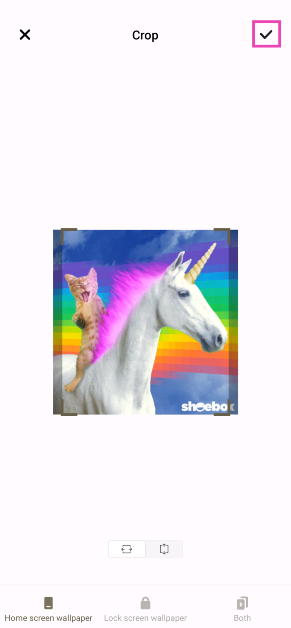
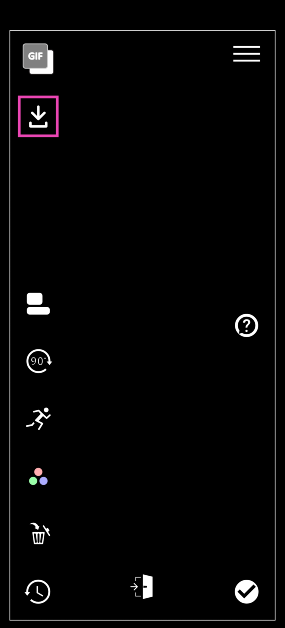
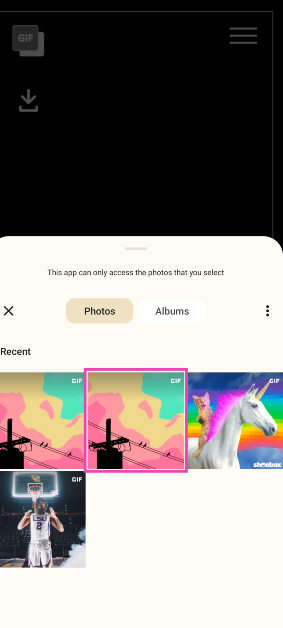

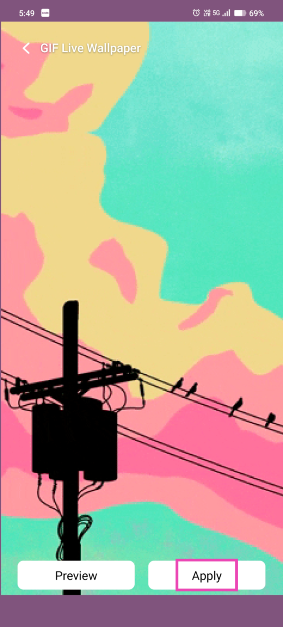
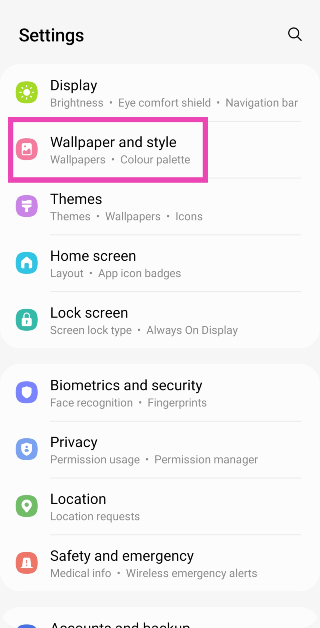
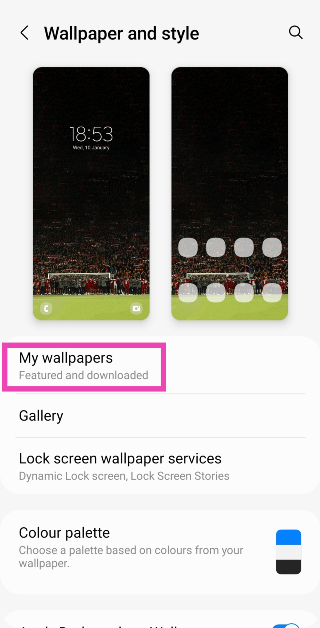
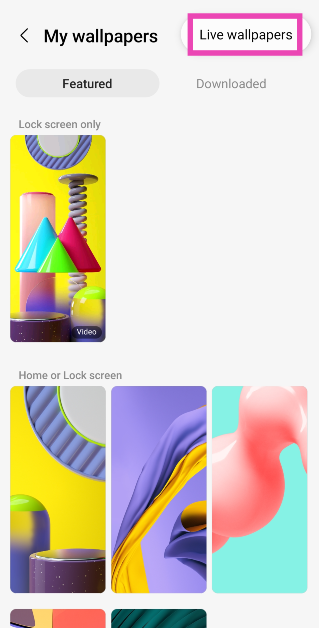


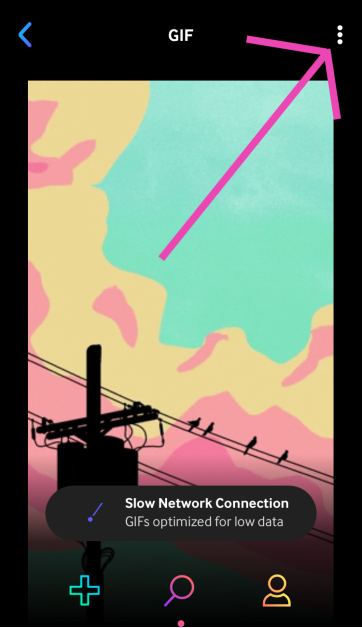
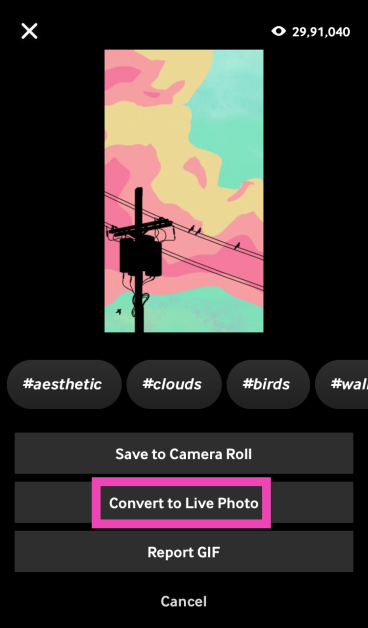
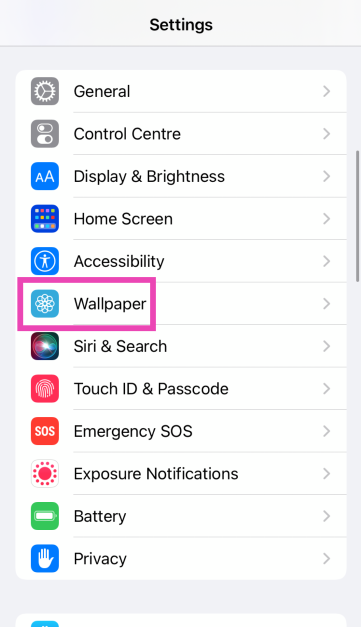
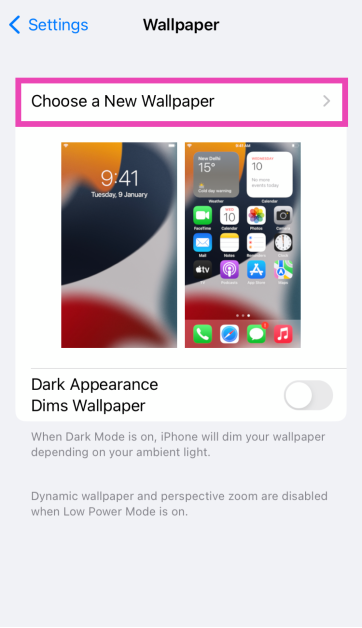
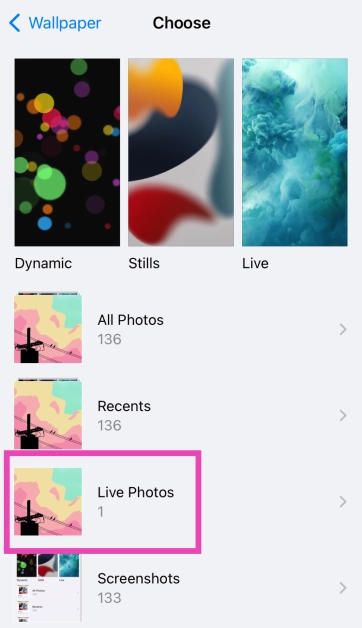


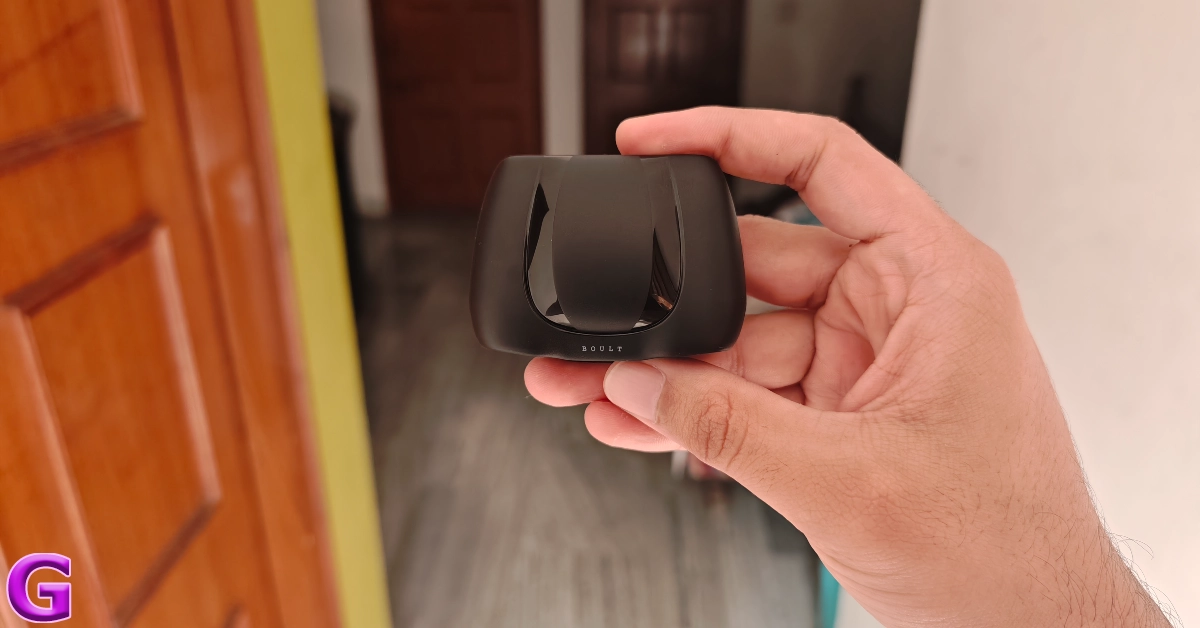
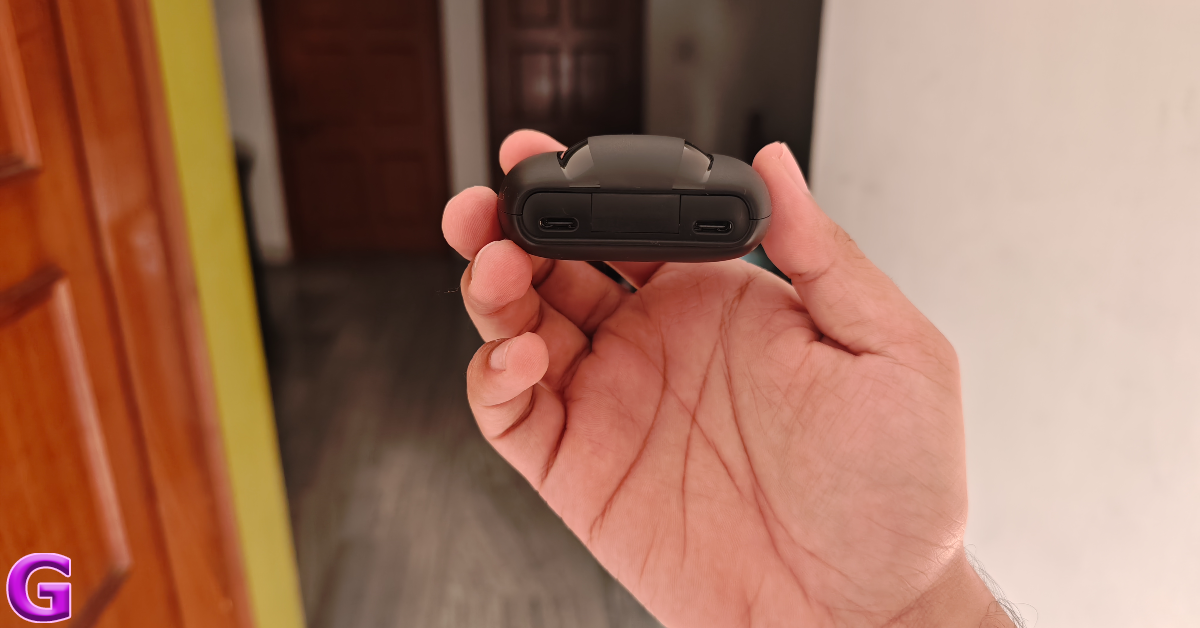

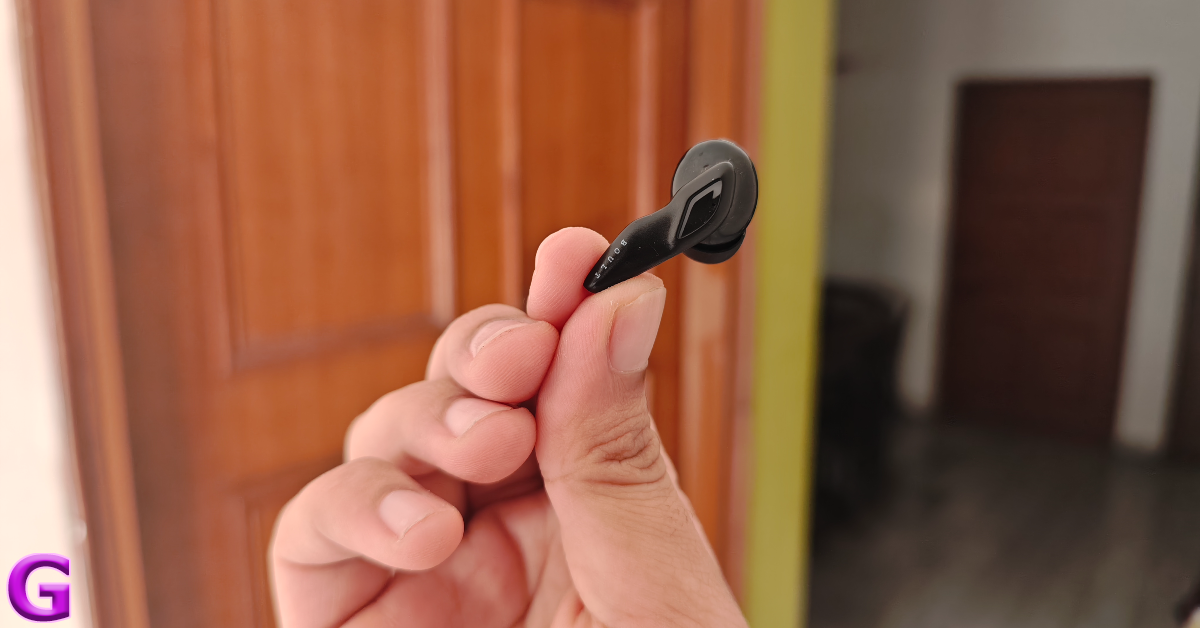
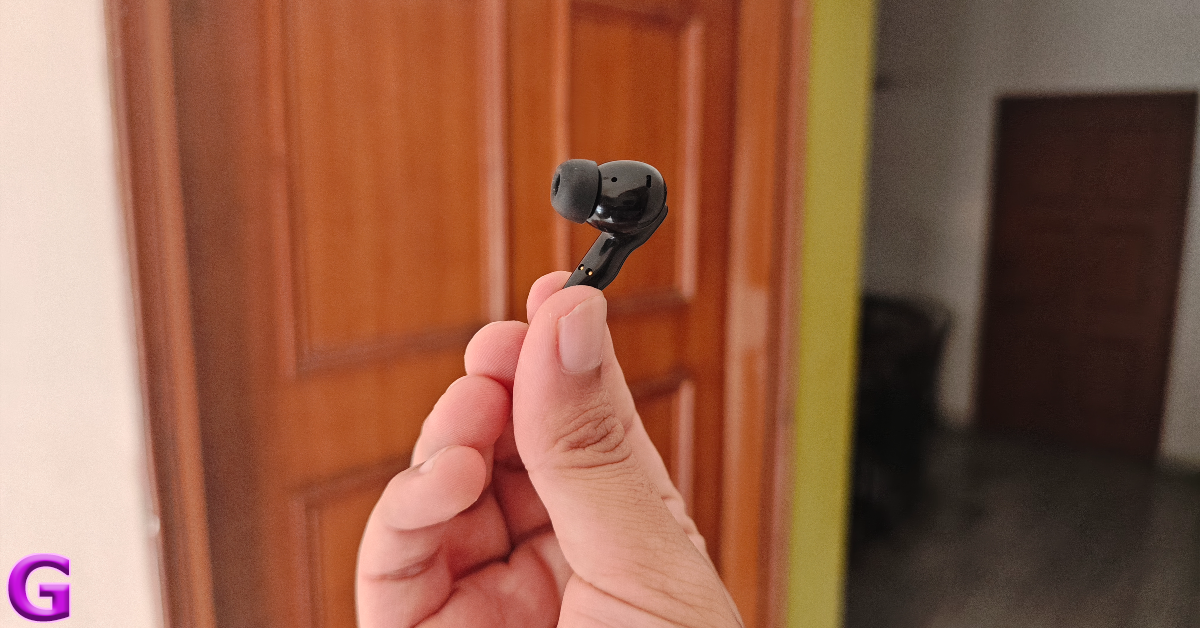
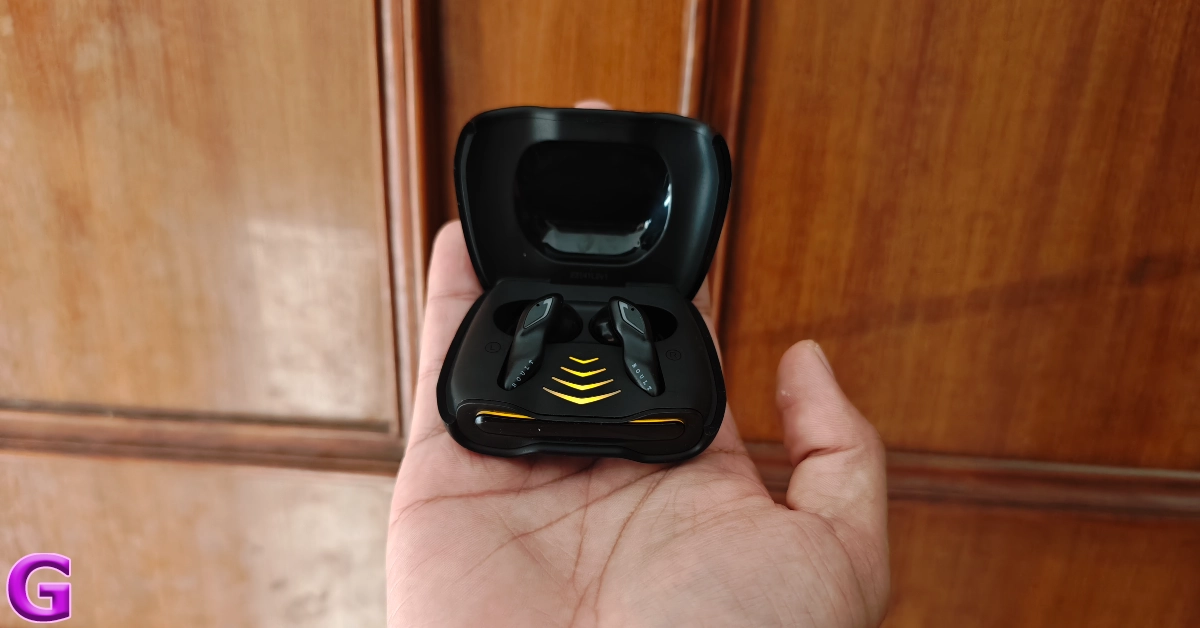


")