
After a three-month trial, the Indian government approves Krafton’s BGMI

Battlegrounds Mobile India (BGMI) appears to have secured official authorisation from the Indian government for Krafton to continue operating here, according to a report. After getting banned in India for 10 months, Battlegrounds Mobile India aka BGMI got clearance to restart operations in India in May this year. For those who are unaware, Free Fire, a competing battle royale game has also returned to the nation after being shut down for around 1.5 years.
However New State Mobile, a different app that Krafton owns is still operating in the country.
According to sources cited by Moneycontrol, the approval was given after the company successfully completed a three-month audit process. According to the report, the game will now need to pass quarterly evaluations in order to maintain its approval. These evaluations will concentrate on several facets of how the game functions.
The government’s action comes before the three-month trial period—given to KRAFTON for the game’s exclusivity in India—that was granted by the Ministry of Electronics and Information Technology (MeitY) in May of this year—expires.
In India, the mobile game held by Krafton was banned in July 2022 as a result of a government order. The Google Play Store and App Store soon removed it. It was outlawed, just like PUBG, and disappeared from India.
If you didn’t know, PUBG was reintroduced in India under the moniker BGMI, which stands for Battlegrounds Mobile India. In addition to the new branding, the game was created especially for Indian players.
For the latest gadget and tech news, and gadget reviews, follow us on Twitter, Facebook and Instagram. For newest tech & gadget videos subscribe to our YouTube Channel. You can also stay up to date using the Gadget Bridge Android App. You can find the latest car and bike news here.
Vivo Y36 and Vivo Y02t prices dropped by up to Rs 1,000: Deets inside

Vivo has announced a price reduction for the two of its smartphones. Vivo Y36 and Vivo Y02t are the latest to see the price cut months after their launch. The company announced a Rs 1,000 price cut on the Vivo Y36 whereas the Y02t is getting a price drop of Rs 500. Vivo Y36 made its debut in India two much back in June in a single variation. On the other hand Vivo Y02t debuted in May this year.
The Vivo Y36 and Vivo Y02t are now offered at new, competitive prices of Rs 15,999 for the 8GB RAM model with 12GB storage and Rs 9,499 for the 4GB RAM model with 64GB storage, respectively. Vivo has announced a Rs. 1,000 price reduction for the Vivo Y36. The phone, which originally cost Rs 16,999. The Vivo Y02t, on the other hand, has seen a price reduction of Rs 500, dropping from Rs 9,999 at launch for the single 4GB RAM and 128GB storage option.
Also Read: Google Pixel 8 and Pixel 8 Pro get listed on the FCC certification website, ahead of October 4 launch
Along with extra perks like vivo V-Shield Protection Plans, customers can receive a cashback of up to Rs 1000 when purchasing the vivo Y36 from specific financial partners like ICICI, SBI Card, IDFC First, Federal Bank, Yes Bank, Bank of Baroda, and IndusInd Bank. Note that the purchase of Vivo Y02t is not subject to any further bank offers.
Customers can purchase the devices with the revised effective pricing on Flipkart, the vivo India e-store, and at all of Vivo’s partner retail locations.
Vivo Y36 comes with a 6.64-inch full-HD+ LCD display that supports a 90Hz refresh rate and 240Hz touch sampling rate. Under the hood, there is an octa-core 6nm Snapdragon 680 SoC with 8GB of RAM and includes 128GB of storage that can be expanded up to 1TB using a microSD card. It runs on FunTouch OS 13 based on Android 13. The smartphone is highlighted with a dual rear camera setup that includes a 50-megapixel primary sensor with an f/1.8 aperture and a 2-megapixel bokeh lens. There is a 16-megapixel front-facing camera for taking selfies and video calling. In addition to this, the device packs a 5,000mAh battery that supports 44W fast charging.
For the latest gadget and tech news, and gadget reviews, follow us on Twitter, Facebook and Instagram. For newest tech & gadget videos subscribe to our YouTube Channel. You can also stay up to date using the Gadget Bridge Android App. You can find the latest car and bike news here.
2 Easy Ways to Copy and Share LinkedIn Profile Link

LinkedIn is a social media platform that specialises in forming professional connections and finding new jobs. Your LinkedIn profile holds all the vital information – from your work history to your educational qualifications. Forwarding your LinkedIn profile to a contact makes it very accessible for them to go through your work and contact you for further dialogue. In this article, we bring you 2 easy ways to copy and share your LinkedIn profile link with other people.
Read Also: Best 3 Ways to Change the Speed of Video on Android and iPhone
 Step 3: Copy the URL under the Public Profile and URL section on the right.
Step 4: Paste the URL from the clipboard to share it with someone.
Step 4: Paste the URL from the clipboard to share it with someone.
Step 3: Copy the URL under the Public Profile and URL section on the right.
Step 4: Paste the URL from the clipboard to share it with someone.
Step 4: Paste the URL from the clipboard to share it with someone.
Copy and Share your LinkedIn Profile Link
Step 1: Open LinkedIn on your device’s web browser. Step 2: Go to your LinkedIn profile. Step 3: Copy the URL under the Public Profile and URL section on the right.
 Step 4: Paste the URL from the clipboard to share it with someone.
Copy and Share your LinkedIn Profile Link from the web browser
Step 1: Open LinkedIn on your device’s web browser. Step 2: Go to your LinkedIn profile. Step 3: Click on the web browser’s address bar and press Ctrl + C. Your profile URL will be copied to the clipboard. Step 4: Paste the URL from the clipboard to share it with someone.
Frequently Asked Questions (FAQs)
How do I copy my LinkedIn profile URL?
Open your LinkedIn profile on a web browser and check out the Public Profile and URL section on the right. This is where you will find your profile URL. Copy this address to share it with others.How do I change my LinkedIn profile URL?
To change your LinkedIn profile URL, click the pencil icon on the Public Profile and URL section. On the following page, hit the pencil icon in the Edit your custom URL section.How do I find my LinkedIn profile URL?
Open your LinkedIn profile in a web browser, then click the address bar to locate the profile link. Read Also: iQoo Z7 Pro 5G with 64-megapixel Samsung GW3 primary sensor launched in IndiaConclusion
These are the 2 ways you can copy and share your LinkedIn profile link with others. If you want a customised link to your profile, simply hit the pencil icon next to the Public Profile and URL section. This will redirect you to a new page where you can set a new URL for your profile. If you found this article helpful, let us know in the comments! For the latest gadget and tech news, and gadget reviews, follow us on Twitter, Facebook and Instagram. For newest tech & gadget videos subscribe to our YouTube Channel. You can also stay up to date using the Gadget Bridge Android App. You can find the latest car and bike news here.BGMI redeem codes for 2 September 2023, claim and receive rewards and benefits

After being banned for nearly ten months, Battleground Mobile India, aka BGMI, is officially available again in India. BGMI fans are looking for ways to improve their game experience and one such method is the usage of redemption codes, which offers a variety of rewards and advantages using BGMI redeem codes players can gain access to new skins, outfits, loot crates, weapons and free UC and diamonds.
As mentioned earlier, these codes give users the chance to earn unique rewards and gain extra benefits while playing the game. This includes GUN SKINS (M4, AKM, M416, AWM, M24, UZI, KAR98K), free character voucher, Andy, Carlo, Sara, Victor character for free, free Anna Character on completing the mission and UC or Royal Pass Discount. So here we have gathered a list of the most recent BGMI redeem codes as of 2 September 2023. Also, redeem these codes asap as these are only valid for a limited duration.
BGMI Redeem Codes for 2 September 2023
updating soon…How to get free Redeem Codes for BGMI on 2 September 2023?
- Launch BGMI on your device.
- Then select the Redeem Code option from the main menu.
- Next, click on the Redeem code tab.
- A new window will open, requesting the redemption code.
- Now enter your BGMI code.
- Confirm and click on the “Redeem” tab.
- If your redeem code is valid then you will get a message confirming that your rewards were successfully redeemed.
Garena Free Fire Redeem Codes Today 2 September 2023: Here is how to claim them

Garena Free Fire is a battle royale game with regular awards and tournaments to keep players interested. If you play Garena Free Fire, you should be aware of the redeem codes that are released on a daily basis. However, because the battle royale game is banned in India, players from other countries can use the Free Fire Redeem codes daily. If you’re unfamiliar with the Garena Free Fire redeem codes or don’t know how to get them, we’ve put together a step-by-step guide to help you redeem them. Check out Garena Free Fire Redeem Codes for 2 September 2023.
The Free Fire redeem codes are a great way to get free stuff. These are 12-digit codes that contain alphabets and numbers, as well as an expiration date and time. Because the Garena FF redeem codes cannot be used more than once, you should hurry to the redemption page to claim your free reward before someone else does. To get a free reward, all you have to do is go to reward.ff.garena.com/en, which is the official redemption page. Also, keep an eye on this space for daily updates on Garena Free Fire redemption codes and rewards.
Garena Free Fire Redeem Codes Today 2 September 2023
- FEICJGW9NKYT
- KEYVGQC3CT8Q
- FVRTNJ45IT8U
- F4BHK6LYOU9I
- F767T1BE456Y
- FFCMCPSJ99S3
- BR43FMAPYEZZ
- XZJZE25WEFJJ
- FF7MJ31CXKRG
- FFPO8BS5JW2D
- PJNF5CQBAJLK
- F7AC2YXE6RF2
- FHLOYFDHE34G
- XGW4FNK7ATON
- 67IBBMSL7AK8G
- V427K98RUCHZ
- MCPW2D1U3XA3
- FFAC2YXE6RF2
- HNC95435FAGJ
- 6KWMFJVMQQYG
- FFCMCPSUYUY7E
- MCPW3D28VZD6
- EYH2W3XK8UPG
- FAGTFQRDE1XCF
- FFCMCPSBN9CU
- NPYFATT3HGSQ
- FFCMCPSGC9XZ
- MCPW2D2WKWF2
- ZZZ76NT3PDSH
- FFCMCPSEN5MX
How to Get Free Fire Redeem Codes for Garena on 2 September 2023?
- Visit the Garena Free Fire game’s official website at reward.ff.garena.com.
- Use your Facebook, Google, VK, Apple ID, Huawei ID, or Twitter account to log in.
- You’ll be taken to a valid redemption code (s)
- Copy and paste the 12-digit redemption code into the text box.
- On the screen, a dialogue box will appear.
- ‘Ok’ should be selected.
3 Ways to Add the Messages App Icon Back to Home Screen

Most Android smartphones have an app drawer along with a home screen. The home screen is where you place all the important app shortcuts for easy access. Meanwhile, the app drawer is where you’ll find all the apps installed on your phone. On iPhone, the app drawer is known as the App Library and can be accessed by swiping left on the last home screen. On most smartphones, the Dialer and Messages app are the common fixtures on the home screen. Sometimes, users remove them by accident and can’t figure out how to get them back. In this article, we bring you 3 quick ways to add the Messages app icon back to the home screen on your iPhone and Android phone.
Read Also: 4 Reasons Why You Should Buy CZUR Fancy S Pro
Step 4: Drop the Messages app icon in the desired place.
Step 3: Select Add to Home in the Shortcut menu.
Step 1: Unlock your iPhone and swipe left until you reach the App Library.
Step 2: Locate the Messages app in the Socials folder or simply search for it using the search tab at the top.
Step 3: Press and hold the Messages app icon.
Step 4: Move the icon towards the top of the screen until you exit the App Library and land on the home screen.
Step 5: Release the app icon. It will show up on the home screen.
Add the Messages App Icon to the Home Screen on Android
Step 1: Unlock your Android smartphone and swipe up to access the app drawer. Step 2: Press and hold the Messages app icon. Step 3: Move the Messages app towards the top until you exit the app drawer and land on the home screen. Step 4: Drop the Messages app icon in the desired place.

Add the Messages App Icon to the Home Screen using the shortcut menu
Step 1: Unlock your Android smartphone and swipe up to access the app drawer. Step 2: Long press the Messages app icon. Step 3: Select Add to Home in the Shortcut menu.

Add the Messages App Icon to the Home Screen on iOS/iPhone
 Step 1: Unlock your iPhone and swipe left until you reach the App Library.
Step 2: Locate the Messages app in the Socials folder or simply search for it using the search tab at the top.
Step 3: Press and hold the Messages app icon.
Step 4: Move the icon towards the top of the screen until you exit the App Library and land on the home screen.
Step 5: Release the app icon. It will show up on the home screen.
Step 1: Unlock your iPhone and swipe left until you reach the App Library.
Step 2: Locate the Messages app in the Socials folder or simply search for it using the search tab at the top.
Step 3: Press and hold the Messages app icon.
Step 4: Move the icon towards the top of the screen until you exit the App Library and land on the home screen.
Step 5: Release the app icon. It will show up on the home screen.
Frequently Asked Questions (FAQs)
How do I add the Messages app icon to the home screen on my Android phone?
Go to the app drawer, press & hold the messages app icon, then drag it to the top of the screen until you land on the home screen. Release the app in the desired spot.How do I add the Messages app icon to the home screen on my iPhone?
Go to the App Library, press & hold the messages app, then move it towards the top of the screen and release it once you hit the main screen.How do I change the home screen layout of my Android phone?
Go to Settings>Home Screen, then use the home screen grid to change its layout. Read Also: How to Sign Out of Amazon on All Devices?Conclusion
This is how you can add the Messages app icon to your iPhone or Android phone’s home screen. Android offers a lot more customisation options than iOS. Some Android skins let you ditch the app drawer altogether and just have one home screen for your device. You can also choose different grid layouts for your home screen. Go to Settings>Home Screen to explore more. For the latest gadget and tech news, and gadget reviews, follow us on Twitter, Facebook and Instagram. For newest tech & gadget videos subscribe to our YouTube Channel. You can also stay up to date using the Gadget Bridge Android App. You can find the latest car and bike news here.Google Pixel 8 and Pixel 8 Pro get listed on the FCC certification website, ahead of October 4 launch

The Mountain View, California-based tech giant Google has revealed the precise date of the formal release of its Pixel 8 range of premium smartphones. The Pixel 8 and Pixel 8 Pro variants are anticipated to be part of the series. For the past few weeks, various rumours have circulated regarding the phone’s key features and other information. The Pixel 8 and Pixel 8 Pro are said to have been listed on the FCC certification website weeks before their release.
After Apple revealed the launch date for its iPhone 15 series Google has now officially confirmed the Pixel 8 series’ launch date. The launch date of October 4 has been announced via X . With a base and a Pro model, the Pixel 8 Series is planned to succeed the Pixel 7 series when it launches on October 4. The event, which is said to be being hosted by the corporation, would begin that day at 10 AM local time in New York.
Also Read: Android 14-based OxygenOS 14 confirmed to be released globally on this date: Details
The Pixel 8 and Pixel 8 Pro, weeks before their release, apparently went to the FCC certification website. According to the listing, the devices’ FCC listing indicates that there may be five different varieties available when they go on sale. GKWS6, G9BQD, GZPF0, GPJ41, and G1MNW are stated as model numbers for the Pixel 8, while G1MNW is reportedly the model number for the Pixel 8 Pro. Furthermore, it’s expected that the Pixel 8 and Pixel 8 Pro will support Bluetooth, Wi-Fi 6E, and both Sub6 and mmWave 5G connectivity.
The Pixel 8 Pro’s colour options and rear design were recently discovered on Google’s promo page for Google Subscriptions & Services. Porcelain White has been used as a colour scheme to tease the smartphone. It’s anticipated to have a single pill-shaped camera island (similar to its predecessors) with a triple back camera system. In addition to this, the existence of a further sensor that sits adjacent to the LED flash has also been suggested.
Additionally, it has been speculated that Google’s camera app on the Pixel 8 Series will get a new user interface. The upcoming series is likely to feature AI-powered cameras.
In some areas, the Google Pixel 8 series is expected to launch as an eSIM-only smartphone. The leaked renderings claimed that the left side’s SIM card slots were absent.
For the latest gadget and tech news, and gadget reviews, follow us on Twitter, Facebook and Instagram. For newest tech & gadget videos subscribe to our YouTube Channel. You can also stay up to date using the Gadget Bridge Android App. You can find the latest car and bike news here.
How to set a battery charging limit on your Android phone?

Your phone’s battery is prone to a lot of wear and tear. While you cannot stop it from eventually degrading over time, you can maximize its longevity by taking a few measures. One of the easiest things you can do is not charge your phone beyond 80%. If you’re used to charging your phone overnight, this can be a tricky task to accomplish. In this article, we show you how to set a battery charging limit on your Android phone.
Read Also: 4 Reasons Why You Should Buy CZUR Fancy S Pro
Step 2: Select Battery.
Step 3: Tap on More Battery Settings.
Step 4: Switch on the toggle bar for Protect battery.
Step 3: Drag the bubble around the charge indicator to set the upper limit.
Step 4: AccuBattery will remind you to unplug the charger when your phone hits the charge limit.
Set a Battery Charging Limit on Android
Step 1: Go to Settings and select Battery and device care. Step 2: Select Battery.
 Step 3: Tap on More Battery Settings.
 Step 4: Switch on the toggle bar for Protect battery.
Set the battery charging limit using a third-party app
Some Android smartphone manufacturers may not have the feature to set a battery charging limit. In this case, use a third-party app like AccuBattery to set a charging alarm. Step 1: Install the AccuBattery app on your phone. Step 2: Launch the app and switch to the Charging tab. Step 3: Drag the bubble around the charge indicator to set the upper limit.
 Step 4: AccuBattery will remind you to unplug the charger when your phone hits the charge limit.
Frequently Asked Questions (FAQs)
How do I set a battery charging limit on my Android phone?
Go to Settings>Battery and device care>Battery>More Battery Settings and switch on the toggle bar for Protect Battery.How do I set a charging alarm on my Android phone?
Install the AccuBattery app, switch to the charging tab, and drag the buddle around the charge indicator to set the alarm at a specific charge level. Once your phone’s battery hits that level, your device will ring an alarm to remind you to unplug your charger.How long should I charge my phone to maximise its battery health?
To maximize your phone’s battery health, you should plug it in to charge when it hits 20% and plug out the charger when the battery level reaches 80%. Read Also: How to Sign Out of Amazon on All Devices?Conclusion
This is how you can set a battery charging limit on your Android smartphone. To maximise your phone’s battery health, turn on optimised charging. This ensures that your phone does not overcharge if you keep it plugged into the charger overnight. Once optimised charging is turned on, your phone trickle charges the battery once it hits 80%. Over a period of time, your phone recognises your waking-up pattern and only boosts your phone to 100% when you’re about to wake up from sleep. Check out this article to learn how to calibrate your Android phone’s battery. For the latest gadget and tech news, and gadget reviews, follow us on Twitter, Facebook and Instagram. For newest tech & gadget videos subscribe to our YouTube Channel. You can also stay up to date using the Gadget Bridge Android App. You can find the latest car and bike news here.Android 14-based OxygenOS 14 confirmed to be released globally on this date: Details

The precise date for the release of OxygenOS 14, the newest operating system from the Chinese smartphone manufacturer OnePlus, has been officially revealed. The company has announced that it will be live worldwide on September 25. According to the company, OxygenOS 14 will be one of the first operating systems based on Android 14 to be released and will include a number of interesting new features aimed at enhancing user experiences.
Kinder Liu, President and COO of OnePlus said, “OnePlus has been committed to delivering a fast, smooth and steady OxygenOS to our users. Powered by OnePlus’ latest innovations, OxygenOS 14 will be the most intelligent and intuitive software product in OnePlus’ history.”
Also Read: Apple Event: September 12 confirmed for the introduction of the iPhone 15 Series
According to OnePlus OxygenOS 14 will bring users an elevated fast and smooth experience powered by innovative algorithms. OnePlus is integrating OxygenOS 14 with its brand-new, exclusive performance platform, the Trinity Engine.
The Trinity Engine unlocks the full potential of OnePlus smartphones by attaining more hardware and software synergy, addressing industry-wide problems in pursuing higher power consumption efficiency, better multitasking capacity, and a more durable quick and smooth experience.
The engine is said to be equipped with six cutting-edge technologies, including HyperBoost, HyperTouch, ROM Vitalization, CPU Vitalization, and HyperRendering. Combining these technologies ensures a flexible, quick, and fluid experience in situations like multitasking, intense mobile gaming, and extended use.
Also Read: iQoo Z7 Pro 5G with 64-megapixel Samsung GW3 primary sensor launched in India
Prior to the general release, OnePlus had launched an Android 14-based OxygenOS 14 Closed Beta Testing (CBT) initiative for the OnePlus Nord 3 5G owners in India. 500 users can participate in the CBT programme. The users will be able to uncover and submit OS faults to OnePlus so that any serious problems will be resolved before the product is released to the general market. Users who are interested can sign up for the program to get a sneak peek at OnePlus’ next custom skin and offer comments and ideas on how to make the software experience better.
OnePlus Nord 3 5G (Review) was launched in India in July. Under the hood, there is a Snapdragon 7+ Gen 2 SoC.
For the latest gadget and tech news, and gadget reviews, follow us on Twitter, Facebook and Instagram. For newest tech & gadget videos subscribe to our YouTube Channel. You can also stay up to date using the Gadget Bridge Android App. You can find the latest car and bike news here.
Best 3 Ways to Change the Speed of Video on Android and iPhone

Changing the video speed is one of the most basic video-editing skills that every smartphone user should know. If you want to make your video more presentable, you should know how to set it to the ideal tempo. Your smartphone is easily able to accomplish this task without needing any third-party app. In this article, we bring you the 3 best ways to change the speed of a video on Android and iOS/iPhone.
Read Also: Top 3 Ways to Stop Instagram From Posting to Facebook
Step 3: Scroll through the editing options and select Speed.
Step 4: Use the slider to change the speed of the video.
Step 5: Hit the tick icon at the bottom right corner of the screen.
Step 6: Hit Save at the bottom right corner of the screen.
Step 1: Launch the Photos app and select the video.
Step 2: Tap the Edit option at the top right corner of the screen.
Step 3: The speed bar is positioned right below the video seeker.
Step 4: Bring the bars closer to speed up the video and separate them further to slow it down.
Step 5: Hit Done at the bottom right corner of the screen.
Step 3: Select Speed from the toolbar.
Step 4: Select the playback speed. You can speed up the video or convert it entirely into slow motion.
Step 5: Tap on Curve to speed up or slow down different parts of the video. Tap the play button to preview.
Step 6: Select Save.
Use the native editor to change the speed of video on Android
Step 1: Select the video you want to edit. Step 2: Tap the pencil icon on the bottom menu. Step 3: Scroll through the editing options and select Speed.
 Step 4: Use the slider to change the speed of the video.
 Step 5: Hit the tick icon at the bottom right corner of the screen.
Step 6: Hit Save at the bottom right corner of the screen.
Step 5: Hit the tick icon at the bottom right corner of the screen.
Step 6: Hit Save at the bottom right corner of the screen.

Use the native editor to change the speed of video on an iPhone
 Step 1: Launch the Photos app and select the video.
Step 2: Tap the Edit option at the top right corner of the screen.
Step 3: The speed bar is positioned right below the video seeker.
Step 4: Bring the bars closer to speed up the video and separate them further to slow it down.
Step 5: Hit Done at the bottom right corner of the screen.
Step 1: Launch the Photos app and select the video.
Step 2: Tap the Edit option at the top right corner of the screen.
Step 3: The speed bar is positioned right below the video seeker.
Step 4: Bring the bars closer to speed up the video and separate them further to slow it down.
Step 5: Hit Done at the bottom right corner of the screen.
Use a third-party app
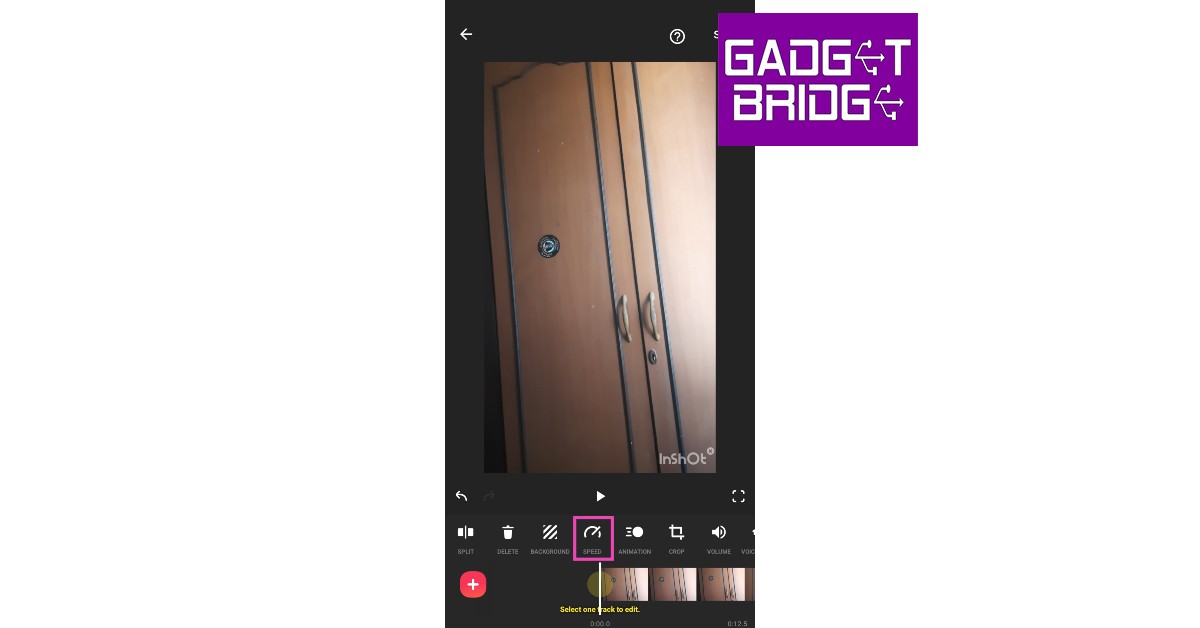
Step 1: Install the Video Editor & Maker – InShot app from the Google Play Store. Step 2: Tap on Video from the Create new section and load the video from your phone’s gallery. Step 3: Select Speed from the toolbar.
 Step 4: Select the playback speed. You can speed up the video or convert it entirely into slow motion.
 Step 5: Tap on Curve to speed up or slow down different parts of the video. Tap the play button to preview.
 Step 6: Select Save.
Frequently Asked Questions (FAQs)
How do I change the speed of a video on Android?
Select the video and go to Edit>Speed. Choose a playback speed from the list of options.How do I change the speed of a video on an iPhone?
Select the video and hit the Edit option at the top. Use the speed bar under the video seeker to change the speed of the video.What are some good video editing apps for Android and iOS?
InShot, VITA, and iMovie are some of the best video editing apps for Android and iOS. Read Also: Oppo Find N3 Flip featuring a 3.26-inch cover display launchedConclusion
This is how you can change the speed of a video on Android and iPhone/iOS. When it comes to basic editing like changing the playback speed, your phone’s native editor is well-equipped to handle the task. For more advanced editing tasks, you will need to install a third-party video editor like InShot, Vita, or iMovie. Here is our list of the top 10 video editing apps for iPhone and iPad. Android users can check out this list to find the top 10 video editors for their platform. For the latest gadget and tech news, and gadget reviews, follow us on Twitter, Facebook and Instagram. For newest tech & gadget videos subscribe to our YouTube Channel. You can also stay up to date using the Gadget Bridge Android App. You can find the latest car and bike news here.iQoo Z7 Pro 5G with 64-megapixel Samsung GW3 primary sensor launched in India

iQoo has officially announced the launch of its new smartphones in India. iQoo Z7 Pro 5G is the latest addition to the company’s Z-Series lineup. The device is powered by an octa-core MediaTek Dimensity 7200 SoC. It comes with a dual camera setup that includes a 64-megapixel sensor. There is a 120Hz AMOLED display and a 4,500mAh battery with 44W wired Flash Charge support.

iQoo Z7 Pro 5G price in India, sale details
iQoo Z7 Pro 5G has been launched in India with a starting price of Rs 23,999 for the base 8GB RAM with 128 GB storage option. On the other hand, the cost of the 8GB RAM with 256GB storage option is set at Rs 24,999. However, additional bank offers of up to Rs 2,000 bring the price down to Rs 21,999 and Rs 22,999, respectively. Also Read: Boat Smart Ring with heart and menstrual monitoring launched in India As per the company, the effective price is for a limited time with launch offers, so users can purchase the device early to avail the best price. The iQOO Z7 Pro will be available for purchase on Amazon.in and iQOO e-store from September 5 at noon. The phone will be offered in two colour options- Blue Lagoon and Graphite Matte.
iQoo Z7 Pro 5G specifications
iQoo Z7 Pro 5G features a 6.78-inch full-HD+ AMOLED display with 2400 x 1080 pixels of resolution. The screen supports a 120Hz refresh rate and has a touch sampling rate of 300Hz. The device has an aspect ratio of 20:9 and comes with a peak brightness level of 1300 nits. The device runs on FuntouchOS 13 with Android 13. Under the hood, there is an octa-core 4nm MediaTek Dimensity 7200 SoC with Mali-G610 MC4 GPU. It comes with 8GB of LPDDR4X RAM and up to 256GB of UFS 2.2 storage. iQoo Z7 Pro 5G sports a dual rear camera setup that includes a 64-megapixel Samsung GW3 primary sensor and a 2-megapixel depth sensor. It also features a ring LED light. It also features a 16-megapixel front-facing sensor for taking selfies and video calling. Also Read: Apple Event: September 12 confirmed for the introduction of the iPhone 15 Series iQoo Z7 Pro 5G has an in-display fingerprint sensor, a gyroscope, an e-compass, a proximity sensor, an ambient light sensor, and an accelerometer. In addition to this has connectivity for 5G, 4G VoLTE, Wi-Fi 6, Bluetooth 5.3, GPS, and USB Type-C. It has an IP52 rating for water and dust resistance. The 4,600mAh battery in the iQoo Z7 Pro supports 66W wired fast charging. For the latest gadget and tech news, and gadget reviews, follow us on Twitter, Facebook and Instagram. For newest tech & gadget videos subscribe to our YouTube Channel. You can also stay up to date using the Gadget Bridge Android App. You can find the latest car and bike news here.BGMI redeem codes for 1 September 2023, claim and receive rewards and benefits

After being banned for nearly ten months, Battleground Mobile India, aka BGMI, is officially available again in India. BGMI fans are looking for ways to improve their game experience and one such method is the usage of redemption codes, which offers a variety of rewards and advantages using BGMI redeem codes players can gain access to new skins, outfits, loot crates, weapons and free UC and diamonds.
As mentioned earlier, these codes give users the chance to earn unique rewards and gain extra benefits while playing the game. This includes GUN SKINS (M4, AKM, M416, AWM, M24, UZI, KAR98K), free character voucher, Andy, Carlo, Sara, Victor character for free, free Anna Character on completing the mission and UC or Royal Pass Discount. So here we have gathered a list of the most recent BGMI redeem codes as of 1 September 2023. Also, redeem these codes asap as these are only valid for a limited duration.
BGMI Redeem Codes for 1 September 2023
updating soon…How to get free Redeem Codes for BGMI on 1 September 2023?
- Launch BGMI on your device.
- Then select the Redeem Code option from the main menu.
- Next, click on the Redeem code tab.
- A new window will open, requesting the redemption code.
- Now enter your BGMI code.
- Confirm and click on the “Redeem” tab.
- If your redeem code is valid then you will get a message confirming that your rewards were successfully redeemed.
Garena Free Fire Redeem Codes Today 1 September 2023: Here is how to claim them

Garena Free Fire is a battle royale game with regular awards and tournaments to keep players interested. If you play Garena Free Fire, you should be aware of the redeem codes that are released on a daily basis. However, because the battle royale game is banned in India, players from other countries can use the Free Fire Redeem codes daily. If you’re unfamiliar with the Garena Free Fire redeem codes or don’t know how to get them, we’ve put together a step-by-step guide to help you redeem them. Check out Garena Free Fire Redeem Codes for 1 September 2023.
The Free Fire redeem codes are a great way to get free stuff. These are 12-digit codes that contain alphabets and numbers, as well as an expiration date and time. Because the Garena FF redeem codes cannot be used more than once, you should hurry to the redemption page to claim your free reward before someone else does. To get a free reward, all you have to do is go to reward.ff.garena.com/en, which is the official redemption page. Also, keep an eye on this space for daily updates on Garena Free Fire redemption codes and rewards.
Garena Free Fire Redeem Codes Today 1 September 2023
updating soon…How to Get Free Fire Redeem Codes for Garena on 1 September 2023?
- Visit the Garena Free Fire game’s official website at reward.ff.garena.com.
- Use your Facebook, Google, VK, Apple ID, Huawei ID, or Twitter account to log in.
- You’ll be taken to a valid redemption code (s)
- Copy and paste the 12-digit redemption code into the text box.
- On the screen, a dialogue box will appear.
- ‘Ok’ should be selected.
Essential Wallet and Smartphone Care Tips for Longevity

For most individuals, a wallet and a smartphone are probably two of their most prized possessions. You don’t often see anyone leaving their home without either of them. However, both wallets and smartphones are subject to wear and tear, more so than any other physical possession out there.
Thankfully, with the right care and consideration, you can enhance the longevity of your cherished belongings. Here are some simple, yet effective tips to care for your smartphone and wallet that you can follow to keep them looking new for a long time.
Tips to Care for Your Wallet
Properly maintaining your wallet can not only enhance the way it looks but can also improve its integrity and durability. Here’s what you need to do.● Keep Away from Sunlight
Irrespective of whether you have a fabric or a leather wallet, always make sure that you keep it away from direct sunlight. The ultraviolet (UV) rays and heat from sunlight will dry the moisture from the material and cause it to fray and crack easily. If you want your wallet to last longer, remember to store it in a cool and dry place.● Clean Regularly
Over time, wallets tend to accumulate dust, dirt and grime, which can make them appear dull and lifeless. A task as simple as cleaning your wallet regularly with a soft, yet slightly damp cloth can do wonders to its looks. If you have a leather wallet, consider using a leather cleaner solution to get rid of grime. But be careful not to use any chemicals, excessive water or abrasives as they can damage the material permanently.● Refrain from Overstuffing
One of the major causes of wallet damage is overstuffing. Keeping coins and other metal objects for extended periods can scratch or tear the linings. To prevent this, check your wallet periodically and remove unwanted items, receipts and business cards. Lightening your wallet should ensure its longevity.● Protect from Moisture
Moisture and water are two things that can irreparably damage your wallet irrespective of whether it is made of leather or fabric. Therefore, you should always make sure to keep your wallet dry and away from moisture. If you find that your wallet has been exposed to either water or moisture, dry it immediately using a cloth or tissue before you start using it again.
Tips to Care for Your Smartphone
Similar to a wallet, your smartphone also deserves to be cared for considering that it is one of the most used physical possessions. However, unlike wallet maintenance, maintaining your smartphone is a different ballgame. Here are some tips that you can follow.● Use a Screen Protector
Although most smartphones these days are offered with toughened glass displays, they may still be prone to scratches and cracks if you drop them. Here’s where investing in a screen protector can help. Display protectors made from tempered glass, especially the ones that cover the entire screen, can prevent your display from getting damaged due to drops; and they’re very cost-effective and easy to replace.● Use a Case
Protecting your phone with a case is another good way to care for it. It not only protects your phone from nicks and dents but also prevents the back panel and the camera unit from getting scratched. There are many different types of phone cases ranging from the cost-effective TPU (silicone) case to a hard-shell case.● Clean Ports and Openings
The various openings and ports of your phone can gather dust, dirt and grime. When left as it is, this can cause irreparable damage. This is precisely why it is crucial to clean them from time to time. If you feel that you’re not well equipped to clean your smartphone properly, don’t hesitate to take it to a professional.● Avoid Water Exposure
Preventing water exposure is not only an integral part of safeguarding your wallet, but is also an important aspect to ensure the longevity of your smartphone. And just because most phones are being offered with IPX dust and water protection doesn’t mean they’re impervious to water damage. Therefore, it is a good idea to keep your phone away from water and moisture.Protect Your Wallet and Smartphone With Insurance
Diligent care for your wallet and smartphone can improve their longevity and keep them in good condition for years to come. However, despite your best efforts, you may still end up damaging them or worse, losing them. Considering that your wallet doesn’t just contain cash but also your documentary evidence, debit cards and credit cards, losing them can prove to be costly. You may end up becoming a victim of unauthorised card use. Here’s where the CPP wallet care plan can help. Available on Bajaj Finserv, this plan for your wallet is a pocket insurance plan that provides coverage of up to ₹2 Lakhs against card fraud, losses due to phishing and PIN-based frauds for just a nominal fee of just ₹699 per year. In addition to this, you also get emergency travel and hotel assistance worth ₹50,000 for domestic destinations and ₹1 Lakh for international destinations. Other plans like our key insurance cover also offer instant card-blocking services in case you lose your wallet. Similarly, your smartphone is no less important than your wallet. Replacing a lost phone or even a damaged component like the display can drain your finances quickly. Having a pocket insurance plan during such incidents can be a lifesaver. The Mobile Protect Plan is an insurance plan for your smartphone starting at just ₹1,212 per annum. What’s more, the plan offers 100% comprehensive coverage against accidental and liquid damage to your phone’s display. For the latest gadget and tech news, and gadget reviews, follow us on Twitter, Facebook and Instagram. For newest tech & gadget videos subscribe to our YouTube Channel. You can also stay up to date using the Gadget Bridge Android App. You can find the latest car and bike news here.4 Reasons Why You Should Buy CZUR Fancy S Pro

The CZUR Fancy S Pro is a versatile solution, seamlessly integrating the functions of a webcam and a document camera.
When talking about their importance, document cameras serve as modern overhead projectors, displaying documents, 3-D objects, and images in classrooms and meetings, fostering engagement and sustainability.
In contrast, webcams, primarily for online meetings and learning, enable real-time face-to-face interactions, enhancing visual communication and bridging distances at a budget-friendly cost.
Let’s dive into four compelling reasons why the CZUR Fancy S Pro deserves your attention.
Versatile Design for Enhanced Functionality
The CZUR Fancy S Pro boasts a versatile design that enhances your work experience in various ways:- Multi-Jointed Arm Design: This design provides unmatched flexibility, allowing you to position the camera precisely as needed. This is particularly useful for live-streaming tutorials, presentations, online meetings, and even teaching remote classes.
- Top View Camera: This feature provides a top-down perspective, making it ideal for showcasing documents, artwork, and 3D objects with clarity. The device features a 12 MP, 4K camera and a 60 fps frame rate, ensuring crystal-clear presentations.
- Adjustable Angles and Levels: It has adjustable angles and levels. The flexible multi-jointed arm can be bent and swivelled at multiple angles, so you can easily find the perfect viewing angle for your needs.
- Camera Orientation: The CZUR Fancy S Pro camera can be oriented horizontally and vertically.
- Physical Controls: Also, it features several physical controls on its top: a light control button for adjusting brightness, an exposure button to modify camera exposure, a focus button for camera focus adjustment, and a rotation button to flip the camera by 180 degrees.

High-Definition Camera for Best Results
Under the hood, the CZUR Fancy S Pro doesn’t disappoint; here’s how:- CMOS 12 Megapixel: A powerful CMOS sensor boasting 12 megapixels captures intricate details and vivid colours with exceptional clarity.
- High-Resolution Streaming: With its best budget webcam, enjoy stunning 4K resolution at 15 frames per second or smooth 1080P streaming at 60 frames per second, ensuring your visuals are crystal clear and engaging.
- Level Fill Light: The built-in 3-level fill light ensures consistent lighting quality, eliminating shadows and enhancing the visibility of your content.
Versatile Tool for Remote Communication
The CZUR Fancy S Pro is a versatile tool that offers various applications for remote communication. Here are some scenarios where it can be particularly useful: In the Classroom for Visual Presenters: The CZUR Fancy S Pro series is a great device for visual presenters in the classroom. This device features a 12MP, 4K camera and LED fill lights, capturing high-quality images of documents, artwork, 3D objects, and microscopic specimens. It’s versatile, adjusting height, angle, and orientation, even rotating 180 degrees for portrait or landscape modes. Doubling as a webcam, it’s compatible with popular software like Zoom and Skype, while its built-in microphone ensures clear audio. Online Teaching/Meetings/Study: Crafted for simplicity, the CZUR Fancy S Pro offers easy access for distance learners, educators, and presenters. Its user-friendly interface unlocks its full potential effortlessly, aiming to enrich experiences and productivity across roles while ensuring user-friendly operation. Recording All Types of Videos: Whether you’re recording painting videos, cooking tutorials, or makeup tutorials, the CZUR Fancy S Pro can capture every detail with clarity and precision with its high-resolution 4k camera. It has the best webcams for streaming and ensures your visuals are crystal clear and engaging.
Seamless Compatibility and Integration
Navigating today’s changing technological realm takes cutting-edge innovation and seamlessly integrating gadgets, systems, and applications. We’ll examine how the CZUR Fancy S Pro bridges the gap between hardware and software and lays the road for a healthy digital ecosystem where work and creativity may flow freely. Compatibility with Various Devices and Operating Systems: The CZUR Fancy S Pro is compatible with Windows and MacOS. It works smoothly with prevailing software like Zoom, Skype, and Microsoft Teams for remote teaching, remote work, and online study. Plug and Play, Universal Compatibility: One of the great features of the CZUR Fancy S Pro is its universal compatibility and ease of use. The device embraces the ‘Plug and Play’ concept, ensuring seamless integration with all your devices. Integration with Popular Productivity and Presentation Applications: The CZUR Fancy S Pro works smoothly with popular productivity and presentation apps, such as- Microsoft Office: You can use the CZUR Fancy S Pro to scan documents and images directly into Microsoft Word, Excel, and PDF/Searchable PDF, etc.
- Evernote: Document scans can be transferred to Evernote, allowing you to easily record notes and ideas.
- Google Drive: You can transfer videos and pictures taken with the CZUR Fancy S Pro to Google Drive. This makes it easy to share your documents with others and lets you access them from anywhere.
- PDF element: You can directly edit and convert scans into PDFs with CZUR Fancy S Pro.
- Prezi: Create presentations from scanned content.

Conclusion
The CZUR Fancy S Pro excels with its versatile design, high-definition camera, communication flexibility, and compatibility. Whether you’re an educator, content creator, or professional, this streaming webcam offers features to meet your needs. Potential improvements could focus on refining low-light performance and expanding integration with emerging platforms. All-in-all, the CZUR Fancy S Pro is a top choice for its innovative features and adaptability in diverse scenarios. For the latest gadget and tech news, and gadget reviews, follow us on Twitter, Facebook and Instagram. For newest tech & gadget videos subscribe to our YouTube Channel. You can also stay up to date using the Gadget Bridge Android App. You can find the latest car and bike news here.How to Sign Out of Amazon on All Devices?

In order to use Amazon’s products and services, you need to create an Amazon account. Your Amazon Echo, Kindle, and Fire TV need a valid Amazon account to function properly. This account can also be used to sign up for Prime Video. With one account logged into so many devices, it can be hard to keep track of its activity. In this article, we show you how to sign out of Amazon on all devices.
Read Also: How To Build a Raspberry Pi Android TV Box?
Step 3: Scroll down to the bottom and tap See All next to Your Account.
Step 4: Under Account Settings, tap on Content and Devices.
Step 5: Switch to the Devices tab.
Step 6: Tap the device you want to log out of.
Step 7: Hit Deregister.
Step 8: Confirm your selection in the popup box.
Go through all the devices individually. You will be signed out of Amazon on all devices.
Step 3: Scroll down and select Your Account.
Step 4: Under Digital content and devices, select Content and devices.
Step 5: Switch to the devices tab.
Step 6: Select the device you want to remove.
Step 7: Click on Deregister.
Step 8: Confirm your selection in the popup box.
You will be signed out of your Amazon account on the selected device.
Sign out of Amazon on all devices using your smartphone
Step 1: Launch the Amazon app on your smartphone. Step 2: Switch to the You tab. Step 3: Scroll down to the bottom and tap See All next to Your Account.
 Step 4: Under Account Settings, tap on Content and Devices.
 Step 5: Switch to the Devices tab.
 Step 6: Tap the device you want to log out of.
 Step 7: Hit Deregister.
 Step 8: Confirm your selection in the popup box.
 Go through all the devices individually. You will be signed out of Amazon on all devices.
Sign out of Amazon on all devices using the website
Step 1: Go to the Amazon website and sign in using your Amazon account. Step 2: Click on the All option at the top right corner of the screen. Step 3: Scroll down and select Your Account.
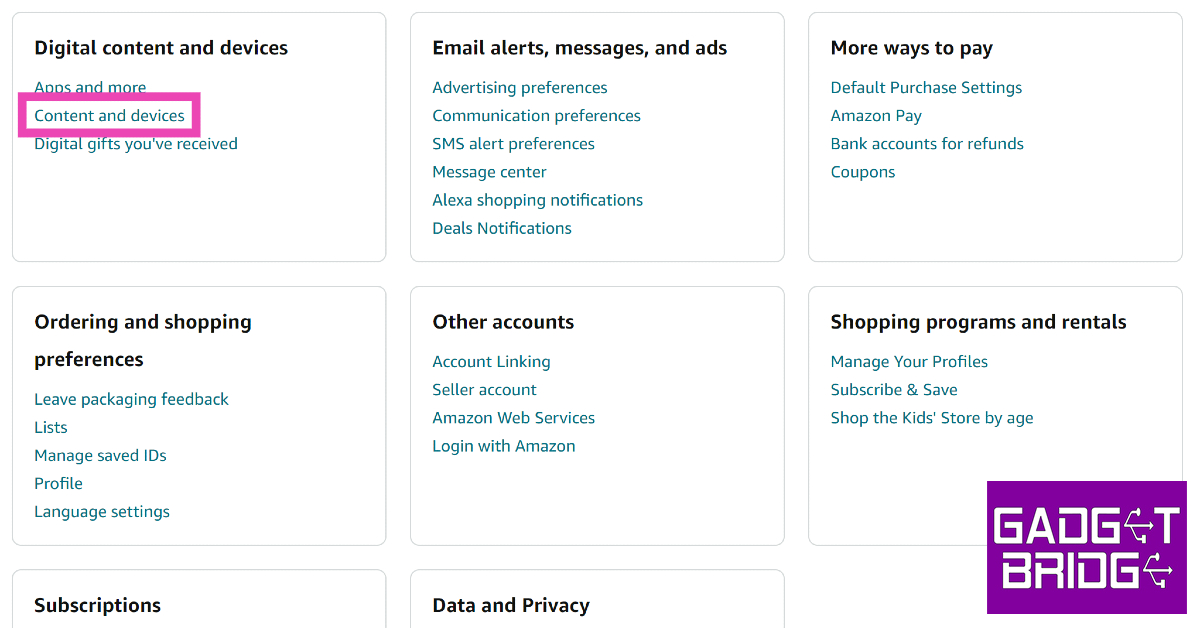
 Step 4: Under Digital content and devices, select Content and devices.
 Step 5: Switch to the devices tab.
 Step 6: Select the device you want to remove.
 Step 7: Click on Deregister.
 Step 8: Confirm your selection in the popup box.
You will be signed out of your Amazon account on the selected device.
Step 8: Confirm your selection in the popup box.
You will be signed out of your Amazon account on the selected device.
Frequently Asked Questions (FAQs)
How do I sign out of my Amazon account on my Echo device?
Launch the Amazon app, go to You>Your Account>Content and devices>Devices, select the Echo device and tap on Deregister.How do I sign out of my Amazon account on my Echo device using a PC?
Go to the Amazon website and select All>Your Account>Digital content and devices>Content and devices>Devices. Select the Echo device and click on Deregister.How do I protect my Amazon account from unauthorised access?
To limit the possibility of unauthorised access, turn on two-step authentication for your Amazon account. Read Also: Apple Event: September 12 confirmed for the introduction of the iPhone 15 SeriesConclusion
This is how you can sign out of your Amazon account on all devices. A quick way of signing out of all devices at once is by changing your Amazon password. This will ensure that you are immediately logged out of all devices running that particular Amazon account. To make your account safer, use two-step authentication. For the latest gadget and tech news, and gadget reviews, follow us on Twitter, Facebook and Instagram. For newest tech & gadget videos subscribe to our YouTube Channel. You can also stay up to date using the Gadget Bridge Android App. You can find the latest car and bike news here.Top 3 Ways to Stop Instagram From Posting to Facebook

Ever since Meta-owned Facebook acquired Instagram, the two platforms have converged significantly. You can share your Instagram Reels to Facebook, where they can reach a new audience altogether. You can also log into Instagram using your Facebook profile. Accounts Center makes it easy to manage both accounts in one place. In this article, we show you how to stop Instagram from posting to Facebook.
Read Also: Apple Event: September 12 confirmed for the introduction of the iPhone 15 Series
Step 2: Tap the hamburger menu icon at the top right corner of the screen and select Settings and privacy.
Step 3: Tap on Accounts Center.
Step 4: Tap on Accounts.
Step 5: Select the Remove option for your Facebook profile.
Your Instagram account will be unlinked from your Facebook account.
Step 2: Tap the hamburger menu icon at the top right corner of the screen and select Settings and privacy.
Step 3: Tap on Accounts Center.
Step 4: Select Connected Experiences.
Step 5: Tap on Sharing across profiles.
Step 6: Under the Share From section, select your Instagram profile.
Step 7: Turn off the toggle switches for Your Instagram Story and Your Instagram Posts.
Unlink your Instagram account from Facebook
Step 1: Launch the Instagram app on your phone and tap the profile icon at the bottom right corner of the screen. Step 2: Tap the hamburger menu icon at the top right corner of the screen and select Settings and privacy.
 Step 3: Tap on Accounts Center.
 Step 4: Tap on Accounts.
 Step 5: Select the Remove option for your Facebook profile.
 Your Instagram account will be unlinked from your Facebook account.
Disable the option to automatically share Instagram posts on Facebook
Step 1: Launch the Instagram app on your phone and tap the profile icon at the bottom right corner of the screen.
Step 2: Tap the hamburger menu icon at the top right corner of the screen and select Settings and privacy.
Step 3: Tap on Accounts Center.
Step 4: Select Connected Experiences.
Step 5: Tap on Sharing across profiles.
 Step 6: Under the Share From section, select your Instagram profile.
 Step 7: Turn off the toggle switches for Your Instagram Story and Your Instagram Posts.

Stop an individual Instagram post from being shared on Facebook
When you’re about to make a post on Instagram, it asks you whether you want to share it on other social media platforms as well. Simply turn off the toggle switch for Facebook. Go to Advanced Settings and turn off the toggle switch for Share Your Posts to Facebook for good measure. You can also choose to restrict the post from being shared on other social media platforms from this window itself. Once that is taken care of, hit Share to post the media on Instagram.Frequently Asked Questions (FAQs)
How do I unlink my Instagram account from Facebook?
Go to Profile Menu>Settings and Privacy>Accounts Center>Accounts and select the Remove option for your Facebook profile.How do I stop my Instagram from posting to Facebook?
Go to Menu>Settings and Privacy>Accounts Center>Connected Experiences>Sharing Across Profiles>Instagram and turn off the toggle switch for Your Instagram Story and Your Instagram Posts.How do I restrict an individual Instagram post from being shared on Facebook?
Simply turn off the toggle switch for Facebook in the sharing window of the post. Read Also: How Ethereum Code is Transforming the ETF Trading ExperienceConclusion
These are the top 3 ways to stop Instagram from posting to Facebook. Unlinking your Instagram and Facebook profile is too harsh a measure simply to restrict posts from being shared. We’d suggest manually disabling the Share to Facebook option every time you post something on Instagram. For the latest gadget and tech news, and gadget reviews, follow us on Twitter, Facebook and Instagram. For newest tech & gadget videos subscribe to our YouTube Channel. You can also stay up to date using the Gadget Bridge Android App. You can find the latest car and bike news here.Oppo Find N3 Flip featuring a 3.26-inch cover display launched

Oppo has unveiled its new flip phone, the Oppo Find N3 Flip, following Samsung’s wrapping up the launch of its most recent foldable smartphone series. AMOLED displays of 6.80 inches and 3.26 inches, respectively, are included on the newly released clamshell phone. A MediaTek Dimensity 9200 SoC with eight cores powers the gadget. Additionally, the smartphone has a triple rear camera configuration.
 The Find N3 Flip’s external cover houses a circular camera set-up that houses a triple rear camera arrangement. The camera system consists of a 32-megapixel telephoto sensor, an 8-megapixel ultra-wide-angle sensor, and a 50-megapixel Sony IMX890 main lens with OIS capability. The phone includes a 32-megapixel front camera for taking selfies and making video calls.
Also Read: Boat Smart Ring with heart and menstrual monitoring launched in India
For biometric security, the Find N3 Flip has a side-mounted fingerprint scanner. A gyroscope and an ambient light sensor are also present. The Oppo Find N3 Flip has 5G, Wi-Fi, Bluetooth, and NFC connectivity options.
The Find N3 Flip’s external cover houses a circular camera set-up that houses a triple rear camera arrangement. The camera system consists of a 32-megapixel telephoto sensor, an 8-megapixel ultra-wide-angle sensor, and a 50-megapixel Sony IMX890 main lens with OIS capability. The phone includes a 32-megapixel front camera for taking selfies and making video calls.
Also Read: Boat Smart Ring with heart and menstrual monitoring launched in India
For biometric security, the Find N3 Flip has a side-mounted fingerprint scanner. A gyroscope and an ambient light sensor are also present. The Oppo Find N3 Flip has 5G, Wi-Fi, Bluetooth, and NFC connectivity options.

Oppo Find N3 Flip specifications
Oppo Find N3 Flip is a clamshell-style foldable phone. The primary display is an AMOLED 6.80-inch screen with a 120Hz refresh rate. An additional 3.26-inch cover display, like its predecessor, is vertically positioned. An octa-core MediaTek Dimensity 9200 SoC is housed inside the device along with up to 512GB of internal storage and 12GB of RAM. The Find N3 Flip’s external cover houses a circular camera set-up that houses a triple rear camera arrangement. The camera system consists of a 32-megapixel telephoto sensor, an 8-megapixel ultra-wide-angle sensor, and a 50-megapixel Sony IMX890 main lens with OIS capability. The phone includes a 32-megapixel front camera for taking selfies and making video calls.
Also Read: Boat Smart Ring with heart and menstrual monitoring launched in India
For biometric security, the Find N3 Flip has a side-mounted fingerprint scanner. A gyroscope and an ambient light sensor are also present. The Oppo Find N3 Flip has 5G, Wi-Fi, Bluetooth, and NFC connectivity options.
The Find N3 Flip’s external cover houses a circular camera set-up that houses a triple rear camera arrangement. The camera system consists of a 32-megapixel telephoto sensor, an 8-megapixel ultra-wide-angle sensor, and a 50-megapixel Sony IMX890 main lens with OIS capability. The phone includes a 32-megapixel front camera for taking selfies and making video calls.
Also Read: Boat Smart Ring with heart and menstrual monitoring launched in India
For biometric security, the Find N3 Flip has a side-mounted fingerprint scanner. A gyroscope and an ambient light sensor are also present. The Oppo Find N3 Flip has 5G, Wi-Fi, Bluetooth, and NFC connectivity options.

Oppo Find N3 Flip price and sale details
The Oppo Find N3 Flip has been introduced in China. It comes in two different configurations of 12GB RAM with 256GB storage priced at CNY 6,799 which translates to Rs 77,000. On the other hand, the price of the 12GB RAM with 512GB storage option is set at Rs 86,100. The device will be available in three colour options of Mirror Night, Mist Rose, and Moonlight Muse. In terms of availability, the phone is up for pre-orders with sales starting from September 8 in China. According to the Chinese company, the device will also arrive in the international market as well. For the latest gadget and tech news, and gadget reviews, follow us on Twitter, Facebook and Instagram. For newest tech & gadget videos subscribe to our YouTube Channel. You can also stay up to date using the Gadget Bridge Android App. You can find the latest car and bike news here.How to upload YouTube Shorts from a Phone and PC?

YouTube is fairly new to the bite-sized content game, but it has made a tremendous impact in the little time that it’s been here. Dubbed ‘Shorts’, YouTube’s short video medium allows users to reach a wide audience across the world. In this article, we show you how to upload YouTube Shorts from a phone and PC.
Read Also: Top 10 Card Games to Play on PC
Step 3: Select Create a Short.
Step 4: Allow access to your Camera and Microphone.
Step 5: Hit the red button to start recording.
Step 6: Hit the red button again to stop recording.
Step 7: Apply your preferred effects from the toolbar on the right side of the screen.
Step 8: Hit the tick icon at the bottom right corner of the screen.
Step 9: Add a sound, text, voiceover, or filter.
Step 10: Hit the Next button at the top right corner of the screen.
Step 11: Add a caption and set the location and visibility preferences.
Step 12: Tap Upload Short.
Step 3: Select Create a Short.
Step 4: Allow access to your Camera and Microphone.
Step 5: Tap the Gallery icon and select a video.
Step 6: Trim the video to its ideal length.
Step 7: Hit the Next button at the top right corner of the screen.
Step 8: Add a caption and set the location and visibility preferences.
Step 9: Tap Upload Short.
Step 3: Select Upload Video.
Step 4: In the upload window, click on Select Files.
Step 5: Select the video from your PC’s storage.
Step 6: Add the description and hit Next.
Step 7: Add the necessary tags to the video, then hit Next.
Step 8: Make sure your video does not violate any copyright.
Step 9: Select your visibility preference and hit Publish.
Create and upload YouTube Shorts from your phone
Step 1: Launch the YouTube app on your smartphone. Step 2: Tap the Plus icon on the bottom menu. Step 3: Select Create a Short.
 Step 4: Allow access to your Camera and Microphone.
 Step 5: Hit the red button to start recording.
 Step 6: Hit the red button again to stop recording.
Step 7: Apply your preferred effects from the toolbar on the right side of the screen.
Step 8: Hit the tick icon at the bottom right corner of the screen.
Step 9: Add a sound, text, voiceover, or filter.
Step 10: Hit the Next button at the top right corner of the screen.
Step 6: Hit the red button again to stop recording.
Step 7: Apply your preferred effects from the toolbar on the right side of the screen.
Step 8: Hit the tick icon at the bottom right corner of the screen.
Step 9: Add a sound, text, voiceover, or filter.
Step 10: Hit the Next button at the top right corner of the screen.
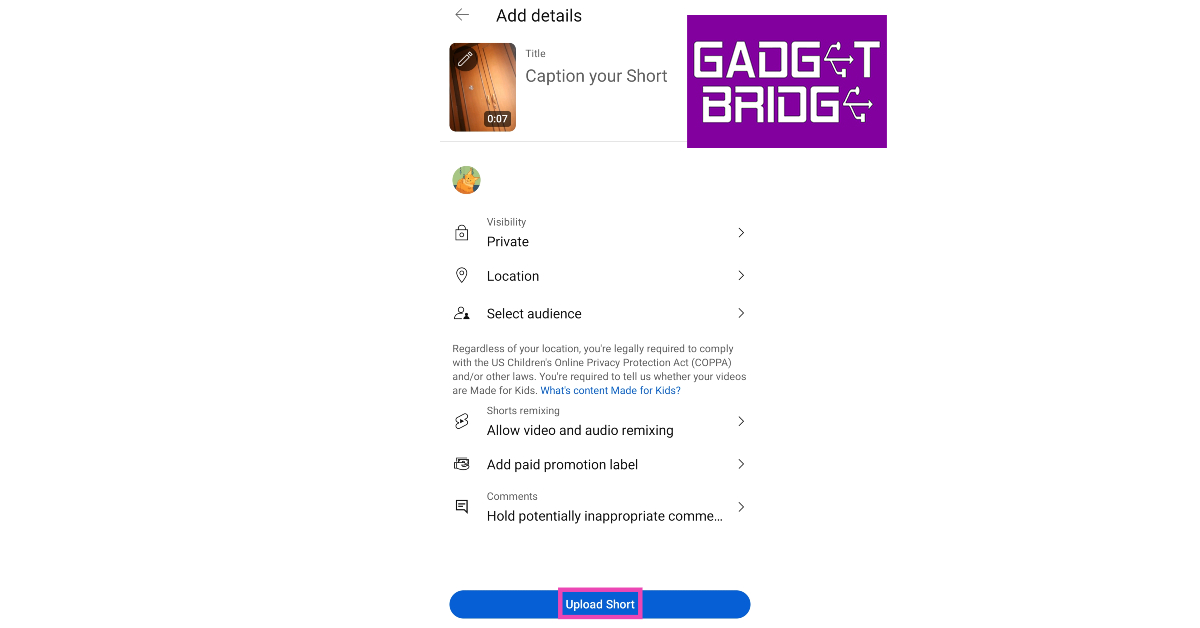
 Step 11: Add a caption and set the location and visibility preferences.
Step 12: Tap Upload Short.
Step 11: Add a caption and set the location and visibility preferences.
Step 12: Tap Upload Short.
Upload YouTube Shorts from your phone’s gallery
Already got a video saved on your device’s gallery? Here’s how you can upload it as a Short. Step 1: Launch the YouTube app on your smartphone. Step 2: Tap the Plus icon on the bottom menu.
Step 3: Select Create a Short.
Step 4: Allow access to your Camera and Microphone.
Step 5: Tap the Gallery icon and select a video.
 Step 6: Trim the video to its ideal length.
Step 7: Hit the Next button at the top right corner of the screen.
Step 8: Add a caption and set the location and visibility preferences.
Step 9: Tap Upload Short.
Step 6: Trim the video to its ideal length.
Step 7: Hit the Next button at the top right corner of the screen.
Step 8: Add a caption and set the location and visibility preferences.
Step 9: Tap Upload Short.
Upload YouTube Shorts from a PC
All videos under 60 seconds and a vertical aspect ratio are uploaded as Shorts on YouTube. Step 1: Launch the web browser and go to YouTube’s homepage. Step 2: Click the Create icon at the top right corner of the screen. Step 3: Select Upload Video.
 Step 4: In the upload window, click on Select Files.
 Step 5: Select the video from your PC’s storage.
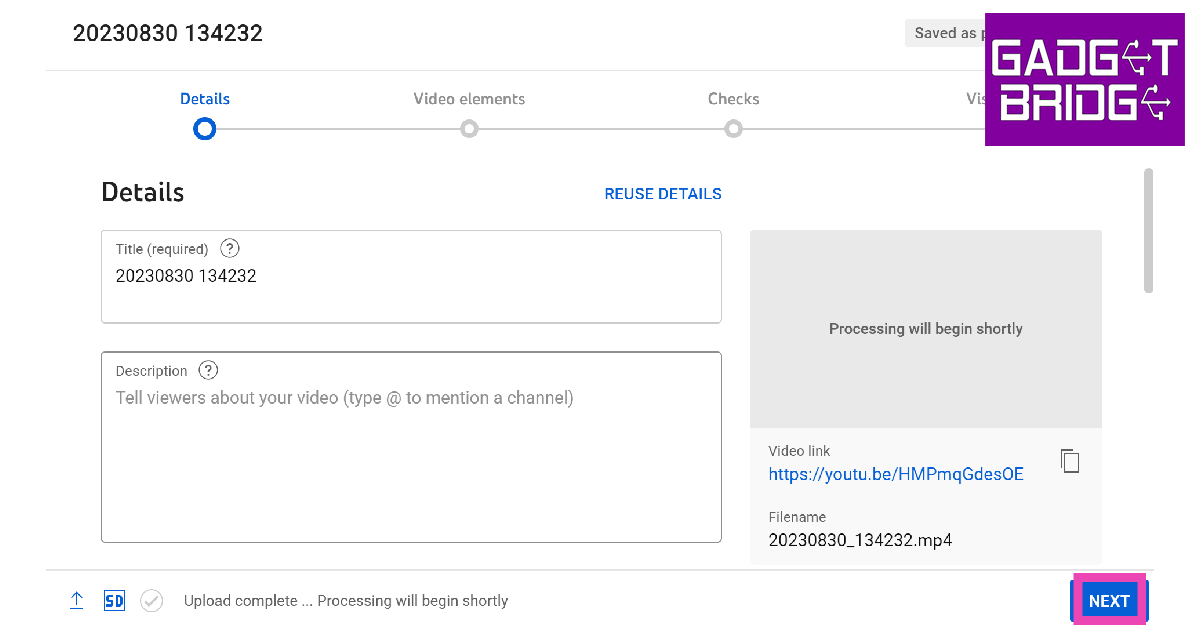
Step 6: Add the description and hit Next.
Step 5: Select the video from your PC’s storage.
Step 6: Add the description and hit Next.
 Step 7: Add the necessary tags to the video, then hit Next.
 Step 8: Make sure your video does not violate any copyright.
 Step 9: Select your visibility preference and hit Publish.
Frequently Asked Questions (FAQs)
How do I upload YouTube Shorts from my phone’s gallery?
Hit the plus icon on the YouTube homepage and go to Create Shorts. Tap the gallery icon and select the video you want to upload from your phone’s gallery. Make your preferred edits, then hit Next followed by Upload Short.How do I upload YouTube Shorts from my PC?
Select the Create icon from the YouTube home page. This will take you to the Creator Studio. Select a video from your PC’s storage and follow the onscreen instructions. The video should be less than 60 seconds long and must have vertical orientation.How do I create a YouTube Short on my phone?
Launch the YouTube app and hit the plus icon. Select Create a Short and press the red button to start recording. Read Also: How Ethereum Code is Transforming the ETF Trading ExperienceConclusion
This is how you can upload YouTube Shorts from a phone and PC. There is no dedication option to upload a Short on YouTube’s website. Any video that is less than 60 seconds in duration and has a vertical orientation gets uploaded as a Short. If you found this article helpful, let us know in the comments! For the latest gadget and tech news, and gadget reviews, follow us on Twitter, Facebook and Instagram. For newest tech & gadget videos subscribe to our YouTube Channel. You can also stay up to date using the Gadget Bridge Android App. You can find the latest car and bike news here.Boat Smart Ring with heart and menstrual monitoring launched in India

The release of a new Smart Ring in India has been announced by Boat. The Noise Luna Ring, which debuted in the nation last month, will be in direct competition with the Boat Smart Ring. Numerous health-related features are included with the new wearable device. The device can track SpO2, heart rate, and menstrual cycle. It is 5 ATM water resistant and boasts a superior ceramic and metal construction. Additionally, it is stated that the Smart ring has a battery life of up to 7 days.
Boat Smart Ring price in India, sale details
A price of Rs 8,999 has been set for the Boat Smart Ring. Three sizes of the device will be offered: 17.40mm, 19.15mm, and 20.85mm. In the nation, Flipkart and Amazon are the only places to buy it. Also Read: Apple Event: September 12 confirmed for the introduction of the iPhone 15 Series
Boat Smart Ring specifications
Boat Smart Ring has a high-quality ceramic and aluminium construction. It is approved for 5 ATM water resistance. Additionally, during music playback, gestures can be utilised to pause, resume, and switch tracks. You can utilise these motions to snap images on a linked smartphone as well, which enables you to capture group photos while holding the phone at a distance for better image quality. Blood oxygen saturation levels (SpO2), body temperature, heart rate, sleep patterns, and blood pressure are all monitored by the Boat Smart Ring. A Menstrual tracker that allows you to monitor your period is also included. The gadget has a smart activity-tracking feature that allows you to keep track of your steps, calories burned, and multiple sports modes. These activities can be monitored using the specific Boat Ring app, which is available for download from the App Store and Google Play Store. In an emergency, SOS calls can also be made via the Boat Smart Ring. The battery life of the device, according to Boat, is seven days, and the ring may be recharged using the provided charger. For the latest gadget and tech news, and gadget reviews, follow us on Twitter, Facebook and Instagram. For newest tech & gadget videos subscribe to our YouTube Channel. You can also stay up to date using the Gadget Bridge Android App. You can find the latest car and bike news here.How To Build a Raspberry Pi Android TV Box?

Raspberry Pi is an ultra-portable single-board computer that can be used to carry out basic computing tasks. Previously, we’ve talked about how you can use an Android device to write Raspberry Pi SD cards. Now, let’s shift our focus to more interesting tasks you can carry out on your portable computer. In this article, we show you how to build a Raspberry Pi Android TV Box.
Read Also: Samsung Galaxy Z Flip 5 Review: Flip it good!
Step 1: Download Android TV OS for Raspberry using this link.
Step 2: Sideload the GApps package for Android TV since its build does not come with Google’s suite of apps.
Step 3: Flash the Android TV OS on the microSD card using the Balena Etcher tool.
Step 4: Insert the microSD card into the Raspberry Pi. Connect a mouse and keyboard as well. A wireless connection is preferred, but a USB connection is fine too. Connect the TV/Monitor using an HDMI cable as well.
Step 5: Once Lineage OS boots up, you will be able to see the Android TV home page.
Step 6: Use these basic controls to navigate the interface:
Requirements
- Raspberry Pi 4 with 4GB or 8GB of RAM
- A monitor or TV
- An HDMI cable
- A 16GB microSD card
- Keyboard and mouse
- Power adapter
Build a Raspberry Pi Android TV Box
 Step 1: Download Android TV OS for Raspberry using this link.
Step 2: Sideload the GApps package for Android TV since its build does not come with Google’s suite of apps.
Step 3: Flash the Android TV OS on the microSD card using the Balena Etcher tool.
Step 4: Insert the microSD card into the Raspberry Pi. Connect a mouse and keyboard as well. A wireless connection is preferred, but a USB connection is fine too. Connect the TV/Monitor using an HDMI cable as well.
Step 5: Once Lineage OS boots up, you will be able to see the Android TV home page.
Step 6: Use these basic controls to navigate the interface:
Step 1: Download Android TV OS for Raspberry using this link.
Step 2: Sideload the GApps package for Android TV since its build does not come with Google’s suite of apps.
Step 3: Flash the Android TV OS on the microSD card using the Balena Etcher tool.
Step 4: Insert the microSD card into the Raspberry Pi. Connect a mouse and keyboard as well. A wireless connection is preferred, but a USB connection is fine too. Connect the TV/Monitor using an HDMI cable as well.
Step 5: Once Lineage OS boots up, you will be able to see the Android TV home page.
Step 6: Use these basic controls to navigate the interface:
- F1 – Home
- F2 – Back
- F3 – Apps
- F4 – Menu
- F5 – Power
- F11 – Volume Down
- F12 – Volume Up
Frequently Asked Questions (FAQs)
Can my Raspberry Pi load Android TV?
Yes, it is possible to load your Raspberry device with Android TV. You will need to download an Android TV build and flash it on a memory card using the Balena Etcher tool. This SD card can then be used to boot Android TV on the device.Does the Android TV build for Raspberry Pi come with Google’s suite of apps?
No, the Android TV build for Raspberry Pi does not come with Google’s suite of apps. You will need to sideload them using a third-party source.Is there a legitimate way to run Android TV on Raspberry Pi?
Using an Android TV build for Raspberry Pi is not strictly legal. You are at risk of losing your Google account if you are found violating the ToS. Read Also: How to use Chrome Extensions on iOS?Conclusion
This is how you can build a Raspberry Pi Android TV Box. While this is a fun little activity, a Raspberry Pi-based Android TV is very limited when it comes to functionalities. Major streaming apps like Netflix lack Widevine support, which means that HD video playback is not up to the mark. With hardware acceleration lacking as well, the viewing experience suffers a lot. For the latest gadget and tech news, and gadget reviews, follow us on Twitter, Facebook and Instagram. For newest tech & gadget videos subscribe to our YouTube Channel. You can also stay up to date using the Gadget Bridge Android App. You can find the latest car and bike news here.Apple Event: September 12 confirmed for the introduction of the iPhone 15 Series

Apple has made its annual event’s date official. September 12 is the date of the tech giant’s Apple event. The launch of the iPhone 15 series, the future Apple Watch Series 9 wearable line, and iPads are all anticipated by the company. The upcoming operating systems for compatible iPhone and Apple Watch devices, iOS 17 and watchOS 10, may also be unveiled at the event. The products that will be presented during the Apple Event have not yet been made public by the firm.
The iPhone 15 is said to keep the same 6.1-inch display as it was before. The dynamic island notch will probably be used in the base model. The actual mute switch will also be replaced by a new “Action Button” that may be modified.
Additionally, Apple will follow the pattern and use the same chipset that powered the iPhone 14 Pro models in the iPhone 15 model. The company’s newest Bionic A17 processor will power the iPhone 15 Pro and iPhone 15 Pro Max versions.
Also Read: iPhone 15 Series may feature colour-matched braided USB-C cables
Rumour has it that this time around, the iPhone 15 models will sport 48-megapixel rear cameras. The Pro Max edition, on the other hand, is anticipated to have a bigger, more visible camera module that has periscope lenses that allow optical zoom of up to 5–6x, as well as other supporting sensors.
Comparing this year’s iPhone 15 series to last year’s model, the battery capacity will be improved dramatically, rising to 350-600mAh. This is the precise capacity:
iPhone 15: 3877mAh (iPhone 14: 3279mAh)
iPhone 15 Plus: 4912mAh (iPhone 14 Plus: 4325mAh)
iPhone 15 Pro: 3650mAh (iPhone 14 Pro: 3200mAh)
iPhone 15 Pro Max: 4852mAh (iPhone 14 Pro Max: 4323mAh)
Apple Event details
Apple Event was previously branded “Far Out,” but this time it will be called “Wonderlust.” The event is scheduled for September 12 and will be broadcast live online. The event will be held at Apple Park and will begin at 10 PM PT and 10.30 PM IST. Apple.com and the Apple TV app will both live broadcast the unveiling.iPhone 15 series specifications
At the fall launch event, the firm is anticipated to unveil a number of devices, including the iPhone 15 series, Apple Watch Series 9, and Apple Watch Ultra 2. In addition to this, we will get confirmed release dates for iOS 17 and watchOS 10. The iPhone 15 series, which includes the iPhone 15, iPhone 15 Plus, iPhone 15 Pro, and iPhone 15 Pro Max, will be part of the much-awaited iPhone series. The features, appearance, and colour possibilities for these versions have all been the subject of several rumours. One of the greatest updates to the next iPhones this year will be the changeover from Apple’s proprietary Lightning port to a USB Type-C port. The iPhone 15 is said to keep the same 6.1-inch display as it was before. The dynamic island notch will probably be used in the base model. The actual mute switch will also be replaced by a new “Action Button” that may be modified.
Additionally, Apple will follow the pattern and use the same chipset that powered the iPhone 14 Pro models in the iPhone 15 model. The company’s newest Bionic A17 processor will power the iPhone 15 Pro and iPhone 15 Pro Max versions.
Also Read: iPhone 15 Series may feature colour-matched braided USB-C cables
Rumour has it that this time around, the iPhone 15 models will sport 48-megapixel rear cameras. The Pro Max edition, on the other hand, is anticipated to have a bigger, more visible camera module that has periscope lenses that allow optical zoom of up to 5–6x, as well as other supporting sensors.
Comparing this year’s iPhone 15 series to last year’s model, the battery capacity will be improved dramatically, rising to 350-600mAh. This is the precise capacity:
iPhone 15: 3877mAh (iPhone 14: 3279mAh)
iPhone 15 Plus: 4912mAh (iPhone 14 Plus: 4325mAh)
iPhone 15 Pro: 3650mAh (iPhone 14 Pro: 3200mAh)
iPhone 15 Pro Max: 4852mAh (iPhone 14 Pro Max: 4323mAh)
The iPhone 15 is said to keep the same 6.1-inch display as it was before. The dynamic island notch will probably be used in the base model. The actual mute switch will also be replaced by a new “Action Button” that may be modified.
Additionally, Apple will follow the pattern and use the same chipset that powered the iPhone 14 Pro models in the iPhone 15 model. The company’s newest Bionic A17 processor will power the iPhone 15 Pro and iPhone 15 Pro Max versions.
Also Read: iPhone 15 Series may feature colour-matched braided USB-C cables
Rumour has it that this time around, the iPhone 15 models will sport 48-megapixel rear cameras. The Pro Max edition, on the other hand, is anticipated to have a bigger, more visible camera module that has periscope lenses that allow optical zoom of up to 5–6x, as well as other supporting sensors.
Comparing this year’s iPhone 15 series to last year’s model, the battery capacity will be improved dramatically, rising to 350-600mAh. This is the precise capacity:
iPhone 15: 3877mAh (iPhone 14: 3279mAh)
iPhone 15 Plus: 4912mAh (iPhone 14 Plus: 4325mAh)
iPhone 15 Pro: 3650mAh (iPhone 14 Pro: 3200mAh)
iPhone 15 Pro Max: 4852mAh (iPhone 14 Pro Max: 4323mAh)
iPhone 15 series price
Pricing-wise, the iPhone 15 Pro might be $100 (about Rs 8,223) more expensive than the current model. Additionally, it is predicted that the cost of the iPhone 15 Pro Max will rise by $200 (about Rs 16,450). There will likely be a price hike for these iPhone 15 models in India as well. The price of the iPhone 15 is projected to be $799 (approximately Rs 65,700), the price of the iPhone 15 Plus to be $899 (about Rs 73,900), the price of the iPhone 15 Pro to be $1,099 (roughly Rs 90,100), and the price of the iPhone 15 Pro Max to be $1,299 (nearly Rs 1,06,500). For the latest gadget and tech news, and gadget reviews, follow us on Twitter, Facebook and Instagram. For newest tech & gadget videos subscribe to our YouTube Channel. You can also stay up to date using the Gadget Bridge Android App. You can find the latest car and bike news here.BGMI redeem codes for 30 August 2023, claim and receive rewards and benefits

After being banned for nearly ten months, Battleground Mobile India, aka BGMI, is officially available again in India. BGMI fans are looking for ways to improve their game experience and one such method is the usage of redemption codes, which offers a variety of rewards and advantages using BGMI redeem codes players can gain access to new skins, outfits, loot crates, weapons and free UC and diamonds.
As mentioned earlier, these codes give users the chance to earn unique rewards and gain extra benefits while playing the game. This includes GUN SKINS (M4, AKM, M416, AWM, M24, UZI, KAR98K), free character voucher, Andy, Carlo, Sara, Victor character for free, free Anna Character on completing the mission and UC or Royal Pass Discount. So here we have gathered a list of the most recent BGMI redeem codes as of 30 August 2023. Also, redeem these codes ASAP as these are only valid for a limited duration.
BGMI Redeem Codes for 30 August 2023
Updating Soon…How to get free Redeem Codes for BGMI on 30 August 2023?
- Launch BGMI on your device.
- Then select the Redeem Code option from the main menu.
- Next, click on the Redeem code tab.
- A new window will open, requesting the redemption code.
- Now enter your BGMI code.
- Confirm and click on the “Redeem” tab.
- If your redeem code is valid then you will get a message confirming that your rewards were successfully redeemed.
Garena Free Fire Redeem Codes Today 30 August 2023: Here is how to claim them

Garena Free Fire is a battle royale game with regular awards and tournaments to keep players interested. If you play Garena Free Fire, you should be aware of the redeem codes that are released on a daily basis. However, because the battle royale game is banned in India, players from other countries can use the Free Fire Redeem codes daily. If you’re unfamiliar with the Garena Free Fire redeem codes or don’t know how to get them, we’ve put together a step-by-step guide to help you redeem them. Check out Garena Free Fire Redeem Codes for 30 August 2023.
The Free Fire redeem codes are a great way to get free stuff. These are 12-digit codes that contain alphabets and numbers, as well as an expiration date and time. Because the Garena FF redeem codes cannot be used more than once, you should hurry to the redemption page to claim your free reward before someone else does. To get a free reward, all you have to do is go to reward.ff.garena.com/en, which is the official redemption page. Also, keep an eye on this space for daily updates on Garena Free Fire redemption codes and rewards.
Garena Free Fire Redeem Codes Today 30 August 2023
updating…How to Get Free Fire Redeem Codes for Garena on 30 August 2023?
- Visit the Garena Free Fire game’s official website at reward.ff.garena.com.
- Use your Facebook, Google, VK, Apple ID, Huawei ID, or Twitter account to log in.
- You’ll be taken to a valid redemption code (s)
- Copy and paste the 12-digit redemption code into the text box.
- On the screen, a dialogue box will appear.
- ‘Ok’ should be selected.
Top 10 Card Games to Play on PC

If you find yourself spending considerable time on your PC and happen to be a passionate card game lover, then this article is tailor-made for you! Get ready to delve into the captivating realm of virtual card games that promise endless hours of entertainment and excitement. Whether you’re already familiar with some of these card games or new to the genre, they all offer an opportunity to enhance your gaming skills and problem-solving abilities. From classic gems that have stood the test of time to innovative creations that push the boundaries of what card games can be, we’ve compiled the top 10 card games to play on PC.