The IMEI number is a 15-digit serial number that is unique to your device. Every mobile number has an IMEI number that it uses to establish contact with the network provider. In case you lose your phone, you can use the IMEI number to triangulate its location as soon as it makes contact with a cell tower. There are multiple ways to find the IMEI number of your mobile device. Read this article for more details. If you want to make your phone untraceable, you can change its IMEI number. We don’t recommend doing this, but it can be done. Before you make up your mind, you should know that changing the IMEI number will certainly void your device’s warranty. Still want to go ahead? Here’s how you can change the IMEI number of your Android phone.
Change your Android phone’s IMEI number using the Xposed Installer and IMEI Changer Pro apps
Changing your Android phone’s IMEI number will require you to install a couple of third-party apps on your device. Since these apps are not available on the Google Play Store, you will have to install them from a third-party source. Make sure the source is trustworthy and the apps are legitimate. Back up your phone’s data before beginning the flashing process. Once you’re ready, follow these steps.
Step 1:Download and install Xposed Installer and IMEI Changer Pro on your Android phone from trusted third-party sources.
Step 2:Restart your phone once both apps have been installed.
Step 3: Launch the Xposed Installer app on your Android phone.
Step 4: Switch to the Modules tab.
Step 5: Check the box next to IMEI Changer Pro.
Step 6:Restart your device.
Step 7: Launch the IMEI Changer Pro app and enter a valid IMEI number in the relevant field.
Step 8: Hit Apply and restart your device.
Your Android phone will be flashed with the new IMEI number.
Frequently Asked Questions (FAQs)
What is an IMEI number?
IMEI stands for International Mobile Equipment Identity. Every mobile device has a unique IMEI number that it uses to make contact with the nearby cell towers.
What is the use of an IMEI number?
Your phone’s IMEI number is used to establish contact with your network provider’s cell towers. It can also be used to track your device in case you lose it.
Can I change my phone’s IMEI number?
While changing your Android phone’s IMEI number is not recommended, it can be done with the help of Xposed Installer and IMEI Changer Pro apps.
This is how you can change the IMEI number of your Android phone. We don’t recommend changing your phone’s IMEI number, but if you have absolutely made up your mind, it is suggested that you use the IMEI number of some other device you own instead of a completely new one. The flasher tools will not work if the IMEI number is not valid.
According to rumours, Apple will hold a launch event next month to introduce the iPhone 15 series. There will probably be a number of improvements in the newest smartphone series, including a new charging connector and an upgraded back camera setup. The upcoming iPhone 15 models are expected to have a USB Type-C port that supports USB 2.0 connectivity, which will result in slower charging and transfer speeds than a USB 4 or Thunderbolt interface. A new source, however, claims that there is a potential the base iPhone 15 devices would employ a slower USB standard. On the other hand, only the iPhone 15 Pro versions may feature a high-bandwidth USB-C connector.
Majin Bu who previously shared the images of colour-matched USB Type-C Cables again revealed that the firm will only allow the iPhone 15’s USB-C to operate at USB 2.0 rates. According to him, iPhone 15’s USB-C port may be comparable to the current Lightning Port. An earlier report stated that the iPhone 15 Pro models would come with the blazing-fast Thunderbolt USB-C Port, which has rates up to a whopping 40Gbps.
A few days back Majin Bu posted pictures of what appears to be the USB Type-C cable that will be included with the iPhone 15. He claims the cable will be 1.6 metres long and have 16 connectors. Compared to the current Apple USB Type-C to Lightning charging cords, it is considered thicker and more durable.
The cable that comes with the iPhone 15 will reportedly allow 20V at 3A charging and USB 2.0 connectivity. According to information that has emerged about the cable, the bundled adapter will support data transfers at speeds of up to 480Mbps.
Some iPhone 15 models, according to a different claim, will reportedly enable 35W wired charging using the new USB Type-C connection. The iPhone 14 Pro presently supports 27W charging, which is the quickest charging speed available for an iPhone to date.
The Samsung Galaxy S23 FE, which is said to be under development could be launching in India. Recently the device has bagged India’s BIS certification as it was spotted listed on the Indian certification website. In addition to this, the phone has also surfaced on the US’s Bluetooth SIG certification website and WPC database signalling the imminent launch. The smartphone will be a successor to the Samsung Galaxy S21 FE. Unofficially, but according to a recent report, the business plans to introduce the Samsung Galaxy S23 FE next month.
According to a GSMArena report, the Samsung Galaxy S23 FE has passed the Bluetooth SIG Certification. The website has model numbers for the smartphone for various locations. Six Samsung Galaxy S23 FE variations with the model numbers SM-S711B, SM-S711B_DS, SM-S7110, SM-S711U1, SM-S711W, and SM-S711U have received certification from Bluetooth SIG. The listings for these variants just specify that they will include Bluetooth 5.3 connectivity.
Although the company hasn’t provided a debut date, we may assume it will be available soon both globally and in India given the listing in the Bureau of Indian Standards. Recent appearances of the Samsung Galaxy S23 FE on different certification platforms include BIS, Wireless Power Consortium (WPC), and Geekbench. This indicates that the release of the smartphone is imminent.
Prior to this, it was rumoured that the alleged Samsung Galaxy S23 FE would be powered by either an Exynos 2200 processor or a Snapdragon 8 Gen 1 SoC. Additionally, the smartphone might ship with Android 13 and will get 4 years of OS updates and 5 years of security patches. It is likely to have a 6.4-inch Dynamic AMOLED screen with a 120Hz refresh rate.
In addition to this, the Galaxy S23 FE might have three back cameras: a 12MP telephoto lens, an 8MP secondary camera, and a 50MP primary camera with optical image stabilisation. The phone is rumoured to have a 10-megapixel front-facing camera for taking selfies.
A 4,500mAh battery is reported to power it, and both 25W wired charging and wireless charging are supported.
Instagram offers a host of privacy options that allow you to shape how other people access and interact with your profile. You can choose which followers can view your content and limit the visibility of unwanted comments. Your Instagram profile is public by default. This means anyone on the platform can view your posts and stories without needing to follow you. In this article, we show you how to change Instagram privacy settings on Android.
Step 1: Launch the Instagram app on your phone and tap the profile icon at the bottom right corner of the screen.
Step 2: Tap the hamburger menu icon at the top right corner of the screen and select Settings and privacy.
Step 3: Scroll down and select Account Privacy.
Step 4: Switch on the toggle bar for Private account.
Hide your story and live stream from certain accounts
Step 1: Step 1: Launch the Instagram app on your phone and tap the profile icon at the bottom right corner of the screen.
Step 2: Tap the hamburger menu icon at the top right corner of the screen and select Settings and privacy.
Step 3: Tap on Hide story and live.
Step 4: Tap on Hide story and live from.
Step 5:Select the accounts from which you want to hide your story and live. Go back once you’re done.
Turn off profile picture expansion
Instagram allows users to expand your profile picture and zoom into it, even if your account is private. Here’s how you can limit people from doing so.
Step 1: Go to your Instagram profile and tap the hamburger menu in the top-right corner.
Step 2: Tap on Account privacy.
Step 3: Turn off the toggle switch next to Allow profile picture expansion.
Hide your Activity Status
Step 1: Launch the Instagram app on your phone and tap the profile icon at the bottom right corner of the screen.
Step 2: Tap the hamburger menu icon at the top right corner of the screen and select Settings and privacy.
Step 3: Scroll down and select Messages and story replies.
Step 4: Tap on Show activity status.
Step 5: Switch off the toggle bar for Show activity status.
Choose who can DM you
Only the messages from people you follow show up in your message inbox. Messages from other people go into the ‘Requests’ folder. To stop receiving requests, follow these steps.
Step 1: Launch the Instagram app on your phone and tap the profile icon at the bottom right corner of the screen.
Step 2: Tap the hamburger menu icon at the top right corner of the screen and select Settings and privacy.
Step 3: Tap on Messages and story replies.
Step 4: Tap on every category under Potential connections & Other people and change it to Don’t receive requests.
Remove a follower on Instagram
Step 1: Go to your profile by tapping your profile picture at the bottom right corner of the screen.
Step 2: Tap on Followers.
Step 3: You will notice a Remove option next to every follower. Search for the follower you want to remove and tap Remove.
Block someone on Instagram
Step 1: Launch the Instagram app and go to the profile you want to block.
Step 2: Tap the ellipses at the top-right corner of the screen and select Block.
Step 3: You can also choose to block any new accounts that the person may create. In the following pop-up box, select Block.
Restrict an account on Instagram
Restricting someone is a less harsh measure than blocking. While blocking an account completely cuts off a user’s access to your profile, restricting them makes sure that they do not see when you’re online and do not get read receipts for your messages. When a restricted account makes a comment on your post, no one else can see it. Here’s how you can change privacy settings to restrict someone on Instagram.
Step 1: Launch the Instagram app on your phone and tap the profile icon at the bottom right corner of the screen.
Step 2: Tap the hamburger menu icon at the top right corner of the screen and select Settings and privacy.
Step 3: Scroll down and select Restricted.
Step 4: Enter the username of the account you want to restrict.
Step 5: Hit the Restrict button.
Frequently Asked Questions (FAQs)
How do I block someone on Instagram?
To block someone on Instagram, go to their profile, hit the ellipses, and select ‘Block’.
How do I hide my Activity Status on Instagram?
Go to Profile>Menu>Settings and privacy>Messages and story replies>Show activity status and switch off its toggle bar.
How do I make my Instagram account private?
Go to Profile>Menu>Settings and privacy>Account privacy and switch on the toggle bar for Private account.
This is how you can change Instagram privacy settings on Android. If you want to restrict Instagram from using your phone’s camera and location, go to your device settings and manage app permissions. Without camera access, you will not be able to go live or upload pictures on Instagram.
After being banned for nearly ten months, Battleground Mobile India, aka BGMI, is officially available again in India. BGMI fans are looking for ways to improve their game experience and one such method is the usage of redemption codes, which offers a variety of rewards and advantages using BGMI redeem codes players can gain access to new skins, outfits, loot crates, weapons and free UC and diamonds.
As mentioned earlier, these codes give users the chance to earn unique rewards and gain extra benefits while playing the game. This includes GUN SKINS (M4, AKM, M416, AWM, M24, UZI, KAR98K), free character voucher, Andy, Carlo, Sara, Victor character for free, free Anna Character on completing the mission and UC or Royal Pass Discount. So here we have gathered a list of the most recent BGMI redeem codes as of 28 August 2023. Also, redeem these codes asap as these are only valid for a limited duration.
BGMI Redeem Codes for 28 August2023
TIFZBHZK4A – Free Outfit
RNUZBZ9QQ – AKM Glacier Skin
PGHZDBTFZ95U – M416 Skin
R89FPLM9S – Companion
BTOQZHZ8CQ – New!
TQIZBZ76F – Vehicle Skin
5FG10D33 – Falcon and Free Emotes
BTOQZHZ8CQ – New!
TQIZBZ76F – Vehicle Skin
5FG10D33 – Falcon and Free Emotes
UKUZBZGWF – Free Fireworks
BMTFZBZQNC – Free Drifter Set
SD14G84FCC – Free Skin for KAR98 Sniper Gun
GPHZDBTFZM24U – UMP9 Skin
KARZBZYTR – Free Outfit
JJCZCDZJ9U – Golden Pan
RNUZBZ9QQ – AKM Glacier Skin
BMTCZBZMFS – Pretty in Pink set and Pretty in Pink Headpiece
5FG10D33 – Outfit for Free
TQIZBz76F – 3 Free Motorcycle
How to get free Redeem Codes for BGMI on 28 August2023?
Launch BGMI on your device.
Then select the Redeem Code option from the main menu.
Next, click on the Redeem code tab.
A new window will open, requesting the redemption code.
Now enter your BGMI code.
Confirm and click on the “Redeem” tab.
If your redeem code is valid then you will get a message confirming that your rewards were successfully redeemed.
(Note that these codes are case-sensitive, so be sure to type them correctly to prevent any errors.)
Garena Free Fire is a battle royale game with regular awards and tournaments to keep players interested. If you play Garena Free Fire, you should be aware of the redeem codes that are released on a daily basis. However, because the battle royale game is banned in India, players from other countries can use the Free Fire Redeem codes daily. If you’re unfamiliar with the Garena Free Fire redeem codes or don’t know how to get them, we’ve put together a step-by-step guide to help you redeem them. Check out Garena Free Fire Redeem Codes for 28 August 2023.
The Free Fire redeem codes are a great way to get free stuff. These are 12-digit codes that contain alphabets and numbers, as well as an expiration date and time. Because the Garena FF redeem codes cannot be used more than once, you should hurry to the redemption page to claim your free reward before someone else does. To get a free reward, all you have to do is go to reward.ff.garena.com/en, which is the official redemption page. Also, keep an eye on this space for daily updates on Garena Free Fire redemption codes and rewards.
Garena Free Fire Redeem Codes Today 28 August2023
FEICJGW9NKYT
KEYVGQC3CT8Q
FVRTNJ45IT8U
F4BHK6LYOU9I
F767T1BE456Y
FFCMCPSJ99S3
FF7MJ31CXKRG
FFPO8BS5JW2D
PJNF5CQBAJLK
F7AC2YXE6RF2
FHLOYFDHE34G
XGW4FNK7ATON
67IBBMSL7AK8G
BR43FMAPYEZZ
XZJZE25WEFJJ
V427K98RUCHZ
FFCMCPSEN5MX
HNC95435FAGJ
6KWVMFJVMQQYG
FFCMCPSUYUY7E
MCPW3D28VZD6
EYH2W3XK8UPG
MCPW2D1U3XA3
FFAC2YXE6RF2
FAGTFQRDE1XCF
FFCMCPSBN9CU
NPYFATT3HGSQ
FFCMCPSGC9XZ
MCPW2D2WKWF2
ZZZ76NT3PDSH
How to Get Free Fire Redeem Codes for Garena on 28 August2023?
As the financial industry continues to evolve, so do the tools and techniques used by traders and analysts. One area that has garnered considerable attention in recent years is that of quantum artificial intelligence (AI) and how it intersects with traditional technical analysis. Immediate Connect is a complex and emerging field that combines principles of quantum physics with machine learning algorithms to solve complex problems. At the same time, technical analysis is a well-established practice that relies on historical market data to make predictions about future price movements. In this article, we will discuss the relationship between Immediate Connect and traditional technical analysis, the key differences between the two, and how Immediate Connect might be integrated into technical analysis.
Understanding Immediate Connect and Traditional Technical Analysis
What is Immediate Connect?
Immediate Connect is a relatively new field that combines the principles of quantum mechanics and computer science to create machines that can learn on their own and make decisions based on this learning. One of the fundamental concepts of quantum mechanics is the idea that certain properties can exist in multiple states simultaneously, known as superposition. Immediate Connect algorithms take advantage of this property to create multiple hypotheses and test them all simultaneously, resulting in faster and more accurate decision-making abilities.
Immediate Connect is an exciting development in the field of artificial intelligence. The ability to learn on their own and make decisions based on that learning has the potential to revolutionize a wide range of industries, from finance to healthcare to transportation. Immediate Connect algorithms are particularly well-suited to tasks that involve large amounts of data and complex decision-making, where traditional machine learning algorithms may struggle.
One of the challenges of Immediate Connect is that it requires specialized hardware to run the algorithms. Quantum computers are still in the early stages of development, and it may be some time before they become widely available. However, researchers and companies are making significant progress in this area, and it is likely that we will see more and more applications of Immediate Connect in the coming years.
The Basics of Traditional Technical Analysis
Technical analysis, on the other hand, is a well-established practice that relies on historical market data to make predictions about future price movements. Traders and analysts who engage in technical analysis use a range of tools, from simple trend lines and moving averages to more complex charting techniques, to identify patterns and make predictions about future market movements.
Technical analysis has been used for decades by traders and investors to make informed decisions about buying and selling assets. It is based on the idea that market trends tend to repeat themselves over time, and that by analyzing past price movements, traders can identify patterns that indicate future price movements.
There are many different tools and techniques used in technical analysis, including chart patterns, technical indicators, and candlestick charts. Each of these tools provides a different perspective on market trends and can be used to make predictions about future price movements.
One of the challenges of technical analysis is that it can be subjective. Different analysts may interpret the same data in different ways, leading to different predictions about future market movements. Additionally, technical analysis does not take into account fundamental factors that may affect market trends, such as economic data or geopolitical events.
Despite these challenges, technical analysis remains a popular and widely used tool for traders and investors. It is often used in combination with other forms of analysis, such as fundamental analysis, to make informed decisions about buying and selling assets.
The Evolution of Technical Analysis
Early Beginnings of Technical Analysis
Technical analysis has been practised for centuries in various forms, dating back to the 18th century when Japanese rice traders used candlestick charts to analyze prices. In the 20th century, technical analysis became more widely adopted in the Western world, and traders developed several techniques and indicators to help them identify patterns in market data.
The Emergence of Immediate Connect in Finance
Immediate Connect is a relatively new concept in finance, but it is already gaining traction as traders and analysts seek to leverage its predictive capabilities to gain an edge in the market. There are several applications of Immediate Connect in finance, from fraud detection to portfolio optimization and risk management.
Key Differences Between Immediate Connect and Traditional Technical Analysis
Speed and Efficiency
One of the primary advantages of Immediate Connect over traditional technical analysis is its ability to process vast amounts of data and identify patterns much faster. Traditional technical analysis relies on historical data, and it can be a slow process to identify trends and make predictions about future price movements. As a result, investors can improve trading via Immediate Connect.
Predictive Capabilities
Another key difference between the two approaches is their predictive capabilities. Immediate Connect has the potential to identify patterns and make predictions about future market movements much more accurately than traditional technical analysis. This is because Immediate Connect takes advantage of the principles of quantum mechanics to analyze multiple hypotheses simultaneously, resulting in more accurate predictions.
Adaptability and Learning
Immediate Connect also has the advantage of being adaptable and able to learn on its own. This means that as it processes more data, it can continue to refine its predictions and become even more accurate over time. Traditional technical analysis, on the other hand, relies on historical data and is limited by the scope of the data available.
The Integration of Immediate Connect in Technical Analysis
Enhanced Trading Strategies
One potential application of Immediate Connect in technical analysis is the development of enhanced trading strategies. As Immediate Connect becomes more advanced and adaptable, it has the potential to identify more complex patterns in market data and develop more effective trading strategies based on this analysis.
Improved Risk Management
Another potential application of Immediate Connect in finance is in the area of risk management. By processing vast amounts of market data, Immediate Connect algorithms can identify potential risks and help traders and analysts develop more robust risk management strategies.
Real-time Data Processing
Finally, Immediate Connect has the potential to revolutionize real-time data processing in the financial industry. As the speed of quantum computing continues to improve, it may be possible to process vast amounts of market data in real-time, allowing traders to make faster and more accurate decisions.
The Future of Immediate Connect and Technical Analysis
Potential Challenges and Limitations
While the potential applications of Immediate Connect in finance are vast, there are still several challenges and limitations that need to be overcome. These include the high cost of quantum computing hardware and the need for specialized skill sets to develop and implement Immediate Connect algorithms.
Opportunities for Growth and Innovation
Despite these challenges, there is no doubt that Immediate Connect will continue to grow and evolve in the coming years, and the potential for innovation in the financial industry is immense. As the cost of quantum computing hardware continues to decline, we can expect to see more applications of Immediate Connect in finance, from fraud detection to advanced portfolio optimization and risk management strategies.
The Role of Immediate Connect in Shaping the Financial Industry
Ultimately, Immediate Connect has the potential to revolutionize the financial industry, offering traders and analysts a faster, more accurate, and more adaptable tool for analyzing market data and making predictions about future price movements. As the technology continues to evolve, we can expect to see significant changes in the way traders and analysts approach their work, and the financial industry as a whole.
Truke has rapidly expanded its TWS portfolio this year, adding a lot of versatile products under the Rs 2,000 price point. Over the last few months, we’ve seen Truke breathe new life into the budget gaming TWS segment with its BTG (Born to Game) series. The newly launched BTG Neo is the priciest product in this series but it also sports some first-in-segment features. Currently priced at Rs 1,499, this pair of TWS has a lot going for it on paper. But how does it fare in everyday use? Find out in our Truke BTG Neo review.
Truke has significantly improved the unboxing experience on the BTG Neo. The Truke products we reviewed in the past were shipped in a flimsy retail package. It’s nice to see the brand ditch this trend for one of the pricier products in its catalogue. Inside the box, you get the charging case, wireless earbuds, two pairs of extra silicone ear tips, a USB Type-A to Type-C charging cable, a quick start guide, and a warranty card.
Truke BTG Neo shares a lot of its design elements with the BTG Storm (review). The edges of the squarish charging case taper towards the bottom, although not as sharply as the BTG Storm. The Truke branding is printed at the centre of the lid in silver lettering. The RGB strips under the lid are visible from the sides, even when the lid is closed. The Type-C charging port is placed right under the hinge.
The matte-like finish on the case feels premium. We fidgeted with the charging case quite a bit during the review period, and the hinge did not show any sign of weakness. Its sturdiness inspires a lot of confidence in the TWS’ strength. The case spent a lot of time in pockets with keys and loose change, and it did not register any significant scratches.
Flipping open the lid, you will find the earbuds locked magnetically to the case in a horizontal position. The inner panel has a dedicated pairing button, a first for the segment. The earbuds sport an in-ear design with glossy insides and a matte finish on the outer panel. A curved RGB strip can be found on either earbud, just above the stem. The part where the stem meets the RGB strip is also touch-sensitive. The touch controls are bang average, something that we’ve come to expect from products in this price range.
The earbuds fit nicely in our ears, without needing to swap the ear tips for a different size. We didn’t have any issues with the fit, but after prolonged use, we felt some fatigue. The size of the earbuds is the major contributing factor behind this. We even used the earbuds while running and working out. The fit remained snug in sweaty conditions and the earbuds did not slip out once despite the glossy texture on the inner panels. Truke BTG Neo is rated IPX5 for dust and water resistance, which means that sweat and water splashes do not damage the earbuds in any way.
Truke BTG Neo review: Performance
Let’s get the specs out of the way first. Truke BTG Neo is equipped with a powerful 13mm titanium driver on either earbud. The earbuds support Bluetooth 5.3. There are 3 microphones on either earbud to relay the voice over calls and online gameplay. The earphones also offer Environmental Noise Cancellation (ENC) to suppress the surrounding noise on calls. Being a gaming TWS, the BTG Neo gets a 35ms low latency mode. Users can also toggle between 3 EQ modes. The Dual Connection technology is perhaps the most impressive spec of them all, being a first-in-segment feature for the BTG Neo.
The earbuds are set to Movie Mode by default, which is a strange choice. You can switch to the Dynamic Audio or Bass Boost mode by pressing and holding the touch control panel on the right earbud for three seconds. Truke still does not have a dedicated app for its TWS products, which is proving to be a massive chink in its armour with every release. The touch controls can be very annoying to work with, especially when toggling between different EQ modes. App support would make this considerably easier. The absence of an app also means that there is no way to customise the touch controls or create a customised EQ profile.
While the lack of a dedicated app is disappointing, Truke continues to knock it out of the park when it comes to the audio performance. The output produced by the BTG Neo is certainly bass-heavy and a little boxy, but the mids and lows get a decent amount of representation in the soundstage. We did most of the listening on Dynamic Audio mode and were satisfied with the level of treble relayed in the output. However, the audio quality depreciates rapidly as you reach a higher volume. We’d suggest sticking to 40-60% for an optimum listening experience.
A low latency mode of 35ms ensures that the gaming experience is smooth and hiccup-free. We played Call of Duty Mobile with the BTG Neo on, and it was quite a pleasant experience. The sound output was crisp and lag-free. Even the sound of the steps of the opposing team members was relayed very well. The six microphones on these earbuds ensure that your voice will be relayed to your teammates without a significant loss in quality.
On regular cellular calls, the ENC does a good job of suppressing surrounding noises in an indoor setting. The sound of a running ceiling fan or an AC unit is completely cancelled out. However, in outdoor conditions, a fair bit of noise manages to creep in and get relayed to the receiver. Overall, Truke BTG Neo’s calling experience is still better than most products in this segment.
Our favourite feature on this TWS has got to be multi-device connectivity. This is a feature mostly found in wireless earbuds priced between Rs 3,000 – Rs 5,000. It is incredible that Truke has managed to slip it in a TWS priced at Rs 1,499. It’s not a gimmick either. The switch in connection is very seamless. We’ve experienced some hangups with this feature on other TWS products, but it works flawlessly on the BTG Neo.
The charging case is equipped with a 500mAh battery unit, with an additional 40mAh on either earbud. On a full charge, the earbuds offer a maximum playtime of up to 8 hours. While we didn’t discharge the earbuds in one go, it took us almost two weeks of use to deplete the charging case. On average, we used the TWS for about 6 hours a day.
Priced at Rs 1,499, Truke BTG Neo is a very easy recommendation from us. The TWS looks smart, incorporating RBG lighting in its design without coming across as gaudy. The audio output is bass-heavy but not in a way that clouds over other frequencies. The 35ms low latency mode is ideal for gaming. The only drawback is the lack of a dedicated app, which we hope gets sorted out as soon as possible.
Tap Tap is a gaming platform that allows users to download the latest games, follow developers, leave reviews, and engage in gaming-related discussions. The app has a very active user base that is very dedicated to gaming. The app also provides users with game suggestions based on their tastes. If you like to keep yourself updated on the news from the industry, you will feel right at home on Tap Tap. In this article, we show you how to download the official Tap Tap app on Android and iOS.
The official Tap Tap Lite app is available on the Google Play Store for Android and the App Store for iOS. On Android, launch the Google Play Store, search for Tap Tap and hit the Install button. iPhone users can follow the same process on the App Store. It should be noted that Tap Tap only offers the Lite version of the app on Google Play Store and App Store. The full version can be officially downloaded from Tap Tap’s official website.
Download the Tap Tap app for Android and iOS from the official website
Step 1: Launch your preferred web browser app on your Android smartphone.
Step 2: Go to the download page on the official Tap Tap website.
Step 3: Tap the icon that says Get the full version.
Step 4: In the popup box, select Download anyway.
Step 5: Once the APK file has been downloaded on your device, go to the downloads folder and open it.
Step 6: Select Install.
Step 7: Flag your mobile browser as a safe source of download.
Step 8:Open the app once it has been installed.
Frequently Asked Questions (FAQs)
How do I download the Tap Tap app on Android?
The Tap Tap Lite app for Android can be officially downloaded from the Google Play Store. The full version can be downloaded from the official Tap Tap app.
Where do I find the official Tap Tap app on iOS/iPhone?
The Tap Tap Lite app is available on the App Store. The version version of the app can be downloaded from its official website.
Can I download games on Tap Tap?
Yes, Tap Tap allows users to download games across different platforms.
This is how you can download the official Tap Tap on Android and iOS. Once installed, set up your profile and join the conversation! Tap Tap gives you the latest scoop on gaming news and also allows users to engage in discussion around different gaming-related topics. You can rate the games you’ve played and explore more titles based on your preferences.
Your phone’s RAM plays a vital role in its speed and efficiency. Smartphones with higher RAM are able to manage multitasking and heavy tasks like gaming with relative ease. If you’re using an old, sluggish phone that has limited RAM and storage capacity, there are some steps you can take to make it faster. In this article, we bring you 2 ways to increase the RAM of your Android phone using internal storage and a memory card.
A micro SD card (Class 4 or higher, preferably Class 10)
A rooted Android phone
The Android phone must support swapping. Use the RAM Truth app to check whether your smartphone supports swapping.
A memory card reader.
A Windows PC.
Increase your Android phone’s RAM using a memory card
Step 1: Place your micro SD card in the memory card reader and connect it to your Windows PC.
Step 2: Use Minitool Partition Wizard, EaseUS Partition Master or any other appropriate tool to partition the memory card.
Step 3: Use the Link2SD app to link your Android phone with the micro SD card. Your smartphone must be rooted. This article will help you through the rooting process.
Step 4: Download the Swapper – ROOT app to create a swap file and store it in the micro SD card. This swap file will boost your phone’s storage.
Use internal storage to increase the RAM of your Android phone
Most modern smartphones allow users to dedicate a part of the internal storage to the RAM. Here’s how you can use it.
Step 1: Go to Settings and select About Device.
Step 2: Tap on RAM.
Step 3: Switch on the toggle bar for RAM expansion.
Step 4: Use the slider to expand your phone’s RAM.
Frequently Asked Questions (FAQs)
How do I increase my Android phone’s RAM?
Go to Settings>About Device>RAM and use the slider to increase the RAM capacity.
How do I boost my phone’s RAM using a memory card?
Partition the SD card using a tool like EaseUS Partition Master, then link it to your rooted Android phone using the Link2SD app. Finally, create a swap file using the Swapper – ROOT app. This will boost your Android phone’s RAM storage capacity.
How do I check my phone’s RAM?
Go to Settings>About Device to check your phone’s RAM capacity.
This is how you can use a memory card or internal storage to increase the RAM of your Android phone. You should know that rooting your Android phone carries a fair bit of risk and nulls the device’s warranty. If you’re running short on RAM, we’d suggest using the native method that uses the internal storage of your device to boost it.
Kodi is an open-source and cross-platform media player that acts as a library for all the streaming services you are subscribed to. You can find all your movies, TV Shows, Podcasts, Pictures, Games, Songs, and more in one place using Kodi. The app is available for almost all platforms, including Android TVs and Chromecast devices. In this article, we show you how to install Kodi on an Android smartphone.
The Kodi app will be installed on your Android smartphone.
Install Kodi from a third-party marketplace
Facing trouble on the Google Play Store? Here’s how you can download Kodi from an independent app marketplace.
Step 1:Launch your preferred web browser app on your Android smartphone.
Step 2: Go to the third-party marketplace of your choice. Read this article for our list of the best app marketplaces around.
Step 3: Search for Kodi.
Step 4: Select the latest version of the Kodi app from the search results.
Step 5: Tap on Download APK.
Step 6: In the following dialogue box, select Download Anyway.
The Kodi APK will be downloaded to your phone.
Step 7: Open the downloads folder and select the APK file.
Step 8: In the following popup box, hit Install.
Step 9: Your smartphone may prompt you to flag the mobile browser as a safe source of download. If you’ve already done this before, you won’t be prompted again.
The Kodi app will be installed on your Android smartphone.
How to Install an Add-on on Kodi
The Kodi experience is very limited without Add-ons. Almost every major service has its own add-on that you can add to the Kodi app. Here’s how.
Step 1:Launch the Kodi app on your Android smartphone.
Step 2: From the side menu select Add-ons.
Step 3: Tap the unbox icon at the top of the side menu.
Step 4: Select Install from repository.
Step 5: Select the type of Add-on you want to install.
Step 6: Now tap the Add-on you want to install.
Step 7: Hit Install.
Frequently Asked Questions (FAQs)
How do I install the Kodi app on my Android smartphone?
You can install the Kodi app from the Google Play Store. Third-party apps like APKMirror and APKPure also allow you to install the Kodi app on your Android smartphone.
Is the Kodi app free to use?
Kodi is free to install and use on Android.
How do I install an add-on on Kodi?
Launch the Kodi app and go to Add-ons>Unbox icon>Install from repository select the type of add-on you want to install, then tap the name of the add-on and hit Install.
This is how you can install the Kodi app on your Android smartphone. Kodi has a vast repository of add-ons, but in case you don’t find what you’re looking for, you can easily download one online. Kodi allows you to install third-party add-ons on the app. First, you need to allow installations from unknown sources in the app settings, then head over to the add-on section and select the ‘Install from zip file’ section.
Garena Free Fire is a battle royale game with regular awards and tournaments to keep players interested. If you play Garena Free Fire, you should be aware of the redeem codes that are released on a daily basis. However, because the battle royale game is banned in India, players from other countries can use the Free Fire Redeem codes daily. If you’re unfamiliar with the Garena Free Fire redeem codes or don’t know how to get them, we’ve put together a step-by-step guide to help you redeem them. Check out Garena Free Fire Redeem Codes for 26 August 2023.
The Free Fire redeem codes are a great way to get free stuff. These are 12-digit codes that contain alphabets and numbers, as well as an expiration date and time. Because the Garena FF redeem codes cannot be used more than once, you should hurry to the redemption page to claim your free reward before someone else does. To get a free reward, all you have to do is go to reward.ff.garena.com/en, which is the official redemption page. Also, keep an eye on this space for daily updates on Garena Free Fire redemption codes and rewards.
Garena Free Fire Redeem Codes Today 26 August2023
FSSAQ12345TYHYU
F7J78I78T7YIKY9
FO8PKJDXAQ125TG
FFTRH6YJ7IUJK79
FYHJKILOP0TUJKU
FI9OL80EY5GDTGZ
FGFBHZAQ234TFTR
FG5H6HUJKIKOW43
FVBNJU87TIR7YU7
FAQ2346YJUT7UKJ
FY7O98P0LOIKCFD
FOPL3IKDXSZQ123
F45TTHY5R6Y6Y78
FKIY79O8IUA5TSE
How to Get Free Fire Redeem Codes for Garena on 26 August2023?
Microsoft Outlook is one of the best email clients around. You probably already use it to manage your work or business email. Users often report that the Outlook app keeps shutting down on their PCs without any reason. Diagnosing this problem can be tedious as there may be several reasons behind it. In this article, we bring you the top 8 ways to fix the ‘Microsoft Outlook keeps crashing issue’ on your PC.
Restarting your device is one of the first steps you should take to fix any problem you’re facing on it. This includes frequent app crashes and glitches. To restart your PC, hit the Windows icon on the taskbar, then click on the power button and select Restart. It will take a few minutes for your PC to restart. Launch the Microsoft Outlook app again to check if it is working as intended.
End Microsoft’s Outlook process
You can also try restarting Microsoft Outlook to keep it from crashing. In order to do this, you need to end its process first. Here’s how you can do that.
Step 1:Right-click anywhere on the taskbar and select Task Manager.
Step 2: Switch to the Processes tab and select Microsoft Outlook.
Step 3: Click on End Task.
Step 4: Now, relaunch the Microsoft Outlook app from your desktop.
Update the Microsoft Outlook
If the Microsoft Outlook app on your PC still keeps crashing, you may want to check if you are using an older version of the app. Older versions may have bugs causing these unexpected malfunctions. Developers are quick to fix these bugs with an update. Follow these steps to update the Microsoft Outlook app on your PC.
Step 1: Launch the Microsoft Outlook app on your PC.
Step 2: Click on File and select Office Account.
Step 3: Click on Update Options and select Update Now.
Disable Hardware Acceleration
Step 1:Launch Outlook on your PC and click on File.
Step 2: Select Options.
Step 3: Select Advanced from the sidebar.
Step 4: Tick the checkbox for Disable Hardware Acceleration.
Run Microsoft Outlook in Safe Mode
Running Microsoft Outlook in Safe Mode helps in finding out the cause of the malfunction. If the app runs perfectly in Safe Mode, it means that one of the add-ins is causing it to crash. Here’s how you can Outlook in Safe Mode.
Step 1: Press Windows Key + R. This will launch the Run dialogue box.
Step 2: Type Outlook.exe/Safe and hit Enter.
Use Outlook in Safe Mode. If it does not cause any complications, it means the problem lies with the add-ins.
Delete malfunctioning add-ins
If the Microsoft Outlook app on your PC started crashing after you installed an add-in, remove it to restore the app to normalcy. Here’s how.
Step 1: Launch the Microsoft Outlook app on your PC.
Step 2: Click on File and select Manage Add-ins.
Step 3:Uncheck the box for the Add-in you want to turn off.
Step 4: Click on Remove to delete the add-in.
Use Microsoft Repair Tool
Step 1: Launch the Control Panel app and select Programs.
Step 2: Click on Programs and Features.
Step 3: Select Microsoft 365 and click on Change.
Step 4: Select Quick Repair, then click on Repair.
Create a new Outlook Profile
If your Outlook profile is compromised, you may need to create a new one to restore normalcy. Here’s how you can go about it.
Step 1: Launch the Control Panel app.
Step 2: Click on View by and select Large icons.
Step 3: Select Mail (Microsoft Outlook).
Step 4: In the following window, select Show Profiles.
Step 5: Click on Add.
Step 6: Enter a name for your profile and hit OK.
Step 7: Now, enter your account credentials and hit Next.
Step 8: Click the box for Always use this profile under When starting Microsoft Outlook.
Step 9:Save your changes.
Frequently Asked Questions (FAQs)
Why does the Microsoft Outlook app keep crashing on my PC?
The Outlook app on your PC may be crashing because of a malfunctioning add-in or because you are using a bug-ridden older version.
How do I keep Microsoft Outlook from crashing on my PC?
Update the app and restart your PC. If it keeps crashing, run the Windows Repair Tool and change your profile.
How do I launch Microsoft Outlook in Safe Mode?
To run Microsoft Office in Safe Mode, press Windows key + R and type Outloo.exe/Safe in the dialogue box. Hit Enter to run Outlook in Safe Mode.
This is how you can fix the Microsoft Outlook app if it keeps crashing on your PC. If these fixes do not work, you may want to consider uninstalling the entire Microsoft 365 package and then reinstalling it from the Microsoft Store. If you found this article helpful, let us know in the comments!
If you ever end up in a situation where you need to use emergency services, your Android smartphone has you covered. Not only can you access your emergency contact without needing to unlock your phone, but you can also enter your medical information so first responders and medical professionals have an easier time tending to your condition. In this article, we show you how to add medical information to your Android phone.
Add your medical information to your Android phone
Step 1: Go to Settings and select Safety and Emergency.
Step 2: Scroll down and select Medical Info.
Step 3: Tap on Medical Info.
Step 4: Switch on the toggle bar for Show info when locked.
Step 5: Enter basic personal details like your Name, Height, Weight, Address, Sex, Blood Type, and Date of Birth. Also, specify whether you are an organ donor or not.
Step 6: Now, enter your health details like Medical conditions, Medications, Allergies & reactions, and other remarks.
Step 7: To save the details hit the tick icon at the top right corner of the screen.
Add an emergency contact on your Android phone
Step 1: Go to Settings and select Safety and emergency.
Step 2: Tap Emergency Contacts.
Step 3: Tap on the pencil icon on the right side of the screen.
Step 4: Tap on Add member.
Step 5: Select a person from your phonebook as an emergency contact.
Step 6: Hit Save.
How to add an emergency contact to your phone’s lock screen
Once you save an emergency contact on your phone, they can only be reached by tapping the ‘Emergency Call’ option on the lock screen. It is possible that the first responders going through your phone may not know where to look for the emergency contact. To avoid this situation, you can add the contact to your phone’s lock screen. You can also use this space to display any urgent medical information. Here’s how.
Step 1: Go to Settings and select Lock screen.
Step 2: Tap on Contact information.
Step 3: Add the phone number of your emergency contact in the popup box.
Step 4: Hit Done. The contact will show up on your lock screen.
Use a third-party app (Medical ID)
If your smartphone does not have the option to file your medical information, use a third-party app like Medical ID.
Step 1:Download and install the Medical ID app on your smartphone.
Step 2:Launch the app and give it the necessary permissions.
Step 3: Fill in information like your full name, birth date, gender, blood group, height, weight, medical conditions, allergies, medications, and more.
Step 4: Hit the tick icon in the top right corner of the screen.
Step 5: Tap Yes on the banner at the top of the screen. This will install a lock screen widget for the app on your phone.
Step 6: In the Accessibility menu, tap on Medical ID.
Step 7: Turn on the toggle switch next to Use Medical ID.
Step 8: Hit Allow in the popup box.
Step 9: The Medical ID widget will appear on your lock screen. Tapping it twice will open your medical profile.
Frequently Asked Questions (FAQs)
How do I add my medical information to my Android phone?
To enter your medical information on your Android phone, go to Settings>Safety and Emergency>Medical info and enter your health-related details.
How do I set an emergency contact on Android?
To set an emergency contact on Android, go to Settings>Safety and Emergency and select Emergency Contact.
How do I dial an emergency contact?
Your emergency contact can be called without needing to unlock your phone. All you need to do is select the ‘emergency’ icon on the lock screen.
This is how you can add your medical information to your Android phone. To call an emergency contact, simply tap on Emergency Call on the lock screen. To use other emergency services, hit the SOS icon in the power menu. You can use the emergency services to flash SOS and ring a siren.
Expanding its Odyssey Neo lineup Samsung has announced the launch of another monitor in India. The company has introduced Samsung Odyssey Neo G9 the world’s first Dual UHD display measuring 57 inches. The newly launched monitor has 1000R curvature. The device comes with a 240Hz refresh rate and a swift 1ms response time.
Samsung Odyssey Neo G9 price in India, sale details
The price of the 57-inch Odyssey Neo G9 is set at Rs 2,25,000. The Samsung monitor is only available in a single white colour option. The Dual UHD display can be purchased via Samsung’s official online store Samsung Shop, Amazon, and all leading retail stores in the country.
Odyssey Neo G9 will be available at a no-cost EMI with an instant cart discount of Rs 10000 when purchasing from Samsung E-store till 31st and Rs 3500 on credit and debit cards of leading Banks.
The Odyssey Neo G9 with Dual UHD display comes with an ergonomic stand that enables users to tilt or raise the monitor to the ideal viewing height. The monitor’s sleek form is loaded with Core Lighting+ & CoreSync, which create an immersive experience for gaming. The monitor’s rear panel changes in accordance with the colours on the screen and resembles gaming situations.
The 140PPI (Pixels per inch) high density is supported by the Samsung Odyssey Neo G9. With a 35% greater active surface than a 49-inch panel, it offers the same resolution as a 32-inch monitor. Users can observe more action on the screen thanks to the 32:9 aspect ratio’s broad field of view. The 1000R curved screen reduces side distractions and improves depth perception.
Quantum Matrix Technology and Quantum Mini-LED, which produce controlled brightness and ideal contrast for high-definition picture quality, are installed in the Dual UHD display. Every scene appears vivid and real thanks to the monitor’s VESA Display HDR 1000, which also has a peak brightness of 1000 nits and a contrast ratio of 1000000:1 for improved colour expression and depth in the images. A matte display that absorbs both artificial and natural light is included with the screen. On the Odyssey Neo G9, sAGAR (Super Anti-Glare, Anti-Reflection) film eliminates glare.
In order to give ultra-smooth gameplay, the display has a faster refresh rate of 240Hz. This eliminates any latency or motion blur. Odyssey Neo G9 users won’t have to worry about choppy images or screen tearing during intense gaming periods thanks to AMD FreeSync Premium Pro and an optimised 1ms response time. The low latency in not only SDR but also HDR, supports meticulous colour and luminance certification.
The new Odyssey Neo G9 is equipped with DisplayPort 2.1, HDMI 2.1, and a USB Hub on the connectivity front. The display has Auto Source Switch+ built in. This function eliminates the inconvenience of manually switching sources every time by detecting when connected devices are turned on and switching to the new signal immediately.
For the latest gadget and tech news, and gadget reviews, follow us on Twitter, Facebook and Instagram. For newest tech & gadget videos subscribe to our YouTube Channel. You can also stay up to date using the Gadget Bridge Android App. You can find the latest car and bike news here.
There has been a lot of false buzz in India that Honor Smartphones from Honor Global are making a comeback in India under a previous Realme employee Sheth as Honor Tech. It has been made clear by Honor Global that the business, the above-mentioned ex-Realme employee, is opening to India is not in any way connected to Honor Global.
It is just the name they are trying to use, bank on by calling them Honor Tech, which might give a wrong illusion that Honor Smartphones from the global company is making a comeback in India.
Few Honor smartphones have been selling in India through its distributor PSAV, in small quantities.
Sheth has joined hands with PSAV to bring H90 a smartphone with Honor Tech branding giving the wrong illusion that it is from Honor Global.
Honor Global has sent out a statement which reads:
HONOR is currently operating in India through local partners and does not own nor intend to establish a subsidiary in the country. There are no plans in place to proceed with any form of technology transfer, including but not limited to aspects relating to hardware, software and service management, to any entity in India. PSAV is HONOR’s distributor in India. As per HONOR’s distributor agreement, PSAV is authorized to import, distribute and resell HONOR products, as well as perform promotional activities for such products in India. PSAV is prohibited from using the HONOR brand outside of the scope stipulated in the distributor agreement. HONOR Device Co. Ltd. and its subsidiaries are not connected nor associated with the Honor Tech company mentioned in recent media coverage.
Honor had stopped its operations in India a few years ago (pre-pandemic) but it continued to sell a few models of Honor smartphones through its local distributor PSAV. Who now seem to have shaken hands with ex-Realme employees and have created a brand Honor Tech playing on the popular Honor brand. The name Honor Tech might also be under scrutiny and is being used right now just to create a buzz. It will likely be changed to something else in the coming months, too.
As of now, Honor Global has no plans to revive its operations in India. Whatever Honor Tech smartphones you will see in India are part of a rebranding exercise, which we have already seen Micromax and other Indian companies do in the past.
They purchase smartphones at wholesale price from China, put their own stamp on them and sell them in India. There might be an assembly plant setup in India, but again that is not part of the Honor Global business or Huawei (Honors parent company). There is no good talk of aftersales and good customer sales ethics/other metrics at the moment.
Seems like Honor Tech is, at the moment, just playing on the hugely popular Honor Brand, which once existed in India at the corporate level. So, yes, Honor Global is not Honor Tech. These are two very different brands owned and run by different people.
Honor Global right now does its business in China, the UK, Europe, UAE etc. But are not in India at a company/corporate level.
If you’ve been using your smartphone for a few years, it may be time to get a new one. Most smartphone manufacturers offer major OS upgrades for 2-3 years, after which you need to get a new device to stay on top of things. Once the security patches stop coming in, it is advised that you switch to a new device. If you don’t want to spend a whole lot of money on your new phone, you can always choose to sell your current device. In this article, we bring you the top 7 things to keep in mind before trading in or selling your phone.
The first thing you should do before trading in or selling your phone is create a complete backup of all your personal data on the device. This may be a bit trickier than you think. Start with the media on your phone. You can choose to back them up on an external storage device like a memory card, hard disk, or even a pen drive. If you don’t have a lot of media on your phone, we’d suggest using an online storage service like Google Drive or Dropbox.
Once that is taken care of, start backing up your contacts. This is an essential part of the process since manually saving contacts on your new phone can prove to be an arduous task. Your phone contacts can be stored in a VCF file. After that, go through all your instant messengers and make sure all your chats and conversation media are backed up. Read this article to find out how you can back up your WhatsApp messages.
Next, you need to back up the miscellaneous data on your device. This includes documents, files, music, ebooks, and other stuff. Go to your phone’s file manager and back up all your downloads.
If you get a new phone before selling your current device, you can use its default file transfer interface to restore your data from your previous phone. Using this interface will also help you restore all your apps on the new device.
Remove your memory card
If your current device has a memory card slot, remember to make sure its empty before you sell it. People often forget to pull out the memory card before switching to a new device. You may also want to take out the card before performing a factory reset of the device. This preserves all your data and ensures that the new owner does not get access to your personal stuff. Newer smartphones come with a hybrid SIM card slot, which means your SIM card and memory card are housed in the same tray. This makes it easier for users to remember to pull out the micro SD card.
Perform a factory reset
Once your data is backed up and you have pulled out the memory card from your device, it’s time to perform a factory reset. Resetting your phone to its factory settings clears all the data on your device and logs out all the accounts you are signed into. Your phone will be restored to the condition it was in when you pulled it out of its retail box for the first time. Here’s how you can perform a factory reset on your Android device.
Step 1: Go to Settings, scroll down and select General Management.
Step 2: Tap on Reset.
Step 3: Select Factory data reset.
Step 4: Scroll down and tap on Reset.
Make sure the accessories are intact
If your phone came with additional stuff like a power adapter, USB charging cable, or even a soft cover, make sure you put them in the retail box while selling your phone. If those accessories are still intact and in usable shape, you can sell your phone for a higher price. Most smartphones these days do not come with a power adapter. So, you can easily bump up the selling price if you have it in the retail box. If your smartphone is still under warranty, make sure you include the bill in the package as well. Phones that are under warranty can fetch a higher price than regular phones with no warranty cover.
Check your phone’s model number
Your phone’s model number is different than its model name. The former is an alphanumeric string while the latter is the name that is used to market the phone. A phone can have several model numbers but only one model name. This is because its specifications and internal components may vary from region to region. For example, Samsung Galaxy S23 Ultra (model name) has several model numbers – SM-S918B, SM-S918B/DS, SM-S918U, SM-S918U1, and more. While trading in your phone, you need to know the exact model number for your device. This makes it easier for the buyer to give you an estimation of the value of your device.
Here’s how you can find the model number of your smartphone.
Step 1: Go to Settings.
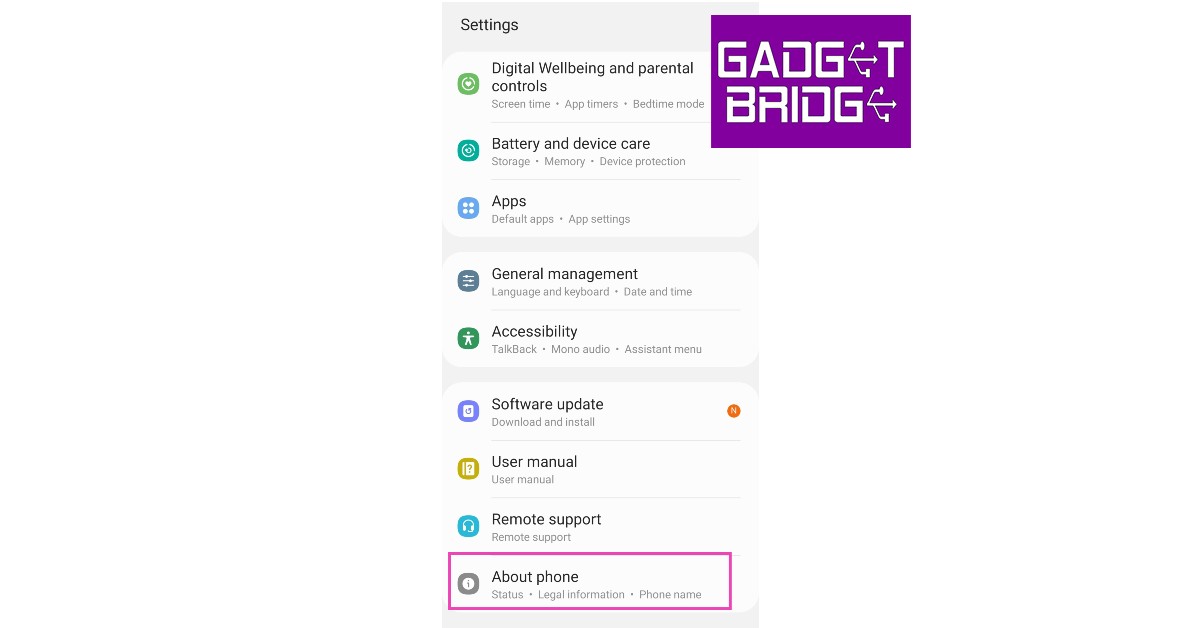
Step 2: Select About Phone.
Step 3: The model name, model number, and the serial number of your smartphone will be displayed in the following page.
Step 4: In some smartphones, you may have to open Regulatory Information in the About Phone section to view the model number.
Give it a good wipe
If you use a solid case or a soft cover on your smartphone, chances are that its back panel has patches of dust or grime. Take off the cover and clean the back panel with isopropyl alcohol. Use a microfibre cloth to wipe the back clean and let it dry out for a bit. If the screen protector for the display has scratches on it, peel it off and install a new one. These small changes can bump up the value of your device.
Get a price estimation from online resellers
Before selling your smartphone to another party, it is always a good idea to check its value online. Online platforms like OLX give you an accurate estimation of the resale value of your device. We’d also suggest looking up the model number of your smartphone on different platforms to gauge what other sellers are asking for it. A thorough market research can get you the best price possible for your device.
These are the top 7 things you need to keep in mind before trading in or selling your phone. We’d also suggest checking out the exchange offers for new flagship devices instead of selling your phone to another buyer. These offers can earn you significant discounts on products that would otherwise be out of your budget. Last week, Flipkart was offering huge exchange discounts on iPhone 14 Plus. You can read more about it here. Keep a watch on our website for such offers!
If you’re a tech enthusiast and like to know the ins and outs of your device, you’re probably interested in finding out the maximum refresh rate your phone’s display can reach in different situations. Most smartphones have an adaptive refresh rate, which helps them conserve the battery. When the phone is resting, its refresh rate can drop down to 1Hz. While gaming, it can be anywhere between 60-90Hz. You may also be interested in checking the frame rate of a random video you shot. In this article, we bring you the top 4 ways to check the FPS in any game or video on Android.
Enable the native FPS meter from Developer Options
Step 1: Go to Settings and select About Phone.
Step 2: Select Software information.
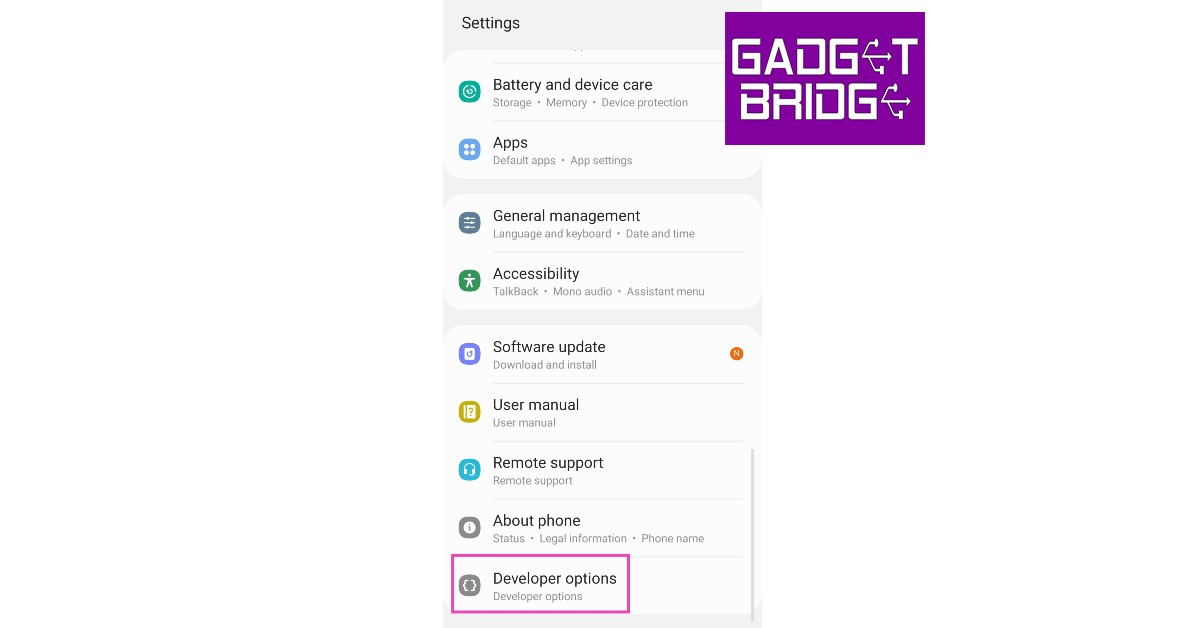
Step 3: Tap on the build number seven times to enable Developer Mode.
Step 4: Go back to Settings and scroll all the way to Developer Options.
Step 5: Scroll down and switch on the toggle bar for Show refresh rate. The FPS counter will now appear on the top left corner of the screen.
Check the FPS in a game on your Android phone
Every smartphone comes with its own in-game toolbar that lets you toggle between different gaming modes, receive notifications, optimise the network, view the internal temperature of the phone, check the frame rate of the display, and much more. Every smartphone has a different gesture to trigger this toolbar. Try swapping from the side or the top of the screen to reveal it. Once revealed, you will be able to view the FPS on its main panel.
Use the Real-time Display FPS Meter app
If your smartphone has no native method to check the FPS, there are several third-party apps for Android that you can use to accomplish the same task. Our favourite app is the Real-time Display FPS Meter. Here’s how you can use it.
Step 2: Give the app permission to display over other apps.
Step 3: Switch on the toggle bar.
Step 4: Adjust the positioning of the meter. You can also select your desired font size.
Use the FPS Test app
Use this app if you suspect that your phone isn’t hitting the maximum refresh rate that it is capable of.
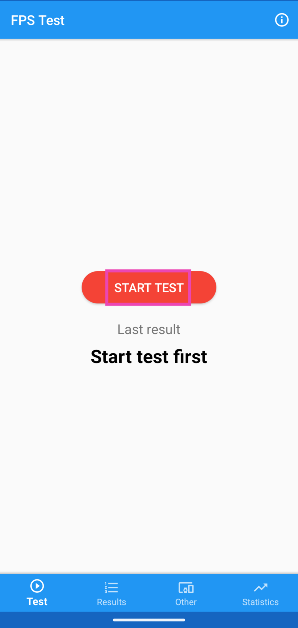
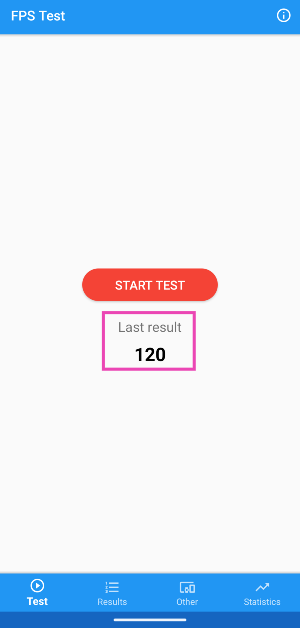
Step 1:Download and install the FPS Test app on your smartphone.
Step 2:Launch the app and tap on Start Test.
Step 3: The app will play an animation to check the display’s refresh rate.
Step 4: The refresh rate will be displayed on the screen.
Frequently Asked Questions (FAQs)
How do I check the FPS in a game on Android?
You can use your phone’s default in-game toolbar to check the frame rate in video games. Depending on your smartphone, you can trigger the gaming toolbar by swiping from the side or the top of the screen. Once the toolbar is revealed, the FPS counter will be visible on the main panel.
How do I overlay the FPS counter on my phone’s screen?
Go to Developer Options and switch on the toggle bar for ‘Show refresh rate’ to view the FPS directly on the display.
Are there any third-party apps to check the FPS on my Android phone?
These are the top 4 ways to check the FPS in any game or video on your Android phone. One of the downsides of relying on the default in-game toolbar is that it does not overlay the frame counter on the screen. While you can get your phone to display it all the time from Developer Options, you may not be able to change its positioning or size. Third-party apps are able to fix this issue by giving you more control over the positioning and size of the counter.
Samsung unveiled its most anticipated foldable phones, the Galaxy Z Fold 5 and Galaxy Z Flip 5, at its Galaxy Unpacked event last month. Both fifth-generation foldable phones are becoming more affordable. The details are given below:
The major obstacle preventing foldable phones from gaining greater popularity is their high cost, which is still regarded as a significant expense. The good news is Samsung is assisting buyers in overcoming this obstacle by providing exclusive discounts on Galaxy Z Fold 5 and Galaxy Z Flip 5 in India.
The pricing of the Galaxy Z Fold 5 for the 256 GB model has now been reduced to Rs 1,38,999 from its initial cost of Rs 1,64,999. Additionally, the price of the Galaxy Z Flip 5 256 GB variant has decreased to Rs 85,999. The device was launched in India at Rs 99,999.
Note that this pricing can only be obtained through a number of promotional offers including bank cashback. The company is also offering an upgrade bonus along with no-cost EMI options.
Samsung is offering a bank cashback of Rs 7,000 on the Galaxy Z Fold 5 and Galaxy Z Flip 5. In addition to this, there will be an upgrade bonus of Rs 9,000 for the Galaxy Z Flip 5.
On the other hand, the company will provide Rs 9,000 bank cashback for the Galaxy Z Flip 5(this discount is only applicable if you do not choose EMIs). There will be an upgrade bonus of Rs 7,000 on the Flip phone.
The HDFC bank customers can also take advantage of no-cost EMI options for up to 9 months on the foldable phones.
Samsung Galaxy Z Fold 5, Galaxy Z Flip 5 Price in India
On the other hand, the Samsung Galaxy Z Flip 5 is available in two distinct configurations: 8GB RAM with 256GB storage and 8GB RAM with 512GB storage. Both versions are priced at Rs 99,999 and Rs 109,999 in India, respectively.
After being banned for nearly ten months, Battleground Mobile India, aka BGMI, is officially available again in India. BGMI fans are looking for ways to improve their game experience and one such method is the usage of redemption codes, which offers a variety of rewards and advantages using BGMI redeem codes players can gain access to new skins, outfits, loot crates, weapons and free UC and diamonds.
As mentioned earlier, these codes give users the chance to earn unique rewards and gain extra benefits while playing the game. This includes GUN SKINS (M4, AKM, M416, AWM, M24, UZI, KAR98K), free character voucher, Andy, Carlo, Sara, Victor character for free, free Anna Character on completing the mission and UC or Royal Pass Discount. So here we have gathered a list of the most recent BGMI redeem codes as of 25 August 2023. Also, redeem these codes asap as these are only valid for a limited duration.
BGMI Redeem Codes for 25 August2023
SIWEST4YLXR
BDNKUPRMF4
GPHZDBTFZM24U
FENKYU5ATPD
LEVKIN1QPCZ
VETREL2IMHX
SD16Z66XHH
R89FPLM9S
ZADROT5QLHP
BOBR3IBMTO
KARZBZYTR
SD14G84FCC
How to get free Redeem Codes for BGMI on 25 August2023?
Launch BGMI on your device.
Then select the Redeem Code option from the main menu.
Next, click on the Redeem code tab.
A new window will open, requesting the redemption code.
Now enter your BGMI code.
Confirm and click on the “Redeem” tab.
If your redeem code is valid then you will get a message confirming that your rewards were successfully redeemed.
(Note that these codes are case-sensitive, so be sure to type them correctly to prevent any errors.)
Garena Free Fire is a battle royale game with regular awards and tournaments to keep players interested. If you play Garena Free Fire, you should be aware of the redeem codes that are released on a daily basis. However, because the battle royale game is banned in India, players from other countries can use the Free Fire Redeem codes daily. If you’re unfamiliar with the Garena Free Fire redeem codes or don’t know how to get them, we’ve put together a step-by-step guide to help you redeem them. Check out Garena Free Fire Redeem Codes for 25 August 2023.
The Free Fire redeem codes are a great way to get free stuff. These are 12-digit codes that contain alphabets and numbers, as well as an expiration date and time. Because the Garena FF redeem codes cannot be used more than once, you should hurry to the redemption page to claim your free reward before someone else does. To get a free reward, all you have to do is go to reward.ff.garena.com/en, which is the official redemption page. Also, keep an eye on this space for daily updates on Garena Free Fire redemption codes and rewards.
Garena Free Fire Redeem Codes Today 25 August2023
F9OXYT5Q4ERDCV
FBNHRTIGUYTGBX
FNKDERUYNFMCI8
FYDHERN567YLOP
FYGYU7AQ4ER2CV
FEGRFRFXBGHUDY
FDFV34H5TIG7YV
FGCXBNDRI5T6YY
FFFTYH6TRFUYU6
FHBNTIGO8H8MEK
F4L5OPTY7ILP0C
FVOIA5QREDCHYR
FTGFCBXKSDIMT6
FLKYO8U9LO8Y1E
How to Get Free Fire Redeem Codes for Garena on 25 August2023?
With the rise of artificial intelligence (AI), the world of trading has undergone a dramatic transformation. AI has revolutionized the way we approach and manage risk, creating new opportunities and challenges for traders. In this article, we will explore the basics of AI and trading, its application in risk management, and examine successful case studies as well as emerging trends and potential challenges in the future.
Understanding the Basics: AI and Trading
Before diving into the impact of AI on trading, it is essential to understand what AI is and how it has evolved over time.
Artificial Intelligence, or AI, refers to the simulation of human intelligence in machines. It encompasses various technologies that enable machines to understand, learn, and perform tasks that would typically require human intervention.
The concept of AI has been around for decades, but it is in recent years that we have witnessed significant advancements in this field. With the exponential growth of computing power and the availability of vast amounts of data, AI has become more accessible and powerful than ever before.
AI can be categorized into two main types: narrow AI and general AI. Narrow AI, also known as weak AI, is designed to perform specific tasks, such as speech recognition or image classification. On the other hand, general AI, also known as strong AI, aims to replicate human intelligence across a wide range of tasks.
The Evolution of Trading
Trading has come a long way from manual transactions to computerized systems. Over the years, advancements in technology have reshaped the trading landscape, leading to increased speed, efficiency, and accuracy.
In the early days of trading, transactions were conducted manually, with traders physically exchanging assets on trading floors. This process was time-consuming and prone to human error. However, with the advent of computers and electronic trading platforms, the trading process became more streamlined and efficient.
Computerized trading systems, also known as algorithmic trading or automated trading, revolutionized the financial markets. These systems use pre-programmed algorithms to execute trades automatically based on predefined rules and market conditions. By eliminating human intervention, algorithmic trading minimizes the impact of emotions and human biases on trading decisions.
With the rise of AI, trading systems have become even more sophisticated. AI algorithms can analyze vast amounts of data, including market trends, news articles, social media sentiment, and even satellite imagery, to make informed trading decisions. These algorithms can identify patterns and correlations that may not be apparent to human traders, enabling them to capitalize on market opportunities and mitigate risks.
Moreover, AI-powered trading systems can adapt and learn from past experiences. Through a process called machine learning, these systems can improve their performance over time by continuously analyzing data and refining their algorithms.
AI is also transforming other areas of trading, such as risk management and compliance. AI algorithms can analyze large volumes of data to identify potential risks and anomalies, helping traders and regulators make more informed decisions.
However, it is important to note that AI is not a magic bullet. While it has the potential to enhance trading strategies and improve outcomes, it is not immune to limitations and risks. AI algorithms are only as good as the data they are trained on, and they can be susceptible to biases and errors.
In conclusion, AI has revolutionized the trading landscape, enabling faster, more efficient, and more data-driven decision-making. As technology continues to advance, we can expect AI to play an increasingly prominent role in the future of trading.
The Intersection of AI and Trading
AI has found its way into the trading world and is being utilized in various aspects of the trading process. The integration of artificial intelligence (AI) technology in trading has brought about significant advancements and transformed the way financial markets operate.
One of the key areas where AI is used in trading is for tasks such as data analysis, prediction, and automation. Machine learning algorithms can analyze vast amounts of data to identify market patterns and trends, aiding in making informed trading decisions. These algorithms can process data from various sources, including financial news, social media, and historical price data, to detect patterns that might not be apparent to human traders.
Machine learning, a subset of AI, plays a vital role in trading. By continuously analyzing data and adapting algorithms, machine learning models can make predictions about market conditions and identify potential trading opportunities. These models can learn from historical data to recognize patterns and trends, enabling traders to anticipate market movements and make more accurate predictions.
Moreover, predictive analytics, powered by AI, provides traders with valuable insights into market behavior. It involves analyzing historical data, identifying patterns, and using statistical models to forecast future market trends. This enables traders to make data-driven decisions and develop effective trading strategies.
Another area where AI is revolutionizing trading is automation. AI-powered trading systems can execute trades automatically based on pre-defined rules and algorithms. These systems can monitor market conditions in real-time, identify trading signals, and execute trades with minimal human intervention. This not only saves time but also eliminates the potential for human error.
Furthermore, AI has enabled the development of algorithmic trading strategies that can adapt to changing market conditions. These strategies can automatically adjust their parameters and trading rules based on real-time market data, ensuring optimal performance in dynamic trading environments.
In conclusion, the intersection of AI and trading has opened up new possibilities for traders. AI technology, with its ability to analyze vast amounts of data, make accurate predictions, and automate trading processes, has transformed the way financial markets operate. As AI continues to evolve, it is expected to play an even more significant role in shaping the future of trading.
Changing the Risk Landscape
The introduction of AI in trading has brought about significant changes in how risks are managed.
Quantum ai trading represents a paradigm shift in the risk landscape of modern financial markets. By harnessing the principles of quantum computing, it enables the analysis of massive data sets in a fraction of the time traditional algorithms would take. These ultra-fast calculations allow for the prediction of market trends with a level of precision and efficiency previously unseen.
The implications of this technology are profound, reshaping risk management strategies and challenging existing trading paradigms. As quantum AI trading becomes more pervasive, understanding its impact is crucial for investors, regulators, and market participants, who must adapt to a rapidly changing risk environment.
Risk Management in Traditional Trading
In traditional trading, risk management relied heavily on human judgment and experience. Traders would manually assess risk factors and implement strategies to mitigate potential losses.
How AI is Transforming Risk Management
AI is revolutionizing risk management by automating processes and providing real-time analysis of market conditions. AI algorithms can detect patterns and anomalies in data, enabling traders to identify and respond promptly to potential risks.
Case Studies: AI in Trading
Examining successful implementations and learning from failures is crucial in understanding the impact of AI in trading.
Successful Implementations of AI in Trading
Several companies have successfully implemented AI in their trading strategies. By incorporating AI-based models, these firms have achieved improved accuracy, increased profitability, and reduced risks.
Lessons Learned from AI Failures in Trading
While many have found success with AI in trading, there have also been notable failures. It is essential to understand the factors that contributed to these failures and learn from them to avoid similar pitfalls.
The Future of AI in Trading
As AI continues to evolve, its impact on trading is poised to grow further. Here, we will discuss emerging trends and potential challenges that lie ahead.
Emerging Trends in AI and Trading
New developments such as natural language processing, deep learning, and reinforcement learning are transforming the field of AI in trading. These advancements are likely to enhance trading strategies and refine risk management techniques.
Potential Challenges and Solutions for AI in Trading
As with any technological advancement, AI in trading comes with its own set of challenges. Issues like data quality, model interpretability, and ethical considerations need to be addressed to ensure the responsible and effective use of AI in the trading world.
In conclusion, AI has significantly impacted the risk landscape in trading. By leveraging AI technologies such as machine learning and predictive analytics, traders can make more informed decisions and optimize risk management strategies. Analyzing successful implementations and learning from failures provide valuable insights for the trading community. With emerging trends and potential challenges on the horizon, the future of AI in trading holds promising opportunities for those willing to embrace this transformative technology.
After expanding its affordable smartphone lineup, Xiaomi is all set to upgrade its lifestyle product ecosystem next. The company is setting the stage to launch Xiaomi Uniblade Trimmer in the country in the first week of September. The grooming product comes with a 40-degree three-way blade. In addition to this, there is support for wireless charging as well.
Xiaomi India has announced that the Xiaomi Uniblade Trimmer will be launched in India on September 4. While teasing its upcoming launch the company said, “Say goodbye to the ordinary and embrace the extraordinary with the #XiaomiUnibladeTrimmer. Stay tuned to witness the future of grooming on 4.09.2023.”
Xiaomi has also created a separate microsite to tease the key details of the Uniblade trimmer. For those who are unaware the device has already been launched globally. According to the teasers, the grooming device will come with a rotary dial. Along with having a new design the device will include a type-C charging port.
Xiaomi Uniblade Trimmer features
As already mentioned Xiaomi Uniblade Trimmer has already been launched worldwide so we know the features of the trimmer. Xiaomi UniBlade Trimmer has a matte finish housed in a waterproof body with an IPX7 classification. It includes a three-way blade mechanism with self-sharpening capabilities. There is a 360° Omnidirectional Floating Shaver Heads that use High-Frequency Sonic Cavitation Bubbles. In addition to this, it is driven by a Linear Magnetic Suspension Motor that vibrates at an amazing rate of 15,000 times per minute
Users can easily customise their grooming preferences with an astounding 14 range of settings.
The trimmer has a 2000mAh battery in terms of its battery. It has a USB Type-C charging interface and can run continuously for more than 90 minutes on a single charge. The trimmer now supports wireless charging, and has a convenient travel lock option.
PlayStation enthusiasts should be happy as Sony has announced a short-term special deal for the PS5 console that promises savings of up to Rs 7,500 in India. Notably, this offer is only valid for the console’s 4K Blu-ray-equipped disc edition. The price reduction comes after Sony increased the prices for its current-gen consoles by 10% for the disc version and 12.5 % for the digital variant in November 2022.
After the discount of Rs 7,500, PS5 will cost Rs 47,490 during the sale. Note that this is a temporary price cut. It is going to be a nine-day sale, which will end on September 2. As per the company, the Rs 7,500 off PS5 promotion will be available at Amazon, Flipkart, Shopatsc, Reliance, Croma, Vijay Sales and select retailers.
For those who are unaware this offer is coming for the second time within a month. So if you could not benefit from the July sale deal this would be an excellent opportunity to get a PS5, given the drop is identical to that event.
In addition, Marvel’s Spider-Man 2 will debut on Friday, October 20, 2023, exclusively for the PlayStation 5 console, according to a statement from Insomniac Games. The production team has worked tirelessly for years to produce the eagerly awaited third installment in the franchise, which follows the enormous success of its predecessors Marvel’s Spider-Man in 2018 and Marvel’s Spider-Man: Miles Morales in 2020.
Microsoft, the parent company of Xbox, said earlier this month, during the lawsuit between it and the US FTC over the purchase of Activision Blizzard, that Sony was preparing to produce a PS5 Slim model later this year, with an expected price of $399.99 about Rs 32,764.
The new, thinner console will reportedly have a new chassis and a detachable disc drive. A leaked video from earlier this month showed a thinner version of the console with a redesigned cover, two USB Type-C ports up front, and what appeared to be space for a removable disc drive in the bulge on the side.
Asus, a pioneer in the production of gaming-focused smartphones and laptops, has announced the release of two new products in India: the Marshmallow Keyboard KW100 and Marshmallow Mouse MD100. A small, wireless keyboard with quiet switches that can cut noise by up to 90% is the KW100. Additionally, a 2-level adjustable kickstand is included so you can find the ideal typing angle. The MD100 is a perfect mouse for use in any setting because it is compact, light, and silent. Additionally, the MD100 has quiet switches that can cut noise by up to 90%. It is therefore perfect for use in offices, classrooms, and other peaceful settings.
Marshmallow Keyboard KW100 and Marshmallow Mouse MD100 price and availability
The new Marshmallow Keyboard KW100 costs Rs 2899, while the MD100 mouse costs Rs 1499. The most recent Marshmallow Range may be purchased offline at ASUS Exclusive Stores, ROG Stores, Croma, Vijay Sales, and Reliance Digital as well as online at ASUS e-shop, Amazon, and Flipkart.
Marshmallow Keyboard KW100 is a small, wireless keyboard with a gentle appearance that works in any setting. The device’s 10 million click lifespan ensures longevity despite its small size and portability. You may move from a notebook to this keyboard without a tedious learning curve because of the scissor keys‘ similarity to the notebook layout. The KW100 will ensure a quiet working environment thanks to its almost silent typing experience and silent switches that can cut noise by up to 90%. Due to its small size and two-level adjustable kickstand for the ideal typing angle, the keyboard is also quite comfortable to use.
The Asus Keyboard comes with 12 hotkeys and the ability to connect to multiple devices. It supports Windows, Chrome, MacOS, and iOS operating systems and can connect up to three devices. Up to 24 months of battery life are available to users.
Asus Marshmallow Mouse MD100 features
The ASUS Marshmallow Mouse MD100, on the other hand, is a colourful, portable mouse. It has a whimsical feel thanks to its vibrant and adaptable design. Its symmetrical form ensures that both left- and right-handed people can use it without discomfort. It is very portable because it just weighs 56g and is 3 cm tall.
The quiet-click buttons on the Marshmallow Mouse MD100 guarantee noise reduction of 20 dB or less, are tested for 10 million clicks and have an extended lifespan of several years. Because of its small weight and customizable DPI, you may customise the sensitivity to your taste. Additionally, it comes with a strap and simply latching the mouse with one finger on the strap makes it easy to carry. By preventing bacterial growth on the surface, the antimicrobial guard ensures cleanliness. Mouse feet made entirely of PTFE allow easy sliding across any surface. In order to accommodate different device preferences, the MD100 is compatible with Windows, Chrome, and macOS.
You may swap between multiple colour palettes and a magnetic top cover. The battery life offers a comfortable 12 months of use.


")


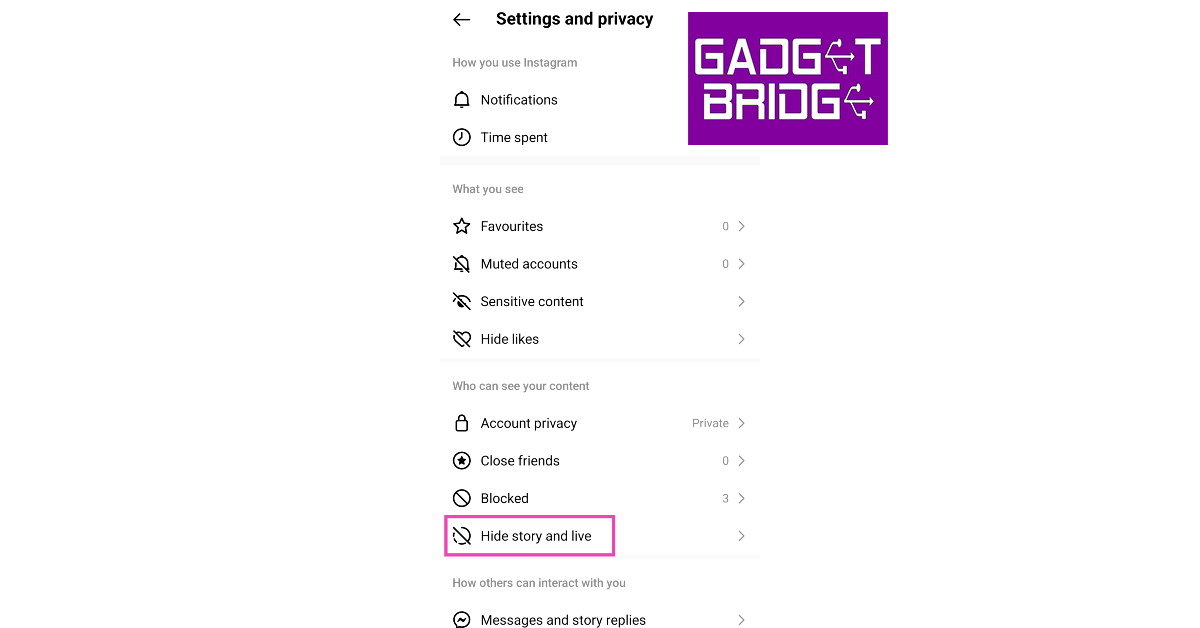


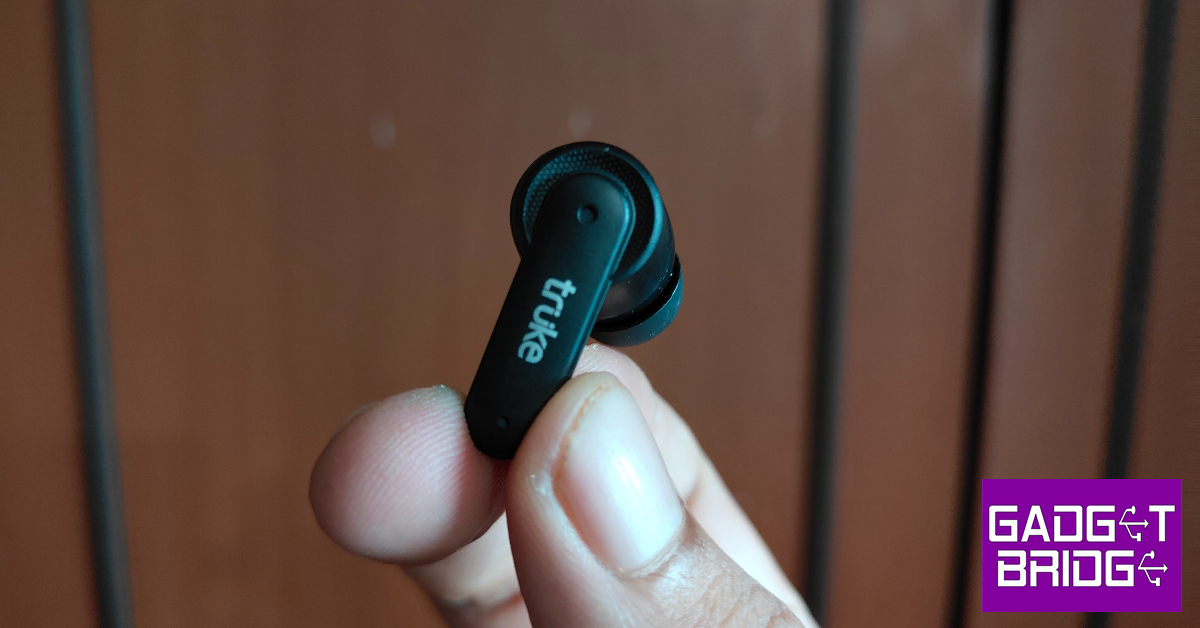


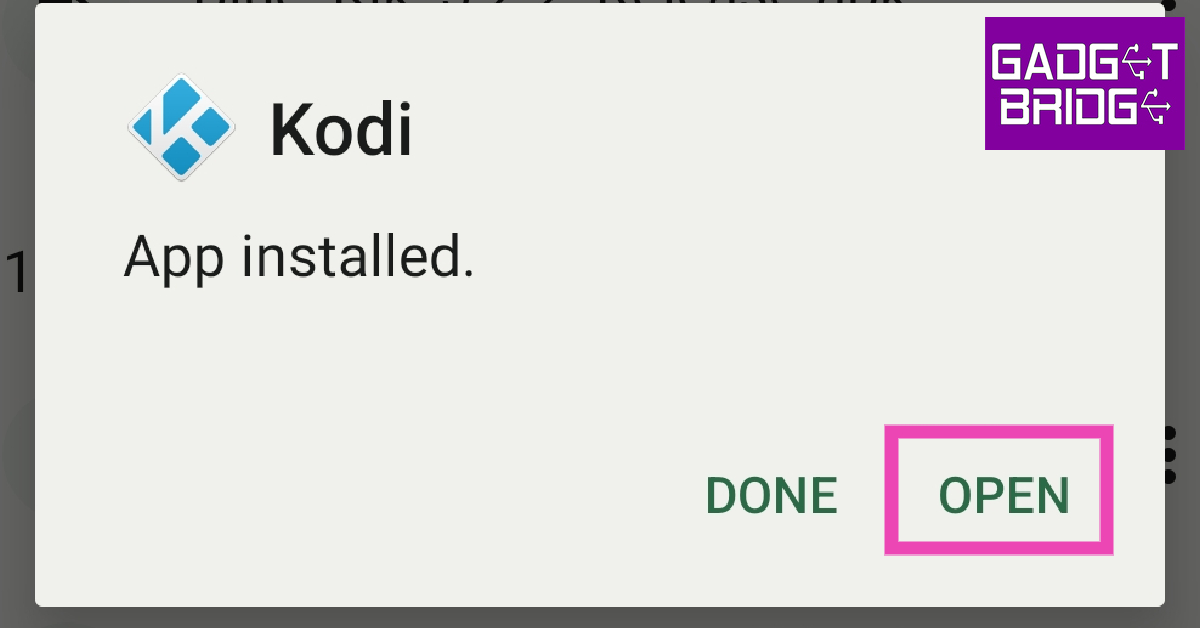


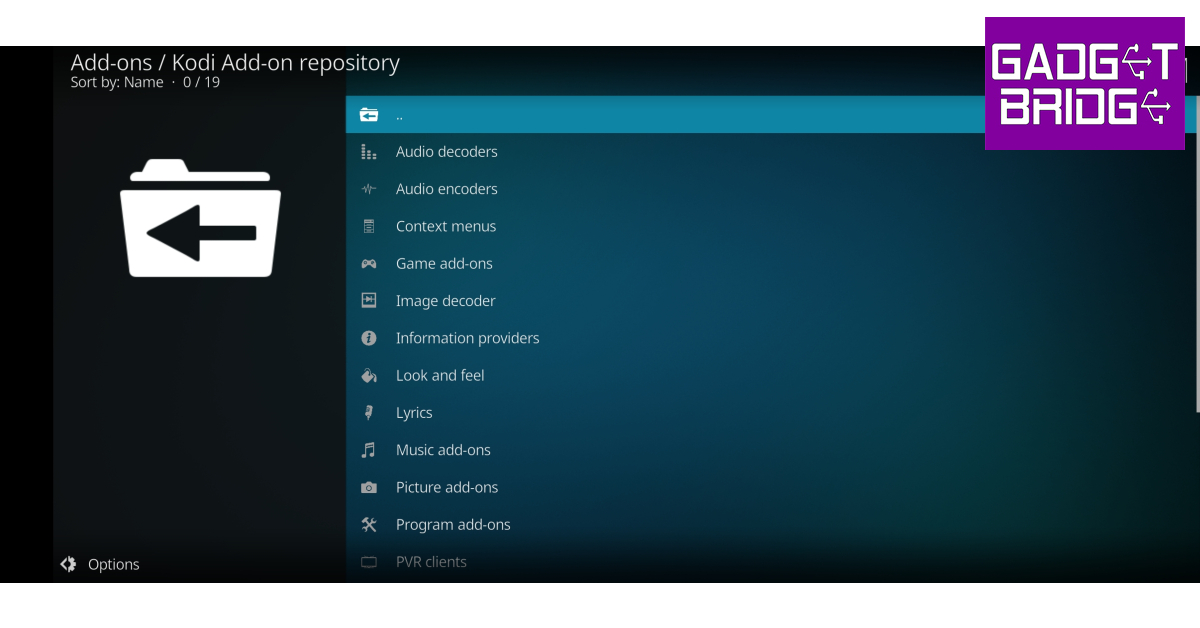


")


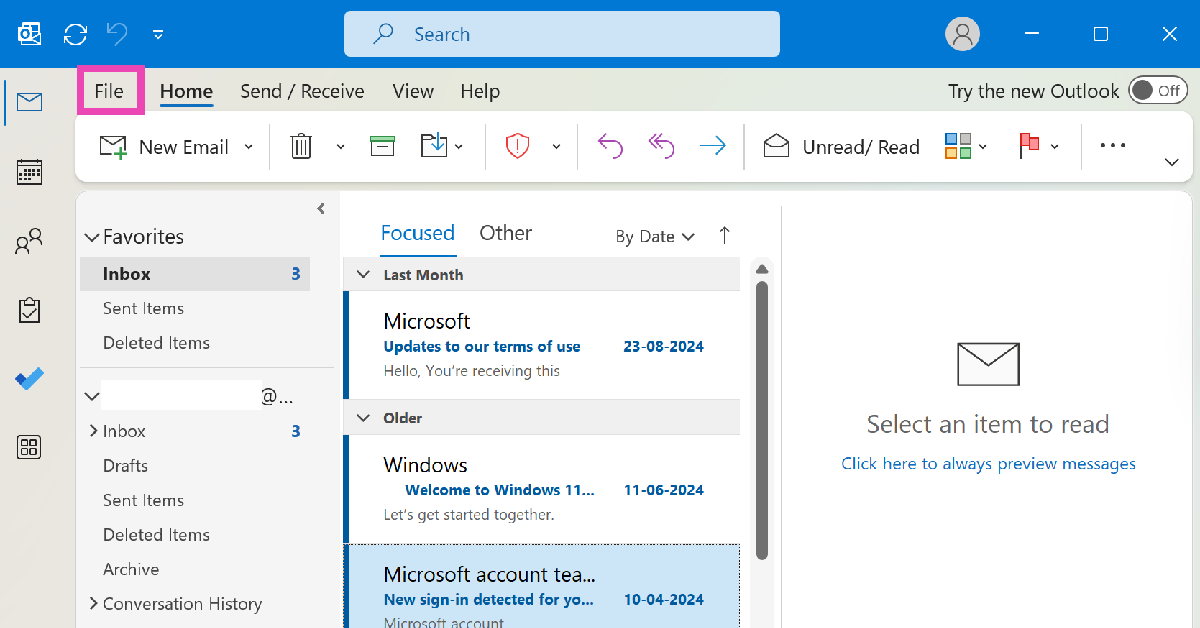
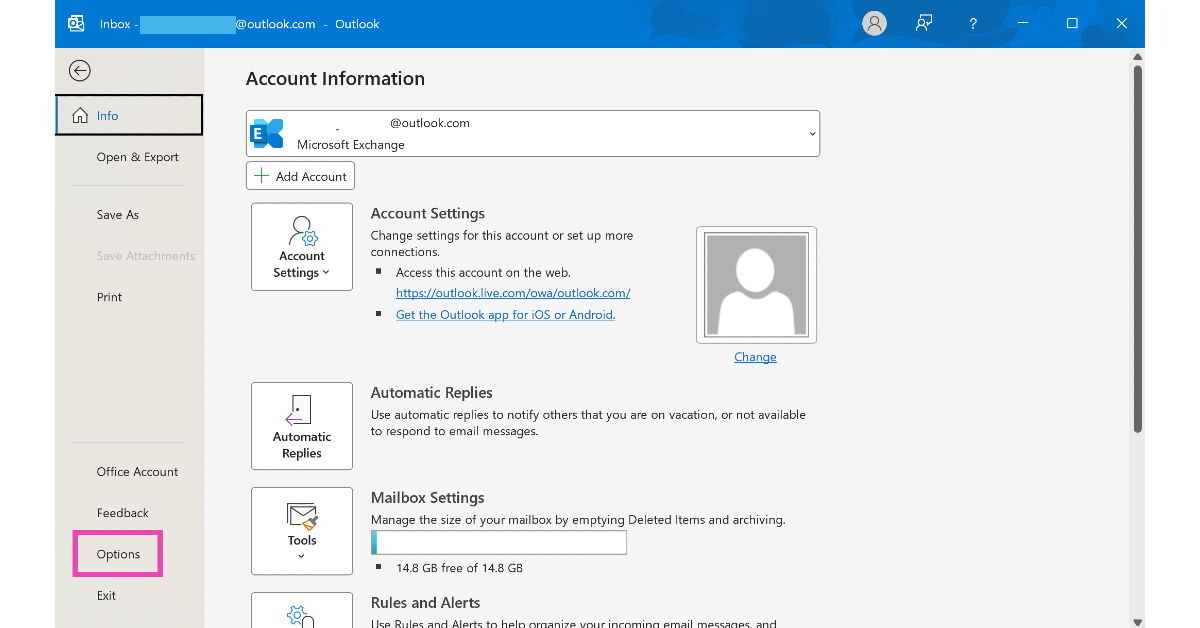
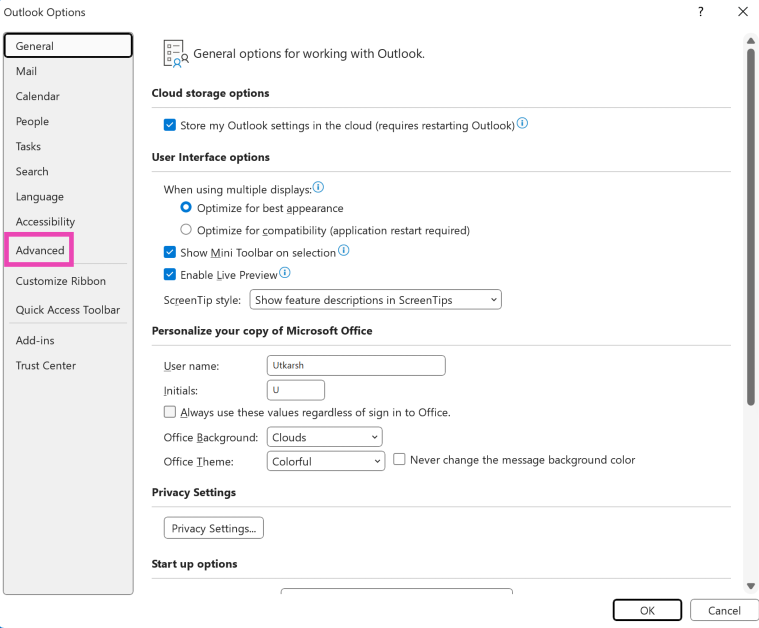


")


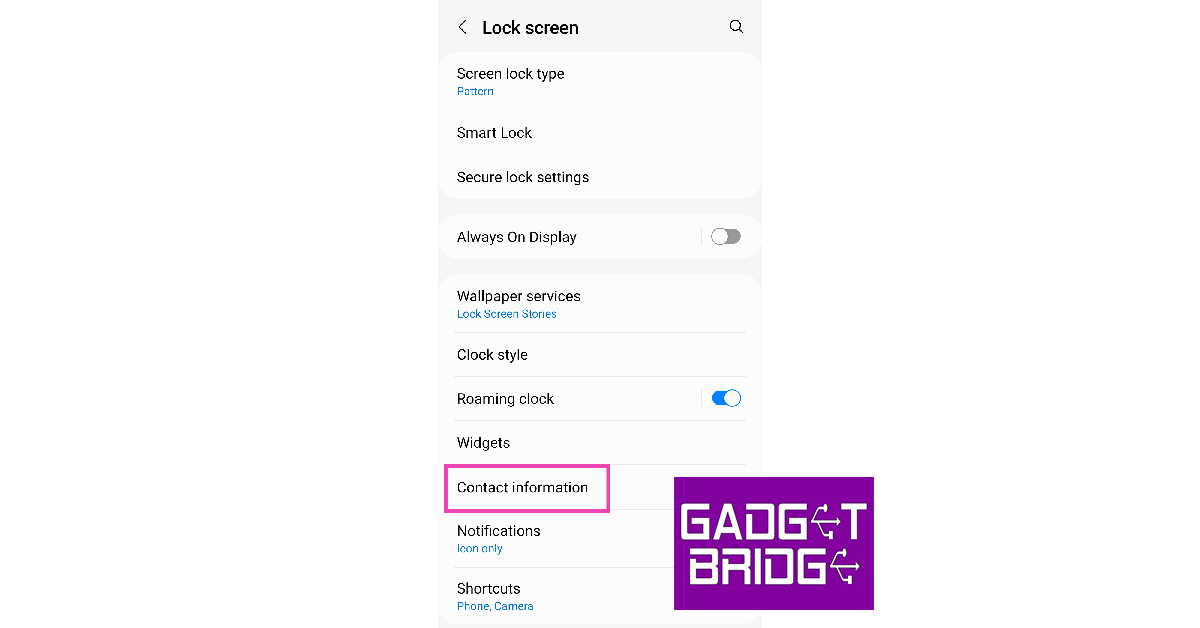


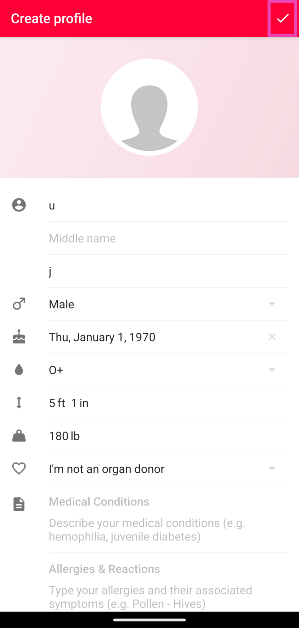
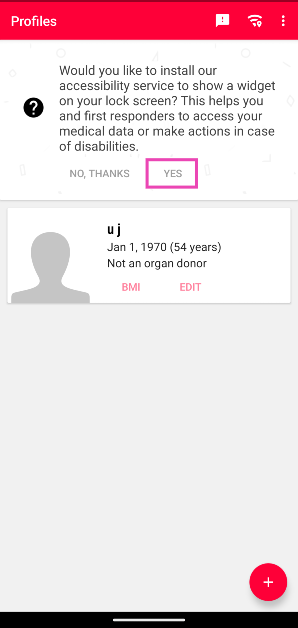
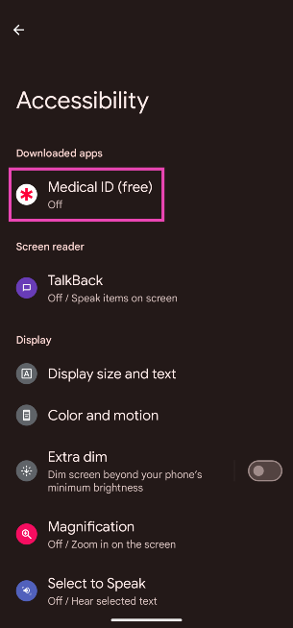
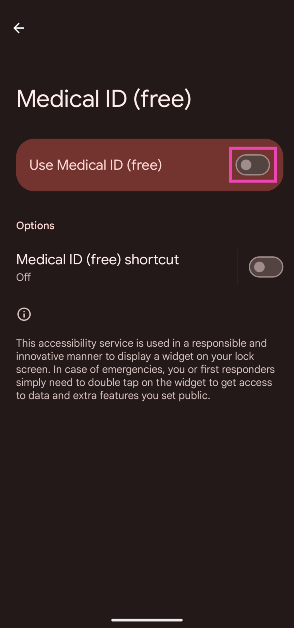


![NO! Honor mobiles is not coming back to India [Exclusive]](https://www.gadgetbridge.com/wp-content/uploads/2023/08/Honor-mobiles-is-not-coming-back-to-India-768x402.jpg "NO! Honor mobiles is not coming back to India [Exclusive]")


")