Amazon Quiz Answers Today 13 February 2023: Participate to win Rs 2,500

13 February 2023 Amazon Quiz has gone live on its platform. The quiz timings are 12 AM to 11:59 PM. Interested users can participate in the Amazon daily quiz to win exciting prizes. The company puts up 5 questions based on general awareness. You can submit the correct answers from the four options. Today the participants have the chance to win a Rs 2,500 Amazon Pay Balance. Daily the e-commerce platform Amazon brings a new set of questionnaires that includes five easy questions. The Amazon Quiz can be played from 12 AM to 11:59. The users have to answer all the questions correctly to enter into a lucky draw. The result of today’s quiz will be announced at the end of the month and only one person is declared a winner. We at Gadget Bridge update all the answers to the Amazon Quiz on our website for the convenience of our readers. Here are the answers of the 13 February 2023 Amazon Quiz that will make you win Rs 2,500 Amazon Pay Balance. Amazon Quiz Today Prize – Rs 2,500 Amazon Pay Balance Quiz Date – 13 February 2023 Daily Timing – 12 AM to 11:59 PM Winner Announcement – Today 12 PM

Amazon Quiz Answers Today 13 February 2023

Question 1: In 2023, who reached the semi-finals of the Australian Open men’s singles for the 10th time? Answer: Novak Djokovic Question 2: Salman Khan has a cameo in the movie ‘Pathaan’. What is the name of his character? Answer: Tiger Question 3: Which of these was a nickname by which children referred to Pandit Jawaharlal Nehru? Answer: Chacha Question 4: This famous gentleman received a Nobel Prize in which field? Answer: Peace Question 5: A part of which famous monument is shown here? Answer: Victoria Memorial, Kolkata

How To Play Amazon Quiz

Only app users are eligible to play the Amazon quiz every morning from 12 AM to 11:59 PM. The quiz is not available on the desktop. For those who are unaware of how to play the Amazon quiz below are the steps, you can follow to take the quiz.
  • Firstly download the Amazon app from Google Play Store or App Store
  • Now fill in the required information through the Sign Up option.
  • You need to log in to the Amazon app and scroll down on the home screen to find the Amazon Quiz banner.
  • Tap on the Amazon Quiz banner and tap on the Start button to start the Quiz.
  • Now you will get 5 questions and you need to answer them correctly. One wrong answer will eliminate you from the Quiz.
  • After answering all the questions correctly you are now eligible for a Lucky Draw.
  • The winner’s name will be announced today at 12 PM.
For the latest gadget and tech news, and gadget reviews, follow us on TwitterFacebook and Instagram. For newest tech & gadget videos subscribe to our YouTube Channel. You can also stay up to date using the Gadget Bridge Android App. You can find the latest car and bike news here.

The best gaming gadgets to use in 2023

As human beings, it is a widely accepted truth that we are always on the lookout for the next best thing. This trend has coincided with the tendency to become more competitive with ourselves and others as well as trying to improve ourselves day by day. One particular industry affected by this societal attitude shift is the gaming industry, one of the most popular and lucrative sectors on a global scale. In the past, gaming has been solely tied to being a source of entertainment and a way to unwind and have fun. However, now gamers are taking their gaming to the next level by purchasing and incorporating a variety of gaming gadgets into their experience. With developments being made every day in the field of technology, it will be interesting to see what 2023 has in store for those who are a fan of gaming gadgets. Firstly, gadgets are incredibly popular and important to everyday life in 2023. In 2017 the gaming industry changed forever when the Nintendo Switch was released. As this console has become more and more popular there has been an increasing demand for storage. This is because storage capacities is limited for Nintendo Switch users and having more storage is necessary for storing their progress and allowing them to play more games. In 2023, the solution for this problem has come in the form of the SanDisk microSD for Nintendo Switch. These SD cards which come in various sizes between 64GB and 512GB, each with a unique Nintendo symbol allows you to store a load of additional games and saved content meaning that you do not have to delete your old games to facilitate more. 
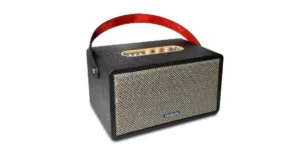
Moreover, no gaming set-up is complete without a proper sound system which is why gamers in 2023 should consider purchasing the LG Module Spinner 1.3. This speaker provides 3D audio for an immersive gaming experience allowing players to properly hear other players in the game. This can massively improve your success in the game as you will be able to communicate better with others in the game as well as make it more exciting and thrilling. This device is great for surround sound and it has Bluetooth features which means it can be connected to your mobile device also. In this light, this gadget can even be integrated with casino gaming. For example, when players are visiting a casino site such as Megaways Casino it can be a great addition to your setup and is available at a myriad of outlets. This means that those who visit online casinos are able to replicate the authentic experience that they would have had if they had visited a traditional brick-and-mortar casino. Read Also: Nintendo Switch Lite gaming console unveiled: All that you should know Furthermore, another one of the best gaming gadgets to use in 2023 is Steam Deck which is an impressive gaming gadget which lets you improve your mobile gaming experience with various consoles, with access to a variety of gaming titles. This gadget is perfect for those who have been gaming for a long period of time and are yearning to start a professional career in it. Perfect also for those who travel a lot or who are always on the go, Steam Deck is innovative and flexible and has great build quality. Its allure is the fact that it lets players access titles and play them seamlessly between the PC and the deck. And it is not exclusively for those advanced gamers as those who have just entered into gaming realms will also find it incredibly useful. In addition, it is worth mentioning that as technology has advanced more and more there has been a huge step taken towards integrating virtual reality into the sphere of gaming. In this context, many VR devices have been released onto the market and are gaining more attention. For example, in 2023 many gamers will be able to witness first-hand the benefits of the Vive XR Elite. Available for pre-order, gamers will soon be able to experience high-resolution passthrough with PC VR capability in a unique experience. Not only is it comfortable to wear and lightweight, but this gadget is able to quickly transform its wearers into a virtual world simply by putting on a pair of glasses. Of course, one of the most significant breakthroughs in the past few years has been the concept of wireless charging which has truly taken the pain out of charging up your devices as you no longer have to keep your devices connected to a lead. In gaming, many devices have been released to help gamers have a hassle-free charging experience. For example, the RGB Gaming Mouse Pad with Wireless Charging is something that every avid gamer needs in 2023 as the mouse pad has plenty of space for your keyboard, phone and mouse. With various lighting modes and a rubber non-slip base, this device is both useful and visually appealing meaning that it would truly complete your gaming setup. There is no need to rush to find a charger for your phone whilst you game on a console either as the 15W charging pad allows you to charge your phone whilst you play. In summary, from to SanDisk microSD for Nintendo Switch to the Vive XR Elite, there are a huge array of gaming gadgets to purchase in 2023. As it is now easier than ever to create an immersive gaming experience, why not improve your gaming set-up and increase your chances of becoming a professional gamer by considering integrating a gaming gadget into your life? For the latest gadget and tech news, and gadget reviews, follow us on TwitterFacebook and Instagram. For newest tech & gadget videos subscribe to our YouTube Channel. You can also stay up to date using the Gadget Bridge Android App. You can find the latest car and bike news here.

8 Easy Ways to Fix ‘Quick Look Not Working’ on Mac (2024)

0
‘Quick Look’ is a handy native feature in Mac devices that lets you preview a file or document without opening it. This includes PDFs, videos, images, and even spreadsheets. Need a glimpse at the contents of a file before you open it on your Mac? Simply select the file and hit the spacebar to take a ‘Quick Look’ into it. Oftentimes, users report some functional issues with this feature. So, here are 8 easy ways to fix the ‘Quick Look not working’ issue on your Mac. Read Also: Sennheiser IE 200 Review: Excellent entry-level IEMs for audiophiles

Restart your Mac

Restart the Mac. how to fix quick look not working on mac Restarting your Mac should be the first step you undertake to fix any minor issues on the system. A quick restart resolves any background issues and fixes any minor glitches on the system. To restart your Mac, simply click on the Apple logo at the top left corner of the screen and select ‘Restart’.

Clear Quick Look Cache

Oftentimes, a temporary file in the cache may get corrupted and impede certain functions on your Mac. It is a good idea to clear cache memory from time to time. Here’s how you can clear the Quick Look cache. Step 1: Launch the Terminal app on Mac. Step 2: Enter the following command and hit Enter.

qlmanage -r cache

This will clear all the temporary files in Quick Look’s cached memory. The previews should load just fine after using this fix. If not, move on to the other methods in this list.

Stop Quick Look’s process and restart it

Like the Task Manager on Windows, Activity Monitor on Mac lets you end the process of any background function. If you’re unable to use Quick Look, a quick restart may fix the issue. Here’s how you can end Quick Look’s process from the Activity Monitor. Step 1: Launch Activity Monitor on Mac. Step 2: Look for Quick Look in the Process Name section or simply search for it from the search bar on the top right corner of the screen. Look for Quick Look in the ‘Process Name’ section Step 3: Select QuickLookUIService and click on the close icon to end the process. Once you’ve ended the process, go back to Finder and use Quick Look to preview the contents of the file.

Force Quit Finder

It is possible that the issue may lie with the Finder app and not the Quick Look function. You can fix this by force quitting the Finder app and then relaunching it. Here’s how. Step 1: Click on the Apple logo at the top left corner of the screen. Step 2: Select Force Quit. Step 3: Click on Finder, select Force Quit, and then click on Relaunch. Step 3: Click on ‘Finder’, select ‘Force Quit’, and then click on ‘Relaunch’. The Finder app will be shut down. Click on it again to check if Quick Look has started working.

Relaunch the Finder app

Another way to quit and relaunch the Finder app is by using the dock at the bottom of the screen. Step 1: Right-click the Finder icon in the dock while pressing the Options key. Step 2: Hit Relaunch.

Check the app’s settings

If the Quick Look function is not working for one particular app on your phone, check its settings. It is possible that the app has assigned another action to the spacebar. Launch the app, go to settings, and check the key next to Open Viewer. Make sure this action is assigned to the spacebar.

Restart the Mac in Safe Mode

Restarting the system in Safe Mode is a quick way to figure out if the issue is software-related or not. Rebooting your Mac in Safe Mode prevents third-party software from running on the system and also checks the hard drive for any faults. The procedure to boot a Mac in Safe Mode depends on whether it is an Intel-based Mac or an M1 Mac. To boot an Intel-based Mac in Safe Mode, shut it down, then turn it on and immediately press and hold the Shift key until the login window shows up on the screen. M1 Mac users can press and hold the power button once the Mac has been shut down, select ‘Start volume’, and then press and hold the Shift key until the option to continue in Safe Mode appears on the screen.

Update macOS

It is not uncommon for software-related bugs to pop up from time to time. Usually, these bugs are fixed with a quick update. Make sure your macOS is updated to the latest version. If you are using an older version, here is how you can update it. Step 1: Click on the Apple logo at the top right corner of the screen and select About this Mac. Step 2: Click on Software Update. Your Mac will check for any pending updates. Step 3: Click on Upgrade Now if there is a pending update. Step 3: Click on ‘Upgrade Now’ if there is a pending update. Read Also: Xiaomi TV Stick 4K is scheduled to launch in India on February 14

Frequently Asked Questions (FAQs)

Why is Quick Look not working on my Mac?

The Quick Look function may stop working on your Mac due to a corrupted cache or background malfunctions with the Finder app. If it isn’t working for a specific app, it is possible that the app has assigned another action to the spacebar.

How do I relaunch the Finder app?

Hold the Options key, right-click the Finder app in the dock, and select Relaunch.

How do I clear Quick Look’s cache?

Launch Terminal and enter this command to clear Quick Look’s cache: qlmanage -r cache.

Conclusion

These are the top 8 ways to fix the ‘Quick Look not working’ issue on Mac. If the issue still persists after trying out all the fixes in this article, take your Mac to an Apple-authorised repair centre for further diagnosis.

Top 6 Firestick Remote Apps for Android

We have seen and used a lot of third-party apps for Amazon Firestick. The biggest issue we faced when using the physical Fire TV remote is the excruciating trouble to enter text through the onscreen keyboard. While most OTT apps like Netflix let you log in to your Smart TV using your smartphone, you still have to rely on the physical remote to search movie titles. Luckily, there are a bunch of Android apps that can take care of this situation and offer more handy features. Today, we bring you the top 6 Firestick remote apps for your Android smartphone which you can use daily and ease your Firestick problems. Read Also: Sennheiser IE 200 Review: Excellent entry-level IEMs for audiophiles

Amazon Fire TV Remote app

Amazon Fire TV Remote app The official Amazon Fire TV remote app covers all the basic remote control functions for your Firestick. Firstly, the app allows input through your smartphone’s QWERTY keyboard, which puts an end to your struggles with the annoying TV keyboard. The official app also lets you voice search through Alexa, although this option may not be available in all regions. To make things simpler, you can access all your TV apps with just one tap on the official Fire TV remote app. Connecting the remote app to your TV doesn’t take much time either. All you need to do is ensure that your smartphone and TV are connected to the same WiFi network, and then pair the two from the Fire TV remote app.

Universal Remote Control

Universal Remote Control As the name suggests, Universal Remote Control works with just about any device in your home that can be operated by a remote control device. Got an old TV with a traditional IR remote control? Use your phone’s IR blaster and let the Universal Remote Control take the rein. You won’t need the IR blaster for Smart TVs if both devices are connected to the WiFi network. Using this app, you can control almost every function of the Firestick including Power on/off, Volume control, media navigation, channel browsing, keyboard input, and much more.

VIZIO Mobile

VIZIO Mobile The VIZIO Mobile app effortlessly handles basic remote tasks like keyboard input, power on/off, volume control, navigation, and more. On top of that, this app also lets you browse the apps on your TV using your smartphone, converging all your entertainment needs in one place. Navigating different apps on your Smart TV can get tricky at times, especially if the TV doesn’t respond quickly. VIZIO lets you browse everything in one place and lets you put it up on your TV whenever you want.

CetusPlay

CetusPlay. top 6 firestick remote apps for android Other than the official Fire TV remote app, CetusPlay is the most preferred remote control app among Firestick users. Not only does CetusPlay connect to the Firestick, but it also works with other services and devices like Android TV, TV box, Chromecast, KODI, and more. In order to use CetusPlay with the Firestick, you will first need to turn on ADB debugging on your TV from the developer options. Quickly restart your TV and then connect it to your smartphone from the CetusPlay app. What makes CetusPlay unique is its gamepad controller and the ability to sideload apps on your TV.

Harmony Remote

Harmony Remote. top 6 firestick remote apps for android Logitech’s Harmony Remote app lets you control all your home appliances and devices from your smartphone. This includes TVs, stereos, game consoles, and even smart devices like automated lights, locks, and blinds. In order to set up Harmony Remote will all your devices, you need to install a Home Hub. One of the unique features of this app is that it lets you connect your smartphone to the TV using a Bluetooth connection, in case your home WiFi is dysfunctional.

AnyMote Universal Remote

AnyMote Universal Remote. top 6 firestick remote apps for android Like Harmony Remote, AnyMote also requires a smart hub to connect to the Firestick. However, if you are already using Amazon Echo as a hub, AnyMote will work just fine. Apart from the usual navigation and input functions, AnyMote offers several customisation options and makes it incredibly easy to control your Smart TV with your smartphone. If you link it to Amazon Echo, you will also be able to use Alexa with the remote. Read Also: Nokia X30 5G launching in India soon, upcoming launch teased

Conclusion

These are the top 6 Firestick remote apps for Android smartphones. While all of the apps are free to use, Harmony Remote requires you to install a Harmony Hub for your smart devices before you can use the app. There are several other subscription-based apps on Google Play Store that you can use to control your Fire TV or Firestick as well, but the added features usually aren’t worth the price. So you can pick any of the apps from above and enjoy them at no additional cost. For the latest gadget and tech news, and gadget reviews, follow us on Twitter, Facebook and Instagram. For newest tech & gadget videos subscribe to our YouTube Channel. You can also stay up to date using the Gadget Bridge Android App. You can find the latest car and bike news here.

How to record video meetings on Microsoft Teams in HD

0
Microsoft Teams, along with Zoom and Google Meet, is one of the most popular clients used to hold online meetings in workspaces. Microsoft Teams comes with its own unique features, like creating different chat channels for different groups in a work setting. Microsoft Teams also allows its users to record video meetings. However, only the meeting organiser or people from the same organisation can record the meeting. If you’re a meeting guest, you will need permission from the IT team to record a meeting. In this article, we show you how to record video meetings on Microsoft Teams in HD. Read Also: Sennheiser IE 200 Review: Excellent entry-level IEMs for audiophiles

Here’s how you can record a meeting on Microsoft Teams from your desktop

Step 1: Launch the Microsoft Teams application on your desktop and join a meeting. Step 2: Tap the ellipses (three dots) on the meeting controls and select ‘Start Recording’. How to record video meetings on Microsoft Teams in HD Once the recording starts, all participants will get a notification that the recording and transcription have started. No more than one participant can record the meeting at one time. Once the recording is over, the video file will be uploaded on One Drive or SharePoint (if it was a channel meeting) for all participants to see. To find the recording, simply login to One Drive or SharePoint and access the Teams recording folder. You will also be able to see the recording in the meeting or channel chat. Guest attendees can only view the recording when an external link to the file is shared with them. Meeting participants can view the live transcription during the meeting. If you do not want to record the transcription, follow these steps. Step 3: To stop recording the transcription, simply click on the ellipses from the meeting controls and select ‘Stop transcription’. Step 4: To stop recording the meeting altogether, click on the ellipses and then select ‘Stop recording’. To delete a recording, simply access the file on One Drive, select it and hit delete on the top toolbar. Typically, meetings recorded on Microsoft Teams come with an expiration date. The recorded file gets auto-deleted upon expiry. If you have admin privileges you can manage the expiration date of any recording. Follow these steps to change the date of expiration of the meeting recording. Step 1: Access the My Files folder on One Drive and view it as a list.  Step 2: Click on the ellipses (three dots) on the recording file. Step 3: Select ‘Show actions’ and then click on ‘Details’. Step 4: Click on the drop-down menu for Expiration Date and select a time period. If you want to store the recording permanently, choose ‘No expiration’. Read Also: Nokia X30 5G launching in India soon, upcoming launch teased

Conclusion 

This is how you can record video meetings on Microsoft Teams in HD. The meetings on Microsoft Teams get recorded in 720p resolution by default. If you do not have permission to record a meeting, you can use a third-party screen recorder to record it. To know, read our article on how to screen record on a Windows device here. For the latest gadget and tech news, and gadget reviews, follow us on Twitter, Facebook and Instagram. For newest tech & gadget videos subscribe to our YouTube Channel. You can also stay up to date using the Gadget Bridge Android App. You can find the latest car and bike news here.

When will iPhone 15 be launched? What to expect?

Last September Apple came out with the new iPhone 14, which boasted some new features like the Dynamic Island, Car Crash Detection and Emergency SOS via Satellite. What left most buyers bemused was that these features were reserved for the Pro and the Pro Max variants. The base variant of the iPhone had very few upgrades to offer. It even retained the A15 bionic processor as well as the 12MP camera setup from its predecessor. As we are a couple of months into a new launch year for Apple, the Internet has already been rife with rumours regarding the upcoming iPhone 15. Will the base variant finally get rid of the notch and come with the ‘Pro’ features of its predecessors? Is there an ‘Ultra’ variant in the works? When will the iPhone 15 finally be launched? Let’s take a look at what the rumours suggest so far. Read Also: Nokia X30 5G launching in India soon, upcoming launch teased

iPhone 15: What to expect?

At this point in time, it is all but confirmed that the new Apple iPhone 15 will feature a USB Type C charging port instead of its signature Lightning port. A recent legislation passed by the European Union mandated all smartphones in the EU to use USB Type C charging. Some believed that Apple may implement this change on the iPhone 14, but it seems like we will have to wait a year. While the EU variants of iPhone 15 may come with Type C charging, it is unclear whether Apple will adopt the change in North America and the rest of the world as well. iPhone-14-Pro-dynamic-island The base variant of the iPhone 15 will most likely come with a pill-shaped cutout for the front camera as well. The Dynamic Island was one of the most talked about features of the iPhone last year, and Apple would be looking to extend it to the non-Pro variants as well. Failure to do that may stagnate the design of the regular iPhone which in turn may affect sales. Other design changes may include curved titanium edges for the Pro and Pro Max variants instead of the flatter ones on iPhone 14. A lot of rumours around the iPhone 15 also suggest that an ‘Ultra’ variant is in the works. So far it is unknown whether it will replace the Pro Max variant or will simply be added to the lineup as an extra option. The iPhone 15 Ultra could also see some new features like an Astrophotography Mode for the camera, something that has been gaining the headlines with the new Samsung S23 Ultra.
Apple might launch its foldable iPhone
Image Courtesy: Appleinsider
Some rumours also suggest that Apple is really close to coming out with its own foldable iPhone. We know that Apple likes to play it safe and only incorporates new technology when it has been totally perfected. But when it comes to a foldable, the company may be slightly ahead in the development process. While we aren’t really expecting a foldable iPhone in 2023, you may never know how Apple surprises us.  Read Also: Best ways to use LiDAR Scanner on iPhone

Conclusion

The most predictable thing about the iPhone 15 is the launch time period. Apple always unveils the new iPhone at its fall event, so like clockwork the iPhone 15 will come out by the second or third week of September 2023. As the months pass by there will certainly be more leaks and rumours about the iPhone 15. We will keep an out for the best ones and keep you posted. Keep checking this space for more. For the latest gadget and tech news, and gadget reviews, follow us on Twitter, Facebook and Instagram. For newest tech & gadget videos subscribe to our YouTube Channel. You can also stay up to date using the Gadget Bridge Android App. You can find the latest car and bike news here.

How to use Google Drive on an iPhone?

0
While Apple’s iCloud is a seamless backup service that is well integrated into your iPhone, the 5GB limit is pretty easy to fill up, especially if you make a backup of all your images and videos. So, what happens when you hit the storage limit? Instead of compromising on what you should back up, it is much better to look into other cloud storage systems. Google Drive is the first name that comes up in this discussion. It also offers 15GB of free storage space. In this article, we show you how to use Google Drive on your iPhone. Read Also: How to record video meetings on Zoom in HD?

Here’s how you can use Google Drive on your iPhone

Step 1: Download and install the Google Drive app on your iPhone from the App Store. Step 2: Launch the app and log in using your Google Account. Once you’ve installed the app on your iPhone and logged in using your Google Account, the first thing you should do is create a backup of the pictures and videos on your device. If you have already backed up the media on your phone somewhere else, you can skip these steps. Step 3: Tap on the hamburger menu at the top left corner of the screen. Step 3: Tap on the hamburger menu at the top left corner of the screen. Step 4: Select Settings and go to Backup. Step 4: Select Settings and go to Backup. Step 5: Go to Photos & Videos and turn the toggle switch on for ‘Back up to Google Photos’. Step 5: Go to Photos & Videos and turn the toggle switch on for ‘Back up to Google Photos’. Step 6: Choose the upload quality size. Uploading images in their original resolution will take up more drive space. Step 7: You can also back up your Calendar entries and contacts on Google Drive. In order to secure your backups and limit any unauthorised access, turn on Face ID protection for Google Drive. This feature is exclusive to iPhones. Here’s how you can enable it. Step 8: Go to Google Drive settings. Step 9: Select ‘Privacy Screen’ and turn on the toggle bar. Backup aside, the most important function that Google Drive has to offer is the ability to upload and share large documents and files. If you do not want to create a backup of all the images on your iPhone, you can selectively upload them on Google Drive. Here’s how. Step 10: Launch the Google Drive app and tap on the Files tab on the bottom toolbar. Step 10: Launch the Google Drive app and tap on the Files tab on the bottom toolbar. how to use google drive on iphone Step 11: Tap the plus icon to create a new folder.  Step 11: Tap the plus icon to create a new folder. how to use google drive on iphone Step 12: Select the folder and tap the plus icon again.  Step 12: Select the folder and tap the plus icon again.  how to use google drive on iphone Step 13: Upload the files you want to share or backup. Step 14: To share the folder with someone simply tap the ellipses (three dots) and select Share. You can also copy the link to the folder and share it with anyone you want. Read Also: Best places to buy a refurbished iPhone

Conclusion 

This is how you can use Google Drive on your iPhone. While iCloud may be your primary backup service, it is very easy to fill up the 5GB limit. Google Drive offers a great supplementary backup limit and is very accessible to use on iPhones. FaceID protection for your backed-up data is the icing on the cake. For the latest gadget and tech news, and gadget reviews, follow us on Twitter, Facebook and Instagram. For newest tech & gadget videos subscribe to our YouTube Channel. You can also stay up to date using the Gadget Bridge Android App. You can find the latest car and bike news here.

How to easily capture a screenshot on iPhone 13 & 14 Series: 3 Quick Ways

0
Even since Apple introduced FaceID on iPhone, the mechanism to take a screenshot has changed a little. This is because iPhones no longer come with a home button at the bottom of the screen. But did you know there are multiple ways you can take a screenshot? In this article, we show you 3 quick ways to easily capture a screenshot on iPhone 13 and 14 series. Read Also: Best ways to use LiDAR Scanner on iPhone

Use the hard buttons

Use the hard buttons This is the most common way to take screenshots on iPhones with Face ID. In order to take a quick screenshot, simply press the Volume up button and the Side Key and quickly release it. Once the screenshot has been taken, its thumbnail will appear on the lower left corner of the screen. Tap on the thumbnail to view it or swipe left to dismiss it.

Use Back Tap

Did you know that you can take a quick screenshot on your iPhone 13 and 14 by simply double tapping its back panel? Here’s how you can do that.  Step 1: Go to Settings and select Accessibility. how to turn on flashlight on iphone without unlocking Step 2: Select Touch and tap on ‘Back tap’. Step 3: After you’ve turned on the toggle bar for Back Tap, choose the appropriate trigger. We suggest a double-tap trigger as it is much easier to use. Step 4: Choose ‘Screenshot’ as the action for the trigger you have selected. Step 4: Choose ‘Screenshot’ as the action for the trigger you have selected.

Use Siri

Looking for a hands-free way of taking a screenshot on your iPhone? Get Siri to do it! Simply say “Hey Siri, take a screenshot” and the voice assistant will take a quick image of the current screen on your iPhone. It’s that easy!

Assistive Touch

The Assistive Touch feature on your iPhone gives you quick access to certain functions. This includes taking a screenshot. Here’s how you can do that. Step 1: Go to Settings and select Accessibility. how to turn on flashlight on iphone without unlocking. how to take a screenshot on iphone 13 Step 2: Under the ‘Physical and Motor’ section, select Touch. Step 3: Select ‘Assistive Touch’ and turn on the toggle bar next to it. Step 3: Select ‘Assistive Touch’ and turn on the toggle bar next to it. how to take a screenshot on iphone 13 Step 4: Now, tap on ‘Customise Top Level Menu’ and replace one of the functions with Screenshot.  Step 4: Now, tap on ‘Customise Top Level Menu’ and replace one of the functions with Screenshot.  how to take a screenshot on iphone 13 Step 5: Tap on the Assistive Touch icon and select ‘Screenshot’ to take a quick screenshot of the screen. Step 5: Tap on the Assistive Touch icon and select ‘Screenshot’ to take a quick screenshot of the screen. how to take a screenshot on iphone 13 To reduce the extra step of selecting ‘Screenshot’ from the Assistive Touch menu, you can simply program it in a manner that your iPhone takes a quick screenshot whenever double tap or long-press the Assistive Touch icon. Here’s how you can do that. Step 6: Go back to Assistive Touch in Settings and under the ‘Custom Actions’ sections choose Double Tap or Long Press. Select ‘Screenshot’ as your desired action. Read Also: Sony Walkman NW-A306 launched in India

Conclusion 

These are three quick ways to take a screenshot on iPhone 13 and 14. When you take a screenshot the entire screen gets captured in the image. If you want to share the image, you probably want to crop out the irrelevant parts of the screen first. Here is our comprehensive guide to quickly editing a screenshot using Instant Markup. For the latest gadget and tech news, and gadget reviews, follow us on Twitter, Facebook and Instagram. For newest tech & gadget videos subscribe to our YouTube Channel. You can also stay up to date using the Gadget Bridge Android App. You can find the latest car and bike news here.

Aiwa MIX- 440 Enigma Beta, RS-X 100 and RS-X 150 Natsukasii Pro launched in India

A Japan-based audio brand AIWA has expanded its Luxury Acoustics Range of Speakers with the launch of three new portable speakers in India. The company has introduced Aiwa MIX- 440 Enigma Beta, RS-X 100 and RS-X 150 Natsukasii Pro. All the devices come with retro aesthetics. The Aiwa Mix Enigma Beta Portable Bluetooth speaker is the most premium of the three. All three devices are portable and have powerful rechargeable batteries, so they can be used both inside and outside. The speakers add to a collection that includes a variety of form factors, including retro, wooden, sumptuous leather, and elegant metallic.

AIWA MIX-440 Enigma Beta Portable Bluetooth Speaker

The AIWA MIX-440 Enigma Beta is the most expensive in the range which is priced at Rs 54,990. Having a BASS++ sound profile, it is a wireless stereo speaker. Over Bluetooth 5.0, it provides audio in 24-bit music quality. Enigma Beta has two passive bass radiators (front + back) to ensure a balanced sound field. Additionally, this device has a Type-C charging port that offers 4 hours of charging time and 9 hours of playback time. It is powered by a 15000 mAH Li-ion battery that produces 80W of tremendous sound. For those who enjoy Karaoke, the speaker also includes a wireless microphone. Additionally, there includes a 3.5mm AUX-IN and a digital control panel. A basic feature of the MIX-440 Enigma Beta is TSW Multi-Link technology, which enables customers to link various products together. Also Read: Nokia X30 5G launching in India soon, upcoming launch teased  
Aiwa MIX- 440 Enigma Beta, RS-X 100 and RS-X 150 Natsukasii Pro launched in India
RS-X 150 Natsukasii Pro

AIWA RS-X 150 Natsukasii Pro Portable Retro Bluetooth Speaker

On the other hand, the AIWA RS-X 150 Natsukasii Pro Portable Retro Bluetooth Speaker comes with a price tag of Rs 33,990. The company’s portable speaker has a vintage appearance. It includes three drivers for a powerful sound field. Additionally, this speaker has a Type-C charging port that allows for 2 hours of charging time and 12 hours of playback time. It is powered by a 6000 mAH Li-ion battery that produces a reliable 60W of high-quality sound.
Aiwa MIX- 440 Enigma Beta, RS-X 100 and RS-X 150 Natsukasii Pro launched in India
RS-X 100 Natsukasii Pro

AIWA RS-X 100 Natsukasii Pro Portable Retro Bluetooth Speaker

Lastly, the AIWA RS-X 100 Natsukasii Pro Portable Retro Bluetooth Speaker has been launched in India at Rs 27,990. Also Read: Xiaomi TV Stick 4K is scheduled to launch in India on February 14 Similar to its older sibling, the RS-X 100 Natsukasii Pro has a 4000 mAH Li-ion battery that produces a strong 40W of rich sound, triple Drivers for deep sound distribution, a Type-C charging connector for rapid charging, and 9 hours of playback time. For the latest gadget and tech news, and gadget reviews, follow us on TwitterFacebook and Instagram. For newest tech & gadget videos subscribe to our YouTube Channel. You can also stay up to date using the Gadget Bridge Android App. You can find the latest car and bike news here.

Sennheiser IE 200 Review: Excellent entry-level IEMs for audiophiles

Sennheiser unveiled its latest In-Ear Monitor, the IE 200, at CES last month. The wired earphones were introduced in India earlier this month at a price of Rs 14,990. Sennheiser has enjoyed tremendous success with its IE range of in-ear monitors, with IE 600 and IE 900 being some of the more popular headphones among audiophiles. With IE 200, Sennheiser seeks to bring its signature ‘IE’ sound at a significantly lower price, appealing to the newer audio enthusiasts looking for an entry-level product. We got our hands on the Sennheiser IE 200 as soon as it launched and have been testing it for over a week, here is our comprehensive review. Read Also: Portronics Hydra 10 RGB keyboard launched in India

Sennheiser IE 200 review: Design

Unboxing the Sennheiser IE 200, you will find the IE 200 earphones neatly placed in a foam piece with the braided cable with MMCX connectors attached to them. The extra silicone and memory foam sets are placed in the adjacent section along with a handy pouch and the safety guide. Unlike IE 300, the IE 200 does not come with a hard carry case. Sennheiser IE 200 review: Design In terms of design and form factor, the IE 200 do not stray too far from the rest of the series. Sennheiser has toned down the look and made it more minimal, but retained the signature IE design profile. The earphones are made out of plastic, unlike the aluminium build of the IE 600 and 900. The braided cable feels quite sturdy and did not create any friction noise during our time of testing. If you have a better cable lying around, you can easily attach it to the earphones using the MMCX connectors. The left earbud has the IE 200 branding on the inner panel while the right earbud has a red ring around it as a distinguishing feature. On the outer panel, the Sennheiser logo is embossed right below the air vent. The braided cable also gets an angled 3.5mm plug. Sennheiser IE 200 review: Design The IE 200 comes with three pairs of silicone and memory foam tips. We’d suggest trying either one to see which offers the better fit. Pushing the ear tips all the way down on the earbuds will deliver a bass-driven audio output. To reduce the low-end representation in the sound profile, pull them slightly outwards. However, in our testing, the ear tips got pushed all the way down after a period of staying in the ears. Sennheiser IE 200 review: Design The plastic ear hooks go over the top of your ear once you put on the earphones. The fit is firm and snug and offers a decent level of passive noise cancellation. Each earbud weighs just 4 grams, so you can easily wear these earphones for hours without feeling any real strain. Overall, we were very pleased with the design choices and the comfortable fit offered by the IE 200.

Sennheiser IE 200 review: Performance

The Sennheiser IE 200 are powered by dynamic 7mm audio drivers. The earphones have a frequency response of 6-20,000Hz and the impedance is just 18 ohms. You don’t necessarily need any additional hardware or headphone amplifier, simply plug the IE 200 into your smartphone or laptop and you are good to go. Sennheiser IE 200 review: Performance The soundstage offered by the Sennheiser IE 200 upholds the reputation of the IE series. While it may not be as fleshed out as the IE 600 and IE 900, it has a personality of its own and does not stray away from the signature sound profile that we have come to associate with Sennheiser. The range of frequencies is presented in a very subtle and intricate manner. The low end is given enough room to do its own thing without overpowering the mids and the highs. The overall output is perfectly balanced, letting you enjoy a nice blend of frequencies as the mix commands. Even the sound of the clapper in the background is well-pronounced and brings a good amount of attention to itself. There is no shrillness to the high-end frequencies and they are delivered in a very nuanced manner. The versatility offered by the IE 200 is quite impressive as well. The soundstage across different genres did justice to the original mix and did not stray too far from the track. There is a level of neutrality that you expect from a good pair of IEMs. Overall, the IE 200 is exactly what you expect Sennheiser to deliver in this price range. Read Also: Canon EOS R8 and EOS R50 full-frame mirrorless cameras launched in India

Verdict

At Rs 14,990, the Sennheiser IE 200 are the ideal pair of IEMs for people who are looking for an affordable entry point into the world of in-ear monitors. If you’re a seasoned audiophile, maybe there are better (also pricier) headphones out there for you. However, if you’re looking for a headset that is in the mould of IE 600 and IE 900 without the hefty price tag, the IE 200 is what you should be going for.

Pros

Excellent soundstage Comfortable fit Light weight

Cons

The dual-tuning ear tips do not always work as intended Comes with a soft pouch instead of a hard carry case like the IE 300 For the latest gadget and tech news, and gadget reviews, follow us on Twitter, Facebook and Instagram. For newest tech & gadget videos subscribe to our YouTube Channel. You can also stay up to date using the Gadget Bridge Android App. You can find the latest car and bike news here.