
Here’s how to pre-order Phone (2) on Flipkart.
- Pay a refundable INR 2,000 deposit to secure the order.
- Come back between 11 July 9 PM IST – 20 July 11:59 PM IST
- Choose your variant
- Pay the remaining balance and claim your exclusive pre-order offers.


 The Asus ProArt Mouse MD300 has an ergonomic design without being too bulky or flashy. The thumb rest on the left side of the device is of the appropriate width. The size of the mouse caters to all hand sizes. Apart from the standard vertically aligned scroll wheel at the centre of the mouse, you also get a horizontal scroll wheel along the side. Also present is the unique Asus Dial right alongside the horizontal scroll wheel. The Asus Dial offers more resistance than the other two wheels to reduce any accidental touches.
 There are a total of six programmable buttons on this mouse. The horizontal and vertical scroll wheels have integrated clicks, and there’s an additional button in the Asus Dial as well. The right-click and left-click have satisfying feedback. There’s another button right below the main scroll wheel, too. Interestingly, there are no dedicated back and forward buttons on this mouse, which a mouse of this stature should have had.
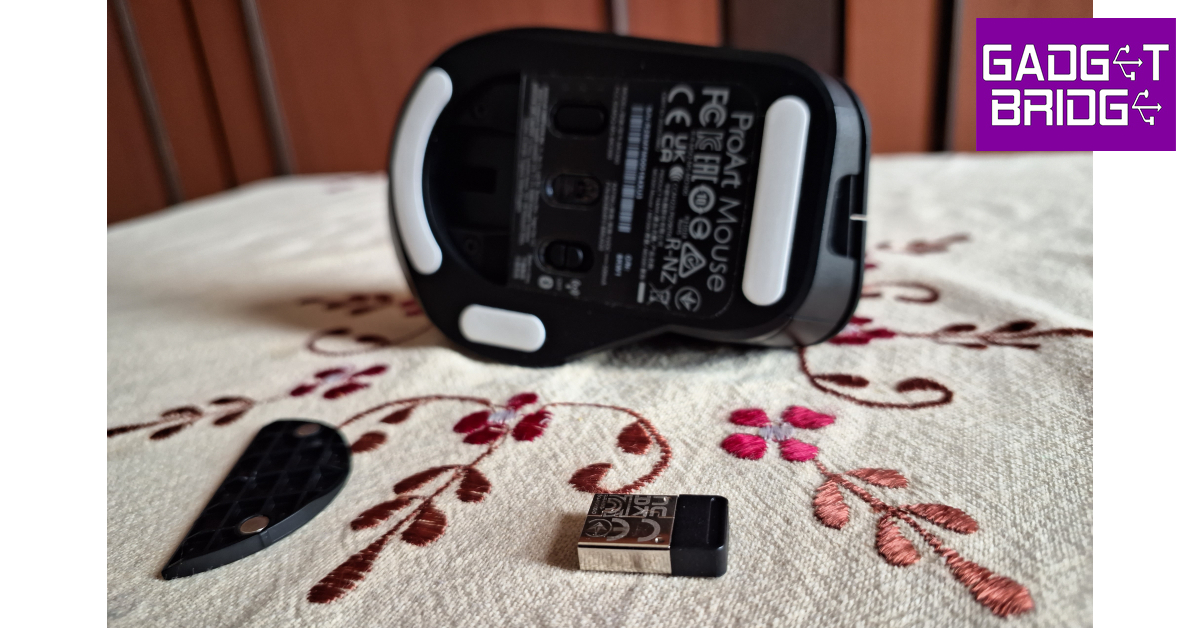 There are three big feet on the bottom panel that keep the mouse in place. The pairing button and power button are placed on either side of the optical sensor. The USB receiver is housed inside a small cavity on the lower side of the panel that does not hinder its movement.
 The 4,200 DPI sensor on this mouse is bang on the money. You can easily use this mouse on any surface. We even tried using it on a glass table, where the mouse performed admirably well. While tracking was not an issue, the scrolling experience could have been better. For starters, there is no option to put the mail scrolling wheel in a free scroll mode. If you want to quickly scroll to the bottom of a spreadsheet or a long web page, you will have to put up with the resistance of the wheel.
 The side scroll wheel is not programmed to work on Excel and Google Docs by default. Horizontal scrolling is something you have to enable using Asus’ customisation software. Ideally, a mouse should be optimised in a way that doesn’t require you to install additional software to map the basic actions.
The Asus Dial is programmed to control the volume by default. You can program it to carry out actions like zooming in/out, altering the exposure, managing brightness and more, using Asus’ Armoury Crate software. This dial is a great tool for users that spend a lot of time editing photos and videos. While it is prone to accidental touches, its high resistance makes sure that it only pursues an action when the proper pressure is applied.
The side scroll wheel is not programmed to work on Excel and Google Docs by default. Horizontal scrolling is something you have to enable using Asus’ customisation software. Ideally, a mouse should be optimised in a way that doesn’t require you to install additional software to map the basic actions.
The Asus Dial is programmed to control the volume by default. You can program it to carry out actions like zooming in/out, altering the exposure, managing brightness and more, using Asus’ Armoury Crate software. This dial is a great tool for users that spend a lot of time editing photos and videos. While it is prone to accidental touches, its high resistance makes sure that it only pursues an action when the proper pressure is applied.
 You can also map other keys using Armoury Crate. Even if you’re not a power user, assigning multimedia controls to the scroll wheels and the Asus Dial will come in very clutch. Once you get a hang of the mouse, you can set it up to carry out routine tasks seamlessly. You can also download firmware updates for the mouse from Armoury Crate.
Equipped with an 800mAh battery, Asus claims the MD300 can last for 150 days on a single charge. We did not use the mouse long enough to test this claim, but in our one week of use the battery drop-off was very minimal. Charging the mouse is also super easy, with a Type-C port provided at the front. One minute of quick charge powers this mouse for 8 hours of light use or 3 hours of heavy use.
Read Also: Embracing The Digital Revolution: The Impact of High-Quality Odds Calculators and Converters
You can also map other keys using Armoury Crate. Even if you’re not a power user, assigning multimedia controls to the scroll wheels and the Asus Dial will come in very clutch. Once you get a hang of the mouse, you can set it up to carry out routine tasks seamlessly. You can also download firmware updates for the mouse from Armoury Crate.
Equipped with an 800mAh battery, Asus claims the MD300 can last for 150 days on a single charge. We did not use the mouse long enough to test this claim, but in our one week of use the battery drop-off was very minimal. Charging the mouse is also super easy, with a Type-C port provided at the front. One minute of quick charge powers this mouse for 8 hours of light use or 3 hours of heavy use.
Read Also: Embracing The Digital Revolution: The Impact of High-Quality Odds Calculators and Converters


 The fitness tracker pairs easily with the NoiseFit App and comes with 150+ watch faces in addition to 100+ sports modes.
With the Noise Health Suite, which is included with the ColorFit Vision 3, customers can effortlessly monitor heart rate, SpO2, sleep patterns, stress levels, and breathing exercises. Daily reminders and weather forecasts are always available to you thanks to the integrated Productivity Suite.
Also Read: Here is everything about the newly launched Qualcomm Snapdragon 4 Gen 2 mobile platform: Specifications, availability
The device is claimed to offer up to 7 days of battery life. Additionally, IP68 water and dust resistance provide longevity in any setting. Up to 10 contacts can be saved by Noise Buzz, and users have access to recent call histories.
For the latest gadget and tech news, and gadget reviews, follow us on Twitter, Facebook and Instagram. For newest tech & gadget videos subscribe to our YouTube Channel. You can also stay up to date using the Gadget Bridge Android App. You can find the latest car and bike news here.
The fitness tracker pairs easily with the NoiseFit App and comes with 150+ watch faces in addition to 100+ sports modes.
With the Noise Health Suite, which is included with the ColorFit Vision 3, customers can effortlessly monitor heart rate, SpO2, sleep patterns, stress levels, and breathing exercises. Daily reminders and weather forecasts are always available to you thanks to the integrated Productivity Suite.
Also Read: Here is everything about the newly launched Qualcomm Snapdragon 4 Gen 2 mobile platform: Specifications, availability
The device is claimed to offer up to 7 days of battery life. Additionally, IP68 water and dust resistance provide longevity in any setting. Up to 10 contacts can be saved by Noise Buzz, and users have access to recent call histories.
For the latest gadget and tech news, and gadget reviews, follow us on Twitter, Facebook and Instagram. For newest tech & gadget videos subscribe to our YouTube Channel. You can also stay up to date using the Gadget Bridge Android App. You can find the latest car and bike news here. 
 Step 1: Go to remotedestop.google/support on both devices.
Step 2: Click the download icon and install the Chrome Remote Desktop app.
Step 3: Click on +Generate Code on the device you want to mirror.
Step 4: Chrome Remote Desktop will generate a 12-digit code. Enter this code on the destination device (your Chromebook). Find the Connect to another computer panel in the Remote Desktop home screen and paste the code there.
Step 5: On the device you want to mirror, click on Share. Give Chrome Remote Desktop the necessary permissions to share your screen.
You will now be able to view and control the screen of the other device on your Chromebook.
Step 1: Go to remotedestop.google/support on both devices.
Step 2: Click the download icon and install the Chrome Remote Desktop app.
Step 3: Click on +Generate Code on the device you want to mirror.
Step 4: Chrome Remote Desktop will generate a 12-digit code. Enter this code on the destination device (your Chromebook). Find the Connect to another computer panel in the Remote Desktop home screen and paste the code there.
Step 5: On the device you want to mirror, click on Share. Give Chrome Remote Desktop the necessary permissions to share your screen.
You will now be able to view and control the screen of the other device on your Chromebook.
 Sharing your Android phone’s screen is a very easy process if you’re using a third-party app. For this to work, your phone and Chromebook need to be connected to the same Wi-Fi network. Here’s how you can share your Android phone’s screen on Chromebook.
Step 1: Install the Screen Mirroring & Sharing app on your Android smartphone.
Step 2: Launch the app and tap the Cast icon.
Step 3: On your Chromebook, go to screenmirrorapp.com.
Step 4: Use the in-app QR code scanner on your phone to scan this QR code.
Step 5: Tap on Start Now.
Your Android phone’s screen will be shared on your Chromebook.
Sharing your Android phone’s screen is a very easy process if you’re using a third-party app. For this to work, your phone and Chromebook need to be connected to the same Wi-Fi network. Here’s how you can share your Android phone’s screen on Chromebook.
Step 1: Install the Screen Mirroring & Sharing app on your Android smartphone.
Step 2: Launch the app and tap the Cast icon.
Step 3: On your Chromebook, go to screenmirrorapp.com.
Step 4: Use the in-app QR code scanner on your phone to scan this QR code.
Step 5: Tap on Start Now.
Your Android phone’s screen will be shared on your Chromebook.
 While the app mentioned in the previous method shares your Android phone’s screen with your Chromebook, it does not let you control it. Use Vysor if you want to mirror and control your phone’s display on your Chromebook. Before you begin, make sure you have enabled USB debugging. Here’s how.
Step 1: Install Vysor on your Chromebook.
Step 2: Launch the Vysor app on your Chromebook and select View.
Step 3: Your Android phone will appear on the list of available devices if it is connected to the same network as your Chromebook. Once you click View, you will be able to see and control its display on your Chromebook.
While the app mentioned in the previous method shares your Android phone’s screen with your Chromebook, it does not let you control it. Use Vysor if you want to mirror and control your phone’s display on your Chromebook. Before you begin, make sure you have enabled USB debugging. Here’s how.
Step 1: Install Vysor on your Chromebook.
Step 2: Launch the Vysor app on your Chromebook and select View.
Step 3: Your Android phone will appear on the list of available devices if it is connected to the same network as your Chromebook. Once you click View, you will be able to see and control its display on your Chromebook.
 Mirroring your phone to a bigger display has its advantages but sometimes it can be a privacy risk. Some users may not want to share every screen of their phone with everyone. This is where Allcast comes in. Using this app, you will be able to share the media screen with your Chromebook and leave everything else hidden. Here’s how you can use it.
Step 1: Install Allcast on your Chromebook from the Chrome Web Store.
Step 2: On your Android device, install Allcast from Google Play Store.
Step 3: Launch the app on both devices and set your Chromebook as the destination device.
Once you begin playing media on your Android phone, it will be mirrored on your Chromebook.
Mirroring your phone to a bigger display has its advantages but sometimes it can be a privacy risk. Some users may not want to share every screen of their phone with everyone. This is where Allcast comes in. Using this app, you will be able to share the media screen with your Chromebook and leave everything else hidden. Here’s how you can use it.
Step 1: Install Allcast on your Chromebook from the Chrome Web Store.
Step 2: On your Android device, install Allcast from Google Play Store.
Step 3: Launch the app on both devices and set your Chromebook as the destination device.
Once you begin playing media on your Android phone, it will be mirrored on your Chromebook.


 Knowing about the problems with retail insurance of mobile phones is essential to make informed decisions when purchasing coverage. One common issue is the high cost of premiums, which can sometimes be disproportionate to the value of the phone. Additionally, some retail insurance policies may have strict claim procedures or limited coverage, resulting in difficulties when filing claims. Another problem is the presence of exclusions and fine print that may restrict coverage for specific incidents or damages. Finally, some retail insurance policies may not offer comprehensive protection against all risks, leaving customers vulnerable to certain types of damage or loss. Being aware of these problems allows consumers to evaluate their options carefully and choose insurance that provides adequate coverage at a reasonable cost.


 Each of the various odds is calculated in a different way, which makes working out any potential winnings difficult if you are only used to one type. For example, in the American way, the figures show what you stand to win if you wagered $100. An American market with +200 would see you profit $200, while a -140 market would see you win $40.
Fractional odds are more complicated, especially if the site offers an outcome at something like 6/4. To work out potential winnings here, you multiply your bet by the first number and divide the answer by the second. For example, a $10 bet at 6/4 would yield $15 plus your stake back (10×6 then divided by 4).
Decimal odds are as simple as the American format; they show what you can win per $1. You subtract 1 from the decimal figure and are left with your profit. Again, for example, winning on a 3.20 selection would yield a $2.20 profit, whereas a win on a 1.36 market would see you profit by $0.36.
Each of the various odds is calculated in a different way, which makes working out any potential winnings difficult if you are only used to one type. For example, in the American way, the figures show what you stand to win if you wagered $100. An American market with +200 would see you profit $200, while a -140 market would see you win $40.
Fractional odds are more complicated, especially if the site offers an outcome at something like 6/4. To work out potential winnings here, you multiply your bet by the first number and divide the answer by the second. For example, a $10 bet at 6/4 would yield $15 plus your stake back (10×6 then divided by 4).
Decimal odds are as simple as the American format; they show what you can win per $1. You subtract 1 from the decimal figure and are left with your profit. Again, for example, winning on a 3.20 selection would yield a $2.20 profit, whereas a win on a 1.36 market would see you profit by $0.36.


 Step 2: Select Photo Shuffle.
 Step 3: Select the photos you want to keep on wallpaper rotation and tap on Add.
Step 4: Set the shuffle frequency. If you have selected a large group of pictures for rotation, you’d want to keep the frequency high.
Step 3: Select the photos you want to keep on wallpaper rotation and tap on Add.
Step 4: Set the shuffle frequency. If you have selected a large group of pictures for rotation, you’d want to keep the frequency high.
 Step 5: Add your desired widgets and filters. Tap on Add at the top right corner of the screen once you’re done.
 Step 2: Select your desired Focus Mode from the list. You can also create a new Focus Mode by tapping the plus icon at the top-right corner of the screen.
 Step 3: Scroll to the Customise Screens section and select the Choose option under the lock screen or home screen.
 Step 4: Select a preinstalled wallpaper or choose one from the gallery.
 Step 5: Add the necessary widgets and filters. Select Add when you’re done.
Step 6: Go to Set a schedule and choose when you want the Focus Mode to kick in.
Step 5: Add the necessary widgets and filters. Select Add when you’re done.
Step 6: Go to Set a schedule and choose when you want the Focus Mode to kick in.
 Your iPhone’s wallpaper will change automatically at the scheduled time.
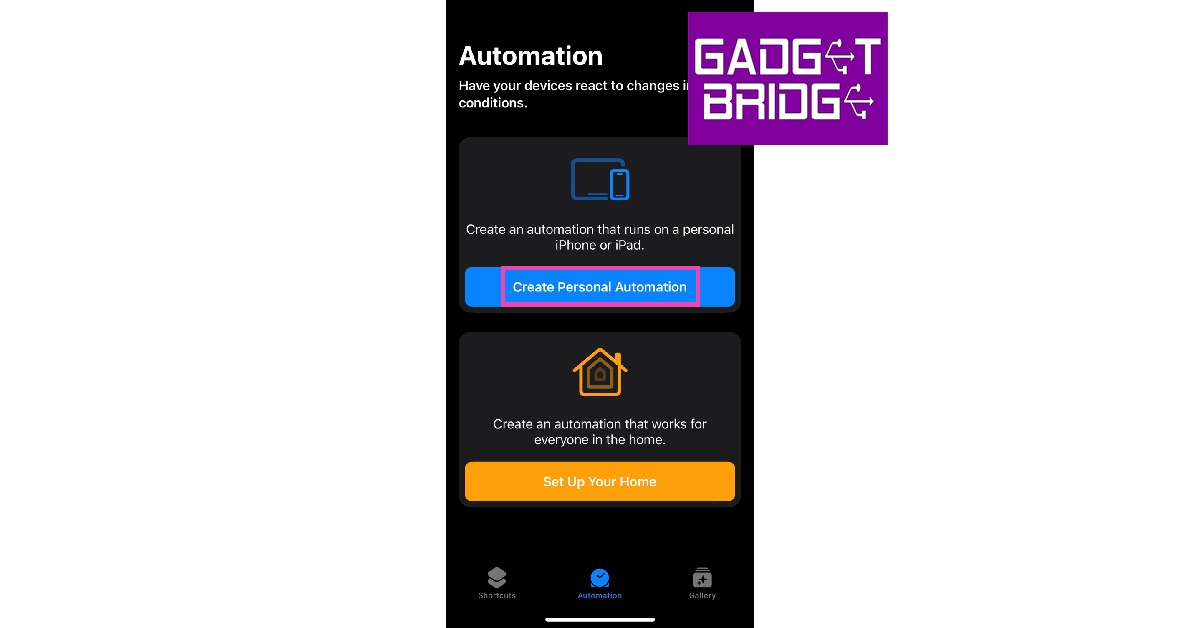
 Step 2: Tap on Create Personal Automation. Then select New Automation. For example, ‘time of the day’ and then set time plus repeat. Press next.
 Step 3: Choose Add action. Select Find Photos in the list of actions.
 Step 4: Tap on Add Filter.
 Step 5: Tap the space next to Album is. Select the album folder containing your desired wallpapers. You can create a new album with all the wallpapers you want on rotation and select it on this screen.
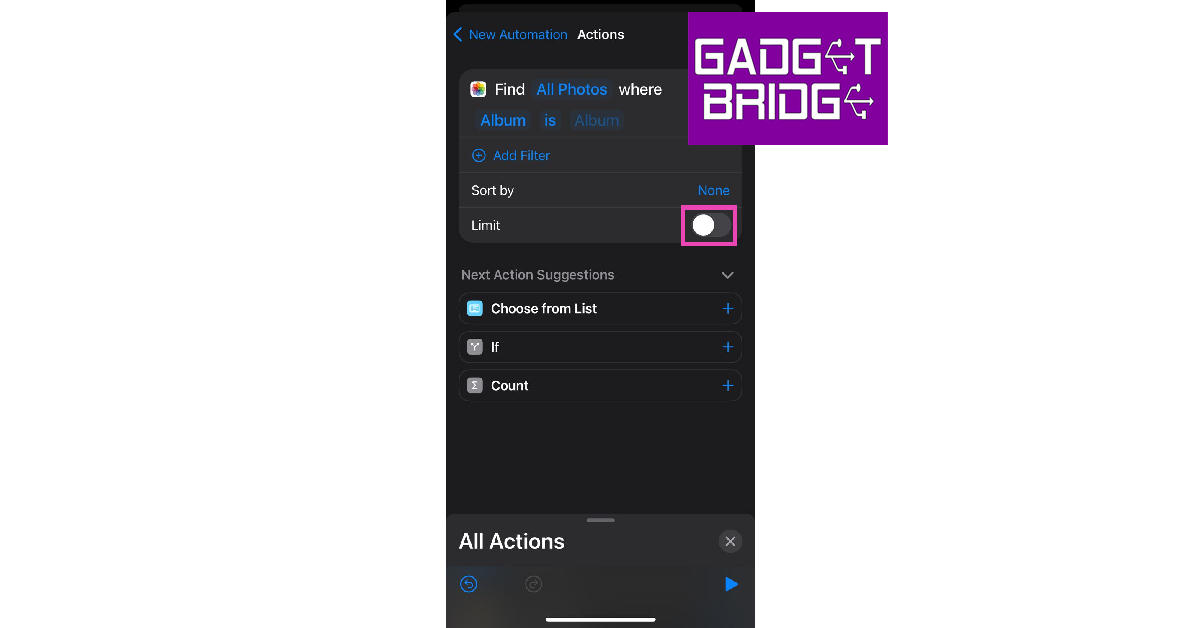
 Step 6: Tap on Sort by and select Random. This ensures that there is no particular order to wallpaper rotation.
 Step 7: Switch on the toggle bar for Limit and select 1.
 Step 8: Search the Set Wallpaper Photo action and add it to the list.
 Step 9: Choose whether you want to set the wallpaper on the home screen, lock screen, or both.
Step 10: Tap the side arrow next to the Set Wallpaper Photo action and switch off the toggle bar for Show preview.
Step 11: Hit Next at the top right corner of the screen.
Step 12: Set the time for the Shortcut to run. Switch off the toggle bar for Ask Before Running.
Step 9: Choose whether you want to set the wallpaper on the home screen, lock screen, or both.
Step 10: Tap the side arrow next to the Set Wallpaper Photo action and switch off the toggle bar for Show preview.
Step 11: Hit Next at the top right corner of the screen.
Step 12: Set the time for the Shortcut to run. Switch off the toggle bar for Ask Before Running.
 Your iPhone wallpaper will change automatically at the selected time.

 Step 2: Select Move Data from Android.
 Step 3: Launch the Move to iOS app on your Android smartphone.
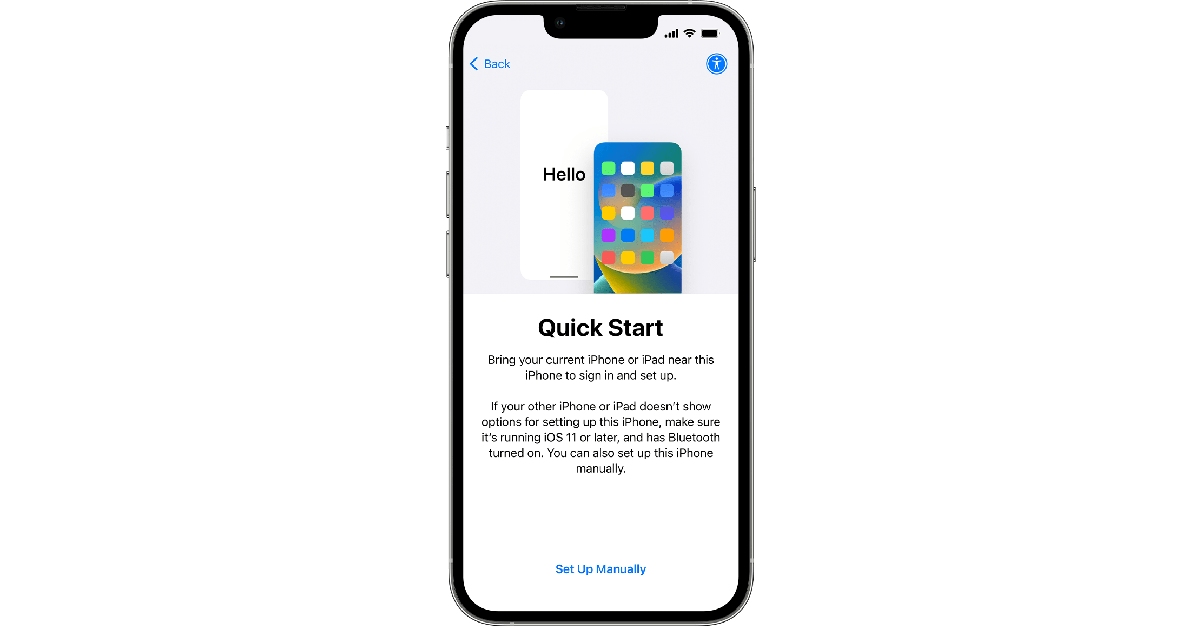
Step 4: Tap Continue on your iPhone. After a few seconds, your iPhone will display a code.
Step 5: Enter the code on your Android smartphone.
Step 3: Launch the Move to iOS app on your Android smartphone.
Step 4: Tap Continue on your iPhone. After a few seconds, your iPhone will display a code.
Step 5: Enter the code on your Android smartphone.
 Step 6: Your iPhone will now create a temporary WiFi network using its hotspot. Join this network on your Android device.
Step 7: Choose the content you want to transfer. In this case, choose Contacts.
Step 8: After the content has been transferred, tap Finish on your Android smartphone and Continue on your iPhone.
Step 9: Follow the on-screen instructions to finish the process on your iPhone.
Step 6: Your iPhone will now create a temporary WiFi network using its hotspot. Join this network on your Android device.
Step 7: Choose the content you want to transfer. In this case, choose Contacts.
Step 8: After the content has been transferred, tap Finish on your Android smartphone and Continue on your iPhone.
Step 9: Follow the on-screen instructions to finish the process on your iPhone.
 Step 2: Select Turn On.
 Step 3: Select Google Account data.
Step 4: Make sure the toggle bar for Contacts is switched on.
Step 3: Select Google Account data.
Step 4: Make sure the toggle bar for Contacts is switched on.
 Step 5: Go back to the previous window and select Back up now.
 Step 6: On your iPhone, open Settings.
 Step 7: Select Mail, then tap on Accounts.
 Step 8: Select Add Account, then tap on Google.
 Step 9: Follow the on-screen instructions to add your Google Account. Once the account has been added, your contacts will be synced to your new device.
 Step 3: Select Gmail to email the VCF file to yourself.
 Step 4: Now, open the email on your iPhone. Open the VCF file attachment.
Step 5: Tap the Share icon.
Step 6: Select the Contacts app.
Step 7: Select Add all contacts.
Step 4: Now, open the email on your iPhone. Open the VCF file attachment.
Step 5: Tap the Share icon.
Step 6: Select the Contacts app.
Step 7: Select Add all contacts.


In advance of the launch of several products, including the OnePlus Nord 3 5G, the OnePlus Nord CE 3 5G, the OnePlus Nord Buds 2r, and the OnePlus BWZ2 ANC on July 5, 2023, OnePlus, unveiled the first look of the upcoming OnePlus Nord 3 5G and revealed the design of the device’s back panel. The smartphone will now come in two colour options: Tempest Grey and Misty Green, according to the manufacturer. OnePlus revealed that OnePlus Nord 3 5G is designed to give two completely different feels to the latest mid-range phone from OnePlus. The new Misty Green colourway of the OnePlus Nord 3 5G offers a glossy and lovely hand-feel, whereas the Tempest Gray version has a textured matte finish that projects strength and durability. The company has also teased the look of the OnePlus Nord CE 3 5G in addition to showcasing the colour possibilities for the OnePlus Nord 3 5G. The phone is displayed in the Aqua Surge colour scheme. According to the teaser, the device features a triple rear camera setup. The Deep Gray and Triple Blue colour options for the OnePlus Nord Buds 2R have been confirmed. “OnePlus Nord 3 5G is designed to deliver outstanding power to those who live dynamic lifestyles and comes with a pure and understated design,” the company said. The company will be sharing more about smartphones over the next few weeks. For the latest gadget and tech news, and gadget reviews, follow us on Twitter, Facebook and Instagram. For newest tech & gadget videos subscribe to our YouTube Channel. You can also stay up to date using the Gadget Bridge Android App. You can find the latest car and bike news here.It's coming. Another generation of Nord smartphones are coming. Join us, July 5th at 7PM IST, as we drop the all-new #OnePlusNord3 5G and the #OnePlusNordCE3 5G along with the new #NordBuds2R!
— OnePlus India (@OnePlus_IN) June 26, 2023
Know more: https://t.co/IPgfOh7UpP pic.twitter.com/slDp2cRlmQ

 Oppo Reno 10 Pro+ turns the sensor and the stacked lens sideways instead of stacking them one on top of the other to provide optical zoom and/or telephoto lens effects. In order to focus light onto the image sensor after it passes through a prism, the optically stabilised telephoto lens, according to the manufacturer, is offset by 90 degrees. This results in a telephoto lens module that does not protrude too far out from the phone. The periscope module on the Reno10 Pro+ is 0.96mm thinner than those on competing products.
Also Read: A new range of premium Kodak Televisions launched in India
The Telephoto lens is claimed to shoot portraits from a distance for more natural facial proportions, devoid of any mild fish-eye distortion that you would get from smartphone cameras that force you to shoot from closer. These portraits boast a natural optical bokeh that separates the subject from the background to add depth to photographs.
Additionally, while taking pictures outside, the telephoto lens closes the distance between the portrait subject and far-off objects like monuments, skyscrapers, and mountains to produce dramatic but artistically pleasing photographs. The telephoto lens excels in low light conditions by improving light gathering for brighter, clearer portraits with less noise while maintaining the natural atmosphere of the environment.
Oppo Reno 10 Pro+ turns the sensor and the stacked lens sideways instead of stacking them one on top of the other to provide optical zoom and/or telephoto lens effects. In order to focus light onto the image sensor after it passes through a prism, the optically stabilised telephoto lens, according to the manufacturer, is offset by 90 degrees. This results in a telephoto lens module that does not protrude too far out from the phone. The periscope module on the Reno10 Pro+ is 0.96mm thinner than those on competing products.
Also Read: A new range of premium Kodak Televisions launched in India
The Telephoto lens is claimed to shoot portraits from a distance for more natural facial proportions, devoid of any mild fish-eye distortion that you would get from smartphone cameras that force you to shoot from closer. These portraits boast a natural optical bokeh that separates the subject from the background to add depth to photographs.
Additionally, while taking pictures outside, the telephoto lens closes the distance between the portrait subject and far-off objects like monuments, skyscrapers, and mountains to produce dramatic but artistically pleasing photographs. The telephoto lens excels in low light conditions by improving light gathering for brighter, clearer portraits with less noise while maintaining the natural atmosphere of the environment.
 Three more sensors are included in the Reno 10 Pro and Pro+ along with the 64MP telephoto portrait camera. The 1/1.56-inch ultra-large sensor size of the 50MP Sony IMX890 sensor allows for great light intake. For increased stability and clarity, it also supports OIS and all-pixel omnidirectional focus.
According to Oppo, the Reno 10 Pro+’s process speed for nighttime photography has increased by 54%, the capture success rate for quick snapshots has increased by 7%, and the dynamic range of the photo has increased by 11% when compared to the Reno 8 Pro. This results in more accurate colours and richer details overall.
Also Read: Spark Go 2023 and Spark 10 now available in a leather-finish edition
The phone also includes the 8MP Sony IMX355, a 112° ultra-wide-angle camera with a 1/4-inch sensor. Its exceptional sensitivity to light produces clear images even in dark environments, while its rapid frame rate of up to 120FPS makes it ideal for shooting fast-moving objects. The IMX355 boasts a broad dynamic range that allows it to preserve details in bright and dark areas of a photograph.
The Reno 10 Pro+ features a 32MP Sony IMX709 sensor with AF for selfies. The RGBW sensor on the front camera is specially customised where the colour W (white) is inserted into each RGGB pixel array; this increases the light intake by 60% when compared to the general RGGB lens. It is backed by a 1/2.47-inch sensor and a 90° FOV for wider selfies.
To prevent green and red glare the camera lenses have an ALD (atomic layer deposition) coating. It also reduces light reflectivity by up to 70% to ensure that unwanted reflections are minimised for clearer and more vibrant images.
For the latest gadget and tech news, and gadget reviews, follow us on Twitter, Facebook and Instagram. For newest tech & gadget videos subscribe to our YouTube Channel. You can also stay up to date using the Gadget Bridge Android App. You can find the latest car and bike news here.
Three more sensors are included in the Reno 10 Pro and Pro+ along with the 64MP telephoto portrait camera. The 1/1.56-inch ultra-large sensor size of the 50MP Sony IMX890 sensor allows for great light intake. For increased stability and clarity, it also supports OIS and all-pixel omnidirectional focus.
According to Oppo, the Reno 10 Pro+’s process speed for nighttime photography has increased by 54%, the capture success rate for quick snapshots has increased by 7%, and the dynamic range of the photo has increased by 11% when compared to the Reno 8 Pro. This results in more accurate colours and richer details overall.
Also Read: Spark Go 2023 and Spark 10 now available in a leather-finish edition
The phone also includes the 8MP Sony IMX355, a 112° ultra-wide-angle camera with a 1/4-inch sensor. Its exceptional sensitivity to light produces clear images even in dark environments, while its rapid frame rate of up to 120FPS makes it ideal for shooting fast-moving objects. The IMX355 boasts a broad dynamic range that allows it to preserve details in bright and dark areas of a photograph.
The Reno 10 Pro+ features a 32MP Sony IMX709 sensor with AF for selfies. The RGBW sensor on the front camera is specially customised where the colour W (white) is inserted into each RGGB pixel array; this increases the light intake by 60% when compared to the general RGGB lens. It is backed by a 1/2.47-inch sensor and a 90° FOV for wider selfies.
To prevent green and red glare the camera lenses have an ALD (atomic layer deposition) coating. It also reduces light reflectivity by up to 70% to ensure that unwanted reflections are minimised for clearer and more vibrant images.
For the latest gadget and tech news, and gadget reviews, follow us on Twitter, Facebook and Instagram. For newest tech & gadget videos subscribe to our YouTube Channel. You can also stay up to date using the Gadget Bridge Android App. You can find the latest car and bike news here. 


")
 Step 2: Select Manage your Google Account.
 Step 3: Switch to the Security tab.
 Step 4: Scroll down and tap on Manage all devices.
 Step 5: Tap on the device you want to remove.
 Step 6: Select Sign out and confirm your selection in the pop-up box.

 Step 3: Scroll down and select Manage all devices.
 Step 4: Click on the device you want to remove.
 Step 5: Click on Sign out.

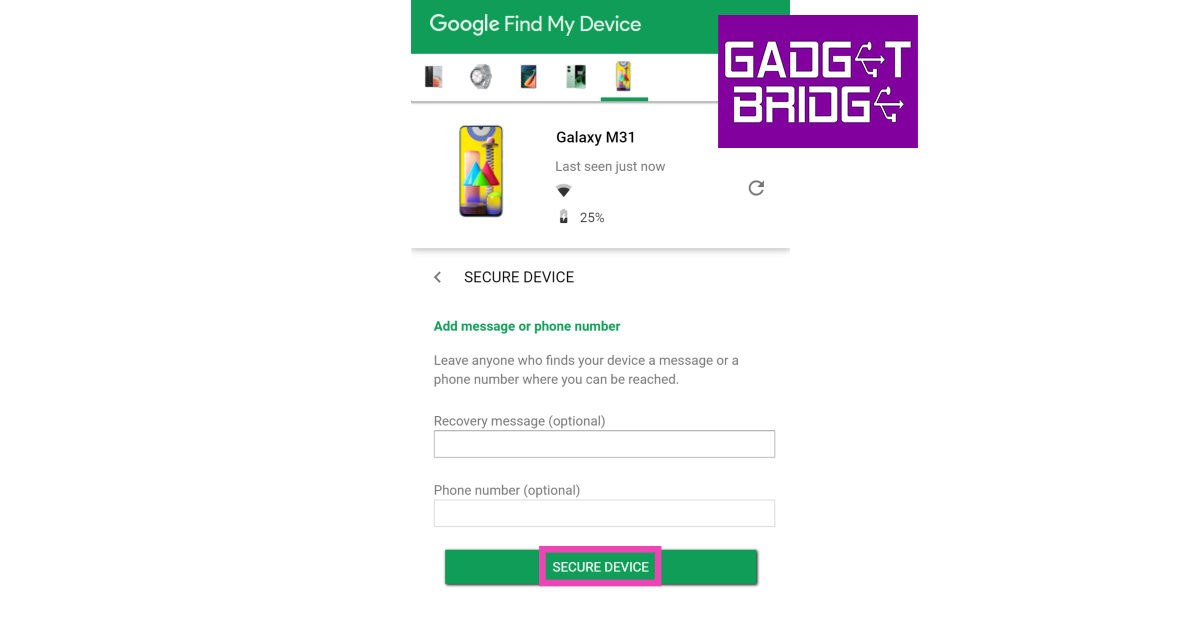
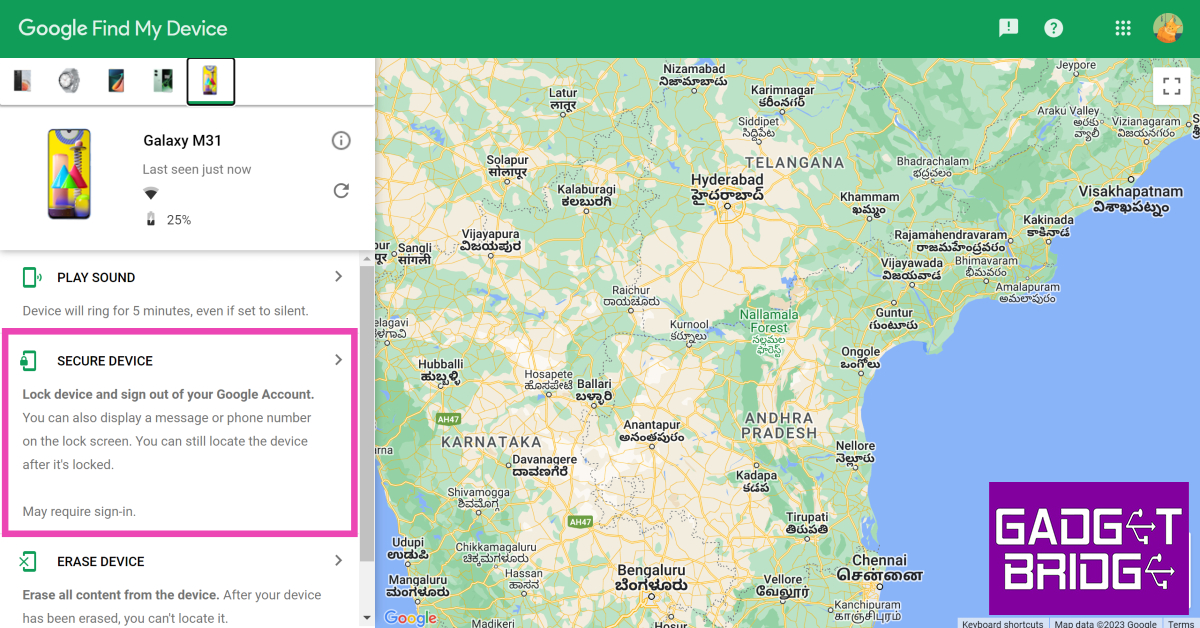 Step 5: Add a recovery message and your phone number in case someone finds your phone and wants to reach out to you to return it.
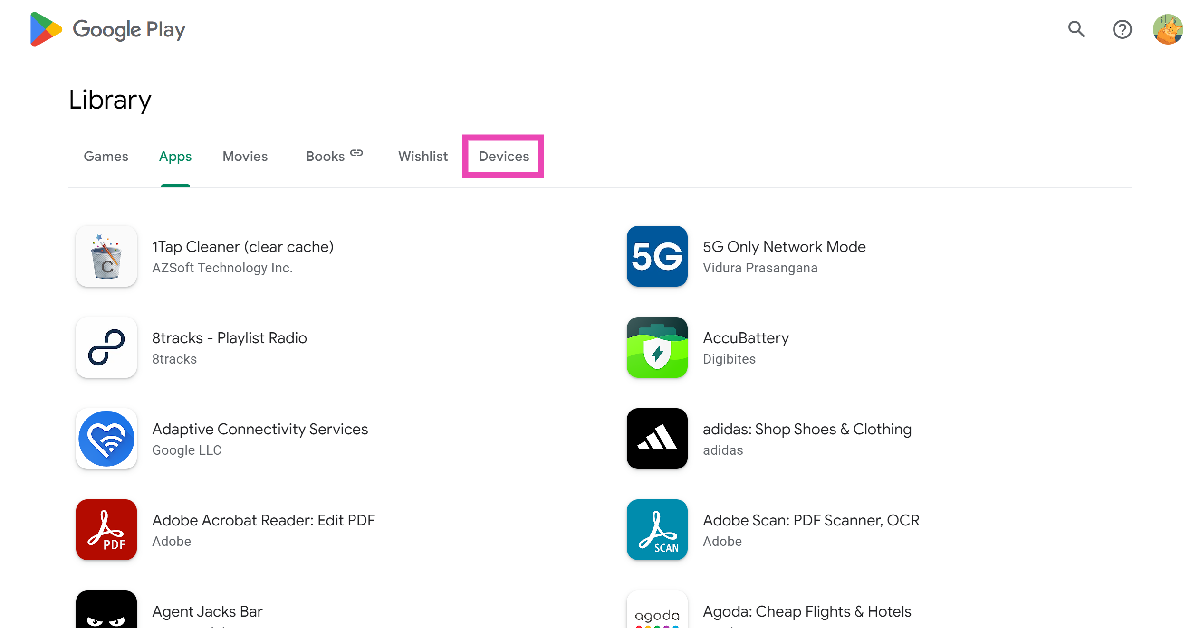
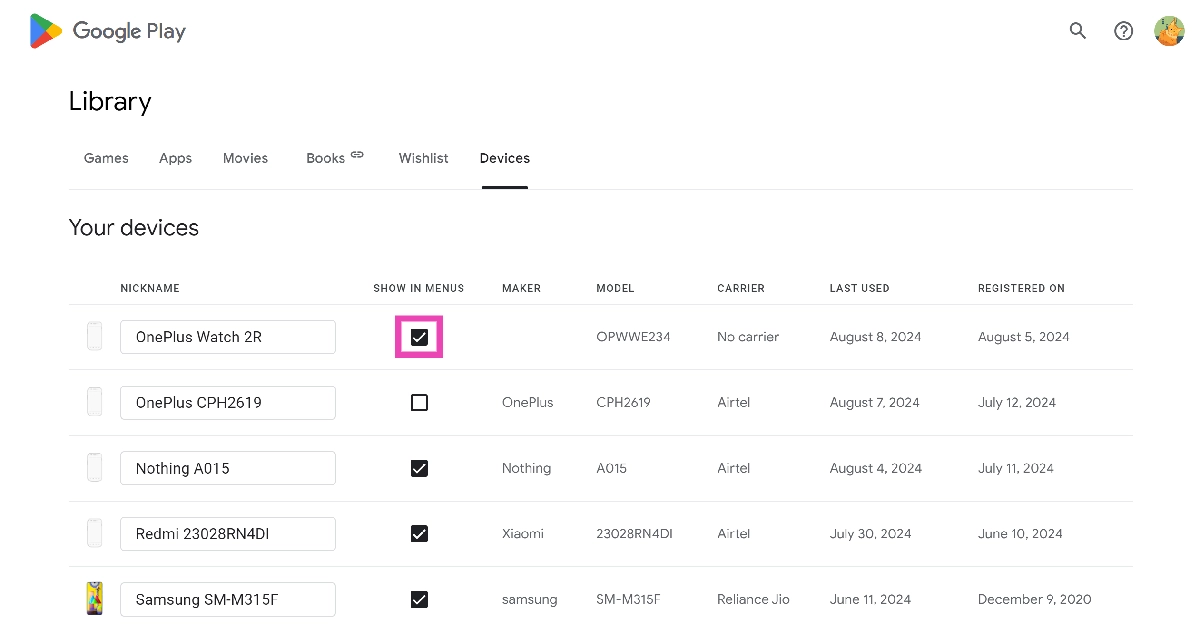
 Step 3: Switch to the Devices tab.
 Step 4: Uncheck the devices you want to remove.
 Step 2: Tap on Reset.
 Step 3: Select Factory data reset.
 Step 4: Scroll down and tap on Reset.


