
Samsung Galaxy S21 FE Snapdragon 888 SoC variant today debuted in India

Samsung Galaxy S21 FE Snapdragon 888 SoC model has officially been announced in India today. For those who are unaware the company introduced the in-house 5nm Exynos 2100 chipset-powered Galaxy S21 FE variant in 2022. Apart from the chipset rest of the specifications of the device will remain unchanged.
In India, Samsung has just unveiled the new Galaxy S21 FE 5G variant. The Samsung Galaxy S21 Fan Edition will once again be offered in the country, but this time it will make use of a Snapdragon 888 SoC made in a 5nm process. The phone will also have 256GB internal storage space and an Adreno 660 GPU.
According to reports, the model with Exynos processor has apparently been discontinued because offline retailers are no longer stocking it and the official website has also stopped selling it. Those willing to buy it can purchase it through Amazon and Flipkart.
Also Read: Samsung Galaxy Z Fold 5, Galaxy Z Flip 5 now up for pre-reservations in India: Details inside
Speaking about the price of the Samsung Galaxy S21 FE Snapdragon 888 SoC variant, it has been launched at Rs 49,999 for a single 8GB RAM with 256GB storage. The device will be available in five colour options of Navy, Olive, Graphite, Lavender, and White.
Consumers looking for enhanced affordability can take advantage of the convenient 15-month no-cost EMI option and own the smartphone at just INR 3334 per month. Galaxy S21 FE 5G will be available starting July 11, 2023, on Samsung.com, and retail stores.
Top 7 Ways To Find Out If Your Phone Has Been Hacked

With spy apps becoming more popular and accessible, more smartphone users are falling victim to illegal hacking operations. This is why installing the OTA updates and security patches is of great importance. Older devices are more vulnerable to getting hacked due to outdated security features. Once your device has been infiltrated, it can be hard to figure out that there’s something wrong with it. But, it is not impossible. In this article, we bring you the top 7 ways to find out if your phone has been hacked.
Read Also: Sony WF-C700N truly wireless stereo (TWS) earphones with ANC launched in India
 If you notice an immediate spike in battery usage on your phone, it is a tell-tale sign of an app using resources in the background. Your Android phone is pretty good at optimising the background usage of apps, it even lets you know when a particular app is consuming more battery than usual. When your phone is ‘hacked’ it needs constant access to your phone’s functions in order to keep tabs on your activity. This is why your phone’s battery drains faster when it has been hacked. If you’ve never had power issues with your phone before, this may warrant a thorough check-up.
Since batteries can deteriorate over time, you should also look for other suspicious signs in order to find out if your phone has been hacked. One of the biggest signs is excessive data usage. When a spy app gets access to your phone, it needs to report your activity to the entity that installed it. In order to do this, it uses your phone’s mobile data or the connected WiFi network. Go to Settings>Connections>Usage>Mobile data usage to check if there are any unaccounted data that has been used by your device.
There are several ways to hack a smartphone. One of the most common ones is the installation of a spy app. Once the app is installed, it either stays hidden or takes the form of an inconspicuous app (like Calculator, Calendar, or Notes) in order to blend into the app drawer. Once you open this app, it will carry out all the basic functions of the app it is disguising itself to be. But you will notice something off with the design or the performance. If you suspect that someone has hacked into your phone, it is a good idea to go through every app and give it a close look. You should also check out the list of apps from your phone’s settings to look for any hidden apps on your device.
If you notice an immediate spike in battery usage on your phone, it is a tell-tale sign of an app using resources in the background. Your Android phone is pretty good at optimising the background usage of apps, it even lets you know when a particular app is consuming more battery than usual. When your phone is ‘hacked’ it needs constant access to your phone’s functions in order to keep tabs on your activity. This is why your phone’s battery drains faster when it has been hacked. If you’ve never had power issues with your phone before, this may warrant a thorough check-up.
Since batteries can deteriorate over time, you should also look for other suspicious signs in order to find out if your phone has been hacked. One of the biggest signs is excessive data usage. When a spy app gets access to your phone, it needs to report your activity to the entity that installed it. In order to do this, it uses your phone’s mobile data or the connected WiFi network. Go to Settings>Connections>Usage>Mobile data usage to check if there are any unaccounted data that has been used by your device.
There are several ways to hack a smartphone. One of the most common ones is the installation of a spy app. Once the app is installed, it either stays hidden or takes the form of an inconspicuous app (like Calculator, Calendar, or Notes) in order to blend into the app drawer. Once you open this app, it will carry out all the basic functions of the app it is disguising itself to be. But you will notice something off with the design or the performance. If you suspect that someone has hacked into your phone, it is a good idea to go through every app and give it a close look. You should also check out the list of apps from your phone’s settings to look for any hidden apps on your device.
The battery drains faster
 If you notice an immediate spike in battery usage on your phone, it is a tell-tale sign of an app using resources in the background. Your Android phone is pretty good at optimising the background usage of apps, it even lets you know when a particular app is consuming more battery than usual. When your phone is ‘hacked’ it needs constant access to your phone’s functions in order to keep tabs on your activity. This is why your phone’s battery drains faster when it has been hacked. If you’ve never had power issues with your phone before, this may warrant a thorough check-up.
Excessive data usage
 Since batteries can deteriorate over time, you should also look for other suspicious signs in order to find out if your phone has been hacked. One of the biggest signs is excessive data usage. When a spy app gets access to your phone, it needs to report your activity to the entity that installed it. In order to do this, it uses your phone’s mobile data or the connected WiFi network. Go to Settings>Connections>Usage>Mobile data usage to check if there are any unaccounted data that has been used by your device.
The phone starts heating up without any reason
You may have noticed your phone heating up while carrying out power-intensive tasks like gaming, video editing, and navigation. However, if it heats up unprompted, it may be a cause for concern. As mentioned earlier, a hacked phone runs background processes almost all the time and reports it back to the source entity. This can cause your phone to heat up even when you’re not using it.Check your phone for unwanted apps
 There are several ways to hack a smartphone. One of the most common ones is the installation of a spy app. Once the app is installed, it either stays hidden or takes the form of an inconspicuous app (like Calculator, Calendar, or Notes) in order to blend into the app drawer. Once you open this app, it will carry out all the basic functions of the app it is disguising itself to be. But you will notice something off with the design or the performance. If you suspect that someone has hacked into your phone, it is a good idea to go through every app and give it a close look. You should also check out the list of apps from your phone’s settings to look for any hidden apps on your device.
Performance issues
Even though modern are powerful devices, they cannot handle multiple power-intensive tasks at once without a few hiccups. If you notice frequent app malfunctions or a general lag in performance, it may be because of spyware running in the background. If your phone is somewhat new, this behaviour should raise an alarm.Your phone produces a strange noise during voice calls
Once your phone is hacked, it collects and logs every minute user activity. This includes recording voice calls. Once a hacker has gained access to your phone, they can listen to a live voice call and even have your phone record it. If you notice a strange beep every time you connect to a voice call, it is a tell-tale sign that the call is being recorded. It is also possible that the other person on the call is recording it using a third-party app. If that isn’t the case, it is very likely that a malicious entity has access to your phone conversations.Notice any unusual ads?
Most smartphone manufacturers offer a clean OS experience that is mostly ad-free. Some OS skins routinely push ads on your notification slider, but outside of that, the ad exposure is very limited. If you notice ads overlaid on your app drawer, native apps, or any system pages, it is a sign that your phone has been exposed to malware or hacked by a foreign entity. Spying apps find a way to nullify your phone’s security features, which leads to other malware or adware getting access to your device.Frequently Asked Questions (FAQs)
How do I know if my phone has been hacked?
Excessive battery and data usage, unusual app activity, unprompted overheating, and unwanted ads are signs that your phone has been hacked.How do I secure my phone against hackers?
To keep your phone from being hacked, do not download any apps from unverified sources and do not click on any suspicious links.What do I do after my phone has been hacked?
If your phone has been hacked, you need to restore it to factory settings to get rid of the malicious apps. Read Also: Oppo Enco Air 3 Pro with ANC and 12.4mm dynamic drivers launched in IndiaConclusion
These are the top 7 ways to find out if your phone has been hacked. It is better to be on the safer side and limit access to any malicious programs and apps by installing a high-end antivirus app on your phone. Routinely check your phone for any unusual behaviour to stay on top of things. For the latest gadget and tech news, and gadget reviews, follow us on Twitter, Facebook and Instagram. For newest tech & gadget videos subscribe to our YouTube Channel. You can also stay up to date using the Gadget Bridge Android App. You can find the latest car and bike news here.Save big on smartphones, electronics during Amazon Prime Day buys: Here is a sneak peek

Amazon Prime Day Sale is set to start in India. The sale will start on July 15 and run through July 16 at 12 a.m. IST. The sale will only last two days. Only global Amazon Prime members are eligible for this discount, according to the announcement. The business will provide excellent discounts and offers across all categories.
Members will be able to enjoy two full days of the best shopping, deals, and blockbuster entertainment from the convenience and security of their homes throughout the sale. 45,000+ new product launches from over 400+ top Indian and international brands, including OnePlus, iQOO, Realme Narzo, Samsung, Hopscotch, American Tourister, Maybelline, Tata, Nestle, Pintola, Slurrp Farm, and many more, as well as 2000+ new product launches from small and medium businesses, are expected as part of the Amazon Prime Day Sale.
Also Read: Redmi 12 India launch to happen on August 1
Save Significantly with 10% Off Payments Made with ICICI Bank Credit/Debit Cards, SBI Credit Cards, and EMIs Made with ICICI Bank Credit/Debit Cards and SBI Credit Cards During Prime Day. On qualifying items, the e-commerce portal will also provide free one-day delivery and substantial discounts. Orders placed by Prime members in 25 Indian cities will be delivered the same day or the following day. These 25 cities are Mumbai, Nagpur, Noida, Patna, Pune, Thane, Thiruvananthapuram, Vijayawada, and Visakhapatnam. They are also Ahmedabad, Bangalore, Chandigarh, Chennai, Coimbatore, Delhi, Faridabad, Gandhi Nagar, Guntur, Gurgaon, Hyderabad, Indore, Jaipur, Kochi, Kolkata, Lucknow, and Mumbai.
Prime Day 2023 Deals on Smartphones:
During Amazon Prime Day, prominent brands’ smartphones and accessories will be 40% off at Amazon. The starting price for the iPhone 14 during the sale period is Rs 66,499. Get instant bank discounts of up to Rs 5,000 on OnePlus smartphones on this Prime Day. Incredible discounts on the Nord series, beginning at just Rs 17,999. With further savings accessible through Amazon Coupons, the price of the OnePlus Nord CE 2 light will be reduced to an alluring level. Purchase the recently released OnePlus 11 5G with an instant bank discount of Rs 2000 and an extra exchange discount of up to Rs 6000. The recently introduced Samsung Galaxy M34 5G will be offered for Rs 16,999 on this Prime Day. Customers may take advantage of previously unheard-of discounts on the Galaxy M14 5G, which starts at Rs 12,490. While the Galaxy S23 and S23 Ultra from Samsung’s top S-Series will receive instant bank discounts of up to Rs 6,000 and Rs 9,500 with no cost EMI for up to 18 months. On this Prime Day, Samsung is offering an additional exchange incentive of up to Rs 8000 for the Galaxy S23 and Rs 10,000 for the Galaxy S23 Ultra. Also Read: Nothing Phone 2 launched in India, equipped with Snapdragon 8+ Gen 1 SoC and tweaked design The recently released Motorola Razr 40 and Razr 40 Ultra will be available with bank discounts, free EMI for up to 12 months on each handset, and an additional exchange bonus of up to Rs 3,000 on the Razr 40. The recently released iQOO Z7s 5G will be available with Rs 2000 off the beginning price of Rs 16,999, and the iQOO Neo 7 pro 5G will be available starting at Rs 33,999. Starting at Rs 13,999, more enticing deals on the iQOO Z6 lite 5G (6GB) will be made accessible. You can upgrade to the Xiaomi 13 Pro 5G through Amazon and get an additional exchange incentive of up to Rs 10,000 off. However, the price of the Redmi K50i 5G will be drastically reduced by Rs 5,000, starting at Rs 20,999. The Redmi Note 12 5G is also eligible for up to 9 months of no-cost EMI with easy monthly payments starting at just Rs 1,888. More discounts on Tecno, Lava, Itel, and Nokia devices will be available.Prime Day 2023 Deals on Electronics
Action cameras and accessories from GoPro, DJI, and Insta360 will see price reductions starting at Rs 15,000 on Amazon Prime Day 2023. On purchases of camera accessories over Rs 3,000, the e-commerce will provide 3 months of no-cost EMI. This Prime Day, security cameras and professional camera equipment will also be more reasonably priced. Headphones, Soundbars, and Speakers will be up to 75% off with Prime-only additional discounts of up to 20% and up to 12 months No Cost EMI. Prices for AMOLED Display Smartwatches from Noise, Fire-Boltt, and Beat-XP have dropped dramatically and now start at Rs 1,999.Here are some more Deals on Amazon Devices
- The lowest price of 2023: Save 68% on the Alexa Smart Home combo of the Wipro 9W smart bulb and the third-generation Echo Dot.
- Wipro 9W smart bulb and 4th-generation Echo Dot with Alexa Smart Home combo for Rs 2,399 with a flat 63% discount.
- Get an Echo Dot (4th Generation) with Clock + Wipro 12W Smart Bulb – Smart Home bundle for just Rs 4,649 with a flat 42% discount.
- Get a 50% discount on the Alexa-enabled Echo Dot (4th Generation) for just Rs 2,249! Get an Echo Dot (3rd Generation) with Alexa for just Rs 1,949 with a flat 56% discount.
- Get the Echo Show 5 (2nd Generation) for 38% less, just Rs 5,499!
- There will be discounts of up to 55% on refrigerators, washing machines, air conditioners, chimneys, dishwashers, and microwaves.
Top 4 Ways to Use Your WhatsApp Account on Multiple Devices

Unlike other popular Instant Messengers, WhatsApp has always struggled with multi-device connections. Until April 2023, you could only link your WhatsApp account to your desktop. WhatsApp did not introduce seamless messaging on linked PCs until last year. Now that muti-device capability has been brought to smartphones, the experience has gotten much better. In this article, we bring you the top 4 ways to use your WhatsApp account on multiple devices.
Read Also: Oppo Enco Air 3 Pro with ANC and 12.4mm dynamic drivers launched in India
Step 3: Select ‘Agree and Continue’ on the following screen.
Step 4: WhatsApp will ask you for your number. Instead of entering your number, tap the ellipses at the top right corner of the screen and select ‘Link to existing account’. This will generate a bar code that you need to scan using the WhatsApp app on your primary device.
Step 5: Launch WhatsApp on your primary phone.
Step 6: Tap the ellipses at the top right corner of the screen and select ‘Linked Devices’.
Step 7: Select ‘Link a device’.
Step 8: Scan the QR displayed on your secondary phone.
Your WhatsApp account will be mirrored on your secondary phone. It will take a few minutes to sync your chats.
Step 3: Launch WhatsApp on your primary phone.
Step 4: Tap the ellipses at the top right corner of the screen and select ‘Linked Devices’.
Step 5: Select ‘Link a device’.
Step 6: Scan the QR displayed on the web portal. Your WhatsApp account will be mirrored on your PC.
Step 4: The QR code to link your WhatsApp account will be displayed on the screen.
Step 5: Launch WhatsApp on your primary phone.
Step 6: Tap the ellipses at the top right corner of the screen and select ‘Linked Devices’.
Step 7: Select ‘Link a device’.
Step 8: Scan the QR displayed on the desktop client. Your WhatsApp account will be mirrored on your PC.
You can now use the WhatsApp Web portal similar to how you use it on a PC. Use your primary phone with the WhatsApp account to link your secondary device.
Step 3: Open WhatsApp on your primary smartphone and tap the ellipses at the top right corner of the screen. Select ‘Linked Devices’.
Step 4: Tap on ‘Link a device’ and scan the QR code on your secondary smartphone or Android tablet.
You will now be able to use your WhatsApp account on your secondary smartphone or Android tablet.
Use your WhatsApp account on another Android phone
Step 1: Install WhatsApp on the secondary phone. Step 2: Launch the app and select your preferred language. Tap the forward arrow icon at the bottom right corner of the screen. Step 3: Select ‘Agree and Continue’ on the following screen.
Step 4: WhatsApp will ask you for your number. Instead of entering your number, tap the ellipses at the top right corner of the screen and select ‘Link to existing account’. This will generate a bar code that you need to scan using the WhatsApp app on your primary device.
Step 3: Select ‘Agree and Continue’ on the following screen.
Step 4: WhatsApp will ask you for your number. Instead of entering your number, tap the ellipses at the top right corner of the screen and select ‘Link to existing account’. This will generate a bar code that you need to scan using the WhatsApp app on your primary device.
 Step 5: Launch WhatsApp on your primary phone.
Step 6: Tap the ellipses at the top right corner of the screen and select ‘Linked Devices’.
Step 5: Launch WhatsApp on your primary phone.
Step 6: Tap the ellipses at the top right corner of the screen and select ‘Linked Devices’.
 Step 7: Select ‘Link a device’.
 Step 8: Scan the QR displayed on your secondary phone.
 Your WhatsApp account will be mirrored on your secondary phone. It will take a few minutes to sync your chats.
Use WhatsApp Web
WhatsApp Web allows you to use your WhatsApp account on your PC without downloading the app’s desktop client. Here’s how you can use it. Step 1: Launch the web browser on your PC and go to web.whatsapp.com. Step 2: You will see a QR code displayed on the screen. To link your account, this code needs to be scanned using the WhatsApp app on your primary device. Step 3: Launch WhatsApp on your primary phone.
Step 4: Tap the ellipses at the top right corner of the screen and select ‘Linked Devices’.
Step 5: Select ‘Link a device’.
Step 6: Scan the QR displayed on the web portal. Your WhatsApp account will be mirrored on your PC.
Step 3: Launch WhatsApp on your primary phone.
Step 4: Tap the ellipses at the top right corner of the screen and select ‘Linked Devices’.
Step 5: Select ‘Link a device’.
Step 6: Scan the QR displayed on the web portal. Your WhatsApp account will be mirrored on your PC.
Use WhatsApp’s desktop client
Step 1: Download WhatsApp’s desktop client from its official website or Microsoft Store for Windows. Step 2: Launch the desktop app on your PC. Step 3: Click on ‘Get Started’. Step 4: The QR code to link your WhatsApp account will be displayed on the screen.
 Step 5: Launch WhatsApp on your primary phone.
Step 6: Tap the ellipses at the top right corner of the screen and select ‘Linked Devices’.
Step 7: Select ‘Link a device’.
Step 8: Scan the QR displayed on the desktop client. Your WhatsApp account will be mirrored on your PC.
Step 5: Launch WhatsApp on your primary phone.
Step 6: Tap the ellipses at the top right corner of the screen and select ‘Linked Devices’.
Step 7: Select ‘Link a device’.
Step 8: Scan the QR displayed on the desktop client. Your WhatsApp account will be mirrored on your PC.
Use WhatsApp Web on your Android phone
Apart from using the WhatsApp app on your Android phone, you can also use its Web portal on Chrome or your preferred mobile web browser. Typically, you wouldn’t need to use this option as WhatsApp now allows your account to be used on multiple Android devices. However, if you’ve got multiple WhatsApp accounts, you may need to use this method to accommodate one of them on your phone. Here’s how you can go about it. Step 1: Open web.whatsapp.com on your phone or tablet’s web browser. Step 2: Tap on the ellipses at the top right corner of the screen and select ‘Desktop site’. You can now use the WhatsApp Web portal similar to how you use it on a PC. Use your primary phone with the WhatsApp account to link your secondary device.
Step 3: Open WhatsApp on your primary smartphone and tap the ellipses at the top right corner of the screen. Select ‘Linked Devices’.
You can now use the WhatsApp Web portal similar to how you use it on a PC. Use your primary phone with the WhatsApp account to link your secondary device.
Step 3: Open WhatsApp on your primary smartphone and tap the ellipses at the top right corner of the screen. Select ‘Linked Devices’.
 Step 4: Tap on ‘Link a device’ and scan the QR code on your secondary smartphone or Android tablet.
 You will now be able to use your WhatsApp account on your secondary smartphone or Android tablet.
Frequently Asked Questions (FAQs)
How do I use my WhatsApp account on multiple Android devices?
WhatsApp now allows you to link your account to multiple Android devices. Simply launch the app on your secondary device and select ‘Link to existing account’ upon startup.Can I use my WhatsApp account on a PC?
You can use your WhatsApp account on your PC with the help of WhatsApp’s web portal and desktop client.What is the device limit for linking a WhatsApp account?
You can link your WhatsApp to a maximum of four devices. Read Also: Asus TUF gaming F15 laptop review: 11 Gen Intel CPU with RTX 2050 under 60K, worth buying?Conclusion
This is how you can use your WhatsApp account on multiple devices. Last year, WhatsApp introduced a true multi-device experience, allowing users to independently link their WhatsApp account to other devices without requiring a smartphone connection. This means you can use your WhatsApp account on your desktop or your phone even if your primary phone is not functional or doesn’t have a functional internet connection. For the latest gadget and tech news, and gadget reviews, follow us on Twitter, Facebook and Instagram. For newest tech & gadget videos subscribe to our YouTube Channel. You can also stay up to date using the Gadget Bridge Android App. You can find the latest car and bike news here.Nothing Phone 2 launching today in India and globally: How to watch getting it unleased live

The launch of Nothing Phone 2 in India and the rest of the world is scheduled for today. Additionally, the company will offer its second device this time in the USA as Phone 1 wasn’t made available there last year. The Phone 2 was made available for pre-registrations in India as well. After being released, the device will be formally available throughout the nation through Flipkart. Additionally, you would be able to in person buy the phone this time. Below are further details on this.
Nothing Phone 2 livestream details
Today marks the global and Indian launch of the Nothing Phone 2. The launch event here in India will start around 8.30 IST. Both the company’s website and its official YouTube channel will broadcast the event. Additionally, you can view the live broadcast using the embedded link below.Nothing Phone 2 price in India (expected) and other details
Pre-orders for Phone 2 are currently open on the company’s website. It has already been revealed that the smartphone would be sold in India through the e-commerce site Flipkart. According to the company, customers will also be able to buy the Nothing Phone 2 directly from Nothing Drops pop-up shops in Bengaluru, India. Before the Phone 2 debut, the company has also developed a special microsite on Flipkart. Pre-orders can be made by those with an interest by paying a refundable deposit of Rs 2,000. The customers will be able to choose the configuration or model of their choosing on the launch day, which is July 11, and pay the balance to secure the purchase between 9 PM IST on July 11 and 11:59 PM IST on July 20. The business has not yet disclosed the Nothing Phone 2’s official launch price in India. However, according to a previous source, the smartphone will make its debut in India with a starting price of Rs 42,000 or Rs 43,000. This speculated pricing is on the higher side compared to its previous generation. According to yet another source, the smartphone would be offered with 12GB RAM with 512GB storage model is rumoured to be priced at EUR 849, or approximately Rs 76,500, the 8GB RAM with 256GB storage model may be offered at EUR 729, or nearly about Rs 65,600.Nothing Phone 2 specifications expected
The Snapdragon 8+ Gen 1 SoC from Qualcomm will power the Nothing Phone 2. A 6.7-inch display will be available on the forthcoming phone. A 4,700mAh battery is also confirmed to be present. There will be a 50MP primary sensor with OIS in the triple camera module. A 16MP selfie camera will be on the front of the device. The Swedish house music DJ group and Nothing has teamed to create a Glyph Sound Pack that is only accessible on the Phone (2) and Phone (1). The “Glyph Composer,” a new feature, can be used to make personalised ringtones. For the latest gadget and tech news, and gadget reviews, follow us on Twitter, Facebook and Instagram. For newest tech & gadget videos subscribe to our YouTube Channel. You can also stay up to date using the Gadget Bridge Android App. You can find the latest car and bike news here.BGMI redeem codes for 11 July 2023, claim and receive rewards and benefits

After being banned for nearly ten months, Battleground Mobile India, aka BGMI, is officially available again in India. BGMI fans are looking for ways to improve their game experience and one such method is the usage of redemption codes, which offers a variety of rewards and advantages using BGMI redeem codes players can gain access to new skins, outfits, loot crates, weapons and free UC and diamonds.
As mentioned earlier, these codes give users the chance to earn unique rewards and gain extra benefits while playing the game. This includes GUN SKINS (M4, AKM, M416, AWM, M24, UZI, KAR98K), free character voucher, Andy, Carlo, Sara, Victor character for free, free Anna Character on completing the mission and UC or Royal Pass Discount. So here we have gathered a list of the most recent BGMI redeem codes as of 11 July 2023. Also, redeem these codes asap as these are only valid for a limited duration.
BGMI Redeem Codes for 11 July 2023
- Updating…
How to get free Redeem Codes for BGMI on 11 July 2023?
- Launch BGMI on your device.
- Then select the Redeem Code option from the main menu.
- Next, click on the Redeem code tab.
- A new window will open, requesting the redemption code.
- Now enter your BGMI code.
- Confirm and click on the “Redeem” tab.
- If your redeem code is valid then you will get a message confirming that your rewards were successfully redeemed.
Garena Free Fire Redeem Codes Today 11 July 2023: Here is how to claim them

Garena Free Fire is a battle royale game with regular awards and tournaments to keep players interested. If you play Garena Free Fire, you should be aware of the redeem codes that are released on a daily basis. However, because the battle royale game is banned in India, players from other countries can use the Free Fire Redeem codes daily. If you’re unfamiliar with the Garena Free Fire redeem codes or don’t know how to get them, we’ve put together a step-by-step guide to help you redeem them. Check out Garena Free Fire Redeem Codes for 11 July 2023.
The Free Fire redeem codes are a great way to get free stuff. These are 12-digit codes that contain alphabets and numbers, as well as an expiration date and time. Because the Garena FF redeem codes cannot be used more than once, you should hurry to the redemption page to claim your free reward before someone else does. To get a free reward, all you have to do is go to reward.ff.garena.com/en, which is the official redemption page. Also, keep an eye on this space for daily updates on Garena Free Fire redemption codes and rewards.
Garena Free Fire Redeem Codes Today 11 July 2023
- FFCMCPSJ99S3
- MCPW2D1U3XA3
- UVX9PYZV54AC
- FFCMCPSGC9XZ
- MCPW3D28GZD6
- BR43FMAPYGZZ
- ZZZ76NT3GDSH
- HNC95435FAGJ
- XZJZE25WEFJJ
- FFCMCPSUYUY7E
- 6KWMFJVMQQYG
- FFCMCPSEN5MX
- MCPW2D2WKWF2
How to Get Free Fire Redeem Codes for Garena on 11 July 2023?
- Visit the Garena Free Fire game’s official website at reward.ff.garena.com.
- Use your Facebook, Google, VK, Apple ID, Huawei ID, or Twitter account to log in.
- You’ll be taken to a valid redemption code (s)
- Copy and paste the 12-digit redemption code into the text box.
- On the screen, a dialogue box will appear.
- ‘Ok’ should be selected.
Sony WF-C700N truly wireless stereo (TWS) earphones with ANC launched in India
 earphones with ANC launched in India")
Sony India today announced the launched Sony WF-C700N truly wireless stereo (TWS) earphones in India. The new TWS comes with Active noise cancellation (ANC) and easy button operation. It is claimed to provide up to 15 hours of battery life. You also get a hands-free calling experience on its multipoint connection too. The device is IPX4 rated for dust and water resistance.

Sony WF-C700N price in India and sale details
The Sony WF-C700N truly wireless stereo (TWS) earphones have been introduced with a price tag of Rs 8,990. They are made available in four colour options of Black, white, lavender and sage green. They are scheduled to go on sale from July 15 via Sony retail stores (Sony Center and Sony Exclusive), the www.ShopatSC.com portal, major electronic stores, and other e-commerce websites in India.
Sony WF-C700N specifications, features
The 5mm driver unit in the Sony WF-C700N TWS headset supports ANC and ambient noise modes. The WF-C700N’s DSEE (Digital Sound Enhancement Engine) produces high-quality audio. For playing back media, it supports the Bluetooth codecs SBC and AAC. The Sony Headphones Connect app’s EQ settings let you adjust the music to your tastes. It can employ noise cancellation to block out background noise or the Ambient Sound Mode to keep you in tune with your environment. Also Read: Samsung Galaxy Z Fold 5, Galaxy Z Flip 5 now up for pre-reservations in India: Details inside Within the Sony Headphones Connect app, you may customise the settings or use the Focus on Voice setting to chat without taking out your headphones. The Adaptive Sound Control modifies ambient sound settings according to your location and activity. The WF-C700N also offers dependable call quality because of its wind noise reduction design, which clearly delivers your voice even on windy days. The WF-C700N earbuds combine an ergonomic surface design for a more stable fit with a form that perfectly mimics the human ear, allowing you to listen for extended periods of time. You can take the earphones wherever you go because the cylindrical charging case is portable and simple to store in a pocket or backpack. WF-C700 are ideal for daily use because of their IPX4 splash- and sweat-proof construction. Voice commands utilising Google Assistant or Siri on an associated Android or iPhone are supported by the Sony WF-C700N TWS headset. The Sony WF-C700N headset supports Bluetooth 5.2 and provides a low-latency mode for watching videos. It also supports fast pairing for Android phones and Swift-Pair for Windows 11 and Windows 10 laptops. The WF-C700N has a Multipoint connection, allowing for simultaneous pairing with two Bluetooth devices. Your earbuds will immediately connect to the appropriate device when a call comes in since they are aware of which device is calling. The Sony WF-C700N TWS earphones have a battery life of up to 7.5 hours, with an additional 7.5 hours possible with the charging case and 10 hours when ANC is turned off. The business claims that a 10-minute charge will provide one hour of playing. For the latest gadget and tech news, and gadget reviews, follow us on Twitter, Facebook and Instagram. For newest tech & gadget videos subscribe to our YouTube Channel. You can also stay up to date using the Gadget Bridge Android App. You can find the latest car and bike news here.Oppo Enco Air 3 Pro with ANC and 12.4mm dynamic drivers launched in India

Alongside Oppo Reno 10, Reno 10 Pro, and Reno 10 Pro+ the company has also launched its new TWS in India. The Oppo Enco Air 3 Pro has been introduced and is a successor to last year’s Oppo Enco Air 2 Pro. The earphones come with a natural bamboo fibre diaphragm for clear and crisp audio. They also include an adaptive noise cancelling feature and offer IP55 dust and water resistance. In addition to this, the audio device is claimed to provide 30 hours of playback.

Oppo Enco Air 3 Pro price in India and sale details
The Oppo Enco Air 3 Pro has been launched in India with a price tag of Rs 4,999. These are scheduled to go on sale on July 11 via Flipkart, Amazon and the OPPO store at noon. The device comes in two colour options of green and white.
Oppo Enco Air 3 Pro specifications
The Oppo Enco Air 3 Pro are the first earbuds in the world to have a natural bamboo fibre diaphragm for crystal-clear sound. With an IP55 certification for water and dust resistance, they are ideal for outdoor activities. They have 12.4mm dynamic drivers that have a 20Hz to 40kHz frequency range. With LDAC, its high-definition audio reproduces reality, and its 49dB adaptive noise cancellation delivers an immersive listening environment. The Enco Air 3 Pro, is a Bluetooth-enabled device with Bluetooth version 5.3. and has a connection range of up to 10 metres. It supports LDAC, AAC, and SBC Bluetooth codecs. When watching movies on a smartphone, the OPPO Alive audio in the Enco Air 3 Pro provides spatial surround sound. Golden Sound 2.0, is another feature of the TWS, which creates a user-specific ear canal model after a short listening test to configure the buds specifically to the user’s hearing. There is a USB Type-C charging port on the casing. The charging case has a 440mAh battery, and each of the earbuds has a 43mAh battery. Thirty hours of listening fun are promised on a single charge. According to the manufacturer, it takes 120 minutes to fully charge both the charging case and the earphones. Charging just the earphones takes 90 minutes to complete. For the latest gadget and tech news, and gadget reviews, follow us on Twitter, Facebook and Instagram. For newest tech & gadget videos subscribe to our YouTube Channel. You can also stay up to date using the Gadget Bridge Android App. You can find the latest car and bike news here.Oppo Reno 10 5G, Oppo Reno 10 Pro 5G, Oppo Reno 10 Pro+ 5G debuts in India

Today marked the official launch of the Oppo Reno 10 5G series in India, which includes the standard Oppo Reno 10, Reno 10 Pro, and Reno 10 Pro+. The new phones come pre-installed with Android 13. They have a triple back camera arrangement and a 120Hz display. Additionally, each device comes with a 32-megapixel selfie camera. While the regular model includes a MediaTek chipset, both pro versions use Qualcomm processors as their power source.
Offers
Customers can avail of the following offers on the first sale of the OPPO Reno10 Pro+ 5G and OPPO Reno10 Pro 5G…
Oppo Reno 10 5G series price in India and sale details
The company is yet to decide on the price of the Oppo Reno 10 5G. According to the company, the price will be announced on July 20 at noon. The phone will come in two colour options of Ice Blue and Silvery Grey. On the other hand, Oppo Reno 10 Pro 5G will be priced at Rs 39,999. Lastly, the price of Oppo Reno 10 Pro+ 5G is set at Rs 54,999. Both the pro variants will be available in Glossy Purple and Silvery Grey and are scheduled to go on sale on July 13 via Flipkart, Oppo India online store, and leading retail stores in the country. Offers
Customers can avail of the following offers on the first sale of the OPPO Reno10 Pro+ 5G and OPPO Reno10 Pro 5G…
Offers
Customers can avail of the following offers on the first sale of the OPPO Reno10 Pro+ 5G and OPPO Reno10 Pro 5G…
- Customers can enjoy discounts of up to INR4000 on Flipkart and OPPO Stores, and no-cost EMI for up to 9 months on HDFC, ICICI Bank and SBI Cards.
- Customers can avail cashback of up to INR4000 from mainline retail outlets and no-cost EMI for up to 9 months on leading banks cards like SBI Cards, Kotak Bank, Bank of Baroda, IDFC First Bank, One Card, AU Small Finance.
- Customer can also avail cash back up to INR4000 on consumer loan partners like TVS Credit, HDB Financial & IDFC First Bank. Additionally, customers can enjoy the benefit of Zero Down Payment schemes from leading financers.
- Loyal OPPO customers can avail an Exchange + Loyalty Bonus of up to INR4000 online & offline.
- Users can enjoy free trials of YouTube Premium and Google One for up to 6 months through MyOPPO.
- Customers who buy a phone between 13th and 19th July can enter the MyOPPO raffle and win a trip to Dubai and other exciting prizes. Buy the Reno10Pro+ 5G and Reno10 Pro 5G between July 13 – July 31 and get OPPO Pad Air(4+128GB) at a discount of INR1500.
- All the issues/queries will be resolved within 24 working hours by a team of dedicated experts (Exclusive hotline – 9958808080)
- Free pick up and drop facility available across 13,000+ pin codes with resolution of issues within 72 hours of the complaint.
- OPPO offers affordable EMI for the service/repairs of smartphones. The lowest EMI starts from INR3200 from all the leading financiers. Customers will have the option to decide on EMI instalment and tenure at their convenience.
Oppo Reno 10 Pro+ 5G specifications
The Oppo Reno 10 Pro+ 5G features a 6.74-inch AMOLED 3D curved display with 1,240x 2,722 pixels of resolution. The screen supports up to 120Hz LTPS dynamic refresh rate, and up to 240Hz touch sampling rate. It also comes with HDR 10+ support 450ppi pixel density, 100 percent coverage of the DCI-P3 colour gamut, 93.9 percent screen-to-body ratio, and is rated to offer 1400 nits of peak brightness. The glass panel has Corning Gorilla Glass 5 coating. The phone runs on Android 13-based ColorOS 13.1 and is powered by an octa-core Qualcomm Snapdragon 8+ Gen 1 SoC, along with 12GB of LPDDR5 RAM (RAM can be extended further to 8GB) and up to 256GB of UFS 3.1 storage. There is a 3,500mm square VC liquid cooling surface area and X-Axis linear motor. In terms of optics, there is a triple rear camera setup that consists of a 64-megapixel periscope sensor with OIS (f/2.5 aperture), a 50-megapixel Sony IMX890 sensor with OIS ( f/1.8 aperture) and an 8-megapixel wide-angle lens. For selfies, there is a 32-megapixel sensor on the front panel. Reno 10 Pro+ 5G boasts a 4,700mAh battery with 100W SuperVOOC fast charging technology. In terms of connectivity, there is 5G, Wi-Fi 6, Bluetooth, NFC, GPS, and a USB Type-C port for charging. It also includes an in-display fingerprint sensor and face unlock, an accelerometer, an ambient light sensor, an ambient colour temperature sensor, an e-compass, a gyroscope, and an IR sensor.
Oppo Reno 10 Pro 5G specifications
Oppo Reno 10 Pro 5G features a 6.7-inch full-HD+ OLED 3D curved display with 1,080X 2,412 pixels of resolution. The screen supports up to 120Hz refresh rate, and up to 240Hz touch sampling rate. There is 93 percent screen-to-body ratio, 950 nits of peak brightness and 100 percent coverage of the DCI-P3 colour gamut. The device is powered by Android 13-based ColorOS 13.1 and comes equipped with an octa-core Snapdragon 778G 5G SoC with up to 12GB of RAM (expandable) and up to 256GB of UFS 3.1 storage. For the photos and videos, there is a triple rear camera setup that includes a 50-megapixel primary Sony IMX890 sensor (f/1.8) with OIS, a 32-megapixel telephoto sensor and an 8-megapixel wide-angle lens. There is a 32-megapixel front-facing camera for taking selfies. The device has a 4,600mAh battery with 80W SuperVOOC flash charging support.Oppo Reno 10 5G specifications
The Oppo Reno 10 5G’s display is similar to the Pro variant. Under the hood, there is an octa-core 6nm MediaTek Dimensity 7050 processor with 8GB of RAM and up to 256GB of UFS 3.1 storage. The Oppo Reno 10 5G features a triple rear camera unit with a 64-megapixel primary sensor with OIS and autofocus, a 32-megapixel telephoto sensor, and an 8-megapixel sensor. There is a 32-megapixel selfie camera as well. The handset also includes a 5,000mAh battery that offers 67W SuperVOOC flash charging support. For the latest gadget and tech news, and gadget reviews, follow us on Twitter, Facebook and Instagram. For newest tech & gadget videos subscribe to our YouTube Channel. You can also stay up to date using the Gadget Bridge Android App. You can find the latest car and bike news here.Here is how to transfer the WhatsApp Chat History via QR code (Android and iOS)
")
WhatsApp recently unveiled a new function for WhatsApp. Users will now be able to easily and securely move their chat history between devices. Currently, the transfer can only occur if both devices are running the same OS. The use of QR code authentication will now allow users to share their chat history. Larger attachments and messages can now be transferred from one device to another more quickly and easily thanks to the new capability.
Users no longer need to exit their apps on one device in order to move data to the other phone thanks to the new procedure. At the moment, users have the option of updating the backup on cloud services or using a third-party app to transfer their chat history.
With the new method, users do not have to close their apps on one device in order to transfer data to the other phone. The data is safe because it only travels between two devices, without the use of any third-party apps or cloud services. However, one must ensure that both of their phones have Android OS Lollipop 5.1, or Android 6 or higher installed in order to transfer the WhatsApp Chat History via QR code. Both the old and new iPhone models should have WhatsApp for iOS version 2.23.9.77 or higher installed in order to move chats over to iOS.
Also Read: 6 Easy Ways to Fix WhatsApp Call Not Ringing When iPhone is locked
Additionally, one needs to ensure the new phone isn’t registered on WhatsApp until the transfer process is complete. Additionally, WiFi must be turned on and connected to the same network on both devices.
How to transfer WhatsApp Chat History via QR code on Android Phone
- On your old Android device launch WhatsApp. Start by selecting More Options > Settings > Chats > Transfer chats.
- Install WhatsApp on the new device and sign up with the same number.
- Next, click on Start to Transfer chat history from the old phone.
- A QR code will show after the permissions are granted. You now need to scan the QR code on your old device.
- The procedure will start as soon as the request to connect the phone is approved.
- Tap Done when the import is complete.
How to transfer WhatsApp Chat History via QR code on iOS device
- Go to Settings > Chats > Transfer Chats to iPhone > Start after opening WhatsApp on the old iPhone.
- Install WhatsApp on the new iPhone and register.
- Tap on the continue option to Transfer chat history to iPhone.
- Scan the QR code displayed on your new device using the camera on your old phone.
- Once the transfer is finished you can set up your profile on the new iPhone.
Asus TUF gaming F15 laptop review: 11 Gen Intel CPU with RTX 2050 under 60K, worth buying?

While the Asus TUF gaming F15 FX506HF has been available in the international market for quite some time, it has finally arrived in India. We are aware that a high-quality gaming laptop costs a lot in India. You all arrived at the appropriate time and right place since this time we’ll be evaluating a min-budget-friendly gaming laptop with good to great features. We have the TUF gaming F15 laptop with RTX 2050 powered by an 11th Gen Intel processor. Yes, it is 2 generations old, but it can very well be a good initial gaming laptop for you. This is their newest TUF gaming laptop model for 2023 in India. Because of its specs, we were really excited. The performance, though, is impressive. It features an FHD 144Hz display and an Intel Core i5-11400H 11th Gen processor with Optimus NVIDIA GeForce RTX 2050 GPU. So is this the most powerful gaming laptop under 60K? Let’s find this out in this Asus TUF gaming F15 laptop review.
 It is a large and hefty laptop, but as it is a TUF model, it does not fall short in terms of durability. In addition to its military-grade ruggedness, its hinge, lid, and keyboard deck are all sturdy. A series of LED indicators with the TUF gaming branding above it can also be seen. These indications can be seen even when the lid is closed. The lid is simple to open with one hand. Another good feature is the keyboard deck’s smooth matte texture, which deters fingerprints. The vents on the keyboard deck’s top are for cool air intake, and the vents on the right side are for hot air outflow. This laptop has two more vents on the back for cooling.
 You receive a full-sized RGB keyboard that includes the numpad and the alphabet. The keyboard’s lighting options are now controlled by the Aura button. In addition, the keyboard is really smooth, and we have written many articles on it, including this one, without experiencing any problems.
You also get a rather sizable trackpad that supports all of the Windows motions. The main drawback is how quickly it smudges, giving the laptop a grimy appearance. However, while using movements like pinch-zoom, two-finger scrolling, and three-finger flicking, the touchpad responded quickly and precisely.
A charging port, Ethernet, HDMI, two USB C thunderbolt connectors, a USB port, and a 3.5mm headphone jack are all included in the Asus TUF gaming F15 laptop. Another USB 3.1 port is located on the opposite side. Through the Thunderbolt port, an external display can be connected.
You receive a full-sized RGB keyboard that includes the numpad and the alphabet. The keyboard’s lighting options are now controlled by the Aura button. In addition, the keyboard is really smooth, and we have written many articles on it, including this one, without experiencing any problems.
You also get a rather sizable trackpad that supports all of the Windows motions. The main drawback is how quickly it smudges, giving the laptop a grimy appearance. However, while using movements like pinch-zoom, two-finger scrolling, and three-finger flicking, the touchpad responded quickly and precisely.
A charging port, Ethernet, HDMI, two USB C thunderbolt connectors, a USB port, and a 3.5mm headphone jack are all included in the Asus TUF gaming F15 laptop. Another USB 3.1 port is located on the opposite side. Through the Thunderbolt port, an external display can be connected.
 Describing the display, the 15.6-inch FHD Anti-glare display on the Asus TUF gaming F15 laptop has a resolution of 1,920 x 1,080 pixels. 16:9 aspect ratio and 144Hz refresh rate are also supported. Additionally, the screen is 250 nits bright, which might seem low for some, but you are not going to take it out in the sun, so mostly it is fine. The Adaptive-Sync technology from VESA is also there.
The colour reproduction on the display appears good, and the contrast isn’t too poor either. The viewing angle is likewise pretty pleasant, with a reduction in saturation and brightness levels only noticeable at extreme angles.
The display of the TUF F15 isn’t the best we have seen in the segment, but it’s adequate for pleasant outside use (just not directly under the sun). If you can locate some sort of shade, though, it can be used just fine. The faster refresh rate is beneficial for everyday use as well as gaming. The 144Hz refresh rate makes the animations appear smooth. Since it is an anti-glare display, there are no reflections visible on the screen. Since the display doesn’t get particularly bright — as we already mentioned — and our room receives a lot of direct sunshine, it can occasionally feel a little dull during the day.
The laptop’s speakers don’t provide terrific sound and aren’t very good. When watching videos, one needs to utilise headphones or connect a speaker because the level is so low. The speaker is even less loud than the speaker of a smartphone. Which is very strange coming from Asus.
Even after experimenting with several equaliser presets in the volume settings, we were unable to settle on a pleasant audio experience.
A typical 720p HD web camera is located on top of the TUF F15 as expected. Despite not being particularly remarkable or spectacular, this is more than adequate for participating in casual video conversations. There isn’t a privacy shutter either.
Let’s finally discuss its battery life. A 48Wh battery is included with the Asus TUF gaming F15 laptop. Under our normal usage, which included online browsing and article writing, this system managed about two to two and a half hours of screen time.
Describing the display, the 15.6-inch FHD Anti-glare display on the Asus TUF gaming F15 laptop has a resolution of 1,920 x 1,080 pixels. 16:9 aspect ratio and 144Hz refresh rate are also supported. Additionally, the screen is 250 nits bright, which might seem low for some, but you are not going to take it out in the sun, so mostly it is fine. The Adaptive-Sync technology from VESA is also there.
The colour reproduction on the display appears good, and the contrast isn’t too poor either. The viewing angle is likewise pretty pleasant, with a reduction in saturation and brightness levels only noticeable at extreme angles.
The display of the TUF F15 isn’t the best we have seen in the segment, but it’s adequate for pleasant outside use (just not directly under the sun). If you can locate some sort of shade, though, it can be used just fine. The faster refresh rate is beneficial for everyday use as well as gaming. The 144Hz refresh rate makes the animations appear smooth. Since it is an anti-glare display, there are no reflections visible on the screen. Since the display doesn’t get particularly bright — as we already mentioned — and our room receives a lot of direct sunshine, it can occasionally feel a little dull during the day.
The laptop’s speakers don’t provide terrific sound and aren’t very good. When watching videos, one needs to utilise headphones or connect a speaker because the level is so low. The speaker is even less loud than the speaker of a smartphone. Which is very strange coming from Asus.
Even after experimenting with several equaliser presets in the volume settings, we were unable to settle on a pleasant audio experience.
A typical 720p HD web camera is located on top of the TUF F15 as expected. Despite not being particularly remarkable or spectacular, this is more than adequate for participating in casual video conversations. There isn’t a privacy shutter either.
Let’s finally discuss its battery life. A 48Wh battery is included with the Asus TUF gaming F15 laptop. Under our normal usage, which included online browsing and article writing, this system managed about two to two and a half hours of screen time.
Asus TUF gaming F15 laptop review: Design and Display
Let’s first examine the design before moving on to the performance. The simple appearance of the Asus TUF gaming F15 laptop is appealing. The TUF logo is embossed on the top, while the vents are designed like a honeycomb at the bottom. The rest of the chassis is made entirely of plastic, but the lid feels like it has a faux aluminium finish. It is a large and hefty laptop, but as it is a TUF model, it does not fall short in terms of durability. In addition to its military-grade ruggedness, its hinge, lid, and keyboard deck are all sturdy. A series of LED indicators with the TUF gaming branding above it can also be seen. These indications can be seen even when the lid is closed. The lid is simple to open with one hand. Another good feature is the keyboard deck’s smooth matte texture, which deters fingerprints. The vents on the keyboard deck’s top are for cool air intake, and the vents on the right side are for hot air outflow. This laptop has two more vents on the back for cooling.

 You receive a full-sized RGB keyboard that includes the numpad and the alphabet. The keyboard’s lighting options are now controlled by the Aura button. In addition, the keyboard is really smooth, and we have written many articles on it, including this one, without experiencing any problems.
 You also get a rather sizable trackpad that supports all of the Windows motions. The main drawback is how quickly it smudges, giving the laptop a grimy appearance. However, while using movements like pinch-zoom, two-finger scrolling, and three-finger flicking, the touchpad responded quickly and precisely.
A charging port, Ethernet, HDMI, two USB C thunderbolt connectors, a USB port, and a 3.5mm headphone jack are all included in the Asus TUF gaming F15 laptop. Another USB 3.1 port is located on the opposite side. Through the Thunderbolt port, an external display can be connected.
You also get a rather sizable trackpad that supports all of the Windows motions. The main drawback is how quickly it smudges, giving the laptop a grimy appearance. However, while using movements like pinch-zoom, two-finger scrolling, and three-finger flicking, the touchpad responded quickly and precisely.
A charging port, Ethernet, HDMI, two USB C thunderbolt connectors, a USB port, and a 3.5mm headphone jack are all included in the Asus TUF gaming F15 laptop. Another USB 3.1 port is located on the opposite side. Through the Thunderbolt port, an external display can be connected.
 Describing the display, the 15.6-inch FHD Anti-glare display on the Asus TUF gaming F15 laptop has a resolution of 1,920 x 1,080 pixels. 16:9 aspect ratio and 144Hz refresh rate are also supported. Additionally, the screen is 250 nits bright, which might seem low for some, but you are not going to take it out in the sun, so mostly it is fine. The Adaptive-Sync technology from VESA is also there.

Asus TUF gaming F15 laptop review: Performance
The 11th Gen Intel Core i5-11400H Processor, 2.7 GHz (12M Cache, up to 4.5 GHz, 6 Cores), is what powers our TUF F15 unit. It has a 4GB Optimus NVIDIA GeForce RTX 2050 Laptop GPU installed. The 512GB PCIe 3.0 NVMe M.2 SSD can be expanded using two PCIe slots, and the 16GB DDR4 RAM can be increased to 32GB using two DDR4 SO-DIMM slots. In India, this configuration costs about Rs 66,000, but after bank and credit card discounts you can get it for under Rs 60,000 (currently). Daily tasks can be easily handled using the laptop. On it, we viewed a lot of multimedia content with no lag or other issues. Our test results for the TUF gaming F15 laptop’s overall performance in Geekbench were: CPU Benchmark- Single-Core Score: 434
- Multi-Core Score: 2132
- OpenCL Score: 40320
 The colour reproduction on the display appears good, and the contrast isn’t too poor either. The viewing angle is likewise pretty pleasant, with a reduction in saturation and brightness levels only noticeable at extreme angles.
The display of the TUF F15 isn’t the best we have seen in the segment, but it’s adequate for pleasant outside use (just not directly under the sun). If you can locate some sort of shade, though, it can be used just fine. The faster refresh rate is beneficial for everyday use as well as gaming. The 144Hz refresh rate makes the animations appear smooth. Since it is an anti-glare display, there are no reflections visible on the screen. Since the display doesn’t get particularly bright — as we already mentioned — and our room receives a lot of direct sunshine, it can occasionally feel a little dull during the day.
The laptop’s speakers don’t provide terrific sound and aren’t very good. When watching videos, one needs to utilise headphones or connect a speaker because the level is so low. The speaker is even less loud than the speaker of a smartphone. Which is very strange coming from Asus.
Even after experimenting with several equaliser presets in the volume settings, we were unable to settle on a pleasant audio experience.
The colour reproduction on the display appears good, and the contrast isn’t too poor either. The viewing angle is likewise pretty pleasant, with a reduction in saturation and brightness levels only noticeable at extreme angles.
The display of the TUF F15 isn’t the best we have seen in the segment, but it’s adequate for pleasant outside use (just not directly under the sun). If you can locate some sort of shade, though, it can be used just fine. The faster refresh rate is beneficial for everyday use as well as gaming. The 144Hz refresh rate makes the animations appear smooth. Since it is an anti-glare display, there are no reflections visible on the screen. Since the display doesn’t get particularly bright — as we already mentioned — and our room receives a lot of direct sunshine, it can occasionally feel a little dull during the day.
The laptop’s speakers don’t provide terrific sound and aren’t very good. When watching videos, one needs to utilise headphones or connect a speaker because the level is so low. The speaker is even less loud than the speaker of a smartphone. Which is very strange coming from Asus.
Even after experimenting with several equaliser presets in the volume settings, we were unable to settle on a pleasant audio experience.
 A typical 720p HD web camera is located on top of the TUF F15 as expected. Despite not being particularly remarkable or spectacular, this is more than adequate for participating in casual video conversations. There isn’t a privacy shutter either.
Let’s finally discuss its battery life. A 48Wh battery is included with the Asus TUF gaming F15 laptop. Under our normal usage, which included online browsing and article writing, this system managed about two to two and a half hours of screen time.
A typical 720p HD web camera is located on top of the TUF F15 as expected. Despite not being particularly remarkable or spectacular, this is more than adequate for participating in casual video conversations. There isn’t a privacy shutter either.
Let’s finally discuss its battery life. A 48Wh battery is included with the Asus TUF gaming F15 laptop. Under our normal usage, which included online browsing and article writing, this system managed about two to two and a half hours of screen time.
Verdict
Overall, there is no doubt that this laptop can easily handle even the most demanding games on medium or lower settings. The TUF F15 would have been great for binge-watching if only its down-firing speakers were a little bit better! You will receive a full-sized chiclet keyboard with everything, including a dedicated Numpad. Additionally, the WASD keys receive a unique transparent flare that distinguishes them from the other keys. The display also doesn’t seem to be very bright. The price of the Asus TUF gaming F15 laptop is Rs 66,990 on both Amazon and the company’s website. And as said, after bank discounts you can get it for less than Rs 60K. But, yes there is a but, this is a machine that is dated and to some, it might not be appealing. Nevertheless, if you are looking for a good-budget gaming laptop, this just might be it.Asus TUF gaming F15 laptop pros
- Budget-friendly
- Can handle most of the games
- RGB keyboard
Asus TUF gaming F15 laptop cons
- The display isn’t bright
- Speaker volume is too low
- No privacy shutter for the webcam
BGMI redeem codes for 10 July 2023, claim and receive rewards and benefits

After being banned for nearly ten months, Battleground Mobile India, aka BGMI, is officially available again in India. BGMI fans are looking for ways to improve their game experience and one such method is the usage of redemption codes, which offers a variety of rewards and advantages using BGMI redeem codes players can gain access to new skins, outfits, loot crates, weapons and free UC and diamonds.
As mentioned earlier, these codes give users the chance to earn unique rewards and gain extra benefits while playing the game. This includes GUN SKINS (M4, AKM, M416, AWM, M24, UZI, KAR98K), free character voucher, Andy, Carlo, Sara, Victor character for free, free Anna Character on completing the mission and UC or Royal Pass Discount. So here we have gathered a list of the most recent BGMI redeem codes as of 10 July 2023. Also, redeem these codes asap as these are only valid for a limited duration.
BGMI Redeem Codes for 10 July 2023
KARZBZYTR JJCZCDZJ9U UKUZBZGWF SIWEST4YLXR TIFZBHZK4A GPHZDBTFZM24U RNUZBZ9QQ BMTCZBZMFS DKJU5LMBPY BBKTZEZET3 PGHZDBTFZ95U SD16Z66XHHHow to get free Redeem Codes for BGMI on 10 July 2023?
- Launch BGMI on your device.
- Then select the Redeem Code option from the main menu.
- Next, click on the Redeem code tab.
- A new window will open, requesting the redemption code.
- Now enter your BGMI code.
- Confirm and click on the “Redeem” tab.
- If your redeem code is valid then you will get a message confirming that your rewards were successfully redeemed.
Garena Free Fire Redeem Codes Today 10 July 2023: Here is how to claim them

Garena Free Fire is a battle royale game with regular awards and tournaments to keep players interested. If you play Garena Free Fire, you should be aware of the redeem codes that are released on a daily basis. However, because the battle royale game is banned in India, players from other countries can use the Free Fire Redeem codes daily. If you’re unfamiliar with the Garena Free Fire redeem codes or don’t know how to get them, we’ve put together a step-by-step guide to help you redeem them. Check out Garena Free Fire Redeem Codes for 10 July 2023.
The Free Fire redeem codes are a great way to get free stuff. These are 12-digit codes that contain alphabets and numbers, as well as an expiration date and time. Because the Garena FF redeem codes cannot be used more than once, you should hurry to the redemption page to claim your free reward before someone else does. To get a free reward, all you have to do is go to reward.ff.garena.com/en, which is the official redemption page. Also, keep an eye on this space for daily updates on Garena Free Fire redemption codes and rewards.
Garena Free Fire Redeem Codes Today 10 July 2023
- UVX9PYZV54AC
- BR43FMAPYEZZ
- 8F3QZKNTLWBZ
- WEYVGQC3CT8Q
- HNC95435FAGJ
- J3ZKQ57Z2P2P
- GCNVA2PDRGRZ
- MCPW3D28VZD6
- ZZZ76NT3PDSH
- EYH2W3XK8UPG
- NPYFATT3HGSQ
- 4ST1ZTBE2RP9
- X99TK56XDJ4X
- MCPW2D1U3XA3
- FFCMCPSEN5MX
- MCPW2D2WKWF2
- B3G7A22TWDR7X
- 6KWMFJVMQQYG
- FF7MUY4ME6SC
- FFCMCPSGC9XZ
How to Get Free Fire Redeem Codes for Garena on 10 July 2023?
- Visit the Garena Free Fire game’s official website at reward.ff.garena.com.
- Use your Facebook, Google, VK, Apple ID, Huawei ID, or Twitter account to log in.
- You’ll be taken to a valid redemption code (s)
- Copy and paste the 12-digit redemption code into the text box.
- On the screen, a dialogue box will appear.
- ‘Ok’ should be selected.
How to Mirror and Control Your Android Phone from Ubuntu?

While most screen mirroring apps do a good job of casting your phone’s display on a bigger screen, not many of them let you control your phone from another device. If you mirror your phone on a TV, you cannot use the remote controller to navigate through different apps. You still have to rely on your phone for that. PCs, on the other hand, offer more control options. Previously, we talked about how you can control your phone using a Windows PC. Now, let’s take a look at how you can mirror and control your Android phone from an Ubuntu (Linux) desktop.
Read Also: Top 7 Ways to Take a Screenshot on Mac, Windows, iPhone, & Android
Step 3: Select ‘Software Information’.
Step 4: Tap on ‘Build Number’ 7 times to enter Developer Mode.
Step 5: Go back to Settings, scroll all the way down, and select ‘Developer options’.
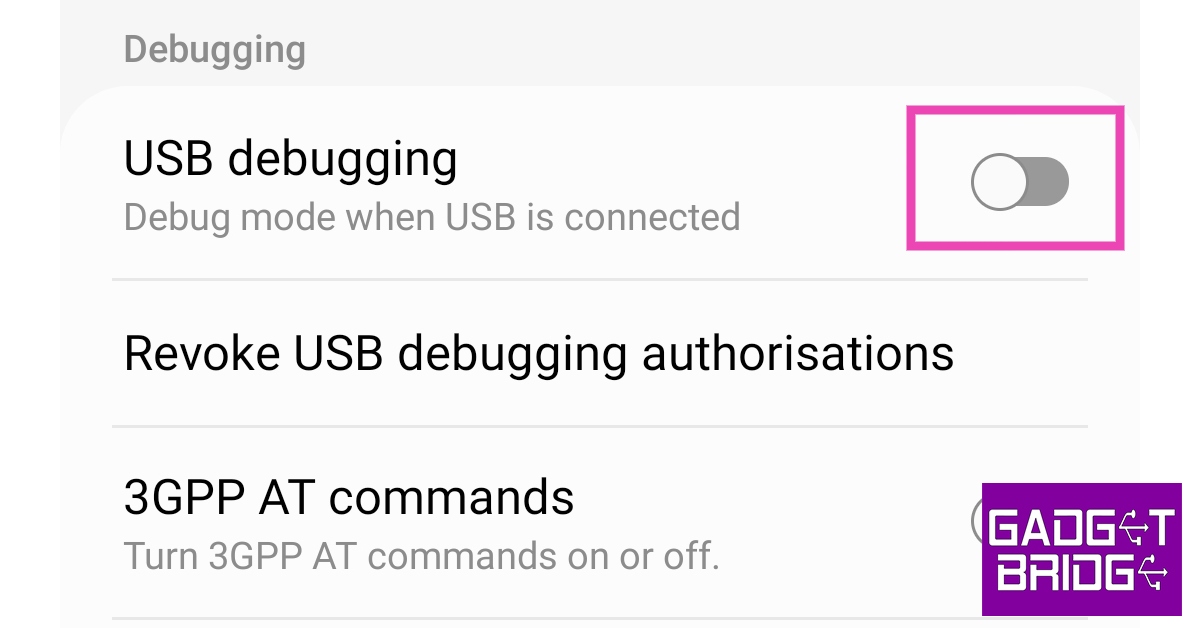
Step 6: Scroll down to the Debugging section and turn the toggle bar on for ‘USB debugging’.
Step 7: Connect your Android phone to the Ubuntu desktop using a USB cable.
Step 8: Launch Terminal using Ctrl + Alt + T key combination.
Step 9: Type scrcpy and hit Enter.
Step 10: Your Android phone will ask you to allow USB debugging. Select ‘OK’.
Your Android phone’s display will be mirrored on your Ubuntu PC and can be controlled from there.
Here’s how you can mirror and control your Android phone from an Ubuntu (Linux) PC
Step 1: Download Scrpy for Linux from Github. Next, you need to enable USB debugging on your Android phone. Here’s how. Step 2: Go to Settings and select About Phone. Step 3: Select ‘Software Information’.
 Step 4: Tap on ‘Build Number’ 7 times to enter Developer Mode.
 Step 5: Go back to Settings, scroll all the way down, and select ‘Developer options’.
 Step 6: Scroll down to the Debugging section and turn the toggle bar on for ‘USB debugging’.
 Step 7: Connect your Android phone to the Ubuntu desktop using a USB cable.
Step 8: Launch Terminal using Ctrl + Alt + T key combination.
Step 9: Type scrcpy and hit Enter.
Step 10: Your Android phone will ask you to allow USB debugging. Select ‘OK’.
Your Android phone’s display will be mirrored on your Ubuntu PC and can be controlled from there.
Step 7: Connect your Android phone to the Ubuntu desktop using a USB cable.
Step 8: Launch Terminal using Ctrl + Alt + T key combination.
Step 9: Type scrcpy and hit Enter.
Step 10: Your Android phone will ask you to allow USB debugging. Select ‘OK’.
Your Android phone’s display will be mirrored on your Ubuntu PC and can be controlled from there.
Frequently Asked Questions (FAQs)
How do I mirror my Android phone’s display on Ubuntu?
You can mirror your phone’s display on an Ubuntu PC using the Scrcpy tool.How to control an Android phone from Ubuntu?
The Scrcpy tool for Ubuntu lets you mirror and control your Android phone from your Ubuntu PC.Does Ubuntu have Miracast?
Yes, Ubuntu supports Miracast wireless displays. Read Also: How to change the username of your Threads account?Conclusion
This is how you can mirror and control your Android phone from an Ubuntu (Linux) PC. Once you’re able to view your smartphone’s display on your PC, you can use the keyboard and mouse to control it. This is a great way to play Android games on your PC without using an Android emulator. For the latest gadget and tech news, and gadget reviews, follow us on Twitter, Facebook and Instagram. For newest tech & gadget videos subscribe to our YouTube Channel. You can also stay up to date using the Gadget Bridge Android App. You can find the latest car and bike news here.Top 5 Ways to Find Hidden Apps on an iPhone

Hiding apps on your iPhone serves a lot of purposes. Firstly, it is a great way of keeping your personal and financial apps away from prying eyes. It also comes in quite handy for people who want to break their social media addiction but also don’t want to uninstall all the apps on their phones. Hiding an app can deter you from constantly opening it on your phone. While you may know how to hide an app, it is also important that you know how to search for it and unhide it. In this article, we bring you the top 5 ways to find hidden apps on your iPhone.
Read Also: Top 7 Ways to Take a Screenshot on Mac, Windows, iPhone, & Android
The Spotlight tab on iOS devices can access hidden apps as well and bring them up in search results whenever they are requested. To perform an app search on your iPhone using Spotlight, simply swipe down from the middle of the home screen. Enter the name of the app in the search bar. Spotlight will display the app even if it is hidden from the home screen.
Step 2: Select ‘Transfer or Reset iPhone’.
Step 3: Tap on ‘Home Screen Layout’.
Step 5: Select ‘Done’.
Step 2: Search for the app in the search bar. If you have prevented the app from showing up in search results, go ahead and change that setting.
Step 3: Once the app shows up in search results, long press it and drag it to the left. The app will be moved to the home screen.
Step 4: Adjust the app’s position on the home screen by pressing and dragging it. Tap ‘Done’ once you’re done.
Perform a search using Spotlight
 The Spotlight tab on iOS devices can access hidden apps as well and bring them up in search results whenever they are requested. To perform an app search on your iPhone using Spotlight, simply swipe down from the middle of the home screen. Enter the name of the app in the search bar. Spotlight will display the app even if it is hidden from the home screen.
Reset Home Screen Layout
Restoring your iPhone’s home screen to its original layout unhides all the apps that you may have stashed away. Here’s how you can go about it. Step 1: Go to Settings and select General.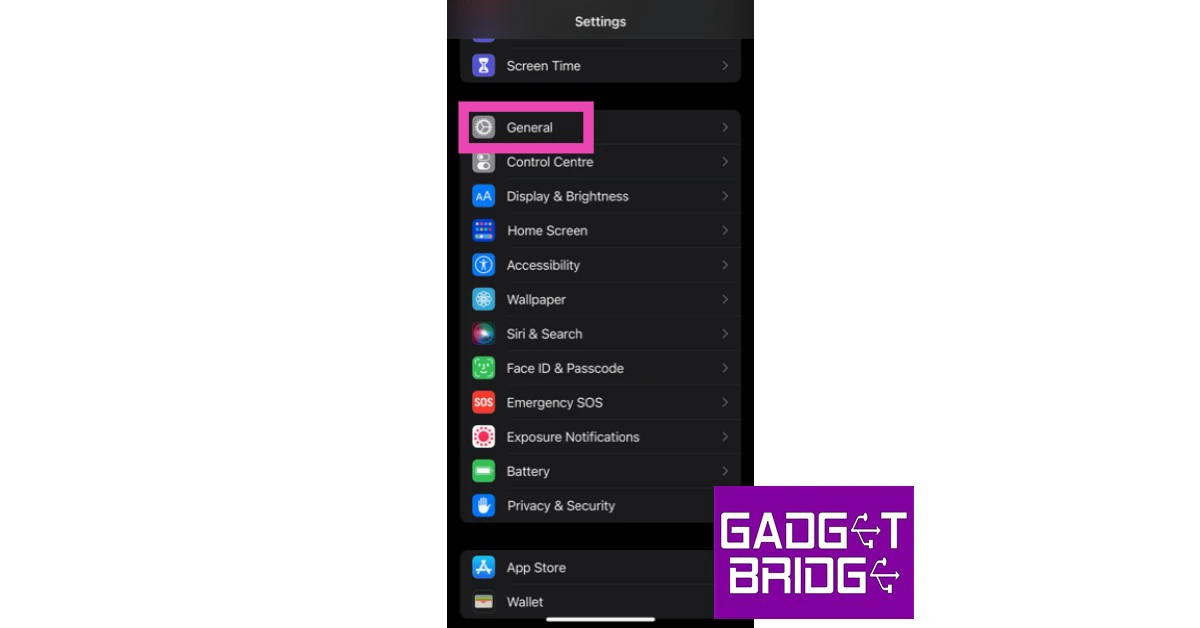 Step 2: Select ‘Transfer or Reset iPhone’.
 Step 3: Tap on ‘Home Screen Layout’.

Unhide a home screen
iOS also gives you the option to hide an entire home screen on your iPhone. If you notice multiple apps missing from your iPhone, you may have accidentally hidden an entire home screen. Here’s how you can unhide it. Step 1: Long press any empty spot on the home screen until the icons begin jiggling. Step 2: Tap the ellipses at the bottom of the screen. Step 3: Go through the home screens and look for a checkmark at the bottom of the screen card. Step 4: If a home screen does not have a checkmark on its card, it means that it is hidden. Tap the circle to unhide it. Step 5: Select ‘Done’.
Unhide apps using the App Library
Step 1: Go to the home screen and scroll all the way to the right. Step 2: Search for the app in the search bar. If you have prevented the app from showing up in search results, go ahead and change that setting.
Step 3: Once the app shows up in search results, long press it and drag it to the left. The app will be moved to the home screen.
Step 2: Search for the app in the search bar. If you have prevented the app from showing up in search results, go ahead and change that setting.
Step 3: Once the app shows up in search results, long press it and drag it to the left. The app will be moved to the home screen.
 Step 4: Adjust the app’s position on the home screen by pressing and dragging it. Tap ‘Done’ once you’re done.

Use Siri
If you can’t find a hidden app on your iPhone, you can simply ask Siri to launch it for you. All you need to say is ‘Hey Siri, launch [app name]’ and the voice assistant will open the app on your iPhone. It’s a simple trick but it works.Frequently Asked Questions (FAQs)
How do I unhide an app on my iPhone?
To unhide an app on an iPhone simply search for it in Spotlight or App Library, press and hold its icon, and drag it back to the home screen.How do I unhide a home screen on my iPhone?
To unhide an entire home screen on your iPhone, long press an empty spot on the home screen and press an empty circle on the thumbnail for the hidden screen.How do I reset the home screen layout on an iPhone?
To reset the home screen layout on an iPhone go to Settings>General>Reset and select Home Screen Layout. Read Also: 10 Easy Ways to Fix ‘Call Failed’ Error on iPhone (2023)Conclusion
This is how you can unhide and find hidden apps on your iPhone. If you don’t want a hidden app to show up as a search result, go to Settings>Siri & Search>App>On Home Screen and switch off the toggle bar for ‘Show app in search results’. This will prevent Spotlight, Siri, and App Library from searching the app. For the latest gadget and tech news, and gadget reviews, follow us on Twitter, Facebook and Instagram. For newest tech & gadget videos subscribe to our YouTube Channel. You can also stay up to date using the Gadget Bridge Android App. You can find the latest car and bike news here.How to Use an Android Device to Write Raspberry Pi SD Cards?

Raspberry Pi is an affordable and portable (fits inside your pocket!) computer that can connect to any monitor, keyboard, and mouse and carry out basic computing tasks. You can browse the web, make a Word file, play a video, and more. Since it is a compact device, you need an SD card to boot the Raspberry Pi OS. Typically, you need a PC to create a bootable SD card, but it is possible to do that with an Android phone as well. In this article, we show you how to use an Android device to write Raspberry Pi SD cards.
Read Also: How to change the username of your Threads account?
Step 5: Tap on ‘Choose OS’.
Step 6: Select the checkbox for Pi 4 at the top of the screen.
Step 7: Select Raspberry Pi OS (32-bit) (3.2 GB) to download all the Raspberry Pi OS installation files on your Android phone.
Step 8: Tap the ellipses at the top right corner of the screen again and select ‘Choose SD or USB’. Select your SD card drive from the list.
Step 9: Select the checkbox for ‘Enable SSH for remote login (raspbian)’.
Step 10: Select ‘Write to SD’. This will take a few minutes.
Step 11: Pull out the micro SD card once the writing process is over. Insert it into the Raspberry Pi.
Step 12: Boot the Raspberry Pi.
Here’s how you can write a Raspberry Pi SD card using an Android device
Step 1: Install Pi SD Card Imager app on your Android smartphone. Step 2: Place the micro SD card in its dedicated slot. Most Android smartphones have a hybrid SIM tray that doubles as a micro SD card slot as well. If your smartphone does not support expandable memory, you will need an external card reader for this task. The card reader can be connected to your smartphone using an OTG adapter. Step 3: Launch the Pi SD Card Imager app. Step 4: Tap the ellipses at the top right corner of the screen. Step 5: Tap on ‘Choose OS’.
 Step 6: Select the checkbox for Pi 4 at the top of the screen.
Step 7: Select Raspberry Pi OS (32-bit) (3.2 GB) to download all the Raspberry Pi OS installation files on your Android phone.
Step 6: Select the checkbox for Pi 4 at the top of the screen.
Step 7: Select Raspberry Pi OS (32-bit) (3.2 GB) to download all the Raspberry Pi OS installation files on your Android phone.
 Step 8: Tap the ellipses at the top right corner of the screen again and select ‘Choose SD or USB’. Select your SD card drive from the list.
 Step 9: Select the checkbox for ‘Enable SSH for remote login (raspbian)’.
Step 10: Select ‘Write to SD’. This will take a few minutes.
Step 9: Select the checkbox for ‘Enable SSH for remote login (raspbian)’.
Step 10: Select ‘Write to SD’. This will take a few minutes.
 Step 11: Pull out the micro SD card once the writing process is over. Insert it into the Raspberry Pi.
Step 12: Boot the Raspberry Pi.
Step 11: Pull out the micro SD card once the writing process is over. Insert it into the Raspberry Pi.
Step 12: Boot the Raspberry Pi.
Frequently Asked Questions (FAQs)
How to install Raspberry Pi OS on an SD card using an Android phone?
You need the Pi SD Card Imager app to install Raspberry Pi OS on an SD card. Once you run the app, it will download all the installation files and write them on the card.How to make a bootable Raspberry Pi SD card?
Making a bootable Raspberry Pi SD card typically requires a PC, but you can do it with your Android phone as well, using the Pi SD Card Imager app.How do I use an SD card on my Android phone if it doesn’t have a micro SD slot?
If your Android phone does not have a micro SD card slot, you can connect it to an external card reader using an OTG adapter. Read Also: Samsung Galaxy M34 5G with 6,000mAh battery launched in IndiaConclusion
This is how you can use an Android device to write Raspberry Pi SD cards. While there are several apps you can use to install Raspberry Pi OS on an SD card, we suggest going with Pi SD Card Imager. If you found this article helpful, let us know in the comments! For the latest gadget and tech news, and gadget reviews, follow us on Twitter, Facebook and Instagram. For newest tech & gadget videos subscribe to our YouTube Channel. You can also stay up to date using the Gadget Bridge Android App. You can find the latest car and bike news here.How to Connect a PS3 Controller to an Android Phone?

Playing games with a PS3 controller is one of the most fun things you can do on your Android phone. The are a couple of ways you can go about pairing the two devices together. You can choose to connect them wirelessly, which takes some time and effort, or go the easier route and connect them with an OTG cable. In this article, we show you the two ways you can connect a PS3 controller to an Android phone.
Read Also: Samsung Galaxy M34 5G with 6,000mAh battery launched in India
The common method of connecting your PS3 controller to an Android phone is through the Sixaxis app. The only catch is that you will need to root your Android phone to use this app. Don’t know how to root your phone? Check out this article for the full guide.
Step 1: Before you begin, you should check whether the app is compatible with your phone. Install the Sixaxis Compatibility Checker app to find out if your phone is compatible with the app.
Step 2: Install the Sixaxis Controller app on your phone.
Step 3: Connect your PS3 controller to your Android phone using a USB cable.
Step 4: Tap the Start icon on the Sixaxis Controller app.
Step 5: Tap on ‘Pair’.
Step 6: Make sure your Android phone and PS3 controller’s Bluetooth address match.
Step 7: Now, tap ‘Pair’ in the pop-up box.
Step 8: Once the app says ‘Master address updated’ unplug your PS3 controller.
Step 9: Turn on the controller. It will form a Bluetooth connection with your Android phone.
 If you don’t want to root your Android phone, you can still connect it to your PS3 controller using an OTG adapter. Simply plug the cable into the USB port of your phone. Pull out your controller, and plug it into the USB Type-A port of the OTG adapter. Once the connection has been established, you can use your PS3 controller to play games on your Android phone.
Use the Sixaxis Controller app
 The common method of connecting your PS3 controller to an Android phone is through the Sixaxis app. The only catch is that you will need to root your Android phone to use this app. Don’t know how to root your phone? Check out this article for the full guide.
Step 1: Before you begin, you should check whether the app is compatible with your phone. Install the Sixaxis Compatibility Checker app to find out if your phone is compatible with the app.
Step 2: Install the Sixaxis Controller app on your phone.
Step 3: Connect your PS3 controller to your Android phone using a USB cable.
Step 4: Tap the Start icon on the Sixaxis Controller app.
Step 5: Tap on ‘Pair’.
Step 6: Make sure your Android phone and PS3 controller’s Bluetooth address match.
Step 7: Now, tap ‘Pair’ in the pop-up box.
Step 8: Once the app says ‘Master address updated’ unplug your PS3 controller.
Step 9: Turn on the controller. It will form a Bluetooth connection with your Android phone.
The common method of connecting your PS3 controller to an Android phone is through the Sixaxis app. The only catch is that you will need to root your Android phone to use this app. Don’t know how to root your phone? Check out this article for the full guide.
Step 1: Before you begin, you should check whether the app is compatible with your phone. Install the Sixaxis Compatibility Checker app to find out if your phone is compatible with the app.
Step 2: Install the Sixaxis Controller app on your phone.
Step 3: Connect your PS3 controller to your Android phone using a USB cable.
Step 4: Tap the Start icon on the Sixaxis Controller app.
Step 5: Tap on ‘Pair’.
Step 6: Make sure your Android phone and PS3 controller’s Bluetooth address match.
Step 7: Now, tap ‘Pair’ in the pop-up box.
Step 8: Once the app says ‘Master address updated’ unplug your PS3 controller.
Step 9: Turn on the controller. It will form a Bluetooth connection with your Android phone.
Use an OTG adapter
 If you don’t want to root your Android phone, you can still connect it to your PS3 controller using an OTG adapter. Simply plug the cable into the USB port of your phone. Pull out your controller, and plug it into the USB Type-A port of the OTG adapter. Once the connection has been established, you can use your PS3 controller to play games on your Android phone.
Frequently Asked Questions (FAQs)
How do I wirelessly connect my PS3 controller to my Android phone?
You will need the Sixaxis app to wirelessly connect your PS3 controller to your Android phone. Sixaxis demands root access to your device.How do I connect my PS3 controller to my Android phone without rooting it?
The simplest way to connect your PS3 controller to your Android phone is by using an OTG cable.Can I play games on my Android phone using my PS3 controller?
Once your controller and phone are paired, you can use it to play games on your phone. Go to input methods in the in-game menu and select your controller before playing the game. Read Also: Viewsonic VP-16 OLED monitor launched in IndiaConclusion
These are the two ways to connect a PlayStation 3 controller to an Android phone. If you don’t mind a wired connection, we’d suggest using an OTG cable since it does not require you to root your device. However, if you don’t want to settle for anything less than a wireless connection, you will need to root your Android phone. For the latest gadget and tech news, and gadget reviews, follow us on Twitter, Facebook and Instagram. For newest tech & gadget videos subscribe to our YouTube Channel. You can also stay up to date using the Gadget Bridge Android App. You can find the latest car and bike news here.BGMI redeem codes for 8 July 2023, claim and receive rewards and benefits

After being banned for nearly ten months, Battleground Mobile India, aka BGMI, is officially available again in India. BGMI fans are looking for ways to improve their game experience and one such method is the usage of redemption codes, which offers a variety of rewards and advantages using BGMI redeem codes players can gain access to new skins, outfits, loot crates, weapons and free UC and diamonds.
As mentioned earlier, these codes give users the chance to earn unique rewards and gain extra benefits while playing the game. This includes GUN SKINS (M4, AKM, M416, AWM, M24, UZI, KAR98K), free character voucher, Andy, Carlo, Sara, Victor character for free, free Anna Character on completing the mission and UC or Royal Pass Discount. So here we have gathered a list of the most recent BGMI redeem codes as of 8 July 2023. Also, redeem these codes asap as these are only valid for a limited duration.
BGMI Redeem Codes for 8 July 2023
JJCZCDZJ9U – Golden Pan UKUZBZGWF – Free Fireworks TIFZBHZK4A – Free Outfit RNUZBZ9QQ – AKM Glacier Skin TQIZBZ76F – Vehicle Skin 5FG10D33 – Falcon and Free Emotes GPHZDBTFZM24U – UMP9 Skin KARZBZYTR – Free Outfit PGHZDBTFZ95U – M416 Skin R89FPLM9S – Companion TQIZBz76F – 3 Free Motorcycle BMTFZBZQNC – Free Drifter Set SD14G84FCC – Free Skin for KAR98 Sniper Gun RNUZBZ9QQ – AKM Glacier Skin BMTCZBZMFS – Pretty in Pink set and Pretty in Pink Headpiece 5FG10D33 – Outfit for FreeHow to get free Redeem Codes for BGMI on 8 July 2023?
- Launch BGMI on your device.
- Then select the Redeem Code option from the main menu.
- Next, click on the Redeem code tab.
- A new window will open, requesting the redemption code.
- Now enter your BGMI code.
- Confirm and click on the “Redeem” tab.
- If your redeem code is valid then you will get a message confirming that your rewards were successfully redeemed.
Garena Free Fire Redeem Codes Today 8 July 2023: Here is how to claim them

Garena Free Fire is a battle royale game with regular awards and tournaments to keep players interested. If you play Garena Free Fire, you should be aware of the redeem codes that are released on a daily basis. However, because the battle royale game is banned in India, players from other countries can use the Free Fire Redeem codes daily. If you’re unfamiliar with the Garena Free Fire redeem codes or don’t know how to get them, we’ve put together a step-by-step guide to help you redeem them. Check out Garena Free Fire Redeem Codes for 8 July 2023.
The Free Fire redeem codes are a great way to get free stuff. These are 12-digit codes that contain alphabets and numbers, as well as an expiration date and time. Because the Garena FF redeem codes cannot be used more than once, you should hurry to the redemption page to claim your free reward before someone else does. To get a free reward, all you have to do is go to reward.ff.garena.com/en, which is the official redemption page. Also, keep an eye on this space for daily updates on Garena Free Fire redemption codes and rewards.
Garena Free Fire Redeem Codes Today 8 July 2023
J3ZKQ57Z2P2P FFICJGW9NKYT XUW3FNK7AV8N B3G7A22TWDR7X 31BBMSL7AK8G 8F3QZKNTLWBZ WEYVGQC3CT8Q GCNVA2PDRGRZ FF7MUY4ME6SC 4ST1ZTBE2RP9 X99TK56XDJ4X FFCMCPSJ99S3 MCPW3D28VZD6 GCNVA2PDRGRZ 4ST1ZTBE2RP9 FFCMCPSUYUY7E EYH2W3XK8UPG UVX9PYZV54AC ZZZ76NT3PDSH XZJZE25WEFJJ V427K98RUCHZ B3G7A22TWDR7X 6KWMFJVMQQYG 31BBMSL7AK8G J3ZKQ57Z2P2PHow to Get Free Fire Redeem Codes for Garena on 8 July 2023?
- Visit the Garena Free Fire game’s official website at reward.ff.garena.com.
- Use your Facebook, Google, VK, Apple ID, Huawei ID, or Twitter account to log in.
- You’ll be taken to a valid redemption code (s)
- Copy and paste the 12-digit redemption code into the text box.
- On the screen, a dialogue box will appear.
- ‘Ok’ should be selected.
Top 7 Ways to Take a Screenshot on Mac, Windows, iPhone, & Android

Screenshots are an easy way to record the information on the screen and share it with your contacts. Once you get your hands on a new device, you should know how to capture its screen. While you may be familiar with the standard way of taking a screenshot, there are a few other tricks you can use as well. In this article, we bring you the top 7 ways to take a screenshot on a Mac, Windows PC or laptop, iPhone, and Android smartphone.
Read Also: How to join Threads without linking your Instagram account?
Pressing the ‘PrtScn’ (print screen) key is the quickest way to take a screenshot on your Windows PC and laptop. On systems running Windows 11, it will trigger the screenshot control bar. You can simply select the area of the screen that you want in the screenshot. The image will be saved as soon as you release the cursor. Devices running Windows 10 or older will simply copy the screenshot on the clipboard when the prtsc key is pressed. You can paste the screenshot on any photo editor using the Ctrl + V key combination.
Windows’ native Snipping Tool app comes in very handy while taking screenshots. Simply search ‘Snipping Tool’ in the Windows search bar and once you’ve opened the app, select ‘New’. Select the area on the screen you want to capture. Once you’ve selected the area, the Snipping Tool will open the screenshot on a preview window where you can further edit it.
Step 2: Select Touch and tap on ‘Back tap’.
Step 3: After you’ve turned on the toggle bar for Back Tap, choose the appropriate trigger. We suggest a double-tap trigger as it is much easier to use.
Step 4: Choose ‘Screenshot’ as the action for the trigger you have selected.
To take a quick screenshot on your Android smartphone, simply press the Volume Down + Power keys together. If you’re using an old Android device with a dedicated home button, press Power Key + Home Button to take a screenshot. Make sure you press both buttons at the same time to take a screenshot. Pressing either button even a tiny bit earlier will not capture the screenshot.
If your Volume keys aren’t working, you can take a screenshot from the Quick Settings menu on your Android phone or tablet. Simply swipe down from the status bar and tap on ‘Screenshot’. Once you press on the tile, your smartphone will capture the screen you are on after rolling up the quick settings menu.
Take a screenshot on Mac
There are a few ways you can go about taking a screenshot on an Apple Mac. In order to capture the entire screen, press Shift + command + 3. To capture a portion of the screen, press Shift + command + 4. Drag the crosshair to select the area you want to capture. Once the release the mouse/trackpad, your Mac will take a screenshot of the selected area.Take a screenshot on Windows
Here are some of the different ways you can take a screenshot on your Windows PC or laptop.Use the PrtScn key
 Pressing the ‘PrtScn’ (print screen) key is the quickest way to take a screenshot on your Windows PC and laptop. On systems running Windows 11, it will trigger the screenshot control bar. You can simply select the area of the screen that you want in the screenshot. The image will be saved as soon as you release the cursor. Devices running Windows 10 or older will simply copy the screenshot on the clipboard when the prtsc key is pressed. You can paste the screenshot on any photo editor using the Ctrl + V key combination.
Snipping Tool
 Windows’ native Snipping Tool app comes in very handy while taking screenshots. Simply search ‘Snipping Tool’ in the Windows search bar and once you’ve opened the app, select ‘New’. Select the area on the screen you want to capture. Once you’ve selected the area, the Snipping Tool will open the screenshot on a preview window where you can further edit it.
Take a screenshot on your iPhone
Here are some easy ways to take a screenshot on an iPhone.Use the key combination
The most common way to take a screenshot on an iPhone is by pressing the Volume Up button + Side Key. This works on iPhones with Face ID. On older iPhones with a dedicated home button, press the top key + home button to take a screenshot.Use Back Tap
Want to take a screenshot by simply tapping your iPhone’s back two times? Follow these steps. Step 1: Go to Settings and select Accessibility. Step 2: Select Touch and tap on ‘Back tap’.
 Step 3: After you’ve turned on the toggle bar for Back Tap, choose the appropriate trigger. We suggest a double-tap trigger as it is much easier to use.
Step 4: Choose ‘Screenshot’ as the action for the trigger you have selected.
Step 3: After you’ve turned on the toggle bar for Back Tap, choose the appropriate trigger. We suggest a double-tap trigger as it is much easier to use.
Step 4: Choose ‘Screenshot’ as the action for the trigger you have selected.

Take a screenshot on Android
Here are some of the ways to take a screenshot on an Android smartphone.Use the key combination
 To take a quick screenshot on your Android smartphone, simply press the Volume Down + Power keys together. If you’re using an old Android device with a dedicated home button, press Power Key + Home Button to take a screenshot. Make sure you press both buttons at the same time to take a screenshot. Pressing either button even a tiny bit earlier will not capture the screenshot.
Use the screenshot option from Quick Settings
 If your Volume keys aren’t working, you can take a screenshot from the Quick Settings menu on your Android phone or tablet. Simply swipe down from the status bar and tap on ‘Screenshot’. Once you press on the tile, your smartphone will capture the screen you are on after rolling up the quick settings menu.
Frequently Asked Questions (FAQs)
How do I take a screenshot on iPhone?
Press the Volume Down key + Side key to take a screenshot on your iPhone.How do I take a screenshot on my Android phone?
To take a screenshot on your Android phone, press the Volume Down key + Power key at the same time.How do I take a screenshot on my Windows PC or laptop?
To take a screenshot on your Windows device, simply press the PrtScn key on your keyboard and drag the cursor over the area you want to capture. Read Also: Spotify is completely removing Apple’s App Store payments from its platformConclusion
This is how you can take a screenshot on a Mac, Windows PC or laptop, iPhone, and Android phone. You can instantly edit your screenshot using Markup on an iPhone. Android phones also have an easily accessible editor that lets you crop, highlight, and add text to the screenshot. On a laptop, however, you will need to use a dedicated photo editor to make changes to a screenshot. For the latest gadget and tech news, and gadget reviews, follow us on Twitter, Facebook and Instagram. For newest tech & gadget videos subscribe to our YouTube Channel. You can also stay up to date using the Gadget Bridge Android App. You can find the latest car and bike news here.How to change the username of your Threads account?

Within the first few days of its launch, Threads has taken the Internet by storm. The social media platform has gathered over 55 million users so far and is expected to maintain a similar pace in the coming days. Earlier thought to be a standalone rival to Twitter, users were surprised at how closely Threads is linked to Instagram. You can only join Threads with an Instagram account, and the usernames of the two profiles are synced together. So, how do you go about changing the username of your Threads account? Let’s take a look.
Read Also: Nothing Ear 2 Black debuts in India, two new features also introduced
Step 3: Tap on ‘Edit Profile’.
Step 4: Tap the text field under ‘Username’.
Step 5: Enter a new username.
Step 6: Hit the tick icon at the top right corner of the screen.
Your Instagram and Threads usernames will be changed.
Here’s how you can change your Threads username
Your Threads account is linked to your Instagram profile. In order to change your Threads username you will need to change your Instagram handle, since both accounts share a common username. Here’s how you can go about it. Step 1: Launch the Instagram app on your smartphone. Step 2: Tap the profile icon at the bottom right corner of the screen. Step 3: Tap on ‘Edit Profile’.
 Step 4: Tap the text field under ‘Username’.
 Step 5: Enter a new username.
 Step 6: Hit the tick icon at the top right corner of the screen.
Your Instagram and Threads usernames will be changed.
Step 6: Hit the tick icon at the top right corner of the screen.
Your Instagram and Threads usernames will be changed.
Frequently Asked Questions (FAQs)
How do I change my username on Threads?
Since your Threads account is linked to your Instagram profile, they both share the same username. In order to change your Threads username, you will have to change your Instagram handle.What is my Threads username?
Your Threads username is the same as your Instagram handle.How many users does Threads have?
Within 24 hours of its launch, over 30 million users signed up for Threads. Currently, the social media platform has over 55 million users, and the number is expected to rapidly rise in the coming days. Read Also: OnePlus Nord CE 3 powered by Snapdragon 782G SoC launched in IndiaConclusion
This is how you can change your username on Threads. Your Threads account is so closely linked with your Instagram profile that it feels more like an extension of the latter rather than a standalone app. You cannot delete your Threads profile without deleting your Instagram account. At best, you can deactivate it. For the latest gadget and tech news, and gadget reviews, follow us on Twitter, Facebook and Instagram. For newest tech & gadget videos subscribe to our YouTube Channel. You can also stay up to date using the Gadget Bridge Android App. You can find the latest car and bike news here.Samsung Galaxy M34 5G with 6,000mAh battery launched in India

The introduction of a new smartphone by Samsung in the Indian market was formally announced today. The Samsung Galaxy M34 5G is the latest addition to the company’s M-Series portfolio. In the nation, Amazon will be the place to get the gadget. A 50-megapixel primary sensor with optical image stabilisation (OIS) capability is a feature of the gadget. Additionally, Samsung’s Nightography feature and a Fun Mode with 16 built-in lens effects are included. A 120Hz display and an Exynos 1280 SoC are also included with the M34. In addition, the phone utilises One UI 5.1, which is based on Android 13.
The phone is being offered in three colour options of Prism Silver, Midnight Blue and Waterfall Blue. The device is scheduled to go on sale from July 15 via Amazon and Samsung online stores. M34 is currently up for pre-orders.
Samsung Galaxy M34 price in India and sale details
Samsung Galaxy M34 has been launched in India with a starting price of Rs 17,999 for the 6GB RAM with 128GB storage. There is an 8GB RAM with 128GB storage option as well that will retail at Rs 18,999. However, the company is offering the phone at a special launch price of Rs 16,999 and Rs 18,999 respectively. The phone is being offered in three colour options of Prism Silver, Midnight Blue and Waterfall Blue. The device is scheduled to go on sale from July 15 via Amazon and Samsung online stores. M34 is currently up for pre-orders.
Samsung Galaxy M34 specifications
The Full HD+ 6.5-inch display of the Samsung Galaxy M34 has a refresh rate of 120 Hz. The screen is shielded by Corning Gorilla Glass 5 and has a brightness of 1000 nits. The device runs OneUI 5.1, an Android 13-based operating system, and will receive four years of Android software upgrades and five years of security fixes. Inside, there is a built-in Exynos 1280 SoC with a Mali-G68 MP4 GPU, up to 8GB of RAM, and 128GB of internal storage. The triple rear cameras on the Samsung Galaxy M34 include a 50-megapixel primary sensor with optical image stabilisation (OIS). A 2-megapixel macro sensor and an 8-megapixel ultra-wide angle camera are also included. A 13-megapixel sensor is located at the front of the device for selfies and video calls. A 6,000mAh battery powers the device and is said to last up to two days on a single charge. Additionally, the device is capable of 25W wired charging. A dual-SIM card slot, 4G VoLTE, 5G, Wi-Fi 802.11 b/g/n/ac, Bluetooth, GPS, and a USB Type-C connector are all included for connectivity. For the latest gadget and tech news, and gadget reviews, follow us on Twitter, Facebook and Instagram. For newest tech & gadget videos subscribe to our YouTube Channel. You can also stay up to date using the Gadget Bridge Android App. You can find the latest car and bike news here.Viewsonic VP-16 OLED monitor launched in India

Viewsonic has announced the launch of its first portable touchscreen monitor VP-16 OLED in India. It is an FHD 15.6-inch ColorPro OLED panel monitor. The display is Pantone validated and comes with an adjustable stand and built-in hood and cover accessory. The OLED monitor supports a 60Hz refresh rate.
The 15.6-inch ColorPro OLED panel monitor of the Viewsonic VP-16 OLED has 1920×1080 pixels of resolution. The Monitor is touchscreen supported and comes with 1080p Full HD resolution and Pantone Validation. A number of light-emitting diodes are used to independently illuminate the OLED display. The Viewsonic VP-16 OLED monitor supports a 60Hz refresh rate. The display can be used as an extraordinarily high-quality photo or video preview display for in-field adjustments and both inside and outdoor photography when it is connected to a camera.
Additionally, OLEDs are said to offer outstanding image quality and are slimmer and more power-efficient than LCDs because they do not need a backlight or filters. The VP-16 OLED provides a wide colour gamut to 100% DCI-P3, Delta E2, offering improved brightness, contrast, and a wider spectrum of colours.
For professionals with precise colour demands the monitor comes with a 100,000:1 high-contrast ratio provides “true black” and depicts lightness and darkness in detail. Additionally, the display emits less blue light than standard monitors, reducing eye strain and enhancing viewing comfort.
There is a USB Type-C connectivity and 40W two-way power charging. The monitor can be powered by a laptop or, when plugged into a USB-C power bank or an AC adapter and outlet, it can provide power to a laptop or mobile device via pass-through charging. The display also has a 3.5mm headphone connector and a mini-HDMI port.
The OLED panel has a highly adjustable stand and built-in hood. Additionally, the monitor has a removable protective cover that serves as a shading hood for a quick “dark room” effect. An ergonomic height-adjustable stand is a feature of the VP-16 OLED that offers more comfortable viewing angles for practically any working position. The stand also comes with a tripod mount that is easily adjustable for five various orientations. This monitor’s two inbuilt speakers deliver stereo sound. Additionally, the product’s energy STAR accreditation lowers greenhouse gas emissions while saving money on electricity.
The Viewsonic VP-16 OLED monitor are available on Amazon and is priced at MRP of INR 75,000 and EUP (end-use-price) Rs 49,999.
For the latest gadget and tech news, and gadget reviews, follow us on Twitter, Facebook and Instagram. For newest tech & gadget videos subscribe to our YouTube Channel. You can also stay up to date using the Gadget Bridge Android App. You can find the latest car and bike news here.
 Additionally, OLEDs are said to offer outstanding image quality and are slimmer and more power-efficient than LCDs because they do not need a backlight or filters. The VP-16 OLED provides a wide colour gamut to 100% DCI-P3, Delta E2, offering improved brightness, contrast, and a wider spectrum of colours.
For professionals with precise colour demands the monitor comes with a 100,000:1 high-contrast ratio provides “true black” and depicts lightness and darkness in detail. Additionally, the display emits less blue light than standard monitors, reducing eye strain and enhancing viewing comfort.
There is a USB Type-C connectivity and 40W two-way power charging. The monitor can be powered by a laptop or, when plugged into a USB-C power bank or an AC adapter and outlet, it can provide power to a laptop or mobile device via pass-through charging. The display also has a 3.5mm headphone connector and a mini-HDMI port.
The OLED panel has a highly adjustable stand and built-in hood. Additionally, the monitor has a removable protective cover that serves as a shading hood for a quick “dark room” effect. An ergonomic height-adjustable stand is a feature of the VP-16 OLED that offers more comfortable viewing angles for practically any working position. The stand also comes with a tripod mount that is easily adjustable for five various orientations. This monitor’s two inbuilt speakers deliver stereo sound. Additionally, the product’s energy STAR accreditation lowers greenhouse gas emissions while saving money on electricity.
The Viewsonic VP-16 OLED monitor are available on Amazon and is priced at MRP of INR 75,000 and EUP (end-use-price) Rs 49,999.
For the latest gadget and tech news, and gadget reviews, follow us on Twitter, Facebook and Instagram. For newest tech & gadget videos subscribe to our YouTube Channel. You can also stay up to date using the Gadget Bridge Android App. You can find the latest car and bike news here.
Additionally, OLEDs are said to offer outstanding image quality and are slimmer and more power-efficient than LCDs because they do not need a backlight or filters. The VP-16 OLED provides a wide colour gamut to 100% DCI-P3, Delta E2, offering improved brightness, contrast, and a wider spectrum of colours.
For professionals with precise colour demands the monitor comes with a 100,000:1 high-contrast ratio provides “true black” and depicts lightness and darkness in detail. Additionally, the display emits less blue light than standard monitors, reducing eye strain and enhancing viewing comfort.
There is a USB Type-C connectivity and 40W two-way power charging. The monitor can be powered by a laptop or, when plugged into a USB-C power bank or an AC adapter and outlet, it can provide power to a laptop or mobile device via pass-through charging. The display also has a 3.5mm headphone connector and a mini-HDMI port.
The OLED panel has a highly adjustable stand and built-in hood. Additionally, the monitor has a removable protective cover that serves as a shading hood for a quick “dark room” effect. An ergonomic height-adjustable stand is a feature of the VP-16 OLED that offers more comfortable viewing angles for practically any working position. The stand also comes with a tripod mount that is easily adjustable for five various orientations. This monitor’s two inbuilt speakers deliver stereo sound. Additionally, the product’s energy STAR accreditation lowers greenhouse gas emissions while saving money on electricity.
The Viewsonic VP-16 OLED monitor are available on Amazon and is priced at MRP of INR 75,000 and EUP (end-use-price) Rs 49,999.
For the latest gadget and tech news, and gadget reviews, follow us on Twitter, Facebook and Instagram. For newest tech & gadget videos subscribe to our YouTube Channel. You can also stay up to date using the Gadget Bridge Android App. You can find the latest car and bike news here. 12 Easy Ways to Fix ‘Call Failed’ Error on iPhone (2024)
")
Sometimes the most basic errors can be the most difficult ones to fix. This is largely because it can take a lot of time to determine the cause of the problem. While you can learn to live with certain issues on your phone, a functional problem with something as essential as placing calls cannot be ignored. In this article, we bring you the top 12 easy ways to fix the ‘call failed’ error on an iPhone.
Read Also: Your Threads profile can only be deleted by deleting your Instagram account
Restarting your iPhone can fix minor background issues and software glitches that may be keeping it from functioning properly. To restart your iPhone, simply press one of the volume buttons along with the side key until the power slider appears on the screen. Drag the power slider to the right to turn off your iPhone. Power the phone back on by pressing and holding the side key.
Toggling the Airplane Mode on your iPhone can refresh the network and fix any background issues related to the cellular connection. Go to Settings and turn on the toggle bar next to Airplane Mode. Wait for a few seconds and turn it off. Place the call using the dialer. It will likely go through now.
Your iPhone’s network provider rolls out regular updates to improve the network connection. Usually, these updates are automatically installed on your phone, but you can always manually check for any pending updates. To update the carrier settings on your iPhone, go to Settings>General>About>SIM Details and tap the ‘Network Provider’ option to receive the latest settings.
If you have disabled automatic network selection on your iPhone, you need to make sure that your device is using the correct network operator to place outgoing calls. Go to Settings>Mobile Data>Network Selection and choose the appropriate network. We’d suggest turning on automatic network selection and letting your iPhone decide which network works for it.
If the ‘call failed’ error is related to a software bug, you may want to update your iPhone to the newest iOS version. Developers are quick to fix these annoying bugs with a software patch. These bugs are more likely to pop up on older iOS versions. Simply go to Settings>General>Software update and check for any pending updates.
Step 2: Scroll down and select Transfer or reset iPhone.
Step 3: Select Reset followed by Reset Network Settings.
Dial *#31#
Your iPhone may not be able to make a call if you have hidden your Caller ID. Hiding your Caller ID allows you to make anonymous calls, but it may not work if the receiver has turned on spam protection. In that case, your call will fail to connect. Simply dial *#31# and try again.Restart your iPhone
 Restarting your iPhone can fix minor background issues and software glitches that may be keeping it from functioning properly. To restart your iPhone, simply press one of the volume buttons along with the side key until the power slider appears on the screen. Drag the power slider to the right to turn off your iPhone. Power the phone back on by pressing and holding the side key.
Toggle Airplane Mode
 Toggling the Airplane Mode on your iPhone can refresh the network and fix any background issues related to the cellular connection. Go to Settings and turn on the toggle bar next to Airplane Mode. Wait for a few seconds and turn it off. Place the call using the dialer. It will likely go through now.
Turn off WiFi calling
If WiFi calling is enabled on your iPhone, it may be keeping the cellular calls from getting connected. Turn off WiFi calling and try placing a call again. Go to Settings>Mobile Data>WiFi Calling and switch off the green toggle bar. Return to the dialer app and place the call.Update Carrier Settings
 Your iPhone’s network provider rolls out regular updates to improve the network connection. Usually, these updates are automatically installed on your phone, but you can always manually check for any pending updates. To update the carrier settings on your iPhone, go to Settings>General>About>SIM Details and tap the ‘Network Provider’ option to receive the latest settings.
Force stop and re-launch the Phone app
iPhone’s native dialer app is not known to malfunction, but on the rare occasion that it does, you can easily fix it by restarting it. Closing the app and opening it again performs a refresh and removes the temporary files that are causing the corruption. Access the app switcher and swipe up on the Phone app’s card to shut it down. Go back to the home screen and tap the app’s icon to restart it.Make sure you are using the right network operator
 If you have disabled automatic network selection on your iPhone, you need to make sure that your device is using the correct network operator to place outgoing calls. Go to Settings>Mobile Data>Network Selection and choose the appropriate network. We’d suggest turning on automatic network selection and letting your iPhone decide which network works for it.
Check your balance
It is possible that the talk time on your SIM card ran out, leading to the suspension of outgoing calls. Use your network provider’s app to check your balance. If you have enough balance, check the plan’s validity. If your calling plan is no longer valid, you will have to recharge it before placing a call.Re-insert the SIM card
If your iPhone has a physical SIM card inside it, pull it out, give it a quick wipe, and re-insert it into the device. The placement of the SIM card may change slightly over a period of time, leading to minor network hiccups. Reinserting it into the phone can help solve that situation. Once you’ve inserted the SIM back in, try placing the call again and see if it goes through.Have you been blocked?
If you’re facing the ‘call failed’ error while trying to ring a specific contact, it is possible that the user may have blocked your number. You can easily verify this by calling the user from another number. If the call goes through, it means that your original number is blocked on the user’s end.Update iOS
 If the ‘call failed’ error is related to a software bug, you may want to update your iPhone to the newest iOS version. Developers are quick to fix these annoying bugs with a software patch. These bugs are more likely to pop up on older iOS versions. Simply go to Settings>General>Software update and check for any pending updates.
Reset Network Settings
Resetting the network settings on your iPhone will un-pair all WiFi networks and Bluetooth devices connected to your phone. You will need to pair with them again. But it may fix the ‘Call failed’ error that you keep receiving on your iPhone. Here’s how you can go about it. Step 1: Go to Settings and select General.
Step 2: Scroll down and select Transfer or reset iPhone.
Step 3: Select Reset followed by Reset Network Settings.
