Are you ready to take your gaming setup to the next level? Look no further than our comprehensive list of the best gaming accessories of 2023. From the latest in high-end graphics cards to revolutionary virtual reality headsets and advanced sound systems, we’ve got you covered.
Plus, we break down the details on everything from top-of-the-line cooling systems to state-of-the-art controllers – all designed to help boost game performance and make your gaming experience more immersive. Get ready for your ultimate gaming setup!
Make sure to visit
Energy Casino, where you can play many engaging casino games!
#1 Logitech G502 SE Hero RGB Gaming Mouse
The Logitech G502 SE Hero RGB Gaming Mouse is an incredible gaming accessory for 2023. It boasts a 16,000 DPI sensor and 11 programmable buttons that provide gamers with highly accurate tracking and the ability to move their mouse quickly and precisely. This makes it perfect for those who need to make quick movements or require precise control over their characters.
The ergonomic design of this powerful mouse ensures comfort during long gaming sessions, featuring an adjustable weight system and wrist rest for added support. Plus, the adjustable RGB lighting adds a personal touch to your gaming setup – allowing you to customize its look however you like!
Features
The G502 SE Hero RGB Gaming Mouse is a gaming powerhouse, boasting an adjustable weight system and customizable RGB lighting. With on-the-fly DPI switching, gamers can instantly switch between two different sensitivity settings for smoother movements. Plus, its advanced tracking technology makes aiming and shooting in the game easier than ever before – like having a personal assistant helping you out! In short, this mouse provides gamers with comfort, customization options and precision – making it the perfect companion for any gaming setup.
Pros and Cons
The Logitech G502 SE Hero RGB Gaming Mouse is a dream come true for gamers. With its 16,000 DPI sensor and 11 programmable buttons, it offers lightning-fast tracking and easy access to commands. Its ergonomic design ensures comfort during long gaming sessions, while the adjustable weight system and customizable RGB lighting add a personal touch.
But there’s a catch – this mouse comes with a hefty price tag that may be too steep for some gamers. Plus, it’s not wireless, so you’ll need to stay connected to your PC or laptop. And if you’re planning marathon gaming sessions? You’ll need an external battery since the G502 SE. The hero doesn’t have one built in.
#2 Turtle Beach Stealth 600 Wireless Gaming Headset
The Turtle Beach Stealth 600 Wireless Gaming Headset is a must-have for any serious gamer looking to take their gaming setup to the next stratosphere. With plug-and-play ease and up to 30 hours of uninterrupted sound, it’s sure to be your go-to companion for long gaming sessions. Compatible with PC, Playstation 4/5, Xbox and Nintendo Switch – this headset will make you feel like you’re in the game!
Its high-end audio drivers, noise cancellation algorithms and lossless 2.4GHz wireless connections create an immersive experience that’ll have you picking up on details you never noticed before. Plus, its under-the-desk headphone stand mount makes it easy to keep your headset within arm’s reach – so no more scrambling around when it’s time for battle!
Features
The Turtle Beach Stealth 600 Wireless Gaming Headset is the perfect choice for gamers, boasting plug-and-play functionality and a wireless connection that offers up to 30 hours of uninterrupted sound. Its high-end audio drivers and noise-cancellation algorithms create an immersive gaming experience.
What’s more? It has a lossless 2.4GHz wireless connection, providing lightning-fast speeds with no lag or dropouts. Compatible with PC gaming, Playstation 4/5, Xbox, and Nintendo Switch – you can enjoy gaming sessions across multiple platforms! Plus, it comes with an under-the-desk headphone stand mount so your headset is always within easy reach. So why not take your gaming to the next level with the Turtle Beach Stealth 600?
Pros and Cons
The Turtle Beach Stealth 600 Wireless Gaming Headset is a gaming powerhouse, perfect for any serious gamer looking to take their experience to the next level. With its plug-and-play functionality and wireless connection, setting up for gaming sessions has never been easier – it’s like a dream come true! The headset also boasts high-end audio drivers and noise-cancellation algorithms that create an immersive soundscape. Plus, with compatibility across multiple platforms, you can game on whatever device you choose. And don’t forget about the under-the-desk headphone stand mount – keeping your headset within easy reach has never been simpler!
But what are the drawbacks? Does this headset have all the features of more expensive models? Is its battery life as long as other headsets on the market? Will it provide crystal clear sound quality? Unfortunately not – but that doesn’t mean it isn’t worth considering. Despite these minor shortcomings, Turtle Beach Stealth 600 still offers plenty of bang for your buck when it comes to creating an immersive gaming experience. So if you’re in search of a reliable and affordable way to enhance your gaming session without breaking the bank, look no further than Turtle Beach Stealth 600 Wireless Gaming Headset!
#3 Eurpmask PC Gaming Headset Hook Holder
The Eurpmask PC Gaming Headset Hook Holder – have you ever wanted to add a touch of convenience and style to your gaming setup? This under-desk mount is designed for all sorts of gaming headsets, with an adjustable design that fits consoles. It boasts a built-in cable loop for easy cable management, rubber pads on the mounts for a secure fit, and a swivel mechanism for a comfortable resting angle. Perfect for gamers looking to store their headphones without taking up too much space! But how does it really add convenience and style?
Features
The Eurpmask PC Gaming Headset Hook Holder is the perfect addition to any gaming setup. It boasts an adjustable universal under-desk design, making it compatible with a variety of desk sizes and shapes. Plus, its built-in cable loop helps keep your gaming area neat and organized. Rubber pads on the mounts ensure a secure fit while its swivel mechanism allows you to adjust the angle of the headset for maximum comfort. Truly, this product is an essential part of any gamer’s arsenal – making it the ultimate gaming accessory!
Pros and Cons
The Eurpmask PC Gaming Headset Hook Holder is a great choice for gamers, boasting an adjustable design that fits gaming consoles and reduces clutter by providing a convenient place to rest your headphones. But there are some drawbacks – its lack of durability may not be suitable for heavier headsets, and it cannot be used with thin glass desks or tables. Additionally, it mounts! Under-desk CPU holders can’t physically adhere to any surface – so if you’re looking for something more permanent, this might not be the best option.
#4 J S Vision Blue Light Shield Gaming Glasses
The J S Vision Blue Light Shield Gaming Glasses are the perfect addition to your gaming setup, offering unparalleled style and comfort. With a variety of frame sizes and shapes, these glasses provide maximum protection from the glare of screens and blue light exposure. The lenses are crafted with high-quality polycarbonate for superior durability. An adjustable nose piece and temple bars allow you to customize your fit for optimal comfort. Plus, they come with a case and cleaning cloth so you can keep them looking pristine!
These glasses not only look great but also help protect your eyes from long-term damage caused by blue light exposure. They reduce eye strain associated with long gaming sessions, allowing you to stay focused on your game without worrying about fatigue or discomfort. So slip on these stylish specs and enjoy hours of gaming in total comfort!
Features
The J S Vision Blue Light Shield Gaming Glasses are a gamer’s dream come true. With an array of frame sizes and shapes, adjustable temple bars, and a flexible nose piece – you can customize your fit for maximum comfort. The lenses are made from high-quality polycarbonate to protect your eyes from the glare of screens and blue light exposure. Plus, they come with a case and cleaning cloth so you can keep them looking their best!
But what makes these glasses truly special is how they help gamers stay focused on their game for longer periods of time without worrying about eye fatigue or strain. They provide protection from the harsh glare of screens while also making it easier to see in dimly lit gaming rooms – perfect for those using standing desks or other gaming setups. In short, these glasses offer unbeatable comfort and clarity that will take your gaming experience to the next level!
Pros and Cons
The J S Vision Blue Light Shield Gaming Glasses are an essential addition to any gaming setup. With their adjustable nose piece and temple bars, you can customize your fit for maximum comfort – no more eye fatigue after long gaming sessions! The lenses are made of high-quality polycarbonate, providing unbeatable protection from the glare of screens and blue light exposure. Plus, they come with a case and cleaning cloth so you can keep them looking pristine.
However, there are some drawbacks to consider too. The case that comes with the glasses isn’t particularly sturdy and unfortunately, there is no prescription-based model available either. So if you need corrective lenses, this might not be the best choice for you.
Despite these minor issues, J S Vision Blue Light Shield Gaming Glasses offer great value for gamers who want to protect their eyes while enjoying their favourite games!
#5 Razer Gaming Mouse Bungee
The Razer Gaming Mouse Bungee is the ideal accessory for any gaming setup. Specifically designed to keep your gaming mouse wires organized, it ensures a smooth and effortless gaming experience. With its adjustable arm, tension and height, the Razer Gaming Mouse Bungee offers an easy solution to cable management – allowing you to create a sleek and attractive desk setup.
Do you struggle with wire and cable management when building up your gaming setup? The Razer Gaming Mouse Bungee eliminates this problem by keeping your mouse’s wire out of the way so that you can move freely without disruption. It also provides gamers who prefer wireless mice with an organized desk space while still enjoying a customized gaming experience as it is compatible with multiple types of mice.
In conclusion, the Razer Gaming Mouse Bungee is perfect for anyone looking for an efficient way to manage their cables while creating a stylish gaming environment!
Features
The Razer Gaming Mouse Bungee is a revolutionary gaming accessory designed to provide gamers with an optimal setup. It boasts an adjustable arm, tension and height for ultimate customization – allowing you to tailor the mouse bungee to your own personal preferences. The adjustable arm fits any gaming mouse, while the adjustable tension keeps wires out of sight and the adjustable height allows you to position it at just the right spot.
Not only does this enhance your gaming experience by providing comfort and convenience, but it also helps keep your desk neat and tidy. By organizing cables, you can avoid clutter that could distract from your game – enabling you to focus on what matters most: winning!
The Razer Gaming Mouse Bungee is a must-have for any serious gamer looking for an edge in their performance. With its customizable features and cable management capabilities, it’s sure to give you a competitive advantage over other players!
Pros and Cons
The Razer Gaming Mouse Bungee is a great gaming companion, crafted with an ergonomic design to fit comfortably in your hand and adjustable height and tension for a personalized experience. However, it may not be the most budget-friendly accessory and requires some setup and adjustment to get used to.
But don’t let that deter you! This mouse bungee helps keep your gaming desk neat and organized by managing cables – plus its adjustable features make it easy to customize according to your gaming needs. In short, the Razer Gaming Mouse Bungee is an ideal addition for any gamer looking to enhance their experience.
#6 Redragon K585 DITI One-Handed Gaming Keyboard
The Redragon K585 DITI One-Handed Gaming Keyboard is the ultimate gaming accessory, designed with gamers in mind. This mechanical keyboard boasts customizable RGB lighting, full N-key rollover, anti-ghosting technology and macro keys that can be programmed to your specific gaming needs. Plus, it comes with an integrated software suite for easy key mapping and lighting adjustments.
When searching for the perfect gaming keyboard, you want one that’s comfortable to use during long sessions – balanced key stiffness is essential here! A wrist rest will also help reduce strain on your wrists. Additionally, look for a design that fits into your gaming desk setup and features that enhance your experience. The Redragon K585 DITI One-Handed Gaming Keyboard has all of these qualities plus more!
This ergonomic keyboard is packed with features to take your gaming experience up a notch. It includes a digital writing pad so you can jot down strategies or moves while playing – this feature helps improve the overall look of your setup too! Plus there are plenty of key mapping and lighting adjustments available through its integrated software suite. With all these features combined, the Redragon K585 DITI One-Handed Gaming Keyboard is sure to give you an edge in any game session!
Features
The Redragon K585 DITI One-Handed Gaming Keyboard is a dream come true for gamers, boasting an array of features that make it the perfect companion. It has customizable RGB lighting, full N-key rollover, anti-ghosting technology and macro keys that can be programmed to your specific gaming needs. Plus, its integrated software suite allows you to easily adjust key mapping and lighting settings. Comfortably ergonomic with a digital writing pad for recording moves and strategies – this keyboard has it all!
When searching for the ideal gaming keyboard, there are several qualities to consider; balanced key stiffness so your fingers don’t tire during long sessions, comfortability and design that fits into your setup. The Redragon K585 DITI One-Handed Gaming Keyboard ticks every box – making it the ultimate choice for any serious gamer!
Pros and Cons
The Redragon K585 DITI One-Handed Gaming Keyboard fits perfectly into any gaming setup. It’s ergonomic design ensures comfort for long gaming sessions, while its wide variety of key mapping and lighting adjustments can be tailored to your exact needs. Plus, it comes with a digital writing pad so you can jot down strategies on the fly – what more could you want?
However, there are some drawbacks to this keyboard. The key mapping and lighting adjustments may take some getting used to, and the keys might feel too stiff for some gamers’ liking. Additionally, it doesn’t come with a wrist rest, which could be an issue if you’re playing for extended periods of time.
Despite these minor issues, the Redragon K585 DITI One-Handed Gaming Keyboard is still an excellent choice for gamers looking to upgrade their setup – why wouldn’t you give it a try?
#7 Cozoo Headphone Stand with USB Charger
For gamers who want to level up their gaming setup, the Cozoo Headphone Stand with USB Charger is a must-have. This sleek and stylish stand offers cable management and wireless charging capabilities that will revolutionize your gaming experience. The ergonomic wrist rest helps reduce fatigue like a soothing massage, while the built-in cup holder and desk drawer keep all your gaming accessories within reach – no more rummaging around for them!
The adjustable wrist rest lets you customize it to suit your individual needs, so you can game in comfort for hours on end without any discomfort. Plus, the cup holder provides an easy spot to store drinks or snacks during those long sessions, while the desk drawer gives plenty of space for power bars and adaptors.
But wait – there’s more! The Cozoo Headphone Stand also features wireless charging capabilities so you don’t have to leave your setup just to charge up your phone. And with multiple ports available at once, you can simultaneously charge up to three devices at once!
In conclusion, if you’re looking for convenience and comfort in one package then look no further than the Cozoo Headphone Stand with USB Charger – perfect for gamers who want to take their setup to new heights!
Features
The Cozoo Headphone Stand with USB Charger is an essential gaming accessory. It features a built-in adjustable wrist rest, cup holder and desk drawer, providing gamers with easy access to their gaming accessories and reducing fatigue during long sessions. The USB charger offers multiple ports for simultaneous charging of up to three devices – making it incredibly convenient for gamers to enjoy their gaming experience in comfort.
Pros and Cons
The Cozoo Headphone Stand with USB Charger is an awesome addition to any gaming setup. It boasts a built-in adjustable wrist rest, cup holder and desk drawer – giving gamers easy access to their gaming accessories while reducing wrist fatigue during long gaming sessions. Plus, the USB charger offers multiple charging ports so you can charge up to three devices at once! Not only that, but it’s also affordable compared to other similar products on the market and its sleek design adds a cool look to your gaming setup.
But there are some drawbacks too: unfortunately, this product doesn’t have a locking feature so if you accidentally knock over the cup holder you could end up with a spill on the floor instead of all over your gear. Additionally, the USB charger may not be powerful enough for all of your devices.
Still though, if you’re looking for an efficient and budget-friendly way to store power bars and adaptors or just need an organizer within reach for urgent gaming needs – then Cozoo Headphone Stand with USB Charger is definitely worth considering!
How We Decided
When looking for the ultimate gaming accessories of 2023, we wanted to ensure that the items we chose would provide an unbeatable gaming experience. We considered a range of factors such as durability, usability, efficiency and aesthetic appeal – all while making sure they offered great value for money.
To evaluate each item, we compared their features and pros/cons to see how they fit into our ideal setup. We then weighed up these points before making our decision based on customer reviews and ratings too.
We also kept up with the latest trends in gaming accessories so that our list was bang-up-to-date with the newest products available. Plus, prices were taken into account to make sure they were affordable yet still provided excellent value for money.
In conclusion, we selected seven top gaming accessories which offer something unique and can create an optimal gaming experience. Hopefully, this list of the best gaming accessories of 2023 will help you build your dream setup!
Summary
From outstanding features, highest-end audio drivers to adjustable weight, RGB lighting, and adjustable wrist rest, the seven best gaming accessories of 2023 are all must-haves for any serious gamer. Logitech G502 SE. Hero RGB Gaming. Mouse is an excellent choice for precise control and customization, while Turtle Beach Stealth 600 Wireless Headset provides an immersive experience with directional targeting and up to 30 hours of playback.
Eurpmask PC Gaming Headset Hook Holder offers a secure fit and a swivel mechanism for a convenient and stylish gaming setup, with J S Vision Blue Light Shield Gaming Glasses protecting eyes from damages caused by excessive blue light exposure. Razer Gaming Mouse Bungee ensures smooth operation and cable management, and Redragon K585 DITI One-Handed Gaming Keyboard optimizes gaming experiences with adjustable key mapping and customizable RGB lighting.
Cozoo Headphone Stand with USB Charger is another essential item with its ergonomic design and wireless charging capabilities. Considering our evaluation based on features, pros and cons, customer reviews, trends and prices, these seven gaming accessories offer maximum comfort, convenience, and performance for the ultimate gaming set-up in 2023.
Frequently Asked Questions
What do you need for the best gaming setup?
To have the best gaming setup at home, you’ll need a powerful gaming PC with a good graphics card, a monitor or two, a gaming chair, a keyboard, a mouse and other gaming accessories like a headset, controllers, and gaming desk.
Additionally, soundproofing is essential for an immersive gaming experience.
What things are needed for gaming setup?
For a complete gaming setup, you will need a gaming PC, monitor, keyboard, mouse, headset, chair, desk, and other gaming accessories.
A gaming setup is essential if you want to experience the best gaming experience possible.
What should I add to my gaming setup?
To enhance your gaming setup, consider investing in a comfortable chair, noise-cancelling headphones, a high-powered gaming monitor, a laptop, a VR headset, an accessible mouse, an Xbox game pass, and speakers.
Having the right setup will create an immersive environment and offer the best gaming experience possible.
For the latest
gadget and tech news, and
gadget reviews, follow us on
Twitter,
Facebook and
Instagram. For newest
tech & gadget videos subscribe to our
YouTube Channel. You can also stay up to date using the
Gadget Bridge Android App. You can find the latest
car and bike news here.


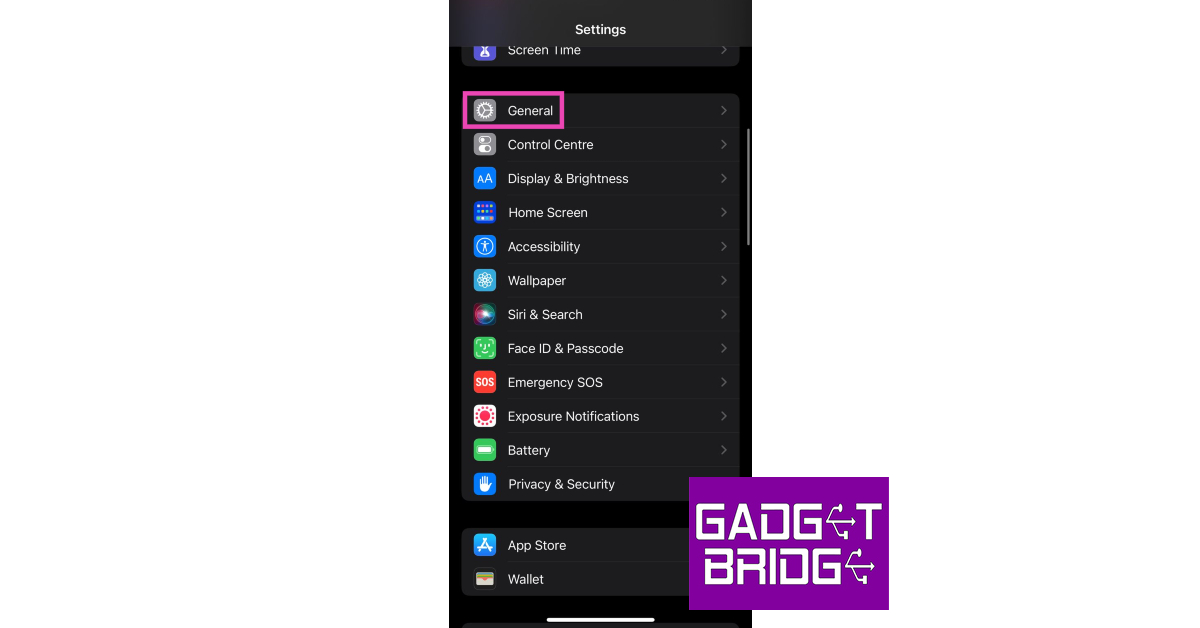
 Step 3:
 Step 4: Confirm
 Step 4: Confirm
 Step 2:
 Step 3:
 Step 5: Confirm


 Step 2:
  Step 3:
 Step 5:
  Step 6:
 Step 5:


 Step 1:
 Step 1:

")


 As the name suggests,
 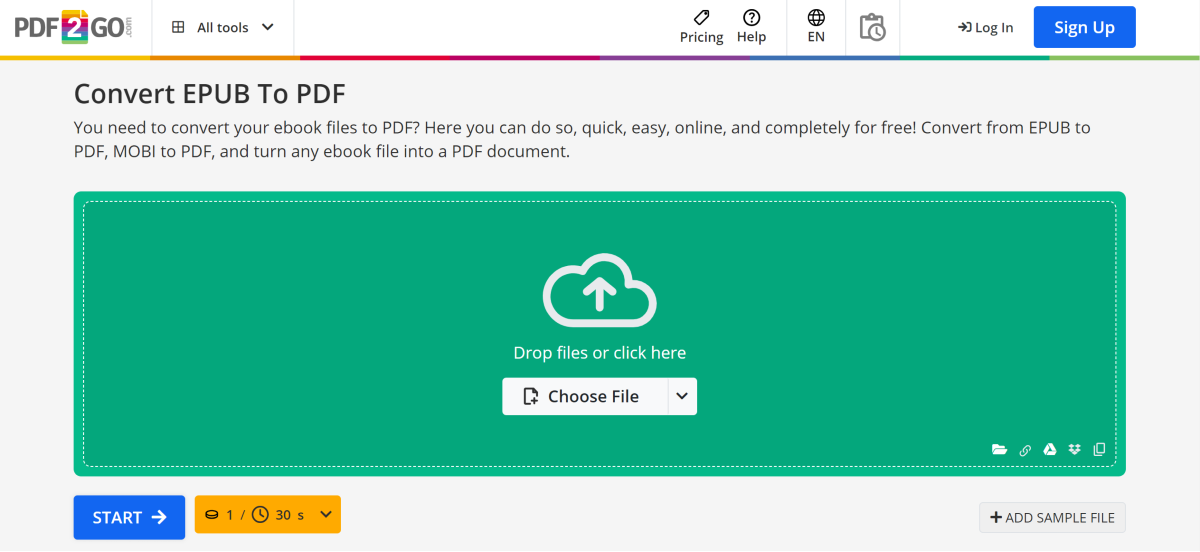 If you’re looking for a Chrome extension to convert your EPUB files to PDF, PDF2GO should be your choice. You can download the extension from the
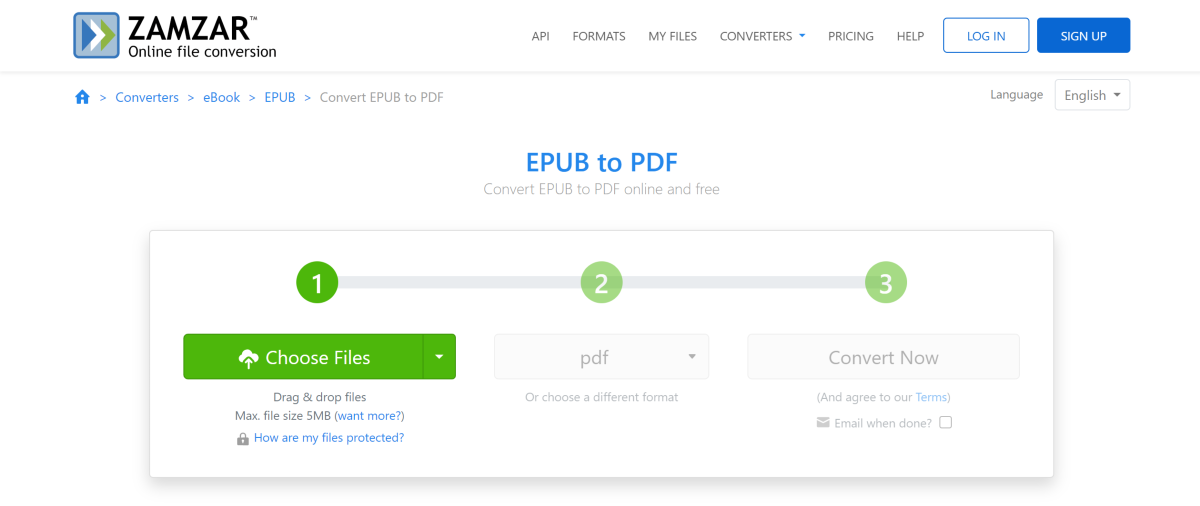
 If you’re interested in converting the format of multiple files at once, check out
 Also Read:
  Also Read:


 Step 3:
 Step 4:
 Step 5:
 Step 6:
 Step 9: Retype
 ![Step 10: To create a new user, enter the following command: sudo adduser [username here] How to run Ubuntu on your Android device?](https://www.gadgetbridge.com/wp-content/uploads/2023/08/u8.jpg)


 Step 1:
 Step 4:
 Step 1:


 Step 4: Confirm
 Step 2:
 Step 3:
  Step 4: Confirm
 Step 5: Confirm