
Furthermore, the OnePlus 11R 5G may be available in the colours Galactic Silver and Grey, according to information shared by tipster Mukul Sharma. In addition to this, the tipster has revealed that the upcoming phone will be available in three different configurations. The phone may be available with 8GB RAM with 128GB storage. It may also be offered in 12GB RAM or 16GB RAM. The expected price and storage capacities for the OnePlus 11R in India were previously revealed by Mukul Sharma. According to his estimation, the device with 8GB of RAM and 128GB of storage space may cost between Rs 35,000 and Rs 40,000 in the country. Additionally, 16GB of RAM and 512GB of storage are anticipated, and the price is anticipated to be around Rs 45,000. Also Read: Finally, Google Chrome for Android has a fingerprint lock for incognito tabs According to the source, the smartphone would have a 6.7-inch full-HD+ AMOLED screen with a resolution of 1,080 x 2,412 pixels and a refresh rate of 120Hz. The new device is anticipated to be powered by a Qualcomm Snapdragon 8+ Gen 1 SoC and up to 16GB of RAM. Rumours suggest that there are two RAM (8GB and 16GB) and two storage (128GB and 256GB) options for the OnePlus 11R. According to rumours, OnePlus’ rumoured 5000mAh battery will support 100W SuperVOOC charging. The phone is expected to have three cameras on the back, including a 50-megapixel primary sensor, an 8-megapixel super-wide-angle sensor, and a 2-megapixel macro lens. A 16-megapixel selfie camera for self-portraits could be located at the front. For the latest gadget and tech news, and gadget reviews, follow us on Twitter, Facebook and Instagram. For newest tech & gadget videos subscribe to our YouTube Channel. You can also stay up to date using the Gadget Bridge Android App. You can find the latest car and bike news here.Breaking!
— Ice universe (@UniverseIce) January 28, 2023
This is the OnePlus Ace2
The design is similar to OnePlus 11, but there are some differences, can you see the difference? pic.twitter.com/deEFSBbEKe
OnePlus 11R 5G design, colour and other details leaked ahead of the official launch

The OnePlus 11R 5G is scheduled to launch in India alongside other OnePlus 11 in India on February 7. Except for the launch date the company has not yet officially revealed any details about its upcoming phone. Since this announcement, anticipation and leaks have been doing the rounds on the web. A design rendering of the model before launch was recently leaked. Expected colour options, storage capacity, and RAM of the 11R 5G have also been leaked by a tipster ahead of the official release.
Also read: Poco C50 Review: A good budget smartphone for basic use
Let’s start with the appearance. A tweet from tipster Ice Universe claims that the OnePlus Ace 2’s design has leaked and is remarkably similar to the OnePlus 11. Previously it was revealed that OnePlus 11R will share a lot of similarities with the OnePlus Ace 2. The 11R is anticipated to debut in China as the OnePlus Ace 2. The leaked render reveals the rear design of the smartphone has a circular camera module. The Hasselblad branding, exclusive to the OnePlus 11 5G, is absent from the device. The phone does, however, appear to have an alert slider.
Oppo Reno 8T 5G confirmed to launch in India on February 3

The Oppo Reno 8T 5G is scheduled to launch in India on February 3. The Chinese smartphone brand has confirmed the upcoming launch in the country today. The upcoming phone will join the other two devices in the lineup which includes Oppo Reno 8 and Oppo Reno 8 Pro. The Oppo smartphone will feature a dual back camera system with a main sensor with a resolution of 108 megapixels. Additionally, it is confirmed to house a 4,800mAh battery with 67W fast charging capability.
Oppo took to Twitter to announce the upcoming launch of its latest smartphone in India. On February 3, the new Oppo Reno 8T 5G will be released in India. The company has also teamed up with Bollywood star Ranbir Kapoor to highlight the features of the phone.
Also Read: OnePlus Pad: OnePlus’s first tablet to launch in India at the Cloud 11 event, could come to USA as well
As of right now, it is unknown what the next item will cost in the nation but according to a leak, the phone will be available with 8GB RAM with a 256GB storage option that might cost between Rs 30,000- Rs 32,000.
However, the company did reveal some of the key features of the upcoming smartphone.
As per Oppo, Reno 8T will be featuring a 6.7-inch micro-curved AMOLED screen with a punch hole for the selfie camera. Moreover, the device’s screen will offer a 120Hz refresh rate and a 93% screen-to-body ratio. The Reno 8T 5G FHD+ display features a 10-bit colour depth to generate 1.07 billion colours, which is 64 times more than what traditional 8-bit screens can display, which can only draw 16.7 million colours.
The smartphone will also highlight a dual rear camera arrangement, with a 108-megapixel primary camera. A 4,800mAh battery with 67W fast charging capability will power it. It is claimed to deliver 9 hours of video streaming in 15 minutes of charging.
Also Read: Finally, Google Chrome for Android has a fingerprint lock for incognito tabs
The smartphone is likely to run ColorOS 13, which is based on Android 13. It might have an 8GB RAM and 128GB storage Snapdragon 695 SoC as its processor. An additional 16-megapixel selfie sensor has been hinted at in previous leaks.
It has also been revealed that Oppo Reno 8T would launch on February 8 in the Philippines. Pricing in the Philippines could be set at PHP 18,999, or about Rs 28,500.
For the latest gadget and tech news, and gadget reviews, follow us on Twitter, Facebook and Instagram. For newest tech & gadget videos subscribe to our YouTube Channel. You can also stay up to date using the Gadget Bridge Android App. You can find the latest car and bike news here.
Best Methods to Reduce Photo File Size on Mac

While filling out online forms, you need to be very particular about the file size of the images you upload along with your documents. Most portals have a very strict limit when it comes to uploading a passport photo or a copy of your signature. To make sure your attached photos don’t exceed the file size limit, you should know how to quickly compress the images. In this article, we bring you the four best methods to quickly reduce the photo file size on a Mac.
Read Also: Finally, Google Chrome for Android has a fingerprint lock for incognito tabs
 Step 1: Go to the Preview app and open the image you want to compress.
Step 2: Click on Tools and select Adjust Size.
Step 3: Click on ‘Resample Image’.
Step 4: Enter a smaller value for the image resolution.
The image will be compressed to a smaller size.
You can also lessen the image quality on Mac in order to limit its file size. Here’s how.
Step 1: Open the image in the Preview app.
Step 2: Click on File and select ‘Export…’.
Step 3: Select the ‘JPEG’ format for your image and turn the slider towards the left to reduce the quality. Lower image quality means lesser file size. You will be able to see the file size in the same window.
Step 4: Hit ‘Save’ once you’re satisfied with the image quality and the image file size.
Step 3: Select the file format of the resulting image. You can choose to compress it to the lowest possible size. Use the slider to control the image quality.
Step 4: Click on ‘Start’.
Step 5: Once the image is compressed it will automatically be downloaded to your Mac.
Read Also: D-Link DPS-FU1211 Portable mini UPS Review: A nifty power backup device!
Step 1: Go to the Preview app and open the image you want to compress.
Step 2: Click on Tools and select Adjust Size.
Step 3: Click on ‘Resample Image’.
Step 4: Enter a smaller value for the image resolution.
The image will be compressed to a smaller size.
You can also lessen the image quality on Mac in order to limit its file size. Here’s how.
Step 1: Open the image in the Preview app.
Step 2: Click on File and select ‘Export…’.
Step 3: Select the ‘JPEG’ format for your image and turn the slider towards the left to reduce the quality. Lower image quality means lesser file size. You will be able to see the file size in the same window.
Step 4: Hit ‘Save’ once you’re satisfied with the image quality and the image file size.
Step 3: Select the file format of the resulting image. You can choose to compress it to the lowest possible size. Use the slider to control the image quality.
Step 4: Click on ‘Start’.
Step 5: Once the image is compressed it will automatically be downloaded to your Mac.
Read Also: D-Link DPS-FU1211 Portable mini UPS Review: A nifty power backup device!
Use Mac’s native editor to reduce the photo file size
 Step 1: Go to the Preview app and open the image you want to compress.
Step 2: Click on Tools and select Adjust Size.
Step 3: Click on ‘Resample Image’.
Step 4: Enter a smaller value for the image resolution.
The image will be compressed to a smaller size.
Step 1: Go to the Preview app and open the image you want to compress.
Step 2: Click on Tools and select Adjust Size.
Step 3: Click on ‘Resample Image’.
Step 4: Enter a smaller value for the image resolution.
The image will be compressed to a smaller size.
Reduce file size by changing the image’s dimensions
This method will come in handy when you need to upload an image to an online document. By using this method you can resize the dimensions of the image while also reducing its file size. Here’s how you can do that. Step 1: Open the image in the Preview app. Step 2: Click the Markup icon and then select ‘Adjust Size’. Step 3: Enter new dimensions for the image. If you want to keep the original proportions of the image, select ‘Scale proportionally’. Step 4: Deselect ‘Resample Image’ to make sure the resized image doesn’t lose any details. Hit ‘Ok’ once you’re done.Reduce the image quality to reduce its size
 You can also lessen the image quality on Mac in order to limit its file size. Here’s how.
Step 1: Open the image in the Preview app.
Step 2: Click on File and select ‘Export…’.
Step 3: Select the ‘JPEG’ format for your image and turn the slider towards the left to reduce the quality. Lower image quality means lesser file size. You will be able to see the file size in the same window.
Step 4: Hit ‘Save’ once you’re satisfied with the image quality and the image file size.
You can also lessen the image quality on Mac in order to limit its file size. Here’s how.
Step 1: Open the image in the Preview app.
Step 2: Click on File and select ‘Export…’.
Step 3: Select the ‘JPEG’ format for your image and turn the slider towards the left to reduce the quality. Lower image quality means lesser file size. You will be able to see the file size in the same window.
Step 4: Hit ‘Save’ once you’re satisfied with the image quality and the image file size.
Use an online image compression tool
There are several online image compression tools that will help you reduce the file size of a photo on a Mac. Here’s how you can compress an image using Compress2go. Step 1: Go to https://www.compress2go.com/compress-image. Step 2: Click on ‘Choose File’ and upload the photo you want to compress. Step 3: Select the file format of the resulting image. You can choose to compress it to the lowest possible size. Use the slider to control the image quality.
Step 4: Click on ‘Start’.
Step 3: Select the file format of the resulting image. You can choose to compress it to the lowest possible size. Use the slider to control the image quality.
Step 4: Click on ‘Start’.
 Step 5: Once the image is compressed it will automatically be downloaded to your Mac.
 Read Also: D-Link DPS-FU1211 Portable mini UPS Review: A nifty power backup device!
Conclusion
These are four quick methods to reduce the photo file size on a Mac. We’d suggest using Mac’s native tools to carry out this task as it does not involve uploading the image to a third-party site. However, online tools can sometimes carry out the best compression jobs without dropping the image quality. To find out how you can compress an image in an iPhone, read our article here. For the latest gadget and tech news, and gadget reviews, follow us on Twitter, Facebook and Instagram. For newest tech & gadget videos subscribe to our YouTube Channel. You can also stay up to date using the Gadget Bridge Android App. You can find the latest car and bike news here.Best methods to Find and Use Draft Reels on Instagram

Instagram makes it easy for content creators on its platform to work on multiple ideas and projects at once. The social media platform allows you to save unfinished Reels as drafts. As the name suggests, the drafts you save on Instagram are not visible to your followers until you publish them. You can take your time to work on a Reel before you decide to publish it. In this article, we bring you the best methods to find and use Draft Reels on Instagram, which you have already created.
Read Also: D-Link DPS-FU1211 Portable mini UPS Review: A nifty power backup device!
Step 3: This is where you will find the Drafts folder. It will be the first folder in this section, next to the first Reel on your profile.
If you haven’t published any Reels yet, your profile won’t display the Reels tab and you will not be able to access your Drafts using this method. In this case, use the method mentioned below.
Step 3: Tap on the ‘Gallery’ icon at the bottom left corner of the screen.
Step 4: Tap on ‘Drafts’.
Access Draft Reels from your Instagram Profile
Step 1: Launch the Instagram app and tap on the profile icon at the bottom right corner of the screen. Step 2: Tap on the Reels tab on your profile. Step 3: This is where you will find the Drafts folder. It will be the first folder in this section, next to the first Reel on your profile.
 If you haven’t published any Reels yet, your profile won’t display the Reels tab and you will not be able to access your Drafts using this method. In this case, use the method mentioned below.
Access Draft Reels from the upload screen
If you haven’t uploaded any Reels on your profile yet, you can access your Drafts from the upload screen. Here’s how. Step 1: Launch the Instagram app on your smartphone and swipe left from the home screen. This will take you to the upload screen. Step 2: Select ‘Reel’ from the bottom menu. Step 3: Tap on the ‘Gallery’ icon at the bottom left corner of the screen.
Step 4: Tap on ‘Drafts’.
Step 3: Tap on the ‘Gallery’ icon at the bottom left corner of the screen.
Step 4: Tap on ‘Drafts’.

How to use Draft Reels on Instagram
Once you gain access to Draft Reels on Instagram, there are several things you can do with them.Finish a Draft
Since Drafts are primarily used to store unfinished ideas or projects you are working on, you can access them anytime to resume working on them. Once you open a Draft Reel, you can edit it like any other Reel you are working on. Simply tap on the ‘Edit’ option at the top right corner of the screen. You can shoot more footage, add transitions, apply stickers, or add different background audio. If you aren’t done yet, you can save the updated Reel in the Drafts folder again. Don’t like the Reel you are working on? You can always delete it by opening the Drafts folder, selecting the Reel, and hitting delete.Publish a Draft Reel
Once you’re done finishing a Draft Reel, you can easily publish it by selecting the Draft and pressing ‘Share’. The Reel will immediately be published on your Instagram profile. Don’t like what you published? You can move the Reel back to Drafts by opening the Reel, tapping on the ellipses and selecting ‘Delete’. In the following pop-up box, select ‘Move to Drafts’. Read Also: Top 7 Easy Fixes for iPhone Not Showing Up in Finder on MacConclusion
These are the best methods to find and use Draft Reels on Instagram. Since Reels are stored locally on your device, you won’t be able to access them if you log in to your Instagram account on another device. Moreover, if you uninstall the Instagram app on your phone, you will lose all your Drafts. Instagram Reels are a wonderful way to show your creativity, hope you will find the drafts you have made/saved and use them to make fantastic content. For the latest gadget and tech news, and gadget reviews, follow us on Twitter, Facebook and Instagram. For newest tech & gadget videos subscribe to our YouTube Channel. You can also stay up to date using the Gadget Bridge Android App. You can find the latest car and bike news here.OnePlus Pad: OnePlus’s first tablet to launch in India at the Cloud 11 event, could come to USA as well

We believe that OnePlus has an unending number of items to announce at its upcoming Cloud 11 event in India. The company has already revealed that it is arriving with OnePlus 11, OnePlus 11R 5G, Buds Pro 2, Keyboard and OnePlus TV 65 Q2 Pro. The company has now announced to introduce the OnePlus Pad, the company’s first tablet at the same event.
OnePlus hasn’t provided any information about the OnePlus Pad’s specifications, only a picture that highlights its colour scheme and design cues. The company had previously hinted at a tablet on its website, but the firm has now formally included the OnePlus Pad to its list of announcements for the Cloud 11 event.
According to reports from a year ago, the tablet might retail for CNY 2,999, or around Rs 34,500 in India and $440 in USA.
Also Read: OnePlus 11R 5G India launch to take place on February 7 at Cloud 11 event
The OnePlus Pad has the OnePlus logo on the backside and is coloured green. The OnePlus Tablet will also include a single rear camera with an LED flash.
Previously it was announced that the OnePlus tab had begun testing in India code-named Aries.
Even before the company’s revelation of its upcoming tablet, a report surfaced on the web with design renderings of the device. The OnePlus Pad is likely to feature a large screen and a high-end design. The 11.6-inch display on the front of the OnePlus tablet will have reasonably minimal bezels surrounding it. According to the leaked renders the OnePlus tablet will sport a circular module to house the rear camera. The company’s branding is located on the metal body beneath the camera cutout.
Also Read: OnePlus to launch its premium OnePlus TV 65 Q2 Pro in India on February 7
On the right side of the frame are the volume controls. There is a cutout on the left side that might house a stylus. When used in landscape mode, the front camera on the right edge of the tablet allows for video calls. A Qualcomm Snapdragon 865 SoC, along with 6GB of RAM and 128GB of internal storage, may power the OnePlus Pad. On February 7 during the Cloud 11 event, it will be introduced in India alongside the OnePlus 11 line of smartphones – The OnePlus 11 5G and the OnePlus 11R 5G. The OnePlus TV 65 Q2 Pro and the OnePlus Buds Pro 2 true wireless earbuds will also be unveiled by the firm. The event will commence at 7.30 PM IST in Delhi.
For the latest gadget and tech news, and gadget reviews, follow us on Twitter, Facebook and Instagram. For newest tech & gadget videos subscribe to our YouTube Channel. You can also stay up to date using the Gadget Bridge Android App. You can find the latest car and bike news here.
How to play YouTube Music on Amazon Echo devices?

Amazon Echo devices are notorious for lacking native support for YouTube Music. While you may be able to use Alexa Skills to play music from Spotify, Apple Music, Amazon Music, and other streaming services, you cannot do the same with YouTube Music. While Google may be absent from Echo’s platform, there is a quick workaround that can resolve this issue. In this article, we show you how to play YouTube Music on Amazon Echo devices.
Read Also: D-Link DPS-FU1211 Portable mini UPS Review: A nifty power backup device!
Step 3: Once the device has been paired, open the YouTube Music app on your phone and play the song you want.
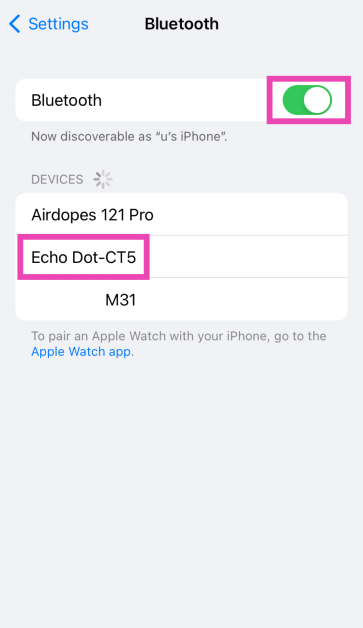
 Step 2: Turn on the toggle switch for Bluetooth.
Step 3: Your iPhone will search for nearby devices.
Step 4: Select your Echo device from the list.
Step 2: Turn on the toggle switch for Bluetooth.
Step 3: Your iPhone will search for nearby devices.
Step 4: Select your Echo device from the list.
 Step 5: Once the two devices are connected, go to the YouTube Music app on your iPhone and play the song you want.
Step 3: Scroll down and select Manage your Services.
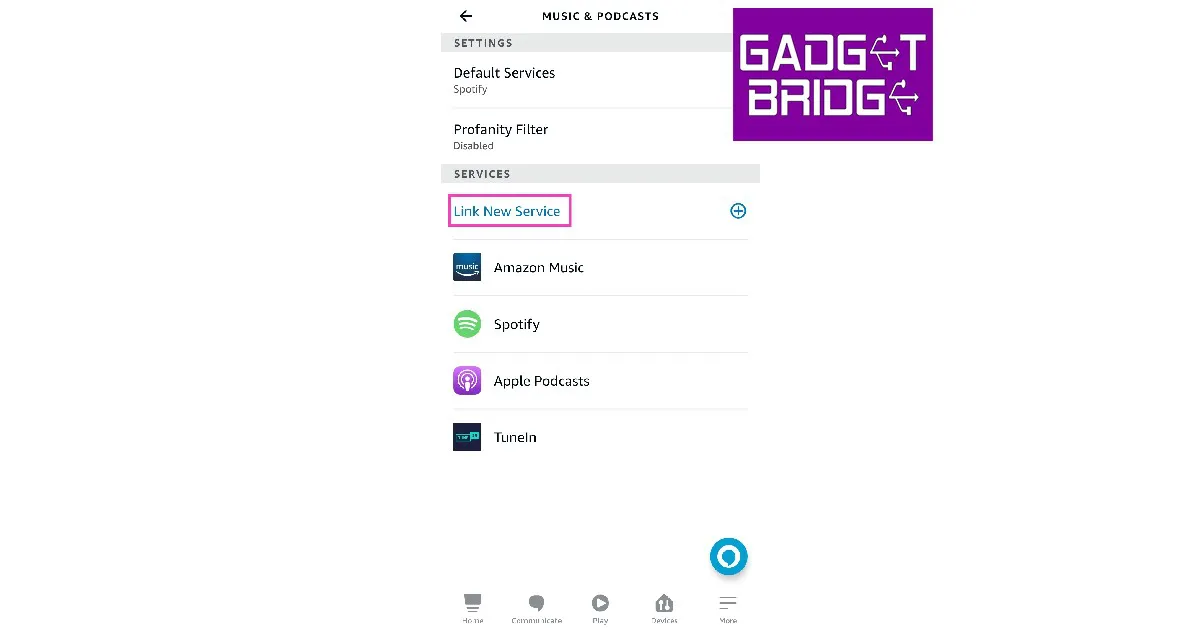
Step 4: Tap on Link New Service.
Step 5: Select the music streaming platform you want to link.
You will be redirected to the music platform to link your account to Alexa. Your Echo device uses Amazon Music to play songs by default. You can change this by going to Amazon Alexa>Play>Manage Your Services>Default Services and selecting the streaming platform you desire. Once you’ve set this up, every time you request Alexa to play music, it will use the music platform you’ve set as the default player.
Step 5: Once the two devices are connected, go to the YouTube Music app on your iPhone and play the song you want.
Step 3: Scroll down and select Manage your Services.
Step 4: Tap on Link New Service.
Step 5: Select the music streaming platform you want to link.
You will be redirected to the music platform to link your account to Alexa. Your Echo device uses Amazon Music to play songs by default. You can change this by going to Amazon Alexa>Play>Manage Your Services>Default Services and selecting the streaming platform you desire. Once you’ve set this up, every time you request Alexa to play music, it will use the music platform you’ve set as the default player.
Play YouTube Music on Amazon Echo via Bluetooth (Android)
Amazon Echo may not support YouTube Music but it still functions like any other Bluetooth speaker. You can play songs on it using the YouTube Music app simply by pairing your smartphone to the device. Here’s how. Step 1: Scroll down from the status bar and long-press the Bluetooth icon. Step 2: Scan for a new Bluetooth device and select the Echo device from the list of available connections. Step 3: Once the device has been paired, open the YouTube Music app on your phone and play the song you want.

Play YouTube Music on Amazon Echo via Bluetooth (iOS)
Step 1: Go to Settings and select Bluetooth.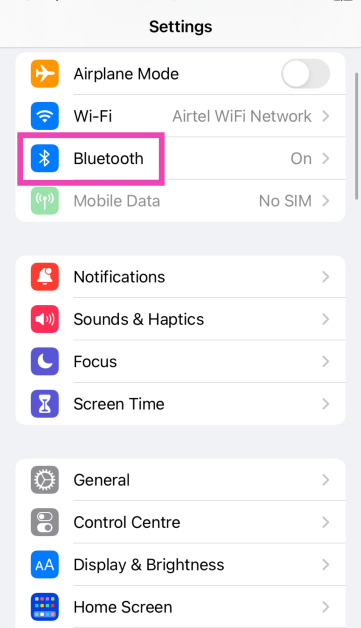 Step 2: Turn on the toggle switch for Bluetooth.
Step 3: Your iPhone will search for nearby devices.
Step 4: Select your Echo device from the list.
Step 2: Turn on the toggle switch for Bluetooth.
Step 3: Your iPhone will search for nearby devices.
Step 4: Select your Echo device from the list.
 Step 5: Once the two devices are connected, go to the YouTube Music app on your iPhone and play the song you want.
How to play songs on Echo from other music platforms
While Amazon Echo may not have native support for YouTube Music, you can still use Alexa Skills to play music from several other streaming services like Spotify, Amazon Music, TuneIn, and Apple Music. Here’s how you can do that. Step 1: Launch the Amazon Alexa app on your smartphone. Step 2: Tap on Play. Step 3: Scroll down and select Manage your Services.
 Step 4: Tap on Link New Service.
 Step 5: Select the music streaming platform you want to link.
 You will be redirected to the music platform to link your account to Alexa. Your Echo device uses Amazon Music to play songs by default. You can change this by going to Amazon Alexa>Play>Manage Your Services>Default Services and selecting the streaming platform you desire. Once you’ve set this up, every time you request Alexa to play music, it will use the music platform you’ve set as the default player.
Frequently Asked Questions (FAQs)
Does my Amazon Echo device support YouTube Music?
While Echo Devices can link to and play music from streaming platforms like Spotify, Apple Music, Amazon Music, Pandora, iHeart Radio, TuneIn Radio, and more, YouTube Music is strangely missing from the list.How do I play YouTube Music on my Echo speaker?
If you want to play YouTube Music on your Amazon Echo Device, you will need to connect it to your phone as a Bluetooth speaker. Once that is done, go to the YouTube Music app and play the song you want.How do I connect my Echo speaker to my phone via Bluetooth?
Give your Echo speaker the voice command to turn on its Bluetooth. Then go to Settings>Bluetooth on your phone and select the Echo speaker from the list of available devices. Read Also: Top 7 Easy Fixes for iPhone Not Showing Up in Finder on MacConclusion
This is how you can play songs using YouTube Music on Amazon Echo devices. You can also use this trick to play YouTube videos on Amazon Echo. However, the audio may stop once you lock your smartphone’s screen. You can subscribe to YouTube Premium to get unhindered playback even when your smartphone display is locked. If you found this article helpful, let us know in the comments!What Does SOS Only Mean on iPhone and How to Turn it Off? Here are 12 best ways (2024)
")
iPhone users may be familiar with the ‘SOS Only’ message that pops up on the status bar from time to time. In iOS 16 this message is displayed on the right side of the status bar but all previous iOS versions have displayed it on the left. So what does ‘SOS Only’ mean? What are your options once your iPhone displays that message? In this article, we explain what the ‘SOS Only’ message means and how you can turn it off.
Read Also: Top 7 Easy Fixes for iPhone Not Showing Up in Finder on Mac
If you are facing a network issue on your phone, a simple restart will most likely fix it. This will take care of any background glitches and resolve any bug-related issues. To restart your iPhone, simply press and hold either volume button and the side button and drag the slider once it appears on the screen.
Step 2: Turn the toggle bar for Mobile Data off. Turn it back on after a few seconds.
You can also do this by disabling and enabling the ‘Mobile Data’ icon from the Control Centre.
Step 2: Select Mobile Data options.
Step 3: Turn the toggle bar on for ‘Data Roaming’.
Step 2: Select ‘About’.
This is where you’ll see any impending updates. If there is a software update pending, update it as well.
Step 2: Select ‘Network Selection’.
Step 3: Turn the toggle bar on for ‘Automatic’.
Step 2: Select Mobile Data Options.
Step 3: Tap on ‘Voice and Data’.
Step 4: Select 4G.
It is possible that a software bug may be keeping your iPhone from receiving network coverage. If this is the case, Apple will quickly sort it out with a software update. To update iOS on your iPhone, simply go to Settings>General>Software Update and install the latest software version on your device.
Step 2: Scroll down and select ‘Transfer or reset iPhone’.
Step 3: Select ‘Reset’ followed by ‘Reset Network Settings’.
Reinserting the SIM card on your iPhone is a good way to manually reset the network. If the methods mentioned above do not work for you, this could be worth giving a try. Sometimes a SIM card may shift its position when your iPhone absorbs an impact. This fix will take care of it. Once you take out the SIM card, inspect it for any physical defects and then reinsert it into your iPhone. SIM cards rarely ever develop any physical issues, but sometimes network providers phase out SIM cards that are decades old. If this is the case, your network provider will issue you a new SIM card with the same phone number. Skip this step if you are using an eSIM on your iPhone.
If your network provider is experiencing an outage or power disruption, your phone will stop receiving coverage. To make sure this is the case, try contacting a friend who uses the same carrier to see if they are facing similar issues. You can also go to Downdetector to check the status of your network provider. If you see a spike in recent user report, it means the fault lies with the network provider.
What does ‘SOS Only’ mean?
Whenever your iPhone is unable to receive network coverage, the ‘SOS Only’ text appears on the top-right corner of the screen. In iOS 15 or earlier, this text used to appear on the top-left corner of the screen. iPhone users outside of North America may receive a ‘No Service’ text whenever they are out of network coverage. However, lack of cellular service may not be the only reason why the SOS text pops up on your phone. It may also appear if the SIM card isn’t inserted properly or is malfunctioning due to some reason. You may also receive this message when you’re on cellular roaming and haven’t subscribed to a data or calling package. To put it simply, anytime your iPhone does not receive network reception, it displays the ‘SOS Only’ text. When you’re out of network coverage you can still make emergency calls. Apple also rolled out the Emergency SOS via Satellite feature with the iPhone 14 last year. This allows iPhone users to directly connect to a satellite in case of an emergency. The satellite then relays all the necessary information to an emergency service. You are read more about Emergency SOS via Satellite here.How to turn off ‘SOS Only’?
The ‘SOS Only’ text only goes away when your iPhone is able to receive a cellular network. There are a few steps you can take to make it happen.Restart your phone
 If you are facing a network issue on your phone, a simple restart will most likely fix it. This will take care of any background glitches and resolve any bug-related issues. To restart your iPhone, simply press and hold either volume button and the side button and drag the slider once it appears on the screen.
Turn Off and turn on Mobile Data
Step 1: Go to Settings and select Mobile Data.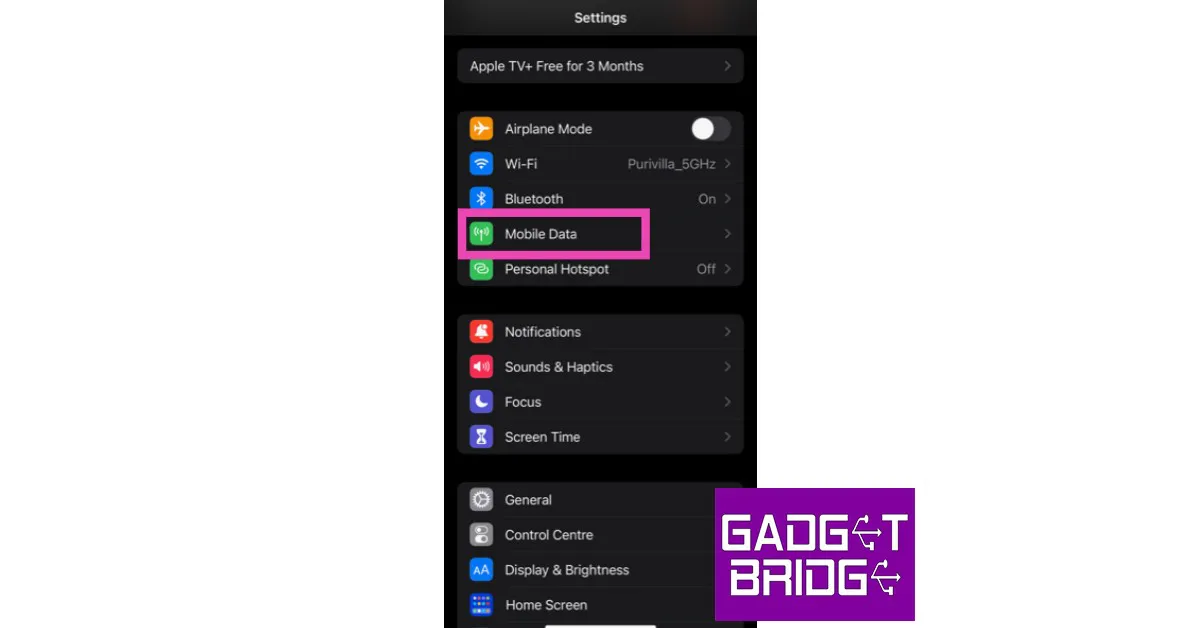 Step 2: Turn the toggle bar for Mobile Data off. Turn it back on after a few seconds.
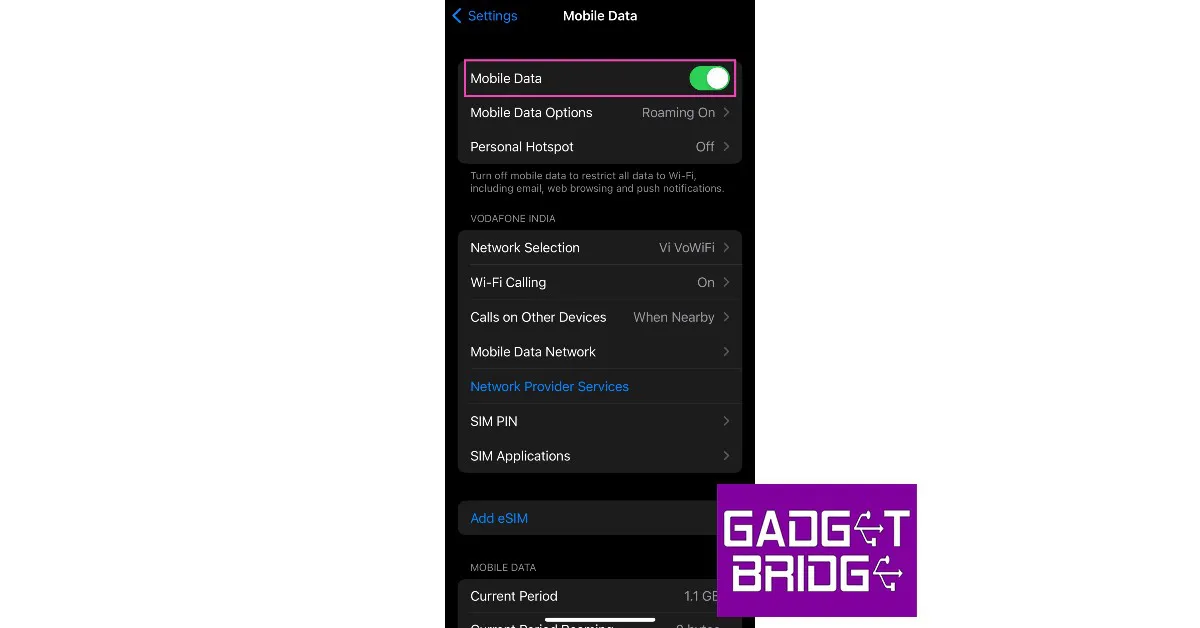 You can also do this by disabling and enabling the ‘Mobile Data’ icon from the Control Centre.
Turn on Data Roaming
Step 1: Go to Settings and select Mobile Data.
Step 2: Select Mobile Data options.
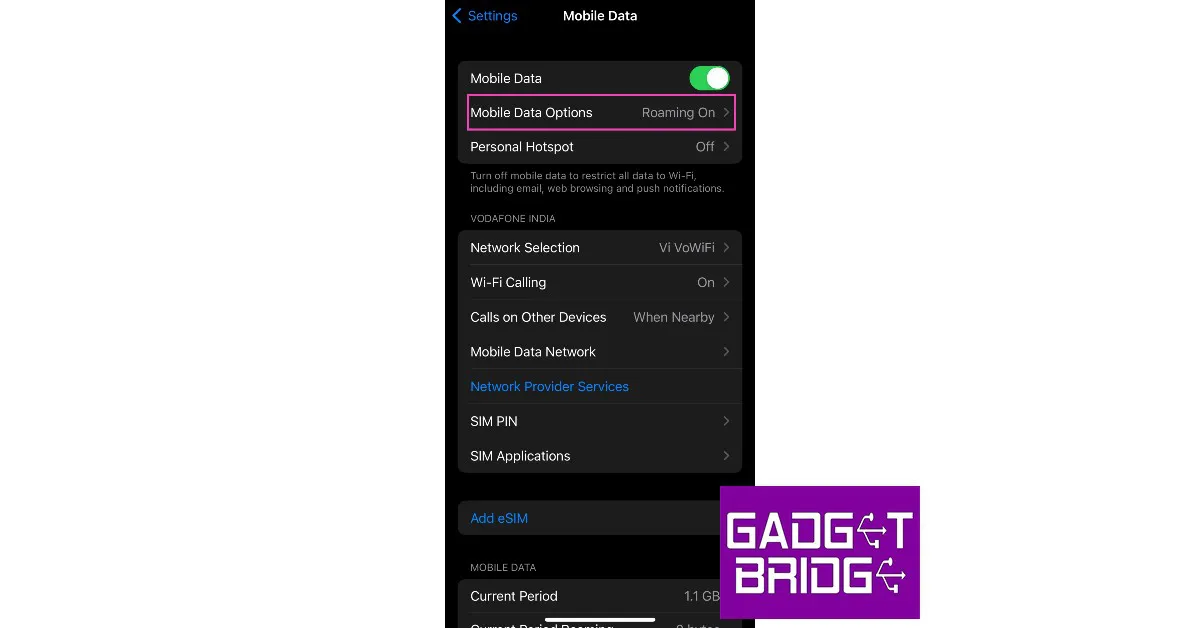 Step 3: Turn the toggle bar on for ‘Data Roaming’.

Update Network Carrier Settings
The network carrier settings are updated periodically on your iPhone. If you missed an update, it may create issues with the network reception on your phone. Here’s how you can update them manually. Step 1: Go to Settings and select General.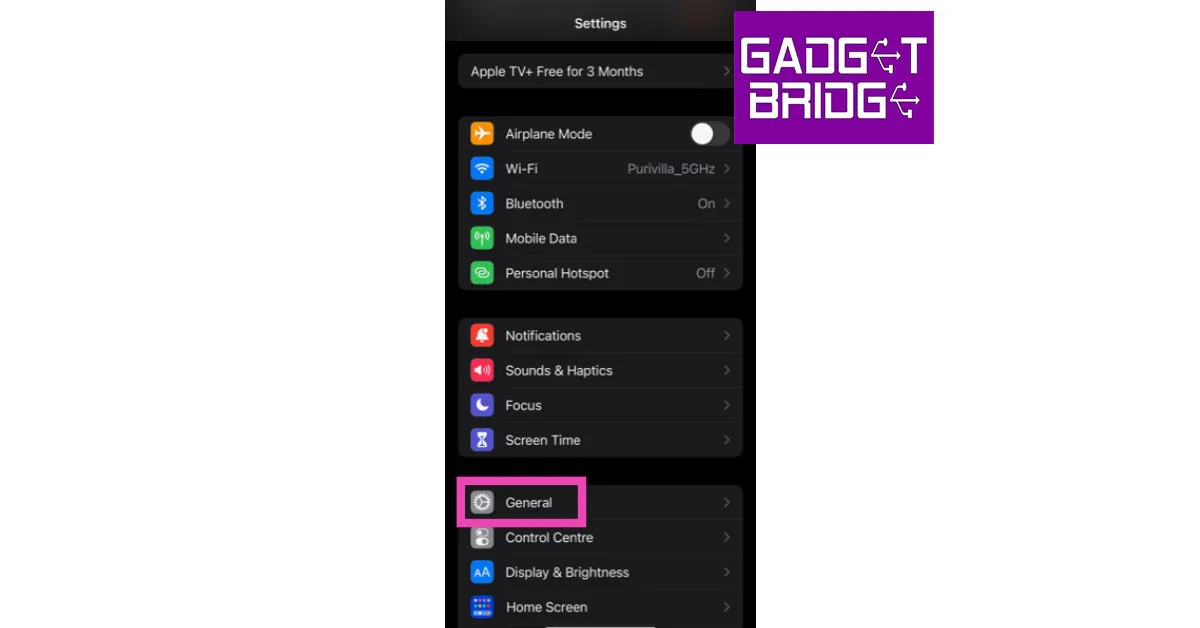 Step 2: Select ‘About’.
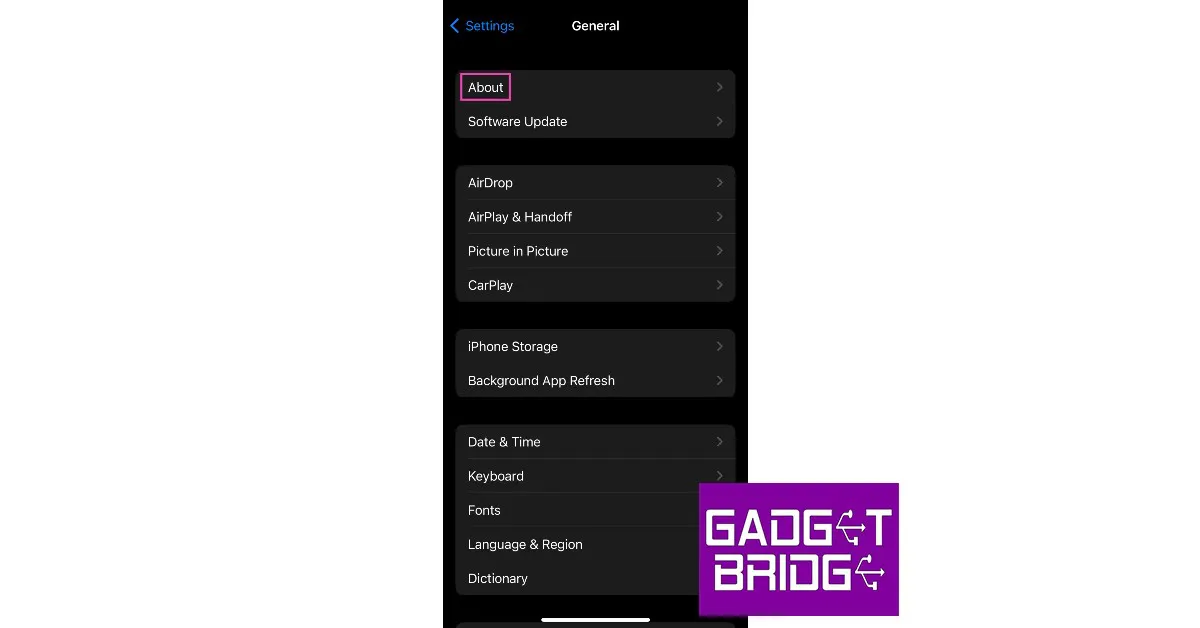 This is where you’ll see any impending updates. If there is a software update pending, update it as well.
Turn on Automatic Network Selection
You may have selected the wrong network by mistake. Turn on ‘Automatic network selection’ to avoid any future hangups. Here’s how. Step 1: Go to Settings and select Mobile Data.
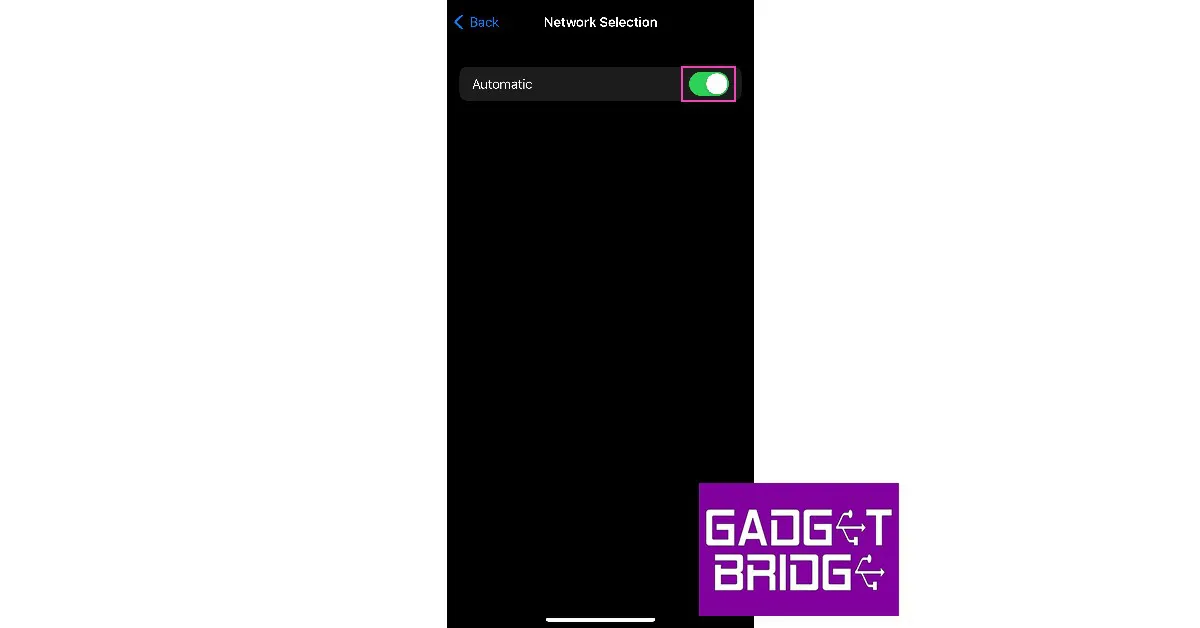
Step 2: Select ‘Network Selection’.
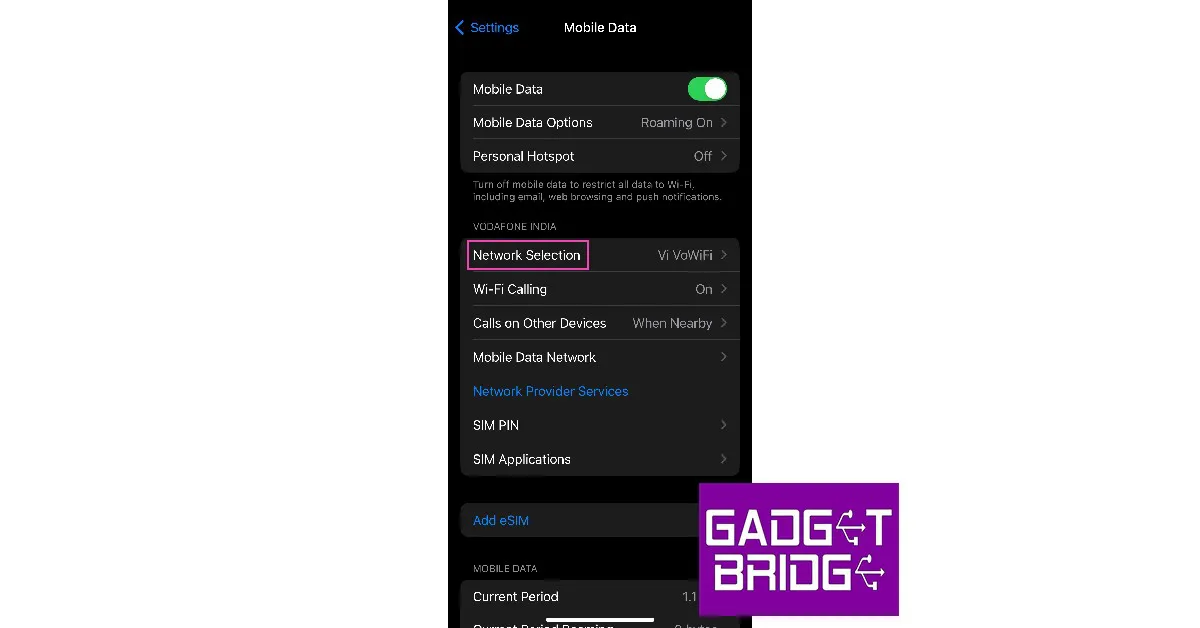 Step 3: Turn the toggle bar on for ‘Automatic’.
Switch to LTE/4G
Tried switching to 5G recently? Maybe your network provider hasn’t rolled out its 5G services in your area yet. In this case, switch back to 4G. Here’s how. Step 1: Go to Settings and select Mobile Data.
Step 2: Select Mobile Data Options.
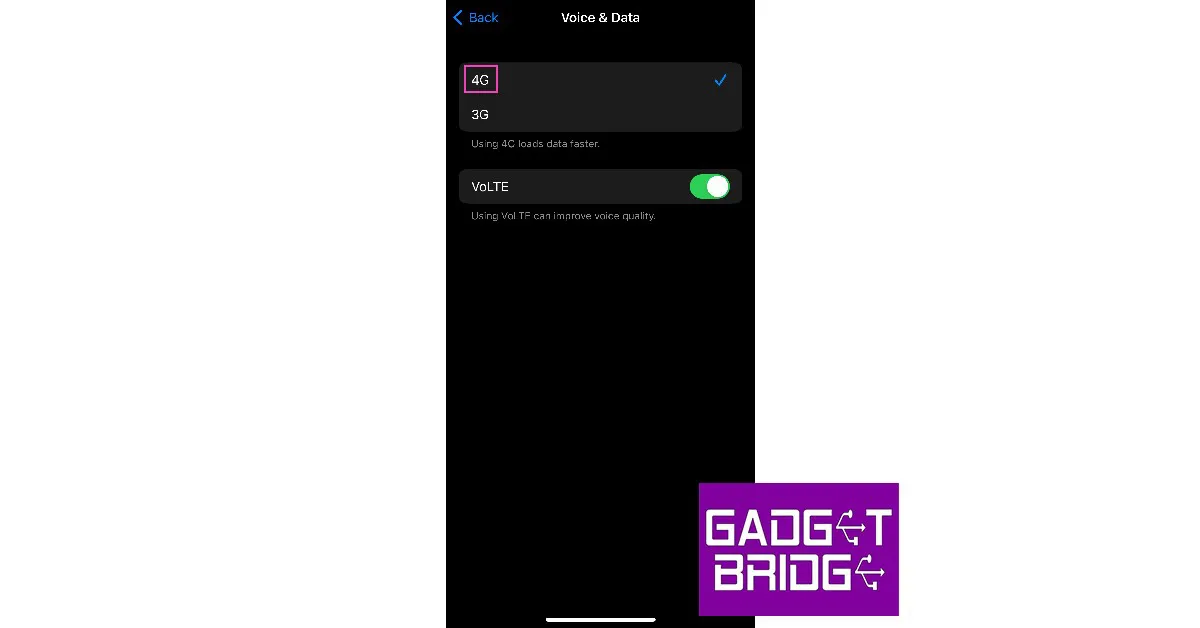
Step 3: Tap on ‘Voice and Data’.
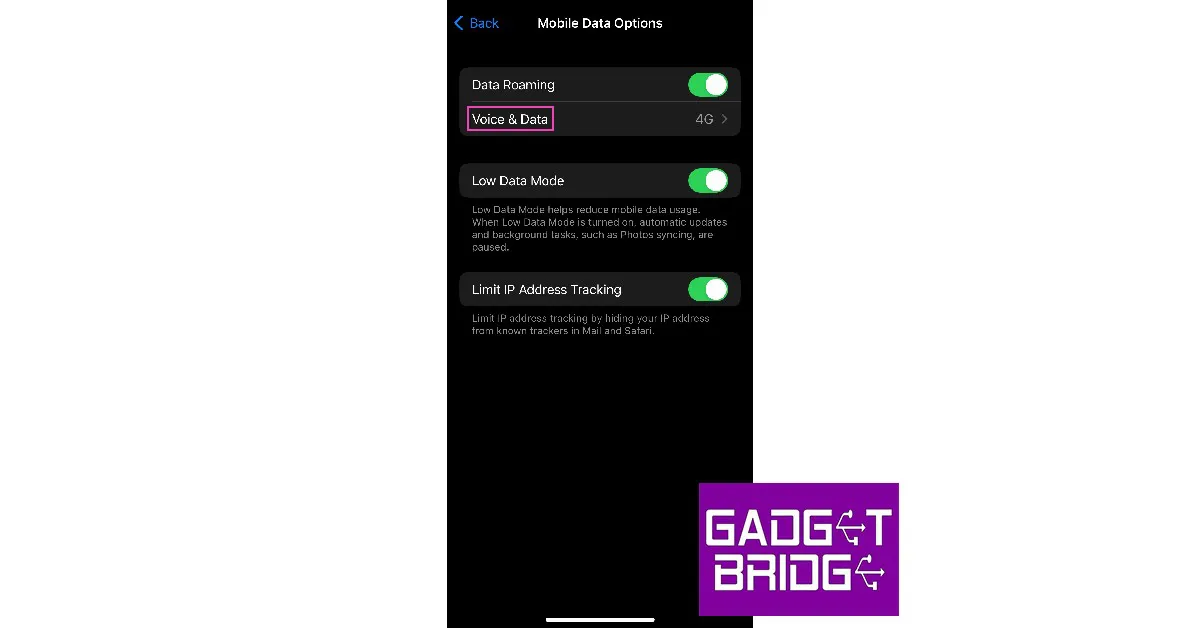 Step 4: Select 4G.
Update iOS version
 It is possible that a software bug may be keeping your iPhone from receiving network coverage. If this is the case, Apple will quickly sort it out with a software update. To update iOS on your iPhone, simply go to Settings>General>Software Update and install the latest software version on your device.
Reset Network Settings
Restore all your customised network settings to the factory default by performing a reset. This will fix any issues caused by your customisations. Performing a network settings reset will unpair all WiFi and Bluetooth connections. You will need to reenter the password to connect to previously paired networks and devices. Here’s how you can perform network settings reset on your iPhone. Step 1: Go to Settings and select General. Step 2: Scroll down and select ‘Transfer or reset iPhone’.
 Step 3: Select ‘Reset’ followed by ‘Reset Network Settings’.

Reinsert the SIM card
 Reinserting the SIM card on your iPhone is a good way to manually reset the network. If the methods mentioned above do not work for you, this could be worth giving a try. Sometimes a SIM card may shift its position when your iPhone absorbs an impact. This fix will take care of it. Once you take out the SIM card, inspect it for any physical defects and then reinsert it into your iPhone. SIM cards rarely ever develop any physical issues, but sometimes network providers phase out SIM cards that are decades old. If this is the case, your network provider will issue you a new SIM card with the same phone number. Skip this step if you are using an eSIM on your iPhone.
Move to a different area
If you’re in an area with a low network coverage, your iPhone will display the ‘SOS only’ text. This often happens in enclosed areas like elevators. Sometimes, the surrounding network towers can get overwhelmed with more activity than usual, leading to poor network reception on your iPhone. This is why phones aren’t able to receive a strong signal in football stadiums and concert arenas. To resolve this problem, move to an open area with strong network coverage.Check if the network provider is facing an outage
 If your network provider is experiencing an outage or power disruption, your phone will stop receiving coverage. To make sure this is the case, try contacting a friend who uses the same carrier to see if they are facing similar issues. You can also go to Downdetector to check the status of your network provider. If you see a spike in recent user report, it means the fault lies with the network provider.
Contact your network provider
If you’ve tried all the methods in this list and still aren’t able to get network reception on your iPhone, contact your network provider. Major network providers like Airtel and Jio have customer service centres across India. Find the nearest service centre and don’t forget to take basic documentation (like a driver’s license or AADHAR card) with you.Frequently Asked Questions (FAQs)
What does SOS Only mean on iPhone?
If your iPhone is displaying ‘SOS Only’ next to the signal bar, it means that it is not receiving any network signal and can only make emergency calls.How do I get rid of the ‘SOS Only’ message on my iPhone?
Move to an area with a better signal and make sure your SIM is inserted properly. If that doesn’t fix it, restart your iPhone and reset the network settings.How do I check if my network provider is experiencing an outage?
To check if your network provider’s services are down, go to Downdetector and search for it. If you see a spike in user reports, it means the service is temporarily down. Read Also: Top 6 Easy Methods to Fix iPhone Battery Draining While ChargingConclusion
These methods will help you regain network coverage on your iPhone and turn off the ‘SOS Only’ text. If you’re receiving a network signal on your phone but are unable to make calls or send texts, check your account balance and recharge it if necessary. If you found this article helpful, let us know in the comments!Finally, Google Chrome for Android has a fingerprint lock for incognito tabs

The Android version of Google Chrome’s Incognito Mode will soon be more secretive for Android users. The search giant has announced the rollout of a biometric new feature where users can now create a fingerprint lock for Incognito tabs using the new feature. The Incognito tabs will now be automatically locked when the browser is minimised or cancelled or when not in use. The function is already present on the iOS version of the Chrome app.
While announcing the feature the company via blog post said, “As online risks have grown, our “privacy by design” approach with Chrome means that you can complete a purchase online, get work done, or pay off a bill with a little more peace of mind. Built-in features like Google Password Manager makes signing in safe and seamless across your devices and helps catch compromised passwords. Along with providing strong security default protections, we make privacy controls easy to find, understand, and use in Chrome. While many of these features are widely known, Chrome includes many privacy settings and security features that may be new to you.”
Also Read: How can you enable Google Chrome extensions in incognito window?
When you resume an interrupted Incognito session, you can require biometric authentication. On iOS, this is accessible to all Chrome users, and Android users are currently receiving it. Simply enable “Lock incognito tabs when you close Chrome” by going to Chrome Settings Privacy & Security.
Tabs that are incognito automatically lock when the browser is minimised or ended. After restarting the web browser, users must unlock them using their fingerprint scan.
When you enable history sync or choose Enhanced Safe Browsing for quicker, proactive protection against risky websites, downloads, and extensions, Google Chrome’s Privacy Guide will walk you through your privacy options step-by-step.
If unsafe extensions or compromised passwords are found, Safety Check will notify you. Additionally, it notifies you when updates need to be installed so that you can keep up with proactive security measures. To make it stronger still Google is extending Safety Check by introducing more tailored recommendations and reminders about the information you have previously given with websites. You can also discover all of the tools you need to revoke permissions and protect your privacy in one convenient location.
Also Read: How to take a screenshot in Google Chrome incognito mode
As Google has already stated, Android users can now access the fingerprint lock for Incognito tabs. Your smartphone might already have the feature, or it might be in the works but not yet available. You could also visit Google Play Store and see if there are any new updates.
For the latest gadget and tech news, and gadget reviews, follow us on Twitter, Facebook and Instagram. For newest tech & gadget videos subscribe to our YouTube Channel. You can also stay up to date using the Gadget Bridge Android App. You can find the latest car and bike news here.
Garena Free Fire Redeem Codes Today 30 January 2023: Here is how to claim them

Garena Free Fire is a battle royale game with regular awards and tournaments to keep players interested. If you play Garena Free Fire, you should be aware of the redeem codes that are released on a daily basis. However, because the battle royale game is banned in India, players from other countries can use the Free Fire Redeem codes daily. If you’re unfamiliar with the Garena Free Fire redeem codes or don’t know how to get them, we’ve put together a step-by-step guide to help you redeem them. Check out Garena Free Fire Redeem Codes for 30 January 2023.
The Free Fire redeem codes are a great way to get free stuff. These are 12-digit codes that contain alphabets and numbers, as well as an expiration date and time. Because the Garena FF redeem codes cannot be used more than once, you should hurry to the redemption page to claim your free reward before someone else does. To get a free reward, all you have to do is go to reward.ff.garena.com/en, which is the official redemption page. Also, keep an eye on this space for daily updates on Garena Free Fire redemption codes and rewards.
Garena Free Fire Redeem Codes Today 30 January 2023
- X99TK56XDJ4X
- FF7MUY4ME6SC
- WEYVGQC3CT8Q
- 3IBBMSL7AK8G
- FFCMCPSUYUY7E
- NPYFATT3HGSQ
- MCPW2D2WKWF2
- V427K98RUCHZ
- MCPW2D1U3XA3
- FFCMCPSJ99S3
- 6KWMFJVMQQYG
- BR43FMAPYEZZ
- UVX9PYZV54AC
- XZJZE25WEFJJ
- HNC95435FAGJ
- J3ZKQ57Z2P2P
- FFDBGQWPNHJX
- TDK4JWN6RD6
- 4TPQRDQJHVP4
- GCNVA2PDRGRZ
- XFW4Z6Q882WY
- HFNSJ6W74Z48
- HHNAT6VKQ9R7
- 2FG94YCW9VMV
- 4ST1ZTBE2RP9
- 8F3QZKNTLWBZ
- V44ZZ5YY7CBS
- WD2ATK3ZEA55
- E2F86ZREMK49
- B3G7A22TWDR7X
- MCPW3D28VZD6
- FFCMCPSGC9XZ
- FFCMCPSEN5MX
- ZZZ76NT3PDSH
- EYH2W3XK8UPG
How to Get Free Fire Redeem Codes for Garena on 2 January 2023?
- Visit the Garena Free Fire game’s official website at reward.ff.garena.com.
- Use your Facebook, Google, VK, Apple ID, Huawei ID, or Twitter account to log in.
- You’ll be taken to a valid redemption code (s)
- Copy and paste the 12-digit redemption code into the text box.
- On the screen, a dialogue box will appear.
- ‘Ok’ should be selected.
Amazon Quiz Answers Today 30 January 2023: Participate to win Rs 1250

30 January 2023 Amazon Quiz has gone live on its platform. The quiz timings are 12 AM to 11:59 PM. The Amazon App users can participate in the quiz daily and all they have to do is submit correct answers to the questions asked on the e-commerce platform. Today’s participants can get a chance to win Rs 1250 Amazon Pay Balance.
By participating in the Amazon Quiz the participants can win Amazon Pay Balance ranging from Rs 1,000 to Rs 50,000 every day while sitting at home. To win the participants must answer five questions correctly that are based on current events and general knowledge. One wrong answer can eliminate you from the quiz. The results will be announced at the end of the month. Today’s question will let you win Rs 1250 Amazon Pay Balance. Check below for today’s Amazon quiz answers.
Amazon Quiz Today Prize – Rs 1250 Amazon Pay Balance
Quiz Date – 30 January 2023
Daily Timing – 12 AM to 11:59 PM
Winner Announcement – Today 12 PM
Amazon Quiz Answers Today 30 January 2023
Question 1: What tissue connects muscles to bones? Answer: Tendon Question 2: Which scientist proposed the three laws of motion? Answer: Isaac Newton Question 3: Albania’s national tree is? Answer: Olive Question 4: This character is part of which fictional universe? Answer: Marvel Cinematic Universe Question 5: This is the flag of which country? Answer: NepalHow To Play Amazon Quiz
Only app users are eligible to play the Amazon quiz every morning from 12 AM to 11:59 PM. The quiz is not available on the desktop. For those who are unaware of how to play the Amazon quiz below are the steps, you can follow to take the quiz.- Firstly download the Amazon app from Google Play Store or App Store
- Now fill in the required information through the Sign Up option.
- You need to log in to the Amazon app and scroll down on the home screen to find the Amazon Quiz banner.
- Tap on the Amazon Quiz banner and tap on the Start button to start the Quiz.
- Now you will get 5 questions and you need to answer them correctly. One wrong answer will eliminate you from the Quiz.
- After answering all the questions correctly you are now eligible for a Lucky Draw.
- The winner’s name will be announced today at 12 PM.