30 January 2023 Amazon Quiz has gone live on its platform. The quiz timings are 12 AM to 11:59 PM. The Amazon App users can participate in the quiz daily and all they have to do is submit correct answers to the questions asked on the e-commerce platform. Today’s participants can get a chance to win Rs 1250 Amazon Pay Balance.By participating in the Amazon Quiz the participants can win Amazon Pay Balance ranging from Rs 1,000 to Rs 50,000 every day while sitting at home. To win the participants must answer five questions correctly that are based on current events and general knowledge. One wrong answer can eliminate you from the quiz. The results will be announced at the end of the month. Today’s question will let you win Rs 1250 Amazon Pay Balance. Check below for today’s Amazon quiz answers.Amazon Quiz Today Prize – Rs 1250 Amazon Pay BalanceQuiz Date – 30 January 2023Daily Timing – 12 AM to 11:59 PMWinner Announcement – Today 12 PM
Amazon Quiz Answers Today 30 January 2023
Question 1: What tissue connects muscles to bones?
Answer: TendonQuestion 2: Which scientist proposed the three laws of motion?Answer: Isaac Newton
Question 3: Albania’s national tree is?Answer: OliveQuestion 4: This character is part of which fictional universe?Answer: Marvel Cinematic UniverseQuestion 5: This is the flag of which country?
Answer: Nepal
How To Play Amazon Quiz
Only app users are eligible to play the Amazon quiz every morning from 12 AM to 11:59 PM. The quiz is not available on the desktop. For those who are unaware of how to play the Amazon quiz below are the steps, you can follow to take the quiz.
Firstly download the Amazon app from Google Play Store or App Store
Now fill in the required information through the Sign Up option.
You need to log in to the Amazon app and scroll down on the home screen to find the Amazon Quiz banner.
Tap on the Amazon Quiz banner and tap on the Start button to start the Quiz.
Now you will get 5 questions and you need to answer them correctly. One wrong answer will eliminate you from the Quiz.
After answering all the questions correctly you are now eligible for a Lucky Draw.
The winner’s name will be announced today at 12 PM.
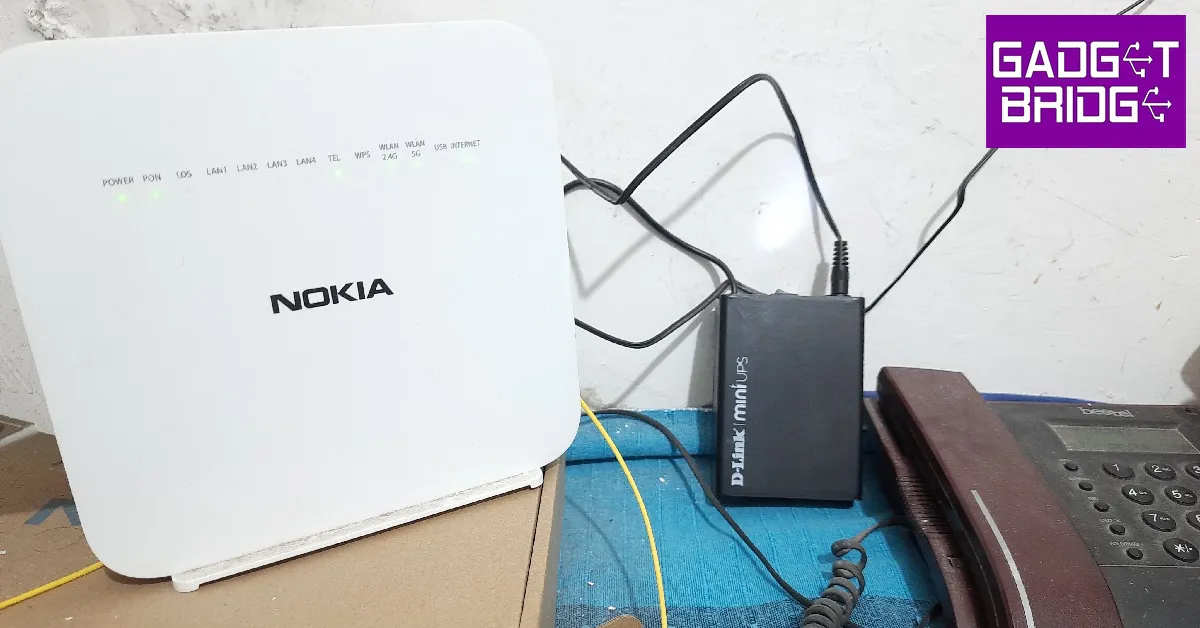
If your work requires you to be connected to the Internet at all times, then a power outage is a cause of serious concern. Since Wi-Fi routers aren’t usually backed up by an inverter, a loss in power can immediately shut off your access to the Internet. While you can always create a personal hotspot using your smartphone, it isn’t feasible when you require a large amount of data over an extended period of time. Creating a mobile hotspot also drains your smartphone’s battery rather quickly. Power outages are pretty common in India, and for people who need Internet access 24×7, this can lead to some sticky situations. Luckily, D-Link has the answer you are looking for. The D-Link portable mini UPS is a handy device that plugs into your Wi-Fi router and provides emergency power backup in case of an outage. We recently got our hands on this mini UPS and used it for over a week. Here is our review of the D-Link DPS-FU1211 Portable mini UPS.Read Also: Fitbit Versa 4 Review: A great fitness tracker, but is it an ideal smartwatch?
D-Link DPS-FU1211 Portable mini UPS review: Design
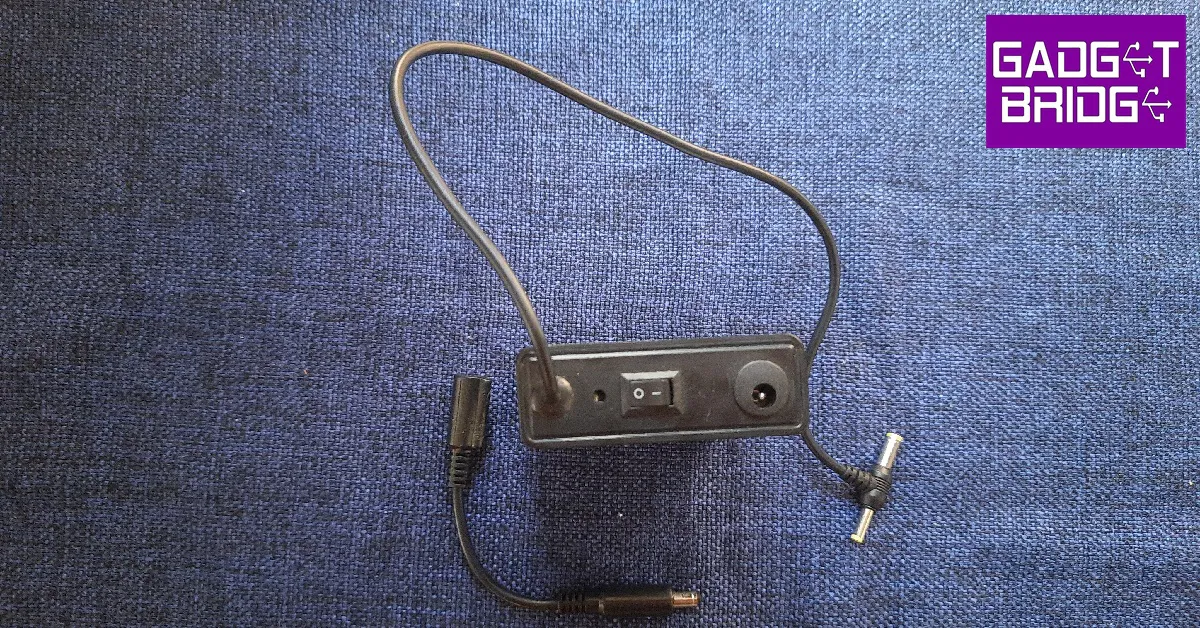
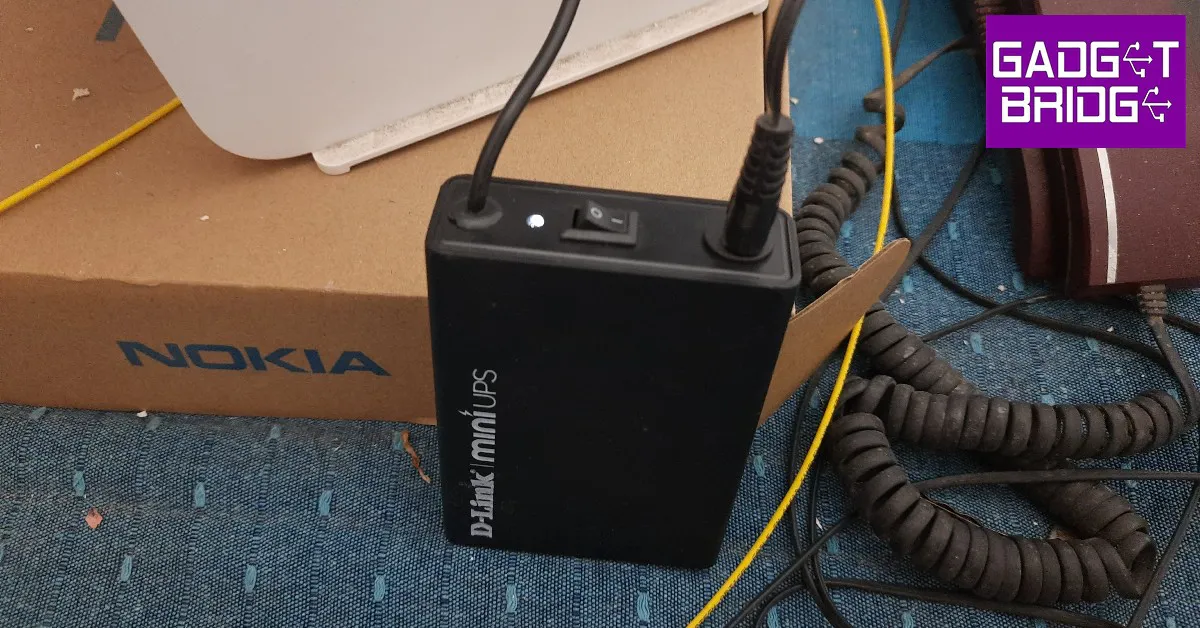
The D-Link Portable mini UPS comes in a sturdy rectangular box that contains the UPS adapter, connector/converter, a quick installation guide, and a warranty card. The device has dimensions of 10.2 x 7.3 x 2.7cm and weighs 175 grams. The mini UPS has a power rating of 12V.The mini UPS is pretty compact and you won’t have any issue fixing it next to your Wi-Fi router, CCTV camera, or even a set-top box. The UPS can rest along its edges or sides pretty easily. Up top, you will find the power switch, a small LED notification light, a power input port, and a power output cable. D-Link has also provided a connector for the power input port.The D-Link portable mini UPS is entirely plug-and-play and can be installed in three simple steps. First, you need to unplug your Wi-Fi router’s power adapter. Next, you need to plug in the power adapter to the power input port of the mini UPS. Finally, connect the power output cable of the UPS of the mini UPS to your Wi-Fi router. Turn on the power adapter switch and the mini UPS switch and you are good to go.The compactness and portability of this device allow you to easily carry it around wherever you go. Thinking of working out of a friend’s place for the day? You can simply slide this mini UPS into your pocket and take it wherever you want. It can easily fit into your luggage without consuming too much space.
D-Link DPS-FU1211 Portable mini UPS: Performance
The D-Link mini UPS is packed with a 2,000 mAh battery that can provide up to 4 hours of power backup, as claimed by the company. We put this to the test and used the mini UPS with the main adapter of the Wi-Fi router turned off. On a full charge, we got just under 4 hours of power backup. Under ordinary usage, we didn’t get to hit this limit as power outages are usually resolved within an hour. However, if you experience frequent shortages that last multiple hours, this device will be of tremendous help. Power backup aside, there were multiple aspects of the D-Link mini UPS that we found quite useful. Firstly, once you plug the device in, you can practically forget about it. The UPS draws power from your wall outlet and charges up while relaying the current to the Wi-Fi router. When not providing power backup, the UPS offers current and surge protection for your Wi-Fi router or CCTV camera. On standby mode, the mini UPS takes 4-5 hours to fully charge. Its smart charging feature ensures that the device does not overcharge. One small drawback here is that there is no battery level indicator on this device, except for a little notification light.The switch from the main power supply to emergency power backup was seamless and did not cause the Wi-Fi router to turn off even for a bit. This is perhaps the most helpful feature of the device as you won’t have to wait for the router to reboot in case the power goes out. If you’re attending an online meeting or connected to a video call, you can carry on with your task without a hiccup. The UPS provides a power output of 18W. Read Also: Infinix Note 12i budget smartphone with 5,000mAh battery launched in India
Verdict
The D-Link DPS-FU1211 Portable mini UPS is currently available at Rs 1,700. While this price may seem a little steep to some, it is a good investment if 24×7 internet access is something that is important to you. The seamless transition to emergency power backup and smart charging are additional features that make this product a decent buy.
Pros
Seamless transition to emergency backup without disrupting the internet connection4 hours of backupCompact and Portable
Connecting your iPhone and accessing its contents is really easy ever since Apple ditched iTunes as the intermediary to the connection. Now you can simply plug in your iPhone to your Mac and access it from the Finder itself. However, things can get tricky when the iPhone doesn’t show up on the Finder sidebar. Luckily, there are several methods to remedy this problem. In this article, we bring you the top 7 easy fixes for the ‘iPhone not showing up in Finder’ issue on Mac.Read Also: 6 Easy Ways to Fix WhatsApp Call Not Ringing When iPhone is locked
Make sure your iPhone is unlocked
You won’t be able to see the contents of your iPhone on your Mac if your phone is locked. This added layer of security ensures no one will be able to break into your phone simply by connecting it to a Mac. In order to view your iPhone you will need to unlock it first. Enter your passcode or use the FaceID or fingerprint to unlock your iPhone and then connect it to your Mac.
Restart your iPhone
Restarting your iPhone can fix any minor background glitches and issues that may be keeping it from connecting to your Mac. To restart your iPhone, simply press and hold one of the volume buttons and the side button until the power-off slider appears on the screen. Drag the slider to turn off your phone. Then, press the side key to turn it back on.
Check the USB cable
A faulty USB cable will be unsuccessful in connecting your iPhone to your Mac. In this scenario, your iPhone won’t show up on the Finder at all. Try using the USB with a power adapter to check if it is charging your iPhone. In some cases, a USB cable may charge your iPhone but it may not connect it to a Mac. Try using a different USB cable to check whether the fault lies with your phone or the cable.
Force quit and relaunch Finder
It is possible that the issue lies with the Finder and not your iPhone. To fix this, force quit the Finder and then restart it. Here’s how.Step 1: Click on the Apple icon at the top left corner of the screen.Step 2: Click on Force Quit.Step 3: Click on Finder and select Relaunch.
Restart your Mac
If relaunching Finder does not work, try restarting your Mac. Here’s how.Step 1: Click on the Apple icon at the top left corner of the screen.Step 2: Select Restart.Once your Mac restarts, connect your iPhone and see if it shows up on the Finder.
Enable CDs, DVDs, and iOS devices from Finder preferences
If your iPhone still isn’t showing up on the Finder’s sidebar, try updating its preferences. Here’s how.Step 1: Click on Finder and select Preferences.Step 2: Select Sidebar from the top menu.Step 3: Make sure all the entries in the Location section are enabled. Step 4: Reconnect your iPhone and check if it shows up on the Finder.
Check your Mac’s USB connection
If your iPhone doesn’t show up in the Finder after trying all the fixes mentioned above, the issue may lie with your Mac’s USB connection. Here’s how you can check if there’s a connection issue with your Mac.Step 1: Connect your iPhone with your Mac and click on the Apple icon at the top left corner of the screen.Step 2: Select ‘About this Mac’.Step 3: Click on ‘System Report’.Step 4: Select USB from the side menu.Step 5: Check your iPhone under USB Device Tree. If your iPhone is not listed, it means your Mac’s USB port may be faulty.Read Also: How to Enable or Disable Smart Downloads on YouTube and YouTube Music
No matter how conservatively you use your smartphone, its battery life is something that is out of your control. After years of usage, your smartphone’s battery level is bound to go down. This may result in a lower power backup and slow charging speeds. You may even notice the battery drain out even when your phone is plugged in to charge. While you may have to change the battery eventually, there are a few things you can do to boost the charging speed. In this article, we bring you the top 12 easy methods to fix the ‘iPhone battery draining while charging’ issue.Read Also: How to Enable or Disable Smart Downloads on YouTube and YouTube Music
Turn off optimised charging
Optimised charging ensures that your iPhone charges at a slower pace when it is plugged in overnight. Keeping your iPhone plugged in to charge for long intervals can damage battery health over a period of time. When optimised charging is turned on, the current passing through your iPhone’s battery is limited after it hits a certain amount of charge. While this works fine for the most part, it can lead to a battery drain if you are using your iPhone while charging. Here’s how you can turn off optimised charging.Step 1: Go to Settings and select Battery.Step 2: Select ‘Battery Health’.Step 3: Turn the toggle bar off for ‘Optimised Battery Charging’.
Close all background apps
Your iPhone charges at a slower pace when it is carrying out a lot of background tasks. If you are using an older iPhone, it could even lead to the battery level dropping down when your phone is charging. To fix this, clear all the background apps on your phone. The app switcher will allow you to see which apps are currently working in the background. You can easily close all background apps from the app switcher itself.
Switch off your phone while charging
If your iPhone is charging slowly even after you have closed all the background apps, turn it off and then put it on charge. Even when you’ve killed all background activity, your iPhone still consumes the battery by receiving the network signal.
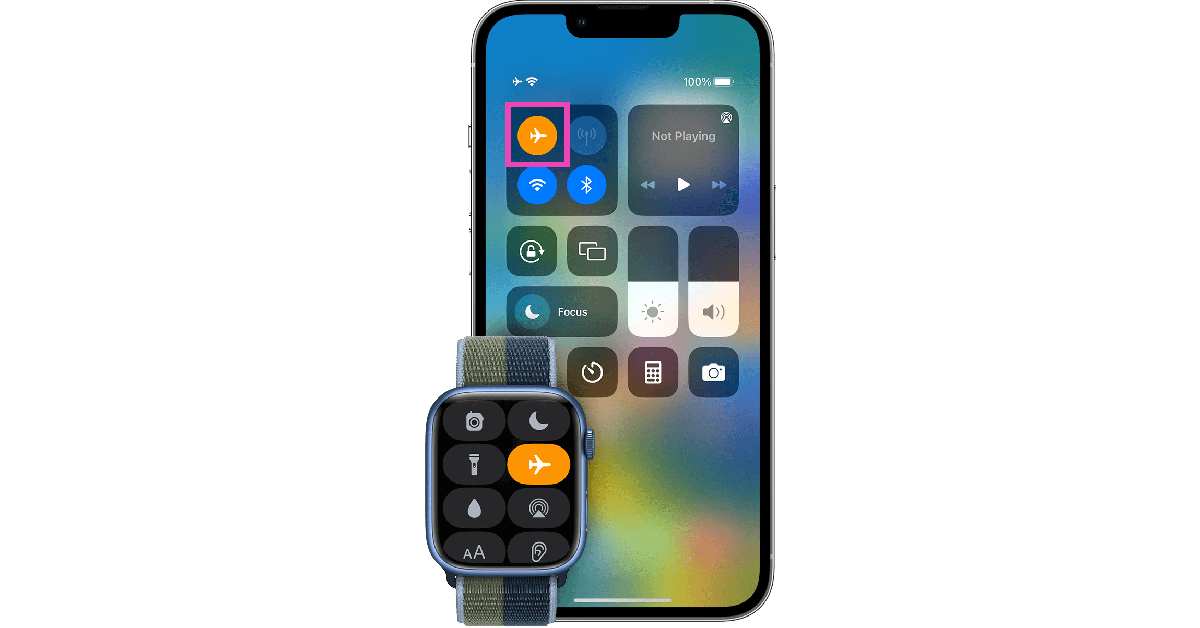
Turn on Airplane Mode
If you don’t want to switch off your iPhone while charging, the next best thing you can do is turn on the Airplane Mode. Receiving a cellular network all the time consumes a lot of power on your device. The power consumption increases when you use the 5G network for streaming videos or just browsing the internet. Turning on Airplane Mode ensures that you don’t use the battery faster than it is being charged.
Enable Low Power Mode
Turning on Low Power Mode on your iPhone cuts down the battery drain by limiting certain tasks. Once it is turned on, the display brightness, refresh rate, and some visual effects will be dialled down. Features like Auto Lock, background app refresh, and automatic downloads will also be disabled. This ensures that your iPhone doesn’t consume power faster than the incoming charge. When the Low Power Mode is turned on, the battery bar turns yellow.
Use an Apple-authorised power adapter
Power adapters play a significant role in determining the rate at which your iPhone charges up. An old adapter will typically not be able to deliver your desired charging speed. This can lead to the battery draining out while your iPhone is charging. To fix this, buy a new power adapter. Make sure you use an original Apple adapter or a ‘Made for iPhone’ adapter for best results.
Use a fast charger
Apple doesn’t ship a power adapter with iPhones anymore. If you have an old iPhone adapter lying around, chances are that it is not a fast charger. Over the years, smartphones have improved their charging speed. While the iPhone may not be able to charge at the ridiculous rate that some Android phones can, a charging speed of 20W is still pretty decent. If you’re using one of those old 5W power adapters, it will take a long time to boost your iPhone’s battery. Switch to a fast charger for better results.
Remove the cover or case while charging
Sometimes, the external case covering your iPhone can cause its temperature to rise. This is more likely to happen when the surrounding temperature is high. Taking off the case lets your iPhone cool down faster. While charging, the battery inside your iPhone can get warmer, leading to a simultaneous loss of charge. Take off the case to keep the iPhone’s temperature in check and boost its charging speed.
Use a different power outlet
It is possible that the fault may not lie with your iPhone but with the low power supply from the power outlet. Try connecting your iPhone to a different wall outlet to check if this is the issue. You can also try using a power bank to check if your iPhone is charging at the desired pace.
Do not charge your iPhone under direct sunlight
If your desk is set up near a window that lets in a lot of sunlight, it can cause your iPhone to get warmer than usual. Find another spot to charge your iPhone, preferable at a place that is cool, ventilated, and away from sunlight. You will immediately notice a boost in charging speed.
Check your iPhone’s battery health
No matter how conservatively you use your phone, the battery health is bound to drop down over a period of time. Your iPhone lets you check the battery health and gives you an idea of its remaining lifespan. Here’s how you can check it.Step 1: Go to Settings and tap on Battery.Step 2: Select ‘Battery Health’.This is where you can have a look at your iPhone’s battery insights. If your battery capacity has dropped down so low that it needs replacement, instead of maximum capacity, you will be shown a message that your battery health has degraded.
Update iOS
Keep your phone’s OS updated at all times to limit the bugs and tap into its maximum potential. Here’s how you can update your iPhone to the latest iOS version.
Step 1: Make sure your iPhone is connected to a WiFi network and plug in its charger.
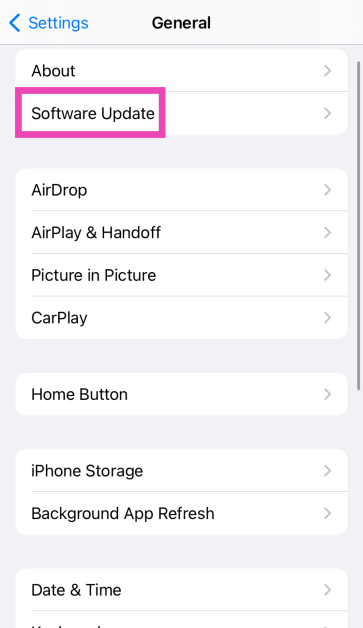
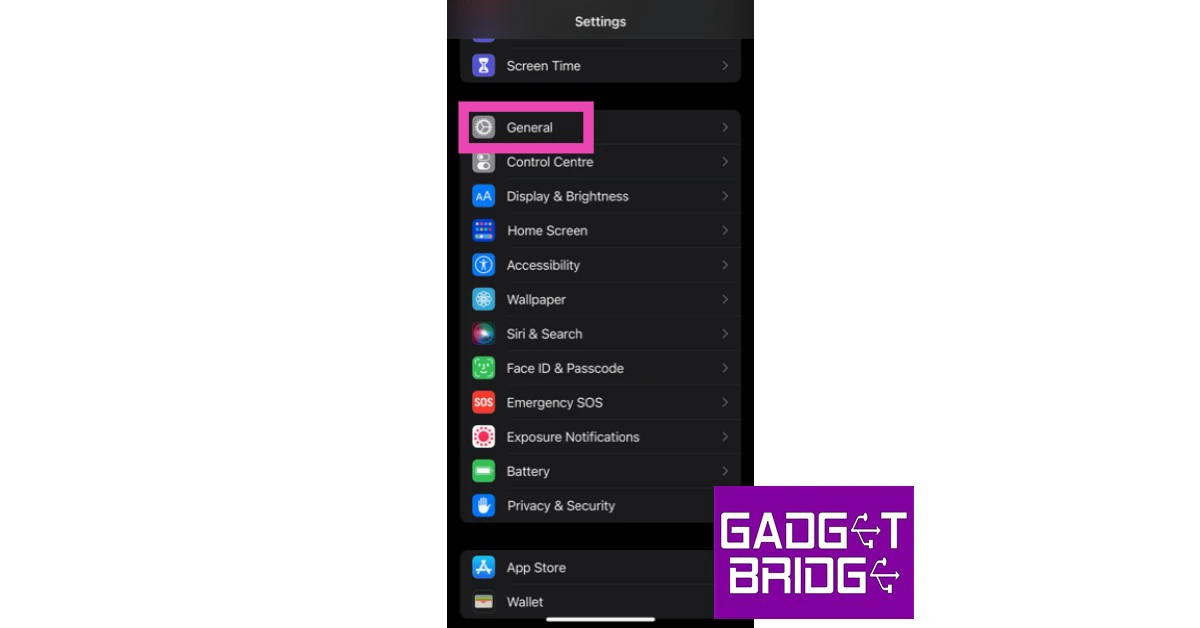
Step 2: Go to Settings and select General.
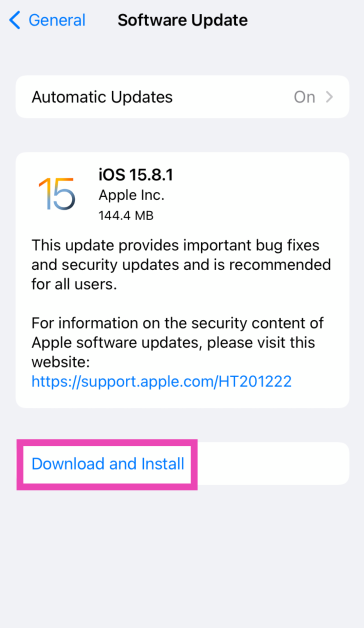
Step 3: Select Software Update.
Step 4: Tap on Download and Install.
Frequently Asked Questions (FAQs)
Why is my iPhone’s battery going down while charging?
If your iPhone’s battery is draining while it is being charged, it is most likely because the battery is old and has lost its power to retain charge.
How do I stop my iPhone’s battery from going down while charging?
The easiest way to reduce battery drain while charging your phone is by turning it off. If you can’t turn it off, close all the background apps and put it on Airplane Mode.
These are the top 12 easy methods to fix the ‘iPhone battery draining while charging’ issue. To increase your iPhone’s battery’s lifespan, only plug it in to charge when the battery hits a low level and always make sure you do not overcharge it. If you want it to charge rapidly, do not use your iPhone while charging.
Discord is one of the biggest platforms preferred by gamers for voice calls, streaming gameplay, and instant messaging. If you’re a fan of a video game, chances are it has its own thriving community on Discord. Once you sign up on Discord, you have to choose a username for yourself. This username along with the user tag is your profile’s identifier on the app. While providing a username is mandatory, Discord also lets you have different screen names or ‘nicknames’ for the servers you are a part of. You can have a different nickname for every server. In this article, we show you how to change your username and nickname on Discord. Read Also: Infinix Note 12i budget smartphone with 5,000mAh battery launched in India
Here’s how you can change your username on Discord
Step 1: Launch the Discord app and tap on your profile icon at the bottom right corner of the screen.Step 2: Select ‘Account’.Step 3: Tap on ‘Username’.Step 4: Enter your desired username. Discord Nitro subscribers can also change the tag next to their Discord username. Step 5: Hit ‘Save’ once you’re done.Your Discord username will be changed.
Here’s how you can change your nickname on Discord
Step 1: Launch the Discord app and select the server in which you want the desired nickname.Step 2: Tap on ellipses (three dots) on the server banner.Step 3: Scroll down and select ‘Edit Server Profile’.Step 4: Enter a nickname and hit ‘Save’.Your Discord nickname for the server will be changed.Read Also: Top 6 Methods to Reduce Photo File Size on iPhone
Conclusion
This is how you can change your username and nickname on Discord. Regular Discord users can only change their username on the app, but Nitro subscribers get to change their user tag as well. To learn about other exclusive features offered by Discord Nitro, read our article here. If found this article helpful, let us know in the comments!For the latest gadget and tech news, and gadget reviews, follow us on Twitter, Facebook and Instagram. For newest tech & gadget videos subscribe to our YouTube Channel. You can also stay up to date using the Gadget Bridge Android App. You can find the latest car and bike news here.
If you search your name on Twitter, chances are that it may not show up in the top results. If a lot of users share your name, it becomes difficult for others to look up your profile. This is why sharing your Twitter profile link is the quickest and most efficient way of sharing your profile and it takes the receiver directly to your page. In this article, we bring you the top 4 simple ways to copy and share a Twitter profile link on a smartphone or desktop.Read Also: Top 6 Methods to Reduce Photo File Size on iPhone
Copy and share a Twitter profile link from the Android app
Step 1: Open the Twitter app for Android and visit the profile you want to share.Step 2: Tap on the ellipses (three dots) at the top right corner of the screen.Step 3: Select ‘Share’.Step 4: Tap on ‘Copy URL’ to copy the profile link. You can also quickly share the profile link via any messaging app.
Copy a share a Twitter profile link on a web browser
Step 1: Open the Twitter profile you want to share on a web browser.Step 2: Tap the address bar to highlight the link.Step 3: Long press and select ‘Copy’. The profile link will be copied to the clipboard and can be shared by pasting on any text field. You can also tap on the clipboard icon next to the address bar to copy the profile link.
Copy and share a Twitter profile link on a desktop
Step 1: Open the desired Twitter profile on your desktop’s web browser.Step 2: Tap on the ellipses (three dots) on the profile page.Step 3: To simply copy the link to the Twitter profile, click on ‘Copy link to profile’.Step 4: To share the profile link, click on ‘Share profile via’.
Copy and share your own Twitter profile link
If you don’t feel like opening the Twitter app or webpage, you can still share your profile link quite easily. Your Twitter profile link is nothing but your handle added to the Twitter web address. To quickly share your Twitter profile link anywhere, simply type www.twitter.com/yourusername. In the above format, substitute ‘yourusername’ with your actual username. For example, if your Twitter handle is sports123, then your Twitter profile link becomes www.twitter.com/sports123.Read Also: How to easily create a custom Apple Watch Face?
One of the early players in the ‘smart wearables’ category, Fitbit quickly gained a reputation for putting out the best fitness tracking gadgets to the point that the name ‘Fitbit’ became synonymous with a health tracking band. However, in the last few years, smartwatches have been on the ascendancy, offering ‘smarter’ features on top of health & fitness tracking. Brands like OnePlus, Noise, Oppo, and Xiaomi have also been successful in bringing smart wearables to the masses with their highly competitive pricing. In January 2021, Google acquired Fitbit for $2.1 billion, opening the door to a range of possibilities. We recently got our hands on the recently launched Fitbit Versa 4 and set out to test whether Fitbit still holds its own in a rapidly developing smartwatch category. After using the Fitbit Versa 4 for over a week, here is our review.Read Also: How to easily create a custom Apple Watch Face?
Fitbit Versa 4 review: Design
Opening the box, you’ll find the Fitbit device housed in the centre with the charger and additional strap on either side. The box also contains a quick start guide and a product information booklet. The Fitbit Versa 4 does not ship with a power adapter. Fitbit has provided an additional 209mm strap with the Versa 4 which is longer than the default one (175mm) that the watch comes fitted with. The watch wraps snugly around the wrist, and the strap does not irritate the skin even after hours of use. The square AMOLED dial is bordered by thick bezels on all sides. Fitbit has reintroduced the physical button on the Versa 4 which was missing in its previous iteration. At the bottom of the watch, you will find the charging point, optical heart rate sensor, red and infrared sensors for SpO2 monitoring, an altimeter, and more. The Versa 4 also houses a microphone, speaker, and vibration motor. Overall, Fitbit has kept things simple with the Versa 4. The design isn’t flashy but is practically suited to a fitness tracker. You can add also customised straps to the Versa 4.The Fitbit Versa 4 is water resistant up to 50 metres, which means you can easily wear it while swimming. The watch remains unfazed during sweaty workouts as well. While Fitbit hasn’t mentioned the exact specifications for the watch display, it is bright enough to be legible in direct sunlight. Weighing around 40g (with the straps), you can easily wear the Versa 4 all day without feeling any discomfort.
Fitbit Versa 4 review: Performance
Pairing the Fitbit Versa 4 with your smartphone takes no time, irrespective of the platform you are using it with. All you need to do is install the Fitbit app on your smartphone and turn on Bluetooth to scan the watch. After exchanging the painting codes, you are good to go. While many were expecting Fitbit to incorporate Google’s Wear OS for its devices, the company is sticking with its own Fitbit OS.While we were quite satisfied with Fitbit Versa 4’s design, there were certain aspects of the OS and the general functions that left a little more to be desired. Let’s begin with the good bits – health and fitness tracking.Having been at the top of the game for fitness tracking, Fitbit wasn’t going to let us down on the Versa 4. This is Fitbit’s home territory, where it sets the benchmark performance for other fitness trackers and smartwatches to follow. The Fitbit Versa 4 follows through on the company’s reputation and delivers rock-solid performance. The smartwatch can track up to 40 workout routines, covering all sorts of exercises like weightlifting, treadmill and CrossFit to sports like martial arts, tennis, and snowboarding. The automatic workout detection works smoothly as well. What we were impressed by was the altimeter, which was pretty accurate in its readings of the stairs climbed and elevation gained. The heart rate monitor works constantly in the background, providing readings in real-time during workouts and updating every five seconds in regular mode. The fact that Fitbit is able to achieve this without a significant drop in battery levels is quite impressive.The Versa 4 has a built-in GPS which allows you to leave your phone at home when you go for a walk or a run. The step counter takes a little time to adapt but the readings are close to accurate. The watch also lets you know how many calories you burned during a workout, which is a stat that should be taken with a grain of salt – not just for Versa 4 but for every other smartwatch.The sleep tracking function on the Fitbit Versa 4 is up there with some of the premium smartwatches in the market. After tracking your sleeping pattern, the Fitbit app assigns you a sleep score, determining the quality of your sleep. You also get access to a full breakdown of your sleep cycle with a chart that tracks REM sleep, light sleep, deep sleep, and the periods you were awake. Along with this, you also get a graph of your blood oxygen level during the sleep period. For fitness-oriented users, the Fitbit app provides detailed health metrics along with all the fitness data that the Versa 4 tracks over the course of a day. Through ‘Active Zone Minutes’ the app lets you know how much time you spent in a heart-pumping activity. These metrics are compared to the ideal benchmarks set by WHO and American Heart Association. For more detailed metrics, you will need to subscribe to Fitbit Premium. The Versa 4 comes with a free 6-month Fitbit Premium package, after which you will be charged Rs 999/year or Rs 99/month.Moving on to the not-so-impressive parts, we feel that Fitbit needs to step up its software and ‘smart’ functionalities if it wants to go against other smartwatches in this category. Firstly, Fitbit Versa 4 offers no support for third-party apps. This means the only apps you can use with this smartwatch are the native ones like Alarms, Find My Phone, Weather, and a handful of Fitbit’s fitness apps. There is no music player support on the Versa 4, something that every other smartwatch in this budget is equipped with. While the OS is pretty clean, it feels very limiting in certain scenarios. For example, you cannot view the detailed breakdown of your activities from the watch itself. You will need to switch to the Fitbit app on your phone to go through all the tracked data. Need to change the watch face? You will need to access the app again, as the watch does not let you long press and swap through the available watch faces. And while the Fitbit Versa 4 comes with Alexa support, it lacks Google’s very own voice assistant. These drawbacks seriously hinder Versa 4’s ‘smart’ capabilities. The experience is much better when it is paired with a smartphone via Bluetooth connection. You can receive calls on the Versa 4 and the call quality is quite satisfactory. You can also go through the notifications and respond to incoming messages by using speech-to-text for replies or choosing from a list of preset auto replies and emojis.Ending on a positive note, the battery life of the Fitbit Versa 4 is impeccable. The smartwatch easily lasts just over 4 days with moderate to heavy use. Even with ‘Always On Display’ turned on, we got almost two and a half days of battery life. A quick 15-minute charge can last you an entire day and a full charge takes just under 2 hours. Quick charging time and extensive battery life allow you to keep the watch on for a longer period of time, resulting in a better quality of data.Read Also: OnePlus Buds Pro 2 to work with Android 13’s spatial audio feature
Verdict
The Fitbit Versa 4 is currently available at a price of Rs 16,999. When it comes to fitness tracking and data evaluation, there aren’t many smartwatches better than the Versa 4. But the OS experience and limited ‘smart’ functions is where the Fitbit Versa 4 falls a step behind its competition in this price category. We’d suggest the Versa 4 to fitness-oriented users that are looking for a comprehensive fitness tracker and don’t mind giving up a few fancier functions.
Pros
Well-rounded fitness trackingComfortable fitLong-lasting battery life
There’s nothing more annoying than missing an important call because WhatsApp didn’t send you a ringing alert. This is one of the more common issues that people face with WhatsApp, and there isn’t one final fix for it. It can arise due to several network or app-related issues. Sometimes, it may be your iPhone’s accessibility settings that are at fault. Luckily, there are a few fixes that will take care of this situation. In this article, we bring you 12 easy ways to fix the ‘WhatsApp call not ringing when iPhone is locked’ issue.Read Also: How to easily create a custom Apple Watch Face?
Turn off Do Not Disturb
When enabled, Do Not Disturb prevents calls, texts, or notifications from delivering to your iPhone. This includes any calls you receive on WhatsApp. If the WhatsApp calls aren’t ringing on your iPhone, it may be because you accidentally enabled DND from the Control Centre or turned it on earlier and forgot to turn it off. Here’s how you can disable Do Not Disturb on your iPhone.Step 1: Scroll down the status bar to access the Control Centre.Step 2: Tap on ‘Focus’ and disable DND.
Check if WhatsApp notifications are turned on
You may have disabled WhatsApp’s notifications and forgotten to turn them on. Here’s how you can enable the instant messenger’s notifications on your iPhone.Step 1: Go to Settings, scroll down and select WhatsApp.Step 2: Tap on Notifications.Step 3: Ensure the toggle bar for Allow Notifications is turned on.Step 4: Ensure that the lock screen, notification centre, and banner alerts are turned on. Additionally, make sure that the toggle bar for Sounds is turned on as well.
Reset Notification Settings
If turning on notifications didn’t work, you can try resetting them instead. Here’s how.Step 1: Go to Settings, scroll down and select WhatsApp.Step 2: Tap on Notifications.Step 3: Select WhatsApp Notification Settings.Step 4: Tap on Reset Notification Settings.Step 5: Confirm your selection in the popup box.
Turn on Background App Refresh
To make sure WhatsApp is running on your iPhone at all times, make sure that Background App Refresh is turned on. If it isn’t turned on, WhatsApp will not refresh when it is minimised, leading to missed messages and calls. You will only be able to catch up on the messages and calls when you launch the app. Go to Settings>General>Background App Refresh and turn it on. Also, make sure that the toggle bar for WhatsApp is switched on.
Turn off Silent Mode
If your iPhone is in silent mode, it will not make a ringing sound every time you receive a call. To disable silent mode, switch the ringer key on the top-left side of your iPhone. If you can see the orange colour on the switch, it means your iPhone is in silent mode. Flick it the other way to switch to a Loud profile.
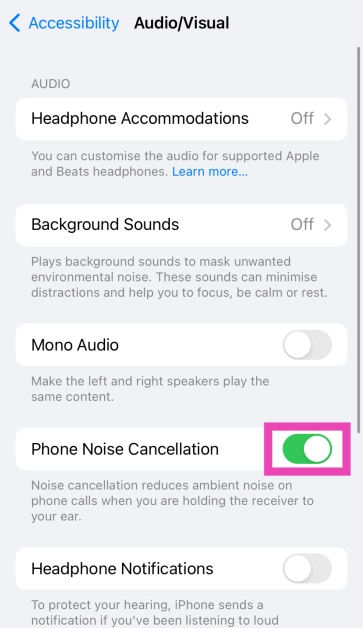
Turn off Noise Cancellation
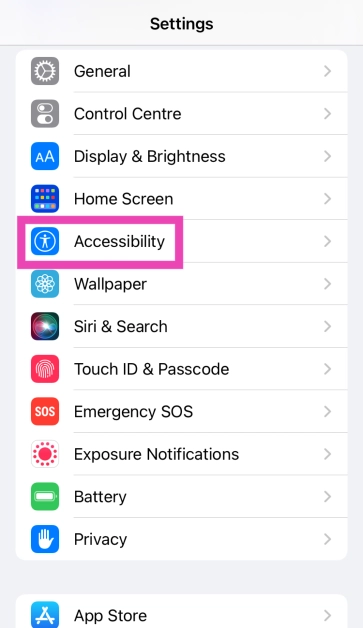
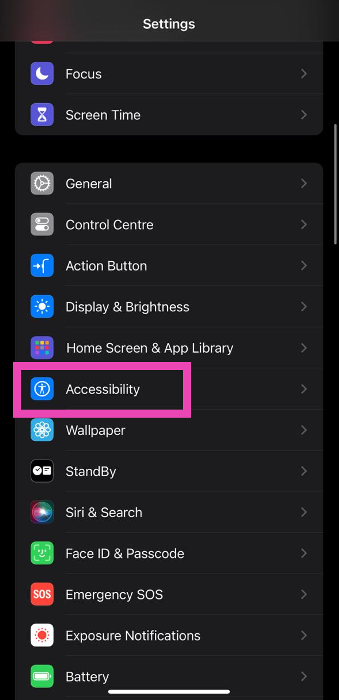
Step 1: Go to Settings and select Accessibility.
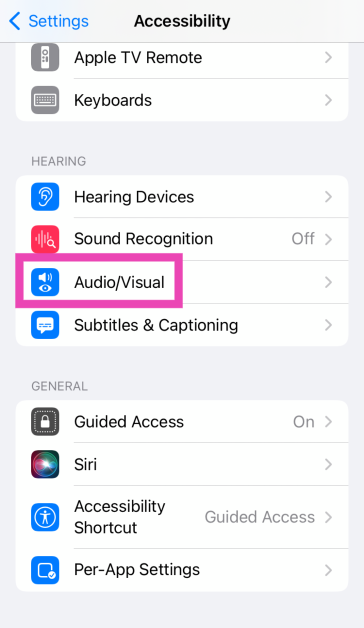
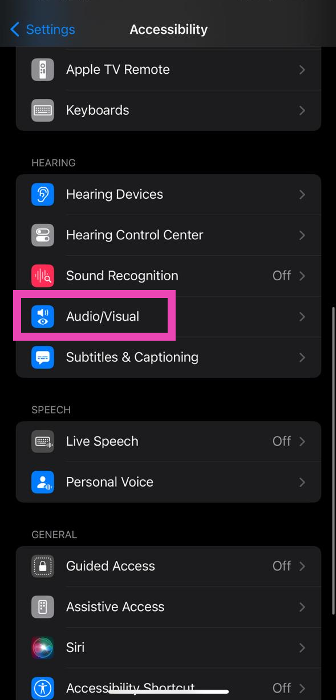
Step 2: Scroll down and tap on Audio/Visual.
Step 3: Turn off the toggle switch for Phone Noise Cancellation.
Turn off Low Power Mode
Once your iPhone goes into Low Power Mode, it cuts down on power consumption by sticking to its essential functions. You may not receive WhatsApp notifications once your iPhone switches to Low Power Mode. To turn it off, go to Settings>Battery and switch off the toggle bar for Low Power Mode.
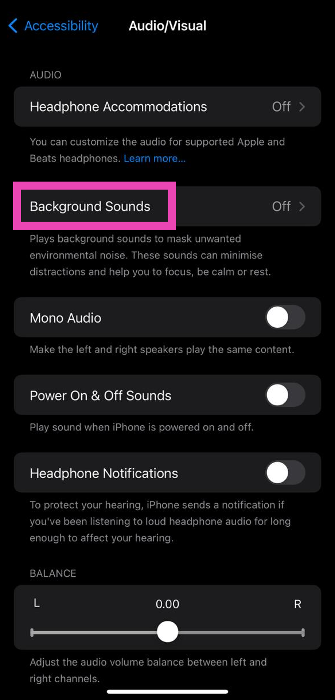
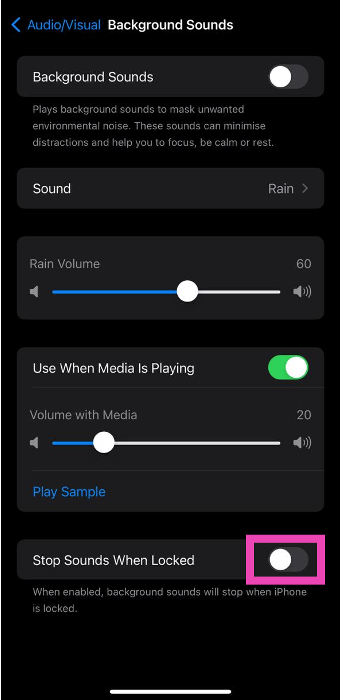
Enable Background Sounds
Step 1: Go to Settings and select Accessibility.
Step 2: Select Audio/Visual.
Step 3: Tap on Background Sounds.
Step 4: Turn off the toggle switch for Stop Sounds When Locked.
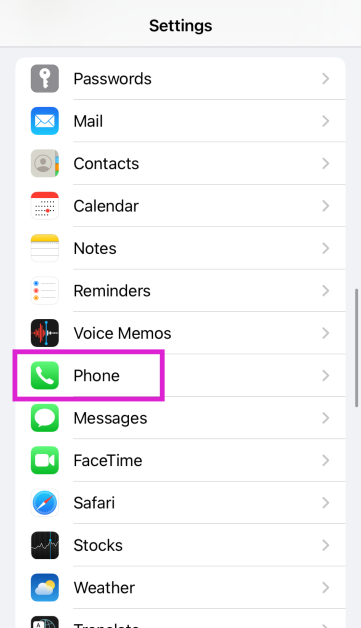
Turn off Silence Unknown Callers
Step 1: Go to Settings and select Phone.
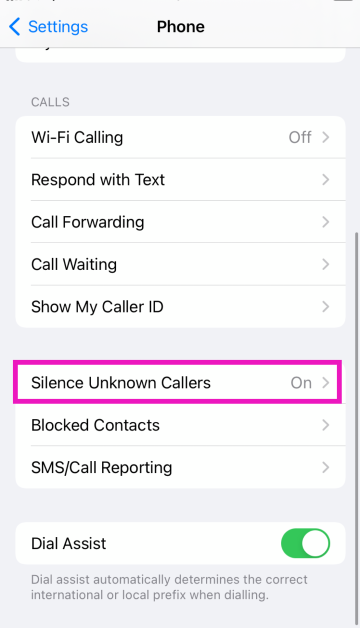
Step 2: Scroll down and tap on Silence Unknown Callers.
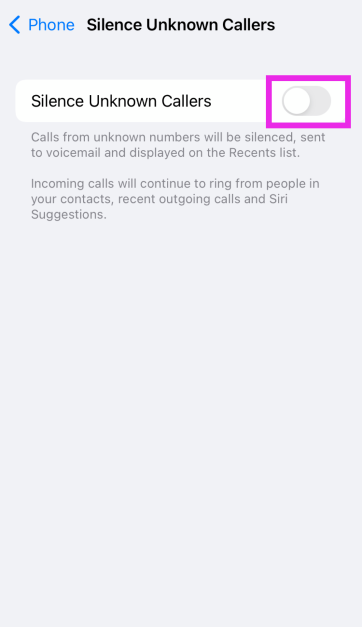
Step 3: Turn off the toggle switch.
Update WhatsApp
If the issue is bug-related, WhatsApp may have patched it with an update. In order to update WhatsApp, go to the app store and search for WhatsApp. From the app page, select ‘Update’. Whenever any bug pops up on the app, the developers quickly fix it with an update. This is why it is essential to keep your apps updated at all times.
Update iOS
An older version of iOS may have a software bug that’s keeping certain apps from pushing their notifications. These bugs are quickly resolved by a software update. If your iPhone is running an older version of iOS, go to Settings>General>Software Update to install the latest version.
Reset Network Settings
It is possible that the issue lies with your iPhone’s network reception and not the WhatsApp app itself. To fix this, reset the network settings on your phone. Here’s how.Step 1: Go to Settings and select General.Step 2: Scroll down and select Transfer or reset iPhone. Step 3: Select Reset followed by Reset Network Settings.
Frequently Asked Questions (FAQs)
Why can’t I view WhatsApp calls on my iPhone?
A faulty internet connection is the most likely reason behind your iPhone not notifying you of WhatsApp calls. You may also have accidentally turned on the silent mode or DND on your iPhone.
How do I fix the ‘WhatsApp calls not ringing’ issue on my iPhone?
Check if there’s a pending update for WhatsApp and install it on your phone. Also make sure that Background App Refresh is turned on for WhatsApp.
If I mute someone on WhatsApp does it mute their calls as well?
These are the top 12 ways to fix the ‘WhatsApp calls not ringing when iPhone is locked’ issue. If none of these methods worked for you, you can try performing a factory settings reset on your iPhone as a last-ditch effort. Before resetting the iPhone to factory settings, make sure you’ve backed up all your data as it will be erased in the process. If you found this article helpful, let us know in the comments!
‘Smart Downloads’ is one of the underrated features of YouTube Premium. While a Premium subscription to YouTube allows you to download unlimited videos and music at the highest quality possible, ‘Smart Download’ automatically saves your most played songs to your device. It also saves new videos from your most watched content creators to your device. In this article, we show you how to enable or disable Smart Downloads on YouTube and YouTube Music.Read Also: Poco C50 Review: A good budget smartphone for basic use
How to Enable or Disable Smart Downloads on YouTube
Step 1: Open the YouTube app and tap on your profile icon at the top right corner of the screen.Step 2: Scroll down and select Settings.Step 3: Select ‘Background and downloads’.Step 4: This is where you’ll find the ‘Smart downloads’ option. Turn the toggle bar on enable smart downloads for YouTube and turn it off to disable it.You can also select the resolution you want to save the videos in by tapping on ‘Download quality’. To save mobile data you can choose to download videos only when your phone is connected to a WiFi network.
How to Enable or Disable Smart Downloads on YouTube Music
Step 1: Open the YouTube Music app and tap on the profile icon at the top right corner of the screen.Step 2: Scroll down and select Settings.Step 3: Tap on ‘Library and downloads’.Step 4: This is where you’ll find the ‘Smart downloads’ option. Turn the toggle bar on enable smart downloads for YouTube Music and turn it off to disable it.You can even decide how many songs you want the YouTube Musicapp to download automatically for you. The limit is set to 100 songs by default but you can expand it to 500 songs.
How to access and remove Smart Downloads?
The YouTube app opens the downloads folder when it is not connected to the internet. However, if you are connected to the internet, you can access your Smart Downloads by tapping on the ‘Library’ option at the bottom right corner of the screen and selecting ‘Downloads’. To remove a video, simply tap on the ellipses next to it and select ‘Delete from downloads’.To access your downloaded songs in the YouTube Music app, tap on the ‘Library’ icon at the bottom right corner of the screen and select the Downloads folder. To remove any download, simply tap on the ellipses next to the song and select ‘Remove download’.Read Also: Meta brings end-to-end encryption to Facebook Messenger, more features also added
Infinix has expanded its Note lineup with the launch of Infinix Note 12i in India. The smartphone has a MediaTek Helio G85 SoC under its hood. It comes packed with a 5,000mAh battery with 33W fast charging support. In addition to this, the device also features a 50MO ultra night camera and an FHD+ AMOLED display.
Infinix Note 12i price in India and sale details
Infinix Note 12i has been launched in a single 4GB RAM with 64GB storage priced at Rs 9,999. The device will be available in three colour options of Force Black, Metaverse Blue, and Alpine White. Beginning on January 30, the smartphone will be offered for purchase on Flipkart.Also Read:OnePlus 11R 5G India launch to take place on February 7 at Cloud 11 eventAdditionally, users can benefit from the Jio Exclusive Program to receive Rs 1000 cashback on Note 12i within 30 days from the date of purchase.
Infinix Note 12i specifications
The 6.7-inch full-HD+ AMOLED display on the Infinix Note 12i has a resolution of 1,080×2,400 pixels. The screen boasts 100 percent coverage of the DCI:P3 colour gamut and has a peak brightness of 1,000 nits. It also has a 180Hz touch sampling rate. Gorilla Glass 3 is installed as protection for the display. The screen also supports Widevine L1 certification. With 4GB of RAM and a MediaTek Helio G85 SoC, the handset is powered. The smartphone’s 64GB of internal storage can be increased to 512GB by using a MicroSD card slot. The device comes pre-installed with the company’s XOS 12.0 skin over Android 12.Also Read:iOS 16.3 and iPadOS 16.3 updates bring Security Keys for Apple ID, support for HomePod (2nd Gen) also addedIt has a 5,000mAh battery and 33W fast charging is supported. The triple camera system on the Infinix Note 12i consists of a 50-megapixel primary sensor with an f/1.6 aperture, a 2-megapixel depth sensor, and a QVGA camera. For selfies and video calls, the Infinix Note 12i’s front-facing 8-megapixel camera has a dual-LED flash.A USB Type-C port, 4G, Wi-Fi, Bluetooth 5.0, GPS, and other connectivity options are available on the smartphone. In addition, a fingerprint sensor is included for biometric verification, along with an ambient light sensor, g-sensor, proximity sensor, gyroscope, magnetometer, and other sensors.
For the latest gadget and tech news, and gadget reviews, follow us on Twitter, Facebook and Instagram. For newest tech & gadget videos subscribe to our YouTube Channel. You can also stay up to date using the Gadget Bridge Android App. You can find the latest car and bike news here.


 Step 3:
 Step 5:
")
 Step 2:
 Step 3:

 If you don’t want to switch off your iPhone while charging, the next best thing you can do is turn on the Airplane Mode. Receiving a cellular network all the time consumes a lot of power on your device. The power consumption increases when you use the 5G network for streaming videos or just browsing the internet. Turning on Airplane Mode ensures that you don’t use the battery faster than it is being charged.
 Turning on Low Power Mode on your iPhone cuts down the battery drain by limiting certain tasks. Once it is turned on, the display brightness, refresh rate, and some visual effects will be dialled down. Features like Auto Lock, background app refresh, and automatic downloads will also be disabled. This ensures that your iPhone doesn’t consume power faster than the incoming charge. When the Low Power Mode is turned on, the battery bar turns yellow.

 Sometimes, the external case covering your iPhone can cause its temperature to rise. This is more likely to happen when the surrounding temperature is high. Taking off the case lets your iPhone cool down faster. While charging, the battery inside your iPhone can get warmer, leading to a simultaneous loss of charge. Take off the case to keep the iPhone’s temperature in check and boost its charging speed.

 Step 3: Select Software Update.
 Step 4: Tap on Download and Install.

 Step 2:
 Step 3:
 Step 4:
 Step 3:
 Step 4:

 Step 3:
 Step 4:
 Step 3:
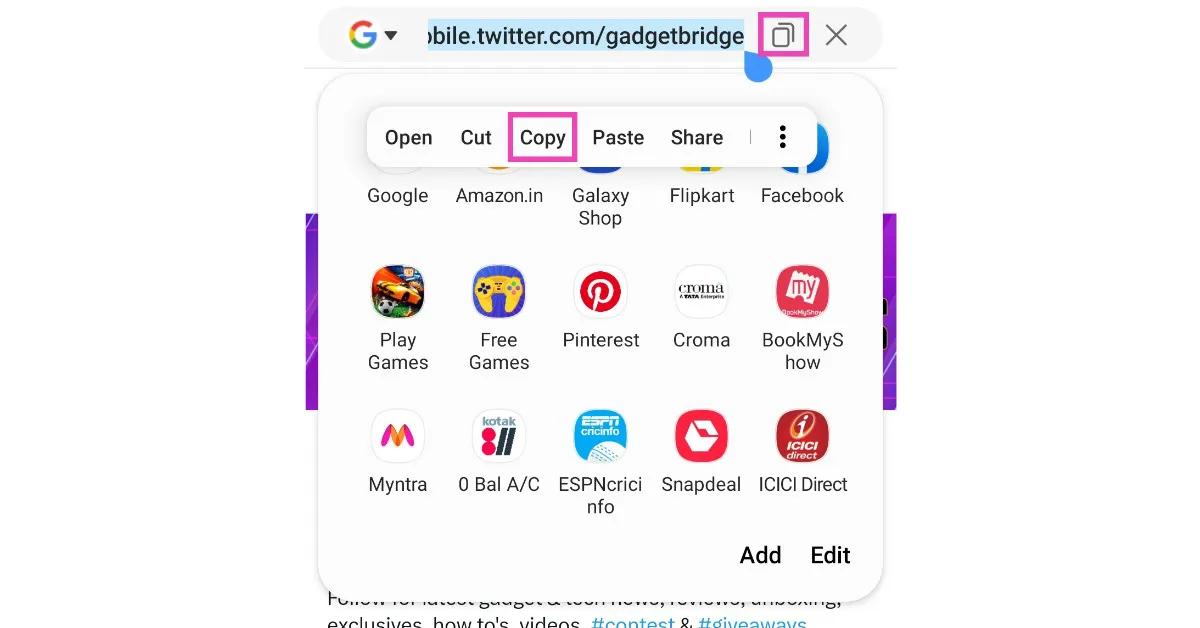
 Step 3:
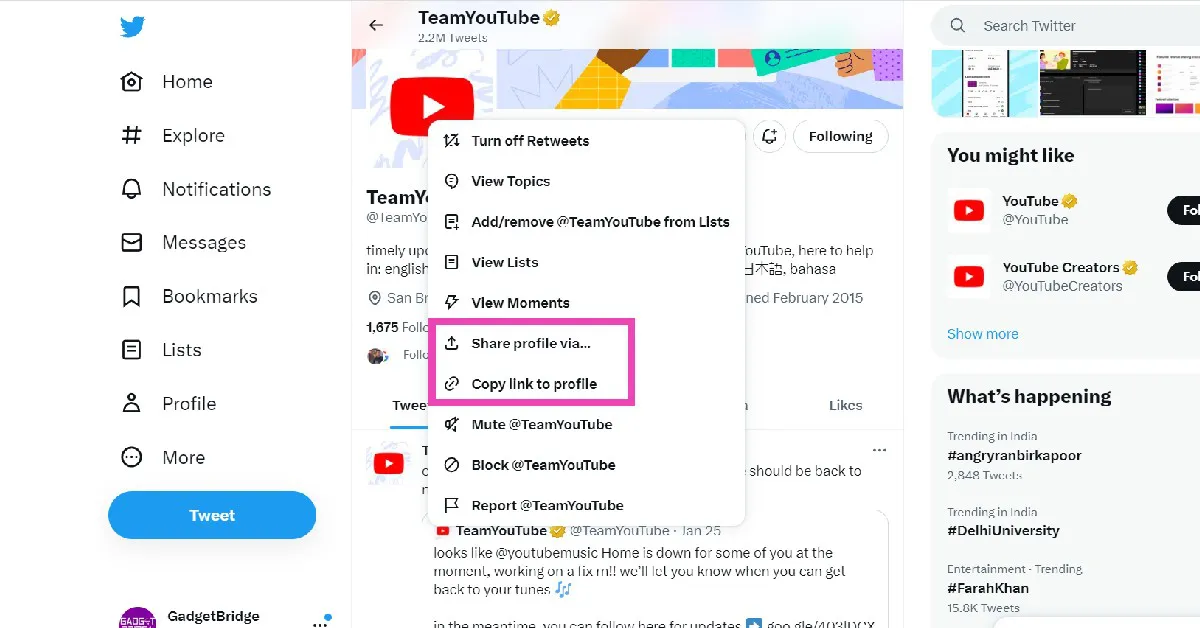 Step 4:


")
 Step 2:
 Step 3:
 Step 4:
 Step 4:
 Step 5:
 Step 2: Scroll down and tap on Audio/Visual.
 Step 3: Turn off the toggle switch for Phone Noise Cancellation.
 Step 2: Select Audio/Visual.
 Step 3: Tap on Background Sounds.
 Step 4: Turn off the toggle switch for Stop Sounds When Locked.
 Step 2: Scroll down and tap on Silence Unknown Callers.
 Step 3: Turn off the toggle switch.
 An older version of iOS may have a software bug that’s keeping certain apps from pushing their notifications. These bugs are quickly resolved by a software update. If your iPhone is running an older version of iOS, go to Settings>General>Software Update to install the latest version.
 Step 2:

 Step 2:
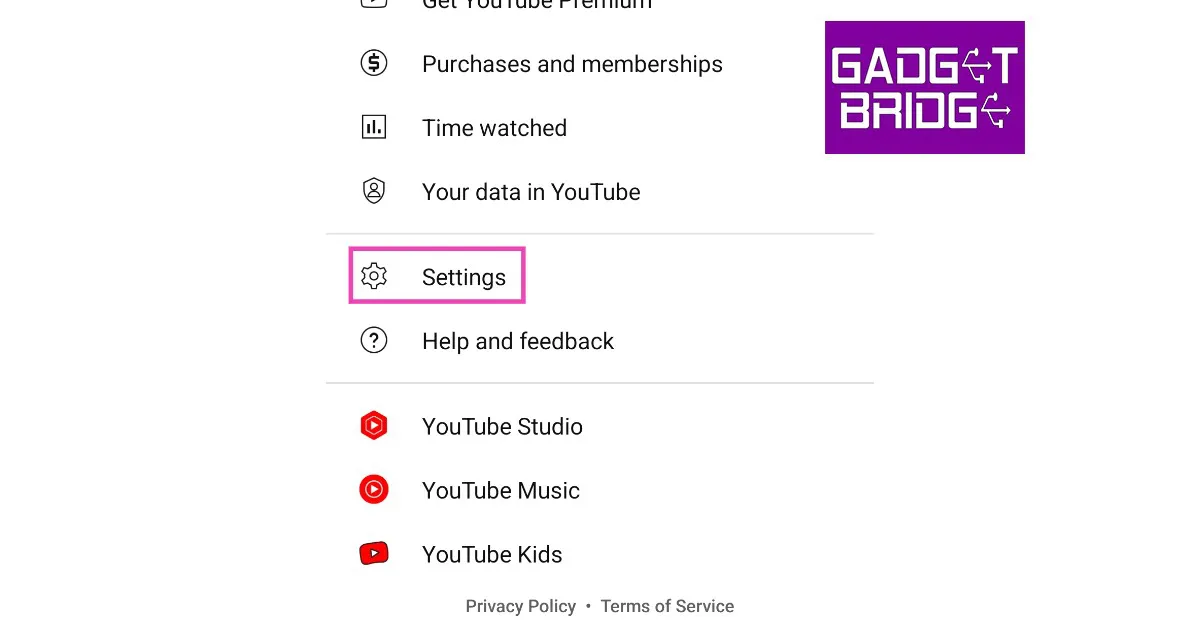 Step 3: