The pictures shot using your iPhone’s camera capture an incredible amount of detail. This also means they carry a decent amount of file size. Sometimes users run into a problem when they need to upload an image to an official document, and the image exceeds the stipulated file size. Luckily, there are several ways you can compress an image and bring its size down to a desirable limit. In this article, we bring you the top 9 methods to reduce the photo file size on an iPhone. Using these methods, you can easily compress any photo on your iPhone.Read Also: 6 easy methods to fix ‘WhatsApp Call Not Ringing’ when Android phone is locked
Crop the image in the Photos app
The easiest way to reduce the file size of a photo is by cropping it ever so slightly in the Photos app on your iPhone. This will alter the image resolution by a tiny amount, but the size of your image will be reduced significantly. To crop an image, open it in the Photos app and select the Edit option at the bottom of the screen. Tap on Crop/Rotate and use the frame to slightly crop the image.
Change the image format in the iPhone Camera settings
Changing the image format from JPEG to HEIF (High-Efficiency Image Format) will help reduce the file size of the resulting image. The JPEG format stores a lot of information, which can lead to a bloated file size. On the other hand, the HEIF format offers a lower file size without compromising the quality of the image. Here’s how you can switch to the HEIF format.Step 1: Open Settings on your iPhone and select Camera.Step 2: Tap on Formats.Step 3: Select ‘High Efficiency’.
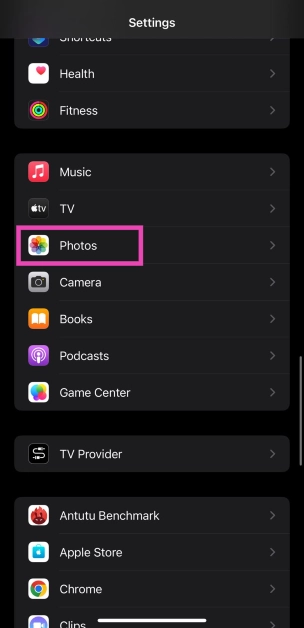
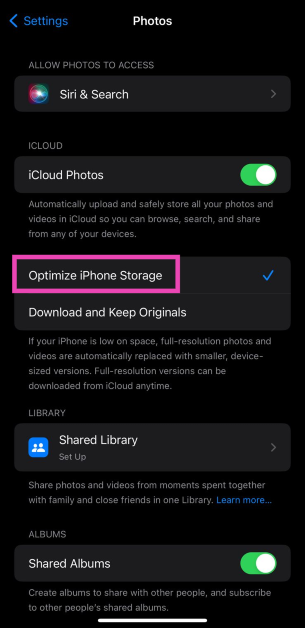
Optimise iPhone Storage
Step 1: Go to Settings and select Photos.
Step 2: Tap on Optimize iPhone Storage.
The images on your iPhone will be compressed to save storage space. The optimised images occupy less space and are perfect to be viewed on your iPhone. You won’t notice much difference. If you want to access the full-resolution images, you can download them from iCloud.
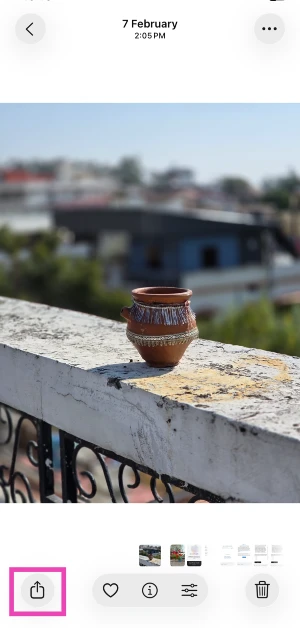
Compress a photo using the Files app
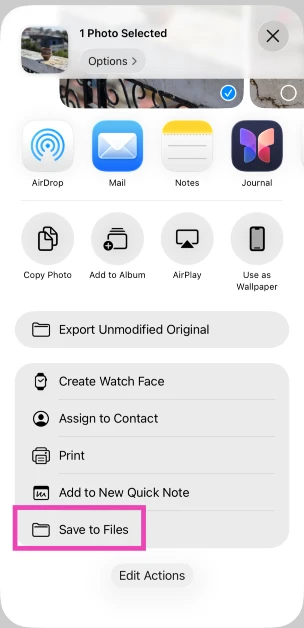
Step 1: Go to the Photos app on your iPhone and open the image you want to compress.
Step 2: Hit the Share icon in the bottom left corner of the screen.
Step 3: Select Save to Files.
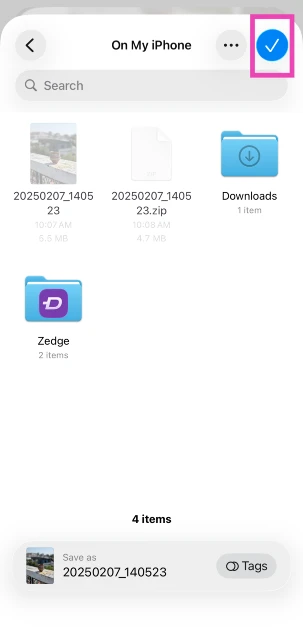
Step 4: Choose the destination and hit the tick icon.
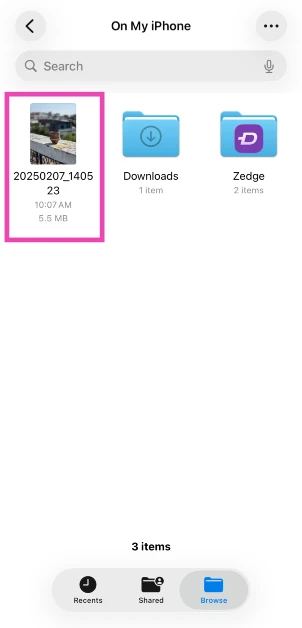
Step 5: Launch the Files app and go to the image.
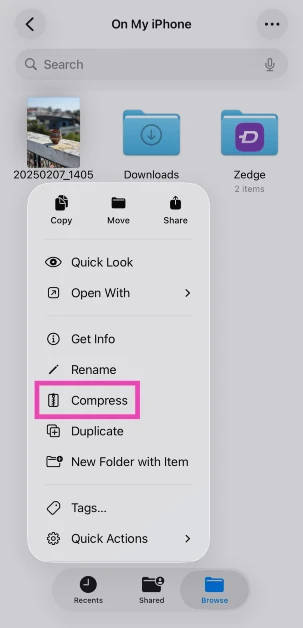
Step 6: Long-press the image icon and select Compressed.
Step 7: A compressedversion of the image will appear next to it.
Use a third-party app
There are several third-party apps on the App Store that will help you resize your images. ‘Image Size’ is one of the highly rated apps for this purpose. Once you’ve installed the app on your iPhone, open it and load the image you want to resize. Now you can resize the image by pixels, inches, mm, cm, or any other metric. Save the image once you’re happy with the result. The saved image will have a significantly smaller file size than the original image.
Send the image to yourself on WhatsApp
Instant Messengers like WhatsApp automatically downsize the images you send on the platform. This is done to increase the speed and reduce the storage space. While some may see it as a flaw, it can come in handy if you want to reduce the file size of an image. WhatsApp also recently launched the ‘Message Yourself’ feature. You can use this function to send yourself the images you want to downsize. Simply select your name from the contacts and attach and send the images you want.
Use Apple Mail to compress images
While you may not have a say in downsizing the images when sending them through an instant messenger, Apple Mail lets you choose a particular file size before you attach the image to your mail. This is helpful because it gives you three options for the file size: Small, Medium, and Large. You can mail the image to yourself via the Photo app. All you need to do is tap on the share icon and select ‘Mail’. Once the mail has been sent you can download the resized image from the Mail app.
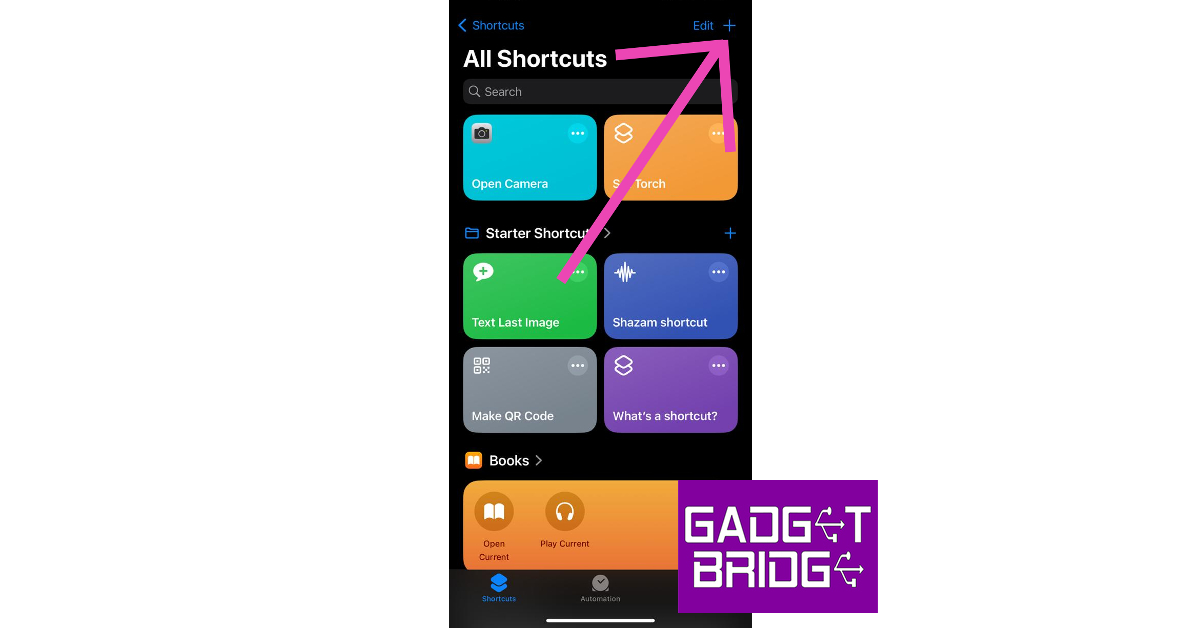
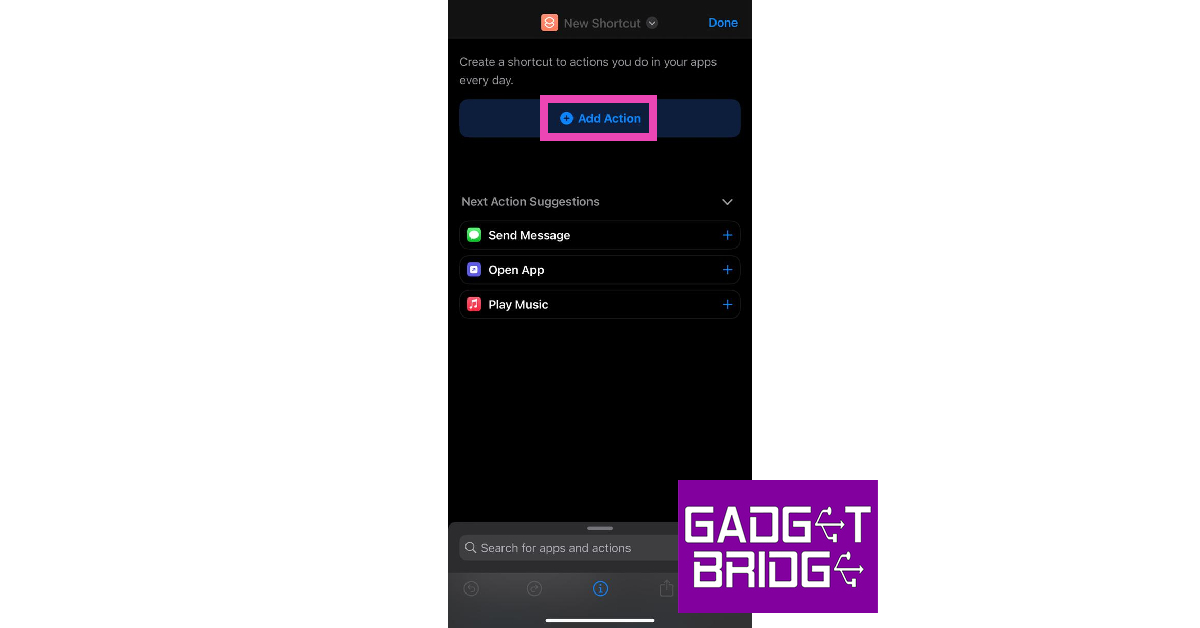
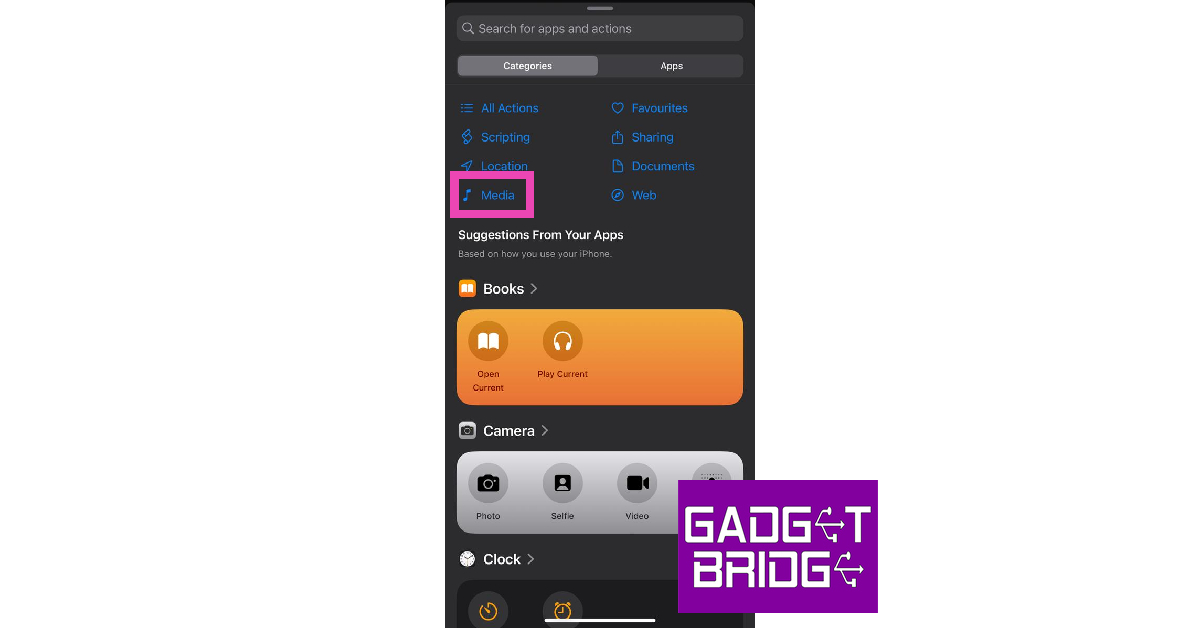
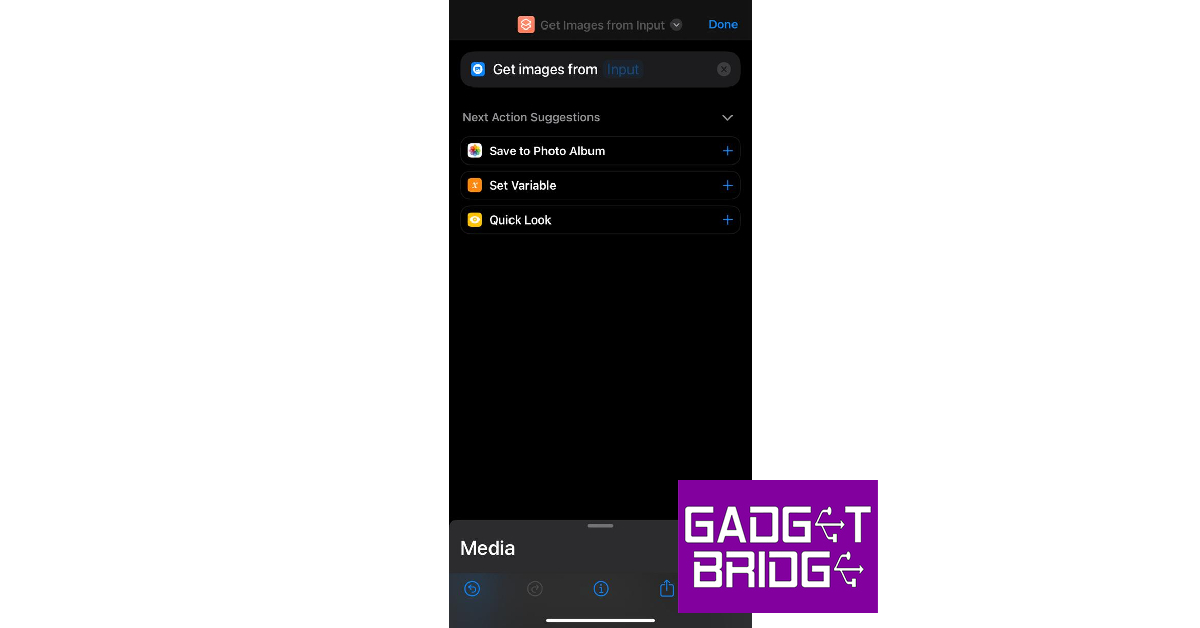
Use a Shortcut
Step 1:Launch the Shortcuts app on your iPhone and hit the Plus icon.
Step 2: Give your shortcut a name.
Step 3: Select Add Action.
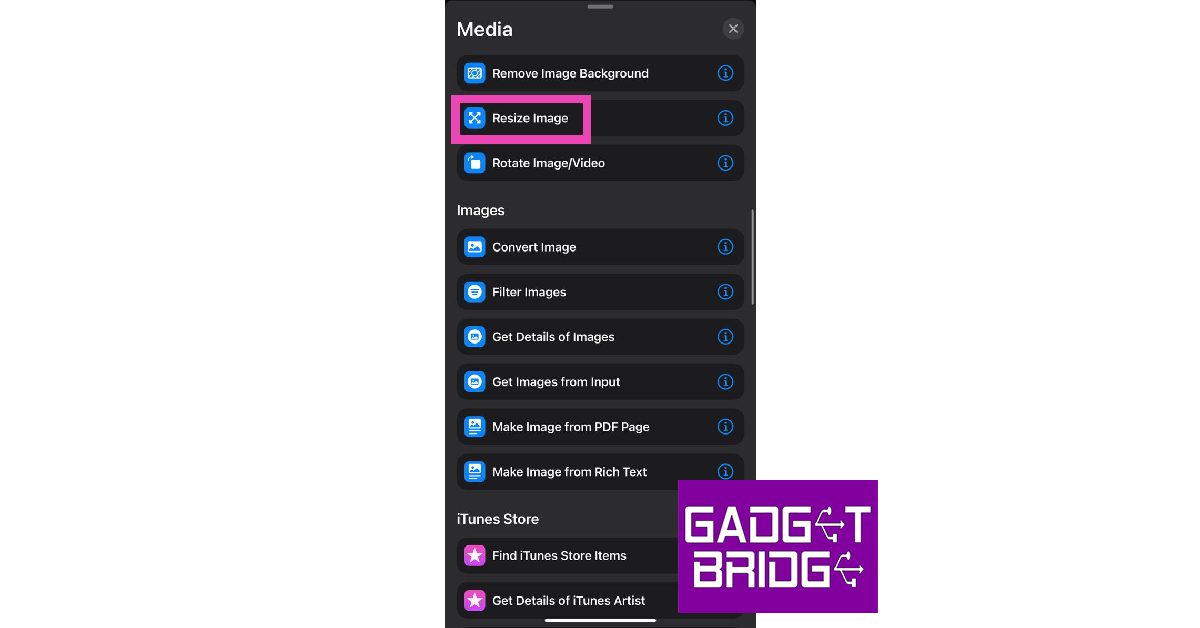
Step 4: Go to Categories and select Media.
Step 5: Under the Images category, select Get Images from Input.
Step 6: Hit the blue icon at the top right corner of the screen and turn on the toggle switch for Show in Share Sheet.
Step 7: Drag the Media page and select Resize Image.
Step 8: Tap on size to set the default metrics or select Ask Each Time.
Step 9: Hit Done.
Step 10: Select the Media page again and tap on Convert Image.
Step 11: Choose the file format for the resized images.
Step 12: Drag the Media page again and tap on Save to Photo Album.
Step 13: Select a destination album for the resized images.
Step 14: Hit the cross icon.
Step 15: To resize an image, open it in the Photos app, hit the Share icon, and select the shortcut from the list.
Use an online tool
There are several online tools you can use to reduce the file size of any image. Img2Go is one of the most popular online compression tools. Here’s how you can use it.Step 1: Open https://www.img2go.com/ on a mobile web browser.Step 2: Select ‘Compress Image’.Step 3: Tap on ‘Choose file’ to select the image you want to resize. This image will be uploaded to the website’s servers. Apart from your iPhone’s local storage, you can also choose an image from Google Drive or Dropbox.Step 4: Choose the image quality you want for the resulting image. If you want to compress the image to the lowest possible size, there will be some loss in quality. Step 5: Select ‘Start’.Step 6: Tap on ‘Download’ to save the resized image.
Why should you compress the images on your iPhone?
If you own an entry-level storage variant of the iPhone, you should be all over photo compression. Not only does it help you save precious storage space, but it also makes the images faster to post on social media or send to your friends. After compression, the images do lose some detail, but the differences are negligible if you’re viewing them on a smartphone. And let’s be honest, most of our social media consumption happens on a mobile device.
If you still want to preserve the full-resolution images, optimising your iPhone’s storage is the ideal way to go about it. Using this method, you will be able to access the original images from iCloud while storing the compressed versions on your iPhone. This makes it easier to manage the storage on your device. If you like to take a lot of photos but don’t want to buy additional iCloud storage, we would suggest creating a hard backup of all your images on an external storage device.
Frequently Asked Questions (FAQs)
How do I reduce the file size of a photo on my iPhone without downloading an app?
There are a few native ways to reduce a photo’s file size on your iPhone. You can slightly crop the image to bring down its size. Changing the image format from JPEG to HEIF also brings down the file size of the images you click. Lastly, you can use any instant messaging app to compress the image by simply sending it to yourself.
Does WhatsApp compress my pictures before sending them?
Yes, WhatsApp compresses pictures before sending them. You can choose to send images in HD, but some compression will still take place. To bypass this compression, you can send a picture as a document.
How do I compress a photo on my iPhone to a file in zip format?
Go to the photo, hit the ‘Share’ icon, and save it to the Files app. Launch the Files app, long-press the saved photo, and hit ‘Compress’. The compressed version of the image will appear next to it in zip format. Tapping it will uncompress the file.
What are some good apps to compress a photo on an iPhone?
Compress Photos 7 Pictures, Photo Compress – Shrink Pics, and Image Size are some of the best apps you can use to bring down the file size of any image on your iPhone.
These are the 9 simple ways you can reduce photo file size on an iPhone. While some methods may lower the image quality, the changes won’t be significantly noticeable. If you are resizing an image to upload to an official document, any of these methods will work just fine. Do you have a go-to method when it comes to compressing the images on your phone? Let us know in the comments!
OnePlus 11, Buds Pro 2, Keyboard and OnePlus TV 65 Q2 Pro are scheduled to launch in India on February 7. All of these products will make their public premiere at the company’s Cloud 11 launch event in Delhi, but there are still more devices scheduled to launch on February 7. The company has now confirmed that the OnePlus 11R 5G will also get released on the same day. Recently the price of the just-confirmed phone was also tipped. Previously the smartphone was also spotted listed on the BIS certification site indicating the India launch.
Fast just got fastR. It's time to get ready for a new way to experience the #ShapeofPower with the all-new #OnePlus11R 5G.
The OnePlus 11R 5G will be introduced in India on February 7 during the Cloud 11 event. The event will be hosted in New Delhi at 7:30 PM. As of now the company has only confirmed the impending launch, other details of the upcoming smartphone are yet to be made public. The event will introduce the OnePlus 11 5G, OnePlus Buds Pro 2, OnePlus Keyboard, and the OnePlus TV 65 Q2 Pro.Also read:OnePlus 11 5G and OnePlus Buds Pro 2 India launch to take place on February 7Mukul Sharma, a tipster for @stufflistings, has already revealed the anticipated price and storage options for the OnePlus 11R in India. A device with 8GB RAM and 128GB of storage space, according to his estimation, may cost between Rs 35,000 and Rs 40,000 in the country. It is also expected to include 16GB of RAM and 512GB of storage, and it would probably cost around Rs 45,000.The smartphone would sport a 6.7-inch full-HD+ AMOLED screen with a resolution of 1,080 x 2,412 pixels and a refresh rate of 120Hz, according to the source. Up to 16GB of RAM and a Qualcomm Snapdragon 8+ Gen 1 SoC are expected to power the upcoming gadget. The OnePlus 11R has two RAM (8GB and 16GB) and two storage (128GB and 256GB) configurations, according to rumours. An alleged 5000mAh battery from OnePlus will reportedly support 100W SuperVOOC charging. A 50-megapixel primary sensor, an 8-megapixel super-wide-angle sensor, and a 2-megapixel macro lens are among the three cameras that the phone is anticipated to include on the back. At the front, there might be a 16-megapixel selfie camera for taking pictures of oneself.
For the latest gadget and tech news, and gadget reviews, follow us on Twitter, Facebook and Instagram. For newest tech & gadget videos subscribe to our YouTube Channel. You can also stay up to date using the Gadget Bridge Android App. You can find the latest car and bike news here.
At the OnePlus Cloud 11 Event On February 7 the Chinese tech firm is going to present a couple of products including the OnePlus 11 5G, Buds Pro 2 and the OnePlus Keyboard. The company is also planning to expand its Smart TV portfolio with the launch of its premium TV called the OnePlus TV 65 Q2 Pro at the same event.Also Read:OnePlus 11 5G and OnePlus Buds Pro 2 India launch to take place on February 7The company via its announcement said, “The new OnePlus TV serves as an extension of the premium Q Series portfolio which debuted in 2019, with the launch of the OnePlus TV Q1 and Q1 Pro. The product is set to be unveiled along with OnePlus 11 and OnePlus Buds Pro 2 on 7th February 2023 at the Cloud 11 launch event in Delhi.” OnePlus further added, “The OnePlus TV Q series symbolises the brand’s efforts to bring industry-leading technology with premium visual and sound features to users in India. The OnePlus TV 65 Q2 Pro is expected to make a significant leap towards these efforts.”The new OnePlus TV 65 Q2 Pro is planned to offer a number of superior hardware and software features and act as the centre of a more upscale, smarter connected ecosystem, according to the firm. The Television is expected to be available for purchase via Amazon in the country.Also Read:OnePlus TV Q1 and OnePlus TV Q1 Pro with 4K QLED display launched in India: Price and specificationsTo recall, OnePlus forayed into the TV industry with the launch of OnePlus TV Q1 Pro and OnePlus TV Q1 in India in 2019. Both TVs offer a 55-inch 4K display with a QLED panel. The televisions have Dolby Atmos, Dolby Vision, and HDR10+ capabilities. It is important to note that the OnePlus TV Q1 Pro includes a motorised soundbar that extends from the unit downward. The TV’s soundbar includes 8 speakers with a 50W total sound output. Four of the speakers are facing forward, while two are facing back. The devices have built-in casting and a very plain-looking remote control with a limited number of buttons that comes with them. However, it contains dedicated buttons for frequently used services like Google Assistant, Amazon Prime Video, and others.
For the latest gadget and tech news, and gadget reviews, follow us on Twitter, Facebook and Instagram. For newest tech & gadget videos subscribe to our YouTube Channel. You can also stay up to date using the Gadget Bridge Android App. You can find the latest car and bike news here.
One of the advantages of owning an Apple Watch is the greater level of customisation options that come with it. With only a little effort, you can create a Watch Face that is unique to your device. On top of that, you can find several third-party apps that offer a plethora of paid and free Apple Watch Faces. In this article, we show you how to create a custom Apple Watch Face.Read Also: Meta brings end-to-end encryption to Facebook Messenger, more features also added
Use the Facer app
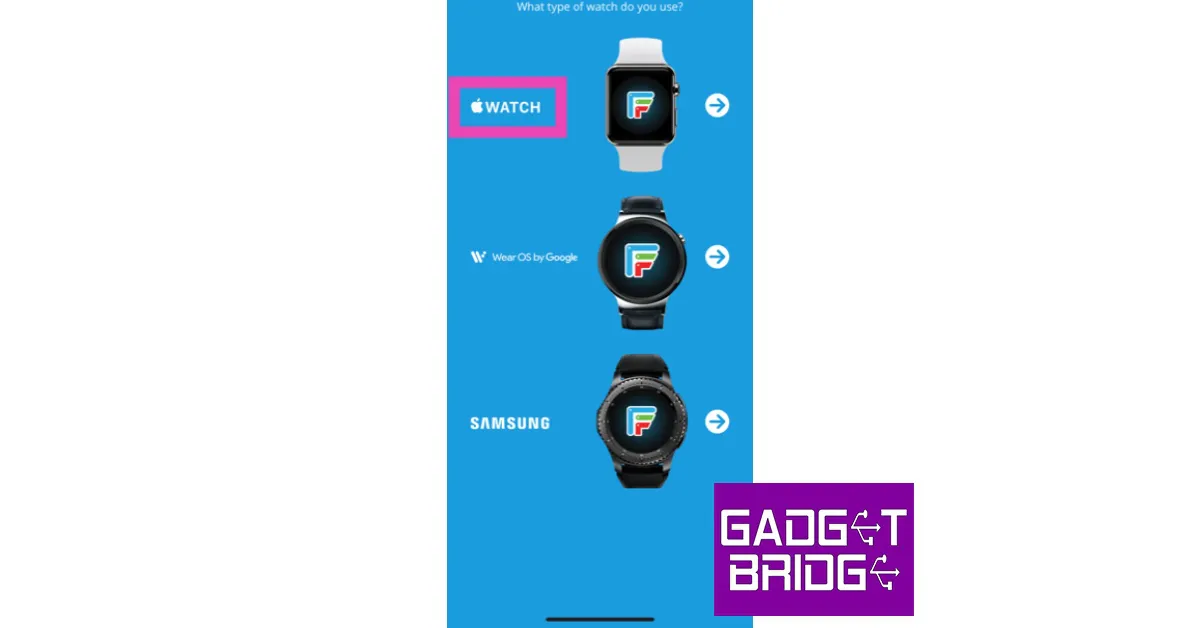
The Facer app for iPhone has a range of watch faces for your Apple Watch and provides a bunch of customisation options as well. Here’s how you can use the Facer app to create a custom Apple Watch face.Step 1: Download and install the ‘Watch Faces by Facer’ app on your iPhone.Step 2: Open the app and select ‘Apple Watch’.Step 3: Select a Watch Face from Facer’s gallery.Step 4: Tap the ‘Watch’ icon to load the watch face on the Apple Watch app.Step 5: Select the watch face from ‘My Faces’.Step 6: This is where you can customise the watch face. You can choose the base colour from a range of shades.Step 7: Tap on options to add widgets (Complications) like blood oxygen level, activity insights, and more to the watch face.Step 8: Save all the changes once you’re done customising the watch face.
Use a Photo to create a custom Apple Watch Face
There’s nothing more unique than setting a picture you took as the customised watch face on your Apple Watch. You can easily do this from the Photos app itself. Here’s how.Step 1: Open the Photos app on your iPhone and select the photo you want to set as your Watch Face.Step 2: Tap on the Share icon.Step 3: Select ‘Create Watch Face’.Step 4: You can either use the photo as it is or apply a Kaleidoscope effect to it. Make your choice before proceeding further.Step 5: Add your desired Complications to the watch face. You can also alter the position of the clock.Step 6: Tap on ‘Add’ once you’re done. Your new Apple Watch Face will be saved.
Create a customised watch face from the Apple Watch itself
Once you have a bunch of saved watch faces in the Apple Watch app, you can easily customise them from your Apple Watch itself. Here’s how.Step 1: To view all the watch faces in your collection, press and hold the watch face and swipe through your options. Tap on the one your want to set as the watch face.Step 2: Customise the watch face by adding your desired Complications. To do this touch and hold the display and select Edit.Step 3: Swipe left until you reach the end. This is where the complications will show up.Step 4: Tap the Complication to add it to the watch face. Turn the crown to browse through the compilations.Step 5: Once you’re done, press the crown to save all changes.Read Also: 6 best working methods to Fix Instagram Direct Messages Not Working
Conclusion
This is how you can create a custom Apple Watch Face. You can also use Shortcuts to change the watch face based on the time. All you need to do is select ‘Time of day’ from the Automation section and add the action to set a particular watch face. If you found this article helpful, let us know in the comments!For the latest gadget and tech news, and gadget reviews, follow us on Twitter, Facebook and Instagram. For newest tech & gadget videos subscribe to our YouTube Channel. You can also stay up to date using the Gadget Bridge Android App. You can find the latest car and bike news here.
iOS 16.3 and iPadOS 16.3 updates for compatible iPhone and iPad models have started to arrive. The new OS update brings Security Keys for Apple ID, enhancements, bug fixes, and security updates for iPhones and iPads.Here is everything that you are getting with the iOS 16.3 and iPadOS 16.3 updates
iOS 16.3 update
The iOS 16.3 update brings Security Keys for Apple ID, a new Unity wallpaper honouring Black history and culture in observance of Black History Month, as well as additional improvements, bug fixes, and security upgrades for your iPhone. Also Read:Apple launched HomePod (2nd generation) in India: Details insideAlso included are Security Keys for Apple ID, which let users increase the security of their account by requiring a physical security key as part of the two-factor authentication sign-in process on new devices. Support for HomePod (2nd generation) has also been added.With iOS 16.3, the Emergency SOS call mechanism has also been updated in order to avoid accidental emergency calls. The emergency SOS calls now require holding the side button with the up or down volume button and then releasing it.The new iOS update also fixes a problem in Freeform where some sketching strokes made with your finger or an Apple Pencil might not show up on shared boards. A problem where the wallpaper can appear black on the lock screen is fixed. A bug that could cause a temporary appearance of horizontal lines while starting up the iPhone 14 Pro Max has also been removed. Fixes a problem where the Home Lock Screen widget misrepresents the status of the Home app. A problem where Siri might not respond appropriately to music requests is fixed.Fixes issues wherein CarPlay’s Siri requests might not have been properly understood.Also Read:Apple releases new Black Unity collection and content to celebrate Black History Month
iPadOS 16.3 update
Along with other improvements, bug fixes, and security updates for your iPad, the iPadOS 16.3 update introduces Security Keys for Apple ID as well.Support for the new HomePod (2nd Gen) is included in this version, making it simple to pair iPhone devices with the Apple HomePod (2nd Gen) and share music between them.Additionally, the iPadOS 16.3 update resolves a problem in Freeform where some drawing strokes made with an Apple Pencil or your finger might not show up on shared boards. An issue where Siri may not respond properly to music requests has also been addressed.
For the latest gadget and tech news, and gadget reviews, follow us on Twitter, Facebook and Instagram. For newest tech & gadget videos subscribe to our YouTube Channel. You can also stay up to date using the Gadget Bridge Android App. You can find the latest car and bike news here.
Every WhatsApp user knows that the app sometimes does not show the ringing alert for an incoming call. Instead, you get notifications for a bunch of missed calls instead. Sometimes, you may miss an important call because of this issue. Luckily, there are a few ways you can take care of this problem. In this article, we bring you 12 easy methods to fix the ‘WhatsApp calls not ringing when Android phone is locked’ issue on your smartphone. Read Also:Meta brings end-to-end encryption to Facebook Messenger, more features also added
Check if background notifications are enabled
Disabling background notifications for an app prevents it from sending alerts to your phone. Here’s how you can check if WhatsApp’s background notifications are disabled.Step 1: Go to Settings and select Apps.Step 2: Scroll down and select WhatsApp.Step 3: Tap on Notifications.Step 4: Make sure that the toggle bar to Show notifications is turned on. Additionally, make sure you have selected Allow sound and vibration under Alerts instead of Deliver quietly.
Make sure Do Not Disturb is turned off
Do Not Disturb does what it implies. Once you turn it on, you will not be ‘disturbed’ by text notifications or call alerts. If someone is calling you on WhatsApp, it won’t show up on your screen. If your WhatsApp calls are not ringing, it is possible that you may have turned on DND but forgotten to turn it off. In order to disable Do Not Disturb, simply drag the drop-down menu and tap on the DND icon.
Check your internet connection
If you’re connected to a weak network, WhatsApp won’t notify you of incoming calls. Instead, you will receive a notification when the caller hangs up. Perform a quick internet speed test to confirm whether the fault lies with your network. Load other web pages to see if the network is acting sluggish on your device. Switch to a stronger network to receive WhatsApp calls again.
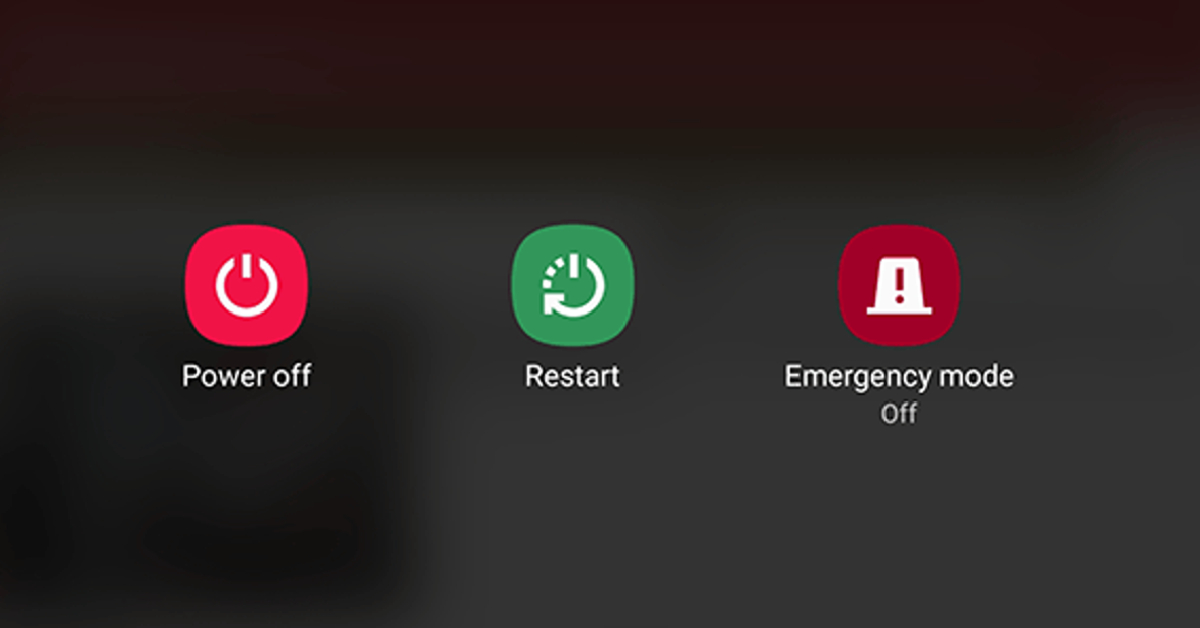
Restart your device
Restarting your device refreshes the network and resolves any background glitches that may be causing WhatsApp to malfunction. Long-press the side key and select ‘Restart’ from the power menu. If long-pressing the side key triggers the voice assistant, press it along with the volume-up button to open the power menu.
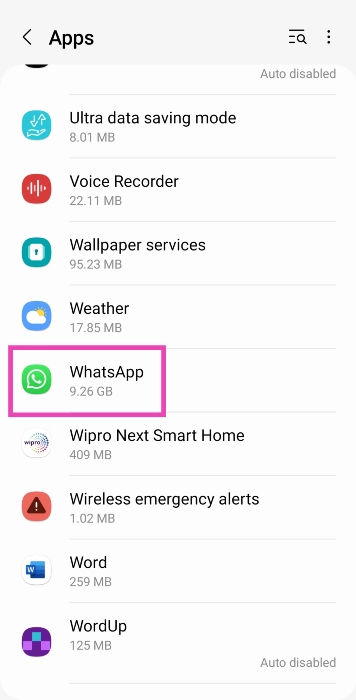
Clear app cache
Corrupted files in the cache memory can keep an app from carrying out its most basic functions. Here’s how you can clear WhatsApp’s app cache.Step 1: Go to Settings.Step 2: Select Apps.Step 3: Select WhatsApp.Step 4: Tap on Storage.Step 5: Select Clear Cache.
Make sure background data is turned on for WhatsApp
When your phone is locked, WhatsApp still keeps working in the background to notify you of any incoming calls or messages. If WhatsApp calls aren’t ringing when your phone is locked, it may be because the app does not have access to background data. Here’s how you can ensure that background mobile data for WhatsApp is turned on.Step 1: Go to Settings and select Apps.Step 2: Scroll down and select WhatsApp.Step 3: Tap on Mobile Data under Usage.Step 4: Turn the toggle bar on for Allow background data usage and Allow data usage while Data saver is on.
Update WhatsApp
Sometimes an older version of WhatsApp may encounter an issue that is fixed in later updates. This is why it is essential you keep the app updated. In order to update WhatsApp, simply go to the Google Play Store and search for WhatsApp. Open the app page and select ‘Update’.
Reinstall WhatsApp
If you’re using the latest version of WhatsApp, uninstall it from your device and reinstall it from the Google Play Store. Tap and hold the icon for WhatsApp from the app drawer on your device. In the pop-up menu, select Uninstall. Now, go to the Google Play Store, search for WhatsApp, and hit Install.
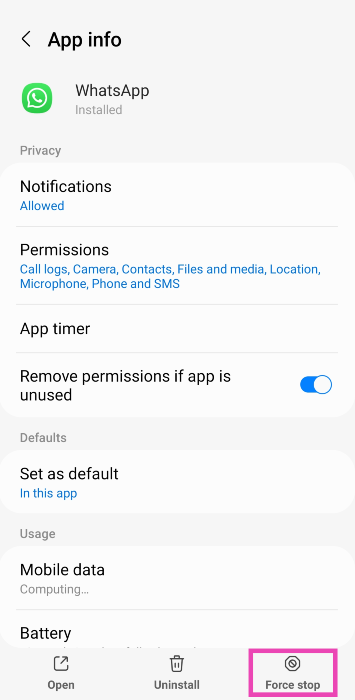
Force Stop WhatsApp
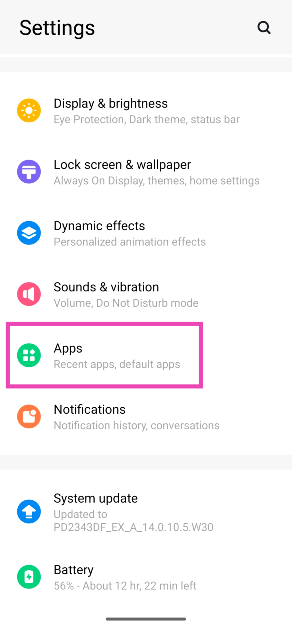
Step 1: Go to Settings and select Apps.
Step 2: Select WhatsApp.
Step 3: Hit Force Stop at the bottom of the screen.
Give WhatsApp the necessary permissions
If the incoming WhatsApp calls on your Android phone aren’t ringing, check the app’s permissions. Make sure it has access to Phone and Microphone.
Step 1: Go to Settings and select Apps.
Step 2: Select WhatsApp.
Step 3: Tap on Permissions.
Step 4: Make sure WhatsApp has access to Phone and Microphone.
Update your phone’s OS
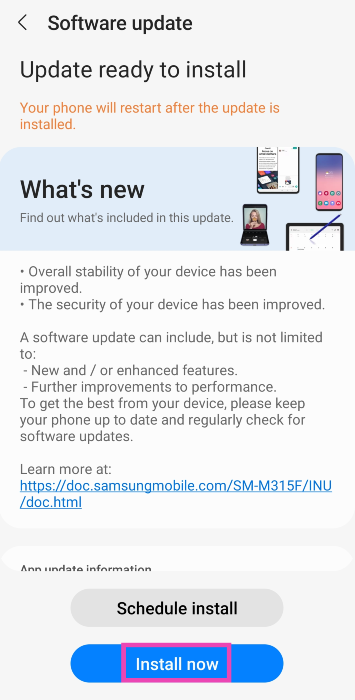
Step 1: Go to Settings and hit Software update.
Step 2: Tap on Download and Install.
Step 3: Once the update has been downloaded, tap on Install Now.
Turn off battery saver mode
When your smartphone’s battery drops below a certain threshold, it automatically turns on the battery-saver mode. When enabled, the battery-saver mode kills a lot of background activity for most of the apps on your phone to preserve the battery. This may be the reason why you are not receiving WhatsApp calls on your phone. You can disable the battery saver mode by simply opening the drop-down menu and deselecting ‘Power Saver’. You can also disable it by going to Settings>Battery and device care>Battery>Power saver.
Frequently Asked Questions (FAQs)
How much data do WhatsApp calls use?
Voice calls on WhatsApp use up to 500 kB – 750 kB per minute. If you’re using a strong network connection, the quality of the call will improve significantly, leading to more data usage.
Do I need to keep my phone unlocked to receive WhatsApp calls?
No, you can receive WhatsApp calls even when your phone is locked.
These are the top 12 ways to fix the ‘WhatsApp calls not ringing when Android phone is locked’ issue on your smartphone. If the methods mentioned in this article do not work for you, try performing a complete factory reset of your device as a last-ditch measure. If you found this article helpful, let us know in the comments!
Ahead of the official launch, OnePlus has disclosed some of the features of its upcoming TWS in India. According to the firm, the OnePlus Buds Pro 2 truly wireless earbuds will be the first wireless earbuds to include Google’s Spatial Audio technology created for Android 13. In addition to this, the device will instantly pair with other Android devices with just a single tap thanks to support for Android’s Fast Pair function.On February 7, the OnePlus Cloud 11 event will introduce the TWS earphones to the world along with the OnePlus 11 and other products from the brand. According to the company with the OnePlus Buds Pro 2 launch, it will establish a new benchmark for spatial audio stability and compatibility with exciting new capabilities for Android users.Also Read:Poco C50 Review: A good budget smartphone for basic useThe OnePlus Buds Pro 2 are the first TWS earbuds to incorporate Google’s renowned spatial audio capability developed for Android 13. This produces a multi-dimensional experience inside a pair of tiny earbuds. Because of this, the sound always emanates from a set location regardless of movement and has the same 3D audio quality as in a movie theatre.The company has further revealed that the OnePlus Buds Pro 2’s spatial audio has been enhanced by them in collaboration with Google to replicate the immersive, multi-dimensional experience enjoyed in cinemas. The OnePlus Buds Pro 2 elevates the spatial audio capability by utilising OnePlus’ spatial rendering algorithm and IMU sensor, adding stability, compatibility with app expansions, and opening up its technology to other applications.The Android Fast Pair feature, which enables you to swiftly connect to neighbouring Android devices in one tap, helps the Buds Pro 2 in its pursuit of establishing seamless connections by increasing its effectiveness. The Buds Pro 2 can connect to two Android smartphones at once and seamlessly switch the audio between them based on your actions, all without having to fuss with Bluetooth settings thanks to Android’s audio switching feature.Furthermore, OnePlus created a bespoke stereo up-mixing algorithm to produce multi-dimensional sound from popular music and video apps, taking into account the compatibility of the majority of audio sources on the market.Also Read:Samsung Galaxy Watch 5 Pro review: Is it an ideal smartwatch?The OnePlus Buds Pro 2 has already been introduced in China on January 4. It comes with an 11mm woofer and a 6mm tweeter. The TWS also supports the MelodyBoost twin driver system that was jointly developed with Dynaudio. It also comes with three Dynaudio-co-tuned equaliser choices Bold, Serenade, and Bass.
For the latest gadget and tech news, and gadget reviews, follow us on Twitter, Facebook and Instagram. For newest tech & gadget videos subscribe to our YouTube Channel. You can also stay up to date using the Gadget Bridge Android App. You can find the latest car and bike news here.
The Poco C50 has an initial retail price of Rs 6,499, making it an amazing smartphone for people who are upgrading to a budget 5G mobile. It would be exorbitant to ask for too much of a phone in this price range. However, it should at least be capable of handling all of your regular chores, such as watching movies, sending emails, and using WhatsApp, while also sporing a long battery life. So let’s put everything we just said to the test in this Poco C50 review and decide whether or not this phone is worth purchasing.
Poco C50 Review: Design and Display
The smartphone is quite lightweight and comfortable to hold in your hand. The Poco C50 has a very simple design. The material used for its back, polycarbonate, has a matte appearance that resembles leather. The nicest element is that it is resistant to fingerprints and smudges, and it has a pleasant texture. Additionally, there is a fingerprint sensor on the back panel. Although it is an outdated technology, it unlocks the device really quickly and works quite well.Another plastic component is the side frames. A dedicated micro SD card (up to 512 GB) and a SIM tray slot, which can hold two nano SIM cards each, are located on the left side of the device, while the volume rocker and power buttons are located on the right. A speaker grille and a micro USB port for charging are located on the top and bottom frame, respectively.Also Read:iQOO 11 Review: A real beastA selfie camera is located in a teardrop-shaped notch on the front. The Poco C50 has a 6.52-inch HD+ display with a 1,600 x 700-pixel resolution. The touch sampling rate on the screen is 120 Hz. Although the phone’s glass is protected by Panda Glass, it is still highly advised that you put a cover on it to shield the front and rear.The text and graphics are incredibly sharp and clear even though the quality is not full HD. Impressive colour reproduction is another feature. Watching movies and videos is wonderful. The YouTube videos’ maximum resolution is FHD, yet some 60 frames per second films lag. We experienced minor frame drops while watching FHD 30 fps videos. Because the phone doesn’t support Widevine L1, OTT apps like Netflix and others will only support a maximum resolution of 540p. Not surprising; it is a budget phone, but the content is still crisp and very watchable.Reels scrolling on Instagram and Facebook feeds is very fluid, too. You won’t be disappointed by this display, for sure.The Poco C50 has a single top-firing speaker, therefore the audio quality is above average. On the plus side, the speaker is not obscured when holding the phone. On the other hand, holding the phone in landscape mode runs the risk of accidentally covering the speaker. The sound actually sounds extremely amazing and is clear and loud.
Poco C50 Review: Performance and Cameras
The Poco C50 is powered by a MediaTek Helio A22 SoC with eight cores and up to 3GB of LPDDR4X RAM. The model we now have has 32 GB of storage, 22 GB of which are usable, and 3 GB of RAM. Which, in our opinion, is adequate to install all necessary programmes. Although this smartphone’s app launch speed is not the fastest, it is remarkably reliable.The phone’s overall performance is really good considering the price it is being sold for. It only supports one band of WiFi (2.4 GHz), which is more than sufficient to stream videos and use all of your social media apps. However, due to the 32GB of capacity, there is a lengthy wait when downloading large apps and games.In terms of the operating system, the Poco C50 runs Android 12 Go Edition, which is a toned-down version of the original Android OS. Absolutely no bloatware is present. Even while it isn’t the smoothest, it is often extremely responsive.Now, we’re assuming that the majority of your daily duties will be accomplished on this phone if you decide to purchase it. In fact, you can even engage in the majority of the basic games, such as Subway Surfer. However, we advise you to search elsewhere if you intend to play graphically intensive games like COD Mobile.Also read:Samsung Galaxy Watch 5 Pro review: Is it an ideal smartwatch?The device also includes an FM radio. Use your wired earphones to listen to music while travelling. But keep in mind that in order for the radio to function, the earphone cable must be plugged in.The Poco C50’s dual rear camera system, which features an 8-megapixel primary sensor, adds AI capability. The front of the gadget has a 5-megapixel sensor for selfies and video calls.Regular daylight shotAlthough the camera’s performance is somewhat basic, HDR, it manages to take some fairly decent shots. Also favourable is the dynamic range. Since you get to see real colours, you really can’t complain. However, selfies with and without portraits perform brilliantly in well-lit settings.Portrait shotAdditionally, you can capture Full HD videos, which while not the best, nevertheless serve their purpose.The battery is really powerful. A very effective 5,000 mAh battery is included with the device, which works well with the processor. With moderate usage, the battery lasts for roughly two days. The main drawback is the slow (10W) charger, which needs more than three hours to fully charge. The manufacturer might have included this smartphone with an 18-watt charger and a USB Type-C port.
Verdict
Okay, final remarks. The price is perhaps really important, and you can get a really excellent display for roughly Rs 6,499. Additionally, it provides a pure Android experience. Also cool are the design and the back panel that looks like leather. Moreover excellent are the 5,000 mAh battery and general performance. Although we are aware that this is a low-cost smartphone, a Micro USB port and a 10W charger are so antique in 2023. Definitely, Poco ought to have improved this. We should have expected a minimum of a USB Type C port and an 18W charger from every phone in 2023. Basically, it’s the perfect phone for newbies, the elderly, and even your young teenagers that you want to stay in touch with.Poco C50 Pros
Garena Free Fire is a battle royale game with regular awards and tournaments to keep players interested. If you play Garena Free Fire, you should be aware of the redeem codes that are released on a daily basis. However, because the battle royale game is banned in India, players from other countries can use the Free Fire Redeem codes daily. If you’re unfamiliar with the Garena Free Fire redeem codes or don’t know how to get them, we’ve put together a step-by-step guide to help you redeem them. Check out Garena Free Fire Redeem Codes for 25 January 2023.The Free Fire redeem codes are a great way to get free stuff. These are 12-digit codes that contain alphabets and numbers, as well as an expiration date and time. Because the Garena FF redeem codes cannot be used more than once, you should hurry to the redemption page to claim your free reward before someone else does. To get a free reward, all you have to do is go to reward.ff.garena.com/en, which is the official redemption page. Also, keep an eye on this space for daily updates on Garena Free Fire redemption codes and rewards.
Garena Free Fire Redeem Codes Today 25 January 2023
FFAC2YXE6RF2
PCNF5CQBAJLK
FFCMCPSBN9CU
FFBBCVQZ4MWA
FFCMCPSJ99S3
MCPW3D28VZD6
ZZZ76NT3PDSH
XZJZE25WEFJJ
B3G7A22TWDR7X
6KWMFJVMQQYG
FFCMCPSUYUY7E
UVX9PYZV54AC
BR43FMAPYEZZ
FF7MUY4ME6SC
8F3QZKNTLWBZ
WEYVGQC3CT8Q
NPYFATT3HGSQ
FFCMCPSGC9XZ
MCPW2D2WKWF2
How to Get Free Fire Redeem Codes for Garena on 25 January 2023?
25 January 2023 Amazon Quiz has gone live on its platform. The quiz timings are 12 AM to 11:59 PM. The Amazon App users can participate in the quiz daily and all they have to do is submit correct answers to the questions asked on the e-commerce platform. Today’s participants can get a chance to win Rs 500 Amazon Pay Balance.By participating in the Amazon Quiz the participants can win Amazon Pay Balance ranging from Rs 1,000 to Rs 50,000 every day while sitting at home. To win the participants must answer five questions correctly that are based on current events and general knowledge. One wrong answer can eliminate you from the quiz. The results will be announced at the end of the month. Today’s question will let you win Rs 500 Amazon Pay Balance. Check below for today’s Amazon quiz answers.Amazon Quiz Today Prize – Rs 500 Amazon Pay BalanceQuiz Date – 25 January 2023Daily Timing – 12 AM to 11:59 PMWinner Announcement – Today 12 PM
Amazon Quiz Answers Today 25 January 2023
Question 1: Which science fiction movie is about the human colonization of a distant moon called Pandora?
Answer: Avatar
Question 2: Which is this largest living animal?
Answer: Blue whale
Question 3: The 36th edition of the National Games of India took place in which state?
Answer: Gujarat
Question 4: What animal is this?
Answer: Sloth Bear
Question 5: This is the jersey of which cricket team?
Answer: England
How To Play Amazon Quiz
Only app users are eligible to play the Amazon quiz every morning from 12 AM to 11:59 PM. The quiz is not available on the desktop. For those who are unaware of how to play the Amazon quiz below are the steps, you can follow to take the quiz.
Firstly download the Amazon app from Google Play Store or App Store
Now fill in the required information through the Sign Up option.
You need to log in to the Amazon app and scroll down on the home screen to find the Amazon Quiz banner.
Tap on the Amazon Quiz banner and tap on the Start button to start the Quiz.
Now you will get 5 questions and you need to answer them correctly. One wrong answer will eliminate you from the Quiz.
After answering all the questions correctly you are now eligible for a Lucky Draw.
The winner’s name will be announced today at 12 PM.


 Step 2: Tap on Formats.
 Step 3: Select ‘High Efficiency’.

 Step 2: Tap on Optimize iPhone Storage.
 The images on your iPhone will be compressed to save storage space. The optimised images occupy less space and are perfect to be viewed on your iPhone. You won’t notice much difference. If you want to access the full-resolution images, you can download them from iCloud.
 Step 3: Select Save to Files.
 Step 4: Choose the destination and hit the tick icon.
 Step 5: Launch the Files app and go to the image.
 Step 6: Long-press the image icon and select Compressed.
 Step 7: A compressed version of the image will appear next to it.
 There are several third-party apps on the App Store that will help you resize your images. ‘Image Size’ is one of the highly rated apps for this purpose. Once you’ve installed the app on your iPhone, open it and load the image you want to resize. Now you can resize the image by pixels, inches, mm, cm, or any other metric. Save the image once you’re happy with the result. The saved image will have a significantly smaller file size than the original image.
 Instant Messengers like WhatsApp automatically downsize the images you send on the platform. This is done to increase the speed and reduce the storage space. While some may see it as a flaw, it can come in handy if you want to reduce the file size of an image. WhatsApp also recently launched the ‘Message Yourself’ feature. You can use this function to send yourself the images you want to downsize. Simply select your name from the contacts and attach and send the images you want.
 While you may not have a say in downsizing the images when sending them through an instant messenger, Apple Mail lets you choose a particular file size before you attach the image to your mail. This is helpful because it gives you three options for the file size: Small, Medium, and Large. You can mail the image to yourself via the Photo app. All you need to do is tap on the share icon and select ‘Mail’. Once the mail has been sent you can download the resized image from the Mail app.
 Step 2: Give your shortcut a name.
Step 3: Select Add Action.
Step 2: Give your shortcut a name.
Step 3: Select Add Action.
 Step 4: Go to Categories and select Media.
 Step 5: Under the Images category, select Get Images from Input.
 Step 6: Hit the blue icon at the top right corner of the screen and turn on the toggle switch for Show in Share Sheet.
Step 7: Drag the Media page and select Resize Image.
Step 6: Hit the blue icon at the top right corner of the screen and turn on the toggle switch for Show in Share Sheet.
Step 7: Drag the Media page and select Resize Image.
 Step 8: Tap on size to set the default metrics or select Ask Each Time.
Step 9: Hit Done.
Step 10: Select the Media page again and tap on Convert Image.
Step 11: Choose the file format for the resized images.
Step 12: Drag the Media page again and tap on Save to Photo Album.
Step 13: Select a destination album for the resized images.
Step 14: Hit the cross icon.
Step 15: To resize an image, open it in the Photos app, hit the Share icon, and select the shortcut from the list.
Step 8: Tap on size to set the default metrics or select Ask Each Time.
Step 9: Hit Done.
Step 10: Select the Media page again and tap on Convert Image.
Step 11: Choose the file format for the resized images.
Step 12: Drag the Media page again and tap on Save to Photo Album.
Step 13: Select a destination album for the resized images.
Step 14: Hit the cross icon.
Step 15: To resize an image, open it in the Photos app, hit the Share icon, and select the shortcut from the list.
 Step 3: Tap on ‘Choose file’ to select the image you want to resize. This image will be uploaded to the website’s servers. Apart from your iPhone’s local storage, you can also choose an image from Google Drive or Dropbox.
 Step 4: Choose the image quality you want for the resulting image. If you want to compress the image to the lowest possible size, there will be some loss in quality.
 Step 5: Select ‘Start’.
Step 6: Tap on ‘Download’ to save the resized image.
Step 5: Select ‘Start’.
Step 6: Tap on ‘Download’ to save the resized image.


 Step 3:
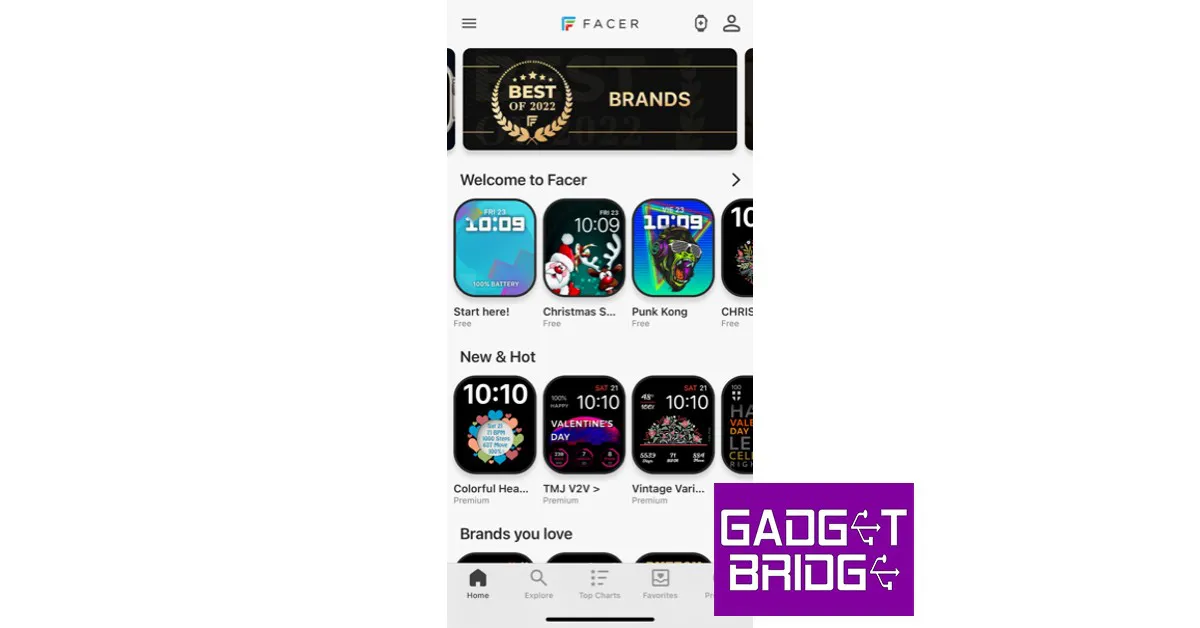 Step 4:
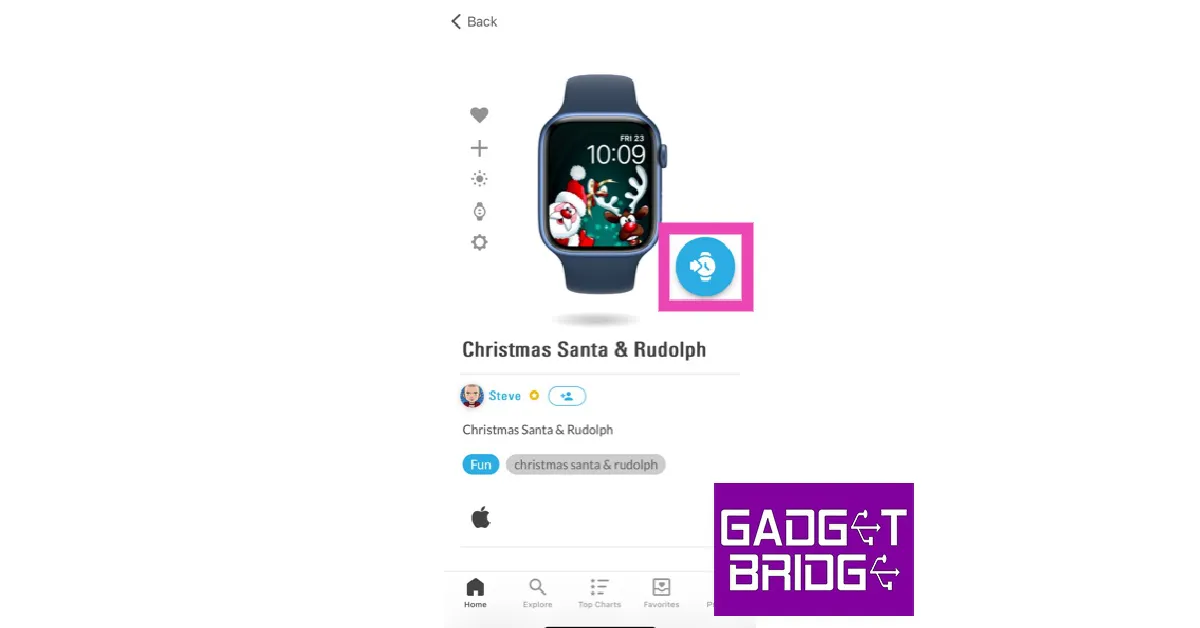 Step 5:
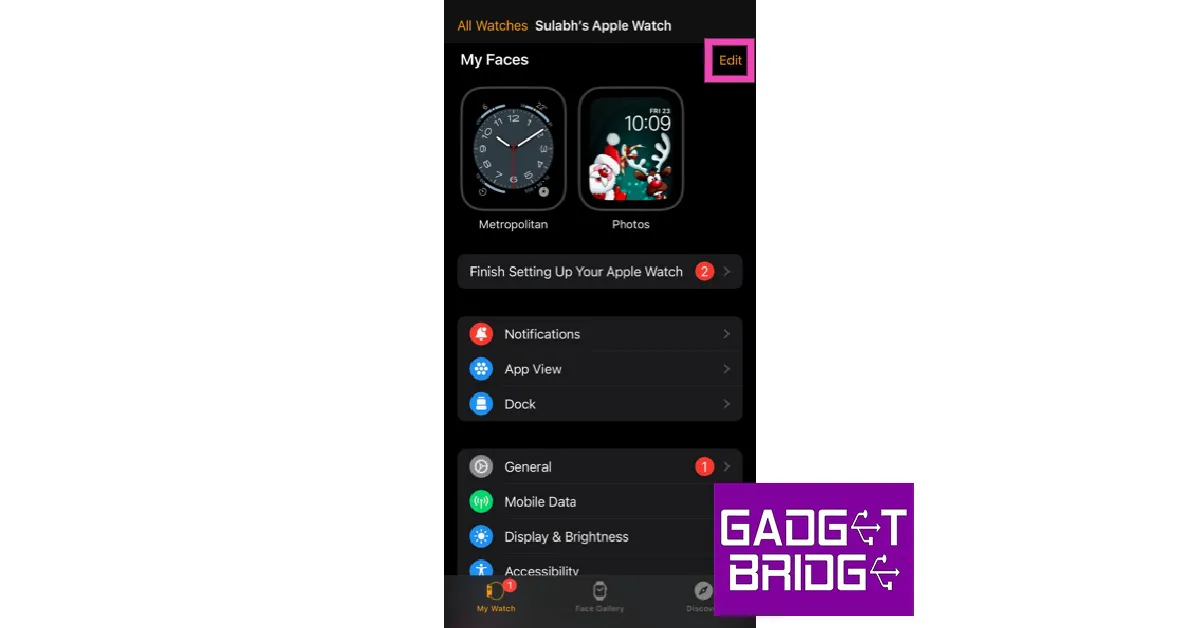 Step 7:
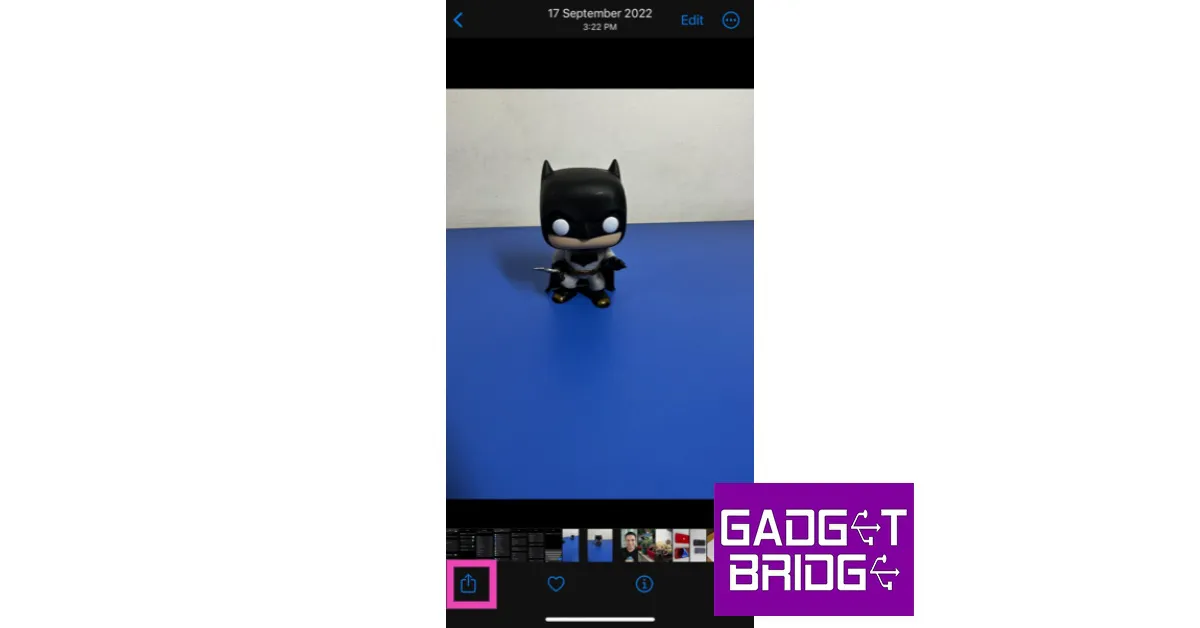 Step 3:
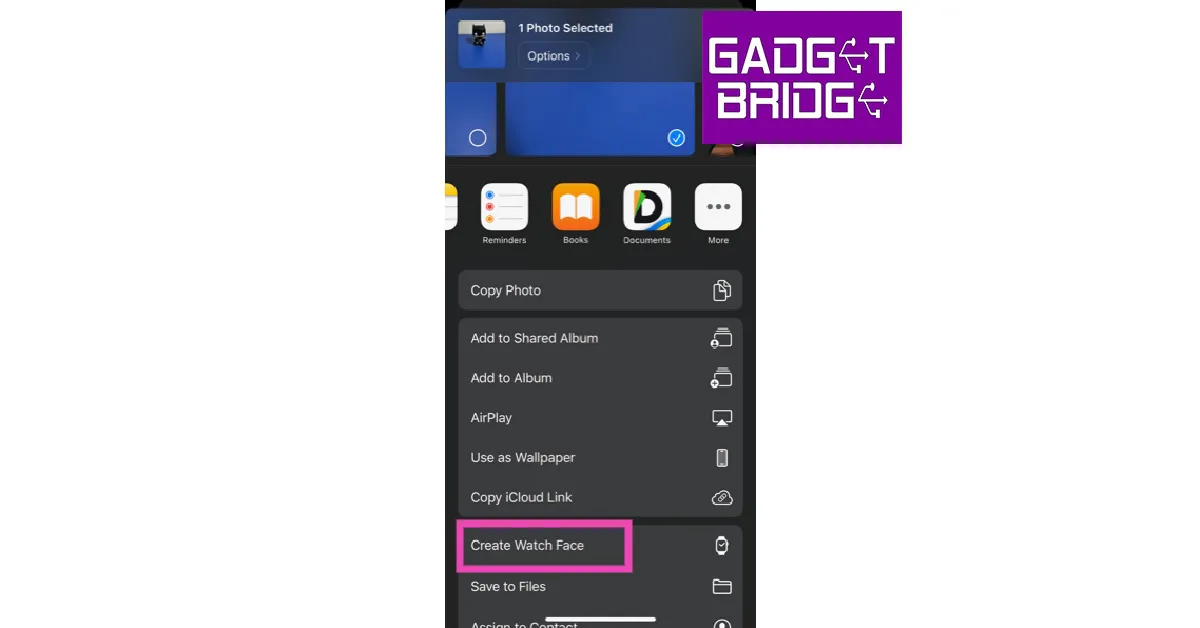 Step 4:
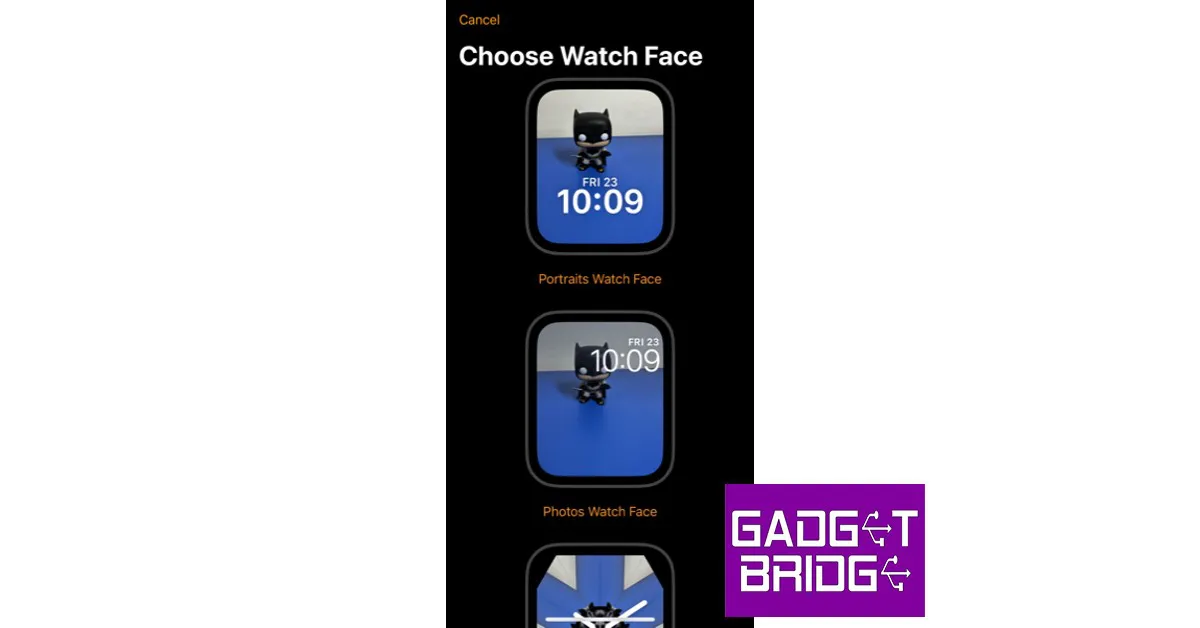 Step 5:
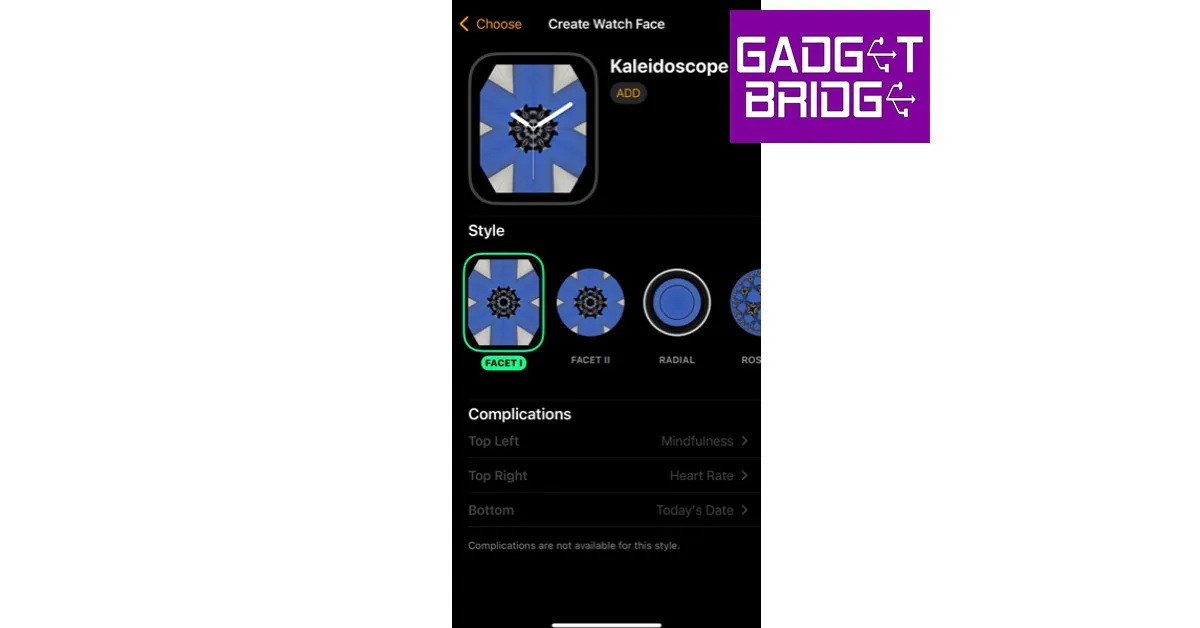 Step 6:
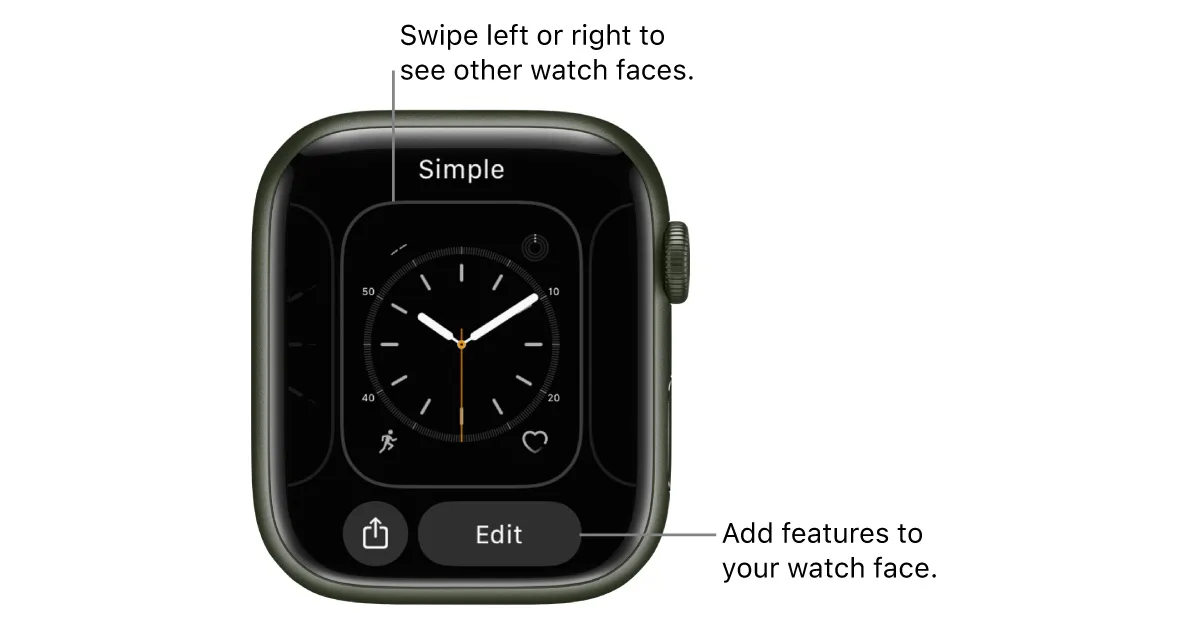 Step 3:
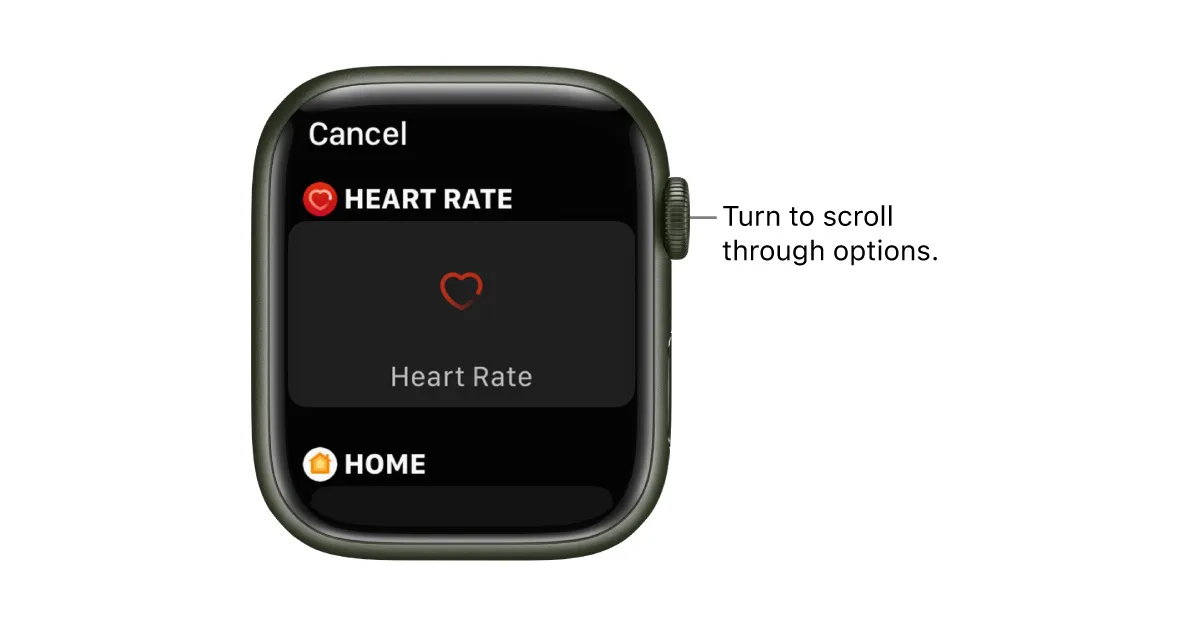 Step 5:
 also added")
")
 Step 2:
 Step 3:
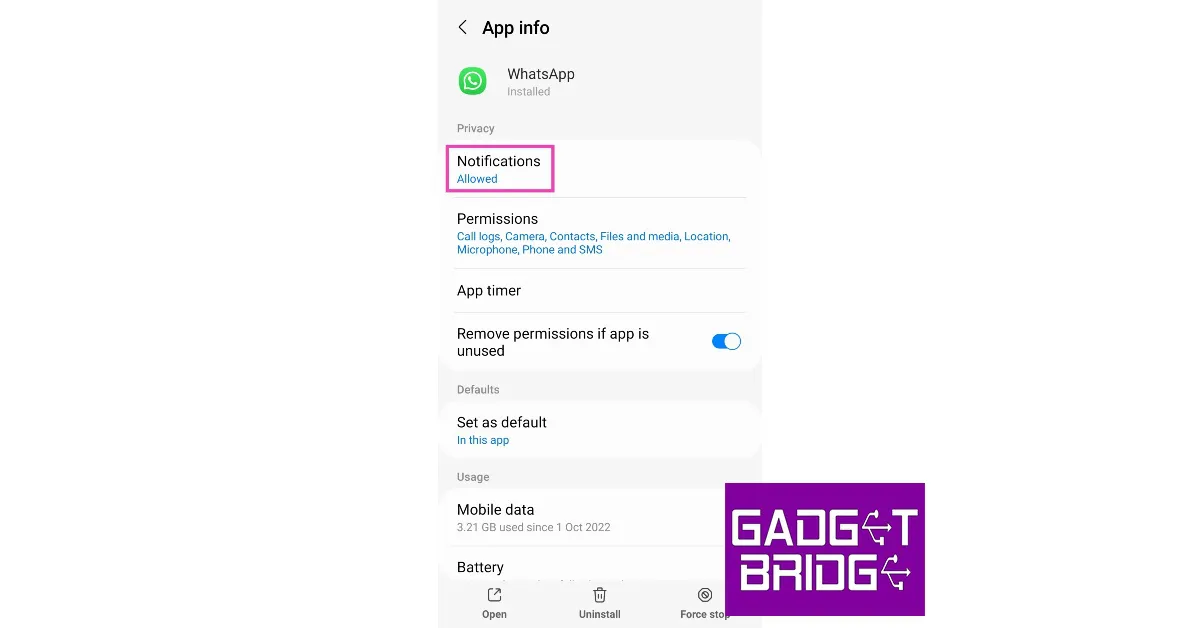 Step 4:

 If you’re connected to a weak network, WhatsApp won’t notify you of incoming calls. Instead, you will receive a notification when the caller hangs up. Perform a quick internet speed test to confirm whether the fault lies with your network. Load other web pages to see if the network is acting sluggish on your device. Switch to a stronger network to receive WhatsApp calls again.
 Restarting your device refreshes the network and resolves any background glitches that may be causing WhatsApp to malfunction. Long-press the side key and select ‘Restart’ from the power menu. If long-pressing the side key triggers the voice assistant, press it along with the volume-up button to open the power menu.
 Step 5:
 Step 4:
 Step 2: Select WhatsApp.
 Step 3: Hit Force Stop at the bottom of the screen.
 Step 2: Select WhatsApp.
 Step 3: Tap on Permissions.
 Step 4: Make sure WhatsApp has access to Phone and Microphone.

 Step 2: Tap on Download and Install.
 Step 3: Once the update has been downloaded, tap on Install Now.


 Also Read: