There are two ways to unlock your iPhone – Passcode and Face ID. While passcodes are the old-school and reliable method to unlock the device, the majority of users prefer Face ID because of its seamless operation and ease of use. Sometimes, your iPhone may throw ‘A Problem Was Detected With the TrueDepth Camera’ error message while you’re trying to unlock it. Some users may wonder what a TrueDepth Camera even is. If you’re caught in the same confusion, this article will address your queries and suggest some possible fixes.Read Also:Acer Nitro V 16 (ANV16-41) gaming laptop powered by up to Zen 4-based AMD Ryzen 7 8845HS CPU launched
What does the TrueDepth Camera do?
When you see the ‘problem detected with the TrueDepth camera’ error message on your iPhone, you might wonder what the TrueDepth camera even is. Well, the answer is quite simple. The TrueDepth Camera is a collective term used for the front camera, infrared camera, dot projector and other proximity sensors. These components are located on the notch of your iPhone’s display. The newer iPhones house them in the ‘Dynamic Island’.As you can guess by now, the TrueDepth Camera maps a 3D image of your face using thousands of dot particles. The 3D scan is matched with the image of your face captured by the front camera to verify your identity. This is the mechanism behind the Face ID on your iPhone. The TrueDepth Camera is also the reason why someone cannot unlock your iPhone simply by putting up your picture in front of the lock screen. Apart from Face ID, the TrueDepth Camera is also used for Memojis and Portrait Mode.
Wipe the camera area
The first thing you should do when you come across any error related to the TrueDepth camera is wipe the front camera panel with a clean microfibre cloth. Oftentimes, dirt and dust particles collect on the sensors and the dot projector, causing a failure to read your face accurately. The TrueDepth camera relies on the infrared dots to create a 3D map of your face. Any smudges or dirt on the sensor can cause it to malfunction. A quick wipe should solve this problem.
Remove any screen protection
Incorrectly installed tempered glass or other forms of screen protection can mess with the functioning of the TrueDepth camera. If the glass is hindering the camera cutout, it can cause unnecessary glare. Your phone may not be able to map your face correctly, leading to the TrueDepth camera error. Take off the screen protector and install it correctly. Make sure you only use Apple-authorised products to protect your iPhone’s display.
Restart your iPhone
So, you’ve wiped the front camera panel and removed the screen protector but the problem still won’t go away? It is likely that your hardware isn’t at fall. Software glitches are quite common on mobile devices and your iPhone is no exception. Luckily, these glitches can be quickly resolved by restarting your phone. Press and hold the side button and any volume key to reveal the power menu on your iPhone. Use the power slider to turn off your device. Wait for a few seconds and use the side key to restart your device.
Update your iPhone
If the problem lies with your iPhone’s software, it can be quickly fixed by updating your device. Here’s how you can go about it.Step 1: Make sure your iPhone is connected to a WiFi network and plug in its charger.Step 2: Go to Settings and select General.Step 3: Select Software Update.Step 4: Tap on Download and Install.
Reset Face ID
Step 1: Go to Settings and select Face ID and Passcode.Step 2: Tap on Reset Face ID.Step 3: Go back to Face ID and Passcode.Step 4: Hit Set up Face ID.Step 5:Register your Face ID again.
Reset all settings
Step 1: Go to Settings and select General.
Step 2: Tap on Transfer or Reset iPhone.
Step 3: Hit Reset.
Step 4: Select Reset All Settings. Enter the passcode to confirm your decision.
Factory reset your iPhone
Resetting your iPhone to its factory settings restores its OS to out-of-the-box condition. However, it erases all the content on your phone along with your personal data.
Step 1: Go to Settings and select General.
Step 2: Tap on Transfer or Reset iPhone.
Step 3: Hit Erase All Content And Settings.
Step 4: Tap on Continue and enter the passcode to reset your iPhone to its factory settings.
Frequently Asked Questions (FAQs)
Can I have 2 Face IDs on my iPhone?
Yes, you can have a maximum of 2 different Face IDs on your iPhone.
Why is the Face ID on my iPhone not working?
If you can’t unlock your iPhone using Face ID, clean the front camera panel and make sure there is nothing obstructing your face.
How does Face ID work?
Using the TrueDepth Camera, your iPhone is able to render a 3D scan of your face and judge that it is actually you who is trying to unlock the phone instead of someone holding up your picture.
What causes problems with the TrueDepth camera on the iPhone?
The TrueDepth camera on your iPhone can malfunction due to the collection of dust and grime on the notch/Dynamic Island, faulty screen protector, and background software issues.
These are the top 5 ways to fix ‘A Problem was Detected with the TrueDepth Camera’ issue on your iPhone. If these fixes do not work for you, take your iPhone to an Apple Repair Centre for further diagnosis. Make sure your personal data is backed up before checking your phone in for repair.
Installing Windows on your PC using a bootable USB drive is something that you should know how to do. The process is fairly simple to grasp, but if you hit a snag, it can get confusing to diagnose the problem. Most users often get the ‘No Device Drivers Were Found’ error while installing Windows 10/11. If you’ve hit the same error too, there is no need to panic. These fixes will resolve the error in no time.Read Also:Top 4 Ways to See Who Viewed Your Instagram Story (2023)
What could be causing the ‘No Device Drivers Were Found’ error to pop up while installing Windows 10/11 on your PC?
As you can probably guess, this error pops up when Windows fails to find the driver package during the installation process. This is very unusual because the installation media typically contains all the necessary drivers required for the installation of the OS on your PC. If you get this error it could be due to either one of these reasons:
The driver package in the installation media is corrupted.
The installation media file is corrupted.
Windows cannot verify the authenticity of the driver package.
The drivers are outdated and not supported by Windows anymore.
Step 4: Continue installing the Windows OS on your PC.
Manually download the drivers from the manufacturer’s website
If the Windows Installation Media on your USB drive does not contain the appropriate drivers, you will need to download them from the manufacturer’s website. Sometimes, a corrupt driver package may lead to the ‘no device drivers were found’ error showing up during the installation process. To fix this, simply download the SATA AHCI controller drivers from the OEM’s website. You will need another PC to do this. Once you have downloaded the driver package, plug the USB drive into the computer again until you reach the error window. In the error window, select Load Driver, followed by Browse. Locate the recently downloaded driver package and install it on the PC.
Reinstall Windows Installation Media
If there’s something wrong with the Windows Installation Media on your USB drive, reinstall it from the official Microsoft website. First, download the Windows Installation Assistant, followed by the Windows Installation Media and Windows Disk Image (ISO). Now, plug in the USB drive to your computer and launch mediacreationtool.exe that you installed on the PC. Select ‘Create installation media for another PC’ and choose your USB drive as the target storage. When the installation process is complete, use the USB drive to boot Windows on another PC.
Reset Motherboard Settings
Step 1:Restart your PC and enter BIOS using its assigned key. This varies among different manufacturers so Google which key leads to BIOS for your PC. Del, F2, or F10 should do the job.Step 2: Go to Exit and select Load Setup Defaults/Load Optimal Defaults.Step 3:Confirm your selection in the following popup box.Step 4:Save your changes and exit BIOS.
Plug the USB drive into a different port
If you’ve tried all the fixes mentioned above and are still getting the ‘no device drivers were found’ error while installing Windows 10 or 11 on your PC, it is possible that the fault may lie with the USB port that your drive is plugged into. Make sure that you plug it into a USB 2.0 port and not a USB 3.0 port. Once that’s done, start the installation process all over again.
Frequently Asked Questions (FAQs)
Why am I getting the ‘No Drivers Were Found Error’ while installing Windows 10/11 on my PC?
This error usually pops up when the driver package on your Windows Installation Media is missing or corrupted. It could also be due to a faulty ISO file for the OS or a dysfunctional USB port.
How do I fix the ‘No Drivers Were Found’ error?
To fix this error, you need to install a new driver package from your PC manufacturer’s official website. If the Windows ISO file is at fault, install a new one from Microsoft’s website.
These are the top 5 ways to fix the ‘No Device Drivers Were Found’ error while installing Windows 10 or 11 on your device. Check out this article to find out how you can update the audio drivers on your PC. This article lets you know how to install the WiFi driver on your device. If you know any more ways to fix this error, let us know in the comments!
Garena Free Fire is a battle royale game with regular awards and tournaments to keep players interested. If you play Garena Free Fire, you should be aware of the redeem codes that are released on a daily basis. However, because the battle royale game is banned in India, players from other countries can use the Free Fire Redeem codes daily. If you’re unfamiliar with the Garena Free Fire redeem codes or don’t know how to get them, we’ve put together a step-by-step guide to help you redeem them. Check out Garena Free Fire Redeem Codes for 9 December 2023.The Free Fire redeem codes are a great way to get free stuff. These are 12-digit codes that contain alphabets and numbers, as well as an expiration date and time. Because the Garena FF redeem codes cannot be used more than once, you should hurry to the redemption page to claim your free reward before someone else does. To get a free reward, all you have to do is go to reward.ff.garena.com/en, which is the official redemption page. Also, keep an eye on this space for daily updates on Garena Free Fire redemption codes and rewards.
Garena Free Fire Redeem Codes Today 9 December 2023
If you suspect someone has blocked you on Facebook, the first thing you should do is check whether they are still in your friend list. Once you block someone on Facebook, they are automatically removed from your friend list. This is also the case when you are on the receiving end of the action. However, someone mysteriously vanishing from your friend list is not a tell-tale sign of them blocking you on the platform. It could also be because they deactivated or deleted their Facebook profile. Move on to the other signs on this list to know for sure.
Perform a quick search of their username
So, you noticed that someone’s missing from your friend list. What do you do next? Instead of jumping to conclusions, perform a quick search of their profile name or username. Better yet, go to their Facebook profile’s URL, if possible. If it returns the ‘content isn’t available’ message, it is an ominous sign that you have been blocked. To confirm if this is the case, log out of your Facebook account and visit their profile URL again. If you’re able to view their profile, your main account has certainly been blocked by the user.
Try sending them a message on Facebook messenger
Once someone blocks you on Facebook, your access to contacting them is cut off for good. This means that the messages you send to them on Messenger will not be delivered. To make sure that the person has blocked you on Facebook, send them a message on Messenger. If it fails to send or returns an error, the person has blocked your profile.
Try to tag them in a post
If you try to tag the person who blocked you on Facebook, their profile simply won’t show up in the post. This is a quick method you can use to verify if your account has been blocked by another user. Click the status box, press ‘@’ and start typing the name of the person. If their profile does not show up as a prompt, it means they have blocked you on Facebook.
Ask a mutual friend for help
How will Facebook implement the new step?If you have a mutual friend with the person who you think has blocked you on Facebook, verifying their action may get a little easier. Simply ask the mutual friend if they are able to contact the person and view their profile on the platform. If you are not able to do the same thing, you have certainly been blocked by the user.Try finding a mutual friend who has regular interactions with the person. Go to a recent post and check if the mutual friend has tagged them on it. If their profile name is greyed out instead of showing up as a hyperlink, it is certain that they have blocked you on Facebook.
Frequently Asked Questions (FAQs)
How do I know for sure that someone has blocked me on Facebook?
Search for the person’s profile on Facebook. If it doesn’t show up in your search results, ask a friend to do the same. If the friend can see their profile, it means the user in question has blocked you on the platform.
Can I contact someone if they unfriended me on Facebook?
Yes, you can still contact someone even if they unfriended you on Facebook. You can send them another request or interact with their public posts. However, this won’t be possible if they have blocked you.
If I block someone on Facebook, do they get blocked on Messenger as well?
These are the top 5 ways to tell if someone has blocked you on Facebook. You can view your own block list by going to Settings & privacy>Settings>Blocking>Block users. Once you unblock someone on Facebook, you will need to add them as a friend again to re-establish contact with them.
Infinix Smart 8 HD smartphone comes with a 13MP dual AI camera and 8MP selfie camera.
It is powered by a UniSOC T606 processor.
The smartphone operates on Android 13 Go with XOS 13.
The Chinese smartphone brand Infinix today officially introduced the Infinix Smart 8 HD smartphone in India. The device features a textured back panel in four colour variants. There is a camera module with Ring Flash on the back and a side-mounted fingerprint sensor. The magic ring feature on the device is said to improve user interaction. It also comes with a 90Hz HD+ display and is powered by an octa-core Unisoc T606 SoC.
Infinix Smart 8 HD price in India and availability
Infinix Smart 8 HD price in India has been set at Rs 5,669. The phone comes in a single 3GB RAM with a 64GB storage option. The budget smartphone is available in Crystal Green, Shiny Gold, and Timber Black colour options. According to the company, the device is scheduled to go on sale from December 13 via Flipkart and offline channels in the country. Interested buyers will get a 10 percent instant discount on Axis Bank cards.
Infinix Smart 8 HD specifications, features
Infinix Smart 8 HD comes with a 6.6-inch HD+ display with 720×1,612 pixels of resolution. The screen supports a 90Hz refresh rate and up to 500 nits of peak brightness. The display has a dynamic notch feature, known as the Magic Ring that shows Face Unlock, Background Call, Charging Animation, Charge Completion Reminder, and Low Battery Reminder.It features a timber texture finish back panel available in four appealing colour variants with a camera module with a Ring Flash and a colour-matched frame.The Smart 8HD runs on Android 13 Go with the latest XOS 13 version. The smartphone is powered by a UniSOC T606 processor with up to 6GB RAM and 64GB of internal storage (expandable up to 2TB with a microSD card). The device also comes with UFS 2.2 fast storage.The Infinix Smart 8 HD includes a dual rear camera setup with a 13-megapixel primary sensor and an AI lens. There is an 8-megapixel front-facing camera with LED flash for selfies and video calling.For biometrics, the budget smartphone incorporates a face unlock function and a side-mounted fingerprint sensor. The handset comes equipped with a 5000mAh battery.
The Acer Nitro V 16 (ANV16-41) features a 165Hz display.
The gaming laptop has a dual-fan cooling system.
The device has over 500 popular games and applications, including blockbuster games such as Cyberpunk 2077 and Alan Wake 2.
Acer has introduced a new Nitro V 16 (ANV16-41) gaming laptop. The laptop is powered by the latest AMD Ryzen 8040 Series processors with Ryzen AI technology. In addition to this GeForce RTX 40 Series Laptop GPUs with DLSS 3.5 are given for graphics and is said to provide improved performance, long-lasting battery life, and AI-powered technologies.
Acer Nitro V 16 (ANV16-41) price and sale details
Nitro V 16 (ANV16-41) gaming laptop will come with a starting price of $999.99 which translates to Rs 83,375 in North America from March 2024. The machine will be available in EMEA in April 2024, starting at EUR 1199 which converts to Rs 1,07,550.
Acer Nitro V 16 (ANV16-41) specifications
Acer Nitro V 16 (ANV16-41) features 16-inch WQXGA or WUXGA display options with a 165 Hz refresh rate, 3 ms response time, and 16:10 aspect ratio. The gaming laptop is incorporated with Windows 11 out of the box. Under the chassis, there is AMD Ryzen 8040 series processor up to Zen 4-based AMD Ryzen 7 8845HS CPU paired with up to NVIDIA GeForce RTX 4060 Laptop GPUs and DLSS 3.5 technology. It supports over 500 popular games and applications, including blockbuster games such as Cyberpunk 2077 and Alan Wake 2. It comes with up to 32 GB of DRR55600 RAM and up to 2 TB of PCIe Gen 4 SSD storage.Acer Nitro V 16 gaming laptop also has a dual fan cooling system, the Nitro V 16 is well-equipped to take on heavy gameplay and data transfers. Also, the machine has a suite of AI-enabled features that can also be maximized when streaming or video chatting with the webcam’s AI-supported Acer PurifiedView and Acer PurifiedVoice 2.0 featuring three microphones with AI noise reduction technology.Also Read:Exciting deals and discounts on Kodak HD LED Television revealed ahead of Flipkart Big Year End SaleIn terms of audio, the laptop features DTS X: Ultra-tuned speakers. Also to monitor the device’s performance and temperature there is a NitroSense utility app with one click of the dedicated NitroSense key.For connectivity, there is a USB 4 Type C, two USB 3 ports (one which allows for offline charging), an HDMI port, a microSD card reader, and compatibility with Wi-Fi 6E. Lastly, the laptop also comes with one month of Xbox Game Pass so users can enjoy the latest titles with fellow gamers on PC.
The world’s biggest photo-sharing platform is all about being seen. Instagram is a great way to connect with people and let them know what you have going on in your life. The ephemeral story section is a perfect place to keep people updated on everyday things that you don’t demand a post of their own. Instagram Stories are also a great place to share funny Reels, videos, and memes made by other creators. Unlike your Instagram posts, you can always see who viewed your Instagram Story. Here are 4 ways you can go about it.Read Also:Best smartphones under Rs 35000 in India: Checkout our recommendations
See who viewed your Instagram Story (Android)
Step 1:Launch the Instagram app on your Android smartphone.Step 2: Tap on Your story at the top left corner of the screen.Step 3: Tap on Activity at the bottom left corner of the screen.This is where you will be able to see the view count on the story and the people who have viewed it.
See who viewed your Instagram Story (iPhone)
The iPhone app for Instagram is very similar to the Android one. You can use the method mentioned above on your iPhone as well. So, let’s take a look at another way you can see who viewed your Story.Step 1:Launch the Instagram app on your iPhone.Step 2: Tap your Instagram Story at the top left corner of the screen.Step 3:Swipe up to see who viewed your Story. This is where you will see the view count as well.
See who viewed your Instagram Story (Windows PC)
Step 1:Log into Instagram on your PC.Step 2: Click on the Profile option in the side menu.Step 3: Click on your profile picture to load the story.Step 4: Select the ‘Seen by’ option at the bottom right corner of the screen.You will be able to see who viewed your Instagram story in a popup box.
See who viewed your Instagram Stories 24 hours after posting them
Your Instagram Story expires 24 hours after being posted. If you’re on vacation and don’t have the time to be on Instagram as often, you may miss out on seeing who viewed your story. Luckily, there is a way you can still check your story viewers. Here’s how.Step 1:Launch the Instagram app on your phone.Step 2: Tap your profile icon at the bottom right corner of the screen.Step 3: Hit the hamburger menu at the top right corner of the screen.Step 4: Select Archive.Step 5:Open the Story for which you want to see the view count.Step 6: Tap on Activity.This is where you can see who viewed your Story.Note: Instagram archives your Story for 48 hours. If more time has lapsed since you posted the story, it will be gone forever.
How do I view someone’s story without showing up in their viewers list?
Unlike WhatsApp, Instagram does not let you view someone’s story inconspicuously, even though both are owned by Meta. Every time you view a story on Instagram, your profile will end up on the viewer’s list. Certain apps falsely claim to get around this situation by letting you peep stories while staying anonymous. Make sure you don’t fall prey to these claims as these apps may push malware on your device.So, is there a way to view someone’s story without them knowing about it? Well, you can always make a throwaway account, but that only works if the poster’s profile is public. If not, you’re at a dead end. Or, are you? There are a couple of workarounds, but they come with certain limitations. These methods only work for the first and the last story that the person has uploaded in their carousel. Let’s a quick look.There are a bunch of ways you can view someone’s Instagram Story. The most direct way is by tapping on their profile icon in the story bar on your Insta home page. You can also visit their profile to see what they have posted on their story. When you’re scrolling through your Instagram feed, you may have noticed a preview section full of stories from the people you follow. These previews always display the first story posted by the user. Tapping on it will count as a view, but merely glancing at them while you’re on your feed will go unnoticed.Another way you can stay incognito while watching stories is by pressing and dragging a story to move on to the one posted by the next user in the list. The only catch is to not drag it all the way so that it doesn’t completely load on your device. If that happens, you will end up on the viewer list. If you wanna check out the last story posted by the user, load the story posted by the person on their right and drag the screen to the right.
Frequently Asked Questions (FAQs)
How do I see my Story’s viewers list 24 hours after posting it?
Go to your Instagram profile, hit the hamburger menu at the top right corner of the screen, select Archive, and load the story of your choice. Swipe up to see the viewers.
Why does the view count on my Instagram Story not match the number of viewers?
This is because Instagram counts every replay as a view count. If someone plays your story multiple times, it will add to the views but their name will only show up once.
How do I view someone’s Instagram Story without showing up in the viewer list?
Scroll down on your home feed until reach the Story preview section. This may take some time. The preview thumbnail will always be the first story posted by the user.Read Also:2023 Australian Gaming Revenue Statistics by the Numbers
Conclusion
These are the top 4 ways to see who viewed your Instagram Stories on an iPhone, Android phone, and Windows PC. If you know any other way to see the view count, let us know in the comments! If you use a Business profile for Instagram, you will also get Story Analytics next to the view count.
If you’re someone who primarily consumes news online, you must be aware of how annoying constant popup ads can be. The constant distraction of having to deal with popups, tuning out certain plug-ins, and blocking intrusive ads can mar the reading experience. Luckily, there are a bunch of reading tools you can use to get rid of these distractions. And now, Google has stepped into a ring and added a helpful ‘Reading Mode’ to the Chrome browser. If you’re not sure where to find it, here’s your complete guide to enabling and using Reading Mode on Chrome like a pro.Read Also:4 Ways to Create a Remote Desktop Connection Shortcut in Windows 11
Can’t find Reading Mode on Google Chrome? Here’s how you can enable it
If your Google Chrome version does not have the Reading Mode turned on by default, here is how you can enable it.Step 1:Launch Google Chrome on your PC.Step 2: Type chrome://flags in the address bar and hit Enter. This will take you to Chrome’s Experimental Features page.Step 3: Type Reading Mode in the search bar and hit Enter.Step 4: Click on the drop-down menu for Reading Mode and select Enabled.
How to use Reading Mode?
So, you’ve enabled Reading Mode on Chrome. Now what? Well, the process is pretty simple. But before you begin, you need to take care of a couple of things.
Make sure there are no pop-up ads on the web page you’re trying to read. If there are any, clear them.
The webpage should not be locked behind a paywall. Chrome’s Reading Mode will not be able to bypass it. Make sure you are subscribed to the publication or use these methods to read the article for free.
Now that you’ve got these hurdles out of the way, simply click on the Side Panel icon at the top right section of the Chrome window to access Reading Mode. Typically, it should open up as the default option. If it doesn’t, simply click on the drop-down menu and select Reading Mode. Another way you can access this mode is by right-clicking anywhere on the article and selecting Open in reading mode. That’s it!
Check out these tips to get the most out of Reading Mode
Once you open an article on reading mode, the first thing you should do is adjust the width of the panel. Drag the panel from its left border and move it towards the left to expand its size. This will allow the article to take centre stage on your screen while the webpage is pushed to the side. If you switch to a different tab and open a different article, it will automatically load on the reading panel.Chrome’s reading mode also gives a lot more control over how the text looks on the screen. You can change the font of the text from the drop-down menu at the top left section of the panel. At the time of writing this article, there are 7 fonts to choose from – Poppins, Sans-serif, Serif, Comic Neue, Lexend Deca, EB Garamond, and STIX Two Text. Right next to this drop-down menu, you will find the option to change the size of the text. The colour plate icon lets you choose the background colour for the reading panel. There are five options on offer – Default, Light, Dark, Yellow, and Blue. Finally, you can use the last two icons to select the level of spacing between the lines and the individual letters.Another thing that Chrome gets right with its Reading Mode feature is its integration with Reading List, Bookmarks, and Search History. You can use the Reading List option to load an article you’ve been meaning to read, then switch to the Reading Mode tab for easy, distraction-free reading. You can also use the side panel to carry out Google searches. If you bookmarked a page instead of saving it to your reading list, you can still access it from this side panel.
Frequently Asked Questions (FAQs)
Does Google Chrome’s Reading Mode display images?
No, Google Chrome’s Reading Mode does not display images yet. You can check out other reading companions like Postlight Reader for Chrome if you want the images displayed along with the text.
Does the Reading Mode on Chrome bypass paywalled articles?
No, Chrome’s reading mode does not give you free access to articles locked behind a paywall.
I can’t find Reading Mode on Chrome. What do I do?
This is how you can enable and use Reading Mode like a pro in Google Chrome. Since this feature is still in its early stages, it lacks image support and text to speech on it. As time goes on, it is expected that Google will expand upon its list of attributes and it will look more like a comprehensive reading tool.
Kodak CAPRO series, 9XPRO series and QLED series will be on sale.
Flipkart will offer a 10% Instant discount with HDFC Bank Credit cards.
Flipkart’s Big Year End Sale will start soon and before the sale begins SPPL has announced huge discounts and offers on the Kodak HD LED Television. The Flipkart Sale will run for 9 days with early access on December 8. During the sale period, customers can enjoy exciting deals on Kodak HD LED TVs.According to the company, recently launched, 8 new TV models in the Kodak CAPRO series, 9XPRO series and QLED series will be part of Flipkart’s Big Year End Sale. During the 9-day-long sale, Flipkart will provide a 10% instant discount with HDFC Bank credit cards. In addition to this, it will also offer credit up to 1 Lakh along with no-cost EMIs.During the Flipkart Big Year End Sale KODAK QLED televisions will be available in three screen sizes—50, 55, and 65 inches—and will start at Rs 23,999. On the other hand, KODAK 75-inch 4K QLED TV (75MT5044) will be offered at a starting price of Rs 94,999.The KODAK CA PRO range of televisions will come with a starting price of Rs 26,999. KODAK 9XPRO TVs is a premium TV series powered by Android 11 will be available at a starting price of Rs 9,999.Also Read:Acer highlights efforts to combat climate change and technology at Conscious Technology for a Brighter Tomorrow eventSharing his excitement for Christmas and New Year, Mr. Avneet Singh Marwah, Director and CEO, Super Plastronics Pvt Ltd, a Kodak brand Licensee said, “The advent of winters brings the joy of festivities in our lives. With Christmas and New year round the corner, we are delighted to announce exciting deals for the Flipkart Big Year End Sale. The kind of trust and love that the brand has received is truly mesmerising. We promise our customers that we are going to bring a lot of surprises for next year including the launch of our one-of-a-kind manufacturing facility in Hapur. We are determined to make India a manufacturing hub with more investments in the future.”Here are the prices of KODAK TVs during the sales-
Dropbox is one of the biggest cloud-sharing services around. When you sign up for Dropbox, you get 2.5GB of free storage. When you cross this limit, you need to pay for a premium subscription package that adds more storage to your account. Apart from cloud sharing, one of the reasons why you may want to use Dropbox is its helpful fringe features. For instance, you can view your entire account history or just the history of edits you made on a particular file. Like what you read? Here’s how you can view Dropbox File Activity and Event Logs.Read Also:Redmi Note 13 series coming to India in January 2024, company confirms
What is the purpose of Dropbox File Activity and Event Logs?
Even though they may not seem like a big deal to casual users, Dropbox’s file activity and event logs hold a great deal of significance to users who carry out collaborative tasks on the platform. The ‘Activity’ tab for any file or folder helps you review any changes that have been made to them. It also lets you know which member carried out the changes. Using the ‘Filter’ options, you can check when the file was added, viewed, moved, renamed, edited, and more.Your ‘Event Log’ on Dropbox is a complete account of all your actions on the website. You can view when you added a particular file, made edits to it, or commented on it. Your event log spans your entire account and not just a particular file. All the entries are listed chronologically and can be sorted by date or event type. If you think something fishy is going on with your account, you can always check the event logs to confirm your suspicions.
View Dropbox file activity
Step 1:Log into your Dropbox account.Step 2: Open a file and select File>Activity.The Activity panel will open on the left. This is where you will be able to see the actions taken on the file throughout its history. It also lets you know when the file was shared, who has access to it, and who made changes to it.
View Dropbox file activity without opening the file
Step 1: Log into your Dropbox account.Step 2: Click on the ellipses next to a file.Step 3: Scroll down the menu and click on File activity.Similarly, you can also view the activity of any folder on Dropbox.
View your Event Log on Dropbox
Step 1: Go to https://www.dropbox.com/events.Step 2:Log into your Dropbox account.You will be able to view your Dropbox account history. You can view the event log for a particular folder using the menu on the right. You can also set a particular date to view the events from that particular day.
Frequently Asked Questions (FAQs)
How is Dropbox file activity different from the event log?
Dropbox file activity gives you a total account of the changes made to a particular file or folder. These changes may be made by you or other editors. The event log, on the other hand, is a chronological account of your activity on Dropbox.
Where do I view the activity log for a particular file?
Open the file and go to File>Activity to view its activity log or history.
This is how you can view Dropbox file activity and event logs. If you suspect someone has gained unauthorised access to your Dropbox account, you can view your account logs to check if they have carried out any activity on the account. To gain back access to your account, go to Security settings and delete all the devices that are logged into your account. Furthermore, turn on two-step authentication to make sure this doesn’t happen in future.
The company showcased energy storage solutions and product concepts in Dubai.
Acer has joined the RE100 initiative and committed to sourcing 100% renewable electricity by 2035.
Acer has officially announced its “Conscious Technology” vision for technology that is created and developed concerning the future. In addition to this it also provided updates on its ongoing climate efforts along with two new energy storage solutions and a climate exhibition featuring technology and the public was also given access to product concepts.Acer joined the RE100 initiative and has pledged to source 100% renewable electricity by 2035. It further committed to attain net-zero emissions by 2050. The company aims to increase positive impacts on the environment through collaborative efforts; 60% of its critical suppliers have committed to RE100 or set science-based carbon reduction targets (SBT).According to the company it aims to make use of 20-30% post-consumer recycled plastic in its computers and monitors by 2025, for which 17% use was achieved in 2022. In addition to this Acer also discussed a number of its initiatives including its Vero line of products made with a high percentage of recycled materials. Another programme the Project Humanity initiative educates and unites its employees around the world to take greener actions. While, the Earthion platform further unites its supply chain partners, including their employees, to address environmental challenges through innovative and integrated solutions.Among the projects under Earthion are using biofuel to reduce Acer’s Sea logistics emissions with biofuel and researching sustainable packaging materials with manufacturing partners.The firm further revealed that it is growing its footprint in the energy storage market as part of its net-zero commitment by offering solutions across the supply chain, from household to industrial use, manufacturing to application, and front-of to behind-the-meter solutions to contribute to the energy transition. Acer has also expanded its range by introducing new energy storage solutions through its investment in battery cell technologies.Conscious Technology for a Brighter Tomorrow Exhibition also highlights Acer’s continuous efforts to combat climate change technology designed and made with consideration for the future. The company presented goods and services categorised under four lifestyle concepts.Also Read:Best smartphones under Rs 35000 in India: Checkout our recommendationsConcept for Working – An on-demand subscription service to Acer’s vast product portfolio with subscription package upgrades, services, and repairs that can be made available with the click of a button. Customers can actively become part of a system that stretches the life of a digital device, lessening the use of new resources.Concept for Learning – Computer hardware and software that help schools reduce their carbon footprint. Students can learn in a climate-positive environment using refurbished laptops along with tools to enable conscious use.Concept for Moving – A network of mobility stations with charging hubs, nimble e-bikes, and e-scooters available to ease journeys, along with tools such as data-informed urban planning and prediction of micro-mobility infrastructure, helping to increase transportation access for more people and support infrastructure planning within smart cities.Concept for Living – A hyper-compatible system with a mobile app that enables the use of both existing and new smart appliances to make homes more climate resilient. The app lets users manage their energy consumption more efficiently and increases visibility on the energy distribution of appliances.
Are you looking for a mid-range smartphone for yourself which comes with premium features and you do not have to spend a lot to buy it? So here we are going to recommend some mid-range phones that won’t break the bank and include nearly all of the features of their higher-end parallels. Here is a list of the best smartphones you can buy under Rs 35000 in India.
OnePlus Nord 3 5G
OnePlus Nord 3 5G is highlighted with a 6.74-inch AMOLED screen with a dynamic refresh rate that may vary between 40Hz and 120Hz. The device runs on OxygenOS 13 with Android 13. Under the hood, there is an octa-core MediaTek Dimensity 9000 SoC with Mali-G710 MC10 GPU. The smartphone features a triple rear camera setup that includes a 50-megapixel Sony IMX890 sensor with OIS support. Additionally, there is an 8-megapixel ultra-wide angle Sony IMX355 sensor with a 112-degree FoV, and a 2-megapixel macro lens. The device is equipped with a 16-megapixel front-facing camera for selfies and video chats. It is backed by a 5,000mAh battery with an 80W SuperVOOC charging support.
Price starts at Rs 33,999
Poco F5 5G
Poco F5 5G comes with a 6.67-inch Full HD+ Flow AMOLED display which supports a 120Hz refresh rate and 240Hz touch sampling rate. The device is powered by a Snapdragon 7+ Gen 2 paired with an Adreno GPU. The phone operates on Android 13-based MIUI 14 for Poco. For photos and videos, the triple rear camera setup includes a 64-megapixel primary sensor, an 8-megapixel ultra-wide lens and a 2-megapixel macro lens. There is a 16-megapixel front-facing camera for taking selfies and video calling. In addition, there is a 5,000mAh battery with a 67W turbocharger.
Price starts at Rs 26,999
NothingPhone 1
The Nothing Phone 1 features a 6.55-inch, 10-bit OLED display with a maximum brightness of 1200 nits, HDR10+, and 402PPI. The device runs on Nothing OS, an Android 12-based operating system. The device is powered by a Snapdragon 778G CPU with Adreno 642L GPU. The handset includes a 4500mAh battery with 33W cable charging, 15W wireless charging, and 5W reverse wireless charging support. In addition to this, there are two 50MP cameras: a primary Sony IMX766 sensor with OIS and EIS, and a secondary Samsung JN1 ultrawide sensor with a 140-degree field of view. When video recording is active, a red LED on the back of the phone will light up. For selfies, there is a 16MP Sony IMX471 sensor and 2.45 aperture on the front.
Price starts at Rs 29,999
iQoo Neo 7 Pro 5G
iQoo Neo 7 Pro 5G is powered by a Snapdragon 8+ Gen 1 chip. The phone operated on Funtouch OS 13 on top of Android 13. It comes with a 6.78-inch full-HD+ AMOLED screen that supports a 120Hz refresh rate and a 300Hz touch sampling rate. The device includes a triple rear camera setup consisting of a 50-megapixel primary Samsung GN5 sensor with an f/1.88 aperture, an 8-megapixel ultra-wide-angle camera with an f/2.2 aperture and a 2-megapixel macro camera with an f/2.2 aperture. The handset also features a 16-megapixel front-facing camera. The iQoo Neo 7 Pro boasts a 5,000mAh battery with 120W Flash Charge support.Price starts at Rs 32,999
Samsung Galaxy F54 5G
The Samsung Galaxy F54 5G features a 6.7-inch full-HD+ Super AMOLED Plus display with a refresh rate of 120Hz. The phone runs on Android 13 with One UI 5.1 OS and is powered by an octa-core 5nm Exynos 1380 SoC. It sports a triple rear camera setup that includes a 108-megapixel primary sensor with OIS, an 8-megapixel sensor ultra wide-angle camera and a 2-megapixel macro lens. In addition to this, there is a 32-megapixel sensor front-facing camera for taking selfies. The Galaxy F54 5G houses a 6,000mAh battery that comes with 25W wired fast charging.
Price starts at Rs 31,999
Redmi Note 12 Pro+ 5G
The Redmi Note 12 Pro+ 5G has a 6.67-inch full-HD OLED display has an up to 120Hz refresh rate. The smartphone is powered by an octa-core 6nm MediaTek Dimensity 1080 SoC with Mali-G68 GPU. The triple rear camera unit includes a 200-megapixel primary sensor with OIS. A 2-megapixel macro lens and an 8-megapixel ultra wide-angle camera are also part of the arrangement. The phone’s 16-megapixel front camera sensor is used for taking selfies. Additionally, the handset houses a 5,000mAh battery that enables 120W fast charging.
Price starts at Rs 27,999
Samsung Galaxy S21 FE
The Samsung Galaxy S21 FE incorporates a Samsung Galaxy S21 FE 5G Snapdragon 888 SoC with Adreno 660 GPU. It has a 6.4-inch FHD+ Dynamic AMOLED 2X Display with a 240Hz touch sampling rate and 120Hz refresh rate. The triple rear camera on the Samsung Galaxy S21 FE includes a 12-megapixel primary sensor a 12-megapixel ultra-wide sensor and an 8-megapixel telephoto sensor. It also includes a 32-megapixel front camera with an f/2.2 aperture. The Galaxy S21 FE 5G offers wireless power sharing, wireless fast charging 2.0, and 25W Super-Fast charging capabilities.
Price starts at Rs 33,989
Vivo V29
Vivo V29 comes with a 6.78-inch full-HD+ curved AMOLED display with 120Hz refresh rate support. It operates on FuntouchOS 13 based on Android 13. Under the hood, there is a Qualcomm Snapdragon 778G SoC. The triple rear camera setup includes a 50-megapixel primary sensor, an 8-megapixel ultra-wide angle lens and a 2-megapixel monochrome camera. On the front, there is a 50-megapixel selfie camera. The smartphone packs a 4,600mAh battery with 80W fast charging support.
Price starts at Rs 32,999
Garena Free Fire is a battle royale game with regular awards and tournaments to keep players interested. If you play Garena Free Fire, you should be aware of the redeem codes that are released on a daily basis. However, because the battle royale game is banned in India, players from other countries can use the Free Fire Redeem codes daily. If you’re unfamiliar with the Garena Free Fire redeem codes or don’t know how to get them, we’ve put together a step-by-step guide to help you redeem them. Check out Garena Free Fire Redeem Codes for 8 December 2023.The Free Fire redeem codes are a great way to get free stuff. These are 12-digit codes that contain alphabets and numbers, as well as an expiration date and time. Because the Garena FF redeem codes cannot be used more than once, you should hurry to the redemption page to claim your free reward before someone else does. To get a free reward, all you have to do is go to reward.ff.garena.com/en, which is the official redemption page. Also, keep an eye on this space for daily updates on Garena Free Fire redemption codes and rewards.
Garena Free Fire Redeem Codes Today 8 December 2023
Recently here at GadgetBridge we looked at how older participants are part of the tech boom, as people over the age of 65 in Australia have widely embraced gaming. Indeed, these silver gamers have doubled in volume over the last four years, reaching 40% within the 65+ age demographic.
This was an intriguing data point featured in the Australia Plays report for 2023, published by the Interactive Games & Entertainment Association, which is the leading advocate organisation for the games industry in the Oceania region. They also highlighted that 81% of all Australians now enjoy gaming, which is up from 67% indicated by the 2021 surveys and research. But what about the industry itself in terms of revenues generated?
Well, that’s where things get a little more complicated. What’s generally referred to as “mainstream” gaming relates to video games, along with associated hardware and devices. Meanwhile, there‘s also the “iGaming” sector, which refers to online betting and casino gaming, although that also falls under the mandate of different legislatures and regulations.
Only by looking at both individually can we get a true picture, as we seek to understand how much Australians actually spend overall on gaming entertainment.
Australian Video Game Revenues
More often than not, the video games industry is how mainstream gaming is most commonly known. Earlier this year, IGEA published the most complete revenue statistics for the sector, covering the financial year from 1 July 2022 to 30 June 2023. This provided a snapshot of Australian consumer video game sales, indicating continued and sustained growth across all segments.
The IGEA report incorporated total sales numbers for games, hardware, and peripherals, which produced a total overall spend by Australians of AUD 4.21 billion, which marks a rise of 5% compared to previous to the previous 2021-2022 financial year figures. But aside from the total sales, this report also provided interesting data for how that sum was reached.
Mobile gaming now accounts for the biggest share, having reached AUD 1.56 billion in revenues, while digital downloads and online gaming achieved AUD 1.5 billion in sales. But what’s also fascinating is that compared to elsewhere around the world, Australia bucked the trend for declining traditional retail video game sales, which rose by 7% in 2023 to AUD 1.15 billion.
Read also:How to Play Wordle: Tips & Tricks to Become a Pro At WordleOnline Casino Gaming Revenues
Now as we mentioned earlier, the iGaming sector falls under the remit of different licensing and regulations, compared to mainstream gaming. But essentially, this covers the kind of online casino games and sites that Aussies will find at TopAustralianGambling reviews and guides. These include everything from pokies to roulette, plus card games like poker and blackjack, among a diverse and wide range of games available to players these days.
Proving that Australia genuinely is a nation which thoroughly enjoys gambling, this hugely popular leisure activity generated AUD 6.82 billion in revenues in 2022, rising by 7.09% to AUD 7.3 billion in 2023. Based on the numbers calculated by imarcgroup analysis, this growth is projected to continue at a sustained rate over the next several years, despite the introduction of increasingly stringent legislature and regulations Down Under.
By comparison, revenues for offline casino gaming have steadily fallen over the last few years, dropping to around AUD 5.8 billion in 2023. Inevitably, the biggest hit came during the pandemic, when physical gambling venues and casinos were forced to close their doors, and in the meantime, the growth of online casino gaming has accelerated and taken over.
Combined Total Revenues
Such numbers unequivocally prove that right now, the iGaming sector is already significantly larger than the video games sector, indicating that in truth, both are genuinely “mainstream” in nature. Taking the combined figures we now have, Aussies have spent AUD 11.51 billion on their overall gaming pastimes, which is more per head of the population than anywhere else in the world.
If you often work from home, you must be aware of Remote Desktop Connection. RDC is a Windows application that lets you remotely access your PC with the proper credentials. Typically, the Remote Desktop Connection application can be accessed from the Windows Start Menu. If you use it quite often, you may want it pinned to a more accessible location. So, let’s take a look at the top 4 ways to create a Remote Desktop Connection Shortcut on a Windows 11 PC.Read Also:Top 7 Ways to Run Command Prompt as an Administrator in Windows 11
How do I enable Remote Desktop Connection on my Windows 11 PC?
To use RDC on your PC, you will need the Pro Edition of Windows. This feature is not available on Windows 11 Home Edition. To enable RDC, follow these steps.Step 1: Go to Settings and select System.Step 2: Select Remote Desktop and turn on its toggle switch.Step 3: Note down the name of the PC.Step 4: Launch the Remote Desktop Connection app on your local Windows PC.Step 5: Type the name of the PC you noted down earlier and hit Connect.
Save a Remote Desktop Connection Shortcut
Step 1: Type ‘Remote Desktop Connection’ in the taskbar search box.Step 2:Open the Remote Desktop Connection app.Step 3: Click on Show Options.Step 4: Enter your login credentials for the remote computer and hit Save As.Step 5: Select the location for the shortcut and hit Save.
Create a desktop shortcut for Remote Desktop Connection in Windows 11
Step 1: Type ‘Remote Desktop Connection’ in the taskbar search box.Step 2: Select the Open file location option in the right panel.Step 3:Right-click on Remote Desktop Connection and select Show more options.Step 4: Select Send To>Desktop (create shortcut).
Another way to create a desktop shortcut for RDC
Step 1:Right-click anywhere on the desktop and select New>Shortcut.Step 2: Click on Browse and navigate to RDC’s file location. Alternatively, you can type mstsc.exe /v:PC-name or mstsc.exe /v:IP.Step 3: Click Next.Step 4: Type a name for the shortcut and hit Finish.
Pin Remote Desktop Connection to the taskbar
Step 1: Type ‘Remote Desktop Connection’ in the taskbar search box.Step 2: Select the Pin to taskbar option in the right panel.
Frequently Asked Questions (FAQs)
How do I create a shortcut for Remote Desktop Connection for a particular PC on Windows 11?
Launch RDC, click on Show Options, enter the login credentials for your remote computer, and hit Save as. Enter the location for the shortcut and select Save.
How do I create a desktop shortcut for Remote Desktop Connection?
You can create a desktop shortcut for RDC by right-clicking its icon in its file location and selecting Show more options>Send to>Desktop. Alternatively, you can also right-click on the desktop itself and select New>Shortcut. In the following window, enter the file location of RDC and hit Next.
These are the top 4 ways to create a Remote Desktop Connection shortcut on your Windows 11 PC. If you don’t like your desktop cluttered with dozens of shortcuts, you can pin RDC to the taskbar instead. Doing so will provide you instant access to the application with just a single click. Know a better way to go about this task? Let us know in the comments!
The latest Redmi Note Series includes three devices- Redmi Note 13, Redmi Note 13 Pro, and Redmi Note 13 Pro+.
The smartphones feature a 6.67-inch 1.5K full-HD+ AMOLED display.
Snapdragon 7s Gen 2 SoC powers the Redmi Note 13.
The Redmi Note 13 and Redmi Note 13 Pro+ are powered by MediaTek Dimensity SoC.
All three of the devices in the lineup come with a 16-megapixel selfie camera.
The upcoming year will be exciting for tech enthusiasts, a tonne of smartphones and other tech gadgets are planned for 2024. Though some brands have kept their secrets close to the vest on what they have in store for us, many brands have already revealed their plans. Xiaomi has announced the Redmi Note 13 series’ introduction in India, while there are still a few weeks till the new year begins. According to the company, it will host its next tech event in January 2024. The information about the upcoming launch was shared during the launch of Redmi 13C 5G.Xiaomi has not yet disclosed the official launch date but it has confirmed that the Redmi Note 13 series will launch in India in January.Also Read:OnePlus 12 could launch in January 2024, company confirmsNote that the Redmi Note 13 series was launched in September in China. The lineup includes the Redmi Note 13, Redmi Note 13 Pro, and Redmi Note 13 Pro+.
Redmi Note 13 Series specifications
Redmi Note 13 comes with a 6.67-inch AMOLED display with a refresh rate of 120Hz. The phone comes integrated with Android 13-based MIUI 14 and is powered by MediaTek Dimensity 6080 SoC.It has a dual rear camera setup that includes a 100MP main sensor and a 2MP macro sensor. Note that all three phones feature a 16MP selfie camera. The smartphone houses a 5,000mAh battery and comes with 33W wired fast charging support.On the other hand, the Note 13 Pro is highlighted with a 6.67-inch 1.5K full-HD+ AMOLED screen with 120Hz refresh rate. The phone is powered by Qualcomm Snapdragon 7s Gen 2 and runs MIUI 14 OS. There is a triple rear camera setup on the phone that includes a 200MP main sensor, an 8MP ultra-wide angle lens, and a 2MP macro lens. The device is backed by a 5,100mAh battery with 67W fast charging support.Lastly, Redmi Note 13 Pro+ has the same display as the Pro model and it is powered by MediaTek Dimensity 7200 Ultra SoC. The device has a 5,000mAh battery that supports 120W fast charging.
Garena Free Fire is a battle royale game with regular awards and tournaments to keep players interested. If you play Garena Free Fire, you should be aware of the redeem codes that are released on a daily basis. However, because the battle royale game is banned in India, players from other countries can use the Free Fire Redeem codes daily. If you’re unfamiliar with the Garena Free Fire redeem codes or don’t know how to get them, we’ve put together a step-by-step guide to help you redeem them. Check out Garena Free Fire Redeem Codes for 7 December 2023.The Free Fire redeem codes are a great way to get free stuff. These are 12-digit codes that contain alphabets and numbers, as well as an expiration date and time. Because the Garena FF redeem codes cannot be used more than once, you should hurry to the redemption page to claim your free reward before someone else does. To get a free reward, all you have to do is go to reward.ff.garena.com/en, which is the official redemption page. Also, keep an eye on this space for daily updates on Garena Free Fire redemption codes and rewards.
Garena Free Fire Redeem Codes Today 7 December 2023
If you grew up in the late 90s and early 2000s you must be aware of the painstaking task of installing the relevant driver package before connecting a PC accessory or hardware to your computer. Even early smartphones used to come with a small disc containing the relevant PC suite. Over the years, ‘plug-and-play’ has become the norm but this does not mean that drivers do not exist. The important drivers come bundled with the OS, facilitating a seamless connection when the computer is connected to the relevant hardware. You can always uninstall these drivers or swap them for new ones. Today, we bring you the top 4 ways to install or update the WiFi driver on a Windows 11 PC.Read Also:Google Messages rolls out Photomoji: Here is how you can use it
When should I update the WiFi Driver on my Windows 11 PC?
Updating the WiFi driver on your Windows PC is not something you should do often. If your PC is connected to the WiFi adapter and is receiving a strong signal, there is no need to meddle with the driver package. As you may already know, a driver is a piece of software that establishes communication between your PC’s OS and the hardware connected to it.The need to update the driver package arises when the hardware stops responding or something goes awry. As a part of troubleshooting a particular problem, you should check the drivers associated with it. If your PC fails to connect to the WiFi network, it is a good idea to check whether its WiFi driver package is updated. To make sure there’s nothing wrong with it, you can also try uninstalling and then reinstalling the WiFi drivers.
Use Device Manager to install or update the WiFi driver on Windows 11
Step 1: Go to Control Panel and select Device Manager.Step 2: Hit the arrow next to Network adapters.Step 3: Right-click on the WiFi adapter and hit Update driver.Step 4: Choose whether you want Windows to automatically search for an updated driver or manually select the driver from your computer’s storage.The WiFi driver will be updated on your computer.
Update the WiFi using Windows Update
Step 1: Go to Settings and select Windows Update from the side menu.Step 2: Click on Advanced Options.Step 3: Select Optional Updates.Step 4: Click on the checkbox for the WiFi driver and hit Download and install.
Use the CD that came with the WiFi adapter
Most PC accessories and peripherals are plug-and-play. However, manufacturers make sure to provide a CD that contains the driver package for the device. Use this CD to install the driver package on your computer. If you can’t find the disc in the adapter’s retail package, you may need to download the driver from the manufacturer’s website. Take a look at the next method to learn how you can do that.
Download and install the WiFi adapter driver from the manufacturer’s website
Another quick way of installing the WiFi driver on your Windows 11 PC is by visiting the manufacturer’s website and downloading the driver package. Here’s how you can go about it.Step 1: Visit the WiFi adapter manufacturer’s website and search for the latest driver for Windows 11. You may find this option in the Services and Support section. Make sure that the driver package is meant for your adapter’s model.Step 2: Download and install the driver package on your computer.Step 3: Locate the package in the Downloads folder and open it.Step 4: Follow the onscreen instructions to install the WiFi driver package on your device.Step 5: Double-check that the correct WiFi driver has been installed by going to Device Manager and viewing the wireless adapter properties.
Frequently Asked Questions (FAQs)
How do I uninstall my Windows 11 PC’s WiFi driver?
Go to Control Panel>Device Manager>View>Devices by driver. Right-click on oem20.inf (netwtw08.inf) and select Remove Driver. In the popup box, select both checkboxes and hit Remove.
How do I update the WiFi driver on my Windows 11 PC?
Updating the WiFi driver on your Windows 11 PC is fairly easy. Simply go to Control Panel>Device Manager>Network Adapters, right click on the wireless adapter and hit Update.
My WiFi adapter did not come with the disc that contains the driver package. What do I do now?
If you can’t find the CD with the driver package in the retail package of your WiFi adapter, you don’t need to worry. Simply go to the Services/Support section on the manufacturer’s website and download the driver package for your adapter.Read Also:Best gaming phones under Rs 20000 in India
Conclusion
These are the top 4 ways to install or update the WiFi driver on your Windows 11 PC. Microsoft works with a lot of third-party hardware manufacturers and bundles their driver packages in its update. This process is quite seamless and saves you the hassle of downloading the package from the manufacturer’s website.
OnePlus 12 features a Hasselblad-branded triple rear camera system led by a Sony LYT-808 sensor with a 50-megapixel primary camera.
The phone has an LTPO OLED screen with 120Hz refresh rate support.
OnePlus 12 debuted in China on Tuesday and now is all set to hit the India stores soon. The device is highlighted with a 120Hz LTPO OLED and is powered by Snapdragon 8 Gen 3 SoC. It has a triple camera setup tuned by Hasselblad. The handset comes with IP65 protection. The Chinese tech firm has officially confirmed to launch its latest flagship in India and Globally. Here is when it will launch in India. OnePlus 12 microsite went live in India including other nations like the USA and the UK. But now the company has revealed the launch timeline for India and the global market. According to the company’s latest revelation, the OnePlus 12 will make its global debut in India and across the world in early 2024.The information has been shared on the UK page in the campaign’s Terms and Conditions section. However, there is no such information shared on the Indian microsite. However, the company has a tradition of launching most of its phones in India and China first so we are pretty are much sure the India launch is next on the cards. As mentioned the UK content page for the upcoming phone suggests launch in late January because the contest would run from November 27 to January 23. The end date of the campaign therefore raises the possibility that January 24 could be the debut date.OnePlus 12 specificationsOnePlus 12 features a 6.82-inch quad-HD+ LTPO OLED screen with an adaptive refresh rate ranging between 1Hz and 120Hz. The screen supports 4,500 nits of screen brightness. The device is IP65 rated for dust and water resistance.The device is powered by Qualcomm- 4nm Snapdragon 8 Gen 3 SoC. The device is offered with up to 24GB of LPDDR5X RAM and up to 1TB of UFS 4 inbuilt storage. The phone is endowed with a Hasselblad branded triple rear camera with a Sony LYT-808 sensor with a 50-megapixel primary camera (OIS, and f/1.6 aperture), a 64-megapixel telephoto secondary lens (OIS, 3X optical zoom and f/2.6 aperture) and a 48-megapixel ultra-wide-angle lens (114-degree field-of-view). Lastly, there is a 32-megapixel front-facing camera (f/2.4 aperture) for taking selfies and video calling.The flagship phone is fueled by a 5,400mAh battery with 100W SuperVOOC wired, 50W wireless and 10W reverse wireless charging support.
The use of digital cameras is now limited only to professionals. Nowadays, most people prefer to take photos using their phones since they can easily fit them in their pockets or bags. If you have an interest in photography and don’t want to spend a lot of money and are looking for a camera-focused phone for yourself then you have come to the right place.Customers have a set budget under which they want to get maximum features like the best camera sensor, fast CPU, long battery life, good design and build that lasts longer. We have done research and prepared a list in which most of the camera phones mainly fall under Rs 25000. We think this list will be very helpful to you in making the proper choice when purchasing a new camera phone, so check it out if you want to buy one with the best features available.
OnePlus Nord CE 2 5G
OnePlus Nord CE 2 5G is endowed with a 6.43-inch Full-HD+ Fluid AMOLED display with a refresh rate of 90Hz. The device is powered by Android 11, with OxygenOS 11 and is equipped with MediaTek Dimensity 900 SoC and ARM Mali-G68 GPU. The triple rear camera setup includes a 64-megapixel main camera, an 8-megapixel ultra-wide-angle camera and a 2-megapixel macro camera. Upfront there is a 16-megapixel Sony IMX471 selfie camera. The OnePlus phone includes a 4,500mAh battery with 65W fast charging support.Price starts at Rs 24,999
iQOO Z7 Pro 5G
iQoo Z7 Pro 5G comes with a 6.78-inch full-HD+ AMOLED display with 120Hz refresh rate. The device boots FuntouchOS 13 with Android 13. It is powered by MediaTek Dimensity 7200 SoC with Mali-G610 MC4 GPU. The phone features a dual rear camera setup that includes a 64-megapixel Samsung GW3 primary sensor and a 2-megapixel depth sensor. It also has a ring LED light. Additionally, a 16-megapixel front-facing sensor is there for taking selfies and video calling. The 4,600mAh battery in the iQoo Z7 Pro supports 66W wired fast charging.Price starts at Rs 23,999
Xiaomi 11i 5G
The Xiaomi 11i has a 6.67-inch full-HD+ Super AMOLED display with 120Hz refresh rate support. It runs on Android 11 with MIUI 12.5 Enhanced version on top. The handset is powered by a MediaTek Dimensity 920 SoC. It includes a triple rear camera arrangement with a 108-megapixel primary Samsung HM2 sensor with an f/1.89 aperture, an 8-megapixel ultra-wide lens, and a 2-megapixel macro sensor. There is a 16-megapixel selfie camera sensor with an f/2.45 aperture on the front. The device equips a 4,500mAh dual-cell lithium polymer battery with 67W fast charging.Price starts at Rs 17,999
Samsung Galaxy M34 5G
Samsung Galaxy M34 5G on the other hand features a Full HD+ 6.5-inch display. The device runs OneUI 5.1, an Android 13-based operating system. The phone is driven by an Exynos 1280 SoC with a Mali-G68 MP4 GPU. It has a triple rear camera setup that includes a 50-megapixel primary sensor, a 2-megapixel macro sensor and an 8-megapixel ultra-wide angle camera. For selfies, there is a 13-megapixel sensor front-facing camera. A 6,000mAh battery powers the device.Price starts at Rs 19,999
Poco X5 Pro 5G
Poco X5 Pro highlights a 6.67-inch Xfinity AMOLED Display on the Poco X5 Pro 5G has a 120Hz adaptive refresh rate. It operates on MIUI 14 for Android 12 and is powered by a Snapdragon 778G SoC and an Adreno 642L GPU. The device includes a triple rear camera setup with a 108-megapixel ISOCELL HM2 main sensor. A 2-megapixel macro camera and an 8-megapixel ultra-wide angle lens are also included. On the front, there is a 16-megapixel selfie camera. Moreover, the phone is backed by a 5,000mAh battery with 67W fast charging and 5W wired reverse charging capabilities.Price starts at Rs 18,999
OnePlus Nord CE 3 Lite
OnePlus Nord CE 3 Lite 5G is highlighted with a 6.72-inch full-HD+ LCD having a dynamic refresh rate of 120Hz. The device is shipped with OxygenOS 13.1 on top of Android 13 out of the box. Under its hood, there is an octa-core Snapdragon 695 SoC with Adreno 619 GPU for graphics. The 5G smartphone features a triple rear camera setup consisting of a 108-megapixel Samsung HM6 sensor with an f/1.75 aperture and EIS support. It also includes a 2-megapixel macro lens and another 2-megapixel depth sensor. For selfies, there is a 16-megapixel front-facing camera. The phone further sports a 5,000mAh battery that supports 67W SuperVOOC fast charging.Price starts at Rs 19,999
Redmi K50i 5G
The Redmi K50i has a 6.6-inch full HD+ liquid FFS (Field Fringe Switching) Display that supports a 144Hz refresh rate. There is a MediaTek Dimensity 8100 processor. It runs on MIUI 13, which is based on Android 12. It has a triple camera setup at the back, including a 64-megapixel Samsung JW1 sensor that is supported by an 8-megapixel and a 2-megapixel ultrawide lens. A 16MP selfie camera is located up front. The phone boasts a 5080mAh battery and comes with 67W Turbo Charger.Price starts at Rs 25,999
Vivo V25 5G
Vivo V25 runs on Android 12, Funtouch OS 12. It has a 6.44-inch full-HD+ AMOLED screen with a refresh rate of 90Hz and a touch sampling rate of 180Hz. The device is powered by MediaTek Dimensity 900 SoC. It features a triple rear camera arrangement consisting of a 64-megapixel sensor with an f/1.79 aperture and optical image stabilisation. Additionally, there is a 2-megapixel macro lens with an f/2.4 aperture and an 8-megapixel wide-angle lens. A 50-megapixel selfie camera with Eye Autofocus and an f/2.0 aperture is located up front. The phone is fuelled by a 4,500mAh battery with 44W fast charging support.Price starts at Rs 23,940
Oppo F21s Pro 5G
Oppo F21s Pro 5G features a 6.43-inch full-HD+ AMOLED display that supports a 90Hz refresh rate. The phone runs on ColorOS 12.1 skinned on Android 12. It is powered by an octa-core Qualcomm Snapdragon 680 SoC. There is a triple rear camera setup that includes a 64-megapixel primary sensor, a 2-megapixel macro camera and a 2-megapixel depth sensor. Also, it comes with a 32-megapixel front-facing camera for selfies. In addition to this, the smartphone boasts a 4,500mAh battery with support for 33W SuperVOOC charging.Price starts at Rs 25,999
Oppo F23 5G
Oppo F23 5G features a 6.72-inch full-HD+ LTPS LCD with 120Hz refresh rate support and 240Hz touch sampling rate. The 5G phone runs on ColorOS 13.1 on top of Android 13. It is driven by an octa-core Qualcomm Snapdragon 695 5G SoC. For optics, there is a triple rear camera setup that includes a 64-megapixel primary sensor (autofocus and f/1.7 aperture), a 2-megapixel mono sensor (f/2.4 aperture), and a 2-megapixel micro sensor (f/3.3 aperture). Additionally, it includes a 32-megapixel front-facing camera for selfies and video calling.The Oppo F23 5G sports a 5,000mAh battery with 67W SuperVOOC charging support.Price starts at Rs 22,999
While the majority of people rely on the graphical interface of their Windows PCs, some users prefer Command Prompt to run text-based commands and gain greater control over the system. For the latter to happen, it is essential to run Command Prompt as Administrator. This is also known as the ‘Elevated’ Command Prompt. There are several ways you can go about this. Today, we bring you the top 7 ways to run Command Prompt as Administrator on a Windows 11 PC.Read Also:Top 4 Methods to Update Audio Drivers on Windows 11
Run Command Prompt as an Administrator from the Windows Search Bar
Step 1: Click on the Search box in the taskbar and search for ‘cmd’.Step 2: On the right panel click on Run as administrator.Step 3: Hit Yes.
Use Quick Access Menu
Step 1:Right-click on the Windows icon on the taskbar. Or simply press Windows Key + X.Step 2: Select Terminal (admin).Step 3: Hit Yes.Step 4: Press Ctrl + Shift + 2 to open Command Prompt.
Use the File Explorer to Run Command Prompt as Administrator in Windows 11
Step 1: Open the File Explorer from the taskbar.Step 2: Open the C: Drive and go to the Windows folder.Step 3: Open the System 32 folder.Step 4: Scroll down and right-click on cmd.exe.Step 5: Select Run as administrator.
Use the Address Bar in File Explorer
Step 1: Launch the File Explorer from the taskbar.Step 2: Click on the address bar and enter ‘cmd’. Hit Enter.This will open CMD in Terminal. To make sure it runs CMD as administrator, follow these steps.Step 3: Click on the downward arrow and select Settings.Step 4: Select Command Prompt from the side menu.Step 5: Turn on the toggle switch for Run this profile as Administrator.
Run Command Prompt as Administrator from the Control Panel
Step 1: Open the Control Panel on your computer and select Windows Tools.Step 2:Right-click on Command Prompt and select Run as administrator.
Use the Run Dialog Box
Step 1: Press Windows Key + R.Step 2: Type ‘cmd’ and press Ctrl+Shift+Enter.
Run Command Prompt as Administrator using the Task Manager on Windows 11
Step 1: Open the Quick Access Menu by right-clicking the Windows icon on the taskbar or pressing the Windows Key + X.Step 2: Select Task Manager.Step 3: Click on Run New Task.Step 4: Enter ‘cmd’ and select the checkbox for ‘Create this task with administrative privileges’.Step 5: Hit Enter.
What if I’m not logged into the Admin profile?
If you’re not logged into the admin profile on your Windows 11 PC, you can still run CMD as administrator. The steps mentioned above will work for Guest accounts as well. The only caveat is that you need to provide the admin username and password. If you don’t have the admin credentials you will be denied access to administrator privileges. But, you can still use CMD in its regular form.
Frequently Asked Questions (FAQs)
How do I run Command Prompt as Administrator on my Windows 11 PC?
To run Command Prompt as Administrator on your Windows 11 PC, simply type ‘CMD’ in the search box in the taskbar and select ‘Run as Administrator’ from the app options.
How do I open CMD as admin in Terminal?
Open Terminal, go to Settings>Command Prompt and turn on the toggle switch for ‘Run this profile as Administrator’.
Where is the Command Prompt file located on my PC?
These are the top 7 ways to run Command Prompt as Administrator on a Windows 11 PC. If you are signed into your PC from a Guest account, you will need to provide admin credentials in order to gain access to the administrator privileges for Command Prompt. If you know any other ways to make this work, let us know in the comments!
The 5G model comes equipped with MediaTek Dimensity 6100+ SoC.
The 4G model is powered by MediaTek Helio G85 SoC.
The much-awaited Redmi 13C series has debuted in India today. The newly launched lineup succeeds Redmi 12C which was introduced in June of this year, only six months ago. The series includes two smartphones Redmi 13C 5G and a 4G variant. The devices fall under the budget segment. The phones are splash-resistant and offer dust protection.
Redmi 13C 5G and Redmi 13C price in India, sale details
Redmi 13C 5G has been launched in the following variants:
4GB RAM with 128GB storage: Rs 9,999
6GB RAM with 128GB storage: Rs 11,999
8GB RAM with 256GB storage: Rs 13,499
On the other hand, the 4G Redmi 13C comes in the following options:
The Redmi 13C features a 6.74-inch HD+ LCD screen with 1,600 x 720 pixels of resolution. The display comes with a 90Hz refresh rate and 180Hz touch sampling rate support. The device is powered by MediaTek Dimensity 6100+ SoC with 8GB of LPDDR4X RAM and 256GB of UFS2.2 internal storage. The storage can be expanded up to 1TB using a microSD card. The phone boots Android 13-based MIUI 14 out of the box.The 5G variant is available with a dual rear camera setup including a 50-megapixel primary camera (f/1.8 aperture) and a secondary sensor for collecting depth data while Portrait mode is in use. In terms of selfies, the company has provided a 5-megapixel camera with f/2.2 aperture.Besides this, there is a 5,000mAh battery onboard with 18W charging support.Connectivity options: 5G, Wi-Fi ac, Bluetooth 5.3, GPS, 3.5mm audio port, and a USB Type-C port.
Redmi 13C specifications
The Redmi 13C 4G model shared a lot of similarities with its 5G sibling. The display, battery, and software are the same as mentioned above. As it is a 4G variant the device is powered by MediaTek Helio G85 SoC with up to 8GB of LPDDR4X RAM and + 256GB of eMMC 5.1 internal storage.Unlike the 5G variant, the 4G model comes with a triple rear camera setup that includes a 50-megapixel main lens (f/1.8 aperture), a 2-megapixel macro lens (f/2.4 aperture), and a third lens for collecting depth data. For selfies and video calling, there is an 8-megapixel front camera with f/2.0 aperture.
Google recently announced 7 new features for the Messages app to celebrate 1 billion RCS users on the platform. The tech giant will roll out these features in a phased manner. Some devices have already started receiving the ‘Photomoji’ feature, which gives users a new way to react to messages and respond with custom emojis. To check if this feature is available on your device, watch out for the circular badge on the emoji icon in the Messages app. If you’re one of the lucky users, check out how you can use Photomoji on Google Messages.Read Also:OnePlus 12 powered by Snapdragon 8 Gen 3 announced: Details inside
How to use Photomoji on Google Messages
Step 1: You can send a Photomoji as a reaction to a message or as a standalone emoji. Long press a text for the former and hit the emoji icon for the latter. Hit Create.Step 2: Select the image that you want to turn into a Photomoji.Step 3: Google will scan the image for objects and display the results. At the moment, you cannot isolate the object from the image yourself. This process is completely automated.Step 4: Select a Photomoji from the list and hit Send.Once you send a Photomoji, it can be accessed from the Customs tab in the emoji section later. You can also choose to delete the saved Photomojis.
Google will also be introducing these new features to Messages
Photomoji is one of the 7 new features that Google plans on introducing to celebrate 1 billion RCS users on the Messages app. Other features include Voice Moods, Screen Effects, Custom Bubbles, Reaction Effects, Animated Emojis, and Profiles.With Voice Moods, users can spruce up their voice notes with visual animations and effects. Google has also increased the bitrate and sampling rate of voice messages to improve the audio quality.Screen Effects is a cool feature that displays beautiful animations on the screen when certain phrases or words are typed into the chat. Google says there are at least 15 hidden prompt words that will trigger these screen effects.Custom Bubbles gives users more control over how their chat screen looks. Users can now choose the colour of the chat bubbles and the chat background for every conversation. You can assign a particular colour to your friends and a different one to your family.Reaction Effects puts a nice twist to the message reactions. Instead of the reaction simply popping up under the message, it will now have its unique effect. For example, once you react to a message with a thumbs-up, three hands with thumbs-up gestures will pop out of the message before settling in as a traditional reaction.Animated Emojis are similar to Reaction Effects. Once you send a standalone emoji in the chat, it will spring into a little animation. All the major emojis have their unique animations that you can now try out with your friends.Finally, with Profiles you can put up a name and picture alongside your phone number. This will help users to recognise other people in group chats. If you receive a message from an unknown phone number, you will now be able to see their name and profile picture.
Frequently Asked Questions (FAQs)
How do I know if my Google Messages app supports Photomoji?
Google is currently rolling out Photomoji in a phased manner. If the feature is available on your device, you will see a circular badge on the emoji icon.
How do I create a Photomoji in Google Messages?
Hit the ‘Create’ button in the reactions or emoji field. Select a picture from your device and let Google isolate the objects from it. You will be presented with a few options. Select the Photomoji that you like the most out of the bunch.
Can I manually create a Photomoji out of any object in a picture?
This is how you can create a Photomoji on the Google Messages app. What do you think of this feature? Would you switch from your phone’s native messaging app to Google Messages to use Photomoji? Let us know in the comments! Watch this space for more updates about the upcoming features in the Google Messages app.
There is a glut of smartphones in India. Among all of these, choosing the best gaming phone which not only works for you but is also within your budget is very difficult in a world where mobile gaming is at its peak. But this year we saw a good range of gaming smartphones that may perform really well for less than Rs 20,000. We did some research for you and picked the best gaming smartphone under Rs 20000 you can buy in India.Our top five choices are listed here.
Infinix GT 10 Pro 5G
Infinix GT 10 Pro’s retail package can also be fashioned into a boom boxInfinix GT 10 Pro (Infinix GT 10 Pro Review)operates on Android 13-based XOS 13. It comes with a 6.67-inch full-HD+ 10-bit AMOLED LTPS display. The screen supports a 120Hz refresh rate and 360Hz touch sampling rate. 900 nits of peak brightness and 100 percent coverage of the DCIP colour gamut. The gaming phone is powered by MediaTek Dimensity 8050 SoC.The device features a triple rear camera set-up with a 108-megapixel primary sensor and two 2-megapixel camera sensors. For selfies, there is a 32-megapixel front-facing camera. The smartphone packs a 5,000mAh battery with 45W fast charging support.
Buy here
OnePlus Nord CE 3 Lite 5G
The OnePlus Nord CE 3 Lite (OnePlus Nord CE 3 Lite Review) runs on octa-core Snapdragon 695 SoC with Adreno 619 GPU for graphics. It also features a 6.72-inch full-HD+ LCD with 1,080×2,400 pixels of resolution. The phone packs a 5,000mAh battery that supports 67W SuperVOOC fast charging. It (OnePlus Nord CE 3 Lite Review) has a triple rear camera setup with a 108-megapixel Samsung HM6 sensor with an f/1.75 aperture and EIS support. It also consists of a 2-megapixel macro lens and another 2-megapixel depth sensor. There is a 16-megapixel front-facing camera for selfies.
Buy Here
Vivo T2x 5G
Vivo T2x 5GVivo T2x 5G operates on Android 13-based Funtouch OS 13 out of the box. It comes with a 6.38-inch AMOLED display with 1,080×2,400 pixels of resolution. The screen supports a refresh rate of 90Hz and a 360Hz touch sampling rate. The display has 1300 nits of peak brightness and a 6000000: 1 contrast ratio. The gaming phone is powered by MediaTek Dimensity 6020 SoC. It has a dual rear camera setup includes a 50-megapixel primary sensor with f/1.8 aperture and a 2-megapixel sensor with f/2.4 aperture. There is an 8-megapixel sensor with f/2.0 aperture for taking selfies. The smartphone comes with a 5,000mAh battery with 18W charging support.
Buy HereAlso Read:OnePlus 12 powered by Snapdragon 8 Gen 3 announced: Details inside
iQoo Z7 5G
iQoo Z7 5G (iQoo Z7 5G Review)includes a 6.38-inch full-HD+ resolution AMOLED display with a refresh rate of 90Hz. It runs on Android 13-based Funtouch OS 13 out-of-the-box. The phone is powered by an octa-core MediaTek Dimensity 920 SoC. In addition to this, there is a dual rear camera system that includes a 64-megapixel primary sensor with OIS, and a 2-megapixel portrait lens. Also, there is a 16-megapixel front camera for selfies. The handset sports a 4,500mAh battery with 44W Flash Charge support.
Buy Here
Poco X5 Pro 5G
Poco X5 Pro 5G (Poco X5 Pro 5G Review) has a 6.67-inch Xfinity AMOLED Display with a 120Hz adaptive refresh rate, 240Hz touch sampling rate and a maximum brightness of 900 nits. It is powered by MIUI 14 for Android 12. Under its hood, there is a Snapdragon 778G SoC and an Adreno 642L GPU. The gaming smartphone also includes a triple camera unit consisting of a 108-megapixel ISOCELL HM2 main sensor. A 2-megapixel macro camera and an 8-megapixel ultra-wide angle lens are also included. On the front, there is a 16-megapixel selfie camera. The mobile phone boasts a 5,000mAh battery with 67W fast charging and 5W wired reverse charging support.
Buy here
There is nothing more annoying than an email attachment refusing to go through. Nine times out of ten, this happens because the attachment’s file size exceeds the limit imposed by the service provider. If this happens more often than you like, you may want to look at other email service providers and the file size limits they offer. So, without further ado, let’s take a look at the attachment size limits for Gmail, Yahoo Mail, Outlook, Hotmail, and more.Read Also:Nothing Phone 2a launch imminent in India, bags BIS certification
Why do email service providers impose an attachment size limit?
Attachment size limits exist for two major reasons. The first reason is related to server security, as having no storage/attachment size limit can prompt certain malicious entities to send extremely large files over email, leading to a server outage. Capping the file size reduces the chances of these attacks. Once you upload an attachment that exceeds the stipulated limit, your email will get stuck in the outbox.The rise of cloud storage services has given email service providers further impetus to limit the attachment size. The size limit on Gmail pushes users towards Google Drive, which is highly compatible with the former. The same goes for Office 365/Hotmail and OneDrive. These service providers are able to generate more revenue by charging users for additional storage space on their respective cloud storage services.
Attachment Size Limits for Gmail, Yahoo Mail, Outlook, and more
Service Provider
Attachment Size Limit
Gmail
25MB (larger attachments are sent as a Google Drive link)
Yahoo Mail
25MB
Outlook
20MB
Hotmail
25MB
AOL
25MB
WhatsApp
16MB for media, 2GB for documents
Telegram
2GB
Facebook Messenger
25MB
iMessage
100MB
Google Drive
15GB free storage
iCloud
5GB free storage
Dropbox
2GB free storage
SkyDrive
7GB free storage
One Drive
5GB free storage
How do I get around the attachment file size limit?
Every once in a while you may hit the file size limit for email attachments or the media you’re trying to send through an IM app. There’s no need to fret as there are a bunch of things you can do in this scenario. Here are some tips and tricks for you.
Use a cloud storage service: The best way to get around the file size limit on emails and instant messengers is by using a cloud storage service like Dropbox, Google Drive, or OneDrive. This option doesn’t compromise on media quality and extends the size limit by a comfortable margin.
Crop your pictures: WhatsApp is notorious for capping the size of all media files at 16MB. The best thing you can do in this scenario is slightly cropping the images to bring their size down. You can crop the images on your smartphone’s native image editor. Even a slight crop that is barely noticeable will also work in this situation.
Trim videos: Editing the unnecessary parts of a video can bring down its size by a large factor. If your video barely exceeds the file size limit, cut out a couple of seconds from the beginning and the end to make it conform to the limit. This can be done using your phone’s native editor and does not require a third-party app. Read this article to learn more.
Compress files: PDF documents and other files rarely create any trouble, but if they do, you can easily compress them using a third-party app or an online tool. Websites like SmallPDF, PDF24Tools, and SodaPDF offer free tools for this job. You can even find a PDF compressor tool on Adobe’s official website.
Frequently Asked Questions (FAQs)
What is the maximum file size that Gmail allows to be sent as an attachment?
You can send files up to 25MB in size using Gmail. Yahoo and Hotmail have a similar file size limit as well.
Why am I not able to email a file even if it is the same size as the allowed limit?
The file size limit constitutes the size of the attachment as well as the size of the text in the email. This means an attachment which is the exact size as the allowed limit will not go through if there is some text in the email as well.
These are the attachment size limits imposed by Gmail, Hotmail, Yahoo Mail, Outlook and other email service providers. You should also know that the cumulative size of the emails in your Gmail inbox also eats up a significant portion of your free Google storage. Always make sure you delete the spam emails to keep the storage manageable.


 When you see the ‘problem detected with the TrueDepth camera’ error message on your iPhone, you might wonder what the TrueDepth camera even is. Well, the answer is quite simple. The TrueDepth Camera is a collective term used for the front camera, infrared camera, dot projector and other proximity sensors. These components are located on the notch of your iPhone’s display. The newer iPhones house them in the ‘Dynamic Island’.
As you can guess by now, the TrueDepth Camera maps a 3D image of your face using thousands of dot particles. The 3D scan is matched with the image of your face captured by the front camera to verify your identity. This is the mechanism behind the Face ID on your iPhone. The TrueDepth Camera is also the reason why someone cannot unlock your iPhone simply by putting up your picture in front of the lock screen. Apart from Face ID, the TrueDepth Camera is also used for Memojis and Portrait Mode.
When you see the ‘problem detected with the TrueDepth camera’ error message on your iPhone, you might wonder what the TrueDepth camera even is. Well, the answer is quite simple. The TrueDepth Camera is a collective term used for the front camera, infrared camera, dot projector and other proximity sensors. These components are located on the notch of your iPhone’s display. The newer iPhones house them in the ‘Dynamic Island’.
As you can guess by now, the TrueDepth Camera maps a 3D image of your face using thousands of dot particles. The 3D scan is matched with the image of your face captured by the front camera to verify your identity. This is the mechanism behind the Face ID on your iPhone. The TrueDepth Camera is also the reason why someone cannot unlock your iPhone simply by putting up your picture in front of the lock screen. Apart from Face ID, the TrueDepth Camera is also used for Memojis and Portrait Mode.
 The first thing you should do when you come across any error related to the TrueDepth camera is wipe the front camera panel with a clean microfibre cloth. Oftentimes, dirt and dust particles collect on the sensors and the dot projector, causing a failure to read your face accurately. The TrueDepth camera relies on the infrared dots to create a 3D map of your face. Any smudges or dirt on the sensor can cause it to malfunction. A quick wipe should solve this problem.
 Incorrectly installed tempered glass or other forms of screen protection can mess with the functioning of the TrueDepth camera. If the glass is hindering the camera cutout, it can cause unnecessary glare. Your phone may not be able to map your face correctly, leading to the TrueDepth camera error. Take off the screen protector and install it correctly. Make sure you only use Apple-authorised products to protect your iPhone’s display.
 So, you’ve wiped the front camera panel and removed the screen protector but the problem still won’t go away? It is likely that your hardware isn’t at fall. Software glitches are quite common on mobile devices and your iPhone is no exception. Luckily, these glitches can be quickly resolved by restarting your phone. Press and hold the side button and any volume key to reveal the power menu on your iPhone. Use the power slider to turn off your device. Wait for a few seconds and use the side key to restart your device.
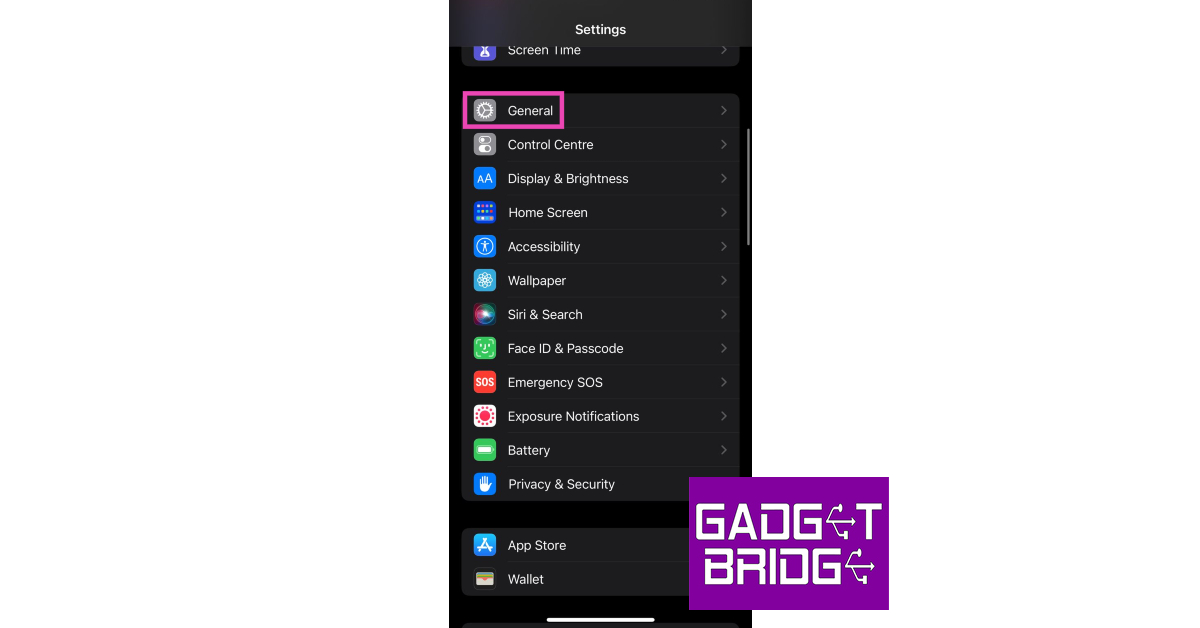 Step 3: Select Software Update.
 Step 4: Tap on Download and Install.

 Step 2: Tap on Reset Face ID.
 Step 3: Go back to Face ID and Passcode.
Step 4: Hit Set up Face ID.
Step 3: Go back to Face ID and Passcode.
Step 4: Hit Set up Face ID.
 Step 5: Register your Face ID again.

 Step 2: Tap on Transfer or Reset iPhone.
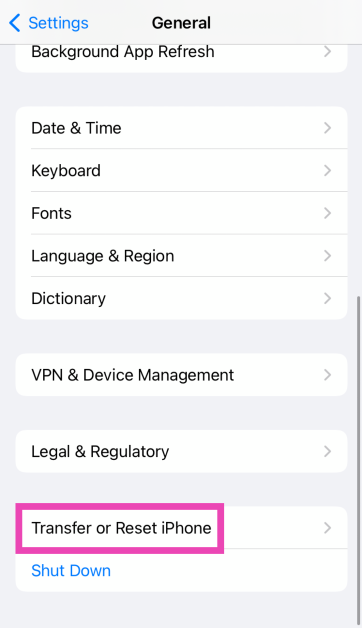 Step 3: Hit Reset.
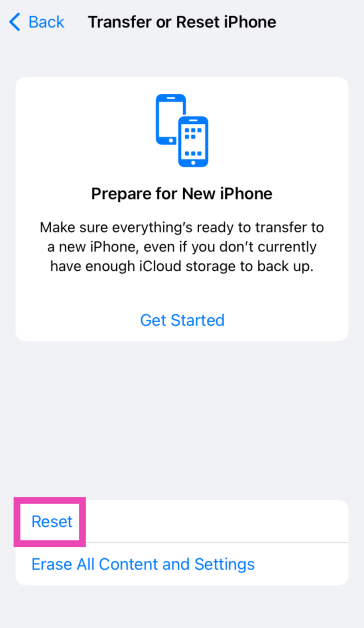 Step 4: Select Reset All Settings. Enter the passcode to confirm your decision.
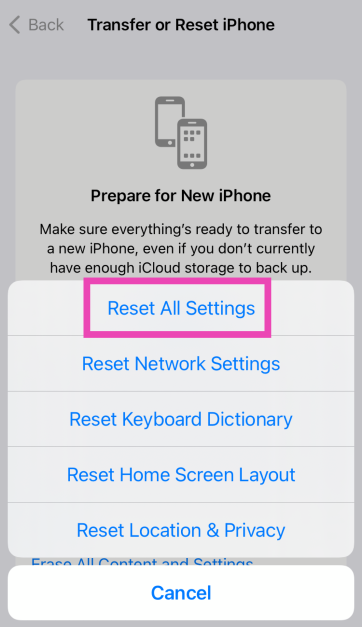
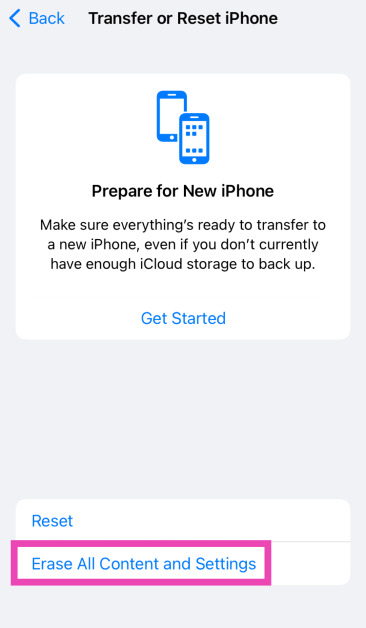 Step 4: Tap on Continue and enter the passcode to reset your iPhone to its factory settings.
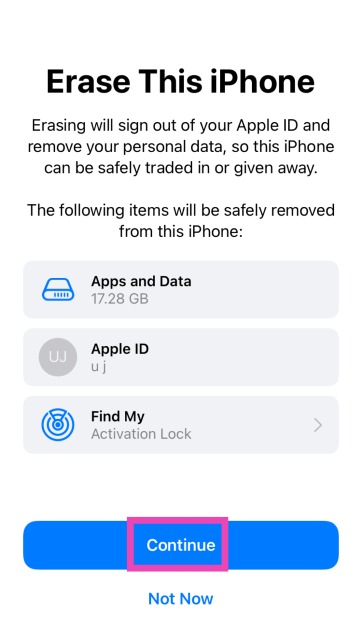

 Step 1: Plug in

 Step 1: Restart


 gaming laptop powered by up to Zen 4-based AMD Ryzen 7 8845HS CPU launched")
")
 Step 3:
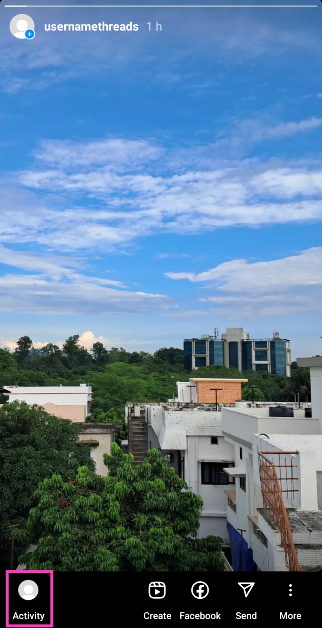

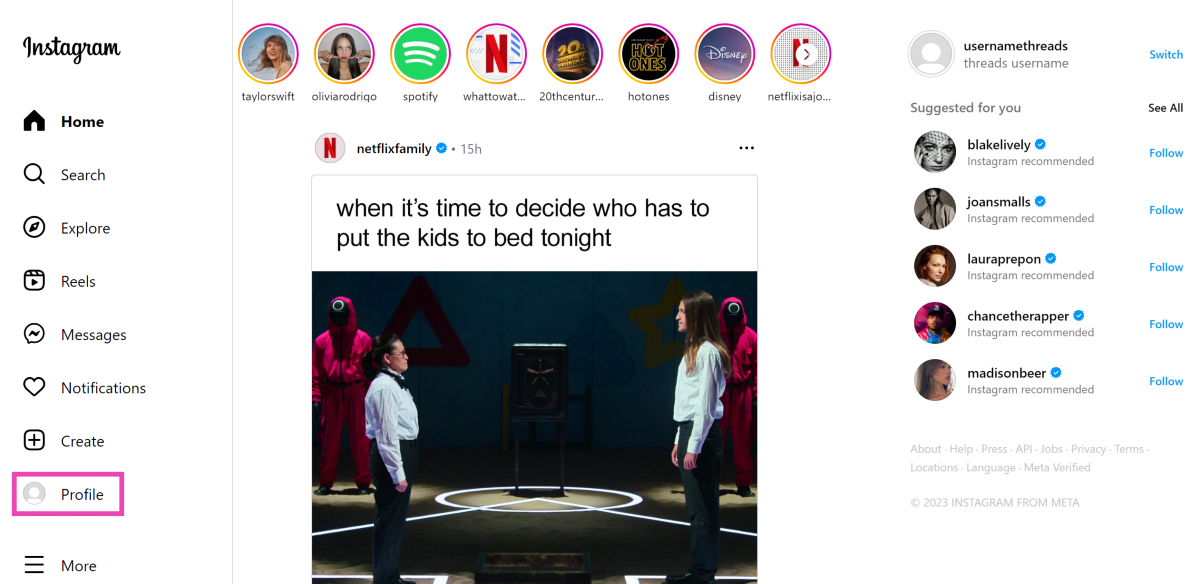 Step 3:
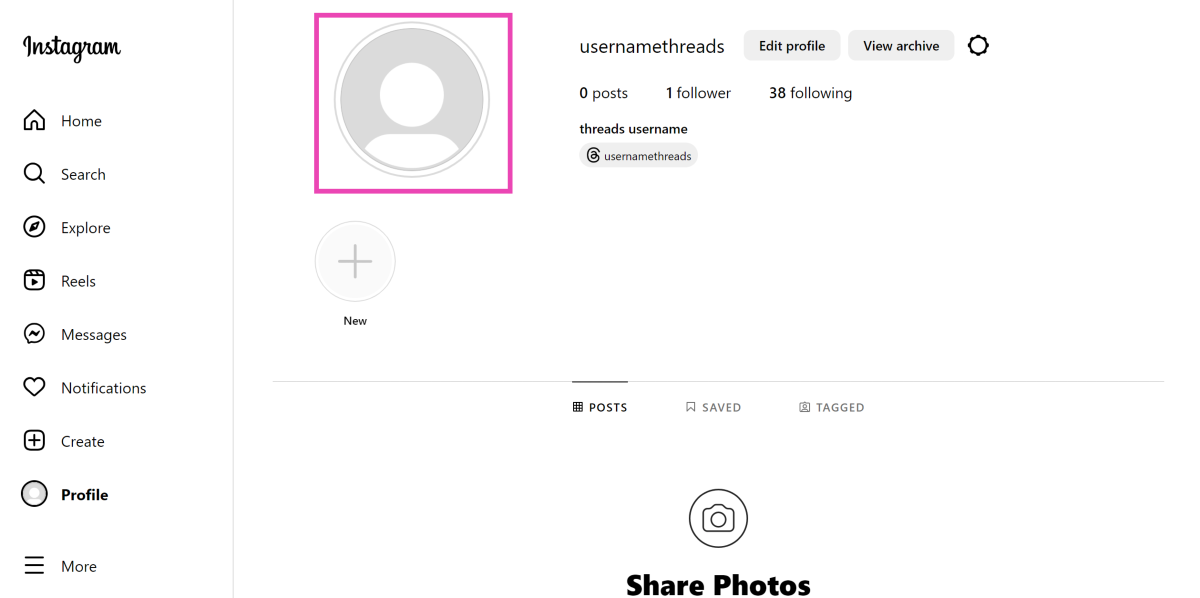 Step 4:
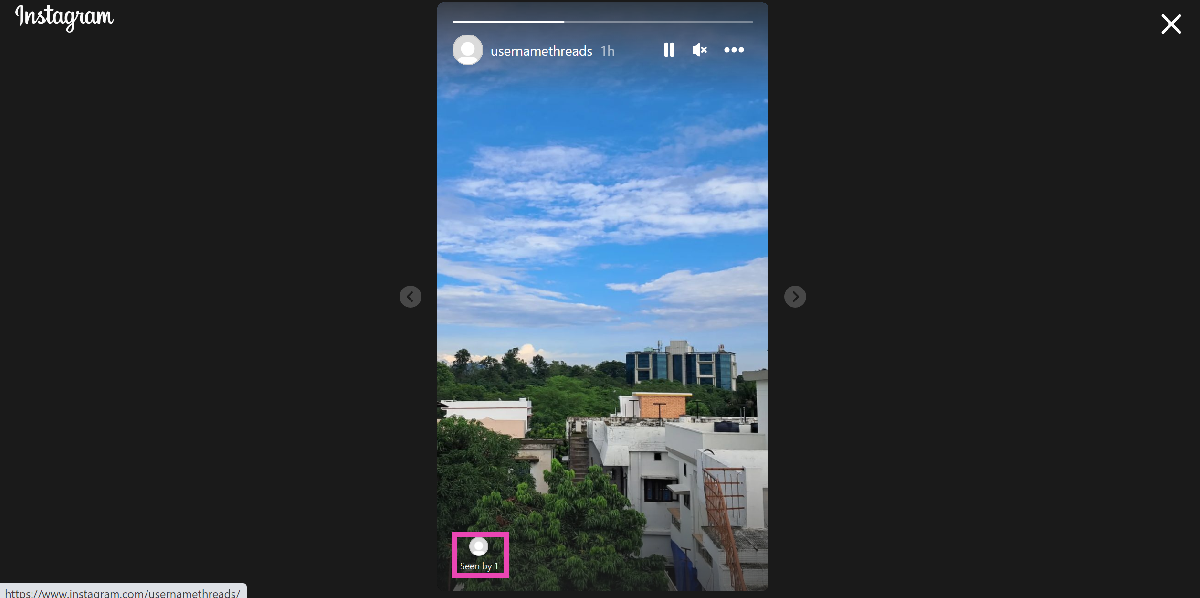
 Step 3:
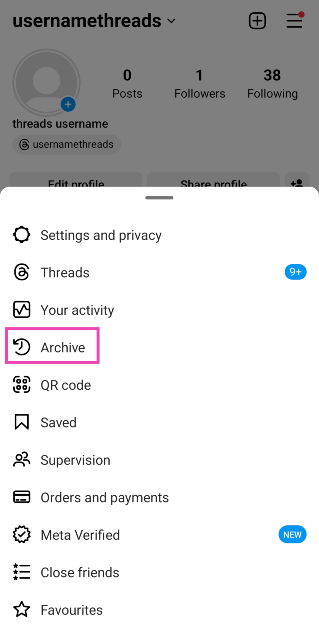 Step 5: Open
  Step 6:
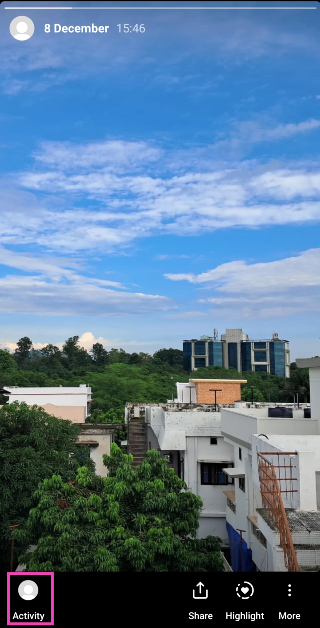


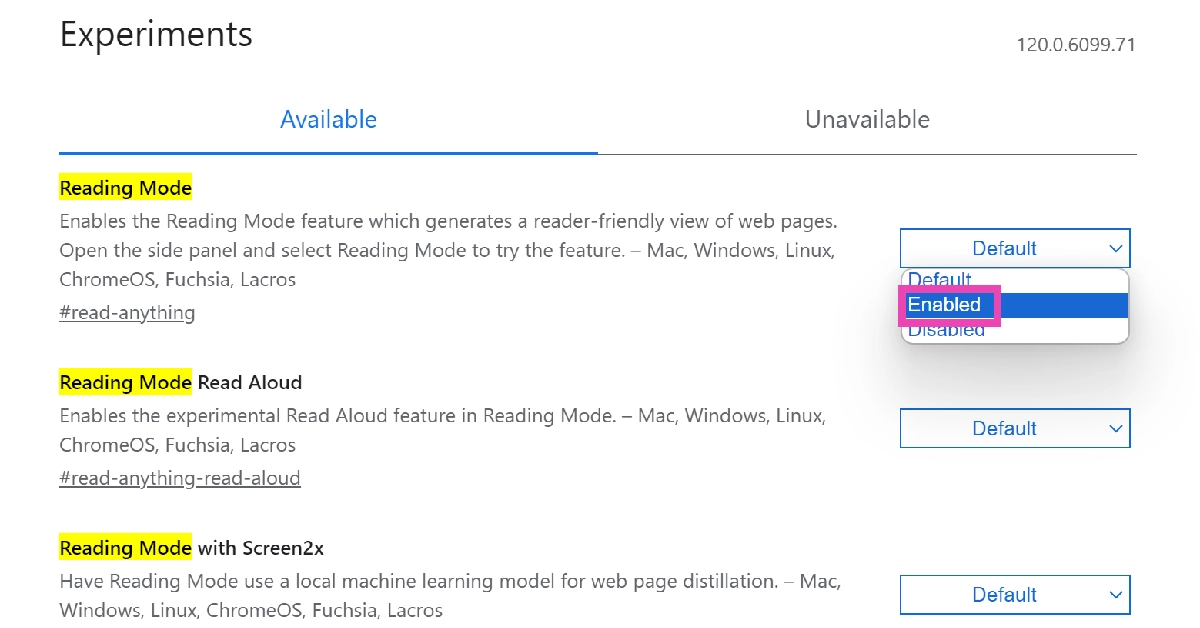
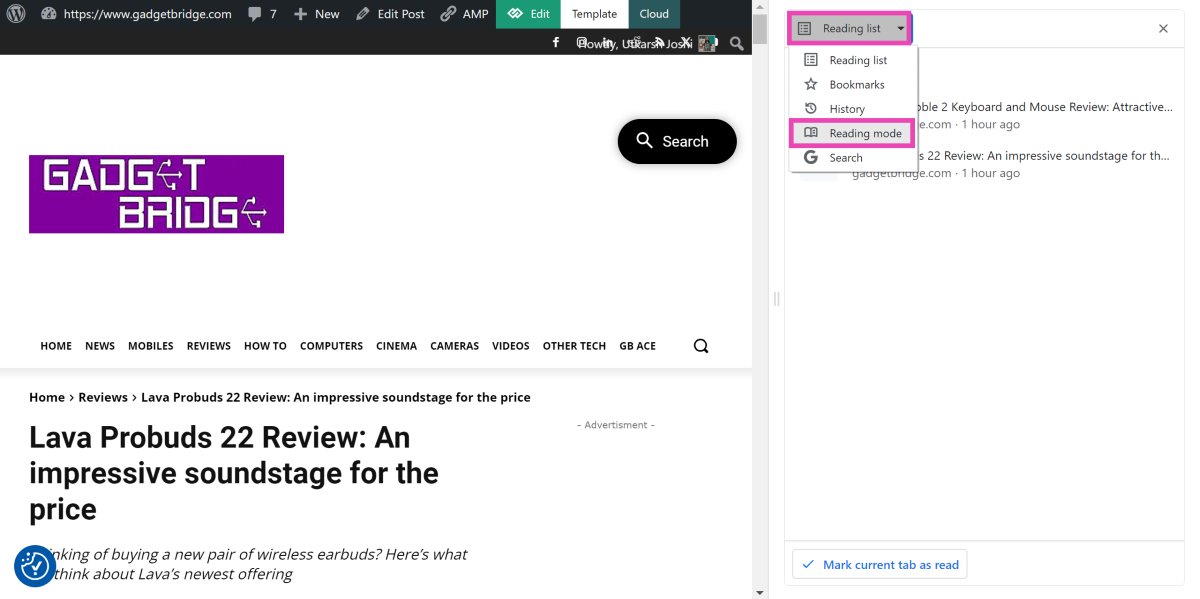
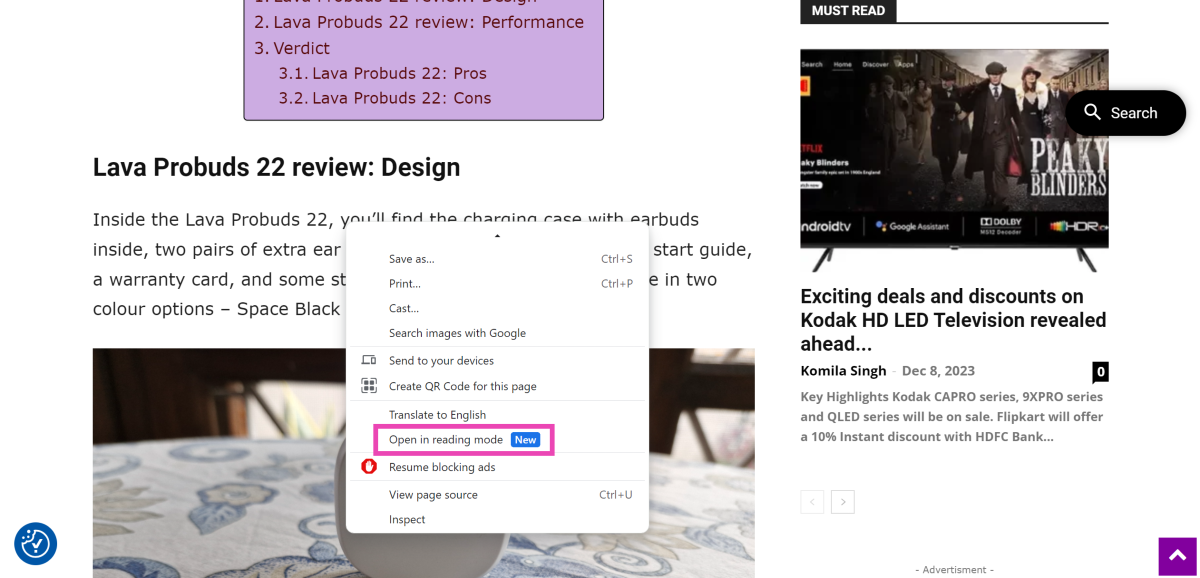
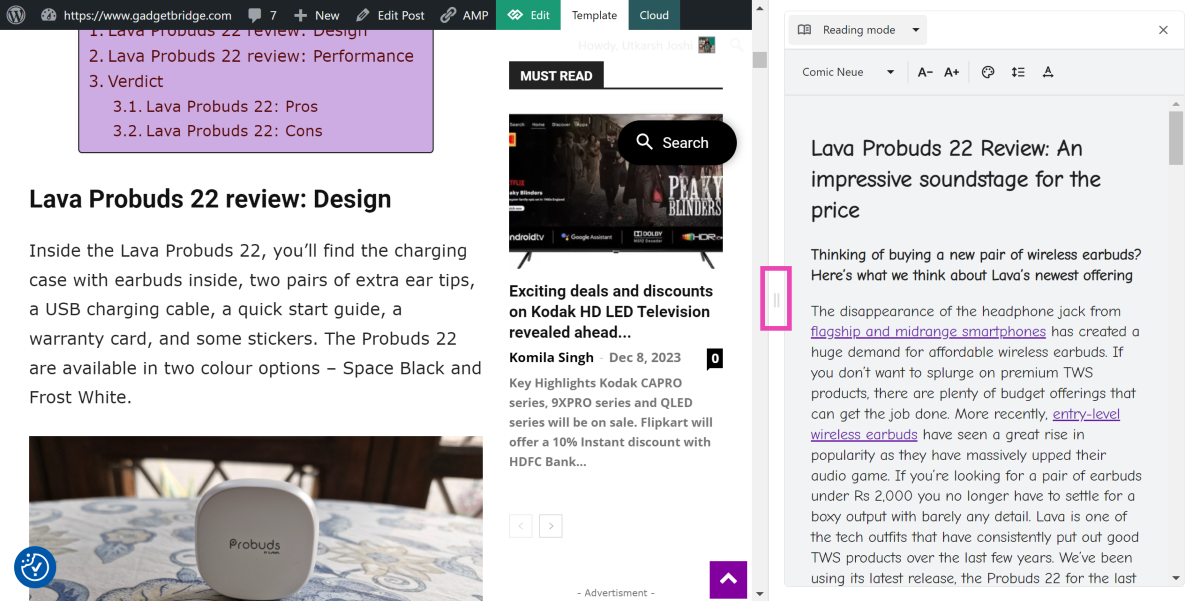


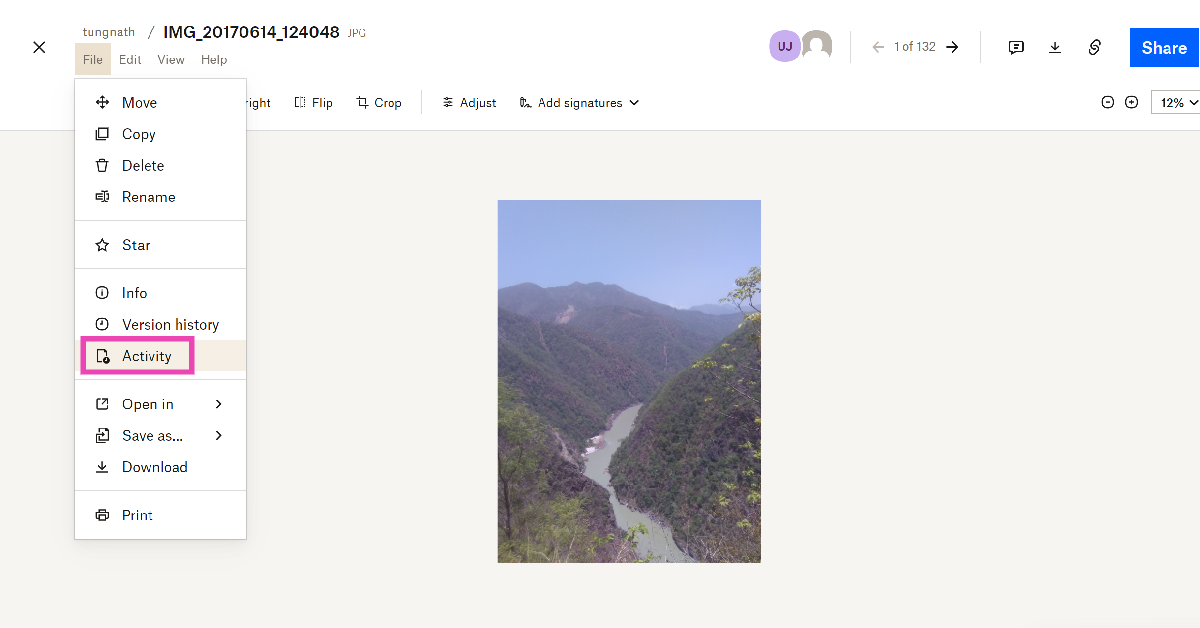 Step 2:
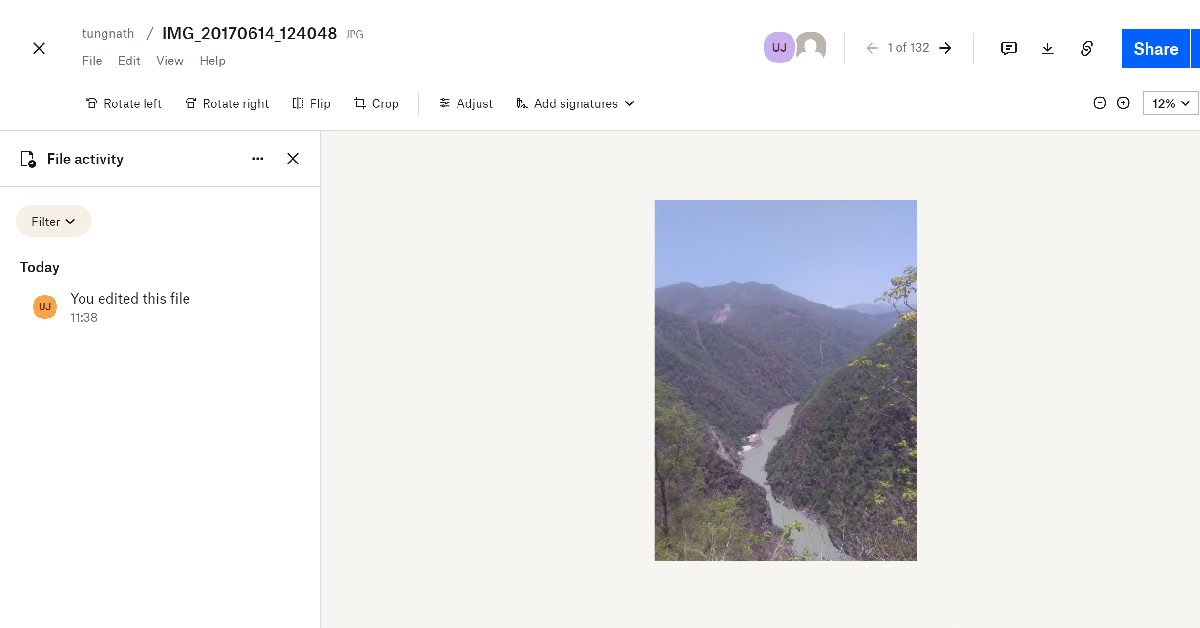
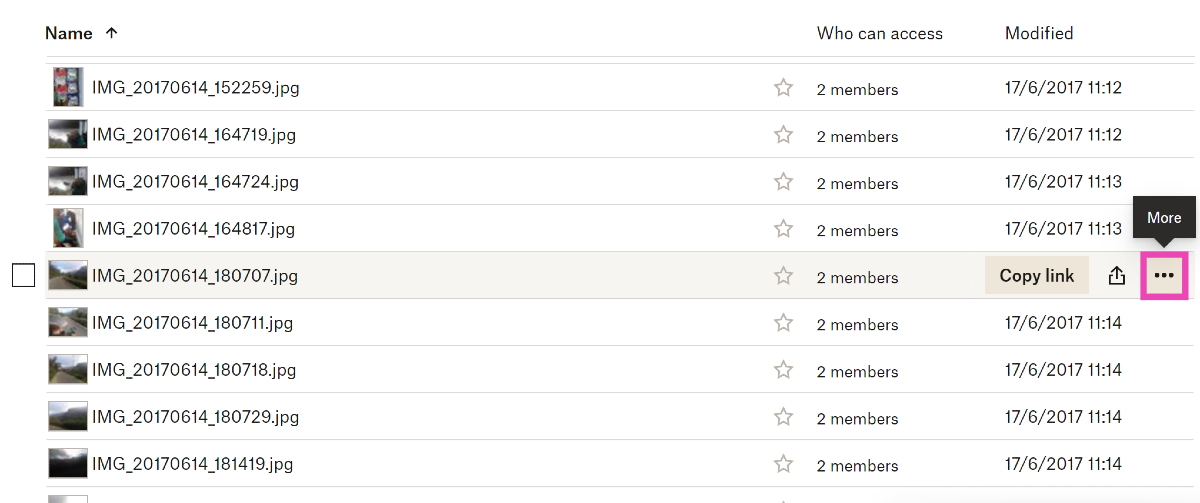 Step 3:
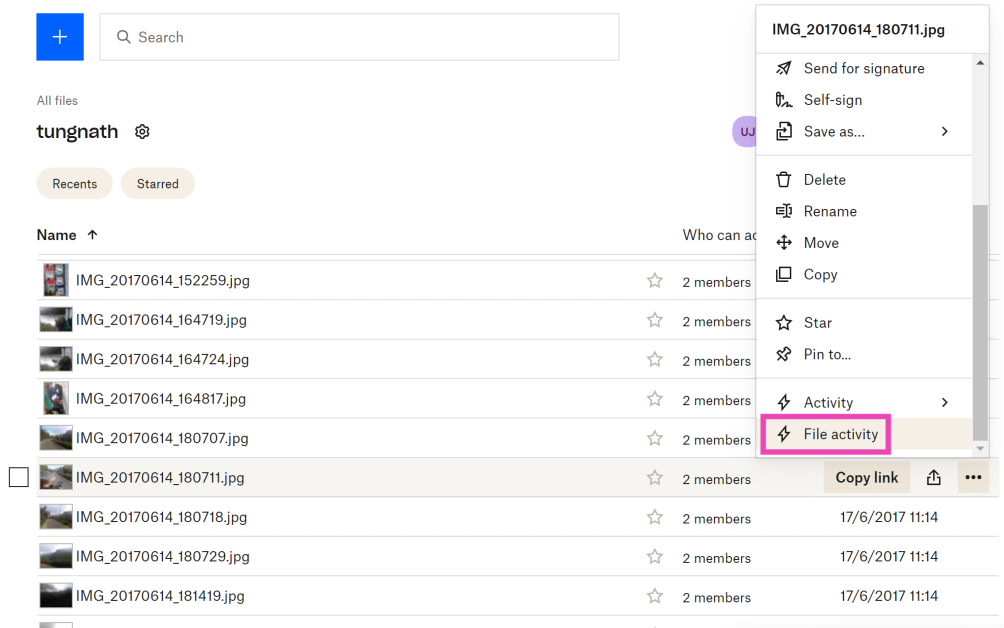


 More often than not, the video games industry is how mainstream gaming is most commonly known. Earlier this year,
  Now as we mentioned earlier, the iGaming sector falls under the remit of different licensing and regulations, compared to mainstream gaming. But essentially, this covers the kind of online casino games and sites that Aussies will find at
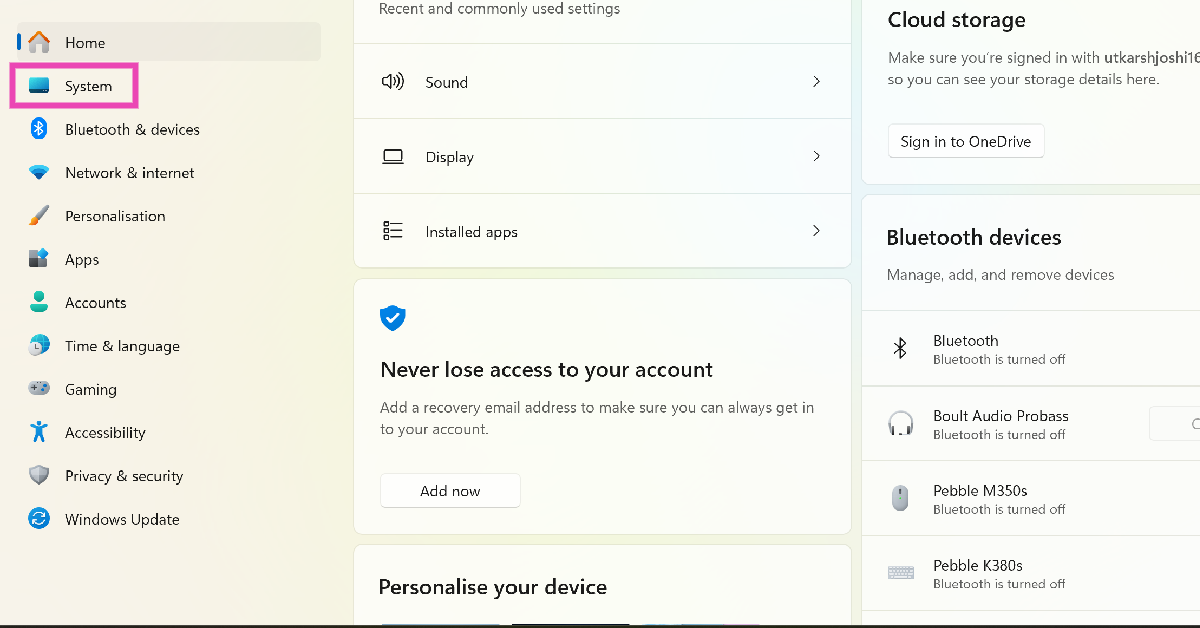 Step 2:
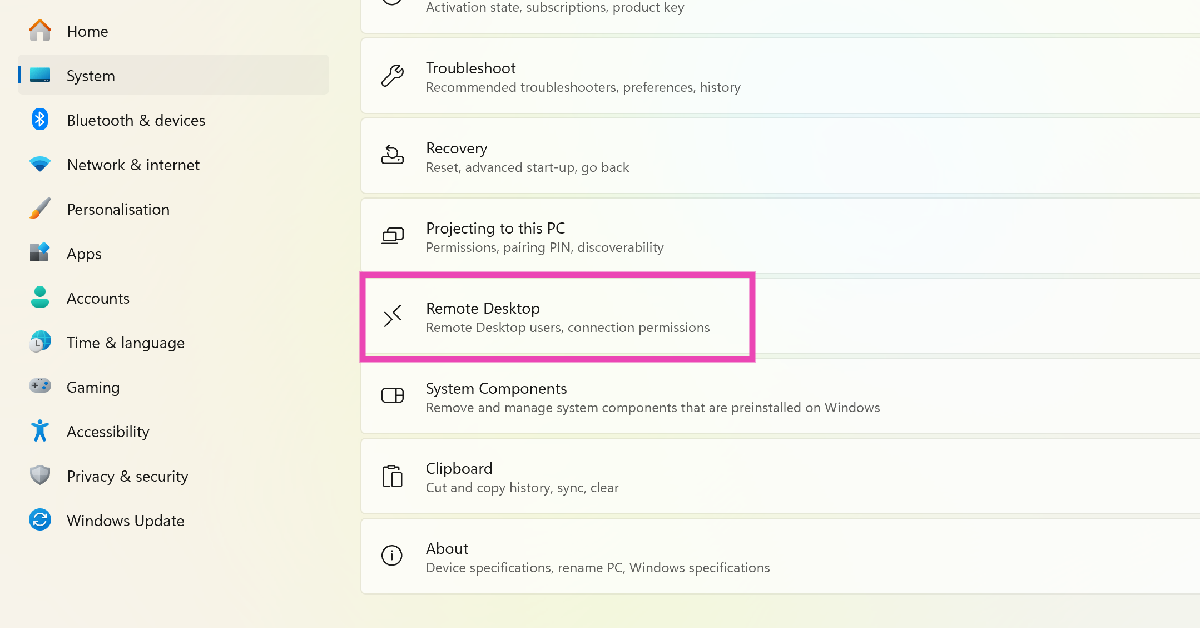 Step 3:
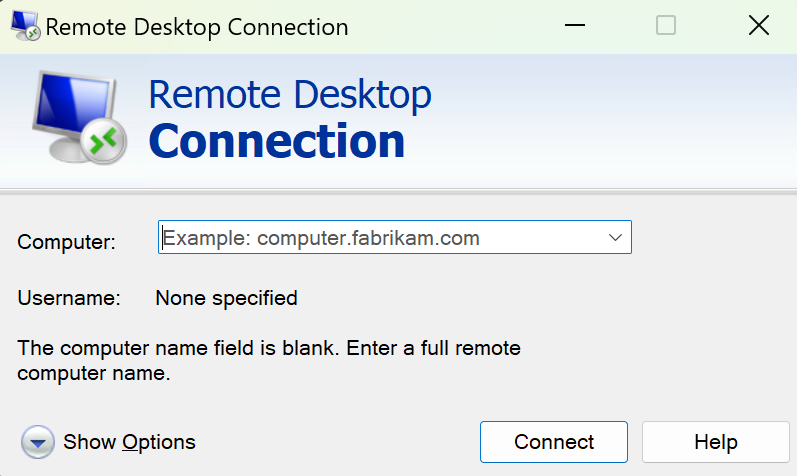 Step 5:
 Step 4:
 Step 5:
 Step 3: Right-click
 Step 4:
 Step 2:
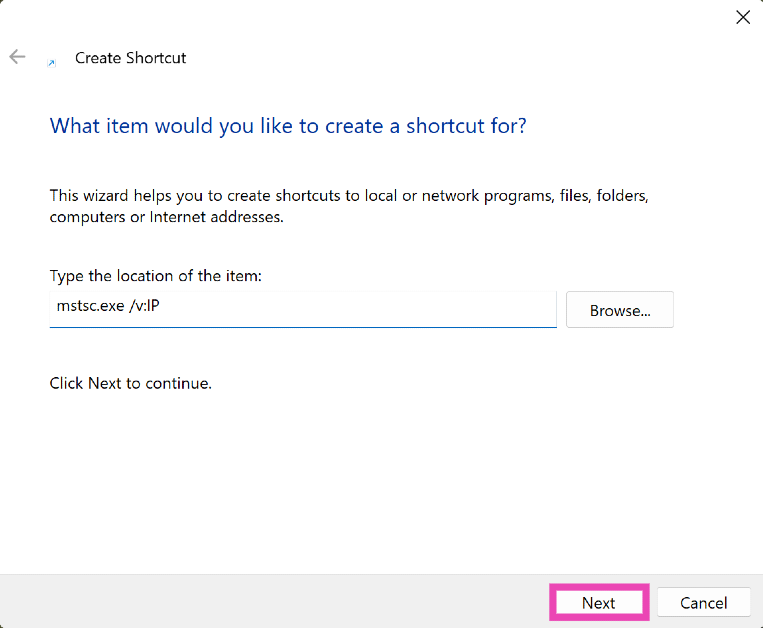 Step 3:
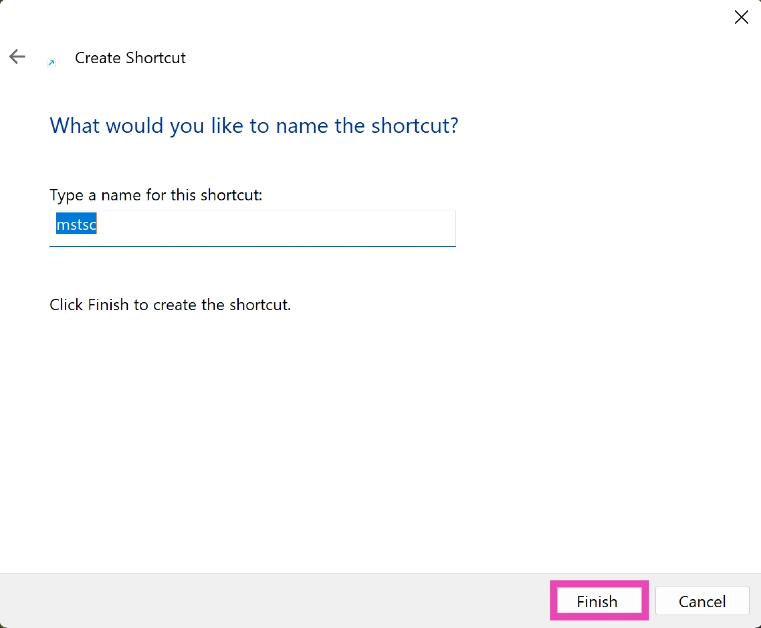
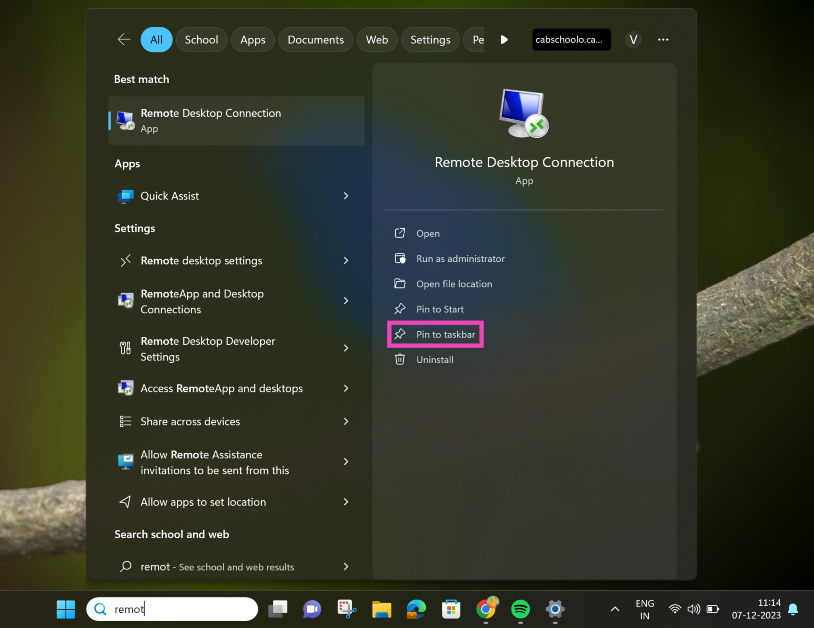


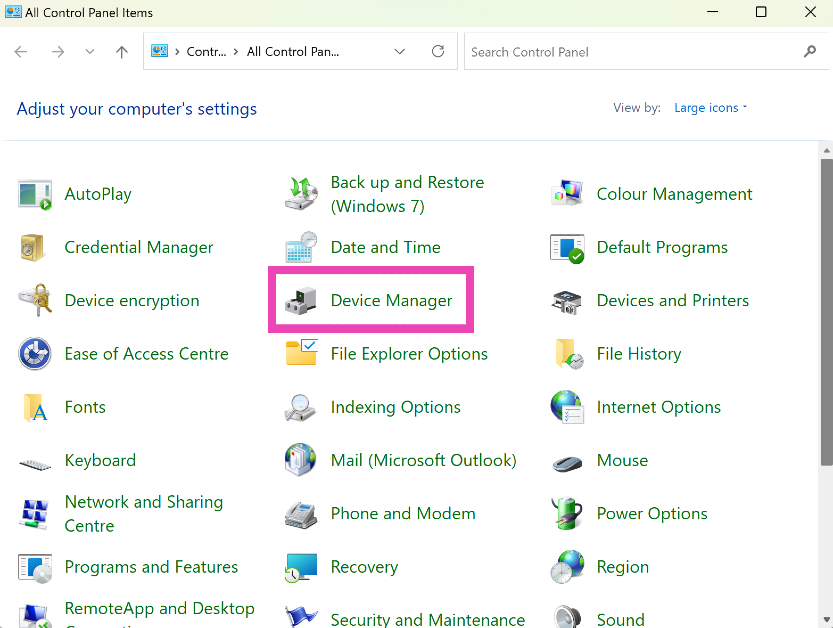 Step 2:
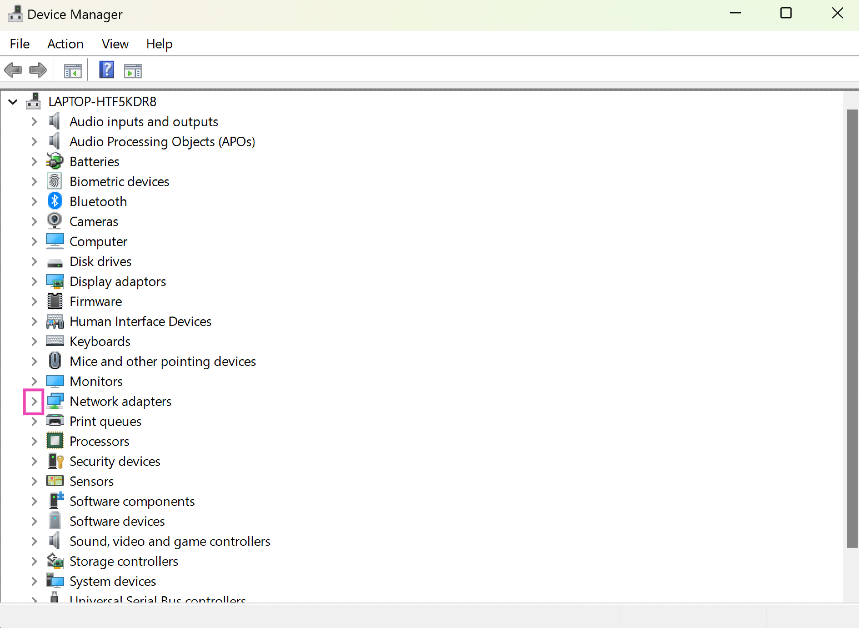 Step 3:
 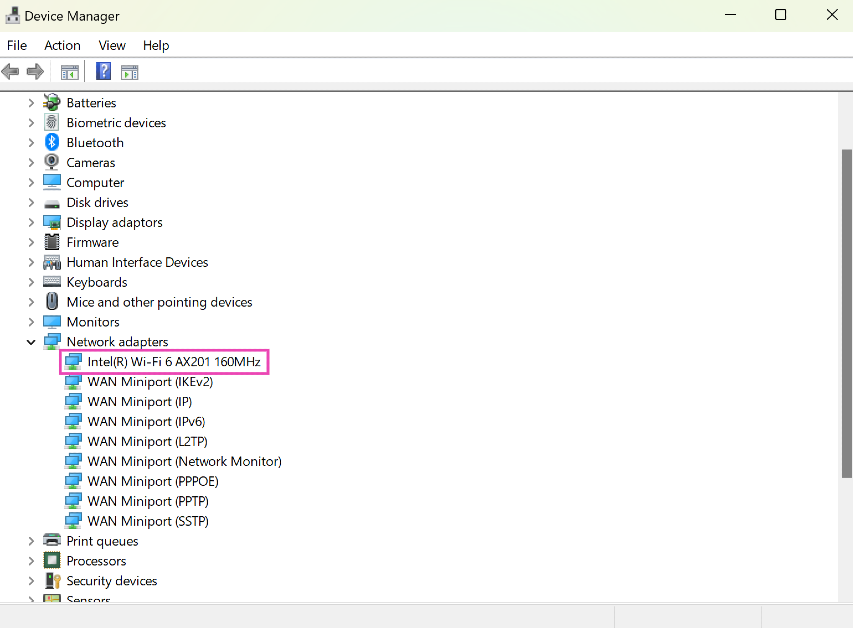 Step 4:
 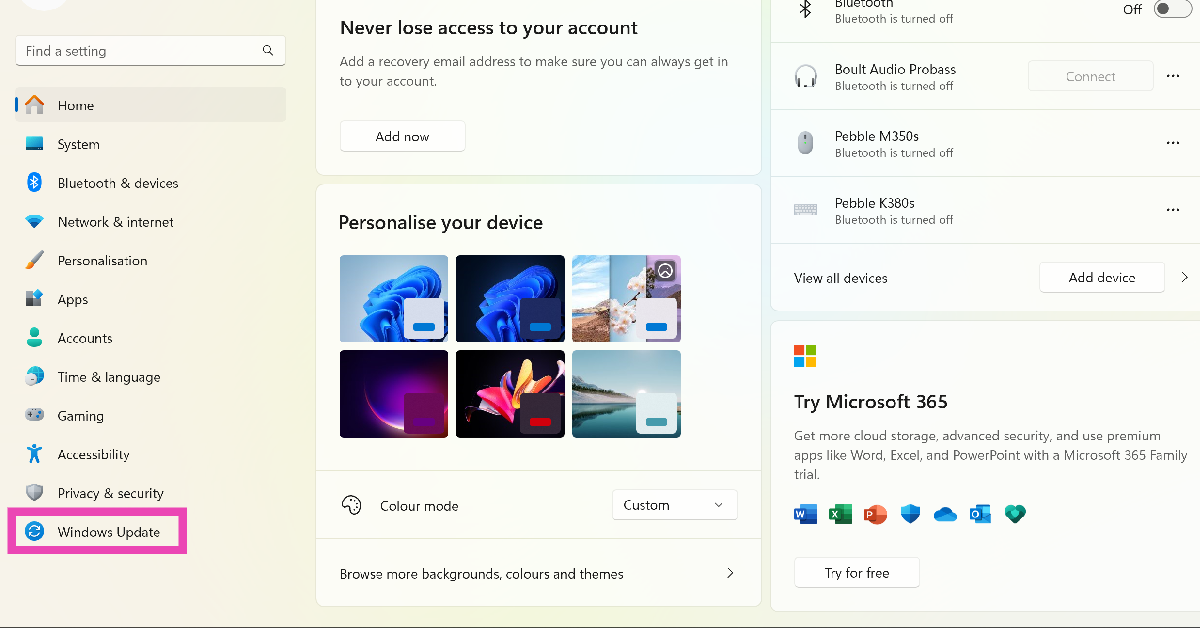 Step 2:
 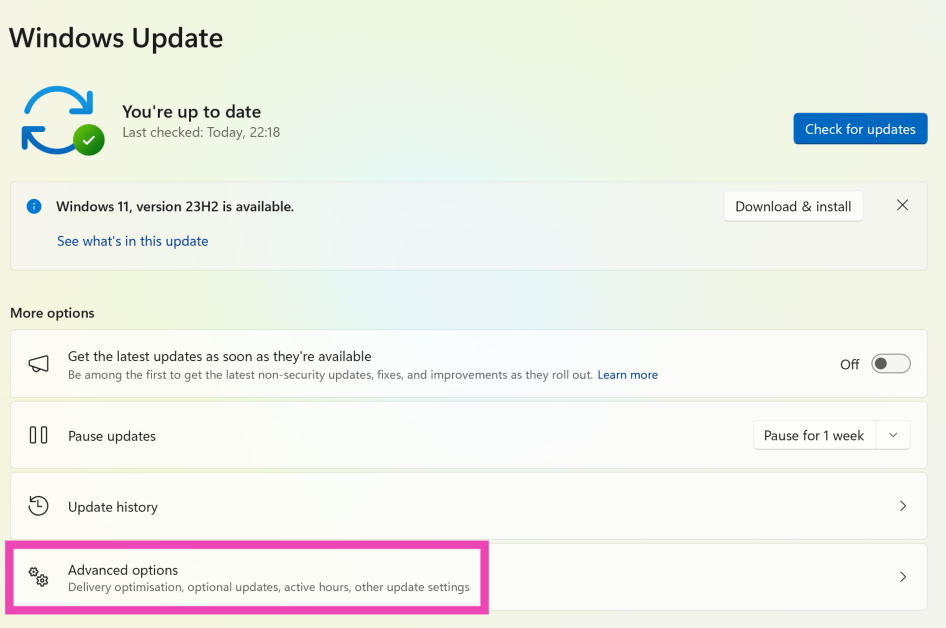 Step 3:
 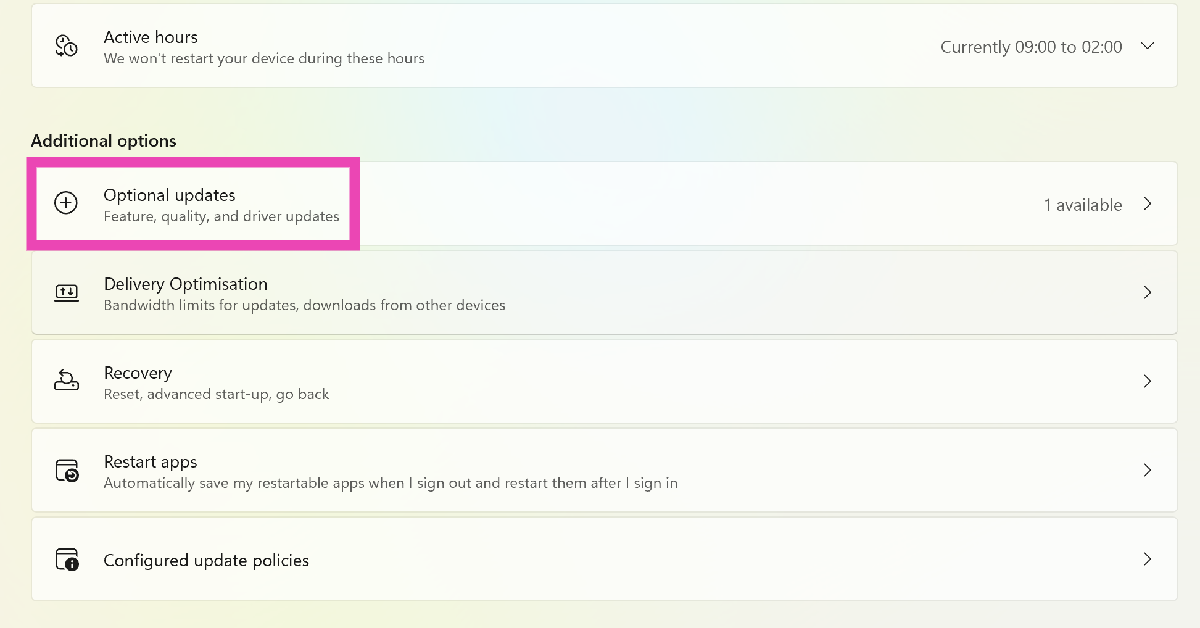 Step 4:


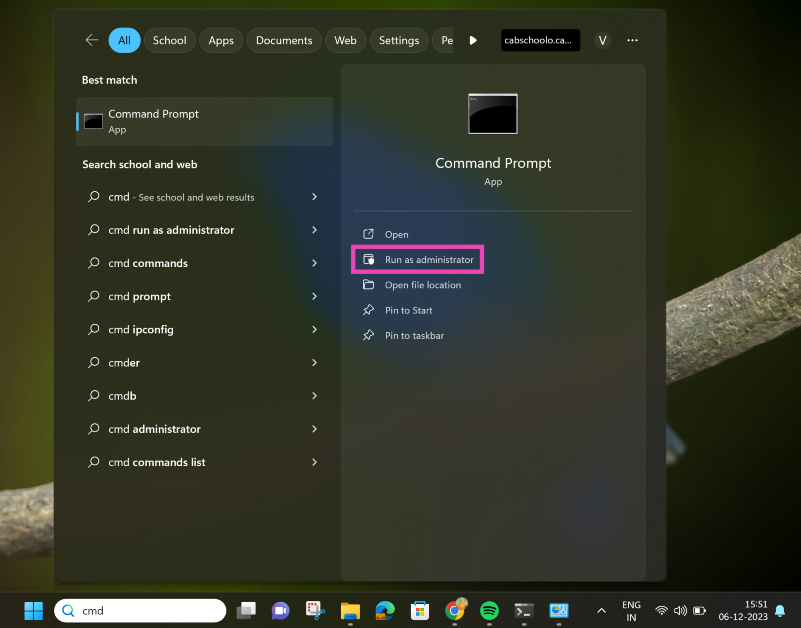 Step 3:
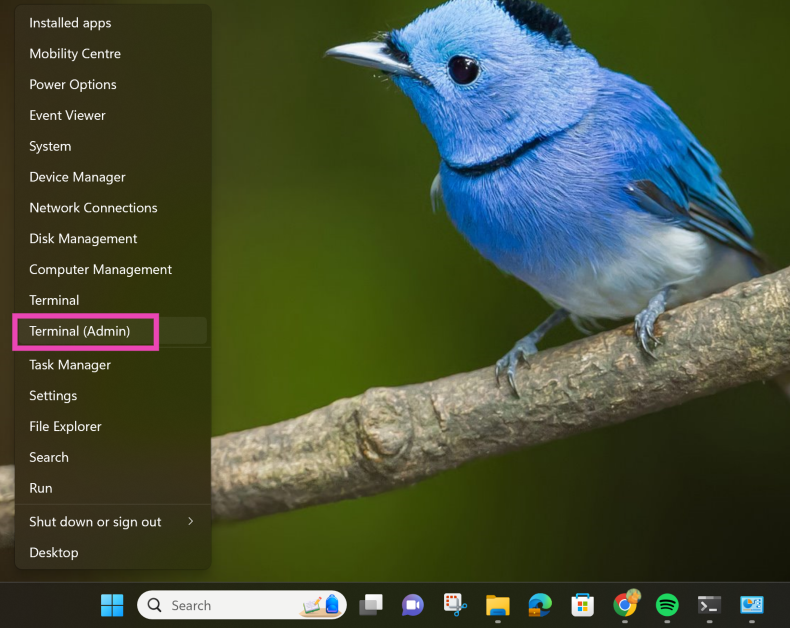 Step 3:
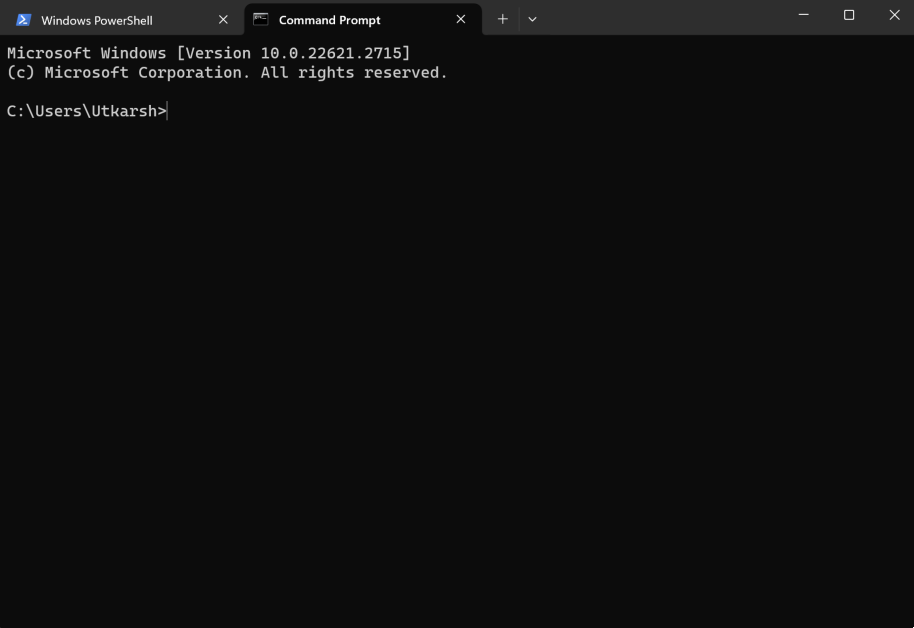
 Step 3:
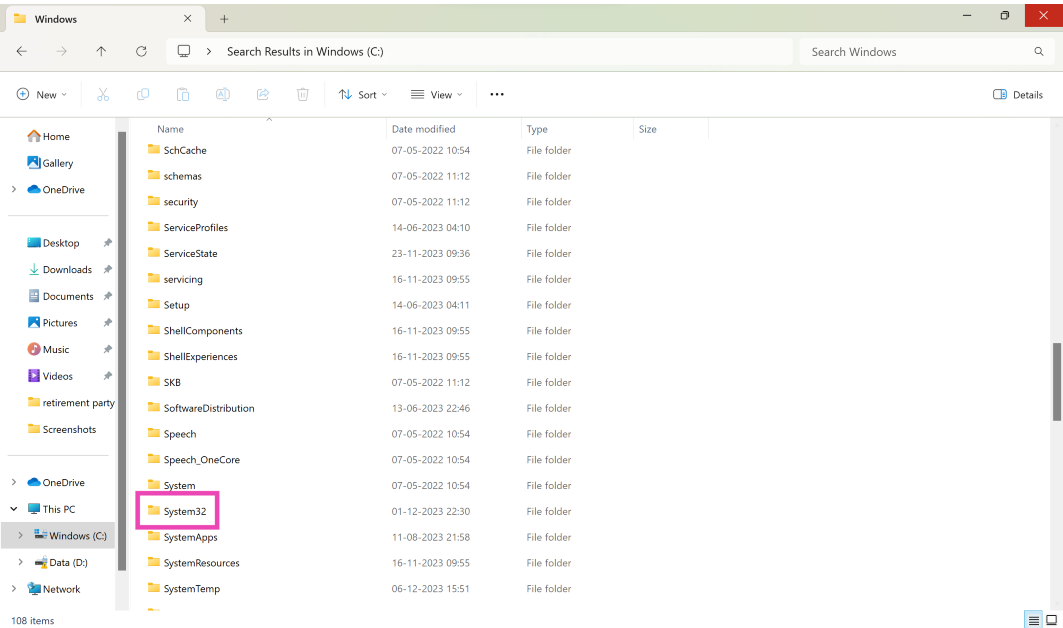 Step 4:
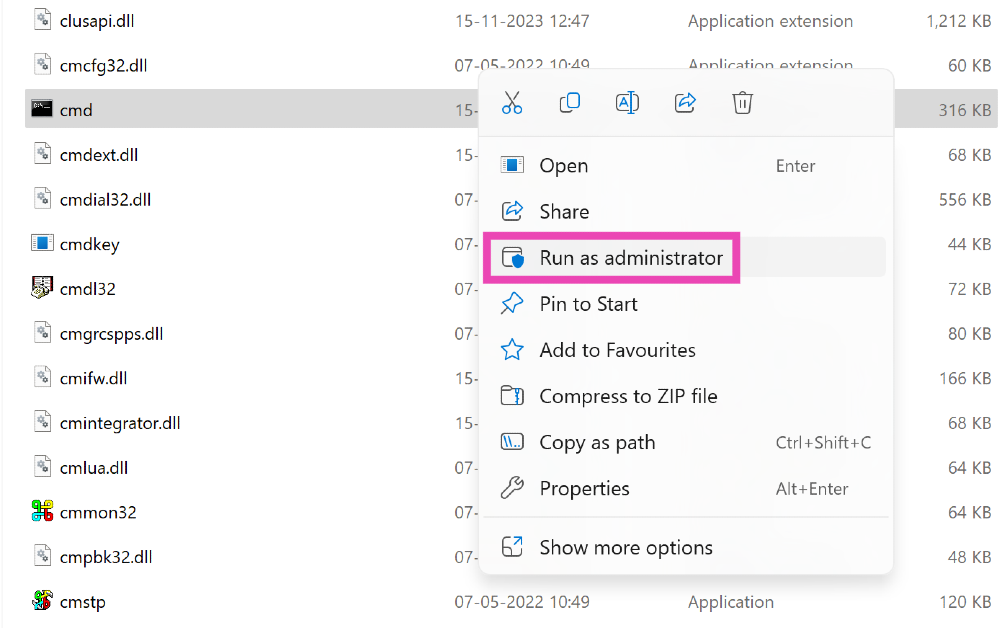 Step 5:
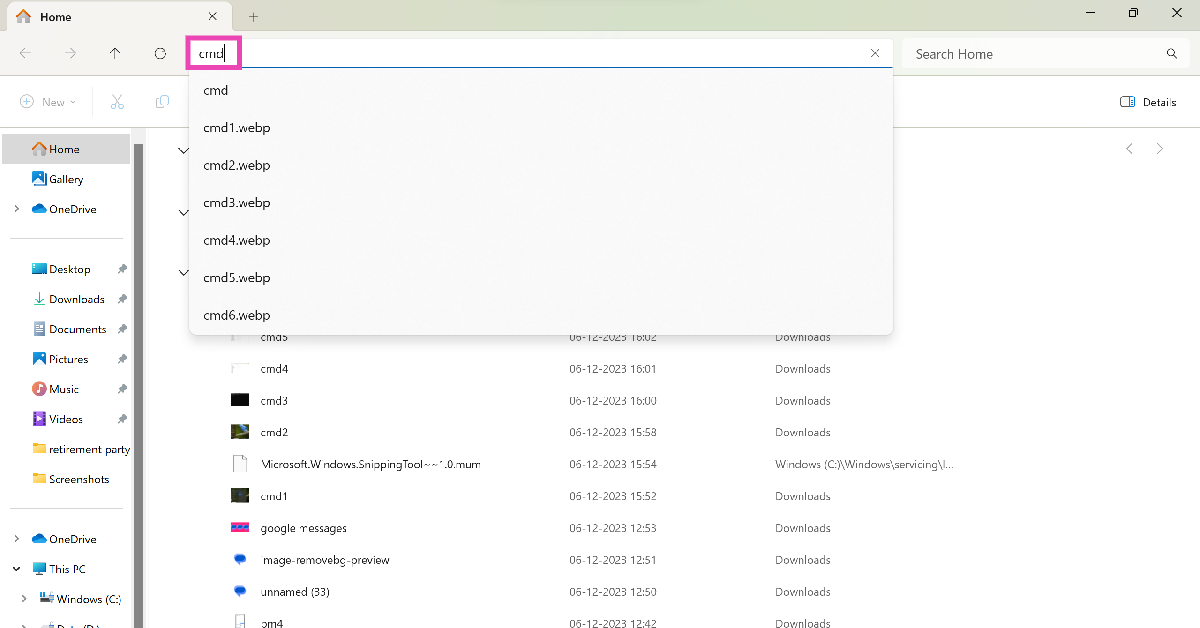
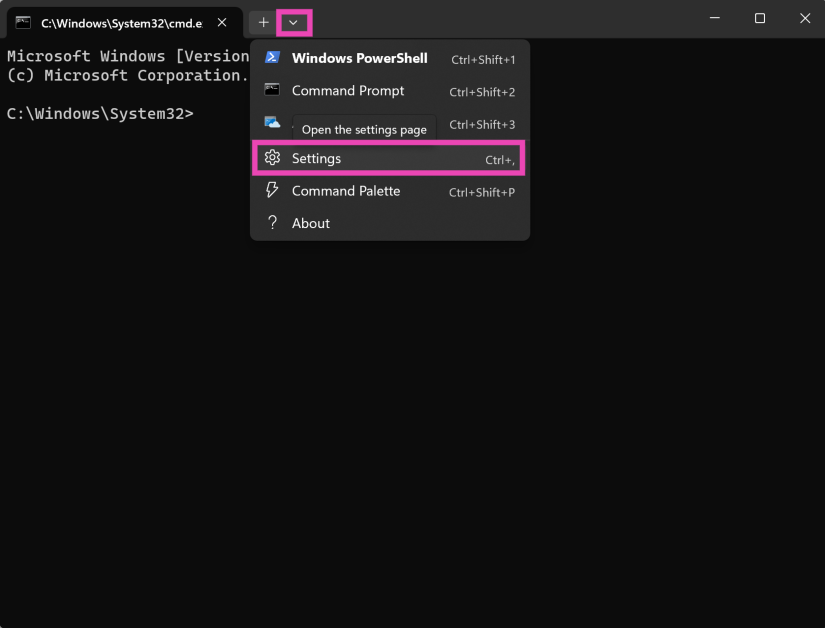 Step 4:
 Step 5:
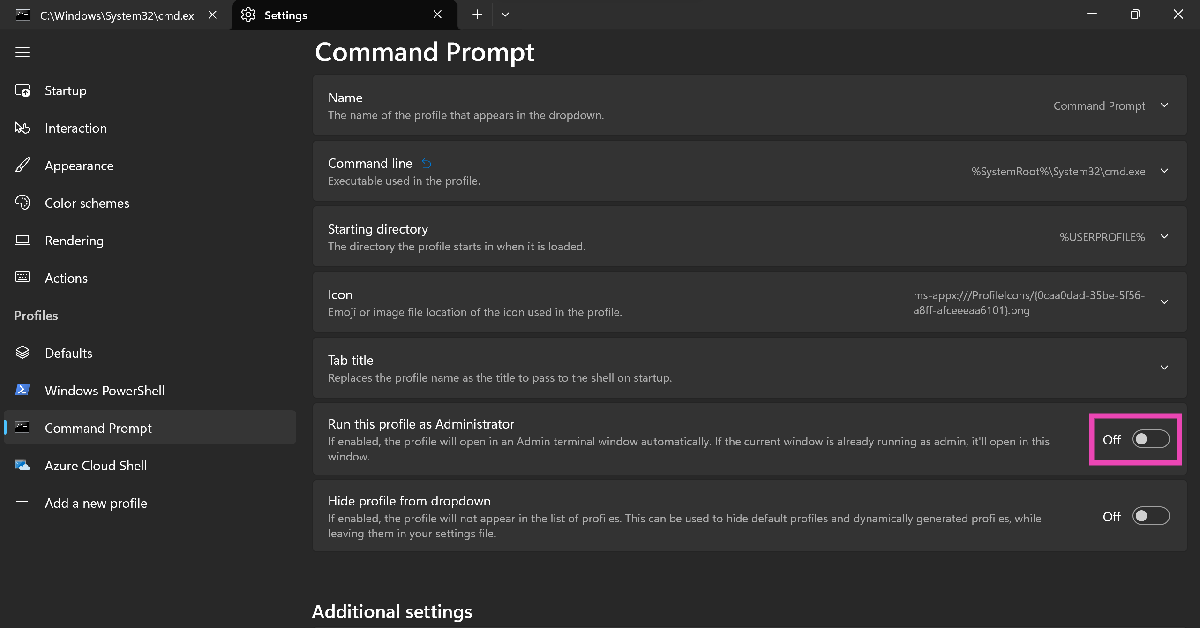
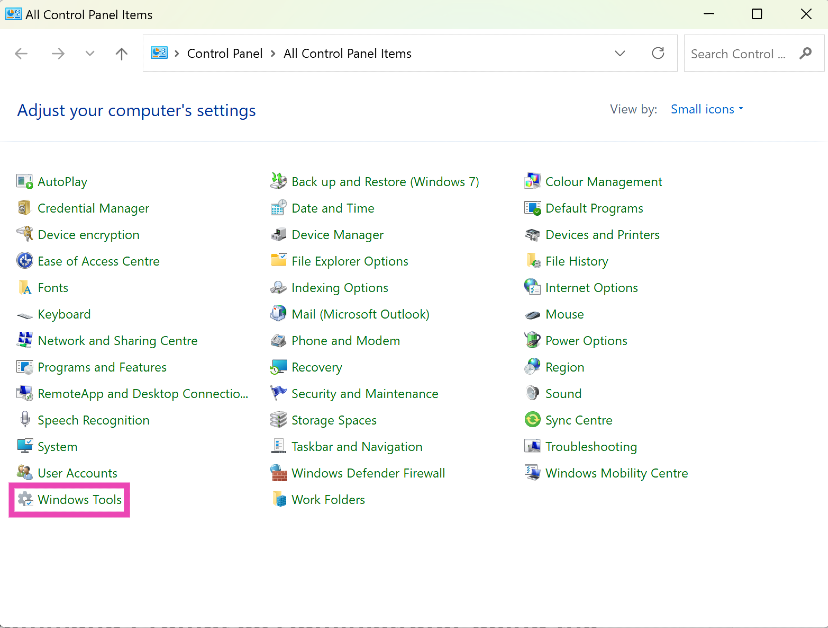 Step 2: Right-click
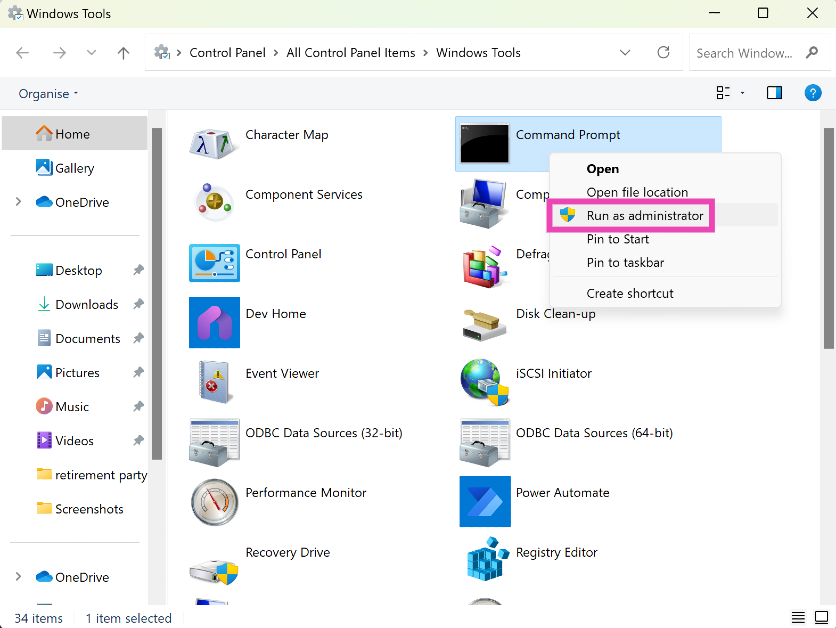
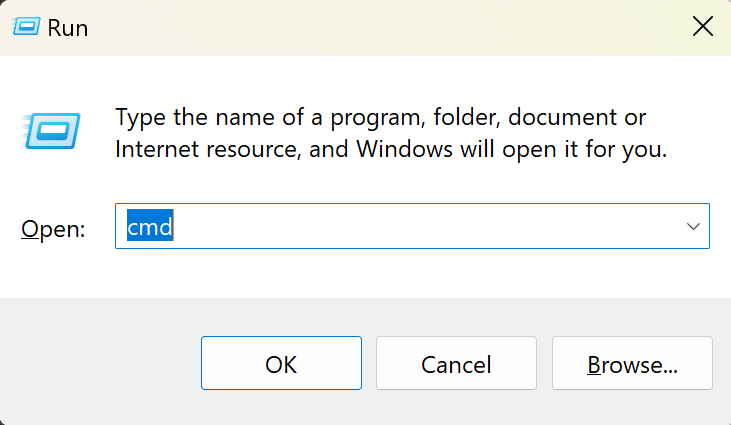
 Step 3:
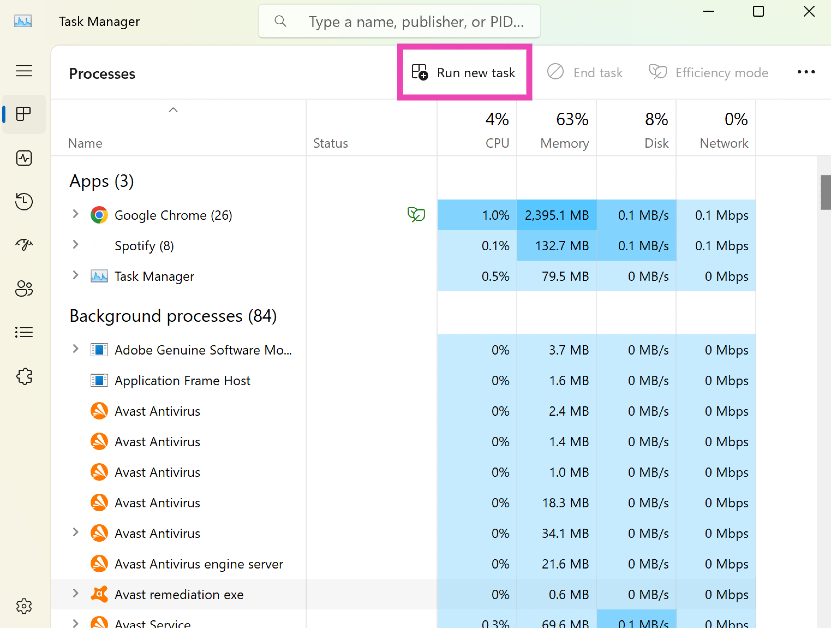 Step 4:
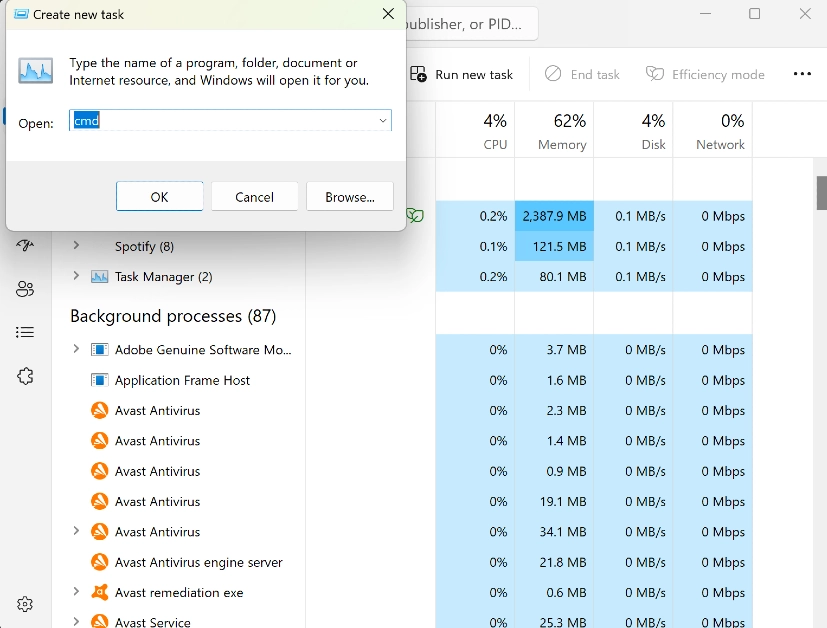 Step 5:


 Step 2:
 Step 3:
 Step 4: