Instagram Highlights are a great way to archive the Stories that you post on the app. Since the Stories disappear from your profile after 24 hours, Instagram came up with the option of Highlights that lets you preserve your favourite moments. Like Stories, Highlights also has a view counter. In this article, we show you how to check who viewed your Instagram Highlights on your smartphone or PC in 2023.Read Also:How to download Instagram Reels without using a third-party app?
In This Article
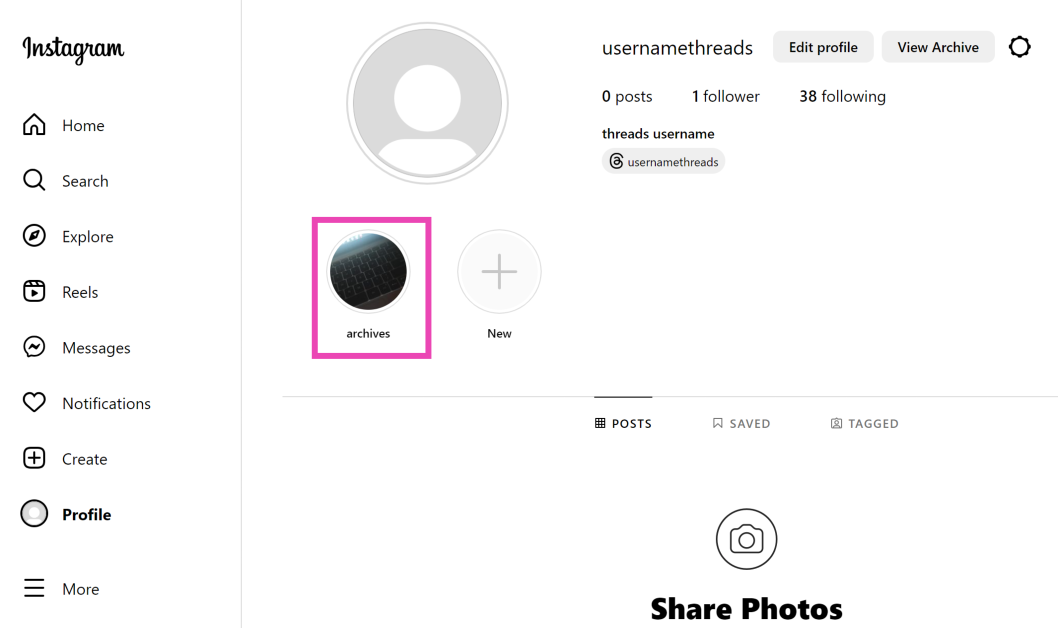
Check who viewed your Instagram Highlights on your smartphone
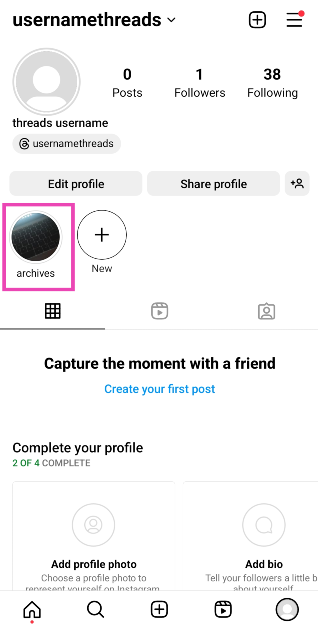
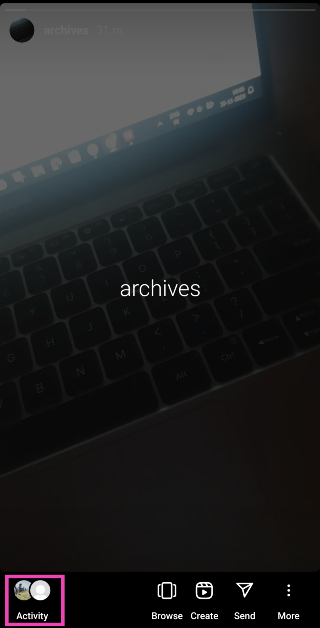
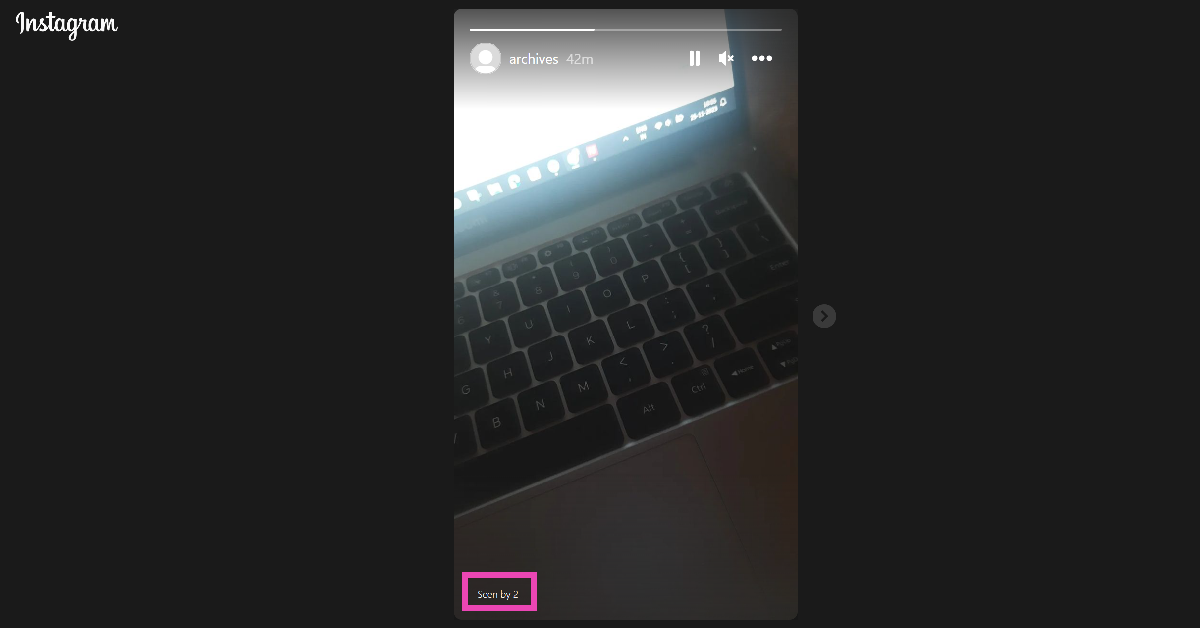
Step 1: Launch the Instagram app on your phone and tap on your profile picture at the bottom right corner of the screen.Step 2: Tap on a Highlight.Step 3: Swipe up on the screen or tap on Activity at the bottom left corner of the screen.This is where you can see the names of everyone who has viewed your Instagram Highlight.
Check who viewed your Instagram Highlights on a PC
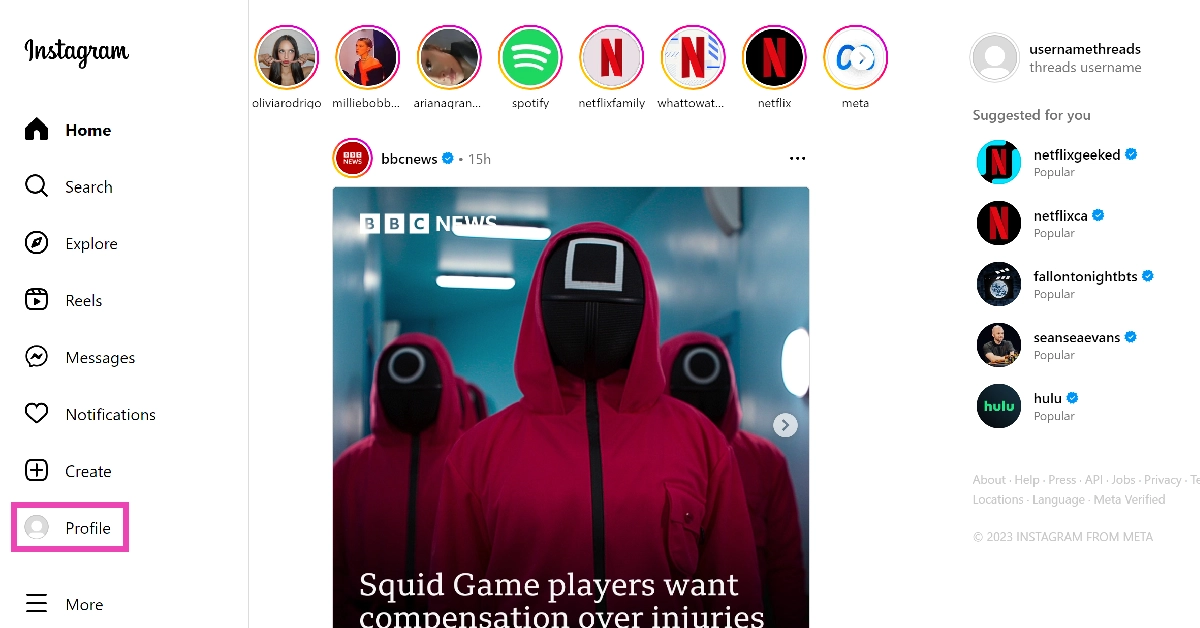
Step 1: Go to the official Instagram website and log in using the proper credentials.Step 2: In the side menu, click on Profile.Step 3: Click on a Highlight.Step 4: Click on the view counter at the bottom left corner of the screen.In the following popup box, you will be able to see who viewed your Instagram Highlight.
Frequently Asked Questions (FAQs)
Why did the views on my Instagram Highlight disappear?
Your Instagram Highlights display the view count for the last two days only. This means you will only be able to check who has viewed the Highlight within the last 48 hours.
Can I see how many times a Story or Highlight was viewed by one person?
No. The view count on your Stories and Highlights only shows who viewed your post, not how many times they viewed it.
How do I keep a person from viewing my Highlight again?
This is how you can check who viewed your Instagram Highlights on a smartphone or PC in 2023. Since Highlights don’t display a cumulative count, the only way you can keep a record of all the people who viewed the post is by taking screenshots of the view count every 48 hours. There is no way to view someone’s Story or Highlight without being seen.
Garena Free Fire is a battle royale game with regular awards and tournaments to keep players interested. If you play Garena Free Fire, you should be aware of the redeem codes that are released on a daily basis. However, because the battle royale game is banned in India, players from other countries can use the Free Fire Redeem codes daily. If you’re unfamiliar with the Garena Free Fire redeem codes or don’t know how to get them, we’ve put together a step-by-step guide to help you redeem them. Check out Garena Free Fire Redeem Codes for 25 November 2023.The Free Fire redeem codes are a great way to get free stuff. These are 12-digit codes that contain alphabets and numbers, as well as an expiration date and time. Because the Garena FF redeem codes cannot be used more than once, you should hurry to the redemption page to claim your free reward before someone else does. To get a free reward, all you have to do is go to reward.ff.garena.com/en, which is the official redemption page. Also, keep an eye on this space for daily updates on Garena Free Fire redemption codes and rewards.
In This Article
Garena Free Fire Redeem Codes Today 25 November2023
Minecraft is one of the most popular games on the Internet, played by people across all age groups. Minecraft is best enjoyed by using in-game items like skin packs, character packs, ammo, and more. Purchasing these objects requires spending Minecraft’s in-game currency called Minecoins. As you can guess already, you need to spend real money to get Minecoins. If you don’t want to loosen your wallet, here are the best 3 ways to get free Minecoins on Minecraft.Read Also:How to remove a friend on Snapchat without them knowing?
In This Article
Use Google Opinion Rewards
As the name suggests, Google Opinion Rewards credits your account with a small reward every time you share your opinion on a particular subject. Once you install the app, you are given one survey a week. These surveys may be based on your recent travel history. Once you share your opinion and complete the survey, the app pays out Play Store credits. These Play Store credits can be used to purchase Minecoins. The only catch is that it may take some time to accumulate enough credits to buy a Minecoin bundle.
Take online surveys
Since the credits earned via Google Opinion Rewards are quite minimal, it is better to take as many online surveys as you can in order to accumulate credits at a faster rate. Some services pay out with gift cards that can be used to purchase Minecoins on Minecraft. Pawns.app, Swagbucks, and LifePoints are some of the best services that you can use to get free credits and gift cards.
Use Microsoft Rewards
If you play Minecraft on an Xbox or PC, you need to check out Microsoft Rewards. Sign into your Microsoft account and visit your Rewards Dashboard to view the activities you can do to accumulate more points. These activities typically include searching the web with Bing on Microsoft Edge, using the search box on your Windows 10/11 PC or laptop, using Cortana, and more. Once you collect enough points, you can exchange them for an Xbox gift card. Xbox gift cards can then be used to buy Minecoin bundles.
Frequently Asked Questions (FAQs)
What is the cheapest Minecoin gift card I can buy online?
On Amazon, the cheapest Minecoin gift card costs Rs 1,000 and gets you 1,720 Minecoins.
How do I buy Minecoins on Minecraft?
To buy Minecoins on Minecraft, go to the Marketplace, click the plus icon next to the Minecoin counter, and select one of the bundle packages. Make the payment using one of the accepted modes. Once the payment is successful, the Minecoins will be credited to your account.
Is there a way to get free Minecoins on Minecraft?
The best way to get free Minecoins on Minecraft is by using Google Opinion Rewards and Microsoft Rewards. The former pays out free Play Store credits that can be used to buy Minecoins while you can exchange the points gained by the latter to get a free Xbox gift card.Read Also:HP Pavilion Plus 14 2023 laptop review: Your go-to laptop
Conclusion
These are the top 3 ways to get free Minecoins on Minecraft. Since free Minecoins are highly sought after online, malicious entities and scam artists are always on the prowl to trick people. A good rule of thumb is to not give out your personal information to any service or vendor that claims to provide free Minecoins. Using third-party Minecraft mods is also very risky and can get your account banned permanently.
Samsung Galaxy A05 is powered by MediaTek Helio G85 SoC.
The smartphone packs a 5,000mAh battery with 25W wired fast charging.
It is available in three colour options.
Samsung Galaxy A05 has been listed on an e-commerce website. Therefore the price of the new smartphone has been revealed. The specification of the new device has also been disclosed. The phone is a successor to the Galaxy A04 and a sibling to the Galaxy A05s. It has already debuted in other countries but the company has yet to officially announce the smartphone but the device’s user manual was spotted on the company’s official website in the country.
In This Article
Samsung Galaxy A05 price in India, availability details
As we mentioned earlier Samsung is yet to announce the availability and pricing of Samsung Galaxy A05 price in India. But just before it was listed on Samsung India’s website the smartphone got listed on Croma’s website. The price of the phone is set at Rs 12,499 for the 4GB RAM with 64GB storage option. There is another 6GB RAM with a 128GB storage option priced at Rs 14,999. The handset is available in three colour options of Black, Light Green, and Silver.Also Read:45% of serious gamers in India are earning above 6 lakh per annum: Report
Samsung Galaxy A05 specifications
Samsung Galaxy A05 runs on Android 13-based OneUI 5.1 on top. Under its hood, there is a MediaTek Helio G85 SoC coupled with Mali G52 GPU. The smartphone supports LPDDR4X RAM and eMMC 5.1 storage which can be expanded up to 1TB using a microSD card. The mobile phone features a 6.7-inch HD+ PLS LCD display with 1,600 x 720 pixels of resolution. The device supports a 60Hz refresh rate.Samsung Galaxy A05 is highlighted with a dual rear camera setup that includes a 50-megapixel primary sensor and a 2-megapixel depth sensor. For selfies, there is an 8-megapixel front-facing camera.The newly arrived phone packs a 5,000mAh battery and comes with 25W wired fast charging support. For connectivity, there is 4G, WiFi 802.11, Bluetooth 5.3, USB 2.0, GPS, GLONASS, a USB Type-C port and a 3.5mm jack. In addition to this, the smartphone includes a side-mounted fingerprint scanner for phone unlock.
The HP India Gaming Landscape Study 2023 has revealed that the 3000 players in 15 Indian cities were part of the survey.
40% of parents participating in the study admitted that their perception of gaming has turned positive in the last few years.
According to HP India Gaming Landscape Study 2023 Income from Gaming is increasing. Sponsorships are said to be the biggest source of income. Reportedly in India, 40 percent of serious gamers earn between 6-12 lakh per annum due to which 52 percent of serious gamers are now choosing gaming as a career.“As India emerges as one of the top three PC gaming countries globally, we are committed to empowering and enabling gamers through constant innovation and cutting-edge tools. This study allows us to develop a deeper understanding of the gaming landscape and provides colour on the passion and aspirations of the gaming community”, said Ipsita Dasgupta, Senior Vice President and Managing Director, HP India market.Also Read:HP Pavilion Plus 14 2023 laptop review: Your go-to laptopThe Indian gaming community is benefiting from the rise of the Esports industry through a variety of career options and increased earnings. The HP India Gaming Landscape Study 2023 has revealed that the 3000 players in 15 Indian cities were part of the survey and found that players are now drawn to gaming for earning money and recognition in addition to having a good time. Also, the survey included 500 parents which shows a positive shift in parents’ attitudes towards gaming in the last few years.The report has also highlighted that compared to 2022 gaming income in India is increasing. About 50% of participants who consider themselves serious gamers claimed to have earned -between 6 to 12 lakh per annum in 2023. Sponsorships and Esports tournaments have become important sources of income. The gaming industry in India is also helping gamers try their hand at various career options. Besides this from being a gamer, the respondents indicated having eyes on being an influencer or esports management in the future.Vickram Bedi, Senior Director, Personal Systems, HP India market said, “It is encouraging to see the esports industry growing and providing diverse career opportunities to gamers. We believe that Indian youth has the potential to not only make it big in the global esports arena but also to tap into entrepreneurial opportunities in the industry. We, at HP, are introducing initiatives like HP Gaming Garage to help them grow and inspire the budding gamers.”According to the survey, a positive shift in parent’s perspective towards gaming has also improved, with 42% of respondents supporting gaming as a hobby. 40% of parents participating in the study indicated The study reveals a positive shift in parent’s perspective towards gaming, with 42% of the respondents approving of gaming as a hobby. 40% of parents participating in the study admitted that their perception of gaming has turned positive in the last few years, mainly due to the growth of the industry. However security of a gaming career and the possibility of social isolation still worry the parents.In addition to this, the HP India Gaming Landscape Study 2023 has revealed that gaming is not restricted to any particular group of people; 75% of Gen Z and 67% of Millennials are serious gamers. 58% of women respondents are identified as serious gamers, underlining the inclusive nature of gaming. As per the study, one in three gamers take part in order to get recognition or monetary gains.
While buying a smartphone (or any other tech product for that matter), one significant thing you should keep in mind is the customer support provided by the manufacturer. Apple, being one of the biggest tech companies around, is known for its swift customer service and reliable assistance. You can simply take your iPhone to a Genius Bar and get it fixed without any hassle. But if there is no Apple Store near you, you will have to rely on Apple-authorised service centres. In this article, we bring you the top 3 ways to contact Apple Support to get help for Apple devices.Read Also:Oppo Reno 11 Series with curved AMOLED displays launched
In This Article
Use the Apple Support app
The easiest way to seek assistance from Apple is by using the Support app on your iPhone. iOS17 users may need to install this app from the App Store. Devices running iOS16 and below should have this app in the ‘Utilities’ folder.Step 1: Go to the App Library on your iPhone and tap the Utilities folder.Step 2: Launch the Support app.Step 3: The home page of the app will display the device you’re currently using. If you want to seek help for another device registered to your Apple account, tap on Products at the top left corner of the screen.Step 4: Select the option that fits the problem you are facing. If you’re reaching out to Apple to repair a damaged device, hit Repairs & Physical Damage.Step 5: Tap on Find Authorised Locations to search Apple service centres and Genius Bars near you.Step 6: Tap on Message or Call to contact Apple Support.
Dial a helpline
Instead of using the Support app, you can simply dial one of Apple’s official helplines to reach out to the Support staff. Depending on your issue, dial one of these helpline numbers.1-800-275-2273: For general issues related to your device.1-800-800-2775: For help related to Educational Devices.1-877-204-3930: For help with issues related to Apple’s accessibility tools.1-877-233-8552: For help with Apple Cash.1-866-752-7753: For Enterprise customers.
Use the Apple Support website
The official Apple Support website provides a similar experience as the Support app. You can select your device and select the kind of issue you are facing with it. You will be given the option of searching for nearby Apple-authorised service centres and Genius Bars where you can book an appointment. You can also track the repair status of a device that is currently being repaired by Apple.
Frequently Asked Questions (FAQs)
Can I visit the Apple Store without an appointment to get my iPhone fixed?
Yes, you can visit the Genius Bar at your nearby Apple Store without a prior appointment. However, you may have to wait in a queue if there are people already at the store. People with appointments are given priority at the Genius Bar.
How much does an AppleCare+ package cost for an iPhone?
The cost of an AppleCare+ package is different for every Apple device. The Pro Models of the iPhone 15 series demand a premium of Rs 20,900 for AppleCare+ coverage. Meanwhile, it costs Rs 17,900 for non-Pro iPhone 15 models. Read this article to find out if you need AppleCare+ for your device.
These are the top 3 ways to contact Apple Support to get help for Apple devices. If your iPhone is damaged and you can’t open the Support app on it, dialling the helpline or using the Apple Support website are your best choices. Once you deposit your iPhone for repair, you can choose to issue a temporary unit for the time your device is being repaired.
Back in June, Instagram added the option to natively download Reels from the app for US users only. Now, this feature is available to all users across the world. This is a vital addition to the platform as it increases the dissemination of the content produced on the app to other places on the Internet. Earlier, users had to rely on third-party apps for the same task. In this article, we show you how to download Instagram Reels on your smartphone without using a third-party app or tool.Read Also:2 Quick Ways to Change or Update the Time on a Fitbit (2023)
In This Article
Download Instagram Reels without using a third-party app
Step 1:Launch the Instagram app on your phone and play the Reel you wish to download.Step 2: Hit the Share icon at the bottom right section of the screen.Step 3: Hit the Download button at the bottom of the screen.The Reel will be downloaded to your device. Go to the Gallery app and open the ‘Instagram’ folder to view it. Downloaded Reels cannot be used for commercial purposes.
Prevent people from downloading your Reels
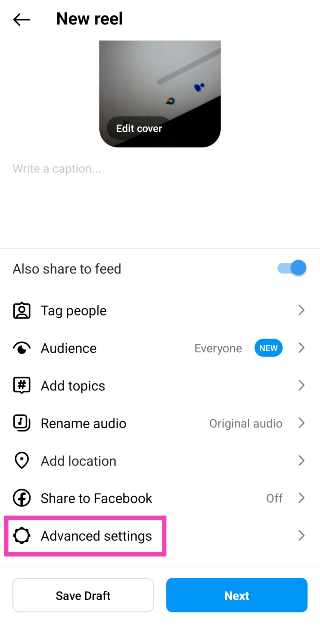
Step 1:Launch the Instagram app on your phone and create a Reel.Step 2: Once you have created and edited the Reel, head over to the sharing page.Step 3: Select Advanced Settings.Step 4: Turn off the toggle switch for ‘Allow people to download your Reels’.Step 5: Select whether you don’t want people to download the Reel you just created or all of your Reels in general.
Frequently Asked Questions (FAQs)
How do I download an Instagram Reel to my smartphone?
Open the Reel, hit the Share icon, and select Download. The Reel will be saved to the ‘Instagram’ folder on your device’s media gallery.
How do I download Reels on my PC?
Since Instagram’s web portal does not have a native feature to download Reels yet, you will need to rely on third-party online tools to save them to your PC. SaveInsta, iGram, and IGdownloader are some good third-party tools to download Reels.
How do I make sure no one downloads my Reels?
If you don’t want other people to download your Reels, set your profile to private or go to Advanced Settings in the Reel sharing page and turn off the toggle switch for ‘Allow people to download your Reels’.Read Also:Sunbird temporarily shutting down, removed from Play Store
Conclusion
This is how you can download Instagram Reels without using a third-party app. If an account is set to private, the Reels that they post on their profile cannot be downloaded by other people. Once you download a Reel, it will be watermarked by the creator’s Instagram handle. If you don’t want a watermark on the downloaded video, you will need to use a third-party app or tool.
Primarily known for ephemeral messaging, there are a couple of other things about Snapchat that typically fly under the radar but are quite helpful to regular users. Once you remove someone on Snapchat, it completely cuts their access to you. There’s no such thing as a ‘Requests’ folder where the unwanted messages keep piling up. However, unfriending someone discreetly on Snapchat can be quite the task. In this article, we bring you two ways to remove a friend on Snapchat without them knowing.Read Also:Top 5 ways to download free music on iPhone (2023)
In This Article
Soft block them
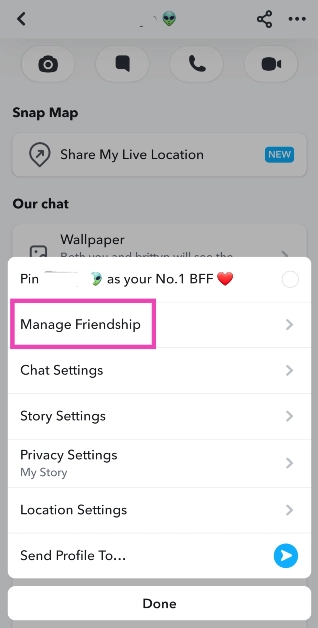
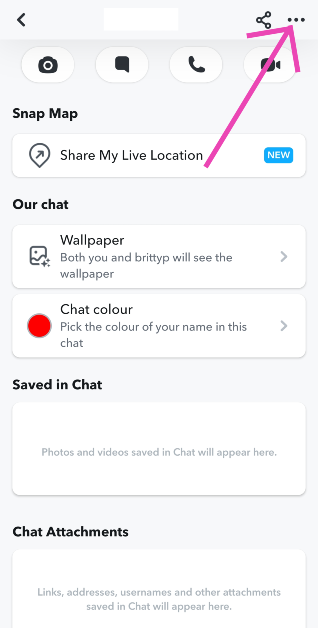
Soft blocking someone quietly removes them from your friend list and does not notify or alert them. If you’re wondering what soft-blocking is, it’s when you block someone and then immediately unblock them, effectively removing them as a friend. Here’s how you can go about it.Step 1: Launch the Snapchat app and switch to the chats tab.Step 2: Tap on the Bitmoji of the friend you want to remove.Step 3: Hit the ellipses at the top right corner of the screen and select Manage Friendship.Step 4: Hit Block.Step 5: Go back to the chats tab and tap your Bitmoji at the top left corner of the screen.Step 6: Hit the gear icon at the top right corner of the screen.Step 7: Scroll down and select Blocked.Step 8: Hit the cross icon to unblock your friend.
Remove a friend on Snapchat using the default option
If you’re certain that your chats show up further down the page on your friend’s phone, removing them the traditional way can work out for you. If they don’t scroll down to your profile, they will not notice that you have removed them as a friend. Since Snapchat doesn’t send a notification every time someone gets removed from a friend list, you don’t have to worry about them finding out right away. Here’s how you can remove a friend on Snapchat.Step 1: Launch the Snapchat app and switch to the chats tab.Step 2: Tap on the Bitmoji of the friend you want to remove.Step 3: Hit the ellipses at the top right corner of the screen and select Manage Friendship.Step 4: Hit Remove Friend.
Frequently Asked Questions (FAQs)
Does Snapchat notify you when someone removes you as a friend?
No, Snapchat does not notify you when you get removed as a friend, but it is easy to tell if you know where to look. Contacts who have deleted you on Snapchat show up in your chats tab with a cross sign on the conversation thread instead of a camera.
How do I remove someone on Snapchat without them knowing?
The best way to do this is by soft-blocking the contact. This way, you will be quietly removed from their list and they won’t be able to contact you.
These are the top 2 ways to unfriend or remove someone on Snapchat without them knowing. Once you remove someone on Snapchat, their messages won’t get delivered to you unless you re-add them. If your profile is set to private, they won’t be able to see your Stories either. You can change this in the privacy settings.
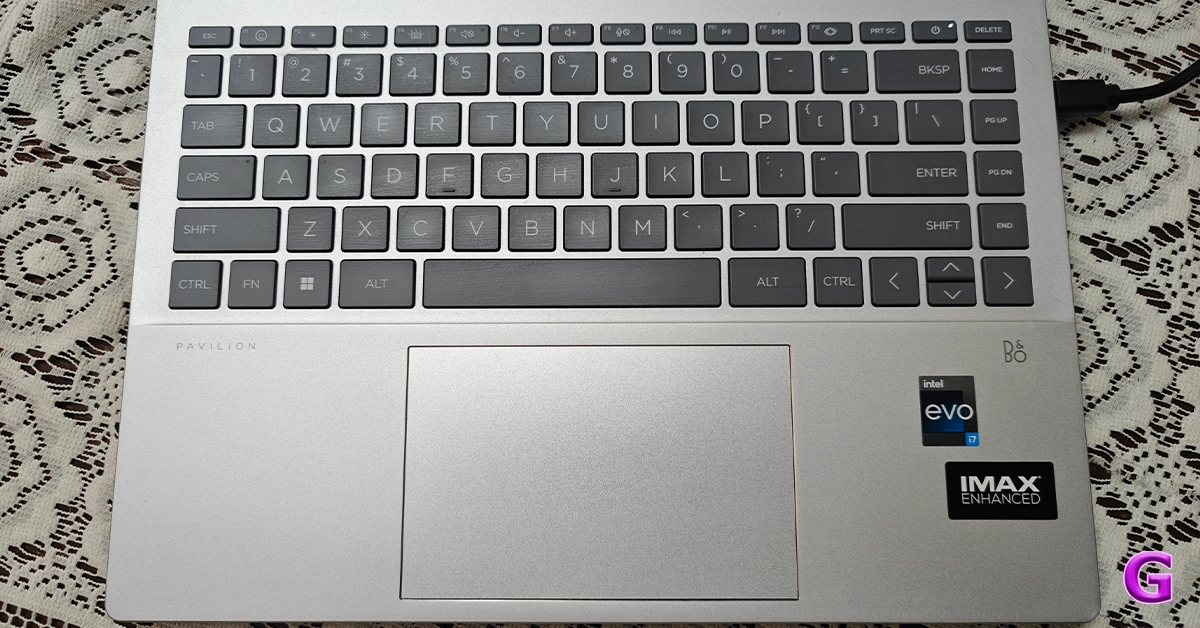
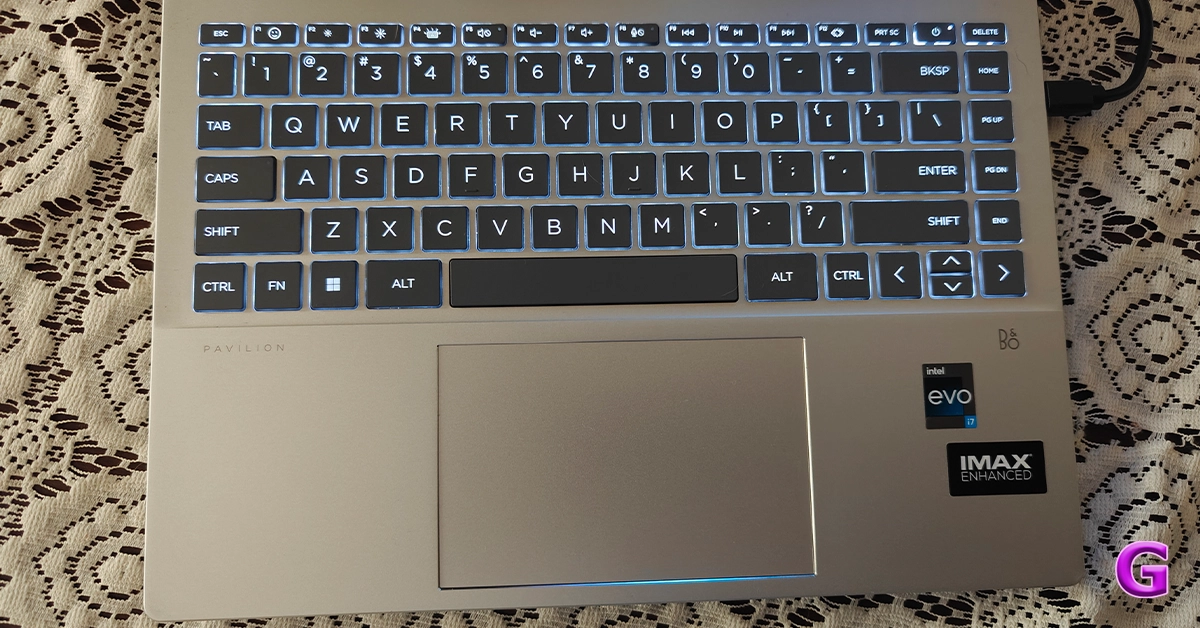
Nowadays, a lot of us count on laptops for work, play, entertainment and creation, as a result, we always prefer sleek, lightweight laptops. It should be compact so that it fits more easily in a small bag while providing all the abilities needed for productivity. In India, HP has unveiled their HP Pavilion Plus 2023 laptop lineup. The HP Pavilion Plus 14, which is available in two versions, was sent to us for review and has now become our main workstation. The latest 13th-generation Intel core processors with Intel Iris X Graphics are included with this HP laptop. Furthermore, the notebook is equipped with an IMAX-enhanced display. Let’s find out how the HP Pavilion Plus 14 2023 performed in this review.
In This Article
HP Pavilion Plus 14 2023 review: Design and display
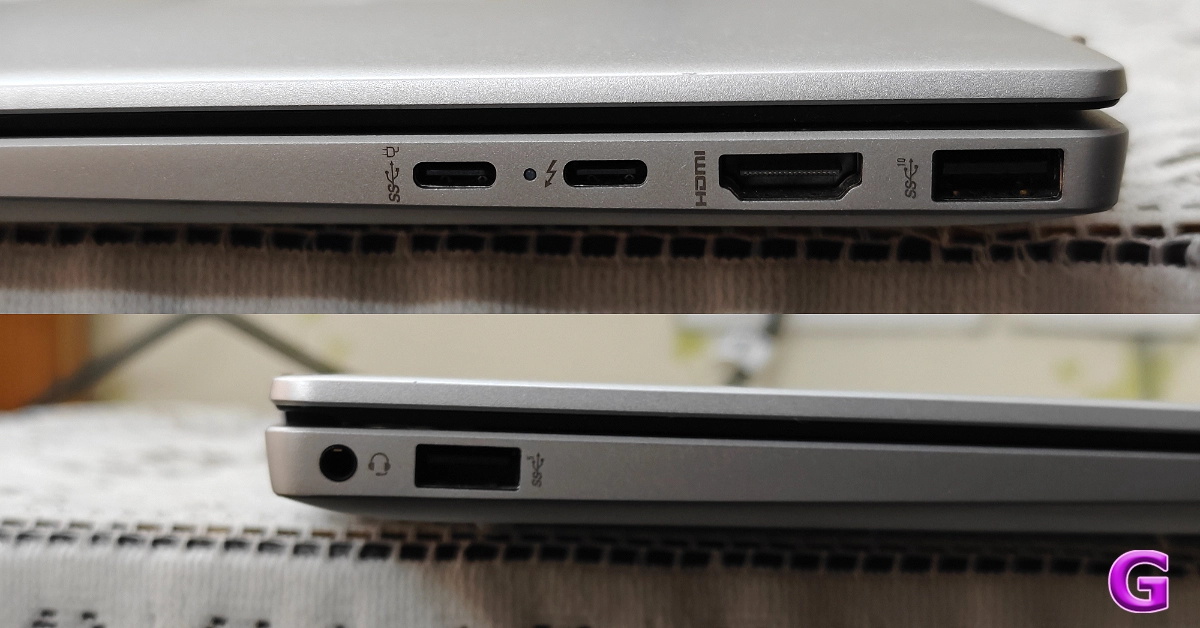
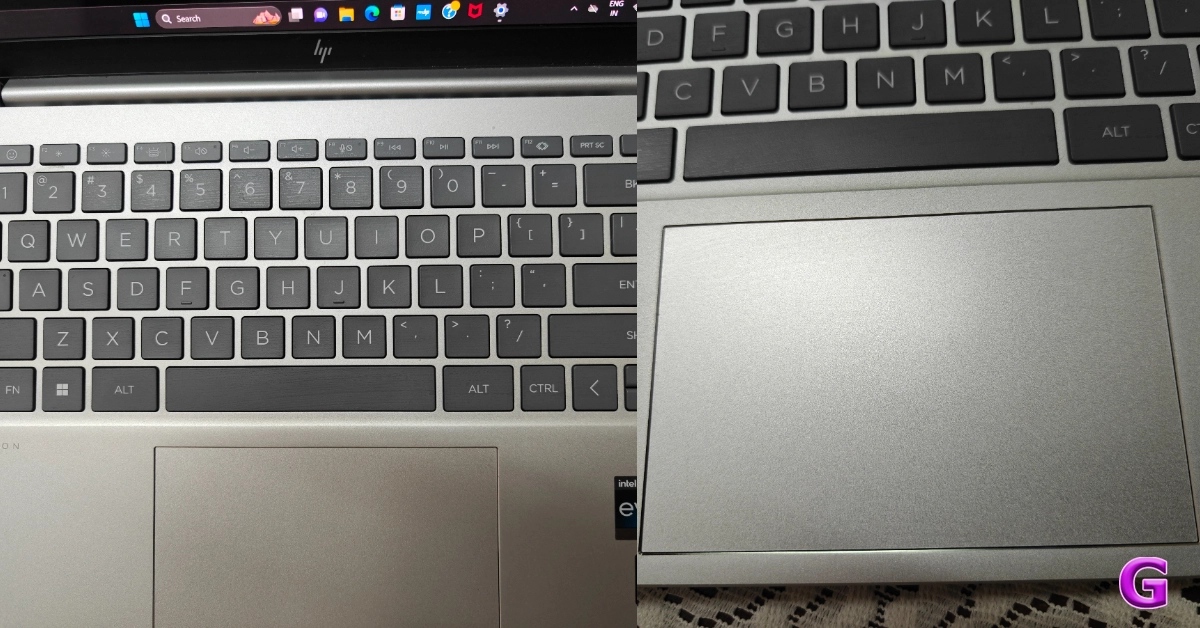
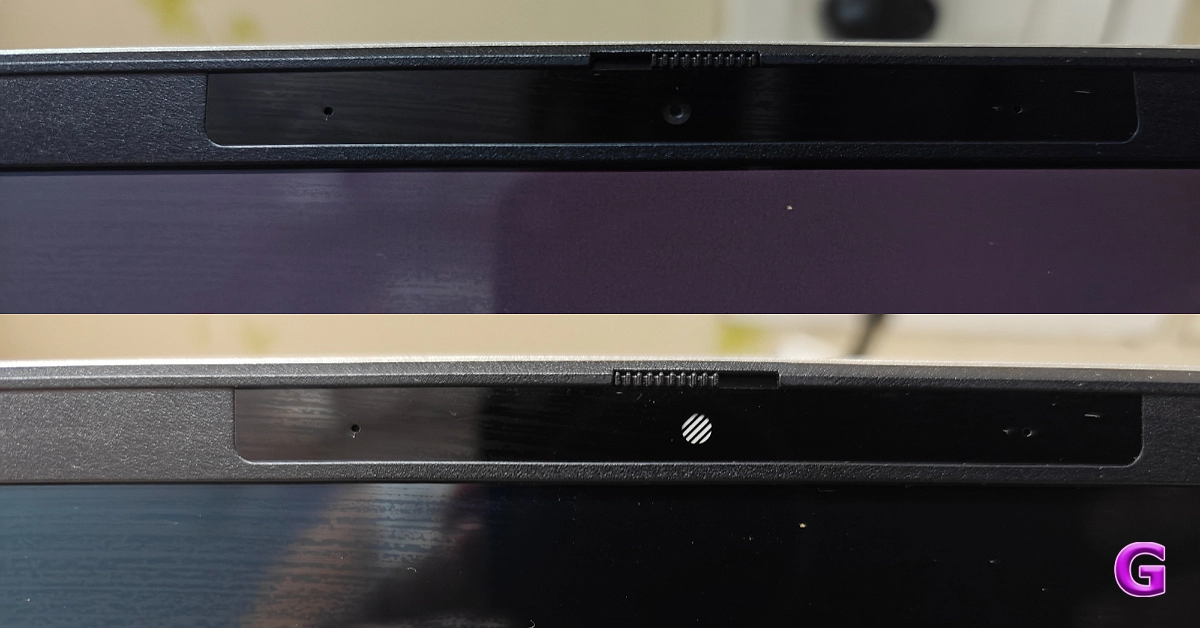
First off, the Pavilion Plus 14’s construction and design make it incredibly small and manageable, making it perfect for carrying to work, home, or on trips. At 17.5 mm thin, the laptop weighs 1.4 kg. For the A/C/D covers, post-industry and post-consumer recycled metal were used in its construction. Since it is lightweight, has a premium appearance, and is built strong, you shouldn’t have any issues at all carrying it for the entire day.As we said, this laptop is made entirely of recyclable materials. The company has used Ocean-bound plastic in a speaker enclosure(s) and bezel for keyboard keycaps and scissors containing post-consumer recycled plastic, too. Recycled metal is used in the cover, keyboard frame, base, sideband, hinge cap(s), and keyboard supporting plate. Also, all of the other competitive brands use recyclable and environmentally friendly materials as part of their sustainable approach, so why should HP be behind?Also Read:HP Victus 16 2023 review: Perfect for work and gamingYou know almost all HP laptops come with minimalist no-nonsense design. Though the LED lighting and other design characteristics may seem sporty and appealing to gamers, nothing matches to its elegant yet meek style.By the way, all the brands are taking a sustainable approach where they are using recyclable and eco-friendly materials.Just like all the other HP laptops the company’s branding is done on the front cover. You get all the necessary ports on this machine. There is Thunderbolt 4 with USB Type-C, another USB Type-C port, two USB Type-A ports, an HDMI-out and a headphone/microphone combo on the sides.To allow more efficient cooling and keep the laptop from overheating, the rubber feet at the bottom elevate the laptop off a level surface higher than usual. Over that, the notebook sports HP Dual Speakers HP Audio Boost, and custom tuning by the experts at B&O, which allows you to enjoy rich and natural audio.The new Pavilion Plus 14 comes with a 14-inch IMAX enhanced 2.8K OLED display with 2,880 x 1,800 pixels of resolution. The display has a 16:10 aspect ratio along with 88% screen-to-body ratio. Also, the screen of the laptop supports an adaptive refresh rate ranging from 48-120Hz.Furthermore, the machine comes with 400 nits (SDR) and 500 nits (HDR) brightness. The screen isn’t as bright as we would have liked it to be for this price. Also, it is an OLED screen that has 100 percent DCI-P3 that supports anti-glare tech.The display is Eyesafe certified and it meets TÜV low blue light requirements, which saves the user’s eyes from harmful blue light without sacrificing colour accuracy to lessen eyestrain from prolonged use. The OLED panel displays brighter colours and a deeper black.The display has a contemporary appearance since the side bezels are very slim. When you lift the lid or cover of the laptop you get a full-size keyboard which comes with back lighting. The colour of the entire keyboard is light grey.For video chats, there is a 5-megapixel webcam with privacy-enhancing mic mute buttons and a shutter for the camera.
HP Pavilion Plus 14: Performance
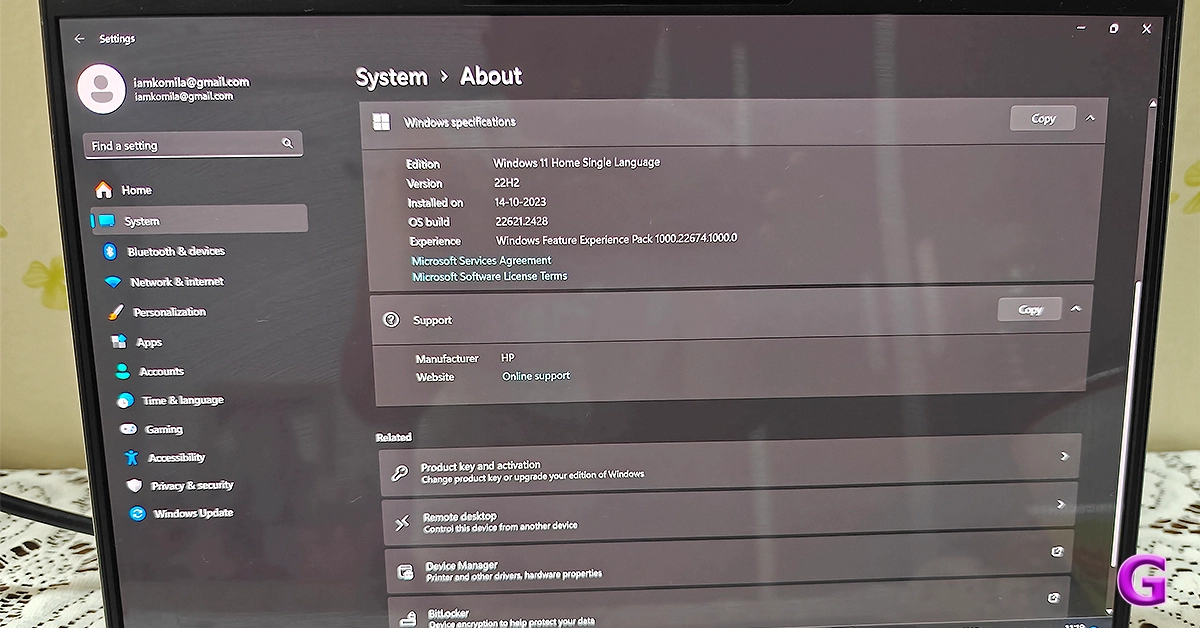
Now coming to the performance, the HP Pavilion Plus 14 laptop is equipped with a 13th Generation Intel Core i7 – 1355U CPU, which has 10 cores and 12 threads and can run at up to 5.0 GHz clock speed thanks to the Intel Turbo Boost Technology. Additionally, the processor has 12 MB of L3 cache. About storage and RAM, you will receive a 1TB SSD hard drive along with 16GB LPDDR5 RAM. In addition to this, the firm is offering 25 GB of Dropbox storage, which is applicable for 1 year from the date of registration.Together with the Intel Iris Xe Graphics card, the 13th-generation processor makes multitasking a breeze. We worked on several documents without any issues. This configuration will be more than sufficient for your daily usage, which includes opening of over 25 Chrome tabs and performing additional tasks like online meetings.We also did not encounter any unusual fan noises or issues with the heating system.The display is good for office use as well as for people who view a lot of OTT content. During our testing, the colours appeared vibrant and sharp, which makes them ideal for multimedia consumption. The resolution is decent, too.Also Read:Apple MacBook Air 15-inch Review: We Apple-solutely Love It!The screen brightness is enough for indoor use only. The colour accuracy is also fairly good. As said, the display has TÜV certification, so even if you use it for extended periods of time, your eyes won’t be harmed and you won’t feel any strain in your eyes or headaches.Additionally, the two speakers are among the best that we have ever heard. The loudness and sound quality, both are excellent.The excellent travel distance between the keys provides pleasant tactile feedback. With it, the size of the trackpad is suitable for comfortable use. Note that the keyboard is smaller because it does not include a number keypad.Zoom meetings and connecting with friends and family are made possible by the 5MP infrared camera. The webcam comes with an 88-degree field of view. Along with the camera, there is a dual-array microphone. You will not only appear very clear but also be heard well, thanks to the temporal noise reduction. The company has also taken care of user privacy, the top-mounted camera shutter on the system can be manually opened and closed. When it comes to connectivity, there is Wi-Fi 6E with a wireless card for speed. The Bluetooth here is the 5.3 version.Users get Windows 11 out of the box. It’s excellent that Microsoft Office comes pre-installed and includes Word, Excel, and other important programs for productivity. The company is providing a 30-day trial of the McAfee Antivirus, too.When it comes to the battery, the HP Pavilion Plus 14 has a 4-cell, 68Wh battery. The 65W USB Type-C power adapter is included in the packaging. The device provides about 7-8 hours of battery life. This means you may use it for nearly the entire workday (in one charge cycle) if you charge it fully in the morning.
Verdict
The thin and light HP Pavilion Plus 14 laptop comes with a gorgeous all-metal chassis design. With that said its display is of good resolution. It also has an excellent battery life.If you’re looking to purchase a laptop for multimedia consumption, the HP Pavilion Plus 14 is a fantastic option. You should give this laptop some serious thought if you need a laptop that can handle demanding work, writing, taking Zoom calls, and multimedia consumption.Its battery life is also very good. Not just that the notebook is sturdy as well as good-looking. In terms of cost, it begins at about Rs 99,999. However, if you buy the machine via the company’s official website you can save a lot of money since there are numerous deals available.Buy Here
Garena Free Fire is a battle royale game with regular awards and tournaments to keep players interested. If you play Garena Free Fire, you should be aware of the redeem codes that are released on a daily basis. However, because the battle royale game is banned in India, players from other countries can use the Free Fire Redeem codes daily. If you’re unfamiliar with the Garena Free Fire redeem codes or don’t know how to get them, we’ve put together a step-by-step guide to help you redeem them. Check out Garena Free Fire Redeem Codes for 24 November 2023.The Free Fire redeem codes are a great way to get free stuff. These are 12-digit codes that contain alphabets and numbers, as well as an expiration date and time. Because the Garena FF redeem codes cannot be used more than once, you should hurry to the redemption page to claim your free reward before someone else does. To get a free reward, all you have to do is go to reward.ff.garena.com/en, which is the official redemption page. Also, keep an eye on this space for daily updates on Garena Free Fire redemption codes and rewards.
In This Article
Garena Free Fire Redeem Codes Today 24 November2023
The series includes Oppo Reno 11 Pro and Oppo Reno 11.
Both the phones feature a 50-megapixel triple rear cameras
The Pro variant is powered by Snapdragon 8+ Gen 1 SoC.
The vanilla model is equipped with MediaTek Dimensity 8200 SoC.
Oppo today officially announced the launch of Oppo Reno 11 Series. The company has introduced its new smartphone series in its home market, China. The newly arrived lineup includes two phones- Oppo Reno 11 Pro and Reno 11. Both the phone runs on ColorOS 14 on top of Android 14 out of the box. Also, both phones feature a curved AMOLED display. Check out more details about the smartphone below.
In This Article
Oppo Reno 11 Pro, Oppo Reno 11 price and availability
In terms of availability, the Oppo 11 series is available for purchase in China. International and Indian availability details remain undisclosed.
Oppo Reno 11 Pro specifications
The 6.74-inch 1.5K OLED curved display with 1,240×2,772 pixels of resolution on the Oppo Reno 11 Pro features the following:
Up to 120Hz refresh rate
Up to 240Hz touch sampling rate
450ppi pixel density
1,600 nits of peak brightness
The device is powered by an octa-core Snapdragon 8+ Gen 1 SoC with LPDDR5x RAM (can be virtually expanded up to 24GB)and UFS 3.1 storage. It operates on Android 14-based ColorOS 14. The handset includes 5G, 4G LTE, Wi-Fi 6, Bluetooth 5.3, GPS/ A-GPS, NFC, OTG, and a USB Type-C port for connectivity. Also, there is an under-display fingerprint sensor and other sensors including an accelerometer, geomagnetic sensor, light sensor, under-screen proximity sensor, gravity sensor, colour temperature sensor, IR control, and gyroscope. The smartphone sports a 4,700mAh battery with 80W Super Flash Charge support.The Oppo Reno 11 Pro comes with a 32-megapixel RGBW Sony IMX709 front-facing camera for selfies. There is a triple rear camera setup which includes:
50-megapixel primary Sony IMX890 sensor with OIS
32-megapixel telephoto lens
8-megapixel ultra-wide camera
Also Read:Best 5G smartphones to buy under Rs 20,000 (November 2023)
Oppo Reno 11 specifications
The Oppo Reno 11 features a 6.70-inch OLED curved display with 1,080×2,412 pixels of resolution. The screen also comes with the following:
Supports an adaptive refresh rate (1Hz to 120Hz)
394ppi pixel density
950nits peak brightness
Under the hood, there is a MediaTek Dimensity 8200 SoC with LPDDR5x RAM (can be virtually expanded up to 12GB) and UFS 4.0 storage. The Reno 11 is highlighted with the same selfie camera. The triple camera setup on the back includes:
50-megapixel Sony LYT600 sensor (26mm focal length and OIS)
32-megapixel telephoto lens
8-megapixel ultra-wide camera
The Oppo Reno 11 packs a 4,800mAh battery that comes with 67W Super Flash Charge support.
Users can now download Reels published by public accounts on Instagram thanks to a new functionality that Meta has now enabled for everyone.
Instagram CEO Adam Mosseri made the announcement about the latest feature.
The downloaded reels can be further shared to other platforms like WhatsApp.
Meta has started rolling out the ability to download Reels on Instagram. Earlier this feature was under testing and only available in the United States and it is now being released globally. Note that one can only download Instagram Reels from public accounts.Meta is adding support for downloading Instagram Reels which are posted publicly. Earlier either one had to use a third-party app or other websites to download reels from public accounts. However, they have the option to download their own reels.The information was shared by Adam Mosseri, through his Instagram broadcast channel. He revealed that now anyone can download Reels to their camera roll. This functionality was first introduced to users in the US in June but has now officially confirmed the availability of the feature to users globally.Also Read:Sunbird temporarily shutting down, removed from Play StoreNote that the option for Download Instagram Reels will be turned on by default for the public accounts. But users also have the option to disable the option of downloading reels that they have published. Moreover, the downloaded Reels will now include the Instagram logo/watermark, account name/username, and audio attribution.The option to download an Instagram reel will show up at the bottom menu with Add to Story, Share, Copy Link, and other options. All you have to do is tap on the share icon. Then select the Download option to save the reel in your camera roll.Note that Reels posted by private accounts cannot be downloaded.
Garena Free Fire is a battle royale game with regular awards and tournaments to keep players interested. If you play Garena Free Fire, you should be aware of the redeem codes that are released on a daily basis. However, because the battle royale game is banned in India, players from other countries can use the Free Fire Redeem codes daily. If you’re unfamiliar with the Garena Free Fire redeem codes or don’t know how to get them, we’ve put together a step-by-step guide to help you redeem them. Check out Garena Free Fire Redeem Codes for 23 November 2023.The Free Fire redeem codes are a great way to get free stuff. These are 12-digit codes that contain alphabets and numbers, as well as an expiration date and time. Because the Garena FF redeem codes cannot be used more than once, you should hurry to the redemption page to claim your free reward before someone else does. To get a free reward, all you have to do is go to reward.ff.garena.com/en, which is the official redemption page. Also, keep an eye on this space for daily updates on Garena Free Fire redemption codes and rewards.
In This Article
Garena Free Fire Redeem Codes Today 23 November2023
If you’re not subscribed to any of the music streaming giants, downloading free music on your phone can be quite a challenging task. Certain online libraries offer free downloads, but they may not always have what you are looking for. So how do you go about saving all your favourite tunes on your phone? Today, we bring you the top 5 ways to download free music on your iPhone.Read Also:Top 4 ways to convert a photo to PDF on iPhone
In This Article
The Internet Archive
The Internet Archive is an incredible online repository of free books, movies, music, software, and more. There are over 14 million audio recordings that can be downloaded from the website for free. This even includes popular and contemporary artists. If you like listening to live music, you can also find bootleg recordings of concerts on the Internet Archive. The only catch is that music downloaded from this website cannot be used for commercial purposes. However, if your goal is to simply listen to music, TIA is one of the best free resources out there.
Audiomack
Audiomack is one of the best apps to download music for commercial and recreational purposes. If you’re looking for a moody background number for your vlog, Audiomack is where you should go. You can even find popular artists like Bad Bunny, Diplo, NBA Youngboy, and others on Audiomack. Once you play a song on the app, you can easily download it from the player itself.
YouTube
You can download music from YouTube without requiring a subscription to YouTube Premium. This usually requires a good amount of hit and trial since most channels restrict the downloads on their uploads. Thankfully, you can find several videos of the same song on YouTube. Once you download the song, you can access it from the Downloads folder on YouTube.
Soundcloud
Soundcloud is one of the best online platforms for up-and-coming artists to showcase their work. You can also find a lot of popular artists on Soundcloud. If the artist allows downloads, you can save their music on your iPhone for free. Like YouTube, this also requires a lot of hit and trial. The best part is that you don’t need to register to Soundcloud to download a song.
Musopen
If you’re a classical music enthusiast, head over to Musopen to download free recordings and sheet music on your device. Musopen has a very friendly interface that is easy to follow and navigate. You can browse and download music from composers like Bach, Mozart, Beethoven, Chopin, and more for free. If you’re honing your craft as a musician, you will also like the educational content present on the website.
Frequently Asked Questions (FAQs)
Where can I download free music on my iPhone?
The Internet Archive is an exhaustive online library that consists of millions of audio recordings from popular artists, both classic and contemporary. Other than that you can also use services like Audiomack and Jamendo to download free music.
Does YouTube allow free downloads?
You can download music for free on YouTube with a Premium subscription. However, some channels and creators allow non-premium subscribers to download their videos for free too.
Where can I find royalty-free music for my vlog?
Services like TuneTank, Jamendo, and Soundstripe offer royalty-free music for vlogs, movies, podcasts, and more. Even YouTube has a royalty-free audio library that lets you select music for your videos.Read Also:Top 2 Ways to Add Checkboxes to Word Document
Conclusion
These are the top 5 ways to download free music on your iPhone. You can also use third-party tools to download YouTube videos as MP3s on your device. Know any music services that allow free downloads on their platform? We’d love to know in the comments!
You must already be familiar with the role that an updated OS plays in keeping your device secure. Malware, ransomware, and other kinds of malicious viruses are rampant on the internet, and it is essential that your device is well-equipped to protect you against them. Your web browser plays an important part in this as well. Like your device’s OS, the web browser also receives routine security patches from its developers. In this article, we bring you the top 4 ways to update the Safari browser on your iPhone and Mac.Read Also:OnePlus AI Music Studio, a platform allowing users to compose music launched in India and globally
In This Article
Update Safari on iPhone using the App Store
Step 1: Long press the App Store icon on your iPhone’s home screen.Step 2: Hit the Updates option.Step 3: Make sure your Account page is refreshed. You can do this by pulling down the top of the page and then releasing it.Step 4: Scroll down to Safari and hit the Update button next to it.
Turn on automatic updates
If you don’t want to manually update the Safari app on your iPhone, simply turn on automatic updates for all apps. Your apps will only update when you are connected to a WiFi network.Step 1: Go to Settings and select App Store.Step 2: Turn on the toggle switch for App Updates. In the Cellular Data section, turn off the toggle switch for Automatic Downloads.
Update the Safari browser on your Mac
Step 1: Open the App Store on your Mac.Step 2: Hit the Updates option at the top of the screen.Step 3: This is where you’ll find the list of apps on your device with a pending update.Step 4: Scroll down to Safari and hit the Update button next to it.
Update Safari on your Mac by updating the macOS
Once you update macOS to its latest version, it also updates the native apps like Safari on your device. Here’s how you can go about it.Step 1: Hit the Apple logo at the top left corner of the screen and select System Preferences.Step 2: Click on System Updates.Step 3: Your device will check for any new updates.Step 4: Once it shows a new update, click on Upgrade Now.
Frequently Asked Questions (FAQs)
How do I update the Safari browser on my Mac?
To update the Safari browser on your Mac, simply head over to the App Store and switch to the Updates tab. This is where you’ll find the list of apps with pending updates. If Safari is on the list, click the Update button next to it.
How do I turn on automatic updates for the apps on my iPhone?
Go to Settings>App Store and turn on the toggle switch for App Updates. Your smartphone will automatically download the latest versions of the apps installed in it.
Why should I update the Safari browser on my iPhone?
These are the top 4 ways to update Safari on your iPhone and Mac. If you’re thinking of turning on automatic updates, make sure it is under the precondition that your device is connected to a WiFi network. Updating apps over a cellular connection can eat up a significant portion of your mobile data.
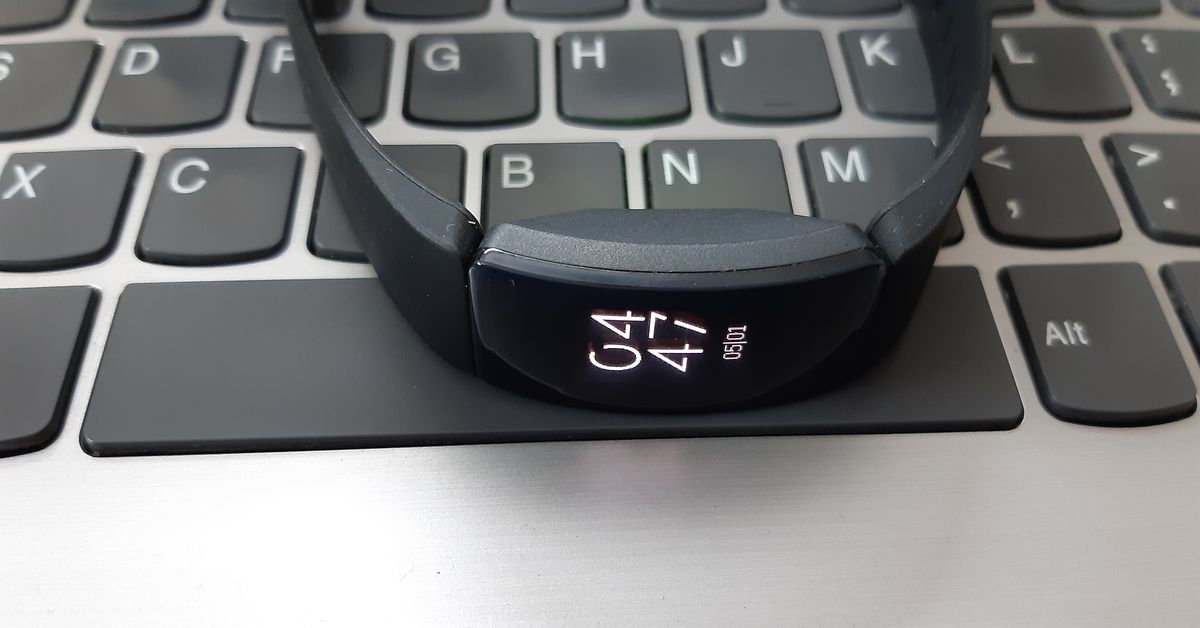
Once you set up your Fitbit device it relies on your smartphone for the accurate date and time. Sometimes, it may malfunction and display the incorrect time even when there doesn’t seem to be anything wrong with your smartphone. Instead of resetting and re-linking your Fitbit to your phone, you can manually set the correct time. In this article, we bring you 2 quick ways to change or update the time on a Fitbit.Read Also:Tinder brings a slew of new features and a fresh look for Gen Z users: Here is what’s new
In This Article
Change the time on your Fitbit using the mobile app
Step 1:Launch the Fitbit app on your smartphone and switch to the Today tab.Step 2: Tap your profile picture.Step 3: Select Advanced Settings.Step 4: To manually change the time, turn off the toggle switch for Automatic time zone.Step 5: Select your time zone manually.Step 6:Sync your Fitbit device.
Change the time on your Fitbit using the official website
Step 1: Go to the official Fitbit website and log into your account.Step 2: Hit the gear icon at the top right corner of the screen and select Settings.Step 3: Switch to the Personal Info tab.Step 4: Choose your timezone in the Advanced Settings section.Step 5: Hit Submit.
Frequently Asked Questions (FAQs)
How do I change the time on my Fitbit?
Launch the Fitbit app and go to Today>Profile>Advanced Settings and manually select your time zone after turning off the toggle switch for Automatic time zone.
How much does the cheapest Fitbit cost?
Fitbit Inspire 2 is the cheapest fitness tracker from the brand, priced at Rs 7,999.
These are the 2 quick ways to change or update the time on your Fitbit device. While you’re here check out our reviews of the Fitbit Sense 2 and Fitbit Versa 4 smartwatches. If you’re looking to buy a smartwatch to track your fitness and health metrics, check out our list of the best smartwatches around!
Sunbird is an iMessage-compatible app for Android.
The company is temporarily shutting down due to security issues.
Sunbird partnered with Nothing and released the Nothing Chats App, which was also removed from the Play Store for the same reasons.
Only a week after the Nothing Chats app launch, the company had to remove it from the Google Play Store and now its partner company Sunbird is shutting down the messaging platform, too. Users have been notified that it will temporarily shut down due to multiple security vulnerabilities that have been affecting the service.Sunbird is the developer of Nothing’s iMessage-compatible messaging app Nothing Chat. After a lot of criticism due to privacy concerns, the app has already been removed from the Google Play Store. After the formal shutdown, Sunbird has also taken down universal Sunbird: iMessage for Android from the Play Store. For those who are unaware, in 2022, Sunbird was launched aimed to provide Android smartphone consumers with iMessage compatibility.Now the company has come to a decision and notified its users about the app’s hold. The push notification stated, “Dear Sunbird User. We have decided to pause Sunbird usage for now while we investigate security concerns. We will update you when we are ready to proceed.” Therefore, it is temporarily suspending its usage in order to safeguard private information. “Good afternoon everyone. We are investigating the security issues raised in the last 24 hours. In an abundance of caution and to protect your confidential data, we are shutting down Sunbird Media temporarily. We will keep you posted. Thank you & sincere apologies, for the inconvenience,” if further stated.Also Read:Samsung Galaxy S24 Ultra bags BIS certification, India launch imminentRecently it came into the limelight when it collaborated with Nothing and released a new chat software called Nothing Chat. The iMessage-compatible Android App is exclusive to Nothing Phone 2. The users were allowed to text or MMS to iOS users via the RCS protocol and it showed up in blue bubbles. But as soon as it was launched it caught the eye and users started raising concerns over the programme’s privacy and security. It is being criticised for sending Apple ID data through HTTP instead of the safer HTTPS protocol. Note that Nothing Chats App is powered by Sunbird and when the messages, images and videos received through its system are unencrypted. Therefore the SMS or MMS sent or received through Sunbird’s system is public.
The Samsung Galaxy S24 series may include- Galaxy S24, Galaxy S24+, and Galaxy S24 Ultra.
Galaxy S24 Ultra is said to be powered by Snapdragon 8 Gen 3 SoC.
The device will feature a triple rear camera setup.
Samsung is getting ready to launch its next-generation flagship lineup- Samsung Galaxy S24 Series. The company has not yet said anything concrete about its upcoming phones but rumours, reports and leaks are doing the rounds online. Leaks suggest that the S24 series may include Galaxy S24, Galaxy S24+, and Galaxy S24 Ultra. The latest news is that one of the smartphones from the series has been spotted listed on the Indian regulatory platform BIS.Also Read:Tinder brings a slew of new features and a fresh look for Gen Z users: Here is what’s newSamsung Galaxy S24 Series is rumoured to launch in January 2024. According to a report the Samsung Galaxy S24 Ultra was listed on the Bureau of Indian Standards (BIS) website. The device has been spotted with model number SM-S928B/DS which appears to be similar to that of a model that appeared on Geekbench. The recent listing on BIS hints at the upcoming launch of the series. Apart from the model number, no other details on the smartphone were revealed. But as the device with the same model number, SM-S928N was also listed on Geekbench so some details about the upcoming smartphone have been revealed.As per the Geekbench listing the Galaxy S24 Ultra will come equipped with Snapdragon 8 Gen 3 SoC paired with 12GB of RAM. Previous reports suggest that the handset will be available in black, grey, violet, and yellow colour options. It is expected that light blue, light green, and orange colourways will be exclusively available online.According to rumours, the phone may feature a 6.8-inch WQHD+ display with 120Hz refresh rate and a peak brightness of 2500 nits.Furthermore, leaks suggest that the S24 Ultra will feature a quad rear camera setup. The camera module is speculated to include a 200-megapixel primary sensor, a 50-megapixel periscope camera, a 12-megapixel ultra wide-angle lens and a 10-megapixel telephoto camera.In addition to this, the smartphone may come equipped with a 5,000mAh battery that will come with 45W fast charging support.As said earlier Samsung may host the Galaxy Unpacked 2024 event on January 24. The launch event is likely to take place in San Jose, US.
iPhones are some of the most versatile smartphones around, largely because of the diverse range of tools embedded in the operating system. You don’t need to download a third-party app for the most basic tasks. For example, while most users flock to third-party apps and online tools to convert a picture to a PDF file, iPhone users can simply use any of the multiple native apps on their devices for this task. In this article, we bring you the top 6 native ways to convert a photo to a PDF file on an iPhone.Read Also:Top Ways to Open the Windows Snipping Tool With a Keyboard Shortcut
In This Article
Which method should you use?
The option to convert a photo to PDF is integrated into a lot of first-party apps on your iPhone. You can use any of the following apps for this task:
Photos
Files
Notes
Books
If you’re not a fan of the native conversion mechanism, you can use a specialised third-party app to convert your images to PDF files. Apps like Photo to PDF Converter Scanner, Photos PDF: Scanner Converter, Image to PDF, and Photo to PDF Converter will get the job done in no time. If you don’t wish to install a third-party app, you can use an online converter like SmallPDF.
Use the Photos app
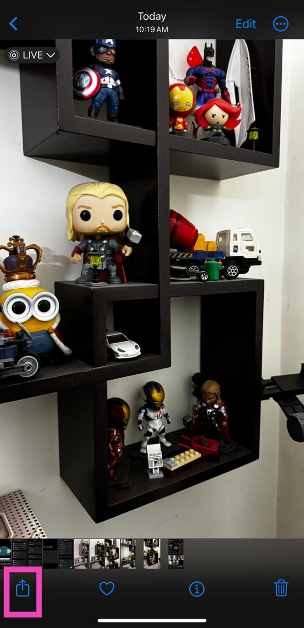
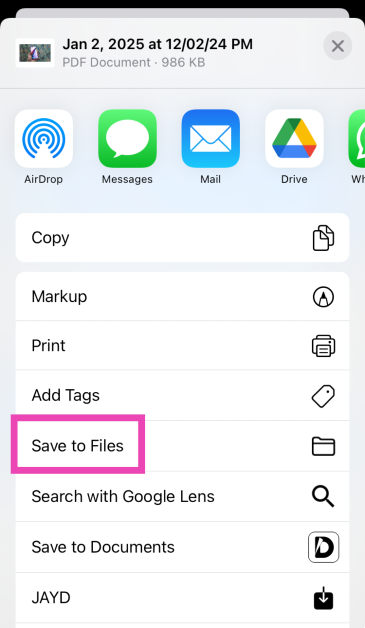
Step 1: Launch the Photos app on your iPhone and select the photo you want to convert to a PDF file.Step 2: Hit the Share icon at the bottom of the screen.Step 3: Tap on Print.Step 4: Hit Print at the top right corner of the screen.Step 5: Select Save to Files from the pop-up menu.The photo will be saved as a PDF copy on your iPhone.
Use the Files app
Step 1: Launch the Files app on your iPhone.Step 2: Locate the photo that you wish to convert to PDF.Step 3: Long press the picture and select Quick Actions.Step 4: Hit Create PDF.To convert a bunch of images to PDF at once, select them all, tap ‘More’ at the bottom-right corner of the screen, and select Create PDF.
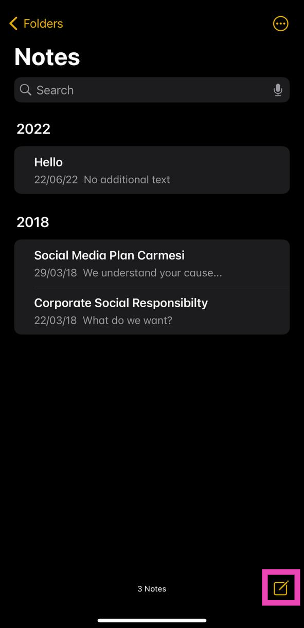
Use the Notes app
Step 1: Launch the Notes app on your iPhone.Step 2: Hit the pen icon at the bottom right corner of the screen.Step 3: Hit the camera icon and select Choose Photo or Video.Step 4: Select the photo(s) you want to convert to PDF and hit Add.Step 5: Tap the share icon at the top of the screen.Step 6: Hit Print.Step 7: Tap on the Print option at the top right corner of the screen and select Save to Files from the pop-up menu.
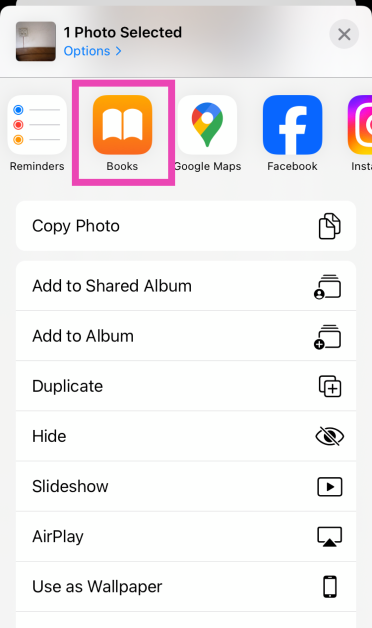
Use the Books app
Step 1: Launch the Photos app on your iPhone and select the image(s) you want to convert to PDF.Step 2: Hit the Share icon at the bottom left corner of the screen and export the image(s) to the Books app.Step 3: Hit the ellipses on the exported image(s).Step 4: Select Save to Files.
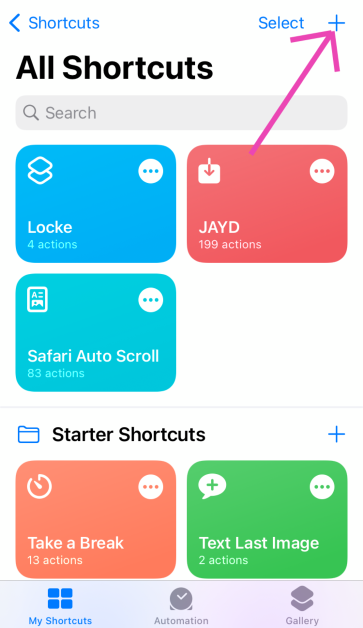
Use the Shortcuts app
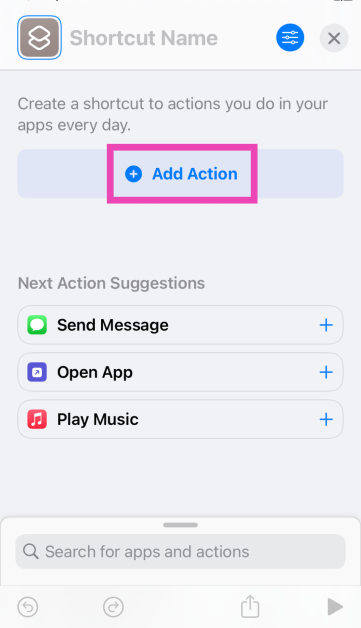
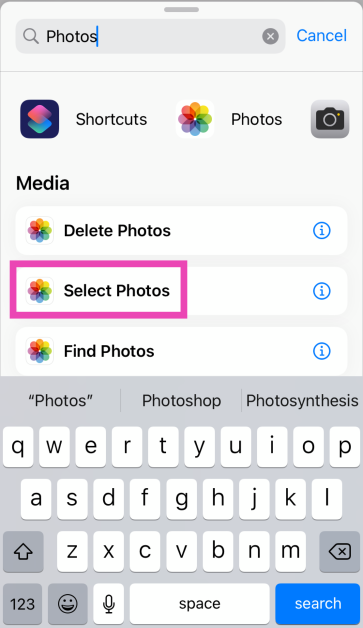
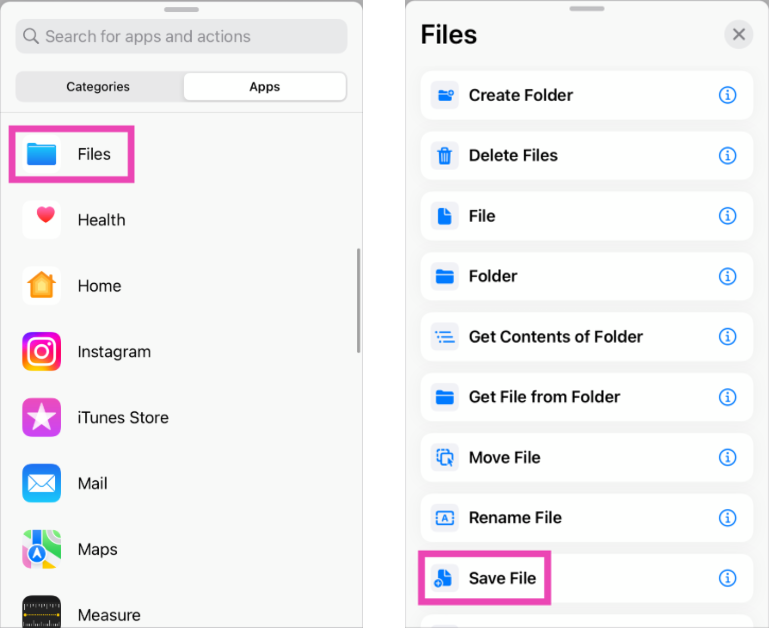
Step 1: Launch the Shortcuts app on your iPhone and tap the plus icon in the top right corner of the screen.
Step 2: Tap on Add Action.
Step 3: Search for the Photos app and tap the Select Photos action.
Step 4: Turn on the toggle switch next to Select Multiple.
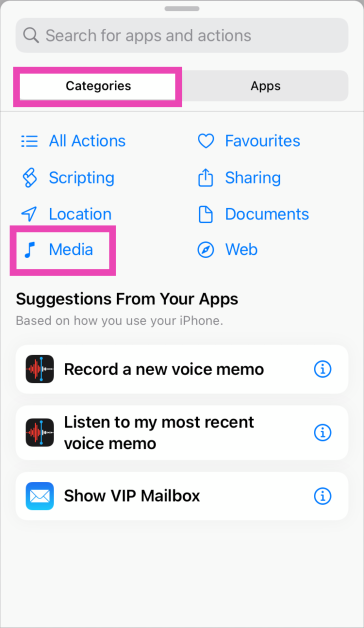
Step 5: Hit the Search bar at the bottom of the screen and select Categories.
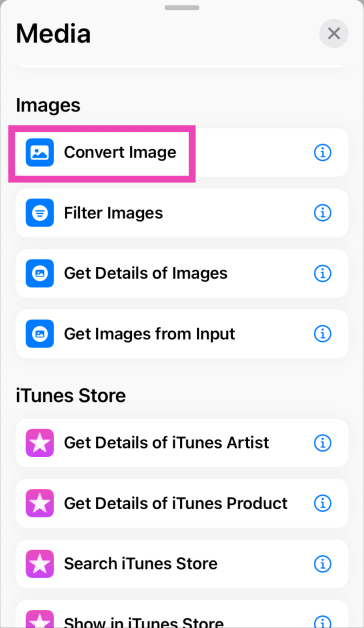
Step 6: Tap on Media and select Convert Image.
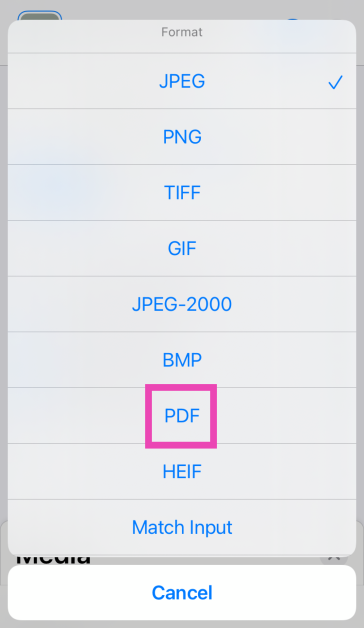
Step 7: Tap on JPEG and select PDF.
Step 8: Hit the Search bar at the bottom of the screen and select Apps.
Step 9: Tap on Files and select Save Files.
Step 10: Hit Done in the top right corner of the screen.
Step 11: When the Shortcut has been created, launch it and select the images you want to convert to PDF.
Use a third-party app
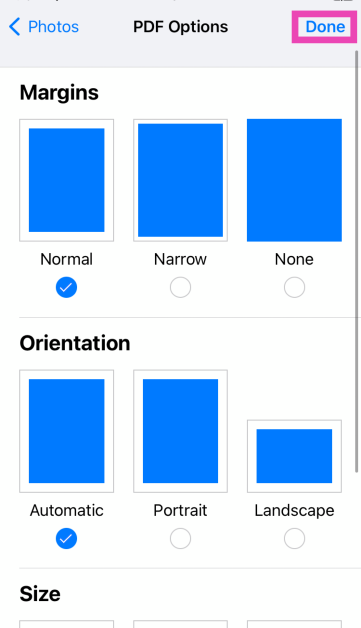
Step 1:Install the Photos to PDF Converter Scanner app from the App Store.
Step 2: Launch the app and hit the photo icon at the bottom of the screen.
Step 3: Select an image and hit Add.
Step 4: Tap on Next.
Step 5: Select the Margins, Orientation, and Size. Hit Done.
Step 6: Once the PDF has been created, select Save to Files.
Frequently Asked Questions (FAQs)
What is the easiest way to convert a picture to a PDF on my iPhone?
Select the picture in the Photos app, go to the Print option, then hit ‘Save to Files’. You can now access the picture as a PDF from the Files app on your iPhone.
How to convert a file to PDF on an iPhone?
Go to the Files app, select the file you wish to convert, tap the share icon, select ‘Print’, tap the print command, then hit the share icon again and save it on your phone.
What are some good online tools to convert an image to a PDF file?
Online tools like PDF24, AllConverter, and SmallPDF can convert an image to a PDF file within seconds. You can also use the file conversion tool on Adobe’s official website for this task.
Which app do I need to convert a photo to a PDF on my iPhone?
These are the top 6 ways to convert any photo to a PDF on your iPhone. Apart from these native methods, you can use online tools like PDF24 & SmallPDF or third-party apps like JPG to PDF & PDF Creator for this task. If you found this article helpful, let us know in the comments!
Microsoft Word offers a diverse range of tools and functions to edit and stylise your text. Sometimes, these tools can be a bit tricky to find. If you’ve ever made a checklist on Word, you’ll know what we are talking about. While bullet points are easy to access, searching for checkboxes can take some time and effort. Well, not anymore. In this article, we bring you 2 quick ways to add checkboxes to your Microsoft Word document.Read Also:Best 4 ways to check if your smartphone is e-SIM compatible
In This Article
Add checkboxes to a Word Document from the Paragraph toolbar
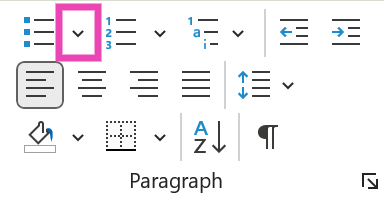
Step 1: OpenMicrosoft Word on your PC or laptop.Step 2: Hit the downward arrow next to the bullet points tile in the Paragraph section.Step 3: Click on Define New Bullet.Step 4: Click on Symbol.Step 5: Select the checkbox symbol and hit OK.Step 6: The checkbox symbol will appear on the document.
Use Developer Options
Step 1: Open a Word Document and click on File at the top left corner of the screen.Step 2: Click on Options at the bottom left corner of the screen.Step 3: Switch to the Customise Ribbon tab.Step 4: Click the checkbox for Developer in the Main Tabs list. Hit OK.Step 5: Move your cursor to the spot where you want to insert the checkbox.Step 6: Go to the Developer tab and click the checkbox in the Control section.
Frequently Asked Questions (FAQs)
How do I add checkboxes to my Microsoft Word document?
To make a checklist, simply hit the downward arrow icon next to the bullet points tile and go to Define New Bullet>Symbol>Checkbox.
Why can’t I tick boxes in Word?
To make a clickable checkbox in Word, go to File>Options>Customise Ribbon and click the Developer checkbox in the Main Tabs list. Once that’s done, move your cursor to the place where you want to add the checkbox, then go to the Developer tab and click the checkbox option in the Control section.
These are the top 2 ways to add checkboxes to any Microsoft Word document. Using the extended Symbols list, you can add other symbols like arrowheads, checkmarks, clockfaces, stars, and more. Know any other ways to add a checkbox to your Word document? We’d love to know in the comments!
A new “It’s a Match!” and animations give a new look to the online dating app.
Profile Quiz now lets users know about compatibility potential with potential matches.
Popular dating app, Tinder has announced the rollout of new features to attract Gen Z on its platform that care about authentic connections formed through shared interests and common causes. The dating app has introduced a new suite of profile and discovery features including Profile Prompts, Profile Quiz, Basic Info Tags, Enhanced Reporting, Rizz-first Redesign and Dark Mode. The new profile and discovery features are said to make finding an authentic and real partner online easy but fun.
In This Article
Profile Prompts
The dating app, Tinder’s latest update has introduced a new feature- Profile Prompts. This feature allows users to choose and respond to prompts to let their matches discover more about them. This is said to unleash your personality and the three most popular prompts globally are: “The key to my heart is”, “The first item on my bucket list is”, and “Two truths and a lie”.
Profile Quiz
Profile Quiz is another feature that comes with the latest update on Tinder. The Profile quiz function lets you find compatibility potential with potential matches through a fun and enlightening quiz about yourself. One can share their quiz answers on their profile to give people a peek at your interests and preferences.Also Read:OnePlus AI Music Studio, a platform allowing users to compose music launched in India and globally
Basic Info Tags
In order to share important information about yourself with your potential matches like whether you have a pet or drinking habits, your zodiac sign and your love language one can now use Basic Info Tags.
Enhanced Reporting
In an effort to make the app safer, the online dating app now allows users to report specific profile elements for a more respectful experience.
Rizz-first Redesign
Tinder has updated its user interface with enhanced and updated animations, and a new “It’s a Match!” screen designed to keep the platform more engaging.
Dark Mode
Along with these updates, Tinder has also introduced a Dark Mode setting for users for late-night activity or discreet public matching.
Garena Free Fire is a battle royale game with regular awards and tournaments to keep players interested. If you play Garena Free Fire, you should be aware of the redeem codes that are released on a daily basis. However, because the battle royale game is banned in India, players from other countries can use the Free Fire Redeem codes daily. If you’re unfamiliar with the Garena Free Fire redeem codes or don’t know how to get them, we’ve put together a step-by-step guide to help you redeem them. Check out Garena Free Fire Redeem Codes for 22 November 2023.The Free Fire redeem codes are a great way to get free stuff. These are 12-digit codes that contain alphabets and numbers, as well as an expiration date and time. Because the Garena FF redeem codes cannot be used more than once, you should hurry to the redemption page to claim your free reward before someone else does. To get a free reward, all you have to do is go to reward.ff.garena.com/en, which is the official redemption page. Also, keep an eye on this space for daily updates on Garena Free Fire redemption codes and rewards.
In This Article
Garena Free Fire Redeem Codes Today 22 November2023
In such a modern society where digital music prevails everywhere, listening to CDs seems to be an archaic thing for most of you now. But there are still some of you who desire to make a CD that is a collection of all your favourite songs for playing back. Also, you may want to burn a delicately designed CD as a gift for a person who is important to you. Confronted with such a demand, the very need for you, for example, is how to burn Apple music to CD. Don’t worry, this post will share with you the solutions to it specifically. Just take a seat and read along.
In This Article
What You Need to Burn Apple Music to CD
Good tools are prerequisites to the successful execution of a job. So, first, you need to prepare the necessary tools on the list below so that it can go on wheels.
A Blank Recordable CD
This is indubitably needed because it is the storage media for saving converted Apple Music Songs.
A CD Drive
A CD drive is used to insert and read blank CDS. If your computer does not have a built-in CD drive, you can purchase an external CD burner and connect it to your computer via a USB cable. Alternatively, you can use a desktop computer with a CD burner.
A Music Burner
You should download the disc-burning application on Windows or Mac to burn the converted DRM-free MP3 Apple Music songs to a CD.
A Music Converter
Before you burn an Apple Music song to a CD, you need to use a certain music converter to remove DRM protection from Apple Music and convert Apple music to MP3 format or any other format the CD can recognize.
Preparations Before Buring Apple Music to CD
As mentioned before, Apple Music songs are encrypted with DRM. Therefore, before burning music onto a CD, the first and necessary step is to make sure the songs you want to burn are free of DRM. To remove the DRM, you will need a music converter.
After searching and trialling, MuConvert Apple Music Converter is discovered as the leading helper which is designed specially to adapt to your needs. It is an easy-to-use software program dedicated to removing DRM from Apple Music songs, and quickly downloading songs/playlists/albums/podcasts from Apple Music into high-quality MP3, WAV, M4A, and FLAC formats.
Highlighted Features of MuConvert Apple Music Converter
Get rid of DRM Protection: Easily remove DRM from Apple Music songs for you.
Multiple Output Formats: Download Apple Music to local MP3, M4A, WAV, and FLAC formats.
Best Audio Quality: Get your desired audio quality by adjusting the sample rate and the bit rate.
Fast Converting Speed: Convert Apple Music at a lightning-fast speed of up to 10X speed and batch download all your favourite Apple Music songs in one go.
Preserve ID3 tags: Song details like title, artist, album, genre, and album will be perfectly preserved throughout the conversion process to facilitate efficient management and organization of your music collection.
How to Remove DRM from Apple Music
Here are the steps on how to use MuConvert Apple Music Converter to remove DRM, and download Apple Music songs in MP3. For lossless quality, you can also download them in WAV.
STEP 1. Install MuConvert Apple Music Converter
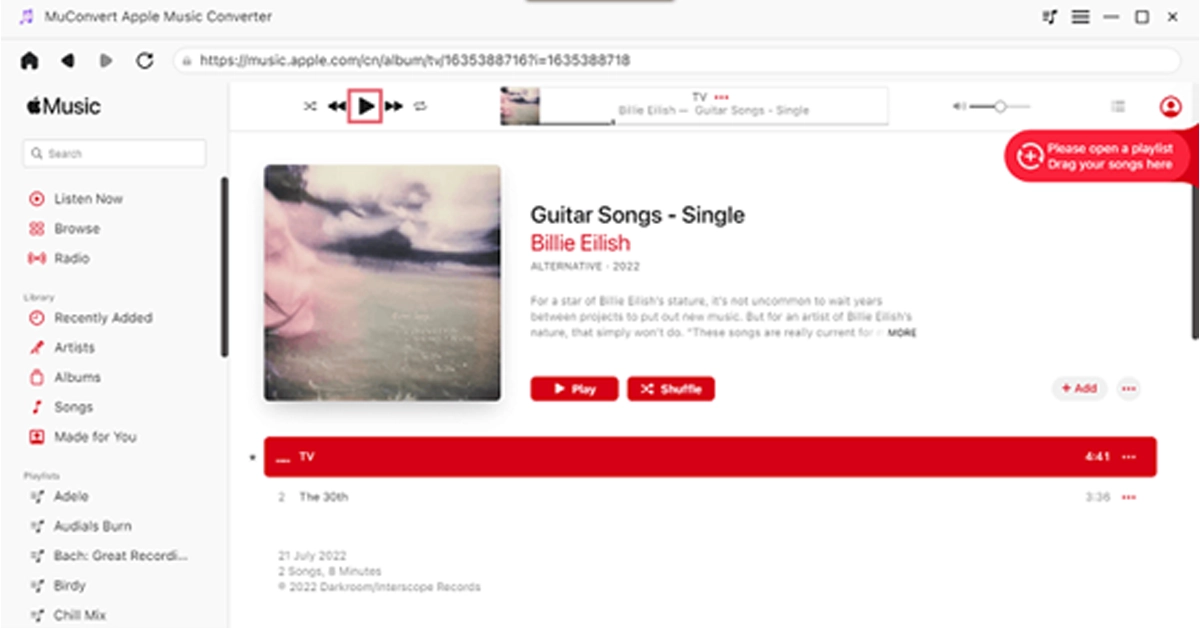
After downloading and installing MuConvert Apple Music Converter, launch it. Then enter the Apple Music web player and log in using your Apple ID.
STEP 2. Add Your Desired Song for Conversion
After logging in, go to the Apple Music web player and choose some songs to download. Simply drag any song, playlist, or album you like to the “+” button located on the right for conversion.
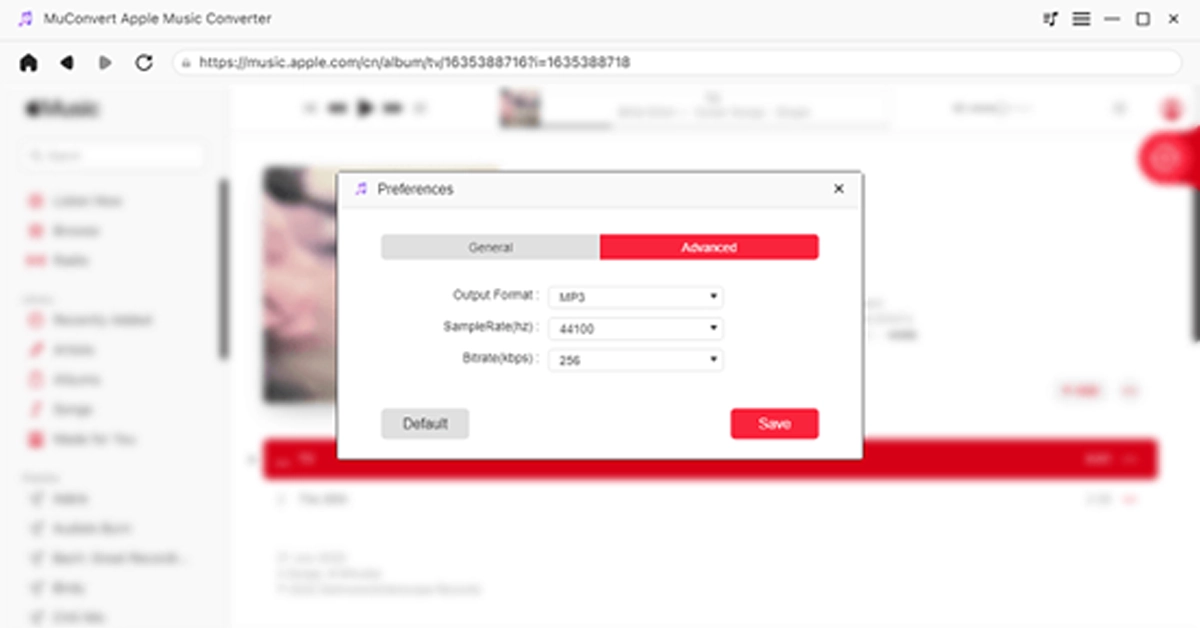
STEP 3. Customize Your Settings (Optional)
Navigate to the “Menu” and select “Preferences” to customize the “Advanced” settings. Within this window, you have the option to adjust the format, sample rate, and bitrate based on your preferences.
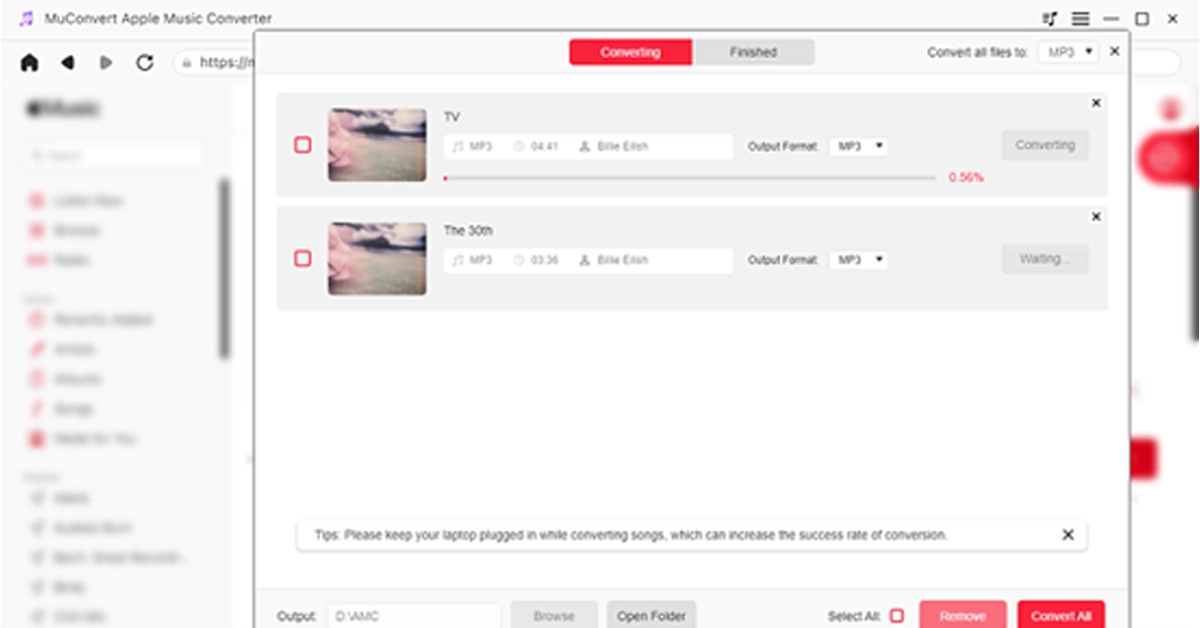
STEP 4. Remove DRM and Download Music to MP3
Now, go to “Convert all files to” in the top right corner and select “MP3” as the output format. Finally, click on the “Convert All” icon at the bottom, and MuConvert Apple Music Converter will remove the DRM from the Apple Music songs, and download all the Apple Music songs you’ve selected to MP3.
Now that you have all DRM-free Apple Music songs, the next step is to burn them into your CD. Keep reading for detailed steps.
Burn Apple Music to CD on Windows
For Windows users, Windows Media Player, a default legacy Apple Music to CD converter, is highly recommended for you to burn Apple Music to CD without additional software. It is easy to use and completely free. Follow the steps below to start burning Apple’s music to a CD.
Step 1. Insert a blank CD and then run Windows Media Player immediately.
Step 2. Choose the “Burn” tab located in the upper-right corner.
Step 3. In File Explorer, find the music files you want to burn. Drag them to the burn list.
Step 4. Click “Start Burn” to begin burning your music files to the CD. Wait for the process to finish before taking away the CD to avoid losing progress or sabotaging your efforts.
Burn Apple Music to CD on Mac
If you are a Mac user, iTunes is often the primary choice for you when it comes to burning Apple Music onto CDs. It can be utilized effortlessly without necessitating the search for an alternative CD burner. Now, let’s read about how to burn Apple Music to CD with iTunes. Note that a playlist needs to be established before burning.
Step 1. Open iTunes and create a new playlist by clicking on “File”-“New”-“New Playlist”. Proceed to name the playlist accordingly before dragging and dropping these converted Apple Music songs into the playlist.
Step 2. Please insert the blank CD into the CD drive. Subsequently, a prompt will appear stating “A CD or DVD has been inserted.” Click on “OK”.
Step 3. Right-click on the playlist and choose the option “File” followed by “Burn the Playlist to disc”.
Step 4. In the popped-up window, either select “Audio CD” or “MP3 CD”, and then click the “Burn” button at the bottom to start burning Apple Music songs to the disc.
Read Also:Qualcomm introduced Bluetooth aptX Lossless Audio feature
Final Words
By and large, this post mainly introduces you to how to burn Apple music to CDs easily as well as quickly. From the very tools you need to the specific procedures listed for reference, everything is to the most extent illustrated and covered to better help you solve your problems. It’s worth mentioning that the key to burning Apple Music songs to CD is removing the DRM and downloading them to your desired format via MuConvert Apple Music Converter. This music converter surely helps you a lot. Don’t hesitate anymore, download it now!
The Music Studio allow its user to create lyrics and compose music.
The users can share their compositions with a global audience.
To bridge the gap between technology and artists OnePlus has officially announced the launch of OnePlus AI Music Studio in India. The company’s most recent community-first innovation is available for both users in India and other international markets. The platform uses AI technology that enables users to create, develop, and unleash their musical skills. Ishita Grover, Director of Marketing at OnePlus India said, At OnePlus, we’re dedicated to fostering innovation and enabling our community to push boundaries. The OnePlus AI Music Studio embodies our commitment to empowering users to explore their creativity in unprecedented ways.”According to OnePlus, Music enthusiasts can explore their creative potential in an immersive setting at the OnePlus AI Music Studio. It provides a diverse range of genres, which include EDM, hip-hop, and rap to users to become independent composers.
In addition to this users can compose lyrics and easily blend them with AI-generated beats with the help of this OnePlus AI Music Studio. On the platform, users will be able to generate visually stunning interfaces, that result in captivating music videos that are instantly available at their fingertips.Also Read:Nothing Chat App with Blue Bubbles removed from Google Play Store after criticism“The OnePlus AI Music Studio isn’t just a tool; it’s an unparalleled fusion of technology and creativity, providing users the opportunity to unleash the artist within. It’s about giving our community the power to shape their musical journey,” added Ishita Grover.The OnePlus AI Music Studio allows users to share their compositions with a global audience, asking them to download and feature their works on many social media platforms. Moreover, the platform also offers means of acknowledgement by enabling users’ tracks to be voted to the top and potentially featured by OnePlus.
How to create music using the OnePlus AI Music Studio
After that enter the OTP shared to your registered mobile number.
Click on “Create Music” and select your preferred genre, mood and theme.
Click on Proceed Provide a prompt for the AI to create your lyrics. It could be anything general from “Under the stars” to something that’s personal to you.
Wait a couple of minutes for the AI to write your song, create your music and the music video.
Your Windows PC’s screenshot-taking chops have come a long way over the years. You no longer need to rely on the native screengrab function triggered by the PrtScn key. Instead, you can use the Windows Snipping Tool to take screenshots of more specific parts of the screen. Other than the Snipping Tool, you can also make use of the Xbox Game Bar to take screengrabs and screen recordings. In this article, we bring you the top ways to open the Windows Snipping Tool with a keyboard shortcut.Read Also:How Computers Ensure Randomness in Online iGaming
In This Article
Here are the 2 most common keyboard shortcuts to open the Windows Snipping Tool
Windows Key + Shift + S: Pressing this key combination will trigger the Snipping tool into action. You will see a small toolbar appear at the top of the screen. You can choose the shape you want for the screenshot from this toolbar. To take a screenshot, simply click and drag the cursor along the screen.
PrtScn key: If your PC or laptop keyboard has a PrtScn key on the top row, you can press it to trigger the Windows Snipping Tool. In older versions of Microsoft Windows, pressing this key will take a screenshot of the entire screen, which can later be pasted on any photo editing tool.
What if the Windows Key + Shift + S keyboard shortcut does not trigger the Windows Snipping Tool?
Follow these steps to make sure your PC launches the Snipping Tool after hitting the Windows Key + Shift + S shortcut.Step 1: Go to C:\ProgramData\Microsoft\Windows\Start Menu\Programs\Accessories.Step 2: Right-click on Snipping Tool and select Properties.Step 3: Switch to the Shortcut tab.Step 4: Enter Windows Key + Shift + S in the Shortcut Key field.Step 5: Hit Apply and OK.
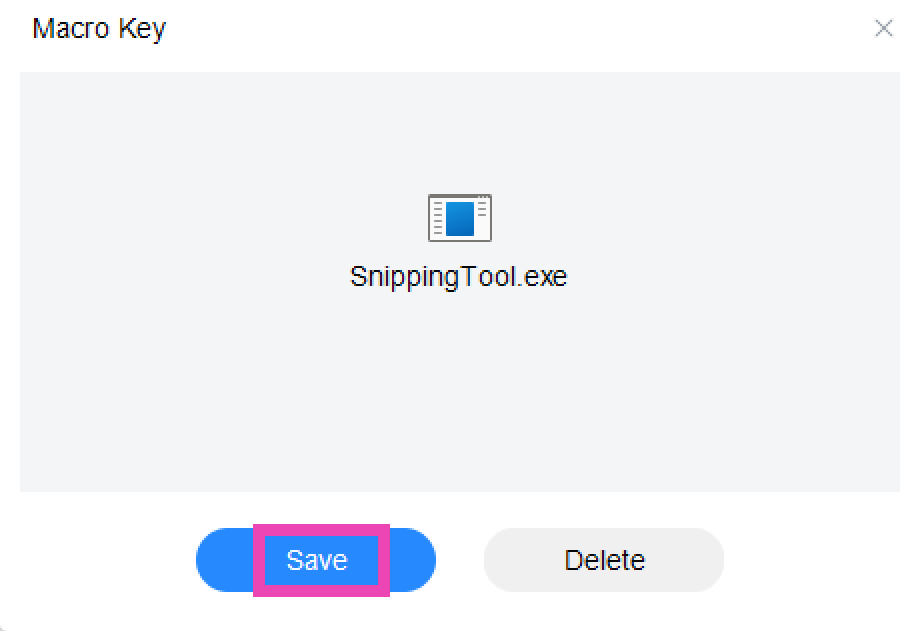
Bonus Tip: Use the Macro Key
If your PC or laptop keyboard has an extra macro key, you can program it to trigger the Windows Snipping Tool. Simply launch the Macro Key app and drag the Snipping Tool icon from C:\ProgramData\Microsoft\Windows\Start Menu\Programs\Accessories to the Macro Key app window. You can also click on ‘Add’ and navigate to the location of the Snipping Key tool. Once that’s done, you can launch the tool simply by pressing the macro key on your keyboard.
Frequently Asked Questions (FAQs)
Where can I find my Snipping Tool screenshots?
To find your Snipping Tool screenshots, go to Pictures>Screenshots.
What is the keyboard shortcut for Windows Snipping Tool?
The Windows Snipping Tool can be triggered by the ‘Windows Key + Shift + S’ key combination. You can also access it by pressing the PrtScn button on your keyboard.
These are the top ways to open the Windows Snipping Tool using a keyboard shortcut on your PC and laptop. If your device does not have the Snipping Tool, you can simply install it from the Microsoft Store. The Snip and Sketch app is no longer available for Windows 11 users. If you found this article helpful, let us know in the comments!

")
 Step 2: Tap on a Highlight.
 Step 3: Swipe up on the screen or tap on Activity at the bottom left corner of the screen.
 This is where you can see the names of everyone who has viewed your Instagram Highlight.

 Step 3: Click on a Highlight.
 Step 4: Click on the view counter at the bottom left corner of the screen.
 In the following popup box, you will be able to see who viewed your Instagram Highlight.


 Also Read:

 Step 4:
 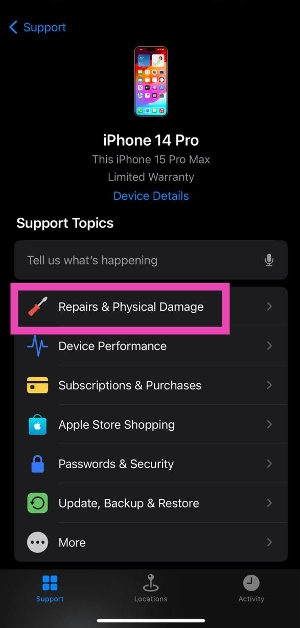 Step 5:
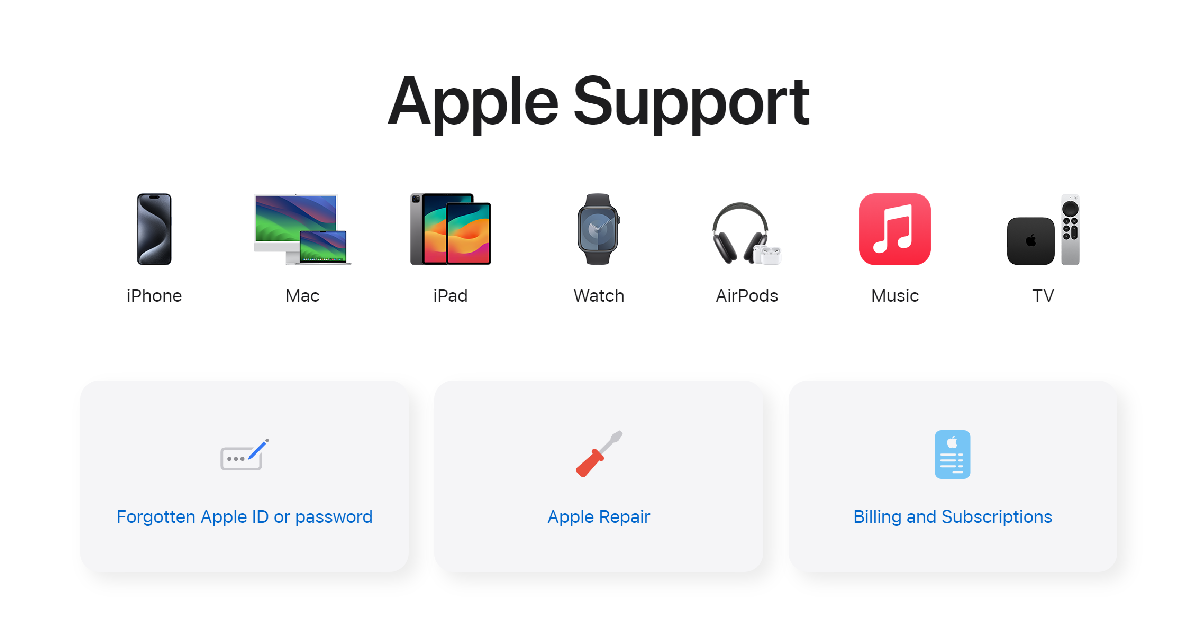

 Step 3:
 Step 4:
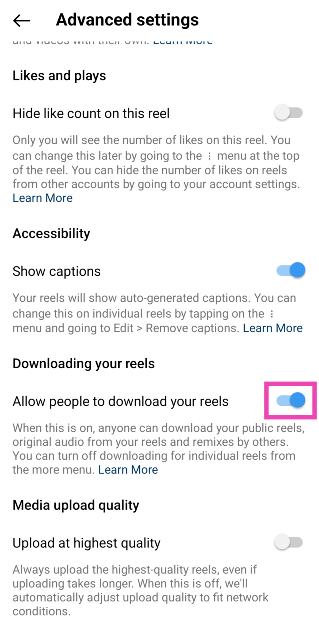 Step 5:
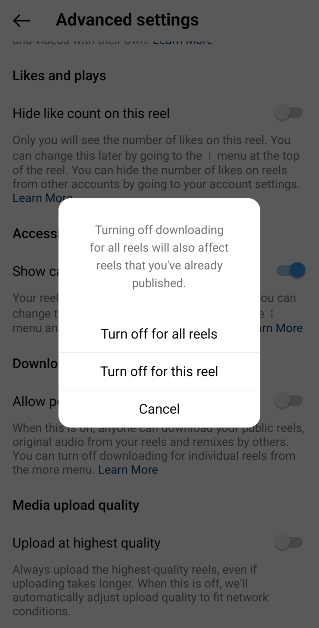

 Step 4:
 Step 5:
  Step 6:
 Step 7:
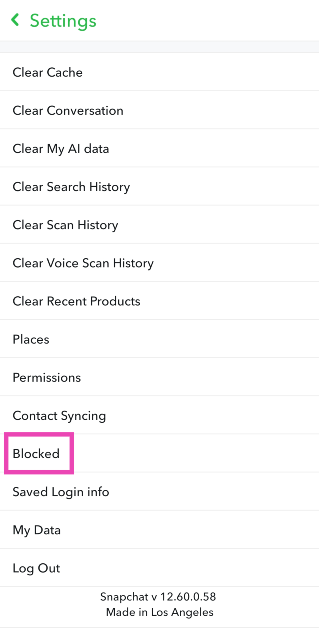 Step 8: Hit the cross icon to unblock your friend
 Step 3:
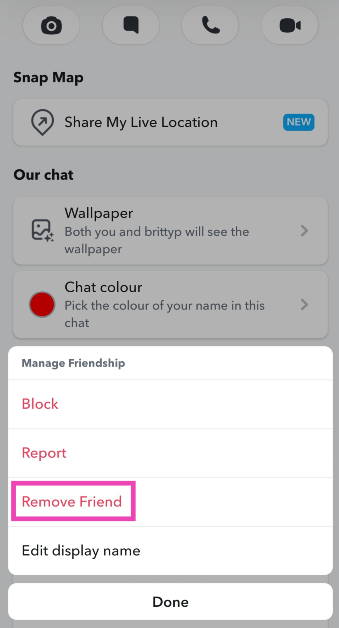


")


 Step 3:
 Step 2:
")
 Step 1: Launch
  Step 1:


 Step 3:
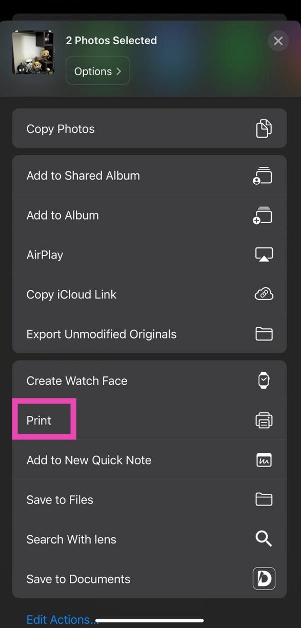 Step 4:
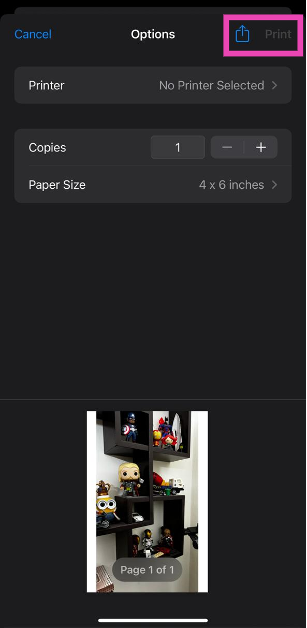 Step 5:
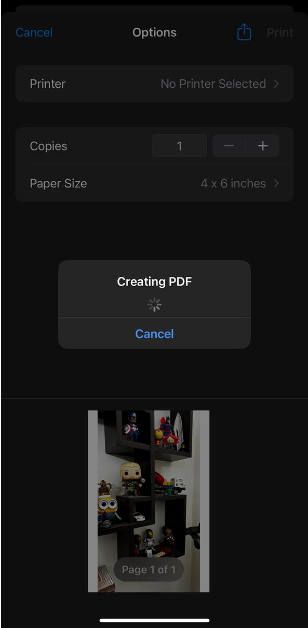
 Step 3:
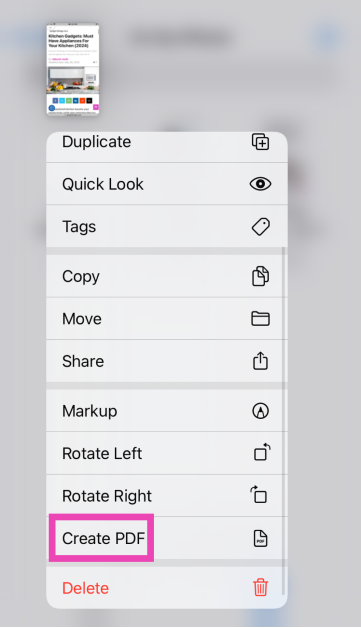
 Step 3:
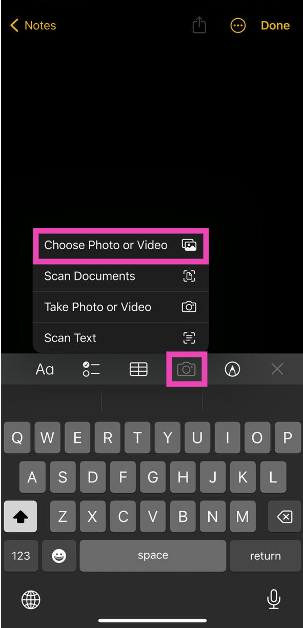 Step 4:
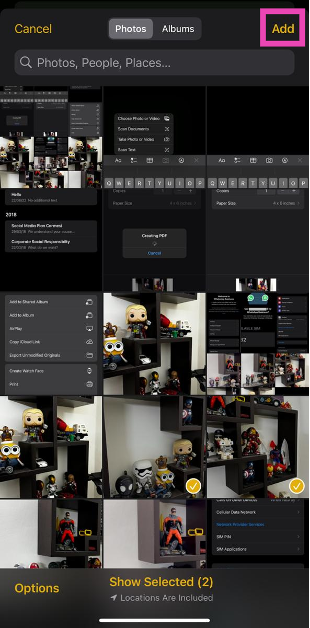 Step 5:
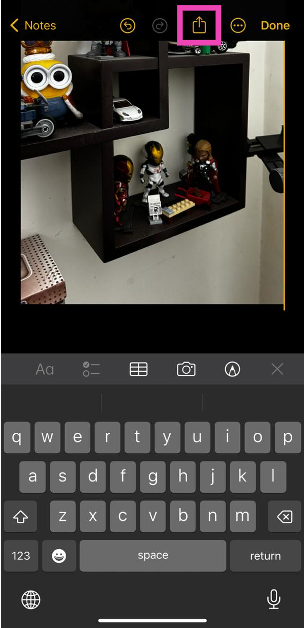 Step 6:
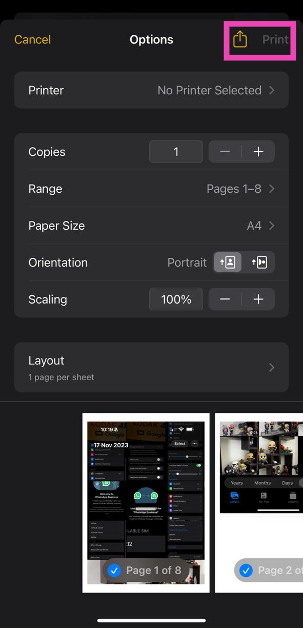 Step 7:
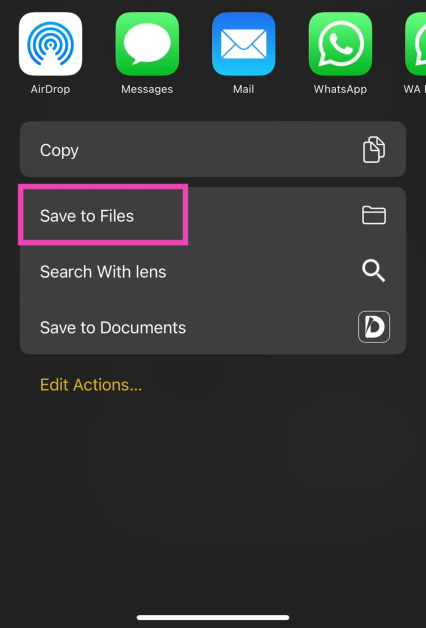
 Step 3:
 Step 4:
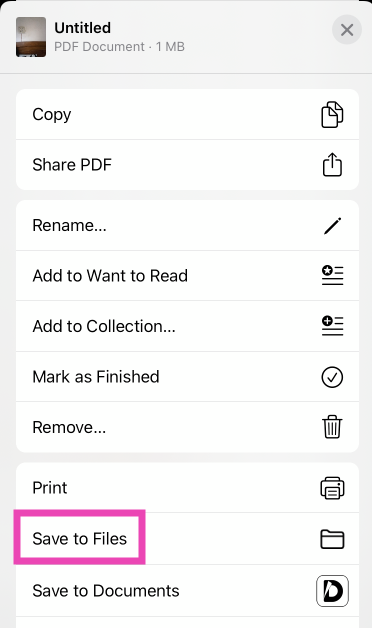
 Step 2: Tap on Add Action.
 Step 3: Search for the Photos app and tap the Select Photos action.
 Step 4: Turn on the toggle switch next to Select Multiple.
Step 5: Hit the Search bar at the bottom of the screen and select Categories.
Step 4: Turn on the toggle switch next to Select Multiple.
Step 5: Hit the Search bar at the bottom of the screen and select Categories.
 Step 6: Tap on Media and select Convert Image.
 Step 7: Tap on JPEG and select PDF.
 Step 8: Hit the Search bar at the bottom of the screen and select Apps.
 Step 9: Tap on Files and select Save Files.
 Step 10: Hit Done in the top right corner of the screen.
Step 11: When the Shortcut has been created, launch it and select the images you want to convert to PDF.
Step 10: Hit Done in the top right corner of the screen.
Step 11: When the Shortcut has been created, launch it and select the images you want to convert to PDF.
 Step 3: Select an image and hit Add.
 Step 4: Tap on Next.
 Step 5: Select the Margins, Orientation, and Size. Hit Done.
 Step 6: Once the PDF has been created, select Save to Files.

 Step 3:
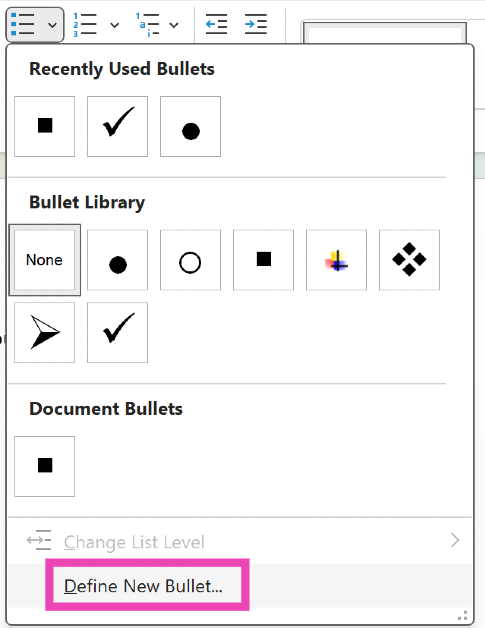 Step 4:
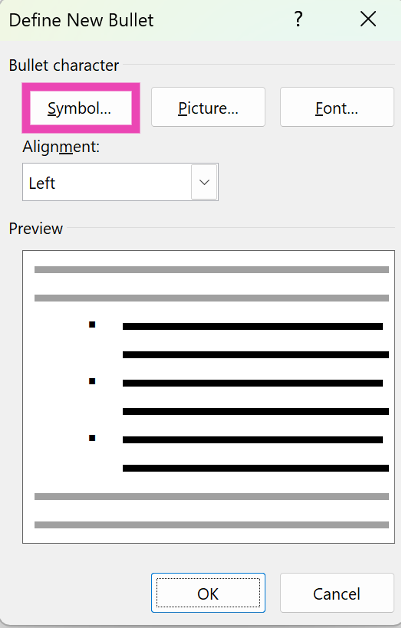 Step 5:
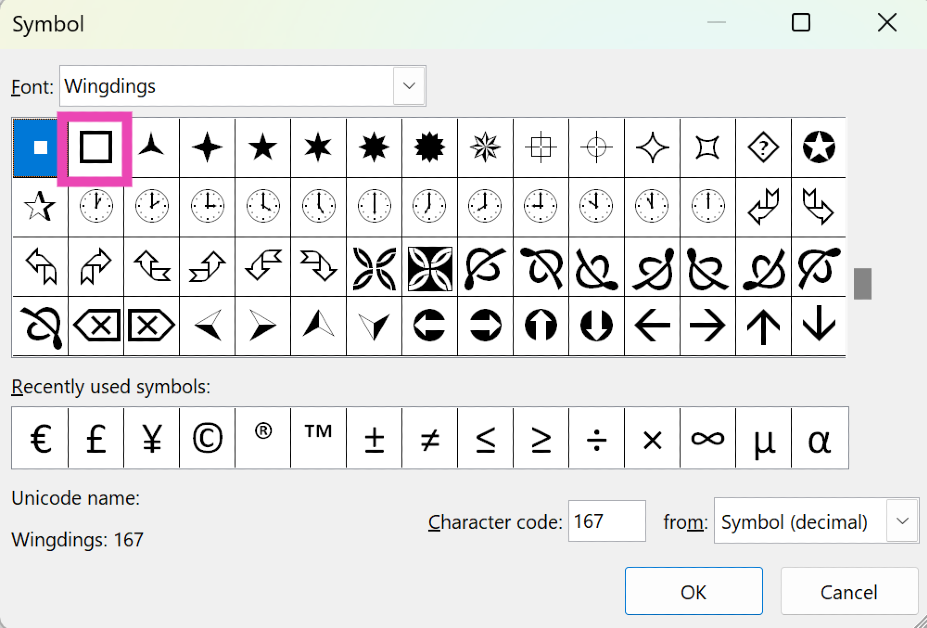 Step 6:
 Step 3:
 Step 4:
 Step 5:


")
 STEP 3. Customize Your Settings (Optional)
Navigate to the “Menu” and select “Preferences” to customize the “Advanced” settings. Within this window, you have the option to adjust the format, sample rate, and bitrate based on your preferences.
STEP 3. Customize Your Settings (Optional)
Navigate to the “Menu” and select “Preferences” to customize the “Advanced” settings. Within this window, you have the option to adjust the format, sample rate, and bitrate based on your preferences.
 STEP 4. Remove DRM and Download Music to MP3
Now, go to “Convert all files to” in the top right corner and select “MP3” as the output format. Finally, click on the “Convert All” icon at the bottom, and MuConvert Apple Music Converter will remove the DRM from the Apple Music songs, and download all the Apple Music songs you’ve selected to MP3.
STEP 4. Remove DRM and Download Music to MP3
Now, go to “Convert all files to” in the top right corner and select “MP3” as the output format. Finally, click on the “Convert All” icon at the bottom, and MuConvert Apple Music Converter will remove the DRM from the Apple Music songs, and download all the Apple Music songs you’ve selected to MP3.
 Now that you have all DRM-free Apple Music songs, the next step is to burn them into your CD. Keep reading for detailed steps.