Poco X5 5G is all set to launch in India today. The upcoming phone is the most anticipated device that is the sibling of the Poco X5 Pro 5G which debuted in India last month. Also, the company has teased the release of the smartphone on Twitter. The specifications and cost, which are currently a mystery, have not been made public by the corporation. Yet, prior to the formal release, details including the expected pricing and the specifications have already appeared online.Poco X5 5 G’s India launch is going to happen today. The company will be hosting an online launch event that will be broadcast live at 12 noon IST. The event will be live-streamed via Poco’s official YouTube channel and multiple social media platforms including Facebook and Twitter.You may watch it live right here on our website, though, by clicking the link below.
Poco X5 5G is going to be a toned-down version of the Pro model that will be available for purchase at a drastically reduced cost. To tease its arrival, the phone has also been listed on the Indian e-commerce website Flipkart. Keep in mind that the device has already made its debut in a few places around the world, so we are well aware of its features.
Poco X5 5G specifications
Poco X5 5G global model features a 6.67-inch AMOLED full-HD+ display that has 1,080 x 2,400 pixels of resolution. The screen also has a hole punch cutout to house a selfie camera and support a 120Hz refresh rate. The phone runs on MIUI 13 with Android 12 and is powered by Snapdragon 695 SoC. The smartphone is provided with up to 8GB of LPDDR4X RAM and up to 256GB of UFS2.2 storage.For photography, the device houses a triple camera setup at the back that includes a 48MP primary camera, an 8MP secondary lens and a 2MP tertiary lens. There will be a 16MP front-facing camera for selfies and video calling.Additionally, the phone will include a 5,000mAh battery with 33W fast charging support. There will be a side-mounted fingerprint sensor as well for biometrics.Last month, the Poco X5 5G was made available in select countries. Black, Blue, and Green are the three colour choices that are available. The handset would probably cost less than 20K in India.
For the latest gadget and tech news, and gadget reviews, follow us on Twitter, Facebook and Instagram. For newest tech & gadget videos subscribe to our YouTube Channel. You can also stay up to date using the Gadget Bridge Android App. You can find the latest car and bike news here.
We have been using the Poco X5 Pro 5G for the past couple of weeks. The design, comfort, and functionality of this phone were all fantastic. The cost, which starts at Rs 22,999, is also excellent and represents great value for money. Yet, it does have a few quirks that we shall discuss in this Poco X5 Pro 5G review.
In This Article
Poco X5 Pro 5G Review: Design and Display
We have to admit that the Poco’s Yellow colour is stunning. It is a mellow yellow that is pleasant to the eye because it is not very intense. It has a matte finish that deters the accumulation of smudges and fingerprints. The design is also extremely similar to that of the Poco X4 Pro from the previous year. It features a wide camera module with the same boxy shape. Nevertheless, because the company opted for plastic construction this time around rather than glass, the smartphone does not seem extremely premium. As a result, this move has also significantly reduced weight, which now only weighs 180 grams. Triple rear cameras are placed up on a large area on the back panel. The device has an IP53 certification for splash and dust resistance.Also Read:Vivo V27 Pro Review: More than just a camera focussed smartphoneThe power button with the yellow accent that also functions as a fingerprint scanner steals the show because it operates so quickly and accurately. It should be noted that the Poco Yellow colour option only has this yellow power button, but the blue and black versions of this phone have the matching colour button.The Poco X5 Pro 5G’s 6.67-inch HD AMOLED Display boasts an adaptive refresh rate of 120Hz. The screen’s maximum brightness is 900 nits, and its touch sampling rate is 240Hz. The display is HDR10+ compatible and protected by Gorilla Glass 5.The device is buttery smooth thanks to the 120Hz adaptive refresh rate and 240Hz touch sampling rate, especially when you’re scrolling through a webpage or your preferred social media app. As was already said, it has an adaptive refresh rate, thus depending on the content you are viewing, it will shift between 30, 60, 90, and 120Hz. Moreover, this lengthens battery life. We streamed 4K HDR content on YouTube, and it played flawlessly at full 4K resolution without any lag or frame drops. There is also Widevine L1 certification which streams content from OTT apps like Netflix, and Amazon videos at full definition. Dolby Atmos and Dolby Vision are also supported by the phone. The brightness is quite amazing and the colours are calibrated nicely.Dual stereo speakers up the ante, but Dolby Atmos makes it much more immersive—trust us—it feels like you’re in a small theatre.We are happy to find that the headphone jack is still present — this is not a frequent thing. Now that your wired headphones are connected, you can listen to clear audio. The device also comes with an IR blaster which is such an undervalued piece of technology. You may use the Mi Remote app to operate your gadgets like your AC all the time. It is quite useful.
Poco X5 Pro 5G Review: Performance and Cameras
The Poco X5 Pro 5G is equipped with a 6nm Qualcomm Snapdragon 778G Processor and an Adreno 642L GPU. It does indeed support 5G. Performance-wise, it is dependable and consistent. Multitasking, switching between apps and opening them all performed flawlessly. We didn’t experience any latency or app crashes during any of these days. Our device has 8GB of RAM and 256GB of internal storage out of the box. It supports LPDDR4X RAM, which can be increased to a maximum of 13GB by an additional 5GB using the RAM extension options. The majority of your recently used apps will remain in memory thanks to this.Also Read:OnePlus 11 review: This is what a OnePlus flagship should look likeCall of Duty was a fantastic game on this mid-range phone, and we only played it for a short while, but it was a great experience. You get gameplay that is snappy, intuitive, and very fluid. After playing nonstop for 30 minutes, the smartphone did begin to heat up, but not enough to make it unpleasant.In terms of software, MIUI 14 for Android 12 is being used. Such a good thing that we get the latest MIUI version but Android 13 along with that would have been great. To counter this, Poco has pledged to provide its smartphone with 3 years of security patches and 2 years of Android OS updates. Overall, the OS has undergone extensive optimization and is undoubtedly cleaner than previous iterations, although bloatware is still a major problem. Of course, you can remove the apps you don’t need from this list as well.Getting to the camera, Poco X5 Pro 5G boasts a triple rear camera setup, the primary one of which is a 108-megapixel ISOCELL HM2 main sensor. A 2-megapixel macro camera and an 8-megapixel ultra-wide angle lens are included too. A 16-megapixel selfie camera is located on the front. The back camera module can record 4K video at 30 frames per second, whereas the selfie camera can record full-HD film at 120 frames per second.daytime shotThe back camera’s daytime pictures are flawless. They provide outstanding colour reproduction and a fantastic dynamic range. The primary sensor’s clarity is just remarkable. The skies are incredibly detailed and don’t get blown up. This portrait capture, which once again performs an excellent job with edge detection, produces some incredibly beautiful results.shot from the 108MP sensorThe 8-megapixel sensor’s ultra-wide photos have beautiful colours that are sharp and have a respectable dynamic range. They generally get good detail.wide/ultrawideNow, the 2-megapixel macro images are decent. In fact, you can take pictures up close and personal.primary camera shot vs portraitIn direct sunlight, the 16-megapixel selfies do overexpose. Although the dynamic range isn’t the highest, the crispness is still excellent. Even if portrait shots have good edge recognition, they are nonetheless overexposed and very flat.indoor ligtings/night modeThe rear camera can capture 4K videos at 30 frames per second that are sharp and barely shaken. Full HD video can be captured by the front camera, however, it feels overexposed and is best used indoors.As for the battery, it has a 5,000mAh capacity and can easily power the device for a day or perhaps a day and a half under moderate use. The phone can be charged from 0 to 100% in less than an hour using the included 67-watt charger.
Verdict
If your budget is between 20 and 25K, the Poco X5 Pro 5G (price starts at Rs 22,999) checks off every requirement you have for a smartphone. It has a 120Hz AMOLED display, outstanding performance, and sturdy construction. We won’t complain too much about the user interface, but Pixel is your only option if you prefer a cleaner UI. Over that, the gaming experience won’t disappoint you. Also, the battery’s and charging performance are rather good. Beyond the software, this is a great package to purchase.
Garena Free Fire is a battle royale game with regular awards and tournaments to keep players interested. If you play Garena Free Fire, you should be aware of the redeem codes that are released on a daily basis. However, because the battle royale game is banned in India, players from other countries can use the Free Fire Redeem codes daily. If you’re unfamiliar with the Garena Free Fire redeem codes or don’t know how to get them, we’ve put together a step-by-step guide to help you redeem them. Check out Garena Free Fire Redeem Codes for 14 March 2023.The Free Fire redeem codes are a great way to get free stuff. These are 12-digit codes that contain alphabets and numbers, as well as an expiration date and time. Because the Garena FF redeem codes cannot be used more than once, you should hurry to the redemption page to claim your free reward before someone else does. To get a free reward, all you have to do is go to reward.ff.garena.com/en, which is the official redemption page. Also, keep an eye on this space for daily updates on Garena Free Fire redemption codes and rewards.
In This Article
Garena Free Fire Redeem Codes Today 14 March 2023
Updating Soon
How to Get Free Fire Redeem Codes for Garena on 14 March 2023?
14 March 2023 Amazon Quiz has gone live. Customers from different parts of the country are participating in the daily quiz. The quiz begins from 12 AM to 11:59 PM. Those participating in the quiz can win exciting prizes by answering all the questions correctly. Today participants have a chance to win a Rs 500 Amazon Pay Balance.Amazon quiz brings an opportunity for its customers to win Amazon Pay Balance ranging from Rs 1,000 to Rs 50,000. The Quiz can be played from 12 AM to 11:59 PM. The e-commerce platform brings a fresh quiz on a daily basis which consists of five questions related to general knowledge and current affairs. The participants need to answer all the questions correctly and their names will be selected for a lucky draw. The winner will be announced at the end of the month.One wrong answer could eliminate you from the quiz. If you manage to answer all the questions correctly you can stand a chance to win a Rs 500 Amazon Pay Balance today. Only app users are eligible to participate in the Quiz. Check Out 14 March 2023 Amazon Quiz Answers.Amazon Quiz Today Prize – Rs 500 Amazon Pay BalanceQuiz Date – 14 March 2023Daily Timing – 12 AM to 11:59 PMWinner Announcement – Today 12 PM
In This Article
Amazon Quiz Answers Today 14 March 2023
Question 1: Which of these actresses performed in the opening ceremony of the Women’s Premier League?Answer: Kiara AdvaniQuestion 2: The movie Gulmohar stars which of these actresses playing the role of Kusum Batra?
Answer: Sharmila TagoreQuestion 3: Dr. John H. Watson usually appears in books and movies alongside which detective?
Answer: Sherlock Holmes
Question 4: Name this famous monumentAnswer: Rumi DarwazaQuestion 5: This is a picture taken in which continent?
Answer: Antarctica
How To Play Amazon Quiz
Only app users are eligible to play the Amazon quiz every morning from 12 AM to 11:59 PM. The quiz is not available on the desktop. For those who are unaware of how to play the Amazon quiz below are the steps, you can follow to take the quiz.
Firstly download the Amazon app from Google Play Store or App Store
Now fill in the required information through the Sign Up option.
You need to log in to the Amazon app and scroll down on the home screen to find the Amazon Quiz banner.
Tap on the Amazon Quiz banner and tap on the Start button to start the Quiz.
Now you will get 5 questions and you need to answer them correctly. One wrong answer will eliminate you from the Quiz.
After answering all the questions correctly you are now eligible for a Lucky Draw.
The winner’s name will be announced today at 12 PM.
One of the biggest issues that users have with smartphones is the commonness in software design and how there’s very little that separates Android smartphones these days. If you want a unique look for your phone, you can apply different themes on the OS. Another thing you can do is install attractive fonts that make the browsing experience on your smartphone more fun. In this article, we bring you the best ways to install fonts on your Android smartphone. Read Also:How to Connect Windows 10 and Android smartphone Using Microsoft’s Phone Link app
In This Article
Download and Install fonts from Settings
Step 1: Go to Settings and select Display.Step 2: Tap on ‘Font size and style’.Step 3: Select ‘Font style’.Step 4: Choose one of the native fonts or tap on ‘Download fonts’ to view more.Step 5: Download the font apps you want by clicking on the arrow icon next to them.Step 6: Go back to the ‘Font style’ page and select one of the newly downloaded fonts.The font style will be applied across the OS and supporting apps.
Install third-party font apps from Google Play Store
There are several third-party apps with an impressive library of fonts that can be applied to your Android smartphone. One of the best apps you can download is iFont. Here’s how you can install different fonts using iFont.Step 1: Download and install the iFont app from Google Play Store.Step 2: Launch the iFont app and give it the necessary permissions.Step 3: Tap on the font you want to install.Step 4: Tap on ‘Download’.Step 5: Once the font has been downloaded, select ‘Set’.
Change the font using a launcher
If you use a launcher app for your Android smartphone, chances are that it has its own set of unique fonts. Apps like Nova Launcher and GO Launcher have an extensive library of fonts that you can use to customise your Android smartphone. Simply launch the app’s Settings and go through all the fonts in the Preferences section.Read Also:Samsung Galaxy A54 5G and Galaxy A34 5G India launch set for March 16
Conclusion
These are the best ways to install fonts on an Android smartphone. You can also download certain font apps after rooting your smartphone, but it isn’t entirely necessary given that there are several third-party apps that can carry out the same job for you. Are there any particular fonts that you like to your use on your smartphone? Let us know in the comments!For the latest gadget and tech news, and gadget reviews, follow us on Twitter, Facebook and Instagram. For newest tech & gadget videos subscribe to our YouTube Channel. You can also stay up to date using the Gadget Bridge Android App. You can find the latest car and bike news here.
HMD Global today announced the launch of the Nokia C12 in the Indian market. The budget phone is the latest addition to the company’s popular C-Series. The newly launched smartphone is powered by an octa-core Unisoc 9863A1 SoC and has the option of RAM expansion. It comes with a 3,000mAh battery which supports a 5W charger. Moreover, there is a 6.3-inch HD+ display and an 8-megapixel rear camera.
In This Article
Nokia C12 price in India, sale details
Nokia C12 has been launched in India with a price tag of Rs 5,999 for the single 2GB RAM with 64GB storage option. Note that it is introductory pricing and the device will be available at its original pricing after a specific period of time. The pocket-friendly phone comes in three colour options of Charcoal, Dark Cyan, and Light Mint. The device is scheduled to go on sale from March 17 via Amazon in the country.
Nokia C12 specifications, features
Nokia C12 runs on Android 12 (Go edition). The company is promising to provide two years of quarterly security updates. Under the hood, there is an octa-core Unisoc 9863A1 SoC with 2 gigabytes of RAM and 64 gigabytes of internal storage. The built-in RAM can be expanded utilising unused internal storage by up to 4GB. Moreover, there is a dedicated MicroSD slot that allows memory to be expanded up to 256GB. The budget smartphone also features a 6.3-inch HD+ display with an aspect ratio of 20:9. The phone is also splash and dust resistant, with an IP52 rating.Also read:GrammarlyGO an on-demand generative AI communication support introduced by GrammarlyThe Nokia C12 comes with an 8-megapixel camera sensor with autofocus and an LED flash on the back. A 5-megapixel sensor is placed at the front of the device for selfies and video calls. The camera unit is capable of using time-lapse photography, portrait mode, auto HDR, and night mode. The Night and Portrait modes are enabled for both the front and the rear camera.The Nokia C12 comes with a detachable 3,000mAh battery that enables 5W rapid charging. According to claims, the battery may last all day on a single charge. The smartphone offers Wi-Fi 802.11 b/g/nc, Bluetooth 5.2, FM radio, a micro-USB connector, and a 3.5mm headphone jack as choices for connectivity. Additionally, there is an accelerometer, ambient light sensor, and proximity sensor.
For the latest gadget and tech news, and gadget reviews, follow us on Twitter, Facebook and Instagram. For newest tech & gadget videos subscribe to our YouTube Channel. You can also stay up to date using the Gadget Bridge Android App. You can find the latest car and bike news here.
Grammarly plans to enhance its AI capabilities with the integration of a brand-new feature called GrammarlyGO. The writing assistance tool’s new feature is inspired by ChatGPT which is said to improve their content using AI. Users will now be able to complete tasks faster, and be more creative, therefore saving time.The grammar-checking platform Grammarly via its blog post said, “Today, we announced to the world GrammarlyGO—Grammarly on-demand, contextually aware assistant powered by generative AI. With GrammarlyGO, we’ll be changing the way people and businesses communicate and get work done by accelerating productivity where writing happens.”With GrammarlyGO which uses generative AI the company aims to support people and businesses with on-demand communication support, whether they are writing from scratch or editing an existing piece of writing. The feature is said to deliver individually geared contextually aware suggestions that take into consideration brand voice and preferences while providing customer control over their experience.
Also Read: Samsung Galaxy A54 5G and Galaxy A34 5G India launch set for March 16According to the company GrammarlyGO features on-demand generative AI communication support directly in the writing apps. It will assist users throughout the writing process, whether it’s in an email thread or a lengthy document.Individuals and businesses can use generative AI to rewrite for tone, clarity and length. They can type a prompt and GrammarlyGO will compose high-quality writing, saving time finding the perfect words. It also understands an email’s context and instantly drafts a thoughtful reply.As per the company, GrammarlyGo will begin rolling out in beta in April to all Grammarly Premium, Grammarly Business, and Grammarly for Education (higher education) customers. It will also be available for users of Grammarly’s free plan in the US, Canada, UK, Australia, New Zealand, Germany, Poland, and Ukraine. Moreover, developers that are interested in using GrammarlyGO within the Grammarly Text Editor SDK can apply now for beta access starting in April. For the latest gadget and tech news, and gadget reviews, follow us on Twitter, Facebook and Instagram. For newest tech & gadget videos subscribe to our YouTube Channel. You can also stay up to date using the Gadget Bridge Android App. You can find the latest car and bike news here.
Truke has been on a bit of a release spree this year, putting out wireless earbuds across different categories and price points. We previously reviewed their ‘Born To Game’ series and were impressed by the sound profile and range of features on offer at very affordable pricing. The German-origin brand manufactures its products out of its Noida factory. Truke’s entry-level TWS products have gained a reputation for punching above their weight, and rightfully so. The recently launched Buds A1 by Truke are some of the most affordable TWS in the market to offer ANC. We used the Truke Buds A1 for over a week, here is our review.Read Also:How to Download Apps on Android Without Google Play Store?
In This Article
Truke Buds A1 review: Design
The Truke Buds A1 come packed in a squarish white box inside which you’ll find the charging case, earbuds, a Type-C USB cable, extra ear tips, a user manual, and a warranty card. The charging case and earbuds are housed in a flimsy plastic tray within the box. Truke’s packaging continues to be shoddy, but it’s something we have no problem with since the brand does not compromise on the really important aspects of the product.The pebble-shaped charging case is made out of plastic but the quality of the material used is surprisingly good. The in-hand feel of the case is quite good, certainly better than other entry-level TWS we’ve used so far. The case has a matte-like finish to it. The Truke branding can be found inside a cutout at the front of the case. This cutout has a small recess right where the lid meets the case. This makes it very easy to flip open the case with just your thumb. Below the cutout lies a solitary notification light.At the bottom of the case, you will find the USB charging port and a pairing button. We don’t usually get to see a pairing button on entry-level wireless headphones that often, but Truke continues to surprise us. Overall, the case feels quite sturdy. The simple design doesn’t seem boring and at the first glance, you wouldn’t peg Buds A1 as an entry-level product at all.The wireless earbuds get the in-ear design, which is the correct choice since Buds A1 also offers ANC. The earbuds offered us a comfortable, snug fit and we didn’t have to use the extra ear tips provided in the box. Out of the box, the earbuds are fixed with medium-sized ear tips. Two extra pairs of small and large ear tips can be found in a small pouch inside the box. The earbuds also house the touch control panels and 2 mics for ANC.Truke Buds A1 is rated IPX4 for water and dust resistance, which means the earbuds can handle water splashes without hampering their performance. We wore the earbuds while working out and while their performance was undeterred by sweat, the fit got loose on multiple occasions.
Truke Buds A1 review: Performance
The Truke Buds A1 deliver their audio output with 10mm dynamic driver units on either earbud. Bluetooth 5.3 support ensures smooth pairing without any hiccups. Most earbuds in this price range are still offering Bluetooth 5.2 or 5.1 support. The buds support both SBC and AAC codecs. There are 3 preset EQ modes on offer – Dynamic Audio, Bass Boost, and Movie Mode. A low latency mode for gaming mode makes Buds A1 a complete all-rounder. The earbuds play a notification alert every time you pair them to a device or switch between the different modes. These notification alerts sound very boxy and hard and they can amount to be annoying. Another thing we noticed was that the earbuds don’t disconnect when you place them back in the charging case. Even the music playback doesn’t pause once the buds are in the case. You will need to disconnect the buds using your smartphone in order to fix this.Moving on, the Truke Buds A1 offer a great sound profile that is definitely unmatched in this price segment. The overall sound is very bass-focused but other frequencies are not lost in the mix. The quality of sound does not feel entry-level at all, these earbuds could’ve easily been placed at a higher segment. The mix of frequencies is very pleasant.The level of detail produced by the dynamic drivers is quite impressive, although there is some room for improvement. The audio had a warm tone to it, which we found quite pleasant. If the audio is too bass-driven for you, you can switch to Dynamic Audio mode. We found the higher frequencies in Dynamic Audio mode to be somewhat shrill. The Normal mode and Bass Boost mode remained our staples during our time of use.The Gaming Mode on Buds A1 offers a low latency of 50ms which we found to be just acceptable while playing Call of Duty mobile. There were some occasional stutters but the overall experience was decent. If you’re looking for dedicated gaming earbuds, we would suggest Truke’s BTG X1.The hybrid ANC is certainly the biggest highlight of Truke Buds A1. At this price range, wireless earbuds with ANC are unheard of (no pun intended). The ANC performance was decent, with the Buds A1 being able to suppress up to 30dB of ambient noise. This is good enough to cancel out the background noise in a room, but don’t expect the same results when you’re outdoors. The earbuds were successful in suppressing the sound of chirping birds, distant footsteps, and faint voices. However, the sound of the traffic from outside was still able to filter through. Regardless, this is still a good performance in a segment where you don’t get this feature at all. Truke also offers ENC with the Buds A1, which is efficient in isolating the surrounding noise while voice calling.The only disappointing aspect of the Truke Buds A1 is the lack of app support. Currently, Truke has no app for its TWS products. This isn’t a big deal when buying entry-level products, but navigating multiple EQ presets along with ANC and transparency modes gets very confusing when you don’t have an app to help you with it. We have been using these earbuds for over a week and still can’t remember all the specific touch commands to activate different functions. Hopefully, Truke comes out with a dedicated app for its TWS products soon.With a 40mAh battery on either earbud, the Buds A1 can last up to 8 hours on a single charge. With Active ANC, this number drops down to 5-7 hours. There is an additional 300mAh battery pack in the charging case, which offers a playtime of up to 48 hours without ANC. It takes two hours to fully charge the case, while the earbuds take 90 minutes to fully charge. A quick 10-minute charge can provide 10 hours’ worth of battery to the case.Read Also:Moto G73 5G powered by MediaTek Dimensity 930 SoC launched in India
Verdict
At a price of Rs 1,499, the Truke Buds A1 seem like a no-brainer purchase. The sound profile is ideal for the segment and the presence of ANC definitely sweetens the deal. The charging case and earbuds have a good build quality that will easily last you a long time. IPX4 rating ensures resistance to water splashes. The lack of app support is the only issue we have with these earbuds, but the pros easily outweigh the cons here.
India has had a great year at the Academy Awards, with RRR winning the Oscar for Best Original Song and The Elephant Whisperers bagging the award for Best Short Documentary. RRR has been making waves across the world ever since its release last year and had previously won the Golden Globe award for Best Original Song (Naatu Naatu) as well. If you haven’t watched the two movies already, there are plenty of ways you can watch them online. Here’s how you can watch the Oscar 2023 India winners, RRR and The Elephant Whisperers, online.Read Also:8 Best Ways to Block a Phone Number On Android or iPhone (iOS)
In This Article
Where to watch RRR online?
RRR is currently streaming on three OTT platforms – Netflix, Hotstar, and ZEE5. The Netflix version of the movie is dubbed in Hindi and subtitled in English. If you want to watch the original Telugu version of the epic action drama, Hotstar and ZEE5 are your best options. Hotstar and ZEE5 offer the Kannada, Tamil, and Malayalam dubs of the movie as well. You can watch the Oscar-winning song from RRR, Naatu Naatu, on YouTube and listen to it across all major music streaming platforms.
Watch RRR on Netflix here.
Watch RRR on Hostar here.
Watch RRR on Zee5 here.
Where to watch The Elephant Whisperers online?
Being a ‘Netflix original’ documentary, The Elephant Whisperers is exclusively available on Netflix. You can watch the official trailer on YouTube. The documentary follows the journey of a South Indian tribal couple, Bomman and Bellie, as they decide to foster an orphaned baby elephant, Raghu. The Elephant Whisperers documents the life of the couple as they nurse and forge a bond with Raghu.
Watch The Elephant Whisperers on Netflix here.
Read Also:Best Easy Ways to Change Your Ringtone on Android and iPhone
Linking your smartphone and PC is one of the better ways to increase your productivity while carrying out certain tasks. Not only does it make it easy to access files between two devices, but it also reduces the distraction that smartphones offer every time you pick them up. While there are a bunch of third-party linking apps for your smartphone and PC, the native Phone Link app on your Windows device is all you need to carry out the pairing. In this article, we show you how to connect your Windows 10 PC or laptop to your Android smartphone using Microsoft’s Phone Link app.Read Also:Stolen or lost Android phone? Here’s how to find it and get it back
In This Article
Here’s how you can link your Android smartphone and Windows 10 PC
Step 1: Launch the Your Phone app on your Windows PC.Step 2: Download and install the Link to Windows app on your Android smartphone from the Google Play Store.Step 3: Choose whether you want to pair your smartphone manually or by using a QR code. Connecting via a QR code will be quicker.Step 4: On your smartphone, launch the Link to Windows app and select ‘Link phone and PC’.Step 5: Select ‘Continue’ and scan the QR code on your PC from your smartphone.Step 6: To pair manually, tap on ‘Link manually’ on your PC and tap on ‘Try another way’ on your smartphone.Step 7: Sign in to your Microsoft account on your smartphone.Step 8: On your PC, click on Create PIN code.Step 9: Enter the PIN code in the Link to Windows app on your smartphone.Step 10: Give the necessary permission to the Link to Windows app on your smartphone and hit ‘Done’ once you’re finished.Step 11: Click on ‘Continue’ on the Phone Link app on your PC.Step 12: Use the sidebar on the Phone Link app to connect your smartphone and PC via Bluetooth. Once connected, you will be able to make and receive calls from your PC.Read Also:Best Easy Ways to Change Your Ringtone on Android and iPhone
Conclusion
This is how you can connect your Windows 10 PC and Android smartphone using Microsoft’s Phone Link app. You will not have to rely on third-party apps like Pushbullet for PC-smartphone pairing once you start using Phone Link. With Phone Link, you can easily make calls, send texts, and browse pictures stored on your phone using your PC, but features like phone mirroring are still not available. However, your Windows PC and laptop come with a native feature to mirror your phone’s display. You can read about it here.For the latest gadget and tech news, and gadget reviews, follow us on Twitter, Facebook and Instagram. For newest tech & gadget videos subscribe to our YouTube Channel. You can also stay up to date using the Gadget Bridge Android App. You can find the latest car and bike news here.
Samsung is all set to upgrade its A-Series in India with the launch of new smartphones in India. The company has confirmed to release of Samsung Galaxy A54 5G and Galaxy A34 5G on March 16. The device has been listed on the company’s website. Prior to the announcement the device has already been seen listed on several certification websites. In addition to this, the specs and design features have also been leaked previously. The upcoming phones will have an IP67 rating.On March 16, Samsung will officially launch the Galaxy A34 and Galaxy A54 5G smartphones in the Indian market. As per the official teaser, the launch would happen on the specified day at 12 noon IST. Furthermore, the devices are confirmed to come with an IP67 rating.Also Read:Samsung Galaxy S23 Ultra Review: A true flagshipAs mentioned earlier the smartphones’ expected pricing, features and design have already been revealed through leaks. Previous leaks suggest that Samsung Galaxy A34 will be powered by chipset type MT6877V/TTZA, indicating that it would be an octa-core MediaTek Dimensity 1080 SoC. On the other hand, the Galaxy A54 5G is likely to feature a 6.4-inch full-HD+ Super AMOLED display. The screen is expected to support a 120Hz refresh rate.As previously reported the handsets may have spherical, stacked vertically camera modules. These claims have also been supported by the Galaxy A54 5G and Galaxy A34 5G’s official marketing photos.
Galaxy A54 5G and Galaxy A34 5G price in India and colour options
Colour possibilities for the Samsung Galaxy A54 5G and Galaxy A34 5G are Awesome Silver White, Awesome Graphite, Awesome Lime, and Awesome Violet. In terms of pricing the company has not yet revealed it yet but rumours suggest that the 128GB Galaxy A34 5G will cost EUR 419 which is about Rs 36,000. Whereas the price of the Galaxy A54 5G for a similar 128GB storage capacity is likely to be set at EUR 519 or approximately Rs 45,400. It is anticipated that these leaked rates will apply to customers in Europe. However, in India, the devices are likely to be offered at a reduced price.Also Read:OnePlus 11 review: This is what a OnePlus flagship should look likeEarlier this year the company also introduced Galaxy A14 in India. The price of the phone starts at Rs 16,499 for the base 4GB RAM with 64GB storage option whereas the price of 6GB RAM with 128GB storage option is set at Rs 18,999. There is another 8GB RAM with a 128GB storage variant that costs Rs 20,999. This smartphone is available in Dark Red, Light Green and Black colour options.
For the latest gadget and tech news, and gadget reviews, follow us on Twitter, Facebook and Instagram. For newest tech & gadget videos subscribe to our YouTube Channel. You can also stay up to date using the Gadget Bridge Android App. You can find the latest car and bike news here.
Garena Free Fire is a battle royale game with regular awards and tournaments to keep players interested. If you play Garena Free Fire, you should be aware of the redeem codes that are released on a daily basis. However, because the battle royale game is banned in India, players from other countries can use the Free Fire Redeem codes daily. If you’re unfamiliar with the Garena Free Fire redeem codes or don’t know how to get them, we’ve put together a step-by-step guide to help you redeem them. Check out Garena Free Fire Redeem Codes for 13 March 2023.The Free Fire redeem codes are a great way to get free stuff. These are 12-digit codes that contain alphabets and numbers, as well as an expiration date and time. Because the Garena FF redeem codes cannot be used more than once, you should hurry to the redemption page to claim your free reward before someone else does. To get a free reward, all you have to do is go to reward.ff.garena.com/en, which is the official redemption page. Also, keep an eye on this space for daily updates on Garena Free Fire redemption codes and rewards.
In This Article
Garena Free Fire Redeem Codes Today 13 March 2023
FFDBGQWPNHJX
E2F86ZREMK49
FFAC2YXE6RF2
HHNAT6VKQ9R7
WD2ATK3ZEA55
HFNSJ6W74Z48
V44ZZ5YY7CBS
2FG94YCW9VMV
4TPQRDQJHVP4
FFCMCPSBN9CU
FFBBCVQZ4MWA
TDK4JWN6RD6
How to Get Free Fire Redeem Codes for Garena on 13 March 2023?
13 March 2023 Amazon Quiz has gone live on its mobile app platform. Customers from different parts of the country are participating in the daily quiz. The daily quiz is conducted by the company brings an opportunity for the customers to win exciting prizes. The quiz begins from 12 AM to 11:59 PM. In today’s quiz participants have a chance to win Rs 2,500 Amazon Pay Balance by answering all the questions correctly.Every day Amazon brings a fresh set of questions for its customers that contains five easy questions. Amazon quiz brings an opportunity for its customers to win Amazon Pay Balance ranging from Rs 1,000 to Rs 50,000. which consists of five questions related to general knowledge and current affairs.The participants need to answer all the questions correctly and their names will be selected for a lucky draw. The winner will be announced at the end of the month. One wrong answer could eliminate you from the quiz. If you manage to answer all the questions correctly you can stand a chance to win Rs 2,500 Amazon Pay Balance today. Only app users are eligible to participate in the Quiz. Check Out 13 March 2023 Amazon Quiz Answers.Amazon Quiz Today Prize – Rs 2,500 Amazon Pay BalanceQuiz Date – 13 March 2023Daily Timing – 12 AM to 11:59 PMWinner Announcement – Today at 12 PM
In This Article
Amazon Quiz Answers Today 13 March 2023
Question 1: Who recently beat Novak Djokovic in the semi-finals of the Dubai Tennis Championships?
Answer: Daniil MedvedevQuestion 2: Which movie got the most number of Oscar nominations in 2023?Answer: Everything Everywhere All at Once
Question 3: In the novel, ‘Moby Dick’, what animal is ‘Moby Dick’?
Answer: Sperm WhaleQuestion 4: Which of these movies is about Ray Kroc, who was responsible for the growth of this company into a giant?Answer: The FounderQuestion 5: In which of these countries is this famous automaker headquartered?
Answer: Italy
How To Play Amazon Quiz
Only app users are eligible to play the Amazon quiz every morning from 12 AM to 11:59 PM. The quiz is not available on the desktop. For those who are unaware of how to play the Amazon quiz below are the steps, you can follow to take the quiz.
Firstly download the Amazon app from Google Play Store or App Store
Now fill in the required information through the Sign Up option.
You need to log in to the Amazon app and scroll down on the home screen to find the Amazon Quiz banner.
Tap on the Amazon Quiz banner and tap on the Start button to start the Quiz.
Now you will get 5 questions and you need to answer them correctly. One wrong answer will eliminate you from the Quiz.
After answering all the questions correctly you are now eligible for a Lucky Draw.
The winner’s name will be announced today at 12 PM.
If you are consistently receiving inappropriate or spam calls and messages from a particular phone number, the first thing you should do is block the number on your phone. There are several ways you can go about this. If the number is saved in your Contacts, blocking it takes no time at all. You can also use third-party apps like TrueCaller to block any phone number. Here are the 8 best ways to block a phone number or a contact on an Android smartphone or an iPhone (iOS).Read Also:Apple Music Classical now available for pre-order on Apple’s App Store
In This Article
Android
Block a phone number from the dialer app
Step 1: Launch the native dialer app on your Android smartphone.Step 2: Look for the number you want to block in your recent call logs.Step 3: Tap on the number your want to block and select the ‘i’ icon for more details.Step 4: Select the ‘Block’ option at the bottom of the screen.
Block a phone number from contacts
Here’s how you can block a phone number saved as a contact on your Android smartphone.Step 1: Launch the Contacts app and select the contact you want to block.Step 2: Tap on the ellipses at the bottom right corner of the screen.Step 3: Select ‘Block contact’.
Block a phone number from the Messages app
Receiving spam texts from a phone number? Here’s how you can block it.Step 1: Long press a message from the sender you want to block.Step 2: Tap on the ellipses (three dots) at the top right corner of the screen.Step 3: Select ‘Block’.
Block a number on TrueCaller
Step 1: Open the TrueCaller app and go to ‘Contacts’.Step 2: Scroll to the contact you wish to block and select their profile.Step 3: From the detailed profile view select ‘Block’.Step 4: In the following popup box, TrueCaller will ask you whether the contact is a personal or business account. It will also request a reason for blocking, which is optional to provide. Make the necessary selections and hit block.The contact will be blocked. If you do not have the person saved in your contacts, here is how you can block them on TrueCaller.Step 1: Open the TrueCaller app and go to ‘Blocking’.Step 2: Scroll down and select ‘Phone Number’ from the ‘Block someone manually’ section.Step 3: Enter the phone number and name of the person you want to block. After filling out the details, tap ‘Block’.
iOS
Block a phone number from the Phone app
Step 1: Launch the Phone app on your iPhone.Step 2: Tap the info icon next to the phone number you want to block.Step 3: Scroll down and select ‘Block this caller’.
Block a contact on iPhone
Step 1: Launch the Phone app on your iPhone and select the Contacts tab at the bottom.Step 2: Select the contact you want to block.Step 3: Scroll down and select ‘Block this caller’.
Block a phone number from Messages
Step 1: Launch the Messages app.Step 2: Open a text message from the sender you want to block.Step 3: Tap the profile icon of the sender.Step 4: Tap on the info icon.Step 5: Select the info icon again from the sender’s profile.Step 6: Select ‘Block this Caller’.
Add a number directly to the block list
Step 1: Go to Settings and select Phone.Step 2: Select ‘Blocked Contacts’.Step 3: Tap on ‘Add new’.Step 4: Select the Contact you wish to block.Read Also:How to link AADHAAR with your PAN card?
If your Android smartphone got lost or stolen recently, not all hope is lost. There are a couple of universal ways to track any Android phone, irrespective of the manufacturer. In case your tracking attempts are unsuccessful, you can still use these methods to remotely block your phone and erase all personal data from it. Here are the two universal ways to find a lost or stolen Android phone.Read Also:Apple Music Classical now available for pre-order on Apple’s App Store
In This Article
Find your Android phone using its IMEI number
Every phone, be it Android or otherwise, has a unique IMEI number that it uses to connect with nearby cellular towers. By tracking the IMEI number of your lost or stolen Android phone, you can triangulate its position with the help of the cellular tower it uses to make a call. If no call is made using the smartphone, then the IMEI number alone cannot determine its position. Another thing to note here is that only the police have the appropriate tools to track a phone by its IMEI number. So in case your phone is stolen, you will need to file an FIR of the incident and then submit a request to get your phone located.You can also use the IMEI number to block your device in case it gets lost or stolen. You can do this yourself by using the CEIR (Central Equipment Identity Register) portal launched by the GoI. Here’s how.Step 1: File a report of the missing device with the police and keep a copy of the report.Step 2: Get a duplicate SIM card for the lost number from your telecom service provider. A duplicate SIM card is necessary since CEIR requires it to send an OTP while accepting the IMEI blocking request.Step 3: Keep the police report ready, along with proof of identity. The mobile purchase invoice is also a valid document.Step 4: Go to the CEIR Portal and fill out the request form to block the IMEI number.Step 5: After submission of the request form, you will be given a Request ID. This ID can be used to track the status of the request form and unblock the IMEI if your device gets recovered in future.
Use Google’s Find My Device
Using Google’s Find My Device service is the quickest and easiest way to find the live location of your device. If your device is switched off or not connected to the Internet, Find My Device will show you the last recorded location of your smartphone. In order to track your smartphone using this service go to the Find My Device webpage and log in using your Google Account. Make sure this is the same Google Account that is logged into your lost phone. Find my Device will show you the live or last known location of your device, depending on its connection status. You can also remotely erase all the data on your smartphone using this service.Read Also:How to link AADHAAR with your PAN card?
Conclusion
These are the two quick ways to find your lost or stolen Android phone. Depending on the manufacturer, your smartphone may have a native tracking service. Samsung smartphones come with a ‘Find My Mobile’ option that can be accessed from the ‘Biometrics and Security’ section of the Settings. Once turned on, you can use this feature to track your Samsung smartphone in case it gets lost or stolen.For the latest gadget and tech news, and gadget reviews, follow us on Twitter, Facebook and Instagram. For newest tech & gadget videos subscribe to our YouTube Channel. You can also stay up to date using the Gadget Bridge Android App. You can find the latest car and bike news here.
Changing the ringtone on your smartphone is a pretty straightforward task, but did you know that you can make custom ringtones out of song samples and set different ringtones for specific contacts? Your smartphone gives you more control over what you can do with ringtones, and the entire process is pretty easy to follow. Here are the best easy ways to change the ringtone on an iPhone and an Android smartphone.Read Also:How to link AADHAAR with your PAN card?
In This Article
Android
Change your ringtone from Settings
Step 1: Go to Settings and select ‘Sounds and vibration.’Step 2: Select Ringtone and tap on the plus icon at the top right corner of the screen. You can also select a ringtone from the sample tones.Step 3: Select a song from your phone’s storage. Step 4: Tap on ‘Done.’
Set a custom ringtone
Step 1: Install the ‘MP3 cutter & ringtone maker’ app from Google Play Store.Step 2: Open the app and select the song you want to trim.Step 3: Use the slider to trim the song and edit the part you want to set as your ringtone.Step 4: You can also use the fade effects and alter the volume of specific parts of the song.Step 5: If you want to get creative, you can even merge multiple songs together to create a unique ringtone.Step 6: Once you’ve edited the song, save it on your device. You can set it as your ringtone from Settings, as shown above. You can also set the song as your ringtone directly from the app.
Change the ringtone for a particular contact
If you want to set a different ringtone for a specific contact, you can do it from the native Contacts app on your phone. Here’s how.Step 1: Launch the Contacts app on your smartphone and select the contact to which the ringtone is to be assigned.Step 2: Tap on the ‘Edit’ option at the bottom of the screen.Step 3: Tap on ‘View More’ and select ‘Ringtone’.Step 4: Select a ringtone from the sample tunes or tap the plus icon to set a customised ringtone. Go back once you’re done.Step 5: Select ‘Save’.
iOS
Change ringtone from Settings
Step 1: Go to Settings and select ‘Sound and Haptics’.Step 2: Select ‘Ringtone’ under the ‘Sound and Haptic Patterns’ section.Step 3: Select the Ringtone you want.
Change the ringtone for a particular contact
Here’s how you can set a different ringtone for a specific contact on your iPhone.Step 1: Launch the Contacts and select the contact in question.Step 2: Tap on the ‘Edit’ option at the top right corner of the screen.Step 3: Scroll down and select ‘Ringtone’.Step 4: Choose a new tone for the contact and save your changes.
Buy a new ringtone from iTunes
Step 1: Launch the iTunes Store app on your iPhone.Step 2: Tap the ellipses and select Tones.Step 3: Search for the ringtone you want and tap on its listed price.Step 4: You can change the ringtone from the iTunes Store itself, or you can download the tone first and change it from Settings later.Step 5: Use your Apple ID to complete the purchase.Read Also:Best ways to mirror your Android smartphone’s screen to a Windows device
While Google Play Store may be the biggest app marketplace in the world, sometimes you may be driven to other platforms for various reasons. One of the major reasons why people look beyond the Play Store is because it doesn’t list the apps that are region-locked or banned in their country. Regulation issues aside, if you’re looking for an older version of a particular app, you will have to resort to a third-party app store. In this article, we bring you the complete guide on how to download apps on your Android smartphone without using the Google Play Store.Read Also:Best ways to mirror your Android smartphone’s screen to a Windows device
In This Article
Authorise installation of unknown apps
Your Android device does not encourage you to download apps from third-party sources. This is primarily because Google does not trust any other platforms other than its native Play Store. All apps on the Play Store have the necessary security certificates and any suspicious apps are swiftly taken down from the platform. However, third-party marketplaces like APKPure, APKMirror, Aptoide, and more are completely trustworthy and employ the necessary measures to keep harmful apps out of their platforms. The Android OS on your device demands authorisation from your when installing an app from a third-party source. Here’s how you can do it.Step 1: Go to Settings and select ‘Biometrics and Security’.Step 2: Tap on ‘Install unknown apps’.
Step 3: Scroll to the app you used to download the APK. You may have downloaded the APK from a web browser or received it via WhatsApp or Telegram.Step 3: Turn on the toggle switch next to the relevant app.
Download the APK file from a third-party marketplace
If you have set your sight beyond the Google Play Store, there are a bunch of safe and secure marketplaces you can use to download your favourite apps. The process of downloading an app from a source other than the authorised marketplace is called ‘sideloading’. These are some of the best sites for safe APK downloads.
APKMirror: Outside of the Play Store, APKMirror is the most popular marketplace for Android apps. It is also one of the most secure places to download APK files. The platform verifies all APK files before publishing them. APKMirror uses cryptographic signatures to identify verified developers and restricts any duplicates. Newer apps are verified by looking into the developer’s profile and matching the signature to the other apps they have published.
APKPure: APKPure has its own rigorous set of tests to ensure that no malicious or harmful APKs get published on the platform. Apart from cryptographic signatures, APKPure also uses SHA certificates to secure the marketplace.
Aptoide: With over 1 million apps on the platform and 300 million users worldwide, Aptoide is one of the biggest app marketplaces outside of the Google Play Store. A study from Waseda University in Japan rated Aptoide as the safest third-party app store in the world. The store’s malware detection tools are some of the most efficient among all marketplaces.
F-Droid: Being an open-source project, F-Droid is as secure as it gets for third-party app stores. One of the better parts of using F-Droid is that you don’t need an account to download an APK from the marketplace. F-Droid also hosts open-source apps that cannot be found in the Google Play Store.
APKHere: If you need to gain access to an app that is local to a foreign country, APKHere is the place to go. Some local apps may be region-locked on Google Play Store, making it hard to install them on your device. APKHere has a treasure trove of apps in foreign languages that can be downloaded with just a tap.
Install the app on your device
While Google Play Store automatically installs the apps you download from it, third-party marketplaces simply download the APK file, leaving you to install them to your device on your own. Here’s how you can install an APK file on your device.Step 1: Go to the third-party app store and download the APK file.Step 2: Access the downloaded APK file from the notification bar. You can also go to the File Manager on your smartphone and look for the APK in the Downloads folder.Step 3: Open the APK file. This is where Android will ask if you want to allow third-party installations to your device from the app you used to download the APK. If you haven’t given the necessary permission already, do it now. Step 4: Proceed to install the APK file. Once installed, the app can be accessed from the app drawer.Read Also:Samsung announced exciting deals and offers on the Galaxy S23 series in India
Motorola has expanded its G-Series in India with the launch of the Moto G73 5G smartphone. The device is a mid-range smartphone priced under 20K. It is the first phone in India to be powered by the latest octa-core MediaTek Dimensity 930 SoC. The device includes a Full HD+ display and a 5,000mAh battery with 30W TurboPower support. In addition to this, the handset includes a dual rear camera setup which includes a 50MP primary sensor. The phone ships Android 13 out of the box and includes Stereo Speakers with Dolby Atmos sound.
In This Article
Moto G73 5G price in India, sale details
The Moto G73 5G has been launched in India with a price tag of Rs 18,999 for the single 8GB RAM with 128GB storage option. The device comes in two colour options of Lucent White and Midnight Blue. It is scheduled to go on sale from March 16 in the country via Flipkart.The company has announced that as part of the launch, users can receive an additional discount of Rs 2,000 in return or an instant discount on purchases made using credit card transactions on certain banks. In addition to this, buyers can choose from HDFC Bank, ICICI Bank, SBI, and AXIS Bank No Cost EMIs of 3 and 6 months starting at just Rs 3,167.Also Read:Apple Music Classical now available for pre-order on Apple’s App Store
Moto G73 5G specifications
Moto G73 5G is highlighted with a 6.5-inch full-HD+ display having 1,080×2,400 pixels of resolution. The screen comes with 120Hz refresh rate support. In addition to this, the phone comes with Android 12 out of the box. Motorola has promised software upgraded up to Android 14 and up to three years of a security patch. Under the hood, there is MediaTek Dimensity 930 SoC. The phone offers 8GB of RAM and 128GB of internal storage. It has a dedicated MicroSD slot for expanding memory up to 1TB.The Moto G73 5G includes a dual rear camera setup that includes a 50-megapixel primary sensor and an 8-megapixel ultra-wide macro depth sensor. According to the company the phone can capture pictures using 1.5x larger pixels than the previous generation, letting in more light for sharper and brighter results. The ultra-wide-angle which fits 4x more of the scene in the frame than a standard lens. For selfies, it includes a 16-megapixel front-facing camera.The smartphone also features stereo speakers with Dolby Atmos. In addition to this, the device has a 5,000mAh battery which comes with TurboPower 30W charger in the box. The device has 5G, Wi-Fi 802.11a/b/g/n/ac, Bluetooth 5.3, FM radio, GPS/A-GPS, NFC, LTEPP, GLONASS, and Galileo. It also includes a USB Type-C port and a 3.5mm headphone jack.
For the latest gadget and tech news, and gadget reviews, follow us on Twitter, Facebook and Instagram. For newest tech & gadget videos subscribe to our YouTube Channel. You can also stay up to date using the Gadget Bridge Android App. You can find the latest car and bike news here.
Over the years Apple has made it easier to transfer data from an Android device to an iPhone. You don’t need to go through iTunes to set up your new iPhone, all data can be transferred wirelessly. However, certain files will need the manual transfer treatment regardless. After you’re done with this process, you can transfer them using any cloud storage service. So, without further ado, here’s how you can transfer data from an Android smartphone to iPhone 14/13/12/11/XS/8.Read Also:Top 6 Easy Ways Scan QR Codes with iPhone
In This Article
Here’s how you can transfer data from Android to iPhone
Before you begin transferring your data, you need to ensure that your iPhone and Android device are connected to the same WiFi network. It is also advised to plug both devices into power. This a precautionary measure, to ensure that neither device runs out of power. You also need to take into consideration the amount of data you are transferring. If your Android device has a micro SD card inside it, make sure that your iPhone has enough storage space to accommodate it. Once you’re set, follow the steps given below.Step 1: Place your Android smartphone and iPhone near each other.Step 2: Turn on your new iPhone and select ‘Set Up Manually’ on the Quick Start screen.Step 3: Select ‘Move Data from Android’ on the ‘Apps & Data’ page.Step 4: Launch the ‘Move to iOS’ app on your Android device.Step 5: Wait for a code on your iPhone. Once the code appears, enter it on your Android smartphone.Step 6: Your iPhone will create a temporary WiFi network. Connect your Android smartphone to it.Step 7: On your Android smartphone, select the content you want to transfer to your iPhone. Wait for the files to transfer and do not finish the process until the loading bar on the iPhone is complete. Keep the devices near each other and plugged into power.Using this method you can transfer your photos, apps, contacts, message history, WhatsApp messages, files, settings, bookmarks, calendar entries, and more. Step 8: Once the loading bar on your iPhone has finished progressing, select ‘Done’ on your Android smartphone. Step 9: Follow the onscreen instruction on your iPhone to finish the process.Read Also:Poco X5 5G launching in India on March 14: details inside
Apple has today announced its latest classical music streaming app namely Apple Music Classical. The latest app is currently available for pre-order on the app store. Users of this app will be able to listen to a wide variety of classical music and their favourite ones as well as immersive spatial audio. To pre-order, it requires an Apple Music subscription.A brand-new standalone app created only for classical music was just released by Apple and is being named Apple Music Classical. Apple’s latest music streaming app was first spotted in the changelog of the iOS 16.3 public betas.Later this month, from March 28th existing Apple Music users will be able to download Apple Music Classical and use it as part of their existing subscription at no additional cost. It can be pre-ordered now via Apple’s App Store. According to the company, once the pre-order is complete, Apple Music Classical will automatically download at launch to enable immediate listening for users who have Auto Update turned on in their settings.Audiences may experience the greatest audio quality and many of their favourite classical songs in a brand-new way with immersive spatial audio on Apple Music Classical. With a fully optimised search, it is quick and simple to find any recording in the largest classical music archive in the world according to the company.Apple Music Classical is said to offer the best classical music listening experience possible thanks to its thousands of exclusive albums, hundreds of specially curated playlists, insightful biographies of the composers, in-depth analyses of many key works, intuitive browsing features and much more.The company is said to have collaborated with the most prolific classical music artists and renowned classical music institutions in the world to offer Apple Music Classical listeners new, unique and exclusive content and recordings at launch and beyond. As per the company listeners of Apple Music Classical will also enjoy brand-new, exclusive artwork, including a series of unique, high-resolution digital portraits for many of the world’s greatest composers.Also Read:Samsung announced exciting deals and offers on the Galaxy S23 series in India
Requirement and Availability
Apple Music Classical is set to release on March 28 till then it is available for pre-order for Apple Music subscribers (Individual, Student, Family or Apple One). It is now available with the Apple Music Voice Plan. In terms of availability, it will be available globally where Apple Music is offered with the exception of China, Japan, Korea and Taiwan. It is enabled for all iPhone models running iOS 15.4 or later. Apple Music Classical for Android is also coming soon.
For the latest gadget and tech news, and gadget reviews, follow us on Twitter, Facebook and Instagram. For newest tech & gadget videos subscribe to our YouTube Channel. You can also stay up to date using the Gadget Bridge Android App. You can find the latest car and bike news here.
The final deadline to link your AADHAAR with your PAN card is March 31, 2023. If you haven’t linked the two yet, you will have to pay a penalty of Rs 1,000. Failure to link the AADHAAR and PAN card before March 31 2023 will render the latter useless. In this article, we show you how to link your AADHAAR to your PAN card.Read Also:Vivo V27 Pro Review: More than just a camera focussed smartphone
In This Article
Here’s how you can link your AADHAAR to your PAN card
Linking your AADHAAR and PAN card is a two-step process. Since you are registering after the first deadline (March 31, 2022) you will need to pay a penalty of Rs 1,000. Once the penalty has been paid, you can proceed to link the AADHAAR with your PAN card. Here’s how.Step 1: Visit the Income Tax Department’s e-Filing portal.Step 2: Select ‘Link Aadhar’ from the Quick Links section on the left.Step 3: Enter your PAN card and Aadhaar card number and hit Continue.Step 4: Click on ‘Continue to pay through e-Pay tax’.Step 5: On the next page, enter your PAN card number (twice) and mobile number.Step 6: Enter the OTP to proceed to the e-Pay Tax page. Click on ‘Continue’.Step 7: Click ‘Proceed’ under the Income Tax section.Step 8: Select ‘2023-24’ under Assessment Year and ‘Other Receipts (500)’ under Type of Payment. Hit ‘Continue’.Step 9: This is where you will see the fee breakdown. You don’t need to enter anything on this page. Hit ‘Continue’.Step 10: The challan will be generated and you will be redirected to your bank’s website in order to make the payment.The following banks are authorised for payment through ‘e-Pay Tax’: Axis Bank, Bank of India, Bank of Maharashtra, Canara Bank, Central Bank of India, City Union Bank, Federal Bank, ICICI Bank, IDBI Bank, Indian Bank, Indian Overseas Bank, IndusInd Bank, Jammu & Kashmir Bank, Karur Vysya Bank, Kotak Mahindra Bank, Punjab National Bank, UCO Bank Union Bank of India.If you do not have an account in either of these banks, go back to step Step 5 and click on the hyperlink for the Protean (NSDL) Portal. Once you’ve made the payment through the portal, proceed to the steps mentioned below. Payments made through the Protean (NSDL) Portal take 4-5 days to process. Wait for the appropriate time before linking your Aadhaar to your PAN card. If you’ve made the payment through e-Pay Tax then you can proceed right away.Step 11: Go back to the e-FIling portal and click on Link AADHAAR. You also click on ‘Link Aadhaar’ in your personal details section after logging in.Step 12: Enter your Aadhaar card number and click on ‘Validate’.Step 13: You will be sent an OTP to the registered mobile number.Step 14: Enter the OTP on the website.Step 15: Your request for AADHAAR-PAN linking will be sent to UIDAI for validation.To check the AADHAR-PAN linking status, read our article here.Read Also:7 Best Ways to Block Spam Text Messages on Android & iPhone
Conclusion
This is how you can link your AADHAAR to your PAN card. To make things quicker, use the e-Pay Tax payment instead of the Protean portal. Using the latter will take up to 5 days to process the penalty fee. Meanwhile, you can proceed to link your AADHAAR and PAN instantly after making the payment through the e-Pay Tax portal.For the latest gadget and tech news, and gadget reviews, follow us on Twitter, Facebook and Instagram. For newest tech & gadget videos subscribe to our YouTube Channel. You can also stay up to date using the Gadget Bridge Android App. You can find the latest car and bike news here.
We don’t need to tell you the advantages of mirroring your Android smartphone’s display to a larger screen. If you’re looking to cast your phone’s display on a TV, read our article here. While a TV screen is great for casting content, a PC or laptop offers better controls for your smartphone. Using your PC’s keyboard and mouse to control your smartphone can be useful in a lot of situations. Need to deliver a quick presentation? Simply cast your phone’s display on a PC and use the controls more accessible to you. In this article, we bring you the best ways to mirror or cast your Android smartphone’s screen to a Windows device.Read Also:Vivo V27 Pro Review: More than just a camera focussed smartphone
In This Article
Mirror your Android smartphone’s screen to a Windows device using Scrcpy
There are several third-party apps that can cast your phone’s display to your PC or laptop, but Scrcpy is the fastest and most reliable option out there. The best part is that you don’t need to download any app on your smartphone at all. Scrcpy (short for screen copy) is an open-source software that is capable of mirroring your smartphone’s display on any Windows device over a USB or wireless connection.
How to mirror your Android phone’s display via USB
Before you begin, you will need to enable USB debugging on your Android smartphone from developer settings. Here’s how.Step 1: Go to Settings and select About Phone.Step 2: Select ‘Software Information’.Step 3: Tap on ‘Build Number’ 7 times to enter Developer Mode.Step 4: Go back to Settings, scroll all the way down, and select ‘Developer options’.Step 5: Scroll down to the Debugging section and turn the toggle bar on for ‘USB debugging’.Now that you’ve enabled USB debugging on your smartphone, you can proceed with the rest of the steps.Step 6: Download the Scrcpy file on your PC or laptop from its GitHub page here.Step 7: Connect your Android smartphone to your Windows device via USB.Step 8: Extract the Scrcpy file on your Windows device.Step 9: Run the Scrcpy application.Step 10: Confirm USB debugging on the window that pops up in your phone.Step 11: Scrcpy will detect your Android smartphone and mirror its display on your Windows device.
How to cast your Android phone’s display wirelessly
Before you carry out this process, make sure your smartphone and Windows device are connected to the same WiFi network.Step 1: Carry out the steps mentions above. Open Command Prompt.Step 2: Enter the command “adb tcpip 5555”.Step 3: Now enter “adb connect <IP address>”.You can view your smartphone’s IP address by going to Settings>About Phone>Status information.Step 4: Disconnect your smartphone and run Scrcpy again. Your smartphone’s display will be mirrored wirelessly on your laptop or PC.
Use the native Connect app on your laptop or PC
Windows 10 or higher devices have a native feature that allows them to mirror your Android smartphone’s display. Here’s how you can go about it. Step 1: Launch the Settings app on your PC and select System Settings.Step 2: Select ‘Projecting to this PC’ from the side menu.Step 3: Download the ‘Wireless display’ optional feature. If ‘Wireless display’ is already installed on your PC, you may skip this step.Step 4: Select ‘Launch the Connect app to project to this PC’.Step 5: Your laptop is now ready for pairing. Make sure your laptop and smartphone are connected to a common WiFi network. Step 6: Open the native screencasting app on your smartphone to connect to your laptop. On Samsung devices, this app is called ‘Smart View’ and can be accessed from the quick settings panel. Step 7: Once connected, your smartphone’s display will be mirrored to your laptop’s screen. You can use your PC’s keyboard to type on your smartphone as well. Read Also:How to check if your AADHAAR is linked to your PAN card?
Conclusion
These are the three best ways to mirror or cast your Android smartphone’s display on your Windows device. While all methods in this list let you use your PC’s keyboard for your smartphone’s display, Scrcpy lets you use the mouse and touchpad as well. You can carry out other tasks on your PC while mirroring your smartphone’s display using Scrcpy. This isn’t possible using the Connect app, as it turns your PC’s monitor solely as a second screen for your smartphone.For the latest gadget and tech news, and gadget reviews, follow us on Twitter, Facebook and Instagram. For newest tech & gadget videos subscribe to our YouTube Channel. You can also stay up to date using the Gadget Bridge Android App. You can find the latest car and bike news here.
Samsung has released exciting deals on the latest premium Galaxy S23 Ultra, Galaxy S23+, and Galaxy S23 smartphones in India. Read on to learn how to benefit from the best discounts and offers on the Galaxy S23 Series.Customers who purchase the Samsung Galaxy S23 Ultra can take advantage of benefits worth up to Rs 18000 and 12 months of no-cost bank EMI. With a further upgrade incentive of Rs 10,000, the company claims that the S23 series may also be purchased for just Rs 5209 per month (24 months of no-cost EMI).On the other hand, customers can purchase the Galaxy S23+ and Galaxy S23 with benefits up to Rs 13000 and no bank EMI for 12 months. With an additional upgrade bonus of Rs 8000, the smartphones can also be purchased starting at just Rs 3125 per month (24 months no cost EMI).The Samsung Galaxy S23 comes in two variants 8GB RAM with 128GB storage and 8GB RAM with 256GB storage options priced at Rs 74,999 and Rs 79,999 respectively. Whereas Galaxy S23+ with 8GB RAM with 256GB storage option will be priced at Rs 94,999 and the 8GB RAM with 512GB storage model will be available at Rs 1,04,999. Lastly, the Galaxy S23 Ultra is priced at Rs 1,24,999 for the base 12GB RAM with a 256GB storage option. The price of the 12GB RAM with 512GB storage option and 12GB RAM with 1TB storage model is set at Rs 1,34,999 and Rs 1,54,999 respectively.Also Read:The flagship smartphone series was launched in India last month.
In This Article
Samsung Galaxy S23 specifications
The Samsung Galaxy S23 features a 6.1-inch full-HD+ Dynamic AMOLED 2X display with a 120Hz refresh rate and Gorilla Glass Victus 2 protection. The phone runs on Android 13 with One UI 5.1. It is powered by Qualcomm Snapdragon 8 Gen 2 SoC and up to 512GB of storage. There is also a 3,900mAh battery with 25W wired and 15W wireless charging support.The handset comes with a triple rear camera setup that includes a 50-megapixel primary wide-angle sensor, a 12-megapixel ultra-wide angle camera and a 10-megapixel telephoto camera. Upfront there is a 12-megapixel selfie sensor.
Samsung Galaxy S23+ specifications
The Samsung Galaxy S23+ has a 6.6-inch full-HD+ Dynamic AMOLED 2X display. It is powered by the Qualcomm Snapdragon 8 Gen 2 SoC. It features the same camera setup as of S23. There is a 4,700mAh battery onboard which supports 25W wired and 15W wireless charging.
Samsung Galaxy S23 Ultra specifications
The Samsung Galaxy S23 Ultra comes with a 6.8-inch Edge QHD+ Dynamic AMOLED 2X Display with 120Hz refresh rate support. The device also ships Android 13 with One UI 5.1 on top and is powered by a Qualcomm Snapdragon 8 Gen 2 SoC. It also includes an S Pen stylus from Samsung. Moreover, the camera setup on the phone consists of a 200-megapixel sensor, a 12-megapixel ultra-wide camera, a 10-megapixel telephoto lens and another 10-megapixel telephoto sensor. A 12-megapixel selfie camera is also included. In addition to this, it is fueled by a 5,000mAh battery (45W wired and Fast Wireless Charging 2.0).
For the latest gadget and tech news, and gadget reviews, follow us on Twitter, Facebook and Instagram. For newest tech & gadget videos subscribe to our YouTube Channel. You can also stay up to date using the Gadget Bridge Android App. You can find the latest car and bike news here.
From boarding passes to restaurant menus, QR codes are everywhere. Now that even small businesses are adopting them, it is a good idea to learn how to scan different types of QR codes. There are several different ways you can scan a QR code with your iPhone, depending on what you are using it for. For example, if you want to make a payment, you should be scanning the code using a digital payment app. In this article, we bring you the top 6 easy ways to scan QR Codes with an iPhone.Read Also:7 Best Ways to Block Spam Text Messages on Android & iPhone
In This Article
Use the native camera app
Step 1: Launch the native camera app on your iPhone.Step 2: Select the rear camera and bring your phone closer to the QR code.Step 3: Make sure the QR code is in the frame.Step 4: Once your iPhone recognises the QR code, a notification will pop up below it.Step 5: Tap the notification to open the link.
Camera app unable to scan QR codes?
If your iPhone’s camera app doesn’t automatically scan QR scan codes, you may have disabled the feature in the settings. Here’s how you can enable it.Step 1: Go to Settings and select Camera.Step 2: Turn on the toggle bar next to ‘Scan QR Codes’.Your camera app will be able to automatically scan QR codes once they are in the frame of the viewfinder.
Use the Control Center
Your iPhone’s Control Center has the option to scan any QR code. Once you select it, it will launch the camera and scan the QR code in the frame. If you can’t find the QR code scanner in the Control Center, you can add it from Settings. Here’s how.Step 1: Go to Settings and select Control Center.Step 2: Tap the green plus icon next to Code Scanner.Step 3: Open the Control Center and select the Code Scanner.Step 4: Point your iPhone camera at the QR code and make sure you see it in the viewfinder.Step 5: Tap the notification that appears below the code to visit the associated link.
Use the Wallet app
The Wallet app on your iPhone neatly organises stuff like tickets, boarding passes, car keys, and more all in one place. If you’re using a QR Code to gain access to any of the utilities mentioned above, it’s best to use the Wallet app. Here’s how you can scan any QR code using Wallet.Step 1: Launch the Wallet app on your iPhone.Step 2: Scroll down and select ‘Edit Passes’.Step 3: Tap on ‘Scan Code’.Step 4: Scan the QR Code using the viewfinder.Step 5: The ticket or boarding pass will be added to the Wallet.
Scan the QR Code from your iPhone’s Gallery
While scanning a physical QR code in front of you using is pretty straightforward, things can get confusing when someone sends you the QR code over WhatsApp or iMessage. After all, you cannot use your iPhone’s camera to scan an image that’s saved in its gallery. Luckily, your iPhone can easily recognise a QR code from any image saved in it. Here’s how you can scan a QR code from an image saved in your iPhone’s photo gallery.Step 1: Launch the Photos app on your iPhone.Step 2: Open the image with the QR code.Step 3: Tap on the share icon at the bottom left corner of the screen.Step 4: On the following page, select ‘Search with Google Lens’.Step 5: Google Lens will scan the QR code and disclose its contents. Click on the result to view the information.
Use Google Lens
Step 1: Launch the Google app on your iPhone.Step 2: Tap on the camera icon next to the search bar.Step 3: Point the rear camera at the QR code.Step 4: Google Lens will scan the QR code and present the result on the screen.
Bonus Tip: Use a third-party app
While all the methods mentioned above should be sufficient to scan a QR code in different circumstances – be it scanning a boarding pass or visiting a website, there is also an option to use a third-party app if the need ever arises. Qrafter and QR Reader for iPhone are two no-nonsense apps that simply scan any QR code, barcode, or document you place in front of them.Read Also:How to Change Your Twitter Handle on Android, iPhone or Web
Conclusion
These are the top 6 easy ways to scan a QR code with an iPhone. Sometimes, your camera app may not be able to detect a QR code due to a lack of optimum lighting. In this case, turn on the flashlight and point at the QR code again. If the same problem arises during the daytime when there’s ample light, clean your iPhone’s camera lens and try again.For the latest gadget and tech news, and gadget reviews, follow us on Twitter, Facebook and Instagram. For newest tech & gadget videos subscribe to our YouTube Channel. You can also stay up to date using the Gadget Bridge Android App. You can find the latest car and bike news here.
Poco X5 Pro 5G debuted in India a few weeks back now a new sibling of the smartphone is also arriving in the country soon. The company announced to launch the Poco X5 5G in India on March 14. It is going to be a toned-down version of the Pro model that will be selling at significantly lower pricing. The upcoming phone has also been listed on the Indian e-commerce platform Flipkart to tease its availability. Note that the device has already debuted in a few regions globally so we are quite aware of its specifications.Xiaomi’s spin-off took to Twitter to announce the Poco X5 5G launch date and time via a teaser video on Twitter. The device is scheduled to launch on March 14. The company will be hosting a launch event that will be streamed live at 12 noon. The live stream can be watched on its official YouTube channel and via the firm’s social media accounts. The device is confirmed to be available via Flipkart in the country.
The video teaser does not share much about the phone but it does give the first glimpse of the smartphone. The teaser makes cryptic mention of at least three colour options. The Poco X5 5G was released in a few international markets last month. It is being offered in three colour options of Black, Blue, and Green. The upcoming version is likely to be priced under 20K in India.Also Read:Poco X5 Pro 5G with 108-megapixel sensor launched in India
Poco X5 5G specifications
Poco X5 5G global variant boasts a 6.67-inch AMOLED full-HD+ display having 1,080 x 2,400 pixels of resolution. It will support a 120Hz refresh rate and a hole punch cutout to house a selfie camera. Just like the pro variant the phone will run on MIUI 13 with Android 12. The device will be driven by a Snapdragon 695 SoC. The handset offers up to 8GB of LPDDR4X RAM and up to 256GB of UFS2.2 storage.For the photos and videos, the Poco X5 5G will house a triple camera setup at the back that includes a 48MP primary camera, an 8MP secondary lens and a 2MP tertiary lens. There will be a 16MP front-facing camera for selfies and video calling.In addition to this, the Poco phone will include a 5,000mAh battery with 33W fast charging support. There will be a side-mounted fingerprint sensor as well for biometrics.
For the latest gadget and tech news, and gadget reviews, follow us on Twitter, Facebook and Instagram. For newest tech & gadget videos subscribe to our YouTube Channel. You can also stay up to date using the Gadget Bridge Android App. You can find the latest car and bike news here.


 Nevertheless, because the company opted for plastic construction this time around rather than glass, the smartphone does not seem extremely premium. As a result, this move has also significantly reduced weight, which now only weighs 180 grams. Triple rear cameras are placed up on a large area on the back panel. The device has an IP53 certification for splash and dust resistance.
Also Read: Vivo V27 Pro Review: More than just a camera focussed smartphone
The power button with the yellow accent that also functions as a fingerprint scanner steals the show because it operates so quickly and accurately. It should be noted that the Poco Yellow colour option only has this yellow power button, but the blue and black versions of this phone have the matching colour button.
Nevertheless, because the company opted for plastic construction this time around rather than glass, the smartphone does not seem extremely premium. As a result, this move has also significantly reduced weight, which now only weighs 180 grams. Triple rear cameras are placed up on a large area on the back panel. The device has an IP53 certification for splash and dust resistance.
Also Read: Vivo V27 Pro Review: More than just a camera focussed smartphone
The power button with the yellow accent that also functions as a fingerprint scanner steals the show because it operates so quickly and accurately. It should be noted that the Poco Yellow colour option only has this yellow power button, but the blue and black versions of this phone have the matching colour button.
 The Poco X5 Pro 5G’s 6.67-inch HD AMOLED Display boasts an adaptive refresh rate of 120Hz. The screen’s maximum brightness is 900 nits, and its touch sampling rate is 240Hz. The display is HDR10+ compatible and protected by Gorilla Glass 5.
 The device is buttery smooth thanks to the 120Hz adaptive refresh rate and 240Hz touch sampling rate, especially when you’re scrolling through a webpage or your preferred social media app. As was already said, it has an adaptive refresh rate, thus depending on the content you are viewing, it will shift between 30, 60, 90, and 120Hz. Moreover, this lengthens battery life.
We streamed 4K HDR content on YouTube, and it played flawlessly at full 4K resolution without any lag or frame drops. There is also Widevine L1 certification which streams content from OTT apps like Netflix, and Amazon videos at full definition. Dolby Atmos and Dolby Vision are also supported by the phone. The brightness is quite amazing and the colours are calibrated nicely.
Dual stereo speakers up the ante, but Dolby Atmos makes it much more immersive—trust us—it feels like you’re in a small theatre.
We are happy to find that the headphone jack is still present — this is not a frequent thing. Now that your wired headphones are connected, you can listen to clear audio. The device also comes with an IR blaster which is such an undervalued piece of technology. You may use the Mi Remote app to operate your gadgets like your AC all the time. It is quite useful.
The device is buttery smooth thanks to the 120Hz adaptive refresh rate and 240Hz touch sampling rate, especially when you’re scrolling through a webpage or your preferred social media app. As was already said, it has an adaptive refresh rate, thus depending on the content you are viewing, it will shift between 30, 60, 90, and 120Hz. Moreover, this lengthens battery life.
We streamed 4K HDR content on YouTube, and it played flawlessly at full 4K resolution without any lag or frame drops. There is also Widevine L1 certification which streams content from OTT apps like Netflix, and Amazon videos at full definition. Dolby Atmos and Dolby Vision are also supported by the phone. The brightness is quite amazing and the colours are calibrated nicely.
Dual stereo speakers up the ante, but Dolby Atmos makes it much more immersive—trust us—it feels like you’re in a small theatre.
We are happy to find that the headphone jack is still present — this is not a frequent thing. Now that your wired headphones are connected, you can listen to clear audio. The device also comes with an IR blaster which is such an undervalued piece of technology. You may use the Mi Remote app to operate your gadgets like your AC all the time. It is quite useful.
 In terms of software, MIUI 14 for Android 12 is being used. Such a good thing that we get the latest MIUI version but Android 13 along with that would have been great. To counter this, Poco has pledged to provide its smartphone with 3 years of security patches and 2 years of Android OS updates. Overall, the OS has undergone extensive optimization and is undoubtedly cleaner than previous iterations, although bloatware is still a major problem. Of course, you can remove the apps you don’t need from this list as well.
Getting to the camera, Poco X5 Pro 5G boasts a triple rear camera setup, the primary one of which is a 108-megapixel ISOCELL HM2 main sensor. A 2-megapixel macro camera and an 8-megapixel ultra-wide angle lens are included too. A 16-megapixel selfie camera is located on the front. The back camera module can record 4K video at 30 frames per second, whereas the selfie camera can record full-HD film at 120 frames per second.
In terms of software, MIUI 14 for Android 12 is being used. Such a good thing that we get the latest MIUI version but Android 13 along with that would have been great. To counter this, Poco has pledged to provide its smartphone with 3 years of security patches and 2 years of Android OS updates. Overall, the OS has undergone extensive optimization and is undoubtedly cleaner than previous iterations, although bloatware is still a major problem. Of course, you can remove the apps you don’t need from this list as well.
Getting to the camera, Poco X5 Pro 5G boasts a triple rear camera setup, the primary one of which is a 108-megapixel ISOCELL HM2 main sensor. A 2-megapixel macro camera and an 8-megapixel ultra-wide angle lens are included too. A 16-megapixel selfie camera is located on the front. The back camera module can record 4K video at 30 frames per second, whereas the selfie camera can record full-HD film at 120 frames per second.


 Step 2: Tap on ‘Font size and style’.
 Step 2: Tap on ‘Font size and style’.
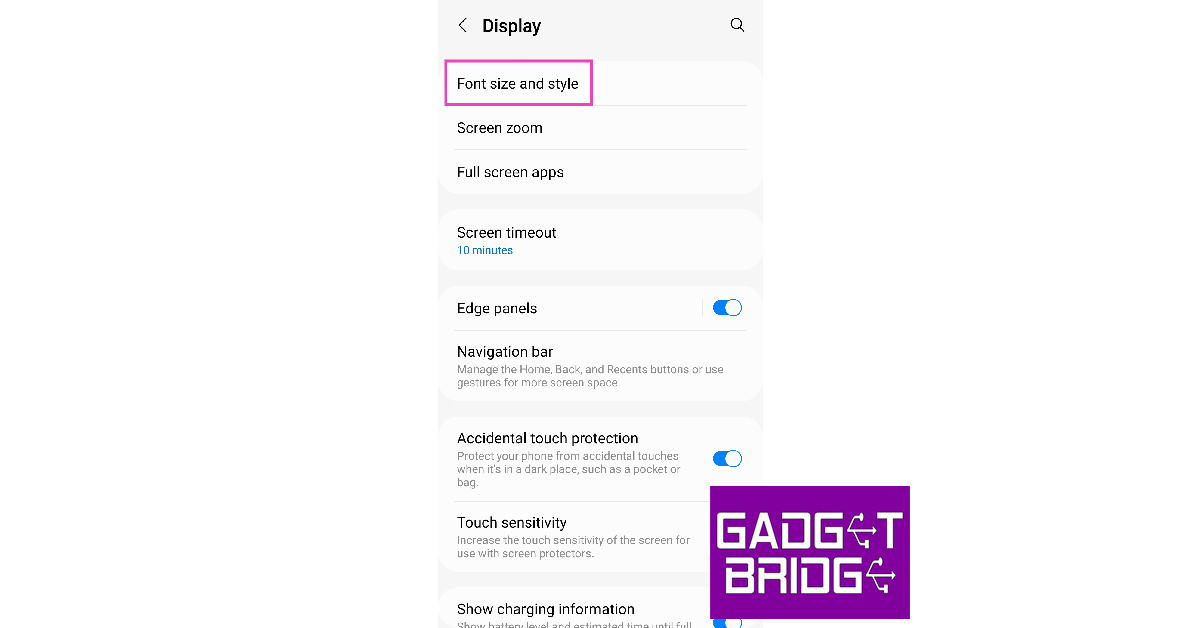 Step 3: Select ‘Font style’.
 Step 4: Choose one of the native fonts or tap on ‘Download fonts’ to view more.
 Step 5: Download the font apps you want by clicking on the arrow icon next to them.
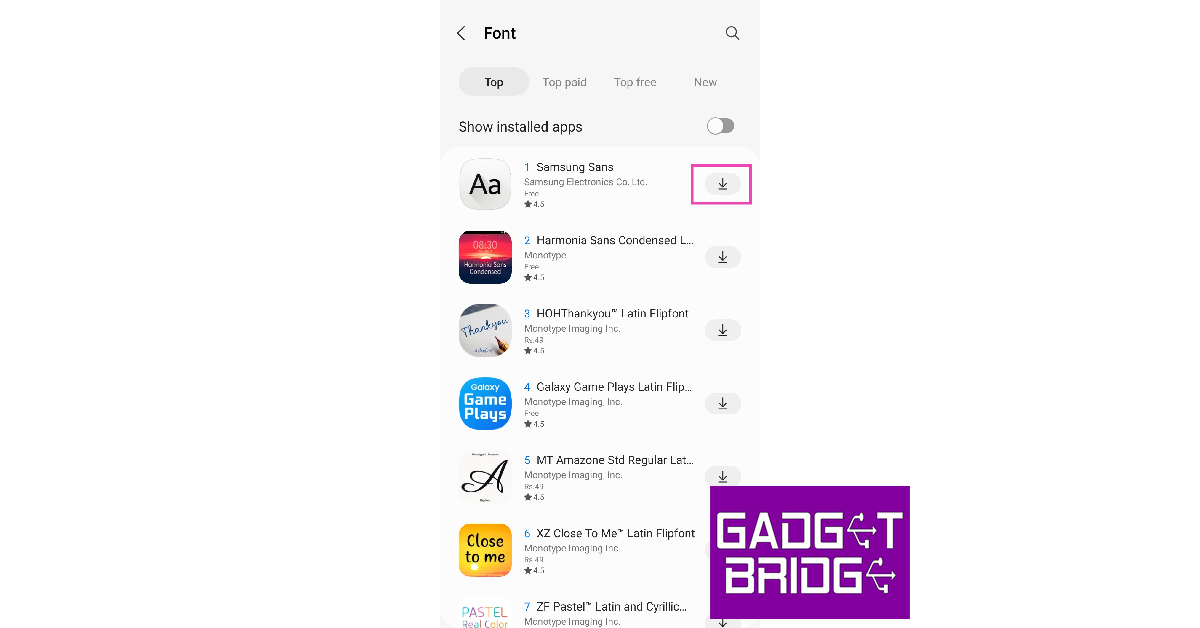 Step 6: Go back to the ‘Font style’ page and select one of the newly downloaded fonts.
 The font style will be applied across the OS and supporting apps.
 Step 4: Tap on ‘Download’.
 Step 5: Once the font has been downloaded, select ‘Set’.


 With GrammarlyGO which uses generative AI the company aims to support people and businesses with on-demand communication support, whether they are writing from scratch or editing an existing piece of writing. The feature is said to deliver individually geared contextually aware suggestions that take into consideration brand voice and preferences while providing customer control over their experience.
Also Read: Samsung Galaxy A54 5G and Galaxy A34 5G India launch set for March 16
According to the company GrammarlyGO features on-demand generative AI communication support directly in the writing apps. It will assist users throughout the writing process, whether it’s in an email thread or a lengthy document.
Individuals and businesses can use generative AI to rewrite for tone, clarity and length. They can type a prompt and GrammarlyGO will compose high-quality writing, saving time finding the perfect words. It also understands an email’s context and instantly drafts a thoughtful reply.
As per the company, GrammarlyGo will begin rolling out in beta in April to all Grammarly Premium, Grammarly Business, and Grammarly for Education (higher education) customers. It will also be available for users of Grammarly’s free plan in the US, Canada, UK, Australia, New Zealand, Germany, Poland, and Ukraine. Moreover, developers that are interested in using GrammarlyGO within the Grammarly Text Editor SDK can apply now for beta access starting in April.
For the latest gadget and tech news, and gadget reviews, follow us on Twitter, Facebook and Instagram. For newest tech & gadget videos subscribe to our YouTube Channel. You can also stay up to date using the Gadget Bridge Android App. You can find the latest car and bike news here.
With GrammarlyGO which uses generative AI the company aims to support people and businesses with on-demand communication support, whether they are writing from scratch or editing an existing piece of writing. The feature is said to deliver individually geared contextually aware suggestions that take into consideration brand voice and preferences while providing customer control over their experience.
Also Read: Samsung Galaxy A54 5G and Galaxy A34 5G India launch set for March 16
According to the company GrammarlyGO features on-demand generative AI communication support directly in the writing apps. It will assist users throughout the writing process, whether it’s in an email thread or a lengthy document.
Individuals and businesses can use generative AI to rewrite for tone, clarity and length. They can type a prompt and GrammarlyGO will compose high-quality writing, saving time finding the perfect words. It also understands an email’s context and instantly drafts a thoughtful reply.
As per the company, GrammarlyGo will begin rolling out in beta in April to all Grammarly Premium, Grammarly Business, and Grammarly for Education (higher education) customers. It will also be available for users of Grammarly’s free plan in the US, Canada, UK, Australia, New Zealand, Germany, Poland, and Ukraine. Moreover, developers that are interested in using GrammarlyGO within the Grammarly Text Editor SDK can apply now for beta access starting in April.
For the latest gadget and tech news, and gadget reviews, follow us on Twitter, Facebook and Instagram. For newest tech & gadget videos subscribe to our YouTube Channel. You can also stay up to date using the Gadget Bridge Android App. You can find the latest car and bike news here.  With GrammarlyGO which uses generative AI the company aims to support people and businesses with on-demand communication support, whether they are writing from scratch or editing an existing piece of writing. The feature is said to deliver individually geared contextually aware suggestions that take into consideration brand voice and preferences while providing customer control over their experience.
Also Read: Samsung Galaxy A54 5G and Galaxy A34 5G India launch set for March 16
According to the company GrammarlyGO features on-demand generative AI communication support directly in the writing apps. It will assist users throughout the writing process, whether it’s in an email thread or a lengthy document.
Individuals and businesses can use generative AI to rewrite for tone, clarity and length. They can type a prompt and GrammarlyGO will compose high-quality writing, saving time finding the perfect words. It also understands an email’s context and instantly drafts a thoughtful reply.
As per the company, GrammarlyGo will begin rolling out in beta in April to all Grammarly Premium, Grammarly Business, and Grammarly for Education (higher education) customers. It will also be available for users of Grammarly’s free plan in the US, Canada, UK, Australia, New Zealand, Germany, Poland, and Ukraine. Moreover, developers that are interested in using GrammarlyGO within the Grammarly Text Editor SDK can apply now for beta access starting in April.
For the latest gadget and tech news, and gadget reviews, follow us on Twitter, Facebook and Instagram. For newest tech & gadget videos subscribe to our YouTube Channel. You can also stay up to date using the Gadget Bridge Android App. You can find the latest car and bike news here.
With GrammarlyGO which uses generative AI the company aims to support people and businesses with on-demand communication support, whether they are writing from scratch or editing an existing piece of writing. The feature is said to deliver individually geared contextually aware suggestions that take into consideration brand voice and preferences while providing customer control over their experience.
Also Read: Samsung Galaxy A54 5G and Galaxy A34 5G India launch set for March 16
According to the company GrammarlyGO features on-demand generative AI communication support directly in the writing apps. It will assist users throughout the writing process, whether it’s in an email thread or a lengthy document.
Individuals and businesses can use generative AI to rewrite for tone, clarity and length. They can type a prompt and GrammarlyGO will compose high-quality writing, saving time finding the perfect words. It also understands an email’s context and instantly drafts a thoughtful reply.
As per the company, GrammarlyGo will begin rolling out in beta in April to all Grammarly Premium, Grammarly Business, and Grammarly for Education (higher education) customers. It will also be available for users of Grammarly’s free plan in the US, Canada, UK, Australia, New Zealand, Germany, Poland, and Ukraine. Moreover, developers that are interested in using GrammarlyGO within the Grammarly Text Editor SDK can apply now for beta access starting in April.
For the latest gadget and tech news, and gadget reviews, follow us on Twitter, Facebook and Instagram. For newest tech & gadget videos subscribe to our YouTube Channel. You can also stay up to date using the Gadget Bridge Android App. You can find the latest car and bike news here. 
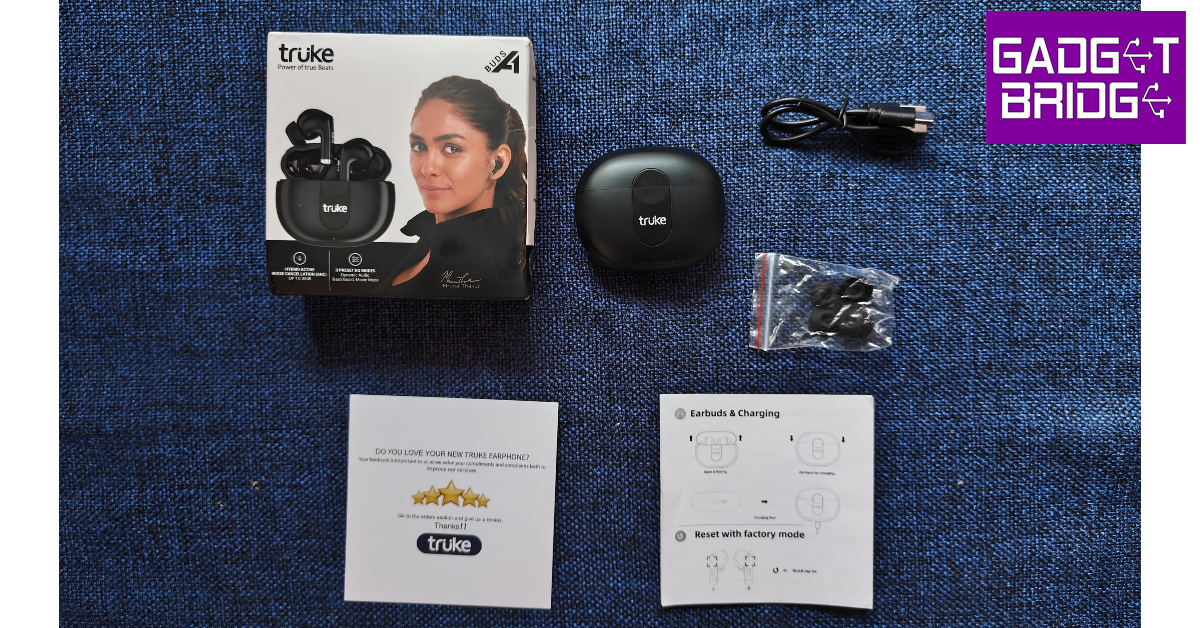 The pebble-shaped charging case is made out of plastic but the quality of the material used is surprisingly good. The in-hand feel of the case is quite good, certainly better than other entry-level TWS we’ve used so far. The case has a matte-like finish to it. The Truke branding can be found inside a cutout at the front of the case. This cutout has a small recess right where the lid meets the case. This makes it very easy to flip open the case with just your thumb. Below the cutout lies a solitary notification light.
 At the bottom of the case, you will find the USB charging port and a pairing button. We don’t usually get to see a pairing button on entry-level wireless headphones that often, but Truke continues to surprise us. Overall, the case feels quite sturdy. The simple design doesn’t seem boring and at the first glance, you wouldn’t peg Buds A1 as an entry-level product at all.
 The wireless earbuds get the in-ear design, which is the correct choice since Buds A1 also offers ANC. The earbuds offered us a comfortable, snug fit and we didn’t have to use the extra ear tips provided in the box. Out of the box, the earbuds are fixed with medium-sized ear tips. Two extra pairs of small and large ear tips can be found in a small pouch inside the box. The earbuds also house the touch control panels and 2 mics for ANC.
 Truke Buds A1 is rated IPX4 for water and dust resistance, which means the earbuds can handle water splashes without hampering their performance. We wore the earbuds while working out and while their performance was undeterred by sweat, the fit got loose on multiple occasions.
 A low latency mode for gaming mode makes Buds A1 a complete all-rounder. The earbuds play a notification alert every time you pair them to a device or switch between the different modes. These notification alerts sound very boxy and hard and they can amount to be annoying. Another thing we noticed was that the earbuds don’t disconnect when you place them back in the charging case. Even the music playback doesn’t pause once the buds are in the case. You will need to disconnect the buds using your smartphone in order to fix this.
Moving on, the Truke Buds A1 offer a great sound profile that is definitely unmatched in this price segment. The overall sound is very bass-focused but other frequencies are not lost in the mix. The quality of sound does not feel entry-level at all, these earbuds could’ve easily been placed at a higher segment. The mix of frequencies is very pleasant.
A low latency mode for gaming mode makes Buds A1 a complete all-rounder. The earbuds play a notification alert every time you pair them to a device or switch between the different modes. These notification alerts sound very boxy and hard and they can amount to be annoying. Another thing we noticed was that the earbuds don’t disconnect when you place them back in the charging case. Even the music playback doesn’t pause once the buds are in the case. You will need to disconnect the buds using your smartphone in order to fix this.
Moving on, the Truke Buds A1 offer a great sound profile that is definitely unmatched in this price segment. The overall sound is very bass-focused but other frequencies are not lost in the mix. The quality of sound does not feel entry-level at all, these earbuds could’ve easily been placed at a higher segment. The mix of frequencies is very pleasant.
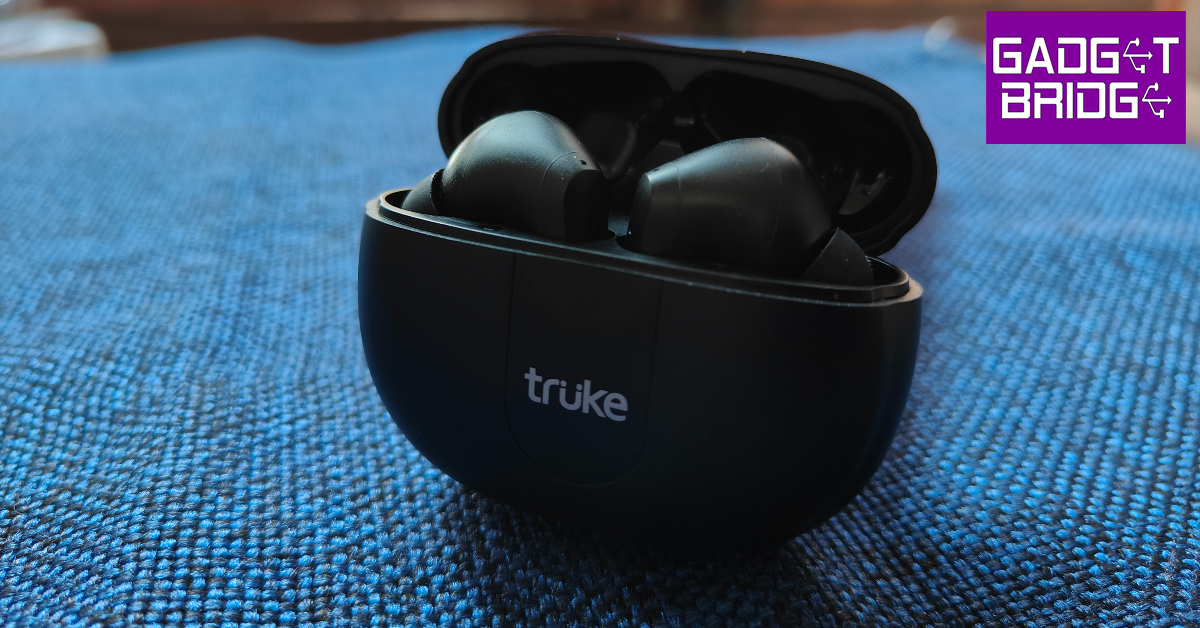 The level of detail produced by the dynamic drivers is quite impressive, although there is some room for improvement. The audio had a warm tone to it, which we found quite pleasant. If the audio is too bass-driven for you, you can switch to Dynamic Audio mode. We found the higher frequencies in Dynamic Audio mode to be somewhat shrill. The Normal mode and Bass Boost mode remained our staples during our time of use.
The Gaming Mode on Buds A1 offers a low latency of 50ms which we found to be just acceptable while playing Call of Duty mobile. There were some occasional stutters but the overall experience was decent. If you’re looking for dedicated gaming earbuds, we would suggest Truke’s BTG X1.
The hybrid ANC is certainly the biggest highlight of Truke Buds A1. At this price range, wireless earbuds with ANC are unheard of (no pun intended). The ANC performance was decent, with the Buds A1 being able to suppress up to 30dB of ambient noise. This is good enough to cancel out the background noise in a room, but don’t expect the same results when you’re outdoors. The earbuds were successful in suppressing the sound of chirping birds, distant footsteps, and faint voices. However, the sound of the traffic from outside was still able to filter through. Regardless, this is still a good performance in a segment where you don’t get this feature at all. Truke also offers ENC with the Buds A1, which is efficient in isolating the surrounding noise while voice calling.
The level of detail produced by the dynamic drivers is quite impressive, although there is some room for improvement. The audio had a warm tone to it, which we found quite pleasant. If the audio is too bass-driven for you, you can switch to Dynamic Audio mode. We found the higher frequencies in Dynamic Audio mode to be somewhat shrill. The Normal mode and Bass Boost mode remained our staples during our time of use.
The Gaming Mode on Buds A1 offers a low latency of 50ms which we found to be just acceptable while playing Call of Duty mobile. There were some occasional stutters but the overall experience was decent. If you’re looking for dedicated gaming earbuds, we would suggest Truke’s BTG X1.
The hybrid ANC is certainly the biggest highlight of Truke Buds A1. At this price range, wireless earbuds with ANC are unheard of (no pun intended). The ANC performance was decent, with the Buds A1 being able to suppress up to 30dB of ambient noise. This is good enough to cancel out the background noise in a room, but don’t expect the same results when you’re outdoors. The earbuds were successful in suppressing the sound of chirping birds, distant footsteps, and faint voices. However, the sound of the traffic from outside was still able to filter through. Regardless, this is still a good performance in a segment where you don’t get this feature at all. Truke also offers ENC with the Buds A1, which is efficient in isolating the surrounding noise while voice calling.

 RRR is currently streaming on three OTT platforms – Netflix, Hotstar, and ZEE5. The Netflix version of the movie is dubbed in Hindi and subtitled in English. If you want to watch the original Telugu version of the epic action drama, Hotstar and ZEE5 are your best options. Hotstar and ZEE5 offer the Kannada, Tamil, and Malayalam dubs of the movie as well. You can watch the Oscar-winning song from RRR, Naatu Naatu, on YouTube and listen to it across all major music streaming platforms.
Watch RRR on Netflix here.
Watch RRR on Hostar here.
Watch RRR on Zee5 here.
RRR is currently streaming on three OTT platforms – Netflix, Hotstar, and ZEE5. The Netflix version of the movie is dubbed in Hindi and subtitled in English. If you want to watch the original Telugu version of the epic action drama, Hotstar and ZEE5 are your best options. Hotstar and ZEE5 offer the Kannada, Tamil, and Malayalam dubs of the movie as well. You can watch the Oscar-winning song from RRR, Naatu Naatu, on YouTube and listen to it across all major music streaming platforms.
Watch RRR on Netflix here.
Watch RRR on Hostar here.
Watch RRR on Zee5 here.
 Being a ‘Netflix original’ documentary, The Elephant Whisperers is exclusively available on Netflix. You can watch the official trailer on YouTube. The documentary follows the journey of a South Indian tribal couple, Bomman and Bellie, as they decide to foster an orphaned baby elephant, Raghu. The Elephant Whisperers documents the life of the couple as they nurse and forge a bond with Raghu.
Watch The Elephant Whisperers on Netflix here.
Read Also: Best Easy Ways to Change Your Ringtone on Android and iPhone
Being a ‘Netflix original’ documentary, The Elephant Whisperers is exclusively available on Netflix. You can watch the official trailer on YouTube. The documentary follows the journey of a South Indian tribal couple, Bomman and Bellie, as they decide to foster an orphaned baby elephant, Raghu. The Elephant Whisperers documents the life of the couple as they nurse and forge a bond with Raghu.
Watch The Elephant Whisperers on Netflix here.
Read Also: Best Easy Ways to Change Your Ringtone on Android and iPhone

 Step 4: On your smartphone, launch the Link to Windows app and select ‘Link phone and PC’.
 Step 5: Select ‘Continue’ and scan the QR code on your PC from your smartphone.
 Step 6: To pair manually, tap on ‘Link manually’ on your PC and tap on ‘Try another way’ on your smartphone.
 Step 7: Sign in to your Microsoft account on your smartphone.
Step 8: On your PC, click on Create PIN code.
Step 7: Sign in to your Microsoft account on your smartphone.
Step 8: On your PC, click on Create PIN code.
 Step 9: Enter the PIN code in the Link to Windows app on your smartphone.
 Step 10: Give the necessary permission to the Link to Windows app on your smartphone and hit ‘Done’ once you’re finished.
 Step 11: Click on ‘Continue’ on the Phone Link app on your PC.
Step 12: Use the sidebar on the Phone Link app to connect your smartphone and PC via Bluetooth. Once connected, you will be able to make and receive calls from your PC.
Step 11: Click on ‘Continue’ on the Phone Link app on your PC.
Step 12: Use the sidebar on the Phone Link app to connect your smartphone and PC via Bluetooth. Once connected, you will be able to make and receive calls from your PC.
 Read Also: Best Easy Ways to Change Your Ringtone on Android and iPhone

 As previously reported the handsets may have spherical, stacked vertically camera modules. These claims have also been supported by the Galaxy A54 5G and Galaxy A34 5G’s official marketing photos.
 As previously reported the handsets may have spherical, stacked vertically camera modules. These claims have also been supported by the Galaxy A54 5G and Galaxy A34 5G’s official marketing photos.


")
 Step 4: Select the ‘Block’ option at the bottom of the screen.

 Step 3: Select ‘Block contact’.

 Step 3: Select ‘Block’.
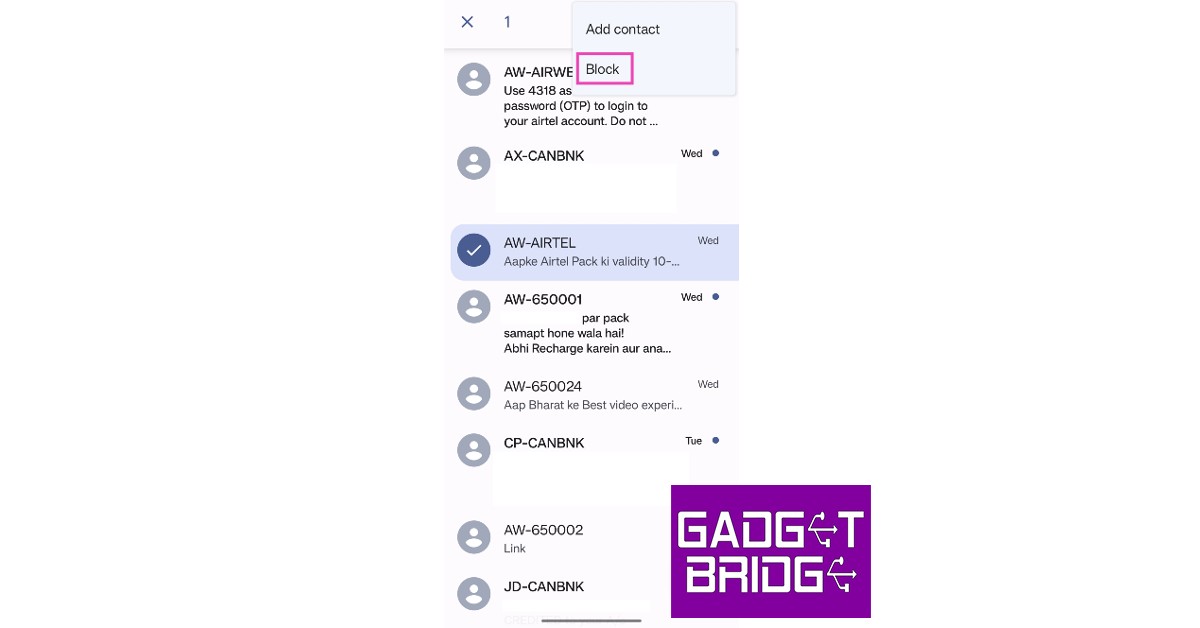
 Step 2: Scroll to the contact you wish to block and select their profile.
 Step 3: From the detailed profile view select ‘Block’.
 Step 4: In the following popup box, TrueCaller will ask you whether the contact is a personal or business account. It will also request a reason for blocking, which is optional to provide. Make the necessary selections and hit block.
 The contact will be blocked.
If you do not have the person saved in your contacts, here is how you can block them on TrueCaller.
Step 1: Open the TrueCaller app and go to ‘Blocking’.
The contact will be blocked.
If you do not have the person saved in your contacts, here is how you can block them on TrueCaller.
Step 1: Open the TrueCaller app and go to ‘Blocking’.
 Step 2: Scroll down and select ‘Phone Number’ from the ‘Block someone manually’ section.
 Step 3: Enter the phone number and name of the person you want to block. After filling out the details, tap ‘Block’.
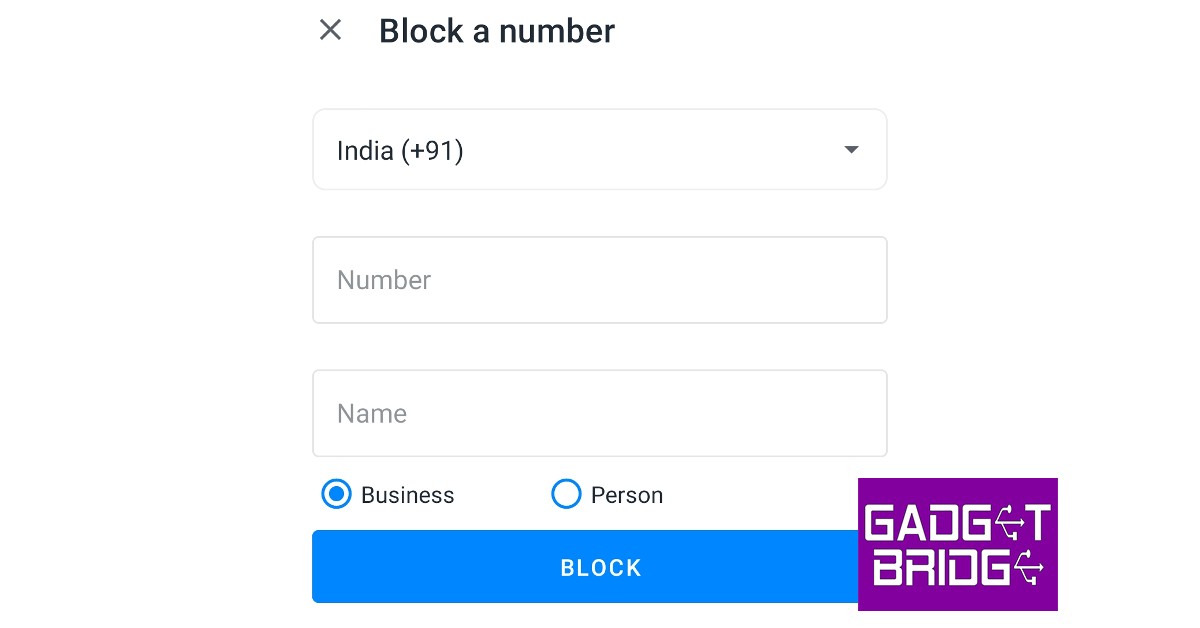
 Step 3: Scroll down and select ‘Block this caller’.

 Step 4: Tap on the info icon.
Step 5: Select the info icon again from the sender’s profile.
Step 4: Tap on the info icon.
Step 5: Select the info icon again from the sender’s profile.
 Step 6: Select ‘Block this Caller’.
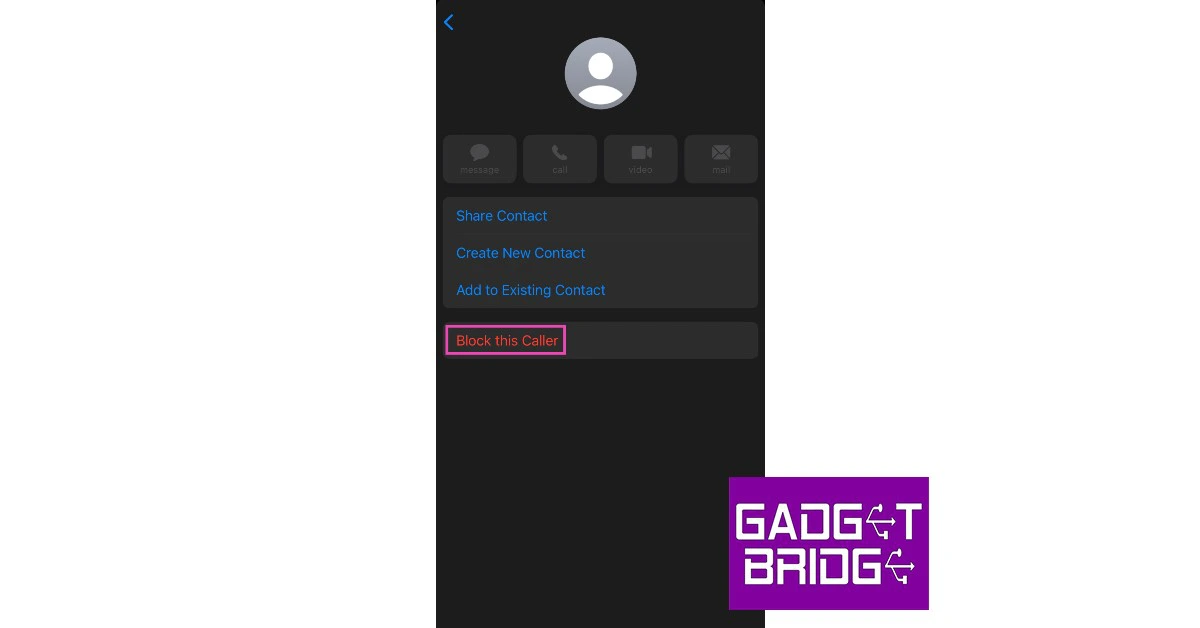
 Step 2: Select ‘Blocked Contacts’.
 Step 3: Tap on ‘Add new’.
 Step 4: Select the Contact you wish to block.
Read Also: How to link AADHAAR with your PAN card?
Step 4: Select the Contact you wish to block.
Read Also: How to link AADHAAR with your PAN card?

 Step 1: File a report of the missing device with the police and keep a copy of the report.
Step 2: Get a duplicate SIM card for the lost number from your telecom service provider. A duplicate SIM card is necessary since CEIR requires it to send an OTP while accepting the IMEI blocking request.
Step 3: Keep the police report ready, along with proof of identity. The mobile purchase invoice is also a valid document.
Step 4: Go to the CEIR Portal and fill out the request form to block the IMEI number.
Step 5: After submission of the request form, you will be given a Request ID. This ID can be used to track the status of the request form and unblock the IMEI if your device gets recovered in future.
Step 1: File a report of the missing device with the police and keep a copy of the report.
Step 2: Get a duplicate SIM card for the lost number from your telecom service provider. A duplicate SIM card is necessary since CEIR requires it to send an OTP while accepting the IMEI blocking request.
Step 3: Keep the police report ready, along with proof of identity. The mobile purchase invoice is also a valid document.
Step 4: Go to the CEIR Portal and fill out the request form to block the IMEI number.
Step 5: After submission of the request form, you will be given a Request ID. This ID can be used to track the status of the request form and unblock the IMEI if your device gets recovered in future.
 Using Google’s Find My Device service is the quickest and easiest way to find the live location of your device. If your device is switched off or not connected to the Internet, Find My Device will show you the last recorded location of your smartphone. In order to track your smartphone using this service go to the Find My Device webpage and log in using your Google Account. Make sure this is the same Google Account that is logged into your lost phone. Find my Device will show you the live or last known location of your device, depending on its connection status. You can also remotely erase all the data on your smartphone using this service.
Read Also: How to link AADHAAR with your PAN card?
Using Google’s Find My Device service is the quickest and easiest way to find the live location of your device. If your device is switched off or not connected to the Internet, Find My Device will show you the last recorded location of your smartphone. In order to track your smartphone using this service go to the Find My Device webpage and log in using your Google Account. Make sure this is the same Google Account that is logged into your lost phone. Find my Device will show you the live or last known location of your device, depending on its connection status. You can also remotely erase all the data on your smartphone using this service.
Read Also: How to link AADHAAR with your PAN card?

 Step 2: Select Ringtone and tap on the plus icon at the top right corner of the screen. You can also select a ringtone from the sample tones.
 Step 3: Select a song from your phone’s storage.
Step 4: Tap on ‘Done.’
Step 3: Select a song from your phone’s storage.
Step 4: Tap on ‘Done.’

 Step 4: You can also use the fade effects and alter the volume of specific parts of the song.
 Step 5: If you want to get creative, you can even merge multiple songs together to create a unique ringtone.
 Step 6: Once you’ve edited the song, save it on your device. You can set it as your ringtone from Settings, as shown above. You can also set the song as your ringtone directly from the app.
 Step 3: Tap on ‘View More’ and select ‘Ringtone’.
 Step 4: Select a ringtone from the sample tunes or tap the plus icon to set a customised ringtone. Go back once you’re done.
 Step 5: Select ‘Save’.
 Step 3: Select the Ringtone you want.
 Step 4: Choose a new tone for the contact and save your changes.
 Step 5: Use your Apple ID to complete the purchase.
Read Also: Best ways to mirror your Android smartphone’s screen to a Windows device
Step 5: Use your Apple ID to complete the purchase.
Read Also: Best ways to mirror your Android smartphone’s screen to a Windows device

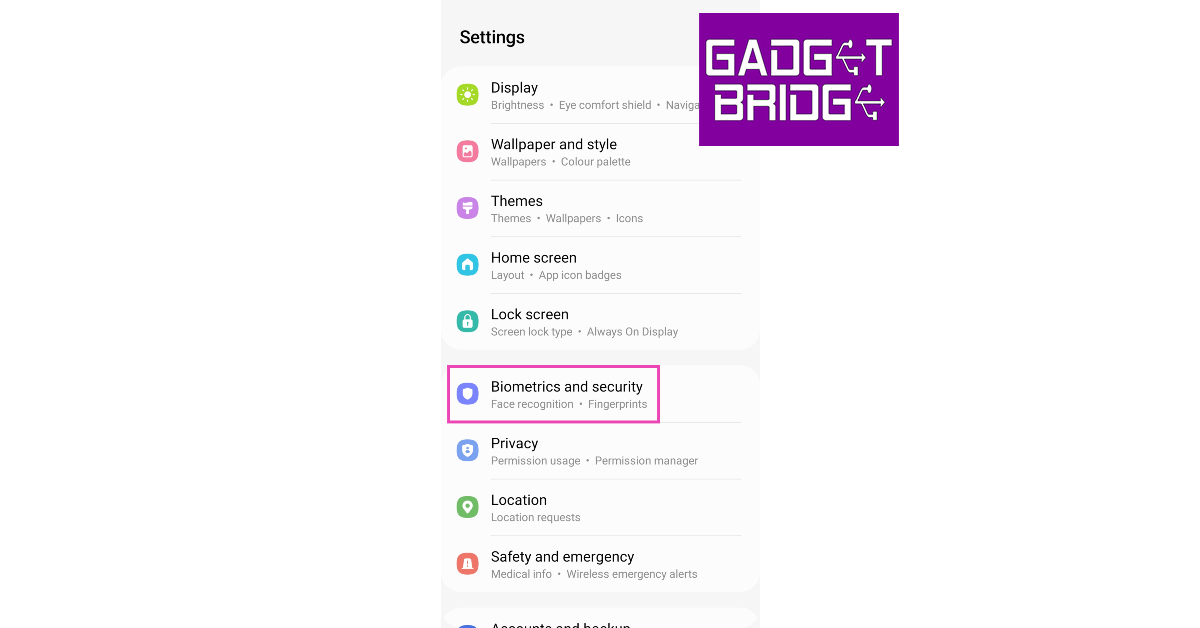 Step 2: Tap on ‘Install unknown apps’.
 Step 3: Scroll to the app you used to download the APK. You may have downloaded the APK from a web browser or received it via WhatsApp or Telegram.
Step 3: Turn on the toggle switch next to the relevant app.
Step 3: Scroll to the app you used to download the APK. You may have downloaded the APK from a web browser or received it via WhatsApp or Telegram.
Step 3: Turn on the toggle switch next to the relevant app.

 Step 2: Access the downloaded APK file from the notification bar. You can also go to the File Manager on your smartphone and look for the APK in the Downloads folder.
 Step 3: Open the APK file. This is where Android will ask if you want to allow third-party installations to your device from the app you used to download the APK. If you haven’t given the necessary permission already, do it now.
 Step 4: Proceed to install the APK file. Once installed, the app can be accessed from the app drawer.
 Read Also: Samsung announced exciting deals and offers on the Galaxy S23 series in India

 The company has announced that as part of the launch, users can receive an additional discount of Rs 2,000 in return or an instant discount on purchases made using credit card transactions on certain banks. In addition to this, buyers can choose from HDFC Bank, ICICI Bank, SBI, and AXIS Bank No Cost EMIs of 3 and 6 months starting at just Rs 3,167.
Also Read: Apple Music Classical now available for pre-order on Apple’s App Store
The company has announced that as part of the launch, users can receive an additional discount of Rs 2,000 in return or an instant discount on purchases made using credit card transactions on certain banks. In addition to this, buyers can choose from HDFC Bank, ICICI Bank, SBI, and AXIS Bank No Cost EMIs of 3 and 6 months starting at just Rs 3,167.
Also Read: Apple Music Classical now available for pre-order on Apple’s App Store

 Step 3: Select ‘Move Data from Android’ on the ‘Apps & Data’ page.
 Step 4: Launch the ‘Move to iOS’ app on your Android device.
Step 5: Wait for a code on your iPhone. Once the code appears, enter it on your Android smartphone.
Step 4: Launch the ‘Move to iOS’ app on your Android device.
Step 5: Wait for a code on your iPhone. Once the code appears, enter it on your Android smartphone.
 Step 6: Your iPhone will create a temporary WiFi network. Connect your Android smartphone to it.
Step 7: On your Android smartphone, select the content you want to transfer to your iPhone. Wait for the files to transfer and do not finish the process until the loading bar on the iPhone is complete. Keep the devices near each other and plugged into power.
Using this method you can transfer your photos, apps, contacts, message history, WhatsApp messages, files, settings, bookmarks, calendar entries, and more.
Step 8: Once the loading bar on your iPhone has finished progressing, select ‘Done’ on your Android smartphone.
Step 9: Follow the onscreen instruction on your iPhone to finish the process.
Read Also: Poco X5 5G launching in India on March 14: details inside
Step 6: Your iPhone will create a temporary WiFi network. Connect your Android smartphone to it.
Step 7: On your Android smartphone, select the content you want to transfer to your iPhone. Wait for the files to transfer and do not finish the process until the loading bar on the iPhone is complete. Keep the devices near each other and plugged into power.
Using this method you can transfer your photos, apps, contacts, message history, WhatsApp messages, files, settings, bookmarks, calendar entries, and more.
Step 8: Once the loading bar on your iPhone has finished progressing, select ‘Done’ on your Android smartphone.
Step 9: Follow the onscreen instruction on your iPhone to finish the process.
Read Also: Poco X5 5G launching in India on March 14: details inside


 Step 3: Enter your PAN card and Aadhaar card number and hit Continue.
 Step 4: Click on ‘Continue to pay through e-Pay tax’.
 Step 5: On the next page, enter your PAN card number (twice) and mobile number.
 Step 6: Enter the OTP to proceed to the e-Pay Tax page. Click on ‘Continue’.
 Step 7: Click ‘Proceed’ under the Income Tax section.
 Step 8: Select ‘2023-24’ under Assessment Year and ‘Other Receipts (500)’ under Type of Payment. Hit ‘Continue’.
 Step 9: This is where you will see the fee breakdown. You don’t need to enter anything on this page. Hit ‘Continue’.
 Step 10: The challan will be generated and you will be redirected to your bank’s website in order to make the payment.
The following banks are authorised for payment through ‘e-Pay Tax’: Axis Bank, Bank of India, Bank of Maharashtra, Canara Bank, Central Bank of India, City Union Bank, Federal Bank, ICICI Bank, IDBI Bank, Indian Bank, Indian Overseas Bank, IndusInd Bank, Jammu & Kashmir Bank, Karur Vysya Bank, Kotak Mahindra Bank, Punjab National Bank, UCO Bank Union Bank of India.
If you do not have an account in either of these banks, go back to step Step 5 and click on the hyperlink for the Protean (NSDL) Portal. Once you’ve made the payment through the portal, proceed to the steps mentioned below. Payments made through the Protean (NSDL) Portal take 4-5 days to process. Wait for the appropriate time before linking your Aadhaar to your PAN card. If you’ve made the payment through e-Pay Tax then you can proceed right away.
Step 11: Go back to the e-FIling portal and click on Link AADHAAR. You also click on ‘Link Aadhaar’ in your personal details section after logging in.
Step 10: The challan will be generated and you will be redirected to your bank’s website in order to make the payment.
The following banks are authorised for payment through ‘e-Pay Tax’: Axis Bank, Bank of India, Bank of Maharashtra, Canara Bank, Central Bank of India, City Union Bank, Federal Bank, ICICI Bank, IDBI Bank, Indian Bank, Indian Overseas Bank, IndusInd Bank, Jammu & Kashmir Bank, Karur Vysya Bank, Kotak Mahindra Bank, Punjab National Bank, UCO Bank Union Bank of India.
If you do not have an account in either of these banks, go back to step Step 5 and click on the hyperlink for the Protean (NSDL) Portal. Once you’ve made the payment through the portal, proceed to the steps mentioned below. Payments made through the Protean (NSDL) Portal take 4-5 days to process. Wait for the appropriate time before linking your Aadhaar to your PAN card. If you’ve made the payment through e-Pay Tax then you can proceed right away.
Step 11: Go back to the e-FIling portal and click on Link AADHAAR. You also click on ‘Link Aadhaar’ in your personal details section after logging in.
 Step 13: You will be sent an OTP to the registered mobile number.
Step 14: Enter the OTP on the website.
Step 15: Your request for AADHAAR-PAN linking will be sent to UIDAI for validation.
Step 13: You will be sent an OTP to the registered mobile number.
Step 14: Enter the OTP on the website.
Step 15: Your request for AADHAAR-PAN linking will be sent to UIDAI for validation.
 To check the AADHAR-PAN linking status, read our article here.
Read Also: 7 Best Ways to Block Spam Text Messages on Android & iPhone
To check the AADHAR-PAN linking status, read our article here.
Read Also: 7 Best Ways to Block Spam Text Messages on Android & iPhone

 Step 2: Select ‘Software Information’.
 Step 3: Tap on ‘Build Number’ 7 times to enter Developer Mode.
 Step 4: Go back to Settings, scroll all the way down, and select ‘Developer options’.
 Step 5: Scroll down to the Debugging section and turn the toggle bar on for ‘USB debugging’.
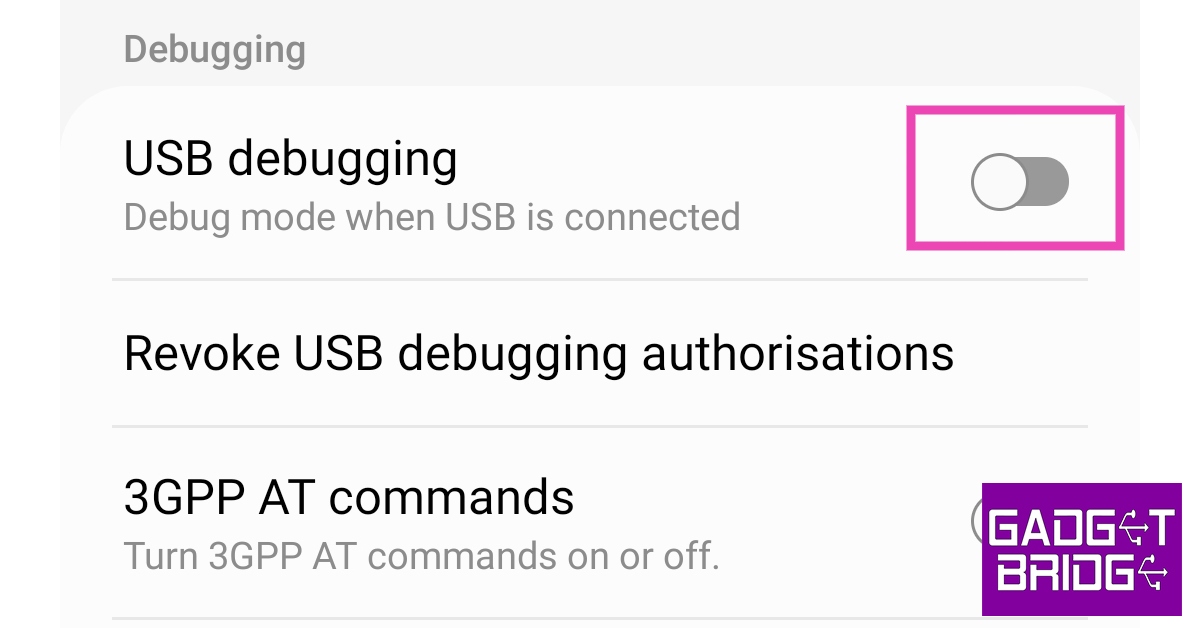 Now that you’ve enabled USB debugging on your smartphone, you can proceed with the rest of the steps.
Step 6: Download the Scrcpy file on your PC or laptop from its GitHub page here.
Step 7: Connect your Android smartphone to your Windows device via USB.
Step 8: Extract the Scrcpy file on your Windows device.
Step 9: Run the Scrcpy application.
Now that you’ve enabled USB debugging on your smartphone, you can proceed with the rest of the steps.
Step 6: Download the Scrcpy file on your PC or laptop from its GitHub page here.
Step 7: Connect your Android smartphone to your Windows device via USB.
Step 8: Extract the Scrcpy file on your Windows device.
Step 9: Run the Scrcpy application.
 Step 10: Confirm USB debugging on the window that pops up in your phone.
Step 11: Scrcpy will detect your Android smartphone and mirror its display on your Windows device.
Step 10: Confirm USB debugging on the window that pops up in your phone.
Step 11: Scrcpy will detect your Android smartphone and mirror its display on your Windows device.

 Step 2: Select ‘Projecting to this PC’ from the side menu.
 Step 3: Download the ‘Wireless display’ optional feature. If ‘Wireless display’ is already installed on your PC, you may skip this step.
Step 4: Select ‘Launch the Connect app to project to this PC’.
Step 3: Download the ‘Wireless display’ optional feature. If ‘Wireless display’ is already installed on your PC, you may skip this step.
Step 4: Select ‘Launch the Connect app to project to this PC’.
 Step 5: Your laptop is now ready for pairing. Make sure your laptop and smartphone are connected to a common WiFi network.
 Step 6: Open the native screencasting app on your smartphone to connect to your laptop. On Samsung devices, this app is called ‘Smart View’ and can be accessed from the quick settings panel.
 Step 7: Once connected, your smartphone’s display will be mirrored to your laptop’s screen. You can use your PC’s keyboard to type on your smartphone as well.
Read Also: How to check if your AADHAAR is linked to your PAN card?
Step 7: Once connected, your smartphone’s display will be mirrored to your laptop’s screen. You can use your PC’s keyboard to type on your smartphone as well.
Read Also: How to check if your AADHAAR is linked to your PAN card?

 The Samsung Galaxy S23 comes in two variants 8GB RAM with 128GB storage and 8GB RAM with 256GB storage options priced at Rs 74,999 and Rs 79,999 respectively. Whereas Galaxy S23+ with 8GB RAM with 256GB storage option will be priced at Rs 94,999 and the 8GB RAM with 512GB storage model will be available at Rs 1,04,999. Lastly, the Galaxy S23 Ultra is priced at Rs 1,24,999 for the base 12GB RAM with a 256GB storage option. The price of the 12GB RAM with 512GB storage option and 12GB RAM with 1TB storage model is set at Rs 1,34,999 and Rs 1,54,999 respectively.
Also Read: The flagship smartphone series was launched in India last month.
The Samsung Galaxy S23 comes in two variants 8GB RAM with 128GB storage and 8GB RAM with 256GB storage options priced at Rs 74,999 and Rs 79,999 respectively. Whereas Galaxy S23+ with 8GB RAM with 256GB storage option will be priced at Rs 94,999 and the 8GB RAM with 512GB storage model will be available at Rs 1,04,999. Lastly, the Galaxy S23 Ultra is priced at Rs 1,24,999 for the base 12GB RAM with a 256GB storage option. The price of the 12GB RAM with 512GB storage option and 12GB RAM with 1TB storage model is set at Rs 1,34,999 and Rs 1,54,999 respectively.
Also Read: The flagship smartphone series was launched in India last month.

 Step 5: Tap the notification to open the link.
 Step 2: Turn on the toggle bar next to ‘Scan QR Codes’.
 Your camera app will be able to automatically scan QR codes once they are in the frame of the viewfinder.
 Step 2: Tap the green plus icon next to Code Scanner.
 Step 3: Open the Control Center and select the Code Scanner.
 Step 4: Point your iPhone camera at the QR code and make sure you see it in the viewfinder.
 Step 5: Tap the notification that appears below the code to visit the associated link.
 Step 4: On the following page, select ‘Search with Google Lens’.
 Step 5: Google Lens will scan the QR code and disclose its contents. Click on the result to view the information.

 Step 3: Point the rear camera at the QR code.
 Step 4: Google Lens will scan the QR code and present the result on the screen.
