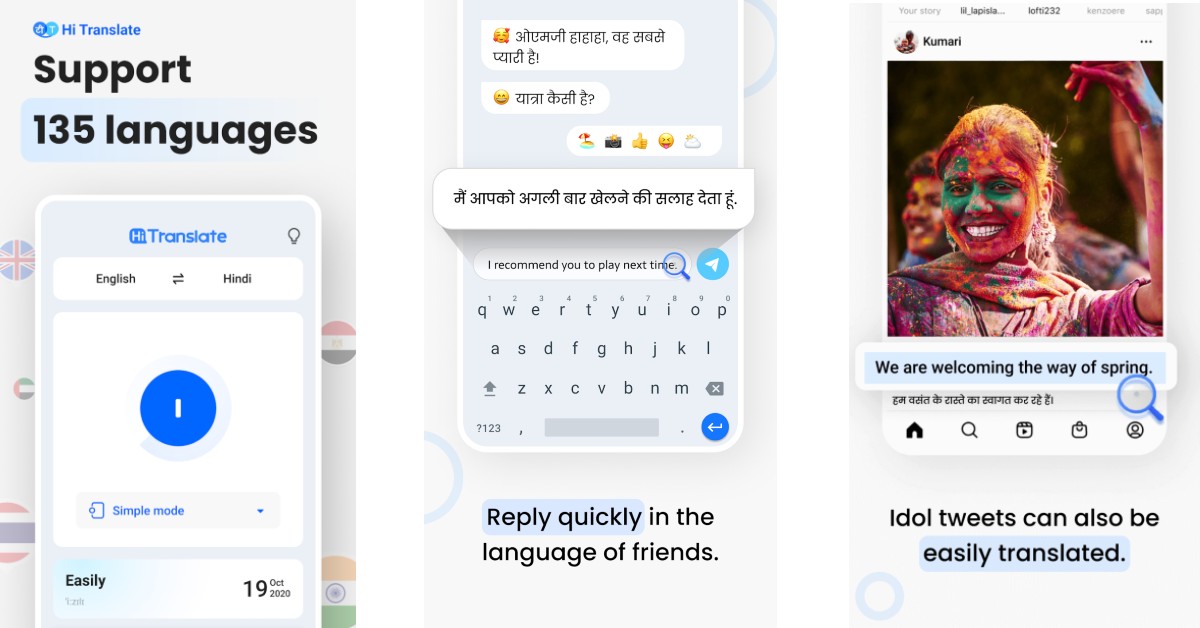
When it comes to creating stickers, Telegram is one step ahead of all instant messengers. Not only can you create your own stickers on Telegram, but you can also carry out the entire process on the app itself, in just a few simple steps. All you need to know is how to remove the background from an image. In this article, we show you how to create your Telegram stickers in just a few simple steps.Read Also: 5 Easy Ways to Fix iPhone Volume goes down automatically
In This Article
Here’s how you can create your own Telegram stickers
Step 1: Choose an image for the sticker. You can download an image from the Internet, take a screenshot from a video, or even pick one from your phone’s gallery.Step 2: Remove the background from the image and create a PNG file. You can do this using any basic editing software or web tools like Adobe Photoshop or PhotoRoom. Read our complete guide to removing an image background on an Android smartphone here. Before you proceed, make sure that the image doesn’t exceed a resolution of 512 x 512 pixels. If the image is copyrighted, it may be taken down later on. However, if you intend to use it among friends, the chances of the sticker receiving a copy strike are marginal.Step 3: Launch the Telegram app on your smartphone.Step 4: Search for ‘Sticker’ in the search bar and select the official Stickers bot. It should have the blue tick next to it.Step 5: Type ‘/newpack’ and hit send.Step 6: Enter a name for your sticker pack and hit send.Step 7: Tap the attachment icon and upload the image you just edited as a file.Step 8: Assign an emoji to the sticker. You will be able to send this sticker to your friends on Telegram using this emoji.Step 9: Upload more images if you want to create more stickers. Assign different emojis to all of them.Step 10: Enter ‘/publish’ and hit send to publish your sticker pack.Step 11: Telegram gives you the option to upload a 100 x 100-pixel icon for your sticker pack. You can also choose to skip this step by entering ‘/skip’.Step 12: Type a short name for your sticker pack. This will be a part of the URL identifier.Step 13: The Stickers bot will create your sticker pack and send you a link. Click on the link and tap on ‘Add stickers’ to download the sticker pack on your device. You can also share this link with your Telegram contacts and groups if you want them to use the stickers you created.Step 14: Once you’ve downloaded your sticker pack, you can access them from the sticker section in the emoji tab.Read Also: Gadget Bridge Awards 2022: The Biggest, Best Consumer Technology and Gadget Awards Winners
The cost of the Vivo Y75 has decreased by Rs 1000 in India. Both Vivo India’s e-store and Flipkart have changed their prices for the smartphone. To recall, the handset was launched in May this year. The MediaTek Helio G96 Chipset powers the smartphone, which has a modern design. A 44MP AF Selfie Camera with Eye Autofocus and a 50MP Super Night Camera are included. The phone has a 4,050mAh battery as well, which enables 44W FlashCharge.
In This Article
Vivo Y75 new price and offers
The Vivo Y75’s pricing has been reduced, and it is now available for Rs. 19,999 for the only 8GB RAM with 128GB storage configuration. The price of the phone has been reduced from Rs 20,999 to Rs 1000.The Vivo Y75 smartphone’s new price has been updated on the company’s website, and Flipkart has confirmed that it would be listed there for Rs. 19,999. Customers can also receive an extra 1,500 rupees in cashback when using their ICICI, YES Bank, Bank of Baroda, or other qualified bank cards to make purchases.Amazon, meanwhile, continues to display the outdated price of Rs. 20,999 for the Vivo Y75. The handset’s price in offline retail establishments has also been adjusted to Rs. 19,999.Moonlight Shadow and Dancing Waves are the two colour options that are offered.
Vivo Y75 tech specifications
The Funtouch OS 12, which is based on Android 11, runs on the Vivo Y75. The MediaTek Helio G96 4G SoC and 8GB of RAM power the MediaTek Helio G96 4G SoC found within the Vivo Y-series phone. Through the use of built-in storage, the RAM can be extended to 4GB. The smartphone’s 6.44-inch AMOLED screen features a 1,080 x 2,400 pixel resolution.Additionally, the vivo Y75 has a 4050mAh battery and a potent 44W FlashCharge that can charge the phone from 1% to 65% in 30 minutes, providing it with enough capacity to last the entire day. For connectivity, the smartphone includes Wi-Fi, Bluetooth v5.2, GPS, BEIDOU, GLONASS, and GALILEO as well as a 3.5mm headphone socket and a USB Type-C connector. The sensors onboard include an accelerometer, ambient light sensor, gyroscope, proximity sensor, and e-compass. Additionally integrated for authentication is a fingerprint sensor.A 50-megapixel main sensor with an f/1.8 aperture is part of the triple rear camera arrangement. The camera system also includes an 8-megapixel wide-angle depth sensor with an f/2.2 aperture and a 2-megapixel macro sensor with an f/2.4 aperture. For selfies, the front of the Vivo Y75 has a 44-megapixel autofocus sensor.
For the latest gadget and tech news, and gadget reviews, follow us on Twitter, Facebook and Instagram. For newest tech & gadget videos subscribe to our YouTube Channel. You can also stay up to date using the Gadget Bridge Android App. You can find the latest car and bike news here.
Modern smartphones are built to take a significant amount of damage. Even if you crack your phone’s touchscreen, it won’t be rendered completely useless. If the touchscreen starts malfunctioning all of a sudden for no reason, there are a few things you can do before taking your phone to the repair centre. In this article, we bring you the best easy methods to fix touchscreen issues on an Android smartphone.Read Also:Gadget Bridge Awards 2022: The Biggest, Best Consumer Technology and Gadget Awards Winners
In This Article
Restart your smartphone
Restarting your smartphone is the first thing you should do on encountering an issue. While it may not diagnose the problem, it will fix any minor background glitches that may be keeping your smartphone from working. A quick restart clears any temporary or corrupted files that may be causing the touchscreen to act up. To restart your smartphone, long press the power key and tap on ‘Restart’. If the touchscreen isn’t working entirely, press the volume down key and power key until your phone shuts down. Press the power key again to restart it.
Fix touch sensitivity
If you removed the screen protector from your smartphone’s display but forgot to lower the touch sensitivity, it may cause the screen to malfunction. Increasing the touch screen sensitivity is essential when you put on a screen protector, as it ensures that there’s no lag in touch response. However, when you take off the screen protector, the heightened sensitivity may create issues with the touchscreen. Go to Settings>Display and tap the toggle bar next to touch sensitivity to turn it off. Conversely, if the touchscreen started presenting issues right after you placed a screen guard, turn on the touch sensitivity.
Check the touchscreen for hardware-related issues
There are a few tests you can carry out to check the touchscreen for dead pixels. These tests will help you figure out if something is wrong with your screen’s hardware. You don’t need to download any app for this. Your smartphone comes embedded with certain tools and diagnostic tests. All you need to do is dial a star code.
For Samsung devices, dial *#7353#
For OnePlus, Oppo, Vivo, and Xiaomi devices, dial *#*#2664#*#*
For Sony devices, dial *#*#7378423#*#*
For Motorola devices, dial *#0*#
Once you carry out these tests, you will be able to check whether there are any ‘dead zones’ on your smartphone’s display.
Remove any physical attachments from the screen
If you have accessorised your smartphone by sticking a label or sticker on the screen, it may be keeping it from working properly. Even a faulty screen guard could cause this problem. Before buying a screen guard it is best you check whether it is approved for use by your smartphone manufacturer, or at least check the user reviews. Some screen guards use adhesives that may render some parts of the screen unresponsive.
Remove any peripherals and accessories
If your phone is connected to any accessories like an external mouse or keyboard, remove them from the device. If you want to be thorough, remove the SIM card and memory card as well. Sometimes a corrupted memory card can cause issues on your device. Restart your smartphone and check if the touchscreen is working again.
Use Display Tester
The Display Tester app is a great tool to figure out what’s wrong with your phone’s touchscreen. Use Display Tester to run tests for dead pixels, multi-touch detection, touchscreen dead spots and more. Once you have diagnosed the issue, it will be easier to determine whether it can be fixed or if you need to replace the screen.
Check your phone for moisture
If your phone got splashed recently, make sure you check your phone for any residual moisture. You can read out guide to completely removing water from any Android smartphone here. Make sure you regularly wipe the touchscreen whenever you operate it with sweaty or wet hands. It is always a good idea to invest in a smartphone with water resistant IP rating to prevent this issue from arising.
Reboot your smartphone in Safe Mode
Rebooting your smartphone in Safe Mode is an effective way to check whether the problem you are experiencing is caused by any of the installed apps. When you restart your phone in Safe Mode, it only uses the essential apps that came preinstalled in it. All third-party apps are restricted from functioning in Safe Mode. To reboot your phone in Safe Mode first, turn it off and then turn it back on using the power key. When the manufacturer logo appears on the screen while rebooting, press and hold the volume down key until ‘Safe Mode’ appears at the bottom of the screen. If the touch screen works fine in Safe Mode, it means that an app may be causing it to malfunction. Remove any recently downloaded apps one by one to see which app is responsible for the screen malfunction. If the problem persists in Safe Mode, then there may be a deeper issue causing the screen to act up.
Turn off developer options
You may have turned on the developer options on your device to enable USB debugging and then forgotten about it. Sometimes, leaving the developer options turned on can interfere with the core functions of your device. Go to Settings and scroll all the way down to access developer options. Switch off the toggle bar and restart your device. Your touchscreen should return to normalcy.
Check for any software update
It is not uncommon for software-related bugs to create touchscreen malfunction. Usually, these bugs are quickly fixed with a software update. To download any latest updates go to Settings>Software Update and select ‘Download and Install’. You can either download the update right there or schedule it for a later time.
Frequently Asked Questions
Why is my phone touch screen acting weird?
Your phone’s touchscreen may be acting weird due to numerous reasons. Install the Display Tester app to diagnose the issue.
What is Ghost touching?
When your phone responds to touch gestures you did not make, it is called Ghost touching. This may be caused by outdated software or faulty touchscreen hardware.
How do I fix touchscreen issues on my Android smartphone?
To fix your Android phone’s faulty touchscreen, reboot it in Safe Mode to determine if the problem is caused by a third-party app. If the touchscreen works fine in Safe Mode, remove the recently installed apps and restart your device. If your phone was exposed to water recently, make sure it is completely dry before using it again. Additionally, take off your phone’s screen protector and case to check if the touchscreen is malfunctioning because of them.
Read Also: How to Trace an Email Back to its Source IP Address
Conclusion
These are the best easy methods to fix any touchscreen issues on an Android smartphone. If these methods didn’t work for you, you should try performing a factory reset. Before performing a factory reset, make sure that all your data is backed up. If a factory reset doesn’t fix the issue either, take your phone to the service repair centre for further diagnosis.For the latest gadget and tech news, and gadget reviews, follow us on Twitter, Facebook and Instagram. For newest tech & gadget videos subscribe to our YouTube Channel. You can also stay up to date using the Gadget Bridge Android App. You can find the latest car and bike news here.
For Twitter Blue subscribers, the option to post videos up to 60 minutes long is currently being rolled out. The quality of the video for release will also change as a result of the new capability.A 60-minute video in 1080p resolution will be available for sharing online for Twitter Blue subscribers. Through its Twitter Blue page, the microblogging platform announced the update. Prior until now, only movies up to 10 minutes in length and with a file size of 512MB could be uploaded to the platform by Twitter Blue members. According to the business, customers can now upload videos that are 60 minutes long. However, the video should not exceed 2GB in size. The Twitter iOS and Android applications do not have this capability.There is a catch, though, since the feature is currently only accessible via the web and not through iOS or Android apps. “Share more content with your followers with Twitter Blue. Subscribers can upload videos up to ~60 minutes long (1080p) (web only)” the company via Twitter Community Page shared.Twitter just launched a new View Count for tweets that allows users to view the exact view count on a tweet in a manner similar to how it appears on videos. According to Elon Musk’s tweet, users will be able to know how many times a tweet has been seen by using the View Count feature. The function is now accessible via the web, iOS, and Android apps.Currently, some businesses can access Twitter Blue for Business, which has been made public. The microblogging service disclosed this functionality in a blogpost. The functionality will allow users and businesses to differentiate themselves from the competition.A business with access to Twitter Blue for Business is free to connect as many individuals, organisations, and brands as it wants to its account. The parent company’s profile photo will then appear on a little emblem next to the blue or gold checkmark for affiliated profiles.Companies can link their leaders, brands, help handles, workers, or teams. sportsmen, writers, and fictional characters in movies. Each affiliate will be vetted and formally linked to its parent handle based on a list provided by the parent business.
For the latest gadget and tech news, and gadget reviews, follow us on Twitter, Facebook and Instagram. For newest tech & gadget videos subscribe to our YouTube Channel. You can also stay up to date using the Gadget Bridge Android App. You can find the latest car and bike news here.
Garena Free Fire is a battle royale game with regular awards and tournaments to keep players interested. If you play Garena Free Fire, you should be aware of the redeem codes that are released on a daily basis. However, because the battle royale game is banned in India, players from other countries can use the Free Fire Redeem codes daily. If you’re unfamiliar with the Garena Free Fire redeem codes or don’t know how to get them, we’ve put together a step-by-step guide to help you redeem them. Check out Garena Free Fire Redeem Codes for December 26.The Free Fire redeem codes are a great way to get free stuff. These are 12-digit codes that contain alphabets and numbers, as well as an expiration date and time. Because the Garena FF redeem codes cannot be used more than once, you should hurry to the redemption page to claim your free reward before someone else does. To get a free reward, all you have to do is go to reward.ff.garena.com/en, which is the official redemption page. Also, keep an eye on this space for daily updates on Garena Free Fire redemption codes and rewards.
In This Article
Garena Free Fire Redeem Codes Today 26 December 2022
FGT6KUYGT3RJBN
JI1UYTY87KUDEX
EQ12QVXGTCXUY
IOL809LOKMNDFR
VFVCSAQGG12GTC
FVBHTYI7980P8
OGFDNHRFDASR3
42TGNJT7KI89OP
90OBSDTRBGSDA
XCBNR67YH824T
UHBJ67UJGT432
Q4XOLHJVGTRYX
DSZER5E4IK7RQ
2DFCGNTHJ7KI8
0P98HGFCKBVTY
How to Get Free Fire Redeem Codes for Garena on December 26?
Have you participated in the Amazon Quiz today? If not then participate in the 26 December 2022 Amazon Quiz as it has already gone live on the app. The daily quiz can be played from 12 AM to 11:59 every day on the mobile app platform. Today e-commerce is giving the chance to win Rs ___ Amazon Pay Balance.Every day Amazon brings a fresh quiz for its customers. By participating in the quiz the participants can win an Amazon Pay Balance of up to Rs 50,000. The quiz can only be played on the mobile app as it is not available for the desktop platform. The quiz contains five easy questions and you have to answer all the questions correctly. The participants will then be shortlisted for a lucky draw to select a winner. Whereas the results are declared at the end of the month. Check out today’s Amazon quiz answers to win Rs ___.Amazon Quiz Today Prize – Rs ___ Amazon Pay BalanceQuiz Date – 26 December 2022Daily Timing – 12 AM to 11:59 PMWinner Announcement – Today 12 PM
Only app users are eligible to play the Amazon quiz every morning from 12 AM to 11:59 PM. The quiz is not available on the desktop. For those who are unaware of how to play the Amazon quiz below are the steps, you can follow to take the quiz.
Firstly download the Amazon app from Google Play Store or App Store
Now fill in the required information through the Sign Up option.
You need to log in to the Amazon app and scroll down on the home screen to find the Amazon Quiz banner.
Tap on the Amazon Quiz banner and tap on the Start button to start the Quiz.
Now you will get 5 questions and you need to answer them correctly. One wrong answer will eliminate you from the Quiz.
After answering all the questions correctly you are now eligible for a Lucky Draw.
The winner’s name will be announced today at 12 PM.
If your iPhone‘s volume goes down automatically, it is likely due to a software-related issue. You may first want to check the volume keys. If you don’t notice anything unusual, you may have to do further investigation. In this article, we bring you the top 10 ways to fix the ‘iPhone volume goes down automatically’ issue.Read Also: How to deactivate a WhatsApp Community?
In This Article
Why is my iPhone’s volume going down automatically?
Before we move on to the fixes, let’s take a look at what could possibly cause your iPhone’s volume to go down automatically.
The volume down button is stuck
Your iPhone’s cover is pressing against the volume down button
The Attention Aware features are misfiring
The touch controls on your AirPods are causing the volume to go down
Software issues
Turn off ‘Attention Aware’
Apple’s ‘Attention-Aware’ features use Face ID to determine whether you are looking at your phone. When you are looking at the screen, Attention Aware turns down the notification sounds since you are already active on your phone. It may also disable other functions that would usually only be useful when you are not using your phone. Attention Aware may be the reason why your iPhone’s volume is going down automatically. Here’s how you can turn it off.Step 1: Go to Settings.Step 2: Select Face ID & Passcode.Step 3: Turn the toggle bar off for Attention-Aware Features.
Turn off Reduce Loud Sounds
If you turn the volume up to a high level while using headphones, your Phone sends you a notification alerting you about the audio levels. The next time you plug in your headphones, the volume will automatically be turned down. You will have to manually turn up the volume using the volume rocker keys. Here’s how you can disable the ‘Reduce Loud Sounds’ feature.Step 1: Go to Settings.Step 2: Select Sound & Haptics.Step 3: Turn off the toggle switch next to Reduce Loud Sounds.
Turn off ‘Change with Buttons’
Your iPhone’s volume may be automatically going down because of a faulty volume button. You can fix this by disabling the ‘Change with Buttons’ in Settings. Here’s how you can do it.Step 1: Go to Settings.Step 2: Select Sound & Haptics.Step 3: Turn the toggle bar off for Change with Buttons.
Take off your iPhone’s case
Not every case is a perfect fit for your phone. Some iPhone cases have the tendency to press against the volume rocker keys, leading to the volume going up or down. To make sure this isn’t the ‘case’ with your phone, pull it out of the protective cover and check if the problem still persists. If the volume still keeps going down, the case is not the culprit. If your phone works fine after taking the case off, it may be time to get a better cover for your iPhone.
Did you just connect your headphones?
If your iPhone’s volume is at the maximum level, pairing it with a Bluetooth headset can bring it down. Your iPhone automatically adjusts the volume to a more acceptable level so as not to hurt your ears when you put on the headphones. Once you manually increase the volume after the headphones have paired with your phone, it will not go down again.
Restart your iPhone
You’ll be surprised how many temporary issues can be fixed with a quick restart. If you’ve tried all the fixes on this list, you may want to restart your iPhone to see if it fixes the volume issue.How to restart your iPhone X, 11, 12, 13, or laterStep 1: Press and hold one of the volume buttons and the side button until the power-off slider appears on the screen. Step 2: Drag the slider to turn off your iPhone.Step 3: After your phone is completely shut down, press the side key to turn it back on.How to restart your iPhone 6, 7, 8, or SE (2nd or 3rd generation)Step 1: Press and hold the side key until the power-off slider appears on the screen.Step 2: Drag the slider to turn off your iPhone.Step 3: Once your iPhone has completely shut down, long-press the power key again to restart it.
Turn Bluetooth off
If you’re using a Bluetooth speaker for audio output, the fault may not lie with your iPhone but with the external speaker. If the speaker has physical buttons for volume control, it is possible that someone may be using them to turn down the volume. This is more likely when there are several people in the room and you’re not paying attention to the Bluetooth speaker. Connecting your phone to an external audio output can also bring down the volume of notifications and other alerts.
Turn off Background Sounds
If your iPhone’s volume keeps going down automatically, try turning off the background sounds feature from accessibility settings. Here’s how.
Step 1: Go to Settings and hit Accessibility.
Step 2: Tap on Audio & Visual.
Step 3: Select Background Sounds.
Step 4: Turn off the toggle switch for Background Sounds.
Reset all settings
Step 1: Go to Settings and select General.
Step 2: Scroll down and tap on Transfer or Reset iPhone.
Step 3: Hit Reset.
Step 4: Tap on Reset All Settings.
Check for software updates
It is not uncommon for bugs to pop up and create software glitches on your phone. Minor issues like these are ironed out in successive updates that are rolled out immediately after the bug is encountered. To check for any software updates, go to Settings>General>Software Update.
Frequently Asked Questions (FAQs)
Why does my iPhone keep turning the volume down?
Your iPhone has a ‘Reduce loud sounds’ feature that automatically turns down the volume when you connect it to your AirPods. To fix this, go to Settings>Sound and Haptics>Headphone Safety and switch off the toggle bar for ‘Reduce Loud Sounds’.
Why does my phone’s volume decrease when ringing?
A faulty volume button or an ill-fitting case can trigger the volume-down action at random times. Get the button fixed to change the case to solve this issue.
What is Attention Aware?
Attention Aware is a feature on your iPhone that turns down the notification sounds when you’re looking at the screen.
How do I disable Attention Aware features on my iPhone?
Go to Settings>Face ID & Passcode and turn off the toggle switch next to ‘Attention Aware Features’.
These are the top 10 easy ways to fix the ‘iPhone volume keeps going down automatically’ issue. If you’ve tried all the methods listed above and still aren’t able to fix the issue, try resetting your iPhone to its factory settings. Of course, this will require backing up your data first.
Welcome to the Gadget Bridge Awards 2022, the world’s largest and greatest consumer technology and gadget awards. This is the fourth year that we have held our annual awards to recognise the finest of the best in the tech and gadget world. All of the Gadget Bridge Awards 2022 nominees can be found here. This year has seen a slew of new gadgets released all year. We observed a wide range of devices in 2022, and this time we thought, why not further increase and appreciate additional tech toys. So, with over 41 categories, we can confidently claim to be the biggest tech and gadget awards of 2022.
We were overwhelmed in a few months due to the unexpected influx of gadgets, but we persevered and saw it as a challenge and powered on. We appreciate you, our readers, viewers, listeners, and well-wishers, for sticking by us and the rest of the industry (Thank You). The new year began with a bang, as some exciting cell phones were released in early 2022. Then, in mid-2022, we saw the return of some fantastic products, such as televisions, earphones, smartwatches, laptops, and tablets. The year was business as usual.
You, our audience, assisted us in determining the People’s Choice smartphone, gadget, and brand of 2022. Thousands of people voted on Twitter and in our voting forum to choose the winners. We had a clear victor in two categories, and a gadget won by a few percentage points in the third.
So, without further ado, let us get started and find out who won in each of the 42 classes. These are the Gadget Bridge Awards 2022: The year’s biggest and best consumer technology and gadget awards.
In This Article
Best Smartphone Of The Year 2022
Winner: Samsung Galaxy Z Fold 4
Best Budget Smartphone Of The Year 2022
Winner: Redmi A1
Best Budget Camera Phone Of The Year 2022
Winner: Redmi Note 11
Best Mid-range Camera Phone Of The Year 2022
Winner: Vivo V25 Pro
Best Camera Phone Of The Year 2022
Winner: Google Pixel 7 Pro
Best Inexpensive 5G Smartphone Of The Year 2022
Winner: Samsung M13 5G
Best Mid-Range Gaming Smartphone Of The Year 2022
Winner: Poco F4 5G
Best Gaming Smartphone Of The Year 2022
Winner: iQOO 9T
Best Mid-Range Smartphone Of The Year 2022
Winner: Oppo Reno 8 Pro
Best Selfie Smartphone Of Year 2022
Winner: Motorola Edge 30 Ultra
Best Vlogging Smartphone Of The Year 2022
Winner: Apple iPhone 14 Pro
Best Budget Smartphone Chipset Of The Year 2022
Winner: Mediatek Helio G99
Best Mid-range Smartphone Chipset Of The Year 2022
If you receive an email from an unrecognisable address, you can find out the location where it may have originated with just a few simple steps. All you need to do is find the IP address of the sender and trace its location online. While it may sound complicated, the process is pretty simple and straightforward. In this article, we show you how to trace an email back to its source IP address.Read Also: Last-Minute Tech Gifting Options for Christmas
In This Article
Here’s how you can trace an email to its source IP Address
You can find the IP address of the sender from the email header. Here’s how.Step 1: Open your Gmail inbox and select the email you want to trace.Step 2: Click on the ellipses (three dots) and select ‘Show original’.This will open the full email header in a new tab. Yahoo mail users can view the full email header by opening the mail and selecting ‘View raw message’ after clicking on the ellipses. Outlook users can click on ‘More actions’ and select ‘View message source’ to open the email header.Any email you receive travels through various servers. For every server that the email travels through, the header adds a ‘Received’ line and records the IP address of the server. To find the IP address of the sender, look for the first ‘Received’ line. The IP address will be listed there.
How to find the location of the email sender using the IP address
Once you know the IP address of the sender, you can trace their location using these easy steps.Step 1: Copy the full email header.Step 2: Go to https://tools.iplocation.net/trace-email.Step 3: Scroll down and paste the email header in the text box.Step 4: Hit ‘Submit’. The website will display the name of the country and the general region where the email may have originated. Read Also: Google is expanding end-to-end encryption beta testing for a few users
Conclusion
This is how you can trace any email back to its source IP address. Instead of iplocation.net, you can use several other online IP location tools like DNS checker and KeyCDN. All you need to do is locate the IP address from the email header and paste it into the appropriate box on the IP locator website. You do not have to copy the full email header in this scenario. If you found this article to be helpful, let us know in the comments!For the latest gadget and tech news, and gadget reviews, follow us on Twitter, Facebook and Instagram. For newest tech & gadget videos subscribe to our YouTube Channel. You can also stay up to date using the Gadget Bridge Android App. You can find the latest car and bike news here.
While you may be aware of the Adblock extension for Chrome, there are several other extension tools that are just as good. For every complicated task, there is an extension that provides an easy solution. But the best extensions are the ones you use most often. Here is our list of the top 10 productivity Google Chrome extensions you should use right now.Read Also:Google is expanding end-to-end encryption beta testing for a few users
In This Article
MightyText
Ever wanted to quickly respond to a text but then found yourself stuck in a scrolling loop on your smartphone? While you can respond to your WhatsApp messages using the app’s web portal, there is no such alternative to regular text messaging. MightyText solves this issue by syncing your texts with your PC and letting you respond from the Chrome tab itself. You will save a lot of time that would otherwise be spent browsing social media feeds. You can also choose to sync the pictures on your phone and access app notifications on your PC.
Notion Web Clipper
If your Chrome bookmarks are full of clutter and hard to sort through, you should give Notion Web Clipper a try. This extension lets you create different projects where you can save the relevant web pages. Now you don’t need to go sort through hundreds of bookmarks to find what you’re looking for. You can easily create different folders for your reading list, academic journals, movie review, or recipes you come across on the Internet. In a workplace setting, you can collaborate with your team members by giving them access to a project and leaving notes and comments wherever required. Notion Web Clipper deserves its spot in the top 10 productivity Google Chrome extensions.
WhatFont
Ever come across a fascinating font while reading an article but don’t know what it’s called? All you need to do is hover the cursor over the text and WhatFont will identify it for you. This is a great tool for graphic designers and students working in design. Apart from identifying the text, WhatFont also detects the services used for serving the web fonts.
OneTab
If your Chrome browser is always full of inactive tabs, this handy extension will neatly store them in a list. Using OneTab you can save up to 95% of memory and make your web browser run faster. On top of that, it gets rid of all the clutter! You can choose to access individual tabs from the list or open them all at once.
Postlight Reader
Reading an article online can be nothing short of annoying with all the unnecessary popups, invasive ads, and additional clutter. Postlight Reader gets rid of all the distractions and provides a clean reading experience with just the text and the images. All you need to do is open the article on Chrome and click on the Postlight Reader extension. You can even send the article directly to your Kindle using Postlight.
Loom: Screen Recorder and Screen Capture
Loom is the most comprehensive screen recording tool that we have come across. Not only can you record your screen using Loom, but you can also use your PC’s camera and microphone to record yourself at the same time. Once the video has been recorded, it automatically gets saved to the cloud and can be shared with a quick link. Loom is a great tool for the workplace. If you want to explain a particular task to an employee or coworker, you can easily record your screen and talk them through it. Loom also gives you the option to turn off your camera and only use the microphone while you’re recording the screen.
Clockify Time Tracker
Clockify Time Tracker is a great tool to optimise your work day. You can use Clockify to time your tasks throughout the day and gain a deeper insight into how you go about your day. You can set a timer for individual tasks and even mark them as ‘billable’. This is a nifty feature for freelancers who take on several projects at once. The extension integrates with 50+ web apps. It even has an idle detection tool for the times you drift off and lose time on a project. If you want to make the most of your time, this is the extension for you. Clockify is easily one of the top 10 productivity Google Chrome extensions that we’ve used.
Todoist
You may be familiar with Todoist’s smartphone app, but its Chrome extension is just as good. Todoist is one of the better smartphone task managers we’ve used, and it delivers a similar performance on Chrome as well. With the Todoist Chrome extension, you can easily save a website on your reading list, create a checklist of tasks and mark them off as you complete them, collaborate with other people on a common project, and more. You can also easily jot down a note or set a quick reminder using this accessible Chrome extension. What we really like about Todoist is how seamlessly it integrates into your work routine.
Timewarp
This one is for all the serial procrastinators out there. If you find yourself wandering off to attention-grabbing sites like Reddit, Twitter, or YouTube, Timewarp reminds you to get back to the task at hand. For Timewarp to work, you need to create a list of websites that you frequent in order to kill time. The extension offers three features to cut down on wasted time – Redirect, Quote, and Timer. ‘Redirect’ takes you to a specified productive website every time you switch to a website on your list. For example, you can program Timewarp to redirect you to Google Docs every time you enter Reddit in the address bar. The ‘Quote’ feature springs a motivational quote your way when you open a website from the list. Lastly, ‘Timer’ displays the time you’ve spent on a particular website today.
Email Tracker for Gmail – Mailtrack
You may not have heard of Mailtrack before, but once you start using it, it will become one of the essential extensions on your browser. To put it simply, Mailtrack monitors your sent emails and lets you know which ones were opened by the recipient. It also tells you how many times the receiver opened your emails. The only downside is that it only works for Gmail.
Read Also: 7 Best Apps for every YouTube Creator in 2023
Unlike Twitter and Facebook, accessing Instagram without creating an account can be an ordeal. The social media platform started out as a smartphone app and is still used by the majority of its users in that form. Since you can’t use the app without signing up, it becomes impossible to view a profile or post without creating an account. Luckily, Instagram also has a website and it has come a long way since its early (and mostly unusable) beginnings. If you want to view a post without creating an account, using the Instagram website is a great alternative. But that’s not the only workaround for this issue. In this article, we bring you four ways to view Instagram posts without creating an account.Read Also: 7 Best Apps for every YouTube Creator in 2023
In This Article
View Instagram posts using a web browser
If you don’t have an Instagram account, you can still view someone’s profile through a web browser. All you need to do is add their username next to www.instagram.com/ and hit enter. However, there are some limitations to this method. Firstly, the profile you are viewing needs to be a public profile. If the profile is set to private, you will need to create an account and request to follow the profile. When approved, you will be able to view their posts. If the profile is public, you will be able to view its recent posts in a web browser.Instagram only lets you view a few posts when you are browsing someone’s profile on a web browser without a registered account. In order to expand a post and view it in its entirety, you will need to create an account. However, there is a workaround to this issue. You can simply right-click on the post and open it in a new tab to view it without creating an account. Browsing Instagram without an account limits your usage to just viewing a few posts. You will not be able to view stories, reels, or even expand comments on a post. If you want full access to Instagram without creating an account, try the other method listed below.
View Instagram posts using ImgInn
There are several third-party websites and services that let you browse Instagram freely without needing to create an account on the platform. One of the most popular websites for this task is Imginn. Once you visit Imginn, all you need to do is type in the Instagram username of the profile you want to visit. You will be able to view all the posts, reels, stories, and highlights posted on the profile. This will only work if the profile is public. In order to view a private profile, you will need to create an account and follow it. ImgInn also lets you download pictures, videos, and reels posted by a profile with just one click.
View Instagram Stories using InstaNavigation
ImgInn only lets you view Instagram posts and reels without an account. If you want to view someone’s story anonymously, use InstaNavigation. Here’s how.
Step 1: Go to the official InstaNavigation website.
Step 2: Enter the profile URL or the username of the account.
Step 3: If the account is public, you will be able to view the stories published on it. Simply click on the profile picture or scroll down to the Stories tab to view them.
Read Also: Samsung Galaxy A04 and Galaxy A04e budget smartphones now available in India
Use Dumpor
Dumpor is another third-party website you can use to view Instagram posts without an account. Just follow these steps.
Step 1: Go to the official Dumpor website.
Step 2: Enter the Instagram handle in the box and hit the search icon.
Step 3: Select the profile from the search results.
Step 4: Scroll down to view the posts. Click on Show Stories to view the current stories.
Frequently Asked Questions (FAQs)
Can you view Instagram posts without an account?
Instagram lets you view public profiles without an account on the web browser. However, you can only view limited posts this way.
How do I view Instagram posts without an account?
Use third-party websites like ImgInn and Dumpor to view Insta posts and reels without an account.
How do I view Instagram stories without an account?
Go to the InstaNavigation website, enter the name of the public profile, and scroll down to the Stories tab to view them.
Conclusion
These are the four simple ways to view Instagram posts without an account. These methods come in handy when you quickly want to view a few posts without going through the hassle of creating a profile. However, if you want to post comments, like posts, and network with people, you will need to create an Instagram account.
We’ve all seen the ads for wireless charging and wondered if it’s really worth it. Is wireless charging somehow better? How does it compare to traditional cable-based charging?
The answer is not as clear-cut as you may think. Not only do you need to consider the practical benefits of wireless charging, but you also have to evaluate how the technology works, what type of device you need to use it, and other factors.
In this article, we’ll explore the pros and cons of wireless charging to help you decide whether it’s right for your needs.
In This Article
What is wireless charging?
We’ve all experienced seeing our battery charge drop to almost 0% making us panic and run searching for a wire to charge our phone, somehow being unable to plug it in until at least the 3rd try. This is especially nerve-wracking if you’re in the middle of paying a casino game on SlotsLV or answering urgent messages from your boss.
Well, wireless charging solves this anxiety-inducing situation almost completely. Wireless charging is a process of transferring energy from one device to another without the use of wires or cables. The most common type of wireless charging uses electromagnetic induction to transfer energy between two coils.
When an electrical current is passed through the primary coil, it creates a magnetic field. This magnetic field then induces a current in the secondary coil, which can be used to power the device.
How to use a wireless charger
Wireless charging is one of the most popular features on new smartphones, and for good reason: it’s incredibly convenient. But not all wireless chargers are created equal, some are simply better than others. They can have faster charging, or work with only certain types of devices, and some come with extra features that can be useful (or not).
Here’s what you need to know about how to choose the right charger for your needs. Most wireless chargers use either the Qi or PMA standard. Qi is more common and is used by companies like Apple, Samsung, LG, and Sony.
PMA is used by Duracell Powermat and other accessory manufacturers. If you’re not sure which standard your device uses, check the product manual or website.
Additionally, when choosing a wireless charger, there are several things you need to keep in mind such as the charging speed. Some wireless chargers are faster than others. If you want the fastest possible charge, look for a charger that supports fast-charging standards like Qualcomm Quick Charge or Samsung Adaptive Fast Charging.
And not all wireless chargers work with all devices. If you have an iPhone, for example, make sure to get a charger that supports the Qi standard. You should also be on the lookout for wireless chargers that come with extra features like LED display lights, temperature control, and overcharge protection. Consider which features are important to you before making a purchase.
Once you’ve chosen a wireless charger, be sure to read the instructions carefully before using it. Most wireless chargers require you to place your device on the charging pad in the correct orientation in order for it to charge properly.
The pros and cons of wireless charging
There are several benefits of wireless charging over traditional methods. One benefit is that it eliminates the need for messy cables and cords. Wireless charging also offers the convenience of being able to charge your devices without having to remove them from their cases or covers.
Additionally, wireless charging is typically faster than wired charging, meaning you can get back to using your devices sooner. And you can continue using your device without any pesky cords or plugs getting in the way. They are also becoming more common and easier to find, so you’re not limited to using only proprietary chargers from your device’s manufacturer.
However, there are also certain drawbacks to this technology. Wireless chargers tend to be more expensive than traditional chargers.
Moreover, you have to make sure your device is properly aligned with the wireless charger for it to work properly, which can be a bit tedious. They can also be bulkier than traditional chargers, so they may not be as convenient to travel with.
Conclusion
So, should you switch to wireless charging? Ultimately, the decision of whether to use a wireless charger or a traditional cable-based charger will boil down to your personal preference and lifestyle.
Wireless charging is becoming more popular due to its convenience and ease of setup, but traditional chargers still have their place in many people’s lives.
If you’re someone who hates dealing with tangled cords, or you’re always on the go and need the convenience of being able to charge your devices quickly and easily, then wireless charging may be the right choice for you.
On the other hand, if you need reliable fast charging capabilities and don’t mind dealing with cords, then a cable-based charger is probably the better option.
For the latest gadget and tech news, and gadget reviews, follow us on Twitter, Facebook and Instagram. For newest tech & gadget videos subscribe to our YouTube Channel. You can also stay up to date using the Gadget Bridge Android App. You can find the latest car and bike news here.
In its latest update, WhatsApp introduced the ‘Community’ feature, allowing admins to manage similar groups in one place. If you want to know how to create a WhatsApp Community, read our article here. If you are a Community admin and are wondering how to deactivate a WhatsApp Community, here’s how you can go about it.Read Also: Samsung Galaxy A04 and Galaxy A04e budget smartphones now available in India
In This Article
What is a WhatsApp Community?
A WhatsApp Community is where you can manage several different groups at once. Different groups can be clubbed together under one umbrella and managed together. This feature comes in handy when you moderate related groups and want to manage them in one place. For example, WhatsApp groups of different classes in a school can be brought together to form a ‘community’ of the school that they are a part of. Any announcements related to the school can be posted to the community where participants of all the groups can look them up.Similarly, groups of teams at a workplace can be brought together as one community and managed in one place. One WhatsApp Community can accommodate up to 50 groups and 5000 members. Admins can post announcements in the ‘community announcement’ group for all the members to see.
Here’s how you can deactivate a WhatsApp community
Boult Audio today announced the launch of Rover smartwatch in India. The device delivers 10 days of battery life. The watch comes with an AMOLED display which offers 600 nits brightness and Rover offers the choice of two bundles with secondary straps being offered for no additional cost. In addition to this, the device has over 100 sports modes to choose from.
In This Article
Boult Rover smartwatch price in India and availability
Boult Rover smartwatch will be available for purchase via the company’s official website with a price tag of Rs 2,999. The swanky watch will also soon be offered on Flipkart.There will be two bundles for Rover. The leather brown strap will be the standard strap for the Classic switch edition, and an orange strap will be available without cost. The second package is called Flip, and it comes with free green and blue straps in addition to black as the main strap colour.
Boult Rover smartwatch features
Boult Rover is a Bluetooth-calling smartwatch with a 1.3-inch AMOLED display. In the box, Rover has a variety of coloured straps, including Orange and Leather and Black, Blue, and Green. With Rover’s 600 nits of high brightness, analysing your activities at any time of day is simple, even at noon when the sun is at its highest. The watch’s charm is heightened by its superior zinc alloy frame and leather straps. You can rest easy knowing that your watch will be able to withstand exposure to water and dust thanks to its IP68 classification.With more than 150 cloud watch faces, the watch offers a cutting-edge and immersive experience, allowing the user a variety of alternatives for choosing the watch faces that best suit their personalities or flaunting a new appearance every day.With more than 100 sports modes available, the smartwatch provides excellent value. Rover owners won’t have to worry about constant charging because of the device’s astounding ten-day battery life. The entire health monitor feature of the smartwatch also makes maintaining tabs on one’s health more convenient.“We have made a name for ourselves in how customers perceive sound or audio. Now, we are expanding our services to other niches so that our customers benefit from the same assurance of quality across our product categories. Although there is still a way to go to achieve this dream, we are putting our best foot forward to deliver the finest quality products to our customers. Rover is a product of technological advancement where durability and style are combined to give it an edge over other variants in the market. Since a watch plays a crucial role in dictating everyday essentials, we have designed the smartwatch in a way that it ups your style game, in addition to giving you a range of functionalities,” said Mr. Varun Gupta, co-founder of Boult Audio.
For the latest gadget and tech news, and gadget reviews, follow us on Twitter, Facebook and Instagram. For newest tech & gadget videos subscribe to our YouTube Channel. You can also stay up to date using the Gadget Bridge Android App. You can find the latest car and bike news here.
While it is beginning to look a lot like Christmas, some of you may be putting off your gift shopping until the last minute. If you don’t know where to begin, we’ve got you covered. 2022 saw a lot of exciting tech products getting released. We’ve picked the best out of the lot and assembled them into a handy gifting guide. So, without further ado, here is our list of last-minute tech gifting options for Christmas.Read Also: Infinix Zero 20 with 60-megapixel selfie camera launched in India
In This Article
iPhone 14 Pro
Price: Rs 1,29,990The latest iPhone as a Christmas gift is always a no-brainer and probably the safest gifting choice. The iPhone 14 Pro comes with a new display and Apple’s biggest camera upgrade in years. The notch on the display has been replaced with a pill-shaped cutout which also houses the highly talked about ‘Dynamic Island’. The rear camera unit gets a 48MP primary sensor, a big upgrade over the 12MP lens on the previous version. Processor duties are handled by the new A16 Bionic chipset. iPhone 14 Pro also packs some new emergency features like crash detection and satellite connectivity. Read more about the latest iPhone in our review here.
Sony WH-1000XM5
Price: Rs 26,990
Sony’s latest flagship headphones, WH-1000XM5, make a perfect gift for an audiophile friend. Sony has been regularly putting out great wireless headphones every year in its 1000XM series, and the 1000XM5 continues that tradition by improving upon the sound profile of its predecessor and being comfortably ahead of its competition. The WH-1000XM5 employs giant 30mm audio drivers to deliver a sensational audio performance. If that’s not enough, these headphones also offer state-of-the-art ANC assisted by 8 microphones. You also get up to 30 hours of playback on a single charge and fast charging support. For more details, read our review here.
Nothing Phone (1)
Price: Rs 32,999Not many smartphones are able to make as big waves in their debut year as the Nothing Phone (1) did this year. While the smartphone may stand out because of its aesthetics (thanks to the see-through back panel design and the Glyph interface), do not be mistaken in thinking that it is a one-trick pony. The rear camera and image processing of the Phone (1) are surprisingly good for a smartphone in the midrange category. Read more about it in our detailed review here. If you’re looking for a powerful smartphone to gift to a tech enthusiast but don’t want to splurge on a flagship, the Nothing Phone (1) stands out as an obvious choice.
Samsung Galaxy Watch 5
Price: Rs 30,000Samsung Galaxy Watch 5 is arguably the best Android smartwatch on the market right now. Its BioActive sensors, health and fitness tracking, app integration and ease of accessibility make it an ideal gift for fitness freaks and regular tech enthusiasts alike. When we reviewed the Galaxy Watch 5 last month, we were blown away by the range of its fitness tracking and the accuracy of its health sensors. Even if you are not heavily into fitness, you’ll come to appreciate the density of the health data that the smartwatch is able to track across the day. On top of that, the dial faces and customisation options make it a pretty appealing bling to wrap around your wrist.
Amazon Echo Dot with Clock
Price: Rs 4,999The Amazon Echo Dot with Clock makes a great nightstand addition. It is also one of the bestselling Echo devices. It comes with a minimal digital clock LED display and the standard LED lighting at the bottom. With the Echo Dot, you can play ambient sounds and white noise while you go to sleep, set up an alarm using Alexa, or even update your to-do list for the day. You can snooze the alarm by gently tapping on the top of the device.
Acer H Series Smart TV
Price: Rs 34,999The recently launched Acer H Series ticks all the boxes for the perfect Christmas gift. This 50-inch Smart TV comes sports a 4k display and a 64-bit Cortex a 55 quad-core CPU with up to 1.3GHz clock speed. The Acer H Series is nearly frameless with just a thick silver border running at the bottom. Designed to be placed in a large living room, the H Series delivers a great viewing experience, one that isn’t easily matched in this price range. The Android TV 11 OS supports all of the OTT apps and the TV comes preloaded with the major ones like Netflix and Prime Video. Acer may be new to the Smart TV market in India but it is consistently delivering great products at really attractive prices. Read our review here.
Lenovo ThinkBook 15
Price: Rs 33,990Looking for a budget-friendly laptop for students? The Lenovo ThinkBook 15 is a great buy at a reasonable cost. The Lenovo ThinkBook 15 features the AMD Ryzen 3 5300U processor and comes preloaded with Windows 11. While the standard variant has 256GB SSD storage along with 8GB RAM, there is also a 512GB SSD storage variant on offer. Brightness for the 15.6-inch Antiglare display is capped at 220 nits, which is optimum for indoor and outdoor usage. The laptop also comes with integrated AMD Radeon graphics.
Qubo Dashcam 4K
Price: Rs 9,990.When it comes to Auto Tech, Hero Electronix has one of the best product portfolios in India. The recently launched Qubo Dashcam can record high-quality footage in 4k (with Sony IMX 415 lens and SIGMASTAR SSC8629G) and also comes with ADAS features like lane departure warning, forward vehicle motion detection, and vehicle ahead alert. On top of that, the dashcam also sports an inbuilt GPS and is capable of taking time-lapse videos. The ‘Loop recording’ feature overwrites old footage to save storage space and the ‘Emergency event recording lock’ automatically saves the video in case of an event.
OnePlus Nord Watch
Price: Rs 4,999Looking for a no-nonsense fitness tracking smartwatch without wanting to splurge too much? The OnePlus Nord Watch fits the bill. The 1.78-inch AMOLED display offers a 60Hz refresh rate and a peak brightness of 500 nits. We reviewed the Nord Watch recently and were pleased by the touch response of the display and the versatility of its fitness tracking. The 230 mAh battery provides a week’s worth of juice even on above-average usage. When the smartwatch is on stand-by it can last up to 30 days.
Steelbird Bike Riding Gloves with Touchscreen Sensitivity
Price: Rs 599While it isn’t exactly a ‘tech’ gift, the Steelbird riding gloves are a great accessory that allows riders to handle touchscreen interfaces without taking the gloves off. These gloves will come in handy for electric scooter owners that need to regularly handle the touch interface on their vehicle. Taking the gloves off every time you need to check your phone can be quite an annoyance, especially on pit stops during long rides. At a price of Rs 599, these gloves would make a thoughtful gift for someone that loves to ride. Read Also: Upcoming Xiaomi Smartphones in 2023 – The Complete list
Conclusion
These are our picks for the best last-minute tech gifting options for Christmas. Before buying any products, look out for the exclusive year-end offers and discounts being offered by e-commerce platforms and tech brands across the spectrum. What tech products did you pick up on your Christmas shopping spree? Let us know in the comments!For the latest gadget and tech news, and gadget reviews, follow us on Twitter, Facebook and Instagram. For newest tech & gadget videos subscribe to our YouTube Channel. You can also stay up to date using the Gadget Bridge Android App. You can find the latest car and bike news here.
Client-side encryption in Gmail for the web is now more accessible to customers thanks to Google. Up until January 20th, 2023, customers of Google Workspace Enterprise Plus, Education Plus, and Education Standard are able to apply for the beta. Emails and attachments on the Web benefit from an additional degree of protection thanks to the company’s encryption technology.More users of Google Workspace’s email messaging service, Gmail, will be able to access the beta version of the company’s end-to-end encryption function. More customers will now be able to apply to beta-test the Client-side encryption in Gmail.Sensitive information in the email body and attachments are rendered unreadable by Google servers thanks to client-side encryption in Gmail. Customers maintain ownership of both the identity service used to access encryption keys.All data that is at rest and in transit between our facilities is already encrypted by Google Workspace using the most recent cryptographic standards. Client-side encryption supports a variety of data sovereignty and compliance requirements while enhancing the secrecy of your data.For Google Drive, Google Docs, Sheets, and Slides, Google Meet, and Google Calendar, client-side encryption is already available (beta).Customers of Google Workspace Enterprise Plus, Education Plus, and Education Standard will have access to client-side encryption in Gmail. Customers of legacy G Suite Basic and Business, as well as those with personal Google Accounts, won’t be able to utilise it. Neither will users of Google Workspace Essentials, Business Starter, Business Standard, Business Plus, Enterprise Essentials, Education Fundamentals, Frontline, and Nonprofits.Customers that are eligible for Workspace can apply for the beta after completing a few account preparation requirements.At the domain, OU, and group levels (Admin console > Security > Access and data control > Client-side encryption), this Client-side encryption in Gmail can be turned on. It is disabled by default. To find out more about client-side encryption, go to the Help Center.Click the lock icon, choose extra encryption, then compose your message and add attachments, as usual, to add client-side encryption to any message.
For the latest gadget and tech news, and gadget reviews, follow us on Twitter, Facebook and Instagram. For newest tech & gadget videos subscribe to our YouTube Channel. You can also stay up to date using the Gadget Bridge Android App. You can find the latest car and bike news here.
Viewsonic has announced the launch of the newest Ultra Short Throw Smart Laser Projectors X2000B-4K and X2000L-4K in the Indian market. The projectors have second-generation laser phosphor technology with 20,000 lamp-free hours of endurance. The Viewsonic Ultra Short Throw Smart Laser Projectors produce 4K HDR images and enhance audio using theatre-quality Harman Kardon speakers.The Viewsonic Ultra Short Throw Smart Laser X2000B-4K and X2000L-4K Projectors are ergonomically designed, blending in seamlessly with the decor and adding to the contemporary home setup.X2000B-4KBlack and white versions of the new X2000B-4K and X2000L-4K projectors are available to match the aesthetics of any home interior. It is also the best alternative for saving space because of its 0.22 ultra-short throw ratio, which delivers a 100″ screen only 23 cm from the wall while maintaining the openness of a home.According to the company, the projectors may be positioned anywhere and can be adjusted to project high-quality images from any angle with ease. The projected image is proportioned correctly even when the surface is curved or spherical thanks to the 60-point adjustment capability. When not in use, the projectors are aesthetically pleasing and unobtrusive, seamlessly, blending subtly and harmoniously into the space.The freshly released projectors provide room-filling audio and visual experience with their native 4K Ultra HD resolution and theatre-level Harman Kardon speakers with Dolby and DTS soundtracks.Similar to a regular TV, the X2000B-4K and X2000L-4K deliver a cinematic experience right out of the box. The projector activates with a single click, achieving full brightness and colour performance.X2000L-4KScreen mirroring, one of its many capabilities that makes it simple to transmit material directly from mobile phones to a large screen, is just one example. Additionally, customers are able to wirelessly stream information sharing from portable devices, such as phones or tablets, to a large screen thanks to the projector’s convenient connectivity choices, including Wi-Fi, Bluetooth, and USB-C connectors.The projectors can also be connected to a gaming console, offering a variety of entertainment options. For instance, it can be utilised as a Bluetooth soundbar to enjoy the enjoyment of the big-screen without bothering others. As an alternative, the user’s Bluetooth headset can receive the audio.The ViewSonic X2000L/B-4K HDR Ultra Short Throw Smart Laser Projector comes with a starting price of Rs 3,99,000.
For the latest gadget and tech news, and gadget reviews, follow us on Twitter, Facebook and Instagram. For newest tech & gadget videos subscribe to our YouTube Channel. You can also stay up to date using the Gadget Bridge Android App. You can find the latest car and bike news here.
If you are a new YouTube creator, standing out in a sea of content can be a really hard task no matter how good your videos are. While there’s no substitute for engaging and good-quality content, you need the help of a bunch of tools to attract an audience online. If you’re wondering where to start out, we’ve got you covered. Here is our list of the 7 best apps for YouTube creators in 2023.Read Also: Upcoming Xiaomi Smartphones in 2023 – The Complete list
In This Article
YouTube Studio
YouTube Studio is one quintessential app that should be a part of every content creator’s arsenal. YouTube’s official channel management app lets you connect with your community and handle your channel while you’re on the go. The ‘Channel Dashboard’ gives you a brief insight into how your videos are performing and the rate at which your channel is growing. Using the YouTube Studio app, you can sort through the comments on your videos using various filters and effectively moderate the comment section.
TubeBuddy
While YouTube Studio is a great app for channel management, it does little to advance your channel’s growth. This is where TubeBuddy comes into play. Can’t think of a catchy title for your video? TubeBuddy will suggest popular and high-performing keywords to craft the perfect title and tags. You will also find various tools that help you drive traffic to your videos and rank them higher in web searches. If that’s not enough, TubeBuddy also helps you test your thumbnails in advance and gives you an idea of how they will perform once you publish your video.
Adobe Premiere Rush
Need to edit videos on the go? Look no further than Adobe. With Adobe Premiere Rush you can arrange videos, audio, graphics, and photos with a simple drag and drop. You can also add graphics and other animations on top of the videos. The built-in camera functionality also lets you record high-quality videos from the editing app itself. On top of that, Adobe Premiere Rush provides thousands of royalty-free soundtracks to go along with your video.
Canva
If you want people to stay on your video once they’ve clicked on it, you need to retain their attention with crafty edits and interactive animations. While a good editing tool like Adobe takes care of all the cuts and transitions, you also need interesting graphics to go along with it. Having your video interlaced with text, animations, and graphics keeps it from being dry and one-dimensional. The viewers are less likely to move on to another video when there’s more stuff on the screen to hold their attention. Canva makes it incredibly easy to design graphics, thumbnails, banners, and posters with its accessible tools and thousands of templates. You can apply these graphics to your video in the Canva app itself. There’s even an extensive library of stock images, videos, and gifs to help you along the way.
Screen Recorder by InShot
If you create tutorials or gaming videos for YouTube, you definitely need a solid screen recording app that can take clear and high-definition recordings of the screen. InShot’s Screen Recorder app is the perfect tool for this purpose. First off, this app does not attach a watermark to the recordings, making them suitable to be published online. You can record your screen in HD resolution (1080p) at 60fps. There is no time limit to the length of videos. InShot even lets you record your own voice on top of the screen recording, making it incredibly easy to create tutorial videos. Gaming content creators can also record themselves in a small overlay window using the app’s Facecam.
Intro Maker
A good quality intro is one of the elements that separate professional YouTubers from amateurs. Well-recorded intros bring uniformity to your videos. With the Intro Maker app, you can easily create professional intros, outros, and end screens for your YouTube videos. This app has a collection of over 4,000 intro templates along with a plethora of sound effects, stickers, and other graphics. If you’re looking for something more original, you can also design an intro from scratch.
Fiverr
While the apps mentioned on this list will help you manage all creative and editing tasks on your own, sometimes it is not a bad idea to outsource some of the work and let a professional handle it. Fiverr is a platform where you can hire freelancers for various services ranging from scriptwriting, logo design, video editing, animation, and more. If there’s some task that is beyond your expertise, let a professional handle it for you. The price of services on Fiverr begins at $5.Read Also: Infinix Zero 20 with 60-megapixel selfie camera launched in India
The most recent additions to the Galaxy A series, Samsung Galaxy A04 and Galaxy A04e are now available in India. Both devices are powered by MediaTek Helio P35 SoC. The Galaxy A04 comes with a 50MP dual rear camera whereas the Galaxy A04e features a 13MP dual camera setup. The smartphones comes with Android 12 out of the box and packs a 5000mAh battery.
In This Article
Samsung Galaxy A04 and Galaxy A04e price and availability details
The Samsung Galaxy A04e has been launched in three variants. The price is Rs 9,299 for the model with 3GB of RAM and 32GB of internal storage, Rs 9,999 for the model with 3GB of RAM and 64GB of storage, and Rs 11,499 for the model with 4GB of RAM and 128GB of storage.The device will be offered in two colour options: Copper and Light Blue.The Samsung Galaxy A04 costs Rs. 11,999 for the base model with 4GB RAM and 64GB of internal storage, and Rs. 12,999 for the model with 4GB RAM and 128GB of storage. The phone is offered in shades of Black, Copper, and Green.In terms of availability, both smartphones are available for purchase through Samsung.com and a few retail locations.
Samsung Galaxy A04 specifications
A 6.5-inch full-HD+ Infinity-V display is available on the Galaxy A04. The screen comes with a resolution of 1560 × 720 pixels. The device is powered by Octa Core MediaTek Helio P35 12nm processor with IMG PowerVR GE8320 GPU. It comes with up to 4GB RAM and 128GB storage options. The internal storage is expandable up to 1TB via a micro SD card. The device comes pre-installed with Android 12 with One UI 4.1 out of the box.The Samsung Galaxy A04 has a dual rear camera arrangement with a 50-megapixel primary sensor on the optical front. There is a 5-megapixel camera on the front for selfies and video calls.There are several connectivity options, including Wi-Fi 802.11ac, Bluetooth v5, GPS/A-GPS, and 4G LTE. As an additional authentication feature, it incorporates a side-mounted fingerprint sensor. A Type-C fast charger is included in the box with a 5,000mAh battery.
Samsung Galaxy A04e key specifications
The 6.5-inch HD+ display on the Samsung Galaxy A04e has a water drop-style display notch that houses the front camera. The screen comes with 1560 × 720 pixels of resolution. It also has a similar chipset and runs on Android 12 with One UI 4.1 OS. The device offers 4GB of RAM and up to 128GB of internal storage which has a maximum capacity of 128GB, but it can be increased to 1TB. The Samsung Galaxy A04e comes with two rear cameras, each with a 13-megapixel primary sensor.It also supports 4G LTE, Wi-Fi 802.11 b/g/n, Bluetooth v5, and has a 5,000mAh battery.
For the latest gadget and tech news, and gadget reviews, follow us on Twitter, Facebook and Instagram. For newest tech & gadget videos subscribe to our YouTube Channel. You can also stay up to date using the Gadget Bridge Android App. You can find the latest car and bike news here.
Each one of us wants to enjoy great video content online or offline. At times, we do not have the internet, for example, on an aeroplane or in remote areas in the mountains. Then what do we do? Well, if you know you are going to be in such situations, then you might as well pre-download the videos on your laptop or mobile device and enjoy them later when you do not have internet. One great 4K downloader that we came across is by 4Kdownload. It lets you download YouTube videos available in high-quality 4K resolution. If that’s not up your alley, we’ve got plenty of other options for you in this article.
Read Also:Funky Friday Codes (July 2025)
In This Article
But before we move further, let’s understand what 4K resolution is
You’ve probably heard the term “4K,” but you might not know what it means. The phrase relates to the resolution of an image. 4K resolution, often known as Ultra High Definition (UHD), is four times that of normal high definition (1080P).
Whereas a conventional high-definition image has 1,080 pixels on the vertical axis and 1,920 pixels on the horizontal axis for a total pixel count of 2,073,600, 4K resolution more than doubles these statistics. The resolution is named for the number of pixels along the width axis, which is over 4,000 in total at 3,840. A 4K image has a total pixel count of 8,294,400 (more than 8 megapixels). This increase in pixel count results in a crisper, clearer image.
Use an app for your PC (4K Video Downloader)
We can get an amazingly clean and lifelike video image with 4K resolution. 4K Video Downloader is the programme to use if you want to watch high-resolution videos on your TV, computer, or mobile device. To download 4K YouTube videos in great quality, follow the steps below.
Step 1: Start 4K Video Downloader. It is compatible with macOS, Windows, Linux, and Android.Step 2: Copy the YouTube URL of the 4K video you wish to download.Step 3: Select the Paste Link option.
Step 4: Choose your format and quality.
Step 5: Select the Download option.
The video will be saved on your device.
Pros
Works like a charm
4K quality
Cons
Requires downloading a third-party app
Use an online tool (SaveFrom)
Step 1:Go to SaveFrom.net.
Step 2:Paste the link to the YouTube video in the text box.
Step 3: Wait for the website to process the link.
Step 4: Choose your preferred resolution and hit Download.
Step 5:Wait for a few minutes for the video to process.
Step 6: Hit Download Video.
Pros
Easy to use
Doesn’t require downloading an app
Cons
Lots of ads
Use Newpipe for your smartphone
There are plenty of third-party YouTube clients that you can install on your smartphone to watch and download YouTube videos. Newpipe is one of the best around. Before you use this app, you should know that it must be sideloaded on your device since it doesn’t comply with Google Play Store’s content guidelines.
Step 1:Launch Newpipe and search for the video you want to download.
Step 2: Play the video and hit the download button.
Step 3: Select the resolution and tap on OKAY.
Pros
Reliable
Quick downloads
Cons
Needs to be sideloaded
Frequently Asked Questions (FAQs)
What’s the best way to download YouTube videos in 4K on my PC?
Download the 4K Video Downloader from the Microsoft Store, go to YouTube and copy the link to the video, come back to 4kVD and hit the ‘Paste Link’ button. Select your preferred format and quality, and hit the Download button.
How do I download a YouTube video without using a third-party app?
Online tools like SSYouTube and SaveFrom help you download YouTube videos without using third-party apps. Copy the link to the video, paste it in the text box of the online tool, select a resolution, and hit the Download button.
How do I download YouTube videos on my phone?
You can use the mobile web version of online tools like SSYouTube and SaveFrom to download YouTube videos on your phone. You can also use third-party apps like Newpipe for this task.
How do I download YouTube Shorts to my phone’s storage?
Copy the link of the YouTube Shorts video you want to save on your device, go to the PasteDownload website, and paste the link in the download box. Hit the download button to save the video to your device.
Is there a legal way to download YouTube videos on my device?
The only ‘legal’ way to download YouTube videos on your device is through YouTube Premium. Third-party apps and online tools that specialise in downloading YouTube videos are in violation of Google’s copyright policy.
Read Also:AKAI Unveils Soul Series Soundbars: Big Sound, Small Footprint
Conclusion
This is how you can easily download any video from websites like YouTube in high-quality, including 4K resolution. There are plenty of download options available on 4K Video Downloader, and the app as well as the web interface are very easy to use. Over that, all popular video and audio sites such as Vimeo, TikTok, Soundcloud, etc, are supported and you can download high-quality 4K content from there too. For people looking for free options, this could be the very first step, as it allows 30 free videos to be downloaded per day. In case you want unlimited access, you can pay a nominal charge and download as many videos as you want with 4KDownload.
Garena Free Fire is a battle royale game with regular awards and tournaments to keep players interested. If you play Garena Free Fire, you should be aware of the redeem codes that are released on a daily basis. However, because the battle royale game is banned in India, players from other countries can use the Free Fire Redeem codes daily. If you’re unfamiliar with the Garena Free Fire redeem codes or don’t know how to get them, we’ve put together a step-by-step guide to help you redeem them. Check out Garena Free Fire Redeem Codes for December 22.
The Free Fire redeem codes are a great way to get free stuff. These are 12-digit codes that contain alphabets and numbers, as well as an expiration date and time. Because the Garena FF redeem codes cannot be used more than once, you should hurry to the redemption page to claim your free reward before someone else does. To get a free reward, all you have to do is go to reward.ff.garena.com/en, which is the official redemption page. Also, keep an eye on this space for daily updates on Garena Free Fire redemption codes and rewards.
In This Article
Garena Free Fire Redeem Codes Today 22 December 2022
FBHYIDEUYGTRDA
FEC2FG31EYHBR
FJBNJ3KLOP098U
FGVCXS821EDXZ
FQ16345YUI9876
FTMKI98UHBCDF
FT56YHNM8LOP0
FIJHBGVCXSERT
FMTKGOIUHYDE
FJMR5KTLOAEQD
FCFR23RTFVGH4
FRIU8FYTVRFGD
FEHNJ4R5ITGU76
FTFDFNVBUY67S
How to Get Free Fire Redeem Codes for Garena on December 22?
Daily Amazon brings a fresh quiz for its customers with exciting rewards on its platform. The Amazon quiz can be played every day from 12 AM to 11:59. 22 December 2022 Amazon Quiz has gone live on its platform and the e-commerce platform Amazon is today giving you a chance to win Rs 1,000 Amazon Pay Balance.To participate all you need to do is log in to your Amazon app on your device and give answers. Daily a new set of questions are presented to the participants which gives them a chance to win exciting prizes. The questionnaire consists of five easy questions that are usually based on general knowledge and current affairs. You can submit the correct answers and can win an Amazon Pay Balance of up to Rs 50,000. It should be noted that the quiz is not accessible on the web platform instead you have to participate only through the dedicated app.Amazon Quiz Today Prize – Rs 1,000 Amazon Pay BalanceQuiz Date – 22 December 2022Daily Timing – 12 AM to 11:59 PMWinner Announcement – Today 12 PM
In This Article
Amazon Quiz Answers Today 22 December 2022
Question 1: Which color is an emerald?Answer: GreenQuestion 2: Name the summer capital of Jammu and Kashmir.Answer: Srinagar
Question 3: A hexagon has _____ sidesAnswer: 6Question 4: Where is this Ashoka Pillar located?Answer: SarnathQuestion 5: The Ajanta Caves are approximately thirty rock-cut ______cave monuments dating from the second century.Answer: Buddhist
How To Play Amazon Quiz
Only app users are eligible to play the Amazon quiz every morning from 12 AM to 11:59 PM. The quiz is not available on the desktop. For those who are unaware of how to play the Amazon quiz below are the steps, you can follow to take the quiz.
Firstly download the Amazon app from Google Play Store or App Store
Now fill in the required information through the Sign Up option.
You need to log in to the Amazon app and scroll down on the home screen to find the Amazon Quiz banner.
Tap on the Amazon Quiz banner and tap on the Start button to start the Quiz.
Now you will get 5 questions and you need to answer them correctly. One wrong answer will eliminate you from the Quiz.
After answering all the questions correctly you are now eligible for a Lucky Draw.
The winner’s name will be announced today at 12 PM.
Infinix Zero 20 smartphone has been introduced in India. The device and the Infinix Zero Ultra 5G were also launched together. The newly launched phone is powered by an 8GB RAM chip from MediaTek called the Helio G99. The device also features a 90Hz 6.7-inch AMOLED screen. The phone has a 4500mAh battery and can charge at a speed of 44W.
In This Article
Infinix Zero 20 price in India and availability details
The Infinix Zero 20’s price for the 8GB RAM with 128GB storage model is fixed at Rs 15,999. There will be three colour options for the smartphone: Space Gray, Glitter Gold, and Green Fantasy. From December 29 on, it will be available for purchase through Flipkart. Additionally, the e-commerce site is giving customers who pay with their Flipkart Axis Bank cards a 5% cashback.Alongside Infinix Zero 20 the company has also introduced Infinix Zero Ultra 5G in India. The Infinix Zero Ultra 5G costs Rs 29,999 for the single 8GB RAM with 256GB storage variant. The smartphone comes in two colour options: Genesis Noir and Coslight Silver.
Infinix Zero 20 specifications
Infinix Zero 20 features a 6.7-inch AMOLED screen with a resolution of 1,080 x 2,400 pixels. The screen comes with a refresh rate of 90 Hz. The device runs on Android 12-based XOS 12 and is driven by 8GB RAM and MediaTek Helio G99 SoC. The smartphone has an internal storage capacity of up to 256GB and a microSD card slot that enables storage expansion by an extra 256GB.The phone has a 44W rapid charging capability and a 4500mAh battery. Wi-Fi 802.11ac, GPS, NFC, Bluetooth v5, a 3.5mm headphone connector, and a USB Type-C port are among the available connectivity options. The smartphone also features a fingerprint reader on the side rail for biometric identification along with gravity, gyroscope, light, proximity, and geomagnetic sensors.The Infinix Zero 20’s triple rear camera system has a 108-megapixel primary sensor. The camera system also includes a 13-megapixel ultra-wide sensor and a 2-megapixel macro camera. The phone has a front-facing 60-megapixel camera with OIS for taking selfies.
For the latest gadget and tech news, and gadget reviews, follow us on Twitter, Facebook and Instagram. For newest tech & gadget videos subscribe to our YouTube Channel. You can also stay up to date using the Gadget Bridge Android App. You can find the latest car and bike news here.
The ASUS Gaming Day Sale has been launched by ASUS India, Republic of Gamers (ROG). The sale provides amazing discounts on the full line of gaming PCs at ASUS E-shop, Asus Exclusive Stores, and ROG Stores. Consumers can get up to 38% off the durable TUF series, an exciting 37% off the small but powerful Zephyrus Series, a 30% off the ultimate gaming machines, the Strix and Scar series, and a 33% off the adaptable and potent ROG Flow series during the Gaming Days Sale.Customers may take advantage of a number of discounts on the most popular and up-to-date ROG laptops starting on December 19 and running through December 23, 2022, including discounted warranty extensions on all gaming laptops and no-cost EMI. The first 100 customers to register on asuspromo.in will receive a ROG gaming mouse worth up to INR 4500 for free when they purchase the G513IE (2021) and G713IE (2021) models, which will provide even more delight to the end-of-year celebrations.Check out ASUS Gaming Day Sale ongoing offers:
Machine translation for languages has come a long way in recent years. With the use of neural networks and deep learning, machine translation provides an effective way to communicate in another language. With the help of language experts and community contributors, translation websites and apps are getting better every day. In this article, we bring you the top 5 language translator apps and websites for Hindi-to-English translation and vice versa. Read Also: Pixel 7 Pro Review: Why you should get the phone
In This Article
Google Translate
Apart from offering translation between 108 languages, Google Translate is incredibly accessible and easy to use. You can either download the app from the Google Play Store or use the website. You can even search for a phrase in the Google search bar and translate it into either Hindi or English. The Google Translate app even lets you point your camera at any image and translates the text instantaneously. On top of that, you can draw text characters instead of typing them, and the app will translate them for you.
Microsoft Translator
Microsoft Translator offers all the basic features of a language translator app along with a few exclusive features of its own. The voice translation option recognises your speech and translates it into the language of your choice. In split-screen mode, Microsoft Translator can recognise two speakers in different languages and translate the conversation in real time. You can also look up alternate meanings of the translations to make sure you are communicating effectively.
Translate.com
Is machine translation not working out for you? Translate.com offers enhanced human translation on top of machine translation. Translate.com hires language experts that edit the machine-translated text and make sure it is error-free and contextually appropriate. The human-enhanced translation will cost you $0.07 per word. While translation apps are convenient and quick, human translations are necessary when you’re carrying out important tasks.
Typing Baba
One of India’s leading typing websites, Typing Baba also offers real-time language translations. The Hindi-to-English (and vice versa) translator on this website works efficiently, but the only drawback is that it can only translate up to 2,000 characters at a time. One of the better features of Typing Baba is that it lets you save the translated text as a document locally on your device. You can also print the text directly from the website.
Hi Translate
Hi Translate is one of the most popular translation apps for smartphones. Its popularity lies in its versatility, as you can draw this app over any screen on your phone and translate whatever text is on it. This feature comes in handy when you are texting someone and need your messages translated in real-time. Hi Translate can visually recognise up to 18 languages. All you need to do is open the app and point your camera at the text you need translated. On top of that, this app can also translate your conversations in real time.Read Also: How To Hard Reset or Factory Reset Vivo Smartphones?


 Step 3: Launch the Telegram app on your smartphone.
Step 4: Search for ‘Sticker’ in the search bar and select the official Stickers bot. It should have the blue tick next to it.
Step 3: Launch the Telegram app on your smartphone.
Step 4: Search for ‘Sticker’ in the search bar and select the official Stickers bot. It should have the blue tick next to it.
 Step 5: Type ‘/newpack’ and hit send.
 Step 6: Enter a name for your sticker pack and hit send.
Step 7: Tap the attachment icon and upload the image you just edited as a file.
Step 6: Enter a name for your sticker pack and hit send.
Step 7: Tap the attachment icon and upload the image you just edited as a file.
 Step 8: Assign an emoji to the sticker. You will be able to send this sticker to your friends on Telegram using this emoji.
Step 9: Upload more images if you want to create more stickers. Assign different emojis to all of them.
Step 10: Enter ‘/publish’ and hit send to publish your sticker pack.
Step 8: Assign an emoji to the sticker. You will be able to send this sticker to your friends on Telegram using this emoji.
Step 9: Upload more images if you want to create more stickers. Assign different emojis to all of them.
Step 10: Enter ‘/publish’ and hit send to publish your sticker pack.
 Step 11: Telegram gives you the option to upload a 100 x 100-pixel icon for your sticker pack. You can also choose to skip this step by entering ‘/skip’.
Step 12: Type a short name for your sticker pack. This will be a part of the URL identifier.
Step 11: Telegram gives you the option to upload a 100 x 100-pixel icon for your sticker pack. You can also choose to skip this step by entering ‘/skip’.
Step 12: Type a short name for your sticker pack. This will be a part of the URL identifier.
 Step 13: The Stickers bot will create your sticker pack and send you a link. Click on the link and tap on ‘Add stickers’ to download the sticker pack on your device. You can also share this link with your Telegram contacts and groups if you want them to use the stickers you created.
 Step 14: Once you’ve downloaded your sticker pack, you can access them from the sticker section in the emoji tab.
Read Also: Gadget Bridge Awards 2022: The Biggest, Best Consumer Technology and Gadget Awards Winners
Step 14: Once you’ve downloaded your sticker pack, you can access them from the sticker section in the emoji tab.
Read Also: Gadget Bridge Awards 2022: The Biggest, Best Consumer Technology and Gadget Awards Winners

")

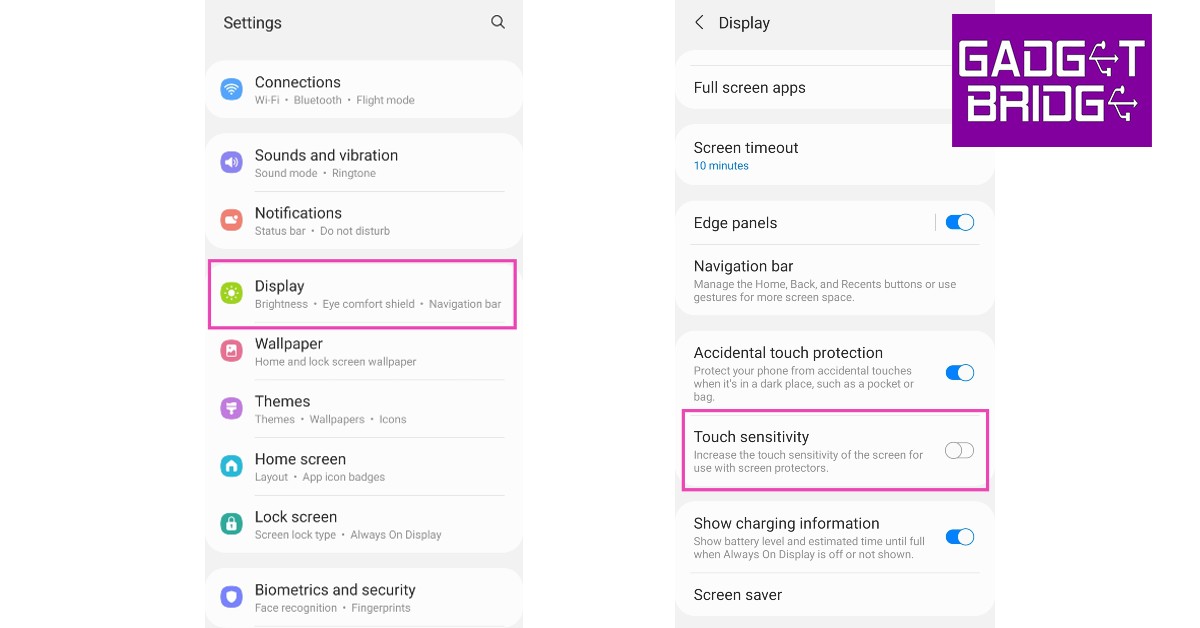

 If your phone is connected to any accessories like an external mouse or keyboard, remove them from the device. If you want to be thorough, remove the SIM card and memory card as well. Sometimes a corrupted memory card can cause issues on your device. Restart your smartphone and check if the touchscreen is working again.
 The
The 


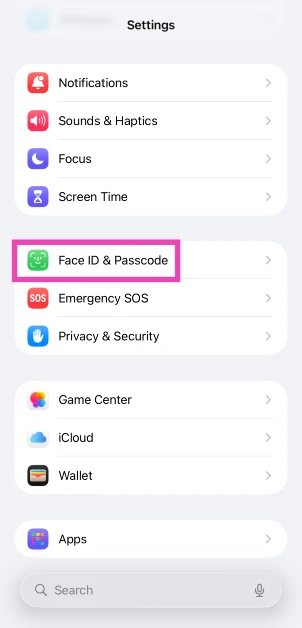 Step 3:
 Step 3:
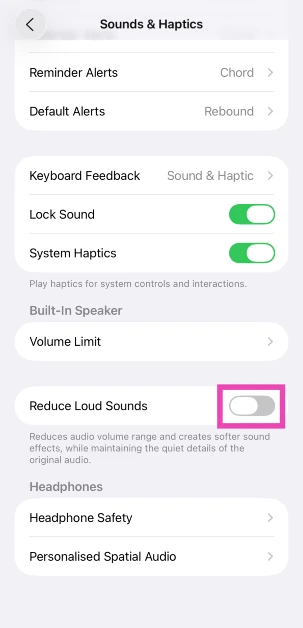
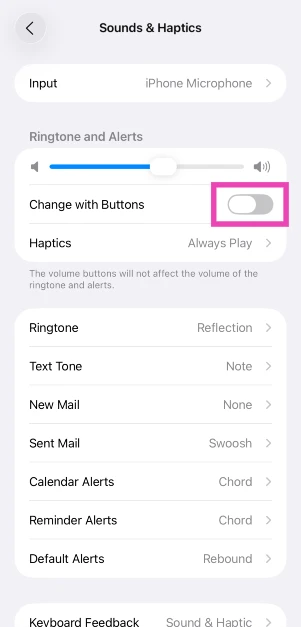
 Not every case is a perfect fit for your phone. Some iPhone cases have the tendency to press against the volume rocker keys, leading to the volume going up or down. To make sure this isn’t the ‘case’ with your phone, pull it out of the protective cover and check if the problem still persists. If the volume still keeps going down, the case is not the culprit. If your phone works fine after taking the case off, it may be time to get a better cover for your iPhone.
 If your iPhone’s volume is at the maximum level, pairing it with a Bluetooth headset can bring it down. Your iPhone automatically adjusts the volume to a more acceptable level so as not to hurt your ears when you put on the headphones. Once you manually increase the volume after the headphones have paired with your phone, it will not go down again.
 Step 2:
 Step 2:
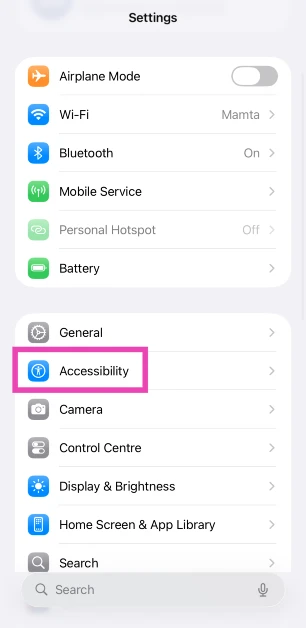 Step 2: Tap on Audio & Visual.
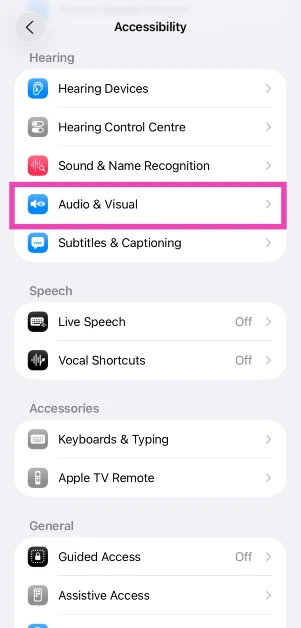 Step 3: Select Background Sounds.
Step 4: Turn off the toggle switch for Background Sounds.
Step 3: Select Background Sounds.
Step 4: Turn off the toggle switch for Background Sounds.

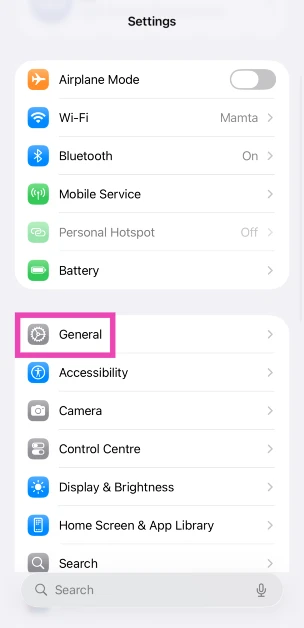 Step 2: Scroll down and tap on Transfer or Reset iPhone.
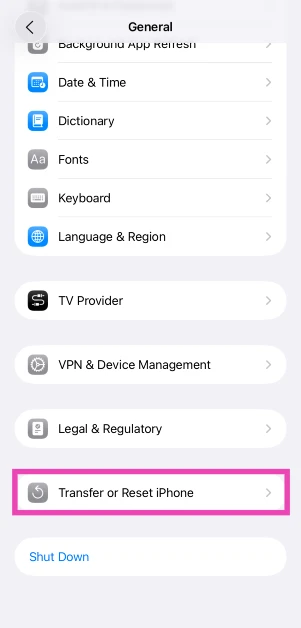 Step 3: Hit Reset.
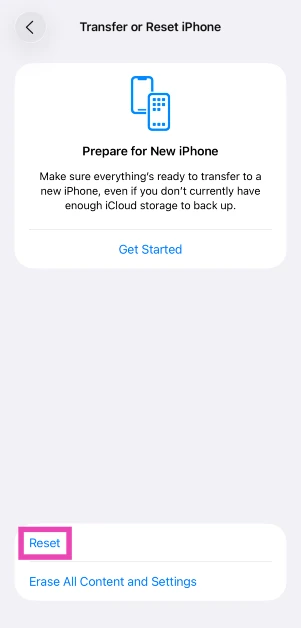 Step 4: Tap on Reset All Settings.
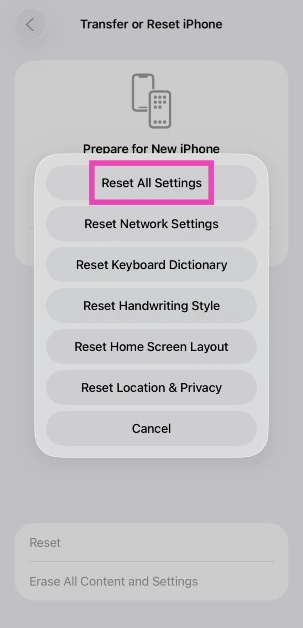


 Step 4:
")
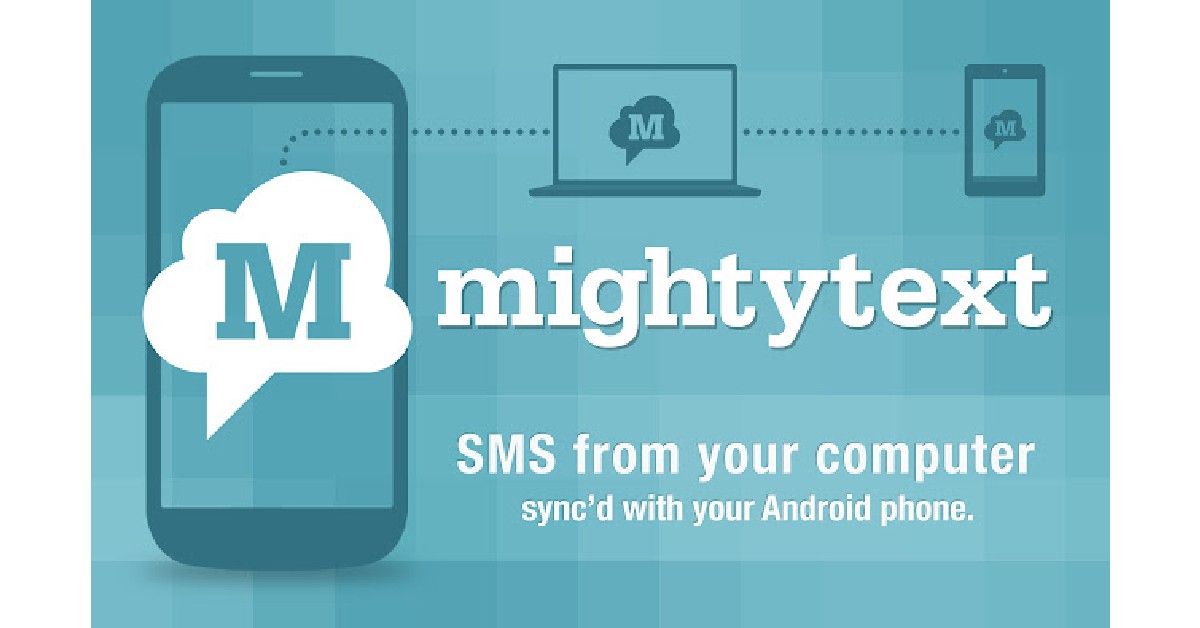


 You may be familiar with Todoist’s smartphone app, but its Chrome extension is just as good. Todoist is one of the better smartphone task managers we’ve used, and it delivers a similar performance on Chrome as well. With the Todoist Chrome extension, you can easily save a website on your reading list, create a checklist of tasks and mark them off as you complete them, collaborate with other people on a common project, and more. You can also easily jot down a note or set a quick reminder using this accessible Chrome extension. What we really like about Todoist is how seamlessly it integrates into your work routine.
 This one is for all the serial procrastinators out there. If you find yourself wandering off to attention-grabbing sites like Reddit, Twitter, or YouTube, Timewarp reminds you to get back to the task at hand. For
  You may not have heard of
 ")


 Step 2: Enter the profile URL or the username of the account.
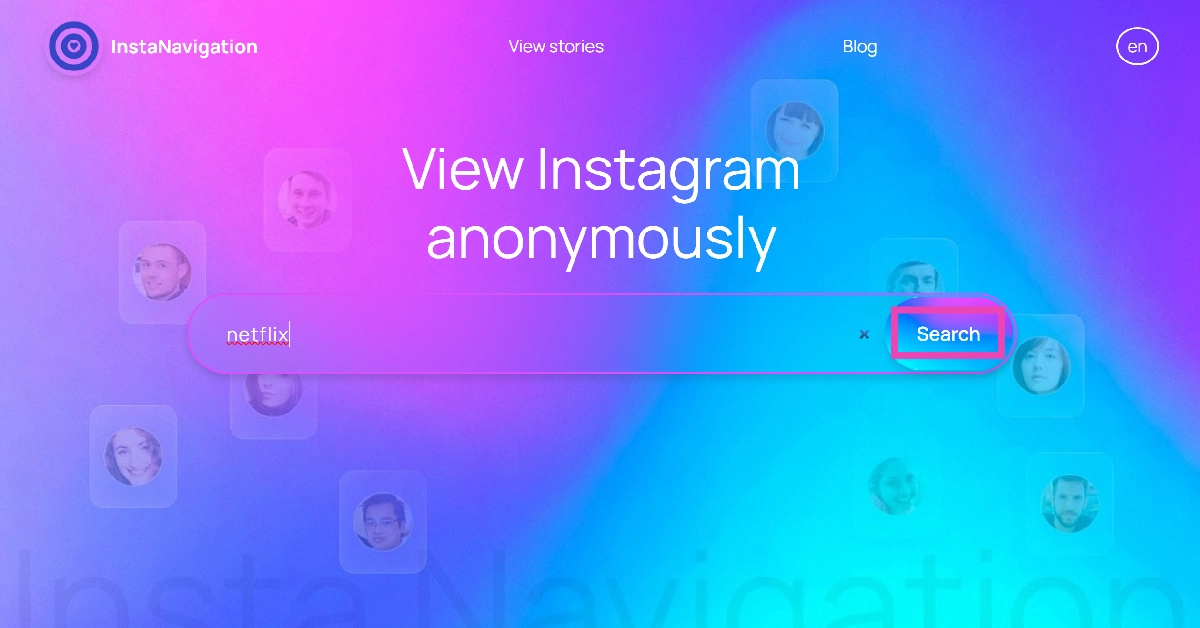 Step 3: If the account is public, you will be able to view the stories published on it. Simply click on the profile picture or scroll down to the Stories tab to view them.
 Read Also:
 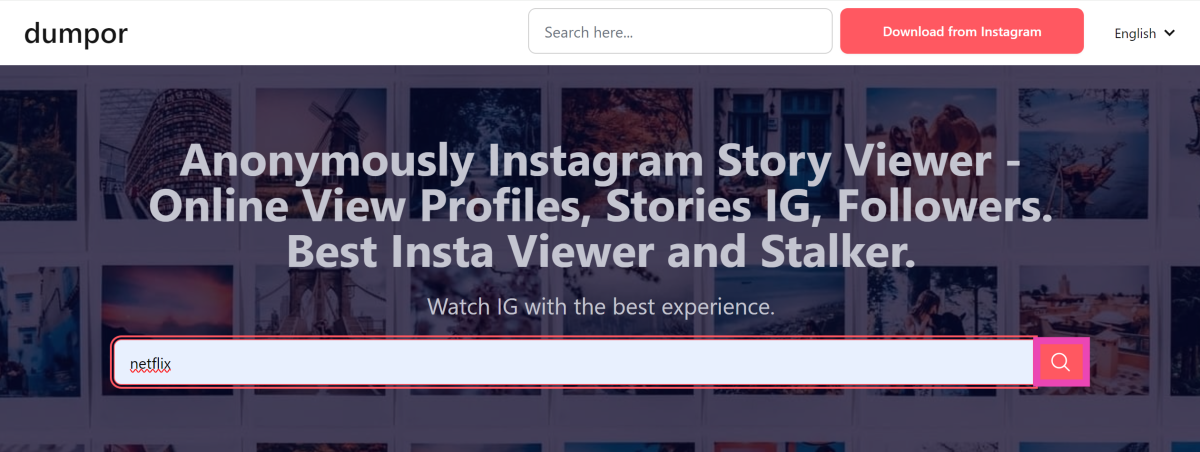 Step 3: Select the profile from the search results.
 Step 4: Scroll down to view the posts. Click on Show Stories to view the current stories.
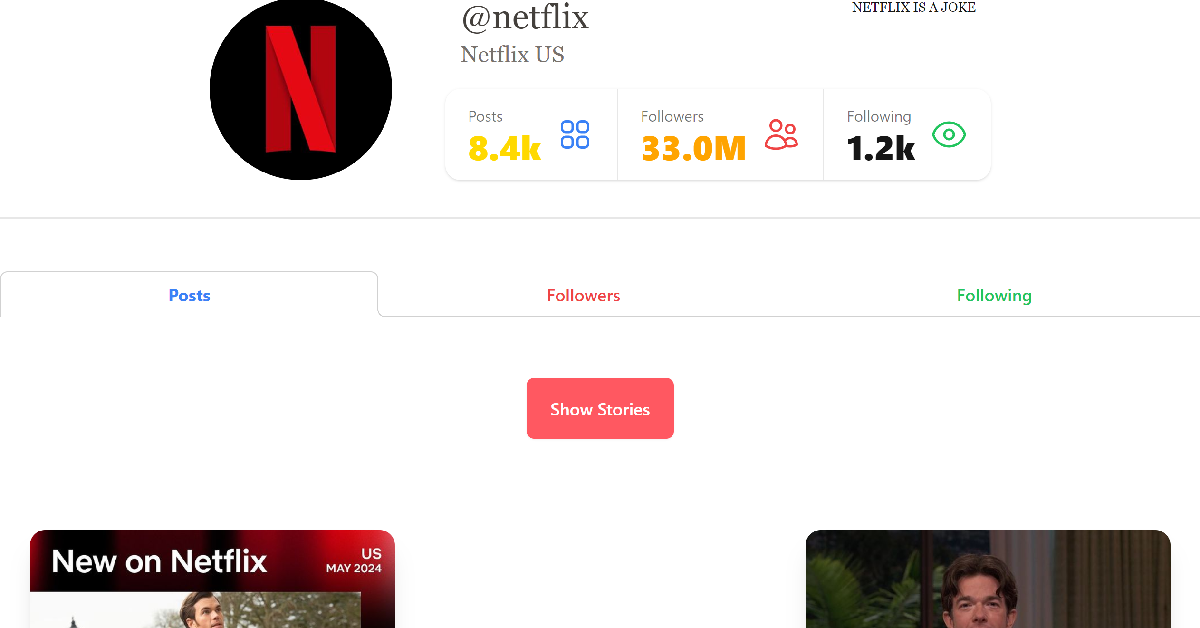


 Step 4:
 Step 5:


 Step 2: Copy the YouTube URL of the 4K video you wish to download.
 Step 3: Select the Paste Link option.
Step 4: Choose your format and quality.
Step 5: Select the Download option.
Step 3: Select the Paste Link option.
Step 4: Choose your format and quality.
Step 5: Select the Download option.
 The video will be saved on your device.
Pros
The video will be saved on your device.
Pros
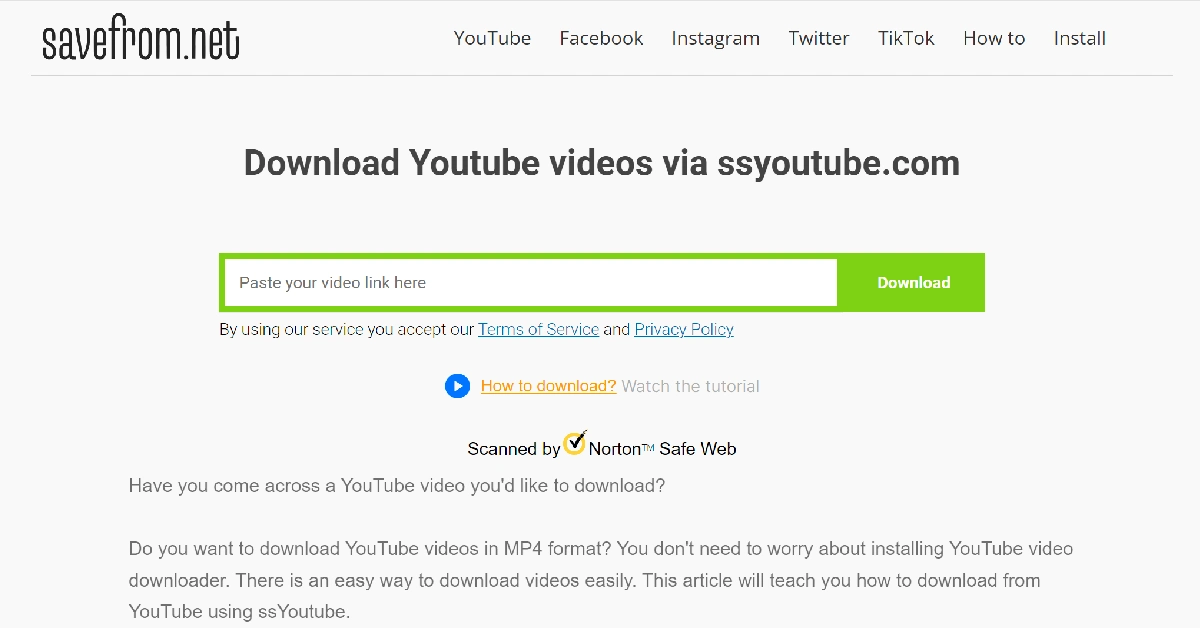 Step 3: Wait for the website to process the link.
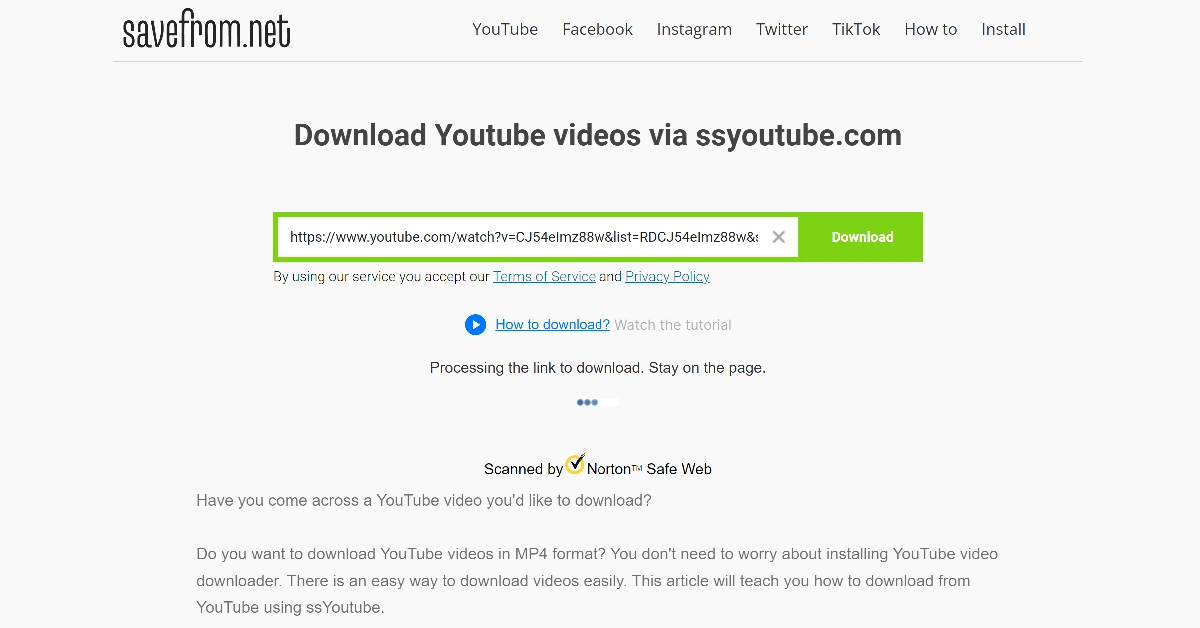 Step 4: Choose your preferred resolution and hit Download.
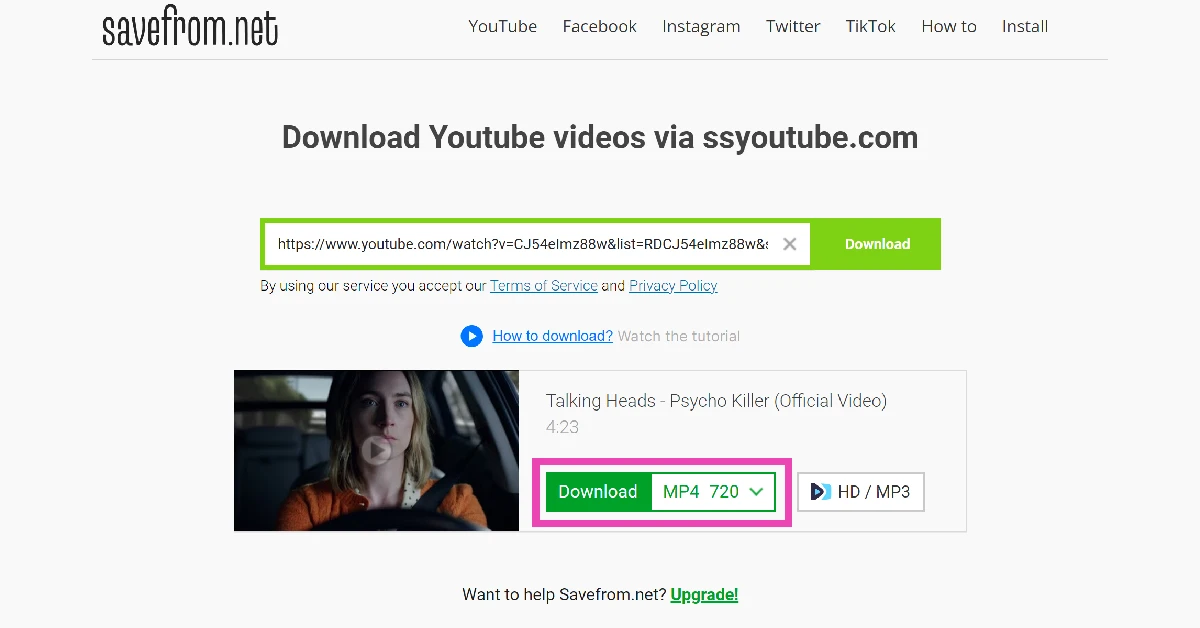 Step 5: Wait for a few minutes for the video to process.
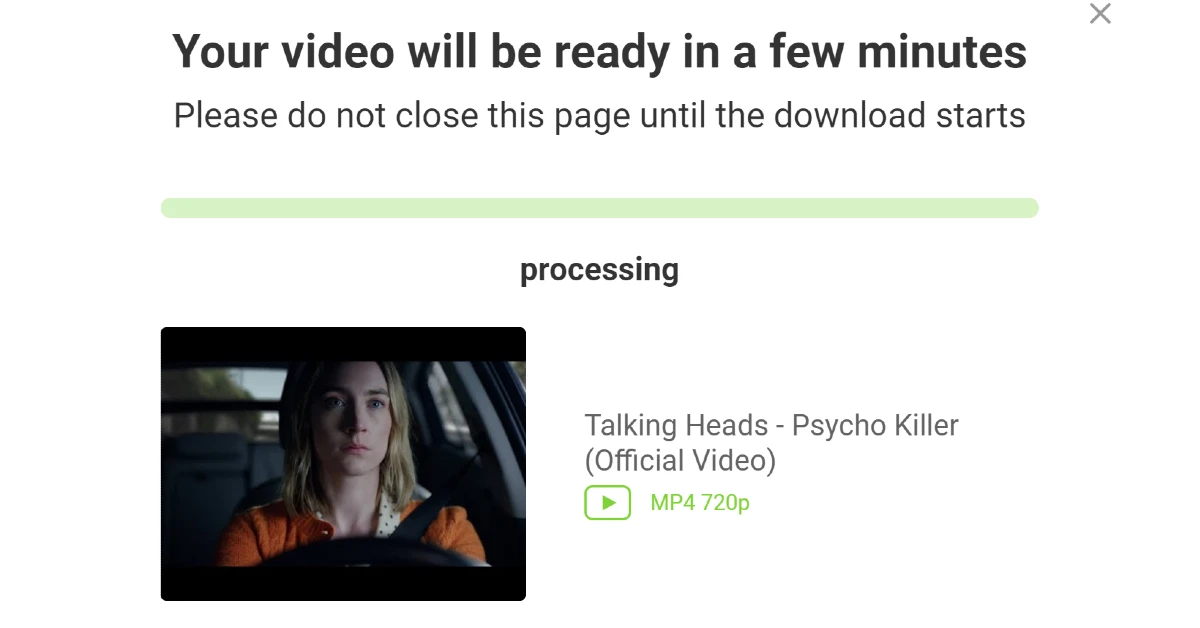 Step 6: Hit Download Video.
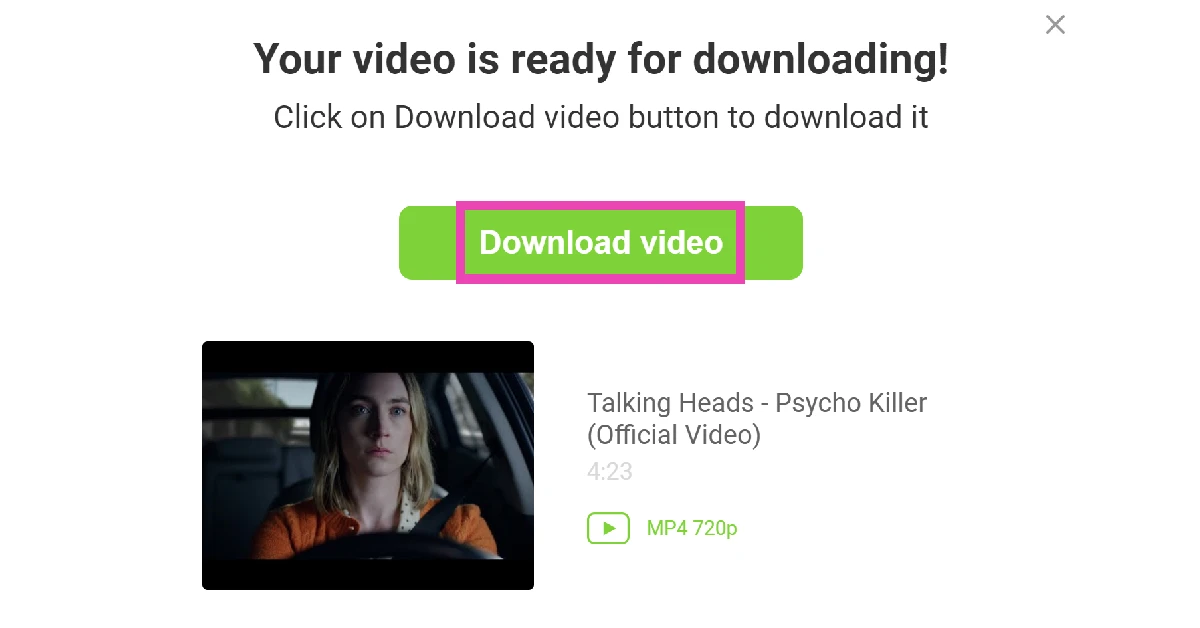 Pros
Pros
 Step 2: Play the video and hit the download button.
 Step 3: Select the resolution and tap on OKAY.
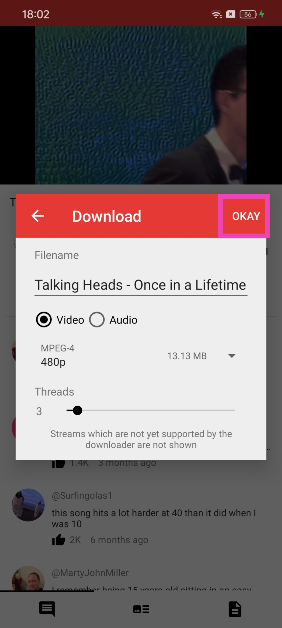 Pros
Pros