After being banned for nearly ten months, Battleground Mobile India, aka BGMI, is officially available again in India. BGMI fans are looking for ways to improve their game experience and one such method is the usage of redemption codes, which offers a variety of rewards and advantages using BGMI redeem codes players can gain access to new skins, outfits, loot crates, weapons and free UC and diamonds.As mentioned earlier, these codes give users the chance to earn unique rewards and gain extra benefits while playing the game. This includes GUN SKINS (M4, AKM, M416, AWM, M24, UZI, KAR98K), free character voucher, Andy, Carlo, Sara, Victor character for free, free Anna Character on completing the mission and UC or Royal Pass Discount. So here we have gathered a list of the most recent BGMI redeem codes as of 1 August 2023. Also, redeem these codes asap as these are only valid for a limited duration.
Garena Free Fire is a battle royale game with regular awards and tournaments to keep players interested. If you play Garena Free Fire, you should be aware of the redeem codes that are released on a daily basis. However, because the battle royale game is banned in India, players from other countries can use the Free Fire Redeem codes daily. If you’re unfamiliar with the Garena Free Fire redeem codes or don’t know how to get them, we’ve put together a step-by-step guide to help you redeem them. Check out Garena Free Fire Redeem Codes for 1 August 2023.The Free Fire redeem codes are a great way to get free stuff. These are 12-digit codes that contain alphabets and numbers, as well as an expiration date and time. Because the Garena FF redeem codes cannot be used more than once, you should hurry to the redemption page to claim your free reward before someone else does. To get a free reward, all you have to do is go to reward.ff.garena.com/en, which is the official redemption page. Also, keep an eye on this space for daily updates on Garena Free Fire redemption codes and rewards.
Facebook Messenger is one of the most popular Instant Messaging apps around. However, if you are already on WhatsApp, you may not find much use for it. The Messenger app comes preinstalled on certain Android smartphones as a part of the bloatware apps. If you don’t want the app around, you can easily remove it from your device. In this article, we bring you the top 3 ways to uninstall Facebook Messenger from your Android smartphone.Read Also:Top 10 Apps for Samsung Galaxy Z Fold 5
In This Article
Uninstall Facebook Messenger from the app drawer
Step 1:Swipe up from your phone’s home screen to access the app drawer.Step 2:Press and hold the Messenger icon.Step 3: Tap the Bin icon or select Uninstall.Step 4:Confirm your selection in the popup box.
Uninstall Facebook Messenger from Settings
Step 1: Go to Settings and select Apps.Step 2: Scroll down and select Messenger.Step 3: Select Uninstall from the bottom menu.Step 4:Confirm your selection in the popup box.
Uninstall Facebook Messenger from Google Play Store
Step 1:Launch Google Play Store on your Android smartphone.Step 2: Search for Facebook Messenger.Step 3: Open Messenger’s app page.Step 4: Hit Uninstall.Step 5:Confirm your selection in the popup box.
Frequently Asked Questions (FAQs)
How do I uninstall Facebook Messenger on my Android phone?
It is the time of the year when rumour mills start to churn regarding the new Apple iPhones. Just like every year Apple is going to launch its latest range of iPhones in early to mid-September this year. There are various leaks and rumours regarding the specifications of the latest iPhone 15 series. One of them says that iPhone 15 Pro can come with a Titanium frame and smaller bezels. However, it is expected to be more costly. Read Also: How to Turn On Flash Light Notifications on Android?
In This Article
Expected Specifications of iPhone 15
The entire line-up is expected to transition to USB-C ports this year. Rumours also suggest that iPhone 15 Pro models will get thinner bezels. Apple can also introduce titanium frames which will supposedly get costlier as compared to the previous models. With higher pricing, there will be several upgrades too. The iPhone 15 and iPhone 15 Pro models will be powered by A16 chips. Bloomberg reports that the new Pro models will feature Titanium frames instead of Stainless steel making them stronger and lighter and the edges will be softer this time. Additionally, iPhone 15 will have a new display technology known as Lipo that will allow for thinner bezels reducing the number of bezels by one-third.The price and availability of the iPhone 15 series are yet to be disclosed but speculations are that iPhone 15 series will come with a price hike too. The pro model could cost around $100 more for Pro and $200 more for Pro Max. The pricing will be increased in the US as well.Apple will also be introducing the Dynamic Island model in its iPhones this year. Rumours suggest that iPhone Pro models will have faster speed and other models will have a slower speed.Read Also: Best 5 ways to use Plex with Chromecast, iOS, Android, Apple TV, NAS
Here’s how you can enable flash light notifications for your Android phone
Step 1: Go to Settings and select Accessibility.Step 2: Select Advanced settings.Step 3: Tap on Flash notification.Step 4: Turn on the toggle bar for Camera flash notification.
Enable flash notifications on stock Android
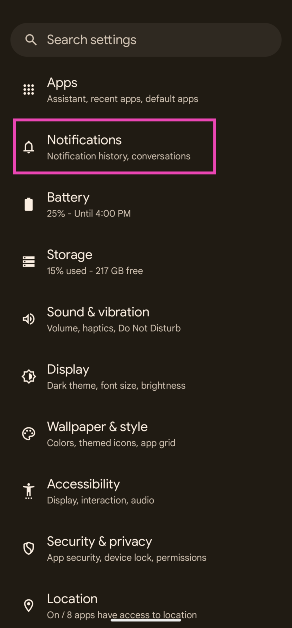
Step 1: Go to Settings and select Notifications.
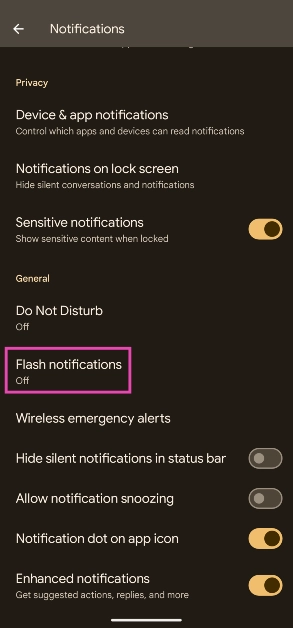
Step 2: Scroll down and select Flash notifications.
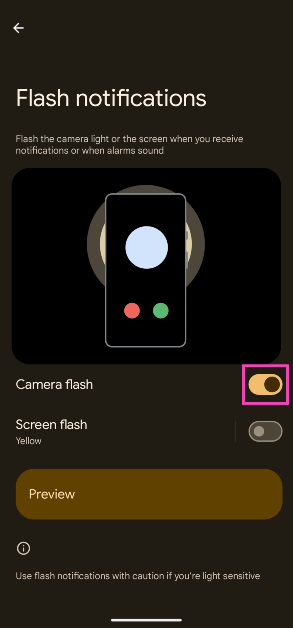
Step 3: Turn on the toggle switch for Camera flash.
Use a third-party app
Not every Android skin has the option to enable camera flash notifications. In case your Android phone’s proprietary OS skin is one of them, you can always use a third-party app to trigger the flash whenever you receive a notification. Apps like Flash Alert and Flash Notifications for All are cut out for this task. Make sure you give these apps camera access and permission to scan the notifications on your phone. Third-party apps offer added features like customising different flash patterns for notifications and enabling the notifications only for selected apps.
Frequently Asked Questions (FAQs)
How do I turn on flash light notifications on Android?
Go to Settings>Accessibility>Advanced settings>Flash notification and switch on the toggle bar for Camera flash notification.
Why can’t I find camera flash notifications on my phone?
Some Android smartphones do not offer camera flash notifications. In this case, you can use third-party apps like Flash Alert and Flash Notifications for All.
How do I add a custom flash pattern for notifications?
Your Android smartphone does not offer any custom patterns for flash notifications. However, third-party apps like Flash Alert let you customise the pattern of the flash notifications and even pause them for selected apps.Read Also:How to sign a document on an iPhone?
Conclusion
This is how you can turn on flash light notifications for your Android smartphone. Flash notifications may be ideal when your phone is in silent mode, but they can be an annoyance to other people when you’re out in public. Flashing or flickering lights are also epileptic triggers, which is why it is recommended to turn off flash notifications when you’re in public.
Plex is a media streaming service that allows you to organise, access and stream your personal media collection such as movies, TV shows, music, photos, etc across TVs, laptops, and computers. Plex offers a user-friendly interface and is very convenient to use. Here is how you can use Plex with Chromecast, iOS, Android, Apple TV or NAS:
In This Article
How is Plex different?
The biggest problem in using media servers is that you need to make sure that the receiving device supports the format. If the format is not supported you’ll need to convert video in a different format which is time-consuming. Now Plex is quite different as it has inbuilt transcoding that converts video quickly to run on any device. Here is how you can use Plex on Chromecast, iOS, Android, Apple TV or NAS:Read Also: Top 10 Apps for Samsung Galaxy Z Fold 5
Using Plex on Chromecast/Android
The most important step to using Plex is to download Plex on your devices. Here is a step-by-step guide on how to set up and use Plex on Chromecast.
Download Plex on the desktop and go to the get started page.
Complete the setup process.
Go to downloads.
On the server tab, select the operating system and download the package.
After installation, a web UI page will ask for login details. Then you can access media across various devices.
After you have set up your account you can now select a video to play. It will get projected on the screen.
At the top corner, you can see a cast icon, tap on it. See the list of connected devices and tap on Chromecast connected display.
This method is the same for Windows/ MAC/ Android servers.
Using Plex on iOS/ Apple TV
Streaming Plex on iOS/ Apple TV requires the Plex iOS app.
After installation, open the app and connect to the Plex Media server.
Hit the AirPlay button and your movie will start playing on your Apple TV.
Using Plex on NAS
You can use Plex on NAS by installing it. Now there are two methods of installing Plex on your NAS server. The first method is by installing Plex manually. Here is how you can do it:
Download the Plex server package.
Connect to Synology NAS.
Open up the Package Centre.
Click on Manual Install.
Click Browse and locate the downloaded server.
Click Next, a pop-up will appear. Click yes on the Pop-up, then click apply.
The second method is installing Plex automatically. Here is how to do it:
Connect to Synology NAS.
Go to Package Center. Click on settings in the top right corner.
Change trust level to Synology Inc. and trusted publishers.
Click the Certificate tab and download the Certificate Key. Then click Import.
Here’s how you can remove the Threads icon from your Instagram account
Step 1: Launch the Instagram app on your smartphone and the profile icon at the bottom right corner of the screen.Step 2: Select Edit Profile.Step 3: Switch off the toggle bar for Show Threads shortcut.Step 4: Tap the tick icon at the top right corner of the screen.
Frequently Asked Questions? (FAQs)
How do I remove the Threads icon on my Instagram profile?
To remove the Threads shortcut from your Instagram profile, go to Edit Profile and switch off the toggle bar for ‘Show Threads shortcut’.
Can I join Threads without using my Instagram account?
You can use a burner Instagram account created using a temporary email to make a Threads profile that isn’t linked to your personal Insta handle. Read this article for more details.
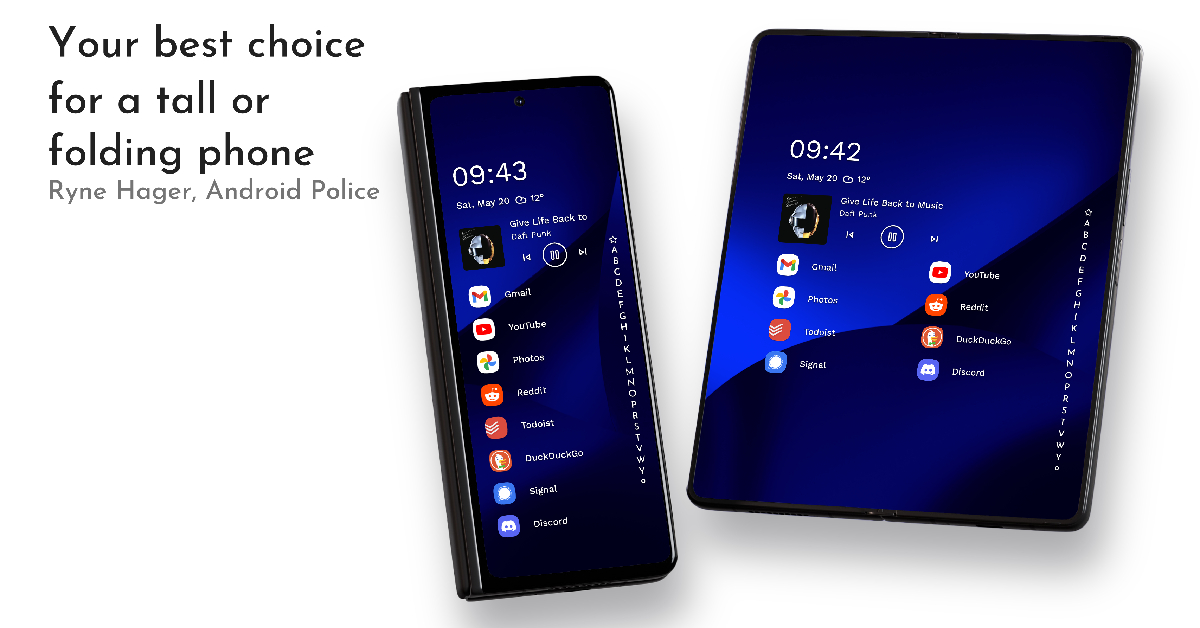
Samsung unveiled its new range of foldable at its Unpacked event in Seoul, Korea last month. The Samsung Galaxy Z Fold 5 is available at a starting price of Rs 1,54,000 in India and can now be pre-booked online. The 12GB RAM + 1TB storage variant is priced at Rs 1,84,000. If you’re thinking of buying the new Samsung Galaxy Z Fold 5, here are the top 10 apps you should download on it first.Read Also:Maono DM30 USB Condenser Microphone Review: A powerful microphone at an affordable price
In This Article
Kindle
With an inner display spanning 7.6 inches, Samsung Galaxy Z Fold 5 is the ideal device for reading ebooks. The display’s aspect ratio is as close as it gets to mimicking a book. The larger screen size also ensures that you don’t have to scroll or turn the page at short intervals. If you own a Kindle e-reader, this app can sync your progress on both devices. While you may prefer the Kindle for its glare-free display, the Fold 5’s HD display is more suited for reading comics and graphic novels.
DocuSign
As the name implies, DocuSign lets you sign your name on any document on your phone. Your Samsung Galaxy Z Fold 5 comes with an S Pen, which makes this app even more special. Simply open any form or document on the Docusign app and use the S Pen to add your signature anywhere. DocuSign supports all the major file formats. Without an S Pen, you’re left with the only option of using your finger to scribble the signature, which may not produce accurate results.
Sketchbook
Sketchbook is an essential app for digital artists. You can use this app to draw a quick sketch or compose an elaborate art piece. Its versatility makes it appealing to graphic artists. Even if you just want to play around with the S Pen, this app is ideal for you. Sketchbook offers a wide range of brushes, suited for almost every style of drawing. The app is also equipped with helpful tools like rulers, guides, and stroke tools for added precision. What we like the most about Sketchbook is its distraction-free interface that allows you to focus on your art.
Spotify
One of the biggest music streaming apps in the world, Spotify needs no introduction. It is one of the handful of apps that is perfectly optimised for the Fold 5, earning its spot in this list. Spotify lets you access the mini-player on one panel while displaying the albums/playlists/artists on the other panel. If you have used Spotify on a tablet, you know what to expect on your Fold 5.
Apex Legends
The incredible hardware on Samsung Galaxy Z Fold 5 is only surpassed by its powerful chipset. With Snapdragon 8 Gen 2 SoC under the hood, the Fold 5 is one of the most powerful foldable smartphones out there. The best way of pushing this chipset to its maximum potential is by playing demanding games like Apex Legends. This game offers exquisite FPS gameplay along with cutting-edge graphics and fast-paced combat.
Riptide GP: Renegade
Riptide GP: Renegade is the only paid app on this list but it is well worth the Rs 150 you pay for it. You can race your Hydrojet through waterfalls, flooded ruins, public waterways, and more. Riptide GP allows you to race in single-player mode or link up with other racers online. You can also play locally with up to 4 players.
Todoist
Todoist is one of our favourite productivity apps for Android. The app functions even better on a larger screen, offering ease of access and a more intuitive way of going about your tasks. Adding new entries to your to-do list and tracking all your tasks is a breeze with Todoist. It can even link with other apps like Outlook, Calendar, Slack, Gmail, and more. You can also assign priority levels to certain tasks and create collaborative projects with other people.
Niagra Launcher
While all foldables follow the same concept, they go about it in different ways. This creates a diverse range of form factors even within the very limited genre of foldables. Samsung’s Galaxy Z Fold 5 is on the taller size, in sharp contrast with the passport-sized Pixel Fold and Oppo Find N. While some people prefer the taller dimensions of the Fold 5, it can be very challenging to reach the corners with one hand. This is where Niagra Launcher comes into play. Using this app, you can customise your home screen in a manner that is much more accessible to one-handed use.
Google Meet
There’s no app like Google Meet for taking virtual meetings on the go. What makes this app special for Fold 5 is its high-end optimisation. If you dislike holding your phone up for video calls and online meetings, you can easily fold your phone and prop it up on a table. The Google Meet app perfectly adapts to the Flex Mode on your phone. You can view the meeting participants in the top panel while accessing the controls from the bottom panel.
Disney+ Hotstar
With content ranging from superhero flicks to live sports, Disney+ Hotstar is an essential app for your Fold 5. With a 7.6-inch inner display, it is a safe bet that you will spend a lot of time watching content on your Fold 5. The app works fine on Flex Mode as well, allowing you to prop the phone up like a laptop and enjoy watching content wherever you are.Read Also:How to Unlock Android Phone Password Without Factory Reset? Must Read Ways!
Apple is a technology company based in California and founded by Steve Jobs in 1976. It primarily deals in iPad, iPhones and MacBooks. IOS has a feature for parents that allows them to keep a check on their children’s screen time. The screen time feature allows family members to keep a check on the usage of devices so that parents can structure the time their kids use them. However, recently a bug has been reported in Apple’s screen time on the parental control system that is allowing their children to continue watching without any limits and access to adult content as well. Here is everything to know about this strange ordeal and how to fix it.Read Also: How to Unlock Android Phone Password Without Factory Reset? Must Read Ways!
In This Article
What is a screen time bug?
Wall Street Journal has recently reported that there is a bug in the screen time feature that is allowing kids to bypass the daily time restrictions set by their parents. Youngsters can play games and interact on social media without any restrictions. Apple has confirmed the bug and a spokesperson said that Apple is looking into this matter very seriously. The screen time feature was added in 2018 in iOS 12 when there was a serious concern regarding smartphone addiction. The screen time feature allows parents to limit content, check who they communicate with and which app they can use. This prevents the kids from getting addicted to their smartphones as they know that their activity is being monitored. However, with this recent bug, all the settings of screen time are restored to normal and there are no restrictions listed at all.
How to fix the Screen Time bug problem?
After several parents reported this issue on the Apple community website, a source who has allegedly been in touch with Apple requested parents to try this method suggested by Apple:
Turn off screen time for the device that is needing to be blocked for downtime (child’s device).
Make sure all pictures have synced with iCloud or they will be lost (scroll to the bottom of the photos app to check if any are pending) sign out of iCloud on all devices that can either approve screen time requests or have screen time limitations (child and parents).
Reset the same devices (not erase content, just reset all settings by going to Settings > General > Transfer or Reset iPhone > Reset > Reset All Settings).
This year Apple is probably going to hold its iPhone 15 event in September. Even though there is still a month until the official announcement the price of the upcoming series has appeared online in advance of the introduction. iPhone 15, iPhone 15 Pro, iPhone 15 Plus, and iPhone 15 Pro Max are most likely to be part of the iPhone 15 series.Also Read:Battery sizes for the iPhone 15 lineup are rumoured to be much bigger this time
In This Article
Apple iPhone 15, iPhone 15 Plus, iPhone 15 Pro, iPhone 15 Pro Max price expected
According to Tim Long, a Barclays analyst the pricing this year from iPhone 15 and iPhone 15 Plus are anticipated to remain the same as their predecessors. In terms of the Pro variants, iPhone 15 Pro may cost $100 (about Rs 8,223) higher than the existing model. In addition to this, the price of the iPhone 15 Pro Max is also anticipated to increase by $200 (about Rs 16,450). It is anticipated that these iPhone 15 models would also see a price increase in India.According to Apple Hub, who cited information from Tim Long of Barclays, the iPhone 15 is anticipated to go on sale for $799 (roughly Rs 65,700), the iPhone 15 Plus may cost $899 (roughly Rs 73,900), the iPhone 15 Pro is anticipated to cost $1,099 (roughly Rs 90,100), and the iPhone 15 Pro Max is anticipated to cost $1,299 (roughly Rs 1,06,500).
Apple iPhone 15, iPhone 15 Plus, iPhone 15 Pro, iPhone 15 Pro Max specifications expected
Additionally, future iPhones have been mostly exposed by leaks. The switch from Apple’s exclusive Lightning port to a USB Type-C port will be one of the biggest modifications the future iPhones will receive this year.Similar to its predecessor, the iPhone 15 is rumoured to retain the 6.1-inch display. The base model is likely to go with the dynamic island notch. Also, a new “Action Button” that may be customised is also planned to take the place of the physical mute switch. The battery capacity of the iPhone 15 models is one of the noteworthy enhancements rumoured for them. The 3,877mAh battery in the regular iPhone 15 is claimed to be larger than the 3,279mAh battery in the iPhone 14. Similar to the iPhone 14 Plus, the iPhone 15 Plus is rumoured to have a 4,912mAh battery.This is also Apple is going to go with the trend to bring the previous year’s chipset to the iPhone 15 model which propelled the iPhone 14 Pro versions. While the iPhone 15 Pro and iPhone 15 Pro Max models will be powered by the company’s newest Bionic A17 processor.Also Read:When will iPhone 15 be launched? What to expect?According to rumours, the iPhone 15 models would have 48-megapixel rear cameras this time. On the contrary, the Pro Max variant is expected to include a larger and more apparent camera module that houses periscope lenses that enable optical zoom of up to 5–6x, along with other supporting sensors.
For the latest gadget and tech news, and gadget reviews, follow us on Twitter, Facebook and Instagram. For newest tech & gadget videos subscribe to our YouTube Channel. You can also stay up to date using the Gadget Bridge Android App. You can find the latest car and bike news here.
After being banned for nearly ten months, Battleground Mobile India, aka BGMI, is officially available again in India. BGMI fans are looking for ways to improve their game experience and one such method is the usage of redemption codes, which offers a variety of rewards and advantages using BGMI redeem codes players can gain access to new skins, outfits, loot crates, weapons and free UC and diamonds.As mentioned earlier, these codes give users the chance to earn unique rewards and gain extra benefits while playing the game. This includes GUN SKINS (M4, AKM, M416, AWM, M24, UZI, KAR98K), free character voucher, Andy, Carlo, Sara, Victor character for free, free Anna Character on completing the mission and UC or Royal Pass Discount. So here we have gathered a list of the most recent BGMI redeem codes as of 31 July 2023. Also, redeem these codes asap as these are only valid for a limited duration.
In This Article
BGMI Redeem Codes for 31 July 2023
updating…
How to get free Redeem Codes for BGMI on 31 July 2023?
Launch BGMI on your device.
Then select the Redeem Code option from the main menu.
Next, click on the Redeem code tab.
A new window will open, requesting the redemption code.
Now enter your BGMI code.
Confirm and click on the “Redeem” tab.
If your redeem code is valid then you will get a message confirming that your rewards were successfully redeemed.
Garena Free Fire is a battle royale game with regular awards and tournaments to keep players interested. If you play Garena Free Fire, you should be aware of the redeem codes that are released on a daily basis. However, because the battle royale game is banned in India, players from other countries can use the Free Fire Redeem codes daily. If you’re unfamiliar with the Garena Free Fire redeem codes or don’t know how to get them, we’ve put together a step-by-step guide to help you redeem them. Check out Garena Free Fire Redeem Codes for 31 July 2023.The Free Fire redeem codes are a great way to get free stuff. These are 12-digit codes that contain alphabets and numbers, as well as an expiration date and time. Because the Garena FF redeem codes cannot be used more than once, you should hurry to the redemption page to claim your free reward before someone else does. To get a free reward, all you have to do is go to reward.ff.garena.com/en, which is the official redemption page. Also, keep an eye on this space for daily updates on Garena Free Fire redemption codes and rewards.
In This Article
Garena Free Fire Redeem Codes Today 31 July 2023
Updating…
How to Get Free Fire Redeem Codes for Garena on 31 July 2023?
If you’re thinking about starting a podcast or a YouTube channel, one of the first purchases you should be making is an efficient microphone. The search for a decent entry-level microphone can get daunting with the sheer number of options out there. To make your search simpler we got our hands on the Maono DM30 and took it for a spin. We’ve been using this microphone for the past week, trying it with a bunch of devices and recording software. Priced at Rs 4,663 on Amazon, the DM30 looks like a good purchase on paper with its metal build, clean design, high-sensitivity condenser core, and high sampling rate. But how did it fare in our tests? Find out in our Maono DM30 USB Condenser Microphone review.Read Also:How to remove the Gmail ‘syncing mail’ notification that won’t go away?
In This Article
Maono DM30 review: Design
Inside the box, you’ll find the condenser box, a desktop stand, a USB Type-C cable with a Type-A attachment, and a user manual. The microphone comes attached to the stand, so you don’t have to worry about assembling it after pulling it out of the box. However, if you’re planning on travelling with this mic, we’d suggest taking it apart for better portability.Maono DM30 surprised us with its sturdy build quality. This isn’t something we expect from affordable microphones, so Maono has definitely earned itself some extra points here. The metal casing for the microphone along with the metallic mesh grill really elevates the premium factor of the microphone. The desktop stand is all metal as well. The cover on the top of the mic, the control dial, and the adjustment knob were the only plastic components we could spot on the microphone.The clean and minimal design of the Maono DM30 makes it very accessible to use. The front end (also the input end) of the microphone houses the control knob along with a couple of notification lights for the mic and headphones. Bordering the bottom of the microphone is a grille with RGB lighting inside. This is where you’ll also find the 3.5mm headphone jack along with a USB Type-C port and a control button for the RGB lights.The microphone can be adjusted back and forth. There is no way to alter its height. You can disassemble the microphone and attach it to another stand or a boom arm. Those accessories need to be purchased separately. However, in a home recording setting, we didn’t feel the need for any additional accessories. If you want to hold the microphone in your hand, all you need to do is unscrew it from the stand.
Maono DM30 review: Performance
Connecting the Maono DM30 microphone to your PC is a total breeze. Since it is a plug-and-play mic, you don’t need to install any driver or any additional piece of software to use the DM30. Simply plug the USB Type-C cable into the microphone and connect it to your PC using the USB Type-A end. To connect the microphone to a smartphone, simply pull out the USB Type-C attachment and plug the Type-C end into your phone. A pretty neat process that completely eliminates the need for an OTG adapter.Maono DM30 is a condenser microphone with a cardioid pattern. This means it picks up sound from only one direction – the front of the microphone. This is where the dial and notification lights are placed. A cardioid pickup helps in suppressing the noise coming from the other direction. You can monitor the audio input in real-time by plugging your headphones into the mic.We used the Maono DM30 microphone on a Windows laptop and an Android smartphone. The level of detail that the microphone managed to capture was very impressive for its price. In a quiet indoor environment, the microphone did a good job of recording different kinds of voice samples. Since it has a cardioid pickup, it did well in rejecting the noise coming in from a distant window in the opposite direction. While some ambient noises (ceiling fan, AC, general humdrum) still managed to slip through, they did not amount to be a nuisance since the microphone was able to suppress them to some degree.While gaming, we placed the DM30 on the desk and recorded a few sample takes. While we did not have any complaints about the general quality of the voice recording, it still managed to pick up the noise from the keystrokes. Placing the microphone farther away from the keyboard helped minimised the noise. The microphone was still able to pick up our voice thanks to its high-sensitivity condenser and the 24bit/48kHz high sampling rate. We even used the DM30 for WhatsApp calls and virtual meetings, the quality of relayed audio when compared to a regular headset was night and day.You can control the microphone gain and the volume of the headphones from the control dial on the mic. Pressing the dial once mutes the microphone while long pressing it allows you to control the monitoring volumes. We also really like the super low latency which allows you to monitor the audio input in realtime. You can also switch the colour of the RGB lights using the dedicated button at the bottom. If you find them too tacky, you can switch them off using this button as well.Maono also offers a customisation app for this mic called Maono Link. Using this app, you can control the mic gain and headset volume from your PC. You can also change the brightness of the RGB lighting, something that can’t be done from the mic itself. Maono Link also offers 4 presets to change the tone of your voice – Deep, Natural, Bright, and Legacy. If you want to boost certain frequencies in the audio input, you can access the equaliser from the Advanced tab of this software.Read Also:Google begins rolling out Unknown Tracker alerts feature for Android smartphones
Verdict
After using the Maono DM30 USB Condenser Microphone in different situations, we were impressed by its range and the quality of audio recordings. If you’re just getting started with content creation, this microphone is a safe bet. For those that want to live stream, the RGB lighting at the bottom of the microphone adds to the gaming aesthetic without being gaudy. The DM30’s portability will also appeal to podcasters that are always on the go. At the price of Rs 4,663, the Maono DM30 is an excellent choice for newbie streamers and content creators.
Maono DM30 USB microphone: Pros
Solid build
Produces detailed audio recordings
Very accessible
Affordable
Maono DM30 USB microphone: Cons
Has the tendency to pick up the sound of keystrokes while gaming
I locked myself out of my Android phone and didn’t remember the password, so how to unlock Android phone password without a factory reset? We live in an age where our smartphones contain a treasure trove of personal information. That’s why password-protected Android phones have become essential in safeguarding our privacy.
In This Article
Can You Unlock Android Phone Password Without Factory Reset?
However, there’s a frustrating predicament that many of us have experienced firsthand: I forgot my Android pin, and now I am locked out of my phone. This leads us to find the solution to your questions, “ Can I unlock Android phone without going through a factory reset? And how to unlock an Android phone without a password and factory reset?”
But fear not, it is quite common among those who want to regain access to their devices without wiping everything and we have the solution! In this article, we’ll reveal five methods to grant you access to your device without pressing that dreaded factory reset button. So, let’s dive in!
Five Must-Read Ways to Unlock Android Phone Password Without Factory Reset
Here are five techniques you can try to unlock an Android phone without resorting to a factory reset:
Way 1: How to Unlock Android Phone Password Without Factory Reset via Android Unlocker [Most Effective]
The most effective and convenient method to unlock an Android phone without performing a factory reset is Tenorshare 4uKey for Android. It’s a specifically designed tool to remove screen locks. Additionally, it can perform other functions, such as:
Works well with over 6000 Android devices running various Android OS versions, including the latest Android 13.
Supports Samsung, Xiaomi, Redmi, and Vivo devices.
It can also remove FRP lock, PIN, pattern lock, fingerprints, and face recognition IDs.
It is beginner-friendly, so you don’t need any technical skills.
Here’s how to unlock your phone when you forgot the password without resetting it with 4uKey:
Back up your Android phone data. Next, connect your phone to your PC. Open the 4uKey tool to its interface and select “Remove Screen Lock.”
2. Tap on the “Start” button to begin the password removal process. Click “Yes” to confirm and proceed with the process.
3. Follow the next set of instructions to put your phone into recovery mode and reboot the system. After completing the steps, the software will successfully unlock your Android phone.
Way 2: How to Unlock Samsung Phone Forgot Password Without Factory Reset via Find My Mobile
If you happen to be using a Samsung device, you can give the Samsung service called “Find My Mobile” a try to resolve this problem. However, please note this solution only applies if you have previously set up a Samsung account.
Without a Samsung account, you won’t be able to unlock your Samsung phone if you’ve forgotten the password. Here’s how to unlock your phone password with the “Find My Mobile” feature:
To begin, sign in to your Samsung account. Choose the “Lock screen” option and input a new PIN in the designated field.
Lastly, click the lock button, and within a minute or two, you’ll observe that your password has been successfully changed.
Way 3: How to Unlock Android Phone Password Without Resetting via Find My Device
Another way to bypass a factory reset and unlock your Android device is by utilizing the “Google Find My Device” feature. It’s important to note that this method only applies if your smartphone runs on Android 7.1.1 or an earlier version.
Additionally, you’ll need to log in to your Google Account on another device, such as your PC. Here’s how to unlock an Android phone with “Find My Device”:
Sign in to your Google account and select your locked Android phone.
Choose the lock option on the screen.
Set a new password for your Android phone to regain access.
Way 4: How to Unlock Android Password Without Factory Reset Using ADB
ADB (Android Debug Bridge) is another helpful method for unlocking an Android phone password without data loss. However, it’s important to note you can only utilize this technique if you have previously enabled USB Debugging on your device.
It’s also worth mentioning this method may require some time to complete. Here’s how to unlock an Android phone without a password with ADB:
Connect your Android phone to your PC. Open the command prompt.
Enter the command “adb shell rm /data/system/gesture.key.” Hit “Enter.” Then, restart your phone.
Way 5:How to Unlock Android Phone Password Without a Factory Reset and Computer
An alternative method to unlock your Android phone password without performing a factory reset or using a computer is by utilizing the Google “Forgot Pattern” feature.
It’s important to note this method applies only if your Android phone runs on Android 4.4 or an earlier version. Here’s how to unlock phone password without a factory reset and computer:
Input an incorrect password five times into your Android phone. After the fifth failed attempt, a prompt will appear with a message asking you to wait 30 seconds—press “Forgot Pattern” on it.
Select the option to enter your Google Account details. Enter the Gmail account and password associated with your Android phone.
Google will send you an email containing the unlock pattern. You can use this pattern to change the screen lock on your Android phone.
Conclusion
If you’re wondering how to unlock Android phone password without a factory reset, there’s no need to worry. There are several methods available to unlock it without resorting to resetting your device. One highly recommended tool that offers great flexibility is Tenorshare 4uKey for Android.
It not only unlocks your phone without a factory reset but can perform other functions as well. This tool can bypass FRP lock and Google account and remove PIN, lock screen pattern, face, and fingerprint ID. So try Tenorshare 4uKey for Android and unlock your phone without hassle!
For the latest gadget and tech news, and gadget reviews, follow us on Twitter, Facebook and Instagram. For newest tech & gadget videos subscribe to our YouTube Channel. You can also stay up to date using the Gadget Bridge Android App. You can find the latest car and bike news here.
Step 1: Open the document in Mail or any other app that supports it.Step 2: Tap the Markup icon at the top right corner of the screen.Step 3: Hit the plus icon at the bottom right corner of the screen.Step 4: Select Signature.Step 5: Sign your name on the screen using your finger. For better results, use the Apple Pencil on your iPad.Step 6: Tap Done at the top right corner of the screen.Step 7: Drag the signature to the appropriate place and resize it by dragging its corners.Step 8: Tap Done at the top left corner of the screen.
Sign a document on an iPhone using Adobe Acrobat
Step 1: Install Adobe Acrobat from the App Store.Step 2: Open the PDF document on Adobe Acrobat.Step 3: Tap the pencil icon at the bottom right corner of the screen.Step 4: Select Fill and Sign.Step 5: Hit the Draw icon.Step 6: Select Create Signature.Step 7: Sign your name using your finger. Use the Apple Pencil on your iPad.Step 8: Save the signature. Drag and drop it in the ideal spot on the PDF.
Frequently Asked Questions (FAQs)
How do I sign a PDF document on my iPhone?
Open the PDF in Mail or any other app that supports it. Hit the Markup icon and then tap the Plus icon at the bottom left corner of the screen. Sign your name on the screen and drag it to the appropriate spot on the PDF.
How do I save my signature on my iPhone?
You can save your signature on your iPhone using the Markup tool. Open a PDF, hit the markup icon, then tap the plus icon and select signature.
Homegrown smart wearables brand, Noise officially enters the market for wearable technology’s premium smart ring segment by launching the health-tracking smart ring Luna Ring. The device supports wireless charging and is capable to monitor your health as it includes all the essential sensor which a smartwatch have. This smart ring is capable to track your heart rate, temperature, and SpO2 and can do a lot more. It has a hypoallergenic inner shell and a titanium body claimed to be suitable for all skin types.
In This Article
Luna Ring price in India and availability details
The cost and launch date for the Luna Ring in India has not yet been disclosed by Noise. However, the device is currently up for prebooking and to do that one needs to purchase a Priority Access pass worth Rs 2,000. Numerous advantages are also included with the Priority Access pass. Sunlit Gold, Rose Gold, Stardust Silver, Lunar Black, and Midnight Black are the available colour options for the new smart ring.
An additional discount of Rs 1,000 on the day of the purchase, giving a direct cash benefit of Rs 3,000 to pass holders. Customers with Priority Access pass also get to purchase Noise i1 smart eyewear at a 50% discounted price, of Rs 4,499. Pass holders would also be eligible for free liquid/damage/theft insurance worth Rs 2000.
Additionally, the pass holders get unique access to additional alluring brand offers and guaranteed packaged benefits, enabling them to experience and improve their way of life with the cutting-edge wearable, Luna Ring by Noise.
Luna Ring features and specifications
The Luna Ring is marketed as an incredibly light smart ring. It’s 3mm slim design, fighter-jet grade titanium body, and diamond-like coating that resists corrosion and scratches make it a sturdy construction. Noise claims that the item is appropriate for all skin types and includes a smooth, hypoallergenic inner shell as well as a pointing edge on the outside shell for guided wearing.
Also Read:Google begins rolling out Unknown Tracker alerts feature for Android smartphones
The sensor on the Luna Ring consists of Infrared Photoplethysmography (PPG), Skin Temperature, and 3-axis accelerometer sensors measuring physiological signals, all of which are seamlessly integrated into a flexible rim with a battery design and practical wireless charging. This allows for a comfortable fit and exceptional health-tracking capabilities.
The Luna Ring has bumps on the inside to guarantee that your finger and the optical sensors are properly aligned. They narrow the space between your skin and the sensors, improving the precision of the PPG signal measurements.
As per the company, the PPG sensor and a 3-axis accelerometer can track subtle changes in your heart rate, sleep patterns, movements, and other bio-data. It utilizes an optomechanical design that combines the 3 LEDs & 2 PDs along with mechanical components (3 bumps) ensuring alignment of the optical sensors with your finger.
The smart ring makes use of in-built algorithms to deliver accurate results. Furthermore, the personalized nudges use tailor-made insights and alerts to help make real-time transformative choices.
It is also said to offer 3 scores daily – Sleep, Readiness, and Activity. The Sleep Score shares insights into sleep and offers recommendations, optimizing nightly rest patterns. The Readiness Score provides a holistic overview of your health taking into account key body signals. The Activity Score consists of inactivity, activity levels, and recovery, through 3-axis motion sensors, decoding the intricacies of body movements and offering invaluable insights.
While the temperature sensor measures body temperature influenced by diet, exercise, physiological states, and hormones once every 5 minutes. The device comes with Bluetooth Low-Energy (BLE 5) technology. It is also water resistant up to 50m or 164 ft.
The Luna ring also supports wireless charging and is claimed to provide a battery life of up to 7 days on a single 60 minutes charge.
For the latest gadget and tech news, and gadget reviews, follow us on Twitter, Facebook and Instagram. For newest tech & gadget videos subscribe to our YouTube Channel. You can also stay up to date using the Gadget Bridge Android App. You can find the latest car and bike news here.
After being banned for nearly ten months, Battleground Mobile India, aka BGMI, is officially available again in India. BGMI fans are looking for ways to improve their game experience and one such method is the usage of redemption codes, which offers a variety of rewards and advantages using BGMI redeem codes players can gain access to new skins, outfits, loot crates, weapons and free UC and diamonds.As mentioned earlier, these codes give users the chance to earn unique rewards and gain extra benefits while playing the game. This includes GUN SKINS (M4, AKM, M416, AWM, M24, UZI, KAR98K), free character voucher, Andy, Carlo, Sara, Victor character for free, free Anna Character on completing the mission and UC or Royal Pass Discount. So here we have gathered a list of the most recent BGMI redeem codes as of 29 July 2023. Also, redeem these codes asap as these are only valid for a limited duration.
Garena Free Fire is a battle royale game with regular awards and tournaments to keep players interested. If you play Garena Free Fire, you should be aware of the redeem codes that are released on a daily basis. However, because the battle royale game is banned in India, players from other countries can use the Free Fire Redeem codes daily. If you’re unfamiliar with the Garena Free Fire redeem codes or don’t know how to get them, we’ve put together a step-by-step guide to help you redeem them. Check out Garena Free Fire Redeem Codes for 29 July 2023.The Free Fire redeem codes are a great way to get free stuff. These are 12-digit codes that contain alphabets and numbers, as well as an expiration date and time. Because the Garena FF redeem codes cannot be used more than once, you should hurry to the redemption page to claim your free reward before someone else does. To get a free reward, all you have to do is go to reward.ff.garena.com/en, which is the official redemption page. Also, keep an eye on this space for daily updates on Garena Free Fire redemption codes and rewards.
If you check emails on your smartphone on a regular basis, you may have seen the ‘syncing mail’ pop up on numerous occasions. Syncing your inbox usually takes just a few seconds. However, users often report that the notification does not go away even after their inbox has been updated. Swiping it across the notification panel yields no results. In this article, we bring you the top 6 ways to remove the pesky Gmail ‘syncing mail’ notification that refuses to go away.Read Also:How to sign a PDF document on Android?
In This Article
Force Stop the app
Force-stopping the Gmail app will remove the pesky ‘syncing mail’ notification from the top panel. Here’s how you can go about it.Step 1: Go to Settings and select Apps.Step 2: Select Gmail.Step 3: Select Force Stop from the bottom menu.Step 4: Confirm your selection from the popup box.
Restart your smartphone
If force-stopping the Gmail app didn’t get rid of the notification, you may have to restart your device. Performing a reboot of your phone can fix the background issues causing the glitchy notifications. Once your phone starts up again, you will notice that the notification panel is completely empty.
Turn off notifications
Users often report that the ‘Syncing mail’ notification pops up on their device every time they launch the Gmail app. If you don’t want to force stop the app every time, you can simply disable its notifications. This means that you won’t get notified of any incoming emails as well. Here’s how you can do it.Step 1: Go to Settings and select Apps.Step 2: Select Gmail.Step 3: Tap on Notifications.Step 4: Switch off the toggle bar for Show Notifications.
Update the Gmail app
Older versions of apps are known to glitch from time to time. App developers fix the issues reported by users with every update. If you are using an older version of the Gmail app on your smartphone, updating it may resolve the notification problem. Go to the Google Play Store, search for Gmail, and hit the Update button.
Uninstall updates for Gmail app
If the problem started popping up after you installed an update, it is likely that it got installed incorrectly. In this situation, you should uninstall the update and reinstall it again. You can do this by going to Gmail’s page on the Google Play Store, hitting the ellipses, and selecting ‘Uninstall updates’. Once that’s done, tap on ‘Update’ to reinstall the updated version of the app.
Clear app cache
Step 1: Go to Settings and select Apps.Step 2: Select Gmail.Step 3: Tap on Storage.Step 4: Select Clear Cache.
Frequently Asked Questions (FAQs)
How do I remove the ‘syncing mail’ notification from my phone?
Force stop and restart the Gmail app to remove the ‘syncing mail’ notification that is stuck on the notification panel.
What happens when I force-stop Gmail?
When you force-stop the Gmail app, it completely terminates its background processes and shuts down. You will need to restart the app to check for new emails.
Will clearing the Gmail cache delete all my draft emails?
This is how you can remove the Gmail ‘syncing mail’ notification from your phone. If the methods mentioned in this article did not work for you, try uninstalling the Gmail app and then reinstalling it. If you found this article helpful, let us know in the comments!
Google is now rolling out its unwanted tracker detection function for Android smartphones. This feature was announced at Google I/O 2023 which sends alerts to users when they are being tracked by an unknown Bluetooth tracker. As of now Unknown tracker alerts currently work with Apple AirTags. Following an alert, you can find out more about the unidentified Bluetooth tracker and obtain guidance on what to do.
Apple has released Unknown tracker alerts to Android 6.0+ users this month. If an unknown Bluetooth tracker is discovered to be travelling with you and its owner is separated from it, this feature will notify you on your compatible Android device.
Also read:Twitter Rebranded: Twitter logo has got a new look, the blue bird logo replaced with an X
Google claims that if you tap on the notification, you can view a map of the tracker’s route and get more information about it. The tracker will also produce noise to help you find it if you hit “Play sound” without the owner of the tracker knowing.
Some Bluetooth trackers may reveal their serial number or other details about the user of the device, such as the last four digits of their phone number when you bring the gadget close to the back of your phone.
You can also find out how to physically deactivate the Bluetooth tracker, which would prevent the owner from receiving any more location updates from the tracker in the future.
A manual scan tool can look for trackers nearby that are separated from their owners so you can search your surroundings for them without waiting for an alert.
To do this, go to Settings → Safety & emergency → Unknown tracker alerts and tap the “Scan Now” button. After your device has finished a manual scan, which usually takes around 10 seconds, you’ll see a list of trackers that are currently considered to be nearby and separate from their owner’s device. By tapping the mentioned tracker, you can obtain advice regarding what to do next.
Apple AirTags are the only tracking tags that currently include unknown tracker notifications, but the business is collaborating with tag manufacturers to eventually expand this important protection to other tracking tags through their shared industry specifications.
Also Read: X aka Twitter now allows users to download videos, but there is a catch
Also, the company has decided to postpone the launch of its impending Find My Device network at the moment till Apple adds protections for iOS.
“User safety and the prevention of unwanted location tracking is a top priority for Android. We are working in partnership with Apple to help finalize the joint unwanted tracker alert specification by the end of this year. At this time we’ve made the decision to hold the rollout of the Find My Device network until Apple has implemented protections for iOS,” the search giant said.
For the latest gadget and tech news, and gadget reviews, follow us on Twitter, Facebook and Instagram. For newest tech & gadget videos subscribe to our YouTube Channel. You can also stay up to date using the Gadget Bridge Android App. You can find the latest car and bike news here.
The proximity sensor on your smartphone is one of the most underrated pieces of hardware on the device. Every time you receive a call, this sensor kicks in and locks the screen when you bring your phone close to your ear. This completely eliminates any chance of accidental touches registering on the screen. When you move the phone away from your ear, the screen gets activated automatically. In this article, we bring you the top 8 ways to fix a faulty proximity sensor on your Android smartphone.Read Also:How to find out the date your Instagram account was created?
In This Article
Perform a diagnostic test
To be absolutely certain that the issue lies with the sensor hardware on your phone, perform a quick diagnostic test. Dial *#0*# on your phone and tap on ‘Sensor’. Now, cover the proximity sensor with a finger. Its position may depend on your smartphone model, but it is usually situated on the top right section of your phone. If the Virtual Proximity Sensing section on the screen says ‘Working’, it means nothing is wrong with the proximity sensor on your device. The dialer code for this diagnostic test may vary among different smartphone manufacturers.
Wipe the sensor with a cloth
Your smartphone’s screen is prone to a lot of smudges and fingerprints. If the area near the proximity sensor is covered in smudges, they may keep it from triggering at the right moment. Take a micro fibre cloth and clean the top border of the screen. This is where the proximity sensor usually is. If you dont have a microfibre cloth around, you can also use a cloth napkin to clean the screen.
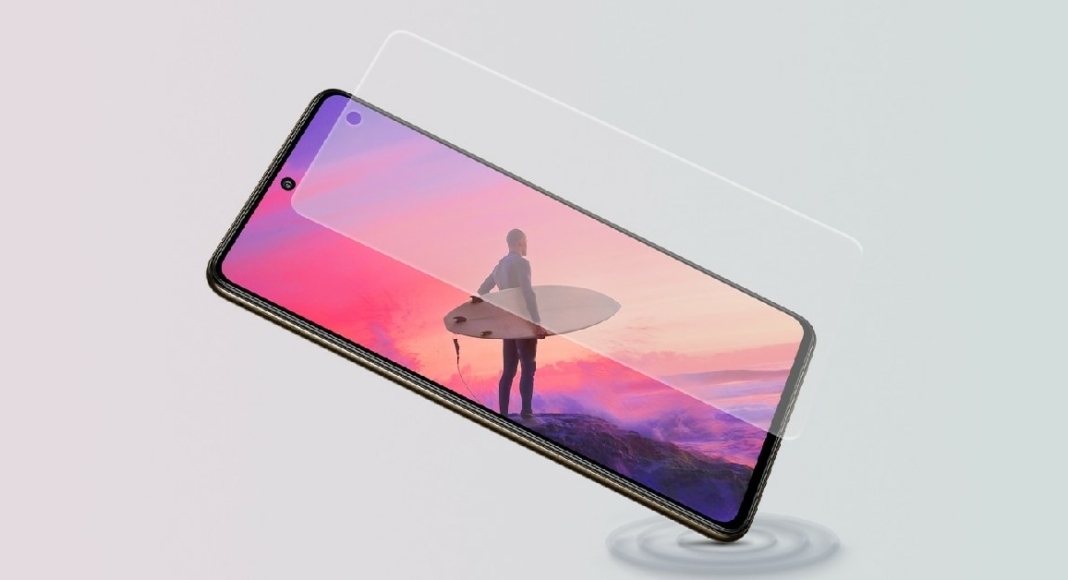
Remove the screen protector
Screen protectors are notorious for messing with the screen sensitivity and the proximity sensor. If the proximity sensor on your phone gets triggered at random times, try taking off the screen protector. When buying a screen protector, always make sure to avoid the ones that aren’t approved by your smartphone’s manufacturer.
Remove the smartphone case
Like screen protectors, smartphone cases can also mess with the proximity sensor. This is more so the case with flip covers and other novelty accessories for your phone. Remove the case to check if the proximity sensor has returned to normalcy.
Recalibrate the sensor
Step 1:Install the Proximity Sensor Reset app on your device.Step 2: Tap the Fix It button on the app’s home screen.Step 3: Bring your finger close to the proximity sensor. Once the red icon turns green, hit the forward arrow.Step 4: Now, remove your hand and tap the forward arrow once the green icon goes back to red.Step 5: Hit the tick icon to recalibrate the sensor. Step 6: Restart your device.
Restart the phone
If the proximity sensor is malfunctioning due to a software issue, restarting the smartphone may resolve the problem at hand. Long-press the side key and hit Restart in the power menu. If long-pressing the side key triggers the voice assistant, press and hold it with the volume up button.
Disconnect any audio devices
The proximity sensor on your phone only works when it is not connected to an external audio device like a Bluetooth headset or a pair of wired headphones. When you’re taking calls using a pair of headphones, your phone’s screen won’t turn off when you bring it closer to your face. Remove any headphones connected to your device and try again.
Update your phone’s OS
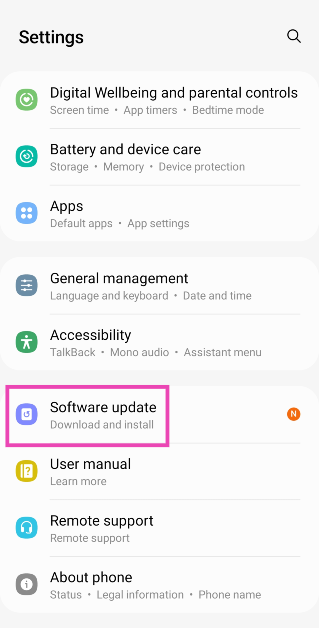
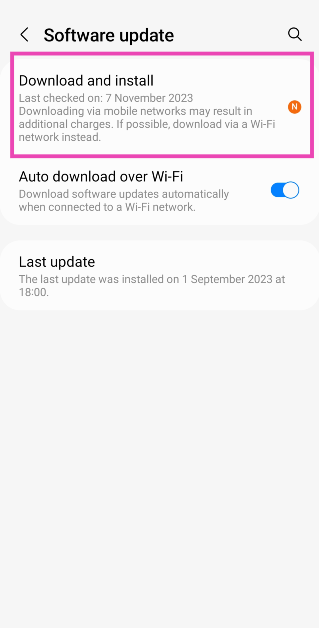
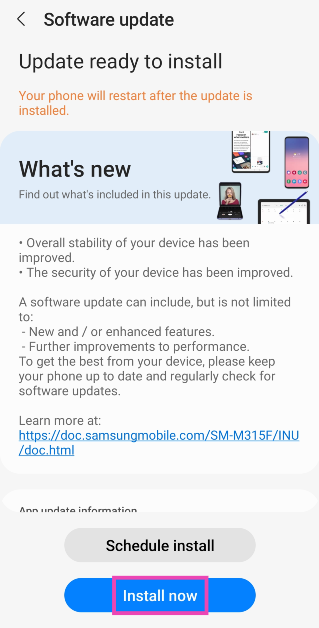
Step 1: Go to Settings and select Software update.
Step 2: Tap on Download and install.
Step 3: Select Install now.
Frequently Asked Questions (FAQs)
How do I confirm that the proximity sensor on my phone is not working?
To run a diagnostic test on the proximity sensor, dial *#0*# (or the relevant code for your smartphone) and select ‘sensor’. Now, cover the proximity sensor on your phone using a finger. If the screen turns green it means that the sensor is working.
How do I fix the proximity sensor on my phone?
If the proximity sensor on your phone is not working properly, give the screen a quick wipe and check again. Make sure that the screen protector is not inhibiting the functioning of the sensor.
Which app should I use to recalibrate the proximity sensor?
This is how you can fix the proximity sensor on your Android smartphone. If the fixes listed in this article don’t work for you, take your phone to the professional repair centre to get the sensor replaced. If you’re finding it hard to use your smartphone with a faulty proximity sensor, turning on accidental touch protection might help.
There is nothing more annoying than unwanted interruptions to a music-listening session. It is even more annoying when the music streaming app keeps pausing the song at random. Trying to fix this issue can be an uphill battle if you can’t figure out what’s causing the app to act this way. Luckily, we’ve got you covered. Here are the top 10 ways to fix the ‘Spotify keeps pausing music’ issue on your device.Read Also:Sony Bravia XR 85X95L Mini LED TV with Cognitive Processor XR launched in India
In This Article
Sign out of all devices
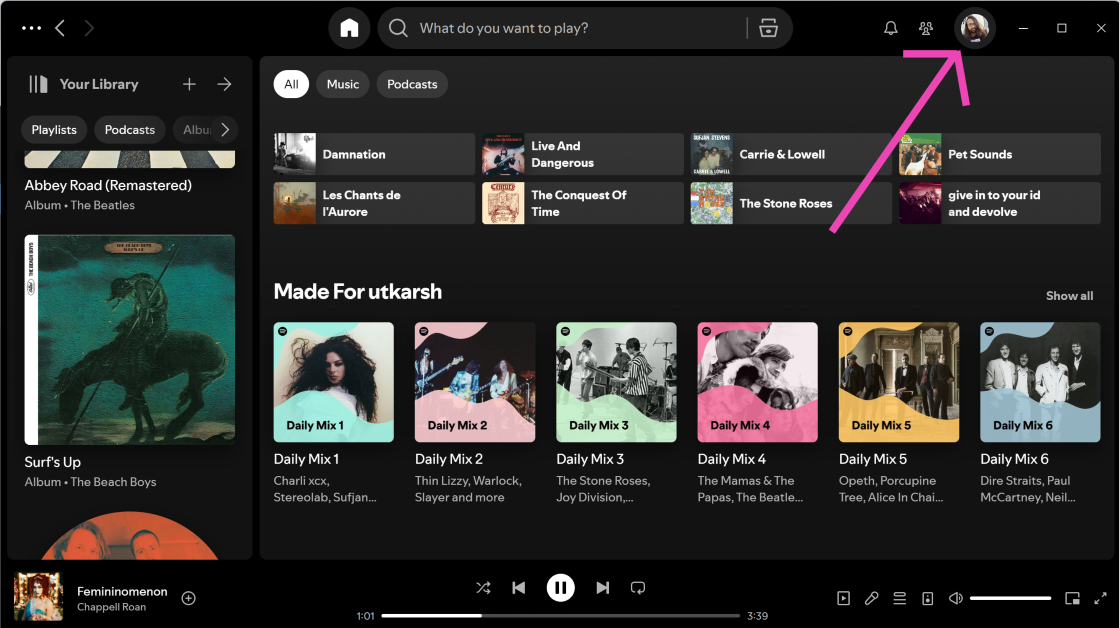
If you are logged into multiple devices using the same Spotify account, it can conflict with the media playback. You cannot use one Spotify account to play different tracks on multiple devices at the same time. This leads to Spotify pausing the song on all devices but one. If the music keeps getting paused on your device, you need to log out of your Spotify account from the other devices. Here’s how you can go about it.Step 1: Launch the Spotify app or Web player on your PC.Step 2: Click the profile icon at the top right corner of the screen.Step 3: Select Account.Step 4: You will be redirected to the Account Overview page. Scroll down and select Sign Out Everywhere.Step 5: Launch the Spotify app on your primary device and log into your account again.
Clear cache
A temporary file in Spotify’s app cache may have gone rogue. Corrupted files in the cached memory can often act up and randomly pause the music playback. Here’s how can fix it.Step 1: Launch the Spotify app on your phone.Step 2: Hit the gear icon at the top right corner of the screen.Step 3: Scroll down to the Storage section and select Clear Cache.Step 4: Confirm your selection in the popup box.
Check your Internet connection
Your Spotify may be pausing because it is taking time to buffer the track. If the song is playing in fits and starts, it is likely due to a faulty Internet connection. Perform a quick speed test to confirm if the Internet connection is the culprit. Toggle the Flight Mode on and off to refresh the network.
Lower the steaming quality
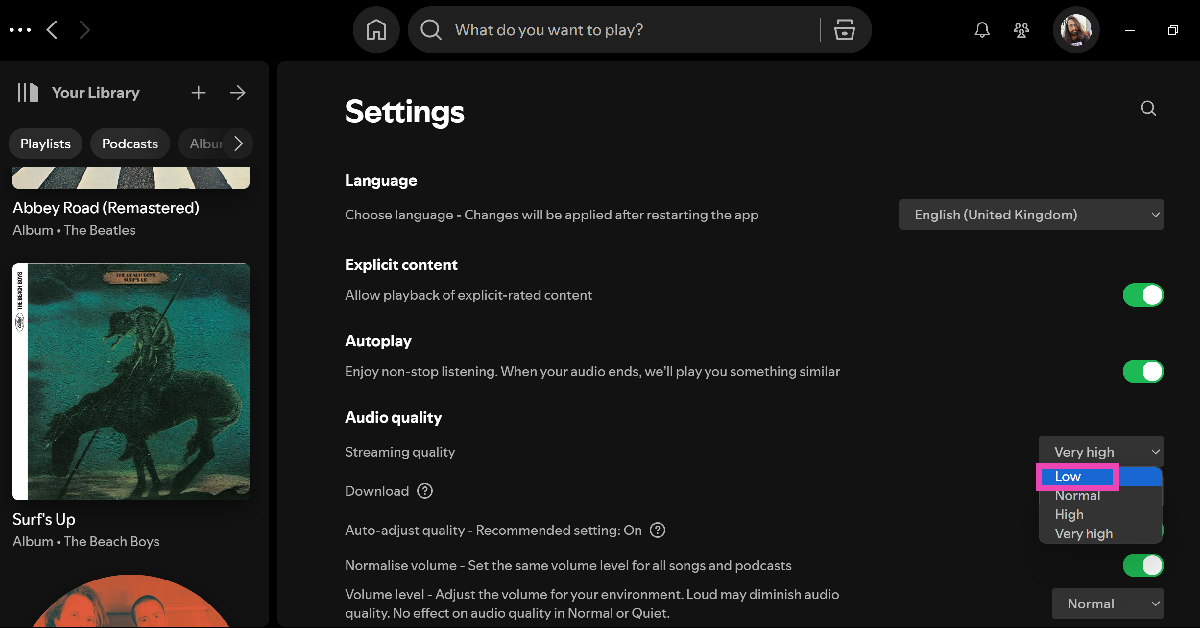
If you’re on a weak internet connection, lower the streaming quality on Spotify to reduce buffering. Here’s how.
Step 1: Launch the Spotify app and tap your profile picture at the top of the screen.
Step 2: Select Settings.
Step 3: Click the dropdown menu next to Streaming quality.
Step 4: Select Low.
Disable hardware acceleration
If you’re using the Spotify app for Windows, disabling hardware acceleration can fix the media playback. Here’s how you can go about it.Step 1: Launch the Spotify app on your PC.Step 2: Click on the ellipses at the top left corner of the screen.Step 3: Move the cursor to View and click on Hardware Acceleration.Step 4: Confirm your selection in the popup box.
Reconnect your wireless headphones
Sometimes, a faulty Bluetooth connection can cause Spotify to randomly pause the song you’re playing. To fix this issue, disconnect your wireless headphones and connect them again. Swipe down from the status bar and long-press the Bluetooth tile in the Quick Settings menu. Tap the name of your wireless headphones to disconnect them. Once they are disconnected, perform a scan for nearby Bluetooth devices on the same window and connect to the TWS again.
Close background apps
A common problem with Android apps is that they continue to play audio even when they are not active. This happens more often when the RAM capacity of a smartphone is limited. When a background app starts playing audio, it causes Spotify to pause the music. Go to the app switcher and close the malfunctioning app.
Update the Spotify app
Usually, app developers are quick to patch any minor issues with an immediate update. If you’re using an older version of Spotify, chances are that the issue you’re facing with media playback has already been resolved in the latest version. Search for the Spotify app in the Google Play Store, App Store, or Microsoft Store (for PC) and hit the Update button.
Restart your phone
It is entirely possible that the issue doesn’t lie with the Spotify app but with your smartphone itself. A quick restart generally resolves any background issues and minor glitches. Launch the Spotify app after restarting your phone to check if the issue has been fixed.
Check if Spotify is down
While it is extremely rare, it is not impossible for Spotify to experience a server outage. If Spotify’s servers are down, the music you’re playing on the app will pause immediately. Head over to the DownDetector website and search for Spotify to confirm whether the app is experiencing a server outage.
Frequently Asked Questions (FAQs)
Why does Spotify keep pausing my music randomly?
The most common reason behind the music randomly pausing on your Spotify app is account conflict with other devices. If you’re logged into multiple devices using the same Spotify account, it can interfere with the music playback. Go to your Spotify account page and sign out of all devices.
Does clearing Spotify’s cache delete the downloaded songs on the app?
No, clearing Spotify’s app cache will not remove your downloads.
This is how you can fix the ‘Spotify keeps pausing the issue’ on your device. If the issue still persists after trying all the fixes mentioned in this article, you may want to reach out to Spotify Support for more help on the issue. Want to know fun insights about your music listening habits? Read this article to find out how to create your own Spotify Iceberg.
In order to keep its existing and attract new ones Twitter which is now known as X has released a new feature. X has introduced the ability to download videos for its Blue subscribers.
For those who are unaware Twitter Blue is a paid service and the company regularly releases new features exclusive to its premium users. According to The Verge, Blue Subscribers now have the option to download videos that other subscribers have uploaded on X for offline use.
Also Read:Now you can send instant video messages on WhatsApp instead of text messages
But there is a catch, there are certain limitations. Firstly there is an age limit, one must be a verified user plus it must be above 18 years old. Your video download setting will be automatically set to OFF if your account is associated with a minor, and you won’t be able to modify it in the settings.
Unless you choose to opt-out by disabling the Allow video to be downloaded option on your video while you are creating your Tweet, videos you submit to Twitter will begin to be downloadable by Verified subscribers as of July 25th, 2023. (Note: Videos posted before the 25th of July 2023 are not downloadable.)
Even if downloads are disabled, Twitter users can still post a link to your Tweet even while they can’t share your videos directly to third-party platforms.
In consideration of privacy, if you’d like to have more control over who can see your Tweets and watch your videos, learn how to change your privacy settings. This can give you added control over your content and who has access to it.
Also Read:Twitter Rebranded: Twitter logo has got a new look, the blue bird logo replaced with an X
In This Article
How to download a video on Twitter
Go to the video you’d like to download.
Tap the three-dot icon in the top right corner.
Tap Download video.
How to opt out of my video being downloadable on Twitter
While composing a Tweet, after uploading a video to your Tweet, tap Edit in the bottom right of your video.
Smartphones can handle just about any routine task, but when it comes to filling PDF docs, most users run out of ideas. Unlike filling out an online form, adding your signature and passport-sized photograph to a PDF form can be tricky since there is no option to upload those files. If you’re looking for a solution to this problem, you have come to the right place. In this article, we show you how to sign a PDF document or form on an Android smartphone using the Adobe Acrobat app.Read Also:OnePlus’s first foldable smartphone teased, confirmed to be called OnePlus Open
In This Article
Use Adobe Acrobat to sign a PDF document on Android
Step 1: Download and install the Adobe Acrobat app on your device from the Google Play Store.Step 2:Sign into Adobe Acrobat using your preferred account. You can even choose to skip this step as the app doesn’t require you to sign in to use its services.Step 3:Open the PDF document in the Adobe Acrobat app.Step 4: Tap the signature icon at the bottom right part of the screen.Step 5: Tap on the pen icon and select Add Signature.Step 6: You can scribble your signature on the screen, but we wouldn’t suggest this unless your smartphone supports stylus input. For better results, tap on Image to upload a scanned copy of your signature from the device.Step 7:Crop the signature and hit Done at the top right corner of the screen.Step 8: Hit Done at the top right corner of the signature editor.Step 9: Now that your signature has been added, you can drag and drop it to the appropriate spot on the document.Step 10: Once you’re happy with the placement of your signature, hit the tick icon at the top left corner of the screen.
Frequently Asked Questions (FAQs)
Can I add a copy of my signature on a PDF document on my phone?
Yes, there are several apps that allow you to add your signature to a PDF document or form. Apps like Adobe Acrobat, Signaturely, and Panda Doc will help you perform this task.
How do I add my signature on a PDF document on an Android phone?
To add your signature to a PDF form on your Android phone, open the document in Adobe Acrobat and upload your signature in the app. Drag and drop this signature in the appropriate signature and adjust its size accordingly.
Can I sign a PDF document on my phone?
Yes, you can sign a PDF form or document on your Android phone using Adobe Acrobat. However, we would only suggest this if your phone supports stylus input. Making your signature on the screen using your finger may not yield the desirable result. Try uploading a scanned copy of your signature instead.Read Also:Galaxy F34 is going to launch in India soon; here is what we know
Conclusion
This is how you can sign a PDF document or form an Android phone using Acrobat Reader. Apps like Signaturely and Panda Doc will also help you carry out the same task. Before you upload your signature on Adobe Acrobat, make sure it is of the ideal size. If your saved signature is not of the appropriate size, get an idea of the dimensions of the signature box in the document and scribble your signature on a sheet of paper accordingly. Scan the paper in the Adobe Acrobat app and add it to your list of signatures.For the latest gadget and tech news, and gadget reviews, follow us on Twitter, Facebook and Instagram. For newest tech & gadget videos subscribe to our YouTube Channel. You can also stay up to date using the Gadget Bridge Android App. You can find the latest car and bike news here.
In a few months, we came across lots of news related to the popular chatting app WhatsApp. In order to make its app more user-friendly the company keeps updating the app or seen testing new features on its platforms. Recently the app rolled out the ability to send short video messages. Using the new feature added to WhatsApp the users can instantly reply on chats by recording a short video in place of text and audio messages. As of now the WhatsApp feature only allows recording and sending video messages having a duration of 60 seconds. Also, Video messages are protected with end-to-end encryption to keep your messages secure.
Meta’s chief Mark Zuckerberg announced, “We’re adding the ability to instantly record and share a video message in your WhatsApp chats. It’s as easy as sending a quick voice message.”
Also Read:Samsung Galaxy Watch 6 and Galaxy Watch 6 Classic Indian pricing announced: Check sale details
WhatsApp’s Instant video messages feature is currently being rolled out and will soon be accessible to all users worldwide in the coming weeks. WhatsApp users will be able to record and share short personal videos directly in the chat. As per the company these real-time video messages are similar to audio messages. These video messages have a maximum duration of 60 seconds. Also, they are allegedly end-to-end encrypted, according to the company.
Also Read:Samsung Galaxy Z Fold 5, Galaxy Z Flip 5 price in India revealed: Availability details inside
The new function allows users to make short videos in real-time and send them instead of text messages, whereas previously they could only respond using instant audio or text messaging. Also sending a video message in chats is as simple as sending a voice message. All you have to do is tap to switch to video mode, and hold to record the video. You can also swipe up to lock and record the video hands-free. Videos will play automatically on mute when opened in a chat, and tapping on the video will start the sound.
For the latest gadget and tech news, and gadget reviews, follow us on Twitter, Facebook and Instagram. For newest tech & gadget videos subscribe to our YouTube Channel. You can also stay up to date using the Gadget Bridge Android App. You can find the latest car and bike news here.


 Step 4: Confirm
 Step 2:
 Step 3:
  Step 4: Confirm
 Step 5: Confirm

")
 Step 2:
 Step 3:
 Step 4:
 Step 2: Scroll down and select Flash notifications.
 Step 3: Turn on the toggle switch for Camera flash.


 Step 2:
 Step 3:
 Step 4:


 2. Tap on the “Start” button to begin the password removal process. Click “Yes” to confirm and proceed with the process.
 3. Follow the next set of instructions to put your phone into recovery mode and reboot the system. After completing the steps, the software will successfully unlock your Android phone.


 Step 1:
 Step 1:
 An additional discount of Rs 1,000 on the day of the purchase, giving a direct cash benefit of Rs 3,000 to pass holders. Customers with
  The Luna Ring has bumps on the inside to

")
 Step 3:
 Step 4:
 Step 4:
 Step 4:
")


 Step 3:
 Step 4:
 Step 5:
 Step 6: Restart
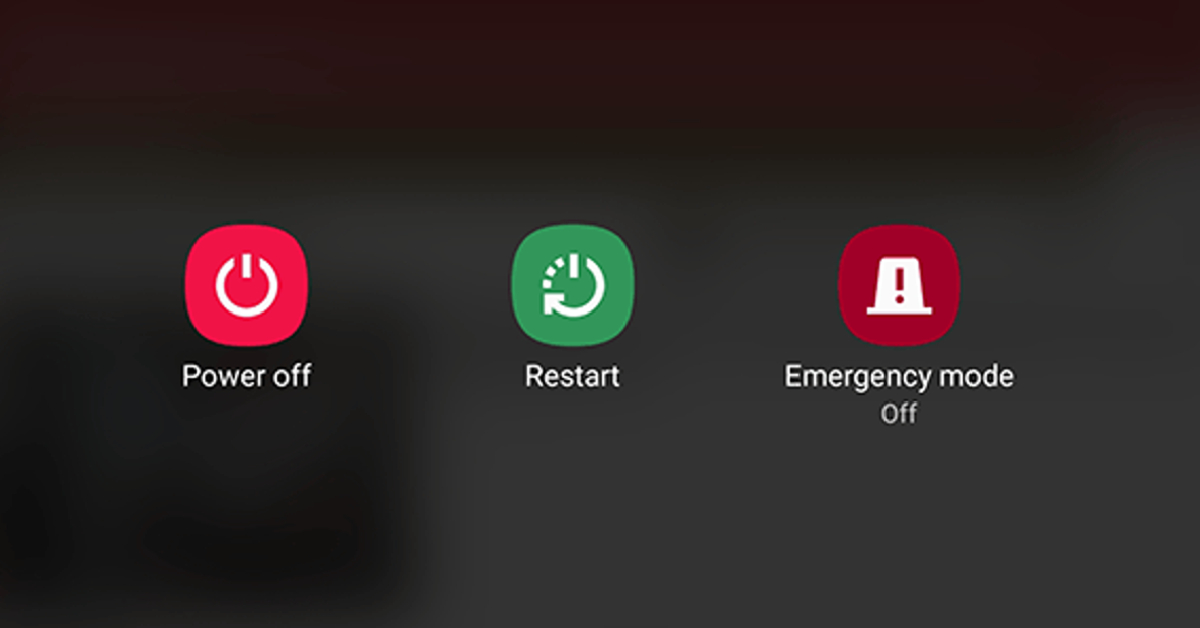 If the proximity sensor is malfunctioning due to a software issue, restarting the smartphone may resolve the problem at hand. Long-press the side key and hit Restart in the power menu. If long-pressing the side key triggers the voice assistant, press and hold it with the volume up button.

 Step 2: Tap on Download and install.
 Step 3: Select Install now.
")
 Step 3:
 Step 4:
 Step 5:
 Step 3:
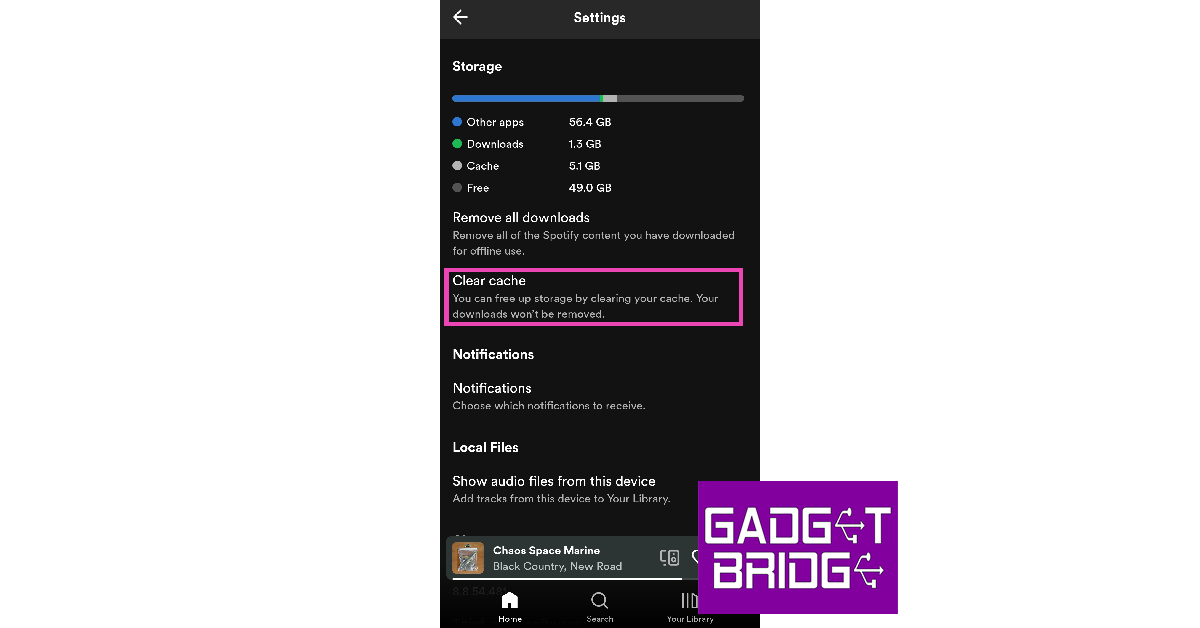 Step 4:
 Step 2: Select Settings.
 Step 3: Click the dropdown menu next to Streaming quality.
 Step 4: Select Low.
 Step 3:
 Step 4:


 Step 5:
 Step 6:
 Step 7: Crop
 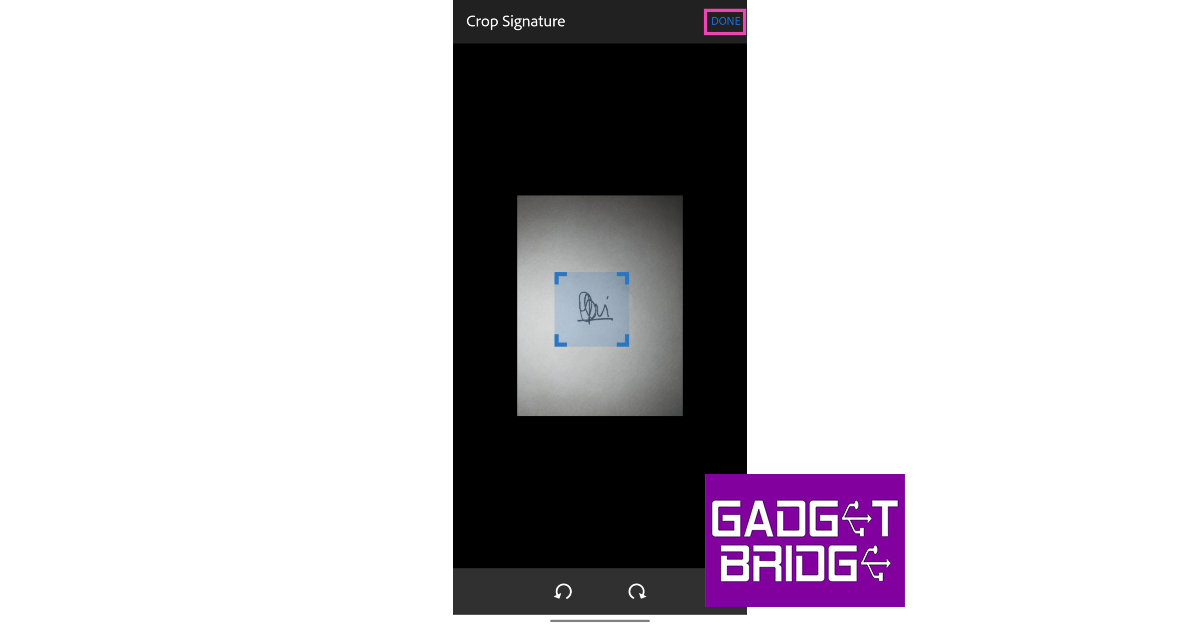 Step 8:
 Step 9:
 Step 10:
