Instagram is one of the liveliest social media platforms on the Internet, but unfortunately, it is also rife with malicious activity. Apart from fake product marketing, it is also common for scammers to directly contact you on the platform. If you’ve ever gone through your Hidden Messages on Instagram, you will know what we’re talking about. In this article, we bring you the top 6 ways to easily protect yourself from Instagram scams. Use these tips and tricks to avoid Instagram scams.Read Also:Canon launches 16 new advanced printers in India: Prices start at Rs 10,325
In This Article
Don’t share your login credentials with anyone
If you’re being scammed by someone on Instagram, chances are they’re going to ask you for your login credentials at some point. Oftentimes, someone may pretend to be from Instagram Security, asking you for your password to verify your profile. You should know that Instagram doesn’t ever approach you for your password. Sharing your password may give scammers access to your account and they may lock you out of it.
Don’t interact with unverified accounts pretending to be large companies
One of the biggest scams on Instagram involves scammers approaching people for modelling work under the guise of a big fashion company. Always be careful while conversing with unverified profiles claiming to be recruitment handles for big companies.
Do not conduct business with unverified sellers
Instagram is a great platform for small businesses to market their product. A lot of people use Instagram to commission artwork and buy artisanal products from small creators. Oftentimes, malicious entities may notice your interactions with small businesses and pretend to sell you a product they do not own. Always make it a point to not do business with unverified sellers as it may lead to you getting scammed out of your money.
Do not click on suspicious links
As a general rule, you should not be clicking on suspicious links anywhere on the Internet. But this applies more so on Instagram. If you go through your hidden messages, you will notice messages containing weird-looking links. These links are most likely phishing scams and are solely created to get your personal information. Sometimes, clicking on these links may also download malware-ridden files on your device.
Keep your Instagram profile private
Public Instagram profiles attract a lot of scammers since they are able to go through all your posts and are able to verify that you are active on the platform. Public profiles also receive a greater volume of messages. If scammers have more information about you, it makes it easier for them to create a scamming scheme for you. To make your Instagram profile private, go to Settings>Privacy and turn the toggle bar on for ‘Private Account’.
Keep an eye out for fake promotions
If you have a decent following on Instagram, chances are you will be approached by brands to market their product. While promoting products can earn you some money, not all promotions are legitimate. Instagram influencers often report not being paid even after promoting a product. It is advised to ask for money upfront when getting into a marketing deal.Read Also:boAt Nirvana Ion wireless earbuds launched at an introductory price of Rs 1,999
Conclusion
These are the six easy ways to avoid getting scammed on Instagram. Use these methods to avoid all kinds of Instagram scams. If you ever do get scammed out of money, the first thing you should do is report the activity to your bank and freeze your account. Next, report the profile on Instagram so the admin staff can take action against the scammers.For the latest gadget and tech news, and gadget reviews, follow us on Twitter, Facebook and Instagram. For newest tech & gadget videos subscribe to our YouTube Channel. You can also stay up to date using the Gadget Bridge Android App. You can find the latest car and bike news here.
Xiaomi’s subsidiary Redmi has launched two new entry-level smartphones today. The Redmi A2 and A2+ smartphones will feature the MediaTek Helio G36 SoC and will come with Android 12 (Go Edition) OS. Android’s Go Edition is a light version of the OS designed for entry-level devices. Xiaomi has not announced the prices for the two smartphones yet.Read Also:boAt Nirvana Ion wireless earbuds launched at an introductory price of Rs 1,999
Redmi A2, A2+: Specs, features, and possible pricing
Redmi A2 and A2+ feature a 6.52-inch IPS LCD display with a resolution of 720 x 1600p. Surrounding the display are thick bezels, with the screen-to-body ratio coming out at 81.0%. Powering the two smartphones is the MediaTek Helio G36 SoC. The smartphones have a fixed internal storage of 32GB and will be made available in 2GB and 3GB RAM variants. OS duties are handled by the Android 12 Go Edition. A microSD slot has been made available on the two phones.The camera panel at the back consists of an 8MP primary shooter along with a 0.08MP depth sensor. Also present is a Dual-LED flash. The 8MP primary camera can record 1080p videos at 30fps. Up front, you get a 5MP selfie camera that can also record 1080p videos at 30fps.Redmi A2 and A2+ get a 5,000 mAh battery which should be enough to provide a full day’s worth of charge. The battery can be charged using a micro-USB cable. There is no USB Type-C port on either smartphone. Both phones can charge at 10W speed. The Redmi A2 and A2+ smartphones do not offer 5G connectivity. Read Also:10 Best ways to Remove Photo Metadata (Windows, Mac, Android, & iOS)While Xiaomi has not revealed the pricing of the two smartphones yet, the A2 and A2+ are expected to cost under Rs 10,000. The only difference between the two phones is the biometric fingerprint which can be found on the back of the A2+. Redmi has not confirmed whether it will launch the two smartphones in India.For the latest gadget and tech news, and gadget reviews, follow us on Twitter, Facebook and Instagram. For newest tech & gadget videos subscribe to our YouTube Channel. You can also stay up to date using the Gadget Bridge Android App. You can find the latest car and bike news here.
One of the key factors in determining the price of a smartphone is its internal storage space. Smartphone makers usually offer 64GB and 128GB variants of a device at an affordable price, while assigning a higher cost to the 512GB and 1TB storage variants. If you’re looking to buy a phone under a strict budget, you can go for a low storage variant while using some tricks to expand the space on your smartphone. In this article, we bring you the top 7 ways to add extra storage to your Android and iOS devices.Read Also:A Guide to Online Privacy: How to Keep Your Data Safe
In This Article
Use a memory card
Unlike iPhones, most budget and midrange Android smartphones come with a dedicated microSD slot as a part of the hybrid SIM tray. You can access this slot by using a SIM ejector tool to pop out the SIM tray. Depending on the smartphone, you can add up to 1TB of extra storage using a memory card. Here is our list of the 5 best microSD cards with high capacity to increase the storage space on your smartphone.
Use an OTG adapter to plug in external storage
If your smartphone does not have a dedicated slot for a microSD card using an external storage device is one of the best ways you can add extra local storage on an Android or iOS device. Using a USB OTG (On-The-Go) adapter, you can link any external storage device to your iPhone or Android smartphone. The official Apple OTG adapter goes for Rs 2,900, but there are plenty of other affordable options around. The downside to using external storage via OTG is that you will have to rely on an extra piece of hardware and constantly transfer data back and forth between your smartphone and external storage. This is why we would suggest using cloud storage before turning to external storage.
Use Cloud Storage
Cloud storage services like iCloud and Google Drive provide an easy solution to the low storage issue on your smartphone. You can use these services to create backups of your personal data and free up some much-needed storage on your device. Filled up your assigned storage on Google Drive already? Try Dropbox and Microsoft OneDrive. The only downside? You can’t access your files on a cloud storage service without an internet connection.
Disable bloatware apps
If you’ve ever taken a look at the storage space of a new phone, you’d have noticed that it is less than what was promised. This is because your phone’s OS occupies a good chunk of the internal storage space. Most smartphones also come with preinstalled bloatware apps that take up internal storage space. One of the first things you should do after buying a phone is to uninstall these apps from the device. This will free up some much-needed storage. To remove an app, go to Settings>Apps>Uninstall. Here is the full guide to deleting apps on your smartphone.
Clear cache
Your smartphone’s cached memory stores all kinds of temporary files for quick access. This increases the speed at which apps work and helps in quickly loading the pages on a web browser. Once you visit a page, your phone will save certain objects on it to the cache, just so it doesn’t have to download them when you revisit the page. Clearing the cache will significantly increase the internal storage of your device. There’s no centralised way to clear all cache on your device. You will need to delete it individually from every app. Here’s how.Step 1: Go to Settings>Apps.Step 2: Choose the App from which you want the cache cleared.Step 3: Click on Storage.Step 4: Click on ‘Clear cache’.The app cache will be cleared in a few seconds, depending on the size of the data stored.
Delete duplicate files
Step 1: Go to Settings and select ‘Battery and device care’.Step 2: Select Storage.Step 3: Scroll down and tap on ‘Duplicate Files’. This is where you will find all the duplicate files on your phone, including images.Step 4: Manually select the duplicate files and delete them.This will boost the internal storage on your smartphone.
Use Lite Apps
Social media apps take up a lot of storage space on your device and keep expanding over time. If you don’t use social media apps outside of the very basic functions, you can use their ‘Lite’ alternatives. Facebook, Messenger, and Instagram have the most popular ‘Lite’ apps that are used by millions of users. A ‘Lite’ app doesn’t occupy too much space on your device, giving you extra breathing space to manage your storage.Read Also:10 Best ways to Remove Photo Metadata (Windows, Mac, Android, & iOS)
Malware, or malicious software, is a piece of code, file, or software that can gain entry into your device and funnel your personal information to malicious entities. It can even plague your device with ads where they don’t need to be and drain the battery quicker than usual. Malware usually infects your system through apps or files downloaded from unverified and suspicious sources. In this article, we bring you the top 7 ways to remove malware from Android and iOS devices.Read Also:10 Best ways to Remove Photo Metadata (Windows, Mac, Android, & iOS)
In This Article
Delete any suspicious apps
Malware creeps into your phone through apps downloaded from suspicious sources (usually outside the Google Play Store and App Store). Google’s app market heavily regulates the apps on its platform. Apps with expired or insufficient security certificates get taken down very quickly. Furthermore, Google Play Protect runs a final safety check on an app before it is downloaded to your device. Not all app markets employ these stringent safety measures, which leaves the door open for malware to gain access to your system. If you notice malware on your device, the first thing you should do is remove any suspicious apps you may have downloaded from shady sources. Removing the source app can remove malware on your Android or iOS device.
Here’s how you can remove an app on Android
Step 1: Go to Settings and select Apps.Step 2: Select the app your want to uninstall.Step 3: Select ‘Uninstall’ from the menu at the bottom of your screen.You can also tap and hold an app icon in the app drawer and select ‘Uninstall’ to remove it from your device.
Here’s how you can remove an app on iOS
To remove an app on your iPhone, simply touch and hold the app on the home screen and tap the ‘Remove App’ option. Select ‘Delete app’ to remove it from your iPhone. You can carry out the same process in the app library to remove any particular application from your iPhone.
Update the OS
With every iteration, your phone’s software is better equipped to handle malware and other malicious entities. Even a small security patch can get rid of the malware plaguing the previous version of the OS. Usually, malware is designed to target old versions of an OS which do not receive any security updates.
Update your Android device
To update your Android phone’s software, go to Settings>Software Update>Download and Install, and check for new updates. If you see any pending updates, download them on your device.
Update your iOS device
To update iOS to its latest version, go to Settings>General>Software Update and download the update. Once installed, restart your iPhone and check if the malware is infecting the system.
Perform a factory reset
A clean wipe of your device will get rid of all the data on it and restore it to the condition it came in when you purchased it. Performing a factory reset is a last-ditch effort which should only be reserved for when the malware has spread to other areas of your device. If uninstalling the source of malware doesn’t fix the issue, a factory reset should be your next move.
Here’s how you can perform a factory reset on an Android device
Step 1: Go to Settings, scroll down and select General management.Step 2: Tap on ‘Reset.’Step 3: Select ‘Factory data reset.’Step 4: Scroll down and tap on ‘Reset.’
Here’s how you can reset your iPhone
Step 1: Go to Settings and select General.Step 2: Scroll down and select ‘Transfer or Reset iPhone’.Step 3: Tap on ‘Reset’.Step 4: In the following window, select ‘Reset All Settings’.Step 5: Enter the Pin and confirm your selection.
Protect your smartphone with a security app
There are tons of security and anti-virus apps that will guard your smartphone against any harmful virus, malware, and other malicious entities. These apps perform routine checks on your device, scanning them for any suspicious files or activity. On top of that, a good security app also scans any file or app your download on your device from third-party sources. McAfee, Norton, and AVG are some antivirus and antimalware protection apps that you can download on your device right now to guard against any malicious activity.
Frequently asked questions
What is malware?
Malware (or ‘malicious software’) is a piece of software that is designed to harm your device and carry out malicious tasks like stealing your personal information or gaining unauthorised access to your system.
How do I remove malware from my phone?
The best way to remove malware from your phone is by deleting any suspicious apps that may have brought it in along with them. You can also perform a factory reset on your device if the malware has spread across the system.
How do I protect myself against malware?
The best way to avoid malware is by avoiding any suspicious third-party app stores and app markets. You can also download a security app like McAfee and AVG on your device to protect yourself against malware.Read Also:Best Way to Transfer Data from Android to iPhone After Setup
Conclusion
These are the top 7 ways to remove malware from an Android or iOS device. To avoid malware from infecting your device, make sure you don’t download apps from unverified or suspicious sources. Oftentimes, modded apps carry a lot of malware with them, which can plague your device with ads and funnel your personal information. For the latest gadget and tech news, and gadget reviews, follow us on Twitter, Facebook and Instagram. For newest tech & gadget videos subscribe to our YouTube Channel. You can also stay up to date using the Gadget Bridge Android App. You can find the latest car and bike news here.
If you’re in the market for a new smartphone, you’re probably looking for a device that can easily last you a day. When looking for phones with a long(er)-lasting battery life, it is easy to get caught up in battery capacity specs. After all, a big battery would mean a greater backup, right? Well, the answer isn’t so straightforward. While battery capacity plays a huge role in how long your phone lasts on a single charge, it is not the only determining factor.Samsung’s Galaxy M Series, known for its superior battery backup, offers smartphones with up to 6000mAh battery capacity. On the other hand, its flagship smartphone, Samsung Galaxy S23+, offers a similar (if not better) battery performance with a 4,700mAh unit. So, which factors determine the battery performance of a smartphone and why do phones with big batteries often offer average battery life? Let’s find out.Read Also:The 6 Best Laptops for College Students
In This Article
Processors and internal hardware matter more than you think
A good processor is one of the big reasons why flagship smartphones offer a better battery life with a smaller battery unit. Every new crop of chipsets offers more efficiency and the ability to make better choices in order to increase the battery life of the device. Even small updates to the SoC can significantly increase the battery performance. Last year, Snapdragon 8+ Gen 1 was 30% more power efficient than the Snapdragon 8 Gen 1 SoC. 2023’s flagship SoC, Snapdragon 8 Gen 2 is already an improvement from the previous generation.The internal cooling system of a smartphone is another piece of hardware that plays a pivotal role in extending its battery life. Internal heating leads to a greater loss of energy, which means a lower battery backup. Smartphones like OnePlus 10T and Asus ROG Phone are able to maximize battery backup with their superior cooling systems.
Power-hungry displays lead to a greater battery drain
Your smartphone’s display is one of the biggest consumers of power on the device. Larger displays consume more power, which is generally balanced out by a bigger battery. A smartphone’s battery life is typically gauged by its ‘screen on time’ due to this very reason. The choice of a display panel can affect the battery life of a smartphone by a significant margin. Midrange and budget smartphones generally come with LCD displays, which are extremely power-hungry. In comparison, OLED displays consume less battery while producing better results. The display’s refresh rate is also a big factor in how quickly the battery gets drained. If you use your phone on the maximum refresh rate setting, you will notice that it runs out of power fairly quickly. A 120Hz refresh rate display will not last as long as a 90Hz or 60Hz display with the same screen-on time.
Is your phone’s software making smart choices?
The OS running on your device can boost the battery backup by killing off background apps and tasks, which would otherwise slowly drain the battery. A well-optimised software is able to make these smart choices. It is also a good idea to keep a check on your phone’s background tasks and record which apps use the most power.
5G connectivity can demand more from your phone
Users who have just made the switch to 5G can attest that high-speed connectivity comes at a price. While using a 5G network, your smartphone is capable of consuming up to 20% more power. Newer processors are able to tackle this issue, to the point that it is not an immediate concern. But if you’re looking to extend the battery life of your device, switching back to 4G will certainly help.Read Also:Sennheiser launches Profile USB Microphone in India, prices start at Rs 10,900
Canon has launched a new range of 16 advanced printers in India today, with prices starting at Rs 10,325. These printers will be new additions to the PIXMA, MAXIFY, and imageCLASS series. Canon’s new range of printers caters to diverse audiences across SOHOs, SMEs, Corporates, and Home consumers. Read Also:Sennheiser HD 660S2 headphones launched in India at Rs 54,990
Canon’s new range of printers comes with advanced security and encryption features
Canon’s PIXMA Series of printers is designed for home and SOHO (Small Office/Home Office) use. The newly launched PIXMA G1730, G1770, G2770, G2730, G3770, G3730, and G4770 are ideal for home usage, offering easy ink refilling and huge ink reservoirs. The PIXMA series produces high print yields, maximizing productivity and keeping operational costs affordable. PIXMA G1730, G2730, and G3730 now come with GI 71 ink bottles. For moderate usage, users can opt for low-cost ink refill bottles that deliver up to 3,900 black-n-white pages and 4,600 colour pages. For high printing capacity, users can opt for standard ink bottles that deliver up to 7,600 black-n-white pages and 8,100 colour pages. Canon GX4070The MAXIFY Series of printers are suited for small and medium businesses. These printers produce water-resistant printers and keep the cost of operation under budget. These printers also come with a refillable ink tank system to achieve maximum productivity.For a more corporate setup, Canon’s imageCLASS Series is designed to do all the heavy work. The newly launched imageCLASS LBP121dn, LBP122dw, MF271dn, MF272dw, MF274dn, and MF275dw improve productivity with their high-speed printing up to 29 pm, auto-duplex printing, and compact size. These printers use an all-in-one cartridge that can be replaced easily and results in lower downtime.Sharing his thoughts on the big announcement, Mr Manabu Yamazaki, President & CEO, Canon India said, “The fast-changing hybrid landscape across sectors have led to significant infrastructural transformations, fueled by advancements in technology. Taking cognizance of these evolving market requirements, we are excited to introduce 16 new state-of-the-art printers; which offer a perfect blend of modern technology and cost-efficiency for users, building on Canon’s long standing legacy of innovation and customer delight. With this portfolio expansion, we want to fortify the printing culture amongst users by providing them with solutions that add value to their work in this current hybrid working environment, hence giving them more reasons to print. We are confident that our new products will empower our customers in their business journey and thereby help us in clocking a 30% market share in the industry.”Read Also:Nothing Ear (2) launched at Rs 9,999, gets Dual ConnectionHere is the full price list of all the new 16 printers launched by Canon India. These printers will be made available on April 1.
Audio brand boAt has launched the new Nirvana Ion wireless earbuds at a special introductory price of Rs 1,999. Expect the price of the TWS to be bumped once the launch offer ends. With the launch of Nirvana Ion, boAt also kicked off its ‘Next Big Thing’ campaign which will see the audio brand giving the spotlight to up-and-coming personalities and influencers – Cyrus Khan, Ambika Nayak, Johanna Rodrigues, and Sabareesh S.Read Also:Nothing Ear (2) launched at Rs 9,999, gets Dual Connection
boAt Nirvana Ion: Specifications and more
boAt Nirvana Ion offers Crystal Bionic Sound powered by HiFi DSP. This improves sound optimisation and provides an immersive listening experience. The TWS comes with two EQ Modes – boAt Balanced Sound and boAt Signature Sound. The audio is delivered by 10mm dual drivers.The case of the Nirvana Ion is ergonomically compact and easy to carry around anywhere you go. The earbuds offer in-ear detection, which enables them to pause the music whenever they are pulled out of the ear. The Nirvana Ion was designed in-house at boAtlabs.boAt Nirvana Ion also employs ENx Technology which uses the Quad Mics on the earbuds to reduce the ambient noise and provide a crystal clear sound during voice calls. The earbuds are able to isolate your voice from the background noise during calls and are able to relay it efficiently. Apart from that, the boAt Nirvana Ion also sports a 60ms low latency mode for gaming.With a 70mAh battery on each earbud and an additional 600mAh in the charging case, the boAt Nirvana Ion is able to provide a total backup of 120 hours. On a full charge, the earbuds can last up to 24 hours. With ASAP charging and fast-charging USB Type-C, the Nirvana Ion can be fully charged in 2.5 hours. The TWS is rated IPX4 for dust and water resistance.Read Also:How to Add Shapes to PDF With and Without Adobe Acrobat?boAt Nirvana Ion can currently be purchased at an introductory price of Rs 1,999 from the official boAt website, Flipkart, Amazon, and Myntra. The TWS earbuds are also available at select physical retail stores – Vijay Sales, Croma, and Reliance Digital. boAt Nirvana Ion is available in two colours – Ivory White & Charcoal Black, and comes with a 1-year warranty.For the latest gadget and tech news, and gadget reviews, follow us on Twitter, Facebook and Instagram. For newest tech & gadget videos subscribe to our YouTube Channel. You can also stay up to date using the Gadget Bridge Android App. You can find the latest car and bike news here.
In today’s data-driven society, protecting your personal information is like wearing a helmet on a bike. Sure, you may not always need it, but when you do, it can save you from a lot of pain and frustration. As technology advances, so does the need to safeguard your online presence. Unfortunately, the digital sphere is rife with malicious threats and fraud attempts.
In This Article
Why Online Privacy is Important
Protecting your online privacy is essential in today’s digital world, as hackers can exploit your personal information for some seriously shady activities, from identity theft to financial fraud, and even physical harm. Online privacy violations are unfortunately all too widespread. Do you remember the Facebook controversy from 2018 where an outside consultancy firm obtained the personal information of up to 50 million users? What about Target Corporation’s 2013 data breach, which exposed the banking information of around 40 million customers? These incidents highlight the importance of online privacy and the potential consequences of poor privacy practices.
Furthermore, with online betting and gaming becoming increasingly popular, protecting your privacy is particularly important when using these platforms. You typically have to provide extremely private information, like your name, address, and credit card information, especially in the case of online casinos, where you deal with financial data. Keeping those data secure will allow you to fully enjoy the excitement and fun of any digital experience while ensuring your peace of mind.
Tips for Protecting Your Online Privacy
The good news is, there are several steps you can take to protect your online privacy, 10 of which are outlined as follows:
Keep Secure Passwords. Keeping your online data secure requires a strong password, as weak or obvious passwords are easier to guess. Make sure your passwords are unique and enable two-factor authentication whenever possible.
Use Two-Factor Authentication. Two-factor authentication adds another layer of security by requiring another verification method in addition to your password, such as a code sent to your phone number or email address. Enabling two-factor authentication where possible is one of the easiest ways to protect your online privacy.
Use a Virtual Private Network (VPN). Several surveys have shown that people primarily use personal VPNs to enhance their online security. According to a Forbes report, around 80% of VPN users employ them for data protection purposes. With a VPN, your data is safe since it is encrypted and directed through secure servers. This makes it extremely difficult for hackers and other malicious individuals to access your sensitive information.
Install antivirus and anti-malware software. Antivirus software can protect personal data online by detecting and removing malicious software like viruses and malware. In addition to providing extra security features, antivirus software often includes firewalls and password managers. Read about GadgetBridge’s top anti-virus picks to choose the antivirus software best suited to your needs.
Use ad blockers and privacy extensions. Ad blockers are browser add-ons that help safeguard your private information by prohibiting trackers, adverts, and other invasive features. Ad blockers not only stop ads and pop-ups, but they also speed up web page loading times and enhance security when browsing. Additionally, there are numerous privacy-focused Chrome and Firefox extensions that help safeguard your data from being monitored or gathered without your consent.
Follow public Wi-Fi safety advice. Only use HTTPS websites when connected to public Wi-Fi, since these sites encrypt your data and help keep you safe online. Also, restrict your use of Airdrop and file sharing when in public, as they can leave your device vulnerable to hackers and malware. Lastly, avoid entering sensitive information, such as passwords or bank accounts, when using public Wi-Fi.
Control your social media privacy settings. When you control your privacy on social media, you can restrict who sees what you share publicly. You can effectively reduce the possibility of unauthorized access to your data by restricting the visibility of your profile, posts, and personal information.
Follow email safety tips. Keeping your email software up to date, avoiding using your email platform on public Wi-Fi networks, and reporting suspicious emails as spam, are crucial when protecting yourself and your data online.
Back up your data to a trusted device or cloud storage solution. Backing up your data can help protect you from data loss due to hardware failure, malware, and ransomware attacks. Additionally, you can restore earlier versions of your files and guarantee the availability of your important data whenever and wherever you require it.
Employ encrypted messaging and email services. With encryption, your messages are unreadable to external sources. Use encrypted messaging services like Signal and WhatsApp to safeguard your privacy and maintain the confidentiality of your messages. To enhance email security, many email service providers also offer encryption. For example, Gmail’s network-level encryption adds an additional layer of security to protect user data.
Additional Resources for Protecting Your Online Privacy
Protecting your online privacy is becoming increasingly important in today’s digital age. Fortunately, there are endless resources available to keep you well informed in taking steps to safeguard you and your personal information online. Digital Guardian has compiled a list of online resources that you can use to increase your online privacy and data protection. By adhering to the advice provided in this guide, as well as taking advantage of the numerous resources available to protect yourself, you can ensure that your online personal information is as secure as possible.
For the latest gadget and tech news, and gadget reviews, follow us on Twitter, Facebook and Instagram. For the newest tech & gadget videos subscribe to our YouTube Channel. You can also stay up to date using the Gadget Bridge Android App. You can find the latest car and bike news here.
When you click an image, your phone does more than just take a picture of the subject. While shooting a picture, your smartphone records additional data like your phone’s model number, date and time of clicking the photograph, exact coordinates of the location, and your camera’s configuration (aperture, shutter speed, etc.) while taking the photo. This group of data about the image is collectively referred to as ‘EXIF data’ or ‘metadata’. While sharing an image online, you are also sharing its metadata along with it. If you’re not comfortable with that, you can easily remove the metadata from an image before sharing it. In this article, we bring you the 10 best ways to remove photo metadata on Windows, Mac, Android, and iOS.Read Also:Interviewed: We talk to Anku Jain, Managing Director, MediaTek India, what the 2023 roadmap looks like
In This Article
How to remove Photo Metadata on Android
While there is no native way to remove the EXIF data of an image on Android, you can use a third-party app to carry out the task. There are also a few additional ways you can prevent the camera app from tagging your location in the pictures you shoot.
Use the Photo EXIF Editor app
Step 1: Download and install the Photo EXIF Editor app from the Google Play Store.Step 2: Launch the app and select ‘Photos’.Step 3: Select the picture from which you want to remove the metadata.Step 4: Tap on the EXIF icon with a strikethrough across it. You will find it at the top right section of the screen.Step 5: Select the information you want to remove from the metadata of the image. If you simply want to remove the location tag, tap the check box next to ‘Geolocation’. If you want to remove all metadata, tap the check box at the top.Step 6: Tap on the save icon at the top right corner of the box to remove the photo metadata.
Remove location data before sharing an image
This is as close as it gets to a native way of removing photo metadata on your Android device. Before sharing an image with a contact, your Android smartphone gives you the option to remove the location tag from it. Here’s how you can share an image without the location data.Step 1: Open the image gallery on your phone and select the image you want to share.Step 2: Tap on the Share icon.Step 3: Tap on ‘Options’ next to ‘Location data included’.Step 4: Turn the toggle bar off for ‘Include location data’ and ‘Include all image and video data’.
Disable location tagging from the Camera app
Your Android phone may not let you remove the EXIF data from a photo, but if all you’re worried about is your location being recorded, you can easily disable location tagging from the camera app on your phone. Here’s how.Step 1: Launch the Camera app on your phone.Step 2: Open Settings. Step 3: Turn the toggle bar off for ‘Location tags’.
Remove the Camera app’s location permission
Removing the location permission from the Camera app is another way of preventing it from tagging your location on images. Here’s how you can do it.Step 1: Go to Settings and select Apps.Step 2: Select the Camera app and tap on ‘Permissions’.Step 3: Tap on ‘Location’.Step 4: Select ‘Don’t Allow’.
How to remove Photo Metadata on iOS
Like Android, iOS devices do not have a native way to remove photo metadata either. Here are some other ways to carry out the task.
Use the Exif Metadata app
Step 1: Download and install the Exif Metadata app on your iOS device.Step 2: Give the app the necessary storage permissions.Step 3: Select the image from which you want to remove the metadata.Step 4: Tap on ‘Edit’ at the top right corner of the screen.Step 5: Select ‘Remove Exif’ to clear all metadata from the image.
Remove location data before sharing an image
Step 1: Launch the Photos app and select the image you want to share.Step 2: Select the ‘share’ option.Step 3: In the following window, tap on ‘Options’ next to ‘Location included’.Step 4: Disable the toggle bar for ‘Location’ and ‘All photos data’.
Remove location permission for the Camera app
Step 1: Go to Settings and select ‘Privacy & Security’.Step 2: Tap on ‘Location Services’.Step 3: Select Camera.Step 4: Under the ‘Allow location access’ section, select ‘Never’.
How to remove Photo Metadata on Windows
Unlike Android and iOS, your Windows device offers an easy native way to remove metadata from your images. Here’s how you can go about it.Step 1: Select the image from which you want to remove the metadata and right-click on it.Step 2: Click on ‘Properties’.Step 3: Go to the Details tab and click on ‘Remove Properties and Personal Information’ at the bottom of the box.Step 4: You can choose to create a copy of the file without the metadata or simply remove the metadata from the original image.Step 5: Click on the properties you want to remove the image. To clear all metadata, click on ‘Select All’.Step 6: Click on ‘OK’. The metadata will be removed from the photo.
How to remove Image Metadata on Mac
Step 1: Open the image in Preview.Step 2: Click on Tools and select Show Inspector.Step 3: Click on the ‘i’ tab.Step 4: Go to the GPS tab and select ‘Remove Location Info’.
Remove Image Metadata using ImageOptim
As you can probably guess by now, you cannot remove the entire metadata of an image on Mac. You can only strip the image of its location info. In order to remove the entire metadata, you will need to use a third-party tool like ImageOptim. Step 1: Download ImageOptim for Mac from its official website. Step 2: Once installed, go to the app’s preferences and select the option to strip PNG and JPEG metadata. Step 3: Now, simply drag the image to the ImageOptim tool to remove its metadata.Read Also:How to Add Shapes to PDF With and Without Adobe Acrobat?
iPhone has always been a tempting purchase for millions and trillions of Apple lovers out there. These remain in pursuit of newer and even newer versions, getting them as soon as the company launched those. But one thing that most of them stuck with is how to transfer data to new iPhone.
Have you finished your iPhone setup without transferring data from Android to iPhone? No need to worry; there are ways by which you can transfer data from android to iPhone after setup, and we have explained them all in our comprehensive article on how to transfer data to a new iPhone. So, without further delays, let’s get into it!
In This Article
Before Transfer Data Tips
Here are some before-transfer data tips that you must stick consider before looking for the answer to how to transfer photos from Android to iPhone after setup!
Ensure Your Devices has at Least 75% Charging.
Both your iPhone and Android must be charged over 75%. It’s natural for mobile devices to get heat up, draining up their charging quicker during data transfer.
Double-Check: How Much Data Are You Moving?
This is a must-thingy, as your iPhone might not have enough space to receive each and every transferred file. Therefore, organize your android data, analyze what’s crucial to be transferred, what you can place in the external drive, and what should be removed before you move to iOS after setup.
Connect to Stable and Secure Wi-Fi Connections
Most of the data transfer methods are wireless, so you will have to ensure that you are connecting your devices to a stable internet connection. This will free you from loads of hassle!
Best 4 Ways to Transfer Data from Android to iPhone After Setup
Let’s now hop onto the best four ways by which you can get answers to how to transfer photos from Android to iPhone after setup!
Method 1: How to Move Data from Android to iPhone After Setup via Move to iOS
Apple has developed an app, namely, Move to iOS, that’s used to move data from Android to iPhone after setup and even before that. Here is what you have to do to get your job done via Move to iOS:
Step 1: Erase your iPhone
Grab your iPhone, unlock it, and navigate to Settings.
Scroll down to the spot and click the Reset option.
Select Erase All Content and Settings, followed by selecting Erase Now.
Insert your device’s password and Apple ID password.
Wait for a while until the entire device is erased.
Step 2: Enable Move Data from Android
Power ON your iOS device and insert your SIM card.
Connect to a stable internet connection and go with the on-screen instruction, setting up your iPhone until the Apps & Data interface pops up.
From the Android option on Apps & Data interface, choose Move Data.
Download, install, and launch the Move to iOS on Android and hit Continue.
Agree to the Terms and Conditions and select Next.
Get a digital code on your iPhone by hitting Continue.
Enter the received code on your Android.
Select data to transfer and hit Next to successfully move to iOS after setup.
Note: To transfer from Android to iPhone after setup using Move to iOS, you have to erase your setup first. That’s the key factor for successfully answering the query can you transfer data from Android to iPhone after setup.
Method 2: How to Move Data from Android to iPhone After Setup via A Transfer Assistant
If, for any reason, the Move to iOS app isn’t working, you can always get help from a third-party transfer assistant. We suggest you try out Tenorshare iCareFone iTransGo! It’s the ultimate iOS setup assistant move data from Android. With it, you cannot only transfer data android to iPhone after setup but can also move data from iOS to Android, iOS to iOS, and Android to Android.
Following are some of the key features of Tenorshare iCareFone iTransGo. Let’s have a look!
Enables transferring data from Android to iPhone without reset
Allows switching from 8000+ android devices to iPhone
Lets the users selectively transfer data instead of a full restore
Compatible with the recently launched iOS16 and android 13
How to use Tenorshare iCareFone iTransGo?
Here is how you can use Tenorshare iCareFone iTransGo to move to iOS after setup:
Step 1: Connect Devices
Download and install the software from the original website. When done, launch it and connect it to both of your devices.
Step 2: Choose Data to Transfer
Proceed with selecting the data files that you wish to transfer from Android to iPhone after setup.
Step 3: Wait Until Done
Wait for a while, and that’s it! Your selected data has been transferred to your iPhone. Isn’t it too simple and convenient?
Method 3: How to Move Data from Android to iPhone After Setup via E-mail
The next convenient and free method to answer the query about can you transfer data from Android to iPhone after setup positively is via E-mail. Although it is a secure transfer method, its con can’t be overlooked. Its transfer speed is slow, and some users may find the process complicated. However, this is still the best means to transfer contacts, e-mails, and calendars.
Here is what you will have to do:
Navigate to your Android Settings and move to Account.
Proceed with enabling Gmail and the sync feature, followed by sync calendar and contacts.
Hit Sync Now to begin syncing contacts and calendars.
Now go to Settings > Mail > Add Account > Google mail on your iPhone.
Insert your Gmail account credentials and hit Next.
Enable Contacts and calendar and hit Save. That’s it! Your contacts and calendar must be synced to your iPhone by this last step.
Method 4: How to Move Data from Android to iPhone After Setup via iTunes
iTunes is another reliable means to sync your photos to your iPhone. Millions of iPhone users use it for transferring data from Android.
Note: You must first export your photos from Android to utilize iTunes to transfer data. Here is how you can export your images from an Android device using iTunes:
Connect your Android mobile to a computer.
Right when the AutoPlay window appears, click on it.
Hit Import photos and select the images you want to transfer. You can also customize the storage path if you desire.
Run the latest iTunes and proceed with syncing your photos with your iPhone. That’s it!
Benefit Tips
Let’s now have a look at some beneficial tips that will surely help you answer the query of how to transfer photos from Android to iPhone after setup.
How to Transfer Contacts from Android to iPhone Quickly?
Are you looking for a way to transfer contacts from Android to iPhone quickly without opting for the E-mail method? We suggest using Tenorshare iCareFone iTransGo. With it, you can transfer your contacts from one phone to another in a matter of a few seconds.
Can I Recover Android WhatsApp Messages without Backup?
Yes, you can conveniently do so with the Tenorshare UltData for Android! This amazing software aids you in recovering android WhatsApp messages without any root or backup. You can also use it to download and view WhatsApp backup from Google.
Can You Transfer Data from Android to iPhone without Resetting?
Yes, you can transfer data from Android to iPhone without resetting if you mistakenly performed the setup first. Although we have mentioned multiple ways to do so, the best one to rely on is the Tenorshare iCareFone iTransGo.
Summary
That was all about the methods you can opt for to answer the queries like can you transfer data from Android to iPhone, how to transfer data to a new iPhone, how to use the Move to iOS after setup, and more. If you have any problem, you can share it with us in the comments section below; we will come up with detailed answer guides as soon as possible. Stay blessed!
Be sure to check out Tenorshare and its range of valuable products, as these come in handy when one loses hope of fixing some common and even rare issues!
For the latest gadget and tech news, and gadget reviews, follow us on Twitter, Facebook and Instagram. For the newest tech & gadget videos subscribe to our YouTube Channel. You can also stay up to date using the Gadget Bridge Android App. You can find the latest car and bike news here.
Of course, the choice of laptops for college won’t magically make your obligations disappear. No laptop will ever write your papers for you, but you can use it to find an essay writer and say ‘write my paper’. Students do this all the time today. They go to a professional essay writing service they trust, order a paper, and submit it as their own. This is a way to meet a short deadline and ensure you get a high grade – without anyone knowing you didn’t write on your own.
While the laptop won’t write papers for you, if you choose one of the best college laptops based on your needs, there’s a lot you can benefit from. You can use it to study, communicate with friends, install apps and tools you need, and much more.
Now without any further ado, let’s take a look at the top options of the best laptop for college students.
In This Article
1. MacBook Air M1
If you have a higher budget and would like to get optimal performance, this is our top choice for you. MacBook Air 2020 has an M1 integrated CPU, RAM of 8 or 16GB, and storage of up to 2TB.
The MacBook Air M1 is priced at around $1000. This price mixed with an amazing performance and a long battery life will give you a bang for your buck. It’s pin-drop silent because it doesn’t have a fan and is cheaper than the Pro version, not to mention lightweight and easily portable.
2. Acer Swift 5
In case you are more of a Windows fan, this is an excellent option for you. The Acer Swift 5 uses Intel Core i7-1260P CPU and has RAM 16GB. It’s lightweight, looks amazing, and its 1TB SSD is ultra-fast.
Acer Swift also has a long battery life and a reasonable price tag.
3. Apple MacBook Pro M2
The Apple MacBook Pro M2 costs more than the first option in this list but is richer in features and performance. It has an integrated CPU, 16GB RAM, and up to 2TB of storage.
If you are a gamer, the battery life (over 18 hours) and fast SSD make this an excellent choice. It also has a high-quality webcam and a very comfortable keyboard.
4. HP Spectre x360 13.5
Featuring a sturdy, yet elegant design, the HP Spectre laptop is one of the students’ favourites. It has 16GB RAM and uses 12th Gen Intel Core 17 CPU. This is a lightweight laptop with long battery life and an amazing 3:2 aspect ratio OLED touchscreen.
That’s not your only option, though. The touchpad is also very sleek and comfortable and the device has a nice selection of ports, which is a pro over the Apple products in this list. While it doesn’t have the same top-notch performance, it comes at a lower price, which is great for those on a limited budget.
5. Lenovo Legion 5i Pro
Lenovo has been one of the best software companies for a long time now, and their Legion 5i Pro is very popular with students who are also gamers. This device uses Intel Core i7-12700H CPU and has 16GB RAM. It is stylish, has a gorgeous display, and has fierce performance. While its camera is not the best, the Lenovo Legion 5i Pro has many ports and a decent battery life.
Gamers are real fans of this laptop because it’s not overly priced and yet, it has great thermal performance, a comfortable keyboard and touchpad, and a gorgeous display.
6. Asus Zenbook 14 OLED
If you are looking for a thin, light laptop with a more affordable price, this is a great option for you. The ASUS laptop has an Intel Core i5-1240P CPU and 256 GB SSD. The battery life is tested at 10.5 hours, so you can do a lot of work on it.
Compared to other ultrabooks that cost over a thousand, the Asus Zenbook can be found at a price between $700 and $800.
The newly launched iQOO Z7 5G has garnered the most single-day sales for any budget (Rs 15-20k) smartphone on Amazon in 2023. The Z7 is iQOO’s first India-exclusive smartphone. Launched on March 21, the iQOO Z7 is available in two variants – 6GB + 128GB and 8GB + 128GB. Buyers can also avail certain bank offers to bring the price down by Rs 1,500. The smartphone is available for purchase on Amazon and the iQOO e-store. Here’s the price list for iQOO Z7.Here’s what the full price list for iQOO Z7 looks like.
The iQOO Z7 offers a bunch of ‘first in segment’ features. These include a 64MP camera with OIS and a 1300-nits Super AMOLED display. The Z7 is also the slimmest smartphone in its price category, with a thickness of just 7.8mm. The smartphone comes in two colour options – Norway Blue and Pacific Night.Segment-defining specs aside, the iQOO Z7 is powered by the MediaTek Dimensity 920 5G SoC, which scored 486916 points on the AnTuTu Benchmark test. Extended RAM 3.0 is capable of boosting the Z7’s RAM capacity to 16GB. iQOO claims the Z7 can offer a lag-free usage experience with up to 27 apps running in the background. The smartphone is equipped with a 4,500 mAh battery and comes with 44W fast charging support. With fast charging enabled, the Z7 can juice up from 1-50% within 25 minutes.Apart from the 64MP primary shooter, the Z7 also gets a 2MP depth sensor in the rear camera module. The 64MP camera is capable of recording 4K videos at 30fps. Upfront, the 16MP selfie camera is housed in a waterdrop notch.“With every Z series launch, we have seen some remarkable milestones and once again we are truly overwhelmed with the unprecedented response by our consumers for the latest iQOO Z7 5G. This is a testament of the brand’s commitment to provide the best in class smartphone experience wrapped in segment’s best innovation for its performance-seeking consumers. This continued success for the smartphone validates our consumers’ trust in our products and services, making our smartphones a preferred choice for the consumers over competition in the segment. We aim to keep up to our consumers’ expectations with innovative products, exciting offers and provide them with unparalleled smartphone experiences” said Nipun Marya, CEO, iQOO India.Read Also:OnePlus 11R Review: Comeback season for OnePlusAs mentioned earlier, the iQOO Z7 can be purchased from Amazon.in and the iQOO e-store at a starting price of Rs 17,499 (after bank offers). The smartphone is made in India at Vivo’s facility in Greater Noida. In terms of customer support, iQOO currently has over 650 service centres across India.For the latest gadget and tech news, and gadget reviews, follow us on Twitter, Facebook and Instagram. For newest tech & gadget videos subscribe to our YouTube Channel. You can also stay up to date using the Gadget Bridge Android App. You can find the latest car and bike news here.
Designed for podcasters, streamers, and gamers, Sennheiser Profile USB Microphone has been launched in India. The table stand version of the microphone is priced at Rs 10,900 while the Profile Streaming Set with a 3-point self-locking boom arm fetches Rs 15,999. The microphone is exclusively available on Amazon.Read Also:ASUS ProArt Mouse MD300 launched at Rs 8,499
Sennheiser Profile USB Microphone combines professional-grade sound with direct accessibility of functions
The award-winning KE10 condenser capsule remains the driving force behind the Sennheiser Profile USB Microphone. The cardioid pickup pattern of this condenser reduces the noise coming from the rear, giving more focus to the speaker’s voice. The microphone records with optimum clarity and warmth when placed within 15cm (6in) from the mouth (or sound source). Sennheiser Profile USB Microphone offers plug-and-play functionality with Apple, Android, and Windows devices. All you need to do is plug in the mic to the USB-C port of your device and you’re ready to go.The Profile USB Microphone features a clean, minimal design. At the front, you get four controls – a soft-touch no-noise mute button, a gain control for microphone volume, a mix control to set a balance between the input voice and computer/tablet’s audio, and finally a volume control for headphone monitoring. The 3.5mm socket for the headphones is placed at the back of the Profile mic.The LED ring lights around the controls denote the working status of the microphone. A green light around the gain control means that the microphone is functional. When this light turns yellow, it means the microphone is clipping and its volume needs to be reduced. Muting the microphone lights up the red LED around the mute button and the gain control.The Sennheiser Profile USB Microphone comes with ⅜” and ⅝” connectors at the bottom which allow the mic to be used with any third-party table stand. The Profile Streaming Set (available at Rs 15,999) comes with a 3-point self-locking boom arm.Sharing his excitement around the launch of the Profile USB Microphone, Mr Vipin Pungalia, Country Manager and Director- Sales Pro Audio at Sennheiser India said, “At Sennheiser, we understand the evolving needs of content creators in the digital age. Our Profile USB Microphones are a testament to our commitment to providing reliable and high-quality audio equipment to podcasters, gamers, and streamers. We have invested in the latest technology and materials to deliver exceptional sound quality, durability, and design, ensuring that our users stand out with ease.”Read Also:OnePlus 11R Review: Comeback season for OnePlusAs mentioned earlier, the Sennheiser Profile USB Microphone is available exclusively on Amazon. With its simple design and ease of accessibility, the Profile Microphone will appeal to streamers, content creators, podcasters, and gamers.For the latest gadget and tech news, and gadget reviews, follow us on Twitter, Facebook and Instagram. For newest tech & gadget videos subscribe to our YouTube Channel. You can also stay up to date using the Gadget Bridge Android App. You can find the latest car and bike news here.
Sennheiser HD 660S2 offers enhanced sub-bass tuning and more pronounced low-end
The Sennheiser HD 660S2 offers the familiar 660 Series build and design. Plush earpads and cushy headband padding place the revised 300-ohm transducers at an optimal listening distance. For an improved low-end profile, the transducer drops from 110Hz (on the original HD 660S) to 70Hz. The outer mesh grilles are crafted to manage airflow at ideal impedance.The HD 660S2 ships with two 1.8 meter user-detachable cables that offer 6.3mm single-ended stereo and 4.4mm balanced stereo jack plugs at the end. There’s also a 6.3mm to 3.5mm adapter in the box, which is suitable for use with DAC amps, DAPs, and dedicated amplifiers like the Sennheiser HDV 820. Finally, you also get a storage pouch with the Sennheiser HD 660S2.Sennheiser HD 660S2 improves upon the soundstage offered by its predecessor, focussing more on the low-end frequencies and offering enhanced sub-bass tuning. The overall sound profile is more refined due to the improved transducer airflow and a refined voice coil. With reduced voice coil weight, HD 660S2 is able to improve the impulse response and brings hyper-realistic textures to the forefront of the audio output. Overall, the audio experience is smoother and warmer on Sennheiser HD 660S2.“Our new Sennheiser HD 660S2 offers listeners what they requested most from the headphones’ predecessor,” says Mr Kapil Gulati, Sales Director – Consumer Hearing Business, Sonova. “With precision and power like no other and new sensitivity across all frequencies, listeners will hear details they’ve never heard before, especially at the lower end of the spectrum.”Read Also:iQOO Z7 5G launched in India at Rs 18,999, goes live on salePriced at Rs 54,990, audiophiles can get the new Sennheiser HD 660S2 headphones at the company e-store and other online platforms like Amazon, Headphone Zone, and The Audio Store. The HD 660S2 is manufactured at the company’s state-of-the-art production facility in Ireland.For the latest gadget and tech news, and gadget reviews, follow us on Twitter, Facebook and Instagram. For newest tech & gadget videos subscribe to our YouTube Channel. You can also stay up to date using the Gadget Bridge Android App. You can find the latest car and bike news here.
Nothing has launched its next-generation wireless earbuds, Ear (2), at a price of Rs 9,999 in India. The TWS will be available to order from March 28 on Flipkart and Myntra. While the design remains largely the same, Nothing Ear (2) offers new features like Dual Connection, Hi-Res audio with LHDC 5.0 codec support, a personal sound profile, and a slightly higher battery backup.Read Also:OnePlus 11R Review: Comeback season for OnePlus
In This Article
Nothing Ear (2) builds on the foundation of its predecessor
Nothing much has changed on the next-gen Ear (2) in terms of the design. The TWS still sports the signature transparent see-through look. The in-ear earbud design is back as well, after skipping the Ear (stick) (review here). The charging case is still made out of plastic but is more compact and lighter than before.The audio experience has improved on the next-gen Ear (2) with the inclusion of LHDC 5.0 support allowing for Hi-Res audio. While Ear (1) (review here) offered only a handful of equaliser presets, Ear (2) users can create a personal sound profile using the Nothing X app and customise the equaliser settings. The Nothing X app can also perform an ear-tips fit test for the new TWS. Nothing Phone (1) (review here) users can enjoy a low latency mode as well. Users can change the ANC level on Ear (2). Like its predecessor, the Ear (2) can nullify surrounding sounds up to 40 dB. The new improved clear voice technology now offers 3 dB higher noise cancellation during audio calls. The earbuds can provide up to 6 hours of listening time on a full charge with an additional 30 hours inside the case. The earbuds also come with 2.5W Qi-certified wireless charging.The new Nothing TWS can now pair with more than one device at the same time, seamlessly switching between them. With Dual Connection, you can pair up to two devices with Nothing Ear (2). The earbuds come with an improved IP54 rating and the charging case gets an IP55 rating as well.Read Also:How to hide apps, files, and folders on Android devices? Top 7 Ways
Conclusion
Priced at Rs 9,999, the Ear (2) is Nothing’s most expensive TWS offering yet. The wireless earbuds will go on sale from March 28 and can be ordered from Flipkart and Myntra. They will also be made available for purchase in certain offline stores. Nothing is also expected to come out with a successor to the Phone (1) later this year.For the latest gadget and tech news, and gadget reviews, follow us on Twitter, Facebook and Instagram. For newest tech & gadget videos subscribe to our YouTube Channel. You can also stay up to date using the Gadget Bridge Android App. You can find the latest car and bike news here.
Mobile World Congress came to life after a few years in 2023. Once the big event was over, we caught up with Mr Anku Jain, Managing Director, MediaTek India to know what the company has in store for 2023. We threw some curve balls at him and being the kind-hearted person he is, he sportingly answered them all for us.
In This Article
What are some of the key challenges facing the semiconductor industry, and how is MediaTek working to address these challenges?
We are in the midst of global digital transformations and this has also led to an increase in demand for smart devices. Semiconductor manufacturing is a complex process involving advanced technologies, requisite infrastructure, and a skilled workforce. We are focusing on our range of products and are very upbeat about the market demand and dynamics.
MediaTek is always focused on expanding its reach to more customers and new market segments via increased investments in R&D as well as collaboration with OEMs and technology firms, and we’ve seen significant growth in the Indian market. Our focus is to continuously innovate in order to meet industry demands.
Can you discuss MediaTek’s strategy for entering and expanding into new markets, particularly in emerging regions like India?
India is a highly prospective market for MediaTek. The reason, as you know, we are the second largest in the world in terms of the Internet user population, next to China. India is also ranked second in terms of the number of smartphone users. Also, the rate of digital adoption is soaring across both urban and rural areas. This is an opportunity for not only MediaTek but the entire ecosystem players. We aim to capitalize on this opportunity while also building new capabilities to address the market demands. As 5G adoption grows, we expect the momentum to grow further, pushing the demand for high-end SoCs like the latest flagship MediaTek Dimensity 9000 series and higher, as well as smart home devices like smart speakers, smart TVs, Wi-Fi 7 and higher, and other smart devices that make homes and people connected always.
Read Also:How often should you upgrade your Android smartphone?
Thus, MediaTek’s strategy in India revolves around these opportunities. In line with the government vision of enabling ‘AatmaNirbhar Bharat’, we are also working closely with our partners and OEMs to ensure a sustainable ecosystem in place. MediaTek is focused on 5G technologies and innovative semiconductor use cases, in order to democratize technology and make it available for the end consumers.
MediaTek has been working on developing 5G technology. How does MediaTek plan to differentiate its 5G solutions from other players in the market, and what are the company’s goals for faster 5G adoption in the near future?
MediaTek has an extensive focus on 5G technologies that have been used across the entire product line in smartphones and smart devices. Working aggressively to make 5G experiences accessible to OEMs, customers and MediaTek-powered products are already ruling the market such as MediaTek Dimensity 5G Series, the latest being MediaTek Dimensity 7200, Dimensity 8200 and Dimensity 9200, Dimensity 9000, and Dimensity 8000 among others. Dimensity 5G Open Resource Architecture is another key differentiator, offering device makers the chance to customize the product as per their customer requirements
With this unique proposition, we continue to enhance each portfolio with exclusive technologies such as the latest HyperEngine 6.0, MediaTek APU 690 – Ultimate AI with eXtreme Power Savings, 4CC-CA Sub-6GHz capable 5G R16 modem, AI-Video Engine, Imagiq 890 Camera with RGBW Sensor Native Support, MiraVision display technologies, and more.
5G is all about higher speed, faster connectivity and greater energy savings, so the devices have to be designed to get the best out of these capabilities. However, to spur the adoption of these devices, we have to also focus on mass acceptance. Thus, our 5G portfolio is designed to be the perfect blend of brilliance, performance, and next-gen experiences.
How was MWC 2023 for MediaTek? Anything you want to throw light upon from the event from MediaTek’s point of view?
At MWC 2023, MediaTek showcased ground-breaking technologies & innovations with the launch of the new MediaTek Dimensity 7200 and MediaTek 5G NTN Solution that will enable two-way satellite communications to smartphones and other devices with its 3GPP standards-based 5G Non-Terrestrial Network (NTN) solution. Also, we showcased our MediaTek Dimensity, Filogic, Genio, Kompanio, and Pentonic portfolio.
MediaTek’s satellite communications portfolio will target both IoT-NTN and NR-NTN technology based on the 3GPP 5G specification for Release 17 (R17). With two-way satellite communications on smartphones and other devices, consumers can stay in touch when they are hiking, driving in secluded areas, on a boat, or in other situations where there has traditionally been no connectivity.
Can you discuss MediaTek’s vision for the future of mobile computing, and how the company plans to stay ahead of emerging trends and technologies?
MediaTek enables nearly 2 billion connected devices a year, which means one in every five connected devices is powered by MediaTek. We are on a mission to make technology democratisation a reality, and with that mission, we focus on the portfolio to cover the entire gamut of customers, from flagship to premium and mainstream. We have invested hugely in R&D to bring the best products to the market, to fulfil the demands of gen Z customers and beyond, while also fulfilling the evolving requirements of Gen X and Y customers.
The latest in the Dimensity family of smartphones, the flagship Dimensity 9200, demonstrates some of the industry-best feature sets like >3GHz CPU performance, WiFi 7-ready 5G sub – 6 GHz and mmWave, G715 GPU with hardware ray tracing, and many more. We also continue our leadership in key technology areas, including highly power-efficient technologies, automotive solutions and a broad range of advanced multimedia products such as smartphones, tablets, digital televisions, 5G, Voice Assistant Devices (VADs), streaming devices, and wearables. We will continue delivering on this momentum to build a smarter and broader device ecosystem.
For the latest gadget and tech news, and gadget reviews, follow us on Twitter, Facebook and Instagram. For the newest tech & gadget videos subscribe to our YouTube Channel. You can also stay up to date using the Gadget Bridge Android App. You can find the latest car and bike news here.
Most people use Adobe Acrobat to make changes like adding shapes in PDF files. However, if you don’t have that expensive PDF editor and feel that it is too expensive to afford, you don’t have to worry because you can use Adobe Acrobat alternative – UPDF. Let’s learn from this article how to add shapes to PDF with and without Adobe Acrobat.
In This Article
Part 1: How to Add Shapes in PDF Without Adobe Acrobat?
UPDF is the most powerful PDF editor that helps you to make changes in PDFs without compromising its quality and formatting. Using this tool, you can edit, annotate and convert documents with a breeze. Moreover, this innovative tool is far better than Adobe Acrobat. Read the following comparative points to learn why you should choose UPDF instead of Adobe Acrobat to add shape to PDF:
User-Friendly Interface: The interface of UPDF is very delightful and intuitive. Even new beginners can use this tool easily without any assistance. Each feature of it is perfectly displayed and given unique icons. However, Adobe Acrobat holds an outdated interface. You have to first watch tutorials on how to use Adobe, and after that, you can perform any task on it.
Affordable Price: Users always prefer software that is affordable. UPDF wins the game here by providing affordable subscription plans. Moreover, it also offers a free-trail version in which you can enjoy all its features. In contrast, Adobe Acrobat is quite expensive, especially for students and low-pay grade professionals.
Feature-Rich Tool: UPDF is loaded with unique features that are enough to solve all the problems related to PDF. With the help of this tool, you can add shapes, stickers, and stamps to PDF in a blink. However, Adobe Acrobat has fewer features compared to UPDF in the comments. Due to this limitation, people prefer UPDF more.
OCR Technology: UPDF offers OCR technology at an affordable price through which it can easily convert scanned documents to editable and searchable PDFs. This advanced technology is beneficial to make the office work efficient and effective. However, the same technology is also offered by Adobe but with a higher price tag.
1. How to Insert a Shape in PDF Via Shape Feature?
In this section of the article, we will teach you how to insert a shape in PDF by using UPDF. Don’t be distressed because UPDF is the easiest software to operate. You just have to follow a few simple steps to add a shape to the document. To learn about these steps, have a look below:
Step 1: Download and Install UPDF
Access the official website of UPDF and download the tool from there. Once downloaded, install it by following the instructions of the installer. Afterwards, launch the UPDF on Windows or Mac.Step 2: Open the PDF File
Click the “Open File” button and select the file in which you want to add shape. After selecting, press the “Open” button to import the file in UPDF. Now, tap the “Comment” icon at the left tool panel.Step 3: Add Shape in the PDF File
Choose the “Shape” icon at the top navigation bar and select the shape you want to add. You can also adjust the shape’s border colour, fill colour, opacity, and border thickness by using the options provided underneath the shapes. Afterwards, insert the shape by clicking on the document. Go to the “File” menu and press the “Save” option to save changes.
2. How to Add Shape to PDF Via Sticker Feature?
Shapes and stickers are both graphical elements that are used to make PDF files more attractive. However, both these elements are distinguishable from each other. Shapes can be filled with text, gradients, colours, and patterns, while in stickers, you cannot sometimes add text or change colour. Moreover, shapes are mainly used to create complex designs and graphics, but stickers are usually used to add visual elements to documents.
UPDF offers a vast collection of shapes in its sticker features. You can easily add these shapes to your PDF file to give it a more aesthetic look. Some of the shapes of this powerful PDF tool are listed below:
Rectangle
Triangle
Circle
Arrow (Up, Down, Right, and Left)
Pointer
Cloud
Text Callout
Line
If you are interested in using the sticker feature for adding shapes, follow the below-provided instructions carefully to learn how to add shapes to PDF via the sticker feature:
Step 1: Access the Sticker Feature
Click the “Sticker” dropdown menu present at the top navigation bar and locate the shape you want to add by scrolling down the cursor.Step 2: Add Shape to the PDF
After choosing the shape, take the cursor to the place where you want to add it and click to paste the shape there. Use the border handles to change the size and position of the shape.
3. How to Draw Shapes in PDF?
Do you want to draw shapes to make the document more personalized instead of adding available shapes in PDF? UPDF gives you a free hand to draw shapes on your PDF file and insert different colours into them. Follow the underneath steps to find out how to draw shapes in PDF by using UPDF:
Step 1: Go to the Pencil Feature
Click the “Pencil” icon available at the top tool panel. Now, select the border colour of the shape from the “Border Color” section. You can also adjust the opacity and thickness of the shape.Step 2: Make Changes in Shape
After drawing the shape, you can use border handles to move its position and double-click on it to change its colour, size, and opacity. If you want to remove any portion of the shape, select the “Eraser” tool and rub the eraser over that part.
Part 2: How to Add Shapes to PDF in Adobe?
Adobe Acrobat also provides a shape feature with the help of which you can add shapes to your document. However, you have to first buy that tool by paying a heavy amount to use the shape feature. If you have already purchased it, read the following instructions to add shape to PDF acrobat:Step 1: Open PDF on Adobe Acrobat Pro DC
Open Adobe Acrobat Pro DC on your device and click the “File” menu present at the top left corner. Select the “Open” button and choose the PDF. After selecting, press the “Open” button to import PDF in Adobe.
Step 2: Add Shape in the PDF
Afterwards, access the “Tools” tab and select the “Comment” option. Click the “Drawing Tools” icon and choose the shape. Place the shape on the document with the help of a cursor.
Step 3: Make Changes in the Shape
You can adjust the thickness of the shape border by using the “Change Shape Thickness” icon. Select the “Settings” icon to access the shape properties for changing the shape, colour, style, opacity, and other properties. Once done, click the “File” menu and select the “Save” option to save changes in a PDF file.
Final Words
In this article, you have learned how to add shapes to PDF using UPDF and Abode Acrobat. It is visible that UPDF is easier to use as it offers simple steps for inserting shapes. And Adobe Acrobat is challenging to operate, as you have to go through many complicated steps to add shapes. That’s why it is recommended to go for UPDF because it is a user-friendly and affordable PDF editor.
FAQS About Adding Shapes to PDF
How to Add Objects in Adobe Acrobat Pro?
Abode Acrobat allows you to add a variety of objects to your documents. However, you have to follow complicated steps to add them. Read the following steps to find out how to add shapes to PDF in Adobe:
Step 1: Launch Adobe Acrobat Pro on your device and open the PDF file. Now, go to the “Tools” tab and select the “Comment” option.
Step 2: Next, choose the “Drawing Tools” option to expand the shapes menu for selection. After selecting the shape, paste it on the document using the cursor.
How to Add Star to PDF?
In UPDF, there are two ways to add a star to a PDF file, and it’s your choice which one to follow. In the following, both these ways are provided:
Way 1: Open the PDF on UPDF and select the “Comment” icon. Click the “Pencil” option and draw the star.
Way 2: Press the “Shape” option and select the line shape. Place the line on the document with the help of a cursor. Now repeat the process to add more lines until you create a star by joining all the lines.
How to Add a Line in PDF on Acrobat?
Adobe Acrobat also offers a line shape along with other basic shapes like rectangles, circles, or triangles. Go through the following instructions carefully to add a line in PDF on Adobe Acrobat:
Step 1: Open the PDF file on Adobe Acrobat and press the “Tools” tab. Select the “Comment” option and click the “Drawing Tools” icon.
Step 2: Following this, choose the line shape from the shapes menu and place it in PDF.
For the latest gadget and tech news, and gadget reviews, follow us on Twitter, Facebook and Instagram. For newest tech & gadget videos subscribe to our YouTube Channel. You can also stay up to date using the Gadget Bridge Android App. You can find the latest car and bike news here.
Nothing is back with another TWS product, this time a successor to the Ear (1). Nothing Ear (2) is set to be revealed globally revealed tomorrow. Nothing Ear (1) (review here) was the company’s first product and was soon followed by the highly anticipated Nothing Phone (1) (review here). The company expanded its TWS lineup with Nothing Ear (Stick) (review here) which came out towards the end of 2022. Now that Nothing Ear (2) is soon to be revealed, here’s how you can watch its premiere online.Read Also:OnePlus 11R Review: Comeback season for OnePlus
How to watch Nothing Ear (2) reveal online?
Nothing will live stream the reveal of Ear (2) on its YouTube channel and website. Click on this link to watch the livestream. You can also head over to nothing.tech to watch the reveal event on Nothing’s official website.
The Nothing Ear (2) will be revealed online on Wednesday, March 22, at 8:30 PM IST. The TWS is expected to be priced under Rs 10,000, much like the Ear (1) and Ear (Stick). Nothing’s first wireless earbuds, Ear (1) were launched at the price of Rs 6,999 back in 2021. Nothing Ear (Stick) can currently be purchased at Rs 8,499 from Flipkart and Myntra. Nothing Ear (1)So far Nothing has kept a tight lid on the specs and features of the Ear (2) TWS. It will come with the signature transparent see-through design and is also expected to support LHDC 5.0 codec. The TWS could feature a low latency mode for gaming. ANC could also make a return on Ear (2) after skipping Ear (Stick). The latter’s open-ear design didn’t allow for Active Noise Cancellation.Nothing Ear (Stick)Nothing may also bring back wireless charging for Ear (2). Like ANC, there was no wireless charging on Ear (Stick), mostly due to the cylindrical design of the case. With ANC and wireless charging, the Nothing Ear (2) TWS could be priced higher than the Ear (Stick).Read Also:Acer Nitro 5 (2023) laptop launched with latest AMD RYZEN 7000 CPUThis is how you can watch the Nothing Ear (2) reveal event online. What do you expect from the Nothing Ear (2) and what would be the ideal pricing for Nothing’s third TWS product? Let us know in the comments!For the latest gadget and tech news, and gadget reviews, follow us on Twitter, Facebook and Instagram. For newest tech & gadget videos subscribe to our YouTube Channel. You can also stay up to date using the Gadget Bridge Android App. You can find the latest car and bike news here.
Expanding its accessories portfolio in India, Asus has announced the launch of ProArt Mouse MD300 along with Asus Vantage Briefcase 15.6 and EOS 2 Shoulder Bag. The ProArt Mouse is priced at Rs 8,499, while the Vantage Briefcase and EOS 2 Shoulder Bag fetch Rs 20,990 and Rs 899 respectively. The EOS 2 Shoulder Bag will be launched on April 1, while the ProArt Mouse MD300 and Vantage Briefcase 15.6 are currently on sale.Read Also:Top 9 ways To Easily Fix ‘Android Phone Keeps Turning Off’
In This Article
Asus ProArt Mouse MD300
Price: Rs 8,499The new ProArt Mouse MD300 from Asus comes with professional-grade tactile switches for the three buttons. The MD300 can track even on a glass surface with its 4200 DPI sensor. Designed for artists and creators, the ProArt MD300 features Asus dial which helps users make quick and precise settings adjustments within seconds. The mouse also gets a side scroll which works in sync with the programmable dial, bringing an intuitive experience to the user. The independent middle key comes integrated with a gaming-graded switch. The Asus ProArt Mouse MD300 can be connected to a maximum of four devices simultaneously and can smoothly switch between them. On a full charge, the mouse can last for up to 150 days. One minute of fast charging can power the MD300 for up to 8 days.
Asus Vantage Briefcase 15.6
Price: Rs 20,990The new Vantage Briefcase from Asus weighs just 0.48 kg, making it ultra-portable and lightweight. Inside, the Vantage Briefcase gets 1262D ballistic nylon. The exterior features Nappa leather. The fabric meets the ASTM3 standard for reliability and durability, being tear-resistant and water-repellent. The briefcase’s main compartment gets a quick-access zipper for laptops and electronic devices, while the exterior gets multiple pockets for everyday essentials.
EOS 2 Shoulder Bag
Price: Rs 899The EOS 2 Shoulder Bag from Asus is made out of scratch-resistant and water-repellent 600D polyester fabric. The bag is available in two dual-tone colour options – Black/Dark Gray and Oat/Light Gray. EOS 2 Shoulder bag weighs just 0.48 kg and sports precision cut zippers, a soft-touch nylon handle, an adjustable padded strap, and a built-in luggage strap.Read Also:Acer Nitro 5 (2023) laptop launched with latest AMD RYZEN 7000 CPUArnold Su, Business Head, Consumer and Gaming PC, System Business Group, ASUS India said, “ASUS always strives to enhance the customer experience at every step and accessories play a key role in reflecting the users’ lifestyle and aspirations. Given the positive response we have received from our community on this segment in 2022, we are all set to further expand our accessories line-up by introducing productivity-oriented products such as ASUS ProArt Mouse, ASUS Vantage Briefcase 15.6 and EOS 2 Shoulder Bag.”For the latest gadget and tech news, and gadget reviews, follow us on Twitter, Facebook and Instagram. For newest tech & gadget videos subscribe to our YouTube Channel. You can also stay up to date using the Gadget Bridge Android App. You can find the latest car and bike news here.
iQOO Z7 5G has launched in India at a starting price of Rs 18,999 for the 6GB + 128GB base variant. The 8GB + 128GB variant fetches Rs 19,999. Sales for the iQOO Z7 are now live, and customers can order the smartphone from Amazon and the iQOO e-store. Customers can also avail bank offers (SBI & HDFC) that will bring the effective price of the two variants down to Rs 17,499 and Rs 18,499. iQOO Z7 is available in two colour options – Norway Blue and Pacific Night.Read Also:iQoo Neo 7 5G Review: Good for almost everything
In This Article
iQOO Z7 5G: Price, Specs, and more
Here’s what the full price list for iQOO Z7 looks like.
iQOO Z7 Variant
Price
SBI & HDFC Discount (CC/DC/EMI Transactions)
Price after Discount
8GB RAM + 128GB Storage
Rs 18,999
Rs 1,500
Rs 17,499
12GB RAM + 128GB Storage
Rs 19,999
Rs 1,500
Rs 18,499
Powering the iQOO Z7 5G is the MediaTek Dimensity 920 5G SoC which scored more than 485K on the AnTuTu benchmark. The 6.38-inch FHD+ AMOLED display offers a peak brightness of 1300 nits. The refresh rate has been capped at 90Hz and the touch sampling rate at 360Hz. In terms of protection, the iQOO Z7 gets Schott Xensation UP glass protection and an IP54 rating. The smartphone sports a 64MP primary lens (GW3 sensor) with Optical Image Stabilisation – a first for the segment. A 2MP depth sensor has also been made available on the rear camera module. The primary camera is capable of shooting 4K videos at 30fps. The Z7 also offers Super Night Mode for low-light photography. Up front, the smartphone gets a 16MP selfie camera in a waterdrop notch. The camera experience is further enhanced by features like Dual View Video, Double Exposure, and Bokeh Flare Portrait.iQOO Z7 also gets the company’s gaming toolbar which allows users to access features like Motion Control in Ultra Game Mode. With Motion Control, users can perform in-game action with up to four-finger touches. This is made possible by an enhanced 1200Hz touch response rate that helps in achieving a 10x touch recognition rate. The Z7 gets a 4,500mAh battery along with 44W fast charging support. The smartphone can be powered from 1-50% in 25 minutes. Users can also expand Z7’s storage capacity to 1TB. Extended RAM 3.0 boosts RAM capacity to 16GB, allowing for a lag-free experience with up to 27 apps running in the background (as claimed by iQOO).Commenting on the launch, Nipun Marya, Chief Executive Officer – iQOO, said, “The response we have witnessed for the previously launched Z series products was truly overwhelming. Our consumer’s trust in our product helps us bring new path breaking performance-oriented smartphones that not just satisfies the needs of our consumers but are segment leading in multiple aspects.At iQOO, we always strive to provide the best technological innovation to our consumers in India. After launching two powerful devices this year, we are here with yet another power packed device – iQOO Z7. We are confident that this device will prove to be the flag bearer of #FullyLoaded performance in the segment featuring segment’s first and best MediaTek Dimensity 920 processor, 64MP OIS camera and much more”.Read Also:Samsung Galaxy F14 5G confirmed to launch in India on March 24
If your smartphone contains all your personal information like documents of identity, banking details, and medical history, then you should make sure that they’re protected by an added layer of security. Your phone’s lock screen is easy to bypass, so incase your device gets stolen you would want all your personal information to stay hidden from malicious entities. In this article, we bring you the top 7 ways to hide apps, images, files, and folders on any Android device.Read Also:iQoo Neo 7 5G Review: Good for almost everything
In This Article
How to hide apps on a Samsung device
Step 1: Go to Settings and select Home Screen.Step 2: Scroll down and select ‘Hide Apps’.Step 3: Select the apps you want to hide. Tap on ‘Done’ once you’re finished.Step 4: Tap the red minus icon on an app if you want to unhide it.You can also tap the ellipses (three dots) on the app drawer and select ‘Settings’ to access Home Screen settings.
How to hide apps on a OnePlus device
Step 1: Go to Settings and select Privacy. Step 2: Swipe to the Privacy tab and tap on ‘Hide Apps’.Step 3: Enter your privacy password.Step 4: To hide an app, turn on the toggle bar next to it. Step 5: Set up a dial code to access the app.Step 6: Once the app is hidden, launch the Phone app and type the dial code to access it.
Hide apps using the Nova Launcher
Step 1: Download and install Nova Launcher on your device from Google Play Store.Step 2: Launch Nova Launcher and get Nova Launcher Prime.Step 3: Open Nova Launcher settings and select ‘App Drawer’.Step 4: Scroll down to Apps and select ‘Hide apps’.Step 5: Tap the apps you want to hide and save your changes.
Hide an app by disabling it
Certain system and bloatware apps cannot be removed from your Android smartphone. At best you can disable them, so they don’t show up in the app drawer. Here’s how.Step 1: Go to Settings and select Apps.Step 2: Select the app you want to disable.Step 3: Select ‘Disable’ from the bottom menu.The app will be disabled on your device and you won’t see it on the app drawer anymore.
Hide a file in the Safe Folder
Google’s Files app offers a ‘Safe Folder’ within which you can lock your important files and documents. Items inside the Safe Folder are not visible to anyone unless they provide the password. Here’s how you can hide a file in the Safe Folder.Step 1: Launch the Files app by Google on your smartphone. If you do not have this app on your phone, download it from Google Play Store.Step 2: In the ‘Browse’ tab, select ‘Safe folder’.Step 3: Choose a lock for your files. You can either add a pin or a pattern lock.Step 4: Go to the file or document you want to secure and tap the ellipses (three dots) next to it.Step 5: Select ‘Move to safe folder’.Step 6: Enter the pin or pattern you just created.Your file will be moved to the safe folder and can only be accessed when you enter the pin or pattern. You will need to move the file out of the secure folder to open it.
Hide images on a Samsung device
Step 1: Open the Gallery app and tap the ellipses at the top right corner of the screen.Step 2: Select ‘Hide or unhide albums’.Step 3: Turn the toggle bar on next to the folder you want to hide.The image folder will not be visible in the gallery anymore.
Hide an image, file, or document on a OnePlus device
Step 1: Go to Settings and select Privacy. Step 2: Swipe to the Privacy tab and tap on ‘Private Safe’.Step 3: To hide an image, tap on ‘Images and videos’. Similarly, if you want to hide a file, tap on ‘Documents’ or ‘Other Files’.Step 4: Tap the plus icon to add files to the Private Safe.Step 5: Select the file and tap on ‘Set as private’.The images and files will be made private and can’t be viewed until they have been made public from the Private Safe in Settings.Read Also:Is mobile gaming actually worth it?
Today, HP announced the arrival of its newest HP Pavilion Aero 13 notebooks in India, which are equipped with Radeon Graphics and an AMD Ryzen 7 processor for a compelling performance. The product is designed for Gen Z and Millennial users, allowing them to work and learn effectively whenever and wherever they choose.
“PCs are increasingly becoming an important aspect of people’s lives in the hybrid environment. We are proud to introduce the new HP Pavilion Aero 13, which is designed to meet the increasing demand for versatile and powerful computing solutions in today’s world. It offers exceptional performance and mobility, allowing users to stay productive and entertained while on-the-go. With the HP Pavilion Aero 13, users are getting a premium and beautifully crafted laptop that empowers them to work and play seamlessly.” said Vickram Bedi, Senior Director – Personal Systems, HP India.
In This Article
HP Pavilion Aero 13 Key Highlights
Designed with an AMD RyzenTM 7000 Series CPU that allows for seamless multitasking
400 nits of brightness; Flicker-Free Screen; Work all day and play all night
HP’s lightest Pavilion laptop, weighing under 1 kilogramme
Consumers today look for devices that can manage several tasks and move between learning and working quickly and easily. These gadgets must be both lightweight and fashionable in order to accommodate the needs of the younger generation and the hybrid workstyle. With Wi-Fi 6 connectivity and a battery life of up to 10.5 hours on this notebook, the brand-new HP Pavilion Aero 13 is perfect for working, surfing, and streaming from any location.
Read Also: HP introduces two new Pavilion laptops: Specs, Price, and more
It has 16:10 aspect ratio and 400 nits of brightness make for an engaging viewing experience for the users. The Pavilion Aero 13 weighs only 970 grammes, making it HP’s lightest Pavilion laptop and making it portable for Gen Z and Millennials. Pale Rose Gold, Warm Gold, and Natural Silver are the three distinct colours that perfectly match their style and way of life.
HP Pavilion Aero 13 Tech Specs:
Display
HP’s first Pavilion laptop with a 16:10 Aspect Ratio
400 nits of brightness to enable seamless browsing
Built with a Flicker-free screen
4-sided narrow bezel display to prevent blocking of view
2.5k resolution for sharp images and text
400 nits of brightness to enable browsing in the sunlight
Wider colour palette with 100% sRGB
Insides
AMD Ryzen 7000 series Processor with Radeon Graphics for smooth performance
Reliable and fast connectivity with Wi-Fi6
10.5 hours of battery life for uninterrupted learning and work
Is 2023 the year when OnePlus finally goes back to its roots and reclaims its personality? After the OnePlus 10T (review here) failed to impress consumers, OnePlus had their work pretty much cut out for them. In February 2023, the Chinese smartphone manufacturer came out with their flagship OnePlus 11 (review here) and its low-cost alternative OnePlus 11R. While most people gauge the brand’s success based on the performance of its flagship products, consumers in India tend to go for the products that offer the biggest bang for the buck. This is precisely where the OnePlus 11R fits in. At Rs 39,999 (base variant), the smartphone offers performance that is similar to the flagship, with a few features that have been held back to reduce its effective price. Currently, the OnePlus 11R goes for Rs 17,000 lower than the OnePlus 11. The high-end 16GB RAM +256GB storage variant is priced at Rs 44,999, while its OnePlus 11 counterpart fetches Rs 61,999. We used the smartphone as our daily driver for about two weeks, here is our in-depth OnePlus 11R review.Read Also:iQoo Neo 7 5G Review: Good for almost everything
In This Article
OnePlus 11R review: Design and Display
The OnePlus 11R ships inside the signature OnePlus red box. Inside, you will find the smartphone, a silicone cover for the back, a 100W power brick, a USB Type-C cable, a SIM ejector tool, some reading material (Quick Guide and Safety Guide), a Red Cable Club membership card, and some fun stickers.In terms of design, the OnePlus 11R looks just like its flagship counterpart. At first glance, you could easily mistake it for OnePlus 11. The 11R is also the first ‘R’ series OnePlus smartphone that gets the same design as the brand’s flagship. There are a couple of differences, though, as the 11R gets a punch hole cutout for the selfie camera at the centre of the display as opposed to the top right placement on OnePlus 11. Turning the smartphone around, you will also notice the lack of Hasselblad branding on 11R’s camera module.What we really liked about OnePlus 11R is that it gets a glass back just like its older sibling. OnePlus could’ve easily ditched the glass panel for a different material (or worse – plastic), but having a glass back really adds to the in-hand feel of the phone and makes it a more premium product. The matte-like finish on the back makes it resistant to fingerprints and gives it a very pleasing texture. The frame of the phone is still plastic, instead of aluminium. The alert slider is back on the OnePlus 11 series after going missing on OnePlus 10T. It is placed on the right side of the frame, above the power key. The volume rocker keys have been accommodated on the right side of the phone. At the bottom, you will find the USB Type-C charging port, SIM tray, primary speaker, and microphone.Up top, you get the secondary speaker, another microphone, and an IR blaster. The smartphone has a native IR remote app, which makes it very easy to use your phone as a remote for home appliances.The under-display fingerprint scanner is fast as ever, but its placement still remains a little too low for our liking. OnePlus fixed the positioning on the flagship but carries on with the previous positioning on the 11R. There is no IP rating available for this smartphone, which is kind of a letdown. Moving to the display, OnePlus 11R sports a 6.74-inch, 120Hz, Fluid AMOLED curved display with HDR10+ support. The display is the same size as the flagship but misses out on Dolby Vision. Watching content on the smartphone is still a treat, though. Watching HDR content was very pleasing, and the curved display with minimal bezels offers an immersive viewing experience. The display produced a good range of colours, with a lot of detail in the images. You can choose the different colour modes from the display settings and adjust the screen colour temperature to your liking. The stereo speakers are great while you’re watching video content, but leave a little more to be desired while playing music. The Dolby Atmos experience with headphones was much better.With a peak brightness of 1,450 nits, the display is perfectly legible under bright sunlight. The 120Hz refresh rate gives a fluid browsing experience, although for some apps the refresh rate has been capped at 60Hz. That being said, the touch response we got from the display was exceptional. The haptic feedback was on point too, although not as well-tuned as the flagship. The little vibrations while adjusting the brightness, scrolling the app switcher, and reaching the end of the app drawer felt good and elevated the smartphone’s experience.
OnePlus 11R review: Performance and Cameras
Let’s get the major specs out of the way first. The OnePlus 11R is powered by Snapdragon 8+ Gen 1 SoC which was also driving the OnePlus 10T. GPU duties are handled by Adreno 730. The smartphone comes with Android 13 skinned with OxygenOS 13. OnePlus has promised three years of software updates and four years of security patches for 11R. As mentioned earlier, the smartphone is available in two variants – 8GB + 128GB and 16GB + 256GB. We used the latter for this review.While the flagship uses the latest Snapdragon 8 Gen 2 SoC, OnePlus 11R makes use of Snapdragon 8+ Gen 1 which was last year’s flagship SoC. Putting the benchmark numbers aside, this chipset leaves no room for any complaints. The phone presented no lags during our use even when we threw a lot of heavy tasks at it. Even with over a dozen apps running in the background, OnePlus 11R did not drop its performance at all. The smartphone continued to crush all the tasks without breaking a sweat. We played some graphically demanding games on OnePlus 11R and were satisfied with the results. There were no stutters, lags, or annoying frame drops while playing Apex Legends at maximum graphics. The phone heated up slightly after 15 minutes of gameplay, but it did not affect its performance at all. After playing Apex Legends for 40 minutes at a stretch, the battery percentage dropped by 11%.Unfortunately, OnePlus’ OS does not have much to contribute to its redemption arc. This isn’t to say that OxygenOS 13 is a bad OS by any means. It just doesn’t have an identity of itself, being awfully similar to Oppo’s ColorOS. It seems like OnePlus is set to keep it this way, at least for the near future. But it’s not all doom and gloom on the OS front. What we liked about OxygenOS 13 is that the bloatware has been kept to a minimum. The software experience is clean with a bunch of cool features thrown in. There are a lot of customisation options for the lock screen and AOD. We also liked privacy options like App Lock, Hide Apps (which only gives you access to hidden apps after typing the code in the dialer), Private Safe, and System Cloner.The game toolbar is also a handy feature that allows you to view the frame rate and internal temperature of your smartphone while gaming. It also offers quick shortcuts for screen recording, orientation lock, system status, and more. We also liked the native IR Remote app and used it to control home appliances and gadgets like the AC and TV.On the Geekbench 8 benchmark, OnePlus 11R scored 888 points on the single-core test and 3,373 points on the multi-core test. In comparison, its nearest rival Vivo V27 Pro scored 1,151 points in the single-core test and 3,099 points in the multi-core test.OnePlus is known to deliver lightning-fast charging speeds, and it doesn’t miss with OnePlus 11R. The 100W SuperVOOC charger can juice up the 5,000 mAh battery in just 25 minutes. This incredible speed doesn’t make you miss wireless charging at all. We were quite pleased with the battery backup as well, as the smartphone coasted through a day of moderate to heavy usage with plenty of charge left at the end. After a screen-on time of almost 7 hours, we were left with a 15% charge at the end of the day.Moving on, the OnePlus 11R sports a dial-like camera panel at the back. There is no Hasselblad branding on the cameras, which also means the camera app is a bit different than the flagship. While OnePlus offers the same 50MP primary lens as the flagship, the ultrawide lens has been downgraded to 8MP from 48MP, and the telephoto lens has been replaced by a 2MP macro lens.The 50MP primary lens delivers a strong performance, much like it does on the flagship. The lack of Hasselblad collaboration is slightly noticeable, but it is by no means a dealbreaker. In daylight conditions, OnePlus 11R managed to capture a lot of detail in the images, with a great range of colours and near-perfect saturation. The images came out sharp, punchy, and well-balanced. Low Light PhotographyIn low light conditions, the primary camera again does a stellar job. The OIS ensures that the images aren’t too blurry. We were happy with the image processing at night, and the level of grain and noise in the pictures has been kept to a minimum. Even without the Night Mode, OnePlus 11R performed well in challenging lighting conditions.Ultrawide ShotUltrawide ShotThe 8MP ultrawide lens produced soft images which were slightly unsaturated. Compared to the primary lens, there is a noticeable drop in image sharpness and overall details. The images seem a bit washed out. It still manages to do a passable job and you won’t be entirely ignoring it while using the smartphone. We can’t say the same for the macro lens, as we still struggle to find its purpose in this camera setup. We were quite pleased with the 16MP selfie camera. Even in challenging low light conditions, the selfies came out well composed. The skin tones produced in the images were close to reality and there is no skin-brightening gimmick that most smartphones in the market resort to. The primary rear camera can record 4K videos at 30 or 60fps. However, the stabilization is very limited in this resolution. The selfie camera can record 1080p videos at 30fps. The camera app offers a Dual-View video which allows the front and rear cameras to record simultaneously. Read Also:International Day of Happiness: Wellbeing apps and gadgets
Verdict
At Rs 40,000, OnePlus 11R offers tremendous value for money – something that consumers used to associate with OnePlus smartphones. Even though it qualifies as a mid-ranger, OnePlus 11R has the best chipset in its category and offers almost the same features as its flagship counterpart. The choices made by the company to reduce the price of the smartphone pay off quite well.
Over the years we have come to rely on our smartphones for nearly everything – be it work, leisure, or entertainment. So when your phone randomly shuts off, it can get really annoying really quick if you don’t have any alternatives. Luckily, not all hope is lost and you may not actually need to replace your device. In this article, we bring you the top 12 ways to fix the ‘Android phone keeps turning off’ issue.Read Also:Microsoft 365 Copilot integrated into Word, Excel, PowerPoint and Teams
In This Article
Restart your phone
Restarting your phone should be the first step in fixing minor issues with your smartphone. A simple restart resolves any software-related background glitches that may have prevented your smartphone from functioning correctly. To restart your smartphone, press and hold the side key for a few seconds and select ‘Restart’ from the power options. Newer smartphones that use the side key to trigger the voice assistant require pressing and holding the side key and Volume Up key simultaneously to access the power options.
Reboot your phone in Safe Mode
Rebooting your phone in Safe Mode disables all third-party apps. Press and hold the power off icon in the power menu to reveal the Safe Mode option. If your phone works fine in Safe Mode, it means that one of the third-party apps is at fault. Delete the apps that you installed right before this issue surfaced on your phone. Once that’s done, reboot your smartphone normally. The issue should be fixed. If you’re experiencing the issue in Safe Mode as well, move on to other fixes.
Make sure your phone is charged
Your Android smartphone shuts off when its battery has been depleted. If it won’t start back up, you need to plug it into a charger. It is possible to miss low-battery reminders when you’re not paying attention to your phone. If you don’t plug your phone into your charger in time, it will shut down within a few minutes. Even when the phone is locked, the background tasks demand battery usage. This leads to the phone shutting off after the battery has been fully drained.
Check if your phone is scheduled to turn off
Most Android phones can be scheduled to turn themselves off at a particular time. If you notice that your smartphone shuts down at a certain time every day, chances are you scheduled that power-off time and probably forgot about it. To turn off ‘Scheduled On/Off’ go to Settings>Additional Settings>Schedule power on/off and turn the toggle bar off.
Check your phone’s storage
If you’re about to reach your phone’s maximum storage potential, you may have already noticed a drop in performance. At times this could also lead to the phone shutting down randomly because the RAM cannot handle all the tasks thrown at it. It is a good idea to have a breathing space of 20-30% in your phone’s storage. Go to Settings>Battery and device care>Storage to manage your smartphone’s storage. This is where you’ll see the breakdown of your phone’s internal memory and get an idea of which apps consume the most space on your phone. To free up space, delete all duplicate files on your phone and uninstall unused apps.
Check your phone’s battery health
Older smartphones lose a significant portion of their battery capacity with time. In most cases this means reduced power backup, but if the battery health has rapidly declined it could lead to random shut-offs as well. To check your phone’s battery health, go to Settings>Battery>Battery Health and see the maximum capacity of your phone’s battery.
Check your phone’s battery status
If your phone’s battery has a workable capacity, it could be suffering from some other issues. To check your phone’s battery status, launch the Phone app and dial *#0228#. This will bring up detailed information about your battery. This code may vary for different smartphones. Look up the dial code for your smartphone manufacturer beforehand.
Check if the power button is stuck
Maybe you have been looking at it the wrong way. Maybe the cause of your phone’s weird behaviour is hardware-related and has nothing to do with the software at all. Sometimes the power button gets stuck in its cutout and constantly pushes inwards, leading to the phone shutting down. Check if that is the case with your phone, and try to pull the button out with a small pair of tongs. Do not apply too much pressure, if you’re not able to restore the button, take your phone to a professional repair shop. Maybe the power button isn’t stuck but it is the phone’s protecting cover that is pressing it inwards, leading to the phone getting shut down. Take off the phone case and see if the problem still persists.
Check if the battery is loose
Smartphone batteries are known to swell up over time. Once they increase in size, you can see the back panel protrude a little bit. This can also lead to the connections inside the phone becoming loose, which may cause the battery to disconnect from the device. To verify this, shake your phone and give it a few jerks. If it turns off, it means that the battery is loose. Take your phone to a professional repair centre and get the battery replaced.
Update your phone’s OS
If the issue is bug-related, chances are that your phone’s manufacturer fixed it with a quick update. Go to Settings>Software Update>Download and Install to check for new updates. If there is a pending update, download and install it on your device.
Perform a scan for viruses
It is possible that a virus or malware is causing your phone to shut down at random intervals. Install a good anti-virus app on your phone and perform a deep scan of your device. Let the anti-virus app find the source of the virus. Once you know which files are compromised, delete them from your phone.
Factory Reset your smartphone
This is a last-ditch effort to restore normal functioning in your smartphone. If you’ve had no luck trying the above-mentioned fixes, it is time to restore your smartphone to its factory settings. To perform a factory reset, go to Settings>General Management>Reset>Factory Data Reset. Make sure you back up all the data on your smartphone before resetting it to its factory settings as this step will wipe all its data.
Frequently asked questions
Why does my Android phone suddenly turn off?
Your Android phone abruptly turns off when its battery has been completely drained.
What does it mean if your phone keeps turning off by itself?
If you haven’t scheduled a power-off time for your phone, then random shutoffs could be a battery-related issue. Check your phone’s battery health to know more.
How do you fix a phone that keeps turning off by itself?
These are the top 12 ways to fix the ‘Android phone keeps turning off’ issue. If the problem still persists after trying all the fixes mentioned in this list, you should take your phone to a repair centre for further diagnosis. If your phone is quite old, you would need to replace it. Here is our list of the top smartphones with good cameras you can buy in 2023.For the latest gadget and tech news, and gadget reviews, follow us on Twitter, Facebook and Instagram. For newest tech & gadget videos subscribe to our YouTube Channel. You can also stay up to date using the Gadget Bridge Android App. You can find the latest car and bike news here.
Acer has been launching a lot of laptops in India and the latest to enter the market is Acer Nitro 5 (2023) laptop. The laptop offers all the resources required to defeat the online rivalry thanks to the Intel Killer E2600 Ethernet Controller and Wi-Fi 6E connectivity. Many peripherals can be plugged into the ports on the device, including HDMI 2.1 and the most recent USB 3.2 standard with Gen 1 and Gen 2 compatibility.
In This Article
Acer Nitro 5 (2023): Tech Specs
This is the ideal companion for users who are constantly on the go thanks to its 57.5 Wh 4-cell Li-ion battery and up to 8 hours of uptime. Gamers can enjoy smooth, tear-free gameplay at maximum speed thanks to AMD FreeSync. Thin, high-performance laptops with new Max-Q technology are quicker and more effective than ever.
Read Also:Acer adds Nitro 7 and Nitro 5 gaming notebooks to its product line-up
Acer Nitro 5 (2023) has maximum performance and massive storage for a fluid and seamless gameplay experience with up to 2×16 GB of DDR5 system memory. Low latency gaming on the Wi-Fi 6E, smooth HD streaming video, and uninterruptible audio and video chats are all provided by the Killer Ethernet E2600. Users can plug in a variety of peripherals thanks to the complete range of ports, which include HDMI 2.1 and the most recent USB 3.2 standard with Gen1 and Gen2 support.
The most recent AMD Ryzen 7000 series on the market gives creators and gamers access to the strength of the most powerful performance in a single chip. This most recent Nitro 5 version offers game-changing speed with up to 8 cores, 16 threads, and boost clocks of up to 4.55GHz.
Better audio gives you a competitive edge and a more immersive experience with dual 2W speakers on the Acer Nitro 5 (2023). Customers can hear opponents clearly and with pinpoint accuracy thanks to DTS:X Ultra’s ability to deliver noises in a 3D spatial soundscape.
With dual-fan cooling, dual-intakes (top and bottom), and a quad-exhaust port design, the newly improved chassis in the Acer Nitro 5 (2023), it has a few additional tricks up its sleeve. Open the NitroSense utility software to gain additional control over fan speeds, lighting, and other factors.
With AMD FreeSync maintaining those frames tight and in sync, everything appears better in QHD. A fluid, uninterrupted, and unmatched gaming experience is guaranteed by the 165Hz refresh rate and 3ms reaction time.
“The Acer Nitro 5 (2023) have an unrivalled reputation for offering cutting-edge technology and intense gaming at affordable prices. As gaming has been in the spotlight for the past several years, we are proud and thrilled to introduce the latest Nitro 5 laptop to our Indian gamers. It features the latest AMD Ryzen 7000 processors which is a gaming powerhouse with high performance. With the latest sleek and refined chassis this robust laptop packs a punch giving the users a seamless gaming experience” said Sudhir Goel, Chief Business Officer, Acer India.
Read Also:Acer Nitro 5 Spin Review: Extreme gaming at minimal weight


 If you’re being scammed by someone on Instagram, chances are they’re going to ask you for your login credentials at some point. Oftentimes, someone may pretend to be from Instagram Security, asking you for your password to verify your profile. You should know that Instagram doesn’t ever approach you for your password. Sharing your password may give scammers access to your account and they may lock you out of it.
 Public Instagram profiles attract a lot of scammers since they are able to go through all your posts and are able to verify that you are active on the platform. Public profiles also receive a greater volume of messages. If scammers have more information about you, it makes it easier for them to create a scamming scheme for you. To make your Instagram profile private, go to Settings>Privacy and turn the toggle bar on for ‘Private Account’.


 Step 2:
 Step 3:


 Step 2:
  Step 3:
 Step 4:
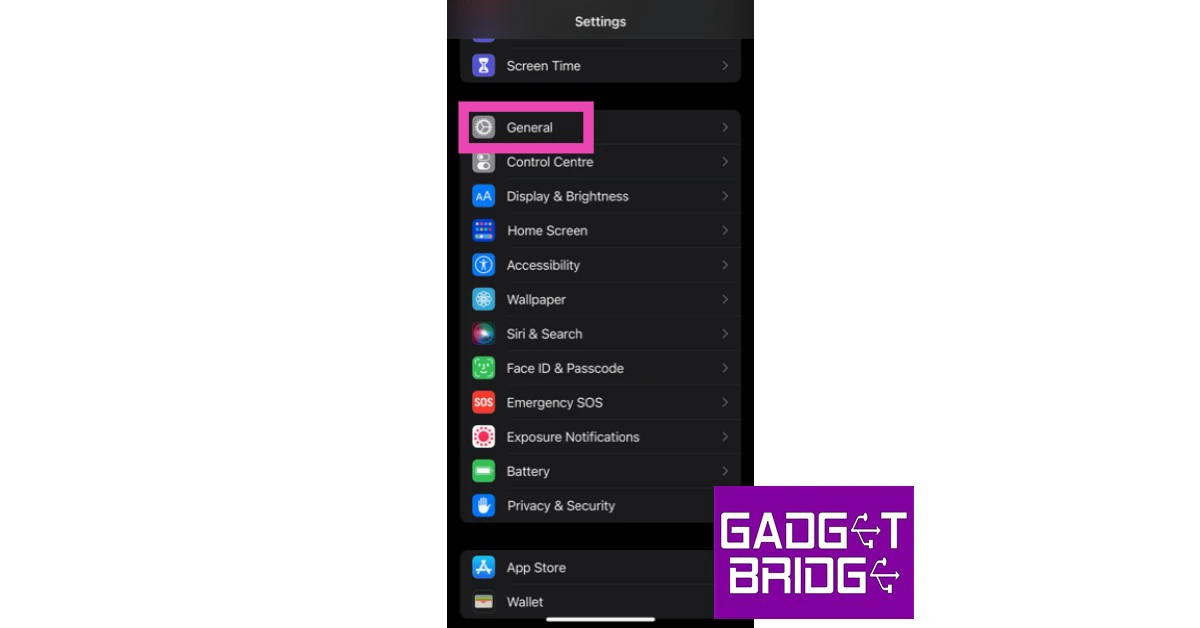 Step 2:
  Step 3:
 Step 4:
 Step 5:


")
 Step 3:
 Step 5:
 Step 6:
 Step 3:
 Step 4:

 Step 2:
  Step 3:
 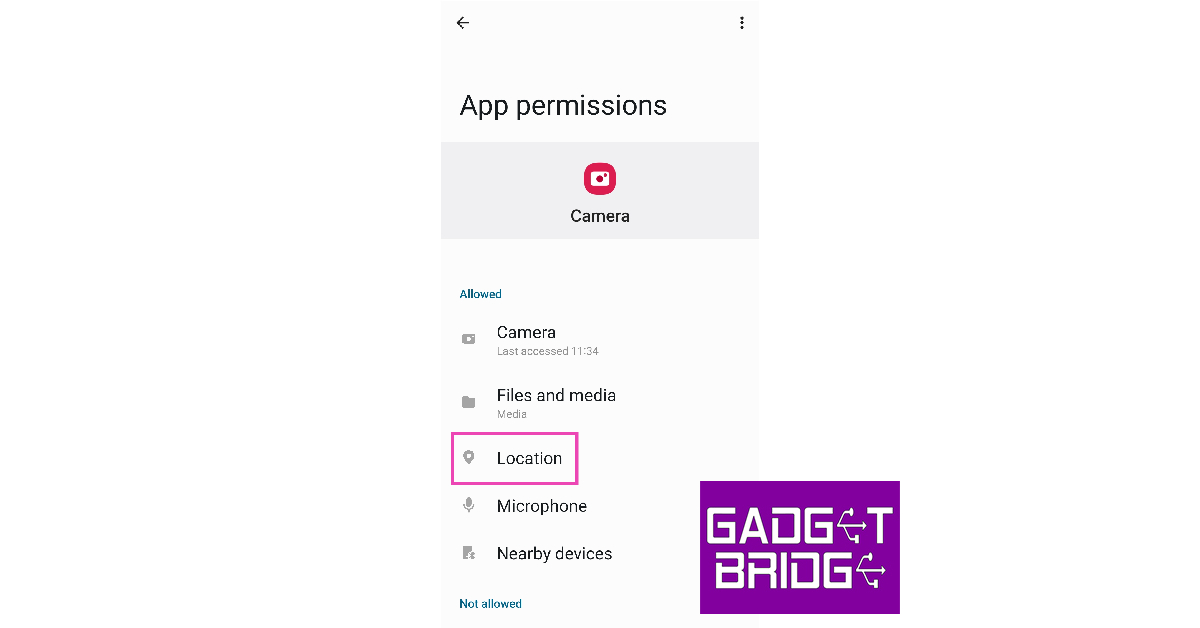 Step 4:
 Step 3:
 Step 5:
 Step 3:
 Step 4:
 Step 2:
 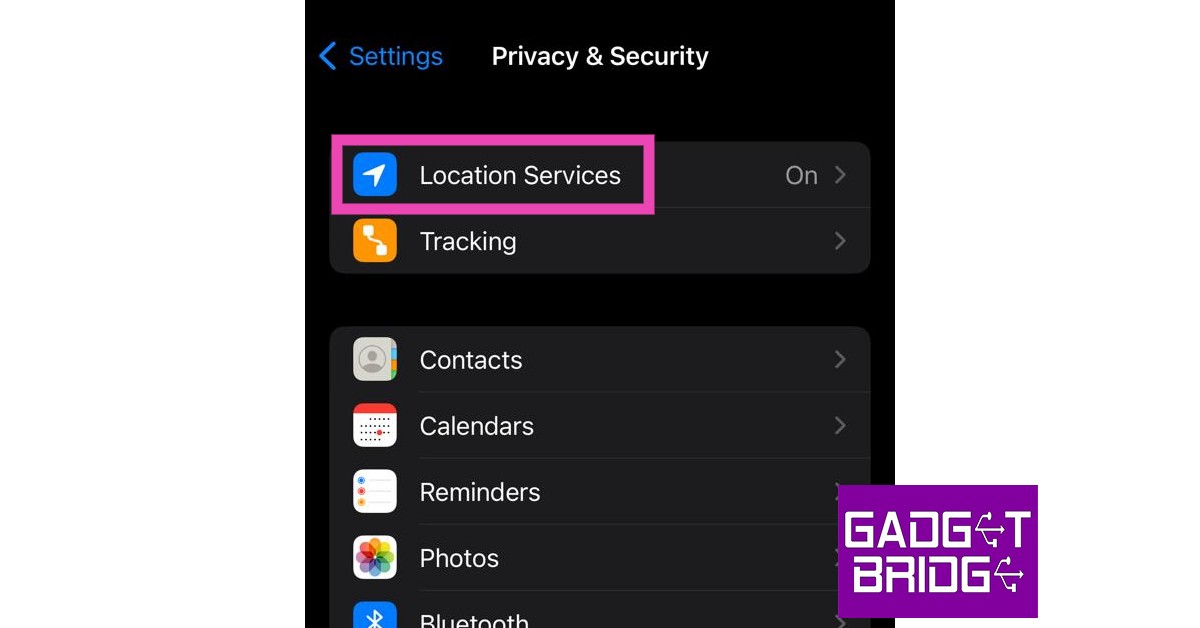 Step 3:
 Step 4:
 Step 3:
 Step 4:
 Step 6:
  Step 3:


 Benefit Tips


 launched at Rs 9,999, gets Dual Connection")


 Step 2: Open the PDF File
Click the “Open File” button and select the file in which you want to add shape. After selecting, press the “Open” button to import the file in UPDF. Now, tap the “Comment” icon at the left tool panel.
Step 2: Open the PDF File
Click the “Open File” button and select the file in which you want to add shape. After selecting, press the “Open” button to import the file in UPDF. Now, tap the “Comment” icon at the left tool panel. Step 3: Add Shape in the PDF File
Choose the “Shape” icon at the top navigation bar and select the shape you want to add. You can also adjust the shape’s border colour, fill colour, opacity, and border thickness by using the options provided underneath the shapes. Afterwards, insert the shape by clicking on the document. Go to the “File” menu and press the “Save” option to save changes.
Step 3: Add Shape in the PDF File
Choose the “Shape” icon at the top navigation bar and select the shape you want to add. You can also adjust the shape’s border colour, fill colour, opacity, and border thickness by using the options provided underneath the shapes. Afterwards, insert the shape by clicking on the document. Go to the “File” menu and press the “Save” option to save changes.
 Step 2: Add Shape to the PDF
After choosing the shape, take the cursor to the place where you want to add it and click to paste the shape there. Use the border handles to change the size and position of the shape.
Step 2: Add Shape to the PDF
After choosing the shape, take the cursor to the place where you want to add it and click to paste the shape there. Use the border handles to change the size and position of the shape.
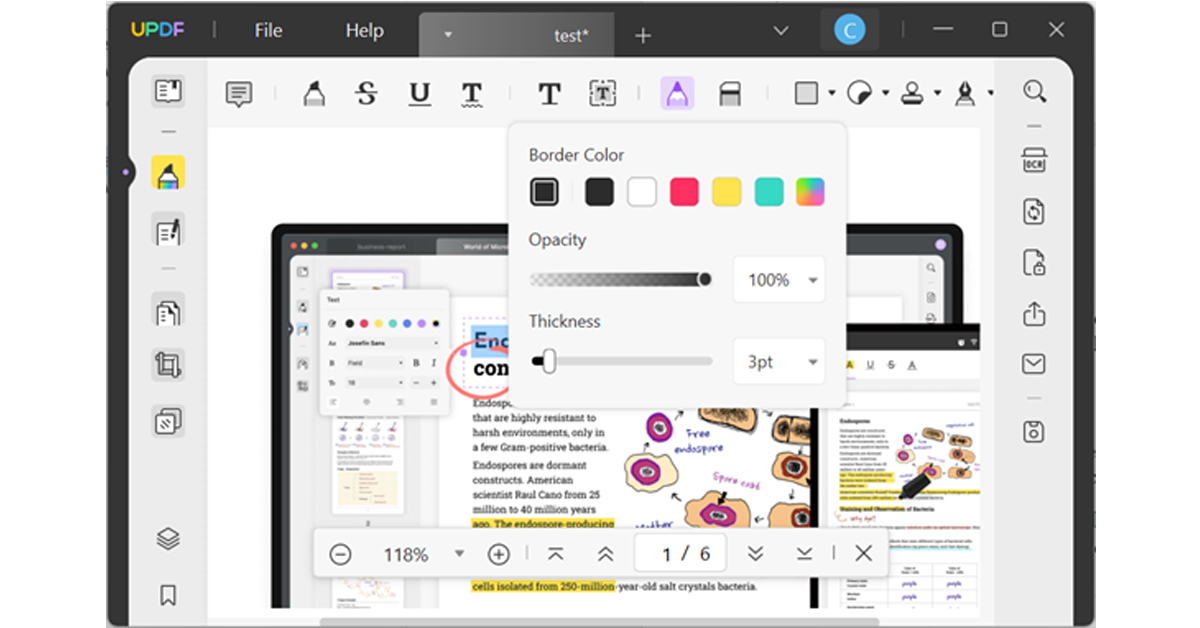 Step 2: Make Changes in Shape
After drawing the shape, you can use border handles to move its position and double-click on it to change its colour, size, and opacity. If you want to remove any portion of the shape, select the “Eraser” tool and rub the eraser over that part.
Step 2: Make Changes in Shape
After drawing the shape, you can use border handles to move its position and double-click on it to change its colour, size, and opacity. If you want to remove any portion of the shape, select the “Eraser” tool and rub the eraser over that part.
 reveal online? Everything you need to know")


 Step 2:
 Step 3:
 Step 4:
 Step 2:
 Step 3:
 Step 5:
 Step 1:
 Step 2:
 Step 3:
 Step 3:
 Step 6:
 Step 2:
 Step 3:
 Step 3:


")

 Rebooting your phone in Safe Mode disables all third-party apps. Press and hold the power off icon in the power menu to reveal the Safe Mode option. If your phone works fine in Safe Mode, it means that one of the third-party apps is at fault. Delete the apps that you installed right before this issue surfaced on your phone. Once that’s done, reboot your smartphone normally. The issue should be fixed. If you’re experiencing the issue in Safe Mode as well, move on to other fixes.


 It is possible that a virus or malware is causing your phone to shut down at random intervals. Install a good anti-virus app on your phone and perform a deep scan of your device. Let the anti-virus app find the source of the virus. Once you know which files are compromised, delete them from your phone.

 laptop launched with latest AMD RYZEN 7000 CPU")
 With dual-fan cooling, dual-intakes (top and bottom), and a quad-exhaust port design, the newly improved chassis in the Acer Nitro 5 (2023), it has a few additional tricks up its sleeve. Open the NitroSense utility software to gain additional control over fan speeds, lighting, and other factors.
With AMD FreeSync maintaining those frames tight and in sync, everything appears better in QHD. A fluid, uninterrupted, and unmatched gaming experience is guaranteed by the 165Hz refresh rate and 3ms reaction time.
“The Acer Nitro 5 (2023) have an unrivalled reputation for offering cutting-edge technology and intense gaming at affordable prices. As gaming has been in the spotlight for the past several years, we are proud and thrilled to introduce the latest Nitro 5 laptop to our Indian gamers. It features the latest AMD Ryzen 7000 processors which is a gaming powerhouse with high performance. With the latest sleek and refined chassis this robust laptop packs a punch giving the users a seamless gaming experience” said Sudhir Goel, Chief Business Officer,
With dual-fan cooling, dual-intakes (top and bottom), and a quad-exhaust port design, the newly improved chassis in the Acer Nitro 5 (2023), it has a few additional tricks up its sleeve. Open the NitroSense utility software to gain additional control over fan speeds, lighting, and other factors.
With AMD FreeSync maintaining those frames tight and in sync, everything appears better in QHD. A fluid, uninterrupted, and unmatched gaming experience is guaranteed by the 165Hz refresh rate and 3ms reaction time.
“The Acer Nitro 5 (2023) have an unrivalled reputation for offering cutting-edge technology and intense gaming at affordable prices. As gaming has been in the spotlight for the past several years, we are proud and thrilled to introduce the latest Nitro 5 laptop to our Indian gamers. It features the latest AMD Ryzen 7000 processors which is a gaming powerhouse with high performance. With the latest sleek and refined chassis this robust laptop packs a punch giving the users a seamless gaming experience” said Sudhir Goel, Chief Business Officer,