Fixing the problem of an external hard drive not shown on windows can be frustrating. Shops can also charge a lot. If you are facing a similar problem, here are 5 ways that you can fix an HDD not showing up in Windows 10. After these, the system will be able to read your external hard disk drive.
Check your Drive management
There might be many reasons why an external Hard Drive is not working when you plug it in. It might be because of a partition issue, wrong file system, or wrong USB ports. Try doing these steps.
Press the Windows + X keys. Or you can do it manually by searching Disk Management on the search bar of your screen. Also, you can run dialogue with Windows +R and enter the keyword diskmgmt.msc
It will now take you to the disk management window. You can see your external drive under the primary and secondary disks. If it does not show it might because the disk is not a partition yet.
In section 4 create a new volume and put a drive letter and partition. So other devices can access
If it has not shown up still it is a hardware issue or maybe the drive is dead.
The USB port that your plugin might be the problem. And that is why it is unable to show the external HDD. Not all but a few of the USB hubs do not give enough power to read the external drive.
Troubleshoot Driver issue
You can always check the troubleshooter, which is at the device manager for any driver problem. Do this by using the shortcut by pressing Windows +X keys. Expand the Disk drivers and check if they show yellow exclamation next to the driver. If there is an issue you can right-click and go to properties and see the message for any solution.
Read also: Amazon Smart Plug launched in India for Rs 1,999
Change Driver Path
Anothermethod to fix the unrecognised external hard drive is to change the drive letter. For this, you need to go to Disk management with the keys mentioned above.
Right-click on the disk partition with no letter
Select change Drive letter and Path in the context menu
Click add button
Assign a drive letter ( for example E, G, D)
Format the drive
Remember formatting your external drive will result in erasing all your data in the drive. Make sure you have copied all important data on another device or any other source. Hope this basic process helps solve the problem with your external HDD. There might be many other reasons why the external drive is not recognising. There are also many other methods that you can try to fix the problem. For example, you can update/uninstall/rollback driver, reinstall USB controller, enable legacy USB support in BIOS, update system to the latest version available, disable USB selective suspend setting, update motherboard chipset drivers, fix the system built-in drivers, run an antivirus scan on the computer and external drive.
For the latest gadget and tech news, and gadget reviews, follow us on Twitter, Facebook and Instagram. For newest tech & gadget videos subscribe to our YouTube Channel. You can also stay up to date using the Gadget Bridge Android App.
Don’t you want to add all your best songs to your playlist and play it over and over? You would want your favourite music to be played continuously when working or reading. You can create a playlist including all your best songs of all time on the Spotify playlist. Follow these steps and create the playlist. Read Also:Apple discontinues iPad (9th gen); iPad (10th gen) gets a price cut
You can also remove a song from your playlist by clicking right click and remove
Download a song from the playlist
You can also download songs from your playlist with the toggle download
Share with friends
You can share your best songs with your loved ones
Secret or Public
Click the Triple-dot button and select make public or make secret.
On the Phone
Listening to music on the Spotify app is always fun. But it will be more fun if you listen to your favourite songs on a playlist. This way you don’t have to search for them, just select the playlist and start listening to your fav tunes.
Read also: Google releases hum to search feature, now hum a song to search on Google
Making a playlist
Open the Spotify app on your Android or iOS smartphone
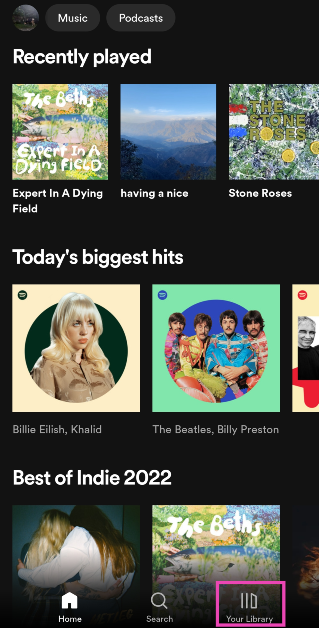
Go to Your Library that is at the bottom of your phone screen
Select Playlist
Press Create playlist
Name the Playlist
Adding songs to a playlist
Search music to add
Press three dots
Select add to playlist
Delete a song
You can also delete an added song from the playlist
Press three dots
Remove
Song Download to the Spotify app
Now you can download songs from the playlist
Use the toggle download
Share with friends/family
You can share your love songs with your loved ones and family by clicking the sharebutton
Make it secret or Public
Press the Triple-dot button
Select make public or make secret
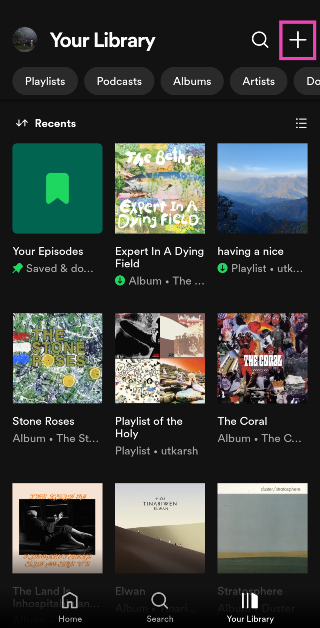
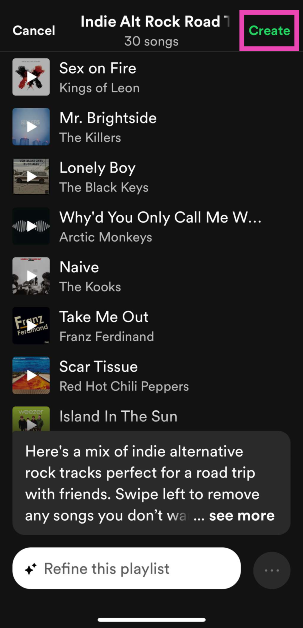
Create an AI Playlist on Spotify
If you’re a Spotify Premium subscriber in the UK and Australia, you can use AI to create a playlist. Here’s how.
Launch the Spotify app on your smartphone and switch to the Library tab.
Tap the plus icon at the top right corner of the screen.
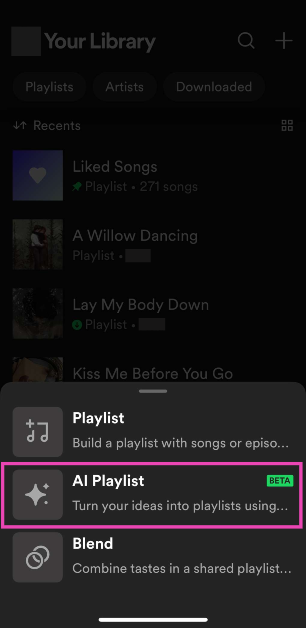
Select AI Playlist.
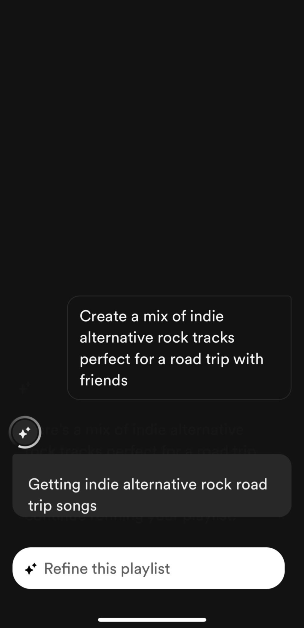
Enter a prompt. If you want a playlist that accurately represents your mood, be very specific with your prompts. Spotify also has preset prompts for you to choose from.
Spotify will produce a playlist based on the prompt. You can edit the songs in this playlist or refine it further by entering a follow-up prompt.
When you’re happy with the results, hit Create.
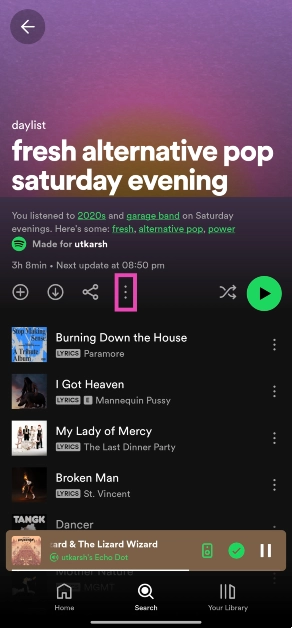
Turn your Daylist into a playlist
Your Spotify Daylist is a playlist that the platform curates specially for you by observing your past listening patterns. Daylists change throughout the and cannot be saved. However, if you want to save one as a playlist, follow these steps.
Launch the Spotify app and go to your daylist.
Hit the ellipses.
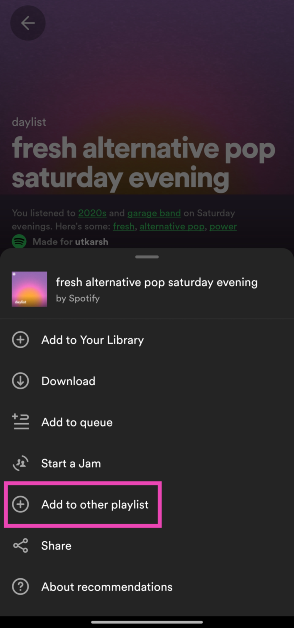
Select Add to other playlist.
Tap on New playlist.
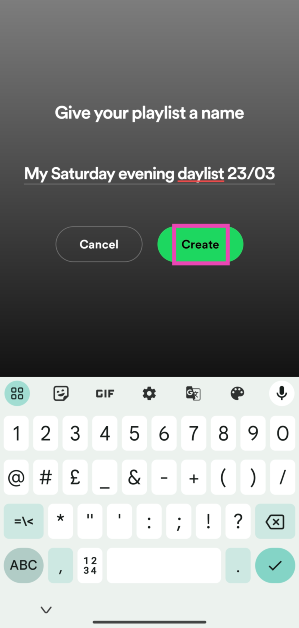
Give the playlist a name and hit Create.
Frequently Asked Questions (FAQs)
How do I create a playlist on Spotify?
Launch Spotify, go to the ‘Your Library’ tab, hit the plus icon, select Playlist, give the playlist a name, and hit ‘Create’. You can now add songs to the playlist.
How do I add a song to a playlist?
To add a song to a playlist, hit the ellipses next to it, select ‘Add to playlist’, and tap on the playlist you want to add it to.
These are the top 4 ways to create a playlist on Spotify. Read this article if you want to know how to transfer your playlist from Amazon Music to Spotify. Do share your created Spotify Playlist in the comments too, we would love to hear it.
This year’s annual Worldwide Developers Conference (WWDC) comes to an end. The Cupertino-based company concludes the WWDC21 with the announcement of the Apple Design Awards. The ceremony is hosted by the company to motivate the creative artistry, craftsmanship, and technical achievement of Apple developers.The Apple Design Awards honours excellence in innovation, ingenuity, and technical achievement in the app and game design. While concluding the online tech event the company announced this year’s finalists- apps and games produced by some of the most talented developers in the world. Finalists were chosen across six categories for innovation, visual & graphics, interaction, delight and fun, inclusivity, as well as social impact.Susan Prescott, Apple’s vice president of Worldwide Developer Relations commented, “This year’s Apple Design Award winners have redefined what we’ve come to expect from a great app experience, and we congratulate them on a well-deserved win. The work of these developers embodies the essential role apps and games play in our everyday lives, and serve as perfect examples of our six new award categories.” Following are winners chosen across six categories:
Inclusivity
The Apple Design Award for the category of Inclusivity in the app has been given to the applicationVoice Dream Reader. This is basically a text-to-speech app developed by Voice Dream LLC (United States). The application can read text aloud from just about any digital source such as PDF, webpage, or ebook, in more than two dozen languages. It comes with customisable settings letting users choose a voice with the perfect tone, timbre, accent, and speed for an optimal reading experience.Another one to receive the award in the game category is, HoloVista which is developed by Aconite (United States). This game supports a wide variety of accessibility features, including options for motion control, text sizes, text contrast, sound, and visual effect intensity.
Delight and Fun
Winners in this category arePok Pok Playroom andLittle Orpheus. Pok Pok Playroom is an animated app that captivates users with its thoughtful design and mesmerising interactions. It offers subtle haptics and spot-on sound effects, this app provides endless hours of fun for kids of all ages, while rewarding creativity and experimentation. Whereas Little Orpheus is another game with easy controls, excellent storytelling, and a console-like experience to a casual game.
Interaction
CARROT Weather andBird Alone are the winners under this category. Bird Alone’s explorative interactions combine gestures, haptics, parallax, and dynamic sound effects that imbue richness into its world. The game is brought to life through clever notification integration, graphics, and music that changes depending on the real-world weather, season, and time of day. On the other hand, CARROT Weather is known for its humorous forecasts and unique visuals. It also offers witty weather projections to a robust set of customisable widgets and a collection of useful watch faces.
Social Impact
Winners in this category areBe My Eyes developed by S/I Be My Eyes (Denmark) andAlba developed by ustwo games (United Kingdom). The Be My Eyes is an application for blind and low vision to identify objects by pairing them with volunteers from around the world using their camera. Whereas Alba is a game that saves local wildlife, repairs the bridge in the reserve, and cleans up trash around town. This game demonstrates the positivity that comes from respecting the environment while telling a story about family, community, activism, and kindness.
Visuals and Graphics
Application Loóna andGenshin Impact are winners of Apple Design Awards under the visuals and Graphics category. Loóna offers gracefully animated sleepscape sessions that combine relaxing activities, storytelling, and atmospheric sounds. On the contrary, Genshin Impact is a game offering motion blur, shadow quality, and frame rate that can be reconfigured on the fly whether players are obliterating slime monsters, summoning earthquakes, flinging lightning, or guiding the wind itself to supercharge flames and blizzards.
Innovation
Winners in this category provide a state-of-the-art experience through the novel use of Apple technologies that set them apart in their genre. ApplicationNaadSadhana by Sandeep Ranade (India) andLeague of Legends: Wild Rift by Riot Games (United States) are the winners of Apple Design Awards in this category. NaadSadhana is an all-in-one, studio-quality music app that helps musicians of all genres and any expertise perform and publish their music without boundaries. It supports seven different genres of music. Whereas “League of Legends: Wild Rift” takes a complex PC game and delivers its full experience on mobile. It offers polished touchscreen controls that have been designed specifically for mobile, and an auto-targeting system to help newcomers find their footing, mobile-exclusive camera settings, and much more.
For the latest gadget and tech news, and gadget reviews, follow us on Twitter, Facebook and Instagram. For newest tech & gadget videos subscribe to our YouTube Channel. You can also stay up to date using the Gadget Bridge Android App.
Privacy is of the most importance on social media networks. In the digital age of social media, staying private is the safest way to browse. If you are confused about how to stay incognito on Instagram, you can turn off the active status. Here are the steps you can follow to turn the active status off on Instagram.
For Andriod
Our favourite photo-sharing app features the option to show all your uploaded photos if not kept private. Being fully aware of all your activity on the app is advised. Being private is always encouraged, though it is a social media network. The online status is shown on your DM (Direct message) for those who have DMed you. Unfollowers or followers who you haven’t DMed do not see you online. It shows a green icon that shows your followers on your DM list and can see you are online on Instagram. Turning it off will make you browse the Instagram app privately without any DM (direct message) intrusion.
Read more: How to prevent Amazon from collecting your private information including your Alexa voice commands
Step 1: Open the Instagram app: After login
Navigate to your profile
Click the profile icon
Click the three horizontal lines, on the top right corner: Options/settings
Step 2: Go to settings: at the bottom
Tap on Privacy
Click the “activity status”
Next on the screen, it shows the Activity status page
Turn off the activity status using the toggle
For IOS: iPhone
Here are the steps you can follow in case you are on an iOS device. The process is also similar to the Android smartphone system. You can follow these easy steps and can also hide your online status message so that you do not get any pesky messages, while you are busy.
Read also: How to verify if your PAN is linked to your Aadhaar Number?
step 1: Open Instagram on IOS
Go to the bottom right corner
Tap the profile icon
Go to the top right corner
Click on the three horizontal lines: Menu
Step 2: A screen pop up from the bottom
Go to settings
Click the privacy options with the lock icon
Under the interaction options: press activity status (Fourth option)
Indian Telecom company Reliance Jio has integrated with WhatsApp to allow its users to recharge mobile numbers, make payments and more. The users will get control of JioFiber, and JioMart accounts via Whatsapp. With the integration, it will be easier for the users to recharge their mobile number on WhatsApp by sending a ‘Hi’ message to the Jio care number.By simply sending Hi on the Jio care number (7000770007) the Reliance Jio users will be able to get their contact number recharged as well as enquire about other Jio services using the popular messaging app. In addition to this, the users can also get a new Jio SIM or Port-in (MNP). Those who want a new JioFiber connection, a query related to the broadband service international roaming, and JioMart all through WhatsApp. It should be noted that JioMart is also integrated within the chat application to place orders.
How to recharge Reliance Jio number using WhatsApp?
First thing first, save the Jio care number (7000770007) to your contact list. To initiate the process simply send a ‘Hi’ message on WhatsApp.
Then a support executive will duly respond to the query.
You will be provided with few options that include Jio SIM Recharge, Get new Jio SIM or Port-In (MNP), Support for Jio SIM, Support for JioFiber, Support for International Roaming and Support for JioMart.
Select the appropriate option like “Jio SIM Recharge” and you will be getting some prepaid plans.
Now select your desired prepaid recharge plan
You will be now directed to the company’s official site to initiate the payment. As of now, it offers various payment options that include, Google Pay (or, GPay), PhonePe, Paytm, Amazon Pay, e-Wallet, credit and debit cards.
Yesterday, OnePlus introduced the OnePlus Nord CE 5G smartphone as its most affordable latest model to the Nord series in India. The device comes with some differences over the existing OnePlus Nord smartphone. To attract the masses the handset has been produced at a more affordable price range that will give tough competition to other smartphones like Xiaomi Mi 10i and the original Nord bringing powerful cameras with additional features. So we have put all three devices together to help you understand which one you should go for.
Display
OnePlus Nord CE 5G: 6.43-inch 90Hz Fluid AMOLED displayOnePlus Nord: 6.44-inch full-HD+ Fluid AMOLED display Xiaomi Mi 10i: 6.67-inch full-HD+ waterdrop-style notch display
OnePlus Nord CE 5G: Triple rear camera set up on its back featuring a 64-megapixel primary camera sensor, an 8-megapixel ultra-wide camera with 119 degrees of FoV and a 2-megapixel depth sensor. OnePlus Nord: Sony IMX586 48-megapixel primary sensor with an f/1.75 aperture along with optical image stabilisation (OIS). In addition to this, there is a secondary 8-megapixel ultra-wide-angle lens with a field of view (FoV) of 119 degrees and an f/2.25 aperture. It also has a 2-megapixel and a 5-megapixel macro and a depth sensor with f/2.4 aperture respectively. Xiaomi Mi 10i:Quad rear camera setup that includes 108-megapixel primary sensor with f/1.75 aperture, an 8-megapixel ultra-wide-angle sensor, 2-megapixel macro lens and a 2-megapixel depth sensor
Selfie camera
OnePlus Nord CE 5G:16-megapixel selfie sensor OnePlus Nord: 32-megapixel and an 8-megapixel ultra-wide-angle cameraXiaomi Mi 10i: 16-megapixel selfie sensor with f/2.45 aperture
RAM and storage
OnePlus Nord CE 5G: 6GB RAM with 128GB/ 8GB RAM with 128GB/12GB RAM with 256GB OnePlus Nord: 6GB RAM with 64GB storageXiaomi Mi 10i: 6GB RAM with 64GB/ 128GB storage and 8GB RAM with 128GB storage
Battery
OnePlus Nord CE 5G: 4,500mAh batteryOnePlus Nord: 4,115mAh battery Xiaomi Mi 10i: 4,820mAh battery
Operating system
OnePlus Nord CE 5G: OxygenOS 11 on top of Android 11 OnePlus Nord: OxygenOS 10.5 based on top of Android 10Xiaomi Mi 10i: MIUI 12 OS based on Android 11
Price
OnePlus Nord CE 5G: Rs 22,999OnePlus Nord: Rs 24,999 Xiaomi Mi 10i: Rs 20,999
Verdict
Looking at the specification sheet there are some exceptional differences between the three smartphones. The OnePlus Nord comes with a glass rear and an alert slider like other OnePlus devices, the new OnePlus Nord CE 5G offers a plastic rear and also misses the alert slider. However, it includes a headphone jack which the original Nord does not offer. Xiaomi Mi 10i comes with a larger display than the Oneplus smartphones. The display supports a 120Hz refresh rate whereas the other two only come with a 90Hz refresh rate. In terms of hardware, OnePlus Nord runs on the Qualcomm Snapdragon 765G platform whereas OnePlus Nord CE 5G and Xiaomi Mi 10i runs on the Qualcomm Snapdragon 750G 5G. If we compare the mobile platforms, 750G is more efficient than 765G that can only be noticed during the day to day usage. Also, Xiaomi’s device offers a larger battery capacity than the Nords at 4,820mAh supported by 33W fast charging tech.Both the original Nord and the Mi 10i features a quad rear camera whereas the new Nord has been downgraded with a triple camera set up but has a primary camera with better resolution than its predecessor. This is where Xiaomi stands out with a 108-megapixel primary quad camera set up. Speaking of selfies, the older Nord offers a dual front camera consisting of a 32-megapixel main camera and an 8-megapixel ultra-wide-angle camera, therefore surpassing others. Comparing the pricing, Xiaomi Mi 10i will attract more attention and praise than the others as it is a more camera-focused phone at Rs 20,999. So for the selfie addicts, you can go for the Nord but we would suggest you go for Xiaomi as it provides a powerful rear camera set-up and other useful features as well as hardware.
For the latest gadget and tech news, and gadget reviews, follow us on Twitter, Facebook and Instagram. For newest tech & gadget videos subscribe to our YouTube Channel. You can also stay up to date using the Gadget Bridge Android App.
Moderating a room in the Clubhouse app is like handling your own Channel. The social networking application allows users to participate in the audio chat-based app. You can add your friends and family, even invite strangers and co-hosts. Now let’s get started with the steps on how to create your own room in the Clubhouse app.
Step 1: Open the Clubhouse App:
You can search for the Clubhouse app from Playstore on your Android or AppStore on IOS smartphones and download it. After downloading you can now open the app and start creating your profile on the Clubhouse app for an audio-based social networking experience. The Clubhouse app is fairly new and comes with many interesting features. It can be used in many ways. Hosting a podcast is one of the cool new features. Voice chat functionality is the most attractive feature of the app.
You can schedule a room with the options given. There are a lot of plus points in scheduling a room. It provides you with a link to the event which you can share. As it shows up in the notification menu, it will notify your followers.
Click the calendar icon (+) on the top right corner
Choose event name (60 character maximum)
Option to add co-host: you can choose or leave blank
Schedule date and time
Add description (200 Characters)
Press the publish button
Step 3: Spontaneous spin a room: When you start a spontaneous spin room you lose the benefit of getting a link that you can share. But you don’t have to go through the lengthy part of filling up the descriptions. Besides, there are other interesting advantages. R
Press on Start a room
Choose open, social, or closed
You can add a topic
Tap the Open it up button
Choose private or public (Private recommended to begin with)
Start off with a formal introduction of yourself and the aims of the room. Highlight and establish the rules and regulations of the room. Next, briefly discuss the topic of the room. Make sure you control the dialogue, manage speakers, and lastly keep the discussion on track.
Tap on All Rooms: room rest (Periodically)
Tap on other profile: make them moderator (options)
Raise hand icon: Set on or off
How to end a Clubhouse room:Ending a Clubhouse voice chat is always the hardest part emotionally. Since we engage with them on a knowledge level where we instantly connect. End it by thanking everyone in the room. Like every good thing comes to an end, it is time to end the Clubhouse room chat too, till next time.
A television has always been an indispensable part of our everyday life and due to the COVID lockdown, this device has become one of the best media devices to kill time during our stay at home. Keeping this in mind Sony has expanded its Smart TV lineup with the introduction of the Bravia X90J Ultra-HD HDR LED TV in India. There are three size options to choose from that comes with the XR Cognitive Processor with Full-Array LED panel, XR Triluminos Pro and XR Contrast Booster for a natural and immersive experience.The company has introduced the new X90J series in three different sizes of 189 cm (75), 165 cm (65) and 140 cm (55) that are powered by Cognitive Processor XR that is said to use a completely new processing method that goes beyond conventional AI. It helps in maintaining focus on certain points which we unconsciously lose focus on. Cognitive intelligence knows where that focal point is by dividing the screen into numerous zones and detecting where the “focal point” is in the picture. There is support for HDR with the HLG, HDR10, and Dolby Vision formats. According to the company, this will make sure everything is synchronized and lifelike which conventional Artificial Intelligence (AI) cannot achieve as it can only detect and analyze picture elements like colour, contrast and detail individually. It also comes integrated with the XR 4K Upscaling technology that upscales 2K signals close to true 4K quality for real and detailed pictures.In addition to this, the Sony BRAVIA X90J series has multiple zones of LEDs that light up independently, allowing to adjust and create contrast by making light areas lighter and dark areas darker with greater depth, textures.The Full-Array LED panel creates ultra-realistic picture quality full of lifelike contrast. Whereas the XR Contrast Booster on the Smart TV will deliver vibrant colours and stunning contrast with deep blacks and intense brightness, therefore, eliminating shadows or blown-out highlights.The XR TRILUMINOS Pro helps in producing brighter colours by widening the colour spectrum with 3D colour algorithms. It also analyses and processes data in every image to make colours even more natural. With the XR Motion Clarity technology the new X90J series can achieve sports and fast action scenes smooth, bright and clear and brightness is boosted when needed.The audio department has been taken care of with XR Surround, 3D Surround upscaling and Acoustic Multi-Audio powered by Dolby Audio and Dolby Atmos. Additionally, there is a dedicated game mode with HDMI 2.1 compatibility, including 4K 120fps, Variable Refresh Rate (VRR), Auto Low Latency Mode (ALLM) and e-ARC for the ultra-smooth gaming experience. There is also access to Google Assistant and Alexa voice assistants to find what you want quickly or to play TV shows, movies, and more without using the TV remote. There is support for Google Chromecast built-in, Apple Home Kit and AirPlay to allow sharing content on the big screen or control your TV with this latest feature support.Pricing and AvailabilityAs of now, the company has only introduced the pricing of the 55-inch model whereas the price of the 75-inch and 65-inch will be announced later on. The price of the Sony Bravia XR-55X90J Ultra-HD HDR LED television has been set at Rs 1,39,990 in India. The QLED TV will be available for purchase across all Sony Centers, major electronic stores and e-commerce portals in the country.
For the latest gadget and tech news, and gadget reviews, follow us on Twitter, Facebook and Instagram. For newest tech & gadget videos subscribe to our YouTube Channel. You can also stay up to date using the Gadget Bridge Android App.
The e-commerce website Flipkart is hosting Daily Trivia Quiz. Every day it brings a bunch of new questions for its users. By answering them correctly you can win exciting prizes. The questionnaire is based on questions related to general knowledge. Also, the users can win free vouchers and super coins, among other offers via the daily quiz. June 11 Flipkart Daily Trivia Quiz Answers has already gone live on its platform.
The participant should be at least 18 years old and should have a valid login ID. The Quiz is available on the mobile platform and not the web version. E-commerce conducts the quiz on daily basis and goes live at 12:00 AM IST and runs till 11:59 PM IST. The winners are announced within 15 days from the date of participation that can be viewed under the Gems/Rewards section in the app.
How to participate in the Flipkart Daily Trivia Quiz
To participate download the Flipkart app on your phone. Then open the Flipkart app then head to Game Zone. Now click on the Daily Trivia Banner or search for Daily Trivia. Enter the game and answer all 5 questions with correct answers.
June 11 Flipkart Daily Trivia Quiz Answers
Question 1: GST stands for Goods and Services Tax. In which year did it come into effect in India?
Answer:2017
Question 2:Which type of condiment comes from the Hindi word meaning “to crush”?
Answer: Chutney
Question 3: On April 23, whose birth is celebrated by the UN as English Language Day?
Answer: William Shakespeare
Question 4: What is the small muscular sac, situated under the liver, which stores bile called?
Answer: Gall bladder
Question 5:Which of these is caused by a sudden closure of the human glottis?
Answer: Hiccup
Amazon Quiz is getting more popular in the country as many people are participating in the quiz every day. The quiz can be played daily from 12 AM to 11:59 PM. The e-commerce platform brings an opportunity for all its customers to play and win free gadgets as well as Amazon Pay Balance. Today’s prize is Rs 10,000 Pay Balance.
In the Amazon daily quiz, you have to answer 5 questions that are based on general knowledge and current affairs. The participants have to answer each question correctly to get their names selected for the lucky draw. The result of the lucky draw will be announced at the end of every month. Every day we update all the quiz questions along with their correct answers on our website to help you to clear the quiz successfully. If you are lucky you might win something by answering all the questions correctly. Check out today’s answers for the Amazon quiz to win Rs 10,000 Pay Balance.
June 11 Amazon Quiz Answers
Question 1: National Anti-Terrorism Day is observed every year on 21st May on whose death anniversary?
The answer is- Rajiv Gandhi
Question 2: Which auto major has launched Ioniq, its e-vehicle brand with the first model named ‘5’?
The answer is- Hyundai
Question 3: Which team was the first in IPL 2021 to have players testing positive, finally leading to the suspension of the season?
The answer is- KKR
Question 4: With which festival do we connect decorative chocolate eggs like these?
The answer is- Easter
Question 5: Which mythical country in South America was believed to be rich in this material?
The answer is- El Dorado
For the latest gadget and tech news, and gadget reviews, follow us on Twitter, Facebook and Instagram. For newest tech & gadget videos subscribe to our YouTube Channel. You can also stay up to date using the Gadget Bridge Android App.


 There might be many reasons why an external Hard Drive is not working when you plug it in. It might be because of a partition issue, wrong file system, or wrong USB ports. Try doing these steps.
 The USB port that your plugin might be the problem. And that is why it is unable to show the external HDD. Not all but a few of the USB hubs do not give enough power to read the external drive.
")