
 Also Read: Compare: OnePlus Nord 3 Vs OnePlus 11R
Flipkart will be the only place in the country where customers can buy it. The Nothing Phone 2 will also be sold directly from Nothing Drops pop-up shops in Bengaluru, India. The business’s first Nothing Drops location in the nation is here. According to the company, customers who make in-person purchases are also qualified for rewards and have the opportunity to speak with the staff. The Nothing Phone 2, Nothing Power 45W charger, and Nothing Phone 2 accessories will be available for purchase on July 21 beginning at 12 PM IST at the Nothing Drop store in Bengaluru located at Lulu Mall, Gopalapura, Binnipete. First come, first served would be the only restriction. The opportunity to own a Phone (2) arrives with an exclusive launch offer price of Rs 39,999 on Flipkart (inclusive of bank, exchange, and EMI offers).
The Nothing Phone 2 was launched in three different configurations of 8GB RAM with 256GB storage, 12GB RAM with 256GB and 12GB RAM with 512GB storage model. The price of the device is set at Rs 44,999 and Rs 49,999 and Rs 54,999 respectively.
For the latest gadget and tech news, and gadget reviews, follow us on Twitter, Facebook and Instagram. For newest tech & gadget videos subscribe to our YouTube Channel. You can also stay up to date using the Gadget Bridge Android App. You can find the latest car and bike news here.
Also Read: Compare: OnePlus Nord 3 Vs OnePlus 11R
Flipkart will be the only place in the country where customers can buy it. The Nothing Phone 2 will also be sold directly from Nothing Drops pop-up shops in Bengaluru, India. The business’s first Nothing Drops location in the nation is here. According to the company, customers who make in-person purchases are also qualified for rewards and have the opportunity to speak with the staff. The Nothing Phone 2, Nothing Power 45W charger, and Nothing Phone 2 accessories will be available for purchase on July 21 beginning at 12 PM IST at the Nothing Drop store in Bengaluru located at Lulu Mall, Gopalapura, Binnipete. First come, first served would be the only restriction. The opportunity to own a Phone (2) arrives with an exclusive launch offer price of Rs 39,999 on Flipkart (inclusive of bank, exchange, and EMI offers).
The Nothing Phone 2 was launched in three different configurations of 8GB RAM with 256GB storage, 12GB RAM with 256GB and 12GB RAM with 512GB storage model. The price of the device is set at Rs 44,999 and Rs 49,999 and Rs 54,999 respectively.
For the latest gadget and tech news, and gadget reviews, follow us on Twitter, Facebook and Instagram. For newest tech & gadget videos subscribe to our YouTube Channel. You can also stay up to date using the Gadget Bridge Android App. You can find the latest car and bike news here. Nothing Drops debuts in India, customers may now experience and preorder the Nothing Phone 2

Nothing recently announced the Nothing Phone 2 will be sold in India through Flipkart. In addition to being available online, Nothing is now letting customers purchase the Nothing Phone 2 in person at temporary shops called Nothing Drops. Through a pop-up shop in Bengaluru, customers in India can buy the most recent phone and the Nothing Ear 2 black colour option.
Beginning on Friday, July 21 at 12 PM, the Nothing Phone (2) will be available for purchase in India. Before then, individuals who are keen to try Phone (2) can pre-order it at the Bengaluru Nothing Drop store LULU Mall through Sunday, July 16.
Also Read: Nothing Phone 2 launched in India, equipped with Snapdragon 8+ Gen 1 SoC and tweaked design
For the first time ever, the London-based tech company Nothing organised a Nothing Drops event in India where attendees got away with the much-anticipated Phone (2), Ear (2) black, and related accessories. Hundreds of people lined up outside their SOHO stores in London and New York for the first incredibly successful drops, which were followed by an exhilarating drop today in Bengaluru, India.
While announcing Nothing Drops in India the company said, “The Phone (2) has generated a remarkable buzz, starting from sold out pre-order passes on Flipkart, to an incredible turnout of over 500 customers who patiently queued for hours, waiting to experience and own its latest offering. The overwhelming response speaks volumes about the anticipation surrounding Phone (2) and the unparalleled excitement it has generated among tech enthusiasts and smartphone aficionados alike.”
 Also Read: Compare: OnePlus Nord 3 Vs OnePlus 11R
Flipkart will be the only place in the country where customers can buy it. The Nothing Phone 2 will also be sold directly from Nothing Drops pop-up shops in Bengaluru, India. The business’s first Nothing Drops location in the nation is here. According to the company, customers who make in-person purchases are also qualified for rewards and have the opportunity to speak with the staff. The Nothing Phone 2, Nothing Power 45W charger, and Nothing Phone 2 accessories will be available for purchase on July 21 beginning at 12 PM IST at the Nothing Drop store in Bengaluru located at Lulu Mall, Gopalapura, Binnipete. First come, first served would be the only restriction. The opportunity to own a Phone (2) arrives with an exclusive launch offer price of Rs 39,999 on Flipkart (inclusive of bank, exchange, and EMI offers).
The Nothing Phone 2 was launched in three different configurations of 8GB RAM with 256GB storage, 12GB RAM with 256GB and 12GB RAM with 512GB storage model. The price of the device is set at Rs 44,999 and Rs 49,999 and Rs 54,999 respectively.
For the latest gadget and tech news, and gadget reviews, follow us on Twitter, Facebook and Instagram. For newest tech & gadget videos subscribe to our YouTube Channel. You can also stay up to date using the Gadget Bridge Android App. You can find the latest car and bike news here.
Also Read: Compare: OnePlus Nord 3 Vs OnePlus 11R
Flipkart will be the only place in the country where customers can buy it. The Nothing Phone 2 will also be sold directly from Nothing Drops pop-up shops in Bengaluru, India. The business’s first Nothing Drops location in the nation is here. According to the company, customers who make in-person purchases are also qualified for rewards and have the opportunity to speak with the staff. The Nothing Phone 2, Nothing Power 45W charger, and Nothing Phone 2 accessories will be available for purchase on July 21 beginning at 12 PM IST at the Nothing Drop store in Bengaluru located at Lulu Mall, Gopalapura, Binnipete. First come, first served would be the only restriction. The opportunity to own a Phone (2) arrives with an exclusive launch offer price of Rs 39,999 on Flipkart (inclusive of bank, exchange, and EMI offers).
The Nothing Phone 2 was launched in three different configurations of 8GB RAM with 256GB storage, 12GB RAM with 256GB and 12GB RAM with 512GB storage model. The price of the device is set at Rs 44,999 and Rs 49,999 and Rs 54,999 respectively.
For the latest gadget and tech news, and gadget reviews, follow us on Twitter, Facebook and Instagram. For newest tech & gadget videos subscribe to our YouTube Channel. You can also stay up to date using the Gadget Bridge Android App. You can find the latest car and bike news here. Compare: OnePlus Nord 3 Vs OnePlus 11R

OnePlus Nord 3 which was recently launched in India has today gone on sale for the public. The device is a strong rival to the OnePlus 11 5G. The cost of the two phones differs significantly, though. Would you like to learn more about how the OnePlus 11R and OnePlus Nord 3 compare? We have analysed the technical details of both smartphones, which will undoubtedly help you choose wisely if you decide to buy one of them.
In This Article
Display
OnePlus Nord 3: 6.74-inch AMOLED screen OnePlus 11R: 6.74-inch Full-HD+ curved AMOLED displayProcessor
OnePlus Nord 3: MediaTek Dimensity 9000 SoC OnePlus 11R: Snapdragon 8+ Gen 1 5G Also Read: OnePlus 11R pre-orders open in India: Details insideRear camera(s)
OnePlus Nord 3: Triple rear camera setup includes a 50-megapixel Sony IMX890 sensor with OIS support, an 8-megapixel ultra-wide angle Sony IMX355 sensor with a 112-degree FoV, and a 2-megapixel macro lens. OnePlus 11R: Triple rear camera setup includes a 50MP Sony IMX890 main sensor, 2MP macro camera with a 120-degree ultra-wide lens, an 8 MP ultra wide-angle sensorSelfie camera
OnePlus Nord 3: 16-megapixel front-facing camera OnePlus 11R: 16MP front cameraRAM and storage
OnePlus Nord 3: 8GB RAM with 128GB of storage/ 16GB RAM with 256GB internal storage OnePlus 11R: 8GB RAM with 128GB storage/16GB RAM with 256GB storageBattery
OnePlus Nord 3: 5,000mAh battery with 80W SuperVOOC charging OnePlus 11R: 5,000mAh battery with 100W SuperVOOC chargingOperating system
OnePlus Nord 3: OxygenOS 13.1 with Android 13 OnePlus 11R: OxygenOS 13 with Android 13 Also read: OnePlus Nord 3 with tri-state alert slider debuts in IndiaPrice
OnePlus Nord 3: Rs 33,999 OnePlus 11R: Rs 39,999Our Take
Both smartphones have AMOLED displays, although the one on the 11R is curved when compared to the Nord 3’s flat display. The OnePlus 11R has a Qualcomm Snapdragon 8+ Gen 1 5G SoC, whilst the Nord has a MediaTek Dimensity 9000 SoC. On the software front, both come pre-installed with Android 13; however, the Nord 3 runs OxygenOS 13.1 as opposed to the OxygenOS 13 of the 11R. On these phones, the battery capacities and cameras are identical. In contrast to Nord’s 80W SuperVOOC charging, the 11R offers 100W SuperVOOC charging. For the pricing, there is a nearly Rs 6,000 price difference between both devices. If your budget is tight, you should consider the Nord 3, but if you want a better flagship processor with a curved screen that looks expensive, you should consider the OnePlus 11R. For the latest gadget and tech news, and gadget reviews, follow us on Twitter, Facebook and Instagram. For newest tech & gadget videos subscribe to our YouTube Channel. You can also stay up to date using the Gadget Bridge Android App. You can find the latest car and bike news here.BGMI redeem codes for 15 July 2023, claim and receive rewards and benefits

After being banned for nearly ten months, Battleground Mobile India, aka BGMI, is officially available again in India. BGMI fans are looking for ways to improve their game experience and one such method is the usage of redemption codes, which offers a variety of rewards and advantages using BGMI redeem codes players can gain access to new skins, outfits, loot crates, weapons and free UC and diamonds.
As mentioned earlier, these codes give users the chance to earn unique rewards and gain extra benefits while playing the game. This includes GUN SKINS (M4, AKM, M416, AWM, M24, UZI, KAR98K), free character voucher, Andy, Carlo, Sara, Victor character for free, free Anna Character on completing the mission and UC or Royal Pass Discount. So here we have gathered a list of the most recent BGMI redeem codes as of 15 July 2023. Also, redeem these codes asap as these are only valid for a limited duration.
In This Article
BGMI Redeem Codes for 15 July 2023
- Updating…
How to get free Redeem Codes for BGMI on 15 July 2023?
- Launch BGMI on your device.
- Then select the Redeem Code option from the main menu.
- Next, click on the Redeem code tab.
- A new window will open, requesting the redemption code.
- Now enter your BGMI code.
- Confirm and click on the “Redeem” tab.
- If your redeem code is valid then you will get a message confirming that your rewards were successfully redeemed.
Garena Free Fire Redeem Codes Today 15 July 2023: Here is how to claim them

Garena Free Fire is a battle royale game with regular awards and tournaments to keep players interested. If you play Garena Free Fire, you should be aware of the redeem codes that are released on a daily basis. However, because the battle royale game is banned in India, players from other countries can use the Free Fire Redeem codes daily. If you’re unfamiliar with the Garena Free Fire redeem codes or don’t know how to get them, we’ve put together a step-by-step guide to help you redeem them. Check out Garena Free Fire Redeem Codes for 15 July 2023.
The Free Fire redeem codes are a great way to get free stuff. These are 12-digit codes that contain alphabets and numbers, as well as an expiration date and time. Because the Garena FF redeem codes cannot be used more than once, you should hurry to the redemption page to claim your free reward before someone else does. To get a free reward, all you have to do is go to reward.ff.garena.com/en, which is the official redemption page. Also, keep an eye on this space for daily updates on Garena Free Fire redemption codes and rewards.
In This Article
Garena Free Fire Redeem Codes Today 15 July 2023
- V427K98RUCHZ 6KWMFJVMQQYG FFCMCPSUYUY7E MCPW3D28VZD6 BR43FMAPYEZZ NPYFATT3HGSQ FFCMCPSGC9XZ XZJZE25WEFJJ EYH2W3XK8UPG FFCMCPSJ99S3 MCPW2D2WKWF2 ZZZ76NT3PDSH FFCMCPSEN5MX HNC95435FAGJ FAGTFQRDE1XCF FFCMCPSBN9CU MCPW2D1U3XA3 FFAC2YXE6RF2
How to Get Free Fire Redeem Codes for Garena on 15 July 2023?
- Visit the Garena Free Fire game’s official website at reward.ff.garena.com.
- Use your Facebook, Google, VK, Apple ID, Huawei ID, or Twitter account to log in.
- You’ll be taken to a valid redemption code (s)
- Copy and paste the 12-digit redemption code into the text box.
- On the screen, a dialogue box will appear.
- ‘Ok’ should be selected.
How to install Google Play Games Beta on your PC?

For the longest time, Windows users had to rely on using Android emulators to play their favourite mobile games on a PC. That changed when Google Play Games (Beta) was launched for PC last year. Initially launched in only a few countries, the gaming platform is now being introduced to other locations as well. Users in India can now download and play Android games on their PC using Google Play Games. If you’re wondering how to install Google Play Games Beta on your PC, here is a quick guide.
Read Also: Viewsonic OMNI VX28 Series 180 Hz gaming monitors launched in India
 Step 5: Click OK.
Step 6: Restart your PC.
Step 3: Run the installation suite as administrator.
Step 4: Once Google Play Games has been installed on your PC, sign in using your Google account.
Step 5: Search for the Android game you want to play on your PC.
Step 5: Click OK.
Step 6: Restart your PC.
Step 3: Run the installation suite as administrator.
Step 4: Once Google Play Games has been installed on your PC, sign in using your Google account.
Step 5: Search for the Android game you want to play on your PC.
In This Article
Minimum PC Requirements
- OS: Windows 10 (v2004) or higher
- Storage: SSD with at least 10GB of available space
- Memory: 8GB of RAM
- Graphics: Intel UHD Graphics GPU or comparable ( Gaming-class GPU like Nvidia GeForce MX450 for better performance)
- Processor: 4 CPU physical cores (8 logical cores for better gameplay)
Enable Virtualization on your PC
Some Android games may require Windows Hypervisor Program to be enabled on your PC. Here’s how you can turn it on. Step 1: Click the search icon on the taskbar. Step 2: Type ‘Turn Windows features on or off’. Step 3: Select Open. Step 4: Tick the boxes for Virtual Machine Platform and Windows Hypervisor Program. Step 5: Click OK.
Step 6: Restart your PC.
Step 5: Click OK.
Step 6: Restart your PC.
Here’s how you can install Google Play Games Beta on your Windows PC
Step 1: Launch the web browser on your PC and go to https://play.google.com/googleplaygames. Step 2: Click on Download beta. Step 3: Run the installation suite as administrator.
 Step 4: Once Google Play Games has been installed on your PC, sign in using your Google account.
Step 5: Search for the Android game you want to play on your PC.
Step 4: Once Google Play Games has been installed on your PC, sign in using your Google account.
Step 5: Search for the Android game you want to play on your PC.
Frequently Asked Questions (FAQs)
What games are available on Google Play Games Beta?
There are over 100 gaming titles currently available on Google Play Games Beta for Windows. Users can download games like Eversoul, Evony: The Kings Return, and Ludo King on their PC using Google Play Games.Is Google Play Games Beta available in India?
Launched in 2022, Google Play Games Beta was first available only in Australia, Brazil, Canada, Hong Kong, Indonesia, South Korea, Malaysia, Taiwan, Thailand, Mexico, the Philippines, and the USA. Google has now launched its Android gaming platform for PC in several other countries including India.Can I sync Google Play Games for PC with my Android phone?
If you don’t want to lose any in-game progress, log in to Google Play Games on your PC using the same account as your Android smartphone. This will sync the in-game progress between the two platforms. Read Also: iOS 17 public beta version now available for downloadConclusion
This is how you can install Google Play Games Beta on your Windows PC. Since this is a Beta version, you may encounter frequent bugs on the platform. If you aren’t impressed by the gaming titles on offer, you can always go back to using an Android emulator for your PC and wait until Google releases the full desktop version of its Gaming platform. For the latest gadget and tech news, and gadget reviews, follow us on Twitter, Facebook and Instagram. For newest tech & gadget videos subscribe to our YouTube Channel. You can also stay up to date using the Gadget Bridge Android App. You can find the latest car and bike news here.How to view saved WiFi passwords on any iPhone?

Unlike certain Android smartphones, the iPhone makes it very easy for users to view their saved WiFi passwords. However, this was not always the case. The feature was first introduced on iOS 16. Older iOS versions allowed users access to WiFi passwords only through Keychain. In this article, we show you how to view the saved WiFi passwords on any iPhone (iOS 16 and below).
Read Also: iOS 17 public beta version now available for download
Step 2: Tap the info icon next to the active WiFi network.
Step 3: Tap the password field.
Step 4: Verify your identity using passcode, Face ID, or Touch ID.
The saved WiFi password will be revealed to you.
 If Keychain is enabled on your iPhone, you will be able to view saved WiFi passwords. While Keychain is primarily used for social media and email accounts, it is also capable of saving the passwords of the WiFi networks you connect to using your iPhone. For iPhones running iOS 15 – iOS 11, this is the only way users can view a saved WiFi password.
Step 1: Go to Settings and select Passwords & Accounts.
Step 2: Tap on Website & App Passwords.
Step 3: All your saved passwords will be displayed on the following page.
Step 4: Scroll through the list and find the WiFi network for which you want the password. Tap on it.
Step 5: Verify your identity using passcode, Face ID, or Touch ID.
The saved WiFi password will be revealed to you.
If Keychain is enabled on your iPhone, you will be able to view saved WiFi passwords. While Keychain is primarily used for social media and email accounts, it is also capable of saving the passwords of the WiFi networks you connect to using your iPhone. For iPhones running iOS 15 – iOS 11, this is the only way users can view a saved WiFi password.
Step 1: Go to Settings and select Passwords & Accounts.
Step 2: Tap on Website & App Passwords.
Step 3: All your saved passwords will be displayed on the following page.
Step 4: Scroll through the list and find the WiFi network for which you want the password. Tap on it.
Step 5: Verify your identity using passcode, Face ID, or Touch ID.
The saved WiFi password will be revealed to you.
In This Article
View saved WiFi passwords on iOS 16 and above
Step 1: Go to Settings and select WiFi. Step 2: Tap the info icon next to the active WiFi network.
 Step 3: Tap the password field.
 Step 4: Verify your identity using passcode, Face ID, or Touch ID.
The saved WiFi password will be revealed to you.
Step 4: Verify your identity using passcode, Face ID, or Touch ID.
The saved WiFi password will be revealed to you.
View saved WiFi passwords on iOS 15 and below
 If Keychain is enabled on your iPhone, you will be able to view saved WiFi passwords. While Keychain is primarily used for social media and email accounts, it is also capable of saving the passwords of the WiFi networks you connect to using your iPhone. For iPhones running iOS 15 – iOS 11, this is the only way users can view a saved WiFi password.
Step 1: Go to Settings and select Passwords & Accounts.
Step 2: Tap on Website & App Passwords.
Step 3: All your saved passwords will be displayed on the following page.
Step 4: Scroll through the list and find the WiFi network for which you want the password. Tap on it.
Step 5: Verify your identity using passcode, Face ID, or Touch ID.
The saved WiFi password will be revealed to you.
If Keychain is enabled on your iPhone, you will be able to view saved WiFi passwords. While Keychain is primarily used for social media and email accounts, it is also capable of saving the passwords of the WiFi networks you connect to using your iPhone. For iPhones running iOS 15 – iOS 11, this is the only way users can view a saved WiFi password.
Step 1: Go to Settings and select Passwords & Accounts.
Step 2: Tap on Website & App Passwords.
Step 3: All your saved passwords will be displayed on the following page.
Step 4: Scroll through the list and find the WiFi network for which you want the password. Tap on it.
Step 5: Verify your identity using passcode, Face ID, or Touch ID.
The saved WiFi password will be revealed to you.
Frequently Asked Questions (FAQs)
How do I view a saved WiFi password on my iPhone?
iPhones running iOS 16 and above offer a direct way to view the WiFi password. Go to Settings>WiFi and select the active WiFi network. Tap on the password field and enter your iPhone’s passcode. On iOS 15, you will need to use Keychain to access a saved WiFi password.Can I view a saved WiFi password on iOS 15?
On iOS 15, you can view the WiFi password of the network you are connected to, but not where you expect it. The only way to view a saved WiFi password on iOS 15 is by going to Settings>Passwords & Accounts>Website & App Passwords>WiFi Network.Can I view a saved WiFi password on my iPhone using my Mac?
Yes, you can view the WiFi password of the network your iPhone is connected to, using your Mac. Simply search for the WiFi network in Keychain Access and click on the password field. For this to work, iCloud Keychain needs to be enabled on your iPhone as well as your Mac. Read Also: Best handheld gaming consoles available in IndiaConclusion
These are the best ways to view saved WiFi passwords on any iPhone. Instead of viewing a WiFi password, you can simply share it with a friend who is trying to connect to the network. All you need to do is turn on the Bluetooth and WiFi on both devices and tap on ‘Share Password’ on your device. The two devices need to be in close proximity to each other for this to work. For the latest gadget and tech news, and gadget reviews, follow us on Twitter, Facebook and Instagram. For newest tech & gadget videos subscribe to our YouTube Channel. You can also stay up to date using the Gadget Bridge Android App. You can find the latest car and bike news here.How to Install iOS 17 Public Beta on Your iPhone?

Apple’s iOS 17 Developer Beta has been floating around for some time now. This year, Apple did not charge its users the $99 fee to sign up for the Apple Developer Program. While using the new iOS is pretty fun, the Developer Beta versions are not known to be stable. For those who have been waiting for the Public Beta version to come out, the wait is now over. If this is your first time installing a beta version of iOS on your iPhone, here’s a quick guide to installing the iOS 17 Public Beta.
Read Also: Best handheld gaming consoles available in India
Step 2: Sign up using your Apple ID. If you have already signed up, sign in using your Apple ID.
Step 3: Select Get Started.
Step 4: Tap on Enroll your iOS Device.
Step 5: Go to Settings and select General.
Step 6: Tap on Software Update.
Step 7: Go to Beta Updates and select iOS 17 Public Beta.
In This Article
Here’s how you can install iOS 17 Public Beta on your iPhone
Before you begin, make sure your iPhone is running the latest version of iOS 16 (16.4). Step 1: Go to the Apple Beta Page. Step 2: Sign up using your Apple ID. If you have already signed up, sign in using your Apple ID.
 Step 3: Select Get Started.
Step 4: Tap on Enroll your iOS Device.
Step 5: Go to Settings and select General.
Step 3: Select Get Started.
Step 4: Tap on Enroll your iOS Device.
Step 5: Go to Settings and select General.
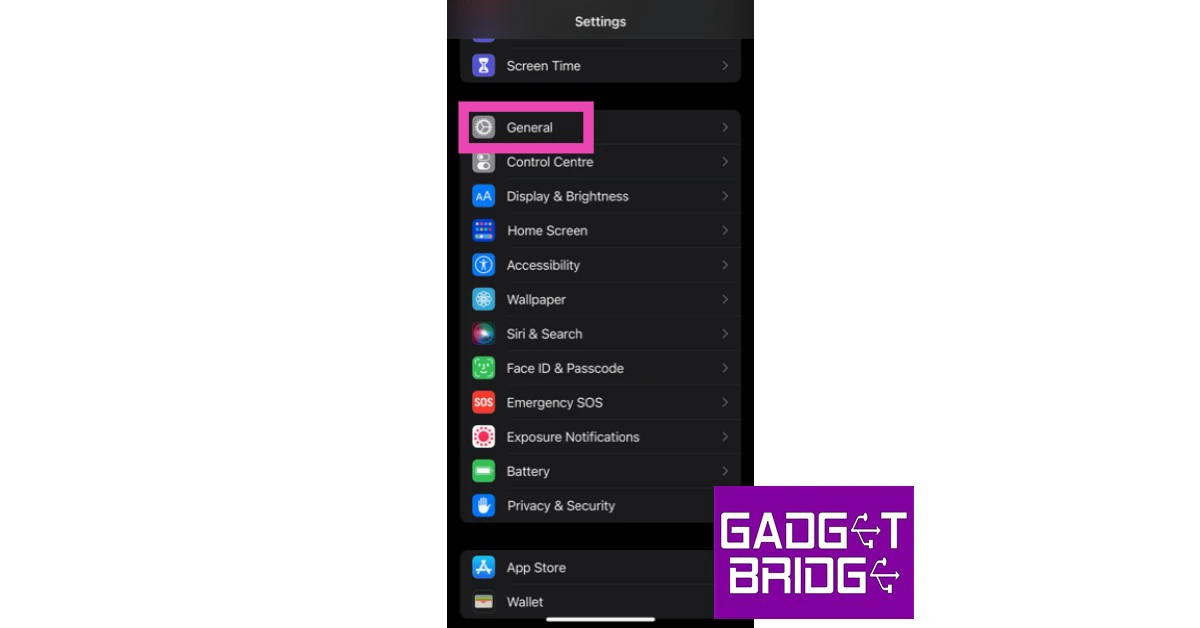 Step 6: Tap on Software Update.
Step 7: Go to Beta Updates and select iOS 17 Public Beta.
Step 6: Tap on Software Update.
Step 7: Go to Beta Updates and select iOS 17 Public Beta.
Frequently Asked Questions (FAQs)
How do I install iOS 17 beta version on my iPhone?
To install the Public Beta version on your iPhone, you need to sign into Apple’s Beta Page and enrol your device. Once that’s done, go to Settings>General>Software Update and select iOS 17 Public Beta.Is iOS 17 Public Beta free to download?
Yes, you can download the iOS 17 Public Beta for free.Which iPhones are getting iOS 17?
All iPhone models above (and including) iPhone XR are getting the new iOS 17 upgrade. This means that iPhone 8 and iPhone X will not receive the new software update. Read Also: Snapchat Keeps Logging You Out? Try these 9 fixesConclusion
This is how you can install the latest iOS beta version on your iPhone. The Public Beta version is more stable than Developer Beta, but you may encounter an odd bug while using it. If you want to go back to iOS 16, you can remove the Public Beta version by going to Settings>General>Device Management>iOS 17 Beta Software Profile>Remove Profile. If you’re sticking with the Public Beta version, check out its top features here. For the latest gadget and tech news, and gadget reviews, follow us on Twitter, Facebook and Instagram. For newest tech & gadget videos subscribe to our YouTube Channel. You can also stay up to date using the Gadget Bridge Android App. You can find the latest car and bike news here.What does clearing Steam’s Download cache do?

While looking for the fixes for any issue you’re facing with Steam, you may have come across the suggestion to clear the download cache. Many users are reluctant to go through with this option, fearing that it will clear their download progress or remove the game from the library altogether. While that may not be true, there are certain changes that you may notice on your Steam account. Let’s take a close look at how you can clear Steam’s download cache and what it does.
Read Also: Best handheld gaming consoles available in India
Step 4: Confirm your selection in the popup box.
In This Article
How to clear Steam’s download cache?
Step 1: Launch the Steam desktop client on your PC. Step 2: Click on Steam at the top left corner of the screen and select Settings. Step 3: Select Downloads from the side menu and click on Clear Download Cache. Step 4: Confirm your selection in the popup box.

I’ve cleared Steam’s download cache. What happens now?
If you’re worried that you will lose all your in-game progress after clearing the download cache on Steam, you can rest easy. This action does not have any effect on the saved progress in any of the gaming titles. However, any unsaved progress will be lost. This is because Steam stores the saved progress in a separate folder while the unsaved progress is stashed in the cached memory. No changes will be made to your installed games upon clearing the cache. They will remain as is. However, any games in the process of being installed will be cleared. You will have to install them again. Once the download cache is cleared, you will also need to log into the Steam app again. Clearing the cache boosts the speed of the app by clearing all the files in its temporary memory. Think of it as refreshing the memory on your phone. If you’re facing any trouble with the Steam app, it is likely that one of these temporary files has gone corrupt. Clearing the download cache will flush it out and fix any issues that you are facing with the desktop client.Frequently Asked Questions
How do I clear the download cache on Steam?
Go to Steam>Settings>Downloads>Clear Download Cache and confirm your selection in the popup box.What does clearing the download cache on Steam do?
Clearing the download cache on Steam removes all the temporary files downloaded by the app. This will fix the slow download speed or any other functional issues.Will I lose my installed games after clearing the download cache on Steam?
No, you will not lose your installed games or in-game progress after clearing the download cache on Steam. However, any ongoing installations and unsaved in-game progress will be deleted. Read Also: Asus ROG Ally ( RC71L) handheld gaming console debuts in IndiaConclusion
Typically, it is suggested you clear the download cache on Steam when a game won’t download or an installed title doesn’t start. If this action doesn’t fix the problem you are facing, you can always contact the Steam support staff. It is also advised that you check your internet connection when dealing with incomplete downloads. For the latest gadget and tech news, and gadget reviews, follow us on Twitter, Facebook and Instagram. For newest tech & gadget videos subscribe to our YouTube Channel. You can also stay up to date using the Gadget Bridge Android App. You can find the latest car and bike news here.Top 3 Ways to Get a Refund for App Store and iTunes Purchases

There are a plethora of free apps on Apple’s App Store that cover all kinds of tasks, ranging from photo and video editing to taking measurements for floor plans. For more specialised apps that can handle advanced tasks, you may need to splurge a little. Purchasing apps on Apple’s native app market is super easy, especially if your bank details are saved on your phone. However, sometimes the app you purchased may not act as advertised. In this case, you are well within your rights to claim a refund. In this article, we bring you the top 3 ways to get a refund for App Store and iTunes purchases on an iPhone and Mac.
Read Also: Top 5 ways to view saved WiFi passwords on any Android phone
Step 3: Select Purchased. If you have enabled Family Sharing, select My Purchases.
Step 4: Select the purchased app that needs to be refunded.
Step 5: Scroll down and select Report A Problem.
Step 6: You will be redirected to Apple’s website. Log in using your Apple ID.
Step 7: Tap the box that says ‘I would like to…’ and select Request a Refund.
Step 8: State your reason for requesting the refund in the following box.
Step 9: Tap Next, then select Submit.
Step 1: Go to Apple’s Report A Problem page.
Step 2: Sign in using your Apple ID.
Step 3: Click the ‘I would like to…’ box and select Request A Refund.
Step 4: State your reason for requesting the refund in the following box.
Step 5: Tap Next.
Step 6: Select the app in question.
Step 7: Select Submit.
Step 1: Launch the App Store on your Mac.
Step 2: Click on your profile icon at the bottom left corner of the screen.
Step 3: Select the app that needs to be refunded.
Step 4: Scroll down and select Report A Problem.
Step 5: You will be redirected to Apple’s website. Log in using your Apple ID.
Step 6: Tap the box that says ‘I would like to…’ and select Request a Refund.
Step 7: State your reason for requesting the refund in the following box.
Step 8: Tap Next, then select Submit.
In This Article
Get a refund for App Store and iTunes Purchases on your iPhone
Step 1: Launch the App Store on your iPhone. Step 2: Tap the profile icon at the top right corner of the screen. Step 3: Select Purchased. If you have enabled Family Sharing, select My Purchases.
 Step 4: Select the purchased app that needs to be refunded.
 Step 5: Scroll down and select Report A Problem.
 Step 6: You will be redirected to Apple’s website. Log in using your Apple ID.
Step 7: Tap the box that says ‘I would like to…’ and select Request a Refund.
Step 6: You will be redirected to Apple’s website. Log in using your Apple ID.
Step 7: Tap the box that says ‘I would like to…’ and select Request a Refund.
 Step 8: State your reason for requesting the refund in the following box.
Step 9: Tap Next, then select Submit.
Step 8: State your reason for requesting the refund in the following box.
Step 9: Tap Next, then select Submit.
Get a refund for App Store and iTunes Purchases using a Web Browser
 Step 1: Go to Apple’s Report A Problem page.
Step 2: Sign in using your Apple ID.
Step 3: Click the ‘I would like to…’ box and select Request A Refund.
Step 4: State your reason for requesting the refund in the following box.
Step 5: Tap Next.
Step 6: Select the app in question.
Step 7: Select Submit.
Step 1: Go to Apple’s Report A Problem page.
Step 2: Sign in using your Apple ID.
Step 3: Click the ‘I would like to…’ box and select Request A Refund.
Step 4: State your reason for requesting the refund in the following box.
Step 5: Tap Next.
Step 6: Select the app in question.
Step 7: Select Submit.
Get a refund for App Store and iTunes Purchases on your Mac
 Step 1: Launch the App Store on your Mac.
Step 2: Click on your profile icon at the bottom left corner of the screen.
Step 3: Select the app that needs to be refunded.
Step 4: Scroll down and select Report A Problem.
Step 5: You will be redirected to Apple’s website. Log in using your Apple ID.
Step 6: Tap the box that says ‘I would like to…’ and select Request a Refund.
Step 7: State your reason for requesting the refund in the following box.
Step 8: Tap Next, then select Submit.
Step 1: Launch the App Store on your Mac.
Step 2: Click on your profile icon at the bottom left corner of the screen.
Step 3: Select the app that needs to be refunded.
Step 4: Scroll down and select Report A Problem.
Step 5: You will be redirected to Apple’s website. Log in using your Apple ID.
Step 6: Tap the box that says ‘I would like to…’ and select Request a Refund.
Step 7: State your reason for requesting the refund in the following box.
Step 8: Tap Next, then select Submit.
Frequently Asked Questions (FAQs)
How do I refund an App Store purchase on my iPhone?
To refund an app go to App Store>Account>My Purchases>App>Report a Problem and select Refund on Apple’s Report a Problem page.Can all App Store purchases be refunded?
Not all apps purchased through App Store are refundable. If you try to refund a non-refundable app, the ‘Submit’ option in Apple’s Report A Problem page will be greyed out.How long does it take for Apple to make a refund?
It takes around 48 hours for Apple to process your refund request. The time required to refund the amount back to your account varies depending on your location. Read Also: Asus ROG Ally ( RC71L) handheld gaming console debuts in IndiaConclusion
This is how you can get a refund for App Store and iTunes purchases on your iPhone and Mac. Once you submit your refund request, it will take about 48 hours to process. There is no strict limit on the time it takes for Apple to refund the amount back to your account. In some cases, it can take up to 60 days. If your reason for requesting a refund is not valid, your request may not be processed at all. For the latest gadget and tech news, and gadget reviews, follow us on Twitter, Facebook and Instagram. For newest tech & gadget videos subscribe to our YouTube Channel. You can also stay up to date using the Gadget Bridge Android App. You can find the latest car and bike news here.Viewsonic OMNI VX28 Series 180 Hz gaming monitors launched in India

Viewsonic has launched a new gaming monitor series- OMNI VX28 Series in India. Under the lineup, four models having 27-inch and 24-inch monitors are included. The display supports a 180Hz refresh rate with 0.5ms (MPRT) response time ensuring immaculate gaming and pristine video editing without needing to overclock. The gaming monitors offer a tear-free gaming experience and support HDR10.
Also Read: Best handheld gaming consoles available in India
Today, ViewSonic Corp. announced the introduction of the new OMNI VX28 gaming monitors. The monitor’s fast IPS panels deliver exceptional colour consistency and accuracy from all viewing angles. They are available in two sizes 27-inch and 24-inch, the OMNI VX28 monitors offer a choice of FHD or QHD fast IPS displays. The OMNI VX28 monitors have a refresh rate of up to 180Hz, and a super-fast 0.5ms (MPRT) response time, which minimizes motion blur and smearing, ensuring seamless pixel transitions.
Additionally, the newest HDR10 offers remarkable control over gamma adjustments, resulting in an entirely new level of image clarity and details with deep contrast, rich, and brilliant colours. The displays have a number of cutting-edge features, such as AMD and VESA-certified anti-tearing and anti-blur technologies and a blue light filter, which guarantee a stutter-free and eye-friendly experience when used all day. The gaming monitors have received certification from AMD FreeSyn Premium, VESA Adaptive Sync, and VESA ClearMR.
This gives players a seamless and immersive experience by removing visual tearing, reducing stuttering, and lowering input lag. The most recent video games and movies, particularly first-person shooters and role-playing games, appear and feel more natural and realistic thanks to the smooth, blur-free graphics.
Users may adjust the monitor’s height, tilt it back or forth, swivel it for a different field of vision, or even rotate it vertically for a completely different perspective thanks to its ergonomic design.
Also Read: iOS 17 public beta version now available for download
The new 27-inch and 24-inch monitors will be available on Amazon and MDComputer.
The new monitors will have a special price during the Amazon Prime Day Sale with all card offers available. The price of the monitors is listed below.
For the latest gadget and tech news, and gadget reviews, follow us on Twitter, Facebook and Instagram. For newest tech & gadget videos subscribe to our YouTube Channel. You can also stay up to date using the Gadget Bridge Android App. You can find the latest car and bike news here.
 Additionally, the newest HDR10 offers remarkable control over gamma adjustments, resulting in an entirely new level of image clarity and details with deep contrast, rich, and brilliant colours. The displays have a number of cutting-edge features, such as AMD and VESA-certified anti-tearing and anti-blur technologies and a blue light filter, which guarantee a stutter-free and eye-friendly experience when used all day. The gaming monitors have received certification from AMD FreeSyn Premium, VESA Adaptive Sync, and VESA ClearMR.
This gives players a seamless and immersive experience by removing visual tearing, reducing stuttering, and lowering input lag. The most recent video games and movies, particularly first-person shooters and role-playing games, appear and feel more natural and realistic thanks to the smooth, blur-free graphics.
Users may adjust the monitor’s height, tilt it back or forth, swivel it for a different field of vision, or even rotate it vertically for a completely different perspective thanks to its ergonomic design.
Also Read: iOS 17 public beta version now available for download
The new 27-inch and 24-inch monitors will be available on Amazon and MDComputer.
The new monitors will have a special price during the Amazon Prime Day Sale with all card offers available. The price of the monitors is listed below.
Additionally, the newest HDR10 offers remarkable control over gamma adjustments, resulting in an entirely new level of image clarity and details with deep contrast, rich, and brilliant colours. The displays have a number of cutting-edge features, such as AMD and VESA-certified anti-tearing and anti-blur technologies and a blue light filter, which guarantee a stutter-free and eye-friendly experience when used all day. The gaming monitors have received certification from AMD FreeSyn Premium, VESA Adaptive Sync, and VESA ClearMR.
This gives players a seamless and immersive experience by removing visual tearing, reducing stuttering, and lowering input lag. The most recent video games and movies, particularly first-person shooters and role-playing games, appear and feel more natural and realistic thanks to the smooth, blur-free graphics.
Users may adjust the monitor’s height, tilt it back or forth, swivel it for a different field of vision, or even rotate it vertically for a completely different perspective thanks to its ergonomic design.
Also Read: iOS 17 public beta version now available for download
The new 27-inch and 24-inch monitors will be available on Amazon and MDComputer.
The new monitors will have a special price during the Amazon Prime Day Sale with all card offers available. The price of the monitors is listed below.
| Model | MRP | |
| 1 | VX2428 – 24” | ₹ 23,900 |
| 2 | VX2428J – 24” | ₹29,000 |
| 3 | VX2728 – 27” | ₹23,000 |
| 4 | VX2728J – 27” | ₹ 25,000 |
iOS 17 public beta version now available for download

Apple announced the latest version of the iPhone operating system, iOS 17 last month. Now its public beta version is available to iPhone users for free to download. Note that the stable version of it will be accessible to all users when the generation of iPhone launches globally.
The public beta of iOS 17 has started to roll out for iPhone users. In addition to this Apple is also releasing the first public betas of iPadOS 17, watchOS 10, and macOS Sonoma along with iOS 17. The latest version of the iPhone operating system brings new features and improvements that improve your daily activities.
The Phone app is getting a significant makeover. Contact Posters, which let you customise how you appear on other people’s devices across Phone, FaceTime, Messages, and AirDrop, give incoming calls a completely different look. Live Voicemail gives you the information you need right away so you can pick up the calls that count, allowing you to regain control over your incoming calls.
Also Read: WWDC23 highlights: iOS 17 brings StandBy mode, Journal app and upgrades to FaceTime, and Messages
With the brand-new app Journal, you can document both regular and memorable events in your life by writing about them. Using information that your iPhone already has about you, such as your activity, location, phone calls, images, and more, intelligently curated ideas with writing prompts to get you started are developed particularly for you. The journal also has scheduled alerts to encourage habit formation and to record personal improvement by reflecting on the past.
You get new tools and insights from your health in two crucial areas: mental and visual health. Additionally, Favourites now features chart information. To keep motivated and consistent, the Fitness app and Fitness+13 introduce additional options like Sharing Highlights, Stacks, and Custom Plans.
By turning iPhone on its side while charging, you get a new full-screen experience with glanceable information designed to view from a distance. You can choose clocks, photos, and widgets to display. Support for Smart Stacks, Live Activities, and Siri make StandBy perfect for your nightstand, kitchen counter, or desk.
Also Read: Best handheld gaming consoles available in India
The new iOS 17 introduces Standby as yet another great function. You can access a new full-screen experience with glanceable information while your iPhone is charging by flipping it on its side. Clocks, pictures, and widgets are all options for display. StandBy is ideal for your nightstand, kitchen counter, or workstation thanks to its support for Smart Stacks, Live Activities, and Siri.
System Requirements
iOS 17 is available as a free software update. The following iPhone models are compatible with iOS 17:
• iPhone 14
• iPhone 14 Plus
• iPhone 14 Pro
• iPhone 14 Pro Max
• iPhone 13
• iPhone 13 mini
• iPhone 13 Pro
• iPhone 13 Pro Max
• iPhone 12
• iPhone 12 mini
• iPhone 12 Pro
• iPhone 12 Pro Max
• Phone 11
• iPhone 11 Pro
• iPhone 11 Pro Max
• iPhone XS
• iPhone XS Max
• iPhone XR
• iPhone SE (2nd generation and newer)
For the latest gadget and tech news, and gadget reviews, follow us on Twitter, Facebook and Instagram. For newest tech & gadget videos subscribe to our YouTube Channel. You can also stay up to date using the Gadget Bridge Android App. You can find the latest car and bike news here.
Snapchat Keeps Logging You Out? Try these 10 fixes (2024)
")
Being one of the biggest messaging platforms in the world, it is very uncommon to experience any account-related issues on Snapchat. The media-based messenger handles a huge volume of monthly traffic without any hiccups. However, sometimes users report that the Snapchat app keeps logging them out. If you are facing the same issue, here are 10 potential fixes.
Read Also: Top 3 Ways to Disable TalkBack on Android Devices
Step 4: Switch off the toggle bar for Allow Background Data Usage.
Step 4: Scroll down and select Partner Connections.
Step 5: Tap the app that you think is the culprit.
Step 6: Select Remove App.
Snapchat may log you out of your account if its servers are down. Although server issues are very rare they are not out of the realm of possibility. To check if there’s any outage, go to DownDetector.in and search for Snapchat. The website will let you know if other users are experiencing similar issues as well.
Snapchat’s app cache contains temporary files that the app doesn’t want to download every time you launch it. This optimises the performance of the app and reduces the load time by a considerable margin. Oftentimes, the temporary files in the cache can get corrupted and cause unexpected issues. To clear these files, launch the Snapchat app on your phone and go to Profile>Settings>Clear Cache.
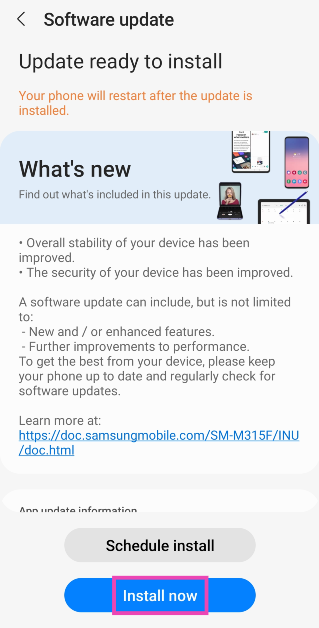
 Step 2: Tap on Download and install.
Step 3: Select Install now.
Step 2: Tap on Download and install.
Step 3: Select Install now.
In This Article
Turn off Background App Refresh
Whenever the Snapchat app receives a major update, it logs you out of your account. Once the app is updated, you are required to log in again using your Snap ID/Phone Number/Email and password. A problem may arise when the app gets stuck in the update loop due to an unexpected bug or glitch. You can fix this issue by turning off background app refresh by disabling background data usage. Here’s how. Step 1: Go to Settings and select Apps. Step 2: Scroll down and select Snapchat. Step 3: Tap on Mobile Data. Step 4: Switch off the toggle bar for Allow Background Data Usage.

Restart your smartphone
Any minor background glitch affecting the apps in your phone can be resolved with a quick reboot of the device. Press and hold the side key and select ‘Restart’ from the power options. If pressing the side key triggers the voice assistant, press and hold the side key and volume up key simultaneously to access the power menu. You can also access the power menu by tapping the power icon in the quick settings panel.Use Snapchat on just one device
One of the common reasons why Snapchat keeps logging you out of the app is multi-device access. Snapchat does not give you the option to log out of all devices at once. If you use the ephemeral messenger on two smartphones, logging out of one device will log you out from the other one as well. This applies to Snapchat’s web interface and the desktop as well. To avoid this problem, use Snapchat on one device only or do not log out of other devices.Remove third-party access
Step 1: Launch Snapchat on your device. Step 2: Tap the profile icon at the top left corner of the screen. Step 3: Tap the gear icon at the top right corner of the screen. Step 4: Scroll down and select Partner Connections.
 Step 5: Tap the app that you think is the culprit.
Step 6: Select Remove App.
Step 5: Tap the app that you think is the culprit.
Step 6: Select Remove App.
Check if Snapchat is down
 Snapchat may log you out of your account if its servers are down. Although server issues are very rare they are not out of the realm of possibility. To check if there’s any outage, go to DownDetector.in and search for Snapchat. The website will let you know if other users are experiencing similar issues as well.
Disable the VPN
VPN apps are known to mess with the functioning of certain messenger and social media apps on your phone. If you keep getting logged out of Snapchat, try disabling the VPN and try again. If this doesn’t fix the issue, move on to the other methods in this list.Clear Snapchat Cache
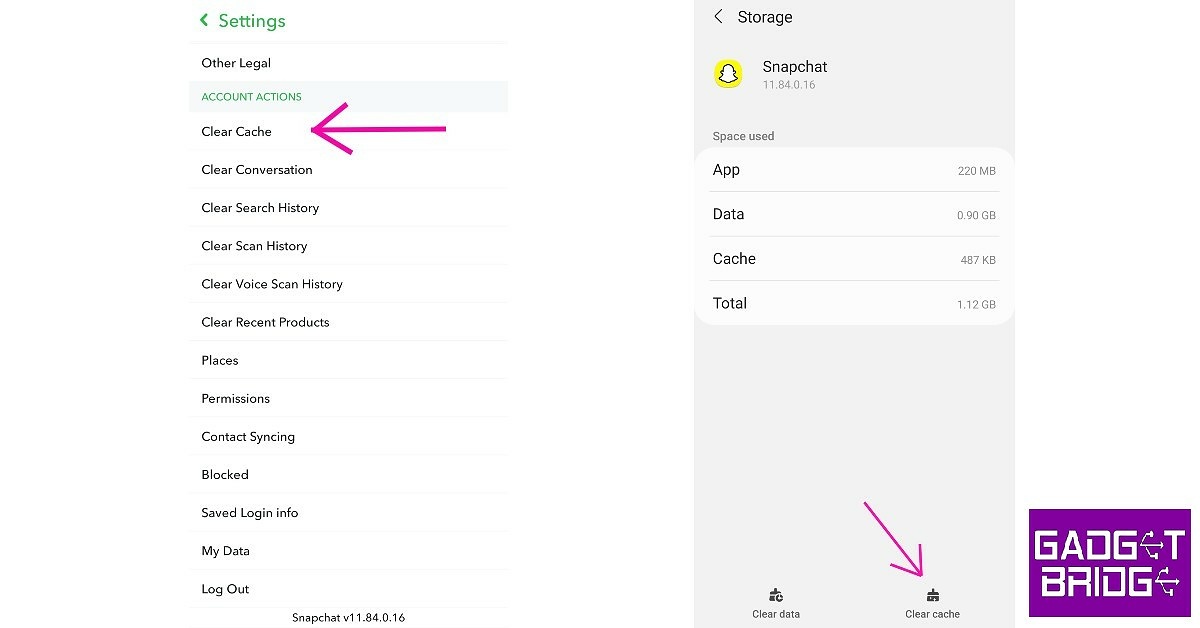 Snapchat’s app cache contains temporary files that the app doesn’t want to download every time you launch it. This optimises the performance of the app and reduces the load time by a considerable margin. Oftentimes, the temporary files in the cache can get corrupted and cause unexpected issues. To clear these files, launch the Snapchat app on your phone and go to Profile>Settings>Clear Cache.
Update the app
An outdated version of the Snapchat app may no longer be functional on your device. As a result, you keep getting logged out as soon as you launch the app. Go to Google Play Store and search for Snapchat. Open the app page and select ‘Update’ to install the latest version of the app. Update your phone’s OS Step 1: Go to Settings and select Software update.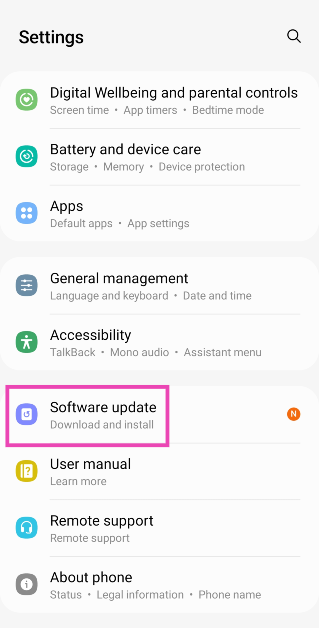 Step 2: Tap on Download and install.
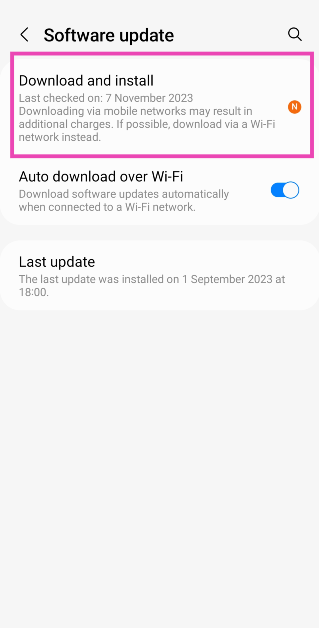 Step 3: Select Install now.
Your Snapchat account is locked
Snapchat is quick to take action when it notices any suspicious or malicious activity going on your account. To safeguard you from hackers, Snapchat locks your account and logs you out of the app. If your account is locked, you will get the option to unlock it the next time you log in. Once you get access to your access, make sure you change your password.Frequently Asked Questions (FAQs)
Why does Snapchat keep logging me out?
If you log out of Snapchat on one device, you get logged out on all devices. To ensure this doesn’t happen, either use Snapchat on just one device or do not log out of other devices.Why is my Snapchat account locked?
Snapchat locks your account when you perform an action that goes against the community guidelines. If your account has been hacked, Snapchat may suspend it until you take back control.Can Snapchat ban my phone?
If you are found guilty of violating community guidelines on multiple occasions, Snapchat can serve you a device ban. Read Also: Redmi Buds 4 Active Review: Very close to a perfect dealConclusion
These are the top 10 ways to fix the ‘Snapchat keeps logging me out’ error on your Android device. If you are still experiencing this error after trying the fixes mentioned in this article, you should contact Snapchat support and find out what’s wrong with your account. Snapchat may have suspended your account if you were found in violation of their community guidelines.Best handheld gaming consoles available in India

It’s exciting to witness the coming back of handheld games. One of the most popular gaming genres is handheld consoles, and as technology has advanced, more potent portable gaming devices have been made available. High-end gaming computers and consoles, like the PlayStation 5 and Xbox One Series, are great players but difficult to move and can’t be used when travelling. Portable gaming consoles can be useful in this type of scenario. We have put together a list of handheld gaming consoles that you may pack in your carry-on bag easily when travelling.


In This Article
Nintendo Switch OLED
A 7-inch OLED screen is included with the Nintendo Switch OLED. OLED Model comes with a large adjustable stand for better viewing angles when used in tabletop mode. The OLED model of the Nintendo Switch is compatible with all Joy-Con controllers and Nintendo Switch software. You may utilise For 64GB of internal storage, a wired internet connection, and improved audio in handheld and tabletop modes using the system’s speakers, use the dock’s LAN connector when playing in TV mode. A LAN cable is offered separately.
GPD Win 4 Handheld Gaming PC
AMD Ryzen 7 6800U Radeon 680M ZEN3 and a 16GB LPDDR5 1TB PCI-E 4.0 NVME SSD power the GPD Win 4 Handheld Gaming PC. Additionally, it contains AMD Radeon 680M integrated graphics, which guarantees 45–60 frames per second when playing AAA games at 19201080 resolution. It employs 32-bit, 4-channel, LPDDR5 memory in either 16GB or 32GB of capacity. It has a 6-inch eye-safe screen with a native landscape screen mode. The display has a 1920 x 1080 resolution, a 16:9 aspect ratio, a 368 PPI, and two selectable refresh rates of 60Hz and 40Hz. Also Read: Asus ROG Ally ( RC71L) handheld gaming console debuts in India Dual ALPS 3D joysticks, which are equivalent to the best Japanese Shimizu and Sanwa joysticks and have a typical staggered configuration, are among the important features. Two customisable physical back buttons that can be mapped and programmed, a 6-axis gyroscope for location, and dual vibration motors for the controller with changeable vibration strength (strong, weak, or off) are additional features. These elements improve the sensation of motion for gaming.
Asus ROG Ally
The 7-inch full-HD IPS LCD screen on the Asus ROG Ally offers a 1,920×1,080 pixel resolution. The display supports refresh rates of 120Hz and reaction times of 7ms. The display is shielded by Corning Gorilla Glass Victus and Gorilla Glass DX and has a maximum brightness of 500 nits. Windows 11 is already preinstalled on the portable gaming computer. With an octa-core AMD Z1 Extreme processor manufactured on a 4nm process technology and AMD RDNA3 graphics with 4GB of VRAM, the company has released the RC71L model in India. Also Read: The best gaming gadgets to use in 2023 It is possible to upgrade the RAM to 8GB. The gadget offers 512GB of extendable NVMe storage with a UHS-II MicroSD 4.0 card slot and 16GB of LPDDR5 RAM. In addition to the USB Type-C port, the Asus ROG Ally features Bluetooth 5.2 and Wi-Fi 6E for connectivity. The console has thumbsticks, ABXY buttons, a D-pad, analogue triggers, and bumpers.
Steam Deck 64 GB Console
When it comes to playing video games, Steam Deck is fantastic. Like any other PC, the whole Steam Library is displayed. The device’s back has been designed to accommodate every kind of hand comfortably. Keep in mind that because this console is imported, the cost varies. Although the product has not yet been formally introduced in the nation, it is nonetheless available through unofficial channels. There are some restrictions when purchasing an imported Steam Deck. First off, forget about claiming a warranty in the event that something goes wrong with your equipment since there would be no official after-sale support. Second, because you are getting the equipment imported, you will have to fork over a significant sum of money.
Ayaneo Air Handheld Game Console
Ayaneo Air Handheld Game Console is the following item on this list of the finest video game consoles. AMD Ryzen 5 5560U processor, 6 Cores/ 12 Threads, Base Frequency 2.3 GHz, Max Turbo Frequency Up to 4 GHz, powers the gadget. The AMD Radeon graphics package is built-in. The gaming console has a 5.5-inch OLED screen with a 1920 x 1080 native landscape resolution and 404 PPI.
GSH X20 Mini Handheld Game Console
The GSH X20 Mini Handheld Game Console has a 4.3-inch screen, as the name would imply. A high-spec microswitch structure with 360° high precision controllability and agile response is made possible by the 360° rocker design. Furthermore, it supports both wired and wireless controller connections. The console supports ten emulators, ten emulator formats, and ten thousand games, all of which you may download independently. For the latest gadget and tech news, and gadget reviews, follow us on Twitter, Facebook and Instagram. For newest tech & gadget videos subscribe to our YouTube Channel. You can also stay up to date using the Gadget Bridge Android App. You can find the latest car and bike news here.Top 6 ways to view saved WiFi passwords on any Android phone (2024)
")
WiFi passwords are notoriously easy to forget. Since you don’t get into the habit of typing it every time you need to connect to the network, your brain doesn’t register the WiFi password the same way as your phone’s PIN. The problem only arises when you need to share the password with someone else. It can be a little embarrassing to forget your home WiFi network‘s password, something that is paired with all the smart devices in your house. To avoid this situation, here are the top 6 ways to view saved WiFi passwords on any Android phone.
Read Also: Top 3 Ways to Disable TalkBack on Android Devices
Step 2: Select WiFi and tap on the gear icon next to the WiFi network you’re connected to.
Step 3: From the bottom menu select ‘QR Code’ and take a screenshot or select ‘Save as image’.
Step 4: Download a QR code scanner app and load the screenshot to read it.
Step 5: You will be able to see the WiFi password. Look for it below the WiFi network name and WPA security tag.
Step 3: Take a screenshot of the QR code.
Step 4: Install any QR Code Scanner app on your device.
Step 5: Launch the app and select the option to scan a QR Code from your device’s gallery.
Step 6: Select the image containing the QR code.
Step 7: The app will scan the QR code and show you the password.
Step 2: Tap on Internet and select the WiFi network you’re connected to.
Step 3: Select Share and type in the pin or scan your fingerprint for verification.
Step 4: The WiFi password will be displayed just below the QR Code.
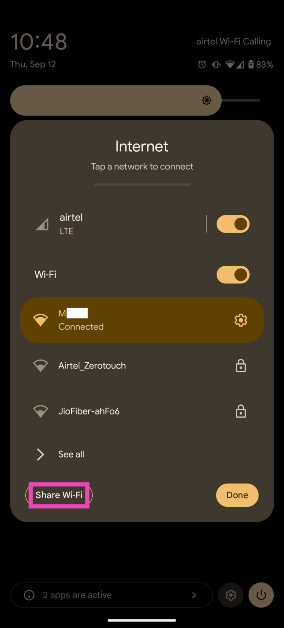
 Step 3: Make sure your smartphone is connected to a WiFi network. Tap on Share Wi-Fi.
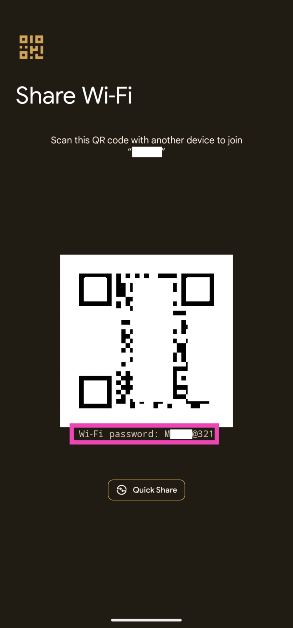
 Step 4: The QR code for sharing the network will appear on the next page. The WiFi password will be mentioned below the QR code.
 Step 2: Tap on the active WiFi network.
Step 3: Select Share.
Step 4: Verify your identity by entering the phone’s PIN or scanning your fingerprint.
Step 5: The WiFi password will be listed above the QR code.
Step 2: Tap on the active WiFi network.
Step 3: Select Share.
Step 4: Verify your identity by entering the phone’s PIN or scanning your fingerprint.
Step 5: The WiFi password will be listed above the QR code.
In This Article
View the saved WiFi password on a Samsung phone
Samsung smartphones don’t let you view the WiFi password of the network you are connected to, but you can share it with another device using a QR code. To view the password, all you need to do is scan the QR code on your phone. This trick works for most Android devices that do not let you view the WiFi password directly. Here’s how you can go about it. Step 1: Go to Settings and select ‘Connections’. Step 2: Select WiFi and tap on the gear icon next to the WiFi network you’re connected to.
 Step 3: From the bottom menu select ‘QR Code’ and take a screenshot or select ‘Save as image’.
 Step 4: Download a QR code scanner app and load the screenshot to read it.
 Step 5: You will be able to see the WiFi password. Look for it below the WiFi network name and WPA security tag.

View the saved WiFi password on a Xiaomi device
Step 1: Go to Settings. Step 2: Select WiFi and tap on the active WiFi network to share its password. Step 3: Take a screenshot of the QR code.
 Step 4: Install any QR Code Scanner app on your device.
Step 5: Launch the app and select the option to scan a QR Code from your device’s gallery.
Step 4: Install any QR Code Scanner app on your device.
Step 5: Launch the app and select the option to scan a QR Code from your device’s gallery.
 Step 6: Select the image containing the QR code.
Step 7: The app will scan the QR code and show you the password.
Step 6: Select the image containing the QR code.
Step 7: The app will scan the QR code and show you the password.

View the saved WiFi password on Google Pixel (Stock Android)
Google Pixel smartphones and other devices running stock Android let you view the WiFi directly from settings. Here’s how you can look for it. Step 1: Go to Settings and select ‘Network and Internet’. Step 2: Tap on Internet and select the WiFi network you’re connected to.
 Step 3: Select Share and type in the pin or scan your fingerprint for verification.
 Step 4: The WiFi password will be displayed just below the QR Code.

View the saved WiFi password on Google Pixel (using the Quick Start Menu)
Step 1: Swipe down from the status bar to reveal the Quick Settings Menu. Step 2: Tap on Internet.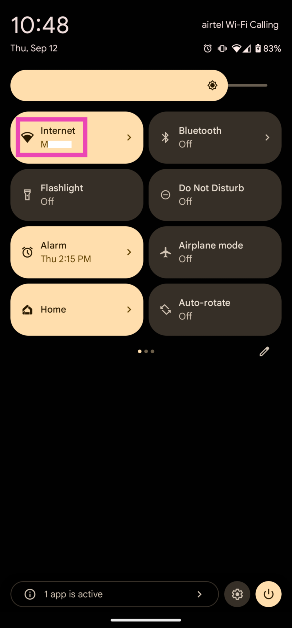 Step 3: Make sure your smartphone is connected to a WiFi network. Tap on Share Wi-Fi.
 Step 4: The QR code for sharing the network will appear on the next page. The WiFi password will be mentioned below the QR code.
View the saved WiFi password on a OnePlus smartphone
Step 1: Go to Settings and select WiFi. Step 2: Tap on the active WiFi network.
 Step 3: Select Share.
 Step 4: Verify your identity by entering the phone’s PIN or scanning your fingerprint.
Step 5: The WiFi password will be listed above the QR code.
Step 4: Verify your identity by entering the phone’s PIN or scanning your fingerprint.
Step 5: The WiFi password will be listed above the QR code.

Use a third-party app (on a rooted phone)
Devices running Android 9 or older do not let you view or share the password of any saved WiFi network. The only way you can extract the WiFi password of any network is by rooting the device. For a complete guide on rooting your Android smartphone, check out this article. Once your phone has been rooted, you can view the saved WiFi password using a File Explorer app. Simply launch the app, head over to data/misc/wifi and open wpa_supplicant.conf. The WiFi password will be listed next to ‘psk’. Read Also: Redmi Buds 4 Active Review: Very close to a perfect dealFrequently Asked Questions (FAQs)
Can I view the saved WiFi password on my Android phone?
Smartphones running the stock Android OS (like Google Pixel) let you view the WiFi password on your device. Simply go to Settings>Network and Internet>Internet and the gear icon next to the connected network. Select ‘Share’ to view the network’s password.Can I view the saved WiFi password on my old Android phone?
Older Android smartphones do not let you view the WiFi password unless they have been rooted. On a rooted smartphone, you can simply use the file explorer to go to data/misc/wifi and open wpa_supplicant.conf to see the WiFi password.How do I view the WiFi password on my Samsung smartphone?
Samsung smartphones do not let you directly view the password, but give you the option to share it with other devices as a QR code. You can save this QR code on your phone itself and scan it using a QR scanner app to reveal the password. Read Also: Redmi Buds 4 Active Review: Very close to a perfect dealConclusion
These are the top 6 ways to view the saved WiFi password on any Android phone. Since every smartphone running Android 10 or above lets you share the WiFi using a QR code, you won’t need root access to the device in order to view the network credentials. If you want to connect to the network using another device, simply go to Settings>Connections>WiFi and select the QR scanner option.Asus ROG Ally ( RC71L) handheld gaming console debuts in India
 handheld gaming console debuts in India")
The much-awaited handheld gaming console of 2023, the ROG Ally, has successfully made its international debut and is now available in India. ASUS ROG hopes to revolutionise gaming in India’s esports scene with its portable Windows PC console. The ROG Ally makes for the ideal portable gaming companion because of its amazing performance, adaptability, and small size and is made to run both 1080p AAA games and basic games. The Indian model will have an AMD Z1 Extreme processor. It also features a 7-inch LCD screen. The handheld gaming PC also runs on Windows 11.
Also Read: Asus TUF gaming F15 laptop review: 11 Gen Intel CPU with RTX 2050 under 60K, worth buying?
In This Article
Asus ROG Ally ( RC71L) price in India, sale details
Asus ROG Ally has been launched in India at Rs 69,999. The device will be available for purchase via ASUS Exclusive Stores, ASUS Eshop & Flipkart in the country. Launch offer includes a Rs 2,000 cashback incentive on no-cost EMI transactions. Also, customers who purchase the ROG Ally from ASUS Eshop or ASUS Stores on July 15 will receive a complimentary ROG Ally Case worth Rs 2000. To redeem this offer, customers can visit asuspromo.in.
Asus ROG Ally ( RC71L) specifications
Asus ROG Ally has a 7-inch full-HD IPS LCD screen with a resolution of 1,920×1,080 pixels. The screen can support a refresh rate of 120Hz and reaction times of 7ms. The display has a maximum brightness of 500 nits and is protected by Corning Gorilla Glass Victus and Gorilla Glass DX. The handheld gaming PC comes pre-installed with Windows 11. The business has introduced the RC71L model in India, which comes with an octa-core AMD Z1 Extreme processor made on a 4nm process technology and AMD RDNA3 graphics with 4GB of VRAM. Also Read: Samsung Odyssey G9 OLED Gaming Monitor (2023) with dual QHD OLED screen launched in India The RAM can be increased further to 8GB. The device has 16GB of LPDDR5 RAM and 512GB of expandable NVMe storage with a UHS-II MicroSD 4.0 card slot. The Asus ROG Ally supports Bluetooth 5.2 and Wi-Fi 6E for connectivity in addition to USB Type-C port. Thumbsticks, ABXY buttons, a D-pad, analogue triggers, and bumpers are all included with the console. The portable gaming device comes with a 40Whr battery that can be charged at 65W. It contains two stereo speakers with Dolby Atmos. In addition to this, there is a noise-cancelling array microphone powered by AI. For the latest gadget and tech news, and gadget reviews, follow us on Twitter, Facebook and Instagram. For newest tech & gadget videos subscribe to our YouTube Channel. You can also stay up to date using the Gadget Bridge Android App. You can find the latest car and bike news here.BGMI redeem codes for 13 July 2023, claim and receive rewards and benefits

After being banned for nearly ten months, Battleground Mobile India, aka BGMI, is officially available again in India. BGMI fans are looking for ways to improve their game experience and one such method is the usage of redemption codes, which offers a variety of rewards and advantages using BGMI redeem codes players can gain access to new skins, outfits, loot crates, weapons and free UC and diamonds.
As mentioned earlier, these codes give users the chance to earn unique rewards and gain extra benefits while playing the game. This includes GUN SKINS (M4, AKM, M416, AWM, M24, UZI, KAR98K), free character voucher, Andy, Carlo, Sara, Victor character for free, free Anna Character on completing the mission and UC or Royal Pass Discount. So here we have gathered a list of the most recent BGMI redeem codes as of 13 July 2023. Also, redeem these codes asap as these are only valid for a limited duration.
In This Article
BGMI Redeem Codes for 13 July 2023
- LEVKIN1QPCZ VETREL2IMHX SIWEST4YLXR BDNKUPRMF4 FENKYU5ATPD ZADROT5QLHP SD14G84FCC GPHZDBTFZM24U BOBR3IBMTO KARZBZYTR
How to get free Redeem Codes for BGMI on 13 July 2023?
- Launch BGMI on your device.
- Then select the Redeem Code option from the main menu.
- Next, click on the Redeem code tab.
- A new window will open, requesting the redemption code.
- Now enter your BGMI code.
- Confirm and click on the “Redeem” tab.
- If your redeem code is valid then you will get a message confirming that your rewards were successfully redeemed.
Garena Free Fire Redeem Codes Today 13 July 2023: Here is how to claim them

Garena Free Fire is a battle royale game with regular awards and tournaments to keep players interested. If you play Garena Free Fire, you should be aware of the redeem codes that are released on a daily basis. However, because the battle royale game is banned in India, players from other countries can use the Free Fire Redeem codes daily. If you’re unfamiliar with the Garena Free Fire redeem codes or don’t know how to get them, we’ve put together a step-by-step guide to help you redeem them. Check out Garena Free Fire Redeem Codes for 13 July 2023.
The Free Fire redeem codes are a great way to get free stuff. These are 12-digit codes that contain alphabets and numbers, as well as an expiration date and time. Because the Garena FF redeem codes cannot be used more than once, you should hurry to the redemption page to claim your free reward before someone else does. To get a free reward, all you have to do is go to reward.ff.garena.com/en, which is the official redemption page. Also, keep an eye on this space for daily updates on Garena Free Fire redemption codes and rewards.
In This Article
Garena Free Fire Redeem Codes Today 13 July 2023
FF9MJ31CXKRG FFAC2YXE6RF2 FFICJGW9NKYT W4GPFVK2MR2C WCMERVCMUSZ9 MSJX8VM25B95 R9UVPEYJOXZX TFF9VNU6UD9J HAYATOAVU76V RRQ3SSJTN9UK FFICJGW9NKYT FFCO8BS5JW2D RRQ3SSJTN9UK FF7MUY4ME6S SARG886AV5GR XUW3FNK7AV8N FF11NJN5YS3E FF1164XNJZ2V FFICDCTSL5FT PACJJTUA29UU FFBCLQ6S7W25 TJ57OSSDN5AP FFPLUED93XRT FF11WFNPP956 MQJWNBVHYAQM 8F3QZKNTLWBZ J3ZKQ57Z2P2PFire Redeem Codes for Garena on 13 July 2023?
- Visit the Garena Free Fire game’s official website at reward.ff.garena.com.
- Use your Facebook, Google, VK, Apple ID, Huawei ID, or Twitter account to log in.
- You’ll be taken to a valid redemption code (s)
- Copy and paste the 12-digit redemption code into the text box.
- On the screen, a dialogue box will appear.
- ‘Ok’ should be selected.
WordPress Security Tips and Best Practices Every Site Owner Should

Among all other CMS, WordPress is one of the most prominent CMS used for developing websites and blogs. On that note, WordPress security is one of the essential aspects every website owner should know. Since developers cannot build all the functionalities from scratch in WordPress, it is necessary to keep various security measures and best practices in mind. This article is a quick walkthrough of the different security tips & best practices site owners should follow.
Common cyber attacks on WordPress sites are listed below.
In This Article
About WordPress Security
More than 43.2 per cent of all websites run on WordPress. WordPress security is the methodology to secure the WordPress CMS website from malicious threats and attack vectors. Various attacks like Cross-Site Request Forgery (CSRF), Distributed Denial of Service (DDoS), SQL injection (SQLi), Local file inclusion (LFI), etc., are what attackers use to access the data and backend of a WordPress website. Thus, various tools, plugins, and security best practices work together to provide WordPress security.Why do WordPress Sites Get Hacked?
Before diving deep into WordPress security techniques and best practices, it is essential to understand how these websites are hacked. From a general perspective, cybercriminals target websites for different reasons:- Stealing personally identifiable information (PII)
- Taking user emails to deliver spam
- Trick users into installing malware on their machines
- Stop customers and users from accessing the website by flooding it with unsolicited requests
- Cross-site request forgery (CSRF): It compels the user to execute unwanted actions on a trusted WordPress site.
- DDoS: It floods any online service or application with unsolicited data packets. Hence the WordPress site becomes inaccessible to genuine visitors.
- Bypassing authentication: Cybercriminals can bypass authentication to access and admin account or other visitors’ accounts. Attackers can also use tricks to extract passwords from you.
- Cross-Site Scripting (XSS): Attackers can inject unwanted code into WordPress sites, making the site/app a malware carrier. It often damages brand reputation.
- SQL Injection: Cybercriminals can execute malicious SQL queries to view & manipulate the data in a database as unauthorized individuals.
- Local file inclusion: Attackers often use this technique to force a website to process malicious files by placing them on the web server.
 Common cyber attacks on WordPress sites are listed below.
WordPress Security Tips and Best Practices
Here are some well-known WordPress security tips and best practices website and WordPress site owners must ponder while developing WordPress-based sites.- Keep all WordPress elements up-to-date: Web developers and WordPress CMS owners often use various WordPress Elements. These are plugins, themes, etc. To boost your WordPress website’s security, owners must keep them updated. Plugin and theme creators often patch these elements to prevent vulnerabilities. Revamping these plugins can be tedious, especially if you manage multiple WordPress sites. Website owners and admins can install Smart Plugin Manager to check for updates automatically.
- App security tools: Application load balancers or DDoS detection & mitigation tools are other essential WordPress security tips and best practices WordPress website owners should consider. Load balancers detect unbidden SYN floods or UDP packets by absorbing fake traffic or separating them for handling to other associated servers. Load balancers detect unnecessary data packets & separate them for handling to other associated servers. Modern DDoS mitigation tools use ML algorithms to prevent bot-based DDoS attacks. It can intelligently identify spoofed data packets through IP addresses, patterns, & geolocations.
- Secure the Website with HTTPS
- WAF is also necessary: Web Application Firewalls are powerful security tools that monitor, filter, and block HTTP traffic from unauthorized systems. It can also identify attacks and malware exploits and prevent WordPress sites from getting hacked. WAF inspects each data packet & uses a rule to filter out malicious data packets. WAF can prevent WordPress sites and server data from malware infections, zero-day exploits, impersonation, etc.
- Use password best practices: Unique passwords or paraphrases with symbols, upper and lower caps, numbers, etc., play a significant role in providing WordPress security. Do not keep any password that is a dictionary word or something easy to guess. Also, it is a good practice to update the password frequently.
- Limit Login attempts: Another best practice and WordPress security tip that helps protect accounts from password guessing, credential stuffing, and brute force attacks are to limit login attempts. WordPress is rich with plugins. Website owners can use “Limit Login Attempts” plugins to limit the number of providing login credentials (3 or 5 times). Then it will block the account for 20 minutes or so. That way, attackers cannot use automated scripts or brute force tools to break the password.
- Use CAPTCHA before filling Forms and Text Boxes: Attackers often use forms and text boxes in web applications to perform local file inclusion, SQL injection, and other web attacks. Modern attack vectors have become automated through scripts. The script fetches data from a database and tries different ways to exploit a system. That is where CAPTCHA comes in for preventing websites from automatically submitting forms and other requests. Website owners can use Google Captcha (reCAPTCHA) plugins to enable CAPTCHA on WordPress forms, logins, and registration pages.
- Backup your site: Often attackers try to infect your WordPress website data with malware. If they can execute any script or inject malware on the server side, chances are such malware might erase all your website data. It can pause your business work and pose losses to revenue. Therefore, backing up your WordPress site is another best practice owners can follow.
Conclusion
We Hope the Above security tips will help you to secure your WordPress website. Other than all these WordPress security tips and practices, website owners can disable the file editing option from the WordPress dashboard, log user activities, change database file prefixes, etc. to make a more secure website. For the latest gadget and tech news, and gadget reviews, follow us on Twitter, Facebook and Instagram. For the newest tech & gadget videos subscribe to our YouTube Channel. You can also stay up to date using the Gadget Bridge Android App. You can find the latest car and bike news here.How to Use Snapchat on PC and Mac? Top 3 Ways

Most instant messengers have dedicated web portals for PC and Mac users. For a lot of people, this is a non-compromisable feature. Using a web portal for an IM on your laptop reduces the distractions that you’re met with every time you pick up your phone to check a message. Snapchat has a web portal where you can not only send and receive texts but also exchange snaps with your friends. In this article, we bring you the top 3 ways you can use Snapchat on a PC and Mac.
Read Also: Top 4 Ways to Mirror Your Android Or iPhone Screen to Amazon Fire Stick
Snapchat’s web interface offers all the essential features of the ephemeral messenger on your PC and Mac. Simply go to web.snapchat.com and log in using your Snapchat account to access the web portal. Once logged in, you can send and receive snaps, view stories, send texts, and make video and audio calls. However, if you want to add a new friend to Snapchat or post a story, you will need to use the mobile app. You also cannot view the Spotlight tab on Snapchat for PC. Another major drawback of this web portal is that it is currently only available for Google Chrome and Microsoft Edge.
Don’t want Snapchat to occupy an additional tab on your web browser? Download the desktop app instead. Go to the Microsoft Store and search for Snapchat. Open the app page and click on ‘Get’ to install it. Snapchat’s desktop app is the same as its web portal. The only advantage of using the app is that it can be accessed in its separate window, which declutters your web browser and gives you a bit of privacy.
 Before Snapchat had a desktop app of its own, the only way to make it work on a PC or Mac was through an Android emulator. You can still explore that option if the web portal and desktop app don’t work for you. Bluestacks is one of the best Android emulators for this task. Once you’ve installed Bluestacks on your PC or Mac, simply log in using your Google account and download Snapchat from the Play Store. The app will operate like its Android version.
In This Article
Use Snapchat Web
 Snapchat’s web interface offers all the essential features of the ephemeral messenger on your PC and Mac. Simply go to web.snapchat.com and log in using your Snapchat account to access the web portal. Once logged in, you can send and receive snaps, view stories, send texts, and make video and audio calls. However, if you want to add a new friend to Snapchat or post a story, you will need to use the mobile app. You also cannot view the Spotlight tab on Snapchat for PC. Another major drawback of this web portal is that it is currently only available for Google Chrome and Microsoft Edge.
Use the desktop app for Snapchat
 Don’t want Snapchat to occupy an additional tab on your web browser? Download the desktop app instead. Go to the Microsoft Store and search for Snapchat. Open the app page and click on ‘Get’ to install it. Snapchat’s desktop app is the same as its web portal. The only advantage of using the app is that it can be accessed in its separate window, which declutters your web browser and gives you a bit of privacy.
Use an Android Emulator
 Before Snapchat had a desktop app of its own, the only way to make it work on a PC or Mac was through an Android emulator. You can still explore that option if the web portal and desktop app don’t work for you. Bluestacks is one of the best Android emulators for this task. Once you’ve installed Bluestacks on your PC or Mac, simply log in using your Google account and download Snapchat from the Play Store. The app will operate like its Android version.
Frequently Asked Questions (FAQs)
How do I use Snapchat on my laptop?
You can access Snapchat on your laptop through its web portal. You can also download the desktop app from Snapchat’s website.Can I send snaps using Snapchat Web?
You can send and receive snaps using Snapchat Web. However, you won’t be able to add new friends or upload a story using the web portal.Where can I download the Snapchat app for PC?
You can download Snapchat for PC from Microsoft Store. Read Also: Redmi 12 India launch to happen on August 1Conclusion
These are the three best ways to use Snapchat on a PC and Mac. As of now, Snapchat Web is only available for Google Chrome and Microsoft Edge users. If you do not use either of those browsers, you can download the desktop app for your laptop. If you found this article helpful, let us know in the comments! For the latest gadget and tech news, and gadget reviews, follow us on Twitter, Facebook and Instagram. For newest tech & gadget videos subscribe to our YouTube Channel. You can also stay up to date using the Gadget Bridge Android App. You can find the latest car and bike news here.Top 3 Ways to Disable TalkBack on Android Devices

TalkBack is a very helpful accessibility tool on all Android phones that lets visually impaired people interact with their devices. Using the screen reader and audio & haptic feedback, TalkBack not only lets users navigate their phones but also use a plethora of apps and services. The feature has gotten better with every update and now allows users to set up a Braille keyboard as well. If you don’t feel the need to use TalkBack but can’t figure out how to turn it off, you’ve come to the right place. In this article, we bring you the top 3 ways to disable TalkBack on Android devices.
Read Also: Redmi 12 India launch to happen on August 1
Step 2: Select TalkBack.
Step 3: Switch off the toggle bar by double tapping it.
Step 4: Confirm your selection in the popup box by double tapping the ‘Turn Off’ option.
In This Article
Turn off Talk Back from Settings
Step 1: Go to Settings and select Accessibility. Step 2: Select TalkBack.
 Step 3: Switch off the toggle bar by double tapping it.
 Step 4: Confirm your selection in the popup box by double tapping the ‘Turn Off’ option.

Turn off TalkBack using Volume Keys
If you accidentally enabled TalkBack on your Android smartphone, it was probably by pressing the volume keys for more than three seconds. Luckily, you can turn off TalkBack in a similar fashion. Simply press and hold both volume keys for three seconds to turn off TalkBack on your Android phone. To make sure you don’t accidentally trigger TalkBack on your phone again, go to Settings>Accessibility>TalkBack and switch off the toggle bar next to the TalkBack shortcut.Use Google Assistant
Navigating your phone when TalkBack is enabled can be an arduous process. Your phone narrates the function of every icon when you tap on it. To make a selection, you need to double-tap the icon on the screen. If you don’t want to navigate all the way to accessibility settings on your device, you can simply ask Google Assistant to turn it off for you. Trigger the Google Assistant using the side key and say “Hey Google, turn off TalkBack”.Frequently Asked Questions (FAQs)
What is the TalkBack feature on my phone?
TalkBack is a very helpful tool on Android devices that lets visually impaired people navigate the software’s interface. Once enabled, TalkBack uses the screen reader to let the users know what’s on their phone’s screen.How do I turn off TalkBack on my Android phone?
To turn off TalkBack on your device, go to Settings>Accessibility>TalkBack and switch off the toggle bar by double tapping it. You can also press and hold the volume keys together for 3 seconds to disable this feature.How do I get Google TalkBack on my phone?
Google TalkBack is a native feature in the Android Accessibility Suite that comes preinstalled on all Android devices. You can find it in your device’s accessibility settings. Read Also: Apple MacBook Air 15-inch Review: We Apple-solutely Love It!Conclusion
These are the 3 best ways to disable TalkBack on Android devices. The easiest way to go about turning off TalkBack is by using the volume keys shortcut or triggering the Google Assistant. Navigating your phone using TalkBack can be a chore if you’re used to the usual mode of browsing. For the latest gadget and tech news, and gadget reviews, follow us on Twitter, Facebook and Instagram. For newest tech & gadget videos subscribe to our YouTube Channel. You can also stay up to date using the Gadget Bridge Android App. You can find the latest car and bike news here.Redmi Buds 4 Active Review: Very close to a perfect deal

2023 has seen a lot of affordable TWS releases already. A couple of years ago you would have been hard-pressed to find a decent pair of wireless earbuds under Rs 2,000. But with a slew of releases from (relatively) new players like Mivi and Truke, the budget TWS segment is going through a very important shift. Enter Xiaomi, which has had a stronghold on the budget smartphones market in India over the last decade. The new Redmi Buds 4 Active TWS seeks to replicate the same quality and value for money that Xiaomi offers on its smartphones. Priced at just Rs 1,399, the Buds 4 Active could easily be the go-to choice for consumers buying their first pair of TWS. We’ve been using these wireless earbuds for the last few days as our daily driver for music, voice calls, and even a fair bit of gaming. If you’re thinking of buying the Redmi Buds 4 Active, you may want to read this in-depth review.
Read Also: Apple MacBook Air 15-inch Review: We Apple-solutely Love It!
The pebble-shaped charging case has a matte-like texture with a glossy strip running across its circumference. We don’t get to say this quite often for entry-level earbuds, but the build quality here is amazing. Even though it’s an all-plastic case, it can easily absorb a few knocks. But what’s really impressive is the strength of the hinge, which is easily the best we’ve seen in this segment. You can fidget with the case all you want without worrying about the hinge loosening up.
At the bottom of the case, you will find the USB Type-C charging port along with a white notification light. The Redmi branding is engraved in the back panel, right underneath the hinge. The front of the case has no markings, recesses, or indents. While the design may be minimal, it doesn’t get in the way of functionality – you can easily flip open the case using just one finger.
The two earbuds are magnetically locked in a vertical position inside the charging case. The earbud housing panel is coloured grey, offering a nice contrast to the white exterior. The earbuds replicate the build quality of the charging case. You don’t have to worry about handling them with care. Xiaomi has gone for a standard in-ear design for the stem earbuds. A safe choice but a welcome one. The default medium-sized ear tips worked perfectly for us. For those struggling with the fit, there are two extra pairs of small and large size ear tips inside the retail box. We wore these earbuds while working out and did not face any problems with the fit even when things got sweaty. An IPX4 rating ensures that minor splashes and sweat won’t do any damage to the TWS.
Redmi Buds 4 Active has touch-sensitive outer panels for music playback and call controls. No controls have been assigned to single touches, which greatly reduces the risk of accidentally pausing the music or hanging up on a call while adjusting the earbuds. A very intelligent solution that we would like to see on other TWS as well.
Let’s get the specs out of the way first. These earbuds use 12mm drivers to deliver the audio output. The frequency range on offer is 20Hz – 24KHz. While the TWS offers Bluetooth 5.3 support, our minor complaint is that it does not support the AAC codec. It gets Google’s Fast Pair feature though, which is nice to see. There is also a low latency mode for gaming. Once connected to your device, these earbuds have a functional range of 10 metres.
We played a variety of artists and genres on the Redmi Buds 4 Active and never once felt like we were using an entry-level TWS. The audio output is very clearly bass-driven, but it makes for a fun listening experience. If your musical palate majorly comprises pop music, these earbuds won’t leave much room for complaints. While the low end may be boosted, the high and mid frequencies get the appropriate representation on the soundstage. We listened to King Gizzard and the Lizard Wizard’s newest release and were pleased with the overall output produced by the TWS.
The sound clarity can still be worked upon, even though it doesn’t stifle the listening experience in a major way. While listening to slowcore and ambient artists like Grouper and Aphex Twin, the gaps in detail were quite noticeable. The is a slight distortion in sound at the maximum volume. We’d suggest sticking within the 60-80% range.
There is also a low latency mode on offer, although we won’t recommend these earbuds strictly for gaming purposes. If you look around, there are a plethora of entry-level gaming TWS on offer, which would be more suited to your needs. The Redmi Buds 4 Active TWS does not claim to be a gaming TWS either. We put on the Buds 4 Active for a couple of COD Mobile sessions. The crip sounds were relayed really well on the earbuds, but the noticeable lag deterred us from keeping them on.
Moving on, the Redmi Buds 4 Active provides decent audio quality on voice calls in an indoor environment. We used the earbuds on cellular as well as WhatsApp calls. The ENC does a passable job of extracting the caller’s voice from the surrounding noise, but the relayed audio isn’t entirely devoid of disturbances. As is the case with most entry-level TWS, the quality of the microphones undermined the overall calling experience.
The Redmi Buds 4 Active can also be paired with the Xiaomi Earbuds app, but there’s not a whole lot of stuff you can do on it. Apart from toggling the low latency mode and renaming the earbuds the app offers no other options. We’d like to see Xiaomi flesh out this app with an update, allowing users to assign custom controls and even mess around with the equaliser settings.
Since we only used the Redmi Buds 4 Active for a few days, we cannot speak to its battery performance. We had the earbuds on for at least 2-3 hours every day and they never ran out of juice. Xiaomi claims a battery backup of almost 5 hours on the earbuds and an additional 30 hours in the case. This is in line with what we observed during our time with the TWS.
Read Also: Samsung Galaxy S21 FE Snapdragon 888 SoC variant today debuted in India
In This Article
Redmi Buds 4 Active review: Design
The Redmi Buds 4 Active are available in two colour options – Air White and Bass Black. We used the Air White variant for this review. The retail box has two extra pairs of ear tips inside but surprisingly lacks a USB charging cable. Nevertheless, if you have a USB Type-C cable lying around, you don’t have to worry about it too much. The pebble-shaped charging case has a matte-like texture with a glossy strip running across its circumference. We don’t get to say this quite often for entry-level earbuds, but the build quality here is amazing. Even though it’s an all-plastic case, it can easily absorb a few knocks. But what’s really impressive is the strength of the hinge, which is easily the best we’ve seen in this segment. You can fidget with the case all you want without worrying about the hinge loosening up.
 At the bottom of the case, you will find the USB Type-C charging port along with a white notification light. The Redmi branding is engraved in the back panel, right underneath the hinge. The front of the case has no markings, recesses, or indents. While the design may be minimal, it doesn’t get in the way of functionality – you can easily flip open the case using just one finger.
 The two earbuds are magnetically locked in a vertical position inside the charging case. The earbud housing panel is coloured grey, offering a nice contrast to the white exterior. The earbuds replicate the build quality of the charging case. You don’t have to worry about handling them with care. Xiaomi has gone for a standard in-ear design for the stem earbuds. A safe choice but a welcome one. The default medium-sized ear tips worked perfectly for us. For those struggling with the fit, there are two extra pairs of small and large size ear tips inside the retail box. We wore these earbuds while working out and did not face any problems with the fit even when things got sweaty. An IPX4 rating ensures that minor splashes and sweat won’t do any damage to the TWS.
 Redmi Buds 4 Active has touch-sensitive outer panels for music playback and call controls. No controls have been assigned to single touches, which greatly reduces the risk of accidentally pausing the music or hanging up on a call while adjusting the earbuds. A very intelligent solution that we would like to see on other TWS as well.
Redmi Buds 4 Active review: Performance
As is the case with every audio product, the design takes a backseat to the quality of the audio output. While we were impressed with the form factor, comfortable fit, and smooth controls of the Buds 4, it would have been completely undone with an underwhelming sound quality. Luckily, that is not the case with Redmi Buds 4 Active. Let’s get the specs out of the way first. These earbuds use 12mm drivers to deliver the audio output. The frequency range on offer is 20Hz – 24KHz. While the TWS offers Bluetooth 5.3 support, our minor complaint is that it does not support the AAC codec. It gets Google’s Fast Pair feature though, which is nice to see. There is also a low latency mode for gaming. Once connected to your device, these earbuds have a functional range of 10 metres.
 We played a variety of artists and genres on the Redmi Buds 4 Active and never once felt like we were using an entry-level TWS. The audio output is very clearly bass-driven, but it makes for a fun listening experience. If your musical palate majorly comprises pop music, these earbuds won’t leave much room for complaints. While the low end may be boosted, the high and mid frequencies get the appropriate representation on the soundstage. We listened to King Gizzard and the Lizard Wizard’s newest release and were pleased with the overall output produced by the TWS.
The sound clarity can still be worked upon, even though it doesn’t stifle the listening experience in a major way. While listening to slowcore and ambient artists like Grouper and Aphex Twin, the gaps in detail were quite noticeable. The is a slight distortion in sound at the maximum volume. We’d suggest sticking within the 60-80% range.
We played a variety of artists and genres on the Redmi Buds 4 Active and never once felt like we were using an entry-level TWS. The audio output is very clearly bass-driven, but it makes for a fun listening experience. If your musical palate majorly comprises pop music, these earbuds won’t leave much room for complaints. While the low end may be boosted, the high and mid frequencies get the appropriate representation on the soundstage. We listened to King Gizzard and the Lizard Wizard’s newest release and were pleased with the overall output produced by the TWS.
The sound clarity can still be worked upon, even though it doesn’t stifle the listening experience in a major way. While listening to slowcore and ambient artists like Grouper and Aphex Twin, the gaps in detail were quite noticeable. The is a slight distortion in sound at the maximum volume. We’d suggest sticking within the 60-80% range.
 There is also a low latency mode on offer, although we won’t recommend these earbuds strictly for gaming purposes. If you look around, there are a plethora of entry-level gaming TWS on offer, which would be more suited to your needs. The Redmi Buds 4 Active TWS does not claim to be a gaming TWS either. We put on the Buds 4 Active for a couple of COD Mobile sessions. The crip sounds were relayed really well on the earbuds, but the noticeable lag deterred us from keeping them on.
Moving on, the Redmi Buds 4 Active provides decent audio quality on voice calls in an indoor environment. We used the earbuds on cellular as well as WhatsApp calls. The ENC does a passable job of extracting the caller’s voice from the surrounding noise, but the relayed audio isn’t entirely devoid of disturbances. As is the case with most entry-level TWS, the quality of the microphones undermined the overall calling experience.
There is also a low latency mode on offer, although we won’t recommend these earbuds strictly for gaming purposes. If you look around, there are a plethora of entry-level gaming TWS on offer, which would be more suited to your needs. The Redmi Buds 4 Active TWS does not claim to be a gaming TWS either. We put on the Buds 4 Active for a couple of COD Mobile sessions. The crip sounds were relayed really well on the earbuds, but the noticeable lag deterred us from keeping them on.
Moving on, the Redmi Buds 4 Active provides decent audio quality on voice calls in an indoor environment. We used the earbuds on cellular as well as WhatsApp calls. The ENC does a passable job of extracting the caller’s voice from the surrounding noise, but the relayed audio isn’t entirely devoid of disturbances. As is the case with most entry-level TWS, the quality of the microphones undermined the overall calling experience.
 The Redmi Buds 4 Active can also be paired with the Xiaomi Earbuds app, but there’s not a whole lot of stuff you can do on it. Apart from toggling the low latency mode and renaming the earbuds the app offers no other options. We’d like to see Xiaomi flesh out this app with an update, allowing users to assign custom controls and even mess around with the equaliser settings.
Since we only used the Redmi Buds 4 Active for a few days, we cannot speak to its battery performance. We had the earbuds on for at least 2-3 hours every day and they never ran out of juice. Xiaomi claims a battery backup of almost 5 hours on the earbuds and an additional 30 hours in the case. This is in line with what we observed during our time with the TWS.
Read Also: Samsung Galaxy S21 FE Snapdragon 888 SoC variant today debuted in India
The Redmi Buds 4 Active can also be paired with the Xiaomi Earbuds app, but there’s not a whole lot of stuff you can do on it. Apart from toggling the low latency mode and renaming the earbuds the app offers no other options. We’d like to see Xiaomi flesh out this app with an update, allowing users to assign custom controls and even mess around with the equaliser settings.
Since we only used the Redmi Buds 4 Active for a few days, we cannot speak to its battery performance. We had the earbuds on for at least 2-3 hours every day and they never ran out of juice. Xiaomi claims a battery backup of almost 5 hours on the earbuds and an additional 30 hours in the case. This is in line with what we observed during our time with the TWS.
Read Also: Samsung Galaxy S21 FE Snapdragon 888 SoC variant today debuted in India
Verdict
For first-time TWS buyers looking for an entry-level pair of earbuds, the Redmi Buds 4 Active is a very easy recommendation. The trifecta of minimal design, seamless touch controls, and good audio output is perfectly matched by these earbuds. We also like the durability of the charging case – something that gets glossed over in this price range. If you’re primarily concerned with listening to music, the Redmi Buds 4 Active is a solid buy at Rs 1,399.Redmi Buds 4 Active: Pros
- Great design
- Durable
- Very impressive audio output for the price
- Highly affordable
Redmi Buds 4 Active: Cons
- Lacks the AAC codec
- Mild performance when it comes to voice calls
Samsung Galaxy Z Fold 5 and Galaxy Z Flip 5 prices leaked ahead of official launch

Samsung is expected to release the Galaxy Z Fold 5 and Galaxy Z Flip 5 at its upcoming Galaxy Unpacked event on July 26. Only a few weeks before its official debut, the first batch of Samsung Galaxy Z Fold 5 hands-on photos also surfaced online. They clearly display the device’s camera configuration and hinge. Samsung foldable phones’ full specifications and design renderings were just posted online. According to reports, the octa-core Snapdragon 8 Gen SoC would be included in both devices. In addition to this the prices of both foldable Galaxy Z Fold 5 and Galaxy Z Flip 5 in Europe, along with the storage and colour options, are now suggested in a new report.
In This Article
Samsung Galaxy Z Flip 5 price expected
According to a Dealabs report, the Samsung Galaxy Z Flip 5’s 256GB edition may cost EUR 1,199, or Rs 1,08,900, and the 512GB variant may cost EUR 1,339, or Rs 1,21,600. The device is likely to be made available in the colours Cream, Graphite, Lavender, and Water Green.Samsung Galaxy Z Fold 5 price expected
The Samsung Galaxy Z Fold 5 is anticipated to cost EUR 1,899, which is equivalent to Rs. 1,72,400 whereas the prices for the 512GB and 1TB choices are anticipated to be EUR 2,039, or roughly Rs. 1,85,100, and EUR 2,279, or roughly Rs 2,06,900 respectively. The phone will be available in Black, Blue, and Cream colouring schemes. Also Read: Samsung Galaxy Z Fold 5, Galaxy Z Flip 5 now up for pre-reservations in India: Details inside Both Galaxy Z Fold 5 and Galaxy Z Flip 5 recently went up for pre-reservations in India. Customers can pre-reserve Samsung’s next-generation foldable devices by paying Rs 2000 on Samsung.com, Amazon.in and Flipkart. The Bookings can also be made by visiting Samsung’s Exclusive Stores and leading retail outlets across the country. Pre-reserved customers will get benefits worth Rs 5000 on the purchase of Samsung’s next generation of foldable devices that will be unveiled globally on July 26.Samsung Galaxy Z Fold 5 specifications and features leaked
Ahmed Qwaider, a tipster, shared photographs of the Samsung Galaxy Z Fold 5, and based on them, it appears that there is no gap between the two folding sides of the smartphone. At the bottom edge of the smartphone are a loudspeaker, a microphone, and a USB Type C port. On the top are three microphones and a loudspeaker. This results in a dual loudspeaker system with a total of four microphones. According to earlier rumours, Samsung may incorporate a hinge in the form of a waterdrop into its upcoming Galaxy Z Flip 5 and Galaxy Z Fold 5 smartphones, which would be akin to recent foldable electronics from Huawei, Vivo, Oppo, and Xiaomi. Also Read: Nothing Phone 2 launched in India, equipped with Snapdragon 8+ Gen 1 SoC and tweaked design Additionally, photos of the Samsung Galaxy Z Fold 5 display its rear camera arrangement, which consists of three rear-facing lenses and an LED flash positioned to the right. A 50MP primary sensor, a 12MP ultrawide lens, and a 10MP telephoto camera with 3x optical zoom are reportedly included in the smartphone. Previous Samsung Galaxy Z Fold 5 leaks indicate that the device will include a 7.6-inch internal folding Super AMOLED screen and a 7.6-inch 6.2-inch 120Hz Super AMOLED cover screen. According to reports, the smartphone will be equipped with a Snapdragon 8 Gen 2 processor, 12GB of RAM, and up to 512GB of internal storage. According to several rumours, the device is water resistant, and it would have GPS, 5G, Wi-Fi 6E, Bluetooth 5.3, NFC, and a USB 3.2 Type-C connection for connectivity. There may be a 4,400mAh battery, 25W rapid charging capability, Samsung DeX, and Samsung Pay. For the latest gadget and tech news, and gadget reviews, follow us on Twitter, Facebook and Instagram. For newest tech & gadget videos subscribe to our YouTube Channel. You can also stay up to date using the Gadget Bridge Android App. You can find the latest car and bike news here.BGMI unlocks the all-new Princess Guard Crate filled with exclusive in-game skins and items

Popular battle royale game BGMI has just added a brand-new Princess Guard Crate to the game along with some new, exclusive game skins and additional, discounted products. The fashionable Crescent Princess Set, Red and Green Soldier Sets, the Slayer Bear Head, and other items are included in the crate.
Also Read: Samsung Galaxy Z Fold 5 images leak showing no gap in the hinge
A brand-new Princess Guard Crate for BGMI has been introduced by Krafton. It is stuffed with discounted unique in-game skins and other merchandise. Some of the highlights from the crate include the stylish Crescent Princess Set, the Red and Green Soldier Sets, the Slayer Bear Head, and more.
A discount of up to 70% is available on the first crate opening. Players may open the Princess Guard Crate during this limited-time promotion for just 18 UC each crate, which is a huge discount from the original cost of 60 UC. Additionally, players have the choice to open the crate 10 times for 540 UC, which is a discount. You have the opportunity to access these things and join the battlefield with each opening.
Also Read: Download BGMI from the Play Store and App Store and begin playing it right away
Your gaming experience is supposed to be improved by the brand-new Princess Guard Crate, which contains unique in-game skins and accessories.
A government order resulted in the mobile game owned by Krafton being banned in India in July 2022 due to privacy and security concerns. It was quickly removed from the App Store and Google Play Store. Similar to PUBG, it was outlawed and vanished from India. If you didn’t know, PUBG was re-released in India under the name Battlegrounds Mobile India (BGMI). The game was developed exclusively for Indian gamers in addition to the new branding.
The Battlegrounds Mobile India is live and now available to play. Note that this is a 3-month trial approval after it has complied with issues of server locations data security etc.
For the latest gadget and tech news, and gadget reviews, follow us on Twitter, Facebook and Instagram. For newest tech & gadget videos subscribe to our YouTube Channel. You can also stay up to date using the Gadget Bridge Android App. You can find the latest car and bike news here.
 A discount of up to 70% is available on the first crate opening. Players may open the Princess Guard Crate during this limited-time promotion for just 18 UC each crate, which is a huge discount from the original cost of 60 UC. Additionally, players have the choice to open the crate 10 times for 540 UC, which is a discount. You have the opportunity to access these things and join the battlefield with each opening.
Also Read: Download BGMI from the Play Store and App Store and begin playing it right away
Your gaming experience is supposed to be improved by the brand-new Princess Guard Crate, which contains unique in-game skins and accessories.
A government order resulted in the mobile game owned by Krafton being banned in India in July 2022 due to privacy and security concerns. It was quickly removed from the App Store and Google Play Store. Similar to PUBG, it was outlawed and vanished from India. If you didn’t know, PUBG was re-released in India under the name Battlegrounds Mobile India (BGMI). The game was developed exclusively for Indian gamers in addition to the new branding.
The Battlegrounds Mobile India is live and now available to play. Note that this is a 3-month trial approval after it has complied with issues of server locations data security etc.
For the latest gadget and tech news, and gadget reviews, follow us on Twitter, Facebook and Instagram. For newest tech & gadget videos subscribe to our YouTube Channel. You can also stay up to date using the Gadget Bridge Android App. You can find the latest car and bike news here.
A discount of up to 70% is available on the first crate opening. Players may open the Princess Guard Crate during this limited-time promotion for just 18 UC each crate, which is a huge discount from the original cost of 60 UC. Additionally, players have the choice to open the crate 10 times for 540 UC, which is a discount. You have the opportunity to access these things and join the battlefield with each opening.
Also Read: Download BGMI from the Play Store and App Store and begin playing it right away
Your gaming experience is supposed to be improved by the brand-new Princess Guard Crate, which contains unique in-game skins and accessories.
A government order resulted in the mobile game owned by Krafton being banned in India in July 2022 due to privacy and security concerns. It was quickly removed from the App Store and Google Play Store. Similar to PUBG, it was outlawed and vanished from India. If you didn’t know, PUBG was re-released in India under the name Battlegrounds Mobile India (BGMI). The game was developed exclusively for Indian gamers in addition to the new branding.
The Battlegrounds Mobile India is live and now available to play. Note that this is a 3-month trial approval after it has complied with issues of server locations data security etc.
For the latest gadget and tech news, and gadget reviews, follow us on Twitter, Facebook and Instagram. For newest tech & gadget videos subscribe to our YouTube Channel. You can also stay up to date using the Gadget Bridge Android App. You can find the latest car and bike news here. Top 4 Ways to Mirror Your Android Or iPhone Screen to Amazon Fire Stick

Mirroring your phone’s display to your Amazon Fire TV should be a seamless task but you can run into complications if your smartphone isn’t compatible with the Fire Stick. This is because Amazon Fire TV Stick supports Miracast to display content over WiFi, while iOS and stock Android devices support AirPlay and Chromecast respectively. Certain Android skins like MIUI, Oxygen OS, One UI and more, support Miracast which makes the task considerably easier. Before you begin mirroring your smartphone’s display to your Fire TV, it is essential that you make sure that both devices are connected to the same WiFi network. Once that’s taken care of, you can use these 4 methods to mirror your Android or iPhone screen to Amazon Fire TV Stick.
Read Also: How to lock a chat on WhatsApp?
Step 1: Turn on your TV and make sure the Amazon Fire Stick is connected to it.
Step 2: On your Amazon Fire TV remote, press and hold the home button until a menu pops up on the TV.
Step 3: Select ‘Mirroring’ from the popup menu.
Step 4: Your TV will now be able to receive the signal from your Android device. Go to the Screen Mirroring section on your phone and connect to the TV. You can find this option in the Quick Settings Menu. Its name may vary depending on the smartphone manufacturer. On Samsung devices, look for SmartView. On OnePlus devices, it is called ScreenCast.
Step 5: Select your TV from the list.
Step 1: Turn on the Amazon Fire TV Stick and go to Settings.
Step 2: Select Display & Sounds.
Step 3: Scroll down and select Enable Display Mirroring.
Step 4: Your TV will now look for nearby devices. On your Android smartphone, select Screen Mirroring from the Quick Settings Menu.
Step 5: Select your TV from the list.
Since Amazon Fire TV Stick does not have AirPlay support, you will need a third-party app to mirror your iPhone’s display on it. Here’s how you can go about it.
Step 1: Launch the Amazon Appstore on your Fire TV.
Step 2: Search and install the Airscreen app.
Step 3: Launch the Airscreen app on your Fire TV.
Step 4: Select Confirm.
Step 5: You can choose to connect the two devices using a QR code or a URL. We prefer the QR Code since it’s quick and easy.
Step 6: Once the QR code is displayed on your TV screen, scan it using your iPhone.
Step 7: Swipe down and select Screen Mirroring from the Control Center.
Step 8: Your iPhone’s display will be mirrored on Amazon Fire TV.
Google favours its own screen mirroring interface, Chromecast, over Miracast. This is why there is no native way to mirror smartphones running stock Android OS to your Amazon Fire TV Stick. If you own a Google Pixel smartphone, you will have to rely on a third-party app like Airscreen.
Step 1: Install and launch Airscreen on Amazon Fire TV.
Step 2: Select Confirm.
Step 3: Select ‘QR Code’.
Step 4: Scan the QR Code displayed on your TV using your Android smartphone.
Step 5: Select Entire Screen to mirror your phone’s display to the Fire TV.
In This Article
Mirror your Android phone to Amazon Fire Stick using the remote shortcut
 Step 1: Turn on your TV and make sure the Amazon Fire Stick is connected to it.
Step 2: On your Amazon Fire TV remote, press and hold the home button until a menu pops up on the TV.
Step 3: Select ‘Mirroring’ from the popup menu.
Step 4: Your TV will now be able to receive the signal from your Android device. Go to the Screen Mirroring section on your phone and connect to the TV. You can find this option in the Quick Settings Menu. Its name may vary depending on the smartphone manufacturer. On Samsung devices, look for SmartView. On OnePlus devices, it is called ScreenCast.
Step 5: Select your TV from the list.
Step 1: Turn on your TV and make sure the Amazon Fire Stick is connected to it.
Step 2: On your Amazon Fire TV remote, press and hold the home button until a menu pops up on the TV.
Step 3: Select ‘Mirroring’ from the popup menu.
Step 4: Your TV will now be able to receive the signal from your Android device. Go to the Screen Mirroring section on your phone and connect to the TV. You can find this option in the Quick Settings Menu. Its name may vary depending on the smartphone manufacturer. On Samsung devices, look for SmartView. On OnePlus devices, it is called ScreenCast.
Step 5: Select your TV from the list.
Mirror your Android phone to Amazon Fire Stick from Display Settings
 Step 1: Turn on the Amazon Fire TV Stick and go to Settings.
Step 2: Select Display & Sounds.
Step 3: Scroll down and select Enable Display Mirroring.
Step 4: Your TV will now look for nearby devices. On your Android smartphone, select Screen Mirroring from the Quick Settings Menu.
Step 5: Select your TV from the list.
Step 1: Turn on the Amazon Fire TV Stick and go to Settings.
Step 2: Select Display & Sounds.
Step 3: Scroll down and select Enable Display Mirroring.
Step 4: Your TV will now look for nearby devices. On your Android smartphone, select Screen Mirroring from the Quick Settings Menu.
Step 5: Select your TV from the list.
Mirror your iPhone screen to Amazon Fire Stick
 Since Amazon Fire TV Stick does not have AirPlay support, you will need a third-party app to mirror your iPhone’s display on it. Here’s how you can go about it.
Step 1: Launch the Amazon Appstore on your Fire TV.
Step 2: Search and install the Airscreen app.
Step 3: Launch the Airscreen app on your Fire TV.
Step 4: Select Confirm.
Step 5: You can choose to connect the two devices using a QR code or a URL. We prefer the QR Code since it’s quick and easy.
Step 6: Once the QR code is displayed on your TV screen, scan it using your iPhone.
Step 7: Swipe down and select Screen Mirroring from the Control Center.
Step 8: Your iPhone’s display will be mirrored on Amazon Fire TV.
Since Amazon Fire TV Stick does not have AirPlay support, you will need a third-party app to mirror your iPhone’s display on it. Here’s how you can go about it.
Step 1: Launch the Amazon Appstore on your Fire TV.
Step 2: Search and install the Airscreen app.
Step 3: Launch the Airscreen app on your Fire TV.
Step 4: Select Confirm.
Step 5: You can choose to connect the two devices using a QR code or a URL. We prefer the QR Code since it’s quick and easy.
Step 6: Once the QR code is displayed on your TV screen, scan it using your iPhone.
Step 7: Swipe down and select Screen Mirroring from the Control Center.
Step 8: Your iPhone’s display will be mirrored on Amazon Fire TV.
Mirror Google Pixel (Stock Android) on Amazon Fire TV
 Google favours its own screen mirroring interface, Chromecast, over Miracast. This is why there is no native way to mirror smartphones running stock Android OS to your Amazon Fire TV Stick. If you own a Google Pixel smartphone, you will have to rely on a third-party app like Airscreen.
Step 1: Install and launch Airscreen on Amazon Fire TV.
Step 2: Select Confirm.
Step 3: Select ‘QR Code’.
Step 4: Scan the QR Code displayed on your TV using your Android smartphone.
Step 5: Select Entire Screen to mirror your phone’s display to the Fire TV.
Google favours its own screen mirroring interface, Chromecast, over Miracast. This is why there is no native way to mirror smartphones running stock Android OS to your Amazon Fire TV Stick. If you own a Google Pixel smartphone, you will have to rely on a third-party app like Airscreen.
Step 1: Install and launch Airscreen on Amazon Fire TV.
Step 2: Select Confirm.
Step 3: Select ‘QR Code’.
Step 4: Scan the QR Code displayed on your TV using your Android smartphone.
Step 5: Select Entire Screen to mirror your phone’s display to the Fire TV.
Frequently Asked Questions (FAQs)
How do I mirror my Android phone’s display to Amazon Fire TV Stick?
Most Android phones support Miracast, which means you don’t need a third-party app to mirror them to a Fire TV Stick. Simply press and hold the home button on your Fire TV Stick remote and select Screen Mirroring. On your smartphone, select Screen Mirroring from the Quick Settings Menu.How do I mirror my iPhone’s display to Amazon Fire TV Stick?
Since Amazon Fire TV Stick does not support Apple AirPlay, you will need a third-party app like Airscreen to mirror your iPhone’s display to your TV.How do I mirror my Google Pixel’s display to Amazon Fire TV Stick?
Google Pixel and other stock Android devices rely on third-party mirroring apps like Airscreen as well, since Amazon Fire TV lacks Miracast support. Read Also: Samsung Galaxy S21 FE Snapdragon 888 SoC variant today debuted in IndiaConclusion
These are the top 4 ways you can mirror your Android or iPhone screen to Amazon Fire TV Stick. If you’re running into trouble with screen mirroring on your Fire TV, make sure your TV and smartphone are connected to the same WiFi network. Read this article if you want to mirror your smartphone’s display to a Windows device. For the latest gadget and tech news, and gadget reviews, follow us on Twitter, Facebook and Instagram. For newest tech & gadget videos subscribe to our YouTube Channel. You can also stay up to date using the Gadget Bridge Android App. You can find the latest car and bike news here.Redmi 12 India launch to happen on August 1

The Redmi 12 is going to launch in India soon. According to the company, the new smartphone will debut on August 1 in the country. The Redmi 12 budget phone made its debut in a few exclusive countries last month. As a result, we are familiar with its specs. A MediaTek G88 SoC is most likely the source of power for this device. The phone will also include a 5,000mAh battery and a triple camera setup on the back. Additionally, the phone has a 90Hz display.
The Redmi 12 is scheduled to launch in India on August 1. While announcing the exact launch date the company revealed that the device will feature a crystal glass design.
 For those who are unaware, the Redmi 12 was introduced in Europe last month with a starting price of EUR 199, or around Rs. 17,000, for the variant with 4GB RAM and 128GB storage. The 8GB RAM with 128GB storage option is offered in Thailand at a price of THB 5,299, or around Rs.
Also Read: Nothing Phone 2 launched in India, equipped with Snapdragon 8+ Gen 1 SoC and tweaked design
The phone is made available there in the colours Midnight Black, Polar Silver, and Sky Blue. Rumours suggest that the smartphone’s price in India might be similar to what it costs in Europe.
For those who are unaware, the Redmi 12 was introduced in Europe last month with a starting price of EUR 199, or around Rs. 17,000, for the variant with 4GB RAM and 128GB storage. The 8GB RAM with 128GB storage option is offered in Thailand at a price of THB 5,299, or around Rs.
Also Read: Nothing Phone 2 launched in India, equipped with Snapdragon 8+ Gen 1 SoC and tweaked design
The phone is made available there in the colours Midnight Black, Polar Silver, and Sky Blue. Rumours suggest that the smartphone’s price in India might be similar to what it costs in Europe.