10 February 2023 Amazon Quiz has gone live on its platform. The quiz timings are 12 AM to 11:59 PM. The Amazon App users can participate in the quiz daily and all they have to do is submit correct answers to the questions asked on the e-commerce platform. Today’s participants can get a chance to win Rs 500 Amazon Pay Balance.Amazon brings a fresh questionnaire that contains 5 questions daily. These questions are based on current affairs and general knowledge. The quiz can be played from 8 AM to 11:59 PM and the contestants need to answer correctly to enter into a lucky draw.Only one person is declared as a winner and the results will be announced at the end of every month. And to make sure that you give correct answers to all the 5 questions Gadget Bridge everyday updates all the answers to the Amazon Quiz. Do check out 10 February 2023 Amazon Quiz Answers to win Rs 500 Amazon pay Balance.Amazon Quiz Today Prize – Rs 500 Amazon Pay BalanceQuiz Date – 10 February 2023Daily Timing – 12 AM to 11:59 PMWinner Announcement – Today 12 PM
In This Article
Amazon Quiz Answers Today 10 February 2023
Question 1: Who came into the Australian Open 2023 men’s singles as the No.1 seed but was knocked out in the second round?
Answer: Rafael NadalQuestion 2: Who is the composer behind the Oscar nominated song ‘Naatu Naatu’?
Answer: MM Keeravani
Question 3: Cannelloni, Cavatelli, Ravioli and Penne are types of what?Answer: PastaQuestion 4: A part of which monument is shown here?Answer: Taj MahalQuestion 5: The places shown here are depicted in which popular show?Answer: Game of Thrones
How To Play Amazon Quiz
Only app users are eligible to play the Amazon quiz every morning from 12 AM to 11:59 PM. The quiz is not available on the desktop. For those who are unaware of how to play the Amazon quiz below are the steps, you can follow to take the quiz.
Firstly download the Amazon app from Google Play Store or App Store
Now fill in the required information through the Sign Up option.
You need to log in to the Amazon app and scroll down on the home screen to find the Amazon Quiz banner.
Tap on the Amazon Quiz banner and tap on the Start button to start the Quiz.
Now you will get 5 questions and you need to answer them correctly. One wrong answer will eliminate you from the Quiz.
After answering all the questions correctly you are now eligible for a Lucky Draw.
The winner’s name will be announced today at 12 PM.
Unlike Google Meet, you don’t need a paid subscription to record a video meeting on Zoom. However, there is one small catch here. Zoom only lets you record meetings at a maximum resolution of 720p. In order to record at a higher 1080p resolution, you will need to subscribe to a Business or Enterprise plan. If you’re planning on recording a lecture, a 720p HD resolution is good enough. In this article, we show you how to record video meetings in HD in Zoom.Read Also:Best ways to fix ‘Sound Not Working on Reddit Videos’ in app and website
In This Article
Here’s how you can record a video meeting on Zoom in HD
Step 1: Launch the desktop client for Zoom and sign in using your email address.Step 2: Click on the gear icon to open Settings.Step 3: Go to the Video tab and select the checkbox for ‘HD’. Additionally, select the checkbox for ‘Touch up my appearance’ as well.Step 4: Now, go to the recording tab and set a destination folder for the recorded file.Step 5: Select the checkbox for ‘Record a separate audio file of each participant’. This will help you during the post-processing of the video. If multiple speakers talk over each other during the meeting, you will be able to use separate audio files to make the audio output much cleaner.Step 6: Start a meeting and wait for the participants to join.Step 7: To start recording the meeting, click on ‘More’ at the bottom toolbar and select ‘Recording on this computer’. Alternatively, you can press Alt+R to start a recording.Step 8: To stop recording, click on ‘More’ and select ‘Stop Recording’. The video will be converted to mp4 format and saved to the destination folder.Read Also: Moto E13 with 6.5-Inch IPS Display announced in India
If you don’t want to shell out a hefty sum of money on the new iPhone, buying a refurbished iPhone is the next best thing. Apple provides up to six years of software updates for iPhones, which means you can easily buy a two year old iPhone at a reduced cost and use it without any security issues for at least four years. On the other hand, most Android phones get software updates for three to five years, depending on the manufacturer. But, what exactly is a ‘refurbished iPhone’ and which are the best places where you can buy one? Read along to find out.Read Also: How to easily Translate WhatsApp Messages on Android to any language: Top 3 ways
In This Article
What is a refurbished iPhone?
A ‘refurbished iPhone’ simply means a previously used iPhone that has been repaired by a trained technician and is in full working condition. You will rarely ever run into any performance issues with a refurbished iPhone. One key difference between a refurbished iPhone and a regular used iPhone is that the former usually comes with a product warranty.While buying a refurbished iPhone, you should ensure that it has some years of software updates left on it. Periodic software updates keep your smartphone secure and get rid of any unexpected software bugs. While a used iPhone may cost cheaper, buying a refurbished one is a much safer choice. Since a lot of users upgrade their iPhones every year, you are likely to get a good deal on a refurbished iPhone that is close to mint condition.
Which are the best places to buy a refurbished iPhone?
There are several sellers and e-commerce websites that can get you a good deal on a refurbished iPhone. Here are the best ones.
Apple’s Refurbished Store
Buying a refurbished iPhone from Apple’s very own Refurbished Store is the safest bet. Sure, they may price the smartphone a bit higher than other sellers, but the iPhone comes with a brand-new battery and exterior shell. Phone batteries are known to deteriorate over time, so a new battery significantly improves the life of the product. A new shell improves the look of the product, ensuring it feels good as new.
Blynk
Blynk is one of the more popular and reliable players when it comes to selling refurbished phones in India. The refurbished smartphones you buy on Blynk come with a one-year warranty and a seven-day money-back guarantee. Simply log on to the site and look for refurbished iPhones. Currently, you can buy a refurbished iPhone 11 for as low as Rs 29,000 on Blynk.
Amazon
The world’s biggest e-commerce website may be new to the ‘refurbished’ arena, but it has taken no time to attract buyers to its platform. Refurbished products on Amazon carry the ‘Renewed’ tag. All you need to do is search ‘Renewed iPhone’ on Amazon and browse through the best results. Refurbished iPhones on Amazon are professionally tested by the seller and come with a 6-month warranty.
Sahi Value
A platform to buy and sell used products, Sahi Value also deals in refurbished iPhones. Simply log on to the website, scroll down to the bottom and click on ‘Refurbished iPhones’ to have a look at their collection. Currently, you can even buy the latest (refurbished) iPhone 14 Pro on Sahi Value at a reduced price of Rs 1,19,000. Meanwhile, a refurbished iPhone 13 Mini will cost you as low as Rs 46,000. Sahi Value also offers pan-India shipping for free along with Cash on Delivery and EMI options.
Offline Sellers
If you don’t think you’re getting a good deal on the Internet, there are several local sellers in your area that may offer you a better price. Some sellers also offer very lucrative exchange offers where you can turn in your current smartphone for a better deal on a refurbished iPhone.Read Also: Google announces Bard, a new AI chatbot and ChatGPT competitor
Conclusion
These are the best places to buy a refurbished iPhone. While buying a refurbished iPhone, always make sure you check if the battery of the device is in good condition. To check the battery health of an iPhone, read our article here. If you have decided on buying a refurbished iPhone, we would suggest getting one which has a few years of software updates left.For the latest gadget and tech news, and gadget reviews, follow us on Twitter, Facebook and Instagram. For newest tech & gadget videos subscribe to our YouTube Channel. You can also stay up to date using the Gadget Bridge Android App. You can find the latest car and bike news here.
Portronics has today expanded its portfolio with the announcement of the new keyboard in India. The company has introduced its first gaming keyboard- Portronics Hydra 10 a compact wireless RGB keyboard. It comes with 20 different RGB customisations. Moreover, the keyboard is iOS-compatible and offers both wired and wireless connectivity.
In This Article
Portronics Hydra 10 RGB keyboard price in India and availability
The Portronics Hydra 10 RGB keyboard has been launched in India with a price tag of Rs 2,999. According to the company the gaming keyboard is currently being offered at an introductory price. It comes with a 12 months warranty and is available for purchase via the company’s official website Portronics.com, Amazon.in, Flipkart.com, and other leading online and offline stores in the country.Also Read:OnePlus TV 65 Q2 Pro, Keyboard 81 Pro introduced in India
Portronics Hydra 10 RGB keyboard specifications and features
The Portronics Hydra 10 RGB keyboard features some of the newest technologies and a luxury design. The Hydra 10 has been designed specifically for gamers and has extremely tactile, user-replaceable, maintenance-free RED mechanical switches for a speedy and painless clicking experience. To improve the appearance of your gaming system, the keys are backlit with RGB LEDs that can output 16.8 million distinct colours and have 20 different customisation choices. The keyboard is made with an incredibly small 68-key form factor (580g), with great portability for frequent travellers in mind.The Portronics Hydra 10 can connect utilising Bluetooth V5.0 and 2.4GHz Wireless receiver, both of which are designed for extreme connectivity and interoperability across numerous devices and platforms. This keyboard is simple to pair and connect with four separate devices at once: three using Bluetooth and one using a laptop or desktop’s wireless 2.4GHz nano receiver. A 1000mAh internal rechargeable battery powers the keyboard and charges via a USB-C connector. When your battery runs out, you may use the USB-C connector to connect this as a wired keyboard and play games with the utmost lag-free performance. With just an hour of charge, the USB-C Port’s fast charging can provide 5 days of wireless use.
For the latest gadget and tech news, and gadget reviews, follow us on Twitter, Facebook and Instagram. For newest tech & gadget videos subscribe to our YouTube Channel. You can also stay up to date using the Gadget Bridge Android App. You can find the latest car and bike news here.
Canon has announced the arrival of the EOS R8 and EOS R50 as new mirrorless cameras in India. Both serious amateurs and wedding industry experts will like using the new Canon EOS R8 mirrorless camera. It includes the Canon Log 3 and up to 40 frames per second continuous shooting capabilities of the EOS R6 Mark II with the portability of the EOS RP. The Canon EOS R50, on the other hand, is a portable, lightweight APS-C mirrorless camera designed for vloggers and content creators.
In This Article
Canon EOS R8
The weight of the Canon EOS R8 is approximately 461g (with battery pack and SD card). It is equipped with Movie Digital IS, which uses digital technology to stabilise images on five axes while recording videos and correct tilt. It has a 24.2-megapixel CMOS image sensor, allowing for the capture of 6K data across its entire width and the production of high-quality cropless oversampled 4K UHD footage at up to 60p. Additionally, the camera incorporates heat suppression features that let you record for an unlimited amount of time at 4K 30p and up to 30 minutes at 4K 60p. When shooting in Full HD at a resolution of 180p or above, the resulting video will be 30p with slowed-down action.The Canon new full-frame camera includes two modes for capturing 10-bit 4:2:2 high dynamic range video HDR PQ and Canon Log 3. It is asserted that the HDR PQ offers incredible dynamic range and natural colour. Canon Log 3, on the other hand, provides the same level of information but it is not “baked-in,” giving it more flexibility for post-processing processes that are more involved and entail colour grading. The Dual Pixel CMOS AF II technology found in the EOS R6 Mark II is also present in the EOS R8.The mirrorless camera R8 boasts an EOS iTR AF X system for quick and precise focusing that not only uses deep learning to identify and track people, animals, and moving objects but also “locks” onto other things based on their shape, colour, and brightness.The AF is still functional in low-light situations because of the low-light restrictions of up to EV-6.5 for still photos and EV-42 for videos. This improves the camera’s usability in low light and works with the high native ISO speed ranges of up to ISO 102,400 (still photography) and ISO 25,600 (video photography).Canon also introduced two new RF lenses, the RF24-50mm f/4.5-6.3 IS STM and the RF-S55-210mm f/5-7.1 IS STM, in addition to the EOS R8. Both of these allow focus breathing correction and provide optical IS up to 4.5 stops equal.
Focus breathing correction is a feature of professional cinema cameras that lessens the angle of view’s discernible variations during focusing.
False colours and zebras: advanced visual aids for exposure adjustment and setting.
Aspect marker display: for easier framing of video to fit various social media dimensions.
UVC (USB Video Class)/UAC (USB Audio Class) support: Plug-and-play direct transmission of audio and Full HD video to a computer with just a USB connection; ideal for live streaming.
The Multi-function Shoe, a digital interface that permits a cordless digital setup with appropriate add-ons like external microphones, is another feature of this device.
Canon EOS R50
With so many clever features, Canon’s new entry-level APS-C mirrorless camera makes creating videos and other digital content simple and hassle-free. The 1-inch image sensor on the most recent smartphones is three times smaller than the APS-C format image sensor on the EOS R50. As a result, even in low light, photos and videos will be crisper, more detailed, and noise-free. Additionally, users may anticipate stunning, authentic-looking bokeh (shallow focus) effects. The EOS R50’s 24.2 megapixels can also produce excellent Uncrop 4K 30p video oversampled from 6K of data.The EOS R50 is made for vloggers who want dedicated camera image quality without the typical learning curve associated with using one.The Dual Pixel CMOS AF II technology, which uses its features to detect and track humans, animals (such as dogs, cats, and birds), and vehicles (such as motorcycles and racing cars), just became smarter. The Movie for Close-up Demo mode swiftly and automatically shifts focus on the subject that is nearest to the camera for close-up demonstrations. With the focus where you want it, you can flaunt your new device or internet shopping haul in one fluid take. When used in conjunction with an RF lens that has in-lens IS, the EOS R50 has two separate Movie IS (Image Stabiliser) levels (‘Enhanced’ and ‘On’) that digitally execute 5-axis camera shaking correction.The “Movie IS: Enhanced” option by default optimises image stabilisation for handheld wide-angle photography while the monitor is in “selfie” mode by removing the undesired motion that accentuates itself at the borders of wide-angle shots.You can simply transfer films and JPEG photographs from your camera to a smartphone using the simple-to-install Camera Connect smartphone software using either a wireless Wi-Fi or wired USB-C connection.The RF-S18-45mm f/4.5-6.3 IS STM and the RF-S55-210mm f/5-7.1 IS STM are two kit choices for the EOS R50, which is available in black and white.
For the latest gadget and tech news, and gadget reviews, follow us on Twitter, Facebook and Instagram. For newest tech & gadget videos subscribe to our YouTube Channel. You can also stay up to date using the Gadget Bridge Android App. You can find the latest car and bike news here.
In India, the demand for gaming headphones is increasing. Online gaming revenue in India reportedly grew by 28% from USD 906 million in 2019 to USD 1.3 billion in 2021. Recently, the BTG (Born To Game) Beta earphones from Truke, a German Audio trademark but made in India, were released in India. The audio device, as its name would imply, makes the claim that its True Gaming Mode, which boasts the Best-In-Class Ultra Low Latency of less than 40ms, would provide the best gaming experience. These TWS earphones for gaming are on a budget and cost Rs 999. It features dual MEMS microphones, 13mm drivers, AAC codec support, up to 38 hours of battery and one-step quick pairing. Are the TWS worth the price? Let’s find out in the review below.
In This Article
Truke BTG Beta Review: Design
The small charging case for the Truke BTG Beta is included in the box. They have an plane jane, simple design and a traditional black body. In addition, Truke BTG Beta is available in different colours. A white version is also an option for gamers. With the Truke logo on the front, the case is built entirely of high-quality plastic and has a matte black finish. An LED indicator, located below the Truke branding, lets you know how the charging case and earphones are doing. So that it may stand upright on a flat surface, the charging case’s bottom is flat.A USB-C connector for charging the charging case is located at the bottom. A USB-C cable has been included within the box by Truke. The case is portable and light, making it simple to handle. On the charging case for the Truke BTG Beta earbuds, there are no buttons. Simply opening the case causes it to begin searching for a device to pair with. Furthermore, the matte finish helps hide any scratches.Also Read:Truke BTG X1 Review: Great looks with a performance to match!When you lift the case’s cover, you’ll see that the earphones are safely inserted into the corresponding slots. It is marked with the words Left and Right. When you lift the case’s cover, you’ll see that the earphones are safely inserted into the corresponding slots. It is marked with the words Left and Right. The case comes with built-in magnets to hold the earphones in place.Talking more about the earbuds, they are extremely lightweight and comfortable to wear, and they offer a secure, comfortable fit that makes them ideal for prolonged use. They have a two-tone appearance. The interior piece has a glossy sheen, while the upper part, which has the Truke logo, has a matte finish. The responsive touch sensors in both earbuds allow you to switch between tracks, accept or decline voice calls, and activate the voice assistant.The touch sensors are positioned behind the LED indicators which turn red while you keep them within the case, showing that they are charging. The LED indicator shines green when they are completely charged.The earphones are IPX4-certified to offer protection from water and dust. They are therefore perfect for use while exercising or engaging in sports like running.
Truke BTG Beta Review: Performance
The Truke BTG Beta connects to your device when you open the lid of the case. You have the option to manually turn off the earphones in addition to having them turn off automatically when you place them back in the charging case. The earphones can be turned off by pressing and holding the button on any of the two earbuds for five seconds.Although the earphones are touch sensitive, we have not had any problems with them and are efficient. Unfortunately, there is no volume control on these earbuds. This implies that the touch sensors on the earphones cannot be used to change the volume. You’ll need to use a linked device to control the volume.The 13mm Titanium drivers in the Truke BTG Beta earphones are a nice touch. They also support the AAC codec. You can choose to “Use High-quality Audio” in the Bluetooth options. The earbuds are set to the SBC codec by default because this option is deactivated. The AAC codec turns on after you activate this feature.Also Read:Google Pixel Buds Pro Review: Highest Quality TWSThe Truke BTG Beta earphones support the newest Bluetooth 5.3 version and have a wireless range of approximately 10 metres in terms of connectivity. It only takes a few seconds to reconnect to the previously paired device, and connectivity is immediate because they allow 1-step rapid pairing. Even before you remove the earphones from the case, they will automatically pair with the nearest previously linked device once the case lid is opened.Due to the lack of dual-pairing functionality, you are unable to use these earphones with two devices at once. The Google Assistant and Apple’s Siri voice assistants are also supported by the earbuds. Double-tap on either earbud to turn it on. Voice assistance is also effective.The earbuds are equipped with Dual MEMS microphones, one on each earbud, and Deep Neural Network Call Noise Cancellation technology, which uses AI to precisely pick up sound waves. The AI-powered noise cancelling does function ok.The 40ms low-latency gaming mode is these earphones’ main selling point. Truke BTG Beta has two modes: gaming mode and music mode. Simply touching the left earbud three times toggles the functionality on or off for those who wish to utilise the earphones’ Gaming Mode. The Gaming Mode, which we tested, performed well, but the Music Mode, as the default option, did not particularly wow us. While using it, there was never any lag. During the game, there is no stutter, voice sync problems, or audio lag.It didn’t deliver a high-quality, immersive musical experience, but its audio quality can at most be described as average. We experimented with many songs from various genres. Although Music Mode produces high-quality treble-heavy music, they don’t seem to have the ability to produce high-quality bass, therefore their potential to create a rich and seamless experience is still limited. If you prefer deeper bass, you won’t appreciate these earbuds because they typically lean more toward the treble. On higher volume levels, We did not notice any distortion, but when the volume level reaches 80%, the sound begins to seep. Overall, the call quality is decent and ought to be sufficient for even lengthy voice calls.The BTG’s battery life is likewise excellent. With 100 percent of the volume, you’ll likely get 5 to 6 hours of battery life. By keeping the volume somewhat low and turning the earbuds off when not in use for an extended period of time, you can increase your endurance. While charging, the white light on the earbuds is constantly on. The green light will appear when the earphones are fully charged, and the blue charging indicator light will turn off after 10 seconds. When the charging case is linked to a USB cable, a white light will continue to flicker. When the charging case is powered up, a white light will remain on until the USB cord is removed.
Verdict
It’s battery life is excellent. When speaking to someone else on the call, the mic quality is pretty good. ENC functions nicely, and Bluetooth Pairing is quick. Bass is typical. The low-latency gaming mode functions well overall and should be sufficient for casual gamers. Overall, it’s an excellent product for less than Rs 999.
For the latest gadget and tech news, and gadget reviews, follow us on Twitter, Facebook and Instagram. For newest tech & gadget videos subscribe to our YouTube Channel. You can also stay up to date using the Gadget Bridge Android App. You can find the latest car and bike news here.
One of the biggest link aggregator websites in the world, Reddit, recently started hosting videos on its platform not too long ago. While the transition has worked favourably for the website, with a large chunk of the front page filled with video content, some users often report not being able to hear the sound on videos when they click on the post. In this article, we bring you the best ways to fix the ‘sound not working on Reddit videos’ issue in the Reddit app and website.Read Also: How to easily Translate WhatsApp Messages on Android to any language: Top 3 ways
In This Article
Check if the video is muted
Most videos on Reddit are muted by default. This is because Reddit is primarily a text-based platform that people use at work. Since unexpected sounds can create unnecessary distractions, you will find that most videos on the platform are muted by default. If you’re not able to hear the sound on videos, all you need to do is unmute the video by clicking on the loudspeaker icon at the bottom right corner of the video player. Once you unmute the video, you can access the volume controls. Adjust the slider to set the ideal volume.
Unmute the video on the official Reddit app
Official Reddit app users can unmute the videos on the platform by tapping on the speaker icon at the bottom right corner of the post. You can also open the video and unmute it by tapping on the speaker icon next to the seek bar. Once you unmute the video, it will remain unmuted when you return to the feed. Every video you scroll past will have its sound turned on until you mute it again.
Check your device’s volume
If you cannot hear the sound on a Reddit video, it is possible that your device may be on mute. If you are using the Reddit app, simply press the Volume Up key on your smartphone to turn up the volume. If you’re browsing Reddit on your computer, check your system volume by clicking on the speaker icon on the right corner of the toolbar.
Clear app cache
Temporary files in the cache are always prone to get corrupted. Once this happens, they may meddle with the basic functioning of the app. Simply clear the app cache to resolve this issue. Here’s how you can do that.Step 1: Go to Settings and select Apps.Step 2: Scroll down and select Reddit.Step 3: Tap on Storage.Step 4: Select Clear cache.
Update the app
Older versions of apps can sometimes malfunction out of the blue in weird ways. If you haven’t updated the Reddit app in a while, now would be a good time to do it. Go to the Google Play Store, search for Reddit, open its app page, and hit the ‘Update’ button. You can also update the app by going to the ‘Manage apps and device’ section in Play Store settings.
Delete and reinstall the app
Some app functions can fail to work correctly if the app is not installed properly. Uninstall the app and reinstall it to resolve these issues. Long-press the Reddit app icon in your phone’s app drawer and hit the bin icon to delete it. Then, install the app using the Google Play Store.
Log out and log back in
If the volume issue is account-related, logging out and then logging back into Reddit can resolve it. Launch the app, tap the profile icon at the top right corner of the screen, hit the arrow next to your username, then tap on your username and select ‘Log out’. Use your account credentials to log back in.
Use a third-party Reddit client
Reddit’s third-party client apps for smartphones have been around longer than the official app. Encountering bugs on the official Reddit app is a common occurrence. Since the third-party clients have been around for a while, they do not face the same issues as the official app and offer a smoother browsing experience. Ever since Reddit started charging an exorbitant amount for its API, the list of third-party clients has thinned out. But, you can still use apps like Nara and Infinity.
Frequently Asked Questions (FAQs)
Why is sound not working on Reddit videos?
Reddit videos are muted by default. Tap the speaker icon at the bottom right corner of the screen to unmute the video. If you don’t see the speaker icon, it means you’re watching a GIF which has no sound.
Why are Reddit videos muted by default?
Since Reddit is still majorly a text-based platform, the videos are muted by default so as to not alarm the users who casually tap on the post.
These are the best ways to fix sound not working on Reddit videos in the app and browser. If the problem still persists after trying all the fixes mentioned above, chances are that the issue lies with the video file uploaded to Reddit. Sometimes users upload videos without any sound on them. To verify if this is the case, check the comments of the post to see if other people have reported the same issue.
Lenovo-owned smartphone company Motorola introduced a new smartphone in the Budget category. The company has launched Moto E13 which is powered by an octa-core Unisoc T606 SoC and a Mali-G57 MP1 GPU. The device comes with a 5,000mAh battery that is claimed to last over 36 hours on a single charge. In addition to this, there is an IPS LCD display and Dolby Atmos speakers. The phone runs on the latest Android 13 (Go edition).
In This Article
Moto E13 price in India and sale details
The Moto E13 has been launched in India with a starting price of Rs 6,999 for the base 2GB RAM with a 64GB storage option. There is another 4GB RAM with a 64GB storage model priced at Rs 7,999. The device is being offered in three colour options of Aurora Green, Cosmic Black, and Creamy White. Beginning February 15, the smartphone will be available for purchase on Flipkart and Motorola.in.For both new and existing customers, a flat cashback of Rs 700 is offered if they choose to use the Jio network for a set amount of time within 15 days of the device’s activation.Also Read:Comparison: Poco X5 Pro Vs Redmi Note 12 Pro
Moto E13 specifications
The 6.5-inch HD+ IPS LCD screen on the Moto E13 has a 20:9 aspect ratio. It has an octa-core Unisoc T606 SoC, up to 4GB of LPDDR4x RAM, 64GB of built-in storage, and up to 1TB of extendable storage through a microSD card. The graphics processor is a Mali-G57 MP1 GPU and the device uses Android 13. (Go edition).In terms of optics, The Moto E1 has a front-facing 5-megapixel selfie camera and a single 13-megapixel camera sensor. The 13MP camera knows when everyone in the frame is smiling and takes a photo when that happens thanks to intelligent features like Auto Smile Capture. Other tools, like Face Beauty and Portrait mode, automatically improve your photosThe low-cost smartphone has a 5,000mAh battery and supports 10W cable charging. It also has 2×2 MIMO and comes with a 10W charger. It is stated to support playback of videos for up to 23 hours. Along with this, the phone has an IP52 water-repellent build to keep your phone safe from spills and splashes while you’re out and about.Wi-Fi dual-band (5GHz and 2.4GHz), the USB Type-C 2.0 connector, and Bluetooth 5.03 wireless technology are all supported in terms of connectivity. Additionally, the smartphone’s speaker is Dolby Atmos compatible.
For the latest gadget and tech news, and gadget reviews, follow us on Twitter, Facebook and Instagram. For newest tech & gadget videos subscribe to our YouTube Channel. You can also stay up to date using the Gadget Bridge Android App. You can find the latest car and bike news here.
If you do not have a laptop on hand, you can still print any document straight from your iPhone. Your iPhone has a feature called ‘AirPrint’ that lets it connect to any compatible printer over WiFi. This cuts out the need to mail yourself the documents and then access them on your laptop to print them out. The whole process of printing from your iPhone doesn’t take more than a few minutes. If you do not wish to use AirPrint, there are a couple of other methods you can employ to print any document, file, or image. In this article, we bring you three quick ways to print from iPhone with and without WiFi.Read Also:OnePlus TV 65 Q2 Pro, Keyboard 81 Pro introduced in India
In This Article
Print from iPhone using AirPrint
When your iPhone and printer are connected to the same WiFi network, printing any document is a breeze. iPhone’s AirPrint feature makes it easy to print any document, file, or photo over WiFi. Here’s how you can go about it.Step 1: Make sure your iPhone and printer are connected to the same WiFi network.Step 2: Open the document, picture, or file your need to print.Step 3: Tap on the Share icon at the bottom left corner of the screen.Step 4: Select ‘Print’.Step 5: In the ‘Print Options’ window, tap on ‘Printer’.Step 6: This is where you will see all the printers on your WiFi network. Select the printer you want to use for the task.Step 7: Select the presets, print quality, and the number of copies. Then select ‘print’.Your document, file, or image will be printed over WiFi.
Print from iPhone using a personal hotspot
If your iPhone and printer are not connected to a WiFi network, you can still print out documents wirelessly. Many AirPrint-compatible printers can also create a personal hotspot that you can connect to and carry out any printing job. Here’s how you can go about it.Step 1: Open Settings and select WiFi.Step 2: Select your Printer from the list of networks. Step 3: Once connected, open the document you wish to print.Step 4: Tap on the Share icon at the bottom left corner of the screen.Step 5: Select ‘Print’.Step 6: Your printer will already be selected.Step 7: Select the presets, print quality, and the number of copies. Then select ‘print’.
Print from iPhone using an OTG cable
Another way of printing from an iPhone without WiFi is by using an OTG cable. If you don’t know what an OTG cable is or what it does, read our article here. Once you’ve connected your iPhone to a printer using an OTG cable, follow these steps.Step 1: Once your iPhone and printer are connected with an OTG cable, open the document you wish to print.Step 2: Tap on the Share icon at the bottom left corner of the screen.Step 3: Select ‘Print’.Step 4: Your printer will already be selected.Step 5: Select the presets, print quality, and the number of copies. Then select ‘print’.Read Also: Google announced Bard a new AI chatbot and ChatGPT competitor
The Poco X5 Pro was unveiled in India earlier this week. The product rivals the Redmi Note 12 Pro in terms of specs and price. If you’re confused between the Poco X5 Pro and Redmi Note 12 Pro, have a look at our comparison. It might help you understand how the phones are different from one another.
Poco X5 Pro: Triple rear camera setup includes: 108-megapixel ISOCELL HM2 main sensor, 2-megapixel macro camera and an 8-megapixel ultra-wide angle lensRedmi Note 12 Pro: Triple rear camera setup includes: 50-megapixel Sony IMX766 sensor, 8-megapixel ultra wide-angle sensor and a 2-megapixel macro sensor
Poco X5 Pro: 5,000mAh batteryRedmi Note 12 Pro: 5,000mAh battery
Operating system
Poco X5 Pro: MIUI 14 for Android 12Redmi Note 12 Pro: MIUI 13 based on Android 12
Starting Price
Poco X5 Pro: Rs 22,999Redmi Note 12 Pro: Rs 24,999
Our verdict
Both the Poco X5 Pro and Redmi Note 12 Pro have a matte-finished polycarbonate back. Notably, the rear of the Poco phone from the previous generation is made of glass rather than plastic. It features a flatter design than the Redmi Note 12 Pro, and the camera island resembles the Redmi phone. The displays on the two phones are identical.The Poco X5 Pro sports a Snapdragon 778G SoC that is two years old, whereas the Redmi Note 12 Pro has a MediaTek Dimensity 1080 chipset. In contrast to the MediaTek chipset, the Snapdragon chipset performs and plays games far better. While the Poco X5 Pro is limited to 8GB of RAM, the Redmi Note 12 Pro offers up to 12GB of RAM. The 5,000mAh battery in both devices supports 67W fast charging.Redmi Note 12 Pro settles for a 50MP primary camera, while Poco X5 Pro boasts a 108MP primary sensor. Be aware that the Redmi phone supports optical image stabilisation, however, the Poco’s camera sensor does not.Which one should you buy?The Redmi Note 12 Pro is an excellent option if you enjoy playing casual video games and are searching for a phone for everyday usage. But the Poco X5 Pro is an obvious choice if you’re a gamer searching for the most affordable phone.
For the latest gadget and tech news, and gadget reviews, follow us on Twitter, Facebook and Instagram. For newest tech & gadget videos subscribe to our YouTube Channel. You can also stay up to date using the Gadget Bridge Android App. You can find the latest car and bike news here.
Garena Free Fire is a battle royale game with regular awards and tournaments to keep players interested. If you play Garena Free Fire, you should be aware of the redeem codes that are released on a daily basis. However, because the battle royale game is banned in India, players from other countries can use the Free Fire Redeem codes daily. If you’re unfamiliar with the Garena Free Fire redeem codes or don’t know how to get them, we’ve put together a step-by-step guide to help you redeem them. Check out Garena Free Fire Redeem Codes for 9 February 2023.The Free Fire redeem codes are a great way to get free stuff. These are 12-digit codes that contain alphabets and numbers, as well as an expiration date and time. Because the Garena FF redeem codes cannot be used more than once, you should hurry to the redemption page to claim your free reward before someone else does. To get a free reward, all you have to do is go to reward.ff.garena.com/en, which is the official redemption page. Also, keep an eye on this space for daily updates on Garena Free Fire redemption codes and rewards.
In This Article
Garena Free Fire Redeem Codes Today 9 February 2023
SARG886AV5GR
ZYPPXWRWIAHD
8F3QZKNTLWBZ
WOJJAFV3TUSE
WLSGJXS5KFYR
FF11HHGCGK3B
FF119MB3PFA5
B61YCTNH4PV3
FF11NJN5YS3E
Y6ACLK7KUD1N
YXY3EGTLHGJX
FF1164XNJZ2V
MCPTFNXZF4TA
X99TK56XDJ4X
FF10GCGXRNHY
FF11WFNPP956
ZRJAPH294KV5
FF11DAKX4WHV
FF10617KGUF9
How to Get Free Fire Redeem Codes for Garena on 9 February 2023?
9 February 2023 Amazon Quiz has gone live. Customers from different parts of the country are participating in the daily quiz. The quiz begins from 12 AM to 11:59 PM. Those participating in the quiz can win exciting prizes by answering all the questions correctly. Today participants have a chance to win a Rs 2,500 Amazon Pay Balance.Amazon quiz brings an opportunity for its customers to win Amazon Pay Balance ranging from Rs 1,000 to Rs 50,000. The Quiz can be played from 12 AM to 11:59 PM. The e-commerce platform brings a fresh quiz on a daily basis which consists of five questions related to general knowledge and current affairs. The participants need to answer all the questions correctly and their names will be selected for a lucky draw. The winner will be announced at the end of the month.One wrong answer could eliminate you from the quiz. If you manage to answer all the questions correctly you can stand a chance to win a Rs 5,000 Amazon Pay Balance today. Only app users are eligible to participate in the Quiz. Check Out 9 February 2023 Amazon Quiz Answers.Amazon Quiz Today Prize – Rs 2,500 Amazon Pay BalanceQuiz Date – 9 February 2023Daily Timing – 12 AM to 11:59 PMWinner Announcement – Today 12 PM
In This Article
Amazon Quiz Answers Today 9 February 2023
Question 1: After his brilliant performances against New Zealand, who recently became the No.1 ranked ODI bowler in the world?Answer: Mohammad SirajQuestion 2: All that Breathes’ from India secured an Oscar nomination in which category?
Answer: Best Documentary Feature FilmQuestion 3: The famous Bharatpur bird sanctuary is located in which Indian state?Answer: RajasthanQuestion 4: What is the name of the primary mascot of this company?Answer: Ronald McdonaldQuestion 5: Which planet is shown in this visual?
Answer: Jupiter
How To Play Amazon Quiz
Only app users are eligible to play the Amazon quiz every morning from 12 AM to 11:59 PM. The quiz is not available on the desktop. For those who are unaware of how to play the Amazon quiz below are the steps, you can follow to take the quiz.
Firstly download the Amazon app from Google Play Store or App Store
Now fill in the required information through the Sign Up option.
You need to log in to the Amazon app and scroll down on the home screen to find the Amazon Quiz banner.
Tap on the Amazon Quiz banner and tap on the Start button to start the Quiz.
Now you will get 5 questions and you need to answer them correctly. One wrong answer will eliminate you from the Quiz.
After answering all the questions correctly you are now eligible for a Lucky Draw.
The winner’s name will be announced today at 12 PM.
Zoom is a popular video conferencing system that allows you to remotely meet with others. It works on a variety of platforms, including desktop PCs and Apple and Android smartphones. It now provides a web-based option for remote meetings as well. But there are many good software out there which are better than Zoom. We found one great option in the form of Waveroom.
In This Article
Why would someone need to replace Zoom with such a feature-rich house? The reasoning is as follows.
Zoom’s free plan is insufficient, video quality frequently falls short due to internet connection limitations, and the tool does not always offer HD video quality. This is a major disadvantage for individuals who want to record podcasts and distant interviews. Zoom’s video call and recording standard is 720p, and HD video is basically only available for small group calls.
Furthermore, if a participant is using the desktop software, there is no ability to record their audio and video locally.
Other complaints include data security, a lack of customer assistance, and limited recording capabilities in the free tier.
So, which is our pick?
We found a great application, Waveroom, which is an online recording studio great to record online meetings and podcasts.
What are Waveroom’s neat features and pricing?
Organizing online video meetings.
We have audio-only calls.
During the meeting, local audio and video recordings were made.
Using an invitation link, you can invite up to four visitors to the meeting.
The ability to enter the recording room during the recording.
Individual workstations with personal rooms that you can delete and rename to make it easier to browse between guests and prior calls.
The quality of the recording is unaffected by your internet connection: a slow or inconsistent network will not disrupt your meeting. The local recording provides you with high-quality digital audio and video files of each participant.
Following the session, you will receive video files in 4K HD definition with clean, uncompressed audio.
So far, the tool is completely free.
Pricing?
The utility is now available for free to all users.
How to Use Waveroom to Record an Online Interview etc.
Step 1: Open Google Chrome and go to the Waveroom website.
Step 2: To sign up for the service, locate the Get started icon in the top right corner of the screen and click on it.
Step 3: Fill out the signup form or sign-up using Facebook or your Gmail account.
Step 4: After registering, you’ll be sent to your personal area where you can begin an audio-only or video meeting online. Meetings are referred to as Rooms.
Step 5: Press Create Room or the Plus button in the upper-left corner of your screen to launch a new podcast.
Step 6: At the top of the page, type the name of your room.
Step 7: Your computer should be equipped with the greatest webcam and microphone you can find. It will assist you in obtaining excellent results.
Step 8: Under the video preview, choose your settings for Video, Audio, and Record. You can select an audio-only room, a video conference, or the Record option, which will record audio, video, or both.
Step 9: Copy the invitation link. Send it to the individuals you wish to participate as podcast speakers.
Step 10: To access your room, click the Start Now option.
Step 11: When you are prepared to begin the podcast, click the Start Recording option.
Step 12: To end the session after the podcast is finished, press the hang-up phone icon.
Step 13: Wait for a little period while the meeting recording saves.
Step 14: In the top left corner of the page, click the ‘All Rooms’ button.
Step 15: Click the space you just left. You can download each podcast guest’s locally recorded audio and video files here.
The recording can be found in your individual dashboard. After that, you can store it as an MKV file on your PC. Soon, more formats will be added.
Being the largest Instant Messaging platform in the world, WhatsApp has broken down several barriers to communication. While the app doesn’t have many shortcomings, it still isn’t able to translate messages on its platform. If you use an Android smartphone, this shouldn’t be too much trouble and you can easily work around this issue with the help of several translation apps. In this article, we show you how to easily translate WhatsApp messages on Android to any language.Read Also: Top ways to Fix Galaxy S22 Screenshot Not Working Issue
In This Article
Translate WhatsApp messages using Google Translate
Instead of opening the web browser every time you need to translate a message, you can download the Google Translate app and make things easier. Here’s how you can translate WhatsApp messages using the Google Translate app.Step 1: Download and install the Google Translate app on your smartphone.Step 2: Launch the Google Translate app, tap on your profile icon, and select Settings.Step 3: Select Tap to Translate.Step 4: Turn the toggle bars on for Use Tap to Translate, Show floating icon, and Auto-translate copied text. You will need to give Google Translate permission to draw over other apps in order to use the floating icon.Step 5: Head over to WhatsApp and open the conversation you want to translate. Step 6: Long press a message and select the copy icon from the toolbar at the top of the screen.Step 7: Tap on the floating icon. The message will automatically be translated into your desired language. In order to change the language, simply tap on the language name and choose another language.
Translate WhatsApp messages using Gboard
Step 1: DownloadGboard from the Google Play Store and use it as your default keyboard.Step 2: Launch WhatsApp and open the conversation you want to translate. Step 3: Long press a text and copy it to the clipboard.Step 4: Tap on the message box to make Gboard appear on the screen.Step 5: Select the Google Translate icon on the Gboard toolbar.Step 6: Paste the text you want to translate in the box that says Type here to translate.Step 7: The text will be translated into your desired language and will show up in the message box.
Live Translate WhatsApp messages on Google Pixel 6 or above
If you own a Google Pixel smartphone, you don’t need to go through a third party to translate the text on the screen. This is a relatively new feature by Google that is only available on Google Pixel 6 and above. Here’s how you can use Live Translate.Step 1: Open Settings on your Pixel and select System.Step 2: Select Live Translate.Step 3: Turn on the toggle bar for Live Translate.Step 4: Choose the default language for translation.Step 5: Now, head over to WhatsApp and open the conversation you want to be translated.Step 6: Tap on the translate icon at the top.Step 7: Any messages in a language that is different from the default system language of your phone will be translated to the language you entered in the Live Translate section above. You may have to download a language pack for some languages.
Use Chat Translator for WhatsApp
Step 1:Download and install the Chat Translator for WhatsApp app from the Google Play Store.
Step 2: Launch the app and hit Next. Then tap Start.
Step 3: Select Turn on Chat Translator.
Step 4: Grant the app the necessary permissions.
Step 5:Select your language and the language that needs to be translated.
Step 6: Drag the ‘Hey‘ ball to the message that you want to translate.
Frequently Asked Questions (FAQs)
Can I translate WhatsApp messages within the app itself?
Yes, you can translate WhatsApp messages within the app using Gboard. Simply hit the Translate icon on the keyboard and paste the message there. The translated text will appear in the message box.
Does Live Translate work for WhatsApp?
Live Translate is only available for Pixel (6 and above) smartphones at the moment. You can turn on this feature from device settings and use it to translate messages on WhatsApp.
Is there a good third-party app to translate WhatsApp messages on Android?
The ‘Chat Translator for WhatsApp’ app carries out this task fairly well. Once you’ve installed the app and granted it the necessary permissions, all you need to do is drag the assistive ball on top of the text to convert it to your desired language.
Read Also: OnePlus Pad, company’s first tablet launches in India: Price and availability details
Conclusion
These are the four quick ways to translate WhatsApp messages on Android to any language. If you wish to send messages in another language on WhatsApp you can easily do so by using Gboard. All you need to do is tap on the translate icon, type your message, and translate it to your desired language. The translated message will automatically show up in the WhatsApp message box.
Apart from launching the OnePlus 11 5G, OnePlus 11R, OnePlus Buds Pro 2, and the OnePlus Pad in India, the Chinese company has also announced more products like OnePlus TV 65 Q2 Pro and Keyboard 81 Pro. The television comes with a refresh rate of 120Hz and runs on OxygenPlay 2.0. The keyboard features Keychron technology, which has a double gasket design and will prevent loud typing sounds.
In This Article
OnePlus TV 65 Q2 Pro specifications
The 65-inch 4K QLED display on the OnePlus TV 65 Q2 Pro has a resolution of 3840 x 2160 pixels. It has a 120Hz refresh rate and a 97 percent DCI-P3 colour space coverage. Additionally, the display has 120 local dimming zones and a peak brightness of 1200 nits. The smart TV with WiFi capability also has Bluetooth functionality.In addition to Dolby Atmos sound capabilities, the OnePlus TV 65 Q2 Pro supports the video formats AVI, MKV, MP4, and WMV. The OnePlus TV’s 70W 2.1 channel soundbar is front firing rather than motorised and features Dynaudio-tuned audio. OxygenPlay 2.0 is installed on top of Android TV on the OnePlus TV.
OnePlus Keyboard 81 Pro specifications
The OnePlus Keyboard is the brand’s first mechanical keyboard that can be customised. The OnePlus Keyboard is the company’s first mechanical keyboard with customization options. The hot-swappable capability on one of them enables customers to swap out switches for distinctive personalization. The keyboard also comes with the alert slider that was taken from OnePlus smartphones. The inclusion of open-source firmware from businesses like QMK and VIA is an additional feature. It boasts Keychron technology, which uses a double gasket construction to produce a precisely timed, softer motion with a pleasant sound. Aluminum was used in the keyboard’s construction to make it portable and lightweight. It also functions with Linux, Mac, and Windows. The design is identical to a MacBook’s, even though it may also be used with Microsoft Windows. The keyboard’s Marble-mallow keycaps come in two colour options: Winter Bonfire and Summer Breeze.
OnePlus TV 65 Q2 Pro, Keyboard 81 Pro price in India, sale details
Search giant Google has announced its own ChatGPT competitor- Bard. The new chatbot is driven by artificial intelligence (AI). The tool would respond to users’ questions and participate in conversations.The company’s CEO via blog post announced the initiative. ” AI is the most profound technology we are working on today. Whether it’s helping doctors detect diseases earlier or enabling people to access information in their own language, AI helps people, businesses and communities unlock their potential. And it opens up new opportunities that could significantly improve billions of lives. That’s why we re-oriented the company around AI six years ago — and why we see it as the most important way we can deliver on our mission: to organise the world’s information and make it universally accessible and useful.”According to Google, it has been developing Bard, an experimental LaMDA-based conversational AI service. Prior to making it more broadly accessible to the public in the upcoming weeks, Google is making it available to reliable testers.Also Read:What is ChatGPT? How to use the viral chatbot like a pro?The business claims that Bard aims to bring together the depth of knowledge found throughout the world with the strength, acumen, and creativity of Google’s expansive language models. It uses data from the internet to deliver original, excellent answers. Bard can serve as a creative release and a springboard for inquiry, enabling you to impart new scientific findings from NASA’s James Webb Space Telescope to a 9-year-old or learn more about the top football strikers of the moment before receiving training to hone your abilities.Google is initially making it available using LaMDA’s lightweight variant. The company claims that because the much smaller device uses a lot less computational power, it can scale to accommodate more users and collect more input. To ensure that Bard’s responses reach a high standard for quality, safety, and information found in real-world data, it will integrate external feedback with its own internal testing.“We’re excited for this phase of testing to help us continue to learn and improve Bard’s quality and speed,” the company noted.Since its November 2022 launch, ChatGPT, the most recent initiative from OpenAI, has generated significant online buzz. For those who are unaware, OpenAI developed ChatGPT, a language model tool that effectively forms phrases and simulates human-like conversations by sifting through huge text data sets using deep learning algorithms. Several language model tools existed before ChatGPT, but none of them was as precise as OpenAI’s chatbot. Additionally, ChatGPT supports user interaction using OpenAI, which has propelled its online popularity.
For the latest gadget and tech news, and gadget reviews, follow us on Twitter, Facebook and Instagram. For newest tech & gadget videos subscribe to our YouTube Channel. You can also stay up to date using the Gadget Bridge Android App. You can find the latest car and bike news here.
While creating and attending video meetings on Google Meet is free for all, recording a meeting is an exclusive feature reserved for Google Workspace subscribers. There are several Workspace editions you can subscribe to in order to access the recording feature. Even when you have the ability to record a meeting, you need the administrator or meeting organiser to give you permission to record the meeting. Regular participants are not allowed to record the meeting without being cleared by the admin first. In this article, we show you how to record video meetings in FHD on Google Meet.Read Also: OnePlus 11R with 100W SUPERVOOC flash fast charging announced in India
In This Article
Here’s how you can record meetings on Google Meet
Step 1: Join a video meeting on Google Meet or start one of your own.Step 2: On the bottom Toolbar, click on Activities and select ‘Record Meeting’.Step 3: Select ‘Start Recording’.Step 4: In the following window, select ‘Start Recording’.Step 5: To stop the recording, click on Activities and select Stop Recording. Confirm your selection in the following window.The video file will be saved to the organiser’s ‘Meet recordings’ folder on Google Drive. A link to the recording will be mailed to the person who started the recording. If the organiser changes midway through the meeting, the recording will be saved to the original event creator’s Drive folder.
Record meetings on Google Meet in FHD using iTop Screen Recorder
You can also record a meeting in FHD using the iTop Screen Recorder. Using this method, the video file will be saved locally to your device and will not be shared with the meeting creator or administrator. You can also record a meeting as a host or a participant. You dont need a Workspace plan subscription for it either. Here’s how you can record a video meeting using iTop Screen Recorder.Step 1: Download and install the iTop Screen Recorder on your laptop from the official website.Step 2: Open the iTop Screen Recorder once it has been installed and go to Options>Settings to customise it according to your liking. You can select the hotkeys, storage location, and more.Step 3: Join a meeting on Google Meet or create one of your own. Step 4: Go back to iTop Screen Recorder and select the region you want to record.Step 5: Click on the red button to start the recording and the square button to end it. The file will be stored in your desired location.Read Also: How to add location to your posts, reels and stories on Instagram
Most iPhone users often report that the Bluetooth on their phone automatically turns on even after they’ve turned it off. This situation may arise if you use the Control Center to turn the Bluetooth off. Swiping down from the status bar and using the Control Center to turn Bluetooth off simply disconnects your iPhone from the devices paired to it via Bluetooth. It doesn’t actually turn off Bluetooth entirely. In this article, we show you how to stop Bluetooth from automatically turning on on your iPhone.Read Also: OnePlus 11R with 100W SUPERVOOC flash fast charging announced in India
In This Article
Turn off Bluetooth from Settings
If you want to switch off Bluetooth on your iPhone for good, you need to do it from Settings. Here’s how.Step 1: Go to Settings and select Bluetooth.Step 2: Turn the toggle bar next to ‘Bluetooth’ off.Step 3: Select ‘Turn off’ from the popup box.
Turn off Airdrop
Airdrop uses your phone’s Bluetooth connection to transfer a file to another device. Once you send a file using Airdrop, it automatically turns on Bluetooth on your iPhone. Follow these steps to turn off AirDrop on your iPhone.
Step 1: Swipe down from the top right corner of the phone to reveal the Control Center.
Step 2: Long press the connection tiles folder to expand it.
Step 3: Select AirDrop.
Step 4: Tap on ‘Receiving off’.
Use Siri to turn Bluetooth off
This is probably the quickest way to turn Bluetooth off on your iPhone. You don’t need to navigate to Settings or Control Center to carry out the job. Activate Siri and simply say “Hey Siri, turn Bluetooth off” and Apple’s voice assistant will execute the command instantaneously.
Reset Network Settings
Step 1: Go to Settings and select ‘General’.
Step 2: Scroll down and select ‘Transfer or reset iPhone’.
Step 3: Select ‘Reset’ followed by ‘Reset Network Settings’.
Update iOS
If you are using an older version of iOS, this problem may be arising due to a software bug. These bugs are usually fixed in the updated OS version. Go to Settings>General>Software update to check for any pending updates and install them on your device.
How to turn Bluetooth back on?
Once you’ve turned the Bluetooth off on your iPhone, you won’t be able to connect to your AirPods or any other Bluetooth device. In order to turn Bluetooth back on, simply swipe down from the top of the screen and tap on the Bluetooth icon in the Control Center. Once the icon turns blue, it means that Bluetooth has been turned on. Alternatively, you can go to Settings>Bluetooth and turn the toggle switch on. You can also use Siri to turn the Bluetooth back on. Simply activate the voice assistant and say “Her Siri, turn Bluetooth on”.
Frequently Asked Questions (FAQs)
Why does the Bluetooth on my iPhone keep turning on?
Whenever you send a file to another through AirDrop, it automatically turns on Bluetooth. Your iPhone’s Bluetooth may also turn on automatically if there’s a Shortcut programmed to do so.
Taking a screenshot is one of the easiest things you can do with your smartphone. On Samsung Galaxy S22, all you need to do is press the volume down and power keys to take a quick screenshot. Using the popup toolbar at the bottom, you can either extend the screenshot to cover multiple pages or quickly edit it before saving. Oftentimes, users report that their Galaxy S22 is unable to take a screenshot. In this article, we bring you the top ways to fix the ‘Samsung Galaxy S22 screenshot not working’ issue.Read Also: Oppo A78 5G Review: How does it stand out in its category?
In This Article
App restrictions
Certain apps on your Galaxy S22 restrict it from taking a screenshot when they are running on the screen. You will run into this issue with OTT apps like Netflix, Disney+ Hotstar, and others. Apart from apps, Chrome’s Incognito window also doesn’t allow you to take screenshots. If you were issued the smartphone by your institution/workplace then the feature to screenshot may inherently be locked.
Restart your phone
Restarting your smartphone is the quickest way to fix any background issues or bugs. A quick restart should be the first step you take in fixing any problem you come across on your smartphone. To restart your Samsung Galaxy S22, simply press and hold the power button and then select ‘Restart’ from the screen.
Take a screenshot from the drop-down menu
Your S22 may not be taking screenshots due to a faulty volume or power key. A quick workaround to this issue is taking a screenshot from the drop-down menu. Simply go to the page you want to screenshot and swipe down from the status bar. Select the screenshot tile. This will take a screenshot of the page under the drop-down menu. Certain smartphones running previous versions of Android also allow you to take a screenshot from the app switcher.Take a screenshot using Google Assistant
Another really handy way of taking a screenshot on your Galaxy S22 is by asking Google Assistant to do it. This does not require using any physical buttons at all. It is also a great way of taking a screenshot while you’re driving, so as to not get distracted by your phone. Simply say “OK Google, take a screenshot” and let Google Assistant do the rest.
Check the storage space
If your Samsung Galaxy S22’s storage space is at full capacity, it won’t be able to take a screenshot since there’s no place to store it. To take a screenshot, clear up the storage space by going to Settings>Battery and device care>Storage. You will find a detailed breakdown of your phone’s storage space there.
Take a screenshot in Safe Mode
Rebooting your phone in Safe Mode confirms whether the issue you are experiencing is related to a third-party app or not. If you are able to take a screenshot in Safe Mode it means that one of the third-party apps is probably keeping you from taking one in regular mode. To enter Safe Mode, press and hold the power button and volume down button. Once the power menu pops up on the screen, press and hold the power icon until the Safe Mode option shows up. Once you enter Safe Mode, take a screenshot using the volume down and power keys.
Use a third-party app
There are several third-party apps you can use to take a screenshot on your phone. Apps like Assistive Touch overlay a convenient icon on your screen to access all the important functions and apps. You can edit these functions to include taking a quick screenshot. Other apps like Screenshot Touch and Screenshot Easy are specialised towards taking and editing screenshots using different customisable gestures and touches.
Enable media storage
Step 1: Go to Settings and select Apps.
Step 2: Tap the filter and sort icon next to Your apps.
Step 3: Switch on the toggle bar for Show system apps.
Step 4: Scroll down and select Media Storage.
Step 5: If it is disabled, select Enable.
Why can I not take screenshots on my Samsung Galaxy S22?
Certain apps restrict you from taking screenshots of their pages. This includes Chrome’s Incognito window. Your phone may also stop taking screenshots if its physical buttons are faulty or if its internal storage is at peak capacity.
How do I fix my phone if it isn’t taking screenshots?
If your phone isn’t taking screenshots, make sure there’s enough space in the device’s internal memory. Restart your phone in Safe Mode to figure out whether the issue is related to a third-party app.
How do I take a screenshot without using buttons?
To take a screenshot without using buttons, simply tap the Screenshot tile in the Quick Settings Menu. You can also take a screenshot using Google Assistant.
Conclusion
These are the top ways to fix the ‘Samsung Galaxy S22 screenshot not working’ issue. If you decide to perform a factory reset on your phone, back up all your data as you will lose it in the process. If you cannot take a screenshot even after performing a factory reset, take your S22 to an authorised service centre for further diagnosis.For the latest gadget and tech news, and gadget reviews, follow us on Twitter, Facebook and Instagram. For newest tech & gadget videos subscribe to our YouTube Channel. You can also stay up to date using the Gadget Bridge Android App. You can find the latest car and bike news here.
At its Cloud 11 event which was held in New Delhi OnePlus upgraded its entire portfolio with the addition of new products. While the company introduced new successors to its flagship smartphone, audio, and Smart TVs, the firm also introduced brand new devices at the event. The company released its first-ever OnePlus Pad and OnePlus Keyboard 81 Pro in the Indian market along with the OnePlus 11 5G, the OnePlus 11R, the OnePlus Buds Pro 2, and OnePlus TV 65 Q2 Pro. The OnePlus Pad has a large screen and a premium aesthetic. The bezels around the 11.6-inch display on the front of the OnePlus tablet are fairly thin.
In This Article
OnePlus Pad price in India and sale details
The OnePlus Pad will be available in a single Wi-Fi variant. The price of the OnePlus Pad is yet to be announced in India. However, the company has revealed that the tablet will open up for pre-orders in the country in the month of April. In addition to India, the company has also announced the availability of the device in North America, Europe and the Middle East.Also Read: OnePlus 11R with 100W SUPERVOOC flash fast charging announced in India
OnePlus Pad specifications
The screen on the OnePlus Pad is large, and it looks expensive. It features an 11.61-inch display with a refresh rate of 144Hz, a resolution of 2800×2000, a pixel density of 296 ppi, and a brightness of 500 nits. On the front of the OnePlus tablet, the bezels around the screen are relatively thin. The tablet sports 2.5D curved glass, a 7:5 screen ratio, and an 88 percent screen-to-body ratio. The four speakers provide an Omnibearing sound field, and depending on how the tablet is held, the speakers can switch between the left and right channels. Dolby Atmos and Dolby Vision are also included on the tablet.5G cellular sharing with smartphones is available on the OnePlus Pad. It is equipped with a MediaTek Dimensity 9000 chipset, which supports up to 12GB of LPDDR5 RAM. The Tab runs on Android 13 out of the box.Also Read:OnePlus Buds Pro 2 with Spatial Audio technology launched in India, OnePlus Buds Pro 2R also introducedIt has a 9,510mAh battery with 67W SUPERVOOC capability, which is said to provide up to one month of standby time. The OnePlus tab has an 8-megapixel selfie camera and a single 13-megapixel back camera with an LED flash. In addition to this, the device is supplied with a magnetic keyboard and a stylus.
For the latest gadget and tech news, and gadget reviews, follow us on Twitter, Facebook and Instagram. For newest tech & gadget videos subscribe to our YouTube Channel. You can also stay up to date using the Gadget Bridge Android App. You can find the latest car and bike news here.
Garena Free Fire is a battle royale game with regular awards and tournaments to keep players interested. If you play Garena Free Fire, you should be aware of the redeem codes that are released on a daily basis. However, because the battle royale game is banned in India, players from other countries can use the Free Fire Redeem codes daily. If you’re unfamiliar with the Garena Free Fire redeem codes or don’t know how to get them, we’ve put together a step-by-step guide to help you redeem them. Check out Garena Free Fire Redeem Codes for 8 February 2023.The Free Fire redeem codes are a great way to get free stuff. These are 12-digit codes that contain alphabets and numbers, as well as an expiration date and time. Because the Garena FF redeem codes cannot be used more than once, you should hurry to the redemption page to claim your free reward before someone else does. To get a free reward, all you have to do is go to reward.ff.garena.com/en, which is the official redemption page. Also, keep an eye on this space for daily updates on Garena Free Fire redemption codes and rewards.
In This Article
Garena Free Fire Redeem Codes Today 8 February 2023
Updating Soon
How to Get Free Fire Redeem Codes for Garena on 8 February 2023?
8 February 2023 Amazon Quiz has gone live on its mobile app platform. Customers from different parts of the country are participating in the daily quiz. The daily quiz is conducted by the company brings an opportunity for the customers to win exciting prizes. The quiz begins from 12 AM to 11:59 PM. In today’s quiz participants have a chance to win Rs 5,000 Amazon Pay Balance by answering all the questions correctly.Every day Amazon brings a fresh set of questions for its customers that contains five easy questions. Amazon quiz brings an opportunity for its customers to win Amazon Pay Balance ranging from Rs 1,000 to Rs 50,000. which consists of five questions related to general knowledge and current affairs.The participants need to answer all the questions correctly and their names will be selected for a lucky draw. The winner will be announced at the end of the month. One wrong answer could eliminate you from the quiz. If you manage to answer all the questions correctly you can stand a chance to win Rs 1,000 Amazon Pay Balance today. Only app users are eligible to participate in the Quiz. Check Out 8 February 2023 Amazon Quiz Answers.Amazon Quiz Today Prize – Rs 5,000 Amazon Pay BalanceQuiz Date – 8 February 2023Daily Timing – 12 AM to 11:59 PMWinner Announcement – Today at 12 PM
In This Article
Amazon Quiz Answers Today 8 February 2023
Question 1: In 2023, Lionel Messi and Cristiano Ronaldo faced off against each other in a football match played in which city?Answer: RiyadhQuestion 2: In the Marvel Cinematic Universe, Paul Rudd plays the role of which superhero?Answer: Ant-Man
Question 3: Which astronaut, part of the Apollo- 11 mission recently got married at the age of 93?
Answer: Buzz AldrinQuestion 4: Who succeeded him as president of the USA?Answer: Joe BidenQuestion 5: This is the flag of which Asian country?Answer: Malaysia
How To Play Amazon Quiz
Only app users are eligible to play the Amazon quiz every morning from 12 AM to 11:59 PM. The quiz is not available on the desktop. For those who are unaware of how to play the Amazon quiz below are the steps, you can follow to take the quiz.
Firstly download the Amazon app from Google Play Store or App Store
Now fill in the required information through the Sign Up option.
You need to log in to the Amazon app and scroll down on the home screen to find the Amazon Quiz banner.
Tap on the Amazon Quiz banner and tap on the Start button to start the Quiz.
Now you will get 5 questions and you need to answer them correctly. One wrong answer will eliminate you from the Quiz.
After answering all the questions correctly you are now eligible for a Lucky Draw.
The winner’s name will be announced today at 12 PM.
At the company’s Cloud 11 launch event today, the OnePlus 11R was introduced in India. The product is a less expensive variant of the recently unveiled premium OnePlus 11 5G model and a rebranded variant of the OnePlus Ace 2 which was also launched in China today. The phone is powered by Qualcomm’s Snapdragon 8+ Gen 1 5G SoC. The smartphone features a 6.74-inch Full-HD+ curved AMOLED display. Just like its elder sibling the 11R also comes with a 5,000mAh battery that supports 100W SUPERVOOC flash fast charging.
In This Article
OnePlus 11R specifications
The 6.74-inch Full-HD+ curved AMOLED display on the OnePlus 11R stands out thanks to its 2772 x 1240 pixel resolution. The screen’s dynamic adaptive refresh rate ranges from 40Hz to 120Hz. Additionally, it offers 450 ppi and a maximum brightness of 1,450 nits. The touch response rate of the display is up to 1000Hz. The Snapdragon 8+ Gen 1 5G chipset, along with up to 16GB of RAM and up to 256GB of internal storage, power the OnePlus 11R.Also Read:OnePlus 11 5G with Hasselblad branded cameras and Snapdragon 8 Gen 2 SoC launched in IndiaA 50MP Sony IMX890 main sensor is one of three back cameras on the OnePlus 11R. It also has a 4 cm macro camera with a 120-degree ultra-wide lens, an 8 MP ultra wide-angle sensor, and other features. The gadget has a 10x digital zoom but no optical zoom capabilities. Because it supports both electronic and optical image stabilisation, the OnePlus 11R’s rear camera can capture videos in 4K quality at 30 frames per second and is shake-free. A hole-punch notch at the top of the display houses the 16MP front camera.The device’s connectivity options include 5G, 4G, Wi-Fi, Bluetooth 5.3, NFC, and GPS. A 5,000mAh battery within the OnePlus 11R supports 100W SUPERVOOC flash fast charging.Also Read:OnePlus Buds Pro 2 with Spatial Audio technology launched in India, OnePlus Buds Pro 2R also introduced
OnePlus 11R price in India, sale details
However, the OnePlus 11R may share a lot of similarities with the flagship OnePlus 11 5G but it will be sold at a much-reduced price in India. The company has set the price of the device at Rs 39,999 for the 8GB RAM with 128GB storage option. Whereas the 16GB RAM with 256GB storage option can be bought for Rs 44,999. The handset is being offered in Sonic Black, and Galatic Silver colour options and the preorders will begin on February 21. Moreover, it can be purchased from February 28 onwards via the company’s official website, Amazon and other retail outlets in the country.
For the latest gadget and tech news, and gadget reviews, follow us on Twitter, Facebook and Instagram. For newest tech & gadget videos subscribe to our YouTube Channel. You can also stay up to date using the Gadget Bridge Android App. You can find the latest car and bike news here.
One of the more underrated features of Instagram is searching by location. Planning a trip somewhere and want to check out what it looks like from a traveller’s perspective? Simply look it up on the search tab and you will find hundreds of posts by Instagram users. If you want one of your posts to show up in that tab, you need to add the location to it. In this article, we show you how to add a location to your Instagram posts, Reels, and Stories.Read Also: Amazon Fire TV Streaming Trends Report 2022: Most searched content by Indians
In This Article
Add location to Instagram Post
Step 1: Launch the Instagram app on your smartphone and swipe left to access the Story creation window. Now, tap on ‘Post’ to create an Instagram post.Step 2: Take a picture or video for your Instagram post. Additionally, you can choose an image or file from your Gallery to upload to your profile.Step 3: Once you’ve selected a picture, tap the blue arrow at the top right corner of the screen.Step 4: Select a filter or edit the image according to your liking. Once you’re done, tap the blue arrow at the top right corner of the screen again.Step 5: In the following window, select ‘Add location’.Step 6: You can either manually search for a location or give the Instagram app location access to suggest places near you.Step 7: Write a caption for your post. You can also add background music to it. Tap the blue arrow at the top right corner of the screen once you’re done.The location will be added to your Instagram post and will appear below your handle in the post overview.
Add location to Reels
Step 1: Launch the Instagram app on your smartphone and swipe left to access the Story creation window. Tap on ‘Reel’ to create an Instagram Reel.Step 2: Tap ‘Next’ once you’ve created a Reel.Step 3: In the following window, tap on ‘Next’.Step 4: Select ‘Add location’.Step 5: You can either manually search for a location or give the Instagram app location access to suggest places near you.Step 6: Write a caption for your Reel. Tap the Share button once you’re done.The location will be added to your Reel.
Add location to Instagram Story
Step 1: Launch the Instagram app on your smartphone and swipe left to access the Story creation window.Step 2: Take a picture or video for your Instagram Story. Additionally, you can choose an image or file from your Gallery to upload to your Story.Step 3: Once you’ve taken a picture, tap on the sticker icon at the top.Step 4: Select the Location sticker. Step 5: You can either manually search for a location or give the Instagram app location access to suggest places near you.Step 6: Once you’ve selected a location, it will appear as a sticker on your story. You can drag it to adjust its placement on the image.Step 7: Tap on the forward arrow at the bottom right corner of the screen and select ‘Share’ to post the Story.The location will be added to your Instagram Story.Read Also: Best Bluetooth speakers for outdoor pool parties (2023)
Conclusion
This is how you can add a location to your Instagram posts, Reels, and Stories. Once you’ve added a location, you can tap on it to view posts of other people in that location. You can also go to Instagram’s search window and look up any location to see the recent posts from there. If you do not want your location to be public, make sure your posts can be viewed only by your followers.For the latest gadget and tech news, and gadget reviews, follow us on Twitter, Facebook and Instagram. For newest tech & gadget videos subscribe to our YouTube Channel. You can also stay up to date using the Gadget Bridge Android App. You can find the latest car and bike news here.
At today’s OnePlus Cloud 11 event in India, the company introduced its brand new OnePlus Buds Pro 2. Google’s Spatial Audio technology, developed for Android 13, is present in true wireless earphones. Additionally, by supporting Android’s Fast Pair feature, the smartphone will instantly pair with other Android devices with only a single tap. MelodyBoost Dual Drivers, which Dynaudio co-developed, are included in the TWS. Each earbud has a 6mm tweeter and an 11mm woofer.
In This Article
OnePlus Buds Pro 2 specifications
A 6mm tweeter and an 11mm woofer are featured on the OnePlus Buds Pro 2. The OnePlus Buds Pro 2’s Bluetooth v5.3 connectivity supports LHDC, AAC, SBC, and LC3 as audio codecs. Both earphones have three microphones with AI noise-reduction technology. The OnePlus Buds Pro 2 also has touch controls for calling and managing music playing. The IP55 designation for water and dust protection applies to these earbuds.Also Read:OnePlus 11 5G with Hasselblad branded cameras and Snapdragon 8 Gen 2 SoC launched in IndiaThe OnePlus Buds Pro 2 features the well-known spatial audio technology created by Google for Android 13. A multidimensional experience is created inside a set of tiny earbuds as a result. Because of this, the sound always comes from a fixed position and has the same 3D audio quality as in a movie theatre, regardless of movement.They have improved the spatial audio in conjunction with Google to imitate the immersive, three-dimensional experience enjoyed in theatres. By utilising OnePlus’ spatial rendering algorithm and IMU sensor, the OnePlus Buds Pro 2 improves the spatial audio capability while enhancing stability, compatibility with programme expansions, and opening up its technology to other apps.Thanks to Android’s audio-switching capability, the Buds Pro 2 can connect to two Android smartphones simultaneously and automatically switch the audio between them based on your actions, all without having to fiddle with Bluetooth settings.The ANC function allegedly has a 48dB noise reduction capacity. They also assist spatial audio for a realistic virtual surround sound experience.They claim that it takes an hour to fully recharge their charging case’s 520mAh battery. They also support Qi wireless charging. With a few extra charges in the case, the Buds Pro 2 offers up to 39 hours of worry-free audio playback. Contrarily, the Buds Pro 2 series’ dual connection with Bluetooth 5.3 LE audio ensures that your Bluetooth streaming experience will be quick and seamless.
OnePlus Buds Pro 2 price in India, sale details
OnePlus has launched two variants of its latest True wireless earphones in India. The first one is the OnePlus Buds Pro 2 which will be available for Rs 11,999. The earphone will come in two colour options of Arbor Green and Obsidian Black and Pre-orders begin today. On February 14 the open sale will begin via the official OnePlus India website, Amazon India, Flipkart, Myntra, the OnePlus Store app, and other hand-picked partners.On the other hand, the OnePlus Buds Pro 2R, a specially designed version of the earphones for India, cost Rs. 9,999. In March, this variation will be put up for sale.
For the latest gadget and tech news, and gadget reviews, follow us on Twitter, Facebook and Instagram. For newest tech & gadget videos subscribe to our YouTube Channel. You can also stay up to date using the Gadget Bridge Android App. You can find the latest car and bike news here.


 Step 3:
 Step 4:
 Step 6:
 Step 8:
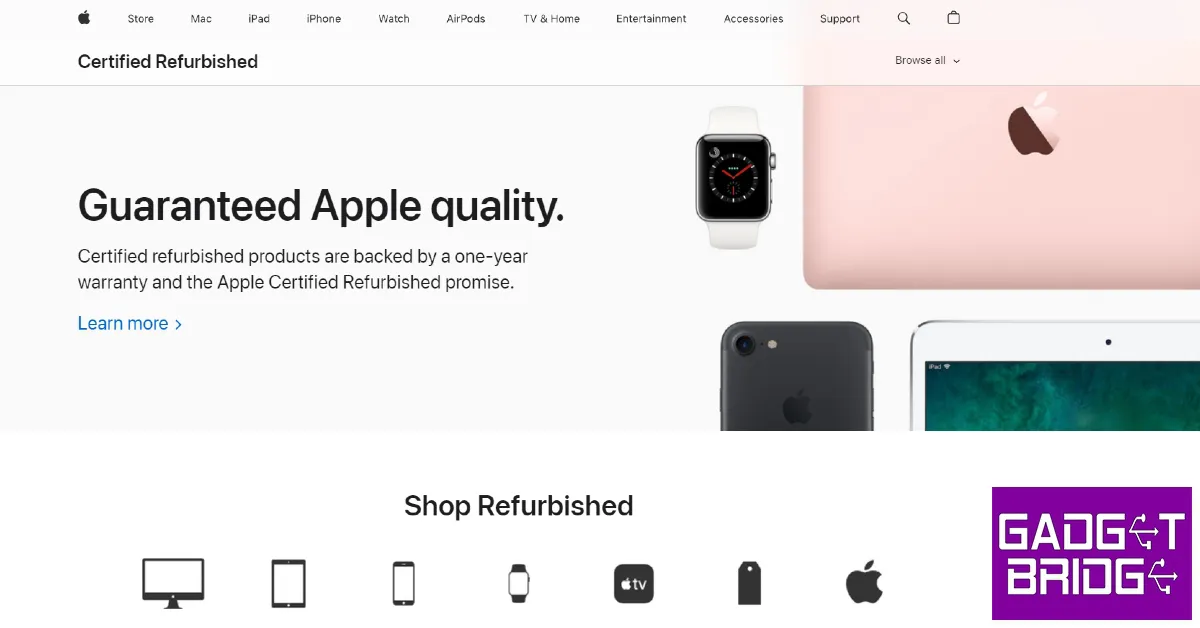
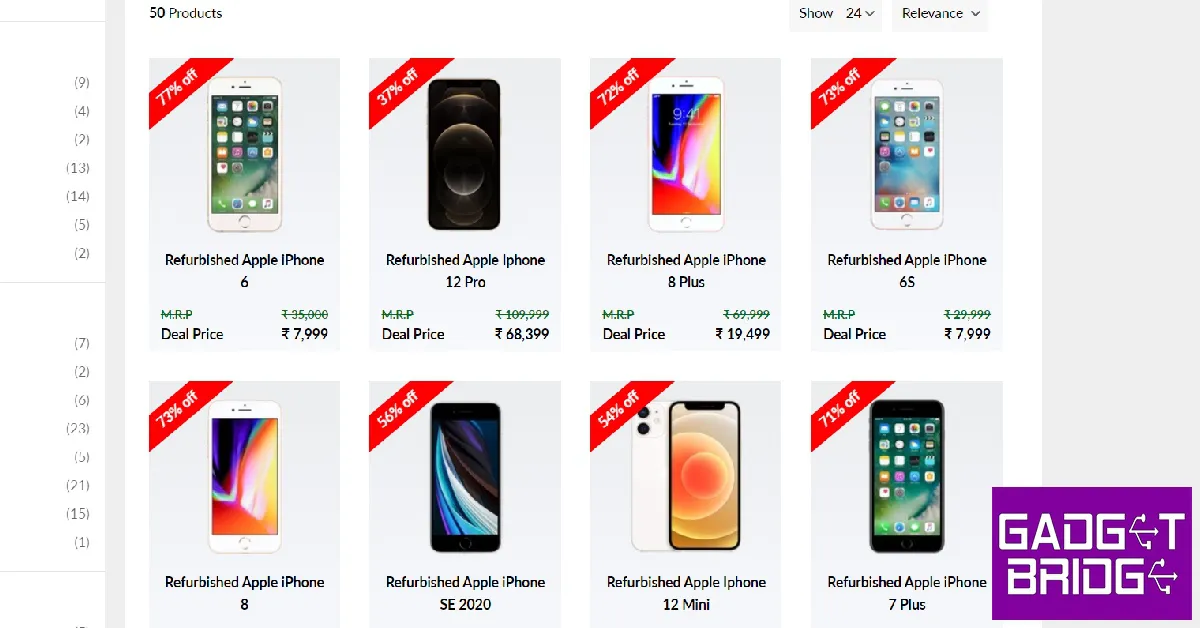

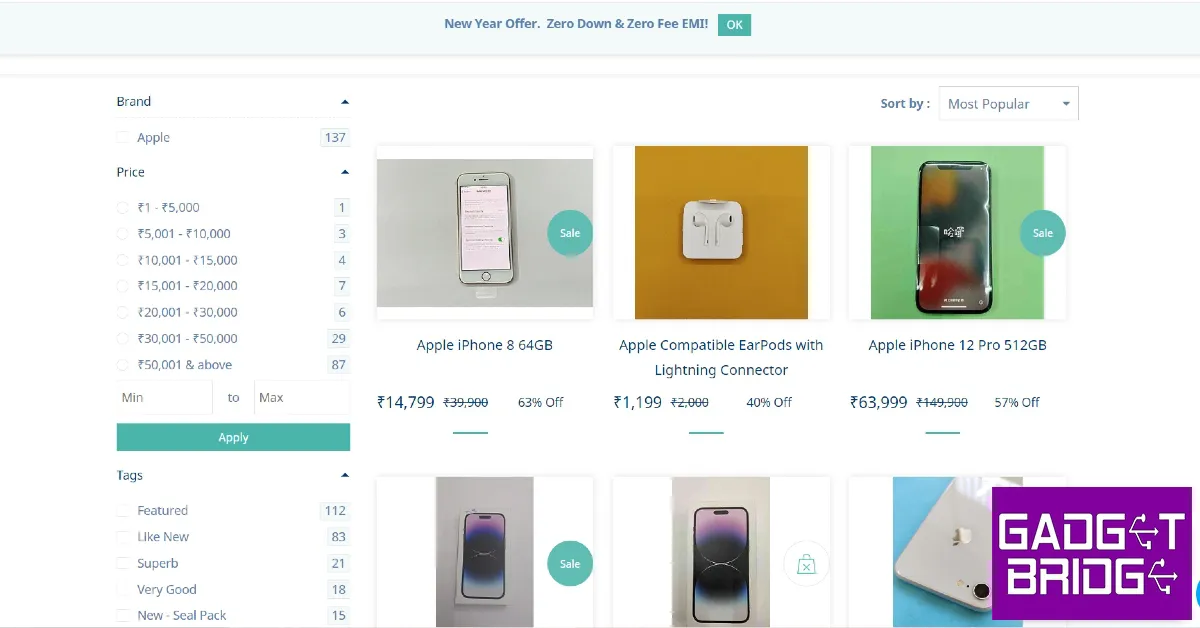


")


 Step 2:
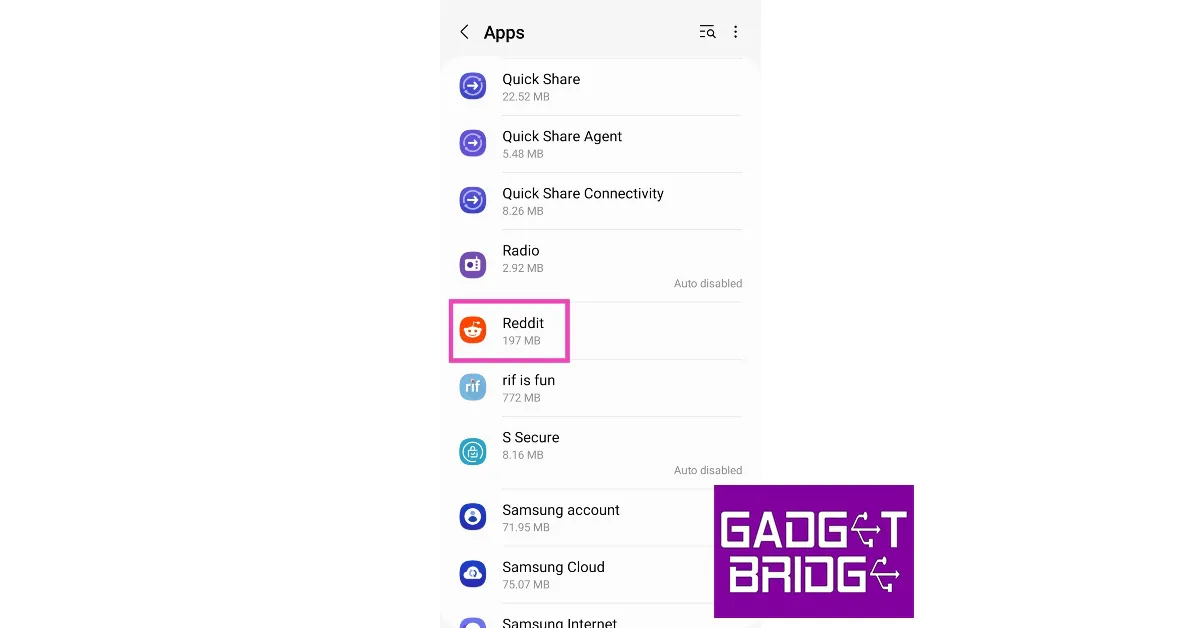 Step 3:
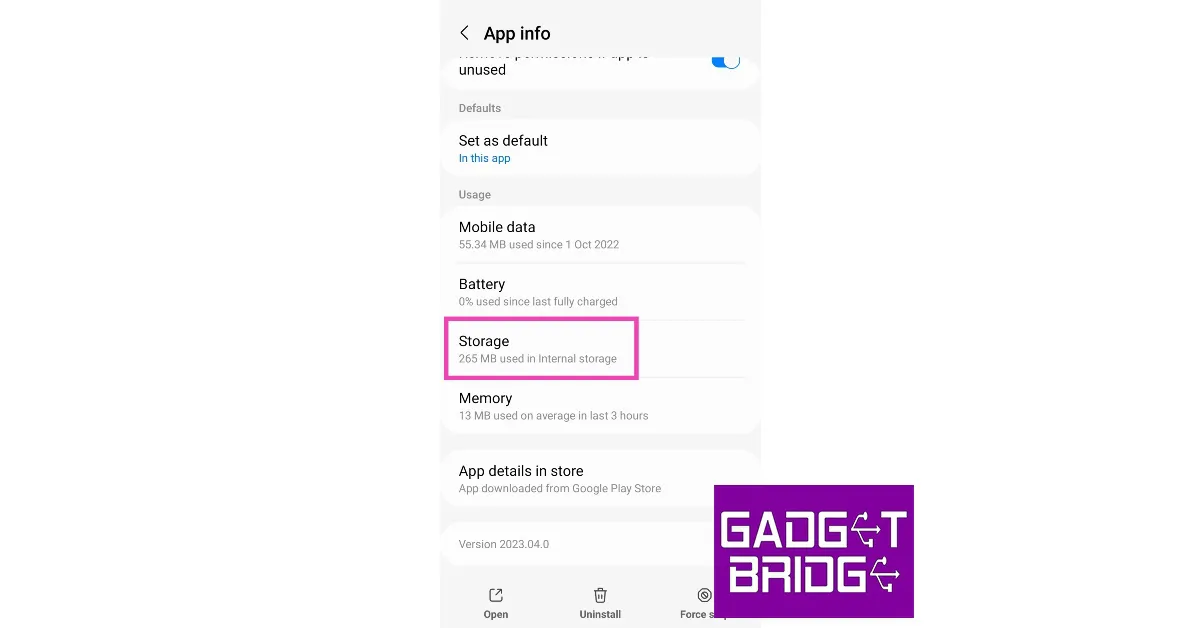 Step 4:
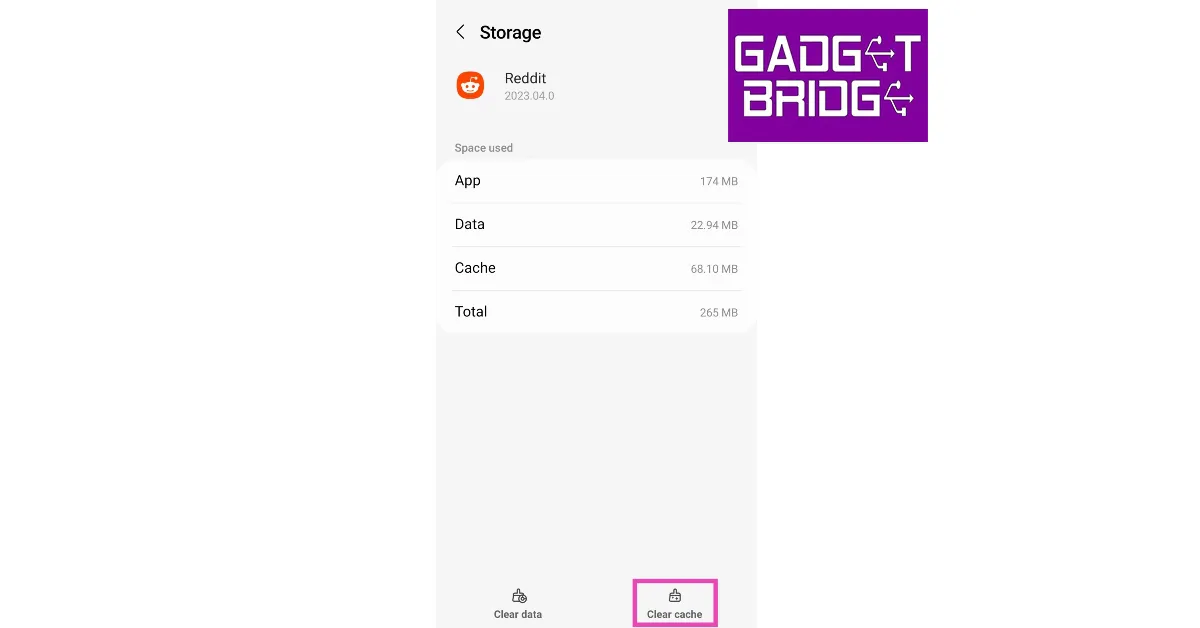
 Older versions of apps can sometimes malfunction out of the blue in weird ways. If you haven’t updated the Reddit app in a while, now would be a good time to do it. Go to the Google Play Store, search for Reddit, open its app page, and hit the ‘Update’ button. You can also update the app by going to the ‘Manage apps and device’ section in Play Store settings.


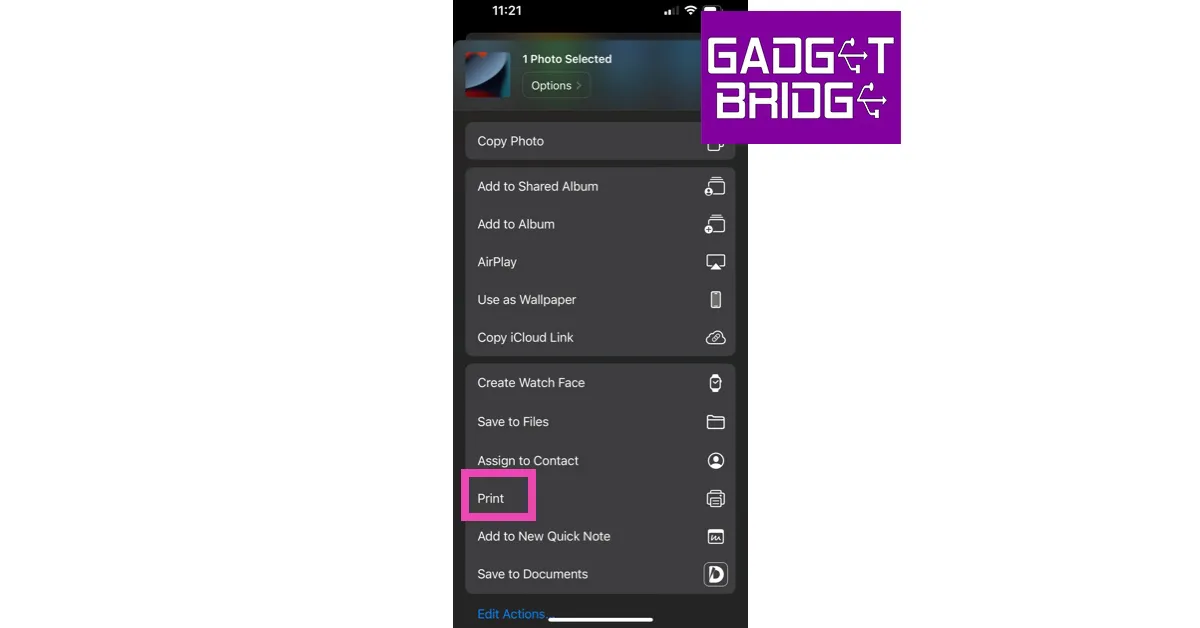 Step 5:
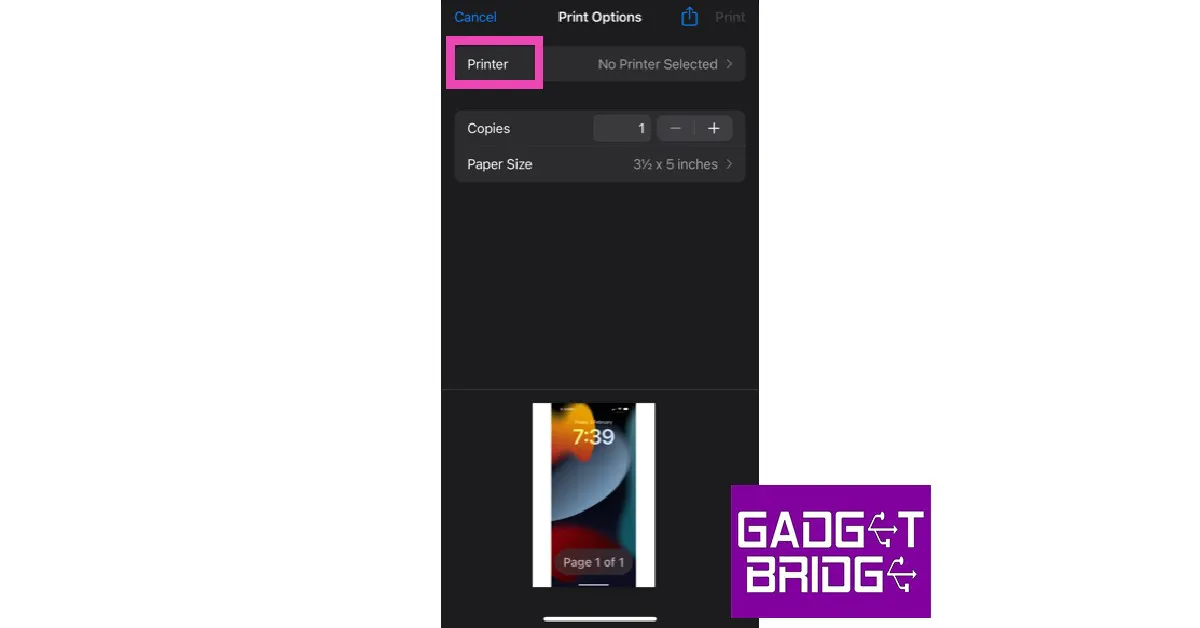 Step 6:
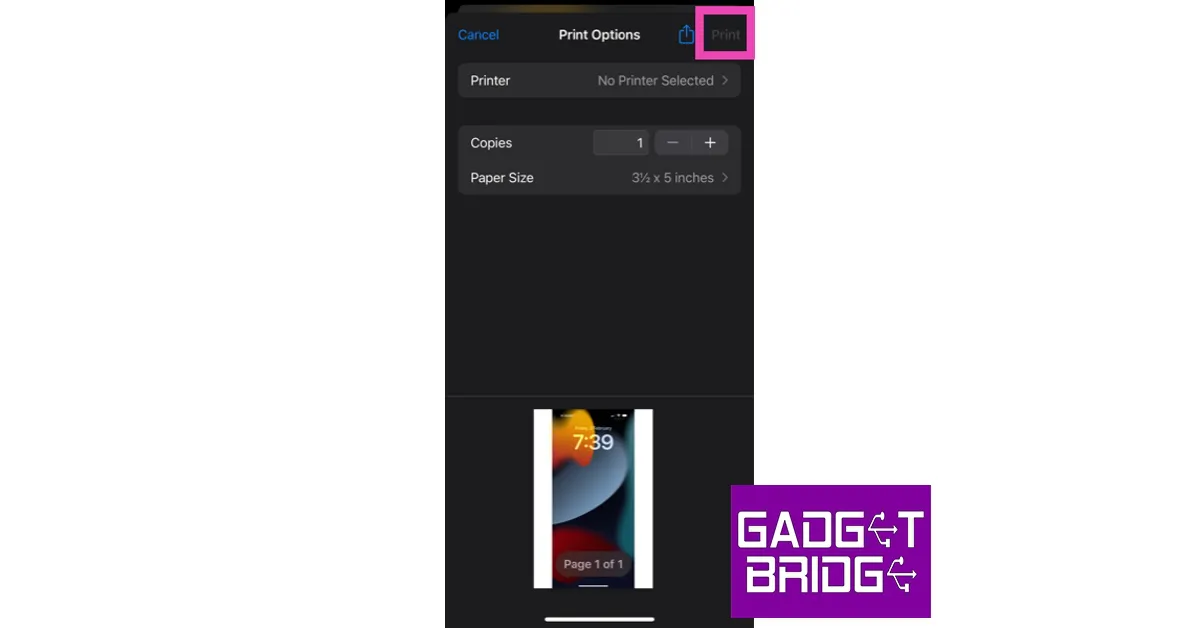
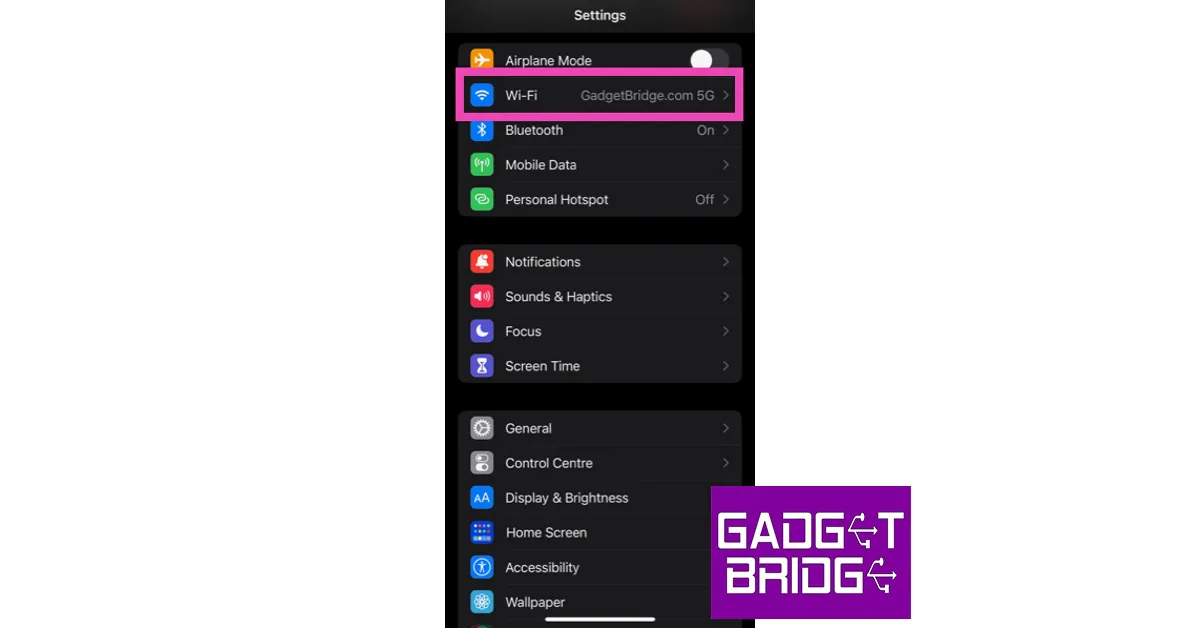 Step 2:
 Step 3:


 Step 2: To sign up for the service, locate the Get started icon in the top right corner of the screen and click on it.
Step 3: Fill out the signup form or sign-up using Facebook or your Gmail account.
Step 2: To sign up for the service, locate the Get started icon in the top right corner of the screen and click on it.
Step 3: Fill out the signup form or sign-up using Facebook or your Gmail account. Step 4: After registering, you’ll be sent to your personal area where you can begin an audio-only or video meeting online. Meetings are referred to as Rooms.
Step 5: Press Create Room or the Plus button in the upper-left corner of your screen to launch a new podcast.
Step 4: After registering, you’ll be sent to your personal area where you can begin an audio-only or video meeting online. Meetings are referred to as Rooms.
Step 5: Press Create Room or the Plus button in the upper-left corner of your screen to launch a new podcast. Step 6: At the top of the page, type the name of your room.
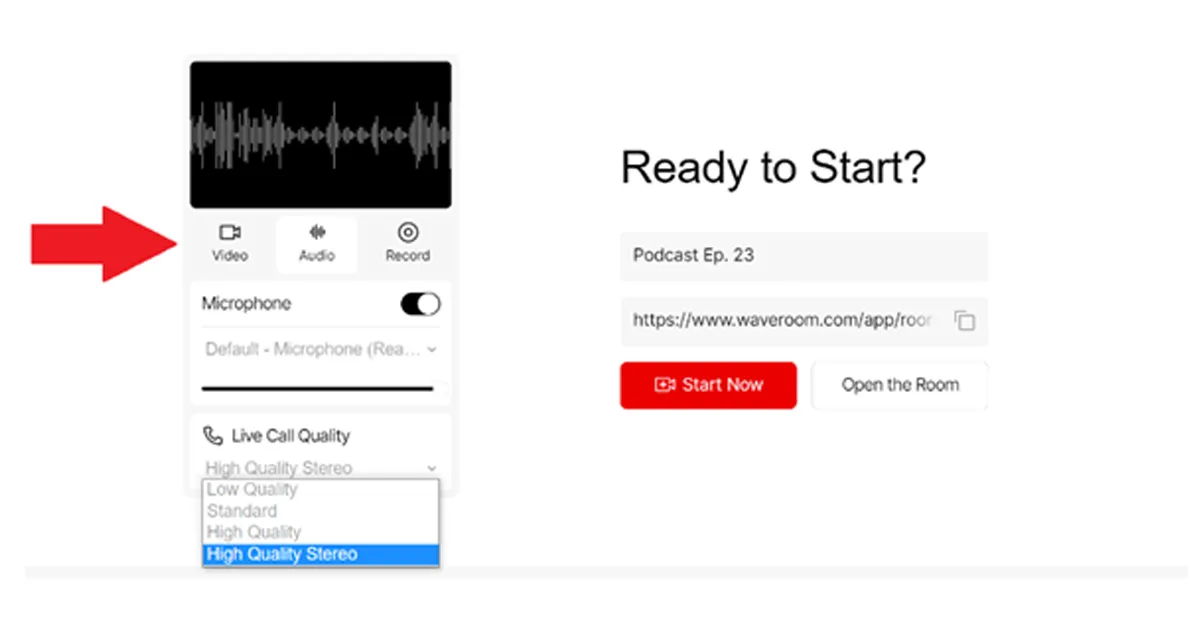 Step 7: Your computer should be equipped with the greatest webcam and microphone you can find. It will assist you in obtaining excellent results.
Step 8: Under the video preview, choose your settings for Video, Audio, and Record. You can select an audio-only room, a video conference, or the Record option, which will record audio, video, or both.
Step 9: Copy the invitation link. Send it to the individuals you wish to participate as podcast speakers.
Step 10: To access your room, click the Start Now option.
Step 11: When you are prepared to begin the podcast, click the Start Recording option.
Step 12: To end the session after the podcast is finished, press the hang-up phone icon.
Step 7: Your computer should be equipped with the greatest webcam and microphone you can find. It will assist you in obtaining excellent results.
Step 8: Under the video preview, choose your settings for Video, Audio, and Record. You can select an audio-only room, a video conference, or the Record option, which will record audio, video, or both.
Step 9: Copy the invitation link. Send it to the individuals you wish to participate as podcast speakers.
Step 10: To access your room, click the Start Now option.
Step 11: When you are prepared to begin the podcast, click the Start Recording option.
Step 12: To end the session after the podcast is finished, press the hang-up phone icon.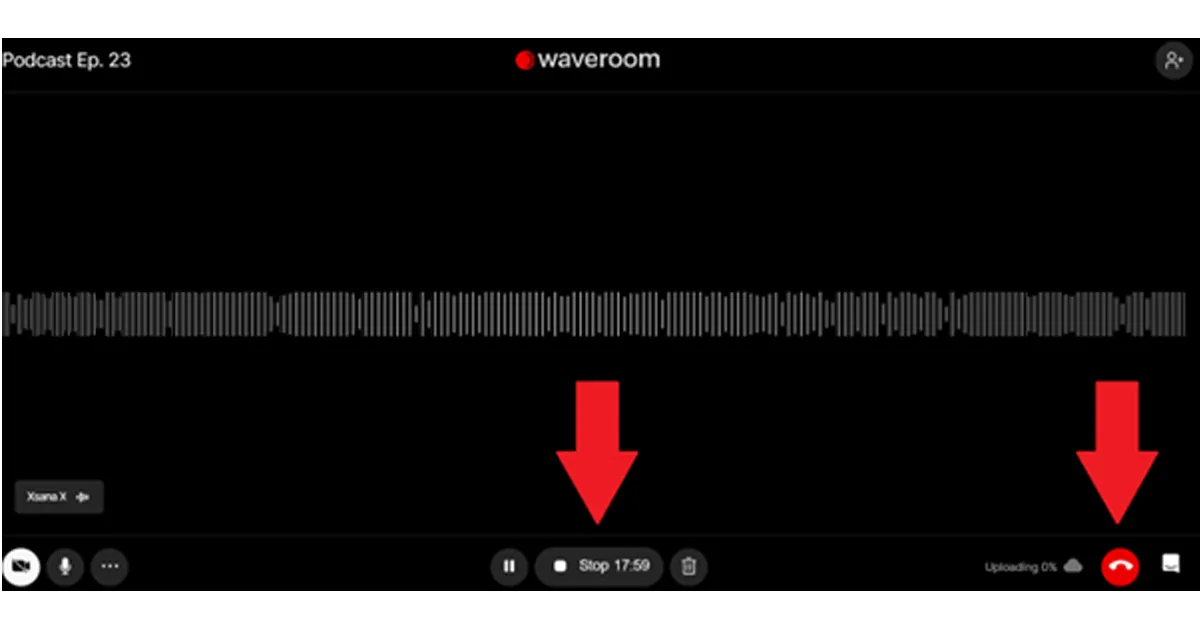 Step 13: Wait for a little period while the meeting recording saves.
Step 14: In the top left corner of the page, click the ‘All Rooms’ button.
Step 15: Click the space you just left. You can download each podcast guest’s locally recorded audio and video files here.
The recording can be found in your individual dashboard. After that, you can store it as an MKV file on your PC. Soon, more formats will be added.
Step 13: Wait for a little period while the meeting recording saves.
Step 14: In the top left corner of the page, click the ‘All Rooms’ button.
Step 15: Click the space you just left. You can download each podcast guest’s locally recorded audio and video files here.
The recording can be found in your individual dashboard. After that, you can store it as an MKV file on your PC. Soon, more formats will be added.

 Step 3:
 Step 4:
 Step 5:
 Step 7:
 Step 6:
 Step 7:
 Step 2:
 Step 4:
 Step 7:
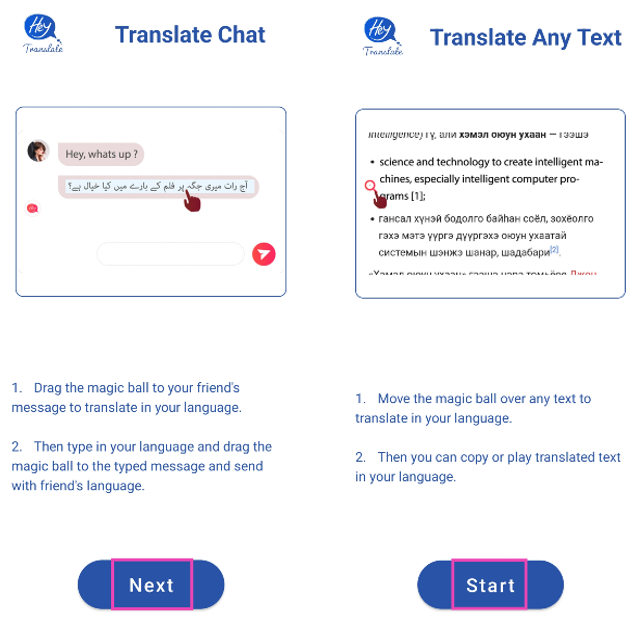 Step 3: Select Turn on Chat Translator.
 Step 4: Grant the app the necessary permissions.
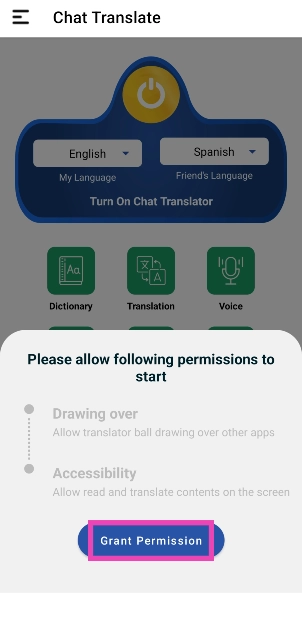 Step 5: Select your language and the language that needs to be translated.
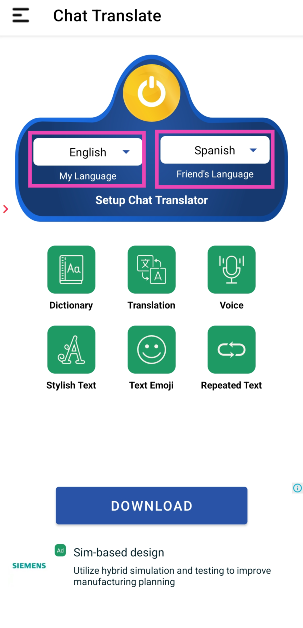 Step 6: Drag the ‘Hey‘ ball to the message that you want to translate.
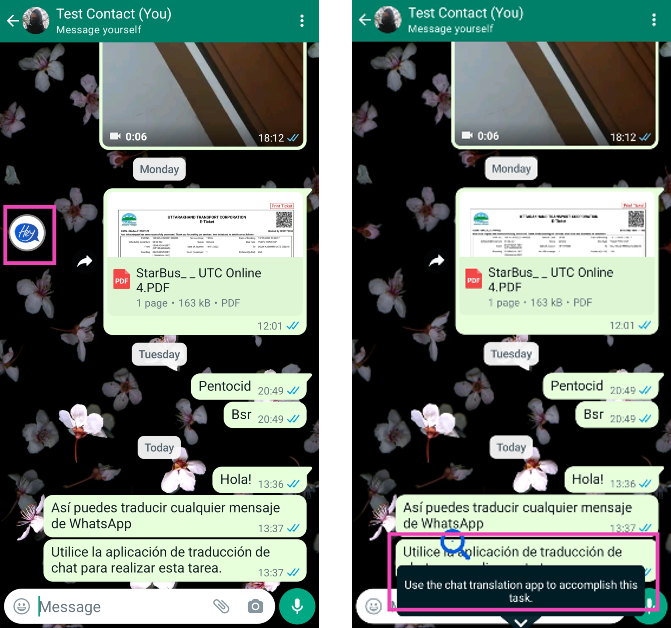


 Step 3:
 Step 4:
 Step 5:
 Step 3:
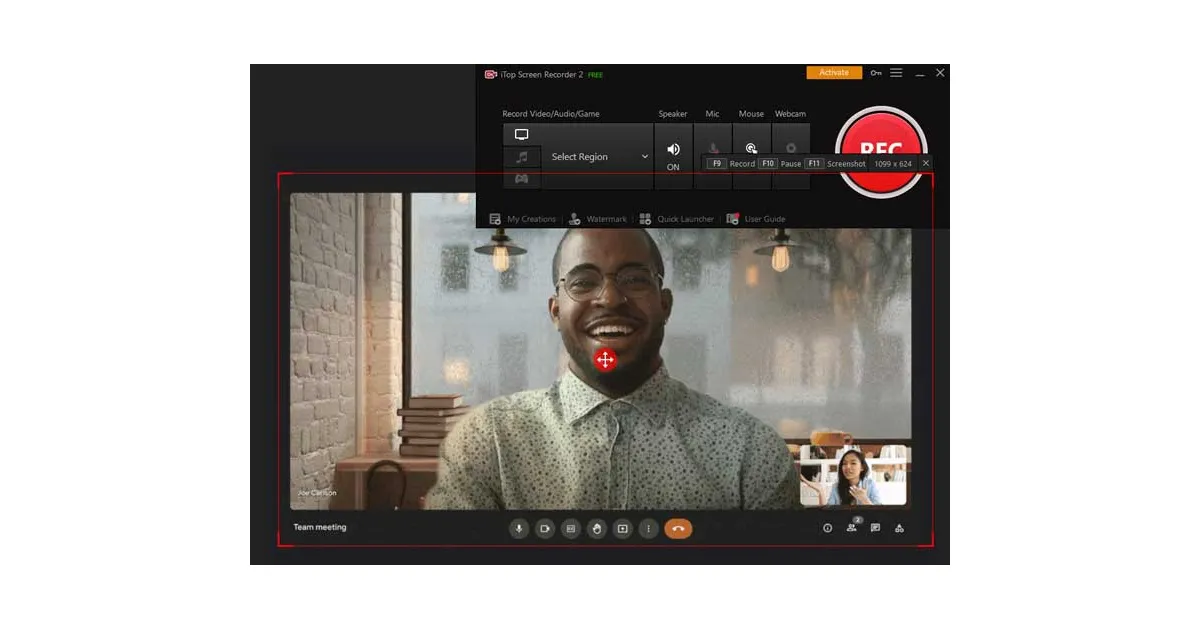 Step 5:
 Step 2:
 Step 3:
 Airdrop uses your phone’s Bluetooth connection to transfer a file to another device. Once you send a file using Airdrop, it automatically turns on Bluetooth on your iPhone. Follow these steps to turn off AirDrop on your iPhone.
Step 1: Swipe down from the top right corner of the phone to reveal the Control Center.
Step 2: Long press the connection tiles folder to expand it.
Step 3: Select AirDrop.
Step 4: Tap on ‘Receiving off’.
Airdrop uses your phone’s Bluetooth connection to transfer a file to another device. Once you send a file using Airdrop, it automatically turns on Bluetooth on your iPhone. Follow these steps to turn off AirDrop on your iPhone.
Step 1: Swipe down from the top right corner of the phone to reveal the Control Center.
Step 2: Long press the connection tiles folder to expand it.
Step 3: Select AirDrop.
Step 4: Tap on ‘Receiving off’.
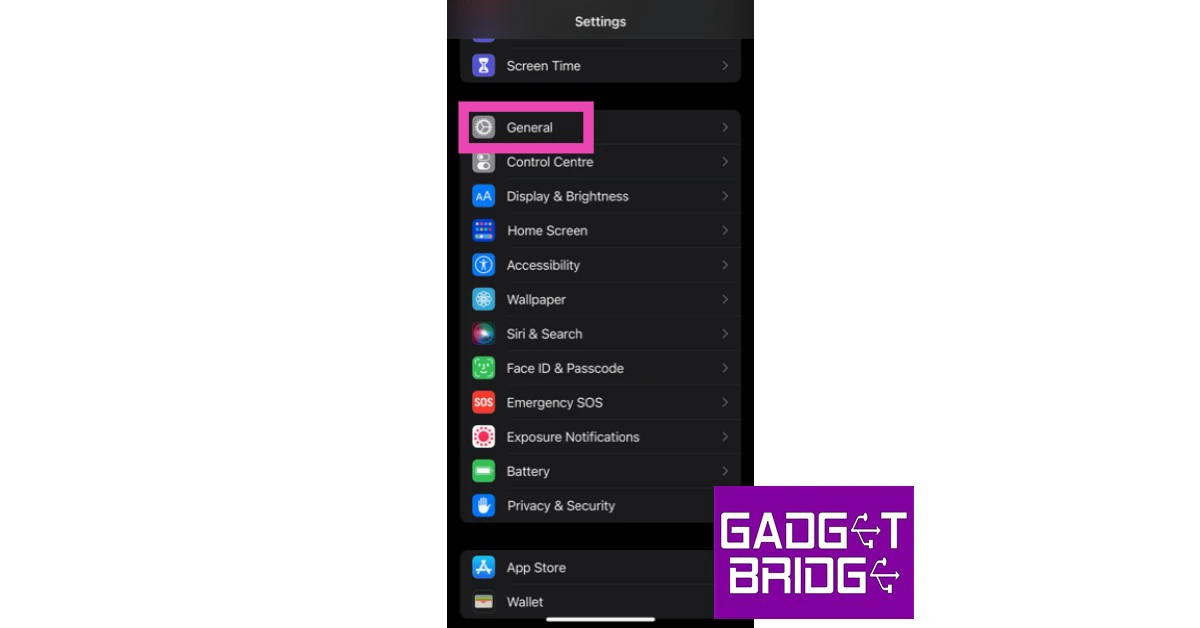 Step 2: Scroll down and select ‘Transfer or reset iPhone’.
 Step 3: Select ‘Reset’ followed by ‘Reset Network Settings’.

 If you are using an older version of iOS, this problem may be arising due to a software bug. These bugs are usually fixed in the updated OS version. Go to Settings>General>Software update to check for any pending updates and install them on your device.

")


 Step 2: Tap the filter and sort icon next to Your apps.
 Step 3: Switch on the toggle bar for Show system apps.
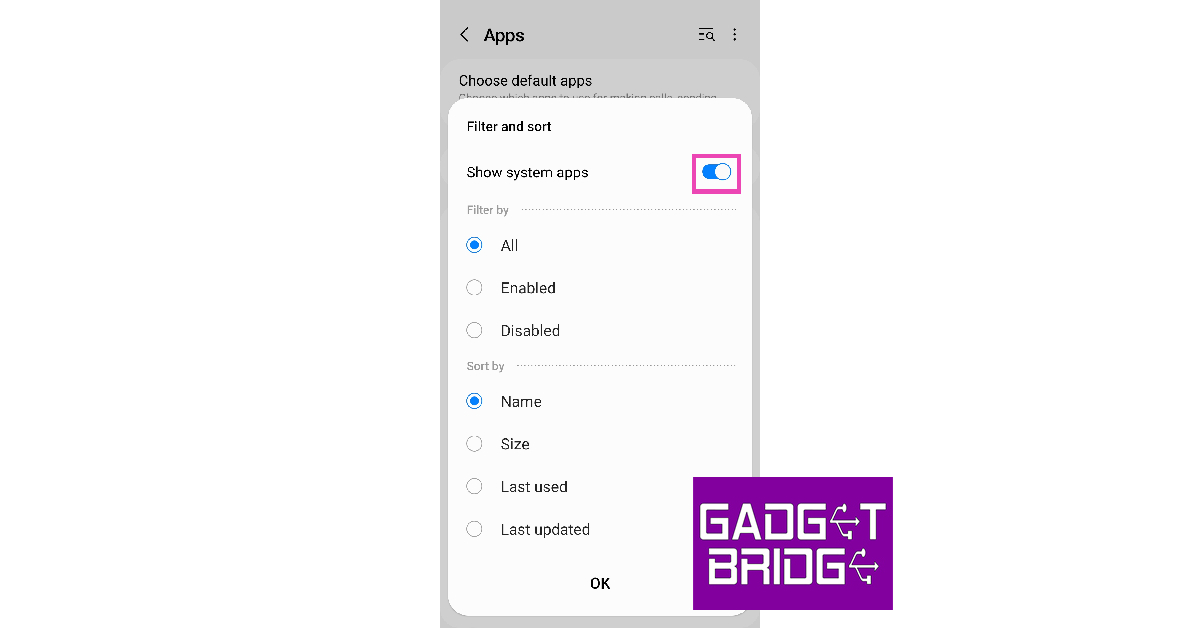 Step 4: Scroll down and select Media Storage.
 Step 5: If it is disabled, select Enable.
 Step 2: Tap on Reset.
 Step 3: Select Factory data reset.
 Step 4: Scroll down and tap on Reset.
 Read Also:
 Also Read:


 Step 2:
 Step 4:
 Step 5:
 Step 6:
  Step 7:
 Step 2:
 Step 3:
 Step 5:
 Step 4:
 Step 5: