TPV has announced the launch of Evnia, a new range of gaming monitors and accessories by Philips, in India. This new range of products caters to the diverse tastes of casual and pro gamers. Evnia will be adding to Philips’ portfolio of gaming monitors and accessories in India. With Evnia, TPV promises an immersive experience for casual and competitive gamers alike. The brand is committed to the best gaming ecosystem which will include an array of products, from mics to monitors for MMORPGs, racing games, simulations or FPS games.Read Also:Infinix’s new budget-friendly 43Y1 Smart TV goes on sale today
Philips Evnia 34M2C7600MV will be the brand’s first product
Philips Evnia 34M2C7600MV will be the first Evnia model to be released in India. The curved gaming display brings a cinematic experience with UltraWide Quad HD 3440 x 1440 resolution and HDR 1400. The monitor sports mini LED backlighting with 1,152 zones that allow greater control of lighting and an effective contrast ratio for deeper blacks and brighter whites. On top of that, Ambiglow makes the visuals more immersive. The monitor also boasts a refresh rate of 165 Hz, ultra-low input lag, and Adaptive sync. These features combine to create a smooth and fluid gaming experience. The Philips Evnia 34M2C7600MV comes with USB-C ports as well as KVM and a height-adjustable stand to adapt to users’ preferences.TPV will be coming out with a series of Evnia releases in the coming months. These include 42M2N8900 (42” OLED flat screen), 34M2C8600 (34” QD OLED curved screen) and 27M2C5500W (27” VA curved screen, QHD, 1000R Curve, 240hz). The company will also launch a lineup of gaming accessories which includes two keyboards (SPK8508 and SPK8708), two mice (SPK9508 and SPK9708), two headsets (TAG5208 and TAG7208), and one mouse pad (SPL7508).Read Also: Apple iPhone SE 4 roundup: Tech specs, release date, price and moreCommenting on the brand launch, Mr Atul Jasra, India Business Head – Philips Monitors said, “We at Philips believes that the joy of gaming should be accessible to everyone. Our goal for Evnia is to introduce today’s gaming enthusiasts with the entire gaming universe and bringing together the gaming and e-sports community. As the name ‘Evnia’ suggests while being true to the name, it encourages gamers to bring their most genuine selves to their sessions and to reconnect with the original purpose of gaming.”
Google Play has added a new UPI Autopay option for subscription-based purchases in India. Users can now set up automated payments for subscription services of various apps and games using their preferred UPI app. This will eliminate the need to make manual payments for multiple services every month. The UPI Autopay feature will accommodate major payment gateways like Paytm, Google Pay, and Phone Pe among others.Read Also: How to Hide Your ‘Last Active’ Status on Instagram and WhatsApp?UPI Autopay was introduced under UPI 2.0 by NPCI. The service is currently being rolled out in India and a few other countries but will later be expanded to other markets as well. The UPI Autopay feature will be enabled by default as soon as you pay for a subscription using a UPI app. Consumers will have to opt out of the autopay option.Using the UPI Autopay feature on Google Play is pretty easy. All you need to do is set up a UPI Payment while subscribing to a service. Once you have authenticated your UPI ID, it will be saved to your Google Play account. You will also receive a text message or a notification to validate the autopay option. Once you make the payment, the balance will be deducted for the first month of the service. The payment for the next month will take place automatically.Read Also: How to Set a Custom Profile Picture on Netflix?Saurabh Agarwal, Head of Google Play Retail & Payments Activation – India, Vietnam, Australia & New Zealand said, “We are always looking at adding popular and effective forms of payment around the world to ensure people can pay for apps and in-app content conveniently. With the introduction of UPI Autopay on the platform, we aim to extend the convenience of UPI to subscription-based purchases, helping many more people access helpful and delightful services – while enabling local developers to grow their subscription-based businesses on Google Play.”
The Snapdragon Summit 2022 kicked off in Hawaii yesterday and Qualcomm came out with a bunch of announcements including the launch of the new flagship chipset, Snapdragon 8 Gen 2. The company also announced a collaboration with Adobe to bring creative experiences on Snapdragon-powered devices. A new developer’s kit was also revealed at the summit. The Snapdragon Summit will go on for three days, concluding on November 17. Here is a quick roundup of all the Qualcomm announcements on Day 1 of the Snapdragon Summit 2022.Read Also: Apple iPhone SE 4 roundup: Tech specs, release date, price and more
In This Article
Qualcomm officially releases the Snapdragon 8 Gen 2 chipset
The much-awaited Snapdragon 8 Gen 2 chipset finally got an official release on Day 1 of the Snapdragon Summit. Designed for flagship smartphones, the S8G2 makes use of groundbreaking AI processes to enable faster natural language processing with multi-language translation and INT4 support.The Snapdragon Sight technology brings more advancements to the photos and videos captured by the smartphone. Snapdragon Connect allows greater connectivity, featuring the world’s first 5G AI processor in a mobile platform and being the only commercial Wi-Fi 7 SoC with High Band Simultaneous Multi-Link.The Snapdragon Sound technology will bring spatial head tracking for a more immersive sound during gaming and multimedia consumption. The Snapdragon 8 Gen 2 chipset is expected to start rolling out in flagshipsmartphones by December 2022.“We are passionate about enabling people to do more, so we design Snapdragon with the user at the center. Snapdragon 8 Gen 2, will revolutionize the landscape of flagship smartphones in 2023,” said Chris Patrick, senior vice president and general manager of mobile handsets, Qualcomm Technologies, Inc. “Snapdragon 8 Gen 2 delivers groundbreaking AI, unparalleled connectivity, and champion-level gameplay, enabling consumers to enhance every experience on their most trusted device.”
Qualcomm and Adobe collaborate to bring creativity across mobile, compute, and XR devices
Snapdragon and Adobe announced a collaborative partnership to deliver creative experiences across mobile, computing, and XR devices. Adobe will continue to build products for creators on Android using the Snapdragon mobile platform. Adobe Fresco and Adobe Acrobat will become native to Windows PCs powered by Snapdragon. Lastly, Adobe Aero will expand its authoring and viewing capabilities through AR and MR with Snapdragon-supported products.“Adobe is driving creativity and document productivity forward and our product magic comes to life on technology platforms that are built for performance and scale,” said Govind Balakrishnan, SVP, Creative Cloud Products and Services, Adobe. “Designers, creatives and knowledge workers using Snapdragon and XR can look forward to working with our flagship products and Adobe Sensei AI technologies as they define a new era of digital experiences across surfaces and new creative mediums.”Read Also:How to Hide Your ‘Last Active’ Status on Instagram and WhatsApp?
Qualcomm launches new Innovators Development Kit
Qualcomm also launched the new Innovators Development Kit that helps new developers to work with Qualcomm Technologies software stacks on Snapdragon mobile platforms. It also minimises time-to-market for devs and increases customisation. This Development Kit will first be made available to select universities and research institutions and will later expand to additional developers segments in the future. “Providing new developer communities with access to our technologies will further enable innovation that accelerates the digital economy and drives the greater good,” said Ziad Asghar, vice president of product management, Qualcomm Technologies, Inc. “Improving time-to-market for developers by minimizing the time from intent to prototype will allow these communities to leverage our One Technology Roadmap for their product needs.”
Most people do not know this but you can view all the posts you’ve liked on Instagram, going all the way back to the first post you liked! If you liked something interesting but can’t remember when it was posted, you can easily access your liked posts on Instagram and view the post again. You can even endlessly scroll through all the posts you’ve liked over the years and revisit the content you enjoyed watching on Instagram. In this article, we show you how to see your liked posts on Instagram.Read Also: How to Set a Custom Profile Picture on Netflix?
In This Article
Here’s how you can see your liked posts on Instagram
Step 1: Open the Instagramapp and go to your profile. Step 2: Tap on the hamburger menu at the top right corner of the screen.Step 3: Select ‘Your Activity.’Step 4: Tap on ‘Interactions’ and select ‘Likes.’You will be able to view all the posts that you’ve liked on Instagram. You can sort the posts by time, date, and author. You can also use the ‘Your Activity’ tab to view your past comments, archived posts, links you’ve visited, and more.
Bonus tip
How to save an Instagram Reel and view it later?
Step 1: Open the Reel you want to save.Step 2: Click on the ellipses (three dots) at the bottom right corner of the screen.Step 3: Tap on ‘Save’.The Instagram Reel will be saved on your profile. Step 4: Open the Instagram app and go to your profile. Step 5: Tap on the hamburger menu at the top right corner of the screen.Step 6: Tap on ‘Saved’.Step 7: Select ‘All posts.’You will find your saved Reel in the folder.Read Also: Apple iPhone SE 4 roundup: Tech specs, release date, price and more
Conclusion
This is how you can view your liked posts on Instagram. You can also see the comments you have posted over the years and the posts you’ve archived for later. The ‘Your Activity’ section can be particularly helpful in locating the posts you’ve been trying to find on Instagram. For instance, you can view all the outgoing links you’ve clicked on in one place. This will help you find any store you wanted to visit or product you wanted to buy but forgot to save.
The “Internet of Things” may appear to be just another vaguely futuristic jargon, but it has a very particular significance regarding the future of interoperability and connected gadgets. It is a word used to describe how “smart” things, as opposed to computer access points, are interconnected to share data that enables the automation of specific operations.
Internet of Things (IoT) could be characterized in healthcare as the interaction between bedside monitors, smartwatches and fitness trackers, implanted medical equipment, and anything that transmits or receives a signal holding data that must be retrieved or stored elsewhere.
Looking at data interoperability through the lens of the Internet of Things may have significant consequences for the future design and implementation of health software services, but why should healthcare providers be concerned with IT outsourcing of IoT right now?
In This Article
Internet of Things (IoT) in Healthcare Facilities
Let’s start by examining the potential applications of IoT devices within the hospital’s infrastructure. Nearly all of these examples combine IoT solutions with medical equipment, and the majority are now being developed or utilized by various healthcare stakeholders throughout the globe. Your healthcare facility likely employs IoT devices to transfer data and perform remote patient monitoring, enhancing the patient experience.
Bed Sensors
Monitoring the availability of hospital beds is a crucial component of remote patient monitoring. The COVID-19 epidemic showed the world how rapidly hospitals may become overcrowded and how valuable hospital beds are as a medical resource. Smart IoT sensors embedded in hospital beds can track their availability and assist medical staff in locating available beds as soon as they become available.
Simple remote bed monitoring can cut patient wait times and facilitate the work of nurses and other healthcare personnel. Smart sensors installed on hospital beds can do much more than monitor occupancy. This technology can also track nurses’ proximity to each hospital bed within the institution, monitor patients’ sleep patterns, and inform medical personnel in an emergency. Adding glucose monitoring devices to the beds of diabetic patients is a highly beneficial intervention.
By integrating smart sensors into hospital beds, staff efficiency and vital patient information can be obtained. Ultimately, this assists any healthcare organization in providing better treatment to entire communities.
Machine Sensors
Healthcare companies frequently rely on costly medical equipment and machines to run tests that collect medical data and aid in the decision-making process for treatments and other crucial healthcare activities. When these pieces of equipment are not operating at optimal levels, they may produce inaccurate findings or cease to function altogether. Repairs can be costly, and equipment breaks down can impede productivity.
Smart IoT devices can monitor machine performance and environmental parameters to guarantee that everything functions optimally. If predetermined thresholds are exceeded, a notification can be sent indicating maintenance or repairs may be necessary. Optimizing the usage of machines can help patients obtain the information needed for high-quality medical care.
Temperature Sensors
Maintaining the right temperature for various foods, drugs, organs, blood, and other resources is crucial. The COVID-19 vaccine represents the most current illustration of the significance of storage temperature. Some of these vaccines must be stored at an extremely cold temperature; otherwise, they will become ineffective and spoil.
Smart IoT sensors can monitor the temperature levels of valuable resources such as drugs, donated blood, and more to prevent spoilage. This might be life or death for certain patients. If medical personnel can be quickly notified when refrigerators, freezers, or other cold storage rooms exceed a specified temperature threshold, they can prevent perishable things from going bad.
For the latest gadget and tech news, and gadget reviews, follow us on Twitter, Facebook and Instagram. For newest tech & gadget videos subscribe to our YouTube Channel. You can also stay up to date using the Gadget Bridge Android App. You can find the latest car and bike news here.
OnePlus, with its ‘Nord’ range, brings affordable products to consumers that don’t want to compromise on features and aesthetics. We previously reviewed the OnePlus Nord Buds CE and were quite pleased by the TWS’ performance. This time, we got our hands on the OnePlus Nord Watch and were very excited to test it, given how the affordable smartwatch category is quickly developing with brands like Noise, Amazfit, and boAt coming out with great products. OnePlus has come a long way from being an ‘enthusiast’ brand and now appeals to a wide bracket of mainstream consumers. For those on the fence about dishing out Rs 4,999 on the OnePlus Nord Watch, this review will help.Read Also: Apple iPhone SE 4 roundup: Tech specs, release date, price and more
In This Article
OnePlus Nord Watch review: Design and Display
The OnePlus Nord Watch comes packaged in a compact square box with a couple of sleeves that you need to slide off before you get to the actual packaging. The outermost black sleeve contains nothing but the OnePlus Logo, while the second sleeve has the product details printed on it. The packaging is pretty compact and it feels like you’re unboxing a flagship product. Inside the box, you’ll find the smartwatch, a user guide, a magnetic clip charger, one brand sticker, and the red cable club welcome card. The smartwatch is available in Midnight Black and Deep Blue colour options. We used the latter for this review.The rectangular watch display has a glass front and a zinc frame. Flip it around and you’ll notice a matte finish at the bottom. On the right side, you’ll find a physical button which acts as a trigger to turn the watch on. The health sensors and charging point are housed at the bottom part of the watch that straps to your wrist. The silicon straps are easily replaceable. One of the standout features of the watch is its 1.78-inch AMOLED display. Of course, there are ample bezels around the display, but it doesn’t take away from the overall look of the display at all. You also get a refresh rate of 60 Hz and a peak brightness of 500 nits, which is incredible. The display is legible even under direct sunlight. The touch response is smoother than we expected and certainly category-defining. The display has curved edges and, initially, we were apprehensive about its robustness. But after using it for a few weeks, the watch seems capable of taking some damage, and you don’t need to worry about bumping it against any objects while working out. With an IP68 rating, you don’t have to worry about wearing the watch in the rain or during sweaty workouts but it is not meant to be worn during swimming.
OnePlus Nord Watch review: Performance
The OnePlus Nord Watch runs a proprietary OS, similar to the OnePlus’ flagship smartwatch, and offers an internal memory of 256 MB. The OS is very clean and extremely accessible. Swiping from the top reveals the quick actions tab, where you can turn on the flashlight, adjust the brightness, turn on the theatre and DND mode, and access the settings among other functions. There’s also an option to find your phone, where your smartwatch rings your phone and makes it easier for you to locate it. Swiping on either side of the home screen will reveal the tracking functions, which include, an activity tracker, heart rate monitor, stress monitor, SpO2 monitor, and sleep tracker. Swiping from the bottom of the display will reveal your phone notifications. There is no option to accept calls on the Nord Watch, but you can hang up any incoming calls. You can also read your messages but not reply back. Pressing the power button again takes you to the app drawer, where you can browse through all the functions. Pairing the Nord Watch to your smartphone requires the N Health app. Once you have set up your account, pairing the watch is quite easy. All you need to do is scan the QR code displayed on the watch using the N health app. Once the watch is paired, it will require certain permissions on your smartphone to be fully functional. If you’re thinking about gifting the watch to an elderly relative who isn’t tech-savvy, you may have to carry out the initial set-up for them.Moving on, the fitness tracking on the OnePlus Nord Watch is up to the mark for a smartwatch at this price point. You get all the essential functions like Activity tracking, Heart Rate monitoring, SpO2 monitoring, Stress monitoring, and Sleep tracking.The Nord Watch is designed to track up to 105 workout routines. These include walking, running, climbing, cycling, and even outdoor sports like cricket, football, badminton and many more. If you take dancing lessons, the Nord Watch has you covered. The watch is equipped to track a range of dance forms. Automatic tracking is available for walking and running only. We mostly used the Nord Watch to track cycling and running, and it performed quite well. The step counter and calorie measurements are slightly off, by up to 5-10%, but that is something that you should expect from a smartwatch at this price point. Sometimes the watch tends to detect physical movement when there isn’t any, like when you’re sitting in a moving vehicle. You will need to be mindful of these discrepancies, and analyse the numbers accordingly. The watch does not come with an in-built GPS, so you will have to rely on your smartphone for the location data while running. The heart rate and SpO2 monitors produced accurate results when compared to medical-grade equipment. The sleep tracker works smoothly but doesn’t give any data for REM sleep. The watch only gives you a breakdown of light sleep, deep sleep, and awake time. We hope OnePlus sorts this out with a future update. Other than that, the essential functions were carried out well and were incredibly accessible. The watch is also equipped with a Menstrual Cycle tracker for women.The battery life is another aspect that we were highly impressed by. The Nord Watch is equipped with a 230 mAh battery that can last for an entire week when connected to a smartphone. Even with regular fitness tracking and above-average usage, the smartwatch held up those numbers. On standby, the Nord Watch can last up to 30 days on a full charge. The magnetic clip charger that comes in the box can fully charge the Nord Watch in just under 2 hours.Read Also: Learn How to Use a Sports Betting App Safely
Verdict
At Rs 4,999, the OnePlus Nord Watch is an absolute bargain. It strikes a nice balance between clean looks and versatile performance and elevates the entire experience with stellar battery life. The AMOLED display is a delight to use, and the touch response of the watch paired with its accessible OS boosts the user experience. The lack of in-built GPS and Bluetooth calling are some things that we would have loved to have in this device, but if you’re looking for a smartwatch that can serve good looks and track all your vital health and fitness data accurately, you don’t need to look beyond the OnePlus Nord Watch.
Transsion Group subsidiary Infinix added to its budget-friendly Y1 series with the launch of 43Y1 Smart TV today. The 43Y1 smart TV will go on sale exclusively on Flipkart today. Priced at Rs 13,999, the 43Y1 will appeal to buyers who do not want to break the bank for a 43-inch smart television. Interested buyers can also avail of a 5% cashback offer on a Flipkart Axis Bank card.Read Also: How to Find a Song Just by Humming?
Infinix 43Y1: Specs, features, and additional details
The Infinix 43Y1 sports a Full HD LED with 300 nits of peak brightness. It also features an ‘eye care’ mode which reduces the blue light emission, leading to a less stressful viewing experience. The FHD display delivers rich and vibrant colours, with highly detailed images. When it comes to the audio profile, the smart television is powered by 20W Dolby stereo speakers that Infinix claims ‘offers a high-quality home-theatre-like experience.’The 43Y1 Smart TV is powered by a Quad-core Processor with 4GB of storage. The Quad-core processor specialises in low energy consumption while delivering a powerful performance. Major OTT apps like Prime Video, Youtube, SonyLiv, Zee5, ErosNow, AajTak etc. come pre-installed on the 43Y1. On top of that, the Smart TV also allows screen mirroring from a smartphone. The TV remote has two dedicated keys for Prime Video and YouTube.Connectivity options include 2 HDMI ports (1 ARC support), 2 USB ports, 1 RF input, 1 AV input, 1 headphone jack, 1 COAX out, LAN, and WiFi.Read Also: Learn How to Use a Sports Betting App SafelyA subsidiary of Transsion Holdings, Infinix was founded in 2013 and since then has expanded its portfolio across smartphones, smart TVs, TWS, and smart wearables. Infinix currently does business in 40+ countries across emerging markets of Africa, Latin America, the Middle East, South, and South-East Asia.
A little birdy has told Gadget Bridge that a new set of flagship phones is slated to debut later this month, following the launch of Qualcomm’s next flagship processor, the Snapdragon 8 Gen 2. Unsurprisingly, brand competition is raging, and iQOO is the one at its forefront. Its next flagship smartphone, the iQOO 11 Pro, is expected to be released as early as next month. However, the launch would take place in China first and then in India. This is excellent news for those looking for iQOO’s next powerhouse in India. Over that, iQOO 11 will be released here.
iQoo 11 series to launch soon in India. Will sport: –Qualcomm Snapdragon 8 Gen 2 SoC –V2 Chip –Android 13 –6.78-inch E6 AMOLED –BMW M Motorsports Inspired Design#iqoo#iqoo11
Yes, the iQOO 11 Pro would feature Qualcomm’s next flagship chipset, the Snapdragon 8 Gen 2. This chip would be accompanied by Vivo’s in-house V2 image processing chip, which was released last week. With the new processor, the company promises greater low-light performance as well as speedier picture and video processing. The iQOO 11 Pro will include a 6.78-inch E6 AMOLED display and a design inspired by BMW M Motorsports. The iQOO 11 Pro may also ship with Android 13 OS, but with the company’s own skin on top.
According to a few previous leaks, the iQOO 11 Pro could be powered by a 4,700mAh battery with support for 200W fast charging. They also stated that the next iQOO flagship would be released in 2022/23. To keep flickering at bay, use a 120Hz panel with QHD+ resolution and up to 1440Hz PWM dimming has been used in iQoo 11 pro.
Read Also:IQOO 3 5G review: Excellent for gamers
The rumour grinder has also revealed some further display characteristics, camera and battery specifications. The phone is believed to have a 2K resolution display with a refresh rate of 120Hz. There will be an in-display fingerprint scanner for biometrics. It will have a hole-punch cutout in the centre. Inside, the phone will also have up to 12GB of RAM. There will be at least 256GB of internal storage. In China, the business is also expected to release a 512GB storage option.
The phone is believed to have a 16MP front camera for selfies. A 50MP primary camera, a 50MP ultrawide camera, and a 14.6MP telephoto camera will be included in the back.
As said, a 4700mAh battery with support for 200W fast charging out of the box could be there. The charging technology can recharge the device’s battery from 0% to 100% in approximately 10 minutes. Rumours are also rife that it will also support wireless charging up to 50W.
iQoo 11 Pro: Price
There is not much spoken about the smartphone’s price right now. However, we have got insider news that the price could be starting from Rs 40,000 in India for the base version. If that is the case it can prove to be an incredible buy.
Read Also:iQoo 9, iQoo 9 Pro, iQoo 9 SE launching in India today: Details
WhatsApp and Instagram’s ‘Last Seen’ status allows your followers and contacts to see when you were last active on the app. While this is a handy feature that gives the sender an idea of whether their message was read (in case you have the blue ticks turned off), some people prefer keeping it hidden. Luckily, both Instagram and WhatsApp let you hide your ‘Last Active’ and ‘Last Seen’ statuses. Recently, WhatsApp also started giving users the option to hide their online status. In this article, we show you how to hide your ‘last active’ status on Instagram and WhatsApp.Read Also: Go Paperless To Improve Your Document Workflow
In This Article
Here’s how you can hide your ‘Last Active’ status on Instagram
Step 1: Go to your Instagram profile and tap on the hamburger menu icon at the top right corner of the screen.Step 2: Go to Settings.Step 3: Tap on ‘Privacy’ and select ‘Activity Status.’Step 4: Turn the toggle bar off for ‘Show Activity Status.’Instagram will hide your online status and ‘last seen’ on your profile. The green dot that appears when you’re online will be hidden on your profile.
Here’s how you can hide your ‘Last Seen’ status on WhatsApp
Step 1: Open WhatsApp and tap on the ellipses (three dots) at the top right corner of the screen.Step 2: Select Settings.Step 3: Tap on ‘Privacy’ and select ‘Last seen and online.’Step 4: Select your required privacy setting for who can see your ‘last seen’ and online status. Select ‘nobody’ if you want your last seen and online to be hidden from everyone. Your ‘last seen’ and online status will be changed accordingly.Read Also: How to Download and Install Skins in Minecraft?
Conclusion
This is how you can hide your ‘last active’ and ‘last seen’ statuses on Instagram and WhatsApp. Once you hide your online and last seen status, you will not be able to view your contacts’ statuses either. You can also turn off the blue ticks on WhatsApp which signify that you’ve read the sender’s message. However, there is no option to turn the read receipts off on Instagram.
Did you know that you can set a custom profile picture as your Netflix profile icon? If you’re bored of the same profile picture, you can make your Netflix account stand out by putting up a custom picture. While the official Netflix app or website does not let you upload a custom picture, you can still do it with an easy workaround. In this article, we show you how you can set a custom profile picture on Netflix in just a few easy steps. Read Also: Go Paperless To Improve Your Document Workflow
In This Article
Here’s how you can set a custom profile picture for your Netflix account
Netflix has a bunch of pre-set profile picture options that you can use on your account across different devices. However, if you want a custom profile picture, you will need to use a Chrome extension tool. The custom profile picture can only be viewed on PC and not the Netflix app on your smartphone or Smart TV. Follow these steps to set a custom profile picture for Netflix.Step 1: Download the ‘Custom profile photo for Netflix’ extension for your Google Chrome web browser.Step 2: Once the extension is installed, you will be redirected to the Netflix sign-in page.Step 3: Click on the ‘Custom profile photo for Netflix’ extension from the toolbar. Step 4: Choose the profile for which you want to put up a new customised picture.Step 5: Upload a picture from your picture. Make sure the image size is less than 5MB.Step 6: Select the image alignment.Your customised profile picture will be uploaded to your Netflix account.
How to change your profile picture on the Netflix app
You can also change your profile picture from the Netflix app on your smartphone. Netflix provides its users with a range of profile picture options to choose from. These changes will be reflected on the Netflix app for your smartphone, Smart TV and PC as well. Simply follow the steps mentioned below. Step 1: Open the Netflix app on your smartphone.Step 2: Tap on the pencil icon at the top right corner of the screen.Step 3: Tap the pencil again on your profile icon.Step 4: Select the template you want to set as your profile picture.Read Also: How to Download and Install Skins in Minecraft?
Conclusion
This is how you can set a custom profile picture on Netflix. Remember that you will only be able to see the custom picture on your profile when you log in using your PC. The changes will not be reflected on your smartphone or TV app. However, Netflix allows you to choose your profile picture from a range of templates on the TV and smartphone app.
The rumour mills are churning fast when it comes to Apple iPhone SE 4. Cupertino-based giant, Apple, is working on an update to the low-cost iPhone SE 3. It is expected to undergo significant upgrades in order to align with the premium iPhone line-up. Apple discontinued the first edition iPhone SE in September 2018. The iPhone SE (2020), its successor, was unveiled in March 2020, and the third edition was released on March 8, 2022. So, chances are the next version will also come in March.
Here are some possible upgrades for the next-generation iPhone SE 4 when it is released in March or April of 2023.
In This Article
Apple iPhone SE 4: Design
All current iPhone SE iterations are based on prior iPhone models. The current iPhone SE (3rd gen) comes striding in with a 4.7-inch display with a TouchID Home button and is based on the iPhone 8. According to a popular tipster, the future Apple iPhone SE 4 may have the same design as the iPhone XR. It could have rounded corners. The business is rumoured to be getting rid of TouchID and maybe be switching to another type of verification.
With the next iPhone SE 4, Apple is also said to include a notch in the iPhone SE family. Although the front camera will be located in the notch, it is unclear if it will support FaceID authentication or not. Though some reports do suggest there will be FaceID.
Read Also:You may now buy iPhone SE 2022 for as low as Rs 28,900, Here is
Apple iPhone SE 4: Display
Apple’s fourth-gen iPhone SE 2023 might still have a small display. 4.7 to 5.2-inch screen is what some reports suggest. However, Apple is apparently exploring another display size for the iPhone SE 4 that falls between 5.7 and 6.1 inches. According to Apple analyst Ming-Chi Kuo, the phone could have a 6.1-inch display, and according to Ross Young, the company is considering both a 6.1-inch and 5.7-inch display for the product.
Read Also:Comparison: iPhone SE 2022 Vs iPhone 13 mini
Apple iPhone SE 4: Hardware
The A15 Bionic chipset used in the iPhone 13 series powers the current iPhone SE 3. The A16 chip, which currently powers the highest models of the iPhone 14 series and is anticipated to power the regular iPhone 15, is most likely to power the Apple iPhone SE 4. And no, there might not be any USB Type-C support in the Apple iPhone SE 4. Three versions of the smart should be available at the time -128GB, 256GB and 512GB.
There is nothing more annoying than trying to remember the name of a song that is stuck in your head. Some of you may remember the popular music app Shazam, which could identify any song that was playing nearby. If that still isn’t enough, Google can now identify a song even if you hum the melody or the lyrics into your phone. It’s that easy. In this article, we show you how to find a song simply by humming the melody into your smartphone.Read Also: How to Download and Install Skins in Minecraft?
In This Article
Use the Google app to find a song just by humming
Step 1: Open the Google app or search widget on your phone and tap on the mic icon next to the search bar.Step 2: In the following window tap on ‘Search for a song.’Step 3: Bring your phone closer to the audio source of the song or simply hum the melody or lyrics to the song.Step 4: Google will search for the song using the melody and bring up matching results. Step 5: Tap on the result to see where you can listen to the song.
Use Google Voice Assistant to find a song just by humming
Step 1: Tap the home icon or say ‘Hey Google’ to trigger Google Voice Assistant.Step 2: Ask ‘What’s this song?’Step 3: Play the song on another device or hum its melody or lyrics. Step 4: Google will search for the song using the melody and bring up matching results.
Use Soundhound to find a song
If Google Assistant fails to bring up any results, you can use the Soundhound app to find the song you are looking for. Soundhound works in the same way, all you need to do is bring the mic closer to the song that you want to find the name of. You can also hum, whistle, or sing the lyrics to the song and Soundhound will identify it for you. You can download the Soundhound app from Google Play Store. Open the app on your smartphone and the orange button to search for a song. Hum for at least 10 seconds to ensure the results are accurate.Read Also: Simple ways to Change Language on Amazon?
Conclusion
This is how you can find or identify any song simply by humming the melody into your smartphone. If Google does not find the song on the first go, make sure you are humming the melody clearly and accurately. You can also try humming other parts of the song for a better result. If you found this article helpful, let us know in the comments!
Can’t figure out what to watch this month? We’ve got you covered. OTT platforms across the spectrum will be teeming with new releases this month. In order to sort through the titles with ease, we’ve compiled a list of the best releases in November. So without further ado, here are our picks for the 10 best movies and TV shows coming out this month on Netflix, Amazon Prime Video, Disney+ Hotstar, and more.Read Also:Simple ways to Change Language on Amazon?
Released just two weeks before the World Cup, FIFA Uncovered dives into the world of corruption, scandal, and infamy that controls the beautiful game at the biggest stage. The documentary charts FIFA’s corrupt history regarding handing out the rights to host the World Cup. FIFA’s corruption has been a public spectacle for the last few years, especially with Sepp Blatter at the helm. With the 2022 WC in Qatar set to kick off later this month, FIFA Uncovered is by no means a bombshell but a reminder of how the biggest sports organisation in the world is complicit in sportwashing and the extent to which the scandal runs in the governing body.
The Crown (Season 5)
Released after the passing of Queen Elizabeth II, The Crown picks up from where it left off, charting the events around the Royal family of England in the 20th century. The Crown is one of Netflix’s most popular original productions and stars Claire Foy, Olivia Colman, and Imelda Staunton. Certainly one of the best releases among other TV shows and movies on Netflix this month.
Dead To Me (Season 3)
The dark comedy featuring Christina Applegate, Linda Cardellini, and James Marsden returns for the third and final season on Netflix. The show follows the blossoming friendship between recently widowed real estate agent Judy (Christina Applegate) and Judy (Linda Cardellini), who she meets at a grief support group. The final season of Dead To Me promises several ups and downs before finally saying goodbye.
Ancient Apocalypse
British journalist Graham Hancock takes viewers on a journey through the world as he gathers evidence for a lost civilisation that could have existed up to 12,000 years back. While it may require a suspension of belief in certain parts, Ancient Apocalypse is an interesting view of our history and lost civilisations through an alternate perspective.
Based on the horror novel by Stephen King, Firestarter is a gripping tale of a couple trying to hide their daughter from a mysterious federal agency that wants to exploit and harness her power of pyrokinesis. As her parents try to keep her under the radar, Charlie finds her power impossible to control and her frequent outbursts make it harder for the family to maintain their cover.
My Policeman
One of the most anticipated releases of the year, My Policeman, featuring Harry Styles, finally makes its way to Amazon Prime. Set in the 1950s, the movie tells the story of a gay policeman played by Styles as he marries a schoolteacher played by Gina McKee, while still being in a relationship with a museum curator played by Rupert Everett. My Policeman explores the social attitudes towards homosexuality through a tale of a forbidden romance that spans decades.
After its theatrical release in September, Ranbir Kapoor and Alia Bhatt starrer Brahmastra finally makes its way to Disney+ Hotstar this month. The mythological drama follows the story of Shiva, played by Ranbir Kapoor, who cannot be harmed by fire. Grossing over Rs 425 crore globally, a sequel for Brahmastra is reportedly already in the works. The movie can now also be enjoyed on OTT.
Grey’s Anatomy
Popular American medical drama Grey’s Anatomy moves on to its 19th season and shows no sign of slowing down. The show can now be watched in its entirety on Disney+ Hotstar. The 19th season marks the end of the chapter for Meredith Grey as she departs Grey Sloan Memorial in Seattle to take up a job with the Catherine Fox Foundation doing research for an Alzheimer’s cure.
Directed by Prakash Raj and starring Nana Patekar, Ali Fazal, Shriya Saran, and Tapsee Pannu, Tadka is a romantic comedy/drama that follows the life of a middle-aged man who finds love through his passion for food. Written by Prakash Raj, Tadka is a remake of the popular 2011 Malayalam movie, Salt n Pepper.
Anjali Menon’s Wonder Women is a story of a group of pregnant women that befriend each other at a prenatal class. What follows is a story full of intrigue as we are let into the lives of this group of friends, following their stories and arcs of personal growth. Out on November 18, Wonder Women will certainly be one of the better releases of the year.Read Also: Koo app now allows users to add 10 profile pictures, more features announced
Conclusion
These are the 10 best movies and TV shows to look out for this month on Netflix, Amazon Prime Video, Disney+ Hotstar, and other OTT platforms. Let us know in the comments which movie or TV show you are looking forward to the most!
Betting is a favorite activity for many sports fans. The ability to predict the outcome adds excitement to the sport-watching experience. When mobile devices are widely available and mainstream, betting apps gain immense popularity. Sports enthusiasts can easily access Ohio sportsbook apps from the comfort of their own homes without having to go to a physical establishment.
How to use betting apps safely
Betting apps work similarly to casinos. You can instantly access real-time odds when you download your favorite betting app. The apps are convenient, offering you various betting options and the necessary information to make a better decision.
To use a betting app, you need to sign up and create an account. After you set up your profile with personal information, you will need to enter your deposit. You can also choose your preferred method for depositing and withdrawing money. The apps are available for iPhone, iPad, and Android, but you need to ensure they have a version for your particular device.
These are the basic things that you need to know about betting apps. However, some will go a step forward and offer unique features to stand out in the competitive market.
How to make sure you always use safe apps? We have a few tips to share with you.
In This Article
Check licenses
Sports betting is regulated by law. Each country has a specific set of rules applied to this industry. Therefore, the betting app needs to have a license. Make sure the app you intend to use is legal and has proper certification that confirms it operates by the local laws. With this, you are protected as a customer.
Payment methods
Every betting app comes with available payment methods. Most will offer different options for your convenience, and you can choose according to your preferences. Make sure that your favorite app offers your preferred payment methods. Wire transfers are a primary option, and almost every app provides them. However, apps will offer additional payment options such as Skrill or Paypal. But also, some apps might offer crypto as an additional option available. Make sure to go with reliable payment methods to make sure your financial information stays safe.
Cybersecurity
Since you enter personal and financial information, you must choose a reliable app to ensure online safety. Check their reputation and license to get to know the app better. Also, check their historical records and see if they have any violations. A reliable app should provide cyber security options to keep the customer’s data safe.
Customer support
When you are a new user of a betting app, you might need assistance. Therefore, the app should provide customer support for you. They can offer different contact options, such as email, phone, or live chat. With this, you can choose your preferred method of obtaining assistance. The best betting apps should provide 24/7 online support since problems can arise at any time of the day.
For the latest gadget and tech news, and gadget reviews, follow us on Twitter, Facebook and Instagram. For newest tech & gadget videos subscribe to our YouTube Channel. You can also stay up to date using the Gadget Bridge Android App. You can find the latest car and bike news here.
WhatsApp, which is owned by Meta, is testing a new feature called ‘Companion mode’ for Android. The companion mode, which is presently available to a few beta testers, allows users to join existing accounts on secondary Android mobile devices. WhatsApp now allows existing accounts to be linked to up to four devices. It enables users to use WhatsApp services on the linked device even if the primary registered device is out of network range or has no internet access.
However, at the moment, the companion mode is confined to a web client and a PC application. Support for tablets and smartphones has long been planned, and Android’s companion mode is a step in the right direction. So, what’s new with Android’s companion mode, and how does it work? Here is what you need to know:
In This Article
A little backgrounder
According to the WABetaInfo website, which follows WhatsApp’s planned features, buddy mode has been given out to some beta testers. WhatsApp is exploring companion mode for mobile phones by enabling the feature for some beta testers, according to the company. WhatsApp gives consumers the ability to link a second smartphone via the ‘Link Device’ option. The connection will take place using the standard QR code.
According to the report, once you connect another smartphone, your conversation history will sync to that new device as well, allowing you to view and respond to messages and calls on it simultaneously. With this, beta testers can now connect up to four devices – two smartphones, one tablet, and a desktop machine.
Here are the steps to activate the companion mode on Android:
Step 1: Download and install WhatsApp desktop software on your PC or Mobile device.
Step 2: Tap on ‘Link a device’ to get the QR code required for account connecting, if it is already not showing.
Step 3: Now, open WhatsApp on your primary registered mobile.
Step 4: Go to Settings and tap on ‘Linked Devices’.
Step 3: Inside Linked Devices, tap on ‘Link a Device’.
Step 4: Point the phone camera to scan the QR code visible on the secondary mobile or desktop screen.
Step 5: Once the link is established, the companion mode is activated on secondary mobile or PC.
When you attach a WhatsApp account to a new phone, the chat history of the primary device is synced across all linked devices. As said, when you use WhatsApp from a linked cell phone, all personal messages and calls are end-to-end encrypted. When someone sends you a message, it is distributed to all associated devices as well, ensuring that encryption is always retained.
Read Also:How to use the same WhatsApp on two or more smartphones?
But beware, some functions may still be unavailable while this new update is being tested. For example, viewing live locations and managing broadcast lists and stickers may be unavailable.
Amazon is back with another quiz on its mobile platform. The 14 November 2022 Amazon Quiz is now live on its platform and today’s Amazon Quiz will give you a chance to win Rs 2,500 Amazon pay Balance.Every day Amazon brings a fresh questionnaire that comprises 5 questions. These questions are based on current affairs and general knowledge. The quiz can be played from 8 AM to 11:59 PM and the contestants need to answer correctly to enter into a lucky draw. In today’s Amazon Quiz the participants will get a chance to win Rs 2,500 Amazon Pay Balance.Today’s Amazon Quiz Prize – Rs 2,500 Amazon Pay BalanceQuiz Date – 14 November 2022Daily Timing – 12 AM to 11:59 PMWinner Announcement – Today at 12 PM
In This Article
Amazon Quiz Answers Today 14 November 2022
Question 1: Which country’s parliament elected Dimitar Kovacevski as the new prime minister in January 2022?Answer: North MacedoniaQuestion 2: UAE’s Ahmed Naser Al-Raisi recently got elected as the president of which international organization?
Answer: INTERPOLQuestion 3: The red umbrella is a symbol for which group of people’s rights around the world?
Answer: Sex workers
Question 4: Apart from the Chicago Bulls, this legendary basketball player also played for which NBA franchise?Answer: Washington WizardsQuestion 5: This is the super saiyan form of which ‘Dragon Ball Z’ character?
Answer: Goku
How To Play Amazon Quiz
Only app users are eligible to play the Amazon quiz every morning from 12 AM to 11:59 PM. The quiz is not available on the desktop. For those who are unaware of how to play the Amazon quiz below are the steps, you can follow to take the quiz.
Firstly download the Amazon app from Google Play Store or App Store
Now fill in the required information through the Sign Up option.
You need to log in to the Amazon app and scroll down on the home screen to find the Amazon Quiz banner.
Tap on the Amazon Quiz banner and tap on the Start button to start the Quiz.
Now you will get 5 questions and you need to answer them correctly. One wrong answer will eliminate you from the Quiz.
After answering all the questions correctly you are now eligible for a Lucky Draw.
The winner’s name will be announced today at 12 PM.
The world is transitioning to a paperless environment in all its departments. While seeking to go paperless, they are looking forward to using the right tools that will allow them to easily perform this transition. As this is majorly performed based on managing environmental concerns, this transformation will also help improve the document workflow.
For this article, we shall be looking into how a free PDF editor helps you in going paperless and help you manage documents with ease. The provided details will help you understand why it is essential to perform this action and how it is done with the help of Wondershare PDFelement, an effective PDF editing solution.
In This Article
Part 1: Wondershare PDFelement – The Ultimate Solution to Go Paperless
There are many PDF editors available in the market providing services for managing digital documents. With simple tools to work with, these PDF editors are not quite extensive in resolving different problems involving documents. Wondershare PDFelement is designed to answer all prevailing concerns of editing PDF documents and helping you in going paperless.
This free PDF editor operates with a vast set of features that can be used to design the perfect PDF document, which looks even better than a printed document. While you make use of the essential editing tools provided on the platform, you can make use of the efficient and diverse tools available for creating and editing PDFs. While it accompanies you in converting PDFs, you can translate and perform multiple functions, such as OCR PDFs. You can also find batch processing on PDFelement, another great highlight of this PDF editor.
Wondershare PDFelement is highly compatible, as it allows editing PDFs on Windows, Mac, iOS, and Android. Such diversity is highly encouraged, as it helps users work through their documents without putting up the effort of transferring, printing, and managing paper documents. PDFelement is the perfect option for going paperless in your offices, homes, and all other places involving document management.
Part 2: Why Should One Consider Going Paperless?
Why does one need to go paperless to manage documents in a better way? Printing documents and using paper systems has been in the market for a while; however, paperless systems have outperformed this in all departments. Let’s help out people understand the benefits of shifting to a paperless system:
1. Reduction in Costs
The cost of managing paper documents is exceptionally high if appropriately observed. From the cost of space to the management of the paper documents by stocking them properly, the entire price is relatively high to manage. While you shift to paperless systems, the cost of managing the documents reduces to a single storage space, which is quite exceptional.
2. Increase in Efficiency of Operations
If you ever find something from a stack of papers, you must go through every piece. This is not only time-taking but highly frustrating to cover. A paperless environment will increase efficiency in operations, as finding documents is simple and easy on such systems. A simple search and you will have your required result on the front.
3. Enhances Collaboration on Platforms
Ever thought of sharing a document with another person through fax or parcel? While it is complicated to cover daily, you would never support this process and would feel tardy in going through this again and again. Going to a paperless system will allow you to share documents with other users easily through emails and other communication sources. Collaboration is much easier with a paperless system.
4. Improves Security of Documents
Documents stocked in a room are never secure. While they can be stolen with no hint of them being removed from the room, they are vulnerable to fire and other hazards that can destroy all data in minutes. Using a paperless model will help increase the security of the documents, where you can protect the storage devices from illegal access. Securing the documents will also protect them from threats of being destroyed. You have to keep backups of the documents, which does not take considerable space or cost in a paperless model.
5. Eco-Friendly System
Using a paperless system protects the environment, which was one of the most prominent factors in adopting this system. As the paper is a primary environmental concern that was not being addressed for years, it is time to realize the need to change to an eco-friendly system to make the environment sustainable for the people who will come ahead of us.
6. Saves Space in Places
Another vital clause that involves using a paperless model is its ability to save space. To save year-long documents, you will need a separate cupboard and a separate room to manage a decade-long document log of your office. This can be reduced to a small hard drive that does not take space more than a few centimeters.
Part 3: How Does PDFelement Support the Transition to a Paperless Environment?
There are many ways PDFelement is helping users to transition their systems to a paperless environment. While you create an editable PDF with this efficient tool, you are taking the next step to a paperless model. Let’s see how PDFelement helps you in setting up the precedent with its features:
1. Organize PDFs
PDFelement helps you organize PDF documents, which means you can log your data and set PDFs according to your requirements. With the option of splitting documents, deleting pages, inserting, and extracting pages from PDFs, PDFelement provides the perfect setup for organizing PDFs to your liking. You can also rearrange the documents and rotate them to manage their orientations.
2. Convert PDFs
The option of converting PDFs is exceptionally great on PDFelement. With the option of converting your PDFs to different Office formats, you can easily edit your documents and convert them to the required format without going through different functions. The conversion tool of this free PDF editor is highly efficient, with the ability to help users convert their documents into multiple supported formats without disrupting the document’s formatting.
3. OCR PDF
PDFelement comes with an OCR tool that supports detecting more than 20 languages on PDF documents. While it helps convert scanned PDFs to editable and searchable PDFs, you do not need to go across any other platform to edit your files. The OCR PDF tool provided by PDFelement recognizes the text in the images or scanned documents and converts the photographic content to a machine-related format.
4. PDF Form
You can also manage different forms on PDFelement. Rather than printing out forms to fill them out for a particular task, you can edit the complete forms on the PDF tool. This is exceptionally great, as it influences the paperless model to perfection. PDFelement servers as a great PDF filler that allows you to fill out PDFs by recognizing the editable locations in a form.
5. Sign PDF
The option of signing documents on PDF files is straightforward on PDFelement. As you can upload, type, and draw the signatures to add to PDF documents, you can ensure the legal boundaries of signing documents. With that, you will never have to print out documents for signing pages.
6. Edit and Annotate PDFs
If you seek to make changes to a PDF or mark something important on the document, you can easily use the editing and annotation features provided by PDFelement. Easily edit the text, pictures, and links on the PDFs and annotate them as desired. With highlighting tools, commenting structures, and several other annotation elements, PDFelement is the best option available for such things.
Verdict
It is time to shift to a paperless system in your office. While it covers every disadvantage of paper systems, it provides efficiency and sustainability of excellent caliber. Using tools like Wondershare PDFelement is a great catalyst for this process. This free PDF editor provides effective tools that can be used to shift to a paperless mode in no time. The results are exceptional with such tools, as they allow you to manage your documents on a single platform with ease.
For the latest gadget and tech news, and gadget reviews, follow us on Twitter, Facebook and Instagram. For newest tech & gadget videos subscribe to our YouTube Channel. You can also stay up to date using the Gadget Bridge Android App. You can find the latest car and bike news here.
Minecraft is one of the most popular games on the planet, enjoyed by people across all age groups. Players can customise a lot of aspects of their character and other parts of the game. With the right skin and unique attributes, you can make your in-game character stand out. There are an endless number of customised skins you can find online as well. In this article, we show you how to download and install skins for your Minecraft character on a PC.Read Also: How to upload a TikTok video using a PC or Mac? The simplest way
In This Article
Choose a premade skin for your Minecraft character
Step 1: Launch Minecraft on your PC.Step 2: Go to your character and select ‘Dressing Room.’Step 3: Click on the menu icon at the top-left corner of the screen and select Classic Skins.Step 4: Choose a new skin for your character. This window will display all the skins that you currently own. To view more skins select ‘Get More Skins.’
Choose a customised skin for your Minecraft character
Step 1: Select a skin from Minecraft Marketplace and download it by clicking the button on the right side of the page.Step 2: Go to https://minecraft.net/en-us/profile/skin and log into your minecraft.net account.Step 3: Click on ‘Select file’ under ‘Upload custom skin.’Step 4: Upload the skin that you just downloaded.Step 5: Open the game on your PC. Your character will be wearing the skin.Read Also:Boult X30 and X50 TWS earphones with 40 hours of playtime launched in India
Conclusion
This is how you can download and install skins for your Minecraft character on a PC. These methods more or less remain the same for every edition of Minecraft, be it Bedrock, Java, or Pocket Edition. If you want a skin that is unique to your character, you can make one of your own using Skindex’s Skin Editor.
Being the biggest e-commerce platform in the world, Amazon is available in most major languages. Changing your language on Amazon is a fairly easy process. You can even select another region and explore the products available there. If you’re in India, you can use Amazon in multiple local and regional languages. In this article, we show you how to change the language on Amazon from the website and the app.Read Also:How to upload a TikTok video using a PC or Mac? The simplest way
In This Article
Change language on the Amazon website
Step 1: Go to www.amazon.com.Step 2: Click on the flag next to the search bar.Step 3: Select the language you want.Step 4: Scroll down and select ‘Save Changes.’Instead of clicking the flag, you can also hover your cursor over it and quickly select the language you want.
Change language on the Amazon app
Step 1: Open the Amazon app on your smartphone.Step 2: Tap on the hamburger menu at the bottom left corner of the screen.Step 3: Scroll down and select ‘Language’ from Settings.Step 4: Choose the language you want.Step 5: Scroll down and hit ‘Continue.’If you want to choose a foreign language, select ‘Country & Language’ and select the region and language you want.
Bonus Tip
How to buy a gift card on Amazon?
Step 1: Go to the Amazonwebsite and select ‘Gift cards’ from the top menu.Step 2: Choose the type of gift card you want. Step 3: Select the gift card amount. You can also enter the amount of your choice.Step 4: Fill in other details like Your Name, Recipient’s email, Date of Delivery, Quantity, and additional message. Step 5: Click on ‘Add to cart’ and then select ‘Proceed to checkout.’Step 6: Fill in the payment information and select ‘Continue’.Step 7: Select ‘Place your order.’Read Also: Snapchat not loading snaps? Here are easy 7 fixes
Conclusion
This is how you can change the language on Amazon. Changing the language by region will also change the currency. Once you change the location, international shipping costs will apply. If you found this article helpful, let us know in the comments!
Instagram was initially launched as a photo-sharing app and the majority of its users still use it in that form. Instagram can also be accessed using its website. For a long time, Instagram’s website offered a very limited set of features. There was nothing much you could do other than browse your feed. Over a period of time, Instagram slowly rolled out more features for its websites, including the ability to upload videos and view stories. In its present form, the Instagram website offers a decent experience but still lacks a few functions. In this article, we show you how to upload an Instagram Reel using a PC or Mac. Read Also:MediaTek announced T800 Modem, alongside Kompanio 520 and Kompanio 528 chipsets for midrange Chromebooks
In This Article
Upload a Reel to Instagram using the web browser
Step 1: Go to www.instagram.com and log in to your Instagram profile.Step 2: Click on the Create button on the side menu.Step 3: Upload the Reel from your computer. Make sure the Reel is edited as Instagram’s website does not let you edit it any further. Step 4: Crop the video to an aspect ratio of 9:16 by clicking on the icon at the bottom left corner of the panel. Click on ‘Next.’Step 5: Select a Cover photo for your Reel. You can pick a thumbnail from the video itself or upload a picture from your computer. Trim the Reel and hit Next. Step 6: Write a caption for your Reel. You can also choose to turn off comments and hide the like counter. Once you’re done, select ‘Share.’Your Reel will be published on your Instagram profile.
Use a third-party tool
There are several third-party tools and software you can use to upload a Reel on Instagram from your PC or Mac. Clients like Sked Social, Gramblr, and Ramme help you manage your Instagram account and offer advanced features like post-scheduling, insights, and more. Some clients also allow you to edit your Reel before you upload it on Instagram. Make sure the third-party client is trusted and well-reviewed before using it to log in to Instagram. For enhanced safety, turn on the two-factor authorisation for your Instagram account. Read Also:Snapchat not loading snaps? Here are easy 7 fixes
Conclusion
This is how you can upload an Instagram Reel using a PC or Mac. While Instagram’s website is much better than before, it still lacks some important features like letting users upload a Story. If you find the methods mentioned above helpful, let us know in the comments. For a full guide on how to use the recently launched Instagram Avatar, read our article here.
12 November 2022 Amazon Quiz has gone live. Customers from different parts of the country are participating in the daily quiz. The quiz begins from 12 AM to 11:59 PM. Those participating in the quiz can win exciting prizes by answering all the questions correctly. Today participants have a chance to win a Rs 1,000 Amazon Pay Balance.Amazon quiz brings an opportunity for its customers to win Amazon Pay Balance ranging from Rs 1,000 to Rs 50,000. The Quiz can be played from 12 AM to 11:59 PM. The e-commerce platform brings a fresh quiz on a daily basis which consists of five questions related to general knowledge and current affairs. The participants need to answer all the questions correctly and their names will be selected for a lucky draw. The winner will be announced at the end of the month.One wrong answer could eliminate you from the quiz. If you manage to answer all the questions correctly you can stand a chance to win a Rs 1,000 Amazon Pay Balance today. Only app users are eligible to participate in the Quiz. Check Out 12 November 2022 Amazon Quiz Answers.Amazon Quiz Today Prize – Rs 1,000 Amazon Pay BalanceQuiz Date – 12 November 2022Daily Timing – 12 AM to 11:59 PMWinner Announcement – Today 12 PM
In This Article
Amazon Quiz Answers Today 12 November 2022
Question 1: Which of these is a name is given to the Border Security Force’s increased surveillance along the Pakistan border in Rajasthan?
Answer: Sard HawaQuestion 2: Petr Fiala has been sworn in as the new Prime Minister of which country?
Answer: Czech Republic
Question 3: The Konyaks are among the largest tribes in which state?
Answer: NagalandQuestion 4: Who among these is an Arjuna award winner in this sport, who was part of an Asian Games bronze medal winning side?Answer: Jimmy GeorgeQuestion 5: This is a famous character from which movie franchise?
Answer: Pirates of the Caribbean
How To Play Amazon Quiz
Only app users are eligible to play the Amazon quiz every morning from 12 AM to 11:59 PM. The quiz is not available on the desktop. For those who are unaware of how to play the Amazon quiz below are the steps, you can follow to take the quiz.
Firstly download the Amazon app from Google Play Store or App Store
Now fill in the required information through the Sign Up option.
You need to log in to the Amazon app and scroll down on the home screen to find the Amazon Quiz banner.
Tap on the Amazon Quiz banner and tap on the Start button to start the Quiz.
Now you will get 5 questions and you need to answer them correctly. One wrong answer will eliminate you from the Quiz.
After answering all the questions correctly you are now eligible for a Lucky Draw.
The winner’s name will be announced today at 12 PM.
Koo app has announced the launch of four new features on its platform. It now allows users to schedule Koos, save drafts and add up to 10 profile photographs. Recently multilingual microblogging network Koo App has surpassed 50 million downloads. Users of the Koo app can now post up to 10 profile pictures. When a user views their profile, these images begin to play automatically. With a drag-and-drop feature, it is simple to change the order of these images.Whereas a Koo can now be scheduled for a later time and date by power creators. This makes it simple for producers who enjoy writing down several ideas at once but scheduling them for different times to avoid clogging their followers’ feeds. A planned Koo can also be edited or rescheduled by users.The save draft feature can be used by creators who want to continue editing a draft before publishing it. They are free to make adjustments indefinitely before uploading thanks to it.Instead of normal responses like Like, Comment, Re-Koo, or Share, users can now save a Koo. Only the user can see saved Koos, which are accessible from their profile page. Users who want to revisit their favourite or significant Koos without having to respond to the Koo can take advantage of this feature. There are no other microblogs that offer this feature.Mayank Bidawatka, Co-founder, Koo, said, “We are very happy to announce new features to millions of our users. Some of these are a first in the social space. We are the first ones to enable users to upload up to 10 profile pictures. We’ve made it extremely easy for power creators to now save a draft and schedule Koos for a future date and time. Saving a Koo functionality is not available in any other microblog. Users have taken really well to these features. We are happy to have crossed the 50 million user mark on the back of these enriching features. We have a very user-focused culture internally and with our ears close to the ground, we will keep building best-in-class features that users need to express themselves and connect with each other.”
For the latest gadget and tech news, and gadget reviews, follow us on Twitter, Facebook and Instagram. For newest tech & gadget videos subscribe to our YouTube Channel. You can also stay up to date using the Gadget Bridge Android App. You can find the latest car and bike news here.
Recently, Boult Audio has announced the launch of its True Wireless Stereo earbuds X30 and X50 in India. Both the TWS earphones come with 10mm drivers. The Boult X30 and X50 also feature Combat gaming mode while also offering 40 hours of playtime. The audio device has 45ms ultra-low latency gaming mode and Quad Mic ENC.The brand-new Boult X30 earbuds have three equaliser modes, lightning-fast charging, and a whopping 40 hours of battery life. The Boult X50 earbuds also have a 40-hour battery life, 45-millisecond low latency combat mode for gaming, and quad microphone environmental noise cancellation.The X30 and X50 earbuds are a dream come with 40 hours of non-stop playback and 100 minutes of playtime in just 10 minutes of charging. Music lovers can select the ideal sound for the appropriate genres thanks to the three equaliser modes function, which includes HiFi, Rock, and Bass Boost settings. Additionally, the X30 and X50 offer a greater audio experience for conversations and music thanks to the built-in 10 mm drivers.The Boult Audio X30 and X50 earphones have improved Bluetooth 5.1 technology built-in with support for SBC and AAC. In addition to being flexible and light, the IPX5-enabled earphones are also water- and sweat-resistant. You may wear the X30 and X50 without worrying, whether you’re working out hard or going for a run outside. The pair comes in portable, lightweight cases that are always prepared to wow you as soon as you pop the lids open. Not to mention the 45ms low-latency Combat Gaming Mode, which will satisfy your inner gamer.Boult X30 and X50 have been launched with a price tag of Rs 999. The X30 comes in two colour options of Blue and Warm Grey whereas the Boult X50 will be available in Black and white colour options. Both audio devices will be available for purchase via Amazon and Flipkart respectively.
For the latest gadget and tech news, and gadget reviews, follow us on Twitter, Facebook and Instagram. For newest tech & gadget videos subscribe to our YouTube Channel. You can also stay up to date using the Gadget Bridge Android App. You can find the latest car and bike news here.
TikTok’s rise as a video-sharing platform has been nothing short of astonishing. Within just a few years, the platform has gained global popularity and boasts over a billion monthly active users. Some users may not know this, but TikTok can be accessed from its website as well. While the experience isn’t as seamless and fun as its smartphone app, you can still carry out the basic functions through the website. In this article, we show you how to upload a TikTok video using a PC or a Mac. Read Also: Qubo Car Air Purifier is now available for purchase via Amazon
In This Article
Here’s how you can upload a video on TikTok using a PC or Mac
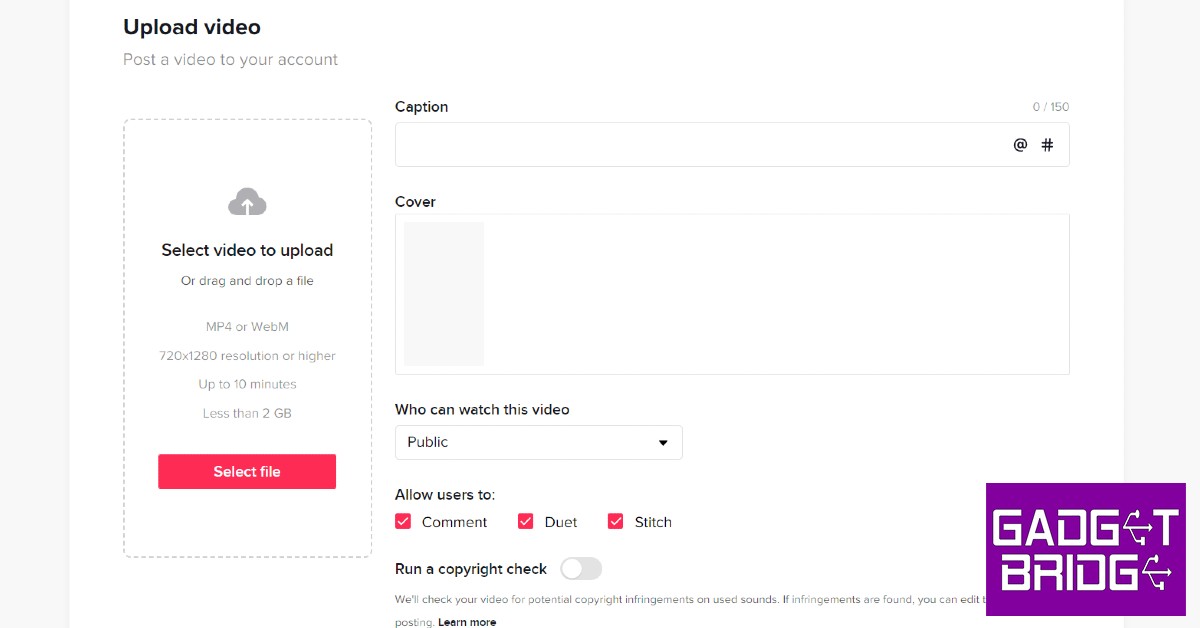
Step 1: Open the web browser on your laptop and go to www.tiktok.com.Step 2: Click on ‘login’ at the top right corner of the screen and enter your username and password to sign in.Step 4: Click on the upload button with the plus sign.Step 5: Select a video from your computer. The video must be in mp4 or WebM format and have a resolution of 720 x 1280p or higher. You can upload videos up to 10 minutes in duration. File size must be below 2GB. Make sure the video is edited before you upload it, as TikTok’s web portal does not allow you to edit videos.Step 6: Enter a caption and select a cover picture. You can also select who can view the video. Step 7: Click on the post button to publish your video.Read Also: How to change the phone number linked to your Apple ID
Conclusion
This is how you can upload a video to TikTok from a PC or Mac using a web browser. Since TikTok’s website does not allow users to edit the videos, you will need to edit them on your laptop before uploading. There are a lot of video editing tools and software for Windows and Mac that you can use for your TikTok videos. You can check out our list of the top 10 free video editing software for Windows here.
The T800 chipset which supports both sub-6GHz and mmWave 5G networks has been introduced by the Taiwanese chip manufacturer MediaTek. The T800 chipset is for Industrial Internet of Things (IIoT), Machine-to-Machine (M2M), and always-connected PCs which promise speeds of up to 7.9Gbps. There are also Kompanio 520 and Kompanio 528 chipsets for midrange Chromebooks and one for high-end 4K TVs that have been announced by MediaTek.
In This Article
MediaTek T800
With the new T800 chipset solution for sub-6GHz and mmWave 5G networks, MediaTek is advancing 5G applications and experiences. Following the release of MediaTek’s T700 5G modem, this quick and energy-efficient 5G solution will enable cutting-edge 5G “beyond smartphone” applications including Industrial IoT, M2M, and always-connected PCs.The latest T800 chip from MediaTek provides download rates of up to 7.9Gbps and upload speeds of up to 4.2Gbps. With the T800, users can browse, stream, and play games for a longer period of time thanks to MediaTek’s most recent 5G UltraSave power-efficiency technologies, which are optimised for all 5G connection situations.According to the company, the fully integrated architecture of the T800 contributes to faster time to market and cheaper development costs. The chipset solution includes an envelope tracking module, FR1 transceivers, and a small modem with a fully integrated 3GPP Release-16 5G cellular modem.“Consumers today want the ability to access 5G speeds from anywhere. MediaTek’s newest 5G chipset solution allows end users to enjoy high-speed, low-latency 5G wherever they are – offering true computing freedom,” said JC Hsu, Corporate Vice President at MediaTek. “The T800 stands out with super fast, reliable 5G speeds in a highly efficient design that maximises battery life for an all-around great user experience.”
Kompanio 520 and Kompanio 528
The Kompanio 520 and Kompanio 528 are two new Kompanio chipsets from MediaTek that are designed for Chromebooks. It is said to offer a seamless experience so customers can browse, play cloud games, stream content, and utilise Google Play apps while enjoying all-day battery life thanks to the improved computational performance and battery life for low-level Chromebooks.For slick and quick performance, the Kompanio 520 and Kompanio 528 both incorporate two premium Arm Cortex-A76 CPU cores within an octa-core CPU in addition to an updated dual-core graphics engine. The chip supports eMMC 5.1 storage and LPDDR4X RAM (up to 3,733Mbps). The Kompanio 520 and Kompanio 528’s Arm Cortex-A76 cores can run at speeds of up to 2GHz and 2.2GHz, respectively while enhancing battery life so that users may go longer between charges. Each chipset incorporates a dual-core AI processing unit (APU) to provide applications with enhanced AI advancements and AI camera functions.Additionally, marketers may pair the Kompanio chipsets with MediaTek’s Filogic Wi-Fi 6 solutions for quick and dependable connectivity when customers are streaming and playing cloud games.A Mali-G52 MC2 2EE GPU and a multimedia engine that can decode VP9 and H.265 videos are responsible for handling graphics. A HiFi-5 DSP for low-power microphone audio processing is also supported. It comes with compatibility for cameras up to 32 MP.The processor can also control an external monitor and supports FHD+ onboard displays with resolutions of up to 2,520 x 1,080 pixels at 60 frames per second.By 1H 2023, Chromebooks with the Kompanio 520 and Kompanio 528 chipsets will be marketed.
For the latest gadget and tech news, and gadget reviews, follow us on Twitter, Facebook and Instagram. For newest tech & gadget videos subscribe to our YouTube Channel. You can also stay up to date using the Gadget Bridge Android App. You can find the latest car and bike news here.


 The monitor also boasts a refresh rate of 165 Hz, ultra-low input lag, and Adaptive sync. These features combine to create a smooth and fluid gaming experience. The Philips Evnia 34M2C7600MV comes with USB-C ports as well as KVM and a height-adjustable stand to adapt to users’ preferences.
TPV will be coming out with a series of Evnia releases in the coming months. These include 42M2N8900 (42” OLED flat screen), 34M2C8600 (34” QD OLED curved screen) and 27M2C5500W (27” VA curved screen, QHD, 1000R Curve, 240hz). The company will also launch a lineup of gaming accessories which includes two keyboards (SPK8508 and SPK8708), two mice (SPK9508 and SPK9708), two headsets (TAG5208 and TAG7208), and one mouse pad (SPL7508).
Read Also: Apple iPhone SE 4 roundup: Tech specs, release date, price and more
Commenting on the brand launch, Mr Atul Jasra, India Business Head – Philips Monitors said, “We at Philips believes that the joy of gaming should be accessible to everyone. Our goal for Evnia is to introduce today’s gaming enthusiasts with the entire gaming universe and bringing together the gaming and e-sports community. As the name ‘Evnia’ suggests while being true to the name, it encourages gamers to bring their most genuine selves to their sessions and to reconnect with the original purpose of gaming.”
The monitor also boasts a refresh rate of 165 Hz, ultra-low input lag, and Adaptive sync. These features combine to create a smooth and fluid gaming experience. The Philips Evnia 34M2C7600MV comes with USB-C ports as well as KVM and a height-adjustable stand to adapt to users’ preferences.
TPV will be coming out with a series of Evnia releases in the coming months. These include 42M2N8900 (42” OLED flat screen), 34M2C8600 (34” QD OLED curved screen) and 27M2C5500W (27” VA curved screen, QHD, 1000R Curve, 240hz). The company will also launch a lineup of gaming accessories which includes two keyboards (SPK8508 and SPK8708), two mice (SPK9508 and SPK9708), two headsets (TAG5208 and TAG7208), and one mouse pad (SPL7508).
Read Also: Apple iPhone SE 4 roundup: Tech specs, release date, price and more
Commenting on the brand launch, Mr Atul Jasra, India Business Head – Philips Monitors said, “We at Philips believes that the joy of gaming should be accessible to everyone. Our goal for Evnia is to introduce today’s gaming enthusiasts with the entire gaming universe and bringing together the gaming and e-sports community. As the name ‘Evnia’ suggests while being true to the name, it encourages gamers to bring their most genuine selves to their sessions and to reconnect with the original purpose of gaming.”


 Step 3:
  Step 4:
 Step 3:
 Step 7:


 Step 3:
 Step 4:
 Step 2
 Step 4:

 Step 5:
 Step 6:
 Step 3:
  Step 4:
 Read Also:

 Step 2:
 Step 3:
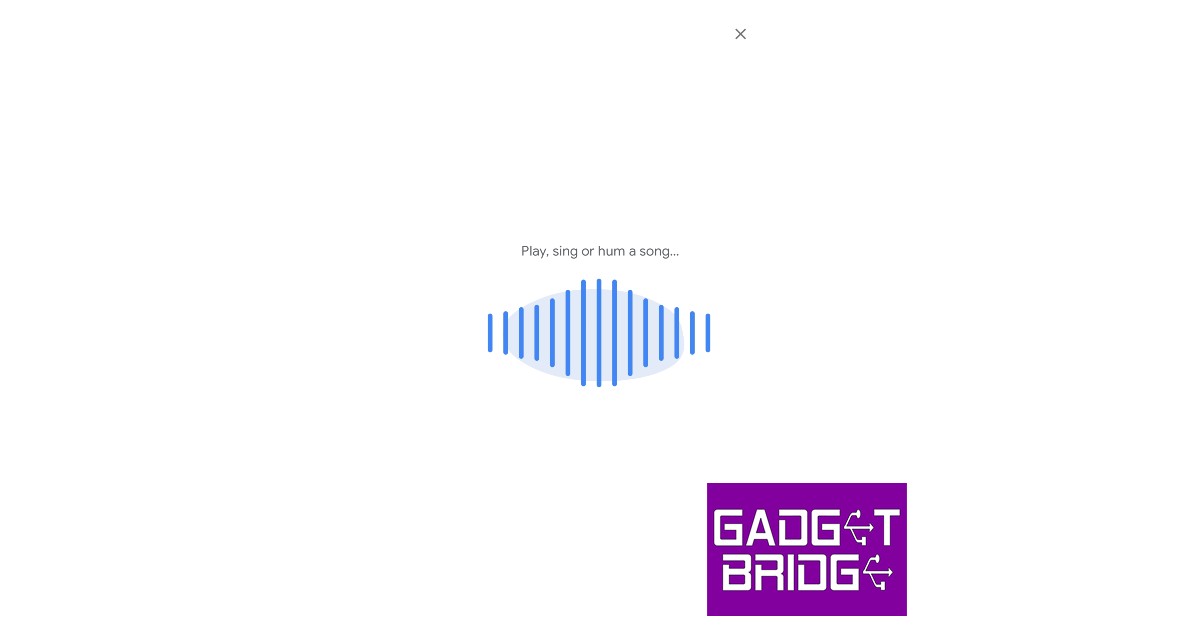 Step 4:
 Step 5:
 Step 3:
  Step 4:
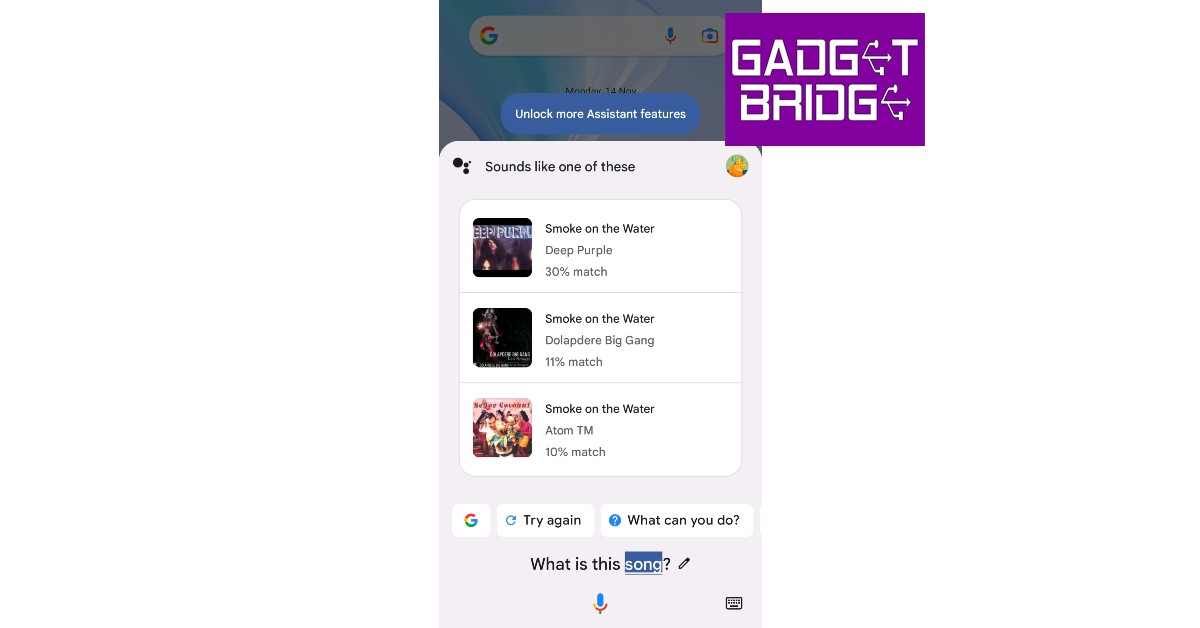


 Step 1:
  Step 2:
  Step 4:
 Step 5:
 Step 3:
 Step 4:
 Step 3:
  Step 4:
  Step 5:
 Step 2:
 Step 3:
 Step 4:
  Step 6:
 Step 3:
 Step 4:
  Step 5:
 Step 6:


 Step 4:
 Step 5: