

In This Article
Redmi Buds 3 Lite: Design
 The Redmi Buds 3 Lite come packed in a compact rectangular box that includes the earbuds, a charging case with the earbuds inside, and extra ear tips and ear hook to suit your ear size. A user manual and info card can also be found inside the packaging. The pebble-shaped charging case is quite compact and fits perfectly within your palm.
We had our concerns over the charging case being prone to scratches due to the matte finish but after a week of rigorous use and being inside pockets with keys, it came out unscratched and unharmed. The plastic material does not inspire a lot of confidence in its strength, but that comes along with buying an affordable pair of earbuds and is common.
The Redmi Buds 3 Lite come packed in a compact rectangular box that includes the earbuds, a charging case with the earbuds inside, and extra ear tips and ear hook to suit your ear size. A user manual and info card can also be found inside the packaging. The pebble-shaped charging case is quite compact and fits perfectly within your palm.
We had our concerns over the charging case being prone to scratches due to the matte finish but after a week of rigorous use and being inside pockets with keys, it came out unscratched and unharmed. The plastic material does not inspire a lot of confidence in its strength, but that comes along with buying an affordable pair of earbuds and is common.
 A small notification LED light can be found right below the lid of the case and the Redmi branding is marked at the back, right below the hinge. The Type-C USB port is housed at the bottom of the case. The lid can be easily opened with a thumb and makes a click sound when it’s pressed shut. You’ll find yourself fidgeting with the case a lot.
 The earbuds have a glossy plastic finish on the outside, that also serve as touch controls. The white notification lights on the earbuds turn on when they’re charging and blink when they’re ready to be paired. The rubber ear hooks grip nicely with the ear, providing a nice snug fit for the earbuds. Weighing only 4.04g each, you’ll barely feel them in your ear. We used them for hours on end and never once found them to be straining or uncomfortable. You can try using the extra ear tips and ear hooks provided with the package if the earbuds aren’t the perfect fit for you.
 The touch sensors are pretty straightforward. Double tapping on either earbud plays the next song and pressing and holding makes it pause. Three gentle taps activate the voice assistant. Pressing and holding both earbuds activates the low latency mode, which is ideal for gaming. While this may seem like a simple enough task, the earbud is sensitive to unintentional touches, and we experienced unwanted skips or voice assistant activation during our use. There is no control for playing the previous song and no option to customise the controls either.
The Redmi Buds 3 Lite are rated IPX4, which means they are resistant to water splashes from any direction. You can wear them in light rainfall but definitely can’t put them on while swimming as they’re not entirely waterproof.
The touch sensors are pretty straightforward. Double tapping on either earbud plays the next song and pressing and holding makes it pause. Three gentle taps activate the voice assistant. Pressing and holding both earbuds activates the low latency mode, which is ideal for gaming. While this may seem like a simple enough task, the earbud is sensitive to unintentional touches, and we experienced unwanted skips or voice assistant activation during our use. There is no control for playing the previous song and no option to customise the controls either.
The Redmi Buds 3 Lite are rated IPX4, which means they are resistant to water splashes from any direction. You can wear them in light rainfall but definitely can’t put them on while swimming as they’re not entirely waterproof.
Redmi Buds 3 Lite: Performance
 Getting down to the brass tacks, the Redmi Buds 3 Lite offer a decent performance for an affordable TWS. If you’re looking to make the switch from wired headphones to TWS, the Redmi Buds 3 Lite make a great entry-level product. At Rs 1,999, you get the most out of what you paid for.
We put the Buds 3 Lite to test and they held up well under all conditions. The audio output was well-rounded across all genres of music. The nice warm bass envelops the sound quite well without being too overpowering. The mid-range frequencies were handled expertly, leading to a smooth and pleasant listening experience. Higher volumes of above 90% did reveal a slight distortion in audio output, but as long as you’re within the 40-70% volume range you’ll get the ideal performance out of the earbuds. We also tried the Buds 3 Lite with Netflix, and the mix came out pretty well, with no additional adjustments required.
When it comes to calling, the noise reduction algorithm identifies human voices and curbs any background noise, leading to better call quality. The microphones do a great job of picking up the sound, even in an outdoor environment. The touch gestures make picking and hanging up calls really accessible and you won’t find yourself looking for your phone when the earbuds are connected.
As said, the Redmi Buds 3 Lite also features a low latency mode that is ideal for gaming. Pressing and holding both touch sensors at once activates the gaming mode. We tested this mode by playing Apex Legends Mobile and it was a wonderful experience. The audio output synced perfectly to the gameplay and it made the gaming experience even more immersive. The sound held up well even with high volumes and we didn’t experience any screeches or distortions. If you’re looking to buy wireless earbuds exclusively for gaming, the Buds 3 Lite should definitely be on the top of your list in the affordable segment.
Getting down to the brass tacks, the Redmi Buds 3 Lite offer a decent performance for an affordable TWS. If you’re looking to make the switch from wired headphones to TWS, the Redmi Buds 3 Lite make a great entry-level product. At Rs 1,999, you get the most out of what you paid for.
We put the Buds 3 Lite to test and they held up well under all conditions. The audio output was well-rounded across all genres of music. The nice warm bass envelops the sound quite well without being too overpowering. The mid-range frequencies were handled expertly, leading to a smooth and pleasant listening experience. Higher volumes of above 90% did reveal a slight distortion in audio output, but as long as you’re within the 40-70% volume range you’ll get the ideal performance out of the earbuds. We also tried the Buds 3 Lite with Netflix, and the mix came out pretty well, with no additional adjustments required.
When it comes to calling, the noise reduction algorithm identifies human voices and curbs any background noise, leading to better call quality. The microphones do a great job of picking up the sound, even in an outdoor environment. The touch gestures make picking and hanging up calls really accessible and you won’t find yourself looking for your phone when the earbuds are connected.
As said, the Redmi Buds 3 Lite also features a low latency mode that is ideal for gaming. Pressing and holding both touch sensors at once activates the gaming mode. We tested this mode by playing Apex Legends Mobile and it was a wonderful experience. The audio output synced perfectly to the gameplay and it made the gaming experience even more immersive. The sound held up well even with high volumes and we didn’t experience any screeches or distortions. If you’re looking to buy wireless earbuds exclusively for gaming, the Buds 3 Lite should definitely be on the top of your list in the affordable segment.
 On a full charge, the earbuds lasted for over 5 hours at a 60-80% volume level. The charging case has a battery backup of up to 18 hours, so you can fully charge the earbuds three times before needing to charge the case again. Connectivity was also not an issue, as the earbuds take no time to link with your smartphone after the initial pairing. You don’t need to download an app to pair the earbuds with your phone. Bluetooth 5.2 is optimum for stable connection and seamless audio transmission.
Read Also: Moto G62 with 5,000mAh battery launched in India
On a full charge, the earbuds lasted for over 5 hours at a 60-80% volume level. The charging case has a battery backup of up to 18 hours, so you can fully charge the earbuds three times before needing to charge the case again. Connectivity was also not an issue, as the earbuds take no time to link with your smartphone after the initial pairing. You don’t need to download an app to pair the earbuds with your phone. Bluetooth 5.2 is optimum for stable connection and seamless audio transmission.
Read Also: Moto G62 with 5,000mAh battery launched in India
Verdict
For the price of Rs 1,999, you won’t find many TWS that can match the performance of Redmi Buds 3 Lite. What it lacks in design and build, it more than makes up in audio performance. The Buds 3 Lite will also appeal to gamers, offering a unique low latency mode that integrates seamlessly with the gaming experience. The touch controls are easy and accessible but our complaint is that there is no way to customise them.Pros
- Audio quality
- Low Latency Mode for gaming
- Price
Cons
- No option to customise touch controls
For the latest gadget and tech news, and gadget reviews, follow us on Twitter, Facebook and Instagram. For newest tech & gadget videos subscribe to our YouTube Channel. You can also stay up to date using the Gadget Bridge Android App. You can find the latest car and bike news here.


 Step 2: Connect your phone to the computer using a USB cable. From the different data types choose the type of data that you want to recover and click on ‘Start’ button.
 Step 3: As soon as your device is detected, the interface will show you the related information of your device. If you find it correct, tap on ‘Start’ button.
 Step 4: Wait until the DroidKit is scanning the data that is deleted or lost from your device.
 Step 5: Once the scanning process is completed, the data which is deleted or lost will appear on your screen.
 Step 6: Choose the data files which you want to restore and click on ‘To Device’ or ‘To PC’ button, wherever you want to store the data. By choosing the option to restore your data on PC you can make changes before exporting it.
 The data restoring process will then be started and the data will be stored in your preferred format. Wait until the recovery process completes.
 Step 7: Once the whole restoring process is completed, you can go to restore other files by clicking on ‘Continue to Recover’ button or take a view of restored files by tapping on ‘View Files’ button.

 Step 2: Use a USB cable to connect your Android mobile phone to the device. On your screen, there will be 13 types of data that you can restore, click the one which you want o restore and tap the ‘Start’ button.
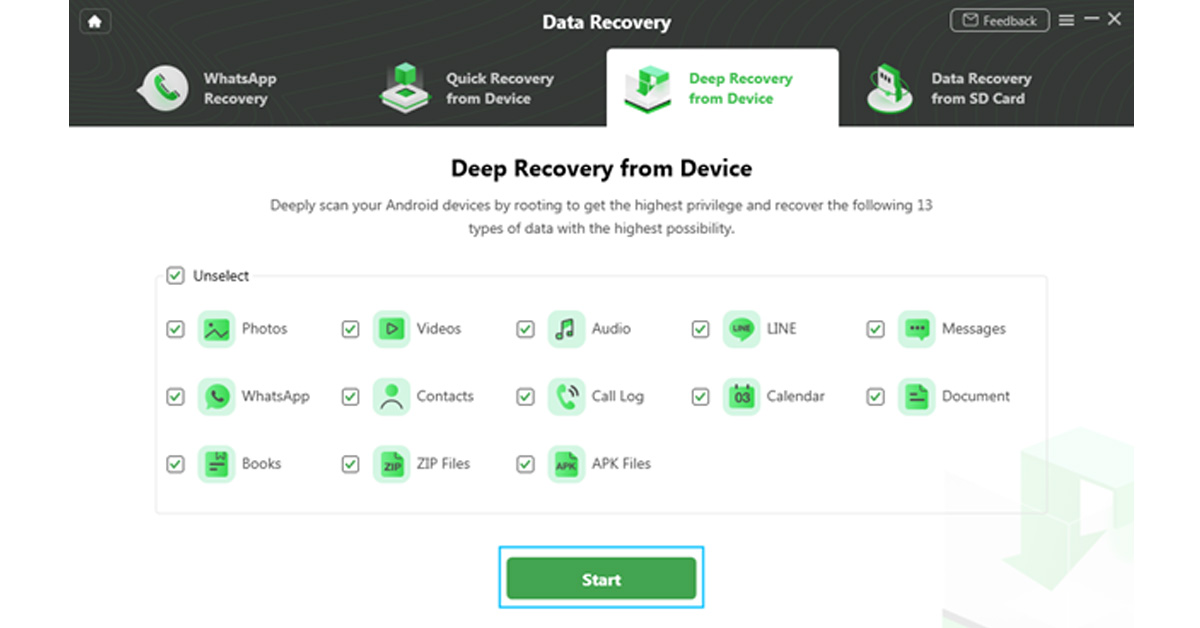 Step 3: On the next step, it will display the information of your Android device on screen. Check the device and hit the ‘Start’ button given below.
 Step 4: Your device status will be recognized and classified by DroidKit (root/unroot).
 The outcome will be displayed after the analysis is finished. The user interface below will appear if your smartphone is not rooted. Rooting the device is required before starting Deep Recovery. Now, click the ‘Root Now’ button.
 Your device will immediately be rooted using DroidKit. Ensure a stable connection to your device during the procedure.
 Step 5: DroidKit will thoroughly check the removed data from your Android device once the rooting process is complete.
 Step 6: You can inspect the scanned data after the scanning procedure is finished.
 Step 7: As soon as the recovering process ends, you can restore the data by clicking on ‘To Device’ or ‘To PC’. By choosing the ‘To PC’ option, you can make the required changes in the settings.
 The recovered data will be restored in any format in which you need it. Wait until the recovery process is ongoing.
 After the completion of recovery process, you can click ‘View Files’ to have a look at the restored data.
 DroidKit is capable of processing these two types of recoveries and supports WhatsApp Data Quick Recovery and Recovers Data from SD Card. In both cases, you can recover data without undergoing the rooting process. The SD Data Card Recovery process is available only for Windows users, and Mac version support is coming soon.
We have discussed the DroidKit version of Data Recovery, but it is not only limited to data recovery. DroidKit is a one-stop solution for all your issues related to Android devices and it has various features that can help you operate your phone more easily. The various features of DroidKit are Recover Lost Data, Extract Needed Data, Unlock Screen, Fix System Issues, Bypass FRP Lock, Screen Unlocker, Reinstall/ Upgrade OS, and Clean System Junk. Check these various features on DroidKit Recover Feature Page. You can try any of these tools to make your Android device work more effectively and efficiently.
For the latest
DroidKit is capable of processing these two types of recoveries and supports WhatsApp Data Quick Recovery and Recovers Data from SD Card. In both cases, you can recover data without undergoing the rooting process. The SD Data Card Recovery process is available only for Windows users, and Mac version support is coming soon.
We have discussed the DroidKit version of Data Recovery, but it is not only limited to data recovery. DroidKit is a one-stop solution for all your issues related to Android devices and it has various features that can help you operate your phone more easily. The various features of DroidKit are Recover Lost Data, Extract Needed Data, Unlock Screen, Fix System Issues, Bypass FRP Lock, Screen Unlocker, Reinstall/ Upgrade OS, and Clean System Junk. Check these various features on DroidKit Recover Feature Page. You can try any of these tools to make your Android device work more effectively and efficiently.
For the latest 


")