Amazon is back with another quiz on its mobile platform. The 14 November 2022 Amazon Quiz is now live on its platform and today’s Amazon Quiz will give you a chance to win Rs 2,500 Amazon pay Balance.Every day Amazon brings a fresh questionnaire that comprises 5 questions. These questions are based on current affairs and general knowledge. The quiz can be played from 8 AM to 11:59 PM and the contestants need to answer correctly to enter into a lucky draw. In today’s Amazon Quiz the participants will get a chance to win Rs 2,500 Amazon Pay Balance.Today’s Amazon Quiz Prize – Rs 2,500 Amazon Pay BalanceQuiz Date – 14 November 2022Daily Timing – 12 AM to 11:59 PMWinner Announcement – Today at 12 PM
Amazon Quiz Answers Today 14 November 2022
Question 1: Which country’s parliament elected Dimitar Kovacevski as the new prime minister in January 2022?Answer: North MacedoniaQuestion 2: UAE’s Ahmed Naser Al-Raisi recently got elected as the president of which international organization?
Answer: INTERPOLQuestion 3: The red umbrella is a symbol for which group of people’s rights around the world?
Answer: Sex workers
Question 4: Apart from the Chicago Bulls, this legendary basketball player also played for which NBA franchise?Answer: Washington WizardsQuestion 5: This is the super saiyan form of which ‘Dragon Ball Z’ character?
Answer: Goku
How To Play Amazon Quiz
Only app users are eligible to play the Amazon quiz every morning from 12 AM to 11:59 PM. The quiz is not available on the desktop. For those who are unaware of how to play the Amazon quiz below are the steps, you can follow to take the quiz.
Firstly download the Amazon app from Google Play Store or App Store
Now fill in the required information through the Sign Up option.
You need to log in to the Amazon app and scroll down on the home screen to find the Amazon Quiz banner.
Tap on the Amazon Quiz banner and tap on the Start button to start the Quiz.
Now you will get 5 questions and you need to answer them correctly. One wrong answer will eliminate you from the Quiz.
After answering all the questions correctly you are now eligible for a Lucky Draw.
The winner’s name will be announced today at 12 PM.
The world is transitioning to a paperless environment in all its departments. While seeking to go paperless, they are looking forward to using the right tools that will allow them to easily perform this transition. As this is majorly performed based on managing environmental concerns, this transformation will also help improve the document workflow.
For this article, we shall be looking into how a free PDF editor helps you in going paperless and help you manage documents with ease. The provided details will help you understand why it is essential to perform this action and how it is done with the help of Wondershare PDFelement, an effective PDF editing solution.
Part 1: Wondershare PDFelement – The Ultimate Solution to Go Paperless
There are many PDF editors available in the market providing services for managing digital documents. With simple tools to work with, these PDF editors are not quite extensive in resolving different problems involving documents. Wondershare PDFelement is designed to answer all prevailing concerns of editing PDF documents and helping you in going paperless.
This free PDF editor operates with a vast set of features that can be used to design the perfect PDF document, which looks even better than a printed document. While you make use of the essential editing tools provided on the platform, you can make use of the efficient and diverse tools available for creating and editing PDFs. While it accompanies you in converting PDFs, you can translate and perform multiple functions, such as OCR PDFs. You can also find batch processing on PDFelement, another great highlight of this PDF editor.
Wondershare PDFelement is highly compatible, as it allows editing PDFs on Windows, Mac, iOS, and Android. Such diversity is highly encouraged, as it helps users work through their documents without putting up the effort of transferring, printing, and managing paper documents. PDFelement is the perfect option for going paperless in your offices, homes, and all other places involving document management.
Part 2: Why Should One Consider Going Paperless?
Why does one need to go paperless to manage documents in a better way? Printing documents and using paper systems has been in the market for a while; however, paperless systems have outperformed this in all departments. Let’s help out people understand the benefits of shifting to a paperless system:
1. Reduction in Costs
The cost of managing paper documents is exceptionally high if appropriately observed. From the cost of space to the management of the paper documents by stocking them properly, the entire price is relatively high to manage. While you shift to paperless systems, the cost of managing the documents reduces to a single storage space, which is quite exceptional.
2. Increase in Efficiency of Operations
If you ever find something from a stack of papers, you must go through every piece. This is not only time-taking but highly frustrating to cover. A paperless environment will increase efficiency in operations, as finding documents is simple and easy on such systems. A simple search and you will have your required result on the front.
3. Enhances Collaboration on Platforms
Ever thought of sharing a document with another person through fax or parcel? While it is complicated to cover daily, you would never support this process and would feel tardy in going through this again and again. Going to a paperless system will allow you to share documents with other users easily through emails and other communication sources. Collaboration is much easier with a paperless system.
4. Improves Security of Documents
Documents stocked in a room are never secure. While they can be stolen with no hint of them being removed from the room, they are vulnerable to fire and other hazards that can destroy all data in minutes. Using a paperless model will help increase the security of the documents, where you can protect the storage devices from illegal access. Securing the documents will also protect them from threats of being destroyed. You have to keep backups of the documents, which does not take considerable space or cost in a paperless model.
5. Eco-Friendly System
Using a paperless system protects the environment, which was one of the most prominent factors in adopting this system. As the paper is a primary environmental concern that was not being addressed for years, it is time to realize the need to change to an eco-friendly system to make the environment sustainable for the people who will come ahead of us.
6. Saves Space in Places
Another vital clause that involves using a paperless model is its ability to save space. To save year-long documents, you will need a separate cupboard and a separate room to manage a decade-long document log of your office. This can be reduced to a small hard drive that does not take space more than a few centimeters.
Part 3: How Does PDFelement Support the Transition to a Paperless Environment?
There are many ways PDFelement is helping users to transition their systems to a paperless environment. While you create an editable PDF with this efficient tool, you are taking the next step to a paperless model. Let’s see how PDFelement helps you in setting up the precedent with its features:
1. Organize PDFs
PDFelement helps you organize PDF documents, which means you can log your data and set PDFs according to your requirements. With the option of splitting documents, deleting pages, inserting, and extracting pages from PDFs, PDFelement provides the perfect setup for organizing PDFs to your liking. You can also rearrange the documents and rotate them to manage their orientations.
2. Convert PDFs
The option of converting PDFs is exceptionally great on PDFelement. With the option of converting your PDFs to different Office formats, you can easily edit your documents and convert them to the required format without going through different functions. The conversion tool of this free PDF editor is highly efficient, with the ability to help users convert their documents into multiple supported formats without disrupting the document’s formatting.
3. OCR PDF
PDFelement comes with an OCR tool that supports detecting more than 20 languages on PDF documents. While it helps convert scanned PDFs to editable and searchable PDFs, you do not need to go across any other platform to edit your files. The OCR PDF tool provided by PDFelement recognizes the text in the images or scanned documents and converts the photographic content to a machine-related format.
4. PDF Form
You can also manage different forms on PDFelement. Rather than printing out forms to fill them out for a particular task, you can edit the complete forms on the PDF tool. This is exceptionally great, as it influences the paperless model to perfection. PDFelement servers as a great PDF filler that allows you to fill out PDFs by recognizing the editable locations in a form.
5. Sign PDF
The option of signing documents on PDF files is straightforward on PDFelement. As you can upload, type, and draw the signatures to add to PDF documents, you can ensure the legal boundaries of signing documents. With that, you will never have to print out documents for signing pages.
6. Edit and Annotate PDFs
If you seek to make changes to a PDF or mark something important on the document, you can easily use the editing and annotation features provided by PDFelement. Easily edit the text, pictures, and links on the PDFs and annotate them as desired. With highlighting tools, commenting structures, and several other annotation elements, PDFelement is the best option available for such things.
Verdict
It is time to shift to a paperless system in your office. While it covers every disadvantage of paper systems, it provides efficiency and sustainability of excellent caliber. Using tools like Wondershare PDFelement is a great catalyst for this process. This free PDF editor provides effective tools that can be used to shift to a paperless mode in no time. The results are exceptional with such tools, as they allow you to manage your documents on a single platform with ease.
For the latest gadget and tech news, and gadget reviews, follow us on Twitter, Facebook and Instagram. For newest tech & gadget videos subscribe to our YouTube Channel. You can also stay up to date using the Gadget Bridge Android App. You can find the latest car and bike news here.
Minecraft is one of the most popular games on the planet, enjoyed by people across all age groups. Players can customise a lot of aspects of their character and other parts of the game. With the right skin and unique attributes, you can make your in-game character stand out. There are an endless number of customised skins you can find online as well. In this article, we show you how to download and install skins for your Minecraft character on a PC.Read Also: How to upload a TikTok video using a PC or Mac? The simplest way
Choose a premade skin for your Minecraft character
Step 1: Launch Minecraft on your PC.Step 2: Go to your character and select ‘Dressing Room.’Step 3: Click on the menu icon at the top-left corner of the screen and select Classic Skins.Step 4: Choose a new skin for your character. This window will display all the skins that you currently own. To view more skins select ‘Get More Skins.’
Choose a customised skin for your Minecraft character
Step 1: Select a skin from Minecraft Marketplace and download it by clicking the button on the right side of the page.Step 2: Go to https://minecraft.net/en-us/profile/skin and log into your minecraft.net account.Step 3: Click on ‘Select file’ under ‘Upload custom skin.’Step 4: Upload the skin that you just downloaded.Step 5: Open the game on your PC. Your character will be wearing the skin.Read Also:Boult X30 and X50 TWS earphones with 40 hours of playtime launched in India
Conclusion
This is how you can download and install skins for your Minecraft character on a PC. These methods more or less remain the same for every edition of Minecraft, be it Bedrock, Java, or Pocket Edition. If you want a skin that is unique to your character, you can make one of your own using Skindex’s Skin Editor.
Being the biggest e-commerce platform in the world, Amazon is available in most major languages. Changing your language on Amazon is a fairly easy process. You can even select another region and explore the products available there. If you’re in India, you can use Amazon in multiple local and regional languages. In this article, we show you how to change the language on Amazon from the website and the app.Read Also:How to upload a TikTok video using a PC or Mac? The simplest way
Change language on the Amazon website
Step 1: Go to www.amazon.com.Step 2: Click on the flag next to the search bar.Step 3: Select the language you want.Step 4: Scroll down and select ‘Save Changes.’Instead of clicking the flag, you can also hover your cursor over it and quickly select the language you want.
Change language on the Amazon app
Step 1: Open the Amazon app on your smartphone.Step 2: Tap on the hamburger menu at the bottom left corner of the screen.Step 3: Scroll down and select ‘Language’ from Settings.Step 4: Choose the language you want.Step 5: Scroll down and hit ‘Continue.’If you want to choose a foreign language, select ‘Country & Language’ and select the region and language you want.
Bonus Tip
How to buy a gift card on Amazon?
Step 1: Go to the Amazonwebsite and select ‘Gift cards’ from the top menu.Step 2: Choose the type of gift card you want. Step 3: Select the gift card amount. You can also enter the amount of your choice.Step 4: Fill in other details like Your Name, Recipient’s email, Date of Delivery, Quantity, and additional message. Step 5: Click on ‘Add to cart’ and then select ‘Proceed to checkout.’Step 6: Fill in the payment information and select ‘Continue’.Step 7: Select ‘Place your order.’Read Also: Snapchat not loading snaps? Here are easy 7 fixes
Conclusion
This is how you can change the language on Amazon. Changing the language by region will also change the currency. Once you change the location, international shipping costs will apply. If you found this article helpful, let us know in the comments!
Instagram was initially launched as a photo-sharing app and the majority of its users still use it in that form. Instagram can also be accessed using its website. For a long time, Instagram’s website offered a very limited set of features. There was nothing much you could do other than browse your feed. Over a period of time, Instagram slowly rolled out more features for its websites, including the ability to upload videos and view stories. In its present form, the Instagram website offers a decent experience but still lacks a few functions. In this article, we show you how to upload an Instagram Reel using a PC or Mac. Read Also:MediaTek announced T800 Modem, alongside Kompanio 520 and Kompanio 528 chipsets for midrange Chromebooks
Upload a Reel to Instagram using the web browser
Step 1: Go to www.instagram.com and log in to your Instagram profile.Step 2: Click on the Create button on the side menu.Step 3: Upload the Reel from your computer. Make sure the Reel is edited as Instagram’s website does not let you edit it any further. Step 4: Crop the video to an aspect ratio of 9:16 by clicking on the icon at the bottom left corner of the panel. Click on ‘Next.’Step 5: Select a Cover photo for your Reel. You can pick a thumbnail from the video itself or upload a picture from your computer. Trim the Reel and hit Next. Step 6: Write a caption for your Reel. You can also choose to turn off comments and hide the like counter. Once you’re done, select ‘Share.’Your Reel will be published on your Instagram profile.
Use a third-party tool
There are several third-party tools and software you can use to upload a Reel on Instagram from your PC or Mac. Clients like Sked Social, Gramblr, and Ramme help you manage your Instagram account and offer advanced features like post-scheduling, insights, and more. Some clients also allow you to edit your Reel before you upload it on Instagram. Make sure the third-party client is trusted and well-reviewed before using it to log in to Instagram. For enhanced safety, turn on the two-factor authorisation for your Instagram account. Read Also:Snapchat not loading snaps? Here are easy 7 fixes
Conclusion
This is how you can upload an Instagram Reel using a PC or Mac. While Instagram’s website is much better than before, it still lacks some important features like letting users upload a Story. If you find the methods mentioned above helpful, let us know in the comments. For a full guide on how to use the recently launched Instagram Avatar, read our article here.
12 November 2022 Amazon Quiz has gone live. Customers from different parts of the country are participating in the daily quiz. The quiz begins from 12 AM to 11:59 PM. Those participating in the quiz can win exciting prizes by answering all the questions correctly. Today participants have a chance to win a Rs 1,000 Amazon Pay Balance.Amazon quiz brings an opportunity for its customers to win Amazon Pay Balance ranging from Rs 1,000 to Rs 50,000. The Quiz can be played from 12 AM to 11:59 PM. The e-commerce platform brings a fresh quiz on a daily basis which consists of five questions related to general knowledge and current affairs. The participants need to answer all the questions correctly and their names will be selected for a lucky draw. The winner will be announced at the end of the month.One wrong answer could eliminate you from the quiz. If you manage to answer all the questions correctly you can stand a chance to win a Rs 1,000 Amazon Pay Balance today. Only app users are eligible to participate in the Quiz. Check Out 12 November 2022 Amazon Quiz Answers.Amazon Quiz Today Prize – Rs 1,000 Amazon Pay BalanceQuiz Date – 12 November 2022Daily Timing – 12 AM to 11:59 PMWinner Announcement – Today 12 PM
Amazon Quiz Answers Today 12 November 2022
Question 1: Which of these is a name is given to the Border Security Force’s increased surveillance along the Pakistan border in Rajasthan?
Answer: Sard HawaQuestion 2: Petr Fiala has been sworn in as the new Prime Minister of which country?
Answer: Czech Republic
Question 3: The Konyaks are among the largest tribes in which state?
Answer: NagalandQuestion 4: Who among these is an Arjuna award winner in this sport, who was part of an Asian Games bronze medal winning side?Answer: Jimmy GeorgeQuestion 5: This is a famous character from which movie franchise?
Answer: Pirates of the Caribbean
How To Play Amazon Quiz
Only app users are eligible to play the Amazon quiz every morning from 12 AM to 11:59 PM. The quiz is not available on the desktop. For those who are unaware of how to play the Amazon quiz below are the steps, you can follow to take the quiz.
Firstly download the Amazon app from Google Play Store or App Store
Now fill in the required information through the Sign Up option.
You need to log in to the Amazon app and scroll down on the home screen to find the Amazon Quiz banner.
Tap on the Amazon Quiz banner and tap on the Start button to start the Quiz.
Now you will get 5 questions and you need to answer them correctly. One wrong answer will eliminate you from the Quiz.
After answering all the questions correctly you are now eligible for a Lucky Draw.
The winner’s name will be announced today at 12 PM.
Koo app has announced the launch of four new features on its platform. It now allows users to schedule Koos, save drafts and add up to 10 profile photographs. Recently multilingual microblogging network Koo App has surpassed 50 million downloads. Users of the Koo app can now post up to 10 profile pictures. When a user views their profile, these images begin to play automatically. With a drag-and-drop feature, it is simple to change the order of these images.Whereas a Koo can now be scheduled for a later time and date by power creators. This makes it simple for producers who enjoy writing down several ideas at once but scheduling them for different times to avoid clogging their followers’ feeds. A planned Koo can also be edited or rescheduled by users.The save draft feature can be used by creators who want to continue editing a draft before publishing it. They are free to make adjustments indefinitely before uploading thanks to it.Instead of normal responses like Like, Comment, Re-Koo, or Share, users can now save a Koo. Only the user can see saved Koos, which are accessible from their profile page. Users who want to revisit their favourite or significant Koos without having to respond to the Koo can take advantage of this feature. There are no other microblogs that offer this feature.Mayank Bidawatka, Co-founder, Koo, said, “We are very happy to announce new features to millions of our users. Some of these are a first in the social space. We are the first ones to enable users to upload up to 10 profile pictures. We’ve made it extremely easy for power creators to now save a draft and schedule Koos for a future date and time. Saving a Koo functionality is not available in any other microblog. Users have taken really well to these features. We are happy to have crossed the 50 million user mark on the back of these enriching features. We have a very user-focused culture internally and with our ears close to the ground, we will keep building best-in-class features that users need to express themselves and connect with each other.”
For the latest gadget and tech news, and gadget reviews, follow us on Twitter, Facebook and Instagram. For newest tech & gadget videos subscribe to our YouTube Channel. You can also stay up to date using the Gadget Bridge Android App. You can find the latest car and bike news here.
Recently, Boult Audio has announced the launch of its True Wireless Stereo earbuds X30 and X50 in India. Both the TWS earphones come with 10mm drivers. The Boult X30 and X50 also feature Combat gaming mode while also offering 40 hours of playtime. The audio device has 45ms ultra-low latency gaming mode and Quad Mic ENC.The brand-new Boult X30 earbuds have three equaliser modes, lightning-fast charging, and a whopping 40 hours of battery life. The Boult X50 earbuds also have a 40-hour battery life, 45-millisecond low latency combat mode for gaming, and quad microphone environmental noise cancellation.The X30 and X50 earbuds are a dream come with 40 hours of non-stop playback and 100 minutes of playtime in just 10 minutes of charging. Music lovers can select the ideal sound for the appropriate genres thanks to the three equaliser modes function, which includes HiFi, Rock, and Bass Boost settings. Additionally, the X30 and X50 offer a greater audio experience for conversations and music thanks to the built-in 10 mm drivers.The Boult Audio X30 and X50 earphones have improved Bluetooth 5.1 technology built-in with support for SBC and AAC. In addition to being flexible and light, the IPX5-enabled earphones are also water- and sweat-resistant. You may wear the X30 and X50 without worrying, whether you’re working out hard or going for a run outside. The pair comes in portable, lightweight cases that are always prepared to wow you as soon as you pop the lids open. Not to mention the 45ms low-latency Combat Gaming Mode, which will satisfy your inner gamer.Boult X30 and X50 have been launched with a price tag of Rs 999. The X30 comes in two colour options of Blue and Warm Grey whereas the Boult X50 will be available in Black and white colour options. Both audio devices will be available for purchase via Amazon and Flipkart respectively.
For the latest gadget and tech news, and gadget reviews, follow us on Twitter, Facebook and Instagram. For newest tech & gadget videos subscribe to our YouTube Channel. You can also stay up to date using the Gadget Bridge Android App. You can find the latest car and bike news here.
TikTok’s rise as a video-sharing platform has been nothing short of astonishing. Within just a few years, the platform has gained global popularity and boasts over a billion monthly active users. Some users may not know this, but TikTok can be accessed from its website as well. While the experience isn’t as seamless and fun as its smartphone app, you can still carry out the basic functions through the website. In this article, we show you how to upload a TikTok video using a PC or a Mac. Read Also: Qubo Car Air Purifier is now available for purchase via Amazon
Here’s how you can upload a video on TikTok using a PC or Mac
Step 1: Open the web browser on your laptop and go to www.tiktok.com.Step 2: Click on ‘login’ at the top right corner of the screen and enter your username and password to sign in.Step 4: Click on the upload button with the plus sign.Step 5: Select a video from your computer. The video must be in mp4 or WebM format and have a resolution of 720 x 1280p or higher. You can upload videos up to 10 minutes in duration. File size must be below 2GB. Make sure the video is edited before you upload it, as TikTok’s web portal does not allow you to edit videos.Step 6: Enter a caption and select a cover picture. You can also select who can view the video. Step 7: Click on the post button to publish your video.Read Also: How to change the phone number linked to your Apple ID
Conclusion
This is how you can upload a video to TikTok from a PC or Mac using a web browser. Since TikTok’s website does not allow users to edit the videos, you will need to edit them on your laptop before uploading. There are a lot of video editing tools and software for Windows and Mac that you can use for your TikTok videos. You can check out our list of the top 10 free video editing software for Windows here.
The T800 chipset which supports both sub-6GHz and mmWave 5G networks has been introduced by the Taiwanese chip manufacturer MediaTek. The T800 chipset is for Industrial Internet of Things (IIoT), Machine-to-Machine (M2M), and always-connected PCs which promise speeds of up to 7.9Gbps. There are also Kompanio 520 and Kompanio 528 chipsets for midrange Chromebooks and one for high-end 4K TVs that have been announced by MediaTek.
MediaTek T800
With the new T800 chipset solution for sub-6GHz and mmWave 5G networks, MediaTek is advancing 5G applications and experiences. Following the release of MediaTek’s T700 5G modem, this quick and energy-efficient 5G solution will enable cutting-edge 5G “beyond smartphone” applications including Industrial IoT, M2M, and always-connected PCs.The latest T800 chip from MediaTek provides download rates of up to 7.9Gbps and upload speeds of up to 4.2Gbps. With the T800, users can browse, stream, and play games for a longer period of time thanks to MediaTek’s most recent 5G UltraSave power-efficiency technologies, which are optimised for all 5G connection situations.According to the company, the fully integrated architecture of the T800 contributes to faster time to market and cheaper development costs. The chipset solution includes an envelope tracking module, FR1 transceivers, and a small modem with a fully integrated 3GPP Release-16 5G cellular modem.“Consumers today want the ability to access 5G speeds from anywhere. MediaTek’s newest 5G chipset solution allows end users to enjoy high-speed, low-latency 5G wherever they are – offering true computing freedom,” said JC Hsu, Corporate Vice President at MediaTek. “The T800 stands out with super fast, reliable 5G speeds in a highly efficient design that maximises battery life for an all-around great user experience.”
Kompanio 520 and Kompanio 528
The Kompanio 520 and Kompanio 528 are two new Kompanio chipsets from MediaTek that are designed for Chromebooks. It is said to offer a seamless experience so customers can browse, play cloud games, stream content, and utilise Google Play apps while enjoying all-day battery life thanks to the improved computational performance and battery life for low-level Chromebooks.For slick and quick performance, the Kompanio 520 and Kompanio 528 both incorporate two premium Arm Cortex-A76 CPU cores within an octa-core CPU in addition to an updated dual-core graphics engine. The chip supports eMMC 5.1 storage and LPDDR4X RAM (up to 3,733Mbps). The Kompanio 520 and Kompanio 528’s Arm Cortex-A76 cores can run at speeds of up to 2GHz and 2.2GHz, respectively while enhancing battery life so that users may go longer between charges. Each chipset incorporates a dual-core AI processing unit (APU) to provide applications with enhanced AI advancements and AI camera functions.Additionally, marketers may pair the Kompanio chipsets with MediaTek’s Filogic Wi-Fi 6 solutions for quick and dependable connectivity when customers are streaming and playing cloud games.A Mali-G52 MC2 2EE GPU and a multimedia engine that can decode VP9 and H.265 videos are responsible for handling graphics. A HiFi-5 DSP for low-power microphone audio processing is also supported. It comes with compatibility for cameras up to 32 MP.The processor can also control an external monitor and supports FHD+ onboard displays with resolutions of up to 2,520 x 1,080 pixels at 60 frames per second.By 1H 2023, Chromebooks with the Kompanio 520 and Kompanio 528 chipsets will be marketed.
For the latest gadget and tech news, and gadget reviews, follow us on Twitter, Facebook and Instagram. For newest tech & gadget videos subscribe to our YouTube Channel. You can also stay up to date using the Gadget Bridge Android App. You can find the latest car and bike news here.
Even though it is one of the biggest messaging apps in the world, it is not uncommon for Snapchat to stop working out of the blue. Users often report that they are unable to load any new snaps. If you ever find yourself in this situation, there are a few easy steps you can take to resolve it. In this article, we bring you 10 easy fixes for when Snapchat does not load snaps. (2023)Read Also: How to Free Extract Subtitles from Videos in 2022
Check your Internet connection
If you’re unable to load any snaps there may be a network connection issue on your smartphone. Snapchat usually downloads some of the snaps when you receive them. These snaps can be viewed even if you are not connected to the internet. However, if you receive a series of snaps you will need a stable internet connection to view all of them. In order to check your internet connection, use another app to see if you’re able to send messages, or open a webpage on your phone’s web browser to check if the internet is still working.
Check if Snapchat’s servers are down
If the Internet connection on your phone is working fine, you may want to check if the problem lies on Snapchat’s end. Server outages are way more common than you think. In order to check whether Snapchat’s servers are down, simply go to the Down Detector website and search for Snapchat. The website will let you know if other users are experiencing similar issues as well.
Update the Snapchat app
If you haven’t updated the Snapchat app in a while, it is possible that the current version has been phased out and is no longer functional. Simply update the app and you will be able to use it like before. In order to update the app, go to Google Play Store, search for Snapchat, and hit the Update button.
Check app permissions
Snapchat needs certain permissions from your phone in order to work properly. Some of the essential permissions include camera, microphone, and files & media. If these permissions are denied you may not be able to use some of the features of the app. In order to check which permissions you’ve given to Snapchat, go to Settings>Apps>Snapchat>Permissions. You can select which permissions you want to give to Snapchat.
Clear app cache
Clearing the app cache can remove any corrupted files that may be keeping the app from functioning correctly. The cache stores temporary files that help load the app faster. When certain files stay too long in the cache, they may get corrupted and affect the functioning of the app. It is always a good idea to clear the cache from time to time. In order to clear the cache open the Snapchat app and go to your Profile>Settings>Clear Cache.
Force Stop the app
If the Snapchat app hangs or shuts down while loading a new snap, simply force stop and restart the app again. Restarting the app can fix any minor background issues. In order to Force Stop Snapchat go to Settings>Apps>Snapchat and tap the ‘Force Stop’ option at the bottom part of your phone’s screen. To restart, simply open Snapchat from the app drawer again.
Logout and log back in
Logging out and then logging into Snapchat can fix the annoying temporary issues that you are facing with the app. To log out of Snapchat, tap your profile icon at the top right corner of the screen and select the gear icon. Once you’re on the Settings page, scroll all the way down and hit ‘Log out’. You will need your registered number, email, or Snapchat username to log back in.
Clear Snapchat Conversations
If you’re having trouble loading snaps sent to you by one specific contact, you should try clearing that conversation. This method will not erase any saved messages, but all the unread and unsaved messages will be deleted. To clear a particular Snapchat conversation, click on your profile icon at the top right corner of the screen and go to Settings. Scroll down and select ‘Clear Conversations’, then tap the cross icon next to the conversation you want to clear.
Check your phone’s storage
If your phone is running out of storage space, Snapchat may halt some of its integral functions like sending and loading snaps until you free up some memory. Go to Settings>Battery and device care>Storage to check the memory status on your device. Delete some unused apps and files to create more space. You can also use an external memory card to expand the storage space on your device.
Disable VPN and try again
If you’re using a VPN to access Snapchat, try disabling it and trying again. The VPN may be connected to an IP address from a country where Snapchat is not available or outright banned. Connect to a different IP address and see if it works.
Frequently Asked Questions
Why are snaps on Snapchat not loading?
Snapchat may not be loading snaps because your internet is down or your phone is running out of storage space. Check your internet connection and make enough space on your phone for Snapchat to function.
What happens if I clear my Snapchat cache?
Clearing Snapchat cache clears the temporary files stored in your device’s memory and gets rid of any issues caused by the corrupt files. It does not clear your messages or account data.
Is Snapchat down in India right now?
To check if Snapchat is down, go to DownDetector.in and search for Snapchat. If other users are experiencing an issue with Snapchat, it will be reported on the website.
Read Also: Keyboard stopped working? Here are some simple fixes
Conclusion
These are some quick fixes for when Snapchat doesn’t load snaps. If the issue still persists after trying all the methods mentioned above, try uninstalling the app from your smartphone and reinstalling it from the Google Play Store. If you found these fixes to be helpful, let us know in the comments!
A password manager for your smartphone can make your life much easier. Remembering passwords can get tricky when you use a different one for every account you have. This is where a password manager can be of tremendous help. Your Android smartphone uses Google’s password manager as default. Google’s password manager triggers a popup window, asking you to save the password any time you log in somewhere on the internet. You can view all your passwords in one place if you ever need to log in using another device. In this article, we bring you two ways to view saved passwords on your Android smartphone.Read Also: Asus Zenbook 17 Fold OLED laptop launched in India: Price and specs revealed
How to view a password using a web browser
Step 1: Go to passwords.google.com.Step 2: Sign in using your Google Account.Step 3: Select the website/account you want the password for.Step 4: Verify your identity by entering your Google Account password or your phone’s lock screen code.Step 5: Tap the eye icon to view your password.Step 6: To update a password tap on ‘Edit’ and enter the new password.Step 7: To delete a password, tap on ‘Delete.’
How to view a saved password using Google Chrome
Step 1: Open Google Chrome on your Android Smartphone and tap the ellipses (three dots) at the top right corner of the screen.Step 2: Go to Settings and select Passwords.Step 3: Tap any website/account to reveal the password.Step 4: You can copy the password to paste and store it somewhere else. To delete the password, tap the bin icon next to it.Read Also: Football Manager 2023 Touch makes its debut on Apple Arcade
Conclusion
This is how you can view saved passwords on your Android smartphone. There are several other password managers you can use apart from the one offered by Google. Before you select a password manager make sure it is rated well by its users and does not have any data breaches in its record.
Xplore Health Technologies has created a revolutionary respiratory muscle training (RMT) gadget called the Airofit PRO in partnership with Airofit, Denmark. The device’s ability to train both the inspiratory and expiratory breathing muscles in the same breath makes it the most efficient and user-friendly training equipment. The introduction of Airofit PRO is appropriate given that winter pollution is already having a negative impact on people’s lungs and general health. All training with Airofit can be done hands-free. It comes with over 17 different breathing exercises, Airofit PRO provides unmatched real-time live guidance and tracking.Several respiratory and lung conditions, such as COPD, asthma, Emphysema, Interstitial Lung Disease, Lung Cancer, Sleep Apnea, Tuberculosis, Bronchitis, Pneumonia, and Covid19 Pneumonia, are claimed to be prevented or treated with Airofit training.When used in conjunction with a smartphone, Airofit PRO allows users to truly customise their breathing exercises, building faster, stronger, and more effective respiratory muscles. Another distinctive characteristic of the apparatus is that it can train both the muscles used for inspiration and expiration. According to the company, the gadget essentially works by exercising the diaphragm and other breathing muscles through the use of resistance wheels that provide adjustable but constrained airflow to the user. To put it another way, since resistance makes breathing muscles tired, their vigour is increased by the growth of muscle tissue, allowing for deeper and longer breaths.The device elevates tailored training by considering baseline vital lung capacity and breathing muscle strength in addition to age, size, gender, and preference, all of which are crucial inputs prior to beginning any training. Every day, the device measures Vital Lung Capacity and tracks key lung health improvement metrics. The device features a real-time live guidance platform that leads a user through all exercises and sessions while monitoring his progress using real-time data, and it offers 17 different breathing sessions. Additionally, the gadget targets various associated aspects of breathing, such as respiratory strength, vital capacity, anaerobic threshold, and relaxation, in addition to simple respiratory muscle training (RMT).It just takes 10 minutes of training commitment per day with Airofit, a simple gadget made to be used apart from other physical activity, and after a few months of consistent training, the likelihood of running out of breath nearly disappears. The business has introduced a 90-day free trial of its premium features, including goal-specific training sessions, for new customers of the product. The Airofit PRO in India is priced at Rs 34,990
For the latest gadget and tech news, and gadget reviews, follow us on Twitter, Facebook and Instagram. For newest tech & gadget videos subscribe to our YouTube Channel. You can also stay up to date using the Gadget Bridge Android App. You can find the latest car and bike news here.
Hero Electronix’s consumer technology brand, Qubo, has introduced a Car Air Purifier in an effort to battle the escalating air pollution in the country. With its three-layer filtering system, it can reduce odours while removing small particles PM 2.5–10 like bacteria, animal hair, and hazardous gases. A built-in TVOC sensor allows the air purifier to detect the quality of the air and automatically alter the fan speed to purify it.The new car air purifier from the Made in India company is released at the perfect time, when the AQI level is above 400 in many areas of Delhi, causing health effects like burning eyes, breathing issues, and frequent headaches. The Qubo Car Air Purifier successfully decreases air pollution inside the automobile, assuring clean air while you’re on the run, in response to the rising levels of air pollution. Its three-layer filtration system can successfully improve the air quality by removing hazardous pollutants from your car, including PM 2.5 to 10, allergens, airborne bacteria, dust, cigarette smoke, chemicals from plastics, exhaust fumes, and other dangerous pollutants. Through its HEPA and HESA layers, the innovative 3-stage filtration technology removes up to 125 hazardous pollutants and exhaust gases, as well as up to 90% of pollen allergens from the air.The Car Air Purifier has an integrated TVOC sensor that can detect air quality and regulate the fan speed automatically, along with an automobile air quality monitoring system.Every car can use a portable, lightweight device, which adds to its general usability. The size of a cup holder is 8 cm around the world. The 7 cm-wide base of the Qubo Car Air Purifier is designed to fit in all cup holders. The cost of the item is Rs 2,790. It is available for purchase through all available channels, including leading online portals like Amazon, Quboworld.com, etc., as well as through a sizable network of dealer locations on the ground.Commenting on the announcement, Nikhil Rajpal, CEO, Hero Electronix said, “Again as winter begins in North India, smog is forming all over the region and particularly in the national capital region. While we can’t completely control our environment and the air we breathe, the need of the hour is to mitigate the risks as much as possible. With our team being based out of NCR, the issue is very personal and real for all of us. Our team has worked hard to bring this product in time to help our consumers manage the impact of pollution while they are on the go. This is in line with our motto of smart products actually making our lives better. Hopefully, products like the Qubo air purifiers help manage the situation a little till more fundamental solutions to this problem are found.”
For the latest gadget and tech news, and gadget reviews, follow us on Twitter, Facebook and Instagram. For newest tech & gadget videos subscribe to our YouTube Channel. You can also stay up to date using the Gadget Bridge Android App. You can find the latest car and bike news here.
Garena Free Fire is a battle royale game with regular awards and tournaments to keep players interested. If you play Garena Free Fire, you should be aware of the redeem codes that are released on a daily basis. However, because the battle royale game is banned in India, players from other countries can use the Free Fire Redeem codes daily. If you’re unfamiliar with the Garena Free Fire redeem codes or don’t know how to get them, we’ve put together a step-by-step guide to help you redeem them. Check out Garena Free Fire Redeem Codes for November 2.The Free Fire redeem codes are a great way to get free stuff. These are 12-digit codes that contain alphabets and numbers, as well as an expiration date and time. Because the Garena FF redeem codes cannot be used more than once, you should hurry to the redemption page to claim your free reward before someone else does. To get a free reward, all you have to do is go to reward.ff.garena.com/en, which is the official redemption page. Also, keep an eye on this space for daily updates on Garena Free Fire redemption codes and rewards.
Garena Free Fire Redeem Codes Today 11 November 2022
Updating Soon…
How to Get Free Fire Redeem Codes for Garena on November 11?
11 November 2022 Amazon Quiz has gone live on its platform. The quiz timings are 12 AM to 11:59 PM. The Amazon App users can participate in the quiz daily and all they have to do is submit correct answers to the questions asked on the e-commerce platform. Today’s participants can get a chance to win Rs 500 Amazon Pay Balance.By participating in the Amazon Quiz the participants can win Amazon Pay Balance ranging from Rs 1,000 to Rs 50,000 every day while sitting at home. To win the participants must answer five questions correctly that are based on current events and general knowledge. One wrong answer can eliminate you from the quiz. The results will be announced at the end of the month. Today’s question will let you win Rs 500 Amazon Pay Balance. Check below for today’s Amazon quiz answers.Amazon Quiz Today Prize – Rs 500 Amazon Pay BalanceQuiz Date – 11 November 2022Daily Timing – 12 AM to 11:59 PMWinner Announcement – Today 12 PM
Amazon Quiz Answers Today 11 November 2022
Question 1: Which institution has launched “Saa₹thi” – a mobile app on investor education?
Answer: SEBIQuestion 2: In January 2021, which Asian country launched its first-ever National Security Policy?Answer: PakistanQuestion 3: In which state did Prime Minister Narendra Modi inaugurate the Saryu Canal National Project?
Answer: Uttar PradeshQuestion 4: Name this animal which exhibits a rare characteristic among mammals?Answer: EchidnaQuestion 5: In the NBA each quarter of this game is of how many minutes?
Answer: 12 minutes
How To Play Amazon Quiz
Only app users are eligible to play the Amazon quiz every morning from 12 AM to 11:59 PM. The quiz is not available on the desktop. For those who are unaware of how to play the Amazon quiz below are the steps, you can follow to take the quiz.
Firstly download the Amazon app from Google Play Store or App Store
Now fill in the required information through the Sign Up option.
You need to log in to the Amazon app and scroll down on the home screen to find the Amazon Quiz banner.
Tap on the Amazon Quiz banner and tap on the Start button to start the Quiz.
Now you will get 5 questions and you need to answer them correctly. One wrong answer will eliminate you from the Quiz.
After answering all the questions correctly you are now eligible for a Lucky Draw.
The winner’s name will be announced today at 12 PM.
Subtitles have become a mandatory element while watching movies and TV shows. The main attention behind creating subtitles is to help people understand the language used in the video. Moreover, if some individual is unable to hear your audio, subtitles can work as an aid. Subtitles also increase video comprehension and SEO, which can benefit you in engaging with the audience.
If you are inexperienced about adding subtitles to videos, this article will address some of the easiest ways. We will shed light on offline and online autosubtitle generators that are capable of adding subtitles with high precision.
A Brief Introduction to Wondershare UniConverter Toolkit
Wondershare UniConverter is a famous tool as it produces instant results of high quality. Using this free video converter, you can execute video conversion without changing the original quality of your video file. You can also download your favourite songs or video clips through its “Downloader” feature. Furthermore, it can also work as a proficient screen recorder that can assist you in capturing your specific application, full-screen, or custom screen.
It also contains great editing tools that can help you in modifying your video. Besides being a quality video editor, UniConverter also functions as an efficient subtitle editor. You can write subtitles on your own manually on this tool by choosing a preferred font, style, colour, and alignment. It can convert text into subtitles and allows you to upload a subtitle file. For more comfort, this subtitle editor can also auto-generate subtitles by transcribing the voice. This feature supports more than 100 languages which means that it can handle video files of any language and type.
How to Extract Subtitles from Videos with UniConverter
UniConverter functions as a compatible subtitle editor available for both Windows and Mac users. Its auto-subtitle generator can produce results with 100% accuracy. If you want to extract subtitles from the auto-generator of UniConverter, check the following instructions given below:
Step 1: Proceed to Subtitle Editor
Launch UniConverter on your system and proceed to its “Subtitle Editor” from the main interface. This will open a new window on your screen instantly. Click on the “Add File” button to upload your video from your PC or MacBook. You can also drag the desired video and drop it in the interface on this tool.
Step 2: Select Auto-Subtitle Generator
Once you have imported the desired video file to this tool successfully, select “Auto-Subtitle Generator” from the right section. After some seconds, the tool will create the subtitles for your video automatically. You can check the results of this auto-subtitle generator from the preview window.Step 3: Edit and Save Subtitles
To edit the subtitles, navigate to the “Styles” tab and select font, outline width, opacity, position, and font size. After adjusting the settings, go to the “File Location” tab and choose your destination folder. Now hit the “Export” button to save the file in the desired folder.
How to Extract Subtitles from Videos with Media.io
When it comes to online tools, many people like to rely on Media.io. You can perform various functions on your video files using this online platform. For example, you can use its video compressor to deal with large file sizes. To make your videos engaging, you can add text boxes and customize them according to your need. The converting feature of Media.io can convert to and from more than 1000 file formats while preserving the high quality of your video.
Media.io also contains a subtitle editor that offers an advanced auto-subtitle creator. Through this feature, you can quickly generate subtitles without putting any effort. It also provides a translation tool that can efficiently translate your subtitles into more than 120 languages. Thus, you can use this reliable online platform to edit videos and extract subtitles from them with the help of its distinct features.
Steps to Extract Subtitles from Videos with Media.io
Through Media.io, you can also upload your subtitle file directly into this tool. Moreover, if you want to write some brief subtitles manually, Media.io gives you this freedom completely. To generate instant subtitles without wasting time, you can try its auto-subtitle generator. This generator supports up to 90 languages, such as English, Chinese, German, etc. To learn how to use this feature, check the below steps:
Step 1: Import Video File
Begin by accessing the website of Media.io and click on “Start to Edit.” Afterwards, select “Upload Media” and browse the video file from your device.
Step 2: Navigate to Subtitles
Once done uploading, click on “Subtitles” displayed in the left section. Now tap on “Auto Subtitles” and choose the language used in the video. Afterwards, select the video from the timeline in which you want to create subtitles. Once done, click on “Start auto-subtitle.”Step 3: Export the Video File
Now you can see the auto-generated subtitles on your screen. You can also change the font, color, size, transparency, and border of your subtitles. Afterwards, select the aspect ratio for your video and hit the “Export” button to select the format and resolution for your edited video before downloading it.
Verdict
There are various subtitle editors in the market that can create subtitles for your videos instantly. However, not every tool provides accurate results. If you are interested in an online tool, Media.io functions as the best subtitle editor. Without making a user account, you can use its auto-subtitle generator to extract subtitles for your video. Moreover, it does not require you to install any software to create subtitles.
On the other hand, for people who want to use a subtitle editor for the longer run, we recommend using Wondershare UniConverter. It’s a compatible desktop tool that you can run on your systems without a Wi-Fi connection. It can also automatically create subtitles by transcription of the voice. Also, it works as a free video converter and video editor that can assist you in eliminating the flaws in your video.
For the latest gadget and tech news, and gadget reviews, follow us on Twitter, Facebook and Instagram. For newest tech & gadget videos subscribe to our YouTube Channel. You can also stay up to date using the Gadget Bridge Android App. You can find the latest car and bike news here.
The global bestseller gaming title, Football Manager 2023 Touch, has finally made its debut on Apple Arcade. The game is available across all Apple devices on Apple’s game subscription service. Football Manager 2023 Touch is based on the classic PC football strategy game of the same name. Players can build their own teams and control every aspect of management like training routines, player transfers, career growth and more. The game now also features a new 3D match engine for the first time on iPhone. Football Manager is touted by many to be the closest thing to being a real football club manager.Football Manager 2023 Touch is the newest addition to Apple Arcade’s portfolio of sporting games, which includes the likes of NBA 2K23 Arcade Edition. Apart from the addition of FM 2023, Apple Arcade has also introduced two highly requested modes – Endless and Expert – in one of its most popular titles, Mini Motorways. The Endless Mode lets you start a new city and continue after ‘Game Over.’ Expert mode encourages a more strategic play style, by making road tiles and upgrades permanent.Read Also:SENS Hendriks 1 review: A decent entry-level TWS Other popular titles like LEGO Star Wars: Castaways, Fruit Ninja Classic+, Garden Tails: Match and Grow, SongPop Party, Gibbon: Beyond the Trees, and Frogger and the Rumbling Ruins also get an upgrade. Here are some of the major upgrades available right now.Mini Motorways – Two new game modes added: Endless and Expert. An Expert Mode leaderboard has also been added to each map, allowing players to compete for the top spot.LEGO Star Wars: Castaways – The game now features a new monthly event based on The Mandalorian TV series, featuring all-new cosmetic items, emotes, sandcastles, and microfighters. A new Arena mode, Challenge Levels, and Alien Species player customization option have also been added.Garden Tails: Match and Grow – Explore a brand new sixth garden in the game, including new levels, 25 new plants, and six new animals.SongPop Party – Two new playlists – 2000s Heartthrob and 2000s Pop Divas – have been added.Gibbon: Beyond the Trees – The update packs new level blocks, more achievements, and an in-game collectible encyclopedia.Frogger and the Rumbling Ruins – An all-new Dungeon, The Sky Ruins, featuring 22 new stages, has been added.Crayola Create and Play+ – Kicks off Thanksgiving-theme in-game event, and also adds a new How to Draw video (How to Draw a Turkey).
Tech giant Asus has come out with the world’s first 17.3-inch OLED laptop, dubbed the Asus Zenbook 17 Fold OLED. The laptop will be launched in India at the price of Rs 3,29,990. The Zenbook 17 Fold comes equipped with the 12th Generation Intel Core i7-1250U processor. Designed with 10 cores (2 performance and 8 efficiency cores), the i7-1250U can clock up to 4.7 max frequency. The laptop also comes with 16GB LPDDR5 RAM and 1TB SSD.Read Also: YouTube Shorts Are Arriving on Smart TVs: Details Inside
Asus Zenbook 17 Fold OLED: All the details
Sporting a unique foldable design, the Asus Zenbook 17 Fold offers users 2 display choices: a large 17.3-inch OLED touchscreen with an aspect ratio of 4:3 which can be folded to produce two 12.3-inch displays with an aspect ratio of 3:2. Asus claims the hinge has been tested to withstand 30,000 open and shut cycles. The versatility of the display allows the laptop to be used in several different modes: Desktop, Laptop (with Bluetooth keyboard), Laptop (with Virtual keyboard), Tablet, Reader, and Extended.The Asus Zenbook 17 Fold OLED comes with two Thunderbolt 4 ports that are capable of supporting a 4k display output, 40Gbps data transfer, and charging. The Type-C ports can support up to 65W of fast charging as well. The audio on the Zenbook 17 fold has been tuned by Harmon-Kardon and comes with Dolby Atmos certification. Moving on, the Zenbook 17 Fold is equipped with state-of-the-art security features. The Asus Adaptive Lock powered by Intel’s Visual Sensing Controller uses the HD infrared camera to dim or lock the screen depending on the user’s proximity to it. The screen automatically dims if the user looks away, to conserve battery life. If the user walks away from the laptop, the screen automatically locks itself and only wakes up when the user returns. Read Also: MediaTek Dimensity 9200 SoC announced for flagship 5G smartphones
Conclusion
Commenting on the launch Arnold Su, Business Head, Consumer and Gaming PC, System Business Group, ASUS India, said, “We are thrilled to announce our stellar innovation Zenbook 17 Fold OLED in the Indian market. It is the world’s first 17.3” foldable laptop that uses a proprietary foldable hinge design. Co-developed with Intel and BOE, it delivers a transformative experience that merges the productivity of a desktop with the portability of a laptop. This laptop eliminates the need to compromise when working in different environments — in the office, at home, while travelling or when relaxing — by stylishly incorporating two screen sizes and multiple usage modes into one highly portable device.”The Asus Zenbook 17 Fold OLED can be bought online at the official Asus e-shop or on other platforms like Amazon, Flipkart, Croma, Reliance Digital, and Vijay Sales. The laptop will also be available for purchase at Asus-authorised dealerships across the country.
There’s nothing more annoying than a dysfunctional keyboard. Even a faulty key can disrupt your workflow and hamper your productivity. For PC gamers, an unresponsive key can completely prevent them from playing a game. You can try using an onscreen keyboard for any small tasks, but you will need to fix your keyboard at some point. In this article, we bring you 10 simple fixes for when your keyboard stops working.Read Also: MediaTek Dimensity 9200 SoC announced for flagship 5G smartphones
Reboot your computer
Restarting your computer can fix minor background issues or software glitches that may be keeping it from carrying out the basic functions. Rebooting your computer should be the first step in diagnosing any problem. Click on the Windows icon at the bottom left corner of the screen and select ‘Restart’ from the power options. Check if your keyboard is working properly after the reboot. If the issue still persists, scroll down for other fixes.
Check the power switch on your keyboard
If you use a wireless keyboard, it is very likely that it comes with a power switch. This switch disabled your keyboard when it is not in use. It comes in handy when your computer is turned on but you are not using your keyboard. Turning off the keyboard can help save you a significant amount of battery. It is very likely that you turned the power switch off on your keyboard and forgot to turn it on. Check if the switch is turned on before trying out other fixes on this list.
Clean the USB port
It is common for dirt and dust particles to accumulate in and around the USB port on your PC, hampering the connection with the keyboard. This may cause the keyboard to stop functioning altogether. Unplug the keyboard and use a small brush to clean the USB port. Blow some air into it to clean out the finer particles. Once that is done, plug in your keyboard again and check if it works.
Try using a different USB port
It is possible that your keyboard stopped working due to a faulty USB port on your computer. Try connecting the keyboard to a different USB port to see if it works. If the keyboard still doesn’t work, it is either a hardware issue related to your issue or a software issue on the PC’s end.
Unpair and re-pair your keyboard
Wireless keyboard users can try unpairing and then re-pairing their keyboard with their PC. Doing this refreshes the connection and gets rid of any temporary glitches that may be keeping the keyboard from working. You can use the dedicated keyboard app or simply go to Settings>Devices on your PC to unpair the keyboard.
Turn off Filter Keys
Step 1: Open Control Panel and select Ease of Access.
Step 2: Click on ‘Change how keyboard works’.
Step 3: De-select ‘Turn on Filter keys’.
Step 4: Click on ‘Apply’ and then save your changes by clicking on ‘Ok’.
Enter the BIOS mode on your computer
Entering the BIOS mode is a quick way to figure out whether the issue is hardware or software related. To enter BIOS, simply press the F2 or Delete key repeatedly while your PC is rebooting. The key may vary for different PCs, so it is advised to do a quick Google search for which key works on your computer. If you are unable to enter BIOS, the issue is hardware related.
Disable fast startup
Step 1: Launch the Control Panel and select Hardware and Sound.
Step 2: Click on Power Options.
Step 3: Select ‘Choose what power buttons do’ from the side menu.
Step 4: Click on ‘Change settings that are currently unavailable’.
Step 5: De-select ‘Turn on fast startup’ and save changes.
Clean your keyboard
You’d be surprised how often keyboards stop working because they accumulate too much dirt. It is very common for dust particles and other kinds of dirt to settle beneath the keys on your keyboard. If you want to thoroughly clean your keyboard, check out our full guide here. For easy cleanup, simply reach for the dirt below the keys using a small brush and gently tap your keyboard on the table to push the dirt out. Clean your keyboard with a microfiber cloth and see if it is working again.
Update or reinstall keyboard drivers
Step 1: Type in ‘Device Manager’ in the search bar at the bottom left corner of your screen and select it.Step 2: Click on ‘Keyboard’ to expand the section.Step 3: Right-click on the keyboard listed on the list and select ‘Update driver’. Follow the onscreen instructions and the driver will be updated.If your keyboard still doesn’t work, try uninstalling the driver by clicking on ‘Uninstall device’ instead of ‘Update driver.’ Restart your computer. The operating system will automatically download the necessary driver for your keyboard.
Frequently Asked Questions
Why is my keyboard not working?
Your keyboard may stop working due to a hardware malfunction or because of outdated drivers. Make sure your keyboard is clean and dust free at all times.
How do I know if my keyboard is locked?
Hold the right shift key button for 8 seconds. If the filer keys icon appears on the taskbar, it means that your keyboard is locked.
There are 10 simple fixes for when your keyboard stops working. If you’ve tried all the fixes mentioned above and your keyboard still doesn’t work, you may need to take it to a repair centre to get it fixed or buy a new one. If you found these fixes to be useful, let us know in the comments!
Changing the phone number linked to your Apple ID is a pretty simple process. You may have noticed that the number linked to your Apple ID by default is the one that you are currently using with your iPhone. This is because Apple ID recognises your iPhone as a ‘trusted device’ and registers the number on it as a ‘trusted phone number’ as soon as your turn on the two-factor authorisation. You can always add more trusted phone numbers to your account. In this article, we show you how to change the phone number linked to your Apple ID. Read Also: What to expect from the new Twitter acquisition?
Change the phone number linked to your Apple ID using your iPhone
Step 1: Go to Settings on your iPhone and tap on the top banner that contains your name.Step 2: Select Password and Security.Step 3: Scroll down to the ‘Trusted Phone Number’ section and tap on ‘Edit.’Step 4: Select the ‘minus’ icon next to the number you want to remove and tap on ‘Delete.’Step 5: Tap on ‘Add a trusted phone number.’Step 6: You will be prompted to enter your device code. After that, enter the phone number you want to link to your Apple ID. Step 7: Verify the phone number using a text message or phone call. Your Apple ID phone number will be changed once it gets verified.
Change the phone number linked to your Apple ID using a web browser
Step 1: Go to https://appleid.apple.com/ on your web browser and sign in to your Apple ID account.Step 2: Go to ‘Sign-in and Security’ and click on ‘Account Security.’Step 3: In the following window, click the plus icon next to the ‘trusted phone number’ section.Step 4: Add the number you want to link to your Apple ID. Verify the number using a text message or phone call.Step 5: Once the number has been verified, it will be linked to your Apple ID. You can now remove the previously linked number by clicking on the minus icon next to it.Read Also: Havells Meditate air purifier with Alexa and Google home support launched in India
Conclusion
This is how you can change the phone number linked to your Apple ID. Instead of deleting the previously linked number, you can simply add more trusted numbers to your Apple ID. However, if the previous number is not in use anymore, we would suggest deleting it. If you change your number on iMessage it will also be reflected on your Apple ID. If you want to change the email address linked to your Apple ID, read our instructional guide here.
Indian smartphone manufacturer Lava has announced the pricing and availability details of the new budget 5G smartphone Lava Blaze 5G. The handset was first unveiled at the October India Mobile Congress 2022 (IMC). MediaTek Dimensity 700 SoC powered the phone and the built-in RAM can virtually be increased by an additional 3GB.. It features a triple rear camera setup supported by AI, with a 50-megapixel primary sensor. The device is fuelled by a 5,000mAh battery and it runs on Android 12 out of the box.
Lava Blaze 5G price in India and availability
Lava Blaze 5G’s single 4GB RAM with 128GB storage model is available at an introductory price Rs 9,999. There are two colour choices available for it: Glass Blue and Glass Green.No information is available on the duration of the introductory offer. Amazon will be the place where the phone is sold. Lava Blaze 5G’s release date hasn’t been made official in all its details.
Lava Blaze 5G specifications
The Lava Blaze 5G runs Android 12 and is powered by a 7nm MediaTek Dimensity 700 SoC with a top clock speed of 2.2GHz. It contains 4GB of RAM that may be expanded by an additional 3GB using available storage. It has 128GB of inbuilt UFS 2.2 storage that can be increased to 256GB using a microSD card. The screen is 6.51 inches HD+ IPS and refreshes at a rate of 90Hz. The device’s display has Widevine L1 capabilities. The phone has 128GB of internal storage and a side-mounted fingerprint sensor for authentication.An AI-backed triple rear camera array with a 50-megapixel primary sensor for images and videos distinguishes the Lava Blaze 5G. A front-facing 8-megapixel camera for selfies and video calls is present on the 5G smartphone.The Lava Blaze 5G is powered by a 5,000mAh battery. The handset has a USB Type-C port, Wi-Fi 802.11 b/g/n/ac, GPRS, Bluetooth V5.1, GLONASS, 3.5mm audio jack, and 5G connectivity choices. An accelerometer, ambient light, gyroscope, magnetometer, and proximity sensor are among the inbuilt sensors. Addition there is a face unlock and a side mounted fingerprint sensor for biometrics.
For the latest gadget and tech news, and gadget reviews, follow us on Twitter, Facebook and Instagram. For newest tech & gadget videos subscribe to our YouTube Channel. You can also stay up to date using the Gadget Bridge Android App. You can find the latest car and bike news here.
SENS is a relatively new brand in India, which is only just foraying into the smart wearables and TWSmarket with a diverse portfolio of Indian-made products. SENS’ audio products are named after famous musicians (‘Hendriks’, ‘Cnatra’, ‘Alvis’, and ‘MJ’), and their smartwatches take their names from scientists (‘Edyson’ and ‘Nuton’). We used their entry-level TWS product, the SENS Hendriks 1 and tested it for about a week. The wireless headset can currently be purchased at an introductory price of Rs 1,699. Here is our SENS Hendriks 1 review.Read Also: How to Repair Your Corrupted AAC File Format for Mac
SENS Hendriks 1 review: Design
The SENS Hendriks 1 comes in a compact square box that contains the charging case with earbuds inside, a USB Type-C charging cable, extra silicone tips, a user manual, a warranty card, and a product catalogue.The build and overall design are the highlights of the TWS. The charging case is made entirely out of metal (zinc alloy) and comes in a ‘Gun Metal Grey’ colour. The case feels quite sturdy and capable of withstanding a lot of damage. The lid easily flips open and shut with one finger and the hinge feels quite strong. Since it’s made out of metal, the charging case will get cold pretty quickly in low temperatures. While it may be heavier compared to other TWS, you can easily walk around with the case in your pocket. The design has been kept quite minimal on the Hendriks 1. There’s a small border around the lid that extends all the way back to the hinge, essentially dividing the case into two segments. In the lower segment, just below the lid, you will find the SENS logo printed on the case. A small notification light has been housed at the lower part of the front panel. The charging port makes its way to the bottom of the case. While the charging case may weigh around 70 grams, the earbuds feel extremely light, weighing just 3.5 grams each. You will barely notice them in your ear and can easily keep them in for hours at a time. There is a small notification on the touch panel of each earbud. The make is entirely plastic.The in-ear design along with the silicone tips provides a very comfortable, snug fit in the ear. For those that don’t find the fit to be comfortable, the TWS is shipped along with a small pack of extra tips with varying size options. The horizontal stems are touch sensitive and can be used for music and call control.With an IPX5 rating, the earbuds can withstand a low-pressure water spray without taking any damage. For a TWS in the entry-level category, this is an impressive rating. We used the TWS while working out and they handled the task expertly. The fit remained undisturbed throughout the workout, even when things got sweaty. The touch controls are easy to use and we were quite surprised to see very minimal accidental touch detection.
SENS Hendriks 1 review: Performance
While the Hendriks 1 certainly impressed us in terms of build, design, and usability, we were left wanting some more improvements in terms of performance. Let’s deep dive into what our experience with the SENS Hendriks 1 was like after a week of use.The Hendriks 1 is equipped with 10mm drivers on each earbud and claims a connection range of 12 metres. However, we experienced certain drops and lags after moving 5-6 metres away from the connected device. If you intend to use these earbuds with your smartphone, the range won’t be an issue as long as you carry your smartphone along with you at all times.Moving on to the most important part of the review, the sound profile of the SENS Hendriks 1 is slightly underwhelming. The audio output sounds a bit boxy and muffled. While it works well for casual listening, the Hendriks 1 didn’t manage to produce a lot of detail in its sound profile. The bass is constantly overridden by the higher frequencies. The overall mix feels like it lacks some depth, which would’ve been present had the lower frequencies been given more prominence. The ideal volume range for listening on the Hendriks 1 is 40-60% beyond which you will notice a slight increase in distortion of the sound profile. The audio quality while calling was decent and the microphone performs well in quiet surroundings, relaying the voice to the recipient without much disturbance. Both earbuds are equipped with a microphone each, so you can use one earbud to call while the other one charges inside the box. The touch controls work smoothly while listening to music or during a call. Since there is no dedicated app for the TWS, you cannot customise the controls. Single touches on either earbud alter the volume of the music while a double touch can be used to play or pause the track. A long touch can be used to skip back and forth between tracks. The Hendriks 1 also comes with Voice Assistant support, which can be activated by a triple touch on the stem.SENS claims a battery backup of up to 4.5 hours on either earbud with an additional 30 hours in the case. These figures were consistent with our tests, as we got over 4 hours of battery life even when playing music at a higher volume. The 450mAh charging case was good enough to provide 5-6 charge cycles. The case can get fully charged in around 90 minutes, while the earbuds can reach a 20% charge in 20 minutes. Read Also:Vivo X90 Pro+ has received 3C certification, to 80W fast charging
Verdict
At the price of Rs 1,699, the SENS Hendriks 1 is not a bad deal for casual music listeners. If you’re looking for an affordable, sturdy pair of earbuds that provide a great battery life, you can look into the Hendriks 1 TWS. However, if you don’t want to make any compromise on the audio output, there may be a few better contenders that are only a few hundred rupees pricier than the Hendriks 1.
Pros
Sturdy buildClean designBattery life
Cons
Sound profile has room for improvementConnection quality drops beyond 5-6 metres
The TV debut of YouTube Shorts has been officially announced. As of right now, viewers will be able to watch these brief video clips (60 seconds or less) at home on a huge screen. Over the next several weeks, YouTube Shorts will become available for smart TVs (models 2019 and later) and newer gaming consoles.Neal Mohan, Chief Product Officer said “Bringing Shorts to our community has transformed the way people create and watch videos on YouTube. When we introduced this new format, we optimised the experience for the mobile creator and viewer. Today, we’re expanding viewing access to Shorts to our fastest-growing surface: the TV screen. While this may seem like a natural next step, an incredible amount of thought and care has gone into bringing this vertical, mobile-first experience to the big screen. In this next instalment of our Innovation Series, you’ll hear from two of the user experience (UX) design leads who made this leap a reality.”YouTube Shorts for TV will be positioned with a white border in the centre of the screen. While the background theme will be based on the primary colour of the Shorts clip. The specific Shorts’ information will be displayed on the video’s side.Its product managers, engineers, designers, and researchers from the Shorts and TV teams got together to talk about how to bring this new video format to the big screen, the business claimed in a statement announcing the launch. It was crucial that the Shorts experience on TV seemed both organic on a larger screen and aligned with what the community views on mobile.YouTube has adopted a unique approach to our research and invited participants to write either “Love” or “Breakup” letters to describe their thoughts about short-form material on TV right now. The “love letters” revealed that consumers like watching stuff they enjoy conveniently with friends and family. The “breakup letters” revealed that users thought the platform may be awkward, sluggish to load, or lacking in essential capabilities like sharing.As per the company, there are unique perks of watching Shorts on the big screen. Firstly YouTube Shorts are easier to watch with others, and the larger screen makes it a more comfortable viewing experience. In order to preserve the essence of Shorts with vertical videos on wide-screen TVs it has created three very different design concepts.“We wanted to know if the unique feel of Shorts could be conveyed in our conventional video player (Option A) or if it should be customized to better fill the blank spaces on either side of the video (Option B). We also considered a divergent option — the “Jukebox” style (Option C)— where multiple Shorts would fill the screen at the same time, taking full advantage of the TV screen’s additional space,” YouTube blog post stated.According to YouTube, feedback from the second round of study revealed that the Jukebox style (Option C) departed too much from the core of Shorts, which focuses on one video at a time, and that the delight of Shorts is lost in the consistent video player (Option A). The customized Shorts experience offers the best of both worlds: a simple design while maximising the additional space provided by the widescreen.Moreover, users of YouTube Shorts on smart TVs must manually select the next Shorts using the remote because the videos do not automatically play. YouTube built two highly detailed prototypes of a customised Shorts video player using input from its most recent round of research. The business is currently attempting to strike a balance between a pure viewing experience and features that users have come to anticipate from Shorts and YouTube, such as comments, community actions (such as like and subscribe), and finding related videos.
For the latest gadget and tech news, and gadget reviews, follow us on Twitter, Facebook and Instagram. For newest tech & gadget videos subscribe to our YouTube Channel. You can also stay up to date using the Gadget Bridge Android App. You can find the latest car and bike news here.
Today, children, adults, and pretty much everyone uses the internet for different purposes, including entertainment, work, or studies. The internet allows us to explore the world, network with people and stay informed. However, parents are often concerned about excessive internet usage and prolonged screen time for their children. Well, Wondershare FamiSafe is the best parental control app for parents who want to monitor and manage their children’s internet activity.
Part 1: Realizing the Drawbacks of Using Excessive Internet By Children
Like everything else, using the internet comes with its pros and cons. An excess of anything, especially the internet, has many drawbacks that overshadow its advantages. Let’s see some of these drawbacks that will help you decide why you need a parental control app like FamiSafe:
1. Addiction
Children use the internet to play games, watch educational videos, and scroll through social media applications for entertainment. The internet has many attractive applications that keep children engaged, so they want to sit in front of a screen for as long as they can. This attraction can turn into an addiction that can lead to abnormally high levels of screen time that disrupt your child’s daily life. Often, children cannot focus on their academics and social life because they want to be on their phones.
2. Inappropriate Content
There are no barriers to the images, videos, and reading materials that children are exposed to on the internet. Inappropriate content, including pornographic and violent images, is readily available that can affect the developing brains. Children may accidentally stumble upon this undesirable side of the internet whilst using other websites, and parents won’t be able to control it.
3. Cyberbullying
It is easier to bully or harass kids on the internet as compared to real life in schools or playgrounds. This is because people hide behind anonymous accounts and can target your children without the fear of any consequences. It doesn’t matter whether the bullying is online or physical because it can cause children to store memories of traumatic events and may lead to depression and social isolation.
4. Privacy Exposure
Children are not specialized in using the internet, computers, and phones. They are prone to easily providing personal information such as pictures, passwords, house addresses, and more to hackers or fake friends. People with evil intentions can gain your child’s trust and then blackmail your children once they get access to this information.
Bonus Tip
If you are on the lookout for a reliable internet service provider, we would recommend you to sign up with Comcast, which not only provides its users with incredible download speeds but also offers fast, reliable connections for all devices. So sign up with Comcast Internet Español and manage all your daily internet activities.
Part 2: Introduction to Wondershare FamiSafe – A Tool That Promotes Safe Search
It is not possible to completely refrain your child from using the internet, but you can control their usage to promote healthy practices. Wondershare FamiSafe is a parental monitoring app that allows you to monitor and manage your child’s screen time. You can set time limits for each application and scan their viewing history on YouTube and TikTok to block any harmful videos or channels.
Can you imagine receiving an activity report of every internet movement of your child? Well, that is exactly what FamiSafe does, and it keeps your child safe from explicit content. It has features that search for harmful messages and pictures on your child’s phone. To ensure safety on the web, FamiSafe filters harmful search results so parents remain at peace and satisfied.
Part 3: How to Manage Your Child’s Internet Activity with FamiSafe?
FamiSafe’s user-friendly interface makes it very easy to manage your child’s internet activity. Follow these instructions to ensure your child’s safety online:
3.1 Set up Parent’s Device
Step 1: If you have an iOS device, go to the App Store to download Wondershare FamiSafe. Android users can download the FamiSafe application from the Play Store. Launch the application to start the setup on your device. Tap on the “Start” button.Step 2: There are two ways to log into FamiSafe. You can either use your Apple ID, Facebook, or Google account or register a new Wondershare ID. The application also provides a “Continue as Guest” option to help you access FamiSafe without logging in.Step 3: Now, you have to connect your device to your child’s device. Select the “Connect a Device” option. On the next screen, you will find a QR and pairing code which will be used later in this guide whilst setting up your child’s phone.Step 4: Follow the guide in the next parts to set up your child’s device. Once that is done, use the Started Wizard to set up basic parental control on your device.
3.2 Setup Child’s Phone
Method 1: Download and launch FamiSafe on your kid’s device and tap the “Start” button. Here you can enter the pairing code that was provided when you were setting up the parent’s device.Method 2: This method is quicker and easier. You have to scan the QR code from your phone using your kid’s phone camera. FamiSafe will be downloaded, and both devices will be connected automatically.
3.3 Give Permissions on Child’s Android Device
Step 1: Parents need to grant some permissions to FamiSafe so it can perform its functions efficiently and manage the child’s internet activity. Start with activating “Accessibility” and “Run in Background.”
Step 2: Afterward, activate “App Supervision” and enable the “Display over other apps” option for generating activity reports and showing blocked apps. If you want to keep yourself updated with the notifications that your child receives, turn on “Notification Access.” FamiSafe will also ask you to enable the “Device Administrator” option to allow it to set screen times for you.
Step 3: There are many other permissions that you can explore on FamiSafe. Granting more permissions will allow you to have greater control over your child’s device. So, explore and enable other options such as “Battery Saver” and “Autostart” according to your needs. You can turn on “Location Access” as well to track your children’s real-time location.
3.4 Give Permissions on Child’s iOS Device
Step 1: Open “Settings” and search “FamiSafe” on your child’s iOS device. You can activate the location in the application’s settings.
Step 2: Just like the Android device, FamiSafe requires you to grant access to the iOS device as well. Install the FamiSafe profile and follow the simple instructions that the tool provides to grant necessary permissions.
Step 3: To ensure a safe search on Safari, you can use FamiSafe’s content blocker feature. Open “Settings” and search “Safari.” Find the “Content Blockers” option and click on it. Afterward, you have to enable “FamiSafe” here.
3.5 Manage your Child’s Internet Activity
Launch FamiSafe on your registered device and tap on the “All Features” option. You will see several features, including those related to monitoring your child’s internet activity. Just click any of those features, such as “Safe Search.” Then follow the simple on-screen instructions that the tool provides.
Last Words
With FamiSafe, it is possible to counter the building interest in the internet and set healthy boundaries for your children. As a parent, it’s your responsibility to ensure that your child is safe on their phones and computers. Download FamiSafe today to manage your child’s activity and get relief from your worries.
For the latest gadget and tech news, and gadget reviews, follow us on Twitter, Facebook and Instagram. For newest tech & gadget videos subscribe to our YouTube Channel. You can also stay up to date using the Gadget Bridge Android App. You can find the latest car and bike news here.


 Step 1:
  Step 2:
  Step 4:
 Step 5:
 Step 3:
 Step 4:
 Step 3:
  Step 4:
  Step 5:
 Step 2:
 Step 3:
 Step 4:
  Step 6:
 Step 3:
 Step 4:
  Step 5:
 Step 6:


 Step 4:
 Step 5:
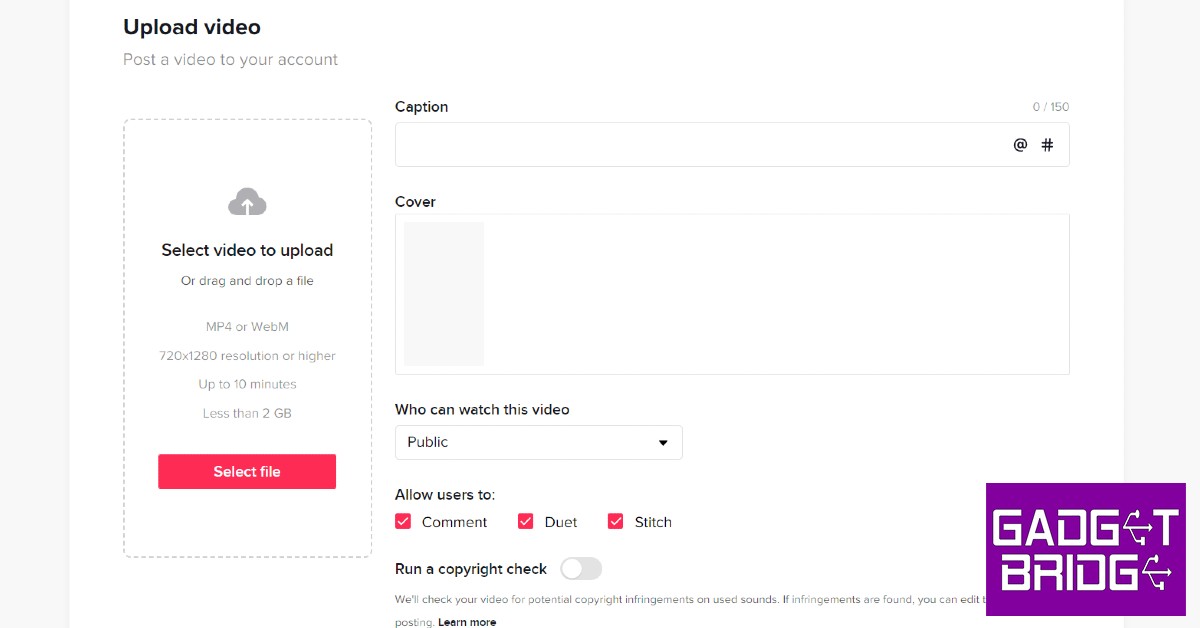

")


 Logging out and then logging into Snapchat can fix the annoying temporary issues that you are facing with the app. To log out of Snapchat, tap your profile icon at the top right corner of the screen and select the gear icon. Once you’re on the Settings page, scroll all the way down and hit ‘Log out’. You will need your registered number, email, or Snapchat username to log back in.
 If you’re having trouble loading snaps sent to you by one specific contact, you should try clearing that conversation. This method will not erase any saved messages, but all the unread and unsaved messages will be deleted. To clear a particular Snapchat conversation, click on your profile icon at the top right corner of the screen and go to Settings. Scroll down and select ‘Clear Conversations’, then tap the cross icon next to the conversation you want to clear.
 If your phone is running out of storage space, Snapchat may halt some of its integral functions like sending and loading snaps until you free up some memory. Go to Settings>Battery and device care>Storage to check the memory status on your device. Delete some unused apps and files to create more space. You can also use an external memory card to expand the storage space on your device.

 Step 4:
  Step 5:
 Step 6:
  Step 7:
 Step 2:
 Step 3:
 Step 4:


 Step 3: Edit and Save Subtitles
To edit the subtitles, navigate to the “Styles” tab and select font, outline width, opacity, position, and font size. After adjusting the settings, go to the “File Location” tab and choose your destination folder. Now hit the “Export” button to save the file in the desired folder.
Step 3: Edit and Save Subtitles
To edit the subtitles, navigate to the “Styles” tab and select font, outline width, opacity, position, and font size. After adjusting the settings, go to the “File Location” tab and choose your destination folder. Now hit the “Export” button to save the file in the desired folder.
 Step 3: Export the Video File
Now you can see the auto-generated subtitles on your screen. You can also change the font, color, size, transparency, and border of your subtitles. Afterwards, select the aspect ratio for your video and hit the “Export” button to select the format and resolution for your edited video before downloading it.
Step 3: Export the Video File
Now you can see the auto-generated subtitles on your screen. You can also change the font, color, size, transparency, and border of your subtitles. Afterwards, select the aspect ratio for your video and hit the “Export” button to select the format and resolution for your edited video before downloading it.


 Read Also:


 Step 2: Click on ‘Change how keyboard works’.
 Step 3: De-select ‘Turn on Filter keys’.
 Step 4: Click on ‘Apply’ and then save your changes by clicking on ‘Ok’.
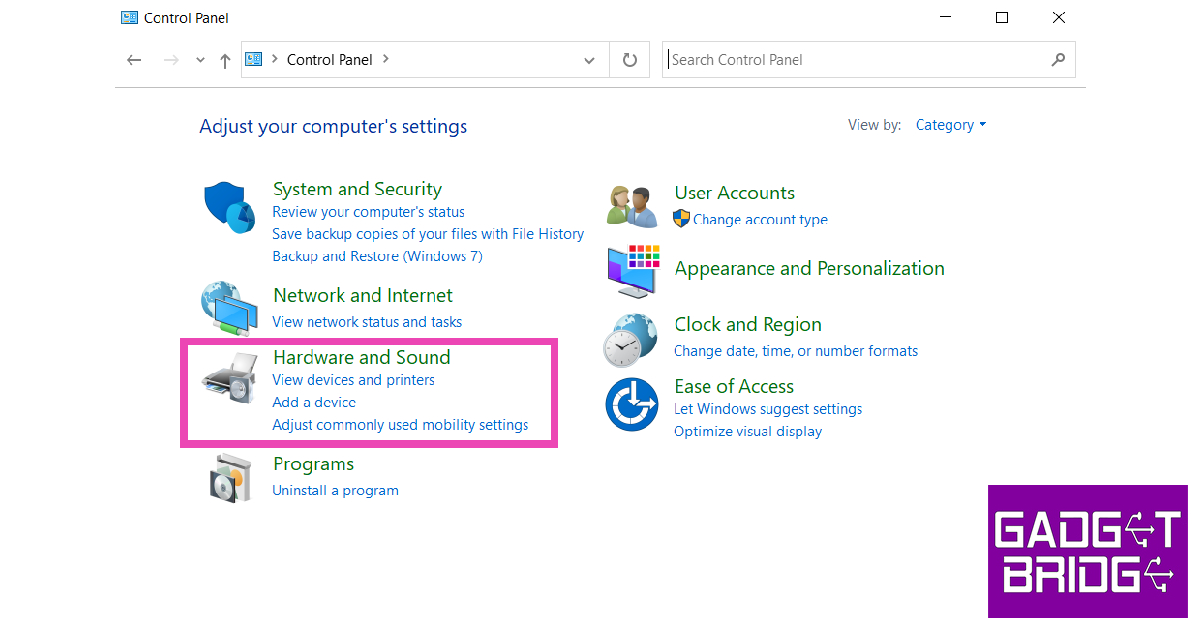 Step 2: Click on Power Options.
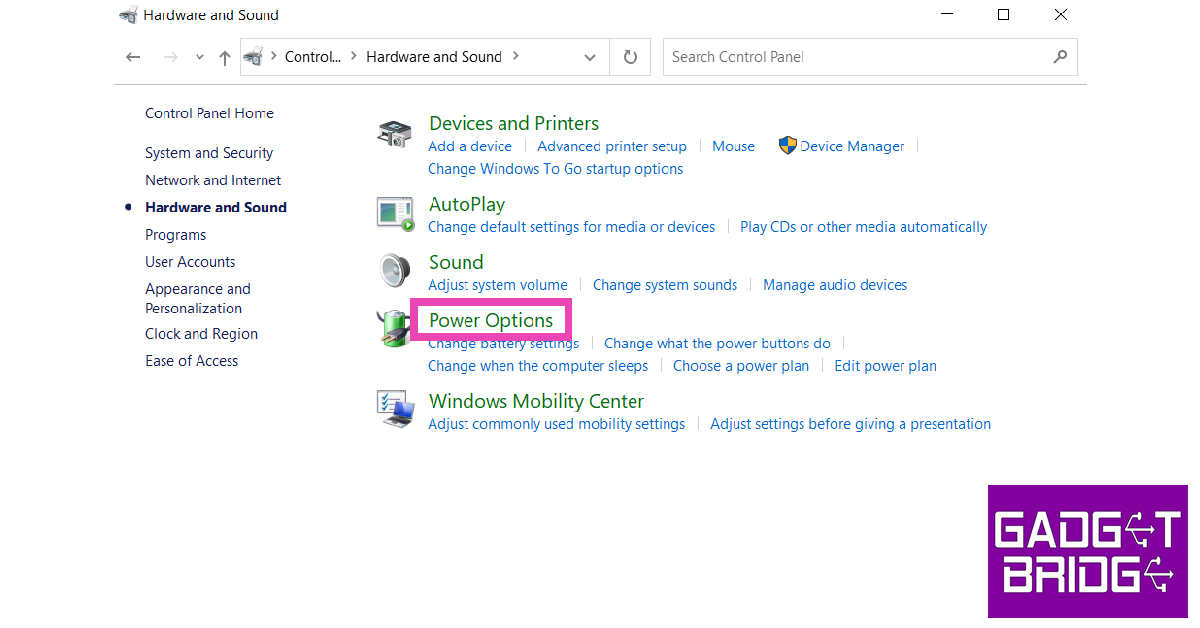 Step 3: Select ‘Choose what power buttons do’ from the side menu.
Step 4: Click on ‘Change settings that are currently unavailable’.
Step 3: Select ‘Choose what power buttons do’ from the side menu.
Step 4: Click on ‘Change settings that are currently unavailable’.
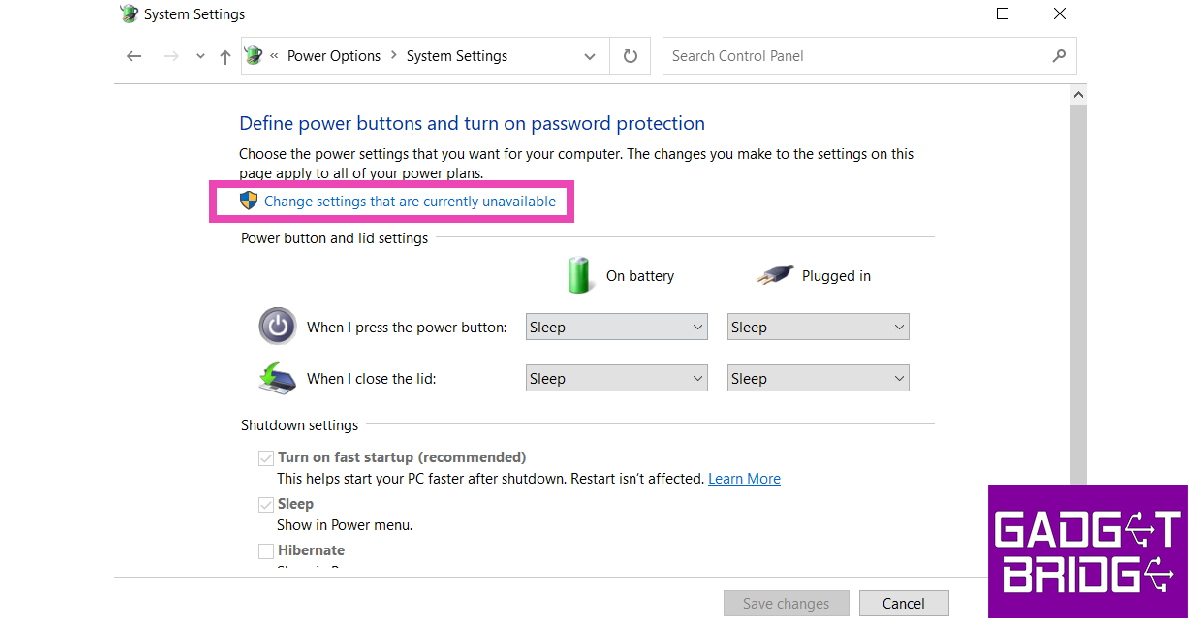 Step 5: De-select ‘Turn on fast startup’ and save changes.


 Step 3:

 Step 3:
  Step 4:
  Step 5:
  Step 7:
 Step 2:
 Step 3:


 Can you imagine receiving an activity report of every internet movement of your child? Well, that is exactly what FamiSafe does, and it keeps your child safe from explicit content. It has features that search for harmful messages and pictures on your child’s phone. To ensure safety on the web, FamiSafe filters harmful search results so parents remain at peace and satisfied.
 Step 2: There are two ways to log into FamiSafe. You can either use your Apple ID, Facebook, or Google account or register a new Wondershare ID. The application also provides a “Continue as Guest” option to help you access FamiSafe without logging in.
 Step 3: Now, you have to connect your device to your child’s device. Select the “Connect a Device” option. On the next screen, you will find a QR and pairing code which will be used later in this guide whilst setting up your child’s phone.
 Step 4: Follow the guide in the next parts to set up your child’s device. Once that is done, use the Started Wizard to set up basic parental control on your device.
 Method 2: This method is quicker and easier. You have to scan the QR code from your phone using your kid’s phone camera. FamiSafe will be downloaded, and both devices will be connected automatically.