
Below is the list of mobile apps that have been banned in India:
- Crypviser
- Enigma
- Safeswiss
- Wickrme
- Mediafire
- Briar
- BChat
- Nandbox
- Conion
- IMO
- Element
- Second line
- Zangi
- Threema


In This Article
 Step 1: Discharge the battery from your Android device. Let it turn off.
Step 2: Turn your device back on. If the battery on your device isn’t calibrated, the battery indicator on the display will show some charge left. Your device will turn off pretty quickly.
Step 3: Without turning on your device, put it on charge. You will see the battery indicator on the screen. Let it charge to 100%.
Step 4: Once the indicator displays that your phone is fully charged, unplug it from the charger and turn it on.
Step 5: Check if the battery indicator on the display shows 100% charge. If it doesn’t put your phone on charge. Keep it connected to the charger until the indicator shows 100% charge or comes very close to 100%.
Step 6: Once your Android phone or tablet hits 100% charge, let it drain out again. Leave the display unlocked to help the battery drain out faster.
Step 7: Charge your phone to 100% without turning it on. When it is fully charged, remove the charging cable and turn it on. Your battery should be calibrated.
Step 1: Discharge the battery from your Android device. Let it turn off.
Step 2: Turn your device back on. If the battery on your device isn’t calibrated, the battery indicator on the display will show some charge left. Your device will turn off pretty quickly.
Step 3: Without turning on your device, put it on charge. You will see the battery indicator on the screen. Let it charge to 100%.
Step 4: Once the indicator displays that your phone is fully charged, unplug it from the charger and turn it on.
Step 5: Check if the battery indicator on the display shows 100% charge. If it doesn’t put your phone on charge. Keep it connected to the charger until the indicator shows 100% charge or comes very close to 100%.
Step 6: Once your Android phone or tablet hits 100% charge, let it drain out again. Leave the display unlocked to help the battery drain out faster.
Step 7: Charge your phone to 100% without turning it on. When it is fully charged, remove the charging cable and turn it on. Your battery should be calibrated.
 Step 4: Once your phone restarts, check if its battery percentage has dropped.
Step 5: Plug the charger in and let your device charge to 100%.
Step 6: Restart your phone and unplug the charger.
Step 7: Carry out this process 2-3 times.
Step 8: Finally, let your phone charge to 100%. Launch the dialer app and type *#9900#.
Step 9: Tap on Batterystats Reset.
Step 4: Once your phone restarts, check if its battery percentage has dropped.
Step 5: Plug the charger in and let your device charge to 100%.
Step 6: Restart your phone and unplug the charger.
Step 7: Carry out this process 2-3 times.
Step 8: Finally, let your phone charge to 100%. Launch the dialer app and type *#9900#.
Step 9: Tap on Batterystats Reset.
 Step 10: Restart your device.
Your device’s battery will be calibrated following this procedure.
Read Also: The Tech Behind Crypto Casinos
Step 10: Restart your device.
Your device’s battery will be calibrated following this procedure.
Read Also: The Tech Behind Crypto Casinos
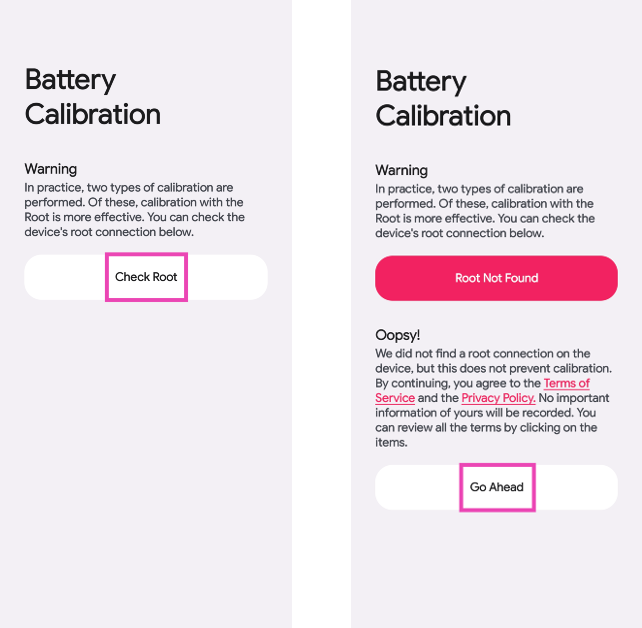 Step 3: Plug your phone into the charger and charge it to 100%.
Step 4: Without taking out the charger, hit Calibrate.
Step 3: Plug your phone into the charger and charge it to 100%.
Step 4: Without taking out the charger, hit Calibrate.
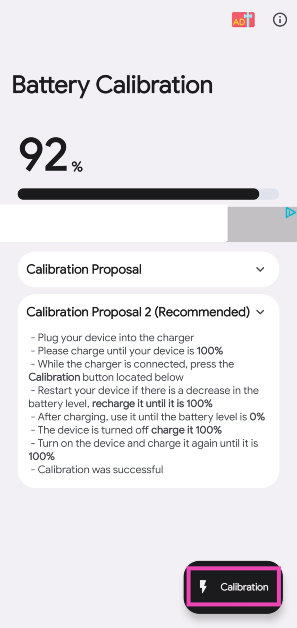 Step 5: Restart your device. If there is a decrease in battery percentage, charge it to 100%.
Step 6: Once the phone is fully charged, unplug the charger. Use the phone until its battery is completely drained.
Step 7: Once the device dies, plug in the charger and charge it to 100% without turning it on.
Step 8: Turn on the device and charge it to 100% again.
Step 5: Restart your device. If there is a decrease in battery percentage, charge it to 100%.
Step 6: Once the phone is fully charged, unplug the charger. Use the phone until its battery is completely drained.
Step 7: Once the device dies, plug in the charger and charge it to 100% without turning it on.
Step 8: Turn on the device and charge it to 100% again.

In This Article
 The NoiseFit Force Plus includes an advanced calling feature, Tru Sync and has a single-chip Bluetooth 5.3 making it easy to use and pair. It comes with a bunch of fitness and health monitoring features. The device offers over 130 sports modes and includes an array of wellness features under Noise Health Suite that can keep track of all your vitals including heart rate, SpO2, sleep monitor, stress measurement, breath practice and female cycle tracker.
In addition to this, the smartwatch allows users to call from a dial-pad, access recent calls and save up to 10 contacts on the watch using Noise Buzz. Users can also keep their daily reminders and weather forecast handy, with the help of its inbuilt Productivity Suite. According to the company it provides 7 days of battery life on a single charge.
The NoiseFit Force Plus includes an advanced calling feature, Tru Sync and has a single-chip Bluetooth 5.3 making it easy to use and pair. It comes with a bunch of fitness and health monitoring features. The device offers over 130 sports modes and includes an array of wellness features under Noise Health Suite that can keep track of all your vitals including heart rate, SpO2, sleep monitor, stress measurement, breath practice and female cycle tracker.
In addition to this, the smartwatch allows users to call from a dial-pad, access recent calls and save up to 10 contacts on the watch using Noise Buzz. Users can also keep their daily reminders and weather forecast handy, with the help of its inbuilt Productivity Suite. According to the company it provides 7 days of battery life on a single charge.


In This Article
 While there is no direct way to install Android apps on an iPhone, you can still utilise some workarounds to carry out this task. One of the best ways you can use Android apps on your iPhone is by mirroring your Android phone’s display on your iPhone. Apowermirror allows you to cast your phone’s display across different platforms. The only prerequisite for using this app is that both devices must be connected to the same WiFi network. Once that is taken care of, follow these steps.
Step 1: Download and install Apowermirror on your Android and iOS devices.
Step 2: Tap on the blue icon that says ‘Mirror’ on your Android device.
Step 3: Apowermirror will begin searching for other devices on the network. Select your iPhone from the list to begin mirroring your Android phone’s display.
While there is no direct way to install Android apps on an iPhone, you can still utilise some workarounds to carry out this task. One of the best ways you can use Android apps on your iPhone is by mirroring your Android phone’s display on your iPhone. Apowermirror allows you to cast your phone’s display across different platforms. The only prerequisite for using this app is that both devices must be connected to the same WiFi network. Once that is taken care of, follow these steps.
Step 1: Download and install Apowermirror on your Android and iOS devices.
Step 2: Tap on the blue icon that says ‘Mirror’ on your Android device.
Step 3: Apowermirror will begin searching for other devices on the network. Select your iPhone from the list to begin mirroring your Android phone’s display.
 This may be a far-fetched way to run Android apps on your iPhone, but it works. Emulators like iAndroid allow you to simulate the Android environment on your iPhone, which means you can use all the Android apps on your iOS device. The only catch is that you will need to jailbreak your iPhone to install an Android emulator on it. Jailbreaking your iPhone compromises the security of your device and prevents you from installing any software updates on it. It also instantly nulls the warranty of your device.
 This may seem too obvious a solution, but most Android apps have an iOS version for iPhone as well. The app market for both operating systems is pretty evenly matched. If you cannot find the iOS version of an Android app, try looking for similar apps on the App Store. This will rarely ever be an issue because almost every mainstream app is available on iOS. However, some niche apps may be absent on Apple’s platform. We ran into this problem while looking for some specific video editing apps on the App Store. If you cannot find an app by its exact name, try searching for the publisher. It is possible that the app may be listed under a different name on iOS.

In This Article


In This Article
 Step 3: Select your country and enter your landline number. Tap on ‘Next’.
 Step 4: Confirm that your number is correct and hit ‘OK’.
Step 5: WhatsApp will send you a verification code as a text to finish the registration process. Since your landline cannot receive text messages, choose the ‘Call me’ option instead. You may have to wait for a few seconds before you are allowed to choose this option.
Step 4: Confirm that your number is correct and hit ‘OK’.
Step 5: WhatsApp will send you a verification code as a text to finish the registration process. Since your landline cannot receive text messages, choose the ‘Call me’ option instead. You may have to wait for a few seconds before you are allowed to choose this option.
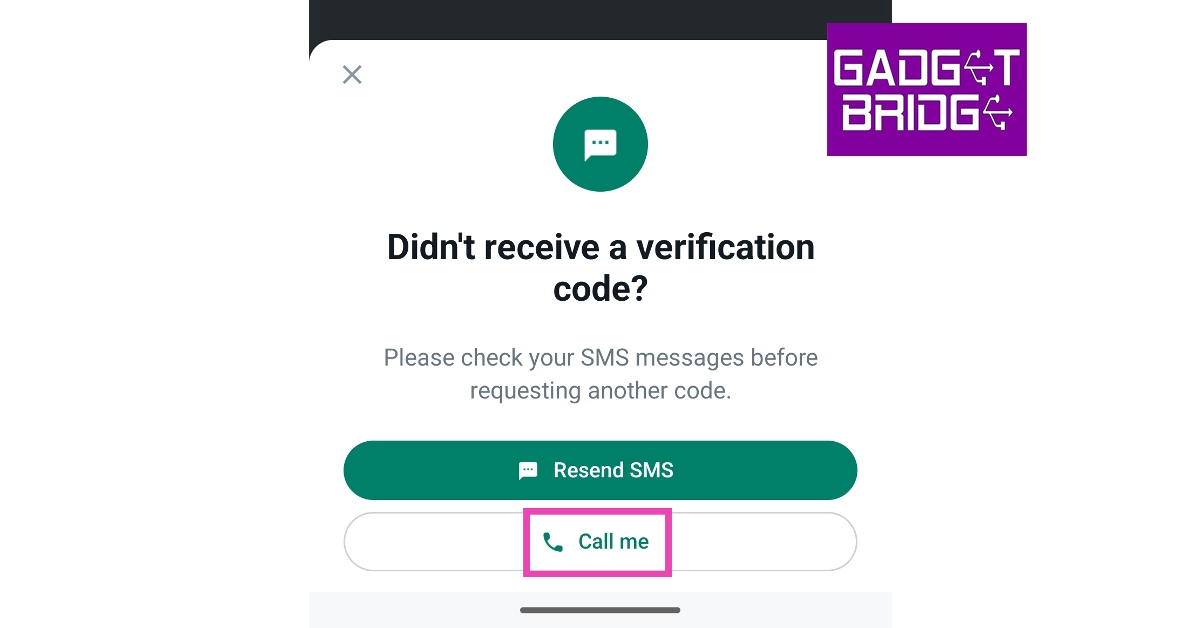 Step 6: Answer your landline when it rings and enter the code on WhatsApp.
Once you have entered the code, your landline number will be registered on WhatsApp. You can proceed to set up your account and start using WhatsApp.
Step 6: Answer your landline when it rings and enter the code on WhatsApp.
Once you have entered the code, your landline number will be registered on WhatsApp. You can proceed to set up your account and start using WhatsApp.
 If you don’t own a fixed line (landline) phone, you can still create a WhatsApp account without using your number. There are several online services that allow you to use a virtual number without needing to buy a physical SIM card. One of the leading virtual phone number apps in India is ‘Doosra’. You will need to subscribe to a monthly plan to start using the virtual number issued to you by Doosra. You can use this number to make calls, send texts, and even register to WhatsApp. Once you get a virtual number, you can follow the steps mentioned above to create a WhatsApp account. Instead of a landline number, simply enter your virtual number. Click on this link to begin using Doosra. For other ‘virtual number’ services, read this article.


In This Article

In This Article

In This Article
 Step 2: Tap on ‘My Balance’.
 Step 3: In the ‘My Winnings’ section, tap on ‘Verify to withdraw’.
 Step 4: Verify your email, PAN card, and bank account details to withdraw your winnings.
 Step 5: Once all details have been verified, enter the amount you want to withdraw from your winnings.
You must have a minimum of Rs 50 in winnings to withdraw an amount. For account verification, you need at least Rs 100 in winnings.
Step 5: Once all details have been verified, enter the amount you want to withdraw from your winnings.
You must have a minimum of Rs 50 in winnings to withdraw an amount. For account verification, you need at least Rs 100 in winnings.
 If you’re unable to withdraw money from your Dream11 winnings, there may be several reasons behind it. As mentioned earlier, you need at least Rs 50 in winnings to withdraw an amount from Dream11. You are only allowed to make 3 withdrawals a day. The sum total of these withdrawals cannot exceed Rs 1 crore. If you try making more withdrawals, the transaction will keep on failing. Wait for the cooldown period to be over in order to proceed. You can only withdraw your winnings and not the cash bonus credited to your account. After you have made a withdrawal request, it can take up to 3 business days for the amount to get credited to your bank account.
If you’ve met all the prerequisites and still aren’t able to withdraw your winnings, try these fixes.
If you’re unable to withdraw money from your Dream11 winnings, there may be several reasons behind it. As mentioned earlier, you need at least Rs 50 in winnings to withdraw an amount from Dream11. You are only allowed to make 3 withdrawals a day. The sum total of these withdrawals cannot exceed Rs 1 crore. If you try making more withdrawals, the transaction will keep on failing. Wait for the cooldown period to be over in order to proceed. You can only withdraw your winnings and not the cash bonus credited to your account. After you have made a withdrawal request, it can take up to 3 business days for the amount to get credited to your bank account.
If you’ve met all the prerequisites and still aren’t able to withdraw your winnings, try these fixes.

In This Article

In This Article


In This Article
 One of the reasons why Bluesky is taking off as a viable Twitter alternative when many others (like Mastodon) have failed is because it looks very similar to Twitter. This is because Bluesky was launched as a Twitter spin-off by then-CEO Jack Dorsey. Announced in 2019, Bluesky is a decentralised version of Twitter that allows users to host their domain name on a server of their choice. Since it is decentralised, Bluesky users can create their own communities on the platform by hosting new servers for other users. Users can also choose which algorithm they want to adopt within the platform.
As of now, Bluesky does not have features like direct messaging or bookmarks but its UI is very similar to Twitter. If you’re wondering why Bluesky isn’t a part of Twitter anymore, it’s because the decentralised network was listed as a separate entity in 2021. Twitter has undergone radical changes since its change of ownership in 2022. Some of these changes have not gone down well with users, who are desperately looking for a new alternative. Since Bluesky looks and feels very close to Twitter, it may be the platform to which most Twitter users migrate.
Since the social media platform is still developing moderation tools, users can only sign up on an invite basis for now. You can join the waitlist for an invite, or get one from an existing member on Bluesky.
One of the reasons why Bluesky is taking off as a viable Twitter alternative when many others (like Mastodon) have failed is because it looks very similar to Twitter. This is because Bluesky was launched as a Twitter spin-off by then-CEO Jack Dorsey. Announced in 2019, Bluesky is a decentralised version of Twitter that allows users to host their domain name on a server of their choice. Since it is decentralised, Bluesky users can create their own communities on the platform by hosting new servers for other users. Users can also choose which algorithm they want to adopt within the platform.
As of now, Bluesky does not have features like direct messaging or bookmarks but its UI is very similar to Twitter. If you’re wondering why Bluesky isn’t a part of Twitter anymore, it’s because the decentralised network was listed as a separate entity in 2021. Twitter has undergone radical changes since its change of ownership in 2022. Some of these changes have not gone down well with users, who are desperately looking for a new alternative. Since Bluesky looks and feels very close to Twitter, it may be the platform to which most Twitter users migrate.
Since the social media platform is still developing moderation tools, users can only sign up on an invite basis for now. You can join the waitlist for an invite, or get one from an existing member on Bluesky.
 Step 3: Select the hosting provider. You can either go for the default Bluesky server or enter the hosting provider of your choice.
 Step 4: If you have an invite code, enter it in the relevant box. If you don’t have an invite code, tap on ‘Join the waitlist’.
 Step 5: Enter your email and select ‘Join waitlist’. You will receive an invite in your mail when your turn arrives.
 If you cannot wait to get your hands on an invite code, there are a few things you can do. Like most people, you can try posting on Twitter for Bluesky invite codes. Since there is a vast overlap between the user base of the two platforms, someone may have an unused invite code for you.
You can also look for a Bluesky invite code on other places on the Internet. The subreddit r/blueskyinvite is one such place. You can either submit a new post asking for an invite code or comment on their pinned mega thread. Since the invite codes are in high demand, people are willing to get their hands on one by paying for it. We wouldn’t suggest doing this because it encourages scammers to deceive people with fake invite codes. Secondly, Bluesky will not always be invite-based. Eventually, everyone will be able to create an account on the platform. So it is not worth paying for an invite code right now.
If you cannot wait to get your hands on an invite code, there are a few things you can do. Like most people, you can try posting on Twitter for Bluesky invite codes. Since there is a vast overlap between the user base of the two platforms, someone may have an unused invite code for you.
You can also look for a Bluesky invite code on other places on the Internet. The subreddit r/blueskyinvite is one such place. You can either submit a new post asking for an invite code or comment on their pinned mega thread. Since the invite codes are in high demand, people are willing to get their hands on one by paying for it. We wouldn’t suggest doing this because it encourages scammers to deceive people with fake invite codes. Secondly, Bluesky will not always be invite-based. Eventually, everyone will be able to create an account on the platform. So it is not worth paying for an invite code right now.

| Model | Sale Price |
| 24HDX100s | 6499 |
| 32HDX7XPRO | 9499 |
| 32HDX7XPROBL | 9999 |
| 32HDX900S | 7499 |
| 40FHDX7XPRO | 15999 |
| 42FHDX7XPRO | 15999 |
| 43CA2022 | 20999 |
| 43CAPRO5022 | 22999 |
| 43FHDX7XPROBL | 16999 |
| 43UHDX7XPROBL | 19499 |
| 50CA7077 | 27999 |
| 50CAPRO5066 | 29999 |
| 50UHDX7XPROBL | 24999 |
| 55CA0909 | 29999 |
| 55CAPRO5088 | 29999 |
| 55UHDX7XPROBL | 28999 |
| 65CA0101 | 47999 |
| 75CA9099 | 84999 |
| 50MT5011 | 30499 |
| 55MT5022 | 34999 |
| 65MT5033 | 53999 |

In This Article

In This Article

In This Article
 Instagram’s Quiet Mode is a great tool for people who are easily distracted by Insta notifications. Quiet Mode pauses all DM notifications, letting you focus on your daily activities. When it is enabled, the green dot on your profile that signifies you are online on Instagram is replaced with a moon icon. This is super helpful because it lets your followers know that you can’t see message notifications on your device. If anyone messages you, they will receive an auto-reply explaining to them that you cannot see the notification alerts for their messages. In case of an emergency, they can contact you elsewhere.
You can choose the timing for Quiet Mode as well. By default, Quiet Mode is tuned to kick in at 11 pm and last till 7 am. The timing can be changed in Settings. Quiet Mode can be customised to be enabled at certain hours of the day, like when you have classes or when you are studying at home.
Once you halt Quiet Mode, you will be presented with a report of all the messages and notifications you received while you were away. Quiet Mode is a handy tool for students who want to focus on studying without being distracted by Instagram. You can use it to increase productivity and take frequent breaks from Instagram without having to delete your profile.
Instagram’s Quiet Mode is a great tool for people who are easily distracted by Insta notifications. Quiet Mode pauses all DM notifications, letting you focus on your daily activities. When it is enabled, the green dot on your profile that signifies you are online on Instagram is replaced with a moon icon. This is super helpful because it lets your followers know that you can’t see message notifications on your device. If anyone messages you, they will receive an auto-reply explaining to them that you cannot see the notification alerts for their messages. In case of an emergency, they can contact you elsewhere.
You can choose the timing for Quiet Mode as well. By default, Quiet Mode is tuned to kick in at 11 pm and last till 7 am. The timing can be changed in Settings. Quiet Mode can be customised to be enabled at certain hours of the day, like when you have classes or when you are studying at home.
Once you halt Quiet Mode, you will be presented with a report of all the messages and notifications you received while you were away. Quiet Mode is a handy tool for students who want to focus on studying without being distracted by Instagram. You can use it to increase productivity and take frequent breaks from Instagram without having to delete your profile.
 Step 3: Select ‘Settings and privacy’.
 Step 4: Tap on Notifications.
 Step 5: Select ‘Quiet Mode’.
 Step 6: Switch the toggle bar on for Quiet Mode.
 Step 7: Select the timing and duration for Quiet Mode.


In This Article
 Nokia has kept the design of the C12 quite simple and in line with the C-Series. This means that the C12 gets a textured plastic back and a two-step camera island. Housed in this camera island is an 8MP camera and an LED flash. The speaker has been placed at the bottom left corner of the back panel, similar to other C-Series smartphones.
 Nokia C12 gets an IPS LCD HD display up front. This display is surrounded by sizeable bezels that get thicker around the chin. The 5MP selfie camera has been placed in a dewdrop notch at the centre of the display. On the left edge of the plastic frame, you will find the volume rocker keys and the power button. The 3.5mm headphone jack has been placed up top and the microphone and the micro USB charging slot have been positioned at the bottom of the phone. Still no Type-C USB charging for Nokia C-Series smartphones.
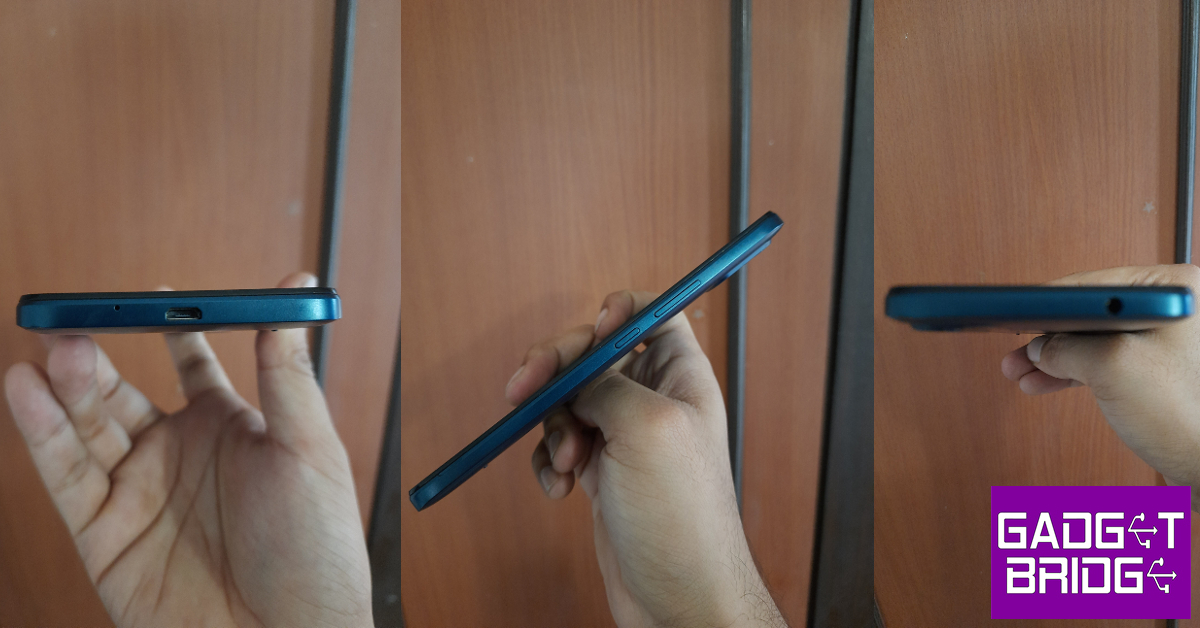 If you’re trying to locate the SIM tray and the memory card slot, there is one little surprise for you. Nokia C12 has a removable plastic back, similar to the smartphones of the yesteryears. Removing the back will give you access to the SIM and memory card slots. The 2,950mAh battery unit is also removable and can be replaced if it ever malfunctions. This is a pretty decent option to have on an entry-level smartphone as it gives the user an option to simply purchase a new battery unit instead of splurging money on repair costs.
 The 6.3-inch IPS LCD display is one of the brighter highlights of the smartphone. If you’re stepping up from a feature phone primarily to watch content on a bigger screen, this display will suit you well. We streamed HD content on YouTube and the image quality produced by the display was decent. The colours were rich and offered a good level of contrast. The speaker focuses more on the higher frequencies and the bass tends to get lost in the background. We would suggest using a pair of headphones while watching content on Nokia C12.
 The touch response offered by the display is below average. Gesture navigation did not work smoothly for us, so we had to revert to three-button navigation on this device. Sometimes, the touches failed to register while typing. The haptic triggers feel a bit too blunt and need to be dialled down.
What we like is that even though it is an entry-level smartphone, Nokia has equipped this smartphone with a scratch-resistant glass panel. The company also claims that the phone is splash resistant, which means it can survive light rainfall and minor spills.
The touch response offered by the display is below average. Gesture navigation did not work smoothly for us, so we had to revert to three-button navigation on this device. Sometimes, the touches failed to register while typing. The haptic triggers feel a bit too blunt and need to be dialled down.
What we like is that even though it is an entry-level smartphone, Nokia has equipped this smartphone with a scratch-resistant glass panel. The company also claims that the phone is splash resistant, which means it can survive light rainfall and minor spills.
 When it comes to daily tasks like texting, calling, checking emails, and streaming videos and music, Nokia C12 performs decently. However, multitasking can take a hit on the average speed. With music playing in the background, the navigation speed slows down a little. Running multiple apps has the same effect and can even warm up the smartphone slightly. In the AnTuTu benchmark test, Nokia C12 scored 97059 points.
 We didn’t expect much from Nokia C12 when it came to gaming, but the smartphone handled basic games like Subway Surfers and Candy Crush pretty well. It struggled with games like Garena Free Fire Max which are graphically demanding. The touch response also could not keep up with the gameplay.
 The OS experience on Nokia C12 is neat but even the lightweight Go Edition isn’t spared of bloatware. While Netflix comes preinstalled on the device, the software installs more apps while the phone is being set up. Bloatware aside, the stock Android experience is pretty decent. There are a handful of customisation options available for wallpaper and app drawer. You can manage camera and microphone permissions for all apps in the privacy settings. Digital Wellbeing and parental controls are also integrated into Android 12 Go Edition.
The 2,950 mAh battery unit on Nokia C12 offers an all-day power backup. If you use the smartphone conservatively, you can even push the power back up to 2 days. On moderate to heavy usage that included watching HD video content, playing music, and light gaming, the phone lasted an entire day with 20-30% battery still in the bank. The lack of a USB Type-C charging port is a letdown on otherwise decent battery performance.
Moving on, you get a sole 8MP primary camera at the back and a 5MP selfie camera up front. The camera app has a Night Mode for low-light photography, a Portrait Mode for close-up shots, and a Timelapse feature to record videos at a slower speed.
The OS experience on Nokia C12 is neat but even the lightweight Go Edition isn’t spared of bloatware. While Netflix comes preinstalled on the device, the software installs more apps while the phone is being set up. Bloatware aside, the stock Android experience is pretty decent. There are a handful of customisation options available for wallpaper and app drawer. You can manage camera and microphone permissions for all apps in the privacy settings. Digital Wellbeing and parental controls are also integrated into Android 12 Go Edition.
The 2,950 mAh battery unit on Nokia C12 offers an all-day power backup. If you use the smartphone conservatively, you can even push the power back up to 2 days. On moderate to heavy usage that included watching HD video content, playing music, and light gaming, the phone lasted an entire day with 20-30% battery still in the bank. The lack of a USB Type-C charging port is a letdown on otherwise decent battery performance.
Moving on, you get a sole 8MP primary camera at the back and a 5MP selfie camera up front. The camera app has a Night Mode for low-light photography, a Portrait Mode for close-up shots, and a Timelapse feature to record videos at a slower speed.
 The camera performance is nothing to write home about. Let’s start with the good aspects. The colours produced in the images are quite decent and make the photographs look lively. If you’re going to be using the camera a lot, make sure there’s ample light falling on the subject. The C12 does a good job of processing the colours on the images. The contrast level and white balance were satisfactory.
 However, when it comes to the details captured by the sensor, there is a lot that is left to be desired. Of course, you wouldn’t expect the sharpest images from an entry-level smartphone, but the images we took seemed blurry and had very little detail to them. Even in bright daylight, the camera struggled to produce sharp images.
 There is a Night Mode on the camera app, which does surprisingly well to light up the images, but the result is very grainy and blurred. The Portrait Mode performs well and is able to produce images with rich colours and some degree of focus on the subject.


In This Article
 The watch is IP68 water and dust resistant, making it safe to use outside and capable of withstanding submersion up to one metre deep. Just below the upper left corner of the frame, there is an integrated speaker. The microphone is placed just opposite to the speaker.


 This watch feels great in the hand and has a fashionable appearance. Featured on the Fastrack Revoltt FS1 is a 1.83-inch, 2.5D curved Ultra VU display. It has a resolution of 240×248 pixels and a maximum brightness of 500 nits. We had no issues utilising it indoors.


 However, the display is sufficiently bright such that text and icons can be seen, even in bright sunshine. On the other hand, the curved screen gives it a good luxury feel. The screen also experienced tiny scratches during our usage. The screen’s bezels are symmetrical on all four sides.
 We could easily hear the audio, which indicates that the audio quality is good. Additionally, you have single sync BT calling, which pairs as soon as your smartwatch is connected to your phone.
 The device also includes a total of 4 games, including 2048, Jigsaw Puzzle, Racing, and Discoloration.
Let’s now discuss the health monitoring features. The Fastrack Revoltt FS1 also provides stress monitoring, sleep tracking, and 24-hour heart monitoring. Users also get automatic HR and automatic stress monitoring with this, which can be turned on and off via its app. We examined the sensor’s precision, and according to our opinion, it is fairly accurate. However, we advise not using it in case of a medical emergency; instead, you should seek immediate medical attention.
The device also includes a total of 4 games, including 2048, Jigsaw Puzzle, Racing, and Discoloration.
Let’s now discuss the health monitoring features. The Fastrack Revoltt FS1 also provides stress monitoring, sleep tracking, and 24-hour heart monitoring. Users also get automatic HR and automatic stress monitoring with this, which can be turned on and off via its app. We examined the sensor’s precision, and according to our opinion, it is fairly accurate. However, we advise not using it in case of a medical emergency; instead, you should seek immediate medical attention.
 The Revoltt FS1 includes fast charging in this price range. Its battery life can be extended by one day with a rapid charge in just ten minutes. So, if your watch is accidentally uncharged and switched off, you can quickly charge it. With heavy use, it offers a battery life of three to four days.

 with 13th Gen Intel Core H-Series Processor launched in India")
In This Article
 The Swift Go is powered by a 13th-generation Intel Core i5-13500H processor with Intel Iris Xe Graphics. It comes with 16GB Dual-channel LPDDR5 RAM, 512GB PCIe Gen4 NVMe SSD storage and, 16 Gb/s.
Also Read: Fastrack Revoltt FS1 Pro with an arched AMOLED display now available in India
In terms of connectivity, it includes Wi-Fi 6E, Bluetooth 5.2, HDMI, USB 3.2 port, USB 3.2 Gen 1 port with power-off charging and USB Type-C port with DC-in. There is a 65Wh battery with 100 W PD charging support. According to the company, with a quick 30-minute charge, the new Swift Go can provide up to 4 hours of battery life.
On the launch Sudhir Goel, Chief Business Officer, Acer India said “We are extremely excited to unveil the Acer Swift Go on the latest Intel platform and OLED display. With its 13th Gen Intel Core CPU, Intel Evo verified features, and impressive OLED display, this ultra-portable laptop delivers exceptional performance and a superior computing experience. Additionally, the Intel Unison multi-device experience provides added convenience and versatility for our customers. Our commitment to providing innovative technology and a seamless user experience is reflected in the design and functionality of the Swift Go.”
For the latest gadget and tech news, and gadget reviews, follow us on Twitter, Facebook and Instagram. For newest tech & gadget videos subscribe to our YouTube Channel. You can also stay up to date using the Gadget Bridge Android App. You can find the latest car and bike news here.
The Swift Go is powered by a 13th-generation Intel Core i5-13500H processor with Intel Iris Xe Graphics. It comes with 16GB Dual-channel LPDDR5 RAM, 512GB PCIe Gen4 NVMe SSD storage and, 16 Gb/s.
Also Read: Fastrack Revoltt FS1 Pro with an arched AMOLED display now available in India
In terms of connectivity, it includes Wi-Fi 6E, Bluetooth 5.2, HDMI, USB 3.2 port, USB 3.2 Gen 1 port with power-off charging and USB Type-C port with DC-in. There is a 65Wh battery with 100 W PD charging support. According to the company, with a quick 30-minute charge, the new Swift Go can provide up to 4 hours of battery life.
On the launch Sudhir Goel, Chief Business Officer, Acer India said “We are extremely excited to unveil the Acer Swift Go on the latest Intel platform and OLED display. With its 13th Gen Intel Core CPU, Intel Evo verified features, and impressive OLED display, this ultra-portable laptop delivers exceptional performance and a superior computing experience. Additionally, the Intel Unison multi-device experience provides added convenience and versatility for our customers. Our commitment to providing innovative technology and a seamless user experience is reflected in the design and functionality of the Swift Go.”
For the latest gadget and tech news, and gadget reviews, follow us on Twitter, Facebook and Instagram. For newest tech & gadget videos subscribe to our YouTube Channel. You can also stay up to date using the Gadget Bridge Android App. You can find the latest car and bike news here.