
In This Article
OnePlus 11R pre-orders open in India: Details inside

Early this month, the OnePlus 11R was unveiled in India. Pre-orders were not opened right away, nor were sales. At the time of the launch, the company announced that the phone’s pre-orders will begin on February 21 while the sale will begin later this month on February 28. In the nation, pre-orders for smartphone are currently open.
Top ways to Fix Samsung Galaxy S22, S22+ and S22 Ultra Fingerprint Sensor Issue

Samsung’s S22 series offered some of the best Android smartphones last year, only to be surpassed by its successor, S23. Samsung’s flagship series boasts one of the fastest under-display fingerprint scanners you can find on a smartphone. Oftentimes, user report that the sensor isn’t working as intended or is entirely dysfunctional. In this article, we bring you the top 7 ways to fix the Samsung Galaxy S22, S22+, and S22 Ultra fingerprint sensor issue.
Read Also: Poco C55 to launch in India today: Launch details inside
 Your Samsung Galaxy S22 is well equipped to diagnose any faults in its hardware. This includes the fingerprint sensor as well. To run a check on the under-display fingerprint sensor, simply go to the dialer app and type *#0*#. Tap on ‘Sensor’ and select ‘Normal Scan’ under Fingerprint Test. Additionally, check the display for any hardware issues as well. If the tests do not return any hardware faults, proceed to the other fixes in this list. If there is an issue with the hardware, you will need to take your phone to a professional repair centre.
Restarting your smartphone is the first thing you can do in order to fix any software-related issues. A quick restart resolves any background glitches and resumes normal functioning. To restart your Samsung Galaxy S22 series smartphone, simply long press the power button on the side and select ‘Restart’. If the touchscreen is totally dysfunctional, press the Volume Down key and Power key together until your phone shuts down. Restart your phone by long pressing the power key again.
If you recently installed a screen protector over your phone’s display, you need to increase the touchscreen sensitivity along with it to make sure everything works as intended. Since there is an additional layer between your fingers and the touch display, increased touch sensitivity is essential to ensure a lag-free experience. Go to Settings>Display and tap the toggle bar next to touch sensitivity to turn it on.
Your Samsung Galaxy S22 is well equipped to diagnose any faults in its hardware. This includes the fingerprint sensor as well. To run a check on the under-display fingerprint sensor, simply go to the dialer app and type *#0*#. Tap on ‘Sensor’ and select ‘Normal Scan’ under Fingerprint Test. Additionally, check the display for any hardware issues as well. If the tests do not return any hardware faults, proceed to the other fixes in this list. If there is an issue with the hardware, you will need to take your phone to a professional repair centre.
Restarting your smartphone is the first thing you can do in order to fix any software-related issues. A quick restart resolves any background glitches and resumes normal functioning. To restart your Samsung Galaxy S22 series smartphone, simply long press the power button on the side and select ‘Restart’. If the touchscreen is totally dysfunctional, press the Volume Down key and Power key together until your phone shuts down. Restart your phone by long pressing the power key again.
If you recently installed a screen protector over your phone’s display, you need to increase the touchscreen sensitivity along with it to make sure everything works as intended. Since there is an additional layer between your fingers and the touch display, increased touch sensitivity is essential to ensure a lag-free experience. Go to Settings>Display and tap the toggle bar next to touch sensitivity to turn it on.
 If the under-display fingerprint sensor doesn’t work even after increasing the touchscreen sensitivity, take off the screen protector and try again. Sometimes, air bubbles get between the screen protector and the phone’s display and prevent an ideal connection between the two. To minimise any issues with the screen protector always look up whether it is compatible with your phone’s manufacturer before buying it.
Step 3: Click on ‘Download and update’ to install the latest OS version on your smartphone.
Read Also: How to Restore Deleted WhatsApp Messages without Backup? [Both Android and iOS]
If the under-display fingerprint sensor doesn’t work even after increasing the touchscreen sensitivity, take off the screen protector and try again. Sometimes, air bubbles get between the screen protector and the phone’s display and prevent an ideal connection between the two. To minimise any issues with the screen protector always look up whether it is compatible with your phone’s manufacturer before buying it.
Step 3: Click on ‘Download and update’ to install the latest OS version on your smartphone.
Read Also: How to Restore Deleted WhatsApp Messages without Backup? [Both Android and iOS]
In This Article
Test the sensor
 Your Samsung Galaxy S22 is well equipped to diagnose any faults in its hardware. This includes the fingerprint sensor as well. To run a check on the under-display fingerprint sensor, simply go to the dialer app and type *#0*#. Tap on ‘Sensor’ and select ‘Normal Scan’ under Fingerprint Test. Additionally, check the display for any hardware issues as well. If the tests do not return any hardware faults, proceed to the other fixes in this list. If there is an issue with the hardware, you will need to take your phone to a professional repair centre.
Restart your smartphone
 Restarting your smartphone is the first thing you can do in order to fix any software-related issues. A quick restart resolves any background glitches and resumes normal functioning. To restart your Samsung Galaxy S22 series smartphone, simply long press the power button on the side and select ‘Restart’. If the touchscreen is totally dysfunctional, press the Volume Down key and Power key together until your phone shuts down. Restart your phone by long pressing the power key again.
Clean your finger and the phone display
The most likely reason behind the fingerprint sensor not working on your smartphone is a dirty display. While using your phone under humid conditions, it is quite common for sweat to stick to the phone’s screen and create some trouble. Simply wipe your phone down with a microfibre cloth and try again. If your S22’s display is fine, it may not be registering your fingerprint because your finger is too dry or chapped. Try using the fingerprint scanner with moisturized hands and see if it works.Increase touchscreen sensitivity
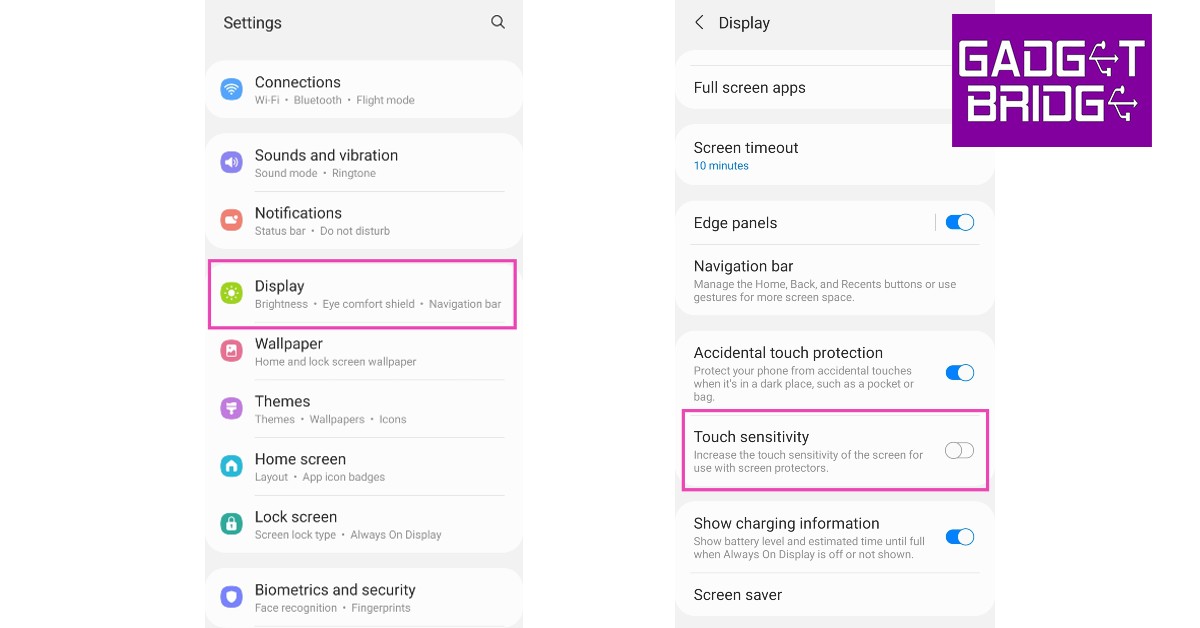 If you recently installed a screen protector over your phone’s display, you need to increase the touchscreen sensitivity along with it to make sure everything works as intended. Since there is an additional layer between your fingers and the touch display, increased touch sensitivity is essential to ensure a lag-free experience. Go to Settings>Display and tap the toggle bar next to touch sensitivity to turn it on.
Remove the screen protector
 If the under-display fingerprint sensor doesn’t work even after increasing the touchscreen sensitivity, take off the screen protector and try again. Sometimes, air bubbles get between the screen protector and the phone’s display and prevent an ideal connection between the two. To minimise any issues with the screen protector always look up whether it is compatible with your phone’s manufacturer before buying it.
Register two fingerprints for the same finger
While Samsung Galaxy S22’s fingerprint scanner thoroughly maps out your fingerprint in different positions, there may still be certain positions where it takes time to register the print or doesn’t register it all. To get rid of this issue, register the same fingerprint twice and make sure you cover every possible position while scanning it. Your Samsung Galaxy S22 allows you to register prints for multiple fingers, making it easy to unlock your device using either hand. If all fingerprint profiles are occupied, delete one and register an extra set of prints for the finger your use the most to unlock your smartphone.Update System Software
If you’re using an old version of the system software, chances are that developers fixed the fingerprint scanner bug in a later update. Here’s how you can update the software version of your Samsung Galaxy S22. Step 1: Go to Settings. Step 2: Scroll down and select ‘Software Update’. Step 3: Click on ‘Download and update’ to install the latest OS version on your smartphone.
 Read Also: How to Restore Deleted WhatsApp Messages without Backup? [Both Android and iOS]
Conclusion
These are the top 7 ways to fix the Samsung Galaxy S22, S22+, and S22 Ultra fingerprint sensor issue. You can also try performing a factory reset on your smartphone if none of the fixes mentioned above work for you. Make sure you back up all your data before resetting your phone to its factory settings. For the latest gadget and tech news, and gadget reviews, follow us on Twitter, Facebook and Instagram. For newest tech & gadget videos subscribe to our YouTube Channel. You can also stay up to date using the Gadget Bridge Android App. You can find the latest car and bike news here.Top 11 ways to Fix ‘Camera not working’ issue on iPhone 13 & 14 (2024)
")
iPhone’s camera arrangement and image processing are in a category of its own, unmatched by its peers. This doesn’t mean that it is immune to malfunctions. Users often report seeing a black screen upon opening the camera app. Usually, this issue is caused by the phone case blocking the camera sensors, but if that isn’t the case with your device, there are a few steps you can take to fix it before taking your phone to the service centre. In this article, we bring you the top 11 ways to fix the ‘camera not working’ issue on iPhone 13 and 14 series.
Read Also: Unlocking the Potential of Your VPN: 8 Things to Do
Switching between the front and rear cameras refreshes the software and fixes any minor issues with the camera app. If your iPhone displays a black screen upon launching the camera app, it may be because the software wasn’t able to transition between the two camera units previously. Tap the camera switcher icon at the bottom right corner of the screen to toggle between the front and rear cameras.
An ill-fitting phone cover can hinder the camera lens, leading to a partial blackout on the viewfinder. This problem is more common in knock-off phone covers, which is why it is recommended you buy phone accessories from reputed sellers only. Take off your iPhone’s case and check if the camera is working again. If it isn’t move on to other fixes.
Step 2: Select VoiceOver.
Step 3: Turn the toggle bar off.
Read Also: Did You Accidentally Delete Your Favourite Photos? Here’s How to Recover Them using Stellar Photo Recovery!
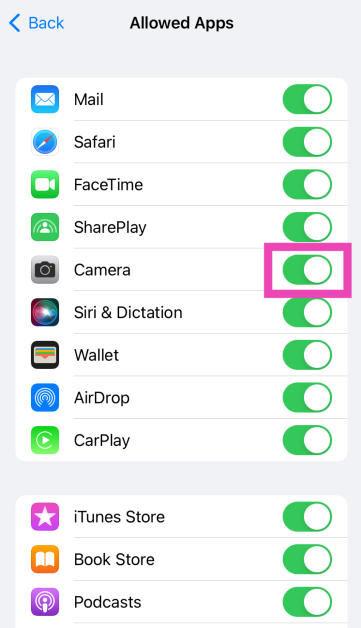
 Step 2: Scroll down and select Content & Privacy Restrictions.
Step 3: Tap on Allowed Apps.
Step 2: Scroll down and select Content & Privacy Restrictions.
Step 3: Tap on Allowed Apps.
 Step 4: Make sure the toggle switch for Camera is turned on.
If you’re using your iPhone to shoot videos under direct sunlight, it can warm up very quickly. The overheating can cause the camera app to stop working. In this scenario, you’re iPhone gives you an overheating warning to let you know it is shutting down the camera app. Rest your iPhone and let it cool down before starting the camera app again.
A simple restart can fix any software glitches that may be keeping your iPhone’s camera from working properly. To restart your iPhone, simply press one of the volume buttons along with the side key until the power slider appears on the screen. Drag the power slider to the right to turn off your iPhone. Power the phone back on by pressing and holding the side key.
Are you using an older version of iOS? Apple is quick to patch any bugs with an update to the system software. Update iOS to its latest version and check if the issue has been resolved. To update your iPhone, go to Settings>General>Software Update and download the update.
Step 4: Make sure the toggle switch for Camera is turned on.
If you’re using your iPhone to shoot videos under direct sunlight, it can warm up very quickly. The overheating can cause the camera app to stop working. In this scenario, you’re iPhone gives you an overheating warning to let you know it is shutting down the camera app. Rest your iPhone and let it cool down before starting the camera app again.
A simple restart can fix any software glitches that may be keeping your iPhone’s camera from working properly. To restart your iPhone, simply press one of the volume buttons along with the side key until the power slider appears on the screen. Drag the power slider to the right to turn off your iPhone. Power the phone back on by pressing and holding the side key.
Are you using an older version of iOS? Apple is quick to patch any bugs with an update to the system software. Update iOS to its latest version and check if the issue has been resolved. To update your iPhone, go to Settings>General>Software Update and download the update.
 Sometimes, the native camera app on your iPhone can start malfunctioning out of the blue. This may lead you to believe that there’s something wrong with the camera module, when in reality it is a software issue. This problem can be resolved by updating your iPhone’s software, but in case it doesn’t work, try using a third-party camera app like Halide Mark II. If that doesn’t work, your iPhone’s camera hardware might be damaged.
If one of the camera lenses on your iPhone is damaged, it can cause the viewfinder in the Camera app to black out. Take off the cover of your iPhone and inspect the lenses for any cracks or other kinds of damage. Put it under a light source to check if there are any cracks under the glass cover.
Step 2: Scroll down and select Transfer or Reset iPhone.
Step 3: Tap on Reset.
Step 4: In the following window, select Reset All Settings.
Step 5: Enter the PIN and confirm your selection.
Read Also: How to Use Google Assistant to Identify a Song in Any Language
Sometimes, the native camera app on your iPhone can start malfunctioning out of the blue. This may lead you to believe that there’s something wrong with the camera module, when in reality it is a software issue. This problem can be resolved by updating your iPhone’s software, but in case it doesn’t work, try using a third-party camera app like Halide Mark II. If that doesn’t work, your iPhone’s camera hardware might be damaged.
If one of the camera lenses on your iPhone is damaged, it can cause the viewfinder in the Camera app to black out. Take off the cover of your iPhone and inspect the lenses for any cracks or other kinds of damage. Put it under a light source to check if there are any cracks under the glass cover.
Step 2: Scroll down and select Transfer or Reset iPhone.
Step 3: Tap on Reset.
Step 4: In the following window, select Reset All Settings.
Step 5: Enter the PIN and confirm your selection.
Read Also: How to Use Google Assistant to Identify a Song in Any Language
In This Article
What’s causing my iPhone’s camera to malfunction?
If your iPhone 13 or 15 series camera suddenly stops working, it could be due to one of these reasons.- Overheating issues: If you’ve been video recording on your iPhone under direct sunlight for a long time, it can cause the device to overheat. Once the internal temperature of your iPhone hits a certain limit, it causes the camera to shut down. Typically, you would see an alert on your iPhone’s display before the camera app shuts down.
- Software issues: Your iPhone isn’t immune to software glitches. The good news is that these glitches can be quickly fixed by restarting your phone or updating its software. If your camera isn’t working in a particular app, then the fault lies with the app and not the camera arrangement.
- Hardware issues: Hardware issues are more serious since they can rarely be fixed at home. Sometimes, even a small knock can damage your iPhone’s camera if it lands on the lens. You can prevent the damage by using lens cover accessories.
Switch between the camera lens
 Switching between the front and rear cameras refreshes the software and fixes any minor issues with the camera app. If your iPhone displays a black screen upon launching the camera app, it may be because the software wasn’t able to transition between the two camera units previously. Tap the camera switcher icon at the bottom right corner of the screen to toggle between the front and rear cameras.
Restart the camera app
Closing the camera app and starting it again can resolve any minor background issues with your iPhone’s camera software. To close the camera simply swipe and hold from the bottom of your iPhone’s screen to access the app switcher. iPhones without a FaceID have a dedicated home button that can be pressed twice to access the app switcher. Slide to the camera app and then swipe upwards to close it. Launch the app again from your iPhone’s home screen to see if it is working.Check if your iPhone’s case is blocking the camera
 An ill-fitting phone cover can hinder the camera lens, leading to a partial blackout on the viewfinder. This problem is more common in knock-off phone covers, which is why it is recommended you buy phone accessories from reputed sellers only. Take off your iPhone’s case and check if the camera is working again. If it isn’t move on to other fixes.
Turn off VoiceOver
Oftentimes, iPhone users report that the VoiceOver feature interferes with the basic functioning of the phone. This issue extends to the camera app as well. If your iPhone’s camera unexpectedly stopped working, try turning off VoiceOver and see if normalcy has been restored. Here’s how you can turn off VoiceOver on your iPhone 13 or 14. Step 1: Go to Settings and select Accessibility. Step 2: Select VoiceOver.
 Step 3: Turn the toggle bar off.
 Read Also: Did You Accidentally Delete Your Favourite Photos? Here’s How to Recover Them using Stellar Photo Recovery!
Make sure the camera app isn’t blocked by Screen Time
Step 1: Go to Settings and select Screen Time.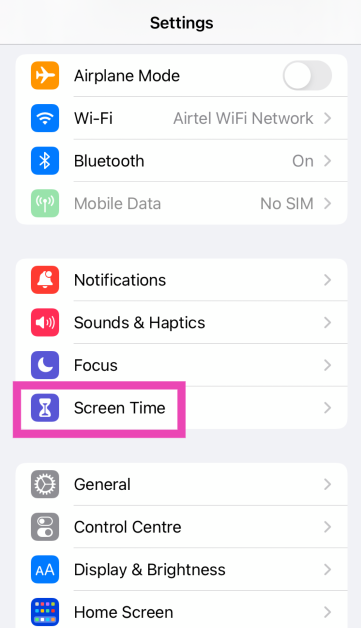 Step 2: Scroll down and select Content & Privacy Restrictions.
 Step 3: Tap on Allowed Apps.
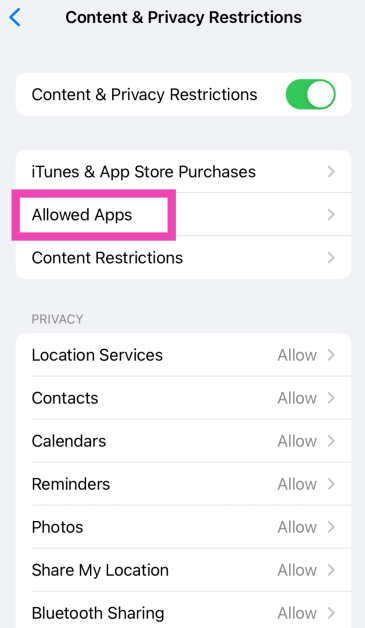 Step 4: Make sure the toggle switch for Camera is turned on.
Let your iPhone cool down
 If you’re using your iPhone to shoot videos under direct sunlight, it can warm up very quickly. The overheating can cause the camera app to stop working. In this scenario, you’re iPhone gives you an overheating warning to let you know it is shutting down the camera app. Rest your iPhone and let it cool down before starting the camera app again.
Restart your iPhone
 A simple restart can fix any software glitches that may be keeping your iPhone’s camera from working properly. To restart your iPhone, simply press one of the volume buttons along with the side key until the power slider appears on the screen. Drag the power slider to the right to turn off your iPhone. Power the phone back on by pressing and holding the side key.
Update your iPhone
 Are you using an older version of iOS? Apple is quick to patch any bugs with an update to the system software. Update iOS to its latest version and check if the issue has been resolved. To update your iPhone, go to Settings>General>Software Update and download the update.
Use a third-party camera app
 Sometimes, the native camera app on your iPhone can start malfunctioning out of the blue. This may lead you to believe that there’s something wrong with the camera module, when in reality it is a software issue. This problem can be resolved by updating your iPhone’s software, but in case it doesn’t work, try using a third-party camera app like Halide Mark II. If that doesn’t work, your iPhone’s camera hardware might be damaged.
Check for hardware damage
 If one of the camera lenses on your iPhone is damaged, it can cause the viewfinder in the Camera app to black out. Take off the cover of your iPhone and inspect the lenses for any cracks or other kinds of damage. Put it under a light source to check if there are any cracks under the glass cover.
Perform a factory reset
If the fixes mentioned above did not work for you, you can try performing a factory reset on your iPhone as a last-ditch effort to resolve the camera issue. Before you go through with this, make sure all your personal data is backed up to cloud storage as you will lose it in the process. Here’s how you can reset your iPhone 13 or 14 to its factory settings. Step 1: Go to Settings and select General.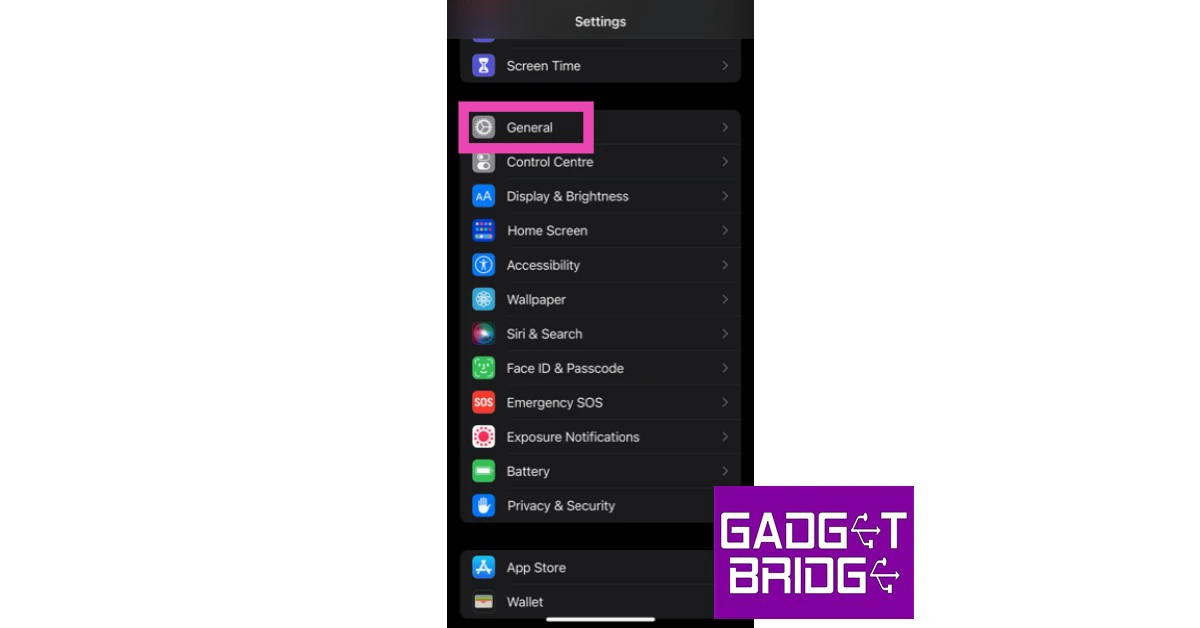 Step 2: Scroll down and select Transfer or Reset iPhone.
 Step 3: Tap on Reset.
 Step 4: In the following window, select Reset All Settings.
 Step 5: Enter the PIN and confirm your selection.
Read Also: How to Use Google Assistant to Identify a Song in Any Language
Step 5: Enter the PIN and confirm your selection.
Read Also: How to Use Google Assistant to Identify a Song in Any Language
Frequently Asked Questions (FAQs)
Why is the camera on my iPhone not working?
Your iPhone camera can start to malfunction if the device gets overheated. Software glitches can also cause it to stop working. A simple restart should fix both issues.Why is my iPhone’s camera only partially working?
If you’re able to see a partial view of the surroundings on the viewfinder, it is possible that your iPhone’s camera is being blocked by the device cover. Take off the cover and try again.How do I turn off the shutter sound on my iPhone camera?
You can turn off the shutter sound of your iPhone camera by muting the system volume. Use the ringer switch or volume rocker keys to mute it.Conclusion
These are the top 11 ways to fix the ‘camera not working’ issue on the iPhone 13 and 14 series. If neither of these fixes worked for you, the problem is likely rooted in the camera hardware. For further diagnosis, take your iPhone to an Apple-authorised service centre. If you know of any other ways to fix the iPhone camera, let us know in the comments!Google Chrome now offers memory and energy modes for desktop users

The Memory Savers and Energy Saver modes are now available on Chrome for desktops. Note that all these features were announced last year that will make the PC run faster and have longer battery life when in Memory and Energy saver mode. While the Energy Saver function will save battery life by restricting background activity. Now that they are available, the functionalities come enabled by default on Mac, Windows, Linux, and Chromebooks.
Google is now widely implementing the Memory and Energy Saving modes on Chrome 110 for Mac, Windows, Linux, and Chromebooks. The desktop will run more quickly and have longer battery life while using Google’s browser when Memory and Energy saver modes are enabled. Memory will be automatically freed up from inactive tabs in Memory Saving mode, while the Energy Saver feature will cut down on background activity to save battery life. Under Chrome Settings, you can disable the modes if necessary.
In This Article
Turn Memory Saver on or off
Chrome deactivates inactive tabs to conserve memory and improve the performance of active tabs. An idle tab immediately reloads when you access it. Google claims that the Memory Saver mode will improve the performance of your active video and gaming tabs. Your computer’s settings and usage practices can make it impossible to deactivate a tab.- Launch Chrome on your computer.
- Click More and then Settings in the top right corner.
- Toggle to Performance from the left.
- On or off the Memory Saver.
Turn Energy Saver on or off
Chrome decreases its background processes and image capture rate in order to prolong the battery life of your device. When Energy Saving is activated, it begins operating automatically anytime your device is unplugged or when the battery is running low. Your device’s Energy Saver does not activate when it is plugged in.- Launch Chrome on your desktop.
- Click More and then Settings in the top right corner.
- Click Performance in the left menu.
- Choose your desired option after turning Energy Saving on or off.
7 Best Offline Music Player Apps for Android

While music streaming apps like Spotify, Apple Music, and Amazon Music have significantly changed how we consume music on our mobile devices, some people still prefer maintaining their own digital library – and for good reason too. Firstly, streaming music online can use up a good portion of your mobile data. Some people may find downloading music to be a much better alternative to streaming their favourite artists over and over again. While streaming services like Spotify offer the option to download your favourite songs, the downloads are only available until your subscription lasts. For those who would rather maintain a local music library on their smartphone, here are the 7 best offline music player apps for Android.
Read Also: Vivo V27 series confirmed to launch in India on March 1
One of the oldest and most popular music players on Android, Pulsar Music Player neatly categorises the music on your phone and offers a clean, ad-free interface at no additional cost. Android’s Material You design has been well integrated into the app, elevating the aesthetic and bringing a personalised touch to the music player. Pulsar Music Player can run a wide range of file formats including mp3, aac, flac, ogg, wav, and more. On top of that, you get the complete set of functions like gapless playback, lyrics display, crossfade, audio balance, visualiser, music equaliser, play speed adjusting, and more. Pulsar Music Player also supports Chromecast, Android Auto, and voice assistant, and you can easily integrate your Last.fm account with the app to record your scrobbles.
Canaree Music Player offers a beautiful app interface on top of the basic features that you expect from a music player. The buttonless player controls further add to the meticulous design of the app. Apart from organising your music collection, Canaree can also catalogue the podcasts in your library and make them accessible in chronological order. The app also comes with multiple themes for the player along with a 3D virtualiser.
BlackPlayer has all the ingredients for a perfect music player app. With the Material design seamlessly incorporated into the app and elegant animations across the board, BlackPlayer offers a unique look compared to other music players. This app also keeps a track of your most-played artists and songs and curates your homepage with personalised suggestions. BlackPlayer comes with Android Auto, WearOS, and Last.fm support.
If you’re looking for greater customisation in a music player, you may want to look into Pulse Music. This app lets you customise your home page, offers multiple Now Playing screens, curates playlists, and lets you customise the widget controls. The app also comes with multiple themes (dark themes included) and offers unique and helpful features like a sleep timer, Bluetooth autoplay, smart search, and more.
One Music Player curates personalised playlists for you based on your listening activity. While the playlists may not have songs outside of your music library, it is still a handy feature that compiles all your most listened songs in one place. To keep things fresh, One Music Player also personalises your homepage. On top of that, you get all the basic functions of a music player along with some unique elements like a carousel effect for album covers, an option to enrich song cover images, and more.
Nyx Music Player is designed for those who give aesthetics a higher preference than anything else. With 6 accent colours and 24 possible themes, Nyx has been thoughtfully designed to offer a unique and intricate interface. The app also comes with its own transitions and animations that greatly elevate the experience. On top of that, you get unique features like looper (repeats your favourite part of the song), nature sound (plays sounds of nature in 432Hz), volume boost, 3D sound, and more.
Retro Music Player comes with 3 base themes, 10+ now playing themes, and a bunch of accents that can be selected from the colour palette. On top of that, you get features like a music duration filter, gapless playback, carousel effect, drive mode, Bluetooth support, tag editor, home screen widgets, and support for over 30 languages. Retro Music Player also curates your homepage, filling it with music suggestions based on your listening activity.
Read Also: Top 5 ways to Fix ‘Instagram Pictures Not Showing Up’ Issue
In This Article
Pulsar Music Player
 One of the oldest and most popular music players on Android, Pulsar Music Player neatly categorises the music on your phone and offers a clean, ad-free interface at no additional cost. Android’s Material You design has been well integrated into the app, elevating the aesthetic and bringing a personalised touch to the music player. Pulsar Music Player can run a wide range of file formats including mp3, aac, flac, ogg, wav, and more. On top of that, you get the complete set of functions like gapless playback, lyrics display, crossfade, audio balance, visualiser, music equaliser, play speed adjusting, and more. Pulsar Music Player also supports Chromecast, Android Auto, and voice assistant, and you can easily integrate your Last.fm account with the app to record your scrobbles.
Canaree Music Player
 Canaree Music Player offers a beautiful app interface on top of the basic features that you expect from a music player. The buttonless player controls further add to the meticulous design of the app. Apart from organising your music collection, Canaree can also catalogue the podcasts in your library and make them accessible in chronological order. The app also comes with multiple themes for the player along with a 3D virtualiser.
BlackPlayer Music Player
 BlackPlayer has all the ingredients for a perfect music player app. With the Material design seamlessly incorporated into the app and elegant animations across the board, BlackPlayer offers a unique look compared to other music players. This app also keeps a track of your most-played artists and songs and curates your homepage with personalised suggestions. BlackPlayer comes with Android Auto, WearOS, and Last.fm support.
Pulse Music
 If you’re looking for greater customisation in a music player, you may want to look into Pulse Music. This app lets you customise your home page, offers multiple Now Playing screens, curates playlists, and lets you customise the widget controls. The app also comes with multiple themes (dark themes included) and offers unique and helpful features like a sleep timer, Bluetooth autoplay, smart search, and more.
One Music Player
 One Music Player curates personalised playlists for you based on your listening activity. While the playlists may not have songs outside of your music library, it is still a handy feature that compiles all your most listened songs in one place. To keep things fresh, One Music Player also personalises your homepage. On top of that, you get all the basic functions of a music player along with some unique elements like a carousel effect for album covers, an option to enrich song cover images, and more.
Nyx Music Player
 Nyx Music Player is designed for those who give aesthetics a higher preference than anything else. With 6 accent colours and 24 possible themes, Nyx has been thoughtfully designed to offer a unique and intricate interface. The app also comes with its own transitions and animations that greatly elevate the experience. On top of that, you get unique features like looper (repeats your favourite part of the song), nature sound (plays sounds of nature in 432Hz), volume boost, 3D sound, and more.
Retro Music Player
 Retro Music Player comes with 3 base themes, 10+ now playing themes, and a bunch of accents that can be selected from the colour palette. On top of that, you get features like a music duration filter, gapless playback, carousel effect, drive mode, Bluetooth support, tag editor, home screen widgets, and support for over 30 languages. Retro Music Player also curates your homepage, filling it with music suggestions based on your listening activity.
Read Also: Top 5 ways to Fix ‘Instagram Pictures Not Showing Up’ Issue
Retro Music Player comes with 3 base themes, 10+ now playing themes, and a bunch of accents that can be selected from the colour palette. On top of that, you get features like a music duration filter, gapless playback, carousel effect, drive mode, Bluetooth support, tag editor, home screen widgets, and support for over 30 languages. Retro Music Player also curates your homepage, filling it with music suggestions based on your listening activity.
Read Also: Top 5 ways to Fix ‘Instagram Pictures Not Showing Up’ Issue
Conclusion
These are our picks for the 7 best offline music player apps for Android. All the music players on this list are free to use, but some may come with additional features locked behind a paywall. Think there’s an app that deserves to be on this list? Let us know in the comments! For the latest gadget and tech news, and gadget reviews, follow us on Twitter, Facebook and Instagram. For newest tech & gadget videos subscribe to our YouTube Channel. You can also stay up to date using the Gadget Bridge Android App. You can find the latest car and bike news here.Garena Free Fire Redeem Codes Today 21 February 2023: Here is how to claim them

Garena Free Fire is a battle royale game with regular awards and tournaments to keep players interested. If you play Garena Free Fire, you should be aware of the redeem codes that are released on a daily basis. However, because the battle royale game is banned in India, players from other countries can use the Free Fire Redeem codes daily. If you’re unfamiliar with the Garena Free Fire redeem codes or don’t know how to get them, we’ve put together a step-by-step guide to help you redeem them. Check out Garena Free Fire Redeem Codes for 21 February 2023.
The Free Fire redeem codes are a great way to get free stuff. These are 12-digit codes that contain alphabets and numbers, as well as an expiration date and time. Because the Garena FF redeem codes cannot be used more than once, you should hurry to the redemption page to claim your free reward before someone else does. To get a free reward, all you have to do is go to reward.ff.garena.com/en, which is the official redemption page. Also, keep an eye on this space for daily updates on Garena Free Fire redemption codes and rewards.
In This Article
Garena Free Fire Redeem Codes Today 21 February 2023
- B3G7A22TWDR7X
- 6KWMFJVMQQYG
- FFCMCPSUYUY7E
- X99TK56XDJ4X
- MCPW2D1U3XA3
- FFCMCPSEN5MX
- HNC95435FAGJ
- EYH2W3XK8UPG
- BR43FMAPYEZZ
- FF7MUY4ME6SC
- FFCMCPSGC9XZ
- MCPW2D2WKWF2
- V427K98RUCHZ
- GCNVA2PDRGRZ
- 4ST1ZTBE2RP9
- 8F3QZKNTLWBZ
- WEYVGQC3CT8Q
- NPYFATT3HGSQ
- UVX9PYZV54AC
- J3ZKQ57Z2P2P
- GCNVA2PDRGRZ
- 4ST1ZTBE2RP9
- 3IBBMSL7AK8G
How to Get Free Fire Redeem Codes for Garena on 21 February 2023?
- Visit the Garena Free Fire game’s official website at reward.ff.garena.com.
- Use your Facebook, Google, VK, Apple ID, Huawei ID, or Twitter account to log in.
- You’ll be taken to a valid redemption code (s)
- Copy and paste the 12-digit redemption code into the text box.
- On the screen, a dialogue box will appear.
- ‘Ok’ should be selected.
Poco C55 to launch in India today: Launch details inside

Xiaomi’s spin-off Poco is all set to launch a new smartphone in India today. Poco C55 will be released today. The company has already hinted at the release of the phone in a brief commercial. The device is rumoured to be a rebranded variant of Redmi 12C which made its debut in China in January. In addition to this, the upcoming phone has also been spotted listed on a number of certification websites.
The Poco C55 India launch is scheduled to take place today. The company will be hosting a launch event that will go live at 12 noon. The launch event will be live-streamed via company’s official social media platforms and YouTube channel. According to the company the device will be exclusively sold on Flipkart starting at noon.
The firm hasn’t yet disclosed the official price, but according to a previous report, the Poco C55 could launch as a Redmi 12C that has been given a new name. The Redmi phone went on sale in January. It is available in four colour options: Shadow Black, Sea Blue, Mint Green, and Lavender. It comes with three storage configurations: 4GB RAM with 64GB storage, 4GB RAM with 128GB storage, and 6GB RAM with 128GB storage.
A 6.71-inch HD+ screen with a resolution of 1650 x 720 pixels is featured on the Redmi 12C. The display has a 20:6:9 aspect ratio and a maximum brightness of 500 nits. The smartphone has a Mali-G52 GPU and an octa-core MediaTek Helio G85 CPU. The device has eMMC 5.1 flash memory and LPDDR4X RAM. All three of the internal storage options for the Redmi 12C allow for microSD card storage expansion of up to 512GB. The hybrid dual SIM (Nano) slot was present when the phone was released.
The phone’s camera module, which is shaped like a pill, and an LED flash are housed in a square cutout on the back. Next to the camera unit is a fingerprint scanner for biometric verification. A 50-megapixel primary sensor serves as the focal point of the Redmi 12C’s dual rear camera system. A 5-megapixel camera sensor is housed in the phone’s front-facing dewdrop notch.
For the latest gadget and tech news, and gadget reviews, follow us on Twitter, Facebook and Instagram. For newest tech & gadget videos subscribe to our YouTube Channel. You can also stay up to date using the Gadget Bridge Android App. You can find the latest car and bike news here.
Amazon Quiz Answers Today 21 February 2023: Participate to win Rs 2,500

Amazon Quiz for 21 February 2023 has gone live on the company’s mobile platform. The daily quiz contest brings an opportunity for Amazon users to win exciting prizes. In today’s Amazon Quiz the participants have the chance to win Rs 2,500 Amazon Pay Balance. All they have to do is answer all the questions correctly.
A fresh question is posted on the Amazon app daily which consists of five simple questions based on general knowledge and current events. The quiz can be played on the Amazon App from 12 AM to 11:59 PM. You have to answer all the questions correctly. Then the participants will be shortlisted for a lucky draw. The result of the lucky draw will be announced at the end of the month. The participants can win Amazon Pay Balance to up to Rs 50,000. Check out the 21 February 2023 Amazon Quiz question and their answers to win Rs 2,500 Amazon Pay Balance.
Amazon Quiz Today Prize – Rs 2,500 Amazon Pay Balance
Quiz Date – 21 February 2023
Daily Timing – 12 AM to 11:59 PM
Winner Announcement – Today 12 PM
In This Article
Amazon Quiz Answers Today 21 February 2023
Question 1: An upcoming movie of Anupam Kher also starring Neena Gupta is titled ‘Shiv Shastri _____ ‘. Fill in the blanks Answer- Balboa Question 2: Who was the captain of the victorious Indian team that won the U19 Women’s T20 World Cup in 2023? Answer- Shafali Verma Question 3: Who among these has been part of the judges panel on MasterChef India 6 times (from the 2nd edition- the current 7th edition)? Answer- Vikas Khanna Question 4: Who among these presidents is seen in this famous monument? Answer- Abraham Lincoln Question 5: This famous monument is located in which state? Answer- GujaratHow To Play Amazon Quiz
Only app users are eligible to play the Amazon quiz every morning from 12 AM to 11:59 PM. The quiz is not available on the desktop. For those who are unaware of how to play the Amazon quiz below are the steps, you can follow to take the quiz.- Firstly download the Amazon app from Google Play Store or App Store
- Now fill in the required information through the Sign Up option.
- You need to log in to the Amazon app and scroll down on the home screen to find the Amazon Quiz banner.
- Tap on the Amazon Quiz banner and tap on the Start button to start the Quiz.
- Now you will get 5 questions and you need to answer them correctly. One wrong answer will eliminate you from the Quiz.
- After answering all the questions correctly you are now eligible for a Lucky Draw.
- The winner’s name will be announced today at 12 PM.
How to Restore Deleted WhatsApp Messages without Backup? [Both Android and iOS]
![How to Restore Deleted WhatsApp Messages without Backup? [Both Android and iOS]](https://www.gadgetbridge.com/wp-content/uploads/2023/02/Whatsapp-768x402.jpg "How to Restore Deleted WhatsApp Messages without Backup? [Both Android and iOS]")
WhatsApp is one of the best messaging applications and has been used by millions of users worldwide. With this app, you can easily send messages, videos and more. But how to restore deleted WhatsApp messages without backup? In case you have deleted your WhatsApp messages and didn’t remember to create the backup file, we got you covered. In this article, we will show you how to restore deleted messages without using the backup file. Also, we will discuss how to use the UltData WhatsApp Recovery tool. Continue reading the article to find out all the information.
Step 2. Connect your iOS device using the USB cable and click the “Start Scan” option.
Step 3. Once the program detects your mobile, it will start scanning the device and will show you some options on the screen.
Step 4. Choose the data which you want to recover. You can also click the Preview option to check the files.
Step 5. Once done, click the “Recover” option, and you are good to go. The program will recover WhatsApp data successfully.
Step 2. Next, connect your Android device using the USB cable. Make sure you have enabled USB debugging on your mobile.
Step 3. Once the program detects your mobile device, click the “Start” option to continue the process.
Step 4. Soon the program will start scanning your phone to find the lost WhatsApp data. Once the process is done, choose the WhatsApp data that you want to recover and hit the “Recover” option.
Step 5. Soon the program will start recovering your WhatsApp data. Make sure your mobile is connected during the process.
So, these are the simple steps you can follow to recover WhatsApp messages on Android and iPhone.
In This Article
How to Restore Deleted WhatsApp Messages without Backup on iPhone
If you are using an iPhone and forgot to back up your data, don’t worry. In this section, we will show you how to restore deleted WhatsApp messages using UltData WhatsApp Recovery. This software is amazing and helps you recover WhatsApp data in no time. Want to know more about its features? Check out the details below. Features of UltData WhatsApp Recovery- You can easily recover deleted messages from WhatsApp on your iPhone without worrying about the backup file.
- It can recover almost 7 different types of data, including videos, photos and more.
- You can recover WhatsApp from your iTunes backup.
- It has the highest recovery rate, around 98%.
- It is compatible with all the latest iOS devices, including iPhone 14(Plus) and Mini.
 Step 2. Connect your iOS device using the USB cable and click the “Start Scan” option.
Step 3. Once the program detects your mobile, it will start scanning the device and will show you some options on the screen.
Step 2. Connect your iOS device using the USB cable and click the “Start Scan” option.
Step 3. Once the program detects your mobile, it will start scanning the device and will show you some options on the screen. Step 4. Choose the data which you want to recover. You can also click the Preview option to check the files.
 Step 5. Once done, click the “Recover” option, and you are good to go. The program will recover WhatsApp data successfully.
How to Recover Deleted WhatsApp Messages on Android without Backup
If you are an Android user and want to recover deleted WhatsApp messages without backup, then you can use UltData for Android. This tool is easy to use and comes with numerous features, including restoring images, photos, videos and more. It supports around 6000+ Android phones and has the highest success rate. You can easily use it to restore deleted WhatsApp messages on Android without backup. Steps to Recover Deleted WhatsApp Messages on Android without Backup Step 1. Launch the program and click the “Recover WhatsApp Data” option. Step 2. Next, connect your Android device using the USB cable. Make sure you have enabled USB debugging on your mobile.
Step 3. Once the program detects your mobile device, click the “Start” option to continue the process.
Step 4. Soon the program will start scanning your phone to find the lost WhatsApp data. Once the process is done, choose the WhatsApp data that you want to recover and hit the “Recover” option.
Step 2. Next, connect your Android device using the USB cable. Make sure you have enabled USB debugging on your mobile.
Step 3. Once the program detects your mobile device, click the “Start” option to continue the process.
Step 4. Soon the program will start scanning your phone to find the lost WhatsApp data. Once the process is done, choose the WhatsApp data that you want to recover and hit the “Recover” option.
 Step 5. Soon the program will start recovering your WhatsApp data. Make sure your mobile is connected during the process.
So, these are the simple steps you can follow to recover WhatsApp messages on Android and iPhone.
Step 5. Soon the program will start recovering your WhatsApp data. Make sure your mobile is connected during the process.
So, these are the simple steps you can follow to recover WhatsApp messages on Android and iPhone.
How to Restore Deleted WhatsApp Messages without Backup for Free
If you don’t want to use a third-party tool and are looking for a free method, then you can use these steps. However, remember that you can only recover limited data. For example, on an iPhone, you can only recover 5GB of data. Also, remember that by using the free method, you can only recover photos and videos within 30 days. Once the time has passed, you won’t be able to restore WhatsApp data. Let’s see how you can recover deleted WhatsApp messages without a backup for free. For Android users:- For this method, you have to uninstall your WhatsApp application and, after a few seconds, reinstall it again.
- Launch the WhatsApp app and verify your number.
- Once you have installed the app, you will see the RESTORE option. So click it to restore your messages. It will search your Google Drive and will restore the data from there.
- Once the process is done, click the “Next” option and wait until you see the messages.
- In case you don’t have a backup in Google Drive, don’t worry; the app will automatically restore the files from your local backup file.
- For iPhone users:
- Open your Settings and hit the “General” option.
- Look for the “Reset on your iPhone” option and choose the “Erase All Content and Settings” option.
- Choose the “Restore from iCloud Backup” option. Make sure you are signed in to your iCloud.
- After that, choose the latest backup file and wait for a few minutes until the process is completed.
FAQs
Q1.How to recover 1-year-old WhatsApp messages without backup?
You can use a third-party tool named UltData WhatsApp Recovery to recover 1-year WhatsApp messages without backup. This tool is amazing and recovers data in no time. Also, the great thing about this app is that you don’t have to worry about the backup data.Q2.I reinstalled the WhatsApp app, but none of my messages appeared. What’s happening?
When you reinstall WhatsApp, you see the restore option, which helps you recover the data in no time. If you don’t see the restore option or skip it accidentally, you won’t see the messages on the screen. But don’t worry; you can easily use the WhatsApp backup recovery tool to restore your messages.Final Words
In this article, we have discussed all the possible ways to restore deleted WhatsApp messages without backup. We have discussed the ways both for your Android and iPhone devices. Moreover, if you want to restore deleted WhatsApp messages without backup, you can use UltData WhatsApp Recovery, which is an amazing application and has the highest rate of recovering WhatsApp messages on iPhone. For the latest gadget and tech news, and gadget reviews, follow us on Twitter, Facebook and Instagram. For newest tech & gadget videos subscribe to our YouTube Channel. You can also stay up to date using the Gadget Bridge Android App. You can find the latest car and bike news here.Unlocking the Potential of Your VPN: 8 Things to Do

Virtual private networks or VPN are useful tools used by individuals nowadays who want to browse freely and safely. This application offers the highest level of security and data privacy protection to make various content accessible to users online.
This article is a list of 8 things that a VPN online user can perform.
In This Article
What Is A VPN?
The fundamental concept of a VPN is to establish a secure, private tunnel between all your devices and a VPN server. This then links you to the rest of the internet. Your real IP address is concealed by the VPN server, making it hard to track the connection back to you. No one can eavesdrop on your activity or use your connection to their advantage because all traffic to and from your device is encrypted. When travelling, you can watch content from websites like Netflix and YouTube and get around some restrictions like government censorship, thanks to VPNs. Additionally, VPNs protect sensitive information from cybercriminals.Uses Of VPN
These are the top 8 fascinating things you can do with a VPN, from viewing your preferred shows in another nation to maintaining the privacy and security of your data.1. Prevent ISP Tracking
ISPs, or Internet service providers, typically have access to the location of their users. They now can track users’ positions and other important data most sensitive, thanks to technological improvements. By transferring the user’s original IP address to a server involved in the program that the network has secured, a VPN can shield consumers from this agenda. To make it difficult for the ISP to pinpoint the user’s location, the server is dispersed throughout the globe in several locations.2. Join A Remote Network
Your ability to access other networks remotely via a VPN is a very valuable capability. With the help of a VPN, you may utilize this to work from home safely, or you can connect from the office to your home office. The key advantage is a rigorous, two-way tunnel allowing unrestricted, secure access. Let’s assume you’re a student at a university, last but not least. In that situation, you have direct access to its online collection of sources and databases, which can only be accessed through a secure route.3. Safe Public Wi-Fi Usage
Using unsecured public Wi-Fi networks to stay connected to your contacts on social media and even to conduct online banking and shopping is likely if you’re always on the move. You open yourself up to countless internet hazards and leave yourself vulnerable to cybercrime by doing this. By masking your real identity and IP address, a VPN can shield you from these vulnerabilities and allow you to browse the internet privately.4. Protect Your Privacy
Giving consumers privacy is the most fundamental purpose of a virtual private network. This is particularly true for websites that collect information via surveys, forums, and other tools like apps. VPNs provide privacy protection by hiding the user’s identity, and they prevent websites from collecting data about users by intercepting their IP addresses and other browsing activity. They offer security and anonymity to ensure efficient browsing.5. Prevent Bandwidth Throttling
Your ISP may be using bandwidth-limiting techniques to target you if you’re engaging in activities that consume a lot of internet bandwidth, including streaming or gaming. Your Internet speed will be negatively impacted by bandwidth throttling, which happens when your ISP tries to control network traffic and lessen bandwidth congestion. You can bypass bandwidth restrictions and sluggish connection speeds using a VPN connection. Your ISP can no longer observe your activity sessions thanks to the encryption provided by a VPN for your web traffic. Your bandwidth will likely slow down if your ISP blocks the entire network in your area, regardless of what you do, but if you’re being singled out because of your surfing habits, a VPN can assist. As a result, you won’t experience significant bandwidth interruptions when playing your online games.6. Unblock Restricted Content
Easy access to international content and streaming portals is one of the primary reasons why so many people use a VPN. You must pay subscription fees to websites and services like Netflix, Amazon, Hulu, and others. Why, then, are you unable to use your purchased services when travelling? Depending on the nation you’re in, you might be able to access a local version. However, don’t be shocked if it doesn’t host your preferred content. However, if you use a VPN, you may connect to a server in the nation that hosts the streaming service, giving you immediate access to all of your preferred content.7. Find Cheaper Prices
Did you realize that there are lower costs available when buying items like airline tickets online? Geolocation data is frequently used by other businesses besides airlines to provide varying prices for the same flights. The majority of e-commerce websites display various prices depending on the region you’re connecting from. In certain cases, changing your location will substantially lower pricing. You’ll be able to connect from a server in the nation of your choice using a VPN. You’ll shortly discover that the identical ticket you were viewing miraculously has a lower price when you’re connected from another country’s servers! This frequently happens on websites for booking hotels, renting automobiles, or finding flight tickets. To make sure you’re receiving the greatest rate, make sure to activate your VPN and test a few different countries before proceeding with the checkout process on these sites.8. Safe Upload And Download
An everyday online activity is to upload and download stuff. Because it leaves certain digital footprints, it can, nevertheless, become fully insecure if a user is not vigilant. By setting up a VPN, a user can use secure browsing sessions to download and upload any content while their location is hidden. Through the usage of a VPN, users may prevent websites from tracking their location, even while they upload or download files. Because of this, nobody can discover the person’s location.Conclusion
Accessing the internet from any location, such as your home office, a restaurant, the airport, etc., may be done affordably and securely using a VPN. It allows you to communicate securely with your staff, clients, and banks. For the latest gadget and tech news, and gadget reviews, follow us on Twitter, Facebook and Instagram. For newest tech & gadget videos subscribe to our YouTube Channel. You can also stay up to date using the Gadget Bridge Android App. You can find the latest car and bike news here.How to Use Google Assistant to Identify a Song in Any Language (2024)
")
If you’re at a bar or listening to music on the radio, identifying a certain song is no longer the hassle it used to be. Earlier, you would have to ask around or simply wait for the song to be played again, but not all you need is your smartphone and you can easily get to know everything about the song – from the artist to the date of release. In this article, we show you how to use Google Assistant to identify any song in any language.
Read Also: 9 Great Voice Recording Apps for Android & iOS
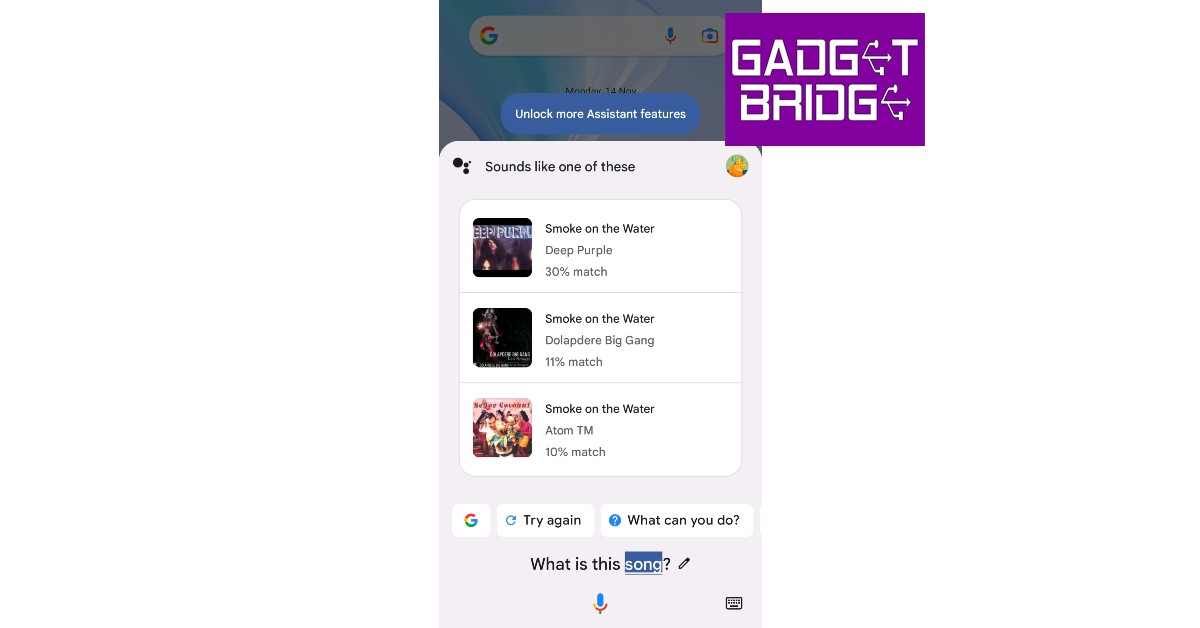
Step 3: Play the song on another device.
Step 4: Google will search for the song using the melody and bring up matching results.
The YouTube Music app uses a similar algorithm to identify songs playing in your vicinity. Here’s how you can use it.
Step 1: Launch the YouTube Music app on your smartphone.
Step 2: Hit the search icon at the top right corner of the screen.
Step 3: Tap the wavelength symbol at the top right corner of the screen.
Step 4: Hum the song for 20-30 seconds.
Step 5: Google’s AI algorithm will look up the song that matches the melody. The song title along with the artist name, album name, and release year will appear on the screen.
Step 6: You can choose to play the song or add it to your playlist. If this is not the song you were looking for, tap the waveform symbol at the bottom of the screen to perform another search.
If Google Assistant fails to identify the song, there are plenty of other third-party apps that will do the job for you. You may already know of Shazam, which was the first app that became popular for its accurate song identification. Other apps like Soundhound and MusixMatch also carry out the same task with expertise. All you need to do is download the app and select the song identification feature. Once the app is using your phone’s mic to listen to the surroundings, bring it closer to the source of the sound so it can get a good sample. Within seconds, the app will show you all matching results.
In This Article
Here’s how you can identify a song using Google Assistant
Step 1: Tap the home icon or say Hey Google to trigger Google Voice Assistant. Step 2: Ask ‘Which song is this?‘ Step 3: Play the song on another device.
 Step 4: Google will search for the song using the melody and bring up matching results.
Use the Hum to Search feature on YouTube Music
 The YouTube Music app uses a similar algorithm to identify songs playing in your vicinity. Here’s how you can use it.
Step 1: Launch the YouTube Music app on your smartphone.
Step 2: Hit the search icon at the top right corner of the screen.
Step 3: Tap the wavelength symbol at the top right corner of the screen.
Step 4: Hum the song for 20-30 seconds.
Step 5: Google’s AI algorithm will look up the song that matches the melody. The song title along with the artist name, album name, and release year will appear on the screen.
Step 6: You can choose to play the song or add it to your playlist. If this is not the song you were looking for, tap the waveform symbol at the bottom of the screen to perform another search.
The YouTube Music app uses a similar algorithm to identify songs playing in your vicinity. Here’s how you can use it.
Step 1: Launch the YouTube Music app on your smartphone.
Step 2: Hit the search icon at the top right corner of the screen.
Step 3: Tap the wavelength symbol at the top right corner of the screen.
Step 4: Hum the song for 20-30 seconds.
Step 5: Google’s AI algorithm will look up the song that matches the melody. The song title along with the artist name, album name, and release year will appear on the screen.
Step 6: You can choose to play the song or add it to your playlist. If this is not the song you were looking for, tap the waveform symbol at the bottom of the screen to perform another search.
Bonus Tip: Use a third-party app
 If Google Assistant fails to identify the song, there are plenty of other third-party apps that will do the job for you. You may already know of Shazam, which was the first app that became popular for its accurate song identification. Other apps like Soundhound and MusixMatch also carry out the same task with expertise. All you need to do is download the app and select the song identification feature. Once the app is using your phone’s mic to listen to the surroundings, bring it closer to the source of the sound so it can get a good sample. Within seconds, the app will show you all matching results.
Frequently Asked Questions (FAQs)
How do I use Google Assistant to identify a song?
Trigger Google Assistant by saying ‘Hey Google’ or long pressing the side key, ask ‘Which song is this’, then play the song or hum it. Google Assistant will produce matching results within a few seconds.Can I identify a song using YouTube Music?
YouTube Music has a new song finder that can be accessed by pressing the waveform icon next to the search bar. Play a song or hum it to find the appropriate match.Are there any third-party apps to identify the song playing near me?
Apps like Shazam, Soundhound, and MusixMatch are great tools to identify songs playing in your vicinity. Read Also: Meta introduces a paid Blue Badge for Facebook and InstagramConclusion
This is how you can use Google Assistant to identify any song. The best part about using Google Assistant is that you don’t even need to play the official recording of the song for it to identify the track. You can even hum a certain section of the song or speak some lyrics into the microphone and Google Assistant will come up with matches for your query.360-degree video backgrounds are now available for Google Meet on mobile

Google Meet users will soon be able to use 360-degree backgrounds while participating in a video conversation on their mobile devices. This feature is currently being rolled out to Android and iOS devices. In addition to this, the editable widgets are now available for Chat app cards which will include interactive widgets like checkboxes, radio buttons, and dropdowns.
In This Article
360-degree video backgrounds
360-degree backgrounds for Android and iOS devices have finally been added to Google Meet. Users of the new functionality can choose from a variety of available backdrops. These backgrounds, which include a beach and a temple, move with you thanks to the gyroscope on your device. Remember that administrators can enable or disable backgrounds for their users. All Google Workspace users and users with personal Google Accounts can access it on Android and iOS devices. It should be noted that admins have the ability to disable these backgrounds when necessary, even if they may hide the user’s original backdrop from meeting attendees. Also Read: How to record video meetings in FHD on Google MeetEditable widgets now available for Chat app cards
In Chat app cards that are posted in the Chat message stream, developers can now include interactive widgets like checkboxes, radio buttons, and dropdown menus. You can rapidly change the information sent from Chat apps by doing this by Changing the assignee on a task card or changing the due date on a task card and Selecting or deselecting options on a card. Also Read: How to Use Face Filters on Google Meet Video Call? Only Google Workspace Essentials, Business Starter, Business Standard, Business Plus, Enterprise Essentials, Enterprise Standard, Enterprise Plus, Education Fundamentals, Education Plus, Education Standard, the Teaching and Learning Upgrade, Frontline, and legacy G Suite Basic and Business customers have access to this feature at this time. For the latest gadget and tech news, and gadget reviews, follow us on Twitter, Facebook and Instagram. For newest tech & gadget videos subscribe to our YouTube Channel. You can also stay up to date using the Gadget Bridge Android App. You can find the latest car and bike news here.Vivo V27 series confirmed to launch in India on March 1

After teasing the Vivo V27 series in India the company today officially announced the actual launch date of the upcoming new lineup. The India launch is scheduled for March 1. In order to tantalise the main features of the new V-Series smartphones, the business has also developed a special microsite. The forthcoming series’ design is displayed in the official teaser. The devices would have three back cameras and a ring LED flash.
Vivo has confirmed that the new V-series smartphones will be launched in India on March 1 at noon. The new lineup is likely to include two new devices Vivo V27 and Vivo V27 Pro. It is confirmed that the Sony IMX 776V sensor and colour-changing rear panel would be included in the Vivo V27 series. According to the company, the camera sensor on the phone will come with compatibility for Aura Light Portrait mode and OIS (Optical Image Stabilization). The handset will be made available in a variety of colour schemes.
Also Read: iQOO 11 Review: A real beast
Moreover, a trio of rear cameras is clearly visible. Each sensor has what appears to have a ring surrounding it, and there is a ring LED flash. The volume rockers and power buttons are visible on the left spine of the device.
The phones will feature a hole-punch display and 3D curved panels. The screen is teased to support 120Hz refresh rates. It has also been confirmed that Flipkart would sell these in India.
Reports claim that the Vivo V27 5G will be powered by a MediaTek Dimensity 7200 Processor. The Vivo V27 Pro, on the other hand, will be using the MediaTek Dimensity 8200 Chipset. They reportedly come in 8GB and 128GB or 12GB and 256GB Memory configurations.
The company hasn’t yet disclosed prices, however, it was earlier reported that the Vivo V27 5G in India might cost Rs 35,000. Whereas the Pro version is said to be priced at Rs 40,000. The base variant of the Vivo V25 5G was made available in India for a starting price of Rs 27,999, while the base model of the Vivo V25 Pro cost Rs 35,999.
For the latest gadget and tech news, and gadget reviews, follow us on Twitter, Facebook and Instagram. For newest tech & gadget videos subscribe to our YouTube Channel. You can also stay up to date using the Gadget Bridge Android App. You can find the latest car and bike news here.
Top 12 ways to Fix ‘Instagram Pictures Not Showing Up’ Issue (2024)
")
Instagram may be the world’s largest photo-sharing platform but it isn’t entirely immune to bugs and other issues. Oftentimes, users report that new images do not show up on their Instagram feed, and even when they do, they simply won’t load. There can be multiple reasons behind this problem. In this article, we bring you the top 12 ways to fix the ‘Instagram pictures not showing up’ issue on your smartphone.
Read Also: Only those who pay will have access to 2FA SMS security protection on Twitter
Step 2: Scroll down and select Instagram.
Step 3: Tap on Storage.
Step 4: Select Clear Cache from the bottom of the screen.
Step 2: Select Settings.
Step 3: Tap on Account.
Step 4: Scroll down and select Mobile Data Use.
Step 5: Turn the toggle bar off for Data Saver.
Step 2: Tap on Data Usage.
Step 3: Tap on Mobile Data usage.
Step 4: Click on the gear icon for additional settings.
Step 5: Turn the toggle bar off for Set data limit.
 Step 2: Select Instagram.
 Step 3: Tap on Mobile data and WiFi.
Step 4: Turn on the toggle switch for Unrestricted data usage.
Step 3: Tap on Mobile data and WiFi.
Step 4: Turn on the toggle switch for Unrestricted data usage.
 Any account-related issues can be fixed by logging out of the Instagram app and logging back in. Go to your profile, open the hamburger menu, and select the Log Out option from Settings. Log back into Instagram using your email, phone number, or Instagram handle.
Instagram Lite is a faster, stripped-down version of Instagram that covers all the essential features of the app. If the main Instagram app isn’t able to load images due to network and connectivity issues, switch to Instagram Lite for smooth and fast browsing. Instagram Lite occupies less space on your phone on top of using minimal data. The app is available on the Google Play Store.
Older versions of the Instagram app may contain bugs that cause glitches and unwanted errors. These bugs are quickly resolved in the following updates. If you haven’t updated the Instagram app in a long time, go to Google Play Store, search for Instagram, and hit Update.
If the VPN server you are currently connected to is experiencing an outage, Instagram won’t load pictures on your device. To fix this, connect to a different server or disable the VPN service entirely. Go to Settings>Connection>More Connection Settings>VPN or disconnect from the connected server after launching the VPN app from your phone’s home page.
Any account-related issues can be fixed by logging out of the Instagram app and logging back in. Go to your profile, open the hamburger menu, and select the Log Out option from Settings. Log back into Instagram using your email, phone number, or Instagram handle.
Instagram Lite is a faster, stripped-down version of Instagram that covers all the essential features of the app. If the main Instagram app isn’t able to load images due to network and connectivity issues, switch to Instagram Lite for smooth and fast browsing. Instagram Lite occupies less space on your phone on top of using minimal data. The app is available on the Google Play Store.
Older versions of the Instagram app may contain bugs that cause glitches and unwanted errors. These bugs are quickly resolved in the following updates. If you haven’t updated the Instagram app in a long time, go to Google Play Store, search for Instagram, and hit Update.
If the VPN server you are currently connected to is experiencing an outage, Instagram won’t load pictures on your device. To fix this, connect to a different server or disable the VPN service entirely. Go to Settings>Connection>More Connection Settings>VPN or disconnect from the connected server after launching the VPN app from your phone’s home page.
In This Article
Check your internet connection
The most likely reason why Instagram won’t load pictures is a faulty internet connection. Make sure that mobile data on your device is turned on or you are connected to an active WiFi network. Check your network provider’s app to see if you have ample data left. Open a web page or another app to see if it is loading. This will help you get an idea of whether the issue lies with Instagram or your network.Clear app cache to fix ‘Instagram pictures not showing up’
Temporary files in the cache are always at risk of getting corrupted and impeding the basic functioning of the app. Here’s how you can clear Instagram’s app cache. Step 1: Go to Settings and select Apps. Step 2: Scroll down and select Instagram.
 Step 3: Tap on Storage.
 Step 4: Select Clear Cache from the bottom of the screen.
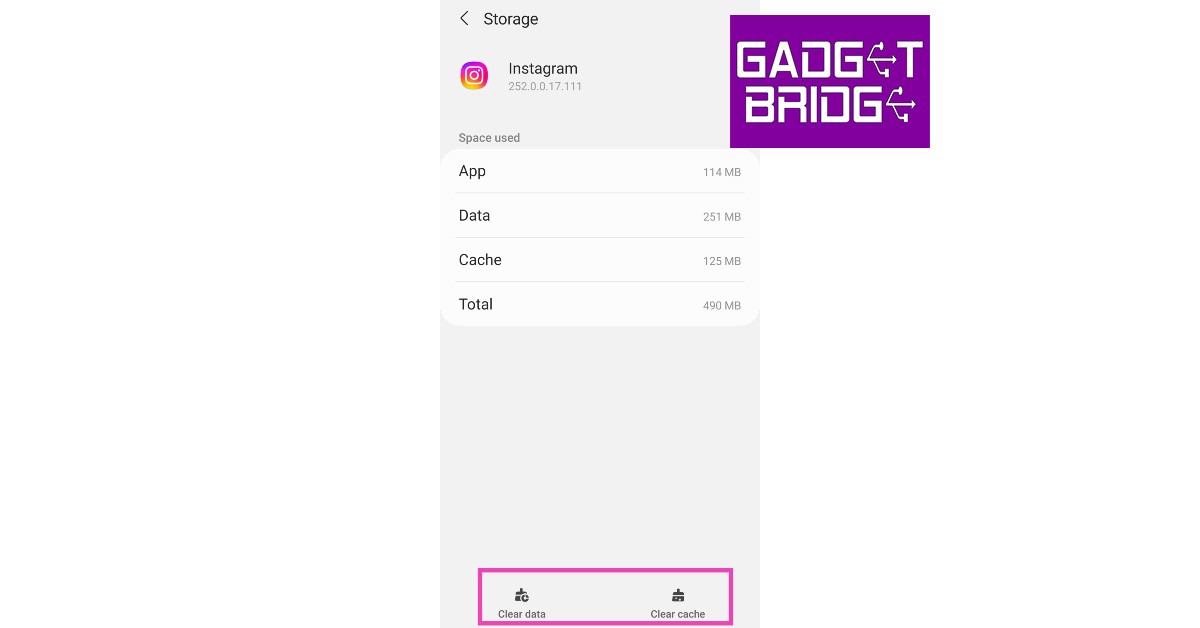
Turn off Instagram’s data saver to fix ‘pictures not showing up’ issue
Instagram has a native data-saving feature that disables the preloading of videos on the platform to consume less mobile data. While this works fine for the most part, it can often lead to pictures and videos not loading at all. Here’s how you can disable the data saver. Step 1: Go to your Instagram profile and tap the hamburger menu at the top right corner of the screen. Step 2: Select Settings.
Step 3: Tap on Account.
Step 2: Select Settings.
Step 3: Tap on Account.
 Step 4: Scroll down and select Mobile Data Use.
 Step 5: Turn the toggle bar off for Data Saver.

Disable your smartphone’s data saver
Like Instagram, your smartphone has a data saver tool as well. You can set a maximum data usage limit on your device. After the limit has been reached, mobile data will be turned off on your phone. Here’s how you can disable data saver on your smartphone. Step 1: Go to Settings and select Connections. Step 2: Tap on Data Usage.
 Step 3: Tap on Mobile Data usage.
 Step 4: Click on the gear icon for additional settings.
 Step 5: Turn the toggle bar off for Set data limit.

Allow unrestricted data usage to Instagram
Step 1: Go to Settings and select Apps.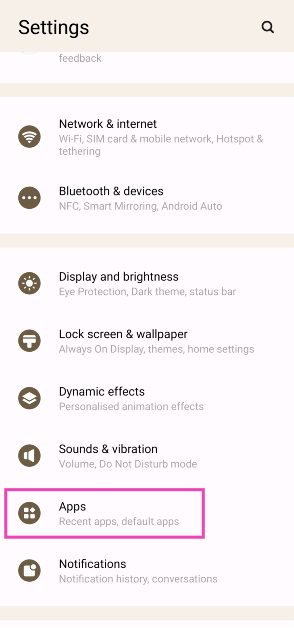 Step 2: Select Instagram.
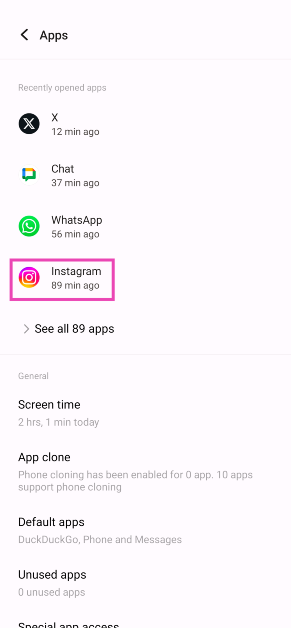 Step 3: Tap on Mobile data and WiFi.
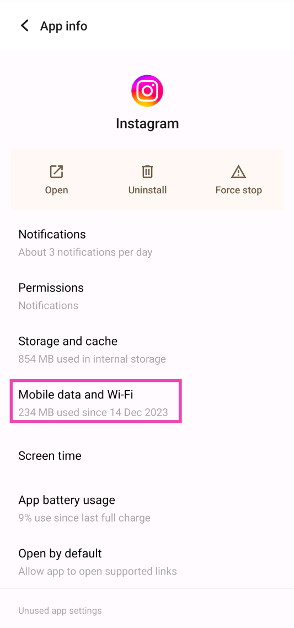 Step 4: Turn on the toggle switch for Unrestricted data usage.
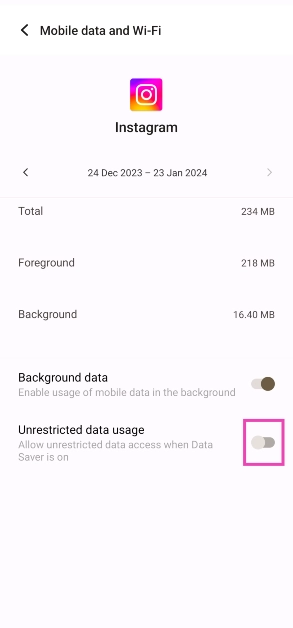
Log out and log back in to fix ‘Instagram pictures not showing up’
 Any account-related issues can be fixed by logging out of the Instagram app and logging back in. Go to your profile, open the hamburger menu, and select the Log Out option from Settings. Log back into Instagram using your email, phone number, or Instagram handle.
Uninstall and Reinstall the app
Uninstalling the app gets rid of the app data on your device. If you suspect the app data is the reason behind Instagram not functioning properly, uninstall and then reinstall the app on your phone. To delete Instagram, long-press its icon in the app drawer and hit the delete button. This will fix the ‘Instagram pictures not showing up’ issue.Use Instagram Lite
 Instagram Lite is a faster, stripped-down version of Instagram that covers all the essential features of the app. If the main Instagram app isn’t able to load images due to network and connectivity issues, switch to Instagram Lite for smooth and fast browsing. Instagram Lite occupies less space on your phone on top of using minimal data. The app is available on the Google Play Store.
Update the Instagram app
 Older versions of the Instagram app may contain bugs that cause glitches and unwanted errors. These bugs are quickly resolved in the following updates. If you haven’t updated the Instagram app in a long time, go to Google Play Store, search for Instagram, and hit Update.
Disable VPN
 If the VPN server you are currently connected to is experiencing an outage, Instagram won’t load pictures on your device. To fix this, connect to a different server or disable the VPN service entirely. Go to Settings>Connection>More Connection Settings>VPN or disconnect from the connected server after launching the VPN app from your phone’s home page.
Use Instagram’s Web Portal
If the above-mentioned fixes don’t work, maybe the problem lies with your device. Try using Instagram’s web portal for PC. Although it started out as a pretty basic webpage, Instagram for Web now supports almost all the features of its mobile apps.Check if Instagram’s servers are down
It is not uncommon for Instagram to experience a server outage. When the servers are down, all app activity is ceased until the servers are back up and running. You have no other option than to wait it out. To check if Instagram’s servers are down, visit the DownDetector website and search for Instagram.Frequently Asked Questions (FAQs)
Why won’t Instagram load any pictures?
If Instagram isn’t loading any pictures on your device, check your network connection. Additionally, make sure that Instagram’s and your device’s data savers are turned off.How do I turn off the data saver on Instagram?
To turn off Instagram’s data saver, go to Profile>Menu>Account>Mobile data use and turn off the toggle bar for Data Saver.How do I turn off my smartphone’s data saver?
Go to Settings>Connections>Data usage>Mobile data usage, hit the gear icon, and turn off the toggle bar for Set data limit. Read Also: Comparison: OnePlus 11 vs Samsung Galaxy S23Conclusion
These are the top 12 ways to fix the ‘Instagram pictures not showing up’ issue on your smartphone. If the issue still persists after trying the fixes mentioned above, it is possible that you may have been handed an account ban. For more details, contact Instagram support. If you found this article helpful, let us know in the comments!Top 7 ways to fix touchscreen issues on iPhone 13 and iPhone 14 (2024)
")
If your iPhone’s touchscreen started malfunctioning out of the blue, there could be a multitude of reasons behind it. Oftentimes, older smartphones are more likely to develop touchscreen issues, but if a newer iPhone (like iPhone 13 or 14) starts giving you problems, chances are it is due to a software glitch. In this article, we bring you the top 7 ways to fix touchscreen issues on iPhone 13 and iPhone 14.
Read Also: Only those who pay will have access to 2FA SMS security protection on Twitter
A quick restart will resolve any minor background issues that may be keeping your iPhone’s touchscreen from functioning properly. You can restart your iPhone 13 or 14 by pressing the volume key and side key until the power slider appears on the screen. Work the slider icon to turn off your iPhone. However, if the touchscreen is entirely unresponsive, you won’t be able to use the onscreen slider. In this case, you will need to force restart your iPhone. Here’s how you can do that
Step 1: Press and release the Volume Up key.
Step 2: Press and release the Volume Down key.
Step 3: Press and hold the side key until the Apple logo appears on the screen.
Step 4: Release the side key.
Step 2: Select Touch from the Physical and Motor section.
Step 3: Select Haptic Touch.
Step 4: Choose fast under the touch duration options. For a better idea of how the two speeds work, use the touch duration test listed below the options.
Make your selection and go back. Your changes will be applied to the phone.
 Step 3: Select Software Update.
 Step 4: Tap on Download and Install.
 You should also know that when you reset your phone to factory settings, there may be cases when your iPhone 13 is completely turned off and does not turn on. This is normal, so the first step is to check all the steps for recovery.
In This Article
Restart your iPhone
 A quick restart will resolve any minor background issues that may be keeping your iPhone’s touchscreen from functioning properly. You can restart your iPhone 13 or 14 by pressing the volume key and side key until the power slider appears on the screen. Work the slider icon to turn off your iPhone. However, if the touchscreen is entirely unresponsive, you won’t be able to use the onscreen slider. In this case, you will need to force restart your iPhone. Here’s how you can do that
Step 1: Press and release the Volume Up key.
Step 2: Press and release the Volume Down key.
Step 3: Press and hold the side key until the Apple logo appears on the screen.
Step 4: Release the side key.
A quick restart will resolve any minor background issues that may be keeping your iPhone’s touchscreen from functioning properly. You can restart your iPhone 13 or 14 by pressing the volume key and side key until the power slider appears on the screen. Work the slider icon to turn off your iPhone. However, if the touchscreen is entirely unresponsive, you won’t be able to use the onscreen slider. In this case, you will need to force restart your iPhone. Here’s how you can do that
Step 1: Press and release the Volume Up key.
Step 2: Press and release the Volume Down key.
Step 3: Press and hold the side key until the Apple logo appears on the screen.
Step 4: Release the side key.
Increase the touchscreen sensitivity
If you’re experiencing lag issues with your iPhone’s touchscreen, it may be because the touchscreen sensitivity has been set too low. This problem is more common in older iPhones. Here’s how you can increase touchscreen sensitivity on an iPhone. Step 1: Go to Settings, scroll down and select Accessibility.
Step 2: Select Touch from the Physical and Motor section.
 Step 3: Select Haptic Touch.
 Step 4: Choose fast under the touch duration options. For a better idea of how the two speeds work, use the touch duration test listed below the options.
 Make your selection and go back. Your changes will be applied to the phone.
Remove the screen protector
Not every screen protector works perfectly with the iPhone. While buying a screen guard, make sure that it is Apple-compatible. If the touchscreen issues on your iPhone started popping up after you installed the screen protector, peel it off and check if the touchscreen is working fine. If you’re using an Apple-compatible protector, take it off and wipe the screen thoroughly before putting it back on.Disconnect all accessories connected through the lightning port
Sometimes, your iPhone’s touchscreen may stop working when the device is connected to an accessory via the lightning port. In this case, disconnect your iPhone from whatever accessory is attached to it. This includes headphones, charger, or any external storage device connected through an OTG adapter. If your iPhone is connected to your Mac through the lightning cable, plug it out and see if the touchscreen has been restored to a working condition.Clean the touchscreen
If your iPhone got splashed with water or is being operated with sweaty hands, make sure you give it a thorough wipe before operating the touchscreen. Any trace of water on the screen may render it unresponsive. It is also common for traces of sweat to accumulate on the touchscreen in humid conditions. Always keep a microfibre cloth handy to give your phone a quick wipe before using it.Update your iPhone
Step 1: Make sure your iPhone is connected to a WiFi network and plug in its charger. Step 2: Go to Settings and select General. Step 3: Select Software Update.
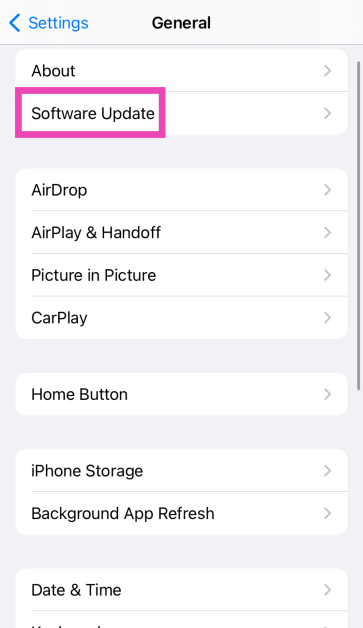 Step 4: Tap on Download and Install.
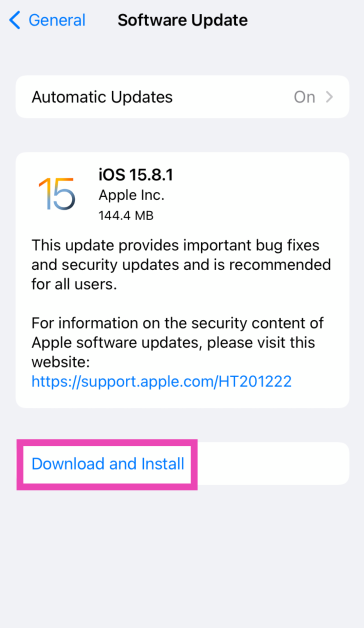
Factory reset your iPhone
As a last-ditch effort to rescue your iPhone’s touchscreen, you can try performing a factory reset if you suspect that the issue may be related to a software malfunction. If the touchscreen stopped working after a physical impact on the phone, skip this step. Here’s how you can factory reset your iPhone. Step 1: Connect your iPhone to a PC or Mac and launch iTunes. Step 2: Press and release the Volume Up key followed by the Volume Down key. Then press the side key for at least 10 seconds. Step 3: Press and hold the Volume Down key and side key simultaneously. Release the side key after 5 seconds and the Volume Down key after 10 seconds. Step 4: Click on Restore iPhone on iTunes. You should also know that when you reset your phone to factory settings, there may be cases when your iPhone 13 is completely turned off and does not turn on. This is normal, so the first step is to check all the steps for recovery.
Frequently Asked Questions (FAQs)
Why is my iPhone touchscreen not working?
A faulty screen protector or phone cover, low screen sensitivity, and background software issues can keep your iPhone’s touchscreen from working properly. If there’s hardware damage to the screen, the only way to fix it is by replacing it.How do I increase my iPhone’s touchscreen sensitivity?
Go to Settings>Accessibility>Touch>Haptic Touch and select ‘Fast’.How do I restart my iPhone if the display isn’t working?
Press the volume up key followed by the volume down key. Then, press and hold the side key and only release it when the Apple logo appears on the screen. Read Also: Comparison: OnePlus 11 vs Samsung Galaxy S23Conclusion
This is how you can fix touchscreen issues on an iPhone 13 and iPhone 14. If the issues still persist after trying the fixes mentioned above, take your iPhone to an authorised Apple service centre for further diagnosis. You may need to replace the entire display if it’s a hardware-related issue.9 Great Voice Recording Apps for Android & iOS

While the native voice recording app on your smartphone works fine for the most part, if you are looking for additional features like live transcription and noise cancellation, you will need to download a specialized third-party voice recorder. Luckily, there are a lot of options when it comes to audio recording and you will be easily able to find an app that suits your task. In this article, we bring you the top 9 voice recording apps for Android and iOS.
Read Also: Comparison: OnePlus 11 vs Samsung Galaxy S23
Dolby’s dedicated audio recording app lets you record music, podcasts, voice memos, and more in a professional capacity. Dolby On offers an array of effects like noise reduction, limiting, spatial audio, EQ, and more. If you don’t have a microphone at your disposal, yet want high-quality sound recordings, Dolby On is a great app to record with. The audio editor that comes with the app lets you improve the sound quality after the recording is finished. You can optimise the volume, boost the fullness, and use other effects to achieve optimum quality before publishing the recording.
Otter is a great voice recording app for recording and transcribing lectures, meetings, and more. Otter efficiently transcribes the voice recordings made using the app and is even capable of producing live captions for meetings, lectures, and seminars. If you want to share the recording with your colleagues, you can use Otter to summarise the session, highlight text, format the transcription, and identify different speakers in the recording. You can invite collaborators to edit the meeting. While most basic functions of Otter are free to use, the premium subscription offers some additional perks.
AudioShare lets you manage all the audio recordings on your phone in one place. You can also use the app to record any kind of audio – be it music or voice – using an external mic or the built-in mic on your phone. AudioShare is equipped to play and record in 96k, 48k, 44.1k, 22k, 11k, and 8k sample rates. With AudioShare you get an incredible level of control over the editing process, as you are able to apply different effects like fade in/out, trim the audio recording, and even leave notes wherever necessary.
If you’re looking for a simple voice recording app without the bells and whistles, go for Easy Voice Recorder. This is a great everyday app to record meetings, lectures, and music using your phone. There is no time limit to the recordings, and you can choose to save the file in compressed formats so as to save storage space. The accessible widgets and shortcuts make it easy to start recording audio within seconds. With WearOS support, you can also record audio using your smartwatch.
If you’re looking to record podcasts on your smartphone, then a simple voice recording app isn’t going to cut it. Riverside is one of the more popular apps used by podcasters to record audio on the go. One of the better features of Riverside is that it lets you record up to 8 individual tracks, which makes editing easy once the recording has been completed. If you’re planning on recording a podcast with multiple participants, recording their voices on different tracks will come in extremely handy. Riverside also offers automatic transcriptions for your voice recordings.
This easy-to-use app comes with all the basic features of a regular voice recorder, with a greater level of accessibility. Smart Voice Recorder lets you record high-quality audio without having to worry about the length of the recording. One of the unique features of the app is that it can recognise silence and automatically trim it from the final recording. There is also a live audio spectrum analyser on offer, and you can even adjust the audio sampling rate.
Google’s very own voice recorder is currently only available on Pixel 6 or newer devices, but it will likely be rolled out for other Android smartphones in future. This app offers accurate live transcriptions of voice recordings and can recognise multiple speakers and label them accordingly. You can search within the audio or edit certain parts with ease. What sets Google Recorder apart from other voice recording apps is that it doesn’t need an internet connection to transcribe.
Not happy with how the automated voice transcriptions turn out? Get a human to do it! Rev Audio & Voice Recorder charges $1.50 for human transcription and guarantees 99% accuracy. Your ordered transcriptions are delivered to you by email. Other than that, the app offers all the features of a regular voice recorder like a high-quality recording and playback engine, background recording, in-app editor, and more.
For strictly dictational purposes, Voice Recorder Pro is one of the best apps out there. There is no recording limit other than your phone’s storage space. You can record audio in four different formats – MP3, PCM, AAC, and AMR. If you’re not necessarily looking to record high-quality audio but instead want to save up on storage space, AMR should be your preferred format. The app also lets you change the sample rate (8 kHz – 44kHz) and the bitrate (32 – 320 kbps). There’s support for mono and stereo recordings with the option to record in the background as well.
Read Also: mPassport Police App launched: To speed up the Police verification process of passport issuance
In This Article
Dolby On: Record Audio & Music
 Dolby’s dedicated audio recording app lets you record music, podcasts, voice memos, and more in a professional capacity. Dolby On offers an array of effects like noise reduction, limiting, spatial audio, EQ, and more. If you don’t have a microphone at your disposal, yet want high-quality sound recordings, Dolby On is a great app to record with. The audio editor that comes with the app lets you improve the sound quality after the recording is finished. You can optimise the volume, boost the fullness, and use other effects to achieve optimum quality before publishing the recording.
Otter: Transcribe Voice Notes
 Otter is a great voice recording app for recording and transcribing lectures, meetings, and more. Otter efficiently transcribes the voice recordings made using the app and is even capable of producing live captions for meetings, lectures, and seminars. If you want to share the recording with your colleagues, you can use Otter to summarise the session, highlight text, format the transcription, and identify different speakers in the recording. You can invite collaborators to edit the meeting. While most basic functions of Otter are free to use, the premium subscription offers some additional perks.
AudioShare
 AudioShare lets you manage all the audio recordings on your phone in one place. You can also use the app to record any kind of audio – be it music or voice – using an external mic or the built-in mic on your phone. AudioShare is equipped to play and record in 96k, 48k, 44.1k, 22k, 11k, and 8k sample rates. With AudioShare you get an incredible level of control over the editing process, as you are able to apply different effects like fade in/out, trim the audio recording, and even leave notes wherever necessary.
Easy Voice Recorder
 If you’re looking for a simple voice recording app without the bells and whistles, go for Easy Voice Recorder. This is a great everyday app to record meetings, lectures, and music using your phone. There is no time limit to the recordings, and you can choose to save the file in compressed formats so as to save storage space. The accessible widgets and shortcuts make it easy to start recording audio within seconds. With WearOS support, you can also record audio using your smartwatch.
Riverside
 If you’re looking to record podcasts on your smartphone, then a simple voice recording app isn’t going to cut it. Riverside is one of the more popular apps used by podcasters to record audio on the go. One of the better features of Riverside is that it lets you record up to 8 individual tracks, which makes editing easy once the recording has been completed. If you’re planning on recording a podcast with multiple participants, recording their voices on different tracks will come in extremely handy. Riverside also offers automatic transcriptions for your voice recordings.
Smart Voice Recorder
 This easy-to-use app comes with all the basic features of a regular voice recorder, with a greater level of accessibility. Smart Voice Recorder lets you record high-quality audio without having to worry about the length of the recording. One of the unique features of the app is that it can recognise silence and automatically trim it from the final recording. There is also a live audio spectrum analyser on offer, and you can even adjust the audio sampling rate.
Google Recorder
 Google’s very own voice recorder is currently only available on Pixel 6 or newer devices, but it will likely be rolled out for other Android smartphones in future. This app offers accurate live transcriptions of voice recordings and can recognise multiple speakers and label them accordingly. You can search within the audio or edit certain parts with ease. What sets Google Recorder apart from other voice recording apps is that it doesn’t need an internet connection to transcribe.
Rev Audio & Voice Recorder
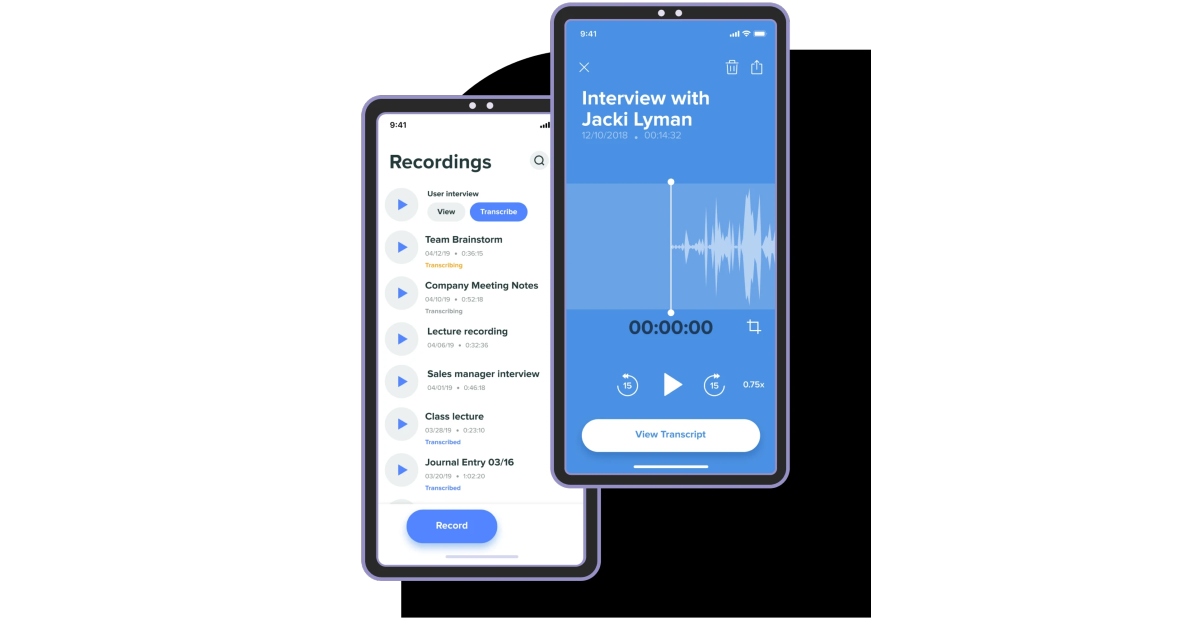 Not happy with how the automated voice transcriptions turn out? Get a human to do it! Rev Audio & Voice Recorder charges $1.50 for human transcription and guarantees 99% accuracy. Your ordered transcriptions are delivered to you by email. Other than that, the app offers all the features of a regular voice recorder like a high-quality recording and playback engine, background recording, in-app editor, and more.
Voice Recorder Pro
 For strictly dictational purposes, Voice Recorder Pro is one of the best apps out there. There is no recording limit other than your phone’s storage space. You can record audio in four different formats – MP3, PCM, AAC, and AMR. If you’re not necessarily looking to record high-quality audio but instead want to save up on storage space, AMR should be your preferred format. The app also lets you change the sample rate (8 kHz – 44kHz) and the bitrate (32 – 320 kbps). There’s support for mono and stereo recordings with the option to record in the background as well.
Read Also: mPassport Police App launched: To speed up the Police verification process of passport issuance
For strictly dictational purposes, Voice Recorder Pro is one of the best apps out there. There is no recording limit other than your phone’s storage space. You can record audio in four different formats – MP3, PCM, AAC, and AMR. If you’re not necessarily looking to record high-quality audio but instead want to save up on storage space, AMR should be your preferred format. The app also lets you change the sample rate (8 kHz – 44kHz) and the bitrate (32 – 320 kbps). There’s support for mono and stereo recordings with the option to record in the background as well.
Read Also: mPassport Police App launched: To speed up the Police verification process of passport issuance
Conclusion
These are our picks for the top 9 voice recording apps for Android and iOS you can download right now. Most of these apps are free to use but some may come with certain exclusive features locked behind a paywall. Some of the apps also offer cloud storage options if you do not have enough storage space on your smartphone. For the latest gadget and tech news, and gadget reviews, follow us on Twitter, Facebook and Instagram. For newest tech & gadget videos subscribe to our YouTube Channel. You can also stay up to date using the Gadget Bridge Android App. You can find the latest car and bike news here.Meta introduces a paid Blue Badge for Facebook and Instagram

Meta Platforms has unveiled Meta Verified, a membership service for both Facebook and Instagram. Users of the paid subscription service will be able to obtain a blue badge and use a government ID to authenticate their accounts. Account verification, impersonation protections, access to more visibility, and support are all part of the new subscription service.
Mark Zuckerberg announced that Meta will start testing a new service called Meta Verified, a subscription package on Instagram and Facebook that includes a verified badge that authenticates your account with a government ID, proactive account protection, access to account support, and increased visibility and reaches.
Also Read: iQOO 11 Review: A real beast
This service is intended to help up-and-coming creators grow their presence and build community more quickly. In order to determine what features are most useful, we will launch a progressive test in Australia and New Zealand later this week. The company will then intend to roll out Meta Verified to the rest of the world in the near future.
The move would enhance security and authenticity on social networking platforms, according to the chief executive of Meta Mark Zuckerberg.
Those unaware to verify the legitimacy of high-profile accounts, badges, often known as blue ticks, have been utilised as a verification tool. Meta’s latest move follows Twitter’s premium Twitter Blue subscription implementation by Elon Musk in November 2022. Nevertheless, when users began pretending to be well-known brands and celebrities by purchasing the badge, Twitter’s pay-for-verification feature was suspended in November of last year.
You’ll receive a verified badge when you sign up for Meta Verified, indicating that your account has been confirmed using a valid government ID and that you are who you say you are. The users will also benefit from increased security against impersonation thanks to proactive account monitoring for potential targets of impersonators who may be people with expanding online audiences. With access to a real person for common account concerns, you can get assistance when you need it. prominence in some platform sections, including search, comments, and recommendations, which increases visibility and reach. special features that let you express yourself in unusual ways.
Also Read: Samsung unveils Galaxy S23, Galaxy S23+, and Galaxy S23 Ultra in India: Details Inside
In This Article
What is required to get Meta verified?
- Accounts must meet minimal activity requirements, such as having a history of prior postings and being at least 18 years old to be eligible.
- When applying for a Facebook or Instagram account, applicants must first provide a government ID that matches their profile name and photo.
- Proactive monitoring for impersonated accounts is part of subscriptions.
How much will it cost?
Later this week, Australia and New Zealand residents will be able to directly purchase Meta Verified on Facebook or Instagram. On the web, monthly subscription costs (USD) $11.99, and for iOS and Android, it costs (USD) $14.99. For the latest gadget and tech news, and gadget reviews, follow us on Twitter, Facebook and Instagram. For newest tech & gadget videos subscribe to our YouTube Channel. You can also stay up to date using the Gadget Bridge Android App. You can find the latest car and bike news hereVivo officially announced Vivo Y56 5G in India

The Chinese smartphone brand Vivo has officially announced the release of its new smartphone in India. The company has launched Vivo Y56 5G smartphone in the nation. The MediaTek Dimensity 700 SoC powers the newly released smartphone. It has dual back 50-megapixel cameras as well. The phone also houses a 5,000mAh battery.
In This Article
Vivo Y56 5G price in India and sale details
Vivo Y56 5G price in India has been set at Rs 19,999 for the single 8GB RAM and 128GB storage option. The device comes in two colour options of Black Engine and Orange Shimmer. The device’s offline retail store sales have started and it can also be purchased via the company’s official website. A significant retailer, Mahesh Telecom, advertised the device for purchase even before the company officially released it. The shop said that physical stores around the country are currently selling the Y56 5G. The retailer from Mumbai posted the information on Twitter.Vivo Y56 5G specifications
The Vivo Y56 5G’s 6.58-inch full-HD+ LCD screen features a 1,080 by 2,408 resolution. The smartphone is controlled by Funtouch OS 13 running on Android 13. It is powered by a MediaTek Dimensity 700 SoC and 8GB RAM combo. The internal RAM can be expanded up to 16GB with the use of unused onboard storage. It also comes with 128GB of built-in storage. The 5,000mAh battery within the Vivo Y56 5G supports 18W rapid charging. Wi-Fi, Bluetooth v5.1, GPS, Glonass, OTG, FM radio, and a USB Type-C port are among the connectivity options available on the Vivo smartphone. The sensors on board include an accelerometer, ambient light sensor, e-compass, gyroscope, and proximity sensor. It has a side-mounted fingerprint sensor for login. A 50-megapixel primary sensor with an f/1.8 aperture and a 2-megapixel secondary sensor with an f/2.4 aperture make up the dual rear camera system on the Vivo Y56 5G. The front of the gadget has a 16-megapixel sensor with an f/2.0 aperture for selfies and video calls. For the latest gadget and tech news, and gadget reviews, follow us on Twitter, Facebook and Instagram. For newest tech & gadget videos subscribe to our YouTube Channel. You can also stay up to date using the Gadget Bridge Android App. You can find the latest car and bike news here.Amazon Quiz Answers Today 20 February 2023: Participate to win Rs 5,000

20 February 2023 Amazon Quiz has gone live on its mobile app platform. The quiz can be played from 12 AM to 11:59. All you need to do is just answer five easy questions that the e-commerce website puts before you. Today you can stand a chance to win Rs 5,000 Amazon Pay Balance.
Every day Amazon posts a new questionnaire that consists of five simple questions about general knowledge and current events. To enter a lucky draw, participants must correctly answer the questions. One incorrect answer will result in your elimination from the quiz. Each month, only one person will be declared the winner and the results will be announced at the end of the month. Amazon customers who submit correct answers can win an Amazon Pay Balance worth up to Rs 50,000. To ensure that you answer all five questions correctly, Gadget Bridge updates all of the correct answers on a daily basis. Take a look at today’s answers:
Amazon Quiz Today Prize – Rs 5,000 Amazon Pay Balance
Quiz Date – 20 February 2023
Daily Timing – 12 AM to 11:59 PM
Winner Announcement – Today 12 PM
In This Article
Amazon Quiz Answers Today 20 February 2023
Question 1: Which country won the 2023 Men’s Hockey World Cup played in Odisha?
Answer: GermanyQuestion 2: A newly released movie by Rajkumar Santoshi is titled ‘Gandhi ______ – Ek Yudh’. Fill in the blanks
Answer: GodseQuestion 3: R’Bonney Gabriel won the 71st Miss Universe competition representing which country?
Answer: USAQuestion 4: This famous ‘toy train’ starts from which hill station?
Answer: DarjeelingQuestion 5: This famous leader was the former President of which country?
Answer: South AfricaHow To Play Amazon Quiz
Only app users are eligible to play the Amazon quiz every morning from 12 AM to 11:59 PM. The quiz is not available on the desktop. For those who are unaware of how to play the Amazon quiz below are the steps, you can follow to take the quiz.- Firstly download the Amazon app from Google Play Store or App Store
- Now fill in the required information through the Sign Up option.
- You need to log in to the Amazon app and scroll down on the home screen to find the Amazon Quiz banner.
- Tap on the Amazon Quiz banner and tap on the Start button to start the Quiz.
- Now you will get 5 questions and you need to answer them correctly. One wrong answer will eliminate you from the Quiz.
- After answering all the questions correctly you are now eligible for a Lucky Draw.
- The winner’s name will be announced today at 12 PM.
Only those who pay will have access to 2FA SMS security protection on Twitter

Twitter officially announced that it will only permit Twitter Blue subscribers to use text messages as a two-factor authentication option after March 20. Users who already have SMS-based 2FA activated but haven’t signed up for Twitter Blue will have 30 days to turn it off and switch to a different method
The company took to Twitter to update the users about the upcoming security change. Its tweet reads, “Effective March 20, 2023, only Twitter Blue subscribers will be able to use text messages as their two-factor authentication method. Other accounts can use an authentication app or security key for 2FA.”
Also Read: Twitter discontinued its CoTweets feature
In order to log in with 2FA, you must also provide a code or security key in addition to your password. By taking this extra step, you can ensure that only you have access to your account. Twitter provides three 2FA options: security key, authentication app, and text message.
Twitter reports that while phone-number-based 2FA was once a common type of 2FA, it has sadly been utilised – and misused – by bad actors. As a result, as of right now, only Twitter Blue subscribers will be able to enrol their accounts in the text message/SMS method of 2FA on the microblogging platform. The availability of text message 2FA for Twitter Blue may vary by country and carrier.
Also Read: Demystified: What each Symbol and Icon Means on Twitter Existing non-Twitter Blue subscribers will have 30 days to cancel this method and sign up for another. Twitter will stop allowing non-Twitter Blue subscribers to use Text messages as a 2FA option as of March 20, 2023. Accounts that still have text message 2FA enabled will have it disabled at that point. Your phone number is not automatically removed from your Twitter account when text message 2FA is disabled. Twitter is encouraging non-Twitter Blue subscribers to think about utilising an authentication app or security key method as an alternative. For the latest gadget and tech news, and gadget reviews, follow us on Twitter, Facebook and Instagram. For newest tech & gadget videos subscribe to our YouTube Channel. You can also stay up to date using the Gadget Bridge Android App. You can find the latest car and bike news here.There you go, things now will be forced if you do not purchase things. A simple thing as 2FA SMS security will only be available for people who pay. Twitter will be more vulnerable to attacks now. pic.twitter.com/BSFgVPvsrM
— Sulabh Puri (@sulabhpuri) February 18, 2023
Comparison: OnePlus 11 vs Samsung Galaxy S23

Earlier this month, Samsung Galaxy S23 and OnePlus 11 were introduced in India. Both are high-end products from their respective brands, however, the OnePlus phone is more affordable and includes additional quality features. In order to determine which device delivers the most features for the lowest price, we have compared the OnePlus 11 with the Samsung Galaxy S23.
In This Article
Display
OnePlus 11: 6.7-inch Samsung LTPO 3.0 AMOLED display Samsung Galaxy S23: 6.1-inch full-HD+ Dynamic AMOLED 2X display Also Read: OnePlus 11 5G with Snapdragon 8 Gen 2 SoC first sale todayProcessor
OnePlus 11: Qualcomm Snapdragon 8 Gen 2 SoC Samsung Galaxy S23: Qualcomm Snapdragon 8 Gen 2 SoC (customised)Rear camera(s)
OnePlus 11: Triple rear camera setup- 50-megapixel sensor with OIS and f/1.8 aperture, 32-megapixel portrait sensor and 48-megapixel Sony IMX58 ultra wide-angle sensor (f/2.2 aperture and 115-degree field of view) Samsung Galaxy S23: Triple rear camera setup- 50-megapixel primary wide-angle sensor (f/1.8 aperture and 85-degree field of view), 12-megapixel ultra-wide angle camera (f/2.2 aperture lens and a 120-degree field-of-view) and a 10-megapixel telephoto camera (f/2.4 aperture lens and 3x optical zoom) Also Read: Samsung unveils Galaxy S23, Galaxy S23+, and Galaxy S23 Ultra in India: Details InsideSelfie camera
OnePlus 11: 16-megapixel sensor (f/2.4 aperture) Samsung Galaxy S23: 12-megapixel selfie sensor (f/2.2 aperture lens and an 80-degree field-of-view)RAM and storage
OnePlus 11: 8GB RAM with 128GB storage and 12GB RAM with 256GB storage options Samsung Galaxy S23: 8GB RAM with 128GB storage and 8GB RAM with 256GB storage optionsBattery
OnePlus 11: 5,000mAh dual-cell battery (support for 100W SuperVOOC charging) Samsung Galaxy S23: 3,900mAh battery (supports 25W wired and 15W wireless charging)Operating system
OnePlus 11: ColorOS 13.0 (Android 13) Samsung Galaxy S23: One UI 5.1 (Android 13)Starting Price
OnePlus 11: Rs 56,999 Samsung Galaxy S23: Rs 74,999Our verdict
Comparing first the displays, the OnePlus 11 has a larger 6.7-inch Samsung LTPO 3.0 AMOLED screen while the Galaxy S23 is content with a 6.1-inch full-HD+ Dynamic AMOLED 2X screen. The Galaxy phone is better suited for people with smaller hands for comfortable single-handed use while the OnePlus device is better if you desire a bigger phone. The Samsung Galaxy S23 provides Gorilla Glass Victus 2, whilst the OnePlus 11 chooses the more dated Gorilla Glass 5. Although the OnePlus 11’s display is curved on the sides, the Galaxy S23’s display is brighter. The most recent Qualcomm Snapdragon 8 Gen 2 Soc powers both devices. However, Qualcomm specifically customised the one in the Galaxy for Samsung to perform faster. Both smartphones have a triple rear camera arrangement in terms of optics, however, OnePlus boasts Hasselblad-branded sensors. A 5,000mAh battery powers the OnePlus 11 and supports 100W SuperVOOC fast charging. The Galaxy S23, on the other hand, has a smaller 3,900mAh battery and supports 25W wired charging and 15W wireless charging Samsung offers a feature for wireless charging, however, the OnePlus 11 has a larger battery and supports faster charging. Even In terms of design, the two devices are completely opposite. The OnePlus 11 features an entry-level IP54 rating, which provides splash protection but no significant protection from drowning. On the other hand, the S23 has a complete IP68 rating. The OnePlus 11 is also less expensive than the Galaxy S23. Which should you purchase, then? Your selection for the phone’s size will be the major deciding element in your decision to purchase. The handsets are compatible and reasonably priced, provided you strictly want or want wireless charging or an IP68 rating. For the latest gadget and tech news, and gadget reviews, follow us on Twitter, Facebook and Instagram. For newest tech & gadget videos subscribe to our YouTube Channel. You can also stay up to date using the Gadget Bridge Android App. You can find the latest car and bike news here.Beginning May 1, Amazon will require employees to work from office at least three days a week

From May 1, Amazon.com will allow employees to work at least three days per week in the office. The company shared the news via blog post. The decision was made at a meeting earlier this week. Note that the company sent workers home to work remotely as a result of the COVID-19 pandemic. Amazon intends to put this adjustment into action on May 1.
CEO Andy Jassy, who also stated that the change would make it simpler to learn and communicate. According to him, there would be several limitations to the norm, including the option for salesmen and customer support staff to work remotely.
Also Read: Samsung unveils Galaxy S23, Galaxy S23+, and Galaxy S23 Ultra in India: Details Inside
As per the Amazon head, the pandemic started about three years ago, and it advised all its staff who could work from home to do so. Following that, the firm made a few updates to the guidance (second half of 2021), the most recent of which stated that Director-level leaders would determine for their teams where they would work and that we would experiment for the ensuing period of time.
Considering how long the epidemic lasted, several models—including some teams working solely from home, some teams spending all of their time in the office together, and numerous varieties of hybrid—could be seen over a significant amount of time. According to the CEO its S-team discussed whether and how to modify its strategy by listening to employees, observing how their teams performed, speaking with leaders at other organisations, and meeting on a number of occasions.
In a blog post, Amazon said that working together and coming up with ideas in person is simpler and more productive. More freely expressed energy and thoughts are riffed on. It’s simpler to learn from one another face-to-face. It’s far simpler to ask someone how to accomplish something or how they handled a certain scenario by walking a short distance to their location as opposed to Chiming or Slacking them. When teams interact in person more regularly, they tend to feel closer to one another. Therefore, this has convinced Amazon that it should return to working together most of the time (at least three days per week). The change will go into effect on May 1 according to Amazon.
Also Read: Garena Free Fire Redeem Codes Today 18 February 2023: Here is how to claim them
“We made this decision at an s-team meeting earlier this week, and for a number of reasons (including the adjustments I know will be required for some of our employees), I wanted to share with you as early as I could even though we haven’t worked out all the execution details yet. Of course, as there were before the pandemic, there will still be certain roles (e.g. some of our salespeople, customer support, etc.) and exceptions to these expectations, but that will be a small minority. We plan to implement this change effective May 1.”
For the latest gadget and tech news, and gadget reviews, follow us on Twitter, Facebook and Instagram. For newest tech & gadget videos subscribe to our YouTube Channel. You can also stay up to date using the Gadget Bridge Android App. You can find the latest car and bike news here.
Garena Free Fire Redeem Codes Today 18 February 2023: Here is how to claim them

Garena Free Fire is a battle royale game with regular awards and tournaments to keep players interested. If you play Garena Free Fire, you should be aware of the redeem codes that are released on a daily basis. However, because the battle royale game is banned in India, players from other countries can use the Free Fire Redeem codes daily. If you’re unfamiliar with the Garena Free Fire redeem codes or don’t know how to get them, we’ve put together a step-by-step guide to help you redeem them. Check out Garena Free Fire Redeem Codes for 18 February 2023.
The Free Fire redeem codes are a great way to get free stuff. These are 12-digit codes that contain alphabets and numbers, as well as an expiration date and time. Because the Garena FF redeem codes cannot be used more than once, you should hurry to the redemption page to claim your free reward before someone else does. To get a free reward, all you have to do is go to reward.ff.garena.com/en, which is the official redemption page. Also, keep an eye on this space for daily updates on Garena Free Fire redemption codes and rewards.
In This Article
Garena Free Fire Redeem Codes Today 18 February 2023
- BR43FMAPYEZZ
- NPYFATT3HGSQ
- FFCMCPSGC9XZ
- MCPW2D2WKWF2
- ZZZ76NT3PDSH
- FFCMCPSEN5MX
- HNC95435FAGJ
- 6KWMFJVMQQYG
- FFCMCPSUYUY7E
- MCPW3D28VZD6
- EYH2W3XK8UPG
- UVX9PYZV54AC
- FFCMCPSJ99S3
- XZJZE25WEFJJ
- V427K98RUCHZ
- MCPW2D1U3XA3
- FFAC2YXE6RF2
- FFCMCPSBN9CU
- FFBBCVQZ4MWA
How to Get Free Fire Redeem Codes for Garena on 18 February 2023?
- Visit the Garena Free Fire game’s official website at reward.ff.garena.com.
- Use your Facebook, Google, VK, Apple ID, Huawei ID, or Twitter account to log in.
- You’ll be taken to a valid redemption code (s)
- Copy and paste the 12-digit redemption code into the text box.
- On the screen, a dialogue box will appear.
- ‘Ok’ should be selected.
Amazon Quiz Answers Today 18 February 2023: Participate to win Rs 500

Have you participated in the Amazon Quiz today? If not then participate in the 18 February 2023 Amazon Quiz as it has already gone live on the app. The daily quiz can be played from 12 AM to 11:59 every day on the mobile app platform. Today e-commerce is giving the chance to win Rs 500 Amazon Pay Balance.
Every day Amazon brings a fresh quiz for its customers. By participating in the quiz the participants can win an Amazon Pay Balance of up to Rs 50,000. The quiz can only be played on the mobile app as it is not available for the desktop platform. The quiz contains five easy questions and you have to answer all the questions correctly. The participants will then be shortlisted for a lucky draw to select a winner. Whereas the results are declared at the end of the month. Check out today’s Amazon quiz answers to win Rs 500.
Amazon Quiz Today Prize – Rs 500 Amazon Pay Balance
Quiz Date – 18 February 2023
Daily Timing – 12 AM to 11:59 PM
Winner Announcement – Today 12 PM
In This Article
Amazon Quiz Answers Today 18 February 2023
Question 1: The first Test between India and Australia in the Border Gavaskar Trophy 2023 would be played in which city? Answer: Nagpur Question 2: Which actor would make his ‘digital debut’ in the Amazon Prime series ‘Farzi’? Answer: Shahid Kapoor Question 3: Manik Saha is the Chief Minister of which state going to elections in February 2023? Answer: Tripura Question 4: This is the flag of which country? Answer: Argentina Question 5: Name this breed of dog Answer: DalmatianHow To Play Amazon Quiz
Only app users are eligible to play the Amazon quiz every morning from 12 AM to 11:59 PM. The quiz is not available on the desktop. For those who are unaware of how to play the Amazon quiz below are the steps, you can follow to take the quiz.- Firstly download the Amazon app from Google Play Store or App Store
- Now fill in the required information through the Sign Up option.
- You need to log in to the Amazon app and scroll down on the home screen to find the Amazon Quiz banner.
- Tap on the Amazon Quiz banner and tap on the Start button to start the Quiz.
- Now you will get 5 questions and you need to answer them correctly. One wrong answer will eliminate you from the Quiz.
- After answering all the questions correctly you are now eligible for a Lucky Draw.
- The winner’s name will be announced today at 12 PM.
mPassport Police App launched: To speed up the Police verification process of passport issuance

The Ministry of External Affairs has announced the launch of the mPassport Police app. The government claims that this app will simplify and hasten the procedure of police verification of passport approval.
The Passport Mobile Application was introduced by Union Home Minister Amit Shah to enable speedy passport verification. Police investigations will be more transparent and time-efficient with digital verification. The staff of the Spl. Branch/Delhi Police has been given 350 mobile tablets. With the help of these tablets, the complete passport application verification procedure will go paperless, and digital. This implies that tablet-based verification will shorten the verification process from 15 days to 5 days, saving a total of 10 days on the time it takes to issue passports.
Also Read: Meta introduces Broadcast Channels, a new messaging tool for creators on Instagram
State Police departments have a pressing need to use smartphones and tablets to reduce paperwork and delays associated with processing at the Thana and field level. The custom mobile application (mPassport Police App) has been suggested for the Thana and Field Verification processing teams. Users of Police Stations who already use the PSP Police (Web) Application for processing Passport Services applicants’ police verifications may download the app to record the inputs of field verification processing completed at the applicant’s residence.
Also Read: Vivo Y56 5G now available via offline retailers in India
“Police plays an important role to deliver passports and related services such as Police Clearance Certificate (PCC) to the citizens. In the various models for police verification implemented across the nation, the status of intermediate activities related to the verification process is not recorded/tracked in the system. This is mainly because most of the activities involved in the verification process essentially include exchange of physical documents (PP Forms) across District Police Headquarter (DPHq), Thana, Criminal Investigation Department (CID)/ Local Intelligence Unit (LIU) and Field Verification teams, and contributes most to the delays in the overall Police Verification Report (PVR) processing time.”
For the latest gadget and tech news, and gadget reviews, follow us on Twitter, Facebook and Instagram. For newest tech & gadget videos subscribe to our YouTube Channel. You can also stay up to date using the Gadget Bridge Android App. You can find the latest car and bike news here.