
In This Article
Honor Pad V8 Pro tablet with 144Hz display launched

Chinese tech company Honor has unveiled the Honor Pad V8 Pro tablet. The tab features a 144Hz IPS LCD display. The device runs on MagicOS 7.0, an Android 12-based operating system. Moreover, it is powered by a MediaTek Dimensity 8100. Only full-HD video can be captured by the front camera; 4K video can be captured by the back camera. Alongside the company has also introduced the Honor 80 GT and the Honor Band 7 fitness tracker.
Garena Free Fire Redeem Codes Today 29 December 2022: Here is how to claim them

Garena Free Fire is a battle royale game with regular awards and tournaments to keep players interested. If you play Garena Free Fire, you should be aware of the redeem codes that are released on a daily basis. However, because the battle royale game is banned in India, players from other countries can use the Free Fire Redeem codes daily. If you’re unfamiliar with the Garena Free Fire redeem codes or don’t know how to get them, we’ve put together a step-by-step guide to help you redeem them. Check out Garena Free Fire Redeem Codes for December 29.
The Free Fire redeem codes are a great way to get free stuff. These are 12-digit codes that contain alphabets and numbers, as well as an expiration date and time. Because the Garena FF redeem codes cannot be used more than once, you should hurry to the redemption page to claim your free reward before someone else does. To get a free reward, all you have to do is go to reward.ff.garena.com/en, which is the official redemption page. Also, keep an eye on this space for daily updates on Garena Free Fire redemption codes and rewards.
In This Article
Garena Free Fire Redeem Codes Today 29 December 2022
- ZYPPXWRWIAHD
- FF10617KGUF9
- FF119MB3PFA5
- WLSGJXS5KFYR
- FF11WFNPP956
- SARG886AV5GR
- FF11HHGCGK3B
- Y6ACLK7KUD1N
- ZRJAPH294KV5
- FF1164XNJZ2V
- FF11DAKX4WH
- YXY3EGTLHGJX
- B6IYCTNH4PV3
- FF11NJN5YS3E
- MCPTFNXZF4TA
- 8F3QZKNTLWBZ
- FF9MJ31CXKRG
- FFICJGW9NKYT
- PCNF5CQBAJLK
- J3ZKQ57Z2P2P
- GCNVA2PDRGRZ
- 4ST1ZTBE2RP9
- X99TK56XDJ4X
- B3G7A22TWDR7X
- FF7MUY4ME6SC
- WEYVGQC3CT8Q
- 8F3QZKNTLWBZ
How to Get Free Fire Redeem Codes for Garena on December 29?
- Visit the Garena Free Fire game’s official website at reward.ff.garena.com.
- Use your Facebook, Google, VK, Apple ID, Huawei ID, or Twitter account to log in.
- You’ll be taken to a valid redemption code (s)
- Copy and paste the 12-digit redemption code into the text box.
- On the screen, a dialogue box will appear.
- ‘Ok’ should be selected.
Amazon Quiz Answers Today 29 December 2022: Participate to win Rs 2,500

Amazon hosts a Quiz session for its customers daily. Its app platform brings a quiz on a daily basis, which begins at 12 AM and ends at 11:59 PM daily. The participants stand a chance to win cash prizes on a daily basis. Today’s 29 December 2022 Amazon Quiz will let you win Rs 2,500 Amazon Pay Balance.
By participating in the Amazon Quiz the participants can win Amazon Pay Balance ranging from Rs 1,000 to Rs 50,000 every day while sitting at home. To win the participants must answer five questions correctly that are based on current events and general knowledge. One wrong answer can eliminate you from the quiz. The results will be announced at the end of the month. Today’s question will let you win Rs 2,500 Amazon Pay Balance. Check below for today’s Amazon quiz answers.
Amazon Quiz Today Prize – Rs 2,500 Amazon Pay Balance
Quiz Date – 29 December 2022
Daily Timing – 12 AM to 11:59 PM
Winner Announcement – Today 12 PM
In This Article
Amazon Quiz Answers Today 29 December 2022
Question 1: What is 64 divided by 8? Answer: 8 Question 2: What is ten squared? Answer: 100 Question 3: What is the opposite of ‘Low’? Answer: High Question 4: What is the general name for a group of wolves? Answer: Pack Question 5: Which infamous pirate did actor Johnny Depp plays? Answer: Jack SparrowHow To Play Amazon Quiz
Only app users are eligible to play the Amazon quiz every morning from 12 AM to 11:59 PM. The quiz is not available on the desktop. For those who are unaware of how to play the Amazon quiz below are the steps, you can follow to take the quiz.- Firstly download the Amazon app from Google Play Store or App Store
- Now fill in the required information through the Sign Up option.
- You need to log in to the Amazon app and scroll down on the home screen to find the Amazon Quiz banner.
- Tap on the Amazon Quiz banner and tap on the Start button to start the Quiz.
- Now you will get 5 questions and you need to answer them correctly. One wrong answer will eliminate you from the Quiz.
- After answering all the questions correctly you are now eligible for a Lucky Draw.
- The winner’s name will be announced today at 12 PM.
Recover Deleted Videos from SD Card from Windows and Mac: SD Card Recovery

You decided to upload some of the significant videos you had on your SD card to your computer. But as soon as the transfer began, it took too long, so you suddenly unplugged the SD card. You were requested to format the SD card the following time you attached the card. Just because of this, you lost those videos. So, how to recover deleted videos from an SD card?
Well, everyone experiences this. You will inevitably lose data from your SD card in such circumstances. There is a highly efficient free SD card recovery Mac method that you may apply to retrieve those pictures back, so it does not necessarily imply that you have lost the images for good. You will learn more about this in this comprehensive guide.
 Step 2: All of the deleted files will show up after scanning. You may check the video’s preview to be sure it is the one you need.
Step 3: To save the movie to your computer, choose the files and hit the “Recover” option.
In three easy steps, you may recover the deleted videos from the SD card. Is it not quick?
2.2 How to Recover Deleted Videos from SD Card on Mac?
Tenorshare 4DDiG has a Mac version that supports SD card video recovery. The program may be used to expertly recover files from SD cards on Mac as well as other data from storage devices that are Mac-based. What’s more, there is no need to turn off SIP to use 4DDiG on Mac. This step gives you an effective boost in recovery efficiency.
You must download the application onto your Mac before starting the recovery procedure. Once finished, adhere to the directions listed below:
Step 1: After installing and running the 4DDiG Mac data recovery software, connecting your SD card to your Mac is the first step. Next, choose a place to begin data recovery. Choose “Scan” from the menu.
Step 2: After the scan results are produced, choose the specific files you want to see.
Step 3: Next, choose a place to store the files you find and touch the “Recover” button.
Step 2: All of the deleted files will show up after scanning. You may check the video’s preview to be sure it is the one you need.
Step 3: To save the movie to your computer, choose the files and hit the “Recover” option.
In three easy steps, you may recover the deleted videos from the SD card. Is it not quick?
2.2 How to Recover Deleted Videos from SD Card on Mac?
Tenorshare 4DDiG has a Mac version that supports SD card video recovery. The program may be used to expertly recover files from SD cards on Mac as well as other data from storage devices that are Mac-based. What’s more, there is no need to turn off SIP to use 4DDiG on Mac. This step gives you an effective boost in recovery efficiency.
You must download the application onto your Mac before starting the recovery procedure. Once finished, adhere to the directions listed below:
Step 1: After installing and running the 4DDiG Mac data recovery software, connecting your SD card to your Mac is the first step. Next, choose a place to begin data recovery. Choose “Scan” from the menu.
Step 2: After the scan results are produced, choose the specific files you want to see.
Step 3: Next, choose a place to store the files you find and touch the “Recover” button.
In This Article
Part 1: Why Your Videos Are Deleted or Lost?
To properly comprehend what has occurred, you must first learn how video data may be lost or erased before looking into recovery options.Physical harm:
SD cards may be physically harmed, much like the majority of electronics. The integrity of an SD card may be progressively compromised over time by dropping it and handling it roughly, which can interfere with both readings from and writing to the card.Corrupt files:
Several factors might cause your files to become corrupt. Most of the time, it can’t be prevented and happens at random. Whatever the source, file corruption makes your files useless, causing them to lose their identity.Incorrect device removal:
It’s advised to carefully eject the storage media rather than take it out when taking an SD card out of a device (namely a computer). This is because removing the storage device while it may still be doing a read-write operation might result in file corruption, which is just as bad as deleting the file.Formatted SD card:
The data on an SD card is deleted when it is formatted. It is a better option than merely choosing and erasing every file on the card. Formatting is often carried out on a computer. However, some cameras have an internal formatting feature that does virtually the same thing.Deletion of a file via error:
People make errors. It might just be that the files were unintentionally destroyed in the case of media saved on an SD card.Part 2: How to Recover Deleted Videos from SD Card Using Tenorshare 4DDiG?
Tenorshare 4DDiG Windows Data Recovery allows you to recover deleted videos from SD cards on Windows PCs and Windows-based devices, such as USB, SD cards, and external devices. You can restore photos and videos and recover data from destroyed computers, lost partitions, external devices, the Recycle Bin, BitLocker-encrypted drives, and local discs. The methods in the following instruction will lead you through all of these scenarios to restore deleted videos on SD card. 2.1 How to Recover your Deleted Videos from SD Card on Windows? Tenorshare 4DDiG can help you recover video from SD cards, formatted SD cards, and other lost or destroyed media. The finest feature of this expert recovery software is that it was created with different user skill levels in mind. So, whether you’re an expert or a beginner, using this program to recover video free from an SD card is simple. Below are some of the features of Tenorshare 4DDiG.- Restore the lost video from an SD card, a laptop or PC, an internal or external drive, a USB flash disc, etc.
- It provides two recovery modes: rapid scan and thorough scan.
- Recover over a thousand media assets, including movies, pictures, audio files, and documents.
- In addition to MP4, MOV, MKV, AVI, AMV, F4V, RM/RMVB, SWF, MPG, TS, MPEG, VOB, DV, and MTS, it also supports several other video formats.
- Files deleted unintentionally, by a virus, or other means may be recovered.
- File previewing is an option before data recovery.
 Step 2: All of the deleted files will show up after scanning. You may check the video’s preview to be sure it is the one you need.
 Step 3: To save the movie to your computer, choose the files and hit the “Recover” option.
 In three easy steps, you may recover the deleted videos from the SD card. Is it not quick?
2.2 How to Recover Deleted Videos from SD Card on Mac?
Tenorshare 4DDiG has a Mac version that supports SD card video recovery. The program may be used to expertly recover files from SD cards on Mac as well as other data from storage devices that are Mac-based. What’s more, there is no need to turn off SIP to use 4DDiG on Mac. This step gives you an effective boost in recovery efficiency.
You must download the application onto your Mac before starting the recovery procedure. Once finished, adhere to the directions listed below:
Step 1: After installing and running the 4DDiG Mac data recovery software, connecting your SD card to your Mac is the first step. Next, choose a place to begin data recovery. Choose “Scan” from the menu.
In three easy steps, you may recover the deleted videos from the SD card. Is it not quick?
2.2 How to Recover Deleted Videos from SD Card on Mac?
Tenorshare 4DDiG has a Mac version that supports SD card video recovery. The program may be used to expertly recover files from SD cards on Mac as well as other data from storage devices that are Mac-based. What’s more, there is no need to turn off SIP to use 4DDiG on Mac. This step gives you an effective boost in recovery efficiency.
You must download the application onto your Mac before starting the recovery procedure. Once finished, adhere to the directions listed below:
Step 1: After installing and running the 4DDiG Mac data recovery software, connecting your SD card to your Mac is the first step. Next, choose a place to begin data recovery. Choose “Scan” from the menu. Step 2: After the scan results are produced, choose the specific files you want to see.
 Step 3: Next, choose a place to store the files you find and touch the “Recover” button.
Part 3: How to Use SD Cards to Avoid Data Loss?
Here’s a quick truth: most “videos disappeared from SD card” users themselves cause incidents. Why? Because they ignore fundamental safety precautions like hitting the eject button before ripping the SD card out like a stray nose hair, and they don’t utilize SD cards as responsively as they should, subjecting them to various hard situations.Always click the Eject button:
Your operating system allows you to securely reject any storage device before you physically detach it for a reason: doing so helps prevent data damage brought on by unexpectedly halted read/write activities.Use many SD cards:
Since SD cards aren’t expensive, it doesn’t make sense to put all your eggs in one basket by choosing one big SD card over several smaller ones. Your data will still be there on the other SD cards, even if one of your smaller SD cards malfunctions.Place the card inside a case for protection:
MicroSD cards are just 1 mm thick, whereas regular SD cards have a thickness of only 2.1 mm. They are thus quite delicate and generally not made to last in hostile environments, which include the inside of your bag or pocket.Conclusion
For anybody, losing videos from the SD may be a frustrating scenario. However, this guide will make it simple to recover lost movies from an SD card. Fortunately, the procedure will be simple and fast thanks to recovery tools like the Tenorshare 4DDiG SD Recovery program. Make sure you keep a backup of the videos saved on the SD card to prevent this circumstance in the future. Get Benefits from these Amazing offers at 4DDiG Christmas & New Year Sales! 4DDiG Christmas & New Year Sales has prepared surprise gifts for users, if you’re still bothered by the price of buying data products, grab this great offer! Don’t miss any discount opportunity to recover deleted videos from SD card on Windows and Mac. This promotion is roughly divided into the following three parts:- 100% Win A Gift
- Up to 70% OFF On Best Single Deals
- XMAS Coupon Code – 40% OFF
Redmi Watch 3 and Redmi Band 2 launched: Price and availability details

Redmi Watch 3 and Redmi Band 2 are the two latest wearables that were launched by Xiaomi. The smartwatch comes with a 60Hz AMOLED screen whereas the smart band has a TFT LCD. Both devices come with health and fitness monitoring features. Additionally, the smartwatch supports five significant satellite location systems while the fitness tracker comes with a blood oxygen monitor.
In This Article
Redmi Watch 3 specifications
Redmi Watch 3 features a 1.75-inch AMOLED display with a resolution of 390×450 pixels. The screen has a brightness of 600 nits and comes with a refresh rate of 60 Hz. The premium GNSS chip powers the device. The smartwatch is usable with devices running iOS 12 and higher or Android 6.0. It’s made to be 5ATM water resistant. The Redmi Watch 3 has 121 sports modes, including swimming, cycling, climbing mountains, and outdoor running. Both Bluetooth calling and an SOS emergency call capabilities are supported by the watch. There are ten running courses already included, and a voice coach will guide you through them. It can also be used to check blood oxygen levels and keep an eye on heart rate. Additionally, the Redmi Watch 3 has sleep-monitoring technologies to help users develop better sleeping patterns. A 289mAh battery inside of this smartwatch is touted to provide up to 12 days of ordinary use. The device supports QZSS, GPS, GLONASS, Beidou, and GALILEO satellite positioning systems. Read Also: boAt Storm Pro smartwatch with Always on HD AMOLED displayRedmi Band 2 specifications
A 1.47-inch TFT LCD screen with a 172×320 pixel resolution is included with the Redmi Band 2. The display has 450 nits of maximum brightness and one may set album photographs as their backdrop. Moreover, the device also comes with more than 100 watch faces. It can endure swimming in shallow water thanks to its 5ATM water resistance. It is compatible with devices running iOS 12 and higher or Android 6.0. The Redmi Band 2 also has a feature for women’s health that vibrates to serve as a reminder. It has more than 30 different sports modes and Blood oxygen tracking, heart rate monitoring, and sleep monitoring are just a few of the capabilities offered by the device. A 210mAh battery inside of it is said to offer up to 14 days of backup. Read Also: Huawei Band 4 to go on its first sale in India today via FlipkartRedmi Watch 3, Redmi Band 2 price
In China, the Redmi Watch 3 is now available for purchase for CNY 599, or around Rs. 7,000. Ivory White and Elegant Blank are the colours available for this smartwatch. The Redmi Band 2 costs CNY 159, which is equivalent to Rs. 2,000. It comes in the colours Dream White and Midnight Black. For the latest gadget and tech news, and gadget reviews, follow us on Twitter, Facebook and Instagram. For newest tech & gadget videos subscribe to our YouTube Channel. You can also stay up to date using the Gadget Bridge Android App. You can find the latest car and bike news here.Redmi Note 12 Pro Speed Edition powered by Snapdragon 778G SoC launched

Chinese electronics giant Xiaomi has unveiled the Redmi Note 12 Pro Speed Edition in China. The Note 12 Pro Speed Edition is powered by a Snapdragon 778G SoC. The device features a triple rear camera arrangement with a 108-megapixel main sensor. The smartphone packs a 5,000mAh battery and supports 67W rapid charging.
The starting pricing for the 8GB RAM with 256GB storage edition of the Note 12 Pro Speed Edition is CNY 1,699, or around Rs. 20,200. The pricing of the 8GB with 256GB storage variant is CNY 1,799, or approximately Rs. 21,400, while the price of the 12GB with 256GB storage model is CNY 1,999, or approximately Rs. 23,700. The phone comes in three colour options of Midnight Black, Shimmer Green, and Time Blue. It is presently available for purchase in China on Mi.com.


Redmi Note 12 Pro Speed Edition specifications
Redmi Note 12 Pro Speed Edition features a 6.67-inch, 1,080×2,400-pixel full-HD+ OLED flexible display. It features a 240Hz touch sampling rate in addition to a refresh rate of up to 120Hz. Along with 1920Hz PWM dimming, HDR10+ compatibility, and DCI-P3 colour gamut, the display provides these features. Android-12-based MIUI 14 runs the handset. Also Read: Google Pixel 7 review: Is this an all-rounder phone? A 6nm Snapdragon 778G octa-core SoC and up to 12GB LPDDR4x RAM are used to power the latest Redmi model. There is support for HDR10+ and a refresh rate of up to 120 Hz. PWM dimming at 1920Hz and the DCI-P3 colour gamut are features of the panel. A 6nm Snapdragon 778G octa-core SoC and up to 12GB LPDDR4x RAM are used to power the phone. The smartphone has 256GB of UFS 2.2 storage capacity. The Redmi Note 12 Pro Speed Edition has a USB Type-C port, 5G, Wi-Fi 6, Bluetooth v5.2, and Wi-Fi 6. The device has a 5,000mAh battery and supports 67W rapid charging. The triple rear camera system on the Redmi Note 12 Pro Speed Edition comprises a 100-megapixel Samsung HM2 sensor. A 2-megapixel macro sensor and an 8-megapixel ultra wide-angle sensor with a 119-degree field of view are also part of the camera arrangement. A 16-megapixel selfie sensor is located at the front of the device for selfies and video calls. An ambient light sensor, acceleration sensor, accelerometer, e-compass, IR remote control, distance sensor, and gyroscope are some of the sensors on the phone. For the latest gadget and tech news, and gadget reviews, follow us on Twitter, Facebook and Instagram. For newest tech & gadget videos subscribe to our YouTube Channel. You can also stay up to date using the Gadget Bridge Android App. You can find the latest car and bike news here.Demystified – What is OTA? How to check and Install OTA Updates on any Android phone

OTA is an umbrella term for all kinds of software updates that are distributed wirelessly by the manufacturer. OTA stands for Over The Air and is used to push any updates ranging from OS to configuration messages for setting up a SIM card. Most Android users receive OTA updates in the form of security patches and new OS versions. Software updates are usually rolled out in phases. Once the update arrives for your phone, a notification will pop up on your phone’s status bar. You can also manually check for any software updates for your phone. In this article, we show you how to check for and install OTA updates for any Android phone.
Read Also: Redmi 11 Prime 5G price in India dropped by Rs 1,000
Step 3: Tap on ‘Download and Install’.
Step 4: Select ‘Install now’.
Make sure you are connected to a WiFi network as the update will consume a lot of data while downloading. Also, ensure that your phone’s battery is charged to an optimum level. Once your phone download’s the update, it will be installed on your Android smartphone.
Read Also: How to Factory Reset Your Windows 11 PC or laptop
In This Article
Here’s how you can check and install OTA updates on Android
Step 1: Go to Settings. Step 2: Scroll down and select Software Update. Step 3: Tap on ‘Download and Install’.
 Step 4: Select ‘Install now’.
 Make sure you are connected to a WiFi network as the update will consume a lot of data while downloading. Also, ensure that your phone’s battery is charged to an optimum level. Once your phone download’s the update, it will be installed on your Android smartphone.
Read Also: How to Factory Reset Your Windows 11 PC or laptop
Make sure you are connected to a WiFi network as the update will consume a lot of data while downloading. Also, ensure that your phone’s battery is charged to an optimum level. Once your phone download’s the update, it will be installed on your Android smartphone.
Read Also: How to Factory Reset Your Windows 11 PC or laptop
Conclusion
This is how you can check and install OTA updates on any Android smartphone. It is recommended that you install a software update as soon as it is rolled out since it removes any previous bugs on your phone and patches any security issues that were previously brought to light. For the latest gadget and tech news, and gadget reviews, follow us on Twitter, Facebook and Instagram. For newest tech & gadget videos subscribe to our YouTube Channel. You can also stay up to date using the Gadget Bridge Android App. You can find the latest car and bike news here.How to Search and Download India Trademark Certificate from the web? (2023)
")
If you’re looking to establish a brand, you need to trademark the name in order to secure its identity under Intellectual Property laws. You can also look up trademark certificates of other brands and organisations from the public database. The process for doing so is fairly simple, even though it takes a few extra steps. In this article, we show you how to search for and download an India Trademark Certificate from the web.
Read Also: Redmi 11 Prime 5G price in India dropped by Rs 1,000
Step 2: Enter the brand or trademark you are looking for in the search field.
Step 3: Select the registered trademark you are looking for.
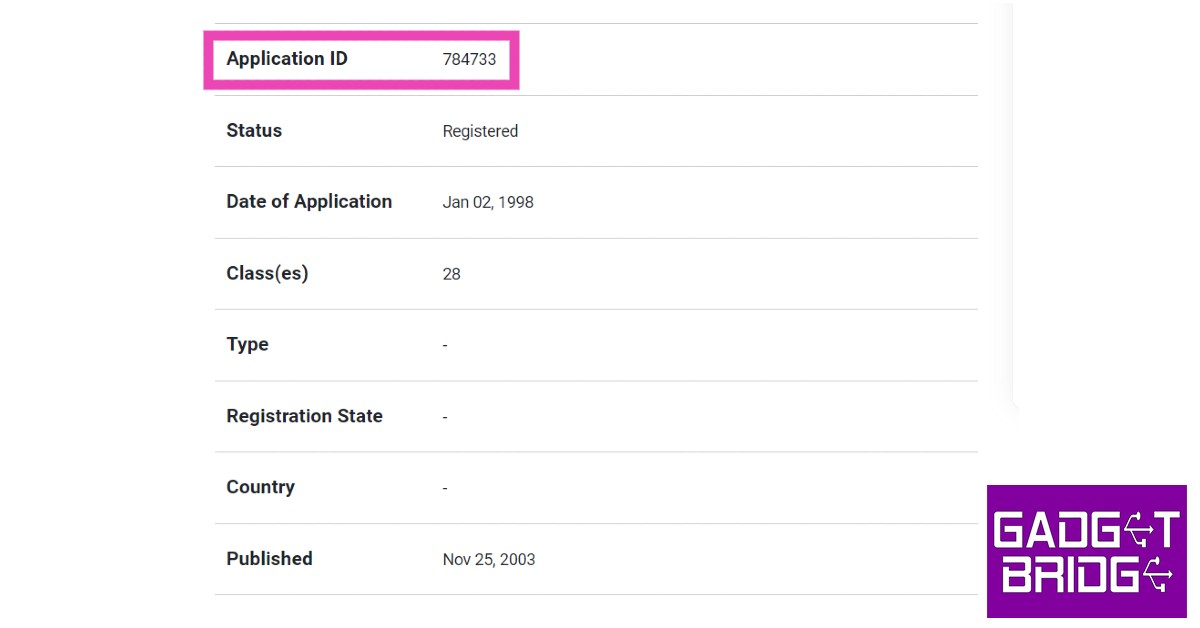
Step 4: Copy the Application ID and go to https://ipindiaonline.gov.in/eregister/eregister.aspx.
Step 5: Select Trade Mark Application/Registered Mark from the side menu.
Step 6: Click the check box for National/IRDI Number.
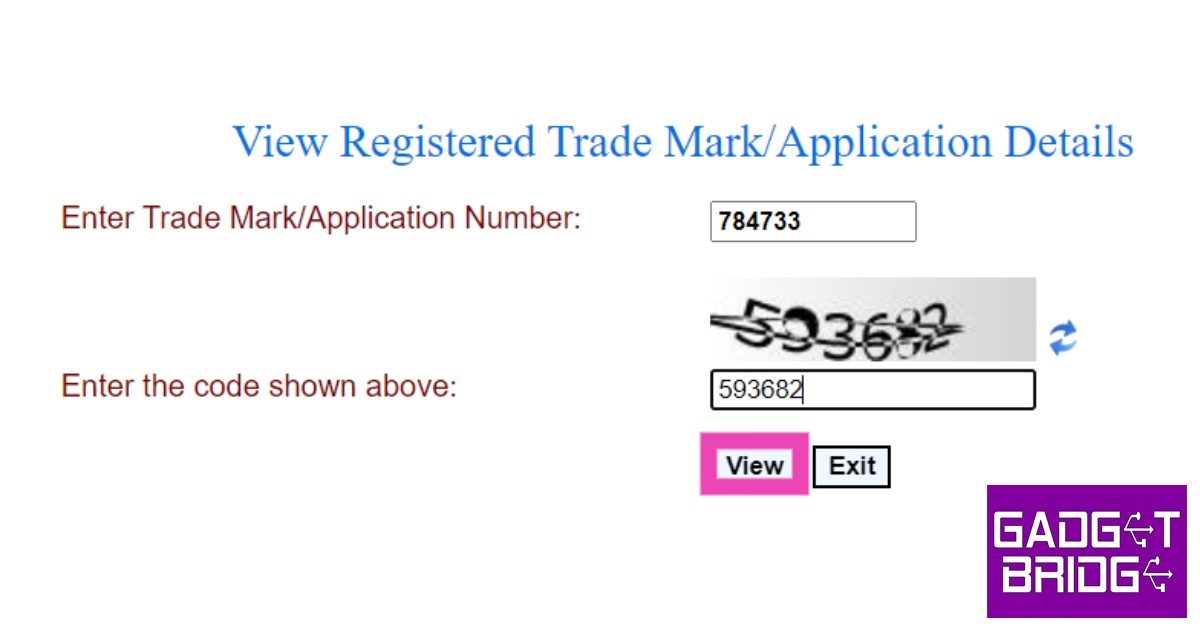
Step 7: Paste the Application ID and enter the captcha code. Hit ‘View’.
Step 8: Click on the Trade Mark number.
Step 9: Click on ‘View Registration Certificate’.
The Registration Certificate will open in a new tab. Hit the download icon to save it in a PDF format.
Read Also: How to Factory Reset Your Windows 11 PC or laptop
In This Article
Here’s how you can download a Trademark Certificate
Step 1: Go to https://vakilsearch.com and select ‘Search for trademark’ from the ‘Trademark & IP’ section at the top. Step 2: Enter the brand or trademark you are looking for in the search field.
 Step 3: Select the registered trademark you are looking for.
 Step 4: Copy the Application ID and go to https://ipindiaonline.gov.in/eregister/eregister.aspx.
 Step 5: Select Trade Mark Application/Registered Mark from the side menu.
 Step 6: Click the check box for National/IRDI Number.
 Step 7: Paste the Application ID and enter the captcha code. Hit ‘View’.
 Step 8: Click on the Trade Mark number.
 Step 9: Click on ‘View Registration Certificate’.
 The Registration Certificate will open in a new tab. Hit the download icon to save it in a PDF format.
 Read Also: How to Factory Reset Your Windows 11 PC or laptop
Conclusion
This is how you can search and download an India Trademark Certificate from the web. Trademark certificates are easily accessible and can be downloaded within a matter of minutes from the official Trade Marks Registry page. If you found this article helpful, let us know in the comments! For the latest gadget and tech news, and gadget reviews, follow us on Twitter, Facebook and Instagram. For newest tech & gadget videos subscribe to our YouTube Channel. You can also stay up to date using the Gadget Bridge Android App. You can find the latest car and bike news here.Redmi K60 Pro, Redmi K60, Redmi K60E launched: Price and availability details

Xiaomi introduced the Redmi K60 series in China. The Redmi K60, Redmi K60 Pro, and Redmi K60E are among the latest models in this portfolio. A 6.67-inch AMOLED screen with a 2K resolution and 120Hz refresh rate comes with these devices. Snapdragon 8 series chipsets from Qualcomm power the Redmi K60 and Redmi K60 Pro. The Redmi K60E, meanwhile, has a MediaTek Dimensity 8200 SoC.
 Xiaomi will begin selling the Redmi K60 Pro and Redmi K60 on December 31 at 10 AM local time. The sale of the Redmi K60E has begun in China. The availability of these devices throughout the world has not been announced by Redmi.
In This Article
Redmi K60 series price and availability details
The Redmi K60 costs CNY 2,499, or around Rs. 30,000, for the variant with 8GB of RAM and 128GB of storage. While the 16GB RAM with 512GB storage costs CNY 3,599, which is equivalent to Rs 43,000. Redmi K60 Pro smartphone has a starting price of CNY 3,299, which is equivalent to Rs 40,000. It has 8GB of RAM and 128GB of storage. The most costly model has 16GB RAM and 512GB storage, costing CNY 4,599 which is approximately Rs 55,000. The price for the Redmi K60E is CNY 2,199, which is equivalent to Rs 26,000. The pricing of its 12GB RAM and 512GB storage is CNY 2,799, or around Rs 33,000. Xiaomi will begin selling the Redmi K60 Pro and Redmi K60 on December 31 at 10 AM local time. The sale of the Redmi K60E has begun in China. The availability of these devices throughout the world has not been announced by Redmi.
Redmi K60 Pro, Redmi K60, Redmi K60E specifications
The 6.67-inch 2K AMOLED screen on the Redmi K60 Pro has a resolution of 1,440×3,200 pixels. Additionally, the screen supports HDR10+ and has a maximum brightness of 1,400 nits. The display supports touch sampling rates of up to 480Hz and refresh rates of up to 120Hz. Android 13-based MIUI 14 powers this Redmi smartphone. This smartphone has a Snapdragon 8 Gen 2 SoC, an Adreno GPU, and a Qualcomm AI Engine built in. This Redmi phone has up to 512GB of UFS 4.0 storage and up to 16GB of LPDDR5x RAM. The 5,000mAh battery on the Redmi K60 Pro is compatible with both 30W and 120W wired fast charging. The Redmi K60 Pro has a triple rear camera arrangement with a 50-megapixel Sony IMX800 primary sensor with OIS. Additionally, it has a 2-megapixel macro sensor and an 8-megapixel ultra-wide angle lens. The device also has a 16-megapixel front-facing selfie camera. Up to 8K videos can be captured at 24 frames per second using the rear cameras. Whereas the selfies camera records full-HD videos at 60 frames per second. Most of the specifications of the Redmi K60 are similar to the Pro variant. The Snapdragon 8+ Gen 1 SoC is present in this regular version. The device has a 5,500mAh battery and can support both 30W wireless fast charging and 67W wired fast charging. The triple rear camera setup of the standard variant features a 64-megapixel sensor instead of a 50-megapixel lens, while the rest of the lenses on the front as well as on the back remain the same. Similar to the Redmi K60 Pro, the Redmi K60E has nearly identical features. However, a MediaTek Dimensity 8200 SoC powers it. A 48-megapixel triple rear camera configuration with OIS is also included. A 5,500mAh battery with 67W fast charging capabilities. For the latest gadget and tech news, and gadget reviews, follow us on Twitter, Facebook and Instagram. For newest tech & gadget videos subscribe to our YouTube Channel. You can also stay up to date using the Gadget Bridge Android App. You can find the latest car and bike news here.GIGABYTE G5 series 12th Gen gaming laptops launched in India

The GIGABYTE G5 series, the newest addition to their lineup of gaming laptops introduced in India. The new gaming devices are powered by Intel 12th Gen CPUs. The Nvidia RTX 30 series GPUs in the new line of laptops enable a fluid gaming experience. A 144Hz refresh rate on the screen makes for a very immersive gaming experience.
The GIGABYTE G5 will be sold on Flipkart and in offline retail outlets all over the nation for a starting price of Rs 77,887 with a free Microsoft Office 365 Personal version 1-Year subscription.
 The 12th generation Intel i5-12500H CPU, which has 12 cores, 16 threads, and a top clock speed of 4.5GHz, powers the G5 series. The laptop also has 16 GB of DDR4 3200 MHz memory and a potent RTX 30 series GPU. With just one click, users will be able to bypass the integrated graphics and connect the display directly to the discrete GPU on the G5 KE laptop from GIGABYTE for greater frame rates and improved gaming performance.
The G5 KE with the NVIDIA GeForce RTX 3060, the G5 ME with the NVIDIA GeForce RTX 3050 Ti, and the G5 GE with the NVIDIA GeForce RTX 3050 are the three types of laptops that will be available.
To speed up the reading and copying of any large files, the G5 gaming laptop supports high-speed PCle Gen4 and includes a lot of SSD slots. Users benefit from exceptional multitasking capabilities and strong gaming performance.
The G5 Series laptops are consistent in their performance throughout high-load gaming sessions or multimedia processing thanks to GIGABYTE’s exclusive WINDFORCE cooling technology, enabling the laptop to achieve 100% CPU and GPU outputs. The laptop can dissipate the heat produced in a reliable and thorough manner thanks to its two extremely effective 59-blade twin fans, five heat pipes, and four exhaust vents.
The G5 series weighs less than 1.9 kg and is made to be easily portable. The laptops’ comprehensive I/O ports and extensive video output ports enable users to effortlessly build multitasking environments wherever they are and at any time. To the USB C, the Thunderbolt 4 connections offer high transmission speeds of up to 40Gbps.
For the latest gadget and tech news, and gadget reviews, follow us on Twitter, Facebook and Instagram. For newest tech & gadget videos subscribe to our YouTube Channel. You can also stay up to date using the Gadget Bridge Android App. You can find the latest car and bike news here.
The 12th generation Intel i5-12500H CPU, which has 12 cores, 16 threads, and a top clock speed of 4.5GHz, powers the G5 series. The laptop also has 16 GB of DDR4 3200 MHz memory and a potent RTX 30 series GPU. With just one click, users will be able to bypass the integrated graphics and connect the display directly to the discrete GPU on the G5 KE laptop from GIGABYTE for greater frame rates and improved gaming performance.
The G5 KE with the NVIDIA GeForce RTX 3060, the G5 ME with the NVIDIA GeForce RTX 3050 Ti, and the G5 GE with the NVIDIA GeForce RTX 3050 are the three types of laptops that will be available.
To speed up the reading and copying of any large files, the G5 gaming laptop supports high-speed PCle Gen4 and includes a lot of SSD slots. Users benefit from exceptional multitasking capabilities and strong gaming performance.
The G5 Series laptops are consistent in their performance throughout high-load gaming sessions or multimedia processing thanks to GIGABYTE’s exclusive WINDFORCE cooling technology, enabling the laptop to achieve 100% CPU and GPU outputs. The laptop can dissipate the heat produced in a reliable and thorough manner thanks to its two extremely effective 59-blade twin fans, five heat pipes, and four exhaust vents.
The G5 series weighs less than 1.9 kg and is made to be easily portable. The laptops’ comprehensive I/O ports and extensive video output ports enable users to effortlessly build multitasking environments wherever they are and at any time. To the USB C, the Thunderbolt 4 connections offer high transmission speeds of up to 40Gbps.
For the latest gadget and tech news, and gadget reviews, follow us on Twitter, Facebook and Instagram. For newest tech & gadget videos subscribe to our YouTube Channel. You can also stay up to date using the Gadget Bridge Android App. You can find the latest car and bike news here.
GIGABYTE G5 series specifications
The GIGABYTE G5 series laptops have a 15.6-inch FHD IPS-level Anti-glare LCD screen with a resolution of 1920×1080 pixels. It has a 144Hz refresh rate, which provides an incredibly immersive gaming experience. The G5 offers an immersive gaming and entertainment experience thanks to its 86% screen-to-body ratio and extremely small bezels. The 12th generation Intel i5-12500H CPU, which has 12 cores, 16 threads, and a top clock speed of 4.5GHz, powers the G5 series. The laptop also has 16 GB of DDR4 3200 MHz memory and a potent RTX 30 series GPU. With just one click, users will be able to bypass the integrated graphics and connect the display directly to the discrete GPU on the G5 KE laptop from GIGABYTE for greater frame rates and improved gaming performance.
The G5 KE with the NVIDIA GeForce RTX 3060, the G5 ME with the NVIDIA GeForce RTX 3050 Ti, and the G5 GE with the NVIDIA GeForce RTX 3050 are the three types of laptops that will be available.
To speed up the reading and copying of any large files, the G5 gaming laptop supports high-speed PCle Gen4 and includes a lot of SSD slots. Users benefit from exceptional multitasking capabilities and strong gaming performance.
The G5 Series laptops are consistent in their performance throughout high-load gaming sessions or multimedia processing thanks to GIGABYTE’s exclusive WINDFORCE cooling technology, enabling the laptop to achieve 100% CPU and GPU outputs. The laptop can dissipate the heat produced in a reliable and thorough manner thanks to its two extremely effective 59-blade twin fans, five heat pipes, and four exhaust vents.
The G5 series weighs less than 1.9 kg and is made to be easily portable. The laptops’ comprehensive I/O ports and extensive video output ports enable users to effortlessly build multitasking environments wherever they are and at any time. To the USB C, the Thunderbolt 4 connections offer high transmission speeds of up to 40Gbps.
For the latest gadget and tech news, and gadget reviews, follow us on Twitter, Facebook and Instagram. For newest tech & gadget videos subscribe to our YouTube Channel. You can also stay up to date using the Gadget Bridge Android App. You can find the latest car and bike news here.
The 12th generation Intel i5-12500H CPU, which has 12 cores, 16 threads, and a top clock speed of 4.5GHz, powers the G5 series. The laptop also has 16 GB of DDR4 3200 MHz memory and a potent RTX 30 series GPU. With just one click, users will be able to bypass the integrated graphics and connect the display directly to the discrete GPU on the G5 KE laptop from GIGABYTE for greater frame rates and improved gaming performance.
The G5 KE with the NVIDIA GeForce RTX 3060, the G5 ME with the NVIDIA GeForce RTX 3050 Ti, and the G5 GE with the NVIDIA GeForce RTX 3050 are the three types of laptops that will be available.
To speed up the reading and copying of any large files, the G5 gaming laptop supports high-speed PCle Gen4 and includes a lot of SSD slots. Users benefit from exceptional multitasking capabilities and strong gaming performance.
The G5 Series laptops are consistent in their performance throughout high-load gaming sessions or multimedia processing thanks to GIGABYTE’s exclusive WINDFORCE cooling technology, enabling the laptop to achieve 100% CPU and GPU outputs. The laptop can dissipate the heat produced in a reliable and thorough manner thanks to its two extremely effective 59-blade twin fans, five heat pipes, and four exhaust vents.
The G5 series weighs less than 1.9 kg and is made to be easily portable. The laptops’ comprehensive I/O ports and extensive video output ports enable users to effortlessly build multitasking environments wherever they are and at any time. To the USB C, the Thunderbolt 4 connections offer high transmission speeds of up to 40Gbps.
For the latest gadget and tech news, and gadget reviews, follow us on Twitter, Facebook and Instagram. For newest tech & gadget videos subscribe to our YouTube Channel. You can also stay up to date using the Gadget Bridge Android App. You can find the latest car and bike news here. Compared: Snapdragon vs MediaTek – Which one is better?

When it comes to SoCs (System on a Chip) – or for the lack of a better term – mobile processors, there are only two chipsets that dominate the Android market: Snapdragon and MediaTek. While Samsung and Google also manufacture their in-house SoCs, the market share held by Qualcomm and MediaTek vastly exceeds any other player. Even Samsung’s flagship smartphones make use of Qualcomm chipsets. Out of these two popular SoCs, Snapdragon largely dominates the flagship smartphone category, while MediaTek caters more to midrange and affordable smartphones. Therefore, the performance metrics favour Qualcomm in every regard. However, it is still interesting to see how the two chipsets fare when pitted against each other. So, without further ado, here is our Qualcomm Snapdragon vs MediaTek SoC comparison.
Read Also: 8 Tips to Engage Your Facebook Group Members
 As mentioned earlier, Snapdragon is a common fixture on flagship smartphones across different brands like Samsung, Sony, Xiaomi, OnePlus, and more. MediaTek, with its more varied chipsets, finds its way into the midrange and affordable smartphones. That said, some of the most popular smartphones in the market today make use of MediaTek. This only goes on to prove that the numbers a processor puts up aren’t the be-all and end-all when it comes to buying a smartphone.
Here are some of the most popular smartphones that use a Snapdragon SoC
As mentioned earlier, Snapdragon is a common fixture on flagship smartphones across different brands like Samsung, Sony, Xiaomi, OnePlus, and more. MediaTek, with its more varied chipsets, finds its way into the midrange and affordable smartphones. That said, some of the most popular smartphones in the market today make use of MediaTek. This only goes on to prove that the numbers a processor puts up aren’t the be-all and end-all when it comes to buying a smartphone.
Here are some of the most popular smartphones that use a Snapdragon SoC
In This Article
Snapdragon vs MediaTek: Availability
 As mentioned earlier, Snapdragon is a common fixture on flagship smartphones across different brands like Samsung, Sony, Xiaomi, OnePlus, and more. MediaTek, with its more varied chipsets, finds its way into the midrange and affordable smartphones. That said, some of the most popular smartphones in the market today make use of MediaTek. This only goes on to prove that the numbers a processor puts up aren’t the be-all and end-all when it comes to buying a smartphone.
Here are some of the most popular smartphones that use a Snapdragon SoC
As mentioned earlier, Snapdragon is a common fixture on flagship smartphones across different brands like Samsung, Sony, Xiaomi, OnePlus, and more. MediaTek, with its more varied chipsets, finds its way into the midrange and affordable smartphones. That said, some of the most popular smartphones in the market today make use of MediaTek. This only goes on to prove that the numbers a processor puts up aren’t the be-all and end-all when it comes to buying a smartphone.
Here are some of the most popular smartphones that use a Snapdragon SoC
- Samsung Galaxy S22 Ultra
- Samsung Galaxy Z Fold and Flip 4
- OnePlus 10 Pro
- Vivo T1
- Motorola Edge 30
- Xiaomi Redmi Note 12 Pro
- Vivo V26 Pro
- Samsung Galaxy M53
- OnePlus 10R
- Poco M4 Pro
Snapdragon vs MediaTek: Pros and Cons
- Snapdragon SoCs offer better battery optimisation which translates to longer battery life compared to their MediaTek counterparts.
- Snapdragon SoCs are also favoured in flagship gaming-oriented handsets since they do not generate a lot of heat. However, MediaTek is largely popular in midrange gaming smartphones.
- MediaTek does not share the Kernel source code for most of its SoCs, which is why Snapdragon is usually a developer’s first choice.
- Snapdragon has its own in-house GPU, Adreno.
- Snapdragon SoCs regularly outperform their MediaTek counterparts in various benchmark tests.
- Snapdragon SoCs are pricier than MediaTek.
Conclusion
While MediaTek has been absent from the flagship sphere for a while now, its newest MediaTek Dimensity 9200 SoC is bound to change that. Released in November, the MediaTek Dimensity 9200 will be competing against Qualcomm’s Snapdragon 8 Gen 2 mobile platform. It remains to be seen which SoC will come out on top, and which flagships will incorporate the two chipsets next year. Here is our list of upcoming smartphones with the Snapdragon 8 Gen 2 chipset. For the latest gadget and tech news, and gadget reviews, follow us on Twitter, Facebook and Instagram. For newest tech & gadget videos subscribe to our YouTube Channel. You can also stay up to date using the Gadget Bridge Android App. You can find the latest car and bike news here.Garena Free Fire Redeem Codes Today 28 December 2022: Here is how to claim them

Garena Free Fire is a battle royale game with regular awards and tournaments to keep players interested. If you play Garena Free Fire, you should be aware of the redeem codes that are released on a daily basis. However, because the battle royale game is banned in India, players from other countries can use the Free Fire Redeem codes daily. If you’re unfamiliar with the Garena Free Fire redeem codes or don’t know how to get them, we’ve put together a step-by-step guide to help you redeem them. Check out Garena Free Fire Redeem Codes for December 28.
The Free Fire redeem codes are a great way to get free stuff. These are 12-digit codes that contain alphabets and numbers, as well as an expiration date and time. Because the Garena FF redeem codes cannot be used more than once, you should hurry to the redemption page to claim your free reward before someone else does. To get a free reward, all you have to do is go to reward.ff.garena.com/en, which is the official redemption page. Also, keep an eye on this space for daily updates on Garena Free Fire redemption codes and rewards.
In This Article
Garena Free Fire Redeem Codes Today 28 December 2022
Updating SoonHow to Get Free Fire Redeem Codes for Garena on December 28?
- Visit the Garena Free Fire game’s official website at reward.ff.garena.com.
- Use your Facebook, Google, VK, Apple ID, Huawei ID, or Twitter account to log in.
- You’ll be taken to a valid redemption code (s)
- Copy and paste the 12-digit redemption code into the text box.
- On the screen, a dialogue box will appear.
- ‘Ok’ should be selected.
Amazon Quiz Answers Today 28 December 2022: Participate to win Rs 2,500

Amazon Quiz for 28 December 2022 has gone live on the company’s mobile platform. The daily quiz contest brings an opportunity for Amazon users to win exciting prizes. In today’s Amazon Quiz the participants have the chance to win Rs 2,500 Amazon Pay Balance. All they have to do is answer all the questions correctly.
A fresh question is posted on the Amazon app daily which consists of five simple questions based on general knowledge and current events. The quiz can be played on the Amazon App from 12 AM to 11:59 PM. You have to answer all the questions correctly. Then the participants will be shortlisted for a lucky draw. The result of the lucky draw will be announced at the end of the month. The participants can win Amazon Pay Balance to up to Rs 50,000. Check out the 28 December 2022 Amazon Quiz question and their answers to win Rs 2,500 Amazon Pay Balance.
Amazon Quiz Today Prize – Rs 2,500 Amazon Pay Balance
Quiz Date – 28 December 2022
Daily Timing – 12 AM to 11:59 PM
Winner Announcement – Today 12 PM
In This Article
Amazon Quiz Answers Today 28 December 2022
Question 1: Which country has the largest population? Answer- China Question 2: What is 7 times 8? Answer- 56 Question 3: Which is the largest internal organ in the human body? Answer- Liver Question 4: What is the general name for a group of wolves? Answer- Pack Question 5: Which card game requires players to “ante”? Answer- PokerHow To Play Amazon Quiz
Only app users are eligible to play the Amazon quiz every morning from 12 AM to 11:59 PM. The quiz is not available on the desktop. For those who are unaware of how to play the Amazon quiz below are the steps, you can follow to take the quiz.- Firstly download the Amazon app from Google Play Store or App Store
- Now fill in the required information through the Sign Up option.
- You need to log in to the Amazon app and scroll down on the home screen to find the Amazon Quiz banner.
- Tap on the Amazon Quiz banner and tap on the Start button to start the Quiz.
- Now you will get 5 questions and you need to answer them correctly. One wrong answer will eliminate you from the Quiz.
- After answering all the questions correctly you are now eligible for a Lucky Draw.
- The winner’s name will be announced today at 12 PM.
How to Restore WhatsApp Backup from Google Drive to iPhone? [2023 Update]
![How to Restore WhatsApp Backup from Google Drive to iPhone? [2023 Update]](https://www.gadgetbridge.com/wp-content/uploads/2022/12/whatsapp-iphone-768x402.jpg "How to Restore WhatsApp Backup from Google Drive to iPhone? [2023 Update]")
Getting a new phone for yourself is a huge deal. However, the biggest hurdle everyone despises is restoring WhatsApp after buying a new phone. It is a tedious chore that everyone tries to avoid, especially when you have to transfer things from Android to iPhone and vice versa.
But, don’t worry. We have come up with a guide on how to restore WhatsApp backup from google drive to iPhone. Read on to explore more about it
 Step 4: Use your credentials to log onto your Google drive account.
 Step 5: Next, you will see a couple of backup options on your screen. Choose the one that you want.
 Step 6: Give it some time – the tool will gather all the pieces of your back up.
Step 7: The tool will display all the data that was available on the backup. Have a look and then choose “restore to iOS.”
Step 6: Give it some time – the tool will gather all the pieces of your back up.
Step 7: The tool will display all the data that was available on the backup. Have a look and then choose “restore to iOS.”
 Step 8: Patiently wait for the backup to complete.

In This Article
How to Store Your WhatsApp Backup in the Google Drive
Before we jump onto how to restore WhatsApp from iCloud – here’s how you can store your WhatsApp backup in Google drive so that you can move to ios easily. Step 1: Launch WhatsApp on your phone. Step 2: Click on more options and then go to settings. After that, click on chats and then chat backup. Lastly, click on backup to Google drive. Step 3: Select your desired frequency from the options available. Step 4: Once you’re done with that – add a Google account so that Google can back up your data there. Step 5: After that, choose the network you want to utilize for the backup process. Note: Always back up your data using Wi-Fi. It will be much faster, and you will not have to pay any additional charges.Is It Possible to Restore WhatsApp Backup from Google Drive?
Yes, it is possible to restore a WhatsApp backup from Google Drive if you have access to the account you used for the backup. Make sure your new iPhone device is linked to your Google account, where you have WhatsApp backups. Then install WhatsApp and verify your number. Lastly, when you are about to set up WhatsApp, you will be prompted to restore your chats and media from your Google account. Simply click on the restore option, and you will have all your WhatsApp data on your iPhone.How to Restore WhatsApp Backup from Google Drive to iPhone? [100% Working]
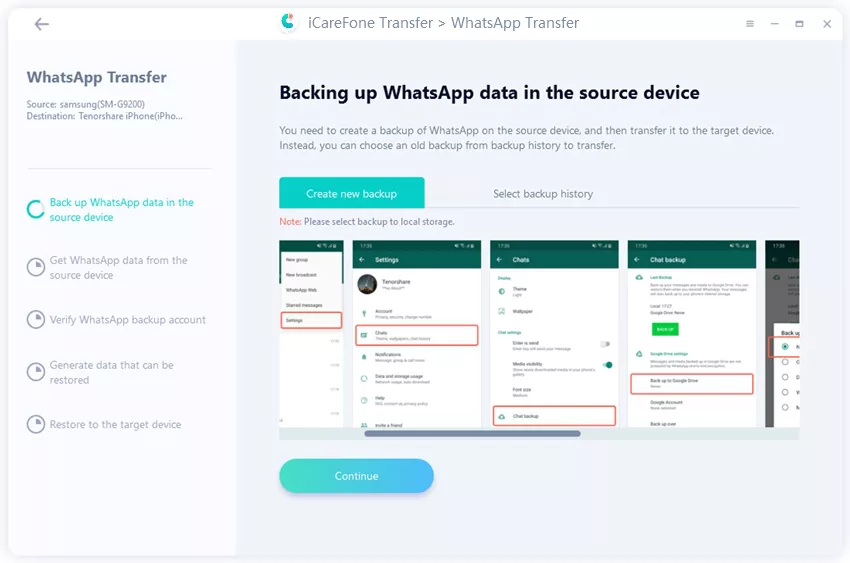
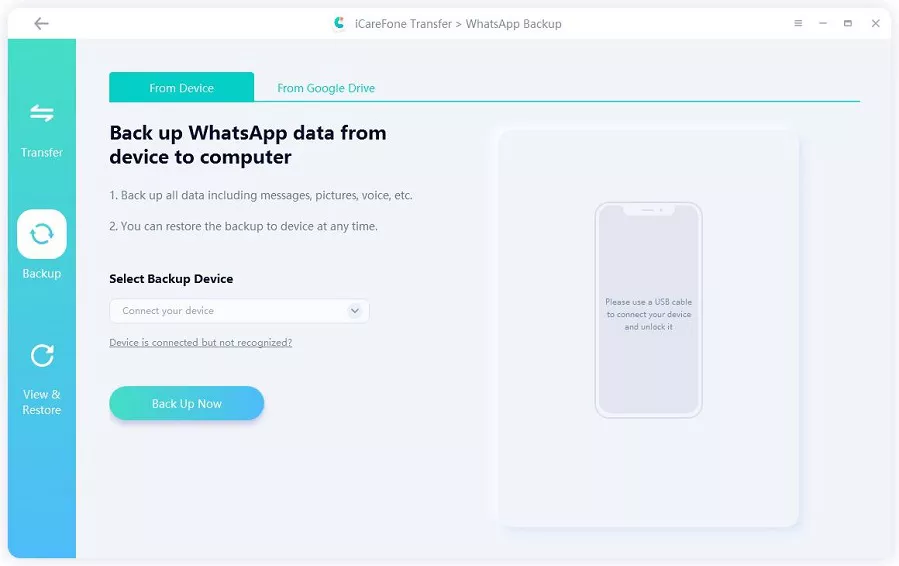
In case you are wondering how to restore Whatsapp messages without backup – we’ve got you covered. There are several ways that you can use to accomplish this task, but using Tenorshare iCareFone Transfer will be your safest bet. It’s a tool that has been built specifically to transfer data from android to iPhone without any data loss. The best thing about this tool is that you can complete your task with just one click. So you will not have to wait for hours to transfer your WhatsApp data from one device to another. Moreover, it saves you tons of time as the tool will take a few minutes to restore all your data from the backup. Here are the pros of using Tenorshare iCareFone Transfer.- Tenorshare iCareFone can transfer photos, videos, and apps.
- It can help you duplicate IOS files within a few clicks.
- It works with the leanest iPhone and IOS
- The free version has some restrictions
 Step 4: Use your credentials to log onto your Google drive account.
 Step 5: Next, you will see a couple of backup options on your screen. Choose the one that you want.
 Step 6: Give it some time – the tool will gather all the pieces of your back up.
 Step 7: The tool will display all the data that was available on the backup. Have a look and then choose “restore to iOS.”
 Step 8: Patiently wait for the backup to complete.

Frequently Asked Questions
Here are some frequently asked questions regarding restoring WhatsApp.- How to Recover Archived Chats in WhatsApp?
- How to Restore WhatsApp from iCloud?
- Why Move to iOS is not showing WhatsApp?
The Bottom Line
Most people avoid changing their phones because they don’t want to get into trouble trying to restore WhatsApp from scratch. Well, it does seem like a hard task, but there are plenty of tools available on the market that can ease the task for you. For example, Tenorshare iCareFone transfer can help you restore WhatsApp within a blink. If you are about to change your phone – get Tenorshare iCareFone now to make your life easier! For the latest gadget and tech news, and gadget reviews, follow us on Twitter, Facebook and Instagram. For newest tech & gadget videos subscribe to our YouTube Channel. You can also stay up to date using the Gadget Bridge Android App. You can find the latest car and bike news here.Redmi 11 Prime 5G price in India dropped by Rs 1,000

Redmi 11 Prime 5G is currently on sale in the nation at a reduced price, a few months after its release. The device was launched in September of this year. The phone has had its price reduced by Rs 1,000 in India as 5G services become more prevalent here. The Redmi 11 Prime 5G comes equipped with a 50-megapixel dual back camera array, a MediaTek Dimensity 700, and a 5,000mAh battery.
Redmi 11 Prime 5G is available in two storage configurations, 4GB RAM with 64GB storage and 6GB RAM with 128GB storage. Instead of its initial starting price of Rs 13,999, it is currently advertised on Mi.com and Amazon with a starting price of Rs 12,999. On the other hand the 6GB RAM with 128GB storage option is now available at Rs 14,999 down from its previous cost of Rs 15,999. A free EMI option is also available from Amazon starting at Rs 2,000.
In addition, consumers who pay for the device with ICICI bank cards and EMI transactions will immediately receive a discount of Rs 1000. The instant discount for transactions made with HDFC bank cards is Rs 750.
Redmi 11 Prime 5G specifications
The Redmi 11 Prime is powered by an octa-core MediaTek Dimensity 700 SoC, a chipset with 7nm architecture and a maximum clock speed of up to 2.2GHz. Additionally, it enables a dual 5G SIM using all seven of India’s primary bands. The device’s RAM Booster feature allows users to temporarily borrow up to 2GB of RAM from their smartphone’s storage, facilitating smooth operation and enhancing overall performance. Up to 6GB of LPDDR4X RAM and 128GB of UFS 2.2 storage are supported. Using a microSD card, the internal capacity can be increased up to 512GB.
The fastest and smoothest experience is provided by the MIUI 13 and Android 12 out-of-the-box on the Redmi 11 Prime 5G. The device has a 6.58 FHD+ display with a resolution of 24081080 pixels. It has AdaptiveSync 90Hz technology built in.
The phone has two rear cameras: a 50MP main lens with an f/1.8 aperture and a 2MP depth sensor with an f/2.4 aperture. The front-facing 8MP camera on the Redmi 5G phone has an f/2.0 aperture for selfies and video calling.
A 5,000mAh battery with 18W quick charging and a 22.5W charger is also included with the Redmi 11 Prime 5G. According to the battery’s specifications, it can play music for 150 hours or videos for 27 hours.
For the latest gadget and tech news, and gadget reviews, follow us on Twitter, Facebook and Instagram. For newest tech & gadget videos subscribe to our YouTube Channel. You can also stay up to date using the Gadget Bridge Android App. You can find the latest car and bike news here.
How to Factory Reset Your Windows 11 PC or laptop

A factory reset is a quick way to clear all data on your PC or laptop in case you want to sell it. If you are experiencing issues with your PC, a factory reset may come in handy. There are a couple of ways you can reset your PC, even if you dont have access to the admin account password. While Windows gives you the option to retain your personal files, it is always a good idea to back up your data before a complete reset. In this article, we bring you two quick ways to perform a factory reset on your Windows 11 PC or laptop.
Read Also: How to Create Your Own Telegram Stickers
Step 2: Scroll down and select Recovery.
Step 3: In the following window, click on ‘Reset PC’.
Step 4: You will be presented with two options. You can choose to keep your personal files and remove apps & settings or remove all of your personal files, apps, and settings. Choose the option you want.
Step 5: Select how you would like to reinstall Windows. You can choose between ‘Cloud download’ or ‘Local download’.
Step 6: After you’ve made your choice, click on next to confirm your selection and then click on reset to begin the factory reset process.
It will take some time for your PC to reset and for Windows 11 to get reinstalled. After the process is complete, your PC will restart.
In This Article
How to Factory Reset your Windows 11 PC or laptop from Settings
Step 1: Go to Settings and select System from the menu on the left. Step 2: Scroll down and select Recovery.
 Step 3: In the following window, click on ‘Reset PC’.
 Step 4: You will be presented with two options. You can choose to keep your personal files and remove apps & settings or remove all of your personal files, apps, and settings. Choose the option you want.
 Step 5: Select how you would like to reinstall Windows. You can choose between ‘Cloud download’ or ‘Local download’.
Step 6: After you’ve made your choice, click on next to confirm your selection and then click on reset to begin the factory reset process.
It will take some time for your PC to reset and for Windows 11 to get reinstalled. After the process is complete, your PC will restart.
Step 5: Select how you would like to reinstall Windows. You can choose between ‘Cloud download’ or ‘Local download’.
Step 6: After you’ve made your choice, click on next to confirm your selection and then click on reset to begin the factory reset process.
It will take some time for your PC to reset and for Windows 11 to get reinstalled. After the process is complete, your PC will restart.
How to Factory Reset your Windows 11 PC or laptop from Recovery Mode
Step 1: Turn on your PC and click on the power icon on the login screen. Step 2: Long press the Shift key and click on Restart. Don’t release the Shift key until you see ‘please wait’ on the screen. This is how you can restart your PC in recovery mode. Step 3: Click on ‘Troubleshoot’ and select ‘Reset this PC’. Step 4: In the following screen, you can choose whether you want to keep your personal files or remove all data including your personal files. Step 5: Select how you would like to reinstall Windows. You can choose between ‘Cloud download’ or ‘Local download’. Step 6: Click on Reset to begin the Factory Reset process. Your PC will restart after it has been reset. Read Also: The global rollout of the Twitter View Count for Tweets has begunConclusion
These are the two quick ways to factory reset your Windows 11 PC or laptop. You can also reinstall Windows using a bootable USB drive. If you are experiencing certain issues with your laptop, performing a factory reset should be a last-ditch effort in fixing them. Try to diagnose the issue before completely wiping your laptop of all data. If you found this article helpful, let us know in the comments! For the latest gadget and tech news, and gadget reviews, follow us on Twitter, Facebook and Instagram. For newest tech & gadget videos subscribe to our YouTube Channel. You can also stay up to date using the Gadget Bridge Android App. You can find the latest car and bike news here.8 Tips to Engage Your Facebook Group Members

As a group admin, you should know that the key to sustaining a group is healthy user engagement. Even if your group doesn’t have a lot of members, you can use effective strategies to drive up user engagement and create meaningful content. If the group is buzzing with activity, it makes it more appealing to the prospective members. In this article, we bring you 8 effective tips to engage your Facebook group members.
Read Also: The global rollout of the Twitter View Count for Tweets has begun
Take some time out to compose a thoughtful welcome message and send it to new members that join your Facebook group. New members are more likely to participate in the group when you acknowledge their presence and make them feel welcome. You can either send a message to every person that joins the group or do a weekly roundup by making a fresh post and tagging all the new members. A public post also helps break the ice between new members and group regulars.
Depending on what your group is about, you can create text posts that spark a discussion in the comments and bring everyone together. Your post needs to be well-researched and should cover multiple facets of the discussion so as to include everyone in the discourse. Make sure the comment section is well-moderated so as to make everyone feel welcome in voicing their opinion without having to worry about any hostility.
If you want your content posted on other platforms, make sure you create frequent video posts. Apps like TikTok and Instagram are integral in making your content ‘viral’, and once your post gains popularity, it can bring a lot more new users to your group. Video posts can also generate within the group as more people are likely to watch a video than read a text post.
A close-knit community is integral to the proper functioning of a group. Make sure the group members are familiar with each other and bring everyone together by hosting virtual meetings through Zoom. You can also host an in-person meetup at a park or cafe if you manage a local group. You can set up fun activities like board games and trivia to unite the group.
As an admin, you have access to group metrics that give you a better idea of the engagement and activity rate. Use these metrics to figure out which kind of content users like to engage with. Weed out the unpopular content. Over a period of time, you will get a good idea of what kind of content should be encouraged within the group.
In This Article
Send a welcome message to new members
 Take some time out to compose a thoughtful welcome message and send it to new members that join your Facebook group. New members are more likely to participate in the group when you acknowledge their presence and make them feel welcome. You can either send a message to every person that joins the group or do a weekly roundup by making a fresh post and tagging all the new members. A public post also helps break the ice between new members and group regulars.
Initiate discourse with text posts
 Depending on what your group is about, you can create text posts that spark a discussion in the comments and bring everyone together. Your post needs to be well-researched and should cover multiple facets of the discussion so as to include everyone in the discourse. Make sure the comment section is well-moderated so as to make everyone feel welcome in voicing their opinion without having to worry about any hostility.
Set up novel themes for specific days
If you’re worried about the group hitting a stagnation point, you can stir things up a bit and generate more user activity by encouraging group members to post content around a certain theme on specific days. For example, if you manage a food-related group, every Sunday can be a ‘homemade recipe’ posting day where users share their own recipes with the group. This will keep the group members interested in engaging with the group and will drive up user activity.Make sure the group is well moderated
Once you notice that your Facebook group is seeing a lot of activity and user-generated posts, you will need to make sure that it is well-moderated. No matter how good the quality of content is, no one wants their feed to be filled with spam. Appoint a group of moderators and assign them certain tasks. Make sure the group members engage in civil discourse so that everyone feels welcome and isn’t put off by any kind of hostility.Create video posts
 If you want your content posted on other platforms, make sure you create frequent video posts. Apps like TikTok and Instagram are integral in making your content ‘viral’, and once your post gains popularity, it can bring a lot more new users to your group. Video posts can also generate within the group as more people are likely to watch a video than read a text post.
Build your community by hosting online or offline meetups
 A close-knit community is integral to the proper functioning of a group. Make sure the group members are familiar with each other and bring everyone together by hosting virtual meetings through Zoom. You can also host an in-person meetup at a park or cafe if you manage a local group. You can set up fun activities like board games and trivia to unite the group.
Use group metrics to gain insights about the group
 As an admin, you have access to group metrics that give you a better idea of the engagement and activity rate. Use these metrics to figure out which kind of content users like to engage with. Weed out the unpopular content. Over a period of time, you will get a good idea of what kind of content should be encouraged within the group.
Run contests and giveaways
Contents and giveaways are a great way of driving up engagement and even recruiting new members to your Facebook group. While you don’t have to entirely rely on giveaways to amplify user activity, you can use them to spark up the group when things hit a slow patch. Make sure the contests are designed around the theme of the group in order to make them unique. Read Also: How to Create Your Own Telegram StickersConclusion
These are the top 8 tips to engage your Facebook group members. While posting good quality content should always be your top priority, it is equally important to create a healthy community of group members. Facebook groups that are not well-moderated often fall apart pretty quickly. If you found these tips helpful, let us know in the comments! For the latest gadget and tech news, and gadget reviews, follow us on Twitter, Facebook and Instagram. For newest tech & gadget videos subscribe to our YouTube Channel. You can also stay up to date using the Gadget Bridge Android App. You can find the latest car and bike news here.Redmi K60 series launching today: Here is how to watch the Livestream

Today in China, Redmi is slated to introduce its Redmi K60 series. The Redmi K60 series will include three different smartphones: the Redmi K60, the Redmi K60E, and the Redmi K60 Pro. Other than the smartphones the company is also going to launch more products Redmi Note 12 Pro Speed Edition smartphone, Redmi Watch 3, Redmi Band 2, and Redmi Buds 4 Lite.
Redmi will announce the launch of the Redmi Watch 3, Redmi Band 2, and Redmi Buds 4 Lite at the New Year conference in a post on the Chinese social networking site Weibo. Both the company’s official website and its official Weibo account allow viewers to watch the launch ceremony. It is important to let readers know that using a VPN is required in order to watch the launch event live stream. The conference is slated to start at 7 PM local time and at 4:40 PM IST on December 27. The Redmi K60 series’ launch date in India is currently unknown.
In terms of operating systems, all three smartphones will come pre-installed with the most recent MIUI 14 skin built on top of Android 13.
Both the Redmi K60 and Redmi K60 Pro will have a single punch-hole selfie camera that is positioned in the centre. The device is likely to feature a 2K display with a refresh rate of 120Hz. The Redmi K60 will have a Snapdragon 8+ Gen 1 processor, while the Redmi K60 Pro will be outfitted with the most recent Snapdragon 8 Gen 2 chip.
The primary sensor on the Redmi K60 Pro will be a Sony IMX800. OIS support will be included on both devices.
The 5,500mAh battery in both smartphones is touted to support 30W wireless charging. The Redmi K60 is anticipated to support 67W whereas the Redmi K60 Pro is anticipated to offer 120W fast charging. An under-display fingerprint scanner will probably be included with the Redmi K60 and Redmi K60 Pro.
The Redmi K60E’s display is anticipated to have a 1.5K resolution and a refresh rate of 120Hz. The device probably has a triple-rear-camera configuration with OIS capabilities.
The Dimensity 8200 chipset, which is rumoured to power the K60E, will reportedly be combined with 12GB LPDDR5 RAM and 256GB UFS3.1 storage. With regard to the device’s battery, the Redmi K60E is anticipated to have a 5,500mAh battery that supports 67W fast charging.
The Redmi Watch 3 will, according to the manufacturer, have a 1.75-inch AMOLED display. The business further revealed that the watch’s display is up to 341 pixels per inch and 1.3 times crisper. It is also revealed that the Redmi Watch 3 has a maximum brightness of 600 nits. On the other hand, Redmi Band 2 will reportedly have a 1.47-inch display.
The Redmi K60E is anticipated to cost about CNY 2,000, or roughly Rs 24,000. The Redmi K60 is rumoured to cost around CNY 2,499, or roughly Rs 30,000, and the Redmi K60 Pro, the most expensive model, may cost around CNY 3,299, or roughly Rs 40,000.
For the latest gadget and tech news, and gadget reviews, follow us on Twitter, Facebook and Instagram. For newest tech & gadget videos subscribe to our YouTube Channel. You can also stay up to date using the Gadget Bridge Android App. You can find the latest car and bike news here.
8 practical ways to use Android NFC in your day-to-day life (2023)
")
Let’s start by understanding what NFC is. NFC stands for Near Field Communication and allows two electronic devices to communicate with each other when they are held up close. NFC is quickly finding its place in modern smartphones but its usage is still limited to making contactless payments. Most smartphone users aren’t aware of the possibilities that lie ahead with NFC.
How to make the most of NFC and use it in day-to-day life?
To tap into the maximum potential of NFC, you will need to purchase ‘NFC tags’ which can be programmed to carry out certain tasks or share the data stored within them. In this article, we bring you the top 8 practical ways to use Android NFC in your day-to-day life.
Read Also: How to Create Your Own Telegram Stickers
Placing an NFC tag alongside your entry doorway can help in automating several smartphone-related tasks. You can program the NFC tag to turn on your phone’s WiFi the moment your step in, turn off the mobile data, decrease brightness, launch a Spotify playlist, and complete other tasks you usually carry out upon arriving home. Conversely, you can program the tag to ‘switch’ the tasks and turn off WiFi and turn on the mobile data as you step out.
If you have a smart lock installed in your house, you can operate it using an NFC tag. You don’t have to enter the code every time you want to enter your house. The only precondition is that the smart lock must have NFC support (common in most modern smart locks). Once you’ve programmed the lock, all you need to do is place your phone near it and the door will automatically unlock for you.
If you don’t have Apple CarPlay or Android Auto in your car, an NFC tag will be extremely helpful. You can place the tag at a convenient spot (like the dashboard or centre console) and program it to automate certain tasks like launching the navigation app, playing a certain playlist on Spotify, enabling Bluetooth to pair with your car’s speakers, and turning on Do Not Disturb mode.
You can save money on printing out business cards and make the process of sharing one look pretty cool with the help of NFC. You can program an NFC tag to share your contact information and business details whenever someone taps on it. If you’re setting up shop at an event, you don’t have to worry about printing the ideal number of business cards. Simply place the NFC tag at a convenient spot where people can easily scan it for its contents.
If you have a habit of hitting the snooze button in bed over and over again, you can use an NFC tag to force yourself out of bed. The NFC Alarm Clock app makes you scan an NFC tag to disable the ringing alarm. To best utilise this feature, place the NFC tag far away from your bed, so you are forced to get up in order to turn off the alarm.
Bluetooth devices are more common than ever these days. You may have several Bluetooth speakers at home that are paired with your smartphone and other media-playing devices. Constantly switching between devices can be quite a hassle. You can easily bypass this minor issue by programming NFC tags for different Bluetooth devices in your house. Once that’s done, all you need to do is tap your phone on the tag and it will automatically connect to the device, whether the Bluetooth is turned on or not. This is one of the most practical ways to use Android NFC at home.
Here’s a cool way to share your home WiFi password. Program an NFC tag to share your WiFi network details whenever a smartphone comes in contact with it. WiFi passwords are usually long and complex, so you won’t need to remember them if you use an NFC tag. Apps like InstaWiFi will help you program the NFC tag to give out your home WiFi password.
In This Article
Automate your tasks at home
 Placing an NFC tag alongside your entry doorway can help in automating several smartphone-related tasks. You can program the NFC tag to turn on your phone’s WiFi the moment your step in, turn off the mobile data, decrease brightness, launch a Spotify playlist, and complete other tasks you usually carry out upon arriving home. Conversely, you can program the tag to ‘switch’ the tasks and turn off WiFi and turn on the mobile data as you step out.
Unlock your door
 If you have a smart lock installed in your house, you can operate it using an NFC tag. You don’t have to enter the code every time you want to enter your house. The only precondition is that the smart lock must have NFC support (common in most modern smart locks). Once you’ve programmed the lock, all you need to do is place your phone near it and the door will automatically unlock for you.
Automate your tasks as you enter your car
 If you don’t have Apple CarPlay or Android Auto in your car, an NFC tag will be extremely helpful. You can place the tag at a convenient spot (like the dashboard or centre console) and program it to automate certain tasks like launching the navigation app, playing a certain playlist on Spotify, enabling Bluetooth to pair with your car’s speakers, and turning on Do Not Disturb mode.
Share your business card
 You can save money on printing out business cards and make the process of sharing one look pretty cool with the help of NFC. You can program an NFC tag to share your contact information and business details whenever someone taps on it. If you’re setting up shop at an event, you don’t have to worry about printing the ideal number of business cards. Simply place the NFC tag at a convenient spot where people can easily scan it for its contents.
Force yourself out of bed with an NFC alarm
 If you have a habit of hitting the snooze button in bed over and over again, you can use an NFC tag to force yourself out of bed. The NFC Alarm Clock app makes you scan an NFC tag to disable the ringing alarm. To best utilise this feature, place the NFC tag far away from your bed, so you are forced to get up in order to turn off the alarm.
Connect to Bluetooth devices
 Bluetooth devices are more common than ever these days. You may have several Bluetooth speakers at home that are paired with your smartphone and other media-playing devices. Constantly switching between devices can be quite a hassle. You can easily bypass this minor issue by programming NFC tags for different Bluetooth devices in your house. Once that’s done, all you need to do is tap your phone on the tag and it will automatically connect to the device, whether the Bluetooth is turned on or not. This is one of the most practical ways to use Android NFC at home.
Share the WiFi password
 Here’s a cool way to share your home WiFi password. Program an NFC tag to share your WiFi network details whenever a smartphone comes in contact with it. WiFi passwords are usually long and complex, so you won’t need to remember them if you use an NFC tag. Apps like InstaWiFi will help you program the NFC tag to give out your home WiFi password.
Share a website
If you have a personal blog or website with a complicated name, you don’t need to spell it out every time someone asks for it. Simply pull out the NFC card with the website URL programmed in it and let the person scan it on their phone. When someone scans the NFC tag, their phone will immediately open the website in a web browser. This trick can be particularly useful for small businesses and sellers to direct people to their online stores. Read Also: Try these Easy Methods to Fix Touchscreen Issues On an Android smartphoneConclusion
These are the 8 practical ways to use Android NFC in your day-to-day life. Since NFC payments are pretty commonplace these days, we’ve omitted it from our list in favour of other creative tasks. Once you get a hang of how to use an NFC tag, the possibilities of its use are endless. You can get creative with it and program it to carry out tasks that fit your quirks and needs. If you found this article helpful, let us know in the comments! For the latest gadget and tech news, and gadget reviews, follow us on Twitter, Facebook and Instagram. For newest tech & gadget videos subscribe to our YouTube Channel. You can also stay up to date using the Gadget Bridge Android App. You can find the latest car and bike news here.Viewsonic launched a new range of limited-edition monitors in India

Viewsonic has announced the introduction of a limited edition monitor series in the Indian market. The new Viewsonic monitors series includes three models 19-inch VA1903H-2-IN1, 22-inch VA2215-H-IN1, 24-inch VA2432-MH-IN1, and 27-inch VA2732-MH-IN1. The monitor line offers eye-care technology to lessen eye strain while using a screen.
The Viewsonic VA1903H-2-IN1 monitor offers performance and value for both home offices and small companies. The VA1903H-2 is excellent for a range of tasks, including viewing office documents and browsing the web. It has HDMI ports, a quick 5ms reaction time, and a 50M:1 Dynamic Contrast Ratio. This monitor, which has a hairline surface finish, looks amazing on any desktop. The proprietary ViewMode feature from ViewSonic offers user-friendly presets for optimal screen performance in various applications. Additionally, for increased productivity, flicker-free technology and a blue light filter assist prevent eye strain from prolonged viewing times. The VA1903H-2 is a fantastic option for both government and education because it has an energy-saving Eco-mode that lowers cost of ownership.
Suitable for use in the office or at home, the ViewSonic VA2215-H is a 22-inch Full HD monitor with HDMI and VGA input. This monitor offers six ViewMode presets that deliver optimum screen performance according to your demands while still delivering superb visual quality with reduced battery consumption. Even while gaming, FreeSync eliminates tearing and stuttering. Eye strain from extended viewing times is reduced by the eye care technology that is a standard feature on all VA displays. This monitor’s easy installation on the wall or with a variety of industry-standard mounts is made possible by a VESA-compatible mount.
The ViewSonic VA2432-MH is a 24-inch (23.8” viewable) Full HD Monitor. It has IPS technology and flexible connectivity for use at home or in the office. Images are crisp and detailed from a variety of viewing angles thanks to SuperClear IPS technology and Full HD resolution. While HDMI and VGA inputs enable greater setup freedom when connecting with other devices, integrated speakers guarantee a clear and sharp sound. The VA2432-MH’s three-sided frameless bezel offers a smooth viewing experience and includes Eye Care technology to lessen eye fatigue brought on by prolonged viewing. The ease of adapting to multi-monitor or wall-mount setups is ensured by VESA compatibility.
For usage in the office or at home, the ViewSonic VA2732-MH is a 27″ (27″ viewable) Full HD Monitor with IPS technology and adaptable connectivity. Images are sharp and detailed from a variety of viewing angles thanks to SuperClear IPS technology and Full HD resolution. While HDMI and VGA ports enable greater setup options when connecting with other devices, integrated speakers guarantee a smooth and crisp audio experience. The VA2732-MH’s three-sided frameless bezel offers a smooth viewing experience and includes Eye Care technology to lessen eye strain brought on by prolonged viewing. Easy adaptation to multi-monitor or wall-mount setups is ensured by VESA compatibility.
For the latest gadget and tech news, and gadget reviews, follow us on Twitter, Facebook and Instagram. For newest tech & gadget videos subscribe to our YouTube Channel. You can also stay up to date using the Gadget Bridge Android App. You can find the latest car and bike news here.
Garena Free Fire Redeem Codes Today 27 December 2022: Here is how to claim them

Garena Free Fire is a battle royale game with regular awards and tournaments to keep players interested. If you play Garena Free Fire, you should be aware of the redeem codes that are released on a daily basis. However, because the battle royale game is banned in India, players from other countries can use the Free Fire Redeem codes daily. If you’re unfamiliar with the Garena Free Fire redeem codes or don’t know how to get them, we’ve put together a step-by-step guide to help you redeem them. Check out Garena Free Fire Redeem Codes for December 27.
The Free Fire redeem codes are a great way to get free stuff. These are 12-digit codes that contain alphabets and numbers, as well as an expiration date and time. Because the Garena FF redeem codes cannot be used more than once, you should hurry to the redemption page to claim your free reward before someone else does. To get a free reward, all you have to do is go to reward.ff.garena.com/en, which is the official redemption page. Also, keep an eye on this space for daily updates on Garena Free Fire redemption codes and rewards.
In This Article
Garena Free Fire Redeem Codes Today 27 December 2022
- AD2Q-FG8I-H3EI
- ET5W-G345-T6YH
- RGY1-TG4F-VBE4
- G5B6-NY3M-KU8H
- DCV3-BH4E-JRFI
- Y9H8-7GY6-FT8D
- FQX1-FT2Q-S3WS
- GEF8-B4N5-M6YK
- OB98-7FD6-E5TR
- JI56-Y9HI-8UBJ
- FY87-HYBT-VGFC
- VXSB-EN4K-56I9
- Y8H7-B6V5-C4XS
- 3EAW-QSD2-CV3G
- TER5-F43E-SWAS
- WEYVGQC3CT8Q
- GCNVA2PDRGRZ
- JHGR-KIU7-HG45
- UOJ8-7B6F-5DRE
- J3ZKQ57Z2P2P
- B3G7A22TWDR7X
- 3IBBMSL7AK8G
- 8F3QZKNTLWBZ
- BG4N-EJ4K-5L6O
- SARG886AV5GR
- FF7MUY4ME6SC
- FJK8-SL6W-Q203
- 9ER8-FG7H-BYU4
- JVK9-DS2W-QJ2U
- Y54E-RF3G-BE4E
- JON9-8B7V-FY6D
- F6C5-X4SA-3QWE
- 2DF3-GHRT-UG76
- F4G5-TYH9-KJU7
- 4VRB-5TJK-GY6H
- 5FD4-SQED-2FV3
How to Get Free Fire Redeem Codes for Garena on December 27?
- Visit the Garena Free Fire game’s official website at reward.ff.garena.com.
- Use your Facebook, Google, VK, Apple ID, Huawei ID, or Twitter account to log in.
- You’ll be taken to a valid redemption code (s)
- Copy and paste the 12-digit redemption code into the text box.
- On the screen, a dialogue box will appear.
- ‘Ok’ should be selected.
Amazon Quiz Answers Today 27 December 2022

27 December 2022 Amazon Quiz has gone live on its mobile app platform. The quiz can be played from 12 AM to 11:59. All you need to do is just answer five easy questions that the e-commerce website puts before you. Today you can stand a chance to win Rs ___ Amazon Pay Balance.
Every day Amazon posts a new questionnaire that consists of five simple questions about general knowledge and current events. To enter a lucky draw, participants must correctly answer the questions. One incorrect answer will result in your elimination from the quiz. Each month, only one person will be declared the winner and the results will be announced at the end of the month. Amazon customers who submit correct answers can win an Amazon Pay Balance worth up to Rs 50,000. To ensure that you answer all five questions correctly, Gadget Bridge updates all of the correct answers on a daily basis. Take a look at today’s answers:
Amazon Quiz Today Prize – Rs ___ Amazon Pay Balance
Quiz Date – 27 December 2022
Daily Timing – 12 AM to 11:59 PM
Winner Announcement – Today 12 PM
In This Article
Amazon Quiz Answers Today 27 December 2022
Question 1:
Answer:Question 2:
Answer:Question 3:
Answer:Question 4:
Answer:Question 5:
Answer:How To Play Amazon Quiz
Only app users are eligible to play the Amazon quiz every morning from 12 AM to 11:59 PM. The quiz is not available on the desktop. For those who are unaware of how to play the Amazon quiz below are the steps, you can follow to take the quiz.- Firstly download the Amazon app from Google Play Store or App Store
- Now fill in the required information through the Sign Up option.
- You need to log in to the Amazon app and scroll down on the home screen to find the Amazon Quiz banner.
- Tap on the Amazon Quiz banner and tap on the Start button to start the Quiz.
- Now you will get 5 questions and you need to answer them correctly. One wrong answer will eliminate you from the Quiz.
- After answering all the questions correctly you are now eligible for a Lucky Draw.
- The winner’s name will be announced today at 12 PM.
The global rollout of the Twitter View Count for Tweets has begun

Recently, Twitter introduced a new View Count feature for tweets that enables users to see a tweet’s precise view count in a way that is similar to how it appears on videos. This new function, which Musk had earlier this month promised to release, is now accessible to all users. Moreover, the ability to publish films up to 60 minutes long is currently being given out to Twitter Blue subscribers. The new capacity will also alter the video’s quality when it is released.
Users will be able to view the actual view count for their tweets using the new feature. Elon Musk tweeted to confirm the feature’s release. Users will be able to find out how many times a tweet has been viewed by using the View Count function, as per Elon Musk’s tweet. The web, iOS, and Android apps can now be used to access the function. Everyone can see how many times a tweet has been viewed, not only the account owner. Apps for iOS and Android presently support the feature. The web version of it is also accessible. The view count will currently only be displayed on newly posted tweets and not on older ones.
According to Elon Musk’s tweet, this novel feature is typical for videos. Given that more than 90% of users see tweets but don’t re-tweet, comment, or like them, he added that it will also demonstrate how much more active Twitter is than it may appear. For Twitter Blue subscribers, a 60-minute video in 1080p resolution will be made accessible for sharing online. The microblogging service made the upgrade public via its Twitter Blue page. Up until now, Twitter Blue members could only submit movies that were up to 10 minutes long and no larger than 512MB in size. Customers can now submit videos that are 60 minutes long, claims the company. The video should not, however, be more than 2GB. This feature is not available in the Twitter mobile apps for iOS and Android. Keep in mind that the feature can currently only be used via web and not through iOS or Android apps. For the latest gadget and tech news, and gadget reviews, follow us on Twitter, Facebook and Instagram. For newest tech & gadget videos subscribe to our YouTube Channel. You can also stay up to date using the Gadget Bridge Android App. You can find the latest car and bike news here.Twitter is rolling out View Count, so you can see how many times a tweet has been seen! This is normal for video.
— Elon Musk (@elonmusk) December 22, 2022
Shows how much more alive Twitter is than it may seem, as over 90% of Twitter users read, but don’t tweet, reply or like, as those are public actions.
Realme 8 started to burn while in the pocket, almost burned leg

The Realme smartphone caught fire in a terrifying accident. On Sunday, the Realme 8 exploded when its owner was sitting, causing the disaster. Sadly, the gadget was in the pocket. Its leg was almost burned when it heard a sizzling sound. A man from India is the owner of the smartphone.
The Redmi 8 users took to Twitter to report the scary accident when the phone caught fire randomly in the middle of the night on December 25. The user noticed a sizzling sound as he and his siblings were seated; when he checked his pocket, he saw that smoke was flowing from the user’s phone. According to him, it nearly burned his leg.
“My Realme 8 EXPLODED ystrdy (25dec). I was sitting with my siblings when we heard a sizzling noise, I checked my pocket and there was smoke coming through my phone. It almost burnt my leg. Please🙏help me get a refund or replacement,” his tweet reads.
This disaster has occurred before; a few months ago, an eight-month-old girl died in the Bareilly region of Uttar Pradesh when her mother’s cell phone exploded while charging. Next to the infant, the mom had left the keypad phone charging. The phone, which was purchased six months ago, had a bloated battery and was attached to a switch powered by a solar panel. According to the family, there was no adapter involved; it was simply being charged using a USB cable.
Another instance apparently involved a Redmi 6A smartphone that detonated, killing a woman in the Delhi-NCR area. The smartphone exploded and apparently took the aunt of a person’s life, based on a tweet. The aunt used the smartphone and had put it close to her face on a pillow while sleeping. Xiaomi has replied to the tweet by stating that it is looking into the situation.
The user was killed by the battery explosion, which also produced photographs of the smartphone’s damage. The back panel of the smartphone shows that the battery has exploded, in contrast to the front panel’s fully bent and wrecked appearance.
For the latest gadget and tech news, and gadget reviews, follow us on Twitter, Facebook and Instagram. For newest tech & gadget videos subscribe to our YouTube Channel. You can also stay up to date using the Gadget Bridge Android App. You can find the latest car and bike news here.

 Step 3:
 Step 5:
 Step 6:
 Step 3:
 Step 4: