

In This Article
Part 1: Why Your Videos Are Deleted or Lost?
To properly comprehend what has occurred, you must first learn how video data may be lost or erased before looking into recovery options.Physical harm:
SD cards may be physically harmed, much like the majority of electronics. The integrity of an SD card may be progressively compromised over time by dropping it and handling it roughly, which can interfere with both readings from and writing to the card.Corrupt files:
Several factors might cause your files to become corrupt. Most of the time, it can’t be prevented and happens at random. Whatever the source, file corruption makes your files useless, causing them to lose their identity.Incorrect device removal:
It’s advised to carefully eject the storage media rather than take it out when taking an SD card out of a device (namely a computer). This is because removing the storage device while it may still be doing a read-write operation might result in file corruption, which is just as bad as deleting the file.Formatted SD card:
The data on an SD card is deleted when it is formatted. It is a better option than merely choosing and erasing every file on the card. Formatting is often carried out on a computer. However, some cameras have an internal formatting feature that does virtually the same thing.Deletion of a file via error:
People make errors. It might just be that the files were unintentionally destroyed in the case of media saved on an SD card.Part 2: How to Recover Deleted Videos from SD Card Using Tenorshare 4DDiG?
Tenorshare 4DDiG Windows Data Recovery allows you to recover deleted videos from SD cards on Windows PCs and Windows-based devices, such as USB, SD cards, and external devices. You can restore photos and videos and recover data from destroyed computers, lost partitions, external devices, the Recycle Bin, BitLocker-encrypted drives, and local discs. The methods in the following instruction will lead you through all of these scenarios to restore deleted videos on SD card. 2.1 How to Recover your Deleted Videos from SD Card on Windows? Tenorshare 4DDiG can help you recover video from SD cards, formatted SD cards, and other lost or destroyed media. The finest feature of this expert recovery software is that it was created with different user skill levels in mind. So, whether you’re an expert or a beginner, using this program to recover video free from an SD card is simple. Below are some of the features of Tenorshare 4DDiG.- Restore the lost video from an SD card, a laptop or PC, an internal or external drive, a USB flash disc, etc.
- It provides two recovery modes: rapid scan and thorough scan.
- Recover over a thousand media assets, including movies, pictures, audio files, and documents.
- In addition to MP4, MOV, MKV, AVI, AMV, F4V, RM/RMVB, SWF, MPG, TS, MPEG, VOB, DV, and MTS, it also supports several other video formats.
- Files deleted unintentionally, by a virus, or other means may be recovered.
- File previewing is an option before data recovery.
 Step 2: All of the deleted files will show up after scanning. You may check the video’s preview to be sure it is the one you need.
 Step 3: To save the movie to your computer, choose the files and hit the “Recover” option.
 In three easy steps, you may recover the deleted videos from the SD card. Is it not quick?
2.2 How to Recover Deleted Videos from SD Card on Mac?
Tenorshare 4DDiG has a Mac version that supports SD card video recovery. The program may be used to expertly recover files from SD cards on Mac as well as other data from storage devices that are Mac-based. What’s more, there is no need to turn off SIP to use 4DDiG on Mac. This step gives you an effective boost in recovery efficiency.
You must download the application onto your Mac before starting the recovery procedure. Once finished, adhere to the directions listed below:
Step 1: After installing and running the 4DDiG Mac data recovery software, connecting your SD card to your Mac is the first step. Next, choose a place to begin data recovery. Choose “Scan” from the menu.
In three easy steps, you may recover the deleted videos from the SD card. Is it not quick?
2.2 How to Recover Deleted Videos from SD Card on Mac?
Tenorshare 4DDiG has a Mac version that supports SD card video recovery. The program may be used to expertly recover files from SD cards on Mac as well as other data from storage devices that are Mac-based. What’s more, there is no need to turn off SIP to use 4DDiG on Mac. This step gives you an effective boost in recovery efficiency.
You must download the application onto your Mac before starting the recovery procedure. Once finished, adhere to the directions listed below:
Step 1: After installing and running the 4DDiG Mac data recovery software, connecting your SD card to your Mac is the first step. Next, choose a place to begin data recovery. Choose “Scan” from the menu. Step 2: After the scan results are produced, choose the specific files you want to see.
 Step 3: Next, choose a place to store the files you find and touch the “Recover” button.
Part 3: How to Use SD Cards to Avoid Data Loss?
Here’s a quick truth: most “videos disappeared from SD card” users themselves cause incidents. Why? Because they ignore fundamental safety precautions like hitting the eject button before ripping the SD card out like a stray nose hair, and they don’t utilize SD cards as responsively as they should, subjecting them to various hard situations.Always click the Eject button:
Your operating system allows you to securely reject any storage device before you physically detach it for a reason: doing so helps prevent data damage brought on by unexpectedly halted read/write activities.Use many SD cards:
Since SD cards aren’t expensive, it doesn’t make sense to put all your eggs in one basket by choosing one big SD card over several smaller ones. Your data will still be there on the other SD cards, even if one of your smaller SD cards malfunctions.Place the card inside a case for protection:
MicroSD cards are just 1 mm thick, whereas regular SD cards have a thickness of only 2.1 mm. They are thus quite delicate and generally not made to last in hostile environments, which include the inside of your bag or pocket.Conclusion
For anybody, losing videos from the SD may be a frustrating scenario. However, this guide will make it simple to recover lost movies from an SD card. Fortunately, the procedure will be simple and fast thanks to recovery tools like the Tenorshare 4DDiG SD Recovery program. Make sure you keep a backup of the videos saved on the SD card to prevent this circumstance in the future. Get Benefits from these Amazing offers at 4DDiG Christmas & New Year Sales! 4DDiG Christmas & New Year Sales has prepared surprise gifts for users, if you’re still bothered by the price of buying data products, grab this great offer! Don’t miss any discount opportunity to recover deleted videos from SD card on Windows and Mac. This promotion is roughly divided into the following three parts:- 100% Win A Gift
- Up to 70% OFF On Best Single Deals
- XMAS Coupon Code – 40% OFF


 Step 3:
 Step 4:
")
 Step 2:
 Step 3:
 Step 4:
 Step 5:
 Step 6:
 Step 7:
 Step 8:
 Step 9:
 Read Also:


![How to Restore WhatsApp Backup from Google Drive to iPhone? [2023 Update]](https://www.gadgetbridge.com/wp-content/uploads/2022/12/whatsapp-iphone-768x402.jpg "How to Restore WhatsApp Backup from Google Drive to iPhone? [2023 Update]")
 Step 4: Use your credentials to log onto your Google drive account.
 Step 6: Give it some time – the tool will gather all the pieces of your back up.
 Step 8: Patiently wait for the backup to complete.


 Step 2:
 Step 3:
 Step 4:
 Step 5:


")

 If you have a smart lock installed in your house, you can operate it using an NFC tag. You don’t have to enter the code every time you want to enter your house. The only precondition is that the smart lock must have NFC support (common in most modern smart locks). Once you’ve programmed the lock, all you need to do is place your phone near it and the door will automatically unlock for you.


 Bluetooth devices are more common than ever these days. You may have several Bluetooth speakers at home that are paired with your smartphone and other media-playing devices. Constantly switching between devices can be quite a hassle. You can easily bypass this minor issue by programming NFC tags for different Bluetooth devices in your house. Once that’s done, all you need to do is tap your phone on the tag and it will automatically connect to the device, whether the Bluetooth is turned on or not. This is one of the most practical ways to use Android NFC at home.


 Step 3:
 Step 5:
 Step 6:
 Step 3:
 Step 4:
 Step 3:
 Step 5:
 Step 6:
 Step 8:
 Step 11:
 Step 13:
 Step 14:
")

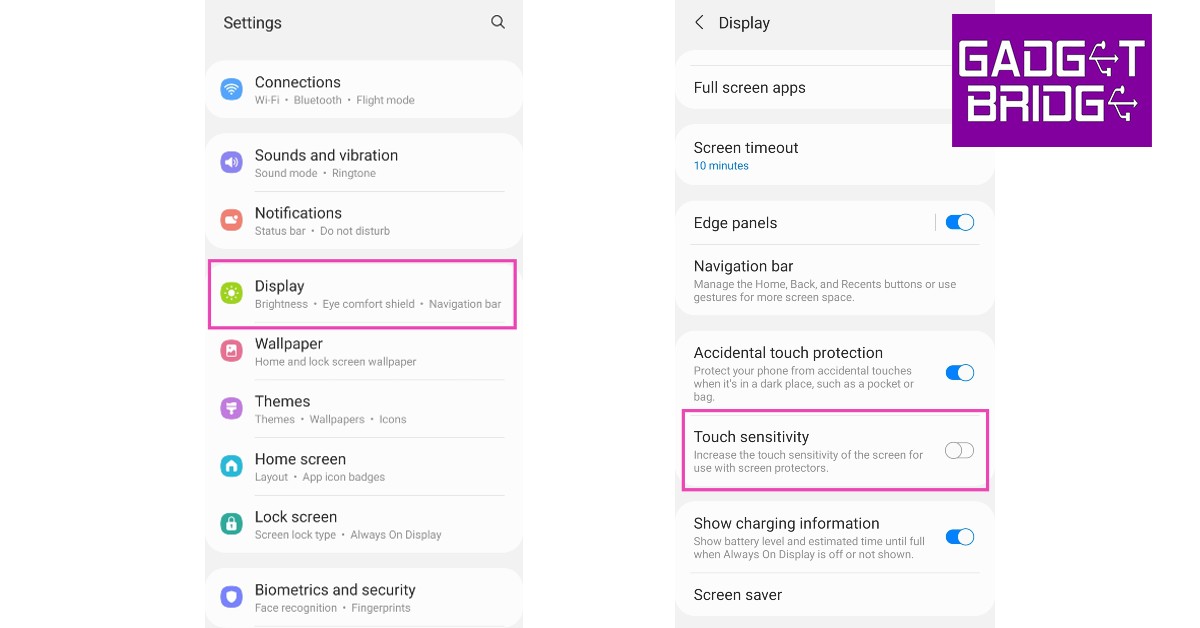

 If your phone is connected to any accessories like an external mouse or keyboard, remove them from the device. If you want to be thorough, remove the SIM card and memory card as well. Sometimes a corrupted memory card can cause issues on your device. Restart your smartphone and check if the touchscreen is working again.
 The
The 
