Titan-owned Fastrack has expanded its product portfolio with the launch of a new smartwatch in India. The company has introduced Fastrack Limitless FS1 which is priced affordable. It is a Bluetooth-calling smartwatch powered by an advanced ATS chipset. It supports Amazon Alexa voice assistance and more than 150 watch faces.
In This Article
Fastrack Limitless FS1 price in India, sale details
Fastrack Limitless FS1 price in India is set at Rs 1,995. The device is scheduled to go on sale on April 11 via the Amazon India website. The device will be available in three colour options Black, Blue, and Pink.
Fastrack Limitless FS1 specifications
Fastrack Limitless FS1 features a rectangular 1.95-inch Horizon Curve Display with 240×296 pixels of resolution. The curved screen offers 500 nits of brightness. There are buttons on the side of the frame for navigation. Fastrack Limitless FS1 comes with the faster and most advanced ATS chipset. It includes advanced health monitoring features, including continuous stress monitoring, auto sleep tracking, and 24×7 heart rate monitoring.
The device offers customisations with 150+ available options and auto identification of sports like running, sprinting, and walking to track from the 100+ sports modes. The smartwatch comes with smart notifications. It has a 300mAh battery that is claimed to provide up to 10 days of battery life on a single charge. For connectivity, there is Bluetooth 5.3 connectivity and the watch is compatible with both Android or iOS devices. For Bluetooth calling there are inbuilt speakers and microphones.
For the launch of Limitless FS1, Mr. Ravi Kuppuraj, COO, Smart Wearables, Titan Company Limited shared, “With the introduction of Limitless series we present fashion-forward smart watches that will grab consumers’ attention with its functionality and style appeal. Fastrack Limitless FS1 the first in the new ‘limitless’ series offers Alexa built-in, and consumers are sure to have one of the best virtual assistants available on their wrist. Fastrack’s commitment to quality is a vital part of all our product development process and we strive to offer the best of fashion and tech to the consumers of today. This launch is partnered with e-commerce giant Amazon and is a testament to our long-standing association with them.”
The Vivo X90 series is likely to launch in India around the end of April. The firm hasn’t revealed anything about the lineup but a well-known informant has revealed the alleged devices’ launch date. The device has already debuted in China last year in November and also made a global debut but is yet to hit Indian stores. The company’s most premium series includes Vivo X90, X90 Pro, and X90 Pro+.
Tipster Yogesh Barar via Pricebaba report said that the Vivo X90 and Vivo X90 Pro will be launching in India on April 26. The tipster also provides information on the expected price of the devices. According to the report, the price of both models is likely to range from Rs 60,000 to Rs 80,000.
In This Article
Vivo X90 specifications
Vivo X90 comes with a 6.78-inch AMOLED display with a 1,260 x 2,800-pixel resolution. The screen also features a 20:09 aspect ratio, a refresh rate of up to 120Hz, and a screen-to-body ratio of 93.53 percent. The DCI-P3 colour gamut is supported by the display. The phone runs on Android 13 with OriginOS 3 on top. Under the hood, there is an octa-core 4nm MediaTek Dimensity 9200 SoC, up to 12GB of LPDDR5, and a G715 GPU. Internal storage on the Vivo X90 is expandable to 512GB UFS4.0.
Vivo X90 comes with a triple rear camera setup that includes a 12-megapixel ultra-wide-angle camera with an f/2.0 aperture, a 12-megapixel portrait camera with a 50mm lens, and a 50-megapixel primary sensor with an f/1.75 aperture are all featured. It has a selfie camera with a 32-megapixel resolution and an f/2.45 aperture. In addition to this, there is a 4,810mAh battery and 120W fast charging.
Vivo X90 Pro specifications
On the other hand, Vivo X90 Pro remaining features are similar to those of the regular model. It is powered by a MediaTek Dimensity 9200 CPU, up to 12GB of LPDDR5 RAM, and up to 512GB of UFS 3.1 internal storage that can be expanded further with a microSD card. The device also includes a 4,870mAh battery with support for both wireless charging at 50W and quick charging at 120W.
The X90 Pro features a triple rear camera setup, with the primary camera being a 50-megapixel Zeiss 1-inch sensor with an f/1.75 aperture. Additionally incorporated are two 50-megapixel secondary 50mm sensors with an f/1.6 aperture each and a 12-megapixel ultra-wide-angle sensor. On the front, it boasts a 32-megapixel selfie camera with an f/2.45 aperture.
Even though our devices are more connected than ever, most users typically rely on emailing files to themselves to access them across multiple devices. This doesn’t have to be the case. If your devices are connected via Bluetooth or WiFi, your file-sharing options are endless. In this article, we bring you the best free apps to transfer files from one computer to another.
Nearby Sharing is Windows’ native way of sharing files between two devices via WiFi or Bluetooth. To set up Nearby Sharing, go to Settings>System and click on ‘Shared Experiences’ on the side menu. Turn the toggle bar on for Nearby Sharing to proceed. Right-click on the file you want to transfer and select ‘Share’. Your PC will look for Nearby devices on the same network. Click on the destination PC to share the file. Using Nearby Sharing, you can transfer documents, images, files, and even web links from one computer to another.
AnySend
AnySend is one of the simplest file-sharing tools for your computer. This app makes it easy to share files between two PCs and offers cross-platform compatibility, allowing you to transfer files between a PC and a Mac or Android. The only requirement is that the two devices must be connected to the same WiFi network. Once AnySend has been installed on both devices you can simply copy and paste the files you want to share. It’s that easy. Click this link to download AnySend.
Send Anywhere
Send Anywhere does as it says. Using this tool you can send a file from your PC or mobile device to any other platform. If you’re using a PC you don’t need to download an app to transfer a file. Simply go to the Send Anywhere website and upload the file you wish to transfer. Send Anywhere will generate a code for the transfer. Open the website on the destination PC and enter the code. The files will be downloaded on your device. For Send Anywhere to work, both devices must be connected to the same WiFi network. You can also download the app to reduce the transfer time.
Xender
If you’re looking for fast transfer speeds, Xender is your best option. This sharing app is up to 200x faster than Bluetooth and does not require an internet connection to transfer files between two devices. Once the two computers are on the same network, Xender can seamlessly transfer any files between them. Xender also offers a web portal to carry out file transfers between two devices.
Feem
One of the advantages of using Feem is that you can carry out file transfer between two devices even if they are not connected to a common WiFi network. Feem uses a mobile hotspot to form a connection between the two devices. There is no size limit to the files you can transfer using Feem. The software claims to be 50 times faster than Bluetooth and twice as fast as Dropbox. You can use Feem to transfer files from one computer to another or to any other mobile device across different platforms.
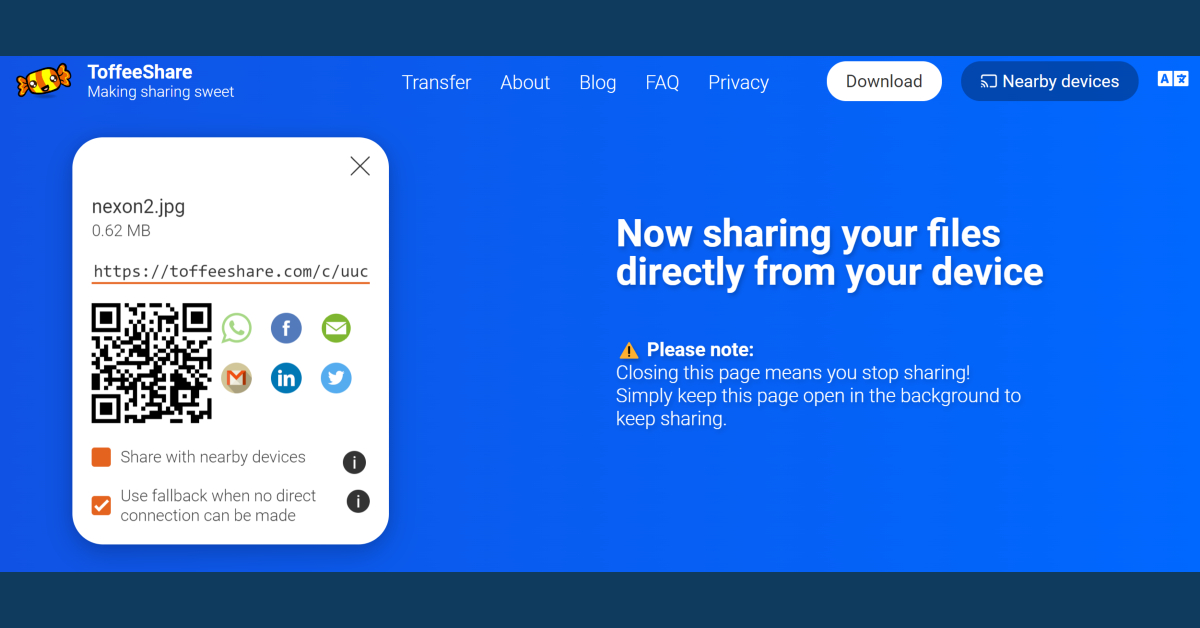
ToffeeShare
Using ToffeeShare, you can send files directly from one PC to another using a common WiFi connection. Peer-to-peer file transfer via ToffeeShare is lightning quick. There is no size limit while transferring files over a WiFi connection. However, if one of the PCs is not nearby, you will have to resort to a third-party transfer. All you need to do is upload the files on ToffeeShare’s web interface and share the QR code with the receiver. All third-party transfers are end-to-end encrypted. The only downside is that there’s a size limit of 2GB.
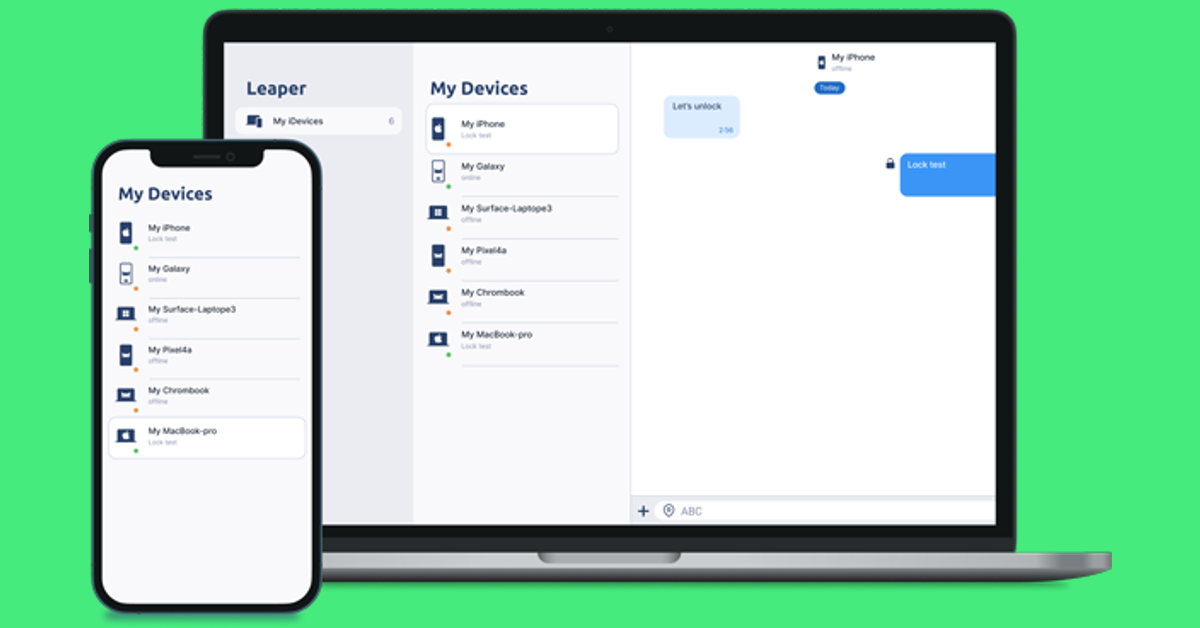
Leaper
With Leaper, you can add unlimited devices to your network and freely transfer files between them. Leaper allows you to share documents, files, images, videos, and even messages between two devices. All transfers are end-to-end encrypted. The message lock feature makes Leaper ideal for sharing passwords, OTPs, PINs, and banking info with other devices. You can also share files with devices that are currently offline.
Google Drive
While strictly not software, Google Drive is still one of the best ways to transfer files between two PCs. Of all the cloud storage devices, Google Drive is, without a doubt, the most popular among users. Being a Google service, it comes embedded into the Android OS and is the default backup app for Android devices. Users get 15GB of free storage when they sign up for Google Drive. To transfer a file, simply upload it to Google Drive and then access it using your destination PC.
Dropbox
Like Google Drive, Dropbox is an online storage and file hosting service that can be used to transfer files between two PCs. After uploading a file on Dropbox, you can share its access with another account or simply use your account on another PC to download it on the device. Free accounts on Dropbox are limited to 2GB uploads. This limit can be extended up to 5TB on a Business account.
These are the best free apps to transfer files from one computer to another. Google recently announced Nearby Share for Windows, to make file transfers easier between a PC and an Android smartphone. Nearby Share is the native way to transfer files on Android. Here is our article explaining how you can use it to transfer files between a PC and an Android smartphone and vice versa.
Fire-Boltt, a homegrown smart wearable brand has introduced its latest smartwatch Collide in India. The Fire-Boltt Collide comes equipped with a 1.32-inch HD display. In addition to this, it offers 70 sports modes. Users can also use it for calling as it has a built-in mic and a speaker setup for Bluetooth calling. The wearable also includes voice assistance, health and fitness features and much more.
In This Article
Fire-Boltt Collide price in India, sale details
Fire-Boltt Collide has been launched in India at Rs 2,999 in India. The smartwatch comes in 5 classic colour variants- Brown, Matte Black, Grey, Silver Black, and Grey Black. The device will be available for purchase via Amazon and the company’s official website in the country.
Fire-Boltt Collide specifications
Fire-Boltt Collide comes with a quadrangle metallic body built with a circular dial, rounded corners and a rotating crown. The smart wearable is highlighted with a 1.32-inch HD display with 360×360 pixels of resolution. The screen offers 500 nits of brightness. Collide features a 10.7 mm ultra-thin body. The device also offers more than 100 built-in watch faces. The fitness tracker supports Bluetooth 5.2 for connectivity. For Bluetooth calling the smartwatch has an in-built mic and speaker. The device also offers contacts sync, call history and a quick dial pad for BT calling.
In addition to this, the Fire-Boltt Collide includes more than 70 sports modes. In terms of health, the smartwatch includes Fire-Boltt Health Suite to support heart-rate monitoring, SpO2 and sleep tracking.
Lastly, the Fire Boltt smartwatch has other features like built-in games, smart notifications, a calculator, camera control, music control, a timer, an alarm clock, and health and wellness reminders. It also provides weather forecasts and supports AI voice assistance for hands-free control. The device is IP68 rated for water resistance.
The watch includes a 330mAh battery that is said to last up to 7 days on a single charge. Commenting on the launch, Aayushi Kishore and Arnav Kishore, Co-Founders of Fire-Boltt, said, “The all-new Collide smartwatch is a true testament to Fire-Boltt’s commitment to cater to all categories of smartwatch enthusiasts. Collide is a seamless amalgamation of round and square dials to create a one-of-a-kind timepiece for those who seek the best of both worlds.”
Garena Free Fire is a battle royale game with regular awards and tournaments to keep players interested. If you play Garena Free Fire, you should be aware of the redeem codes that are released on a daily basis. However, because the battle royale game is banned in India, players from other countries can use the Free Fire Redeem codes daily. If you’re unfamiliar with the Garena Free Fire redeem codes or don’t know how to get them, we’ve put together a step-by-step guide to help you redeem them. Check out Garena Free Fire Redeem Codes for 10 April 2023.
The Free Fire redeem codes are a great way to get free stuff. These are 12-digit codes that contain alphabets and numbers, as well as an expiration date and time. Because the Garena FF redeem codes cannot be used more than once, you should hurry to the redemption page to claim your free reward before someone else does. To get a free reward, all you have to do is go to reward.ff.garena.com/en, which is the official redemption page. Also, keep an eye on this space for daily updates on Garena Free Fire redemption codes and rewards.
In This Article
Garena Free Fire Redeem Codes Today 10 April 2023
FGRGTBCS01GBHY
FGUK0POUYE4TGB
FCXAQ234RTGTYHY
FHGFYTU79OIHJG
FGTY6UILKHMNBV
FET5RYTK8O90ULO
FGYUK8O90LJRHD
F7JUHGT5Y6U7IKJ
How to Get Free Fire Redeem Codes for Garena on 10 April 2023?
Every other tech brand in India is launching new wireless earphones in every price range since the TWS market here is expanding quickly. For the review this time, we have got the OnePlus Buds Pro 2. These have been in use by us for a few weeks now. These are OnePlus’s premium TWS earbuds and the replacement for the OnePlus Buds Pro, which made its debut in 2021. Dynaudio support is included in the recently released gadget, and while there haven’t been any substantial design changes, the audio quality has significantly improved. Here’s a big reveal before we dive into the review’s details: these earbuds sound incredible, and we loooove them.
In This Article
OnePlus Buds Pro 2 Review: Design
Let’s start with the design and construction of the OnePlus Buds Pro 2. At first glance, there doesn’t appear to be much of a difference between the current case’s appearance and that of the Buds Pro, which was introduced last year. The top of the case has the OnePlus branding on it. If you look closely, you can see a mention of Dynaudio just below the branding. Oppo (OnePlus’s sister company) Enco and Oppo Enco X2 were the first devices to have the Dynaudio alliance. It has now also been supplied to the OnePlus Buds Pro 2.
The shell has a matte finish on the front and back, and a USB Type-C port for charging is located at the bottom. The rest of the design has been kept basic and modest, giving it a highly premium appearance. It appears to be a very durable and sturdy case. The Dynaudio branding is also inscribed on the inside of the box. The magnetic mechanism is also quite strong. The enclosure has a button that can be used to pair it with any smartphone.
Again, not much has changed when it comes to the earphones’ appearance. They have a two-toned body. While the bottom has a glossy appearance, the top has a matte finish. For the finest fit and comfort, it includes a few extra ear tips. The earbuds are IP55 rated, while the casing is IPX4 rated. That’s unquestionably one of the best advantages one can sport, as the majority of earbuds merely have an IP rating, whilst the charging cases do not.
Even when shaken vigorously, the magnet on the buds is incredibly powerful and prevents them from falling out of the case. Thus, we are really pleased with the OnePlus Buds Pro 2’s construction.
You do get Google’s Fast Pair compatibility with these, which allows the earphones to connect to linked devices or any other smartphone instantly after receiving a notification from your phone that the device is ready for pairing.
Be aware that these earphones include a dual connection, allowing you to use them with two different devices, including your phone, tablet, and laptop.
OnePlus Buds Pro 2 Review: Performance
The OnePlus Buds Pro 2 are quite comfortable to use, even for extended periods of time. We didn’t observe any significant problems. Nonetheless, because of its somewhat larger size, it would likely fit you well if you have a larger ear canal. Nevertheless, those of us with smaller ear canals must use one of the extra ear tips for the optimum fit and seal. Our use of these while travelling has been quite comfortable. OnePlus Buds Pro 2 come with a flight mode, which is great if you travel frequently. The overall comfort is good, especially when watching movies.
MelodyBoost Dual Drivers are now included in the OnePlus Buds Pro 2. A 6mm tweeter and an 11mm woofer are featured on each earbud. Three microphones with AI noise-reduction technology are also included in these earbuds.
Regarding the controls, the earphones’ bottom stem houses the pinch controls. But, these earphones do not have a volume control feature. You must take your smartphone out in order to adjust the volume.
It has Bluetooth v5.3 connectivity, which supports the audio codecs LHDC, AAC, SBC, and LC3. So all you have to do to use these with a OnePlus smartphone is pair them, and after you do, the OnePlus Buds Pro LHDC will be shown in your Bluetooth settings. You can download the HeyMelody app from the Google Play Store or Apple App Store if you do not have a OnePlus device. These are compatible with iOS devices, too. The UI on both the OnePlus and the app is therefore pretty identical once you are in the settings. Here, you have a variety of options, including sharing contacts, input devices, media audio, and phone calls. In addition, LHDC support is visible. From there, you can also access the earbuds’ features. There are three options: transparency mode, noise cancellation, and battery percentage.
Simply remove the earphones from the charging case and put them on to activate noise cancelling. You will see a variety of options for this as well, including smart noise cancellation and options for maximum, moderate, and mild intensity. Thus, you must wear it and customise it as desired.
A Sound Master EQ (equaliser) is available with several choices. Essentially, Dynaudio tunes all of these. When you don’t like the sound characteristic, you can also create a custom equaliser using the option provided. The Android operating system now supports spatial audio. It uses head tracking, so if you turn your head to the side, the volume control will adjust accordingly. Moreover, Zen Air mode provides some calming sounds that can be heard while meditating, relaxing, dealing with stress, and just before bed. Moreover, Dolby Atmos compatibility is available, but only for OnePlus smartphones. You may turn it on in the settings.
Let’s now discuss audio quality, which is critical for any TWS. The 6mm and 11mm dual drivers bring better bass and treble, especially when listening to music with a lot of bass. The treble is on the higher side, the mids and the vocals are also on the good side. However, you might not have the ideal experience if you enjoy singing and listening to music that features a lot of vocals.
But once more, we would assert that musical tastes vary greatly. You might have a different music taste than we do. For that, the app’s built-in equaliser gives you the option to adjust the sound balance, so one can always tune it to your own personal choice.
You can choose from a variety of effective noise-cancellation methods. It does, however, add a hissing-like sound, which is not a huge issue when listening to music, but is highly noticeable when there is no music. It does have a gaming mode that can be turned on through the app. However, this is only compatible with OnePlus smartphones; if you don’t use one, you won’t experience this level of low latency. Which, when compared to conventional phones, will be on the higher side.
Let’s finally discuss battery life. We have been using them for over two weeks, and with ANC on, the earbuds provide six to seven hours of playback. With the case, it provides approximately 25 hours of music playback, which is once more a fantastic deal. There is fast charging as well as wireless charging on the case. Three hours of music playback can be obtained with just ten minutes of charging.
Verdict
Overall, we believe that the OnePlus Buds Pro 2 are excellent TWS for the price of almost Rs 12,000. The noise cancellation performs excellently. The battery life is fantastic, and the build quality is also quite nice. Having said that, you should absolutely give them a try in this price range if you want loud, powerful bass and high-end headphones.
Amazon is back with another quiz on its mobile platform. The daily quiz is now live on the Amazon App and today’s Amazon Quiz will give you a chance to win Rs 2,500 Amazon pay Balance. The participants can play the 10 April 2023 Amazon Quiz from 12 AM to 11:59 PM. For those who are unaware of the quiz, the e-commerce platform brings a fresh quiz on a daily basis which consists of five questions related to general knowledge and current affairs.
The participants need to answer all the questions correctly and their names will be selected for a lucky draw. The winner will be announced at the end of the month. One wrong answer could eliminate you from the quiz. Only app users are eligible to participate in the Quiz. In today’s Amazon Quiz the participants will get a chance to win Rs 2,500 Amazon Pay Balance. Check Out 10 April 2023 Amazon Quiz Answers.
Question 1: In which country was UK’s new prime minister Rishi Sunak born?
Answer: United Kingdom
Question 2: What is the name of the tropical storm that has recently caused widespread devastation in the Philippines?
Answer: Nalgae
Question 3: Who plays the role of Sherlock Holmes in the movie ‘Enola Holmes 2’?
Answer: Henry Cavill
Question 4: Identify this asana.
Answer: Bhujangasana
Question 5: When was he fired from Apple?
Answer: 1985
How To Play Amazon Quiz
Only app users are eligible to play the Amazon quiz every morning from 12 AM to 11:59 PM. The quiz is not available on the desktop. For those who are unaware of how to play the Amazon quiz below are the steps, you can follow to take the quiz.
Firstly download the Amazon app from Google Play Store or App Store
Now fill in the required information through the Sign Up option.
You need to log in to the Amazon app and scroll down on the home screen to find the Amazon Quiz banner.
Tap on the Amazon Quiz banner and tap on the Start button to start the Quiz.
Now you will get 5 questions and you need to answer them correctly. One wrong answer will eliminate you from the Quiz.
After answering all the questions correctly you are now eligible for a Lucky Draw.
The winner’s name will be announced today at 12 PM.
Garena Free Fire is a battle royale game with regular awards and tournaments to keep players interested. If you play Garena Free Fire, you should be aware of the redeem codes that are released on a daily basis. However, because the battle royale game is banned in India, players from other countries can use the Free Fire Redeem codes daily. If you’re unfamiliar with the Garena Free Fire redeem codes or don’t know how to get them, we’ve put together a step-by-step guide to help you redeem them. Check out Garena Free Fire Redeem Codes for 9 April 2023.
The Free Fire redeem codes are a great way to get free stuff. These are 12-digit codes that contain alphabets and numbers, as well as an expiration date and time. Because the Garena FF redeem codes cannot be used more than once, you should hurry to the redemption page to claim your free reward before someone else does. To get a free reward, all you have to do is go to reward.ff.garena.com/en, which is the official redemption page. Also, keep an eye on this space for daily updates on Garena Free Fire redemption codes and rewards.
In This Article
Garena Free Fire Redeem Codes Today 9 April 2023
B6IYCTNH4PV3
ZRJAPH294KV5
8F3QZKNTLWBZ
Y6ACLK7KUD1N
FF11DAKX4WHV
W0JJAFV3TU5E
WLSGJXS5KFYR
FF11NJN5YS3E
FF11WFNPP956
YXY3EGTLHGJX
FF1164XNJZ2V
FF10GCGXRNHY
MCPTFNXZF4TA
ZYPPXWRWIAHD
FF10617KGUF9
SARG886AV5GR
FF11HHGCGK3B
How to Get Free Fire Redeem Codes for Garena on 9 April 2023?
Amazon is back with another quiz on its mobile platform. The 9 April 2023 Amazon Quiz is now live on its platform and today’s Amazon Quiz will give you a chance to win Rs 5,000 Amazon pay Balance.
Every day Amazon brings a fresh questionnaire that comprises 5 questions. These questions are based on current affairs and general knowledge. The quiz can be played from 8 AM to 11:59 PM and the contestants need to answer correctly to enter into a lucky draw. In today’s Amazon Quiz the participants will get a chance to win Rs 5,000 Amazon Pay Balance.
Question 1: The walls and ceiling of the sanctum sanctorum of which temple have been given a new look with 550 gold layers?
Answer: Kedarnath temple
Question 2: Which actor plays the role of Avik San in the 2022 Hollywood film The Gray Man?
Answer: Dhanush
Question 3: The largest and most powerful optical telescope in space sent its first images back to Earth in 2022. What is it named?
Answer: James Webb Space telescope
Question 4: This dessert was originated in which country?
Answer: Austria
Question 5: Who was the first woman pilot of India?
Answer: Sarla Thukral
How To Play Amazon Quiz
Only app users are eligible to play the Amazon quiz every morning from 12 AM to 11:59 PM. The quiz is not available on the desktop. For those who are unaware of how to play the Amazon quiz below are the steps, you can follow to take the quiz.
Firstly download the Amazon app from Google Play Store or App Store
Now fill in the required information through the Sign Up option.
You need to log in to the Amazon app and scroll down on the home screen to find the Amazon Quiz banner.
Tap on the Amazon Quiz banner and tap on the Start button to start the Quiz.
Now you will get 5 questions and you need to answer them correctly. One wrong answer will eliminate you from the Quiz.
After answering all the questions correctly you are now eligible for a Lucky Draw.
The winner’s name will be announced today at 12 PM.
Samsung DeX is a unique feature that is offered by One UI in Samsung’s most premium smartphones. Using DeX you can use your smartphone on a bigger display, like a TV or an external monitor. So how is it different from mirroring your smartphone’s display, you ask? Samsung DeX creates a unique desktop-like interface for your smartphone on a bigger screen. Which means you can use your smartphone like a PC. In this article, we bring you all the ways you can use DeX on your Galaxy smartphone.
Step 1: Connect your Samsung Galaxy smartphone to your TV or monitor using a USB TYpe-C to HDMI cable.
Step 2: Swipe down from the status bar to access the quick settings menu. Select DeX. If you don’t see DeX in quick settings, go to Settings>Connected Devices and tap on Samsung DeX.
Step 3: Once DeX has been enabled, your phone’s interface will appear on the TV or monitor.
Wirelessly connect to your TV or Monitor
Step 1: Make sure your TV and Monitor are connected to the same WiFi network.
Step 2: Swipe down from the status bar to access the quick settings menu. Select DeX. If you don’t see DeX in quick settings, go to Settings>Connected Devices and tap on Samsung DeX.
Step 3: Connect your Samsung Galaxy smartphone to your PC using a USB Type-C cable.
Step 4: Launch the DeX app on your PC and tap on the DeX notification on your smartphone. If you don’t see a notification, try enabling DeX from the quick settings menu.
Samsung DeX will appear on your PC within a few seconds.
Frequently asked questions
What does Samsung DeX do?
Samsung DeX lets you use your Galaxy smartphone like a PC on a bigger screen.
How is Samsung DeX different from screen mirroring?
While screen mirroring simply casts your phone’s display on a bigger screen as it is, Samsung DeX converts it into a PC-like experience.
Is Samsung DeX available for all Galaxy smartphones?
No. Currently, DeX is only available for premium Samsung smartphones like the S series or Fold series.
These are the best ways to use Samsung DeX on your Galaxy smartphone. While using DeX on your TV or an external monitor, you can turn your Galaxy smartphone into a trackpad for easy navigation. If your smartphone has an integrated stylus, you can use it to track the cursor as well.
Easter is right around the corner. Easter celebrations include various traditions including great discounts and offers on technology and gadgets. One great offer/discount we have come across is on the Geekom Mini IT11 compact PC, which is excellent for any type of use. Its RSP is $779 but right now it is on sale and can be bought for just $549 only. You can avail of the offer by going to the Geekom Mini IT11 offer link here.
Over that, there is an event special running as well, here anyone who spends more than $399 will receive one of the following free gifts, each worth $40:
Carrying Case
2.RAM Memory
3.10 In-1 USB Hub Splitter
Keyboard and mouse combo
In This Article
Here is everything you need to know about the Geekom Mini IT11
Geekom Mini IT11 is a powerful and compact mini PC that packs in a lot of features for its size. The device is powered by an Intel Core i7-11390H processor and comes with 16GB of RAM and 512GB of storage. This makes it a great option for users who need a powerful PC that can handle a variety of tasks.
Design and Build Quality:
The Geekom Mini IT11 is a sleek and stylish mini PC that measures just 4.6 x 4.4 x 2.2 inches. It is small enough to fit on your desk without taking up too much space, yet powerful enough to handle demanding applications. The device has a solid build quality, with a sturdy metal chassis that feels durable and well-made.
Processor and Performance:
At the heart of the Geekom Mini IT11 is an Intel Core i7-11390H processor, which is a quad-core processor with a clock speed of 3.0 GHz. The processor is based on Intel’s Tiger Lake-H architecture and is built on a 10nm process. It also comes with Intel Iris Xe graphics, which is great for casual gaming and basic photo and video editing.
The device comes with 16GB of DDR4 RAM, which is more than enough for most users. It also has a 512GB NVMe SSD, which is lightning-fast and ensures that the device boots up quickly and applications load in no time.
Connectivity and Ports:
The Geekom Mini IT11 comes with a variety of ports, including two USB-C ports, two USB-A 3.0 ports, an HDMI port, and an Ethernet port. It also has a headphone jack and a microSD card slot. The device also supports Wi-Fi 6 and Bluetooth 5.1, which ensures that you have fast and reliable connectivity.
Operating System:
The device comes with Windows 10 pre-installed, which is a great option for users who are familiar with the operating system. It also comes with a one-year subscription to Microsoft Office 365, which is a great bonus for users who need to use Microsoft’s suite of productivity applications.
Final Words
The Geekom Mini IT11 is a powerful and compact mini PC that is perfect for users who need a powerful PC that doesn’t take up too much space. It is packed with features, including a powerful processor, fast storage, and a variety of ports. The device also has a solid build quality and comes with a one-year subscription to Microsoft Office 365. Overall, it is a great option for users who need a powerful and compact PC.
Data recovery is an essential aspect of the Android experience and something that every Android user should know how to perform. The need for data recovery typically arises when you factory reset your smartphone. Factory resets are a common solution to unexpected malfunctions that are caused due to unknown reasons. A reset wipes all data from your phone. Here are the top 4 ways you can recover your data after performing a factory reset on your Android smartphone.
If you keep your personal data backed up locally, you will not have any trouble restoring it after a factory reset of your Android phone. Local backups can be created on a memory card, a pen drive, an external hard drive, or even on your PC. Creating a local backup is recommended for personal data like photos, videos, and documents like your IDs, books, and more. Stuff like chat history, contacts, and apps are more suited for an online backup. Here’s how you recover your data using a local backup after performing a factory reset on your Android smartphone.
Step 1: Connect your Android phone to your PC or laptop using a USB cable. If you have created a local backup of your data on a pen drive or an external hard disk, make sure you copy it on your PC first. If the backup was created on a memory card, insert it on your smartphone and skip this step.
Step 2: On your Android smartphone, go to Settings>Accounts and backup, and select ‘External storage transfer’.
Step 3: Locate the backup on your computer or memory card and click on ‘Restore’.
Restore data from an online backup
Cloud storage services like Google Drive and Dropbox come in extremely handy to create an online backup of your data at a very nominal cost. Google Drive offers the first 15GB of storage free of cost. For a lot of users, 15GB is enough to back up all the important stuff from their phone. Creating an online backup has its own advantages. Firstly, you can automatically sync your data and update the backup, without needing to check on it every other week. Secondly, creating an online backup gets rid of the hassle of always plugging in an external storage device and backing data up manually. Here’s how you can recover your data from an online backup.
Step 1: Launch your phone after performing a factory reset.
Step 2: Login using the Google Account in which you backed up all your data.
Step 3: While setting up your device, tap on the ‘Restore backup’ option.
Step 4: Tap on ‘Automatic restore’ to recover your backed-up data from Google Drive.
If you skipped the restore option while setting up your device, go to Settings>Accounts and backup and select ‘Restore data’.
Recover data from your device using DroidKit
If you do not have an updated backup for your data, there is still a way to recover it after performing a reset on your Android phone. Android tools like DroidKit have special functions that let you recover lost data on your device. Follow these steps to restore data on your phone using DroidKit.
Step 1: Download and install DroidKit on your PC from here.
Step 2: Click on ‘Quick recovery from device’ under the ‘Data Recovery’ section.
Step 3: Select the kind of data you want to recover.
Step 4: Connect your Android smartphone to your PC using a USB cable. Make sure USB debugging is enabled on your phone. You can read how to enable it here. Step 5: Let DroidKit deep scan your device for deleted data.
Step 6: Go through the selected data and select the files you want to keep. You can choose to keep the files on your PC or on the phone.
Step 7: Unplug your phone after data has been recovered.
Recover data using Dr.Fone
Dr.Fone is another great tool to recover data after performing a factory reset on your Android phone. Here’s how you can use it.
Step 1: Download and install Dr.Fone on your PC from here.
Step 2: Launch Dr.Fone and select ‘Data Recovery’.
Image Credit: Wondershare
Step 3: Enable USB debugging on your Android phone (read here) and connect it to your PC using a USB cable.
Step 4: Select the type of file you want to recover.
Image Credit: Wondershare
Step 5: Click on ‘Start’ and let Dr.Fone scan your device for lost data.
Image Credit: Wondershare
Step 6: Once the scan is complete, you can go through the recovered files and save them on your phone individually or all at once.
Image Credit: Wondershare
Frequently Asked Questions
Can data be recovered after a factory reset on Android?
You can recover data from a local or online backup after a factory reset on your Android phone. If you haven’t backed up your data, you can use tools like Dr.Fone and DroidKit to restore your lost data.
How to restore data after a factory reset without backup?
If you haven’t created a backup of the data on your phone, you can use tools like DroidKit and Dr.Fone to recover it after performing a factory reset.
Does factory reset restore the Android version?
No. A factory reset simply wipes all data from your device and restores the settings back to how they were when your phone was unboxed. A factory reset does not restore the Android version on your phone.
These are the top 5 ways to recover data after performing a factory reset on your Android smartphone. For smooth and lossless data recovery, we’d recommend creating frequent backups of your data. The easiest way to do this is by enabling auto-backup on your Google account. While tools like Dr.Fone and DroidKit are highly efficient, they are not always flawless and may throw errors while scanning your phone for lost data.
If you share a PC or laptop with your coworkers or family members, your privacy can take a big hit. You can’t freely store your personal information like banking info, login credentials, or private files on your PC without the risk of someone else accessing them. Luckily, you can take a couple of measures to ensure your private files are safely locked on the shared system. In this article, we bring you the 4 best ways to password-protect any file or folder on a Windows PC or laptop.
Encrypting a file or folder on your Windows PC ensures that no other account on the system is able to view it. When you’re logged in to your Windows account, you won’t need to enter a password to view the encrypted folder. In case someone gets access to your hard drive and tries to view its content using another account, basic encryption will deny them any access. Before you begin this process, make sure that the drive containing the folder is formatted as NTFS. Here’s how you can encrypt a file or folder on Windows.
Step 1: Open the folder containing the file you want to encrypt.
Step 2: Right-click on the file and click on ‘Properties’.
Step 3: Select ‘Advanced’.
Step 4: Tick the box for ‘Encrypt contents to secure data’. Apply the settings and then click on ‘Okay’.
Step 5: Windows will ask you whether you want to encrypt the entire folder or just that specific file. Enter your choice.
Once the process is complete, a small yellow lock will appear next to the file or folder that has been encrypted. The files will automatically be decrypted as long as you access them using your Windows account.
Password protect a file using a zipped folder
Use this simple trick to password-protect any file on your Windows PC.
Step 1: Right-click on the file you want to secure and hover the cursor over ‘Send To’.
Step 2: Select ‘Zip folder (compressed)’.
Step 3: Rename the folder.
Step 4: Open the folder and click on ‘File’. Select ‘Add password’.
Step 5: Create a new password and save your changes.
You can add other files to this folder to password-protect them.
Password protect a file or folder using 7-Zip
7-Zip is a great tool for Windows that will help you add a layer of security to the important files and folders on your system. Here’s how you can use it.
Step 1: Download the 7-Zip tool for Windows using this link.
Step 2: Follow the onscreen instructions and install 7-Zip on your PC.
Step 3: Select the file you want to secure.
Step 4: Right-click on the file and go to 7-Zip>Add to archive.
Step 5: In the following window, enter the password under the ‘Encryption’ section.
Step 6: Change the encryption method from ZipCrypto to AES-256.
Step 7: Click on ‘Ok’ to create the password-protected folder.
Use a third-party file locker
There are several third-party software and Windows apps you can use to lock the important files on your PC. Some anti-virus protection tools have a folder lock functionality as well. We recommend going through the anti-virus software installed on your PC for folder-locking options. If you don’t find any such feature, we recommend using Folder Lock for file encryption and password protection. You can download it for free using this link.
These are the 4 best ways you can password-protect any file or folder on a Windows PC or laptop. If you’re sharing a PC with your family members, we’d suggest encrypting your data if everyone has a separate user account on the PC. If everyone uses one common account, then adding a password is the only choice you have to secure your personal information.
If you’re constantly working while on the go, you need a good calendar and appointment scheduling app that keeps you updated about the events of the day. iPhone users are spoiled for choice in this category. With tons of apps to browse through, it can get pretty confusing to settle on one. We used the best calendar apps on the App Store and narrowed your choices down to a handful. So, without further ado, here are the top 10 online calendar and appointment scheduling apps for iPhone.
Google Calendar’s integration with other Google apps makes it a no-brainer if you’re looking for a seamless and hassle-free calendar experience. You can easily embed Google Meet links into your schedule without needing to look through your emails for the invite at the last minute. Have a flight reservation? Google Calendar will automatically import it and place it in your schedule. Browsing through the calendar, you can view your appointments by date, and simply tap on a date to expand your schedule. The aspect of using Google Calendar is that it works with every other calendar app on your iPhone.
Apple Calendar
Apple’s native Calendar app is well-equipped to handle basic scheduling tasks and more. To create an event, all you need to do is press and hold an empty spot in your day. It’s that easy. Apple Calendar allows you to view your calendar in different layouts. For a more detailed breakdown of your schedule, opt for the ‘Day’ view. If you just want to take a cursory glance, go for the week or month view.
Fantastical
With multiple awards under its belt, Fantastical is without a doubt one of the best calendar apps you can download on your iPhone. Fantastical pays a lot of attention to the aesthetic and the design of the app. The app is loaded with helpful features that you will find easy to integrate into your routine. These include intuitive natural language input, multiple calendar layouts for easy viewing, time zone support, Todoist and Google Tasks compatibility, and even weather forecasts. The premium version of the app unlocks features like meeting polls, multi-device syncing, 10-day weather forecasts, Zoom/Meet/Teams support, and more.
Things 3
Things 3 is one of the highest-rated productivity apps on the App Store and has garnered a lot of accolades over the years. This app is the perfect synthesis of intuitive design and powerful features. Apart from basic scheduling tasks, you can use Things 3 to create to-dos (and schedule them on the calendar), create new projects, plan your tasks, and create different areas (like work, personal, and finance) to neatly organise everything. If you’re looking for an app that neatly blends scheduling, organising, and project planning together, Things 3 should be at the top of your list.
Calendly Mobile
If you own a small business and are constantly flooded with appointments, you’re probably in desperate need of an organising tool. Calendly’s desktop application has acquired a reputation for being one of the best at this task and its iOS app is just as good. Calendly sets up your appointment based on the openings in your schedule and even sends a reminder to the participants ahead of the meeting. To avoid any conflicting bookings, this app works in conjunction with Google, Outlook, Office 365, iCloud, and more.
Calendars 5 by Readdle
Calendars 5 by Readdle has all the essential features you want in an ideal calendar app. What we like about this app is its event-focused interface which keeps all your upcoming commitments in sight. You can expand the events with a single touch and quickly edit them if necessary. Seamless syncing ensures that any changes you make to your calendar offline will be immediately reflected on your account as soon as you are connected to the Internet. Calendars 5 is also equipped with a task manager that can create recurring to-do tasks for you.
Simple Calendar: daily planner
As the name suggests, Simple Calendar gets rid of the bells & whistles and creates a very accessible UI for its users. You can choose a font size that suits you best and browse through the different calendar layouts on offer. Daily tasks can be easily differentiated with colour-coded panels. Entries can be added in the form of text notes, URLs, and even geographical coordinates and map locations. Want to keep your calendar away from prying eyes? You can choose to lock it up with a password.
BusyCal: Calendar and Tasks
BusyCal‘s versatility earns it a spot on this list. This calendar app is compatible with iCloud, Google Calendar, Google Tasks, Microsoft Outlook, Todoist, and other productivity apps and services. This ensures that sharing your BusyCal entries with other iOS or Android users is not hindered by cross-platform issues. Apart from seamless sharing, BusyCal offers all the essential features like multiple calendar layouts, colour-coded entries, natural language input, and more.
One Calendar
If you use multiple calendar apps on your iPhone, One Calendar can integrate all of them in one place. Using One Calendar, you can view all your appointments and scheduled tasks in one place. This app is compatible with Google, Live, Outlook, iCloud, Exchange, Office 365, Yahoo, NextCloud, Synology, GMX, ownCloud, mailbox.org, and more.
These are the top 10 calendar and appointment-scheduling apps for your iPhone. Most of these apps come with Google Meet/Zoom/Microsoft Teams compatibility, which makes it easier to take meetings from the app itself without needing to look through your emails for the invite. We’d suggest going through the different apps mentioned in this list before deciding which one suits your needs the best.
OnePlus Nord CE 3 Lite 5G was launched in India earlier this week. The device’s first sale is yet to begin in the country but ahead of this, the company has an exciting offer for the buyer. According to the company, the buyers of the newly launched smartphone are eligible for a free OnePlus Nord Buds CE. To learn more about the deal in detail, keep reading.
In This Article
OnePlus Nord CE 3 Lite 5G launch offers
OnePlus Nord CE 3 Lite 5G first sale is scheduled to begin on April 11 in India at 12 noon via Amazon in the country. Just ahead of the sale, the company has announced introductory offers for buyers. Now the offer is, those who purchase the OnePlus Nord CE 3 Lite 5G will get a OnePlus Nord Buds CE worth Rs 2,299 for free. This offer can be availed via OnePlus.in and Amazon.in, OnePlus Experience Stores, authorised stores and select partner stores. Note that this offer is only available till stock lasts.
In addition to this buyers can also avail a discount of Rs 1000 on the OnePlus Nord Watch via OnePlus.in and OnePlus Store App between April 12 to April 15 and Rs 500 off from April 16 to April 30.
The Nord CE 3 Lite was launched in India at a starting price of Rs 19,999. While the 8GB RAM with 256GB RAM with 256GB storage option is priced at Rs 21,999. The device comes in two colour options of Pastel Lime and Chromatic Gray.
The Nord CE 3 Lite 5G is highlighted with a 6.72-inch full-HD+ LCD display with 1,080×2,400 pixels of resolution. The display has a dynamic refresh rate of 120Hz and 240Hz touch sample rate. In addition to this, it comes with a peak brightness of 680 nits, a 91.4 percent screen-to-body ratio, a 20:9 aspect ratio, and a 391ppi pixel density.
Moreover, the screen is protected with Corning Gorilla Glass Victus. The phone is powered by an octa-core Snapdragon 695 SoC and runs on OxygenOS 13.1 on top of Android 13. There is a triple rear camera setup that includes a 108-megapixel Samsung HM6 sensor with an f/1.75 aperture and EIS support. It also consists of a 2-megapixel macro lens and another 2-megapixel depth sensor. There is a 16-megapixel front-facing camera for selfies. In addition to this, the smartphone packs a 5,000mAh battery that supports 67W SuperVOOC fast charging.
Garena Free Fire is a battle royale game with regular awards and tournaments to keep players interested. If you play Garena Free Fire, you should be aware of the redeem codes that are released on a daily basis. However, because the battle royale game is banned in India, players from other countries can use the Free Fire Redeem codes daily. If you’re unfamiliar with the Garena Free Fire redeem codes or don’t know how to get them, we’ve put together a step-by-step guide to help you redeem them. Check out Garena Free Fire Redeem Codes for 8 April 2023.
The Free Fire redeem codes are a great way to get free stuff. These are 12-digit codes that contain alphabets and numbers, as well as an expiration date and time. Because the Garena FF redeem codes cannot be used more than once, you should hurry to the redemption page to claim your free reward before someone else does. To get a free reward, all you have to do is go to reward.ff.garena.com/en, which is the official redemption page. Also, keep an eye on this space for daily updates on Garena Free Fire redemption codes and rewards.
In This Article
Garena Free Fire Redeem Codes Today 8 April 2023
4ST1ZTBE2RP9
XFW4Z6Q882WY
GCNVA2PDRGRZ
8F3QZKNTLWBZ
E2F86ZREMK49
TDK4JWN6RD6
FFDBGQWPNHJX
WD2ATK3ZEA55
4TPQRDQJHVP4
HFNSJ6W74Z48
HHNAT6VKQ9R7
2FG94YCW9VMV
J3ZKQ57Z2P2P
B3G7A22TWDR7X
V44ZZ5YY7CBS
3IBBMSL7AK8G
X99TK56XDJ4X
How to Get Free Fire Redeem Codes for Garena on 8 April 2023?
8 April 2023 Amazon Quiz has gone live. Customers from different parts of the country are participating in the daily quiz. The quiz begins from 12 AM to 11:59 PM. Those participating in the quiz can win exciting prizes by answering all the questions correctly. Today participants have a chance to win a Rs 1,000 Amazon Pay Balance.
Amazon quiz brings an opportunity for its customers to win Amazon Pay Balance ranging from Rs 1,000 to Rs 50,000. The Quiz can be played from 12 AM to 11:59 PM. The e-commerce platform brings a fresh quiz on a daily basis which consists of five questions related to general knowledge and current affairs. The participants need to answer all the questions correctly and their names will be selected for a lucky draw. The winner will be announced at the end of the month.
One wrong answer could eliminate you from the quiz. If you manage to answer all the questions correctly you can stand a chance to win a Rs 1,000 Amazon Pay Balance today. Only app users are eligible to participate in the Quiz. Check Out 8 April 2023 Amazon Quiz Answers.
Question 1: As of November 7, 2022, whose Twitter bio reads ‘Twitter Complaint Hotline Operator’?
Answer: Elon Musk
Question 2: Who got the 2022 Sakharov Prize for Freedom of Thought from the European Parliament?
Answer: People of Ukraine
Question 3: What is the name of the resident cat of 10 Downing Street, the subject of much public scrutiny and affection?
Answer: Larry
Question 4: Which country is the largest contributor of carbon dioxide emission in the atmosphere?
Answer: China
Question 5: In 2017, this monarch reached which jubilee?
Answer: Sapphire
How To Play Amazon Quiz
Only app users are eligible to play the Amazon quiz every morning from 12 AM to 11:59 PM. The quiz is not available on the desktop. For those who are unaware of how to play the Amazon quiz below are the steps, you can follow to take the quiz.
Firstly download the Amazon app from Google Play Store or App Store
Now fill in the required information through the Sign Up option.
You need to log in to the Amazon app and scroll down on the home screen to find the Amazon Quiz banner.
Tap on the Amazon Quiz banner and tap on the Start button to start the Quiz.
Now you will get 5 questions and you need to answer them correctly. One wrong answer will eliminate you from the Quiz.
After answering all the questions correctly you are now eligible for a Lucky Draw.
The winner’s name will be announced today at 12 PM.
Google’s voice assistant offers a nifty feature called ‘call screening’, which lets the Assistant take calls on your behalf and ask the caller preset questions regarding their purpose of calling. This is a great way to deter spam callers who may drop the call upon hearing a prerecorded message. The only catch is that call screening is only available on Google Pixel phones in selected regions. If you don’t own a Pixel or aren’t in one of the countries where Google has rolled out call screening, there still is one alternative for you. Samsung Galaxy smartphones running One UI 5 offer the exact same feature on Bixby, Samsung’s native voice assistant. Here is how you can use Bixby to screen calls on your Samsung Galaxy smartphone.
Here’s how you can use Bixby to screen incoming calls on your phone
Step 1: Launch the native Phone app (not the Google dialer) on your Samsung Galaxy smartphone.
Step 2: Tap the ellipses (three dots) at the top right corner of the screen.
Step 3: Select Settings.
Step 4: Tap on Bixby text call.
Step 5: Turn the toggle bar on to enable Bixby text call.
Step 6: Tap on language and voice. Currently, Bixby only offers to screen your calls in Korean and English. More language options will be added soon. You can also download different voices for the assistant and select one you like.
Step 7: Go back to the previous window and select quick responses. This is where you can choose which messages you want your callers to be greeted with first. You can also add a custom response of your own. These messages will show up on your screen while Bixby is asking questions on your behalf. Long press a particular message and drag it to change its order on the screen. When you’re on call, you can tap on a message to make Bixby relay it to the caller.
Step 8: Now that you’ve set up Bixby text call, all you need to do is wait for someone to call you. Once you receive a call, tap on ‘Bixby text call’ to begin the screening.
Step 9: Bixby will ask the first question in the list mentioned above. You can type out a response of your own or select a preset response from the list. You can view the live transcript of the conversation on your screen. Once you’re satisfied with the screening, you can pick up the call.
Frequently Asked Questions
Can Bixby screen calls?
Samsung introduced the call screening feature with One UI 5. You can screen all calls on your number using Bixby text call.
Can Bixby screen incoming calls in English?
At first, Bixby text call was only available in the Korean language, but with the One 5.1 update, it offers English functionality as well. Bixby text call doesn’t let you screen calls in Hindi yet.
Can I use Google Assistant to screen calls on my smartphone?
Call screening using Google Assistant is not available in India yet. But you can use Samsung Bixby to carry out the same task.
This is how you can Bixby to screen calls on your Samsung Galaxy smartphone. Currently, this feature is only offered with One UI. Smartphones running the Core version of One UI may not have the option to screen calls using Bixby. You can use this feature to effectively weed out all spam calls without having to pick them up. It also filters out scam callers as they are likely to hang up as soon as they encounter a robotic voice on the other end.
Poco has announced another budget smartphone in the Indian market today. Poco C51 has been introduced under Rs 9,000. The device comes with MediaTek Helio G36 SoC with a 7GB Turbo RAM feature. The entry-level phone also includes a dual 8MP rear camera and a 5,000mAh battery. It also features a 6.52-inch HD+ display.
In This Article
Poco C51 price in India and sale details
Poco C51 has been launched in India with a price tag of Rs 8,499 for a single 4GB RAM with 64GB storage options. However, the device will be available at an introductory price of Rs 7,799 on the first sale of the date. The phone is scheduled to go on sale on April 10 via Flipkart in the country.
Poco C51 specifications
Poco C51 features a 6.52-inch HD+ display with 720×1,600 pixels of resolution having a waterdrop style notch. The screen supports a 120Hz touch sampling rate and 400 nits of brightness. In addition to this, the device is shipped with Android 13 Go Edition. Under the hood, there is an octa-core MediaTek Helio G36 SoC, paired with 4GB of RAM and 64GB of internal storage. There is a 7GB Turbo RAM feature which has the ability to run and switch between various apps more quickly. Whereas the internal storage can be expanded up to 1TB using a microSD card.
For taking photos and videos the Poco C51 comes with a dual rear camera setup consisting of an 8-megapixel primary sensor and a secondary depth sensor. The device also includes a 5-megapixel front-facing camera for taking selfies. The smartphone also offers a 1080p @ 30fps option to record videos.
In addition to this, there is a 5,000mAh battery on the phone which comes with 10W charging support. Poco C51 also includes a rear-mounted fingerprint sensor and an accelerometer. In terms of connectivity, there is 4G LTE, Wi-Fi, Bluetooth, GPS, Glonass, Beidou, a micro-USB port, and a headphone jack.
Commenting on the launch, Himanshu Tandon, Country Head, POCO India said, “POCO C-series smartphones have consistently outperformed in the market and managed to steal the show in an otherwise crowded segment. We received a tremendous response to the POCO C31 and have sold over 2 million units to date. Taking the legacy forward, the POCO C51 is here to #SlayAllDay with the newly released MediaTek Helio G36. We are excited to unleash a disruptor in town with the all-new POCO C51, making it a steal bargain for our fans and consumers.”
iQoo is celebrating its third anniversary in India with exciting discounts and offers on its smartphones for consumers in the coming weeks. It will bring the All Stars Cup on the iQOO Esports YouTube channel for a third season with a prize pool of INR 10,00,000. Moreover, 18 lucky community members will also have the chance to attend an exclusive International fan meet. Customers can benefit from discounts and deals on all iQOO Smartphones with the best price guarantee.
The gaming-focused company iQoo has announced some exciting offers and discounts for their fans for completing three years in India. iQoo has some wonderful surprises for the iQOO Fam/ community members on this occasion.
In This Article
iQOO All Stars Cup
The fans and community members will be able to support and witness top teams in India, including one team from the iQOO Community, compete to win the event. It is going to be a four-day event that will have already begun and will run till April 9. It will be aired on the iQOO ESPORTS official YouTube channel. The top three podium finishers and one best performer, known as the MVP, will each win Rs 10,00,000 as their award. This is the third season of the tournament and this time iQOO All Stars Cup will feature QOOL Questers, an all-exclusive iQOO Community team. Four iQOO Connect members who are passionate New State Mobile players make up the team.
iQoo International Fan Meet
iQoo International Fan Meet has also been announced by the company. This will come up with exciting contests along with giveaways on its official community forum – iQOO Connect for its fans. Along with additional giveaways the top 18 winners will receive a once-in-a-lifetime opportunity to participate in an international fan meet.
Exciting Offers
Customers can also benefit from the iQoo third anniversary discounts and offer on the top-selling smartphone in the coming weeks. The deals and offers will soon be made public on the Amazon India website.
Sharing the excitement of iQOO’s third-year anniversary, Nipun Marya, Chief Executive Officer – iQOO said, “When we commenced our journey three years back in India, we had a vision of providing the best of performance to our consumers. Keeping up with this quest of continuously providing meaningful and innovative products, offers and services, we are thrilled to announce all these exciting offers and opportunities to celebrate our three-year magical journey in India. This journey wouldn’t have been possible without our consumers as their support and love have made us the No 1 brand in customer satisfaction consecutively for two years. We shall continue to focus on innovating future-ready technology that cater to the evolving needs of Indian consumers”.
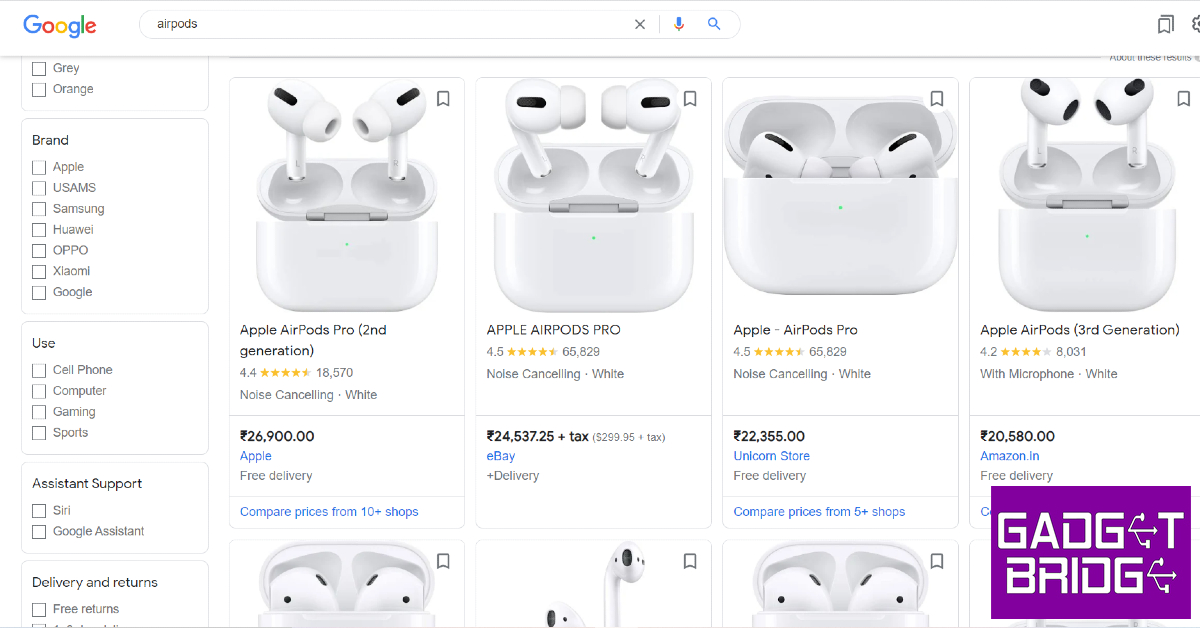
When you’re shopping online, it is recommended that you visit a bunch of sellers and marketplaces on the Internet to find the best deals. This can prove to be an arduous task when there are a lot of options to choose from. Luckily, Google makes it easy for you to compare prices and shop for a product in one place. While Google Shopping isn’t a marketplace in itself, it aggregates different sellers across marketplaces to bring you the best deals. In this article, we show you how to shop online and compare & track the prices of products using Google.
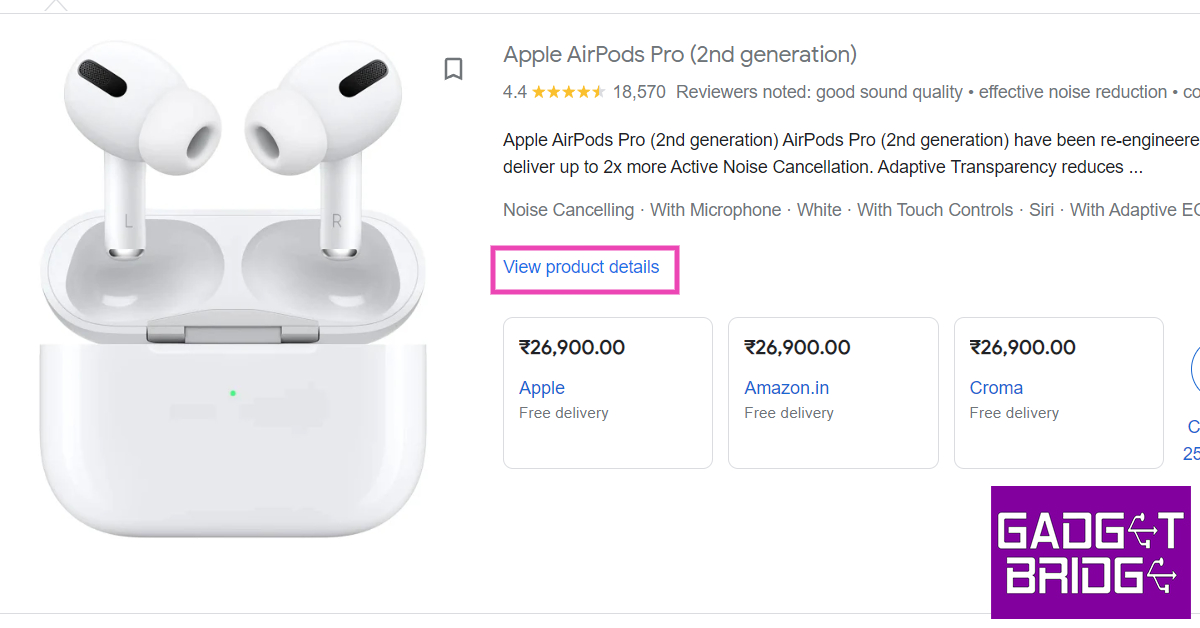
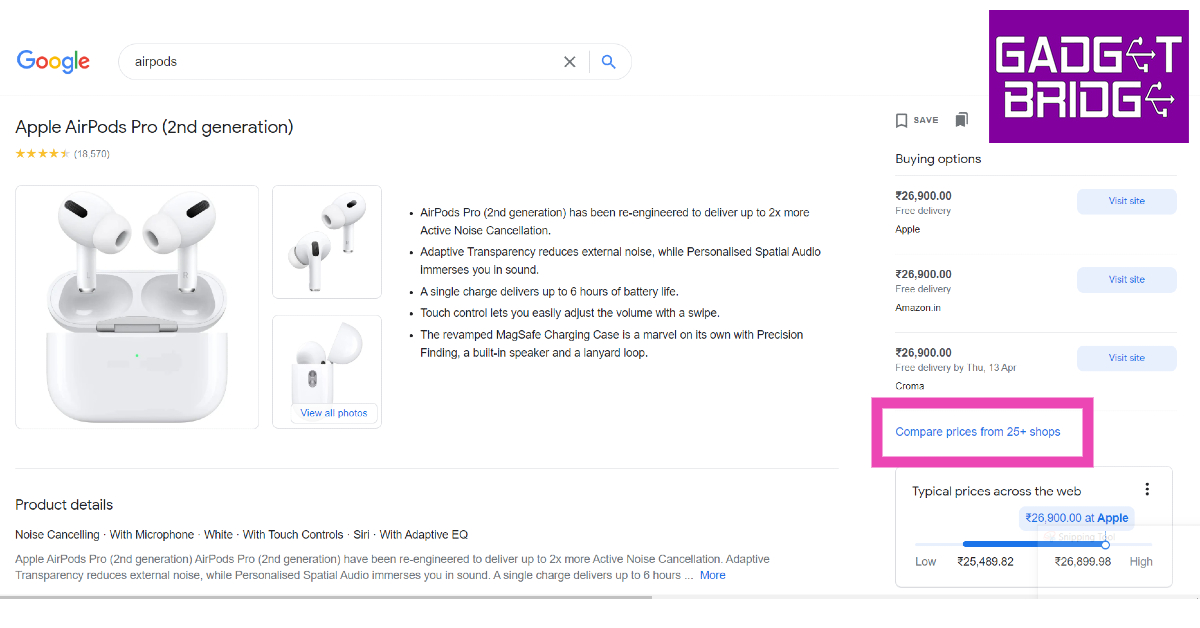
There are two ways you can compare product prices on Google. The simplest way to go about it is by performing a Google search for the product. Once the search results load on the page, you will see the different buying options under the ‘Popular Products’ or ‘Related Products’ section. To compare prices of the product simply go through the various listings in the product on the right. Click on ‘Compare prices’ to view the detailed list.
Another way you can compare prices for a product is by logging into Google Shopping. Once you’ve signed in using your Google Account, search for a product and click on the most relevant result. Click on ‘Compare prices’ to view the detailed list of prices for the product.
Step 2: Once you’ve entered the desired product, you will see buying options from sellers across the Internet. This includes sellers on major e-commerce platforms like Flipkart and Amazon as well as independent retailers.
Step 3: Click on the product and select ‘View product details’.
Step 4: Check the panel on the right to compare the product’s prices from different sellers and platforms. Click on ‘Visit site’ to view the product on the seller’s website.
How to track a product’s price using Google Chrome?
Make sure you are signed into Chrome and have ‘sync’ turned on. In addition to that, you need to turn on ‘Web and app activity’. Click on this link to turn it on. Now, follow these steps.
Step 1: Open the page of the product that you want to track.
Step 2: Click on the ‘track price’ icon in the address bar. Select ‘Done’ in the popup box to confirm your selection.
You will be notified whenever the price of the product gets slashed. To manage the products you’re tracking, click on bookmarks and select ‘Tracked Products’.
Here’s how you can track a product on your Android smartphone
Step 1: Launch Chrome on your smartphone and tap on the three dots in the top right corner of the screen. Go to Settings>Google Services and turn on the toggle bar for ‘Track prices on tabs’.
Step 2: Now, go to the product page and tap on the three dots again. Select ‘Track price’.
You will be notified whenever the seller reduces the price of the product.
Frequently Asked Questions
What is Google Shopping?
Google Shopping is a link aggregator that makes it easy to compare product prices across the Internet.
Is Google Shopping free?
Yes, Google Shopping is free to use for buyers as well as sellers. You can put up the product you’re selling on Google Search Index for it to show up on Google Shopping. The only time you will need to pay is when you are advertising your product.
Why use Google Shopping?
Google Shopping makes it easy for the buyer to compare all the prices of a product across different sellers in one place.
This is how you can shop online and compare & track the prices of products using Google. To get the most out of Google Shopping, make sure you login using your Google Account. Once you are logged in, you will be able to save products on your profile and track their price over a period of time.
Popular Indian audio and wearable brand Noise has strengthened its smartwatch portfolio with the launch of a new product. In partnership with HRX, the company has launched Noise HRX Sprint. The device has a square dial and offers features like BT calling and QR code storage for easy transactions. It is ideal for college-goers and young professionals. The smartwatch also comes equipped with an AI voice assistant.
In This Article
Noise HRX Sprint price in India and sale details
Noise HRX Sprint smartwatch comes with a price tag of Rs 1,999. The smartwatch comes in five colour options of: Jet Black, Active Black, Active Blue, Active Grey and Vintage Brown. The original price of the product is 6,999 however it is available at Rs 2,199 on Amazon, Rs 1,999 on both Myntra and the company’s official website in the country.
Noise HRX Sprint specifications
The all-new Noise HRX Sprint comes with a 1.91-inch square TFT display with 240×296 pixels of resolution. The always-on display offers 550 nits of brightness. The device offers over 150 cloud-based watch faces and is IP67 rated for water and dust resistance. In addition to this, the tracker also comes equipped with smart features that allow users to save QR codes for easy transactions and an AI voice assistant for a hands-free experience. Noise HRX Sprint includes more than 100 sports modes to track daily activity and comes with an Inbuilt Games. It has the ability to access recent call logs, it can store up to 10 contacts through Noise Buzz, making interaction with the device extremely interactive and hassle-free.
Apart from this, the Noise smartwatch has an updated Noise Health Suite that uses a heart rate monitor, a SpO2 tracker, a sleep monitor, a stress measurement technique, and breathing practices. It also sends daily reminders and weather forecasts to users using the inbuilt Productivity Suite. Moreover, there is an Alarm clock, Timer, World Clock and an inbuilt stopwatch.
Commenting on the launch, Amit Khatri, Co-Founder, Noise, said, “As today’s youth are becoming more health conscious, smartwatches are becoming an essential part of their daily lifestyle. This has led to an increase in amalgamation of innovation and style when it comes to smart wearables. Here is where our series with HRX comes into play. At Noise, we understand that consumers are always on the lookout for a device which becomes their reliable companion and with this endeavour we are certain that Noise HRX Sprint will become yet another go-to choice for our customers.”
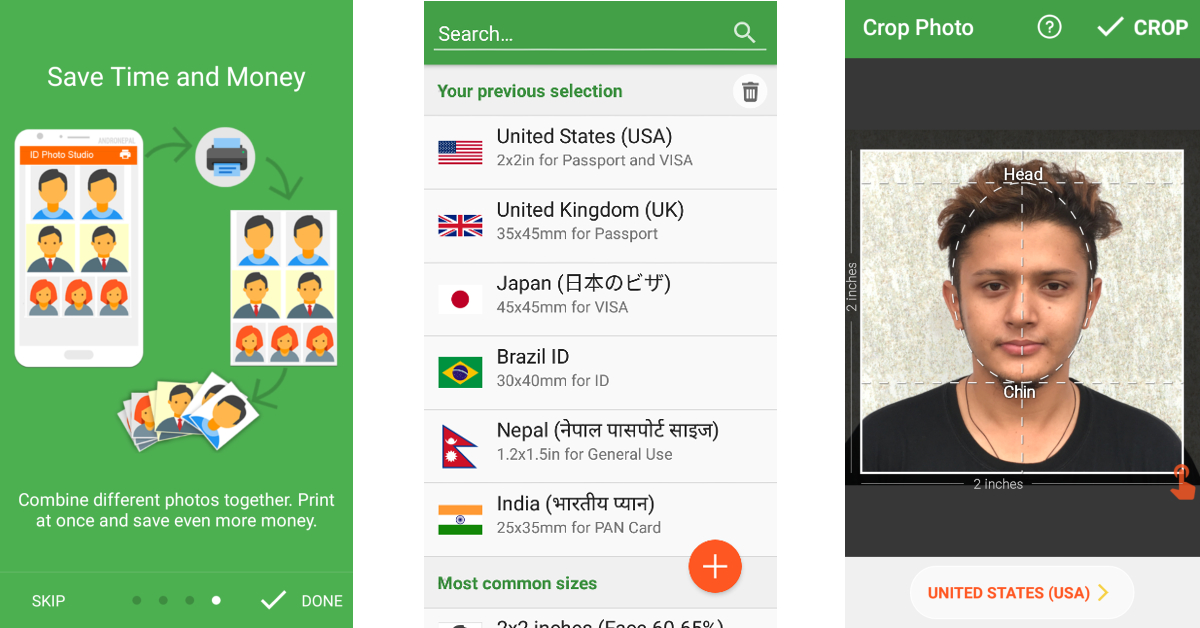
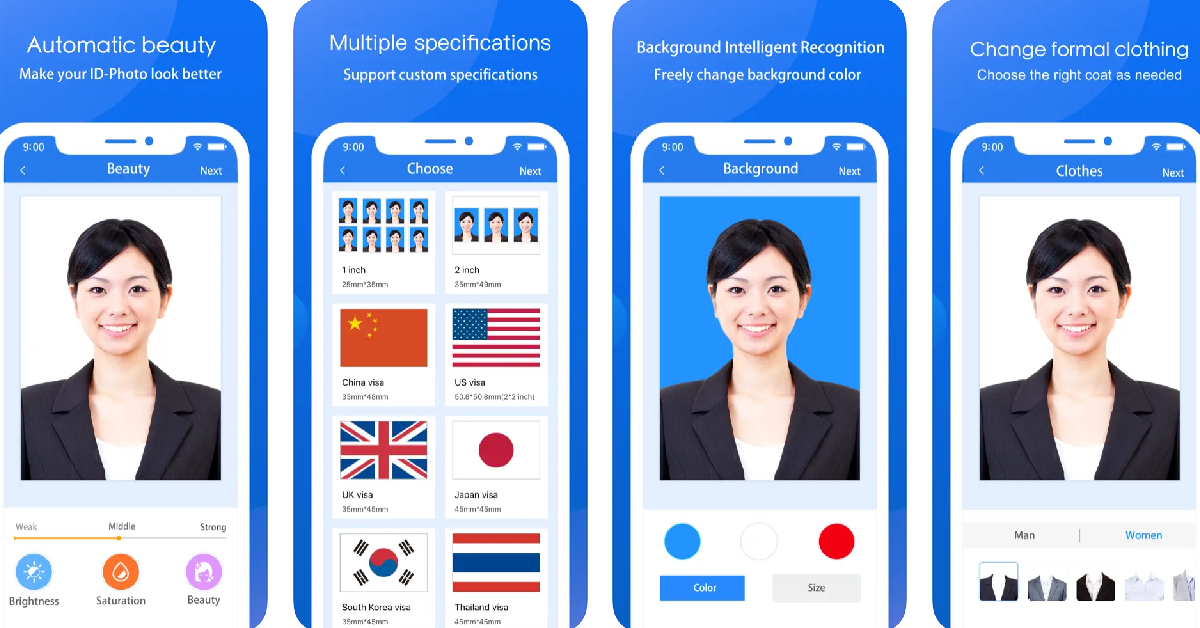
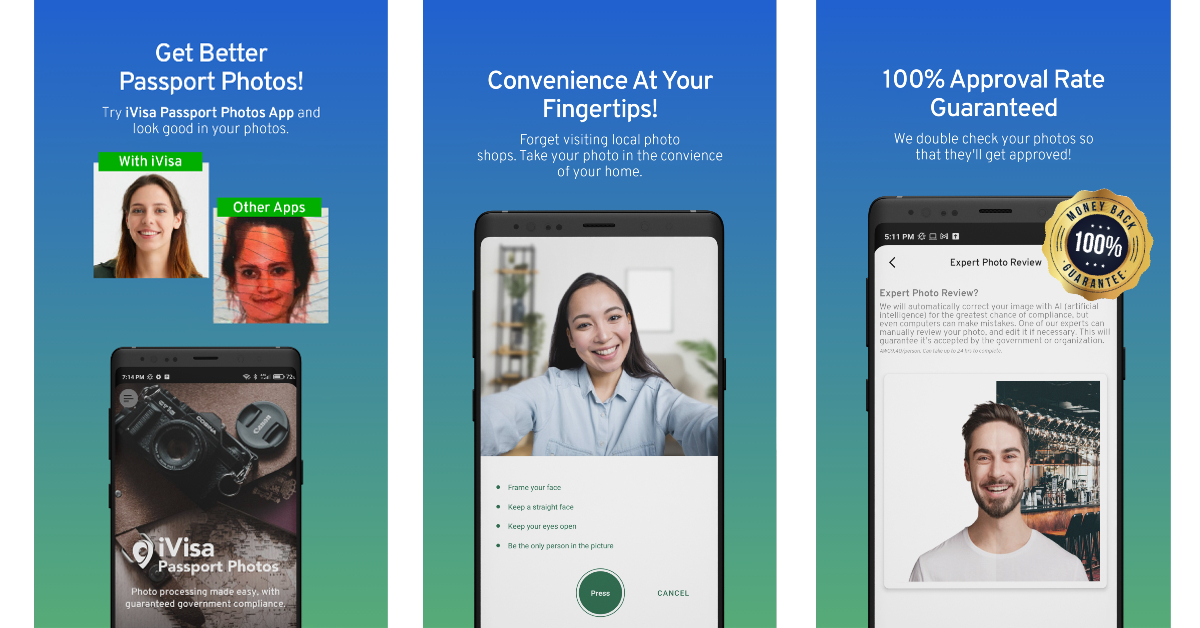
One of the most challenging tasks while filling up an online form is the processing of uploading a scanned copy of your passport-sized photo. It can get trickier if you don’t have a physical copy on hand. In this scenario, using your phone to scan a physical image is out of the question. Luckily, you’re not all out of options. There are a ton of apps that will help you take a passport-sized picture or edit an existing image in your gallery to meet the required size. So, without further ado, here are the top 11 passport photo apps for Android and iOS for easy printing.
ID Photo Application is one of the most popular passport photo editing apps on Android. There’s an iOS version of the app as well, although it is not as popular. This app is perfect for turning your pictures taken using your smartphone to passport size (4×6) while retaining all the important details. The app allows you to carry out basic editing tasks like removing spots and blemishes from your face before finalising the photo. You can also customise the size of the picture to match the requirements of the frame in your application. Once you are done editing the image, you can easily print out several copies on a single sheet of paper using your home printer.
This passport photo app has a ton of preset frame sizes for different IDs and applications. You can find the frame for your passport, visa, PAN card, and more. You can even create a custom size for the frame to match your needs. Apart from resizing the image to passport size, this app removes the background for you and even gives you the option to add professional suits to the image. You also get basic editing features like adjusting contrast, tilt, white balance, and more. You can use this app to print out several copies of your passport photo on a single piece of paper.
The Passport Photo app for iOS has integrated passport and visa sizes for every country in the world. While the basic features of this app are free, premium tools like automatic background remover and ink saver are locked behind a paywall. Once you have edited the size of your image, you can set the layout for an A4 size sheet and print it out at home or from a professional service.
This app recreates the photo lab experience at your home. The one significant advantage is that, unlike a photo lab, you can use this app to take as many shots as you want until you settle on the one you like the most. The app is equipped with instructions to help you take the perfect picture for your passport or ID. Once you’ve taken a picture, you can carry out basic edits within the app itself.
The Passport Photo & ID Maker comes with passport and visa sizes for over 130 countries. Using this app you can create pictures for passports, visas, green cards, driving licenses, and other IDs. You can even customise the size of the image if you can’t one you like in the presets. You can take a picture within the app or upload one from your phone’s gallery. The app recognises your facial features and crops the image accordingly. You can use basic editing tools within the app to change the contrast, brightness, saturation, and white balance of the image.
If you’re looking for a simple passport photo editing app that offers all the basic features in a very accessible manner, go for Passport Photo – ID Photo. This app is available on Android as well as iOS. This app has a ton of templates to resize your images to meet different formats. Laying out multiple copies of your image on a single sheet of paper is an easy task using this app. You can either print the pictures at home or save the file and send it to a photo lab to take out professional-grade prints.
If you want to take a passport photo at home but want to get it printed out by a professional photo lab, you can do so within a single app. The Official Passport photo app by Smartphone iD lets you take images at home and gives you the option to resize them to meet the requirements of your document. Once that is out of the way, you can order prints of the photo from the app itself. You can even track the status of your order from within the app. Concerned about your privacy? This app works in line with the GDPR policy.
Apart from resizing your images to meet the required criteria, the Vivid ID app also offers a bunch of AI-powered tools to enhance your image. Using these tools you can change the background of the image, and even try out different professional suit filters for different genders that look very close to real. You can either take a picture within the app or upload one from your phone’s gallery. The Vivid ID app automatically edits the image and resizes it to put your face and upper body in focus.
With over 10 million downloads on Google Play Store alone, Passport Photo Maker is one of the most popular passport photo apps around. What makes this app a fan favourite is its phenomenal range of editing tools. You can juxtapose several copies of a passport photo on an A4 size sheet of paper and save it to get it printed out later. This app is also capable of creating official photo sizes for IDs, passports, and VISA of different counties like Brazil, Spain, India, USA, and more.
The ID Photo app lets you edit the passport-size photo to make it look more brightened and legible. You can also choose to edit the background and your clothes. This app can be used to edit photos for passports, IDs, VISA, green cards, naturalisation certificates, school documents, corporate identification, firearms permits, and more. It has dimensional presets for multiple countries, so you don’t have to look up the size of the photo for the VISA of the country you are about to visit.
The Passport and VISA photos app simplifies the process of taking a passport-sized photo at home. This app guides you through the process of taking the perfect passport-sized picture. Once you’ve shot an image, the app will review whether it fits the perfect dimensions for the official document. It also offers to deliver printed photos directly to your doorstep.
These are the top 11 Passport photo apps for Android and iOS for easy printing. All apps mentioned in this list give you the option to print out photos at home. For more professional results, save the image on your phone and get them printed at a photo studio. Some apps like Passport Photo Booth Creator and Official Passport Photo offer their own printing services and ship you the printed photos at an affordable price.
Voice assistants are getting scary good with every passing year. Google Assistant has been ahead of the curve for quite some time now, being preferred by almost half a billion people. Even with new players like Samsung’s Bixby arriving on the scene, Google Assistant remains the leader of the pack. In this article, we bring you the top tips and tricks to use Google Assistant like a pro.
To get started, you need to turn on Google Assistant on your smartphone. Go to Google app>Settings>Google Assistant>Hey Google & Voice Match, and turn on the toggle bar for Hey Google. Now, you will be able to trigger Google Assistant simply by saying ‘Hey Google’.
One of the better parts of using Google Assistant is that it’s purely voice controlled and you do not need to scroll on your device to do a particular task. To make full use of this functionality, make sure you have activated Assistant responses on the lock screen. Train Google Assistant to recognise your voice using Voice Match. This will ensure that the voice assistant only responds to you when your phone is locked.
Set your preferred news sources
If you rely on Google for news, you can ask Google Assistant to read you the headlines of the day. You can even customise the assistant to read you the news from your preferred sources. Simply go to Google Assistant>You>News and set up your preferred sources. Say ‘Hey Google play the news’ to have the assistant read the news to you at any given time.
Set up a routine
Google Assistant can help you with certain tasks using the ‘routines’ trick. For example, upon waking up, Google Assistant can tell you about the weather, read out the schedule for the day from your calendar, remind you of the tasks for the day and any upcoming birthdays, and even tell you if your battery is low so you can plug it in to charge before leaving the house. To set up a routine, go to Google Assistant>Routines and customise any routine you like. You can also set up a new routine for yourself.
Set up a reminder
With your smartphone always by your side, setting up reminders is easier than ever. All you need to do is say ‘Hey Google set a reminder for…’ followed by the reminder. You can use this function to set reminders for basically anything. Didn’t get to charge your phone before you left the house? Tell Google Assistant to remind you to plug in your phone to charge after 30 minutes. You can even set reminders for birthdays, anniversaries, and more.
Manage smart gadgets with Google Assistant
If you use any smart gadgets or appliances around the house, you can easily control them with your voice using Google Assistant. First, you need to install Google Home on your device and link your gadget with it. Once that is done, you can use voice commands to manage the device. For example, if you use a smart bulb for your room, you can use Google Assistant tricks to turn it on, change the colour temperature or intensity, and even set it to turn off at a specific time.
Create a shopping list
Of all the assistant functions mentioned in the list, this is the easiest one to incorporate into your daily routine. If you are always forgetting to add stuff to your shopping list, now you can easily update just by speaking into your phone. To start, say ‘Hey Google create a shopping list’. You can edit the list title and easily add entries to it. You can ask the Assistant to pin this list to your home screen as well.
Enable continued conversation
If you’re using Google Assistant for a task like creating a shopping list, you probably don’t want to say ‘Hey Google’ before making each entry. To skip this, go to Google Assistant settings and select Continued Conversation.
Check your flight reservation
Google Assistant can access your Gmail inbox to look through any flight reservations. By asking Google Assistant for any upcoming flights, you can have it read out the flight info from the ticket in your Gmail inbox.
Get Google Assistant to screen your calls
Call screening is one of Google Assistant’s newest features and possibly the most helpful one too. Currently, only Pixel phones have this feature and it has been made available in selected regions across the globe. Some Android phones in North America have been given early access to call screening as well. Google plans on rolling out this feature across all Android smartphones in a phased manner.
So, what does call screening do? Using call screening, Google Assistant can take your calls for you, screen them, and answer them on your behalf. You can set up responses for Google Assistant to read out to the caller. The caller’s responses will be shown as a transcript on the screen. Call screening can help you filter a lot of spam calls from annoying telemarketers and other sources.
To enable Automatic call screening on Google Assistant, open the Phone app and go to Settings>Spam and Call Screen. Select ‘Automatically screen’. To do this manually, simply tap on ‘Screen Call’ every time your phone rings. You can also choose to record what the caller says while interacting with Google Assistant.
These are the top tips and tricks to use Google Assistant like a pro. As you can probably tell by now, the possibilities with Google Assistant are endless. You can use it to play trivia, flip a coin, take a selfie, play music, translate a phrase, or do any other task (within fair limits) that you can think of!
Audio accessories maker JBL has announced its audio device in the headphones line-up named JBL Tour ONE M2. These are over-ear headsets featuring true adaptive noise cancelling with customizable ANC (Active Noise Cancellation) and ambient sound. The wearable device offers low-volume dynamic EQ and features 40mm dynamic drivers. In addition to this, the JBL headphone comes with JBL Spatial sound and up to 50 hours of total playback.
In This Article
JBL Tour ONE M2 price in India and availability
The JBL Tour ONE M2 headphones have been launched at an introductory price of Rs 24,999. This pricing is available for a limited time period and after this, you can purchase it at Rs 34,999. It comes in a single black colour option and can be purchased via all major retailers and also on www.JBL.com.
JBL Tour ONE M2 specs and features
JBL Tour ONE M2 features a high-res audio with 40mm dynamic drivers tuned by legendary JBL PRO sound. The device comes with a hybrid True Adaptive ANC with JBL Pro-tuned drivers. According to the company, the True Adaptive ANC technology automatically adjusts to the surroundings in real-time, eliminating distractions and maximizing the whole listening experience. There is an advanced built-in voice recognition that reacts to the user’s voice, pauses music and enables Ambient Aware. The music and True Adaptive ANC automatically resume once the conversation is over. With Smart Ambient tech the headset controls the environmental sound levels and turns the personal sound amplification button on through the JBL headphone app. This helps in boosting conversation volume with +15-20dB and adjusting the L/R balance. Whereas with the smart talk feature, you do not need to pause the music to have a quick conversation
The JBL headphones have a 4-mic crystal call algorithm for better sound and call quality even in loud windy environments. With the VoiceAware feature, users can select how much of their own voice to hear by controlling the amount of mic input routed back into the headphones. There is Spatial sound support as well that gives you a theatre-like sound experience.
The JBL Tour ONE M2 is said to provide up to 50 hours of playtime and 30 hours of battery life with ANC turned on. It does come with fast charging. Just 10 mins of charging provide 5 hours of music playback.
Vikram Kher, Vice President, Lifestyle, HARMAN India said, “We’re thrilled to introduce the JBL Tour ONE M2 headphones, the ultimate listening experience for music lovers and audiophiles alike. Over 76 years of our audio supremacy, has led us to create products like Tour ONE M2 with advanced noise-cancellation technology, pristine sound quality, and comfortable design. One can experience unparalleled sound and a seamless listening experience whether you’re at home or on the go.”


")