Hello, Instagram users. Have you noticed a visible improvement in the app’s presentation and a new visual refresh? Yes, the Meta-owned photo-sharing app has made small modifications to its logo, including a refreshed visual identity and new life and purpose for other brand elements. Apart from this Meta has also expanded 3D Avatars to Stories and DMs in India. Continue reading to know more.Instagram via blog post announced, “Today, we’re bringing new energy and purpose to our colours, typeface, logo and other brand elements with a refreshed visual identity. Our new system is designed to embrace continued evolution to help us create more immersive and inclusive experiences for our community.”The vibrant gradient on Instagram was reimagined using an innovative 3D modelling process to make it feel lit up and alive. The entire colour system is built around the Instagram gradient, which is made up of our brand colours.The gradient in marketing, logos, and even in-app, as seen in Create mode, stickers, and Instagram Story rings, signals moments of discovery through illumination.Meta has also introduced a new typeface called Instagram Sans which is inspired by the platform’s history. “From billboards to websites, our new typeface highlights our distinct identity,” the company noted.Instagram Sans helps it showcase a distinct identity across surfaces, from our marketing campaigns to our websites. Instagram Sans is a new way for the global Instagram community to express themselves in places like Stories and Reels. To make Instagram Sans universally accessible it collaborated with language experts all over the world to adapt the typeface to international scripts such as Arabic, Thai, and Japanese.Instagram is also announcing a brand new layout and design system that prioritises content and emphasises simplicity and self-expression. The new Instagram marketing layouts feature full-screen imagery, refer to the in-app experience, and celebrate the everyday creativity we see from our community.Separately in India Meta introduced 3D avatars to Instagram stories and direct messages (DMs). Moreover, the company has also released new avatars for Facebook and Messenger that can be customised. Users can customise their virtual version by selecting facial features, body types, clothing styles, and more using the 3D virtual avatar. In addition to this Avatars can be used for a variety of purposes, including stickers, feed posts, and Facebook profile pictures. Avatars have also been updated to more closely resemble users’ facial features and appearance. Certain facial shapes and skin shaders have been tweaked.Cochlear implants and coloured over-the-ear hearing aids are among them. It also includes wheelchairs, which will appear in Facebook stickers, Messenger chats, and Instagram DMs.
For the latest gadget and tech news, and gadget reviews, follow us on Twitter, Facebook and Instagram. For newest tech & gadget videos subscribe to our YouTube Channel. You can also stay up to date using the Gadget Bridge Android App. You can find the latest car and bike news here.
Garena Free Fire is a battle royale game with regular awards and tournaments to keep players interested. If you play Garena Free Fire, you should be aware of the redeem codes that are released on a daily basis. However, because the battle royale game is banned in India, players from other countries can use the Free Fire Redeem codes daily. If you’re unfamiliar with the Garena Free Fire redeem codes or don’t know how to get them, we’ve put together a step-by-step guide to help you redeem them. Check out Garena Free Fire Redeem Codes for May 25.The Free Fire redeem codes are a great way to get free stuff. These are 12-digit codes that contain alphabets and numbers, as well as an expiration date and time. Because the Garena FF redeem codes cannot be used more than once, you should hurry to the redemption page to claim your free reward before someone else does. To get a free reward, all you have to do is go to reward.ff.garena.com/en, which is the official redemption page. Also, keep an eye on this space for daily updates on Garena Free Fire redemption codes and rewards.
In This Article
Garena Free Fire Redeem Codes Today 25 May 2022
FFCO 8BS5 JW2D
FFAC 2YXE 6RF2
FF10 GCGX RNHY
FF10 617K GUF9
FF11 HHGC GK3B
FFIC JGW9 NKYT
FF11 64XN JZ2V
FF11 WFNP P956
FF11 9MB3 PFA5
FF11 NJN5 YS3E
FFIC JGW9 NKYT
FF9M J31C XKRG
How to Get Free Fire Redeem Codes for Garena on May 25?
In support of the global LGBTQ+ community and the equality movement, Apple has announced the launch of two new Pride Edition bands with dynamic Pride watch faces in June. The Pride Edition Sport Loop features a colour gradient and the word “pride” woven directly into the band this year. Additionally, Apple is also releasing a new shot on iPhone pride campaign on Instagram, which captures the essence of LGBTQ+ artists and figures around the world.
In This Article
Pride Edition Sport Loop
Pride Edition Sport Loop’s unique design is said to be inspired by members and allies of Apple’s LGBTQ+ creative community. Apple used a new technique to remove several of the double-layer nylon-woven textile loops on the band, revealing the word “pride” in a cursive style inspired by the original “hello” greeting — displayed on the first Macintosh in 1984 — giving the word a novel, three-dimensional look and feel.The team created a colour gradient that combines the original rainbow colours with those from different pride flags, such as light blue, pink, and white, which represent transgender and gender-nonconforming people, and black and brown, which represent Black and Latinx communities. The colours also represent those who are living with HIV/AIDS or have died from the disease.Also Read:iPhone SE 2022 Review: A good mix of old and new
Pride Threads Watch Face
This new watch face, which was inspired by multiple pride flags, combines coloUrs to represent the LGBTQ+ movement’s strength and mutual support. Each strand of colourful thread contributes to the overall composition of the watch face, mirroring the woven loops of the Sport Loop. As the user rotates the Digital Crown® on Apple Watch, taps the display, or raises his or her wrist, the colourful threads move. Customers will be able to access the new matching watch face using the new App Clip functionality included in the band packaging.Textile loops were removed using a new technique to reveal the word “pride” written in cursive on the band, giving it a three-dimensional look and feel.A new Pride Edition Nike Sport Loop celebrates the rainbow’s full spectrum and includes a rainbow-coloured Nike Bounce face to go with the new band. The Sport Loop honours individuals who are expanding sport for future generations and inspiring others to feel the joy of being authentically themselves, in addition to Nike’s Be True collection. Be True is part of Nike’s larger LGBTQ+ commitment, which includes recognition, advocacy, inspiration, and education.The Nike Sport Loop for Apple Watch Pride Edition features black stripes, which are a design theme in Nike’s Be True campaign, which promotes LGBTQ+ equality in sports.
A New Shot on iPhone Pride Campaign
The Shot on iPhone pride campaign will feature imagery from an illustrious group of intersectional creatives, celebrating present-day queer pioneers in places of historic significance to the LGBTQ+ movement, from Harvey Milk Plaza in San Francisco to Paulista Avenue in So Paulo. The series, which will debut on Instagram soon, will include photographs by Ryan McGinley at Stonewall Inn in New York, Evan Benally Atwood at Window Rock in Arizona, Meinke Klein at The Homomonument in Amsterdam, Caia Ramalho at Paulista Avenue in So Paulo, Lydia Metral at Plaza de Chueca in Madrid, and Collier Schorr at Harvey Milk Plaza in San Francisco, all of which feature Baobei.
Availability
Rs 3,900 gets you the Pride Edition Sport Loop and the Pride Edition Nike Sport Loop. Beginning May 26, the new Pride Edition bands will be available for purchase at Apple Store locations and on apple.com and in the Apple Store app. Nike.com will soon carry the Pride Edition Nike Sport Loop. The new Pride watch face is available now for Apple Watch Series 4 and later running watchOS 8.6, as well as iPhone 6s and later running iOS 15.5. The Pride Edition Nike Sport Loop and the Pride Edition Sport Loop are both Apple Watch compatible.
For the latest gadget and tech news, and gadget reviews, follow us on Twitter, Facebook and Instagram. For newest tech & gadget videos subscribe to our YouTube Channel. You can also stay up to date using the Gadget Bridge Android App. You can find the latest car and bike news here.
No matter how much a company promises the degree of water resistance of their smartphones, there always remains the fear of losing your device to water damage. Fortunately, Apple realizes that and provides its customers with a way out of such a situation. It provides the Water Eject Siri Shortcut, which ejects water from the speaker grille of your iPhone by playing a low-frequency sound. The low-frequency sound makes the speakers of your iPhone vibrate, which in turn pushes the water out. Below are the steps provided on how to eject water from your iPhone using Siri in 2022. Although most of the iPhone models are water-resistant, there still remains the risk of water seeping into the smartphone’s internal system and causing damage. Hence, the Water Eject Shortcut is a great way to eradicate any amount of moisture from your iPhone. However, this shortcut is not available as a built-in feature and has to be added to your iPhone manually.Read also: How To Hard Reset iPhone 13 (2022)? A Quick And Easy Stepwise GuideStep 1: To get the Water Eject shortcut for your iPhone, open icloud.com/shortcuts/watereject and click on the Get Shortcut button at the bottom of the page. The Water Eject shortcut will get added to your Shortcuts library.Step 2: Go to the Shortcuts library and tap on the Water Eject shortcut. Step 3: Tap on the Begin Water Ejection button. That’s it!You will hear a low-frequency sound being played by Siri to eject the water from your iPhone. The water comes out from the speaker grille and after the process is complete, the device’s volume is turned down to 50%. You will also receive a notification from the system stating the completion of the process. Read also: How To Recover Deleted Photos From iPhone (2022)? Best 4 WaysYou can add the shortcut to your home screen to use it directly from there, whenever the need arises. You can also straightaway give a voice command to Siri, asking her to run Water Eject. In this way, you can easily eject water from your iPhone. This feature is compatible not only with iPhones but iPads as well. The only catch is that your phone has to be water-resistant for it to work. If you know of any other way how to eject water from an iPhone in 2022, we would be delighted to hear it. Do let us know in the comments section below. For the latest gadget and tech news, and gadget reviews, follow us on Twitter, Facebook and Instagram. For newest tech & gadget videos subscribe to our YouTube Channel. You can also stay up to date using the Gadget Bridge Android App. You can find the latestcar and bike news here.
25 May 2022 Amazon Quiz has gone live on its platform. The quiz timings are 12 AM to 11:59 PM. The Amazon App users can participate in the quiz daily and all they have to do is submit correct answers to the questions asked on the e-commerce platform. Today’s participants can get a chance to win Rs 25,000 Amazon Pay Balance.Amazon brings a fresh questionnaire that contains 5 questions daily. These questions are based on current affairs and general knowledge. The quiz can be played from 8 AM to 11:59 PM and the contestants need to answer correctly to enter into a lucky draw.Only one person is declared as a winner and the results will be announced at the end of every month. And to make sure that you give correct answers to all the 5 questions Gadget Bridge everyday updates all the answers to the Amazon Quiz. Do check out 30 April 2022 Amazon Quiz Answers to win a Rs 25,000 Amazon pay Balance.Amazon Quiz Today Prize – Rs 25,000 Amazon Pay BalanceQuiz Date – 25 May 2022Daily Timing – 12 AM to 11:59 PMWinner Announcement – Today 12 PM
In This Article
Amazon Quiz Answers Today 25 May 2022
Question 1: PVR Ltd launched its movie non-fungible token (NFT) ahead of the release of which of these movies?Answer: RRRQuestion 2: In 2022, who became the first cricketer to score a triple century on debut in a first-class match?Answer: Sakibul GaniQuestion 3: Which Indian company joined the SEA-ME-WE-6 undersea cable consortium?Answer: AirtelQuestion 4: What did this company used to initially manufacture?Answer: Plane EnginesQuestion 5: The flag of which country has been shown in this visual?Answer: Romania
How To Play Amazon Quiz
Only app users are eligible to play the Amazon quiz every morning from 12 AM to 11:59 PM. The quiz is not available on the desktop. For those who are unaware of how to play the Amazon quiz below are the steps, you can follow to take the quiz.
Firstly download the Amazon app from Google Play Store or App Store
Now fill in the required information through the Sign Up option.
You need to log in to the Amazon app and scroll down on the home screen to find the Amazon Quiz banner.
Tap on the Amazon Quiz banner and tap on the Start button to start the Quiz.
Now you will get 5 questions and you need to answer them correctly. One wrong answer will eliminate you from the Quiz.
After answering all the questions correctly you are now eligible for a Lucky Draw.
The winner’s name will be announced today at 12 PM.
The point is pretty straightforward. Walking up to the nearest cyber cafe every time you need to get a printout or a document scanned is not feasible. Moreover, printers come at easily affordable rates these days. Needless to say, working from home has globally become the new normal after the Covid-19 pandemic. And working from home automatically implies printing from home, whether you are a student, a freelancer, or a corporate professional. In fact, scanning and printing needs arise even if you’re not working from home. Hence, we bring to you the top 5 printers under Rs 5000 for home usage, that scan and produce coloured prints. So why not pick one for yourself and do away with all the scanning and printing hassles once and for all?
In This Article
HP DeskJet 2331
The first one on our list of the top 5 printers under Rs 5000 for scanning and colour printing is the HP DeskJet 2331 model. It is the highest-rated bestselling printer on Amazon under Rs 5k, which offers coloured printing, scanning, and copying services. It uses the HP thermal inkjet technology for printing. It supports high-speed printing for home use and is perfect for professionals and students who are working from home. It prints with up to 7.5ppm (ISO) in black and up to 5.5ppm (ISO) in colour. The page sizes supported by it include A4, B5, A6, and DL envelopes. It is priced at Rs 4,099. Buy from hereRead also: Cheapest Wireless Colour Laser Printers in India (2022)
Canon PIXMA MG2577S
The next colour printer scanner on our list is from Canon. The Canon PIXMA MG2577S is a compact all-in-one low-cost printer and is the second-highest rated on Amazon. It is an inkjet printer that offers coloured printing, scanning, and copying services. The printer allows you to select the resolution from a range of 25 to 19,200dpi. It supports USB connectivity and is compatible with PCs with OS Windows XP, Windows Vista, and above. It is also compatible with Mac OS X v10.6.8. The page sizes supported on it are A4, A5, B5, LTR, LGL, 4 x 6 inches, 5 x 7 inches, envelopes (DL, COM10), and more. It is ideal for occasional home printing needs, where the requirement is less than 50 pages per month. It is priced at Rs 3,149.Buy from here
HP DeskJet 2332
The HP DeskJet 2332 coloured printer cum scanner is compact in size and can also be used for your copying needs. This one also is a thermal inkjet printer from HP. It has high-speed USB 2.0 connectivity and can print with up to 7.5ppm in black and up to 5.5ppm in colour. The page sizes supported on it include A4, B5, A6, and DL envelope size while its paper tray holding capacity is 60 sheets for the input tray and 25 for the output tray. It is compatible with Windows 10 and above and is ideal for home use. It is priced at Rs 3,799. Buy from hereRead also: HP Deskjet Ink Advantage Ultra 4826 AIO review: Modern printer, good for home and basic office use
Canon PIXMA MG3070S
The next best printer under Rs 5000 on our list, that scans and produces colour prints, is Canon’s PIXMA MG3070S model. It is an inkjet printer with print, scan, and copy functions and is able to produce coloured printouts. This one also supports Wi-Fi along with USB connectivity. It is compatible with Windows Vista and upward models and Mac OS X v10.8.5 and upward models. It prints up to 4 pages per minute in colour and 8 pages per minute in black-and-white. The page sizes supported on it are A4, A5, B5, letters, legal, envelope sizes, and more. It is ideal for home usage, for printing about 50 to 100 pages per month. It is priced at Rs 4,699. Buy from here
Canon PIXMA TS3370S
Finally comes Canon’s PIXMA TS3370S model on our list. It is also a multi-function wireless inkjet printer offering coloured printing, scanning, and copying services to its users. It supports, Wi-Fi, Wi-Fi Direct, and USB connectivity along with AirPrint, Windows 10 mobile, Mopria as well as Google Cloud Print. It is compatible with Windows 7 SP1 and above, Mac OS v10.12 and above, and Mac OS X v10.11.6. It has a 3.8cm mono-LCD display and prints at the rate of 7.7ppm in black and 4ppm in colour. It is perfect for your home printing requirements where the need is less than 50 pages per month. It is priced at Rs 4,449. Buy from hereSo those were our top picks for the 5 best printers that scan and colour print under Rs 5000 for home use. You can pick any one of them for your scanning or printing needs, and you will not feel unhappy. We will soon be out with another list of affordable printers for professionals and advanced users, so stay tuned. For the latest gadget and tech news, and gadget reviews, follow us on Twitter, Facebook and Instagram. For newest tech & gadget videos subscribe to our YouTube Channel. You can also stay up to date using the Gadget Bridge Android App. You can find the latestcar and bike news here.
Canon has announced the release of the EOS R7 and EOS R10, the first cameras in its EOS R mirrorless system to feature APS-C image sensors. The 32.5-megapixel Canon EOS R7 features In-Body Image Stabilisation (In-Body IS), weather-sealing, and dual SD card slots. Whereas the 24.2-megapixel EOS R10, which has a built-in flash and a smaller form factor, is intended for more common day-to-day photography. Alongside, the company has also announced RF-S18-45MM F4.5-6.3 IS STM and RF-S18-150MM F3.5-6.3 IS STM, two new lenses.The EOS R7 and EOS R10 are the first cameras to receive the new autofocusing (AF) technology that debuted on the EOS R3, thanks to the powerful DIGIC X image processing engine. This technology takes advantage of the EOS iTR AF X system’s deep learning-based subject detection capabilities to track subjects more diligently throughout the entire image area, irrespective of the AF area mode. Even in dynamic scenes, this results in highly responsive and reliable autofocusing.In mechanical and electronic first-curtain shutter modes (with AF/AE tracking), both the EOS R7 and EOS R10 can shoot at up to 15 frames per second, which is the fastest speed not only among all APS-C EOS cameras but also in the EOS R series. The EOS R7 can shoot 32.5-megapixel images at up to 30 frames per second in electronic shutter mode, whereas the EOS R10 can shoot 24.2-megapixel images at up to 23 frames per second.Both cameras have a RAW burst mode that allows them to shoot full-resolution RAW images at up to 30 frames per second. Pre-shooting is supported, which starts recording the scene up to 0.5 seconds before the shutter is released, making it easier to capture unexpected opportunities.Both the Canon EOS R7 and EOS R10 use newly developed 32.5 and 24.2 megapixel APS-C CMOS image sensors. Despite having the same megapixel resolution, the EOS R7’s visual resolution exceeds that of the EOS 90D and the EOS M6 Mark II, whereas the EOS R10’s is equivalent to the same two cameras. Which makes it capture fine details like silky hair, fabric textures, and other fine details that can be captured with pinpoint accuracy.As per the company, the Canon EOS R7 is the first APS-C EOS camera to include a sensor-shift type 5-axis In-Body IS (Image Stabiliser) mechanism, which can provide up to 8 stops of equivalent image stabilisation during the video and still image shooting. The EOS R7 and EOS R10 both have Movie Digital IS, which performs 5-axis image stabilisation for smoother videos even when the lens does not have an Optical Image Stabiliser (Optical IS).In the new 4K UHD Fine mode, the EOS R7 can use 7K oversampling to record high-quality 4K UHD video at up to 30p for content creators. In 4K UHD Standard mode, uncropped 4K 60p recording is possible. It’s also the first APS-C EOS camera to support Canon Log 3 gamma, which is useful for colour grading and HDR video production. On the other hand thanks to 6K oversampling, the Canon EOS R10 can shoot high-quality 4K UHD Fine 30p video. Both cameras are capable of recording 4K HDR PQ video.The inherent telephoto effect of APS-C sensor cameras, which is similar to having a built-in extender, is one of their strengths. Users who frequently photograph wildlife and other subjects that require longer focal lengths will benefit greatly from this. The field of view is automatically “zoomed in” by about 1.6 times the lens’s focal length. Recording, on the other hand, uses the full resolution of the image sensor, unlike the 1.6x crop mode on full-frame EOS R cameras.According to Canon The EOS R7’s built-in 1.6x APS-C crop can be combined with the 4K UHD crop mode for an even stronger telephoto effect of around 1.8 times the focal length when shooting video. APS-C image sensors are roughly 40% smaller than 35mm full-frame image sensors.
Pricing and Availability
The Canon EOS R7 body only costs Rs 1,27,995, while the RF-S18-150mm F3.5-6.3 IS STM lens costs Rs 1,64,995. On the other hand, the Canon EOS R10 body alone costs Rs 80,995, while the RF-S18-45mm F4.5-6.3 IS STM lens costs Rs. 90,995.For Rs 1,17,995, the Canon EOS R10 can be combined with the RF-S18-150mm F3.5-6.3 IS STM lens. The RF-S18-45mm F4.5-6.3 IS STM lens retails for Rs 28,995, while the RF-S18-150mm F3.5-6.3 IS STM lens retails for Rs 45,995.In terms of availability, the devices will begin selling in July.
For the latest gadget and tech news, and gadget reviews, follow us on Twitter, Facebook and Instagram. For newest tech & gadget videos subscribe to our YouTube Channel. You can also stay up to date using the Gadget Bridge Android App. You can find the latest car and bike news here.
There are multiple occasions on which one might need to take a screenshot. You may be a professor who is explaining a procedure to their students digitally, or you may be a friend helping another friend or a family member navigate through their brand-new iPad and understand its functions, that too sitting at your home. Whatever the situation is, in case you’re not sure how to take a screenshot on an iPad, we’ve got your back. To tell you, taking a screenshot on an iPad is a cakewalk, irrespective of the model that you’re using. Here are the top 5 ways how to take a screenshot on your iPad in 2023.
In This Article
Take A Screenshot By Pressing Buttons On iPad
On iPad With A Home Button
If you own an iPad model with a home button, all you need to do is press and release the top button and the home button simultaneously. That’s it!
On Other iPad Models
If you own an iPad model that doesn’t have a home button, you have to press and release the top button and the volume button (either one) simultaneously.Read also: How To Set Up And Use WhatsApp On iPad (2022)?
Using Apple Pencil
If you own an ApplePencil and are a frequent user of the same, then this one may seem an even easier method to you. All you have to do is load the page you want to take a screenshot of, keep your pencil positioned at your iPad’s bottom left or right corner, and drag the corner towards the center. That’s it! But remember to keep your Apple Pencil fully charged and connected with your iPad before taking the screenshot. Read also: Here is how to disable live text on your iPhone, iPad or Mac
Using Assistive Touch
Our final method of taking a screenshot on an iPad is for those who are not good with hand movements. Sometimes pressing buttons simultaneously or using the Apple Pencil can be tricky, and we totally understand. Fortunately, Apple also identified the issue and provided another way out of the situation. Through Assistive Touch, an option available within the Accessibility settings of your iPad, the gesture required to take a screenshot becomes quite easy. Step 1: Go to Settings > Accessibility > Assistive Touch or simply Touch (depending on your iPad model) > Assistive Touch. Step 2: Toggle on the Assistive Touch option.Step 3: A button appears on the bottom right corner of the screen. Click on Double-Tap under the Custom Actions area. Step 4: Scroll and find the screenshot option that appears next on the screen. Step 5: Now, all you have to do is just open the page of which you have to take a screenshot, find the Assistive Touch button, and just double-tap it.
Use Siri
If you want to go hands-free, you can always use Siri to take a screenshot on your iPad. You may be wondering why you would ever need Siri to take a screenshot, but this method will come in handy when you’re driving or if the physical buttons are not working. To take a screenshot on your iPad, simply say “Hey Siri, take a screenshot” and Apple’s voice assistant will do the next.
Use a third-party app
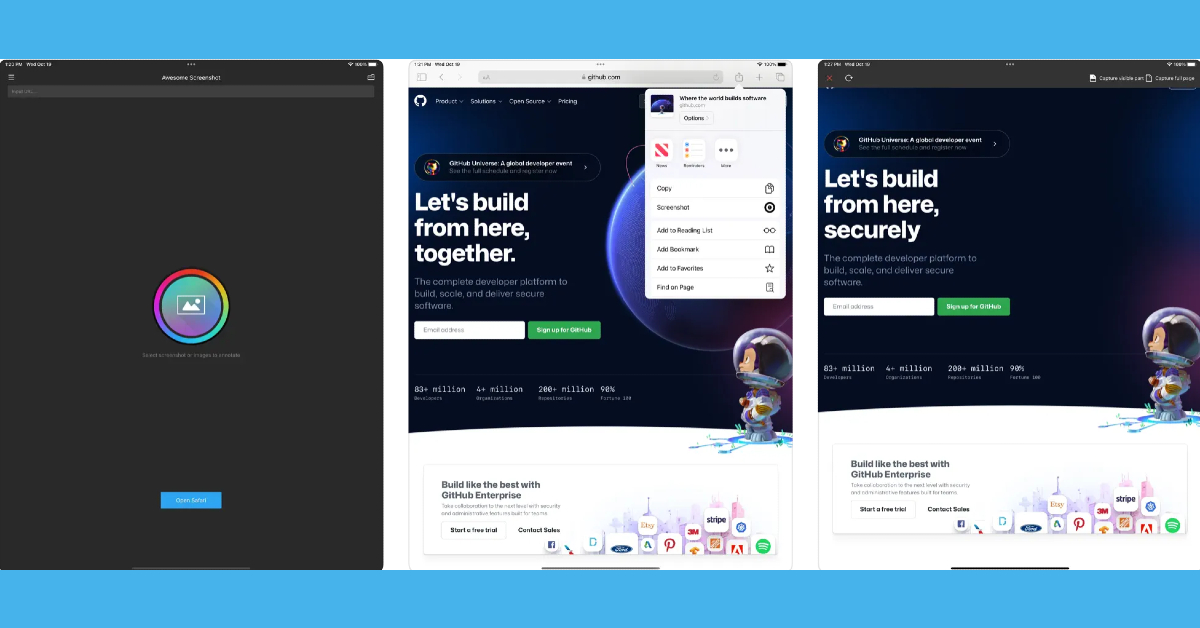
If you want to take a screenshot of an entire article that spans multiple pages, there are several third-party apps that can do it for you. Apps like WebCapture, Awesome Screenshot, and WebShot seamlessly integrate with Safari and are able to take legible full-page screenshots. These apps also have basic tools for cropping, annotations, and more.
Frequently Asked Questions (FAQs)
How do I take a screenshot on my iPad?
To take a screenshot on your iPad, simply press the side key and the volume key together. Older iPad versions allow a screenshot to be taken when the side key and home button are pressed simultaneously.
How do I take a screenshot on my iPad if its physical buttons are not working?
There are a couple of ways you can go about taking a screenshot on your iPad without relying on the physical buttons. You can ask Siri to take a screenshot for you, or go to settings and enable Assistive Touch. Once Assistive Touch has been enabled on your iPad, tap on it and select the screenshot option. If you have an Apple Pencil, drag it from the bottom left corner of the iPad to the centre to take a screenshot.
How do I capture an entire article or a long message in one screenshot?
Want to take a long screenshot that captures multiple pages? Tap the screenshot preview and select Full Page. You can also use third-party apps like WebShot, WebCapture, and Awesome Screenshot for this task.
The Filogic 880 and Filogic 380 Wi-Fi 7 platform solutions from MediaTek were announced recently by MediaTek. Both chipsets are meant for high-bandwidth applications in the operator, retail, enterprise, and consumer electronics markets.This pair of chips will be among the first Wi-Fi 7 solutions available, allowing device makers to deliver cutting-edge products with the most up-to-date connectivity technology.According to MediaTek, Filogic 880 is a complete platform that combines a Wi-Fi 7 access point with a new advanced host processor solution to deliver the industry’s best router and gateway solution for operators, retailers, and enterprises.It has a scalable architecture that can support up to penta-band 4×4 at 36 Gbps. All client devices, including smartphones, tablets, TVs, notebooks, set-top boxes, and OTT streaming devices, will benefit from the Filogic 380’s Wi-Fi 7 connectivity. The chip’s dual concurrent 2×2 capability will be optimised “out of the box” for these devices. This streamlines the design process, improves performance, and reduces time to market.The Filogic 880 platform features a 6nm Wi-Fi 7 access point that supports key Wi-Fi 7 technologies like 4096-QAM, 320MHz, MRU, and MLO. It has the ability to scale up to 36Gbps penta-band speeds. Furthermore, the chipset can support up to 10Gbps per channel. OFDMA RU, MU-MIMO, and MBSSID are also supported.The Filogic 880 platform includes a powerful host processor with a quad-core Arm Cortex-A73 application processor and an advanced NPU, in addition to Wi-Fi 7 capabilities. An advanced hardware network full off-load engine on both Wi-Fi and Ethernet interfaces is one of the key features. IPSec, SSL/TLS, DTLS (CAPWAP), SRTP, and MACsec are all accelerated by a built-in networking crypto engine (EIP-197). High-speed interfaces (5Gbps USB and 10Gbps PCI-Express), UART, SD, SPI, PWM, GPIO, and OTP are all supported, allowing for extensive platform customization.Filogic 380, on the other hand, is a stand-alone, single-chip 6nm Wi-Fi 7 and Bluetooth 5.3 combo solution designed by MediaTek to deliver best-in-class connectivity. It works with MediaTek SoCs in smartphones, TVs, notebooks, set-top boxes, OTT streaming devices, and many other consumer electronics devices.Support for key Wi-Fi 7 technologies such as 4096-QAM, 320MHz, MRU, and MLO are among the Filogic 380’s highlights. Furthermore, MLO is supported, with speeds of up to 6.5 Gbps. It can also handle up to 5Gbps per channel. It supports the 2.4GHz, 5GHz, and 6GHz frequency bands. Dual 2×2 radios for dual-band simultaneous operation are supported, as is Bluetooth 5.3 with LE Audio.
For the latest gadget and tech news, and gadget reviews, follow us on Twitter, Facebook and Instagram. For newest tech & gadget videos subscribe to our YouTube Channel. You can also stay up to date using the Gadget Bridge Android App. You can find the latest car and bike news here.
One of the latest OnePlus models released in the country is the all-new Nord CE 2 Lite 5G. Offering 6GB and 8GB RAM options coupled with 128GB storage capacity, the smartphone comes with a Qualcomm SM6375 Snapdragon 695 5G (6 nm) Octa-core processor. Along with a 120 Hz refresh rate IPS LCD display. Over that, you get a triple rear camera system with a 64MP main camera and a 16MP front selfie camera. As we finally got our hands on the brand-new smartphone, we dug deeper into each of its aspects, ranging from its design and display to its cameras, OS and CPU, to test its performance thoroughly. And we are super excited to share our findings with all of you. So here is the inside-out review of the all-new OnePlus Nord CE 2 Lite 5G.
In This Article
OnePlus Nord CE 2 Lite 5G Review: Design and Display
The Nord CE 2 Lite 5G comes sitting in the classic Nord lineup packaging. In support of the smartphone are offered a range of goodies, including a 33W SuperVOOC fast charger, a red coloured USB to Type-C cable, a silicone case, a SIM ejector tool, a quick start guide, some OnePlus Nord stickers, et al. Opening up the package, you’ll meet the smartphone’s 6.59-inches IPS LCD 120Hz display with a screen-to-body ratio of 84.1%. On picking up the phone in hand, you might feel it to be a little chunky. Flip it over and you’ll be face-to-face with its black-coloured plastic back with the triple camera system along with the flashlight quietly sitting on a black glass mount placed on its top left corner. The OnePlus Nord CE 2 Lite 5G is offered in two colours, Black Dusk and Blue Tide, out of which we were able to get our hand on the former. Overall, the back has a plain and relatively unembellished look. The frame also comes in body-coloured plastic. On its left side is the SIM card tray along with separated upper and lower volume buttons while on the right side lies the fingerprint sensor integrated power button. On the bottom can be seen a 3.5 mm jack, a Type-C port along with the single-speaker of the smartphone’s mono-audio system. Bringing the phone to life, its 1,080 x 2,412 pixels resolution display lights up, which has a 401ppi density and an aspect ratio of 20:9. The brightness of the screen has to be set to at least 70% for it to be legible when brought under direct sunlight. For its use indoors, the brightness has to be set to about 50% for the display to be viewed comfortably. Some may, however, still find the overall brightness range to be a little dull. The experience of streaming videos on Youtube was decent on the OnePlus Nord CE 2 Lite 5G. The highest quality offered for streaming videos is up to 1080p at a 60fps frame rate. Watching movies and TV series on OTT platforms like Netflix on the smartphone turned out to be surprisingly good. The colour quality as well as the picture clarity appeared to be quite decent. The mono-speaker sound quality is also commendable. However, one does miss the essence of a stereo audio system, which would have taken the experience to the next level. The gaming features on the Nord CE 2 Lite 5G were tested by playing both simple and high-end games including Subway Surfer. The graphics quality is appreciable, and so is the on-screen colour quality. The touch experience is smooth and the response to touch commands is on point. Sound quality is also decent while gaming on the OnePlus Nord CE 2 Lite 5G. The smartphone strides in with a Game focus mode, which offers the user an immersive and distraction-free gaming experience, by blocking gesture navigation, quick settings, notifications, and calls.Overall, the design of the OnePlus Nord CE 2 Lite 5G appears simple. For some people, it might appear a bit bland. Sprinkling a little glamour into it might make it more captivating. The display of the smartphone, on the other hand, is decent. There might be a slight need to tune up the display brightness range a little bit. Read also: Smartphone comparison: OnePlus Nord CE 2 Lite 5G Vs OnePlus Nord CE 2 5G
OnePlus Nord CE 2 Lite 5G Review: Performance and Cameras
Elaborating further on the Oneplus Nord CE 2 Lite 5G specs, the smartphone is a nano dual-SIM supporting model. It is offered with 6GB/8GB RAM options coupled with 128GB internal storage. The microSD card does not have a dedicated slot but shares space with the 2nd SIM slot (so yes, a hybrid SIM card slot). As said, the smartphone comes with a Qualcomm SM6375 Snapdragon 695 5G (6 nm) chipset, an Octa-core processor, and Adreno 619 GPU. A plus point of the all-new smartphone is that it comes pre-installed with the latest Android 12 OS. The battery offered with it is of 5,000mAh capacity and supports 33W fast charging. Upon moderate usage, the battery lasts up to one day. The smartphone supports 5G connectivity, Wi-Fi 802.11, and Bluetooth 5.2. The interface of the device is pretty easy to use, too. You are offered both gesture and screen buttons navigation options during the initial setup. The home screen and the app drawer are separate, with square-shaped icons having round corners. The app drawer comes pre-organized with alphabetical ordering and no extra apps can be seen pre-loaded onto the system. There was no app crash observed while using multiple apps simultaneously on the device. Switching between apps was also hassle-free. Another point noted was that the device doesn’t get easily heated up. Upon heavy usage for prolonged periods, the back may feel warm ever so slightly, but never too hot for the fingers. The touch experience is also favourable on the OnePlus Nord CE 2 Lite 5G. Coming to the Nord CE 2 Lite 5G cameras, it comes with a 64MP+2MP+2MP rear triple camera system and a 16MP front camera. The smartphone has a unique radial zoom scale, which has a range from 1x to 6x. However, the zoom adjustment is only available for the rear camera and not for the front one. When capturing in daylight, as we move up the zoom scale, the quality of the images surprisingly appears consistent. Captures in 1x zoom may appear to slightly lack details but still are of above-average quality. Upon increasing the zoom to 5x, you might have to give the phone a couple of seconds to focus, after which it starts capturing details better than the lower zoom modes, although slightly blurred.OnePlus Nord CE 2 Lite 5G: Macro Mode and Portrait ModeOnePlus Nord CE 2 Lite 5G: Photo Mode Vs Night Mode, Foliage captured in Night ModeBoth the normal rear camera Photo Mode and Portrait Mode work great under well-lit conditions. There is also a 64MP mode provided. However, the difference between it and the standard Photo mode was found minimal. The night mode from the rear camera does a fantastic job to light up even a completely dark image and turn it into a pretty decent capture, although the results appear a little hazy. Coming to video captures, recordings can be made from the rear camera in up to 1080p at a 30fps frame rate. The picture quality is quite good and the camera is able to capture good details even in close-ups. OnePlus Nord CE 2 Lite 5G: AI ModeSpeaking of the front camera, the details of the facial features are captured decently while the skin tone and the colour scheme are pretty close to reality. This holds for both the photo and the video captures. Another positive note is that the front camera also supports the night mode, and offers a face light tool, which lights up the subject’s face evenly like a ring light in the dark. The Macro mode on the OnePlus Nord CE 2 Lite 5G, although produces vivid images, needs slight improvement in its saturation balance and clarity. Apart from that, the AI mode of the rear camera recognizes the scene in the frame and adjusts the images accordingly, such as increasing the greens and adding a slight pop element if the foliage is being captured. Overall, the camera package offered with the OnePlus Nord CE 2 Lite is commendable, but with slight tweaks, can be taken even further, to the next level. Read also: OnePlus Nord CE 2 Review: Super Stylish Design With Excellent Performance
Verdict
To sum up, the OnePlus Nord CE 2 Lite 5G offers a decent package of features to the customers. Although the smartphone does not stand out on any specific front, judging it too strictly also won’t be fair, since it is an entry-level phone and in fact, one of the cheapest ones from the OnePlus brand. However, considering its cost and the value offered by its competitors within the same price range, there is a definite scope for improvement. Geekbench 5 gives it a single-core score of 687 and a multi-core score of 1,941. Hence, whether its pros weigh heavier than its cons is something that will vary according to the personal requirements of every individual. The OnePlus Nord CE 2 Lite 5G price in India starts from Rs 19,999. So does it seem worth the buy to you, at this price? We certainly feel it is a very good buy. Let us know your thoughts in the comments section below.


 The vibrant gradient on Instagram was reimagined using an innovative 3D modelling process to make it feel lit up and alive. The entire colour system is built around the Instagram gradient, which is made up of our brand colours.
The gradient in marketing, logos, and even in-app, as seen in Create mode, stickers, and Instagram Story rings, signals moments of discovery through illumination.
The vibrant gradient on Instagram was reimagined using an innovative 3D modelling process to make it feel lit up and alive. The entire colour system is built around the Instagram gradient, which is made up of our brand colours.
The gradient in marketing, logos, and even in-app, as seen in Create mode, stickers, and Instagram Story rings, signals moments of discovery through illumination.
 Meta has also introduced a new typeface called Instagram Sans which is inspired by the platform’s history. “From billboards to websites, our new typeface highlights our distinct identity,” the company noted.
Instagram Sans helps it showcase a distinct identity across surfaces, from our marketing campaigns to our websites. Instagram Sans is a new way for the global Instagram community to express themselves in places like Stories and Reels. To make Instagram Sans universally accessible it collaborated with language experts all over the world to adapt the typeface to international scripts such as Arabic, Thai, and Japanese.
Meta has also introduced a new typeface called Instagram Sans which is inspired by the platform’s history. “From billboards to websites, our new typeface highlights our distinct identity,” the company noted.
Instagram Sans helps it showcase a distinct identity across surfaces, from our marketing campaigns to our websites. Instagram Sans is a new way for the global Instagram community to express themselves in places like Stories and Reels. To make Instagram Sans universally accessible it collaborated with language experts all over the world to adapt the typeface to international scripts such as Arabic, Thai, and Japanese.
 Instagram is also announcing a brand new layout and design system that prioritises content and emphasises simplicity and self-expression. The new Instagram marketing layouts feature full-screen imagery, refer to the in-app experience, and celebrate the everyday creativity we see from our community.
Separately in India Meta introduced 3D avatars to Instagram stories and direct messages (DMs). Moreover, the company has also released new avatars for Facebook and Messenger that can be customised. Users can customise their virtual version by selecting facial features, body types, clothing styles, and more using the 3D virtual avatar. In addition to this Avatars can be used for a variety of purposes, including stickers, feed posts, and Facebook profile pictures. Avatars have also been updated to more closely resemble users’ facial features and appearance. Certain facial shapes and skin shaders have been tweaked.
Cochlear implants and coloured over-the-ear hearing aids are among them. It also includes wheelchairs, which will appear in Facebook stickers, Messenger chats, and Instagram DMs.
For the latest gadget and tech news, and gadget reviews, follow us on Twitter, Facebook and Instagram. For newest tech & gadget videos subscribe to our YouTube Channel. You can also stay up to date using the Gadget Bridge Android App. You can find the latest car and bike news here.
Instagram is also announcing a brand new layout and design system that prioritises content and emphasises simplicity and self-expression. The new Instagram marketing layouts feature full-screen imagery, refer to the in-app experience, and celebrate the everyday creativity we see from our community.
Separately in India Meta introduced 3D avatars to Instagram stories and direct messages (DMs). Moreover, the company has also released new avatars for Facebook and Messenger that can be customised. Users can customise their virtual version by selecting facial features, body types, clothing styles, and more using the 3D virtual avatar. In addition to this Avatars can be used for a variety of purposes, including stickers, feed posts, and Facebook profile pictures. Avatars have also been updated to more closely resemble users’ facial features and appearance. Certain facial shapes and skin shaders have been tweaked.
Cochlear implants and coloured over-the-ear hearing aids are among them. It also includes wheelchairs, which will appear in Facebook stickers, Messenger chats, and Instagram DMs.
For the latest gadget and tech news, and gadget reviews, follow us on Twitter, Facebook and Instagram. For newest tech & gadget videos subscribe to our YouTube Channel. You can also stay up to date using the Gadget Bridge Android App. You can find the latest car and bike news here. 


?")
 Step 1:


? Top 5 Ways")
 There are multiple occasions on which one might need to take a screenshot. You may be a professor who is explaining a procedure to their students digitally, or you may be a friend helping another friend or a family member navigate through their brand-new iPad and understand its functions, that too sitting at your home. Whatever the situation is, in case you’re not sure how to take a screenshot on an