

In This Article
HP Deskjet Ink Advantage Ultra 4826 AIO review: Design
Out of the box, the HP Deskjet Ink Advantage Ultra 4826 AIO is a very modern-looking Deskjet machine. It is not the usual boxy printer you used to get 5 years ago. This printer has curves and is not afraid to flaunt it. We quite liked the new look HP has given to this printer. The paper holding tray can be found at the top back, which also has a flip over it that protects it from dust. The bottom tray is divided into three parts, one that hides the colour and black ink cartridges, a fixed output tray and a drop-down tray that extends the fixed tray further with a swivel out arm. The output tray can hold up to 25 pages, while the input slot can hold up to 60 A4 sheets. Since it is an all-in-one machine, you get a scanner on top that can scan pages up to A4 in size. On the left of which users get to see a few buttons, that can scan, scan and print in colour or black, the power button and the Wi-Fi key. Here there is a mono colour LED screen that shows you the ink levels of the cartridges as well.
 At the back, you get to see the USB port as well as the power input port. All in all, the HP Deskjet Ink Advantage Ultra 4826 AIO is a well built, sturdy and good looking machine.
HP Deskjet Ink Advantage Ultra 4826 AIO review: Performance
Now let’s talk about the main USP of HP Deskjet Ink Advantage Ultra 4826 AIO – its scanning and printing capabilities. Setting it up is easy and one can just download the HP smart software after turning on the machine and wirelessly set it up using a PC/Laptop or via your smartphone. Yes, you can give direct print commands from your smartphone as well. We chose to set it up with our laptop and it was a very easy process. Just remember to turn off your Anti-Virus for a few minutes as that might hinder the process as it did in our case, we had to turn down Kaspersky for 5 minutes for the process to complete. In the box, you get two black number 47 cartridges as well as tri-colour number 47 cartridges. But the printer can hold just 1 colour and 1 black. So the additional ones can be used once you run out of the first ones. HP claims that the HP Deskjet Ink Advantage Ultra 4826 AIO can print up to 7.5 pages of black and 5 pages of colour pages in one minute at mid 600PPi setting. However, on our test bench, we could only squeeze out 5.5 black and 3.5 colours pages in a minute, which is not bad but isn’t the best either. If you bring down the quality then you can get over 12.5 pages of black at blitzkrieg speeds, but that will not give you the desired results. At the max setting, which is 1200PPi you get the best results and blacks look deep, and colours look vibrant. But printing at that level is painfully slow, even if you are just printing a black excel sheet it will take over 5 minutes to spurt out a single paper. Colour? Even more. We ended up getting a fabulous looking page but after 7 minutes of wait time. We gave the print command, made ourselves a cup of coffee and the page was still printing. But as said, the wait is worth it. In case you are ok with decent (not the best) looking colour pages, you can always print at the mid setting of 600PPi.
Over that, we did not find the colours to be bleeding, no white lines in between and at the best settings the colours came very close to what we were seeing on the laptop’s screen.
At the max setting, which is 1200PPi you get the best results and blacks look deep, and colours look vibrant. But printing at that level is painfully slow, even if you are just printing a black excel sheet it will take over 5 minutes to spurt out a single paper. Colour? Even more. We ended up getting a fabulous looking page but after 7 minutes of wait time. We gave the print command, made ourselves a cup of coffee and the page was still printing. But as said, the wait is worth it. In case you are ok with decent (not the best) looking colour pages, you can always print at the mid setting of 600PPi.
Over that, we did not find the colours to be bleeding, no white lines in between and at the best settings the colours came very close to what we were seeing on the laptop’s screen.
 Scan times are very decent and in under 35 seconds, you get a fabulous, scanned copy on your computer screen. You can even scan and print in colour without the need for any computer or mobile. Over that, printing through an Android mobile (with Bluetooth V4.2 or higher) using the HP Smart app is also child’s play. Again, no need to send the file to a computer, simply connect to the HP Deskjet Ink Advantage Ultra 4826 AIO using your smartphone and print away. Remember you need to be less than 5 feet from the AIO to print using your mobile phone.


 Read also:

 Read also:


 Step 2:
  Step 3:
  Step 4:
 Read also:
  Step 3:
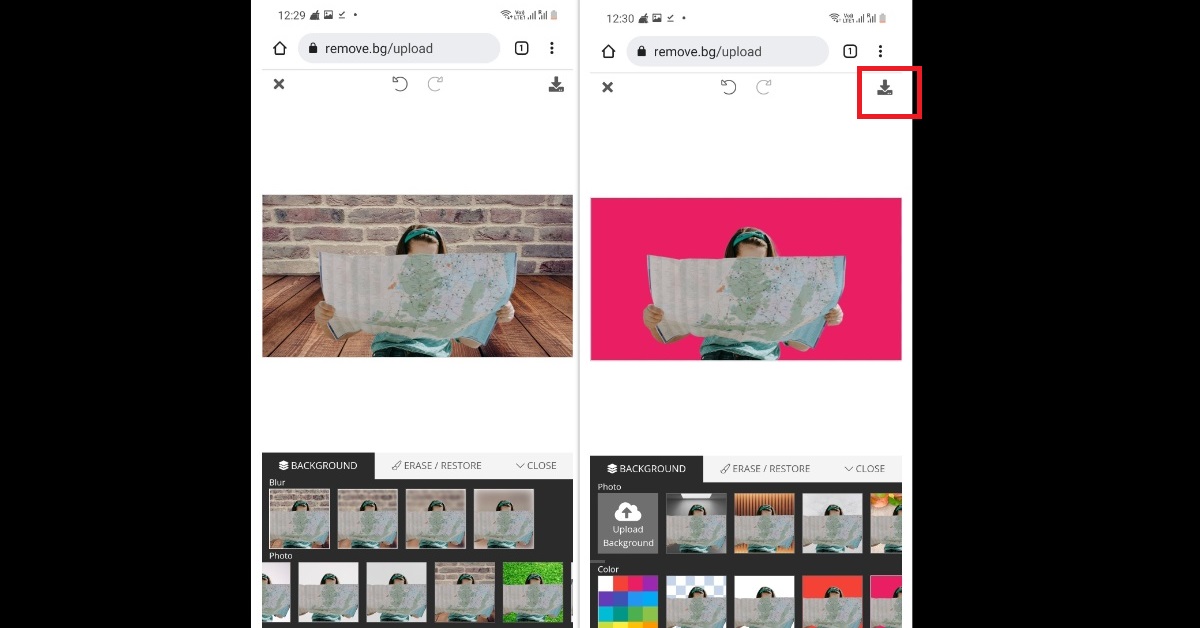 Step 4:
 Step 2:
  Step 3:
  Step 4:
 Step 3: Hit Copy.
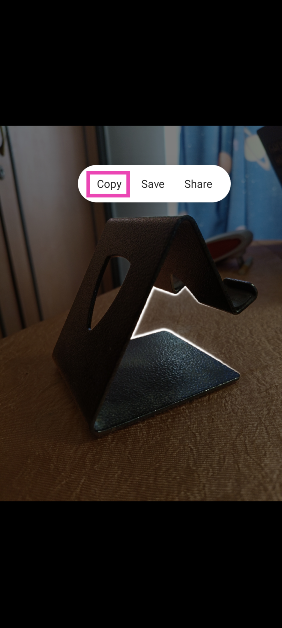 Step 4: The subject will be copied to the clipboard. You can use any of the above-mentioned editing apps to fill its background.


 The TV can easily be wall-mounted or kept on a table using the supplied V legs. At the back, you will find a lot of connectivity ports. These include three HDMI, USB, headphones that are side-mounted and downward-facing AV, Ethernet and Optical ports. The physical power off button is placed behind the LED indicator at the bottom.
 The remote has also seen an upgrade. Well, it is still sleek, but with the Netflix and Prime video buttons, you will also get dedicated Disney+ Hotstar and Apps keys. These are good additions as people do watch a lot of Disney+ Hotstar, and geeks like us want to quickly get to the apps section instead of jogging through the menu.


 Step 2:
 Step 3:
 Step 4:
 Read also:
  Step 2:
 Step 3:
 Step 2:
  Step 3:
  Step 4:
 Step 2:
  Step 3:
  Step 4:
  Step 5:
  Read also:
  Step 2:


 Step 2:
  Step 3:
  Step 4:
  Step 5:
  Read also:
  Step 2:


 Step 3:
  Step 4:


