Samsung today officially announced the launch of a new A-series smartphone in the Indian market. The company has introduced Samsung Galaxy A22, which features a quad rear camera set up. Moreover, there is a 90Hz AMOLED display and a 5,000mAh battery with 15W Adaptive Fast Charging. Samsung Galaxy A22 Price and availabilitySamsung Galaxy A22 has been launched in India in a single 6GB RAM with a 128GB storage model. The device is priced at Rs 18,999 and will be offered in two colour options of Black and Mint. The device will be available for purchase via the company’s official website in the country and is likely to retail at more online channels. To recollect, the Samsung Galaxy A22 first debuted in the European market alongside the 5G variant earlier this month. There the handset is available in three different configurations of 4GB RAM with 64GB storage, 4GB RAM with 128GB storage, and 6GB RAM with 128GB storage.Samsung Galaxy A22 tech specs and featuresSamsung Galaxy A22 features a 6.4-inch HD+ Super AMOLED display with 720×1,600 pixels of resolution. It offers a 90Hz refresh rate panel and a 20:9 aspect ratio. The device runs on One UI 3.1 Core based on Android 11 out of the box. Under the hood, there is an unnamed octa-core SoC paired with 6GB RAM with 128GB storage. The internal memory can be expanded up to 1TB using a microSD card. In terms of camera capabilities, the Samsung Galaxy A22 comes with a quad rear camera setup that includes a 48-megapixel primary sensor with an f/1.8 aperture with optical image stabilisation (OIS). Further accompanied by an 8-megapixel ultra-wide-angle lens, a 2-megapixel macro lens and a 2-megapixel depth sensor with an f/2.4 aperture. For taking selfies, there is a 13-megapixel camera sensor on the front.The handset packs a 5,000mAh battery that is supported by 15W Adaptive Fast Charging. The device is said to deliver up to 38 hours of talk time. In terms of connectivity, there is 4G LTE, Wi-Fi 802.11ac, Bluetooth v5.0, GPS/ A-GPS, USB Type-C, and a 3.5mm audio jack. While the sensors on the phone include a side-mounted fingerprint sensor, accelerometer, ambient light, gyroscope, magnetometer, and proximity sensor.
For the latest gadget and tech news, and gadget reviews, follow us on Twitter, Facebook and Instagram. For newest tech & gadget videos subscribe to our YouTube Channel. You can also stay up to date using the Gadget Bridge Android App.
The Chinese electronics maker, TCL, today announced the launch of its new range of 4K QLED TVs in India. The new series includes three models- Mini LED QLED 4K C825 with Magic Camera, QLED 4K C728 with Game Master and QLED 4K C725 with Video Call Camera. All the TCL C-Series collection features a 120Hz MEMC along with Dolby Vision and Dolby Vision IQ support. The whole range comes with voice control support and other advanced features.TCL Mini LED QLED4K C825 TCL Mini LED QLED 4K C825 supports Dolby Vision IQ and features a 120Hz MEMC. While TCL’s proprietary software algorithm reduces visual fatigue and delivers enhanced image quality. It has a Game Master feature that comes with an HDMI 2.1 support that enables high-quality gameplay and offers smoother processing and powerful optimization. The Television also equips a 1080P magnetic magic camera that is workable with Google Duo and Zoom Meet. For the audio it has IMAX Enhanced certified 2.1 integrated ONKYO Soundbar with Dolby Atmos and a built-in Subwoofer.The TCL Mini LED QLED 4K C825 will be available in India in two different sizes 55inches and 65 inches. The device can be purchased at a price tag of Rs 114,990 and 149,990 respectively.TCL QLED 4K C725 This QLED Television is available in three sizes which offer 4K resolution. It comes with Dolby Vision, HDR 10+ technology along with AiPQ Engine, and supports both MEMC and HDMI 2.1. Integrated with ONKYO certified soundbar which is powered by Dolby Atmos for high-quality audio. Additionally the TCL QLED 4K C725 also offers hands-free voice control 2.0. Besides this, the TV operates with TCL Smart UI, which includes TCL Home Entertainment Center, where users can enjoy all kinds of global and local content in TCL Channel 3.0. The users can also play games via air console in the Game Center with no additional gamepad required. Whereas the Home Control Center, with Mirroring and MagiConnect, will enable mobile casting. You will also get a personalised screensaver and quick panel.This model will be available in three sizes 50, 55 and 65 inches priced at Rs 64,990, Rs 72,990, Rs 99,999 respectively.TCL QLED 4K TV C728 This Television comes with dedicated gaming features like Game Master backed by HDMI 2.1. There are other features like Variable Refresh Rate (VRR), Auto Low Latency Mode (ALLM), eARC, and the company’s proprietary software algorithm that will enhance the gaming experience. The QLED Display Technology ensures over 100% colour volume for enhanced visual impact and support for Dolby Vision, Dolby Vision IQ, and Dolby Atmos. It comes with a 120Hz high refresh rate with MEMC for smooth animation. This TV also offers hands-free voice control as well. The TCL QLED 4K TV C728 comes in three sizes 55, 65 and 75 inches priced at Rs 79,990, Rs 102,990 and Rs 159,990 respectively.
Screenshots have become essential, maybe for work or to be shared on social media. Taking a screenshot is an easy process and a way to show others what you are viewing on your screen. On a Mac as well, the steps to capture a screenshot are fairly simple if you know the correct command keys. Follow the guide below to take screenshots on a Mac.Read Also:Philips TAB4228 Soundbar with 120W sound output launched in India
Using Shift+Command+3:
To take the screenshot of the entire screen press Shift+Command+3 on your Mac. After pressing the command key a thumbnail will appear on your screen at the corner. You can also use the edit option to edit the screenshot. Once you have clicked the screenshot it will be saved on your Mac.
Read more: How to take a screenshot on Windows 10 using a laptop or a PC?
Using Shift+Command+4:
This function is to capture a customised selection of the screenshots. This means you can take screenshots of a portion of your screens. Press Shift+Command+4 and wait for the cursor to change into Apple crosshair. There are many options now that you can make use of. Follow the steps:
Press and release spacebar: By pressing the spacebar the crosshair will change into a camera icon that can now be dragged into an open window and screenshot it. The screenshot will be a white border around the window with a bit of a drop shadow
Press and hold the spacebar: After you drag the camera icon to choose the portion of the screenshot if you press and hold the spacebar it locks the shape and size of the selection area
Hold down the shift key: Pressing the shift key locks each side of the selection portion and lets you move your mouse up or down to position the bottom edge.
Shift+Command+5:
If you want to take screenshots of a particular window or menu you can press the keys Shift+Command+5. After pressing the command keys, click on the Capture selected window option in the toolbar. Now the pointer will turn into a camera icon and you can drag the icon to a window to capture the screenshot. You can also take a custom screenshot by using the spacebar. There are some advanced features with this command: you can also capture video by pressing Shift+Command+5. Read also:Top 5 things you didn’t know your Apple Watch could do
ShiftCommand+6:
If you have a 16-inch MacBook Pro or a Mac with a touch bar, you can take screenshots of the touch bar by using Shift+Command+6.
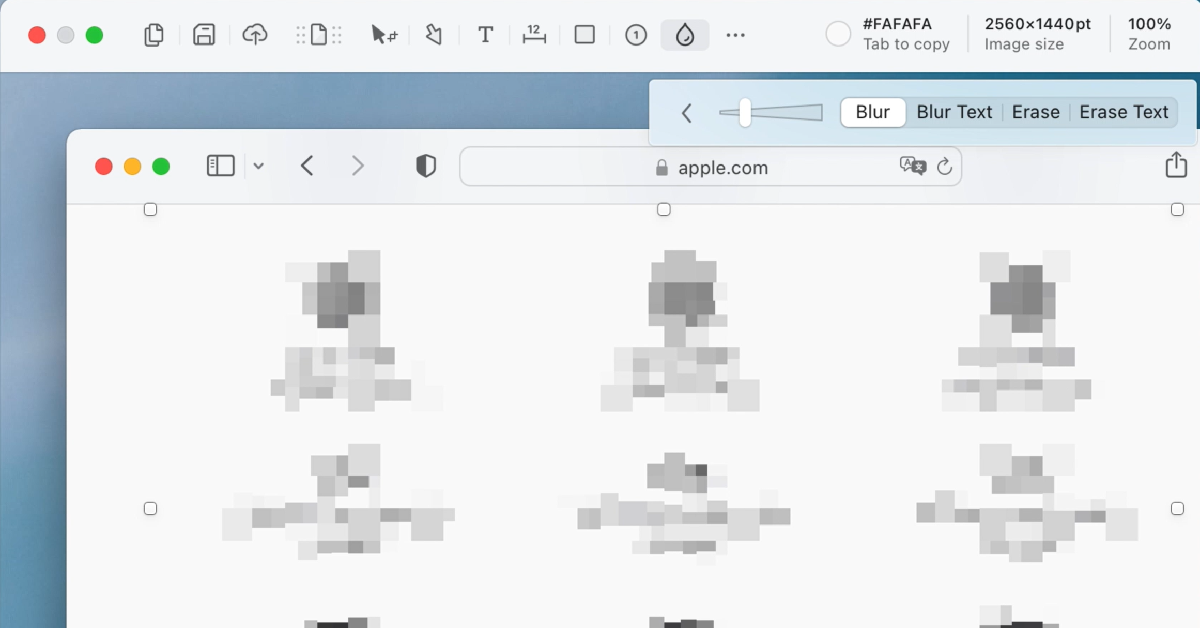
Use a third-party app: Shottr
If you don’t want to rely on native methods to take a screenshot on Mac, you can always download a third-party app. Shottr is one of the best ones around. Not only can Shottr take screenshots on your Mac, but it can also carry out basic editing tasks like erasing certain elements from the screen grabs and pixelating or blurring personal information. You can also pin multiple screenshots on the screen and extract text from them to your clipboard. Want to take a rolling screenshot? Shottr can manage that too.
Frequently Asked Questions (FAQs)
How do I take a screenshot on a Mac?
The quickest way to take a screenshot of the entire screen on a Mac is by pressing Shift + Command + 3.
How do I take a partial screenshot on Mac?
If you want to capture only a part of the screen on your Mac, press Command + Shift + 4, use the crosshair to select the area and shape of the screenshot, press and hold the spacebar to adjust the selected area, and then release the mouse.
These are the top 5 ways to take a screenshot on your Mac. The images that you have taken screenshots of are by default saved on your Mac desktop. But in case you are not able to find it, go to Launchpad>Other>Screenshot. If you have any queries related to these methods, let us know in the comments!
Nothing beats your mood more than seeing those kitchens in an awful manner. And nothing lightens up the ambience than looking at those clean and shiny kitchen appliances. If you are a cleaning freak like Monica from Friends or just are fond of neatness, here are some hacks you can apply today to your chores. Follow the hacks below to clean your kitchen appliances.
Microwaves cleaning hacks:
Cleaning your microwaves is everyday work and it often gets overlooked. The task seems to take a lot of time but to your surprise, these hacks will make things easier. A clean microwave will ensure the durability of the appliance and hygienic cooking as well. Follow the hacks to clean your microwaves.
By using a wet paper towel, clean the interior of the appliance and leave it for some time.
Use baking soda, which helps in removing the spills inside the microwaves.
Another method that you use is by using water and vinegar. By mixing the vinegar in the water, pour it into a bowl and microwave it for 5 minutes. Once you see all the steam inside of the microwave let it cool down and wipe it with a clean cloth.
You can try lemons. Cut the lemon into slices and place it in a bowl of water and put it in the microwave for some minutes. Make sure there is steam inside the microwave, wait for the appliance to cool down, and clean the interior with a cloth or any cleaning scrubs.
Electrical appliances such as ovens and toasters are advised to be cleaned regularly. The leftover crumbs from your toast might spark a circuit. There are some easy things you can start doing every day after you toast your breakfast: unplug the toaster and shake it upside down so that the crumbs fall down. If the toaster has a crumb tray regularly clean and you can also use a brush to clean the inside of a toaster. For ovens, you can wash the removable tray with water and make sure it is dry before you put it back. You can also use vinegar mixed with water to clean the insides of the oven.
Read also: World Food Day: Top gadgets that will help you prepare great food at home
How to clean your grillers:
Most grillers come with a non-stick surface so cleaning the grillers will help preserve the non-stick surface and make the appliance last longer. The everyday hacks for cleaning a grill can be started off by wiping it with a wet paper towel after you finish using the appliances but make sure the grill has cooled down. Also, use some warm water and wipe the surface with a clean cloth so that all the leftovers stuck on the grillers are wiped off. You can also use a brush soaked in water to rub off any particles that cannot be cleaned with a wet paper towel. Before plugging back in, make sure the appliances are dry and clean.
How to clean your coffee maker:
The coffee maker which is used daily should be cleaned regularly, possibly every day. This will prevent bacteria growth and also make your coffee taste better. The coffee maker mixed moisture and warmth which is the highest breeding ground for bacteria and other mold growth. The parts of the coffee maker can be washed with warm and soapy water. Make sure you empty the water reservoir and drip trays regularly. Do not forget to leave the reservoir lid open so that it is dry out.
How to clean your RO water tank:
The motive of RO water is drinking clean water so cleaning the RO water tank is critically important. The first thing you can do to maintain a clean hygienic RO water tank is by making sure you change the RO filters on a timely basis. Not just the filters and the interiors, it is also important to clean the exteriors of the RO to maintain a hygienic environment around the RO water tank. You can use vinegar water to clean the RO tank and let it dry, then wash it with clean RO water.
For the latest gadget and tech news, and gadget reviews, follow us on Twitter, Facebook and Instagram. For newest tech & gadget videos subscribe to our YouTube Channel. You can also stay up to date using the Gadget Bridge Android App.
Google is rolling out a fresh update for Android devices. The new update comes for the Google Messages application, which will be delivering two new features to your devices. The first is the auto delete OTPs messages and the other one is the sorting feature, which is going to sort all your messages into categories. This will make it easier for users to not manually segregate or delete the promotional or One Time Passwords that we receive from businesses or while making money transactions and logging in accounts.The news comes by way of a blog post by the company, which has announced a very important update for the Google Messages application to make text or messages on your device simpler to consume. The blog post says, “With our Messages app, we’re bringing a seamless and helpful experience on Android. We’ve heard from many users in India that they receive a lot of different types of messages, from friends and family and businesses sending promotions, receipts, order confirmations and more. With so many incoming texts vying for your attention, it can be difficult to separate the important ones from everything else. To help you easily manage your messages, today we have two new updates to the Messages app to share.”In order to keep your inbox clutter-free, the Messages app has received a feature in which it uses machine learning technology to automatically sort your messages into categories, including personal, transactions and OTPs. The new functionality will filter out bank transactions and bills to the transitions tab while the conversations with saved numbers can be easily located in the personal tab. The decluttering of the messages will not hamper any of your conversations they will stay in a device but will be more manageable. We all have a habit of not deleting one-time passwords (OTPs) from our phones after money transitions, payments or account log-in is complete. So now the Google Messages app will take the lead by auto-deleting the OTPs from your phone. The application will provide the option to automatically delete your one-time passwords (OTPs) 24-hours after they’re received, so you don’t have to spend time deleting them manually. To enable the feature, just tap continue when you see the suggestion prompt to confirm your selection.As per the company, the new update for the Messages app will be pushed out over the coming weeks (in English) on Android phones in India running Android 8 or newer. These features are optional and can be managed in settings, too. To try them out, update your Messages app to the latest version or download the apphere.
For the latest gadget and tech news, and gadget reviews, follow us on Twitter, Facebook and Instagram. For newest tech & gadget videos subscribe to our YouTube Channel. You can also stay up to date using the Gadget Bridge Android App.
The website or the app of CoWIN have allowed you to correct any particular errors on your vaccine certificates. There are some details you should keep in mind before you make those changes. Make sure to fill in all the information correctly since the chance of fixing the errors is allotted just one time. The website has opened a portal to change your name, gender, photo ID number, and date of birth.
How to fix errors on the vaccine certificates online:
The CoWIN vaccination certificates are produced when you are traveling and will help in entering many premises. Earlier the status update on your vaccination was through the Aarogya Setu app, but now CoWIN has allowed you to make changes. Here are the steps to fix the errors.
Go to cowin.gov.in and sign in with your mobile number that has been registered
Once the mobile number is verified it will show your account details
Click on the “Raise an issue” option on the top and select the member’s name
Press on the “Correction in certificate” option
There will be four options given: Name, Year of Birth, Photo ID Number, and Gender
Those who have received the first dose will have a single blue border with vaccination status on the home screen. And for those who have gotten the second dose have a “Blue Shield” with a double tick displayed on CoWin after 14 days of the vaccination. When you get vaccinated the certificate that has been issued includes a secure QR code to maintain authenticity and you can do the authentication from the CoWIN portal. Here are the steps:
Open the CoWIN site and click on Verify Certificate on the top bar
Select the button Scan your QR code using the notification that will prompt you to activate your camera
Aim the camera at the QR code of your vaccine certificate and scan it
Wait for the response for the certification
It will either show “Certificate successful” or “Certificate Invalid”
Amazon has expanded its lineup of Echo Show devices with the announcement of the third generation of Echo Show 10 in India. The new smart display officially made its debut along with other Echo devices in September last year. The Amazon Echo Show 10 (3rd generation) comes with an all-new design while holding on to its 10-inch display. The biggest USP of the device is that it comes with a 360-degrees rotating body which automatically rotates when you interact with Alexa. Alongside this, the company has also launched Echo Show 5 which was launched in the US last month.Amazon Echo Show 10 (3rd generation) and Echo Show 5 price in India and availabilityAmazon Echo Show 10 (3rd generation) has made its debut in India with a price tag of Rs 24,999. It should be noted that the device was launched in the US at $250 that translates to Rs 18,600 which is cheaper than the price quoted for the Indian market. This smart device will be available in India in a single black colour variant via the e-commerce website only. Whereas in the US it comes in two colour variants Charcoal and Glacier White. Besides this, the company has also introduced another smart display- Echo Show 5 (2nd Generation) at Rs 8,999. However, the smaller and affordable Echo Show will be available at a discounted price of Rs 6,999. It comes in three colour variants: Black, White, and Blue. Amazon Echo Show 10 featuresAmazon Echo Show 10 features a 10-inch adaptive HD display. It equips a 360-degrees rotating body that automatically rotates when you interact with Alexa. Also, the display will rotate with you during a video call and watching videos that makes sure that it is always in view. There is a 13-megapixel wide-angle camera that moves left to right and right to leftkeep you at the centre of the frame.Amazon Echo Show 10The Amazon Echo Show 10 also incorporates Alexa Group Calling features that lets you connect with up to 8 people for video calling. Besides this, it also supports Zoom and Amazon Chime video conferencing as well.There are dual front-firing tweeters and a powerful woofer onboard. With Netflix support Echo Show 10 will be able to stream content. The smart display also uses advanced computer vision algorithms to help make your home smarter and more secure. When Alexa Guard is in Away Mode, Echo Show 10 can periodically pan the room and will send you a Smart Alert if it detects someone in its field of view. Echo Show 5Amazon Echo Show 5 featuresThe Echo Show 5 is a smaller and more affordable smart display by Amazon. It features a 5.5-inch touch display and comes with an upgraded 2-megapixel HD camera. The camera can also be accessed through the Alexa app to check in on home when you are out of town or away from your home. It can also control smart home devices and also play news and provide weather updates and more. It is also capable of recognising sounds of a crying baby, dog barking, person coughing or snoring—and automate a series of actions.
For the latest gadget and tech news, and gadget reviews, follow us on Twitter, Facebook and Instagram. For newest tech & gadget videos subscribe to our YouTube Channel. You can also stay up to date using the Gadget Bridge Android App.
The pandemic is changing our lifestyle and work ethics, along with education and entertainment. We have started valuing products that offer convenience and enable us to multitask seamlessly. Dell is the latest entrant in the market to offer a webcam for 4K video conferencing. The brand has announced the launch of the Dell UltraSharp Webcam that comes with an auto framing feature. It will compete against Mi TV Webcam and the OnePlus TV camera.Dell UltraSharp Webcam price and availability detailsDell UltraSharp Webcam has been introduced in India with a hefty price tag of Rs 18,999. The device will be available for purchase via Dell’s enterprise channels across the country. Similar to the Dell Webcam, other brands such as Xiaomi and OnePlus have also brought their proprietary webcam for the Smart TVs in the Indian market. OnePlus TV Camera is priced in India at Rs 2,999 whereas Mi TV Webcam comes at a much lesser price tag of Rs 1,999. Both the webcam modules are currently available for purchase in the country.Dell UltraSharp Webcam specificationsSpeaking of the design first, the Dell UltraSharp Webcam features an all-aluminium cylindrical body. There is a magnetic mount along with a tripod adapter so that it can be attached to your device easily. It comes with a magnetic snap-on cover for privacy. There is a white LED light indicator, which lets us know when the webcam is in use.This Webcam from Dell comes with an 8.3-megapixel Sony STARVIS CMOS sensor. The camera is capable of offering 4K UHD resolution at 24fps/ 30fps frame rate and full-HD and HD resolution at up to 60fps frame rate. In addition to this, the camera module also comes integrated with the multi-element lens on top for well light videos and Digital Overlap HDR capability. Over that, the webcam features an AI-backed Auto-Framing feature to keep you stay focused during video conferencing. The device is compatible with both Windows and macOS devices.The Dell UltraSharp Webcam uses 3D/2D video noise reduction for not so grainy picture quality and offers a customisable field of view options to choose from 65, 78, and 90-degrees of FOV. Additionally, it is also capable of providing 5x digital zoom. Furthermore, there is a Dell Express Sign-In feature to detect motion with a built-in proximity sensor. This also lets it log you out when it detects you have stepped away from the sensor. With an IR sensor, it logs in users using Windows Hello.On the connectivity front, there is a USB Type-C port, which can be used to connect with a PC using a USB-A-to-USB-Type C cable that comes inside the box.
For the latest gadget and tech news, and gadget reviews, follow us on Twitter, Facebook and Instagram. For newest tech & gadget videos subscribe to our YouTube Channel. You can also stay up to date using the Gadget Bridge Android App.
Live wallpaper is basically one that contains some form of animation. These wallpapers are interactive wallpapers that are used on your Android home screen. The Google Play Store is home to a vast array of live wallpaper with so many options to choose from. So if you are ever sick of the same dull wallpapers try the live wallpapers by following the guide below.
Pre-installed live wallpaper on Android smartphone
There are not many options to choose from for the pre-installed live wallpaper library. But android smartphones do come with some pre-loaded live wallpapers that you can set on your home screen. Here are the steps:
From your home screen press the menu button or go to Settings from the gear icon
Select Display from the options given in Settings
Press on wallpapers
From the three options that pop up choose one: Home screen, Lockscreen, Both home screen, and Lock screen
Now from the page “Select wallpaper from” choose Live wallpaper: Gallery, Live wallpaper, wallpaper
From the list of live wallpaper select one and change your homescreen layout
As mentioned, Playstore has thousands of Live wallpaper apps on the market for you to download and install and most of them are for free. There are many ways to download a live wallpaper. You can either check the live wallpaper for rating, search on Google for the best live wallpaper on Play Store, or just go Google Playstore and type live wallpaper on the search box and click on the one you like. Here is how you can download and install a live wallpaper app.
Open the Play Store on your Android smartphone and search live wallpaper
Browse for the live wallpaper whose aesthetic appeals to you
Open the page and click install
After the download of the app
Go to phone settings>Display>Wallpaper
Choose Home screen, Lock screen, or Both>Live wallpaper>Set wallpaper
Set videos as live wallpaper on your Android smartphones:
Most Android phones do not come with pre-installed video live wallpaper, but you can always download it from the Google Play Store. The video live wallpaper is to be added to your home screen through a third-party app so make sure you have the best-looking app. Here is a guide to add video as live wallpaper.
Open your Google Play Store and download the best video live wallpaper app you can do that by just typing Video live paper on the search box and choose the one which has the best rating and that is of your taste
Download and install the app on your phones
Open the app on your smartphone after installation
Go to choose options and select the video from your gallery or from other platforms you have a video you want to use as live wallpaper
Previously Google confirmed that Pixel 5A will be a mid-range option that is going to be available later this year in the worldwide markets. But according to a fresh report the company is expected to launch the device in August. In addition to this, the phone may also go on sale in a similar month of the launch. However, the past rumours suggested that this time the company might not bring the device to the stores. Reportedly, Google Pixel 5A is said to be announced in August. The device is a follow up of the original Pixel 5, which was launched last year. However, the upcoming devices are said to be low-cost handsets. Another report suggests, that the phone has been spotted with multiple references to the codename “Barbet” in the latest Android 12 Developer Preview that is slated to be used for the models which were launched last year. These references have a model number “sm7250” that is believed to be the Qualcomm Snapdragon 765G SoC which is also present in the Pixel 5 and Pixel 4a 5G.Earlier Google Pixel 5a was rumoured to be cancelled by the company but the company took this matter into its hands therefore by confirming the launch. Google released a statement saying “Pixel 5a 5G is not cancelled. It will be available later this year but will be available in the US and Japan. This statement contradicts an alleged BIS listing which indicated the launch in India as well. Last year Google Pixel 4a and 5 was launched in the month of October. In the same way, the launch of the Pixel 5a is expected to happen around the same timeline or maybe earlier. Image Courtesy: Jon Prosser/YouTubeSeparately, Google Pixel 6 is also scheduled for a launch. The device is said to be powered by the company’s in-house chipset codenamed “Whitechapel” which is also being referred to as GS101. The GS in the acronym stands for Google Silicon. The new chipset is said to be co-developed with Samsung that may share some similarities with its Exynos chipsets. The Google Silicon is also said to have an octa-core ARM CPU with two Cortex-A78 plus two Cortex-A76 and four Cortex-A55 cores. This can be further paired with ARM Mali GPU which is based on Samsung’s 5nm manufacturing architecture.
For the latest gadget and tech news, and gadget reviews, follow us on Twitter, Facebook and Instagram. For newest tech & gadget videos subscribe to our YouTube Channel. You can also stay up to date using the Gadget Bridge Android App.

 Samsung Galaxy A22 tech specs and features
Samsung Galaxy A22 features a 6.4-inch HD+ Super AMOLED display with 720×1,600 pixels of resolution. It offers a 90Hz refresh rate panel and a 20:9 aspect ratio. The device runs on One UI 3.1 Core based on Android 11 out of the box. Under the hood, there is an unnamed octa-core SoC paired with 6GB RAM with 128GB storage. The internal memory can be expanded up to 1TB using a microSD card.
In terms of camera capabilities, the Samsung Galaxy A22 comes with a quad rear camera setup that includes a 48-megapixel primary sensor with an f/1.8 aperture with optical image stabilisation (OIS). Further accompanied by an 8-megapixel ultra-wide-angle lens, a 2-megapixel macro lens and a 2-megapixel depth sensor with an f/2.4 aperture. For taking selfies, there is a 13-megapixel camera sensor on the front.
The handset packs a 5,000mAh battery that is supported by 15W Adaptive Fast Charging. The device is said to deliver up to 38 hours of talk time. In terms of connectivity, there is 4G LTE, Wi-Fi 802.11ac, Bluetooth v5.0, GPS/ A-GPS, USB Type-C, and a 3.5mm audio jack. While the sensors on the phone include a side-mounted fingerprint sensor, accelerometer, ambient light, gyroscope, magnetometer, and proximity sensor.
For the latest gadget and tech news, and gadget reviews, follow us on Twitter, Facebook and Instagram. For newest tech & gadget videos subscribe to our YouTube Channel. You can also stay up to date using the Gadget Bridge Android App.
Samsung Galaxy A22 tech specs and features
Samsung Galaxy A22 features a 6.4-inch HD+ Super AMOLED display with 720×1,600 pixels of resolution. It offers a 90Hz refresh rate panel and a 20:9 aspect ratio. The device runs on One UI 3.1 Core based on Android 11 out of the box. Under the hood, there is an unnamed octa-core SoC paired with 6GB RAM with 128GB storage. The internal memory can be expanded up to 1TB using a microSD card.
In terms of camera capabilities, the Samsung Galaxy A22 comes with a quad rear camera setup that includes a 48-megapixel primary sensor with an f/1.8 aperture with optical image stabilisation (OIS). Further accompanied by an 8-megapixel ultra-wide-angle lens, a 2-megapixel macro lens and a 2-megapixel depth sensor with an f/2.4 aperture. For taking selfies, there is a 13-megapixel camera sensor on the front.
The handset packs a 5,000mAh battery that is supported by 15W Adaptive Fast Charging. The device is said to deliver up to 38 hours of talk time. In terms of connectivity, there is 4G LTE, Wi-Fi 802.11ac, Bluetooth v5.0, GPS/ A-GPS, USB Type-C, and a 3.5mm audio jack. While the sensors on the phone include a side-mounted fingerprint sensor, accelerometer, ambient light, gyroscope, magnetometer, and proximity sensor.
For the latest gadget and tech news, and gadget reviews, follow us on Twitter, Facebook and Instagram. For newest tech & gadget videos subscribe to our YouTube Channel. You can also stay up to date using the Gadget Bridge Android App. 
")
 To take the screenshot of the entire screen press Shift+Command+3 on your Mac. After pressing the command key a thumbnail will appear on your screen at the corner. You can also use the edit option to edit the screenshot. Once you have clicked the screenshot it will be saved on your Mac.
Read more: How to take a screenshot on Windows 10 using a laptop or a PC?
To take the screenshot of the entire screen press Shift+Command+3 on your Mac. After pressing the command key a thumbnail will appear on your screen at the corner. You can also use the edit option to edit the screenshot. Once you have clicked the screenshot it will be saved on your Mac.
Read more: How to take a screenshot on Windows 10 using a laptop or a PC?
 This function is to capture a customised selection of the screenshots. This means you can take screenshots of a portion of your screens. Press Shift+Command+4 and wait for the cursor to change into Apple crosshair. There are many options now that you can make use of. Follow the steps:
 If you want to take screenshots of a particular window or menu you can press the keys Shift+Command+5. After pressing the command keys, click on the Capture selected window option in the toolbar. Now the pointer will turn into a camera icon and you can drag the icon to a window to capture the screenshot. You can also take a custom screenshot by using the spacebar. There are some advanced features with this command: you can also capture video by pressing Shift+Command+5.
Read also: Top 5 things you didn’t know your Apple Watch could do
If you want to take screenshots of a particular window or menu you can press the keys Shift+Command+5. After pressing the command keys, click on the Capture selected window option in the toolbar. Now the pointer will turn into a camera icon and you can drag the icon to a window to capture the screenshot. You can also take a custom screenshot by using the spacebar. There are some advanced features with this command: you can also capture video by pressing Shift+Command+5.
Read also: Top 5 things you didn’t know your Apple Watch could do
 If you don’t want to rely on native methods to take a screenshot on Mac, you can always download a third-party app. Shottr is one of the best ones around. Not only can Shottr take screenshots on your Mac, but it can also carry out basic editing tasks like erasing certain elements from the screen grabs and pixelating or blurring personal information. You can also pin multiple screenshots on the screen and extract text from them to your clipboard. Want to take a rolling screenshot? Shottr can manage that too.

 Cleaning your microwaves is everyday work and it often gets overlooked. The task seems to take a lot of time but to your surprise, these hacks will make things easier. A clean microwave will ensure the durability of the appliance and hygienic cooking as well. Follow the hacks to clean your microwaves.
 Electrical appliances such as ovens and toasters are advised to be cleaned regularly. The leftover crumbs from your toast might spark a circuit. There are some easy things you can start doing every day after you toast your breakfast: unplug the toaster and shake it upside down so that the crumbs fall down. If the toaster has a crumb tray regularly clean and you can also use a brush to clean the inside of a toaster. For ovens, you can wash the removable tray with water and make sure it is dry before you put it back. You can also use vinegar mixed with water to clean the insides of the oven.
Read also: World Food Day: Top gadgets that will help you prepare great food at home
Electrical appliances such as ovens and toasters are advised to be cleaned regularly. The leftover crumbs from your toast might spark a circuit. There are some easy things you can start doing every day after you toast your breakfast: unplug the toaster and shake it upside down so that the crumbs fall down. If the toaster has a crumb tray regularly clean and you can also use a brush to clean the inside of a toaster. For ovens, you can wash the removable tray with water and make sure it is dry before you put it back. You can also use vinegar mixed with water to clean the insides of the oven.
Read also: World Food Day: Top gadgets that will help you prepare great food at home
 The coffee maker which is used daily should be cleaned regularly, possibly every day. This will prevent bacteria growth and also make your coffee taste better. The coffee maker mixed moisture and warmth which is the highest breeding ground for bacteria and other mold growth. The parts of the coffee maker can be washed with warm and soapy water. Make sure you empty the water reservoir and drip trays regularly. Do not forget to leave the reservoir lid open so that it is dry out.

 In order to keep your inbox clutter-free, the Messages app has received a feature in which it uses machine learning technology to automatically sort your messages into categories, including personal, transactions and OTPs. The new functionality will filter out bank transactions and bills to the transitions tab while the conversations with saved numbers can be easily located in the personal tab. The decluttering of the messages will not hamper any of your conversations they will stay in a device but will be more manageable.
We all have a habit of not deleting one-time passwords (OTPs) from our phones after money transitions, payments or account log-in is complete. So now the Google Messages app will take the lead by auto-deleting the OTPs from your phone. The application will provide the option to automatically delete your one-time passwords (OTPs) 24-hours after they’re received, so you don’t have to spend time deleting them manually. To enable the feature, just tap continue when you see the suggestion prompt to confirm your selection.
As per the company, the new update for the Messages app will be pushed out over the coming weeks (in English) on Android phones in India running Android 8 or newer. These features are optional and can be managed in settings, too. To try them out, update your Messages app to the latest version or download the app here.
For the latest gadget and tech news, and gadget reviews, follow us on Twitter, Facebook and Instagram. For newest tech & gadget videos subscribe to our YouTube Channel. You can also stay up to date using the Gadget Bridge Android App.
In order to keep your inbox clutter-free, the Messages app has received a feature in which it uses machine learning technology to automatically sort your messages into categories, including personal, transactions and OTPs. The new functionality will filter out bank transactions and bills to the transitions tab while the conversations with saved numbers can be easily located in the personal tab. The decluttering of the messages will not hamper any of your conversations they will stay in a device but will be more manageable.
We all have a habit of not deleting one-time passwords (OTPs) from our phones after money transitions, payments or account log-in is complete. So now the Google Messages app will take the lead by auto-deleting the OTPs from your phone. The application will provide the option to automatically delete your one-time passwords (OTPs) 24-hours after they’re received, so you don’t have to spend time deleting them manually. To enable the feature, just tap continue when you see the suggestion prompt to confirm your selection.
As per the company, the new update for the Messages app will be pushed out over the coming weeks (in English) on Android phones in India running Android 8 or newer. These features are optional and can be managed in settings, too. To try them out, update your Messages app to the latest version or download the app here.
For the latest gadget and tech news, and gadget reviews, follow us on Twitter, Facebook and Instagram. For newest tech & gadget videos subscribe to our YouTube Channel. You can also stay up to date using the Gadget Bridge Android App. 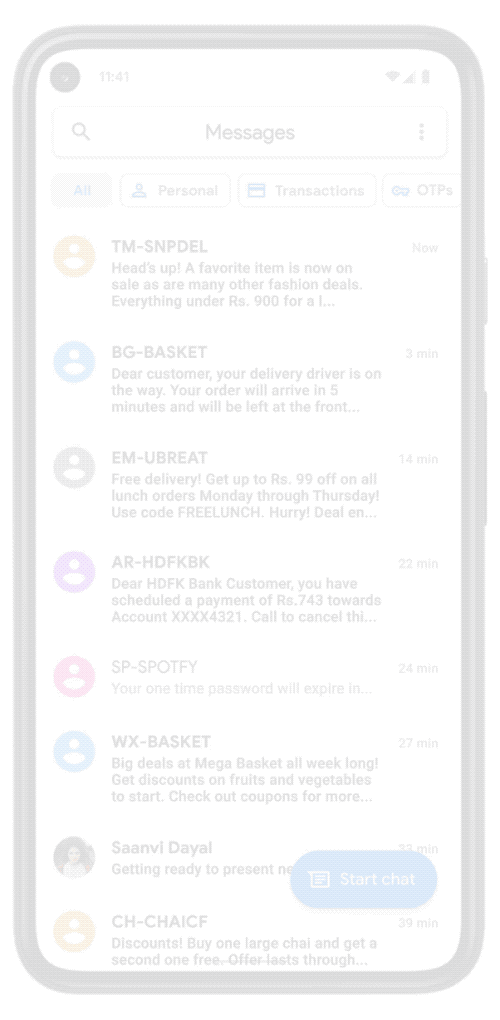 In order to keep your inbox clutter-free, the Messages app has received a feature in which it uses machine learning technology to automatically sort your messages into categories, including personal, transactions and OTPs. The new functionality will filter out bank transactions and bills to the transitions tab while the conversations with saved numbers can be easily located in the personal tab. The decluttering of the messages will not hamper any of your conversations they will stay in a device but will be more manageable.
We all have a habit of not deleting one-time passwords (OTPs) from our phones after money transitions, payments or account log-in is complete. So now the Google Messages app will take the lead by auto-deleting the OTPs from your phone. The application will provide the option to automatically delete your one-time passwords (OTPs) 24-hours after they’re received, so you don’t have to spend time deleting them manually. To enable the feature, just tap continue when you see the suggestion prompt to confirm your selection.
As per the company, the new update for the Messages app will be pushed out over the coming weeks (in English) on Android phones in India running Android 8 or newer. These features are optional and can be managed in settings, too. To try them out, update your Messages app to the latest version or download the app here.
For the latest gadget and tech news, and gadget reviews, follow us on Twitter, Facebook and Instagram. For newest tech & gadget videos subscribe to our YouTube Channel. You can also stay up to date using the Gadget Bridge Android App.
In order to keep your inbox clutter-free, the Messages app has received a feature in which it uses machine learning technology to automatically sort your messages into categories, including personal, transactions and OTPs. The new functionality will filter out bank transactions and bills to the transitions tab while the conversations with saved numbers can be easily located in the personal tab. The decluttering of the messages will not hamper any of your conversations they will stay in a device but will be more manageable.
We all have a habit of not deleting one-time passwords (OTPs) from our phones after money transitions, payments or account log-in is complete. So now the Google Messages app will take the lead by auto-deleting the OTPs from your phone. The application will provide the option to automatically delete your one-time passwords (OTPs) 24-hours after they’re received, so you don’t have to spend time deleting them manually. To enable the feature, just tap continue when you see the suggestion prompt to confirm your selection.
As per the company, the new update for the Messages app will be pushed out over the coming weeks (in English) on Android phones in India running Android 8 or newer. These features are optional and can be managed in settings, too. To try them out, update your Messages app to the latest version or download the app here.
For the latest gadget and tech news, and gadget reviews, follow us on Twitter, Facebook and Instagram. For newest tech & gadget videos subscribe to our YouTube Channel. You can also stay up to date using the Gadget Bridge Android App. 
 The CoWIN vaccination certificates are produced when you are traveling and will help in entering many premises. Earlier the status update on your vaccination was through the Aarogya Setu app, but now CoWIN has allowed you to make changes. Here are the steps to fix the errors.
 Those who have received the first dose will have a single blue border with vaccination status on the home screen. And for those who have gotten the second dose have a “Blue Shield” with a double tick displayed on CoWin after 14 days of the vaccination. When you get vaccinated the certificate that has been issued includes a secure QR code to maintain authenticity and you can do the authentication from the CoWIN portal. Here are the steps:


 Dell UltraSharp Webcam specifications
Speaking of the design first, the Dell UltraSharp Webcam features an all-aluminium cylindrical body. There is a magnetic mount along with a tripod adapter so that it can be attached to your device easily. It comes with a magnetic snap-on cover for privacy. There is a white LED light indicator, which lets us know when the webcam is in use.
This Webcam from Dell comes with an 8.3-megapixel Sony STARVIS CMOS sensor. The camera is capable of offering 4K UHD resolution at 24fps/ 30fps frame rate and full-HD and HD resolution at up to 60fps frame rate. In addition to this, the camera module also comes integrated with the multi-element lens on top for well light videos and Digital Overlap HDR capability. Over that, the webcam features an AI-backed Auto-Framing feature to keep you stay focused during video conferencing. The device is compatible with both Windows and macOS devices.
The Dell UltraSharp Webcam uses 3D/2D video noise reduction for not so grainy picture quality and offers a customisable field of view options to choose from 65, 78, and 90-degrees of FOV. Additionally, it is also capable of providing 5x digital zoom. Furthermore, there is a Dell Express Sign-In feature to detect motion with a built-in proximity sensor. This also lets it log you out when it detects you have stepped away from the sensor. With an IR sensor, it logs in users using Windows Hello.
On the connectivity front, there is a USB Type-C port, which can be used to connect with a PC using a USB-A-to-USB-Type C cable that comes inside the box.
For the latest gadget and tech news, and gadget reviews, follow us on Twitter, Facebook and Instagram. For newest tech & gadget videos subscribe to our YouTube Channel. You can also stay up to date using the Gadget Bridge Android App.
Dell UltraSharp Webcam specifications
Speaking of the design first, the Dell UltraSharp Webcam features an all-aluminium cylindrical body. There is a magnetic mount along with a tripod adapter so that it can be attached to your device easily. It comes with a magnetic snap-on cover for privacy. There is a white LED light indicator, which lets us know when the webcam is in use.
This Webcam from Dell comes with an 8.3-megapixel Sony STARVIS CMOS sensor. The camera is capable of offering 4K UHD resolution at 24fps/ 30fps frame rate and full-HD and HD resolution at up to 60fps frame rate. In addition to this, the camera module also comes integrated with the multi-element lens on top for well light videos and Digital Overlap HDR capability. Over that, the webcam features an AI-backed Auto-Framing feature to keep you stay focused during video conferencing. The device is compatible with both Windows and macOS devices.
The Dell UltraSharp Webcam uses 3D/2D video noise reduction for not so grainy picture quality and offers a customisable field of view options to choose from 65, 78, and 90-degrees of FOV. Additionally, it is also capable of providing 5x digital zoom. Furthermore, there is a Dell Express Sign-In feature to detect motion with a built-in proximity sensor. This also lets it log you out when it detects you have stepped away from the sensor. With an IR sensor, it logs in users using Windows Hello.
On the connectivity front, there is a USB Type-C port, which can be used to connect with a PC using a USB-A-to-USB-Type C cable that comes inside the box.
For the latest gadget and tech news, and gadget reviews, follow us on Twitter, Facebook and Instagram. For newest tech & gadget videos subscribe to our YouTube Channel. You can also stay up to date using the Gadget Bridge Android App.  Dell UltraSharp Webcam specifications
Speaking of the design first, the Dell UltraSharp Webcam features an all-aluminium cylindrical body. There is a magnetic mount along with a tripod adapter so that it can be attached to your device easily. It comes with a magnetic snap-on cover for privacy. There is a white LED light indicator, which lets us know when the webcam is in use.
This Webcam from Dell comes with an 8.3-megapixel Sony STARVIS CMOS sensor. The camera is capable of offering 4K UHD resolution at 24fps/ 30fps frame rate and full-HD and HD resolution at up to 60fps frame rate. In addition to this, the camera module also comes integrated with the multi-element lens on top for well light videos and Digital Overlap HDR capability. Over that, the webcam features an AI-backed Auto-Framing feature to keep you stay focused during video conferencing. The device is compatible with both Windows and macOS devices.
The Dell UltraSharp Webcam uses 3D/2D video noise reduction for not so grainy picture quality and offers a customisable field of view options to choose from 65, 78, and 90-degrees of FOV. Additionally, it is also capable of providing 5x digital zoom. Furthermore, there is a Dell Express Sign-In feature to detect motion with a built-in proximity sensor. This also lets it log you out when it detects you have stepped away from the sensor. With an IR sensor, it logs in users using Windows Hello.
On the connectivity front, there is a USB Type-C port, which can be used to connect with a PC using a USB-A-to-USB-Type C cable that comes inside the box.
For the latest gadget and tech news, and gadget reviews, follow us on Twitter, Facebook and Instagram. For newest tech & gadget videos subscribe to our YouTube Channel. You can also stay up to date using the Gadget Bridge Android App.
Dell UltraSharp Webcam specifications
Speaking of the design first, the Dell UltraSharp Webcam features an all-aluminium cylindrical body. There is a magnetic mount along with a tripod adapter so that it can be attached to your device easily. It comes with a magnetic snap-on cover for privacy. There is a white LED light indicator, which lets us know when the webcam is in use.
This Webcam from Dell comes with an 8.3-megapixel Sony STARVIS CMOS sensor. The camera is capable of offering 4K UHD resolution at 24fps/ 30fps frame rate and full-HD and HD resolution at up to 60fps frame rate. In addition to this, the camera module also comes integrated with the multi-element lens on top for well light videos and Digital Overlap HDR capability. Over that, the webcam features an AI-backed Auto-Framing feature to keep you stay focused during video conferencing. The device is compatible with both Windows and macOS devices.
The Dell UltraSharp Webcam uses 3D/2D video noise reduction for not so grainy picture quality and offers a customisable field of view options to choose from 65, 78, and 90-degrees of FOV. Additionally, it is also capable of providing 5x digital zoom. Furthermore, there is a Dell Express Sign-In feature to detect motion with a built-in proximity sensor. This also lets it log you out when it detects you have stepped away from the sensor. With an IR sensor, it logs in users using Windows Hello.
On the connectivity front, there is a USB Type-C port, which can be used to connect with a PC using a USB-A-to-USB-Type C cable that comes inside the box.
For the latest gadget and tech news, and gadget reviews, follow us on Twitter, Facebook and Instagram. For newest tech & gadget videos subscribe to our YouTube Channel. You can also stay up to date using the Gadget Bridge Android App. 
 Most Android phones do not come with pre-installed video live wallpaper, but you can always download it from the Google Play Store. The video live wallpaper is to be added to your home screen through a third-party app so make sure you have the best-looking app. Here is a guide to add video as live wallpaper.
 As mentioned, Playstore has thousands of Live wallpaper apps on the market for you to download and install and most of them are for free. There are many ways to download a live wallpaper. You can either check the live wallpaper for rating, search on Google for the best live wallpaper on Play Store, or just go Google Playstore and type live wallpaper on the search box and click on the one you like. Here is how you can download and install a live wallpaper app.
 Most Android phones do not come with pre-installed video live wallpaper, but you can always download it from the Google Play Store. The video live wallpaper is to be added to your home screen through a third-party app so make sure you have the best-looking app. Here is a guide to add video as live wallpaper.
