
- Carrying Case
- Keyboard and mouse combo
In This Article

In This Article

In This Article
 Step 3: Locate the backup on your computer or memory card and click on ‘Restore’.
 Cloud storage services like Google Drive and Dropbox come in extremely handy to create an online backup of your data at a very nominal cost. Google Drive offers the first 15GB of storage free of cost. For a lot of users, 15GB is enough to back up all the important stuff from their phone. Creating an online backup has its own advantages. Firstly, you can automatically sync your data and update the backup, without needing to check on it every other week. Secondly, creating an online backup gets rid of the hassle of always plugging in an external storage device and backing data up manually. Here’s how you can recover your data from an online backup.
Step 1: Launch your phone after performing a factory reset.
Step 2: Login using the Google Account in which you backed up all your data.
Step 3: While setting up your device, tap on the ‘Restore backup’ option.
Step 4: Tap on ‘Automatic restore’ to recover your backed-up data from Google Drive.
If you skipped the restore option while setting up your device, go to Settings>Accounts and backup and select ‘Restore data’.
Cloud storage services like Google Drive and Dropbox come in extremely handy to create an online backup of your data at a very nominal cost. Google Drive offers the first 15GB of storage free of cost. For a lot of users, 15GB is enough to back up all the important stuff from their phone. Creating an online backup has its own advantages. Firstly, you can automatically sync your data and update the backup, without needing to check on it every other week. Secondly, creating an online backup gets rid of the hassle of always plugging in an external storage device and backing data up manually. Here’s how you can recover your data from an online backup.
Step 1: Launch your phone after performing a factory reset.
Step 2: Login using the Google Account in which you backed up all your data.
Step 3: While setting up your device, tap on the ‘Restore backup’ option.
Step 4: Tap on ‘Automatic restore’ to recover your backed-up data from Google Drive.
If you skipped the restore option while setting up your device, go to Settings>Accounts and backup and select ‘Restore data’.
 Step 3: Select the kind of data you want to recover.
 Step 4: Connect your Android smartphone to your PC using a USB cable. Make sure USB debugging is enabled on your phone. You can read how to enable it here.
Step 5: Let DroidKit deep scan your device for deleted data.
Step 4: Connect your Android smartphone to your PC using a USB cable. Make sure USB debugging is enabled on your phone. You can read how to enable it here.
Step 5: Let DroidKit deep scan your device for deleted data.
 Step 6: Go through the selected data and select the files you want to keep. You can choose to keep the files on your PC or on the phone.
 Step 7: Unplug your phone after data has been recovered.


In This Article
 Step 4: Tick the box for ‘Encrypt contents to secure data’. Apply the settings and then click on ‘Okay’.
 Step 5: Windows will ask you whether you want to encrypt the entire folder or just that specific file. Enter your choice.
 Once the process is complete, a small yellow lock will appear next to the file or folder that has been encrypted. The files will automatically be decrypted as long as you access them using your Windows account.
 Step 2: Select ‘Zip folder (compressed)’.
Step 3: Rename the folder.
Step 2: Select ‘Zip folder (compressed)’.
Step 3: Rename the folder.
 Step 4: Open the folder and click on ‘File’. Select ‘Add password’.
 Step 5: Create a new password and save your changes.
You can add other files to this folder to password-protect them.
Step 5: Create a new password and save your changes.
You can add other files to this folder to password-protect them.
 7-Zip is a great tool for Windows that will help you add a layer of security to the important files and folders on your system. Here’s how you can use it.
Step 1: Download the 7-Zip tool for Windows using this link.
Step 2: Follow the onscreen instructions and install 7-Zip on your PC.
Step 3: Select the file you want to secure.
Step 4: Right-click on the file and go to 7-Zip>Add to archive.
Step 5: In the following window, enter the password under the ‘Encryption’ section.
Step 6: Change the encryption method from ZipCrypto to AES-256.
Step 7: Click on ‘Ok’ to create the password-protected folder.
7-Zip is a great tool for Windows that will help you add a layer of security to the important files and folders on your system. Here’s how you can use it.
Step 1: Download the 7-Zip tool for Windows using this link.
Step 2: Follow the onscreen instructions and install 7-Zip on your PC.
Step 3: Select the file you want to secure.
Step 4: Right-click on the file and go to 7-Zip>Add to archive.
Step 5: In the following window, enter the password under the ‘Encryption’ section.
Step 6: Change the encryption method from ZipCrypto to AES-256.
Step 7: Click on ‘Ok’ to create the password-protected folder.

In This Article
 Google Calendar’s integration with other Google apps makes it a no-brainer if you’re looking for a seamless and hassle-free calendar experience. You can easily embed Google Meet links into your schedule without needing to look through your emails for the invite at the last minute. Have a flight reservation? Google Calendar will automatically import it and place it in your schedule. Browsing through the calendar, you can view your appointments by date, and simply tap on a date to expand your schedule. The aspect of using Google Calendar is that it works with every other calendar app on your iPhone.
 Apple’s native Calendar app is well-equipped to handle basic scheduling tasks and more. To create an event, all you need to do is press and hold an empty spot in your day. It’s that easy. Apple Calendar allows you to view your calendar in different layouts. For a more detailed breakdown of your schedule, opt for the ‘Day’ view. If you just want to take a cursory glance, go for the week or month view.
 With multiple awards under its belt, Fantastical is without a doubt one of the best calendar apps you can download on your iPhone. Fantastical pays a lot of attention to the aesthetic and the design of the app. The app is loaded with helpful features that you will find easy to integrate into your routine. These include intuitive natural language input, multiple calendar layouts for easy viewing, time zone support, Todoist and Google Tasks compatibility, and even weather forecasts. The premium version of the app unlocks features like meeting polls, multi-device syncing, 10-day weather forecasts, Zoom/Meet/Teams support, and more.
 Things 3 is one of the highest-rated productivity apps on the App Store and has garnered a lot of accolades over the years. This app is the perfect synthesis of intuitive design and powerful features. Apart from basic scheduling tasks, you can use Things 3 to create to-dos (and schedule them on the calendar), create new projects, plan your tasks, and create different areas (like work, personal, and finance) to neatly organise everything. If you’re looking for an app that neatly blends scheduling, organising, and project planning together, Things 3 should be at the top of your list.
 If you own a small business and are constantly flooded with appointments, you’re probably in desperate need of an organising tool. Calendly’s desktop application has acquired a reputation for being one of the best at this task and its iOS app is just as good. Calendly sets up your appointment based on the openings in your schedule and even sends a reminder to the participants ahead of the meeting. To avoid any conflicting bookings, this app works in conjunction with Google, Outlook, Office 365, iCloud, and more.
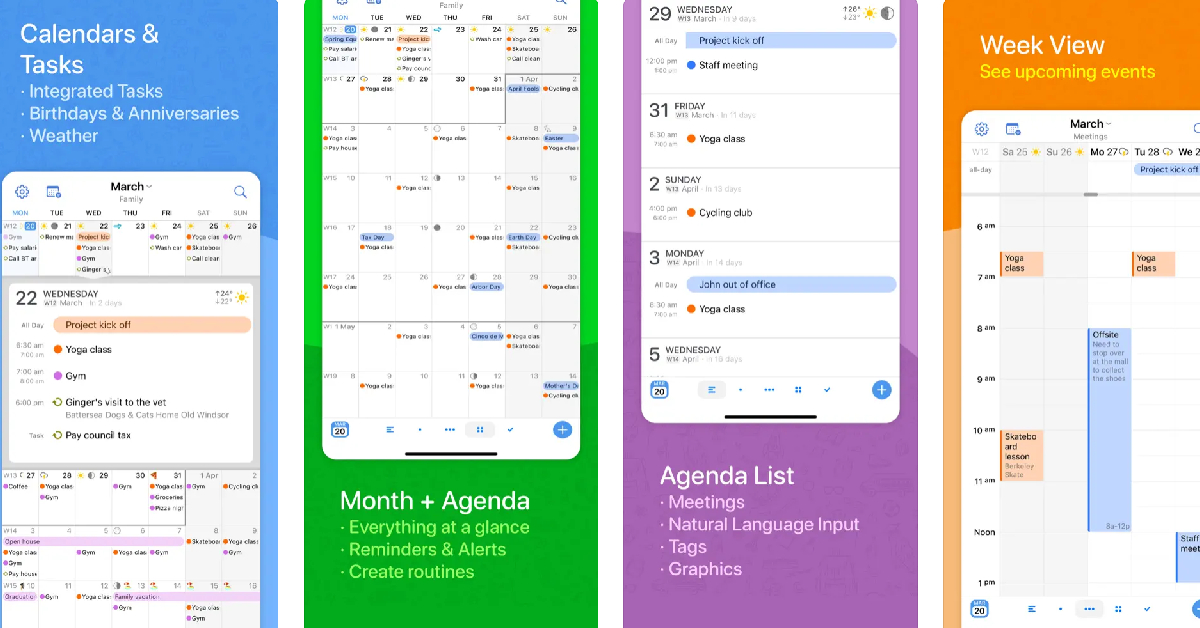
 Calendars 5 by Readdle has all the essential features you want in an ideal calendar app. What we like about this app is its event-focused interface which keeps all your upcoming commitments in sight. You can expand the events with a single touch and quickly edit them if necessary. Seamless syncing ensures that any changes you make to your calendar offline will be immediately reflected on your account as soon as you are connected to the Internet. Calendars 5 is also equipped with a task manager that can create recurring to-do tasks for you.
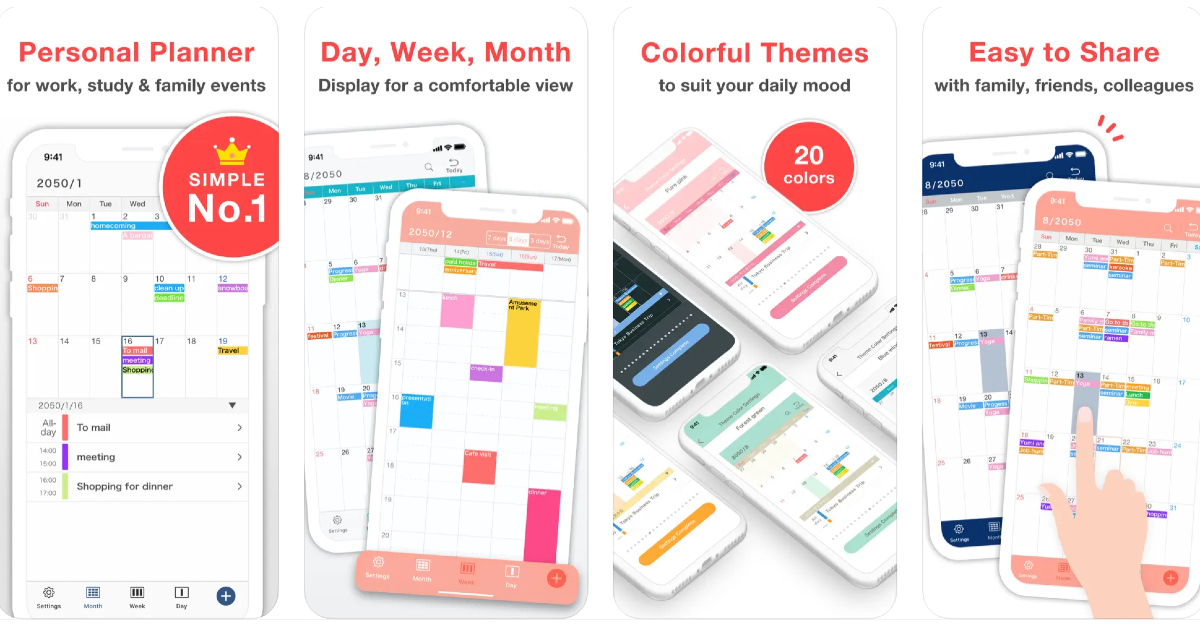 As the name suggests, Simple Calendar gets rid of the bells & whistles and creates a very accessible UI for its users. You can choose a font size that suits you best and browse through the different calendar layouts on offer. Daily tasks can be easily differentiated with colour-coded panels. Entries can be added in the form of text notes, URLs, and even geographical coordinates and map locations. Want to keep your calendar away from prying eyes? You can choose to lock it up with a password.
 BusyCal‘s versatility earns it a spot on this list. This calendar app is compatible with iCloud, Google Calendar, Google Tasks, Microsoft Outlook, Todoist, and other productivity apps and services. This ensures that sharing your BusyCal entries with other iOS or Android users is not hindered by cross-platform issues. Apart from seamless sharing, BusyCal offers all the essential features like multiple calendar layouts, colour-coded entries, natural language input, and more.
 If you use multiple calendar apps on your iPhone, One Calendar can integrate all of them in one place. Using One Calendar, you can view all your appointments and scheduled tasks in one place. This app is compatible with Google, Live, Outlook, iCloud, Exchange, Office 365, Yahoo, NextCloud, Synology, GMX, ownCloud, mailbox.org, and more.
Read Also: iQoo to celebrate 3 years in India with exciting discounts, offers and International fan-meet
If you use multiple calendar apps on your iPhone, One Calendar can integrate all of them in one place. Using One Calendar, you can view all your appointments and scheduled tasks in one place. This app is compatible with Google, Live, Outlook, iCloud, Exchange, Office 365, Yahoo, NextCloud, Synology, GMX, ownCloud, mailbox.org, and more.
Read Also: iQoo to celebrate 3 years in India with exciting discounts, offers and International fan-meet

In This Article
 In addition to this buyers can also avail a discount of Rs 1000 on the OnePlus Nord Watch via OnePlus.in and OnePlus Store App between April 12 to April 15 and Rs 500 off from April 16 to April 30.
The Nord CE 3 Lite was launched in India at a starting price of Rs 19,999. While the 8GB RAM with 256GB RAM with 256GB storage option is priced at Rs 21,999. The device comes in two colour options of Pastel Lime and Chromatic Gray.
Also Read: OnePlus announced the all-new Nord CE 3 Lite 5G with a 108-megapixel camera in India
In addition to this buyers can also avail a discount of Rs 1000 on the OnePlus Nord Watch via OnePlus.in and OnePlus Store App between April 12 to April 15 and Rs 500 off from April 16 to April 30.
The Nord CE 3 Lite was launched in India at a starting price of Rs 19,999. While the 8GB RAM with 256GB RAM with 256GB storage option is priced at Rs 21,999. The device comes in two colour options of Pastel Lime and Chromatic Gray.
Also Read: OnePlus announced the all-new Nord CE 3 Lite 5G with a 108-megapixel camera in India

In This Article

In This Article

In This Article
 Step 3: Select Settings.
 Step 4: Tap on Bixby text call.
 Step 5: Turn the toggle bar on to enable Bixby text call.
 Step 6: Tap on language and voice. Currently, Bixby only offers to screen your calls in Korean and English. More language options will be added soon. You can also download different voices for the assistant and select one you like.
 Step 7: Go back to the previous window and select quick responses. This is where you can choose which messages you want your callers to be greeted with first. You can also add a custom response of your own. These messages will show up on your screen while Bixby is asking questions on your behalf. Long press a particular message and drag it to change its order on the screen. When you’re on call, you can tap on a message to make Bixby relay it to the caller.
 Step 8: Now that you’ve set up Bixby text call, all you need to do is wait for someone to call you. Once you receive a call, tap on ‘Bixby text call’ to begin the screening.
 Step 9: Bixby will ask the first question in the list mentioned above. You can type out a response of your own or select a preset response from the list. You can view the live transcript of the conversation on your screen. Once you’re satisfied with the screening, you can pick up the call.


In This Article
 For taking photos and videos the Poco C51 comes with a dual rear camera setup consisting of an 8-megapixel primary sensor and a secondary depth sensor. The device also includes a 5-megapixel front-facing camera for taking selfies. The smartphone also offers a 1080p @ 30fps option to record videos.
In addition to this, there is a 5,000mAh battery on the phone which comes with 10W charging support. Poco C51 also includes a rear-mounted fingerprint sensor and an accelerometer. In terms of connectivity, there is 4G LTE, Wi-Fi, Bluetooth, GPS, Glonass, Beidou, a micro-USB port, and a headphone jack.
Commenting on the launch, Himanshu Tandon, Country Head, POCO India said, “POCO C-series smartphones have consistently outperformed in the market and managed to steal the show in an otherwise crowded segment. We received a tremendous response to the POCO C31 and have sold over 2 million units to date. Taking the legacy forward, the POCO C51 is here to #SlayAllDay with the newly released MediaTek Helio G36. We are excited to unleash a disruptor in town with the all-new POCO C51, making it a steal bargain for our fans and consumers.”
For the latest gadget and tech news, and gadget reviews, follow us on Twitter, Facebook and Instagram. For newest tech & gadget videos subscribe to our YouTube Channel. You can also stay up to date using the Gadget Bridge Android App. You can find the latest car and bike news here.
For taking photos and videos the Poco C51 comes with a dual rear camera setup consisting of an 8-megapixel primary sensor and a secondary depth sensor. The device also includes a 5-megapixel front-facing camera for taking selfies. The smartphone also offers a 1080p @ 30fps option to record videos.
In addition to this, there is a 5,000mAh battery on the phone which comes with 10W charging support. Poco C51 also includes a rear-mounted fingerprint sensor and an accelerometer. In terms of connectivity, there is 4G LTE, Wi-Fi, Bluetooth, GPS, Glonass, Beidou, a micro-USB port, and a headphone jack.
Commenting on the launch, Himanshu Tandon, Country Head, POCO India said, “POCO C-series smartphones have consistently outperformed in the market and managed to steal the show in an otherwise crowded segment. We received a tremendous response to the POCO C31 and have sold over 2 million units to date. Taking the legacy forward, the POCO C51 is here to #SlayAllDay with the newly released MediaTek Helio G36. We are excited to unleash a disruptor in town with the all-new POCO C51, making it a steal bargain for our fans and consumers.”
For the latest gadget and tech news, and gadget reviews, follow us on Twitter, Facebook and Instagram. For newest tech & gadget videos subscribe to our YouTube Channel. You can also stay up to date using the Gadget Bridge Android App. You can find the latest car and bike news here. 
In This Article

In This Article
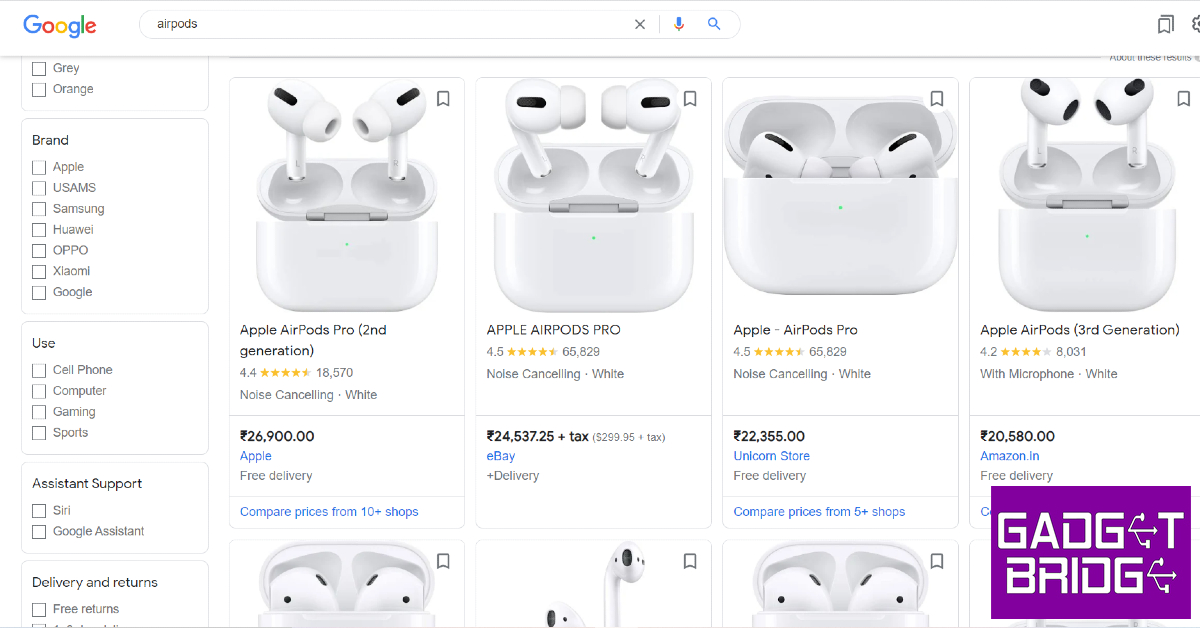 Step 3: Click on the product and select ‘View product details’.
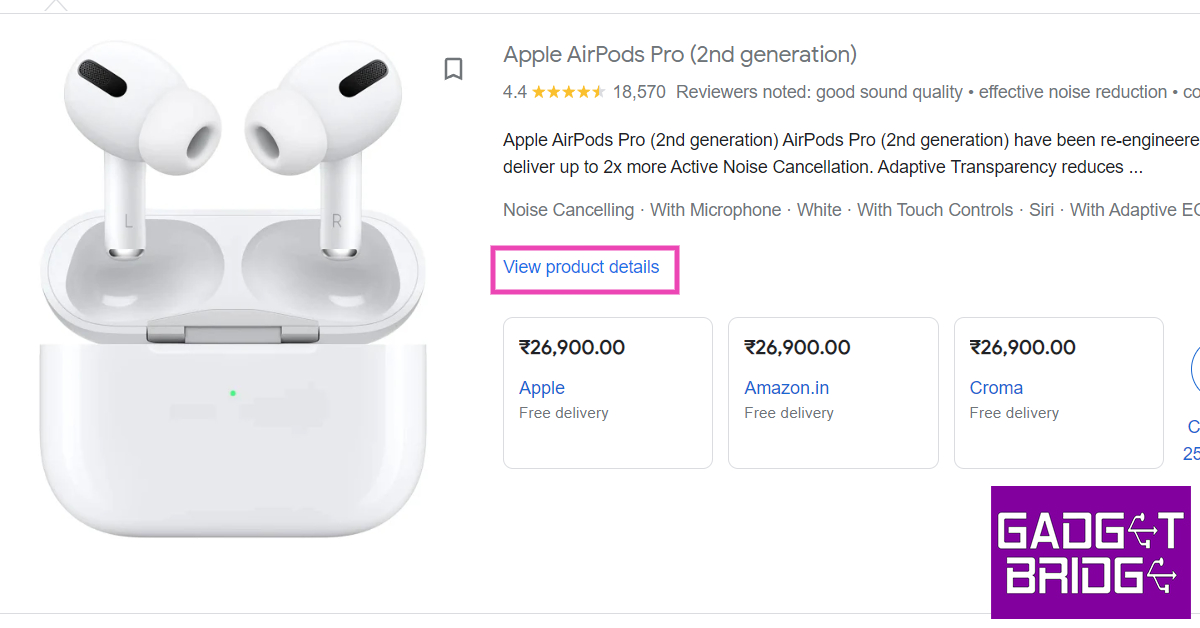 Step 4: Check the panel on the right to compare the product’s prices from different sellers and platforms. Click on ‘Visit site’ to view the product on the seller’s website.
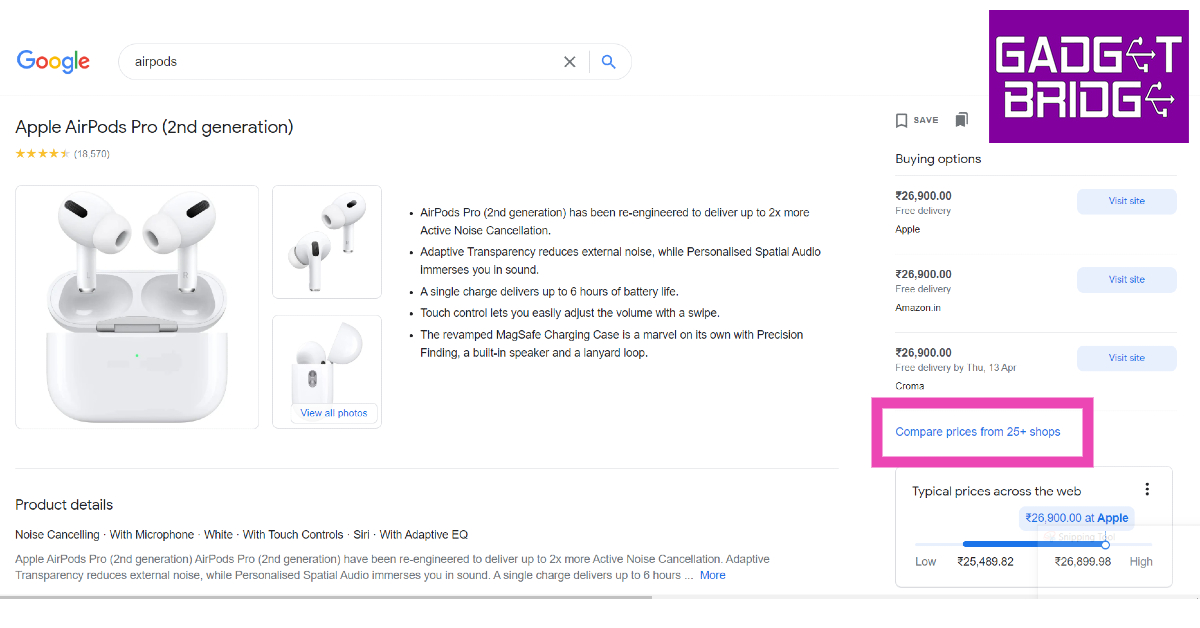
 You will be notified whenever the price of the product gets slashed. To manage the products you’re tracking, click on bookmarks and select ‘Tracked Products’.
 You will be notified whenever the seller reduces the price of the product.

In This Article


In This Article
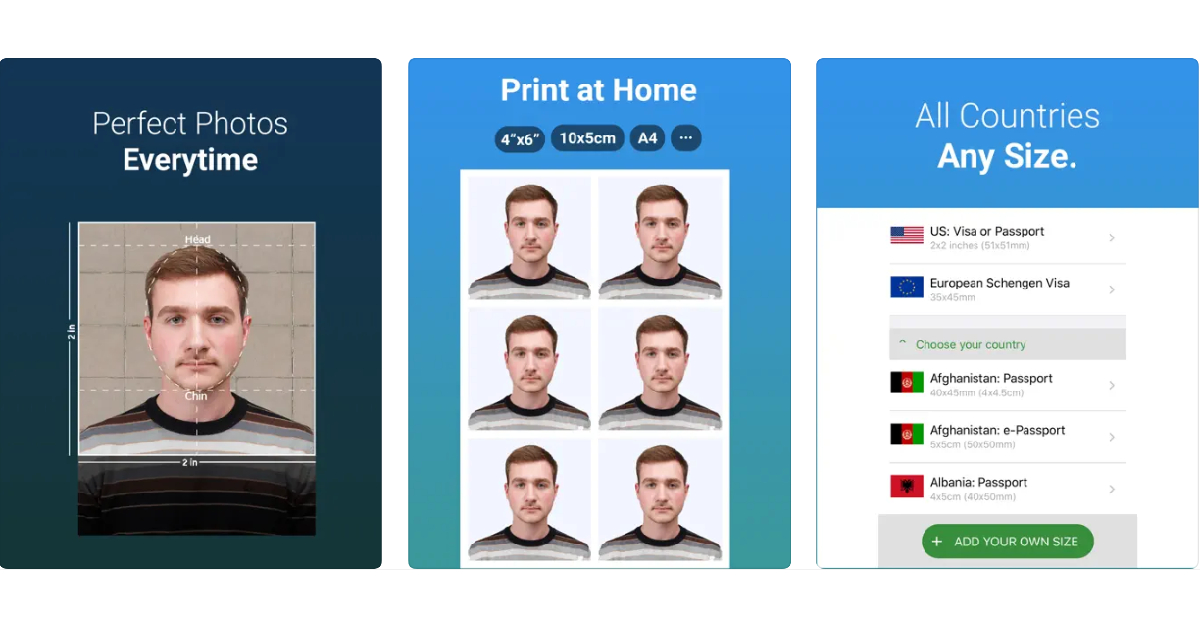
 ID Photo Application is one of the most popular passport photo editing apps on Android. There’s an iOS version of the app as well, although it is not as popular. This app is perfect for turning your pictures taken using your smartphone to passport size (4×6) while retaining all the important details. The app allows you to carry out basic editing tasks like removing spots and blemishes from your face before finalising the photo. You can also customise the size of the picture to match the requirements of the frame in your application. Once you are done editing the image, you can easily print out several copies on a single sheet of paper using your home printer.
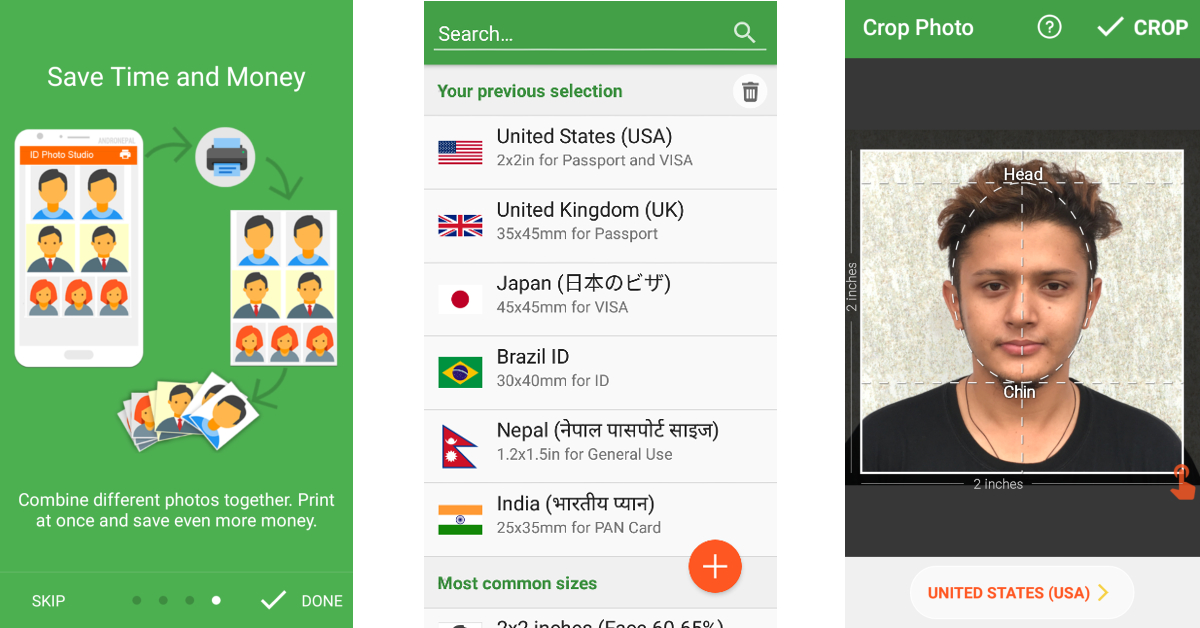
 This passport photo app has a ton of preset frame sizes for different IDs and applications. You can find the frame for your passport, visa, PAN card, and more. You can even create a custom size for the frame to match your needs. Apart from resizing the image to passport size, this app removes the background for you and even gives you the option to add professional suits to the image. You also get basic editing features like adjusting contrast, tilt, white balance, and more. You can use this app to print out several copies of your passport photo on a single piece of paper.
 The Passport Photo app for iOS has integrated passport and visa sizes for every country in the world. While the basic features of this app are free, premium tools like automatic background remover and ink saver are locked behind a paywall. Once you have edited the size of your image, you can set the layout for an A4 size sheet and print it out at home or from a professional service.
 This app recreates the photo lab experience at your home. The one significant advantage is that, unlike a photo lab, you can use this app to take as many shots as you want until you settle on the one you like the most. The app is equipped with instructions to help you take the perfect picture for your passport or ID. Once you’ve taken a picture, you can carry out basic edits within the app itself.
 The Passport Photo & ID Maker comes with passport and visa sizes for over 130 countries. Using this app you can create pictures for passports, visas, green cards, driving licenses, and other IDs. You can even customise the size of the image if you can’t one you like in the presets. You can take a picture within the app or upload one from your phone’s gallery. The app recognises your facial features and crops the image accordingly. You can use basic editing tools within the app to change the contrast, brightness, saturation, and white balance of the image.
 If you’re looking for a simple passport photo editing app that offers all the basic features in a very accessible manner, go for Passport Photo – ID Photo. This app is available on Android as well as iOS. This app has a ton of templates to resize your images to meet different formats. Laying out multiple copies of your image on a single sheet of paper is an easy task using this app. You can either print the pictures at home or save the file and send it to a photo lab to take out professional-grade prints.
 If you want to take a passport photo at home but want to get it printed out by a professional photo lab, you can do so within a single app. The Official Passport photo app by Smartphone iD lets you take images at home and gives you the option to resize them to meet the requirements of your document. Once that is out of the way, you can order prints of the photo from the app itself. You can even track the status of your order from within the app. Concerned about your privacy? This app works in line with the GDPR policy.
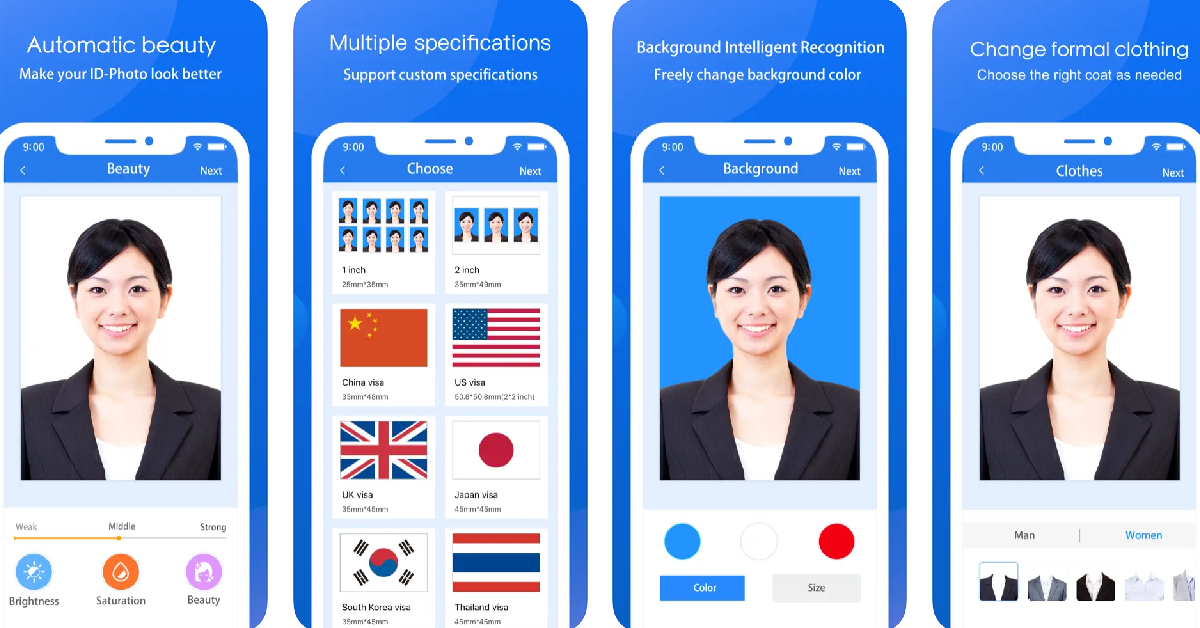
 Apart from resizing your images to meet the required criteria, the Vivid ID app also offers a bunch of AI-powered tools to enhance your image. Using these tools you can change the background of the image, and even try out different professional suit filters for different genders that look very close to real. You can either take a picture within the app or upload one from your phone’s gallery. The Vivid ID app automatically edits the image and resizes it to put your face and upper body in focus.
 With over 10 million downloads on Google Play Store alone, Passport Photo Maker is one of the most popular passport photo apps around. What makes this app a fan favourite is its phenomenal range of editing tools. You can juxtapose several copies of a passport photo on an A4 size sheet of paper and save it to get it printed out later. This app is also capable of creating official photo sizes for IDs, passports, and VISA of different counties like Brazil, Spain, India, USA, and more.
 The ID Photo app lets you edit the passport-size photo to make it look more brightened and legible. You can also choose to edit the background and your clothes. This app can be used to edit photos for passports, IDs, VISA, green cards, naturalisation certificates, school documents, corporate identification, firearms permits, and more. It has dimensional presets for multiple countries, so you don’t have to look up the size of the photo for the VISA of the country you are about to visit.
 The Passport and VISA photos app simplifies the process of taking a passport-sized photo at home. This app guides you through the process of taking the perfect passport-sized picture. Once you’ve shot an image, the app will review whether it fits the perfect dimensions for the official document. It also offers to deliver printed photos directly to your doorstep.
Read Also: Sony ZV-1F vlogging camera with 20 mm ultra-wide angle lens launched in India
The Passport and VISA photos app simplifies the process of taking a passport-sized photo at home. This app guides you through the process of taking the perfect passport-sized picture. Once you’ve shot an image, the app will review whether it fits the perfect dimensions for the official document. It also offers to deliver printed photos directly to your doorstep.
Read Also: Sony ZV-1F vlogging camera with 20 mm ultra-wide angle lens launched in India

In This Article
 To get started, you need to turn on Google Assistant on your smartphone. Go to Google app>Settings>Google Assistant>Hey Google & Voice Match, and turn on the toggle bar for Hey Google. Now, you will be able to trigger Google Assistant simply by saying ‘Hey Google’.
One of the better parts of using Google Assistant is that it’s purely voice controlled and you do not need to scroll on your device to do a particular task. To make full use of this functionality, make sure you have activated Assistant responses on the lock screen. Train Google Assistant to recognise your voice using Voice Match. This will ensure that the voice assistant only responds to you when your phone is locked.
To get started, you need to turn on Google Assistant on your smartphone. Go to Google app>Settings>Google Assistant>Hey Google & Voice Match, and turn on the toggle bar for Hey Google. Now, you will be able to trigger Google Assistant simply by saying ‘Hey Google’.
One of the better parts of using Google Assistant is that it’s purely voice controlled and you do not need to scroll on your device to do a particular task. To make full use of this functionality, make sure you have activated Assistant responses on the lock screen. Train Google Assistant to recognise your voice using Voice Match. This will ensure that the voice assistant only responds to you when your phone is locked.
 If you rely on Google for news, you can ask Google Assistant to read you the headlines of the day. You can even customise the assistant to read you the news from your preferred sources. Simply go to Google Assistant>You>News and set up your preferred sources. Say ‘Hey Google play the news’ to have the assistant read the news to you at any given time.
 Google Assistant can help you with certain tasks using the ‘routines’ trick. For example, upon waking up, Google Assistant can tell you about the weather, read out the schedule for the day from your calendar, remind you of the tasks for the day and any upcoming birthdays, and even tell you if your battery is low so you can plug it in to charge before leaving the house. To set up a routine, go to Google Assistant>Routines and customise any routine you like. You can also set up a new routine for yourself.
 With your smartphone always by your side, setting up reminders is easier than ever. All you need to do is say ‘Hey Google set a reminder for…’ followed by the reminder. You can use this function to set reminders for basically anything. Didn’t get to charge your phone before you left the house? Tell Google Assistant to remind you to plug in your phone to charge after 30 minutes. You can even set reminders for birthdays, anniversaries, and more.
 If you use any smart gadgets or appliances around the house, you can easily control them with your voice using Google Assistant. First, you need to install Google Home on your device and link your gadget with it. Once that is done, you can use voice commands to manage the device. For example, if you use a smart bulb for your room, you can use Google Assistant tricks to turn it on, change the colour temperature or intensity, and even set it to turn off at a specific time.
 Of all the assistant functions mentioned in the list, this is the easiest one to incorporate into your daily routine. If you are always forgetting to add stuff to your shopping list, now you can easily update just by speaking into your phone. To start, say ‘Hey Google create a shopping list’. You can edit the list title and easily add entries to it. You can ask the Assistant to pin this list to your home screen as well.
 Call screening is one of Google Assistant’s newest features and possibly the most helpful one too. Currently, only Pixel phones have this feature and it has been made available in selected regions across the globe. Some Android phones in North America have been given early access to call screening as well. Google plans on rolling out this feature across all Android smartphones in a phased manner.
So, what does call screening do? Using call screening, Google Assistant can take your calls for you, screen them, and answer them on your behalf. You can set up responses for Google Assistant to read out to the caller. The caller’s responses will be shown as a transcript on the screen. Call screening can help you filter a lot of spam calls from annoying telemarketers and other sources.
To enable Automatic call screening on Google Assistant, open the Phone app and go to Settings>Spam and Call Screen. Select ‘Automatically screen’. To do this manually, simply tap on ‘Screen Call’ every time your phone rings. You can also choose to record what the caller says while interacting with Google Assistant.
Read Also: Vivo T2 5G series India launch set for April 11: Key details revealed
Call screening is one of Google Assistant’s newest features and possibly the most helpful one too. Currently, only Pixel phones have this feature and it has been made available in selected regions across the globe. Some Android phones in North America have been given early access to call screening as well. Google plans on rolling out this feature across all Android smartphones in a phased manner.
So, what does call screening do? Using call screening, Google Assistant can take your calls for you, screen them, and answer them on your behalf. You can set up responses for Google Assistant to read out to the caller. The caller’s responses will be shown as a transcript on the screen. Call screening can help you filter a lot of spam calls from annoying telemarketers and other sources.
To enable Automatic call screening on Google Assistant, open the Phone app and go to Settings>Spam and Call Screen. Select ‘Automatically screen’. To do this manually, simply tap on ‘Screen Call’ every time your phone rings. You can also choose to record what the caller says while interacting with Google Assistant.
Read Also: Vivo T2 5G series India launch set for April 11: Key details revealed

In This Article

 The JBL headphones have a 4-mic crystal call algorithm for better sound and call quality even in loud windy environments. With the VoiceAware feature, users can select how much of their own voice to hear by controlling the amount of mic input routed back into the headphones. There is Spatial sound support as well that gives you a theatre-like sound experience.
Also Read: Vivo T2 5G series India launch set for April 11: Key details revealed
The JBL Tour ONE M2 is said to provide up to 50 hours of playtime and 30 hours of battery life with ANC turned on. It does come with fast charging. Just 10 mins of charging provide 5 hours of music playback.
Vikram Kher, Vice President, Lifestyle, HARMAN India said, “We’re thrilled to introduce the JBL Tour ONE M2 headphones, the ultimate listening experience for music lovers and audiophiles alike. Over 76 years of our audio supremacy, has led us to create products like Tour ONE M2 with advanced noise-cancellation technology, pristine sound quality, and comfortable design. One can experience unparalleled sound and a seamless listening experience whether you’re at home or on the go.”
For the latest gadget and tech news, and gadget reviews, follow us on Twitter, Facebook and Instagram. For newest tech & gadget videos subscribe to our YouTube Channel. You can also stay up to date using the Gadget Bridge Android App. You can find the latest car and bike news here.
The JBL headphones have a 4-mic crystal call algorithm for better sound and call quality even in loud windy environments. With the VoiceAware feature, users can select how much of their own voice to hear by controlling the amount of mic input routed back into the headphones. There is Spatial sound support as well that gives you a theatre-like sound experience.
Also Read: Vivo T2 5G series India launch set for April 11: Key details revealed
The JBL Tour ONE M2 is said to provide up to 50 hours of playtime and 30 hours of battery life with ANC turned on. It does come with fast charging. Just 10 mins of charging provide 5 hours of music playback.
Vikram Kher, Vice President, Lifestyle, HARMAN India said, “We’re thrilled to introduce the JBL Tour ONE M2 headphones, the ultimate listening experience for music lovers and audiophiles alike. Over 76 years of our audio supremacy, has led us to create products like Tour ONE M2 with advanced noise-cancellation technology, pristine sound quality, and comfortable design. One can experience unparalleled sound and a seamless listening experience whether you’re at home or on the go.”
For the latest gadget and tech news, and gadget reviews, follow us on Twitter, Facebook and Instagram. For newest tech & gadget videos subscribe to our YouTube Channel. You can also stay up to date using the Gadget Bridge Android App. You can find the latest car and bike news here. 
In This Article

In This Article


 The Sony ZV-1F has a ‘Soft Skin Effect’ option that makes the skin look more vibrant and natural by smoothing it and reducing wrinkles. While Face Priority AE automatically adjusts the brightness even in situations where light changes.
Also Read: Vivo T2 5G series India launch set for April 11: Key details revealed
Moreover, the Sony vlog camera features high precision focusing and Eye AF for both humans and animals without being distracted by other subjects. While the touchscreen ability makes changing subjects simple for users.
The Sony ZV-1F has a ‘Soft Skin Effect’ option that makes the skin look more vibrant and natural by smoothing it and reducing wrinkles. While Face Priority AE automatically adjusts the brightness even in situations where light changes.
Also Read: Vivo T2 5G series India launch set for April 11: Key details revealed
Moreover, the Sony vlog camera features high precision focusing and Eye AF for both humans and animals without being distracted by other subjects. While the touchscreen ability makes changing subjects simple for users.
 According to the company, stabalisation is available for both photos and videos, which is accessible in Active Mode (electronic). With adjustments in tone, brightness, colour depth, and more, the newly introduced Creative Look function provides users with a total of 10 preset options to create desired atmospheres in both still photos and videos with no need for editing. There is an S&Q mode as well to shoot in both slow motion at 5 x slower speed and quick motion at 60 x faster hyper lapse speed to achieve the desired effect. For better audio quality the company has provided an in-built Directional 3-Capsule Mic. However, there is a provision for an external mic for clearer audio.
The camera is compatible with the GP-VPT2BT Shooting Grip with Wireless Remote Commander which offers cable-free control of zoom, recording and more, and expands into a mini-tripod for stable hands-free shots.
According to the company, stabalisation is available for both photos and videos, which is accessible in Active Mode (electronic). With adjustments in tone, brightness, colour depth, and more, the newly introduced Creative Look function provides users with a total of 10 preset options to create desired atmospheres in both still photos and videos with no need for editing. There is an S&Q mode as well to shoot in both slow motion at 5 x slower speed and quick motion at 60 x faster hyper lapse speed to achieve the desired effect. For better audio quality the company has provided an in-built Directional 3-Capsule Mic. However, there is a provision for an external mic for clearer audio.
The camera is compatible with the GP-VPT2BT Shooting Grip with Wireless Remote Commander which offers cable-free control of zoom, recording and more, and expands into a mini-tripod for stable hands-free shots.


In This Article

In This Article

In This Article
 There is a transparent case design with a digital battery indicator allowing users to keep track of the battery life. The Buds Vibe also includes dual noise cancellation with a range of premium features, including Dual Noise Cancellation with up to 35dB Active Noise Cancellation (ANC) and Quad-Mic Environmental Noise Cancellation (ENC).
The earphones also include Bluetooth 5.3 for connectivity. While the Instant Paring Technology with Open-to-Pair Technology for fast pairing. The Truke Buds Vibe has up to 48 hours of playtime with the case and up to 10 hours of playtime on a single charge.
The company also provides 12 months of warranty on the purchase of the device.
There is a transparent case design with a digital battery indicator allowing users to keep track of the battery life. The Buds Vibe also includes dual noise cancellation with a range of premium features, including Dual Noise Cancellation with up to 35dB Active Noise Cancellation (ANC) and Quad-Mic Environmental Noise Cancellation (ENC).
The earphones also include Bluetooth 5.3 for connectivity. While the Instant Paring Technology with Open-to-Pair Technology for fast pairing. The Truke Buds Vibe has up to 48 hours of playtime with the case and up to 10 hours of playtime on a single charge.
The company also provides 12 months of warranty on the purchase of the device.
 Mr. Pankaj Upadhyay, CEO, Truke India, said, “At Truke, we believe that everyone deserves the best technology and in the same pursuit, we launched our ANC Buds series this year. After receiving an overwhelming response from our customers on Buds A1, we realized the huge supply gap of affordable ANC audio products in the market, while the customers are actively looking for such premium features at budget prices.
We are thrilled to launch our latest offering, the Buds Vibe, which comes with premium features like ANC, a stylish transparent case design, a battery indicator and four preset EQ modes for different user preferences. We are confident that customers across India will appreciate our efforts and committed to providing high-quality audio products at affordable prices.”
For the latest gadget and tech news, and gadget reviews, follow us on Twitter, Facebook and Instagram. For newest tech & gadget videos subscribe to our YouTube Channel. You can also stay up to date using the Gadget Bridge Android App. You can find the latest car and bike news here.
Mr. Pankaj Upadhyay, CEO, Truke India, said, “At Truke, we believe that everyone deserves the best technology and in the same pursuit, we launched our ANC Buds series this year. After receiving an overwhelming response from our customers on Buds A1, we realized the huge supply gap of affordable ANC audio products in the market, while the customers are actively looking for such premium features at budget prices.
We are thrilled to launch our latest offering, the Buds Vibe, which comes with premium features like ANC, a stylish transparent case design, a battery indicator and four preset EQ modes for different user preferences. We are confident that customers across India will appreciate our efforts and committed to providing high-quality audio products at affordable prices.”
For the latest gadget and tech news, and gadget reviews, follow us on Twitter, Facebook and Instagram. For newest tech & gadget videos subscribe to our YouTube Channel. You can also stay up to date using the Gadget Bridge Android App. You can find the latest car and bike news here. 
