In order to comply with regulations around recording phone calls without the other party’s consent, Android smartphones are required to use the Google Phone app as their default dialer. While you can still record a phone call using Google’s dialer app, it sends an alert to the other people on the call as soon as you hit the record button. While this is the ethical way to go about things, in some cases, it can defeat the purpose of recording a call. In this article, we show you how to remove the call recording warning on Android smartphones.Read Also:Meta released more tools for creators on Facebook, bringing more improvement to the platform
In This Article
Remove Call Recording Warning on the Google Phone app
Step 1: Install the TTSLexx app from Google Play Store.Step 2: Go to Settings and select General Management.Step 3: Tap on Text-to-speech output.Step 4: Tap on Preferred Engine and select TTSLexx. Save the changes.Step 5: Go back to Settings and select Apps.Step 6: Scroll down to Google Phone and select it.Step 7: Go to Storage and select Clear Data and Clear Cache.Step 8: Restart your phone.This will remove the call recording warning in the Google Phone app.
Turn off Call Recording Warning on OnePlus/Oppo smartphones
OnePlus’ proprietary dialer app does not alert the receiver when you start recording the call. Here’s how you can use it.Step 1: Go to the Google Play Store and install the ODialer app on your OnePlus smartphone.Step 2: Launch the ODialer app on your phone.Step 3: In order to use the app, you will need to set it as the default dialer. Hit Yes on the popup box upon launching the app.Step 4: On the following page, select ODialer as the default dialer app.Step 5: Give ODialer the necessary permissions and phone access.Step 6: Hit ‘Record’ when you’re on a call. The receiver will not hear any call recording alert or warning.
Frequently Asked Questions (FAQs)
How do I disable the call recording alert on the Google Phone app?
Install TTSLexx on your device and set it as the preferred engine in text-to-speech output settings. Clear the cache and app data of the Google Phone app and restart your phone. The call recording warning will be disabled.
Do proprietary dialer apps have a call recording alert?
Proprietary dialer apps from Oppo and OnePlus do not notify the receiver when you start recording the call.
This is how you can remove the call recording warning on your Android smartphone. If your Android smartphone comes pre-installed with the Google Phone app, your best option is to remove it from your device and install the manufacturer’s default phone dialer. If this hack doesn’t work on your device, use the TTSLexx method.For the latest gadget and tech news, and gadget reviews, follow us on Twitter, Facebook and Instagram. For newest tech & gadget videos subscribe to our YouTube Channel. You can also stay up to date using the Gadget Bridge Android App. You can find the latest car and bike news here.
Almost two decades ago, Google introduced a free web-based email service known as Gmail. Gmail is one of the most popular email platforms in the world. It provides users with a secure and convenient way to send, receive and manage their emails. With rising technological advancements, cybercrimes are on the rise as well. To curb this problem Gmail is encouraging its users to enable Enhanced Safe Browsing.
In This Article
What is Enhanced Safe browsing?
Enhanced Safe browsing is an advanced layer of security. It provides users with additional protection while browsing the internet. Enhanced Safe Browsing is an enhanced layer of filtering and scanning that identifies and blocks potentially harmful websites and downloads. Here are some of the features of Enhanced Safe Browsing in Gmail:
Malware and Phishing protection: Enhanced Safe Browsing in Gmail scans websites and downloads for malicious content which includes malware, viruses and phishing attempts. It then blocks such content and prevents users from downloading it.
Dangerous website warning: Enhanced Safe Browsing warns users about websites that can be potentially harmful to them.
Download scanning: Before the completion of downloads, Enhanced Safe Browsing scans the files for any malware. If it detects a threat it will block the download immediately.
Privacy Protection: Enhanced Safe Browsing in Gmail also adds an additional layer of privacy as well. It blocks tracking cookies, prevents websites from collecting excessive user information and provides options to disable tracking advertisements.
Enhanced Safe Browsing works in the background and provides faster and proactive protection against dangerous websites, downloads and extensions. Enhanced Safe Browsing provides protection when you are signed in and improves your security on Chrome and Gmail.
How to enable Enhanced Safe Browsing on Gmail?
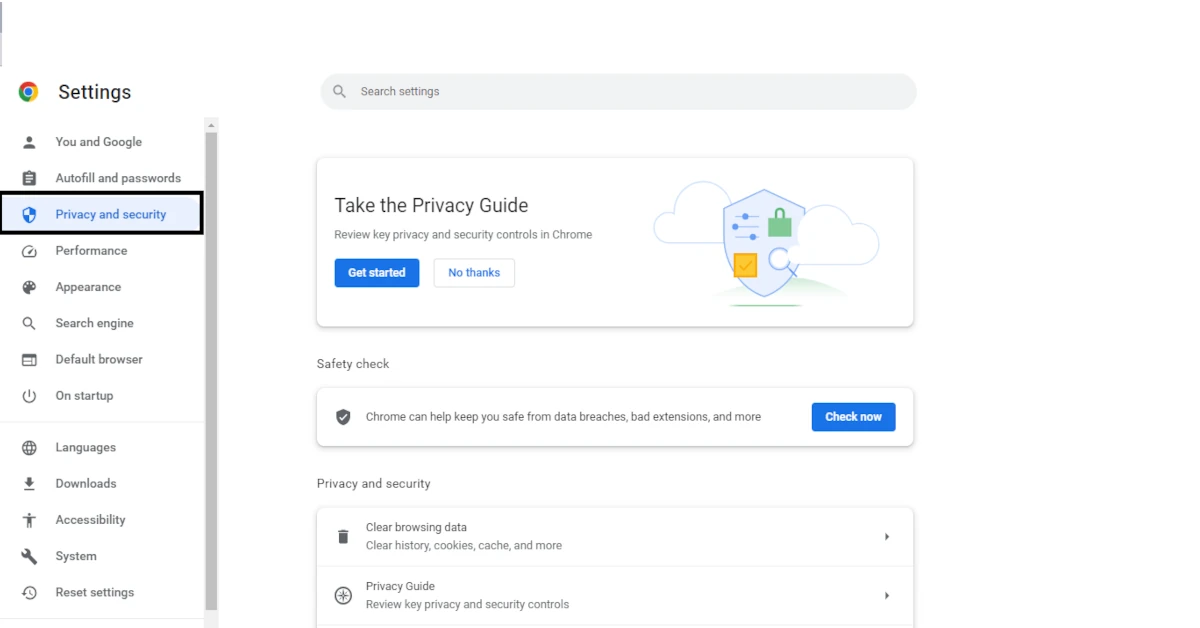
You can turn on Enhanced Safe Browsing on Gmail when it shows on your screen by flipping on the toggle. If you haven’t got the banner suggestion here is a step-by-step guide:
Philips has announced the launch of new smart home security cameras in India featuring two indoor and one outdoor camera. The newly launched lineup includes three models- HSP 1000, HSP 3500 and HSP 3500, supported by a user-friendly app-based, control interface, AI motion detection, anti-theft alarm, smart alert and more.The Philips Smart Security Cameras come with smart capabilities to distinguish between people, noise, and motion, resulting in fewer false alarms and more precise notifications. They also provide 24/7 control that enables viewing, recording, or responding to security incidents from anywhere. These cameras are incredibly easy to set up and use, and Virtual Assistance makes it possible for users to do so in just three easy steps. Videos are protected even if the SD card is removed thanks to AES-128 encryption at the same level as that employed by banks, and app-level biometric recognition prevents unauthorised access.Also Read:Meta brings a new update to Threads, to impose rate limits to combat spamAs we said earlier there are about three variants of Philips home security cameras- HSP 1000, HSP 3500 and HSP 3500.The Philips Smart Indoor WiFi Camera (HSP1000) provides mobile app control that is available around the clock. Better day and night vision is provided by the 2MP camera. The CCTV camera also has features like motion detection, live view, two-way communication, and an anti-theft alarm system that gives smart alerts and simple do-it-yourself installation.On the other hand, a 360° view is provided with the Philips Smart 360° WiFi Indoor Security Camera (HSP3500). For improved 2K clarity, it has a 3MP camera built in. Motion detection, live viewing, a two-way communication function, an anti-theft alarm system, smart warnings, and hassle-free DIY installation are also included.Philips Smart 360° WiFi Indoor Security Camera (HSP3800) has a 2MP camera for enhanced day and colour night vision. The CCTV camera is also IP65 rated for clear vision even during rain. Other security features are similar to the other two models.The price of the Philips Smart Indoor WiFi Camera (HSP1000) is set at Rs 3,295. Whereas the Philips Smart 360° WiFi Indoor Security Camera (HSP3500) and (HSP3800) models come with a price tag of Rs 5,295 and Rs 7,795 respectively. The device will be available for purchase via Amazon and Philips Domestic Appliances online store.
For the latest gadget and tech news, and gadget reviews, follow us on Twitter, Facebook and Instagram. For newest tech & gadget videos subscribe to our YouTube Channel. You can also stay up to date using the Gadget Bridge Android App. You can find the latest car and bike news here.
Twitter is a popular social networking site where people communicate in small messages called tweets. It was developed by Jack Dorsey, Biz Stone and Evan Williams in 2006. Elon Musk is the current Chairman of Twitter and Linda Yaccarino is its current CEO. Twitter is used to share news, images, videos, etc. Twitter is also used for microblogging. However, with its recent changes, your Twitter settings may no longer allow DMs. Here is what we know about it:Twitter has recently introduced us to its paid blue tick verification system known as Twitter Blue. Twitter Blue is available at different pricing in different countries. A user will get blue tick verification after paying for it and after getting verified by Twitter. This is seen as a desperate measure by Twitter to curb its negative cash flow. Read also: 6 Easy Fixes for Cast Option Not Showing In Google ChromeTwitter’s desperate measure to increase Twitter Blue subscribersTo further promote Twitter Blue, Twitter has rolled out another feature. Twitter has changed the settings of users with open DMs blocking non-blue subscribers from messaging them. The tweet from the official account of Twitter read as follows: “Starting as soon as July 14th, we’re adding a new messages setting that should help reduce the number of spam messages in DMs. With the new setting enabled, messages from users who you follow will arrive in your primary inbox, and messages from verified users who you don’t follow will be sent to your message request inbox. Users who previously had their permissions set to allow message requests from everyone will be migrated to this new setting, but can switch back at any time.”In its previous version, Twitter has given two options to its users. They can either allow everyone to DM them or only allow users who they follow to message/DM them. If the user only allowed DMs from users they followed others would not get an option of messaging them. However, with the new Twitter settings, every user will be able to see the DM button but after clicking on it non Twitter Blue subscribers will see a prompt asking them to subscribe to Twitter Blue to message. Read also:How to watch YouTube videos on Android Auto in any car?
In This Article
How you can change the new Twitter DM setting
In case your Twitter DM setting has changed too, here is a step-by-step guide on how you can change it back to default:
Log in to your Twitter account and head to the messages option. It looks like an envelope.
2. Click on the settings option displayed in your primary inbox.3. After opening settings, you can see the option of ‘control who can message you’. Choose the option that suits your requirements.
Conclusion
Twitter has made a significant impact on various fields and is one of the most popular social media applications. It is a powerful tool for sharing news, engaging audiences and mobilising communities. However, this new Twitter DM setting is facing a lot of backlash as is being seen as a marketing mechanism.
For the latest gadget and tech news, and gadget reviews, follow us on Twitter, Facebook and Instagram. For newest tech & gadget videos subscribe to our YouTube Channel. You can also stay up to date using the Gadget Bridge Android App. You can find the latest car and bike news here.
To reduce the risk of road accidents, the Android Auto car interface did not support the YouTube app for the longest time. Users had to rely on screen mirroring apps in order to stream YouTube videos from their phones. That is bound to change now, as Google announced YouTube support for Android Auto at this year’s I/O event. In this article, we show you how to watch YouTube videos on Android Auto in any car.Read Also:Mivi DuoPods A650 Review: Should you buy them?
In This Article
Use the official YouTube app
Since Android Auto now supports YouTube, you can easily watch videos on your car’s infotainment screen. Here’s how.Step 1: Install the Android Auto app on your smartphone.Step 2: Connect your smartphone to your car’s infotainment system via Bluetooth or USB.Step 3: Launch Android Auto on your smartphone. Some cars may automatically trigger Android Auto on the screen as soon as your phone connects to the infotainment system.Step 4: Select YouTube from the list of apps.Step 5: Search for the video you want to watch and play it. You will be able to watch the video on your car’s screen.
Play downloaded videos
Your car’s interface can also play the videos saved on your phone’s internal storage. The only condition is that the videos should be in MP4 format. Here’s how you can go about it.Step 1: Connect your smartphone to your car’s infotainment system via USB. You can also connect a USB drive or an external hard disk to the car.Step 2: Scroll through the car’s interface to look for the storage folder. If there’s a different folder for videos, tap on it.Step 3: Search for the video you want to watch and select it. It will start playing on your car’s infotainment system.
Use a third-party app to mirror your phone’s display
Lastly, you can mirror your phone’s display on your car’s infotainment system. This will require a third-party app like ApowerMirror.Step 1: Install ApowerMirror on your Android phone and the car’s infotainment system. The app is available on Google Play Store.Step 2: Make sure the infotainment system is connected to your phone’s WiFi hotspot.Step 3: Open the app on your phone and the infotainment system.Step 4: On your phone, select the name of your car’s infotainment system.Step 5: Select Start Now.Step 6: Launch YouTube on your smartphone. It will be mirrored on your car’s infotainment system.
Frequently Asked Questions
Does Android Auto support YouTube?
At I/O 2023, Google announced that it will be bringing YouTube to its Android Auto interface. You can now watch YouTube videos on your parked vehicles.
How do I watch YouTube videos on my car’s infotainment screen?
You can use the Youtube app on Android Auto or mirror your phone’s display to watch videos on your car’s infotainment display.
How do I connect my phone to Android Auto?
Install the Android Auto app on your phone and your car’s infotainment system. Connect the two devices via Bluetooth or USB. Launch Android Auto on both devices to use the app.Read Also:Top 3 ways to use your Android smartphone as a modem
Tired of searching high and low for the cast option in Google Chrome? Don’t let its disappearance put a damper on your streaming experience on the big screen. Fear not if you have misconfigured settings or a troublesome extension gone rogue! Today, we will provide you with 7 fixes for the cast option not showing in your Google Chrome.Read Also:Best ways to mirror your Android smartphone to a Smart TV
How to Fix the Cast Option not Showing in Google Chrome
Connect your PC to the same Internet Network as Chromecast
Your Chromecast and computer have to be aligned with the same network connection. Failing, Google Chrome will not be able to display the cast option. To rectify this, ensure that both your PC and Chromecast device are on the same WiFi Network.
Add Cast icon to the toolbar
Step 1: Launch Google Chrome and hit the ellipses at the top right corner of the screen.
Step 2: Hover the cursor over Cast, save, and share. Select Cast.
Step 3: Once the Cast option pops up on the tool-bar, right-click on it.
Step 4: Select Always show icon.
Disable your VPN
Chromecast is built not to communicate with an active VPN or a proxy server. If you have these enabled, you won’t be able to use the cast option.Step 1: To disable VPN, go to your System Settings.Step 2: Select Network and Internet, and then press VPN. Step 3:Disconnect.
Update Google Chrome
Chrome releases update regularly, so it is hard to not miss. You should update your Chrome app often, even when you are not facing any difficulty. If the Chromecast is not visible due to a Chrome bug, updating it should fix itStep 1: In Chrome, click on the three-dotted lines, and select Help.Step 2: From the sub-menu, click on About Google Chrome.Step 3: This action will automatically make Google Chrome check for any updates and will install them. Restart your browser and check if the cast option is visible.Read Also: Chromecast with Google TV with a remote and 4K HDR Support launched
Disable Extensions
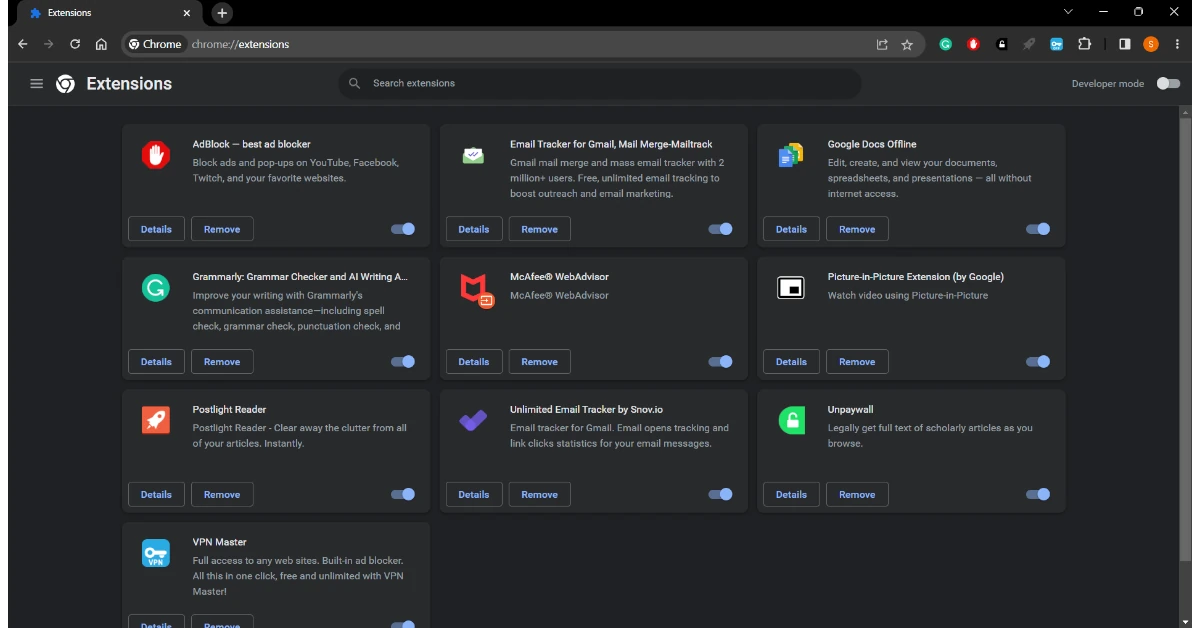
Extensions in Google Chrome add a lot of value to your browsing experience. However, it is not abnormal for these third-party add-ons to encounter glitches. This usually occurs when you have an incompatible or outdated extension installed. Try disabling all your extensions temporarily and see if this helps you to rectify the Chromecast issue.Step 1: In your Google Chrome, type chrome://extensions, and press Enter.Step 2: Disable them one by one.Step 3: Once you are done, restart your browser and check if the cast option appears.
Reset your Chromecast
In rare instances, you can have trouble using Chrome to access your Chromecast if it was previously plugged into a different computer or network. A quick device reset should address the problem. Locate the button on the back of your Chromecast and press and hold it for a long time. You’ll be able to tell the gadget has been reset when the LED light starts to blink. After that, repeat the setup procedure, making sure your PC and Chromecast are both linked to the same Wi-Fi network.
Frequently Asked Questions (FAQs)
What is Chromecast?
A Chromecast is a media streaming device that plugs into the HDMI port of your TV and allows you to cast media on it using your smartphone, laptop, or PC.
Why isn’t Google Chrome able to detect my Chromecast device?
For Google Chrome to detect your Chromecast device, your PC/laptop and Chromecast device need to be connected to the same network.
How do I add the Cast icon to Chrome’s toolbar?
Hit the ellipses at the top right corner of the screen, hover the cursor over ‘Cast, Share, and Save’, and select Cast. Once the icon pops up on the screen, right-click on it and select ‘Always Show’.
Read Also:How to identify a song using Circle to Search on Android (2024)
Conclusion
And there you go, one of these 7 fixes for the cast option not showing in your Google Chrome will work for you. With these fixes, we hope you can rectify your problem of the cast option not showing. Do tell us in the comments if you used any other tip or trick to solve the problem.
More than two weeks have passed since Meta introduced Threads, and already the brand-new social media platform has grown immensely popular, challenging Twitter for first place. A major upgrade to Threads is now available, adding significant new features like built-in translation and a new Follows tab.According to a source, the initial buzz surrounding the Threads app seems to have subsided as the amount of daily active users has significantly decreased due to the platform’s continued lack of key functionality provided by competing platforms.Since the social network’s introduction earlier this month, Meta has brought Threads its first major update. An update to the iOS app, according to the company’s Cameron Roth, adds a Follows tab to the activity stream, making it simpler to discover who has recently followed you. You’ll find it simpler to follow individuals back. To find out if you’re missing anyone, you can check your list of Instagram followers. Unfollowed users can be subscribed to if you want notifications without having them clog up your timeline.Also Read:How to Deactivate/Delete your Threads Account?Additionally, users will get access to a translate button, making it simpler for them to understand content written in languages other than their own. According to Roth, the iOS update contains a few software bug fixes and other enhancements. There are also a few fundamental interface changes, such as reposter labels you can tap. More so while loading or scrolling over your activity stream, the app should be lighter and more fluid.According to Roth some of the features will not be accessible right away since some of them are server-side activated after the latest Threads update has been installed. However, they ought to be available by the end of the day.Besides this, citing an upsurge in spam attacks Threads will impose rate limits similar to Twitter. This will automatically cap the number of times a user can connect with a platform within a particular time frame.Adam Mosseri said, “Spam attacks have picked up so we’re going to have to get tighter on things like rate limits, which is going to mean more unintentionally limiting active people (false positives). If you get caught up in those protections let us know.”
For the latest gadget and tech news, and gadget reviews, follow us on Twitter, Facebook and Instagram. For newest tech & gadget videos subscribe to our YouTube Channel. You can also stay up to date using the Gadget Bridge Android App. You can find the latest car and bike news here.
After its theatrical release in May, Guardians of the Galaxy Vol 3 is finally arriving on steaming platforms next month. The Marvel production will be available for streaming from August 2 on Disney+ Hostar. It will be made available in five languages – English, Hindi, Tamil, Telugu, and Malayalam.Read Also:How to enable the camera level tool in iOS 17?
In This Article
Guardians of the Galaxy Vol 3: Exclusively available on Disney+ Hotstar next month
Following the recent Marvel trend, Guardians of the Galaxy Vol 3 will be added to Disney+ Hotstar 90 days after its theatrical release. Previously, Black Panther: Wakanda Forever was added to the streaming platform 80 days after hitting the theatres. This is in contrast to the 2-month waiting period that Marvel used to have for its productions joining digital streaming.The third instalment of Guardians of the Galaxy will also be the last one with James Gunn as the director. Chris Pratt, Zoe Saldana, Karen Gillan, Vin Diesel, Dave Bautista, and Pom Klementieff revive their roles as the Guardians, setting out on a mission to protect Rocket (played by Bradley Cooper) from the High Evolutionary.
Guardians of the Galaxy Vol 3 has enjoyed commercial success at the box office. The movie has grossed over $840 million worldwide so far. As of now, Guardians Vol 3 is the second-highest grossing film of 2023. If you need to brush up on the storyline before watching the third volume of Guardians, the first two parts can also be streamed on Disney+ Hotstar.Read Also: Top 3 ways to use your Android smartphone as a modem
Conclusion
Disney+ Hotstar currently offers three subscription plans: Super, Premium, and Premium Monthly. While both Super and Premium unlock all content on the platform, only the latter offers an adless experience. The Super subscription package has a screen limit of 2 devices, while Premium pushes this to 4 devices. If you want the 4K viewing experience, you will have to splurge for the Premium subscription. Here is what each subscription plan will cost you.Super: Rs 899/yearPremium: Rs 1,499/yearPremium Monthly: Rs 299/monthFor the latest gadget and tech news, and gadget reviews, follow us on Twitter, Facebook and Instagram. For newest tech & gadget videos subscribe to our YouTube Channel. You can also stay up to date using the Gadget Bridge Android App. You can find the latest car and bike news here.
The increasing technologicaladvancements also pose a potential risk of cybercrimes. People are becoming more dependent on technology for their daily needs leading to a stark rise in cybercrimes. As per reports, around 94% of Indians are Android users. Unfortunately, Android users are facing a new threat from cyber criminals. Android users are being tricked into installing malicious bank account apps. Fraudulent mobile applications mimicking legitimate banking apps that are designed to deceive users and steal their sensitive information are known as malicious bank account apps. Read also:Meta released more tools for creators on Facebook, bringing more improvement to the platformAlthough the Google Play store uses protective measures to ensure no user is being tricked into installing malicious apps it still isn’t 100% safe. Malicious apps often pose as legitimate ones and trick Android users into downloading them. Research shows that around 3,00,000 Android users have been tricked into installing malicious bank account apps. These apps have managed to bypass Google security checks. According to reports by ThreatFabric, Anatsa is the most common form of malware currently which has been active since January. It steals user’s personal information such as usernames and passwords and shares them with hackers. This malware can hack your banking apps, steal financial data and intercept with two-factor authentication as well.
In This Article
The common characteristics of these malicious bank account apps are as follows:
Impersonation: These apps look like legitimate apps by using similar logos, colours and interfaces. Impersonation makes it difficult to distinguish between legitimate and malicious ones.
Data Theft: Malicious banking apps steal users’ sensitive information and use them to cause harm.
Keylogging and screen recording: Keylogging means capturing keystrokes made by users. Keylogging and screen recording enable attackers to gather the personal information of users.
Phishing attacks: Malicious bank account apps trick users with pop-up ads or unwanted SMSs and emails. They request users to share their personal information such as PINs, Passwords etc.
Here are 5 best ways for Android users to stay safe and protected:
Download your banking apps only from trusted sources. Do not download bank account apps from other sites or sources as these may host malicious apps. Always make sure that you are downloading from genuine sources only.
Before downloading any bank account app check for its reviews and ratings. Always pay special attention towards negative reviews that mention suspicious activities.
Check for the permissions being requested by the app during installation. If the app asks for any unrelated permission after installation do remove it immediately.
Android users are advised to regularly update their device’s operating system and installed applications. These updates include security patches and help them protect against vulnerabilities. Always install reputable security software that protects you from viruses and detects harmful applications.
Always remember that legitimate bank account apps do not request any sensitive information from any links or other related channels. Do not click on any links received via SMS, emails or other instant messaging apps. These links can be from hackers trying to steal your information.
Meta has announced a number of improvements to Facebook’s video features. The new update has begun to roll out which brings improved Reels editing features, the option to upload HDR videos, and the Watch tab has been replaced with a Video tab. More features such as adding music, filters, effects, titles, and captions also come with the update. Facebook users will also be able to upload videos in HDR as well.More Reels editing features are now available in Facebook Feed thanks to upgrades from Meta. The company has released new editing tools for Reels or long-form videos. On Reels, Meta integrated audio, music, and text in one location. And now it’s accessible for reels and videos on Feed on Meta Business Suite. Additionally, Meta is introducing additional editing features like the ability to change a clip’s speed, reverse it, or replace it. Users can also make their videos better by exploring and adding music and audio clips, recording voiceovers and reducing unwanted noise.Also Read:Mivi DuoPods A650 Review: Should you buy them?Users of Facebook can now upload HDR videos from their phones to Reels, where they can play them again in full HDR. Also, the Facebook Watch has been replaced with the Video tab. According to the company, this will be a one-stop shop for everything video on Facebook, including Reels, long-form and Live content.The video tab will now have new horizontal-scroll reel sections that emphasise recommended reels so you can easily jump into short-form videos. You can still scroll vertically via a personalised feed that promotes all forms of video content.Soon, the shortcut bar—which is located at the top of the app on Android and the bottom of the app on iOS—will have a Video as a tab. The tabs in the shortcut bar change based on the parts of the app you use the most.Also Read:Google Pixel 7a Review: Is it an all-rounder phone at Rs 44,000?Video Explore has also been revamped on Facebook to let people discover popular videos on the platform. Explore can be found by tapping the search icon in the Video tab. You can view a selection of reels, long-form and live videos related to relevant topics and hashtags.Moreover, You no longer have to switch between applications to view and comment on Instagram Reels that have been recommended to you on Facebook. You can add your Facebook and Instagram accounts to the Accounts Centre to get started.
For the latest gadget and tech news, and gadget reviews, follow us on Twitter, Facebook and Instagram. For newest tech & gadget videos subscribe to our YouTube Channel. You can also stay up to date using the Gadget Bridge Android App. You can find the latest car and bike news here.
This year, Mivi has released a variety of wireless earbuds under various price ranges and categories. We have been using the brand-new Mivi DuoPods A650, one of its newest releases, for more than two weeks. The TWS earphones have features like ENC, custom-tuned EQ, 13mm electro-dynamic bass drivers, and more, and they cost about Rs 1,500. The device is advertised as having a 55ms low latency and 55 hours of playing. Is the cost of these TWS justified? Check out the Mivi DuoPods A650 review below to find out.
In This Article
Mivi DuoPods A650 review: Design
Let’s begin by talking about how it looks. The Mivi Duopods A650’s body is shaped like a pebble. Although the device comes in a variety of colours, we have the blue version. Even though the earphones’ housing is made of plastic, it is sturdy enough to endure accidental falls. Furthermore, a lot of scratches are drawn to the shiny sheen.They have four vertically positioned LEDs on the front that light up, along with the Mivi logo, and red and blue LEDs on the earphones that indicate pairing status and battery life, respectively. At the bottom is a USB-C port for powering the charging case. Mivi has provided a USB-C cable within the box. Also Read:Logitech M240 Silent Bluetooth Mouse Review: Replace your trackpad with this mouseThe case is very luggable thanks to its lightweight. There are no buttons on the charging case for the Mivi DuoPods A650 earbuds. It starts looking for a device to pair with as soon as the case is opened.You can see that the earphones are securely fit into the correct slots when you lift the case’s lid. To keep the earbuds in place, the casing has built-in magnets. Out of the box, the earphones are incredibly lightweight and stem-like appearance. In terms of comfort and fit, the earbuds are slightly hard to wear while you are sleeping, so if you use them for an extended period, you may get ear irritation and pain. If you enjoy listening to music while you sleep, this product is not for you.You can select between songs, accept or turn down phone calls, and enable the voice assistant with the touch sensors in both earbuds. We discovered that there is a delay when pausing or resuming it and that the touch response is slow.
Mivi DuoPods A650 review: Performance
The Mivi Duopods A650 have an IPX4 rating, so you can use them whenever you want, in the gym or while working out in the rain.After initial setup, you only need to remove the earbuds from the charging case, connect them to your device, and they will instantly pair. The Bluetooth 5.1 version is supported by the Mivi Duopods A650 earphones, which also have a wireless range of about 10 metres.Also Read:Google Pixel 7a Review: Is it an all-rounder phone at Rs 44,000?The 13mm electroplated bass drivers in the Duopods have a frequency response of 20Hz to 20KHz. The earbuds sound okay in terms of audio quality and are acceptable for casual use but do not provide professional-grade audio quality. An overly deep bass response is heard. The voices irritating and pinching at high volumes, we identified certain difficulties. The sound was also significantly louder than other gadgets we’ve recently tried. Because the music sounds a little distorted when the volume is set all the way up, it is advised to maintain it at 80% or lower.Additionally, Mivi provides ENC (Enviromental Noice Cancellation) with the Duopods A650, which is effective at blocking out background noise while making phone calls. The Duopods A650’s lack of app support is another frustrating feature, in addition to its distorted loud volume. Sadly, Mivi does not yet have an app for its TWS products.The Duopods A650’s battery life, however, is exceptional. These Mivi earphones’ 500mAh battery offers 55+ hours of nonstop use (claimed by the company). The case provides around 9 hours of talk time and may recharge the earbuds five times. A quick 10-minute charge might give the battery backup a 10-hour runtime. More than an hour is needed to fully charge both the buds and the charging capsule.
Verdict
The Duopods A650’s battery life is excellent and allows for continuous use for up to 9–10 hours. Loud and clear audio can be heard through the microphone. However, because it is extremely loud and the bass is over-boosted, and the sound quality is not particularly impressive. The connectivity strength is excellent, and the entire design is good too. Yes, these are suitable for gaming because of its low latency. As a whole, this product is good except for how painful and uncomfortable the earphones are to wear for longer durations due to its design and thickness.Mivi DuoPods A650 Pros
Good for gaming
The entire design is good too
Excellent battery life
Mivi DuoPods A650 Cons
Too loud
Earbuds are uncomfortable when worn for longer durations
After being banned for nearly ten months, Battleground Mobile India, aka BGMI, is officially available again in India. BGMI fans are looking for ways to improve their game experience and one such method is the usage of redemption codes, which offers a variety of rewards and advantages using BGMI redeem codes players can gain access to new skins, outfits, loot crates, weapons and free UC and diamonds.As mentioned earlier, these codes give users the chance to earn unique rewards and gain extra benefits while playing the game. This includes GUN SKINS (M4, AKM, M416, AWM, M24, UZI, KAR98K), free character voucher, Andy, Carlo, Sara, Victor character for free, free Anna Character on completing the mission and UC or Royal Pass Discount. So here we have gathered a list of the most recent BGMI redeem codes as of 19 July 2023. Also, redeem these codes asap as these are only valid for a limited duration.
Garena Free Fire is a battle royale game with regular awards and tournaments to keep players interested. If you play Garena Free Fire, you should be aware of the redeem codes that are released on a daily basis. However, because the battle royale game is banned in India, players from other countries can use the Free Fire Redeem codes daily. If you’re unfamiliar with the Garena Free Fire redeem codes or don’t know how to get them, we’ve put together a step-by-step guide to help you redeem them. Check out Garena Free Fire Redeem Codes for 19 July 2023.The Free Fire redeem codes are a great way to get free stuff. These are 12-digit codes that contain alphabets and numbers, as well as an expiration date and time. Because the Garena FF redeem codes cannot be used more than once, you should hurry to the redemption page to claim your free reward before someone else does. To get a free reward, all you have to do is go to reward.ff.garena.com/en, which is the official redemption page. Also, keep an eye on this space for daily updates on Garena Free Fire redemption codes and rewards.
If you haven’t heard the news already, Google will be shutting down its Album Archive on July 19, 2023. For those that aren’t aware, Google Album Archive stores all the images linked to your Google Account across different Google services. These images can still be accessed from their respective services. But, if a particular service is now defunct (Google Plus, Google Allo etc.), the images linked to it can only be viewed on the Album Archive. With the Archive shutting down, all those images will be deleted as well. Unless you save them first. Here’s a quick explainer on how you can save your pictures from Google Album Archive before it gets shut down.Read Also:Non-Inverter AC vs Inverter AC: Differences and Which One to Buy
In This Article
Save your images in Google Album Archive using Google Takeout
Step 1: Go to the Google Takeout webpage and sign in using your Google Account.Step 2: Select the checkbox for Album Archive only.Step 3: Scroll down and click on Next Step.Step 4: Select the location where you want to save the images. You can choose to receive a download link if you want to save the images directly on your device. You can also choose to save the images in Dropbox, Google Drive, or One Drive.Step 5: Select the frequency of exports.Step 6: Select file type & size.Step 7: Click on Create Export.Your Album Archive images will be sent to you through your selected medium.
Frequently Asked Questions
What is Google Album Archive?
Google Album Archive is a collection of images from different (older) Google services like Hangouts, Google Plus, Picasa and more.
Is Google Album Archive shutting down?
Yes, Album Archive will be shutting down on July 19, 2023. All your saved images will be deleted following the cancellation.
iPhone has always had a native ‘level’ tool for the Measure app. You can use this feature to make sure that the objects around you are perfectly aligned and not tilting in either direction. This comes in handy when you want to hang a picture frame perfectly. In iOS 17, Apple has introduced this feature on the iPhone’s camera app as well. This will allow users to remove any tilt from their pictures. Integrated into the viewfinder, this tool serves as an excellent guide to taking aesthetically pleasing pictures. In this article, we show you how to enable the camera level tool in iOS 17.Read Also:Apple’s first-generation iPhone sold for over $190,000
In This Article
Here’s how you can use the camera level tool on your iPhone
Before you begin, make sure your iPhone is running the iOS 17 Public Beta version. Read this article to find out how you can install the new OS version on your iPhone.Step 1: Go to Settings and select Camera.Step 2: Switch on the toggle bar for Level.Step 3: Launch the Camera app.Step 4: Hold your iPhone in landscape orientation.Step 5: You will notice a horizontal white line on the screen with two horizontal dashes on either end. This is the level tool. Tilt your phone until this line rests at an angle of 0 degrees, connecting the two dashes to form a straight line. Once it does, it will turn yellow.Step 6: Take a picture.The picture you take will be untitled and align perfectly with the X-axis.
Frequently Asked Questions
Why does my camera take tilted images?
Pictures taken with your phone camera come out tilted because you do not hold your phone straight while shooting them. This can be resolved using the camera level tool on your iPhone.
How do I enable the camera level tool on iOS 17?
To enable the camera level tool for your iPhone’s camera app go to Settings>Camera and switch on the toggle bar for Level.
How do I straighten the crooked images on my iPhone?
This is how you can use the camera level tool in iOS 17. Once you get a hang of this tool, you will never take crooked pictures using your iPhone. As convenient as this feature is, it has a couple of drawbacks. Firstly, it doesn’t work in portrait mode. You will need to put your phone in landscape orientation if you want to use the camera level. Secondly, this tool only works for X-axis alignment. Meaning, you will be able to make sure that the images aren’t tilted along the X-axis but there is always a possibility of them being tilted vertically. To check out other interesting features on iOS 17, read this article.For the latest gadget and tech news, and gadget reviews, follow us on Twitter, Facebook and Instagram. For newest tech & gadget videos subscribe to our YouTube Channel. You can also stay up to date using the Gadget Bridge Android App. You can find the latest car and bike news here.
Five letters, six guesses, and one word. You guessed it right, we are talking about our dear Wordle. When John Wardle introduced this game, he might not have thought about the immense popularity this game will gain irrespective of age group and geography. But here we are, playing a scavenger hunt in our heads to get that one damn word. Today, we will give you five easy tips to play Wordle like a pro.Read Also: How to Get the ‘Wordle’ Game on Your Android or iPhone home screen?Before we dive into the tips, let’s loop in those who are playing it for the first time.
In This Article
If You Joined the Party Late, Here is How to Get Started
Visit the Wordle website, where the game reigns supreme! It isn’t on typical app stores, and guess what? There are no ads, in-app purchases, or membership fees. This is how it works: You will be given a five-letter word to crack. You have six guesses to solve the mystery. Take note of the feedback! A correct letter in the correct location turns green, whereas a correct letter in the wrong spot turns yellow. What about the rest? They remain in the grey zone.Read Also: Top 7 timepass games like Wordle that you can play every daySo, what does one have to do to be the Wordle Champ? Well, here are some tricks that might come in handy:
Tips to Set the Wordleboard on Fire
Tip 1: Begin with the Popular Letters
Some letters hold more power than others. Choose your sacrificial first lamb made of these powerful letters. Those who play word games regularly know that a “P” or an “S” is more likely to occur than an “X” or a “Z”.Building on it, vowels(a,e, i,o,u) are the most common letters to appear in a word. Try making your first words using a combination of these with other common letters like T, N, P, etc. It is a good strategy to proceed with the hit-and-trial method.Try using ADIEU, TEARS, and EARNS.
Tip 2: Boggle your mind with different word games
Wordle skills, like any other skill, get better with practice. Don’t limit yourself, hone your wit with other games like Scrabble, Boggle, and Bananagrams. Wordle skills are not unique to it, so might as well play other crossword games with your friends, family, or your computer.Play other puzzle video games like Portal 2 to sharpen your brain. Outboard your opponents in Chess. Any puzzle game that can exercise your brain will work as a catalyst in the guessing game of Wordle.
Tip 3: Play Wordle daily
Discipline. Yes, you read it right. Play it every day. It’s a cure for boredom and is a good brain tonic. In today’s age of mindlessly scrolling through Instagram reels and Tik Toks, this might be considered a productive endeavour. It also helps us to communicate better, not going overboard here, but it widens our vocabulary. We have learnt so many good and weird words on Wordle that mindfully stumbling upon them would have had a probability close to zero. For instance, one time it was “Sissy.” Three S’s in one word, it was a task to get this one right.
Tip 4: Wordle Only Uses US Spellings
This seemingly minor detail sometimes put the British spellers under a spell. An American reader might not put much thought to it but Wordle might play with this little oversight.For example, the word might be “COLOR” but one could lose their streak if they overlooked the American factor in it.
Tip 5: Keep a Check on Your Statistics
Keep an eye on your Wordle statistics to track your score and guess performance. Whether you use the same starting word each time or change it up, analysing your guess data is vital to determining the effectiveness of your strategy and making adjustments.Accessing your up-to-date statistics is a breeze through your account, allowing you to stay informed and adjust your approach in real-time.Read Also: How to install Google Play Games Beta on your PC?
If you’ve got an old Android smartphone lying around, you can use it as a modem for your PC. This will especially be of great use to people who do not want to splurge on a home WiFi network. You can simply share your phone’s mobile data with your PC whenever you want to go online. In this article, we bring you the top 3 ways to use your Android smartphone as a modem and tether your internet data.Read Also:Best 5 Drones Under $100 In The USA
In This Article
USB Tethering
Step 1:Connect your smartphone to your PC using a USB cable.Step 2: A popup box will appear on your phone. Select USB Tethering on it.Step 3: If the popup box does not appear on your device, swipe down from the status bar and select USB options from the notification panel.Step 4: Select USB Tethering from the list of options.Your PC will start sharing your Android smartphone’s data connection.
Use your Android smartphone as a model via Bluetooth
Step 1: On your Android smartphone, go to Settings and select Connection and Sharing.Step 2: Tap on Personal hotspot and switch on the toggle bar for Bluetooth tethering.Step 3:Connect your smartphone to your PC via Bluetooth.Step 4: On your PC, go to Settings and select Network and Internet.Step 5: Click on Advanced Network Settings.Step 6: Scroll down and select More network adapter options.Step 7: Double-click on Bluetooth Network Connection.Step 8: Select your device and click on Connect using.Step 9: Select Access Point.Your PC will start sharing your phone’s data connection via Bluetooth.
Use a Personal WiFi Hotspot
The easiest way to share your phone’s mobile data with your PC is by creating a personal WiFi hotspot. Simply swipe down from the status bar and select the ‘WiFi Hotspot’ or ‘Personal Hotspot’ tile from the Quick Settings Menu. Once the hotspot has been created, you can search for it on your PC and connect to it using the hotspot password. Don’t know what the password is? Long press the WiFi Hotspot tile and look for security details. You will be able to view and change the WiFi hotspot password. Creating a personal hotspot essentially turns your Android smartphone into a modem.
Frequently Asked Questions (FAQs)
How do I use my Android smartphone as a modem?
You can share your phone’s mobile data with your PC using USB tethering, Bluetooth tethering, or by creating a personal WiFi hotspot.
How do I share my phone’s internet via a USB cable?
To enable USB tethering on your phone, connect it to your PC using a USB cable and select USB Tethering from the list of options.
AFib History, a new function on Apple Watch Series is now accessible in India. The features will be available on Apple Watch Series 4 and later for users on watchOS 9. This Apple Watch feature will allow users to track how frequently their heart rhythm exhibits atrial fibrillation (AFib) symptoms. For those who are unaware, AFib is a long-term irregular heart rhythm disorder that results in the heart’s upper and lower chambers beating at different times.Apple Watch users with atrial fibrillation (AFib) can now monitor and manage their disease with the help of the AFib History. According to the company, the new function will only be available on Apple Watches running WatchOS 9 and newer. Indian users need to make sure their iPhones are running iOS 16. According to Apple’s support page, AFib History is only available to those who have been diagnosed with the illness and are over the age of 22.AFib History is a first-of-its-kind service for people who have already been diagnosed with AFib that can track how long your heart has been in AFib and also improve the management of crucial lifestyle factors.A type of abnormal heart rhythm known as atrial fibrillation (AFib) occurs when the upper and lower chambers of the heart do not beat in sync. Some with this disease show symptoms and some don’t. Others report signs including a racing heartbeat, palpitations, exhaustion, or shortness of breath. It is said to be the most common type of serious arrhythmia.Also Read:Apple’s first-generation iPhone sold for over $190,000Although AFib is a chronic illness, the duration of AFib might vary. Regular exercise, enough sleep, a heart-healthy diet, maintaining a healthy weight, and getting treatment for various medical disorders that could exacerbate AFib all have the potential to lessen the amount of time your heart is in AFib. AFib can cause heart failure or blood clots that may result in a stroke if left untreated.
In This Article
How does it work?
AFib History is a first-of-its-kind service for people who have already been diagnosed with AFib that can track how long your heart has been in AFib and also improve the management of crucial lifestyle factors.Potential symptoms of AFib can be recognised through the Apple Watch’s ECG app and irregular rhythm warning.AFib History, also known as AFib burden, provides you with a weekly estimate of the amount of time your heart exhibits AFib-related symptoms. You can keep track of this over time and discuss it with your doctor to have more in-depth conversations. Although AFib can happen at any time, there are some things that may affect how frequently your heart displays AFib symptoms.Also Read:Sony signs deal with Microsoft, Call of Duty to remain on PlayStationAlways seek medical advice if users are in any discomfort. The business claims that customers’ Exercise Minutes, Sleep Minutes, and Mindful Minutes are automatically logged whether they exercise, sleep, or meditate while consistently wearing an Apple Watch. Users can also tap each life factor, then tap Log to manually log the details. They can also tap a suggested 3rd party app to download from the App Store to track each factor.
How to set up AFib History
Update your iPhone to the latest version of iOS and Apple Watch to the latest version of watchOS.
Select Yes to indicate that you have been diagnosed with AFib by a doctor, then tap Continue.
Tap Continue to learn more about AFib History, the results, and life factors.Tap Done.
View AFib History estimate
After gathering enough readings, every Monday users receive weekly alerts on Apple Watch with the estimated percentage of time their heart showed signs of AFib from the previous week. The estimate for AFib History is displayed as a percentage. A lower percentage indicates a lesser frequency of AFib, whereas a higher percentage indicates a greater frequency. Never will the AFib History display 0%. It will instead display as “2% or less.” To compare a Life Factor with AFib History, users can also tap Show Life Factors.
Users can also view their history in greater detail in the Health app.
On iPhone, open the Health app.
Tap Browse, then tap Heart.
Tap AFib History. If users have AFib History saved to Favorites, they can also access it from the Summary tab.
Buying an air conditioner (AC) is not as easy a task as it is assumed to be. While comfort and cost are significant aspects, it is also important to consider energy efficiency and environmental effect. Keeping in mind the cooling and heating requirements, home layout, and AC types, the choice between inverter and non-inverter air conditioners becomes imperative. Today we will provide you with the best insights to help you understand the differences between these air conditioner units and to help you make an informed choice.Read Also: Panasonic unveils new ACs in India, price starts at Rs 39,900
In This Article
Key Differences between the Non-Inverter and Inverter Air Conditioners
A non-inverter air conditioner, often known as a fixed-speed air conditioner, uses a constant-speed compressor motor. The compressor motor turns off when the required temperature is reached and restarts when the temperature rises. This entails that non-inverter air conditioners have a fixed cooling capacity and adjust the compressor dependent on the surrounding temperature. An inverter air conditioner on the other hand uses a variable-speed compressor motor to regulate the cooling output depending on the temperature required. In contrast to non-inverter ACs, the compressor in an inverter AC runs continuously but can be regulated by adjusting the frequency of the power supply. When the target temperature is attained, the compressor slows down instead of entirely shutting down, resulting in efficient cooling with lower power usage and lesser noise.Non-inverter air conditioners often use refrigerants that generate toxic emissions and harm the environment. Modern inverter air conditioners, on the other hand, use efficient refrigerants like R32, which not only give improved cooling capability but also produce fewer hazardous emissions. Inverter ACs surpass non-inverter models in terms of energy efficiency, saving up to 30% on electricity use.Inverter air conditioners have lower energy expenses and faster cooling capabilities. They are capable of dehumidifying the air and providing improved temperature control as compared to non-inverter types since they can vary the compressor speed to adapt to changing conditions.Read Also: Samsung Launched a new series of Convertible Inverter Air Conditioners
Factors to Keep in Mind While Choosing Between the Two
Energy Savings: Inverter air conditioners often have higher energy efficiency than non-inverter versions, resulting in long-term utility savings. Temperature Control: Inverter AC units thrive at maintaining a constant temperature with little variations, however, non-inverter systems can cause temperature fluctuations due to their “all or nothing” approach.Consider the Space Size: When selecting an air conditioner, think about the size of the room or area to be cooled. In very large settings, a non-inverter air conditioner will be more suited.Environmental Impact: As stated earlier, inverter ACs are more environmentally friendly compared to their non-inverter counterparts as they consume less energy and have lower greenhouse emissions.Quieter operation: Inverter air conditioners typically generate less noise than non-inverter versions.Upfront Cost: While non-inverter air conditioners have a lower upfront cost, inverter air conditioners are a smarter investment in the long term due to their energy efficiency, resulting in potential cost savings over time.Lifespan: Inverter air conditioners often have a longer lifespan than non-inverter versions, ensuring durability and longevity.Maintenance Requirements: Inverter air conditioners require less maintenance and repairs than non-inverter units.Read Also: Panasonic unveils new ACs in India, price starts at Rs 39,900
Conclusion
Individual tastes and unique requirements ultimately determine whether one should buy an inverter or a non-inverter AC unit. Choosing an inverter AC is a sensible decision for individuals that prioritize long-term energy savings and are willing to invest upfront. If cooling large rooms on a budget is the primary concern, a non-inverter AC might be a good option.
For the latest gadget and tech news, and gadget reviews, follow us on Twitter, Facebook, and Instagram. For the newest tech & gadget videos subscribe to our YouTube Channel. You can also stay up to date using the Gadget Bridge Android App. You can find the latest car and bike news here.
Many of us enjoy collecting items, but who would believe that an iPhone can also be purchased as a collectible? Yes, the first generation of Apple iPhone was up for auction and someone bought the 16-year-old device for more that Over $190,000.A 2007 Apple iPhone fetched $190,372.80 at auction. Someone paid 300 times the item’s original sale price to purchase it. After a $10,000 opening offer, the auction received a total of 28 bids.This is not the first time an iPhone has been offered for sale as a collectible. Another first-generation iPhone was auctioned by The LCG Auctions for $63,356 in February. In March, a different company, Wright Auctions, sold a first-generation iPhone for $40,320.According to the item description on LCG Auctions, the vintage Apple phone is the “Holy Grail” of phone collecting.Also Read:Sony signs deal with Microsoft, Call of Duty to remain on PlayStationFor those who are unaware the first-ever iPhone debuted all the way back in January 2007. At the time, Apple released two versions of what would become its most successful product ever: a 4GB storage model that cost $499 and an 8GB model that cost $599.According to the auction description, the 4GB model, which cost $599 at the time of purchase, was still wrapped in its factory packaging and in great condition. The object was referred to as “exceedingly rare” and a “popular high-end collectible” by the auctioneer LCG Auctions.Due to slow overall sales and the introduction of an 8GB variant, the 4GB model was dropped soon after launch. And this is how the 4GB model is the one that has started to get some collector’s value. Apple discontinued the 4GB version because the majority of customers just paid the extra $100 to double the phone’s storage. This is why the unsold devices still remained sealed in their boxes.According to LCG Auctions, the 2007 Apple iPhone was being auctioned off in its original box, still factory sealed, and was reportedly in “exceptional condition.” For the latest gadget and tech news, and gadget reviews, follow us on Twitter, Facebook and Instagram. For newest tech & gadget videos subscribe to our YouTube Channel. You can also stay up to date using the Gadget Bridge Android App. You can find the latest car and bike news here.
Emojis are an integral aspect of the texting experience. If you’re serious about your emoji game then you must know that there are tons of unique emojis out there that can’t be found on the default iPhone keyboard. These emojis can be used on any messenger or social media platform. If you’re looking to make your conversations more fun, here are the 8 best emoji keyboards for your iPhone.Read Also:Top 3 Ways to View Saved WiFi Passwords on a Windows 10/11 PC
In This Article
Emoji>
Download from App StoreEmoji> is one of the best emoji apps for iPhones around. The app is constantly updated with new emojis, fonts, stickers, fonts, and more. The app is compatible with all the major instant messengers like iMessage, WhatsApp, Messenger, and more. Apart from sending new and fun emojis to your friends, you can also use the Emoji> app to play different emoji games. To add the Emoji> keyboard on your iPhone, launch the app and go to Add Keyboard>Add Now>Let’s Go>Keyboards>Emoji+>Allow full access.
Gboard
Download from App StoreGoogle’s very own Gboard is one of the most popular keyboards on the Android platform. It is not surprising that it is just as good on iOS. While it may seem like a regular onscreen keyboard, the emoji-related features on this app are quite underrated. One of our favourite features is the emoji fusion tool, which two or more emojis together to create a new one. Gboard also lets you search for GIFs using emojis and has tons of emoticons for old-school users.
Symbol
Download from App StoreEmojis are fun, but sometimes nothing gets the message across like a good old unicode symbol. If you’re looking for a niche symbol that can’t be found in the emoji section of your default keyboard, Symbol might be worth giving a shot. In this app, you’ll find dozens of different kinds of arrows, crosses, fonts, and characters. If you’re searching for a symbol that doesn’t belong in the English language, this app will not disappoint you.
AA Emoji Keyboard
Download from App StoreAA Emoji Keyboard has a unique set of emojis that will definitely breathe life into any dull conversation. You can choose between static and animated emojis and easily search for the relevant feeling you’re trying to get across by going through the different categories. The classification of the emojis in this app makes them easier to access and also ensures that you don’t keep reusing the same set of emojis in your conversations.
Kika
Download from App StoreA 4.6 rating from 184K ratings is a sign of a rock-solid app. If you’re serious about your emoji game, Kika is the way to go. This emoji app not only offers an extensive collection of emojis, but you also get to choose from different themes, fonts, textarts, stickers, and more. Kika is compatible with all major social media platforms along with instant messaging apps like Telegram, WhatsApp, Snapchat, iMessage, and more.
SMS Rage Faces
Download from App StoreRemember the Rage Faces from the early 2010s? You can still send them as emojis using this app. If you’re looking for a dose of nostalgia, this app is a perfect trip down memory lane. You will find almost every famous rage face in this app along with some of the lesser-known ones that you may not have come across earlier. You can search for rage faces by category and even import your own pictures from the camera roll!
Emoji Free
Download from App StoreEmoji Free has a diverse set of emojis that can be used wherever there is a text field. Be it an instant messaging app or your website, this app will pull through. You can choose from static and animated emojis, and if you’re feeling a bit creative, you can use this app to send unique patterns composed of emojis. Apart from that, Emoji Free also offers a bunch of fonts to make your social media captions stand out.
Big Emoji
Download from App StoreOne of the more unique features of the Big Emoji Keyboard is that it lets you create emoji stickers from your photos. You can upload an image from your iPhone’s gallery on this app and turn it into a sticker. You can download different emoji packs or play the slot machine to win unique emojis based on themes like pets, weddings, food, animals, festivals, and more. Big Emoji is compatible with all major messaging and social media apps.Read Also:Lenovo Tab M10 5G With 10.61-inch LCD display and 7,700mAh battery launched in India
Conclusion
These are the 8 best emoji keyboards you can download on your iPhone right now. While all the apps mentioned in this list are free to use, some may come with paid ‘Pro’ versions or have premium emoji packs locked behind a paywall. Already use an emoji keyboard on your phone? Let us know which one it is in the comments!For the latest gadget and tech news, and gadget reviews, follow us on Twitter, Facebook and Instagram. For newest tech & gadget videos subscribe to our YouTube Channel. You can also stay up to date using the Gadget Bridge Android App. You can find the latest car and bike news here.
Drones have grown in popularity in recent years, exciting both hobbyists and experts. However, the impression that owning a drone involves a large investment is rapidly fading. With technological breakthroughs and a growing market, you may now go on your flying adventures without breaking the bank. In this article, we’ll take you through a list of the Best 5 drones under $100 in the USA that offer great features and exceptional performance at a low price. Read also: DJI Mini 2 drone weighs less than 249 grams
In This Article
DJ Tello
The DJ Tello is an excellent drone for both beginner and experienced pilots, providing a pleasant flying experience thanks to its easy-to-use layout and amazing features. The Tello provides dependable suspended adventures with its robust flight performance and battery life of roughly 13 minutes. What distinguishes it is its capacity to independently capture 720p photographs and films, which is often found in more expensive photography drones. Although it is not the best choice when it comes to racing due to its lower top speed, it is a good option for those who enjoy aerial photography.Buy it from here.
Holy Stone HS110D FPV RC Drone with 1080p HD Camera
The Holy Stone budget drone has a plethora of features that make it a great mid-sized model for drone enthusiasts. It gives value for money, offering a 1080p FPV camera and a variety of simple in-app controls. One notable feature is its pre-set button, which allows for flips in any direction, while a landing mechanism helps beginners prevent crashes. In addition, the Holy Stone provides altitude hold, ensuring stable and clear shots during flights. The accompanying mobile app improves the user experience by offering control options like voice control and gravity sensor control. The Holy Stone drone comes with two batteries, each having a flying time of up to 20 minutes.Buy it from here.
Cheerwing Syma X5SW-V3
Cheerwing USA’s best-selling drone is an excellent pick, offering agility, affordability, and an abundance of features. Its six-axis gyro guarantees extremely stable flight while also allowing for spectacular in-flight manoeuvres. With adequate practice, you’ll be able to perform 360-degree rolls while simultaneously streaming a first-person view to your iOS or Android device.Buy it from here. Read Also: You can now legally fly drones in India
UDI U818A FPV Drone
The Force1 U818A sticks out due to its integrated rotor blade protectors. These circular shields provide a considerable benefit to beginner pilots by protecting the blades from potential harm caused by things like sticks or fingers. However, the lightweight plastic case feels weak and may not resist moderate-speed impacts. It is outfitted with a camera that hangs below the centre of the drone and permits manual adjustment to shoot footage from a straight-ahead or tilted downwards up to 30 degrees. The camera can capture video at 720p resolution and store the footage on a microSD card. The accompanying software, compatible with both iOS and Android, includes drone control features as well as a 480p video preview. Switching to 720p resolution may cause some issues if the drone is at a distance of more than 20 feet. This drone has a flight time of about 8 to 10 minutes.Buy it from here.
Propel Star Wars TIE X1 Advanced
The Propel TIE X1 Advanced is a Star Wars-themed drone that was initially priced at $200 but is currently available for less than $50. This drone comes with a controller that lets you perform acrobatics such as flips, as well as sound and audio effects from the original Star Wars trilogy. The TIE X1 drone has excellent attention to detail, with a battered exterior that resembles a battle-worn starship. It boasts incredible flight speed, capable of completing the Kessel Run in less than 12 parsecs. These drones include infrared lights and sensors that allow them to participate in epic battles with other Propel Star Wars drones. Buy it from here. Read Also: IMC 2018: Airtel showcases connected homes to self-driving drones
Sony and Microsoft have reached an agreement to preserve the Call of Duty series on PlayStation for a 10-year period. This decision comes after Sony reportedly realised that Microsoft’s acquisition of Activision Blizzard was inevitable.Microsoft has confirmed that Call of Duty will continue to be available on PlayStation. In the future, users will have more options for where and how to play their favourite games. Sony and Microsoft have reportedly reached a “binding agreement” to maintain Call of Duty on PlayStation, according to Microsoft Gaming CEO Phil Spencer. He said, “We are pleased to announce that Microsoft and @PlayStation had signed a binding agreement to keep Call of Duty on PlayStation following the acquisition of Activision Blizzard. We look forward to a future where players globally have more choice to play their favorite games.”Also Read:Samsung Galaxy Unpacked Event confirmed for July 26, hints a foldable phoneAfter Microsoft initially presented Sony with a 10-year contract in December 2022, Sony resisted agreeing to a Call of Duty agreement with the corporation. Rather, Sony has consistently stated in submissions to regulators that it is concerned Microsoft may make Call of Duty Xbox exclusive or even destroy the PlayStation versions of the game.Although the 10-year commitment for Call of Duty on PlayStation is not included in Microsoft’s first statement, Xbox’s head of worldwide communications, Kari Perez, confirmed it to The Verge.Perez further revealed that the deal is exclusive to COD. As a result, the pact is comparable to a 10-year contract between Microsoft and Nintendo but differs from the many agreements Microsoft has made with Nvidia and other cloud gaming platforms to bring Call of Duty and other Xbox / Activision games to competing services.Also Read:Nothing Drops debuts in India, customers may now experience and preorder the Nothing Phone 2According to Verge, Microsoft’s initial agreement proposal to Sony in January 2022 included retaining “all existing Activision console titles on Sony, including future versions in the Call of Duty franchise or any other current Activision franchise on Sony through December 31st, 2027.” The conditions of the agreement have obviously altered since the initial offer, and the 10-year extension is only applicable to COD. For the latest gadget and tech news, and gadget reviews, follow us on Twitter, Facebook and Instagram. For newest tech & gadget videos subscribe to our YouTube Channel. You can also stay up to date using the Gadget Bridge Android App. You can find the latest car and bike news here.
After being banned for nearly ten months, Battleground Mobile India, aka BGMI, is officially available again in India. BGMI fans are looking for ways to improve their game experience and one such method is the usage of redemption codes, which offers a variety of rewards and advantages using BGMI redeem codes players can gain access to new skins, outfits, loot crates, weapons and free UC and diamonds.As mentioned earlier, these codes give users the chance to earn unique rewards and gain extra benefits while playing the game. This includes GUN SKINS (M4, AKM, M416, AWM, M24, UZI, KAR98K), free character voucher, Andy, Carlo, Sara, Victor character for free, free Anna Character on completing the mission and UC or Royal Pass Discount. So here we have gathered a list of the most recent BGMI redeem codes as of 18 July 2023. Also, redeem these codes asap as these are only valid for a limited duration.
Garena Free Fire is a battle royale game with regular awards and tournaments to keep players interested. If you play Garena Free Fire, you should be aware of the redeem codes that are released on a daily basis. However, because the battle royale game is banned in India, players from other countries can use the Free Fire Redeem codes daily. If you’re unfamiliar with the Garena Free Fire redeem codes or don’t know how to get them, we’ve put together a step-by-step guide to help you redeem them. Check out Garena Free Fire Redeem Codes for 18 July 2023.The Free Fire redeem codes are a great way to get free stuff. These are 12-digit codes that contain alphabets and numbers, as well as an expiration date and time. Because the Garena FF redeem codes cannot be used more than once, you should hurry to the redemption page to claim your free reward before someone else does. To get a free reward, all you have to do is go to reward.ff.garena.com/en, which is the official redemption page. Also, keep an eye on this space for daily updates on Garena Free Fire redemption codes and rewards.
In This Article
Garena Free Fire Redeem Codes Today 18 July 2023
FF11NJN5YS3E
FF11WFNPP956
MQJWNBVHYAQM
8F3QZKNTLWBZ
FF9MJ31CXKRG
FFICJGW9NKYT
FFCO8BS5JW2D
FFAC2YXE6RF2
FFICJGW9NKYT
J3ZKQ57Z2P2P
W4GPFVK2MR2C
WCMERVCMUSZ9
MSJX8VM25B95
RRQ3SSJTN9UK
FFPLUED93XRT
R9UVPEYJOXZX
TFF9VNU6UD9J
HAYATOAVU76V
RRQ3SSJTN9UK
FF7MUY4ME6S
SARG886AV5GR
FF1164XNJZ2V
FFICDCTSL5FT
PACJJTUA29UU
FFBCLQ6S7W25
TJ57OSSDN5AP
How to Get Free Fire Redeem Codes for Garena on 18 July 2023?


 Step 3: Tap on Text-to-speech output.
 Step 4: Tap on Preferred Engine and select TTSLexx. Save the changes.
 Step 5: Go back to Settings and select Apps.
 Step 6: Scroll down to Google Phone and select it.
 Step 7: Go to Storage and select Clear Data and Clear Cache.
 Step 8: Restart your phone.
This will remove the call recording warning in the Google Phone app.
Step 8: Restart your phone.
This will remove the call recording warning in the Google Phone app.
 Step 4: On the following page, select ODialer as the default dialer app.
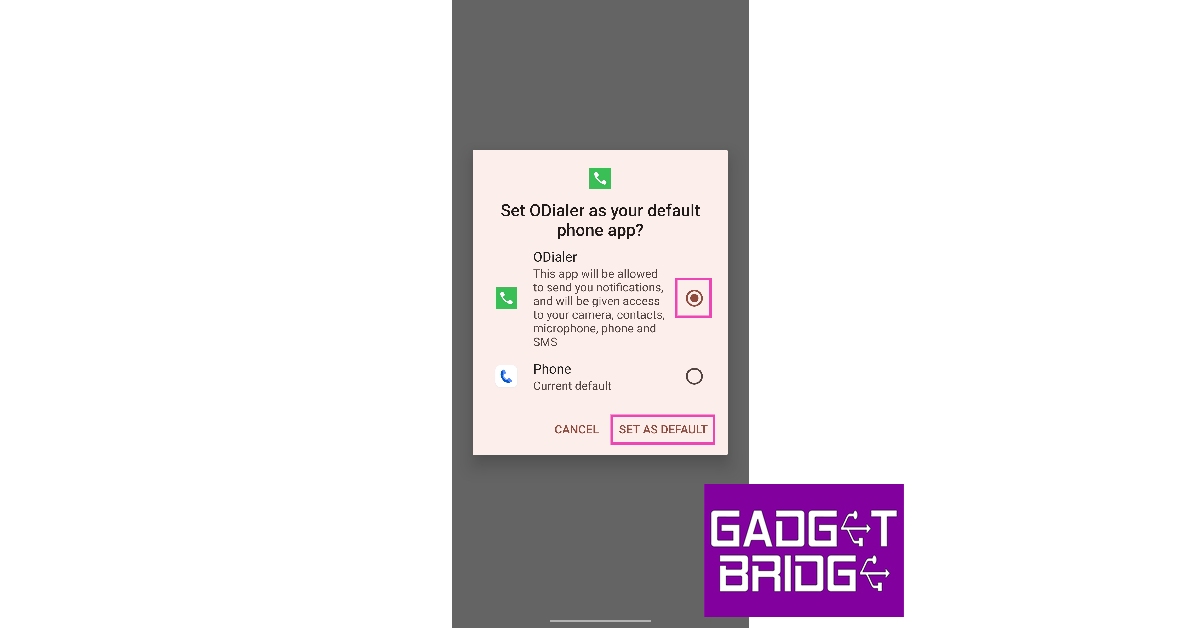 Step 5: Give ODialer the necessary permissions and phone access.
Step 6: Hit ‘Record’ when you’re on a call. The receiver will not hear any call recording alert or warning.
Step 5: Give ODialer the necessary permissions and phone access.
Step 6: Hit ‘Record’ when you’re on a call. The receiver will not hear any call recording alert or warning.


 Read also:


 3.
3. 


")
 Step 3: Once the Cast option pops up on the tool-bar, right-click on it.
 Step 4: Select Always show icon.


 Step 3:
 Step 4:
 Step 6:

 Step 2:
 Step 3:


 Step 3:
 Step 4:
  Step 2:
 Step 3: Connect
 Step 5:
 Step 6:
 Step 7:
 Step 8:
 Step 9:


 Energy Savings:
")


