Today, Vivo introduced its most expensive X90 series in India. Its two flagship devices are the Vivo X90 and Vivo X90 Pro. With a price of Rs 84,999, the Vivo X90 Pro is the premium costlier option and directly competes with the OnePlus 11 and Galaxy S23 Ultra. To assist you in choosing which device to buy, we’ll examine the features of the Vivo X90 Pro, OnePlus 11, and Samsung Galaxy S23 Ultra in this article.
Vivo X90 Pro: MediaTek Dimensity 9200 chipsetOnePlus 11: Qualcomm Snapdragon 8 Gen 2 SoCSamsung Galaxy S23 Ultra: Customised Snapdragon 8 Gen 2 SoC
Rear camera(s)
Vivo X90 Pro: A Zeiss-powered triple rear camera setup that consists of a 50-megapixel Zeiss 1-inch primary sensor with an f/1.75 aperture. A 12-megapixel extreme wide-angle sensor and a 50-megapixel secondary 50mm sensor with an f/1.6 aperture each are also included.OnePlus 11: Triple rear camera setup- 50-megapixel sensor with OIS and f/1.8 aperture, 32-megapixel portrait sensor and 48-megapixel Sony IMX58 ultra wide-angle sensor (f/2.2 aperture and 115-degree field of view)Samsung Galaxy S23 Ultra: A quad rear camera setup, featuring a 200-megapixel primary wide camera (f/1.8 aperture and an 85-degree field of view). There is a 12-megapixel ultra-wide camera (f/2.2 aperture and 120 degrees field of view), a 10-megapixel telephoto lens (f/2.4 aperture and 3x optical zoom) and lastly another 10-megapixel telephoto sensor (10x optical zoom).
Selfie camera
Vivo X90 Pro: 32-megapixel selfie camera on the front with an f/2.45 apertureOnePlus 11: 16-megapixel sensor (f/2.4 aperture)Samsung Galaxy S23 Ultra: 12-megapixel selfies camera (f/2.2 aperture and 80-degree field of view)
RAM and storage
Vivo X90 Pro: 12GB RAM with 256GB storageOnePlus 11: 8GB RAM with 128GB storage and 12GB RAM with 256GB storage optionsSamsung Galaxy S23 Ultra: 12GB RAM with 256GB storage, 12GB RAM with 512GB storage and 12GB RAM with 1TB storage
Battery
Vivo X90 Pro: 4,870mAh batteryOnePlus 11: 5,000mAh dual-cell battery (support for 100W SuperVOOC charging)Samsung Galaxy S23 Ultra: 5,000mAh battery
Operating system
Vivo X90 Pro: OriginOS 3 and runs Android 13OnePlus 11: ColorOS 13.0 (Android 13)Samsung Galaxy S23 Ultra: Android 13 with One UI 5.1 on top
A larger and brighter display than the other two devices is included with the Samsung Galaxy S23 Ultra. Another advantage over the other two phones is the S-Pen’s inclusion. The Qualcomm Snapdragon 8 Gen 2 SoC powers the phones from OnePlus and Samsung. MediaTek 9200 SoC is included in the X90. The Samsung Galaxy S23 Ultra, on the other hand, comes in a wider variety of options than the OnePlus and Vivo devices. Although Android 13 is pre-installed on all handsets.Samsung competes with other devices in the field of cameras as well because of its triple back camera configuration, which is powered by a 200-megapixel sensor. Samsung is ahead of the competition with a 5000mAh battery, though the OnePlus phone also offers a 5,000mAh battery, whereas the Vivo smartphone houses a 4870mAh battery. Both Vivo and OnePlus equip their phones with 120W and 100W wired charging respectively. Samsung, on the other hand, only provides 25W wired and 15W wireless charging.However, compared to the other two gadgets, the Samsung S23 Ultra has a significantly higher price. If you have the financial means, consider the S23 Ultra; if you don’t, you can go for Vivo X90 Pro without breaking a sweat. For the latest gadget and tech news, and gadget reviews, follow us on Twitter, Facebook and Instagram. For newest tech & gadget videos subscribe to our YouTube Channel. You can also stay up to date using the Gadget Bridge Android App. You can find the latest car and bike news here.
Haier Appliances has expanded its Smart Television portfolio with the launch of a new range of QLED series with Google TV. The new Haier S9QT QLED TV comes in two sizes 65 and 55 inches. Both of them features a bezel-less display with Dolby Vision IQ, and 120Hz refresh rate support. It runs on Google TV and comes with built-in Chromecast and Google Assistant, and Hands-free Voice Control.
In This Article
Haier S9QT QLED TV price in India and availability
The Haier S9QT QLED TV price in India starts at Rs 69,999. Both the 65 and 55-inches screen size models will be available for purchase at Haier e-commerce store and other retail outlets in the country.
Haier S9QT QLED TV specifications and features
Haier S9QT QLED TV comes with a metallic body and a slim design. It includes a Premium Center Stand and features a bezel-less QLED display. The Haier TV supports a 120Hz refresh rate, High Contrast Ratio, Local Dimming and MEMC. The screen also includes Dolby Vision IQ (an advanced imaging technology which optimizes visual content based on ambient light conditions), High Dynamic Range (HDR) and Wide Color Gamut.The Haier QLED TV is powered by ARM CA73 Quad-core with TEE 1.3Ghz, with G52 MC1 @550MHz GPU with a memory of 3GB + 32GB Flash. In terms of connectivity, it includes Wi-Fi 5( 2.4G+5G) Chromecast, Bluetooth 5.1, HDMI 2.1, and USB 2.0. It also has Google TV which provides premium features like Auto Low Latency Mode (ALLM) which enables a game console to send a signal to the display which will cause it to automatically switch to a low-latency, low-lag mode for gaming and HDMI 2.1. Like other streaming device platforms, Google TV features Netflix, Zee5, Prime Video and more OTT platforms.Also Read:Vivo X90, X90 Pro with Zeiss-powered triple rear cameras launched in IndiaThe TV has a built-in Chromecast, Google Play Store, Hands-free voice control, Google Assistance, and Google UI. For speedy responsiveness, there is a dedicated game mode, ALLM, which is triggered when it recognises a gaming console attached to the TV. Additionally, it has a 120 Hz screen with VRR and MEMC120Hz, which greatly improves the clarity of each frame.Speaking on the launch, Mr. Satish NS, President, Haier Appliances India said, “We are extremely excited with the launch of new QLED TV series which will give consumers a new and immersive experience of watching television. This launch is yet another example of our commitment to Haier’s brand philosophy of ‘Inspired Living’. The new Haier QLED TV is designed to elevate user experience through its latest features and a stylish bezel-less design. Indian consumers are smart and look for new smart products to add in their lives. Keeping the same in mind we have launched the new range of QLED TV S9QT series for consumers to experience entertainment in an immersive way.” For the latest gadget and tech news, and gadget reviews, follow us on Twitter, Facebook and Instagram. For newest tech & gadget videos subscribe to our YouTube Channel. You can also stay up to date using the Gadget Bridge Android App. You can find the latest car and bike news here.
Truke is one of the newer players in the TWS market and already features a very impressive range of audio products. So far, there hasn’t been a Truke product that we didn’t like. If you’re looking for the biggest bang for your buck, Truke’s TWS series should be high on your list. The company’s TWS catalogue caters to music enthusiasts as well as gamers. Truke has been on a release spree this year. We reviewed the Truke A1 last month, you can read more about it here. This month, the company has put out a new pair of TWS – Truke Buds Vibe. Interestingly, these earbuds are manufactured in China, as opposed to other Truke TWS that are produced locally. Truke Buds Vibe is currently priced at Rs 1,599. We took them out for a spin and used them for over a week. Here is our Truke Buds Vibe review.Read Also:Telegram-like WhatsApp Channels feature now rolled out to WhatsApp beta for iOS: Deets inside
In This Article
Truke Buds Vibe review: Design
Truke Buds Vibe ship inside a rectangular box, with the contents housed in a flimsy plastic tray. Truke makes some compromises on the quality of packaging in order to limit the cost of the product. We don’t really mind it as long as no compromises are made on the audio front. Inside the box, you will find wireless earbuds, a charging case, 2 pairs of extra ear tips, a USB charging cable, a user manual, and a warranty card.Buds Vibe is easily one of the best-looking TWS in Truke’s catalogue. The earbuds are available in a single-tone blue colour and a dual-tone black & yellow colour combination. The charging case and earbuds are made entirely out of plastic, which is something to be expected in this price range. The charging case weighs just 76.4 grams (with the earbuds inside).The see-through plastic lid covers 70% of the front panel. There is a small display inside that notifies you of the charge held in the case at any given time. When the earbuds are in their respective pods, you can also see their battery level bar on this display. Truke branding can be found just below the plastic lid. The USB type C charging port has been housed at the bottom of the case.The build quality of Buds Vibe is satisfactory. Comparing it with other Truke products, we feel that the Buds Vibe could have been a bit more sturdy. The lid is fun to snap open and shut but rests slightly loose on the case. It is a very minor complaint but we haven’t faced this issue on any other Truke product. On the bright side, the case does not attract any fingerprints or smudges. After a week of rough use, where the case shared pockets with keys and loose change, we are happy to report that it came out unscathed with no scratches.The earbuds sport an in-ear design. There are an additional two pairs of ear tips in the box to help you find the perfect fit. This is going to be necessary if you plan on using the Buds Vibe to cancel out surrounding noise. Made out of glossy plastic, the earbuds have the tendency to fall out during sweaty workouts. We did not experience any water damage due to sweat during our use.The outer panels of the earbuds are touch sensitive and can be used to control the audio playback. If you want to switch between different audio/ANC modes, you will have to rely on touch gestures since there is no app support for Buds Vibe. The earbuds are highly prone to accidental touches, which can get annoying very quickly. It is also not uncommon for some touch gestures to not register at all. A dedicated app would sort this issue out altogether.
Truke Buds Vibe review: Performance
There are several things to like about Truke Buds Vibe’s performance. The earbuds feature 13mm titanium drivers that produce a solid audio output. With Bluetooth 5.3 on board, the earbuds are instantly connected to your device as soon as you flip open the lid. The strength of the connection is also optimum.Truke Buds Vibe gets four preset EQ modes – balanced mode (default), dynamic audio mode, movie mode, and bass boost mode. You can switch between these modes by touching and holding the outer panel of the left earbud. The notification sound remains very rough and not pleasing to listen to at all. To switch to an EQ mode, you will need to go through all the other modes. An app would’ve been extremely handy here. The touch panels sometimes fail to register the hold gesture and play music instead of switching to a different EQ mode.In terms of sound quality, Truke Buds Vibe does not disappoint. We played a variety of genres on these earbuds and had an enjoyable listening experience. The sound is punchy and rich, with no significant distortion if you keep the volume under 80%. The lower frequencies get a special focus and the warm, enveloping bass can be further enhanced with the ‘Bass Boost’ mode. While the Buds Vibe provide a good bass output, the mid and higher frequencies could have used a bit more work. The higher frequencies (guitar and vocals) sound slightly rough on certain occasions. A greater level of detail in the output would have been ideal. Having said that, the Truke Buds Vibe is still a worthy contender in its segment.There is a 40ms low latency Gaming Mode onboard the Buds Vibe too. We did experience a mismatch in audio and gameplay while playing Call of Duty in regular mode. Turning on the Gaming Mode was a big improvement and instantly ironed out all issues. If you’re looking for a TWS on a budget that can cater to different needs, Buds Vibe is worth looking into.You also get Active Noise Cancellation on Truke Buds Vibe. This is where Buds Vibe pulls ahead of its competition. At this price range, having ANC on your earbuds is a total steal deal. The ANC performance is surprisingly good. The TWS can cancel up to 35dB of surrounding noise. We previously used Truke Buds A1 which also offers ANC in a similar price range, but the ANC on Buds Vibe is much better. The TWS was able to suppress background noises like the sound of the ceiling fan and distant humdrum.The calling experience provided by Truke Buds Vibe gave us little to complain about. The earbuds are able to effectively isolate the voice from the background noise and relay it perfectly to the receiver. The Quad Mic Environmental Noise Cancellation plays its part here.With 300mAh of battery inside the case, Truke Buds Vibe offers a total playback time of 48 hours. We used the earbuds every day throughout the week and only felt the need to charge the case twice. This included using ANC at all times with up to two hours of music consumption each day. Each earbud is equipped with a 40mAh battery, which is good enough to last 5-7 hours with ANC turned on. The case takes two hours to fully charge. Read Also:PUBG New State Mobile Battle Adda tournament announced: Details inside
Verdict
Currently priced at Rs 1,599, Truke Buds Vibe is a good buy. If you don’t want to splurge a lot on wireless earbuds but don’t want to compromise on audio quality, Truke Buds Vibe fits the bill. We’ve been saying this for quite some time, but Truke will massively benefit from app support for its TWS products. Navigating through the different audio modes using the touch panels is certainly not ideal. The low-quality notification alerts are also something that needs to be fixed.
The Vivo X90, X90 Pro, and X90 Pro+ were the three smartphones that were introduced in China first last year. The latest flagship Vivo X90 series from the Chinese tech giant has finally launched in India today. However here in India, the company has only released the former two models out of the three. The MediaTek Dimensity 9200 SoC is found inside both smartphones. The triple rear camera unit is powered by Zeiss lenses and uses the V2 image processing technology.
In This Article
Vivo X90 series price and availability
The price of the Vivo X90 has been set at Rs 59,999 for the 8GB RAM with 256GB storage option whereas the 12GB RAM with 256GB storage comes with a price tag of Rs 63,999. The phone will come in a lone Legendary Black colour option.The Vivo X90 Pro on the other hand will be available at Rs 84,999 for the single 12GB RAM with 256GB storage option. The device will be available in two colour options of Asteroid Black and Breeze Blue.Pre-orders for all the X90 phones are now being taken. All the devices are scheduled to go on sale in India on May 5. The phone can be purchased via Vivo e-store, Flipkart and retail outlets in the country. Consumers can pre-book the smartphones starting today and avail up to 10% cashback on SBI, ICICI, HDFC, and IDFC banks.
Vivo X90 specifications
The X90 comes with a 6.78-inch AMOLED display and has a resolution of 1,260 x 2,800 pixels. The device has a screen-to-body ratio of 93.53 percent, a 20:09 aspect ratio, and a refresh rate of up to 120 Hz. The screen has been certified to support the DCI-P3 colour gamut. The handset operates on OriginOS 3 and runs Android 13. Under the hood, there is an octa-core 4nm MediaTek Dimensity 9200 SoC and a G715 GPU. It offers up to 12GB of LPDDR5 RAM, to power the smartphone. The Vivo X90 comes with internal storage of up to 512GB UFS4.0.The Vivo X90 comes with a triple rear camera unit that includes Zeiss lenses. It has a 12-megapixel ultra-wide-angle camera with an f/2.0 aperture, a 12-megapixel portrait camera with a 50mm lens, and a 50-megapixel main sensor with an f/1.75 aperture. The smartphone sports a 32-megapixel selfie camera with an f/2.45 aperture for taking selfies.Vivo X90The handset includes a 4,810mAh battery and supports 120W rapid charging. According to the company, the battery may provide up to 22.2 days of standby life on a single charge. The phone is IP64 rated for dust and water resistance. For connectivity, there is 5G, Wi-Fi 6, Bluetooth 5.3, NFC, GPS, and a headphone jack. There is an accelerometer, ambient light sensor, ambient colour temperature sensor, e-compass, gyroscope, IR blaster, and ultrasonic distance sensor.
Vivo X90 Pro specifications
The Vivo X90 Pro is a top-of-the-line device which comes with a similar display as its sibling. This phone is also powered by a MediaTek Dimensity 920 0 chipset paired with up to 12GB of LPDDR5 RAM and up to 256GB of UFS 3.1 inbuilt storage that can be expanded further via microSD card.
Vivo X90 ProThe X90 Pro also has a Zeiss-powered triple rear camera setup that consists of a 50-megapixel Zeiss 1-inch primary sensor with an f/1.75 aperture. A 12-megapixel extreme wide-angle sensor and a 50-megapixel secondary 50mm sensor with an f/1.6 aperture each are also included. In addition to this, there is a 32-megapixel selfie camera on the front with an f/2.45 aperture.It includes a 4,870mAh battery with compatibility for 50W wireless charging and 120W rapid charging. The device is IP68 rated for dust and water resistance. In terms of connectivity, there is a 5G, Wi-Fi 6, Bluetooth v5.3, NFC, GPS, and a USB Type-C port. Additionally, the phone includes a fingerprint sensor, IR control, accelerometer, ambient light sensor, ambient colour temperature sensor, e-compass and gyroscope. For the latest gadget and tech news, and gadget reviews, follow us on Twitter, Facebook and Instagram. For newest tech & gadget videos subscribe to our YouTube Channel. You can also stay up to date using the Gadget Bridge Android App. You can find the latest car and bike news here.
WhatsApp has officially rolled out the functionality to use a WhatsApp account on multiple phones. According to the Meta-owned instant chatting app the same WhatsApp account can now be accessed on up to four phones. This feature is similar to how you use the same account on a desktop, tablet or any secondary device.WhatsApp now let you log in to the same account on multiple smartphones. Previously this feature was available through the Web platform but now it is possible to link it to multiple phones. The company CEO Mark Zuckerberg officially announced the ability to link one single account to multiple phones. He said, “Starting today, you can log into the same WhatsApp account on up to four phones.”The company also took to Twitter to announce the availability to link a WhatsApp account on multiple phones. The blog post said, “Last year, we introduced the ability for users globally to message seamlessly across all their devices while maintaining the same level of privacy and security. Today, we’re improving our multi-device offering further by introducing the ability to use the same WhatsApp account on multiple phones.”Also Read:WhatsApp Kept Messages feature to save disappearing messages announcedAccording to the company, multidevice support for phones is a highly requested feature. One can now link one single account to 4 additional devices/phones. It works the same as when you link with WhatsApp on web browsers, tablets and desktops.Notably, each linked phone connects to WhatsApp independently, ensuring that your personal messages, media, and calls are end-to-end encrypted. If the primary device is inactive for a long period, WhatsApp automatically logs you out of all companion devices.As per WhatsApp linking phones as companion devices will make messaging easier. This means the ability to switch between phones without signing out allows you to continue conversations where you left them. Alternatively, if you run a small business, other staff members can now reply to clients directly from their phones using the same WhatsApp Business account.
In This Article
Availability
WhatsApp noted via blog post that they have begun rolling out the update to users all over the world and it is dropping on your devices in the coming weeks.“Also rolling out over the coming weeks, we’re introducing an alternative and more accessible way to link to companion devices. Now you can enter your phone number on WhatsApp Web to receive a one-time code, which you can use on your phone to enable device linking, rather than having to scan a QR code. We look forward to introducing this feature to more companion devices in the future.”
🥁 Drumroll please…
Now you can use the same WhatsApp account on multiple phones 📱📞 ☎️ 📲
Link up to 4 other devices to your account so you can easily switch between phones without signing out and pick your chats up right where you left off. pic.twitter.com/Loqa30EgHk
One of the best ways you can utilise Google Assistant on your smartphone is by using the ‘Routines’ feature. A routine is a set of automated tasks and actions that are carried out during a specific time or whenever you say the trigger phrase. Routines are incredibly versatile and offer a lot of customisation options. For example, you can set a routine that carries out a set of tasks every time you come home from work. This routine can be customised to turn off mobile data and turn on WiFi on your phone, turn on the house lights of the living room, play a particular playlist on Spotify, and more. In this article, we show you how to set up daily routines with Google Assistant on Android in 2023.Read Also:OnePlus Pad price in India and availability details announced: Details
In This Article
Here’s how you can create or edit a routine on Google Assistant
If you’re looking to automate certain tasks on your smartphone, Google Assistant is already a step ahead of you. You can find a bunch of preset routines in the Google Assistant app. These routines cover the major aspects of everyday life and you can edit them according to your needs. Here’s how you can create a completely new personal routine.Step 1: Go to the Google app and tap on your profile icon.Step 2: Tap on Settings.Step 3: Select ‘Google Assistant’.Step 4: Tap on Routines.Step 5: Tap on the Plus icon that says ‘New’.Step 6: Choose whether you want to create a personal or a household routine. A household routine can be edited by home members while a personal routine can only be accessed by you.Step 7: Once you’ve selected a routine, you can create a set of automated tasks. Tap on ‘Untitled’ to name the routine.Step 8: Tap on ‘Add Starter’. This will be the trigger for your routine. You can set the routine to start at a specific time of the day or when you say a certain phrase to Google Assistant.Step 9: Now, choose the actions you want to be played out in this routine. Tap on ‘Add action’ to set a task or action for Google Assistant to perform.Step 10: The actions have been classified into different categories, depending on the task they cater to. Select the relevant category to set up an action. You can also add an action of your own.Step 11: Once you’re done, go to the routine page and tap on ‘Save’.
Frequently Asked Questions
What is Google Assistant routine?
A Google Assistant routine carries out a set of automated tasks and actions every time it is triggered. A routine can control the smart devices connected to the Google Home app.
How do I trigger a Google Assistant routine?
You can set a routine to trigger at a specific time during the day or whenever you say a certain phrase to Google Assistant.
Vivo X90 Series is all set to debut in India today. The smartphone, which will replace the current X80 Series, is the most anticipated flagship to debut. Two models, the X90 and X90 Pro, are anticipated to be released as part of the series. The gadget made its debut last year in November in China and in February globally. The Vivo X90, Vivo X90 Pro, and Vivo X90 Pro+ are the three models in the lineup; however, as was already mentioned, the business is most likely to just debut the first two versions.
In This Article
How to watch the livestream of the Vivo X90 Series
Vivo X90 Series is set to launch in India today. The launch event will start at 12 noon IST. The event is going to stream live via the company’s official website in the country, in addition to all its social media channels and YouTube channel. You can also watch it live here on our website we have embedded the link below.
Vivo X90 Series price expected
The Vivo X90 and Vivo X90 Pro are most likely to debut, while the company has not yet made a formal announcement. Additionally, there is no cost information.At the time of the introduction, the smartphones’ prices will be made public. The cost of both versions was made known in a report by The Tech Outlook just before the formal announcement. The base 8GB RAM with 128GB storage edition of the X90 is reportedly expected to cost Rs 59,999, while the 12GB RAM with 256GB storage option will be offered at Rs 63,999.The X90 Pro, on the other hand, is anticipated to cost Rs 84,999 for the 12GB RAM with 256GB storage option.
Vivo X90, Vivo X90 Pro specifications
The specs of both handsets will remain the same as the original ones.Vivo X90 will have a 6.78-inch AMOLED display with a 1,260 x 2,800-pixel resolution. The display comes with a 20:09 aspect ratio, a refresh rate of up to 120Hz, and a screen-to-body ratio of 93.53 percent. The DCI-P3 colour gamut is also supported. The handset runs on Android 13 with OriginOS 3 on top. The smartphone will be driven by an octa-core 4nm MediaTek Dimensity 9200 SoC, up to 12GB of LPDDR5, and a G715 GPU. Internal storage on the Vivo X90 is expandable to 512GB UFS4.0.Vivo X90 will come with a triple rear camera setup that includes a 12-megapixel ultra-wide-angle camera with an f/2.0 aperture, a 12-megapixel portrait camera with a 50mm lens, and a 50-megapixel primary sensor with an f/1.75 aperture are all featured. It will also sport a selfie camera with a 32-megapixel resolution and an f/2.45 aperture. In addition to this, there is a 4,810mAh battery and 120W fast charging.On the contrary, X90 Pro will be powered by a MediaTek Dimensity 9200 CPU, up to 12GB of LPDDR5 RAM, and up to 512GB of UFS 3.1 internal storage that can be expanded further with a microSD card. The device also includes a 4,870mAh battery with support for both wireless charging at 50W and quick charging at 120W. The rest of the remaining features will be similar to X90.The X90 Pro will include a triple rear camera setup, with the primary camera being a 50-megapixel Zeiss 1-inch sensor with an f/1.75 aperture. In addition to this, it includes two 50-megapixel secondary 50mm sensors with an f/1.6 aperture each and a 12-megapixel ultra-wide-angle sensor. On the front, it boasts a 32-megapixel selfie camera with an f/2.45 aperture.
For the latest gadget and tech news, and gadget reviews, follow us on Twitter, Facebook and Instagram. For newest tech & gadget videos subscribe to our YouTube Channel. You can also stay up to date using the Gadget Bridge Android App. You can find the latest car and bike news here.
Garena Free Fire is a battle royale game with regular awards and tournaments to keep players interested. If you play Garena Free Fire, you should be aware of the redeem codes that are released on a daily basis. However, because the battle royale game is banned in India, players from other countries can use the Free Fire Redeem codes daily. If you’re unfamiliar with the Garena Free Fire redeem codes or don’t know how to get them, we’ve put together a step-by-step guide to help you redeem them. Check out Garena Free Fire Redeem Codes for 26 April 2023.The Free Fire redeem codes are a great way to get free stuff. These are 12-digit codes that contain alphabets and numbers, as well as an expiration date and time. Because the Garena FF redeem codes cannot be used more than once, you should hurry to the redemption page to claim your free reward before someone else does. To get a free reward, all you have to do is go to reward.ff.garena.com/en, which is the official redemption page. Also, keep an eye on this space for daily updates on Garena Free Fire redemption codes and rewards.
In This Article
Garena Free Fire Redeem Codes Today 26 April 2023
HFNSJ6W74Z48
V44ZZ5YY7CBS
3IBBMSL7AK8G
X99TK56XDJ4X
XFW4Z6Q882WY
WD2ATK3ZEA55
E2F86ZREMK49
TDK4JWN6RD6
FFDBGQWPNHJX
4TPQRDQJHVP4
GCNVA2PDRGRZ
8F3QZKNTLWBZ
How to Get Free Fire Redeem Codes for Garena on 26 April 2023?
26 April 2023 Amazon Quiz has gone live. Customers from different parts of the country are participating in the daily quiz. The quiz begins from 12 AM to 11:59 PM. Those participating in the quiz can win exciting prizes by answering all the questions correctly. Today participants have a chance to win a Rs 2,500 Amazon Pay Balance.Amazon quiz brings an opportunity for its customers to win Amazon Pay Balance ranging from Rs 1,000 to Rs 50,000. The Quiz can be played from 12 AM to 11:59 PM. The e-commerce platform brings a fresh quiz on a daily basis which consists of five questions related to general knowledge and current affairs. The participants need to answer all the questions correctly and their names will be selected for a lucky draw. The winner will be announced at the end of the month.One wrong answer could eliminate you from the quiz. If you manage to answer all the questions correctly you can stand a chance to win a Rs 2,500 Amazon Pay Balance today. Only app users are eligible to participate in the Quiz. Check Out 26 April 2023 Amazon Quiz Answers.Amazon Quiz Today Prize – Rs 2,500 Amazon Pay BalanceQuiz Date – 26 April 2023Daily Timing – 12 AM to 11:59 PMWinner Announcement – Today 12 PM
In This Article
Amazon Quiz Answers Today 26 April 2023
Question 1: Which racing driver won the Saudi Arabian Grand Prix 2023 title?Answer: Sergio PerezQuestion 2: In 2023, Eric Garcetti was appointed the US Ambassador to which country?Answer: IndiaQuestion 3: The safeguarding of the Indo-Myanmar border is the responsibility of which paramilitary force?Answer: Assam Rifles
Question 4: Where is this site located?Answer: TurkeyQuestion 5: Which is considered as the highest-ranked belt in this sport?
Answer: Black
How To Play Amazon Quiz
Only app users are eligible to play the Amazon quiz every morning from 12 AM to 11:59 PM. The quiz is not available on the desktop. For those who are unaware of how to play the Amazon quiz below are the steps, you can follow to take the quiz.
Firstly download the Amazon app from Google Play Store or App Store
Now fill in the required information through the Sign Up option.
You need to log in to the Amazon app and scroll down on the home screen to find the Amazon Quiz banner.
Tap on the Amazon Quiz banner and tap on the Start button to start the Quiz.
Now you will get 5 questions and you need to answer them correctly. One wrong answer will eliminate you from the Quiz.
After answering all the questions correctly you are now eligible for a Lucky Draw.
The winner’s name will be announced today at 12 PM.
Gaming in 2023 is a high-tech affair. The industry has developed at breakneck speed over the past few decades, with new technologies and innovations driving its growth and ensuring widespread popularity among global consumers. For PC gamers in particular, there’s now more choice than ever before, especially when it comes to the devices on which they can access and play bleeding-edge gaming experiences.
Choosing between a gaming laptop and a gaming PC is a common dilemma here in the digital age. In previous decades, laptops simply didn’t have the processing power needed to get through the most basic of computer games, but all that has changed with the rise of the gaming laptop. Nowadays, many gamers are torn between investing in an all-new gaming laptop or a more traditional gaming PC, but which delivers the ultimate experience overall?
Whether you’re a budding eSports pro or a newbie, this article will help you decide which machine is right for you.
In This Article
PCs vs Laptops – How Do They Compare?
Generally speaking, the right machine for you should provide you with all the power and performance that you need to play your favourite games. For instance, a desktop machine should provide blistering power, while gaming laptops need a good balance between portability and visual fidelity.
To help you make your decision, we’ll break down the key things to consider when investing in a new way to play PC games.
Budget
First and foremost, before you make any decision on what to buy, it’s important to have a budget in mind. There’s no point looking at high-end gaming rigs if you only have the funds for a lightweight machine; meanwhile, going straight for a cutting-edge gaming laptop when you only intend to play at home a few times a month won’t give you the most value either.
Surprisingly, gaming PCs that you build from scratch can be significantly cheaper than either pre-built models or laptops. It’s all down to where you source the parts from: manufacturers like Origin will obviously be a lot more expensive than lesser-known brands. You’ll also need to either have previous experience of putting a PC together or the confidence to do so using online resources.
Pre-built general-use PCs typically fall into the mid-range price category, but some can reach in excess of $5000 if they’re loaded with the latest top-of-the-range GPUs and CPU. A modest pre-build with adequate cooling, processor and graphics card that will ensure long-term use can be picked up for anywhere between $500 and $1000, depending on the manufacturer.
Surprisingly and despite their smaller stature, gaming laptops capable of delivering 60fps with 4K resolution can be more expensive than desktops. Portability often comes at a premium, so the more lightweight a machine is and the greater battery life it can deliver, the higher the price tag will likely be.
Of course, prices will vary from manufacturer to manufacturer, and even high-end brands like Alienware have more wallet-friendly options in their lines, while customizations across product ranges can also help keep costs down.
Performance
Performance is where gamers will typically experience the difference between playing on a desktop and playing on a laptop. At first glance, it could seem like they both offer the same performance, especially when models have similar processors, RAM, and storage. There are, however, noticeable differences between the two, even if they’re both built with the same Intel CPUs or NVIDIA graphics cards. This difference becomes more evident when playing the multitude of digital games like online roulette or top FPS titles available today, where you need to rely on performance to get the biggest rewards.
Even the most cutting-edge GPU in a laptop will typically perform at a rate that’s 20-30% less than that same card in a desktop PC. This also plays out across CPUs too, leaving players with a noticeable difference between gaming on a portable device and a PC. Furthermore, games run a lot smoother on desktop machines, even when compared to the performance of a premium-priced laptop.
Performance is all relative to the titles that you want to play, but if you’re into innovations like Ray Tracing and want to spend hours exploring the virtual worlds of games like Hogwarts Legacy, a gaming desktop will be most suitable. Older games like Final Fantasy XIV will run just as well on gaming laptops, however.
The Verdict
When it comes to choosing between a laptop or a desktop, there’s no single wrong or right answer. Both have their inherent advantages and disadvantages, meaning the choice is entirely depending on your needs as a player. Many gamers are more than happy with the performance that inexpensive Dell or Lenovo laptops provide, while others prefer the meaty power of a budget gaming rig.
As well as buying within your budget and having a clear idea of the performance and power you need, other things to take into consideration include design, portability and longevity. On the design front, laptops can push ahead due to offering everything that players need for gaming on the go in a portable package.
They clearly take the lead when it comes to portability, too, since PCs are intended to stay in one place, while the gaming rig takes the edge when it comes to longevity (PC components are generally easier and more cost-effective to replace).
For the latest gadget and tech news, and gadget reviews, follow us on Twitter, Facebook and Instagram. For newest tech & gadget videos subscribe to our YouTube Channel. You can also stay up to date using the Gadget Bridge Android App. You can find the latest car and bike news here.
Vivo X90, and Vivo X90 Pro, the most premium smartphones by the Chinese tech firm are set to launch in India on April 26. Just right before its official release the Indian pricing leaked on the web.The Vivo X90 series which debuted in China in February is all set to hit Indian shores on April 26. The lineup launched in China includes Vivo X90, Vivo X90 Pro, and Vivo X90 Pro+ but here in India, the company will only introduce the former two models. The price of the smartphones will be revealed at the time of the launch. Just ahead of the official announcement a report by The Tech Outlook revealed the pricing of both the models.As per the report Vivo X90’s base 8GB RAM with 128GB storage model is likely to cost Rs 59,999 whereas the 12GB RAM with 256GB storage option will be available at Rs 63,999.On the other hand, the price of the Vivo X90 Pro is likely to be priced at Rs 84,999 for the 12GB RAM with 256GB storage model.
Vivo X90, Vivo X90 Pro specifications
Vivo X90 comes with a 6.78-inch AMOLED display with a 1,260 x 2,800-pixel resolution. The display has a 20:09 aspect ratio, a refresh rate of up to 120Hz, and a screen-to-body ratio of 93.53 percent. The DCI-P3 colour gamut is also supported. The device runs on Android 13 with OriginOS 3 on top. The smartphone is powered by an octa-core 4nm MediaTek Dimensity 9200 SoC, up to 12GB of LPDDR5, and a G715 GPU. Internal storage on the Vivo X90 is expandable to 512GB UFS4.0.Vivo X90 features a triple rear camera setup that consists of a 12-megapixel ultra-wide-angle camera with an f/2.0 aperture, a 12-megapixel portrait camera with a 50mm lens, and a 50-megapixel primary sensor with an f/1.75 aperture all featured. It includes a selfie camera with a 32-megapixel resolution and an f/2.45 aperture. In addition to this, there is a 4,810mAh battery and 120W fast charging.On the other hand, X90 Pro is driven by a MediaTek Dimensity 9200 CPU, up to 12GB of LPDDR5 RAM, and up to 512GB of UFS 3.1 internal storage that can be expanded further with a microSD card. The phone houses a 4,870mAh battery with support for both wireless charging at 50W and quick charging at 120W. The rest of the remaining features are similar to X90.The X90 Pro also has a triple rear camera setup, with the primary camera being a 50-megapixel Zeiss 1-inch sensor with an f/1.75 aperture. In addition to this, it includes two 50-megapixel secondary 50mm sensors with an f/1.6 aperture each and a 12-megapixel ultra-wide-angle sensor. On the front, it sports a 32-megapixel selfie camera with an f/2.45 aperture.
For the latest gadget and tech news, and gadget reviews, follow us on Twitter, Facebook and Instagram. For newest tech & gadget videos subscribe to our YouTube Channel. You can also stay up to date using the Gadget Bridge Android App. You can find the latest car and bike news here.
OnePlus Pad, the company’s first tablet debuted in India earlier this year at the OnePlus Cloud 11 event. The tablet was introduced along with the OnePlus 11 5G, the OnePlus 11R, the OnePlus Buds Pro 2, OnePlus Keyboard 81 Pro and OnePlus TV 65 Q2 Pro. Until now there was no official word on the device but today the company revealed the price as well as the availability details of the tab.
In This Article
OnePlus Pad price in India and availability
The OnePlus Pad price in India has been set at Rs 37,999 for the 8GB RAM with 128GB storage. Whereas the price of the 12GB RAM with 256GB storage option is set at Rs 39,999. Buyers may pre-order the tablet starting on April 28 at 12 noon. The company will also offer the device to the OnePlus community on May 1 in a select number of OnePlus Experience stores, with an open sale starting on May 2 at 12 p.m.The OnePlus Tablet can be purchased via Amazon.in, Flipkart.com, OnePlus.in, the OnePlus Store app and offline through OnePlus Experience stores & select Reliance and Croma stores.The launch offer includes an instant discount of Rs 2,000 on the OnePlus Pad if transactions are made through ICICI Bank Credit Cards, Debit Cards and EMI transactions on OnePlus.in, OnePlus Store App, Amazon.in, Flipkart.com, OnePlus Experience Stores and select partner stores.Also Read:OnePlus Nord CE 3 Lite review: Is it a fully loaded package?There will be up to 12 months No Cost EMI starting from Rs 3166/month using major credit cards. In addition to this, the company will also provide a free Folio case worth INR 1,499 on pre-orders. There will be an additional exchange discount of up to Rs 5,000 on the OnePlus smartphones or Rs 3000 on the exchange of select smartphones and tablets.According to OnePlus RCC linked device members can avail of an additional Rs 2000 discount on the purchase of the OnePlus Pad via the RCC benefit section on their OnePlus smartphone. This offer is valid from 25 April for a limited period of time.
OnePlus Pad specifications
The OnePlus Pad is powered by a MediaTek Dimensity 9000 chipset, which supports up to 12GB of LPDDR5 RAM. The tablet operates on Android 13 out of the box. 5G cellular sharing with smartphones is available on the OnePlus Pad. On the front of the OnePlus tablet, the bezels around the screen are relatively thin. The device comes with an 11.61-inch display with a refresh rate of 144Hz, a resolution of 2800×2000, a pixel density of 296 ppi, and a brightness of 500 nits. The OnePlus tablet has 2.5D curved glass, a 7:5 screen ratio, and an 88 percent screen-to-body ratio. There are quad speakers on board which are said to provide an Omnibearing sound field, and depending on how the tablet is held, the speakers can switch between the left and right channels. Dolby Atmos and Dolby Vision are also included on the tablet.The OnePlus Pad features an 8-megapixel selfie camera and a single 13-megapixel back camera with an LED flash. In addition to this, the device also includes a magnetic keyboard and a stylus. It houses a 9,510mAh battery with 67W SUPERVOOC capability, which is said to provide up to one month of standby time.
For the latest gadget and tech news, and gadget reviews, follow us on Twitter, Facebook and Instagram. For newest tech & gadget videos subscribe to our YouTube Channel. You can also stay up to date using the Gadget Bridge Android App. You can find the latest car and bike news here.
There have been numerous Google Pixel Fold leaks and rumours floating around online. Google’s first foldable phone’s launch schedule was recently leaked. It’s predicted that the device will show up later this year. According to rumours, the Google Foldable phone would most likely be unveiled at the upcoming Google I/O 2023 event with the Google Pixel 7a. In a recent development, information on the price, available colours, and availability has emerged.According to Jon Prosser, the Google Pixel Fold is likely to go on sale on May 30, a few days after its release at the Google I/O 2023 event. The device is said to come in two colour options of chalk and obsidian. He also shared the US pricing of the Pixel Fold. In the US the price for the 12GB RAM with 256GB storage option is likely to be set at $1,799 which translates to Rs 1,47,000. There will be a 12GB RAM with 512GB storage option too that would cost $1919 which is about Rs 1,57,500.Also Read:WhatsApp Kept Messages feature to save disappearing messages announcedIn terms of availability, the Google Pixel Fold’s pre-orders are expected to begin on May 10 via Google Store. The Company is said to start shipping the Foldable phones on June 27. However, another carrier should probably begin pre-brooking from May 30. As a part of the launch offer, the company may offer Pixel Watch for free on the purchase of the device.Similar to the Pixel 7 Series the upcoming Pixel Fold is also speculated to be powered by Google’s in-house Tensor G2 SoC paired with a Titan M2 security chip. The Google foldable phone may also feature a 7.6-inch inner display with 1,840 x 2,208 pixels of resolution. Moreover, the primary display will have a 120Hz refresh rate and a pixel density of 380ppi. The outer display is expected to have a 5.8-inch OLED screen with 1,080×2,092 pixels of resolution and 120Hz refresh rate and a 17.4:9 aspect ratio.In terms of cameras, the Pixel Fold may come equipped with a triple rear camera set-up comprising of a 48-megapixel primary wide-angle sensor with an f/1.7 aperture and OIS as well as CLAF. The camera unit may also include a 10.8-megapixel ultrawide lens with an f/2.2 aperture and 121-degree FoV. In addition to this, there will be a 10.8-megapixel dual PD telephoto lens with 5x optical zoom and 20x Super Res Zoom. A 9.5-megapixel sensor with 1.22 pm pixel width, f/2.2 aperture on the outside and an 8-megapixel inner selfie camera with f/2.0 aperture on the inside might be available for selfies.The battery capacity has not yet been revealed but according to Jon Prosser, it is likely to run for over 24 hours and offer 72 hours of standby time.
For the latest gadget and tech news, and gadget reviews, follow us on Twitter, Facebook and Instagram. For newest tech & gadget videos subscribe to our YouTube Channel. You can also stay up to date using the Gadget Bridge Android App. You can find the latest car and bike news here.
The Meta-owned WhatsApp is planning to include a new Telegram-like feature. The company is currently developing a feature called WhatsApp Channels that is said to allow users to broadcast content on the platform. The functionality is apparently being provided to the WhatsApp beta for iOS. The feature is likely to become available soon. However, the company is likely to release read-only channels. In case you didn’t know, Instagram has recently received the Channels feature.According to a report by WABetaInfo, WhatsApp Channels, a feature similar to Telegram is under development. This feature was first made available to Android beta users earlier this year. But now the functionality has been discovered by WABetaInfo in the most recent WhatsApp beta update for iOS users, version 2.23.8.75 available on the TestFlight app. Reportedly the WhatsApp Channels will share space with the Status tab allowing users to identify or find new channels in the Find Channels button. However, this feature will not display participants’ names as well as their phone numbers.Image courtesy: WABetaInfoAccording to a shared screenshot, WhatsApp intends to rename the Status page to “Updates” because the app’s channels will also be shown here. A WhatsApp Channel is a private platform where joining users’ phone numbers and other personal information is always kept secret. Although the messages received within a channel are not end-to-end encrypted. It should be noted that channels won’t have an impact on private messaging’s continued end-to-end encryption. People always have freedom over which channels they wish to subscribe to, and no one else can see whom they follow, regardless of whether they have added them as contacts or not.Also Read:WhatsApp Kept Messages feature to save disappearing messages announcedNote that, since there are no algorithmic recommendations or social graphs promoting content that viewers didn’t choose to see, people won’t automatically subscribe to channels.Users will be able to search for a certain WhatsApp channel by just entering their username within WhatsApp, which is claimed to support handles as well. This function is intended to increase the channels’ usability by making it simpler for users to access the updates they want.WhatApp Channels are currently being developed and will be made available in a future WhatsApp update. So stay tuned to Gadget Bridge for more information related to WhatsApp features.
For the latest gadget and tech news, and gadget reviews, follow us on Twitter, Facebook and Instagram. For newest tech & gadget videos subscribe to our YouTube Channel. You can also stay up to date using the Gadget Bridge Android App. You can find the latest car and bike news here.
Garena Free Fire is a battle royale game with regular awards and tournaments to keep players interested. If you play Garena Free Fire, you should be aware of the redeem codes that are released on a daily basis. However, because the battle royale game is banned in India, players from other countries can use the Free Fire Redeem codes daily. If you’re unfamiliar with the Garena Free Fire redeem codes or don’t know how to get them, we’ve put together a step-by-step guide to help you redeem them. Check out Garena Free Fire Redeem Codes for 25 April 2023.The Free Fire redeem codes are a great way to get free stuff. These are 12-digit codes that contain alphabets and numbers, as well as an expiration date and time. Because the Garena FF redeem codes cannot be used more than once, you should hurry to the redemption page to claim your free reward before someone else does. To get a free reward, all you have to do is go to reward.ff.garena.com/en, which is the official redemption page. Also, keep an eye on this space for daily updates on Garena Free Fire redemption codes and rewards.
In This Article
Garena Free Fire Redeem Codes Today 25 April 2023
T7EN 45M6 LY7U
TFGR 5GT67 YUIKJY
78JUK90OLKIJHDG
RTGDEF5ETGHTYUI
AQB2 NJE7 6T5R
F8VE BRN5 6KYO
X99T K56X DJ4X
EYH2 W3XK 8UPG
FA54 QE1D F2G3
H4JR TGI8 V76C
WEYV GQC3 CT8Q
F6BN 56Y8 76TG
How to Get Free Fire Redeem Codes for Garena on 25 April 2023?
25 April 2023 Amazon Quiz has gone live on its mobile app platform. Customers from different parts of the country are participating in the daily quiz. The daily quiz is conducted by the company brings an opportunity for the customers to win exciting prizes. The quiz begins from 12 AM to 11:59 PM. In today’s quiz participants have a chance to win Rs 5,000 Amazon Pay Balance by answering all the questions correctly.Every day Amazon brings a fresh set of questions for its customers that contains five easy questions. Amazon quiz brings an opportunity for its customers to win Amazon Pay Balance ranging from Rs 1,000 to Rs 50,000. which consists of five questions related to general knowledge and current affairs.The participants need to answer all the questions correctly and their names will be selected for a lucky draw. The winner will be announced at the end of the month. One wrong answer could eliminate you from the quiz. If you manage to answer all the questions correctly you can stand a chance to win Rs 5,000 Amazon Pay Balance today. Only app users are eligible to participate in the Quiz. Check Out 25 April 2023 Amazon Quiz Answers.Amazon Quiz Today Prize – Rs 5,000 Amazon Pay BalanceQuiz Date – 25 April 2023Daily Timing – 12 AM to 11:59 PMWinner Announcement – Today at 12 PM
In This Article
Amazon Quiz Answers Today 25 April 2023
Question 1: Which Indian Constitution Article deals with the disqualification of MPs from Lok Sabha or Rajya Sabha?
Answer: Article 102Question 2: In 2023, who became the first Indian to win four medals at the world wrestling championships?Answer: Bajrang PuniaQuestion 3: The MCF Rae Bareli has renamed the hockey stadium to in whose honour?
Answer: Rani RampalQuestion 4: What is the preferred living spot of these animals?
Answer: CitiesQuestion 5: How many movies of this series were made?
Answer: 8
How To Play Amazon Quiz
Only app users are eligible to play the Amazon quiz every morning from 12 AM to 11:59 PM. The quiz is not available on the desktop. For those who are unaware of how to play the Amazon quiz below are the steps, you can follow to take the quiz.
Firstly download the Amazon app from Google Play Store or App Store
Now fill in the required information through the Sign Up option.
You need to log in to the Amazon app and scroll down on the home screen to find the Amazon Quiz banner.
Tap on the Amazon Quiz banner and tap on the Start button to start the Quiz.
Now you will get 5 questions and you need to answer them correctly. One wrong answer will eliminate you from the Quiz.
After answering all the questions correctly you are now eligible for a Lucky Draw.
The winner’s name will be announced today at 12 PM.
Krafton today officially announced the Battle Adda, a PUBG New State tournament. There will be a total prize pool of 10 lakhs, the company revealed. The PUBG New State Mobile Battle Adda tournament will begin from April 25 till April 30, where 32 invited teams will be participating and the winning team will take home Rs 5 Lakhs.The 32 teams will compete in a Round-Robin format after being divided into four groups of eight with top esports teams including S8UL, Enigma Gaming, OR Esports, Godlike Esports, and Revenant Esports competing. According to Krafton, the top 16 teams will advance to the finals, where the winning team will get the top prize of Rs 5,000,000.
New State Mobile – Battle Adda will commence on 25th April 2023. Here are the teams to look out for who will be fighting for the prize pool of INR 10,00,000/-
Captain Cool (best IGL voted by the community) – Rs 50,000
Maximum Headshot Kills – Rs 50,000
The tournaments will be streamed live on NEW STATE MOBILE’s Youtube and Facebook channels at 12 noon IST.
Participants for PUBG New State Mobile Battle Adda
A full list of competitors for PUBG New State Mobile Battle Adda is shared below:Group ARevenant EsportsTeam TamilasTrue TamilasGodLike EsportsBad DevilsARK EsportsTeam GenesisChief YTGroup BTeam InsaneGods ReignUnited 4 GloryMidwave EsportsVelocity GamingTeam AtomTWOBReckoning EsportsGroup COR EsportsHyderabad HydrasGlobal EsportsBig Brother EsportsCelsius EsportsZero GravityTeam ZCKLHell EsportsGroup D4Ever EsportsXO UDATry HardUdog IndiaTeam MaviS8ULMarcos GamingEnigma Gaming For the latest gadget and tech news, and gadget reviews, follow us on Twitter, Facebook and Instagram. For newest tech & gadget videos subscribe to our YouTube Channel. You can also stay up to date using the Gadget Bridge Android App. You can find the latest car and bike news here.
The first week of April saw the launch of the OnePlus most affordable phone, OnePlus Nord CE 3 Lite in India. The business also unveiled the OnePlus Nord Buds, which are presently undergoing testing; a review will be published soon. The smartphone has been in use for a few days now. We will discuss if it is a worthy device to purchase in our in-depth OnePlus Nord CE 3 Lite review.
In This Article
OnePlus Nord CE 3 Lite review: Design and Display
Let’s talk about the design first. Previously, the camera setup had been slightly raised and rectangular in shape. The unit for this year has been improved, thus the camera module is no longer present. The phone appears smooth and seamless because of the triple camera sensor’s placement on the back panel, which is very well integrated into the rear panel. It has a great feel, and the OnePlus logo is shiny on the back panel. The shade of pastel lime that we received looks really cool in the summer.Despite having a glossy appearance, as we have mentioned, the phone does not attract fingerprints. The lighter colour options actually make fingerprints and smudge less noticeable.The phone is similarly lightweight and pleasant to hold. It has curved corners and a sleek appearance.The front panel now includes a lovely display and a selfie camera with a punch-hole in the top centre. The side bezels, however, are thin.The flat, body-coloured side frames give the phone a premium appearance. The volume rocker and hybrid SIM tray are located on the left side, and the power button with an integrated fingerprint sensor is located on the right of the frame. The earpiece also functions as a secondary speaker, and the main speaker is located on the bottom edge. The 3.5mm headphone jack and USB-C type port are also located at the bottom. The Alert Slider is once again absent from the phone because it is a Lite model. Overall, the design and construction quality is excellent; nothing to be negative about.The Nord CE 3 Lite’s display is a 6.72-inch full-HD+ LCD screen with a resolution of 1,080×2,400 pixels. The screen has a 240Hz touch sampling rate and a dynamic refresh rate of 120Hz. It boasts a maximum brightness of 680 nits, a screen-to-body ratio of 91.4 percent, a 20:9 aspect ratio, and a pixel density of 391 ppi. The screen is additionally shielded with Corning Gorilla Glass Victus.Also Read:Nothing Ear (2) review: They have hit the ball (hard) out of the park!Instead of a waterdrop-style notch for the selfie camera on the LCD display, there is a punch hole. On the smartphone’s display, everything appears clear and lively thanks to the screen’s brightness. Anyhow, AMOLED has a distinct edge over IPS LCD because that technology is also energy-efficient, at the same time, pictures appear more colourful and true to life.As we already mentioned, the screen’s content is clearly visible even outside in bright daylight, thanks to the display’s adequate brightness level. Additionally, the display has WideVine L1 certification, allowing you to see full HD content on OTT services like Netflix.The 120Hz refresh rate capability is what gives the panel its smoothness and fluidity. Due to the adaptive refresh rate, the phone might shift between 30Hz and 120Hz depending on the media being played. Also, during our testing, there were no jitters or stutters.
OnePlus Nord CE 3 Lite review: Performance and Cameras
Moving on to the performance, the Qualcomm Snapdragon 695 SoC powers the OnePlus Nord CE 3 Lite this time again. The CPU performs well when you run any application and is suitable for daily use. Additionally, there were no lags, which is fantastic news given the cost. The phone also supports all sub-6GHz 5G bands ( including SA and NSA).The overall experience was quite nice, as we also played some games on it. It is capable of handling the majority of difficult games, including Call of Duty and Asphalt. Additionally, the graphics were fantastic, and there were seldom any frame dips. We also saw no heating problems while playing nonstop for about an hour.
We ran Geekbench 6 CPU benchmark and here are the results:
Single-Core Score: 899
Multi-Core Score: 2044
The device comes pre-installed with OxygenOS 13.1, which is an upgraded version of Android 13. On OnePlus devices, the software experience is undoubtedly good because it is incredibly user-friendly and offers a tonne of customization options. Along with several other choices, you can customise themes and styling. The notification toggle worked flawlessly, and there is hardly any bloatware on the device.Normal daylight imagesA 108-megapixel Samsung HM6 sensor with an f/1.75 aperture and EIS capability is one of three rear cameras on the OnePlus Nord CE 3 Lite 5G. A 2-megapixel macro lens and a second 2-megapixel depth sensor are also included. A 16-megapixel front-facing camera is available for taking selfies. Similar to its predecessor, it lacks an ultra-wide angle camera.Both the colours and the details of the daylight capture from the primary sensor are good. The hues are generally vibrant and the image processing is superb. Even if it’s not a major issue, there is some saturation. However, the contrast ratio could have been tackled more effectively. Pixel peeping reveals that the sharpness levels are fairly good for the price range. Normal daylight imageAlso, it is quite good and suitable for the segment is the dynamic range. With little quality loss, the camera can zoom in three times, and the photographs are decent for the price.Moving on to the close-up pictures, you can see that the 108-megapixel camera provides an adequate depth of field and that there are also good details to be found here. Both the clarity and the details are excellent. The colours are lovely, but once more, we noted some saturation problems, particularly with the reds and greens.closeups (normal vs macro)Now that it has a 2-megapixel macro sensor, the quality is only fair. Given the majority of 2-megapixel lenses, soft photos are to be expected. However, the colours are decent.The camera produces respectable portraiture. Although the skin tones are not true, warmer tones have the tendency to pop out, and the background blur appears to be unnatural. Moreover, sharpness levels are acceptable. Although the edge recognition is rather good, it does miss some intricate edges.1x vs 3xlow light/ night mode onextreme low light/ night modeThe pictures taken in low light are pretty decent. In artificial indoor lighting, there is a respectable amount of detail available, and the sharpness level is likewise respectable. Turning on the night mode helps because noise is much more noticeable when the light is low.PortraitsFor the segment, the detailing appears to be fairly good. Although there is noise when you pixel peep, we would still consider this performance to be adequate given the price range.Even the 16-megapixel selfie camera performs admirably. The way it creates skin tones, sharpness levels, and details is excellent, and the dynamic range is also excellent. Again, the colours are somewhat saturated here. Additionally, the portrait mode for selfies has good edge recognition.The OnePlus Nord CE 3 Lite only supports 1080p video at 30 frames per second as a video format. The details are also appealing, and the colours are quite pleasing and natural-looking. While the stabilisation is generally adequate, panning is not very smooth.A big 5,000mAh battery is included with the OnePlus Nord CE 3 Lite. On this smartphone, a 67W charger is supported. However, despite the fact that it only supports 67W, the firm included an 80W SuperVOOC charger in the packaging. 70 percent of the battery may be charged in 30 minutes. The phone can be fully charged in about 50 minutes.
Verdict
The processor is one thing that the OnePlus Nord CE 3 Lite and the OnePlus Nord CE 2 Lite have in common. The Snapdragon 695 processor is the same in both smartphones.Users won’t have many complaints about the 108-megapixel camera’s overall performance in this price range. But sadly, in this price range, it lacks an ultrawide angle camera. However, the main camera performs admirably, despite occasionally having some saturation difficulties. This is one of the gadgets in its price bracket that offers a 5,000mAh battery and 67W charging, which is a slightly rare find. The OxygenOS experience is always positive, and the display is bright and decent.Overall, OnePlus fans looking for a stylish smartphone within a budget could consider the OnePlus Nord CE 3 Lite.
Reports and leaks are doing rounds on the web regarding the expected price and availability of the OnePlus Pad in India. Two months have already passed since the tablet was unveiled at the Cloud 11 event in February and still, there is no official information about the tablet. At the time of the launch, the company confirmed that the device will be available for purchase in the month of April. According to a fresh report the company is likely to make an announcement on April 25.Fonearena reported that the OnePlus Pad’s price in India is expected to be announced on April 25. The newly launched tablet is claimed to sell via e-commerce websites namely Flipkart, and Amazon as well as via the company’s official OnePlus Store in the country. It will also be available for purchase via retail outlets. The exact sale date or launch date is yet to be announced by the company but the official website still notes that pre-orders begin this month.The upcoming tablet is currently listed on Amazon however just a few days ago the tab was also spotted listed on Flipkart which was later removed from its platform. The listing was spotted by ROBINAYN which also revealed the price of the OnePlus Tab. As per the Flipkart listing the device will be available in two different configurations. The price of the 8GB RAM with 128GB storage variant will be Rs 37,999 while the 12GB RAM with 256GB storage option will be priced at Rs 39,999. In addition to this, the e-commerce will also offer an additional bank discount of Rs 2,000.
OnePlus Pad specifications
The OnePlus Pad is highlighted with an 11.61-inch display with a refresh rate of 144Hz, a resolution of 2,800×2,000, a pixel density of 296 ppi, and a brightness of 500 nits. The device has a 2.5D curved glass, a 7:5 screen ratio, and an 88 percent screen-to-body ratio.The Device has 5G cellular sharing with smartphones and comes equipped with a MediaTek Dimensity 9000 chipset, which supports up to 12GB of LPDDR5 RAM. The Tab runs on Android 13 out of the box and should get at least the 2 next OS updates with security updates.The OnePlus Tablet comes with a quad-speaker setup that is said to provide an Omnibearing sound field, and depending on how the tablet is held, the speakers can switch between the left and right channels. Dolby Atmos and Dolby Vision are also supported on the tablet. OnePlus tablet also comes with a 9,510mAh battery with 67W SUPERVOOC capability, which is said to provide up to one month of standby time. It has an 8-megapixel selfie camera and a single 13-megapixel back camera with an LED flash. In addition to this, the device is supplied with a magnetic keyboard and a stylus.
For the latest gadget and tech news, and gadget reviews, follow us on Twitter, Facebook and Instagram. For newest tech & gadget videos subscribe to our YouTube Channel. You can also stay up to date using the Gadget Bridge Android App. You can find the latest car and bike news here.
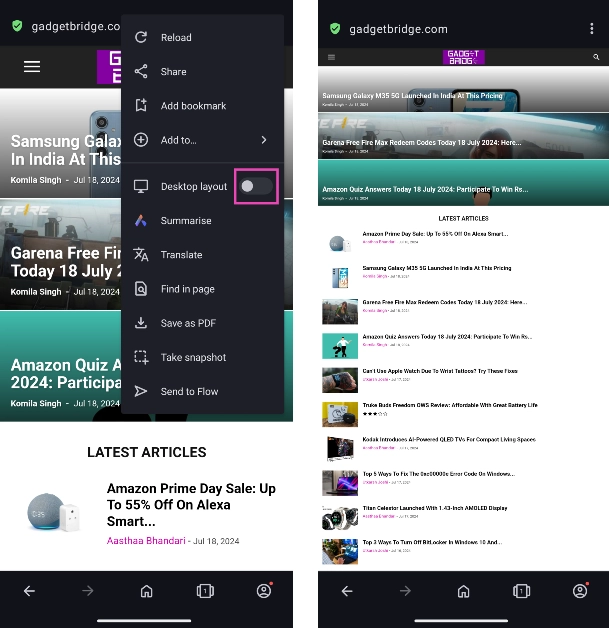
Your internet activity is not as private as you think. One of the biggest concerns that users have while browsing the web is complete privacy. While absolute privacy has been reduced to a myth, there are still some measures you can take to deny third-party entities access to your internet activity. Usually, these third-party entities monitor your internet usage to send you targeted ads. By denying access, you will stop receiving relevant ads. Here are the top 5 ways to disable Ad ID tracking on Android and iOS.Read Also:Best 3 Ways to View a Full Desktop Site on an Android Phone?
In This Article
Disable Ad ID tracking on Android
Step 1: Go to Settings and select ‘Privacy’.Step 2: Tap on ‘Ads’ in the Google section.Step 3: Select ‘Delete advertising ID’.Step 4: Tap the blue icon for ‘Delete advertising ID’.
Turn off Customisation Services on Samsung devices
Samsung devices curate personalised ads for their users by tracking their app and internet usage. Here’s how you can disable it.Step 1: Go to Settings and select ‘Privacy’.Step 2: Tap on ‘Customisation Service’ in the Samsung section.Step 3: Select ‘Stop customising all devices’.Step 4: Tap on ‘Stop all customisation’.
Disable personalised ads on a Xiaomi smartphone
Step 1: Launch the device Settings on your Xiaomi smartphone.Step 2: Scroll down and select ‘Passwords and Security’.Step 3: Tap on ‘Authorisation & revocation’.Step 4: Turn the toggle bar off for ‘msa’.
Disable Ad ID tracking on iOS
While there is no way to delete your Ad ID on Apple, you can choose which apps have access to it. All iOS apps require your permission to access your Ad Identifier (IDFA). Simply select ‘Ask App Not To Track’ to deny this access. To remove this permission for all apps, follow these steps.Step 1: Go to Settings and select Privacy & Security.Step 2: Tap on ‘Tracking’.Step 3: Disable the toggle bar for ‘Allow Apps to Request to Track’.You can also remove tracking permission for individual apps from this window. By deselecting ‘Allow Apps to Request to Track’ you will not receive the tracking prompt upon opening any app for the first time.
Switch off personalised ads on iOS
Apple targets its users with personalised ads of its own. Here’s how you can disable them.Step 1: Go to Settings and select Privacy & Security.Step 2: Select ‘Apple Advertising’.Step 3: Disable the toggle bar for Personalised Ads.
Frequently Asked Questions
How do I disable Ad ID tracking on Android?
To disable Ad ID tracking on Android go to Settings>Privacy>Ads>Delete Advertising ID.
How do I disable Ad ID tracking on my iPhone?
To disable Ad ID tracking on your iPhone, go to Settings>Privacy & Security>Tracking and disable the toggle bar for ‘Allow Apps to Request to Track’.
How do I stop ads from tracking my activity on Android?
These are the top 5 ways to disable Ad ID tracking on Android and iOS. Deleting your Ad ID does not mean that you will stop receiving ads altogether. You will still receive ads, they just won’t be relevant to you. Your Ad ID uses your internet activity, location, and other data to send you targeted ads. Deleting your Ad ID limits third-party entities and data broker agencies from accessing your data.For the latest gadget and tech news, and gadget reviews, follow us on Twitter, Facebook and Instagram. For newest tech & gadget videos subscribe to our YouTube Channel. You can also stay up to date using the Gadget Bridge Android App. You can find the latest car and bike news here.
According to the latest announcement by Xiaomi India, it will now offer support to senior citizens to set up their phones at home. As a part of this initiative, the company has also announced to the provision of free service for senior citizens for 30 days as an introductory offer.The Chinese smartphone manufacturer Xiaomi has officially announced specialised at-home phone support services for their senior citizen users in India. Commenting on the initiative, Muralikrishnan B, President at Xiaomi India said, “At Xiaomi India, we strive to provide our customers with innovative and customised solutions to meet their evolving needs. This service is specifically designed for our senior citizen users who may not be able to visit the Service centre for various reasons. By offering a limited period free of cost at-home service, we want to encourage our users to stay better connected with our teams and enable us to deliver a smooth service. We will continue to align our efforts in making our services accessible to a larger network of customers in the coming years.”Also Read:WhatsApp Kept Messages feature to save disappearing messages announcedAs per the company, only senior citizens residing within 20 kilometres of their nearest service centre can be benefited. However other customers can also take advantage of the specialised at-home services but will have to pay Rs 249 plus taxes.In the first phase, the service will initially go live in 15 cities that include Ahmedabad, Bangalore, Bhopal, Bhubaneswar, Chandigarh, Chennai, Delhi, Hyderabad, Indore, Jaipur, Kolkata, Lucknow, Mumbai, Noida, Pune.
How senior citizens can avail of at-home phone support services in India?
In order to use the services just follow a few simple steps.
Firstly you can choose your desired service by scanning a QR Code and filling in your personal details to proceed.
Then a Xiaomi customer service agent will get in touch with you once you have provided all your personal details. He will verify the type of service and eligibility by checking their pin code.
After this Xiaomi service representative will arrive at their house as soon as possible. The customers can also raise tokens via a hotline number 1800 103 6286 and on Whatsapp number — 8861826286.
Connecting your phone to a bigger screen has tons of advantages. Linking your phone to your TV allows you to stream the videos on your phone on a bigger screen. Want to show the photos in your gallery to a room full of people? Mirroring your phone’s display to a TV is the way to go. In this article, we bring you the top 5 ways to connect your iPhone or Android phone to your TV.Read Also:Best TV Shows and Movies to Watch This Week on Apple TV+
In This Article
Connect your iPhone to your TV using AirPlay
AirPlay is Apple’s native mechanism for casting your iPhone’s display to another screen. Initially, AirPlay was only compatible with Apple TV streaming box, but over the years, more devices from other manufacturers have been added to the ecosystem. This includes Smart TVs from LG, Samsung, Sony, and more. Here’s how you can use AirPlay to mirror your iPhone’s display on a TV.Step 1: Connect your iPhone and your TV to the same WiFi network.Step 2: Launch the video you want to cast on your TV.Step 3: Some streaming apps have a dedicated AirPlay icon on their video player. Tap on it.Step 4: If you don’t see the AirPlay icon, tap on ‘Share’ and then select AirPlay.Step 5: Choose your TV from the list.To stop streaming on your TV, tap the AirPlay icon on your iPhone and deselect the device on which the video is being cast.
Use screen mirroring to cast your iPhone’s display on your TV
The method mentioned above is good for casting content from a streaming platform or selected apps. If you want to use your iPhone on a bigger screen, mirroring its entire display is a better option. Here’s how you can go about it.Step 1: Connect your iPhone and TV to the same WiFi network.Step 2: Swipe down from the upper right corner of the screen to reveal the Control Center.Step 3: Tap on the Screen Mirroring icon.Step 4: Select your TV’s name from the list.Step 5: A code will appear on your TV. Enter it on your iPhone.Your iPhone’s display will be mirrored on your TV. To stop mirroring, go to Control Center>Screen Mirroring>Stop Mirroring.
Mirror your Android phone’s display on a Smart TV
Step 1: Make sure your TV and Android phone are connected to the same WiFi network.Step 2: Select ‘Screen Mirroring’ from your TV’s system settings. Some TVs may have a screen mirroring function in the HDMI input menu.Step 2: Swipe down from the status bar on your smartphone and turn on screen mirroring. This may be called ‘Smart View’ on Samsung phones or ‘Cast’ on phones from other manufacturers.Step 3: Connect to your TV from your smartphone.Step 4: Your smartphone’s display will be mirrored on your TV.
Use the Google TV app for Android
If you use the Google TV app to manage your Smart TV, you can use it to cast your phone’s display on the big screen. Here’s how.Step 1: Launch the Google TV app on your smartphone.Step 2: Select the screencast icon on the search bar.Step 3: Select the device for casting.Step 4: Once the cast icon is filled in, it means that your device is ready to cast.
Use Chromecast for Android
If your Smart TV has Chromecast support, you can use this method to cast your Android phone’s display to it. If not, you will need a Chromecast device for your TV to use this method.Step 1: Pair your smartphone with your TV from the Google Home app.Step 2: Go to the homepage and select the device you want to mirror your display on.Step 3: Select ‘Cast my Screen’ from the list of options at the bottom.
Frequently Asked Questions
How do I do screen mirroring?
Make sure your TV and phone are connected to the same WiFi network. On your iPhone, tap on ‘Screen Mirroring’ in the Control Center and select your TV from the list. Android phones have the screen mirroring option in the quick settings menu. In Samsung phones, this feature is called ‘Smart View’.
Can you screen mirror to PC?
Yes, you can mirror your phone’s display to your PC using MIracast. Read this article to know more.
These are the top 5 ways to wirelessly connect your iPhone and Android phone to your TV. If a common home WiFi network is not available, you can go the old-school route and connect your phone to your TV using an HDMI cable. For this, you will need an HDMI to lightning/USB C adapter. The only downside to this method is that you can only take your phone as far away from the TV as the HDMI cable allows.For the latest gadget and tech news, and gadget reviews, follow us on Twitter, Facebook and Instagram. For newest tech & gadget videos subscribe to our YouTube Channel. You can also stay up to date using the Gadget Bridge Android App. You can find the latest car and bike news here.
WhatsApp Disappearing Messages was launched in December 2021. This allows received messages in chats to automatically delete after a set time duration. However, the company has been working for a long time which allows the user to keep a particular message saved even after disappearing messages is turned on. The Meta-owned messaging platform has now rolled out a new functionality dubbed Kept Messages to allow users to save messages in disappearing chat.According to the latest announcement by WhatsApp, it is now rolling out the Keep in Chat function that allows users to save a message received in disappearing chat for later access. Users can keep messages that are about to disappear in chats if a user has the disappearing messages feature enabled during a conversation. The sender has control over which messages the receiver can keep or save which is the catch here.Also Read:Sony BRAVIA X75L television with X1 4K Processor launched in IndiaAccording to WhatsApp sender will be informed when someone keeps the chat and will have the power to veto the choice. If you decide that someone else cannot keep your message, your decision is final, no one else may keep it, and the message will be removed after the timer expires. By doing this, you have the last say in how messages you send are safeguarded.“We believe if you’ve sent the message, it’s your choice whether others in the chat can keep it for later,” the blog post noted.The saved WhatsApp messages can be accessed from the Kept Messages folder. The saved message will be identified by a bookmark icon.As per the company, the Kept messages feature will be rolled out globally over the next few weeks.A few days ago WhatsApp also added new security features in order to improve user security on the app. The additional security features added to the platform include Account Protect, Device Verification and Automatic Security Codes. According to the company, these three additional features will make your chats as private and secure as an in-person conversation. The additional security features are said to be added to WhatsApp in the coming months.
For the latest gadget and tech news, and gadget reviews, follow us on Twitter, Facebook and Instagram. For newest tech & gadget videos subscribe to our YouTube Channel. You can also stay up to date using the Gadget Bridge Android App. You can find the latest car and bike news here.
Emojis are an essential part of the texting experience. There is no substitute for the flair that emojis provide during texting. While iOS and Android have very similar emojis for the most part, sometimes even the most subtle change can make a world of difference. Not to mention, emojis are constantly updated and sometimes you may see a square box instead of the emoji on your platform. In this article, we show you how to get iOS or iPhone emojis on any Android device.
Read Also:Samsung Galaxy Watch 5 series can track menstrual cycles using skin temperature: Update
In This Article
Use iOS Emojis Keyboard
There are plenty of third-party keyboard apps that will give you access to iPhone or iOS emojis on your Android device. Apps like FancyKey, Green Apple Keyboard, Kika Keyboard, and more are constantly updated with new emojis as soon as they are released on the iOS platform. Another great app that lets you use iPhone emojis on your Android phone is ‘iOS emojis keyboard’. Here’s how you can use it.Step 1: Download and install the ‘iOS emojis keyboard’ app from Google Play Store.Step 2: Launch the app and tap on ‘Enable iOS emojis keyboard’.Step 3: Tap on the ‘off’ button next to iOS Emojis Keyboard to switch it to ‘on’.Step 4: Return to the previous screen and tap on ‘Switch iOS emojis keyboard’.Step 5: In the ‘Choose input method’ popup box, select ‘iOS emojis Keyboard’.Step 6: Go to any messaging app and tap on the message box. You will be able to view and use the iPhone emojis in the chat.
Use Emoji Fonts Message Maker
Another way to switch to iPhone-style emojis on your Android phone is by changing the emoji font on your device. This is only possible on devices that let the user download custom fonts from non-native sources. Here’s how you can use the ‘Emoji Fonts Message Maker’ to switch to iPhone emojis.Step 1: Download and install the Emoji Fonts Message Maker app on your Android phone.Step 2: Go to Settings and select Display.Step 3: Tap on ‘Font size and style’.Step 4: Select ‘Font Style’.Step 5: Select ‘EmojiFont10’.You will be able to view and send iPhone emojis on your Android device.
Frequently Asked Questions
Can I get iPhone emojis on my Android?
Yes, you can get iPhone emojis on your Android by using a third-party keyboard app like Green Apple Keyboard, Kik Keyboard, FancyKey, or iOS emojis keyboard. You can also use an iOS emojis font on your Android device to use all the iPhone emojis.
Can I get memoji on Android?
While you cannot create an Apple memoji on Android, there are plenty of apps that will help you create your own avatar that can be used across different apps and platforms. You can use a third-party app like Bitmoji or native apps like Samsung’s AR Zone.
Are iPhone emojis different from Android?
Due to licensing and copyright, the emojis on iPhone are slightly different from the ones on Android. This is also why no two apps have the same emoji set. While they may convey the same meaning, the emojis on the two platforms are not entirely the same.Read Also:Microsoft Edge vs Google Chrome: Here’s Why Edge May Be Better for You
When you open a webpage on your Android phone, what you see is the mobile version of the website. The design and layout of a mobile site are more suited to the dimensions of your smartphone. If a website does not have a mobile version, it may struggle to fit in your phone’s display. Sometimes, you may feel the need to use the desktop version of a site over the mobile site. This may be because the mobile is poorly optimised the layout is all over the place. A desktop version may also unlock some features that aren’t included in the mobile site. In this article, we bring you the 7 best ways to view a full desktop site on an Android phone.Read Also:Sony BRAVIA X75L television with X1 4K Processor launched in India
In This Article
Here’s how you can view a full desktop site on Chrome
Step 1: Launch the Chromeapp on your smartphone and open a webpage.Step 2: Tap on the three dots (ellipses) at the top right corner of the screen.Step 3: Tap on Desktop Site.The webpage will reload and you will be able to see the desktop version of the website.
Enable Desktop Mode for all websites on Google Chrome for Android
Step 1:Launch the Google Chrome app on your Android smartphone.
Step 2: Tap the ellipses at the top right corner of the screen and select Settings.
Step 3: Scroll down and select Site Settings.
Step 4: Scroll down and select Desktop site.
Step 5: Switch on the toggle bar for Desktop site.
How to view a full desktop site on Samsung’s native browser
Step 1: Launch the Internet app on your Samsung smartphone.Step 2: Open a web page.Step 3: Tap on the hamburger menu icon at the bottom right corner of the screen.Step 4: Select Desktop site.The page will reload in a few seconds and you will be presented with the desktop version of the website.
View a full desktop site on the native OnePlus/Oppo web browser
Step 1: Launch the Internet app on your OnePlus smartphone.
Step 2: Tap the ellipses at the top right corner of the screen.
Step 3: Switch on the toggle bar for Desktop website.
How to view a full desktop site on Duck Duck Go
Duck Duck Go is popular among users who value their privacy over everything else. The browser goes above and beyond to ensure your browsing experience is safe and that you remain untracked. While DDG’s search optimisation may suffer because of this, the browser still offers basic functions like the option to load desktop sites. Here’s how you can do that.Step 1: Launch the Duck Duck Go browser on your Android smartphone.Step 2: Open a web page.Step 3: Tap on the ellipses (three dots) at the top right corner of the screen.Step 4: Select Desktop Site.The desktop version of the site will load on the screen in a few seconds.
View a desktop site on Microsoft Edge for Android
Step 1:Launch the Microsoft Edge browser on your Android phone and open a website.
Step 2: Hit the hamburger menu at the bottom right corner of the screen.
Step 3: Tap on View desktop site. The desktop site will open on the browser.
View a desktop site on Opera for Android
Step 1:Launch the Opera browser on your Android phone and go to the website of your choice.
Step 2: Hit the ellipses at the top right corner of the screen.
Step 3: Turn on the toggle switch for Desktop layout. The desktop website will load on the screen.
Frequently Asked Questions
How do I view desktop sites on mobile?
To view a desktop site on mobile, simply load the web page on Chrome, tap the ellipses and select ‘Desktop site’. Most web browsers for Android give you the option to load a desktop site.
How do I turn on desktop sites on Android?
To turn off a desktop site and go back to the mobile format, simply undo the checkbox for the desktop site. Tap on the ellipses (three dots) and tap on ‘desktop site’ again.
What is a desktop site?
A desktop site is the version of a website you see on your PC or laptop. This is the ‘full version’ of the website. If you open the web page on a smartphone, you will be presented with a version of the website that is optimised for mobile usage.Read Also:Acer announced Acerpure Pro Vero Air Purifier with 3-in-1 + HEPA Filter
Conclusion
These are the 7 best ways to view a full desktop site on an Android phone. If you need to fill up a form or upload an important document, it is advised that you use the desktop version of the website. Browsing a desktop site may consume more mobile data than its mobile version.


 The Haier QLED TV is powered by ARM CA73 Quad-core with TEE 1.3Ghz, with G52 MC1 @550MHz GPU with a memory of 3GB + 32GB Flash. In terms of connectivity, it includes Wi-Fi 5( 2.4G+5G) Chromecast, Bluetooth 5.1, HDMI 2.1, and USB 2.0. It also has Google TV which provides premium features like Auto Low Latency Mode (ALLM) which enables a game console to send a signal to the display which will cause it to automatically switch to a low-latency, low-lag mode for gaming and HDMI 2.1. Like other streaming device platforms, Google TV features Netflix, Zee5, Prime Video and more OTT platforms.
Also Read: Vivo X90, X90 Pro with Zeiss-powered triple rear cameras launched in India
The TV has a built-in Chromecast, Google Play Store, Hands-free voice control, Google Assistance, and Google UI. For speedy responsiveness, there is a dedicated game mode, ALLM, which is triggered when it recognises a gaming console attached to the TV. Additionally, it has a 120 Hz screen with VRR and MEMC120Hz, which greatly improves the clarity of each frame.
Speaking on the launch, Mr. Satish NS, President, Haier Appliances India said, “We are extremely excited with the launch of new QLED TV series which will give consumers a new and immersive experience of watching television. This launch is yet another example of our commitment to Haier’s brand philosophy of ‘Inspired Living’. The new Haier QLED TV is designed to elevate user experience through its latest features and a stylish bezel-less design. Indian consumers are smart and look for new smart products to add in their lives. Keeping the same in mind we have launched the new range of QLED TV S9QT series for consumers to experience entertainment in an immersive way.”
For the latest gadget and tech news, and gadget reviews, follow us on Twitter, Facebook and Instagram. For newest tech & gadget videos subscribe to our YouTube Channel. You can also stay up to date using the Gadget Bridge Android App. You can find the latest car and bike news here.
The Haier QLED TV is powered by ARM CA73 Quad-core with TEE 1.3Ghz, with G52 MC1 @550MHz GPU with a memory of 3GB + 32GB Flash. In terms of connectivity, it includes Wi-Fi 5( 2.4G+5G) Chromecast, Bluetooth 5.1, HDMI 2.1, and USB 2.0. It also has Google TV which provides premium features like Auto Low Latency Mode (ALLM) which enables a game console to send a signal to the display which will cause it to automatically switch to a low-latency, low-lag mode for gaming and HDMI 2.1. Like other streaming device platforms, Google TV features Netflix, Zee5, Prime Video and more OTT platforms.
Also Read: Vivo X90, X90 Pro with Zeiss-powered triple rear cameras launched in India
The TV has a built-in Chromecast, Google Play Store, Hands-free voice control, Google Assistance, and Google UI. For speedy responsiveness, there is a dedicated game mode, ALLM, which is triggered when it recognises a gaming console attached to the TV. Additionally, it has a 120 Hz screen with VRR and MEMC120Hz, which greatly improves the clarity of each frame.
Speaking on the launch, Mr. Satish NS, President, Haier Appliances India said, “We are extremely excited with the launch of new QLED TV series which will give consumers a new and immersive experience of watching television. This launch is yet another example of our commitment to Haier’s brand philosophy of ‘Inspired Living’. The new Haier QLED TV is designed to elevate user experience through its latest features and a stylish bezel-less design. Indian consumers are smart and look for new smart products to add in their lives. Keeping the same in mind we have launched the new range of QLED TV S9QT series for consumers to experience entertainment in an immersive way.”
For the latest gadget and tech news, and gadget reviews, follow us on Twitter, Facebook and Instagram. For newest tech & gadget videos subscribe to our YouTube Channel. You can also stay up to date using the Gadget Bridge Android App. You can find the latest car and bike news here.  The Haier QLED TV is powered by ARM CA73 Quad-core with TEE 1.3Ghz, with G52 MC1 @550MHz GPU with a memory of 3GB + 32GB Flash. In terms of connectivity, it includes Wi-Fi 5( 2.4G+5G) Chromecast, Bluetooth 5.1, HDMI 2.1, and USB 2.0. It also has Google TV which provides premium features like Auto Low Latency Mode (ALLM) which enables a game console to send a signal to the display which will cause it to automatically switch to a low-latency, low-lag mode for gaming and HDMI 2.1. Like other streaming device platforms, Google TV features Netflix, Zee5, Prime Video and more OTT platforms.
Also Read: Vivo X90, X90 Pro with Zeiss-powered triple rear cameras launched in India
The TV has a built-in Chromecast, Google Play Store, Hands-free voice control, Google Assistance, and Google UI. For speedy responsiveness, there is a dedicated game mode, ALLM, which is triggered when it recognises a gaming console attached to the TV. Additionally, it has a 120 Hz screen with VRR and MEMC120Hz, which greatly improves the clarity of each frame.
Speaking on the launch, Mr. Satish NS, President, Haier Appliances India said, “We are extremely excited with the launch of new QLED TV series which will give consumers a new and immersive experience of watching television. This launch is yet another example of our commitment to Haier’s brand philosophy of ‘Inspired Living’. The new Haier QLED TV is designed to elevate user experience through its latest features and a stylish bezel-less design. Indian consumers are smart and look for new smart products to add in their lives. Keeping the same in mind we have launched the new range of QLED TV S9QT series for consumers to experience entertainment in an immersive way.”
For the latest gadget and tech news, and gadget reviews, follow us on Twitter, Facebook and Instagram. For newest tech & gadget videos subscribe to our YouTube Channel. You can also stay up to date using the Gadget Bridge Android App. You can find the latest car and bike news here.
The Haier QLED TV is powered by ARM CA73 Quad-core with TEE 1.3Ghz, with G52 MC1 @550MHz GPU with a memory of 3GB + 32GB Flash. In terms of connectivity, it includes Wi-Fi 5( 2.4G+5G) Chromecast, Bluetooth 5.1, HDMI 2.1, and USB 2.0. It also has Google TV which provides premium features like Auto Low Latency Mode (ALLM) which enables a game console to send a signal to the display which will cause it to automatically switch to a low-latency, low-lag mode for gaming and HDMI 2.1. Like other streaming device platforms, Google TV features Netflix, Zee5, Prime Video and more OTT platforms.
Also Read: Vivo X90, X90 Pro with Zeiss-powered triple rear cameras launched in India
The TV has a built-in Chromecast, Google Play Store, Hands-free voice control, Google Assistance, and Google UI. For speedy responsiveness, there is a dedicated game mode, ALLM, which is triggered when it recognises a gaming console attached to the TV. Additionally, it has a 120 Hz screen with VRR and MEMC120Hz, which greatly improves the clarity of each frame.
Speaking on the launch, Mr. Satish NS, President, Haier Appliances India said, “We are extremely excited with the launch of new QLED TV series which will give consumers a new and immersive experience of watching television. This launch is yet another example of our commitment to Haier’s brand philosophy of ‘Inspired Living’. The new Haier QLED TV is designed to elevate user experience through its latest features and a stylish bezel-less design. Indian consumers are smart and look for new smart products to add in their lives. Keeping the same in mind we have launched the new range of QLED TV S9QT series for consumers to experience entertainment in an immersive way.”
For the latest gadget and tech news, and gadget reviews, follow us on Twitter, Facebook and Instagram. For newest tech & gadget videos subscribe to our YouTube Channel. You can also stay up to date using the Gadget Bridge Android App. You can find the latest car and bike news here. 
 Buds Vibe is easily one of the best-looking TWS in Truke’s catalogue. The earbuds are available in a single-tone blue colour and a dual-tone black & yellow colour combination. The charging case and earbuds are made entirely out of plastic, which is something to be expected in this price range. The charging case weighs just 76.4 grams (with the earbuds inside).
The see-through plastic lid covers 70% of the front panel. There is a small display inside that notifies you of the charge held in the case at any given time. When the earbuds are in their respective pods, you can also see their battery level bar on this display. Truke branding can be found just below the plastic lid. The USB type C charging port has been housed at the bottom of the case.
Buds Vibe is easily one of the best-looking TWS in Truke’s catalogue. The earbuds are available in a single-tone blue colour and a dual-tone black & yellow colour combination. The charging case and earbuds are made entirely out of plastic, which is something to be expected in this price range. The charging case weighs just 76.4 grams (with the earbuds inside).
The see-through plastic lid covers 70% of the front panel. There is a small display inside that notifies you of the charge held in the case at any given time. When the earbuds are in their respective pods, you can also see their battery level bar on this display. Truke branding can be found just below the plastic lid. The USB type C charging port has been housed at the bottom of the case.
 The build quality of Buds Vibe is satisfactory. Comparing it with other Truke products, we feel that the Buds Vibe could have been a bit more sturdy. The lid is fun to snap open and shut but rests slightly loose on the case. It is a very minor complaint but we haven’t faced this issue on any other Truke product. On the bright side, the case does not attract any fingerprints or smudges. After a week of rough use, where the case shared pockets with keys and loose change, we are happy to report that it came out unscathed with no scratches.
 The earbuds sport an in-ear design. There are an additional two pairs of ear tips in the box to help you find the perfect fit. This is going to be necessary if you plan on using the Buds Vibe to cancel out surrounding noise. Made out of glossy plastic, the earbuds have the tendency to fall out during sweaty workouts. We did not experience any water damage due to sweat during our use.
The outer panels of the earbuds are touch sensitive and can be used to control the audio playback. If you want to switch between different audio/ANC modes, you will have to rely on touch gestures since there is no app support for Buds Vibe. The earbuds are highly prone to accidental touches, which can get annoying very quickly. It is also not uncommon for some touch gestures to not register at all. A dedicated app would sort this issue out altogether.
The earbuds sport an in-ear design. There are an additional two pairs of ear tips in the box to help you find the perfect fit. This is going to be necessary if you plan on using the Buds Vibe to cancel out surrounding noise. Made out of glossy plastic, the earbuds have the tendency to fall out during sweaty workouts. We did not experience any water damage due to sweat during our use.
The outer panels of the earbuds are touch sensitive and can be used to control the audio playback. If you want to switch between different audio/ANC modes, you will have to rely on touch gestures since there is no app support for Buds Vibe. The earbuds are highly prone to accidental touches, which can get annoying very quickly. It is also not uncommon for some touch gestures to not register at all. A dedicated app would sort this issue out altogether.
 Truke Buds Vibe gets four preset EQ modes – balanced mode (default), dynamic audio mode, movie mode, and bass boost mode. You can switch between these modes by touching and holding the outer panel of the left earbud. The notification sound remains very rough and not pleasing to listen to at all. To switch to an EQ mode, you will need to go through all the other modes. An app would’ve been extremely handy here. The touch panels sometimes fail to register the hold gesture and play music instead of switching to a different EQ mode.
In terms of sound quality, Truke Buds Vibe does not disappoint. We played a variety of genres on these earbuds and had an enjoyable listening experience. The sound is punchy and rich, with no significant distortion if you keep the volume under 80%. The lower frequencies get a special focus and the warm, enveloping bass can be further enhanced with the ‘Bass Boost’ mode.
Truke Buds Vibe gets four preset EQ modes – balanced mode (default), dynamic audio mode, movie mode, and bass boost mode. You can switch between these modes by touching and holding the outer panel of the left earbud. The notification sound remains very rough and not pleasing to listen to at all. To switch to an EQ mode, you will need to go through all the other modes. An app would’ve been extremely handy here. The touch panels sometimes fail to register the hold gesture and play music instead of switching to a different EQ mode.
In terms of sound quality, Truke Buds Vibe does not disappoint. We played a variety of genres on these earbuds and had an enjoyable listening experience. The sound is punchy and rich, with no significant distortion if you keep the volume under 80%. The lower frequencies get a special focus and the warm, enveloping bass can be further enhanced with the ‘Bass Boost’ mode.
 While the Buds Vibe provide a good bass output, the mid and higher frequencies could have used a bit more work. The higher frequencies (guitar and vocals) sound slightly rough on certain occasions. A greater level of detail in the output would have been ideal. Having said that, the Truke Buds Vibe is still a worthy contender in its segment.
There is a 40ms low latency Gaming Mode onboard the Buds Vibe too. We did experience a mismatch in audio and gameplay while playing Call of Duty in regular mode. Turning on the Gaming Mode was a big improvement and instantly ironed out all issues. If you’re looking for a TWS on a budget that can cater to different needs, Buds Vibe is worth looking into.
You also get Active Noise Cancellation on Truke Buds Vibe. This is where Buds Vibe pulls ahead of its competition. At this price range, having ANC on your earbuds is a total steal deal. The ANC performance is surprisingly good. The TWS can cancel up to 35dB of surrounding noise. We previously used Truke Buds A1 which also offers ANC in a similar price range, but the ANC on Buds Vibe is much better. The TWS was able to suppress background noises like the sound of the ceiling fan and distant humdrum.
While the Buds Vibe provide a good bass output, the mid and higher frequencies could have used a bit more work. The higher frequencies (guitar and vocals) sound slightly rough on certain occasions. A greater level of detail in the output would have been ideal. Having said that, the Truke Buds Vibe is still a worthy contender in its segment.
There is a 40ms low latency Gaming Mode onboard the Buds Vibe too. We did experience a mismatch in audio and gameplay while playing Call of Duty in regular mode. Turning on the Gaming Mode was a big improvement and instantly ironed out all issues. If you’re looking for a TWS on a budget that can cater to different needs, Buds Vibe is worth looking into.
You also get Active Noise Cancellation on Truke Buds Vibe. This is where Buds Vibe pulls ahead of its competition. At this price range, having ANC on your earbuds is a total steal deal. The ANC performance is surprisingly good. The TWS can cancel up to 35dB of surrounding noise. We previously used Truke Buds A1 which also offers ANC in a similar price range, but the ANC on Buds Vibe is much better. The TWS was able to suppress background noises like the sound of the ceiling fan and distant humdrum.
 The calling experience provided by Truke Buds Vibe gave us little to complain about. The earbuds are able to effectively isolate the voice from the background noise and relay it perfectly to the receiver. The Quad Mic Environmental Noise Cancellation plays its part here.
With 300mAh of battery inside the case, Truke Buds Vibe offers a total playback time of 48 hours. We used the earbuds every day throughout the week and only felt the need to charge the case twice. This included using ANC at all times with up to two hours of music consumption each day. Each earbud is equipped with a 40mAh battery, which is good enough to last 5-7 hours with ANC turned on. The case takes two hours to fully charge.
Read Also: PUBG New State Mobile Battle Adda tournament announced: Details inside
The calling experience provided by Truke Buds Vibe gave us little to complain about. The earbuds are able to effectively isolate the voice from the background noise and relay it perfectly to the receiver. The Quad Mic Environmental Noise Cancellation plays its part here.
With 300mAh of battery inside the case, Truke Buds Vibe offers a total playback time of 48 hours. We used the earbuds every day throughout the week and only felt the need to charge the case twice. This included using ANC at all times with up to two hours of music consumption each day. Each earbud is equipped with a 40mAh battery, which is good enough to last 5-7 hours with ANC turned on. The case takes two hours to fully charge.
Read Also: PUBG New State Mobile Battle Adda tournament announced: Details inside


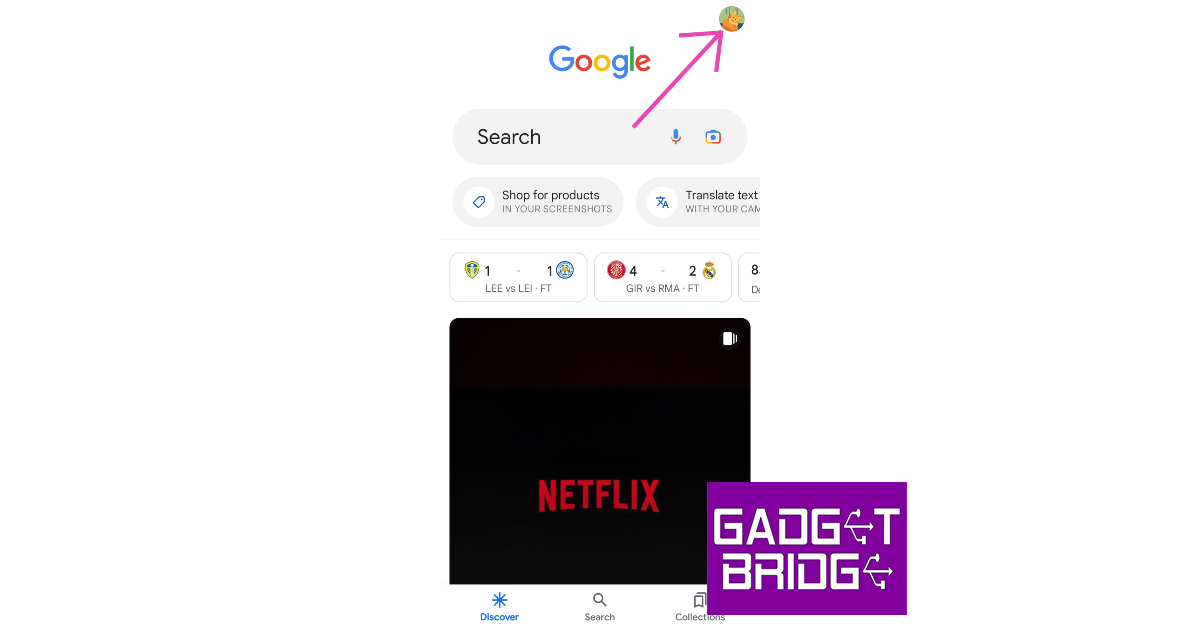 Step 2: Tap on Settings.
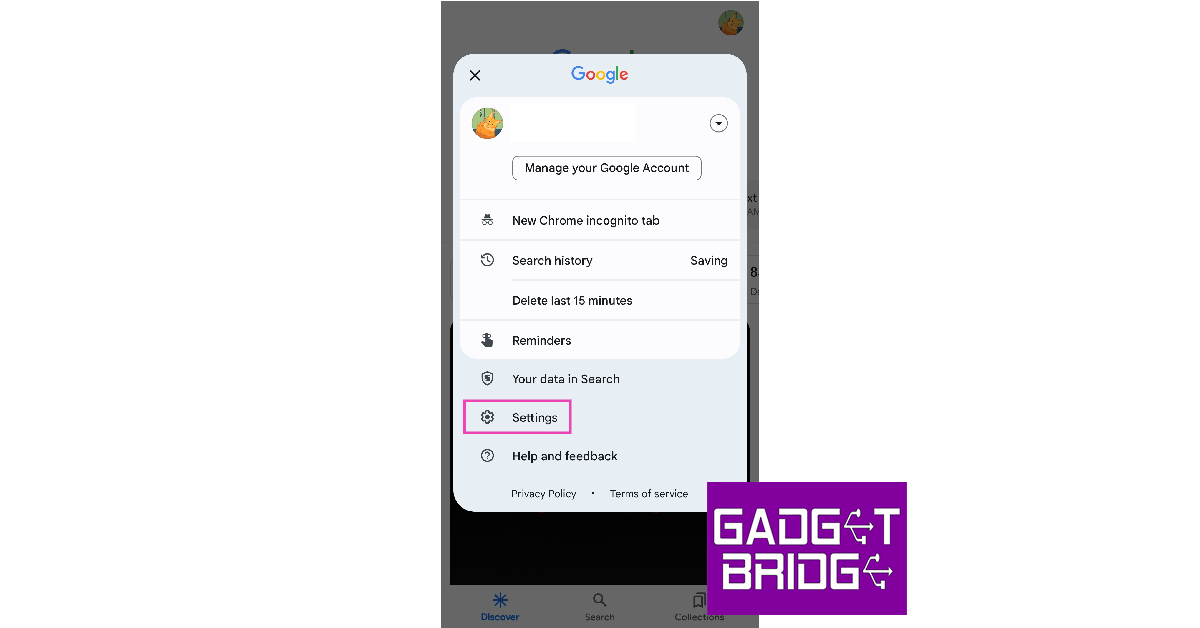 Step 3: Select ‘Google Assistant’.
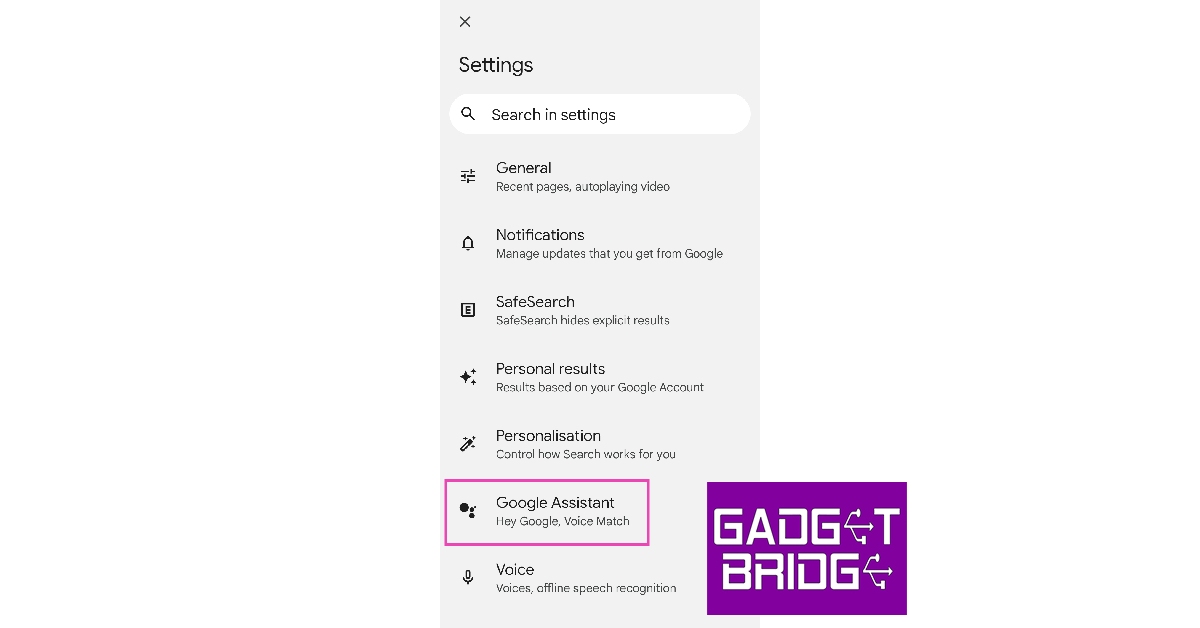 Step 4: Tap on Routines.
 Step 5: Tap on the Plus icon that says ‘New’.
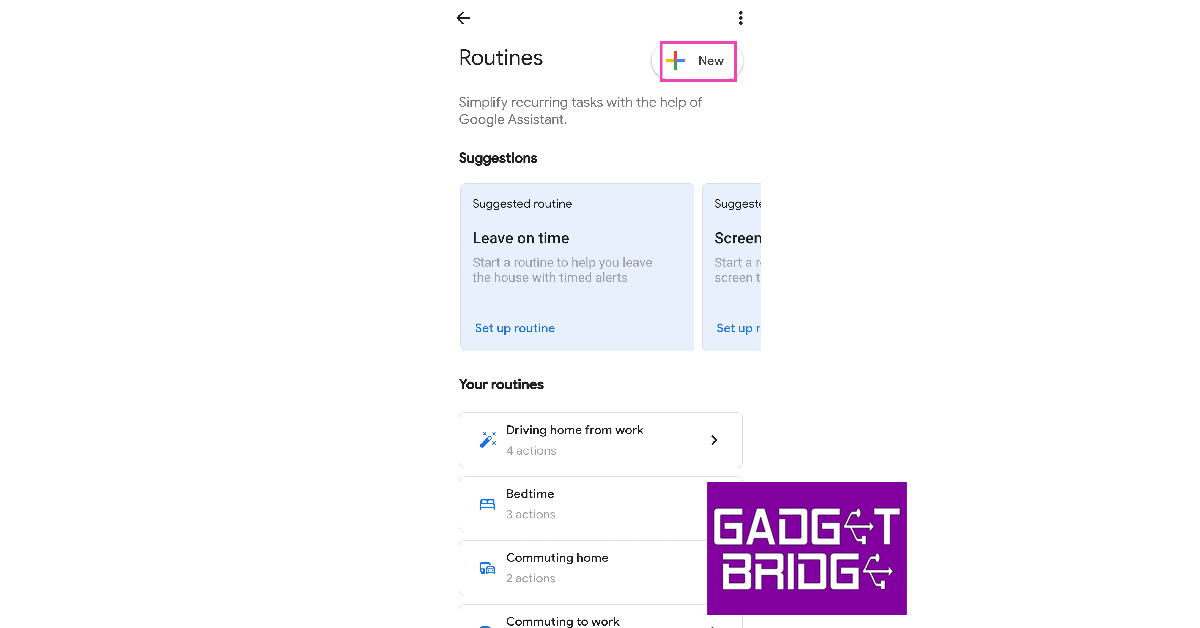 Step 6: Choose whether you want to create a personal or a household routine. A household routine can be edited by home members while a personal routine can only be accessed by you.
Step 7: Once you’ve selected a routine, you can create a set of automated tasks. Tap on ‘Untitled’ to name the routine.
Step 6: Choose whether you want to create a personal or a household routine. A household routine can be edited by home members while a personal routine can only be accessed by you.
Step 7: Once you’ve selected a routine, you can create a set of automated tasks. Tap on ‘Untitled’ to name the routine.
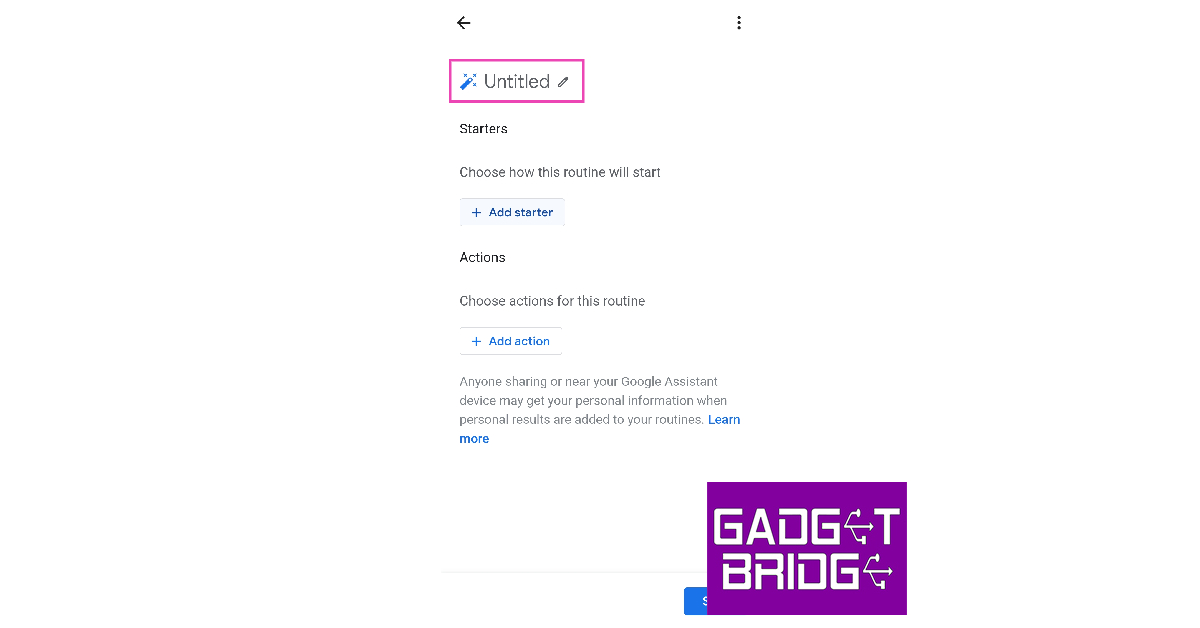 Step 8: Tap on ‘Add Starter’. This will be the trigger for your routine. You can set the routine to start at a specific time of the day or when you say a certain phrase to Google Assistant.
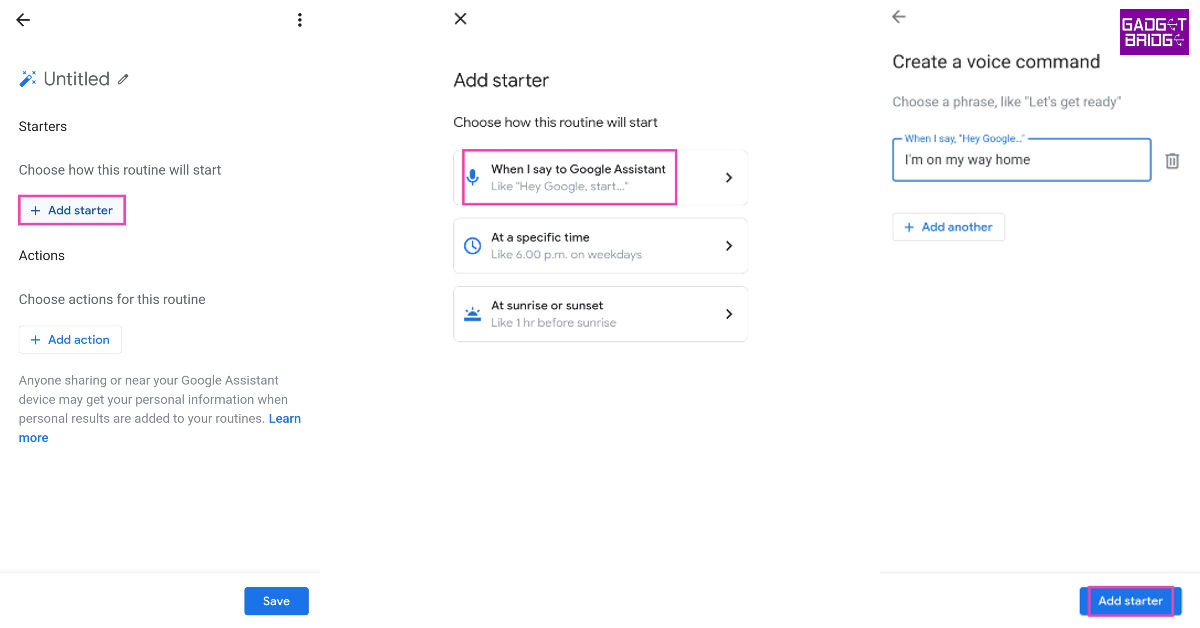 Step 9: Now, choose the actions you want to be played out in this routine. Tap on ‘Add action’ to set a task or action for Google Assistant to perform.
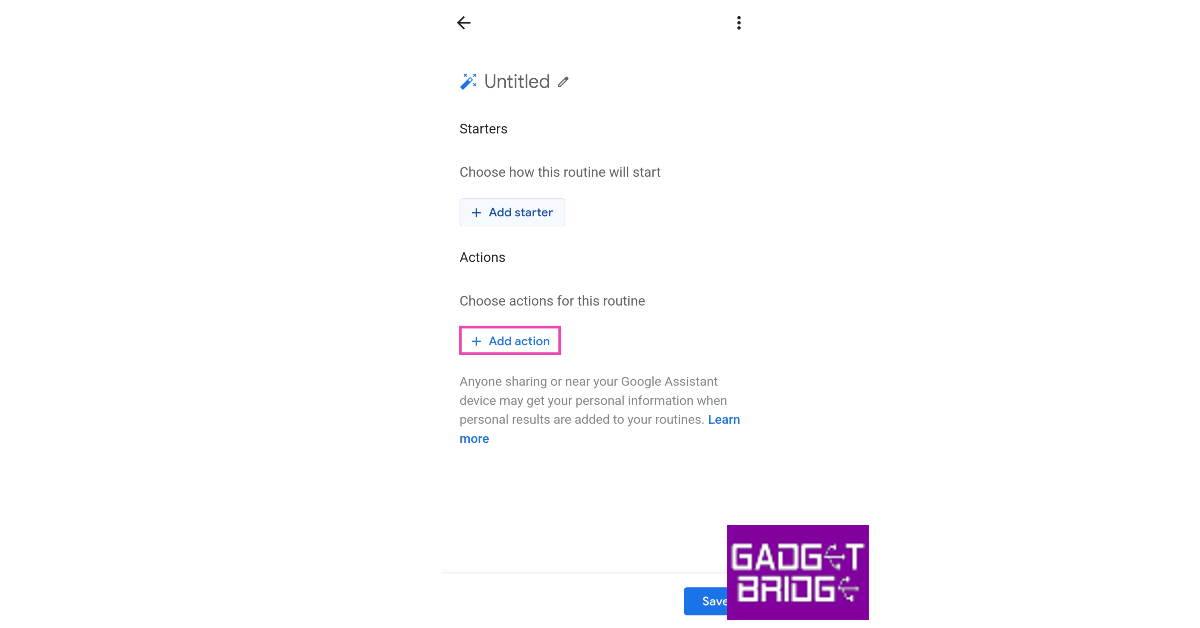 Step 10: The actions have been classified into different categories, depending on the task they cater to. Select the relevant category to set up an action. You can also add an action of your own.
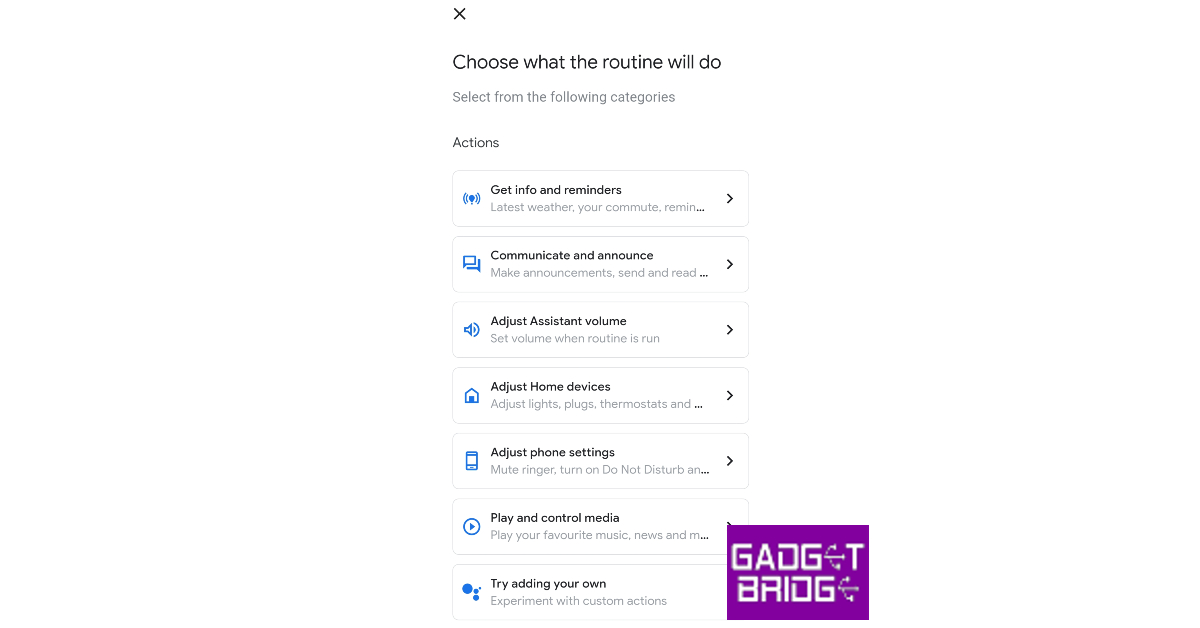 Step 11: Once you’re done, go to the routine page and tap on ‘Save’.
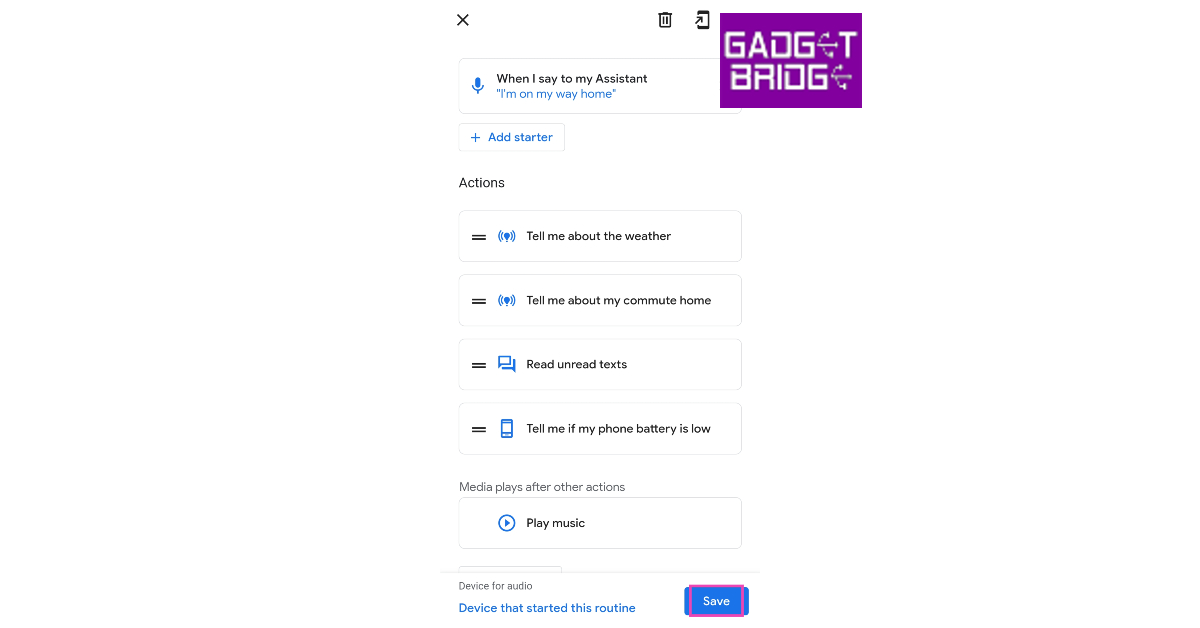


 Despite having a glossy appearance, as we have mentioned, the phone does not attract fingerprints. The lighter colour options actually make fingerprints and smudge less noticeable.
The phone is similarly lightweight and pleasant to hold. It has curved corners and a sleek appearance.
The front panel now includes a lovely display and a selfie camera with a punch-hole in the top centre. The side bezels, however, are thin.
Despite having a glossy appearance, as we have mentioned, the phone does not attract fingerprints. The lighter colour options actually make fingerprints and smudge less noticeable.
The phone is similarly lightweight and pleasant to hold. It has curved corners and a sleek appearance.
The front panel now includes a lovely display and a selfie camera with a punch-hole in the top centre. The side bezels, however, are thin.
 The flat, body-coloured side frames give the phone a premium appearance. The volume rocker and hybrid SIM tray are located on the left side, and the power button with an integrated fingerprint sensor is located on the right of the frame.
The earpiece also functions as a secondary speaker, and the main speaker is located on the bottom edge. The 3.5mm headphone jack and USB-C type port are also located at the bottom. The Alert Slider is once again absent from the phone because it is a Lite model.
Overall, the design and construction quality is excellent; nothing to be negative about.
The flat, body-coloured side frames give the phone a premium appearance. The volume rocker and hybrid SIM tray are located on the left side, and the power button with an integrated fingerprint sensor is located on the right of the frame.
The earpiece also functions as a secondary speaker, and the main speaker is located on the bottom edge. The 3.5mm headphone jack and USB-C type port are also located at the bottom. The Alert Slider is once again absent from the phone because it is a Lite model.
Overall, the design and construction quality is excellent; nothing to be negative about.
 The Nord CE 3 Lite’s display is a 6.72-inch full-HD+ LCD screen with a resolution of 1,080×2,400 pixels. The screen has a 240Hz touch sampling rate and a dynamic refresh rate of 120Hz. It boasts a maximum brightness of 680 nits, a screen-to-body ratio of 91.4 percent, a 20:9 aspect ratio, and a pixel density of 391 ppi. The screen is additionally shielded with Corning Gorilla Glass Victus.
Also Read: Nothing Ear (2) review: They have hit the ball (hard) out of the park!
Instead of a waterdrop-style notch for the selfie camera on the LCD display, there is a punch hole. On the smartphone’s display, everything appears clear and lively thanks to the screen’s brightness. Anyhow, AMOLED has a distinct edge over IPS LCD because that technology is also energy-efficient, at the same time, pictures appear more colourful and true to life.
As we already mentioned, the screen’s content is clearly visible even outside in bright daylight, thanks to the display’s adequate brightness level. Additionally, the display has WideVine L1 certification, allowing you to see full HD content on OTT services like Netflix.
The 120Hz refresh rate capability is what gives the panel its smoothness and fluidity. Due to the adaptive refresh rate, the phone might shift between 30Hz and 120Hz depending on the media being played. Also, during our testing, there were no jitters or stutters.
The Nord CE 3 Lite’s display is a 6.72-inch full-HD+ LCD screen with a resolution of 1,080×2,400 pixels. The screen has a 240Hz touch sampling rate and a dynamic refresh rate of 120Hz. It boasts a maximum brightness of 680 nits, a screen-to-body ratio of 91.4 percent, a 20:9 aspect ratio, and a pixel density of 391 ppi. The screen is additionally shielded with Corning Gorilla Glass Victus.
Also Read: Nothing Ear (2) review: They have hit the ball (hard) out of the park!
Instead of a waterdrop-style notch for the selfie camera on the LCD display, there is a punch hole. On the smartphone’s display, everything appears clear and lively thanks to the screen’s brightness. Anyhow, AMOLED has a distinct edge over IPS LCD because that technology is also energy-efficient, at the same time, pictures appear more colourful and true to life.
As we already mentioned, the screen’s content is clearly visible even outside in bright daylight, thanks to the display’s adequate brightness level. Additionally, the display has WideVine L1 certification, allowing you to see full HD content on OTT services like Netflix.
The 120Hz refresh rate capability is what gives the panel its smoothness and fluidity. Due to the adaptive refresh rate, the phone might shift between 30Hz and 120Hz depending on the media being played. Also, during our testing, there were no jitters or stutters.


 The OnePlus Nord CE 3 Lite only supports 1080p video at 30 frames per second as a video format. The details are also appealing, and the colours are quite pleasing and natural-looking. While the stabilisation is generally adequate, panning is not very smooth.
A big 5,000mAh battery is included with the OnePlus Nord CE 3 Lite. On this smartphone, a 67W charger is supported. However, despite the fact that it only supports 67W, the firm included an 80W SuperVOOC charger in the packaging. 70 percent of the battery may be charged in 30 minutes. The phone can be fully charged in about 50 minutes.
The OnePlus Nord CE 3 Lite only supports 1080p video at 30 frames per second as a video format. The details are also appealing, and the colours are quite pleasing and natural-looking. While the stabilisation is generally adequate, panning is not very smooth.
A big 5,000mAh battery is included with the OnePlus Nord CE 3 Lite. On this smartphone, a 67W charger is supported. However, despite the fact that it only supports 67W, the firm included an 80W SuperVOOC charger in the packaging. 70 percent of the battery may be charged in 30 minutes. The phone can be fully charged in about 50 minutes.


 Step 2: Tap on ‘Ads’ in the Google section.
 Step 3: Select ‘Delete advertising ID’.
 Step 4: Tap the blue icon for ‘Delete advertising ID’.

 Step 3: Select ‘Stop customising all devices’.
 Step 4: Tap on ‘Stop all customisation’.
 Step 3: Tap on ‘Authorisation & revocation’.
 Step 4: Turn the toggle bar off for ‘msa’.

 While there is no way to delete your Ad ID on Apple, you can choose which apps have access to it. All iOS apps require your permission to access your Ad Identifier (IDFA). Simply select ‘Ask App Not To Track’ to deny this access. To remove this permission for all apps, follow these steps.
Step 1: Go to Settings and select Privacy & Security.
Step 2: Tap on ‘Tracking’.
Step 3: Disable the toggle bar for ‘Allow Apps to Request to Track’.
While there is no way to delete your Ad ID on Apple, you can choose which apps have access to it. All iOS apps require your permission to access your Ad Identifier (IDFA). Simply select ‘Ask App Not To Track’ to deny this access. To remove this permission for all apps, follow these steps.
Step 1: Go to Settings and select Privacy & Security.
Step 2: Tap on ‘Tracking’.
Step 3: Disable the toggle bar for ‘Allow Apps to Request to Track’.
 You can also remove tracking permission for individual apps from this window. By deselecting ‘Allow Apps to Request to Track’ you will not receive the tracking prompt upon opening any app for the first time.


 Step 4: If you don’t see the AirPlay icon, tap on ‘Share’ and then select AirPlay.
Step 5: Choose your TV from the list.
Step 4: If you don’t see the AirPlay icon, tap on ‘Share’ and then select AirPlay.
Step 5: Choose your TV from the list.
 To stop streaming on your TV, tap the AirPlay icon on your iPhone and deselect the device on which the video is being cast.
 Step 4: Select your TV’s name from the list.
 Step 5: A code will appear on your TV. Enter it on your iPhone.
Your iPhone’s display will be mirrored on your TV. To stop mirroring, go to Control Center>Screen Mirroring>Stop Mirroring.
Step 5: A code will appear on your TV. Enter it on your iPhone.
Your iPhone’s display will be mirrored on your TV. To stop mirroring, go to Control Center>Screen Mirroring>Stop Mirroring.
 Step 3: Connect to your TV from your smartphone.
 Step 4: Your smartphone’s display will be mirrored on your TV.
 Step 3: Select the device for casting.
 Step 4: Once the cast icon is filled in, it means that your device is ready to cast.
 Step 3: Select ‘Cast my Screen’ from the list of options at the bottom.
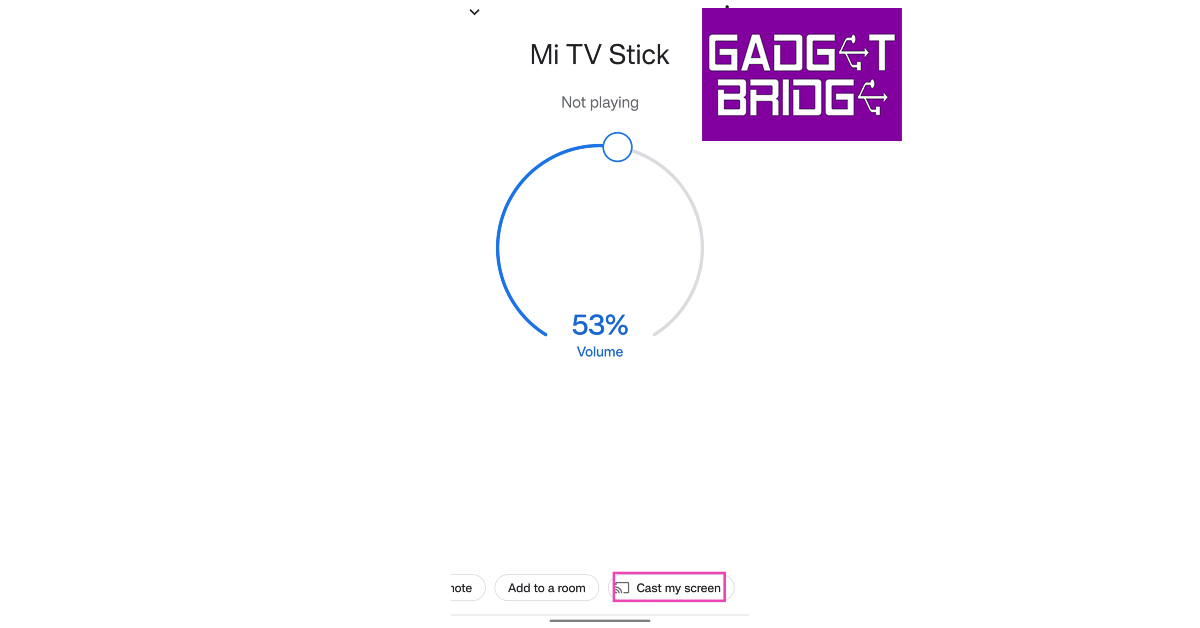


 Step 3: Tap on the ‘off’ button next to iOS Emojis Keyboard to switch it to ‘on’.
 Step 4: Return to the previous screen and tap on ‘Switch iOS emojis keyboard’.
Step 5: In the ‘Choose input method’ popup box, select ‘iOS emojis Keyboard’.
Step 4: Return to the previous screen and tap on ‘Switch iOS emojis keyboard’.
Step 5: In the ‘Choose input method’ popup box, select ‘iOS emojis Keyboard’.
 Step 6: Go to any messaging app and tap on the message box. You will be able to view and use the iPhone emojis in the chat.

 Step 3: Tap on ‘Font size and style’.
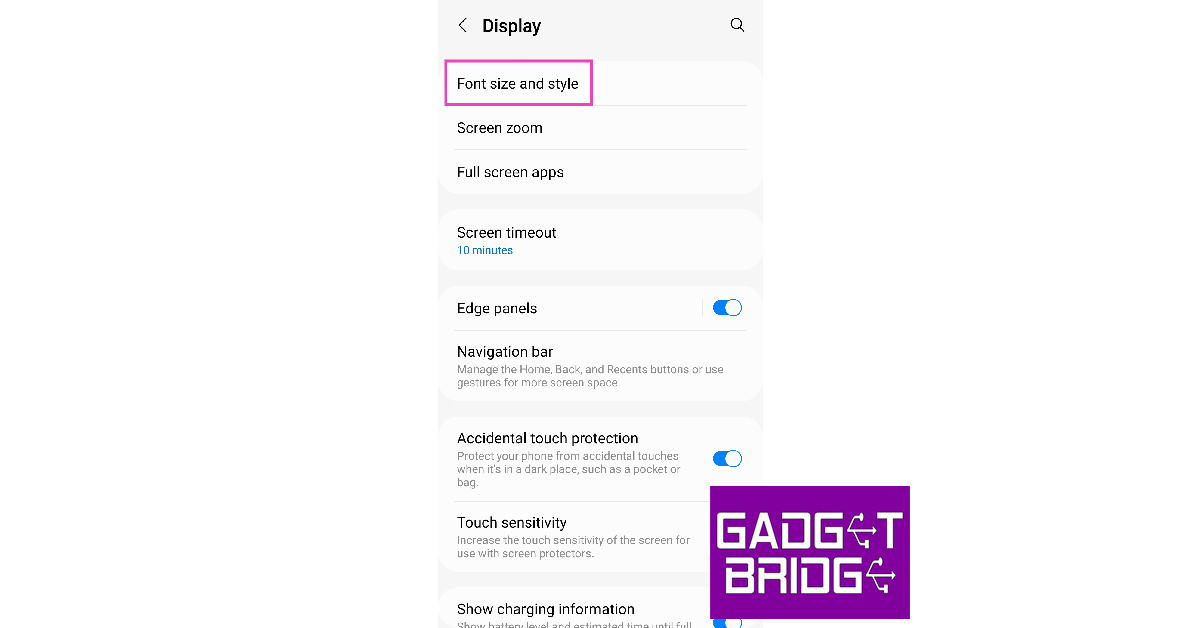 Step 4: Select ‘Font Style’.
 Step 5: Select ‘EmojiFont10’.
 You will be able to view and send iPhone emojis on your Android device.
")
 Step 3: Tap on View desktop site. The desktop site will open on the browser.

 Step 3: Turn on the toggle switch for Desktop layout. The desktop website will load on the screen.

 Step 3: Tap on Desktop Site.
 The webpage will reload and you will be able to see the desktop version of the website.
 Step 3: Scroll down and select Site Settings.
 Step 4: Scroll down and select Desktop site.
 Step 5: Switch on the toggle bar for Desktop site.

 Step 4: Select Desktop site.
 The page will reload in a few seconds and you will be presented with the desktop version of the website.
 Step 3: Switch on the toggle bar for Desktop website.

 Step 4: Select Desktop Site.
 The desktop version of the site will load on the screen in a few seconds.
 Step 3: Tap on View desktop site. The desktop site will open on the browser.
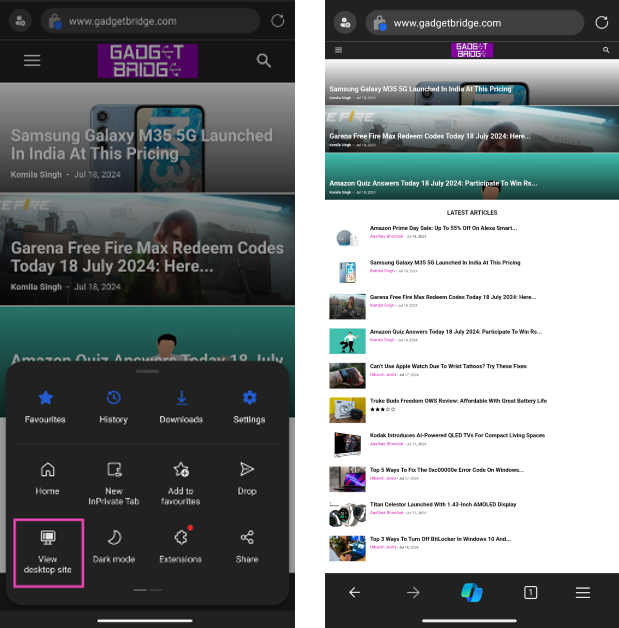
 Step 3: Turn on the toggle switch for Desktop layout. The desktop website will load on the screen.