-
In This Article
Quick Recovery from Device
 Step 2: Connect your phone to the computer using a USB cable. From the different data types choose the type of data that you want to recover and click on ‘Start’ button.
 Step 3: As soon as your device is detected, the interface will show you the related information of your device. If you find it correct, tap on ‘Start’ button.
 Step 4: Wait until the DroidKit is scanning the data that is deleted or lost from your device.
 Step 5: Once the scanning process is completed, the data which is deleted or lost will appear on your screen.
 Step 6: Choose the data files which you want to restore and click on ‘To Device’ or ‘To PC’ button, wherever you want to store the data. By choosing the option to restore your data on PC you can make changes before exporting it.
 The data restoring process will then be started and the data will be stored in your preferred format. Wait until the recovery process completes.
 Step 7: Once the whole restoring process is completed, you can go to restore other files by clicking on ‘Continue to Recover’ button or take a view of restored files by tapping on ‘View Files’ button.

-
Deep Recovery from Device
 Step 2: Use a USB cable to connect your Android mobile phone to the device. On your screen, there will be 13 types of data that you can restore, click the one which you want o restore and tap the ‘Start’ button.
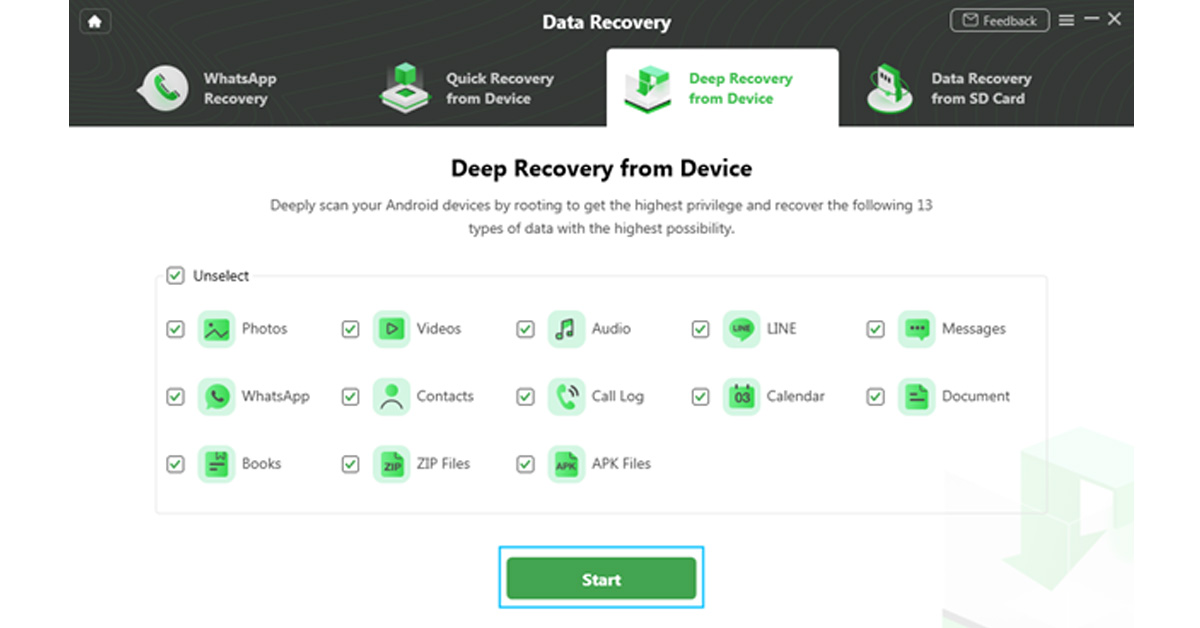 Step 3: On the next step, it will display the information of your Android device on screen. Check the device and hit the ‘Start’ button given below.
 Step 4: Your device status will be recognized and classified by DroidKit (root/unroot).
 The outcome will be displayed after the analysis is finished. The user interface below will appear if your smartphone is not rooted. Rooting the device is required before starting Deep Recovery. Now, click the ‘Root Now’ button.
 Your device will immediately be rooted using DroidKit. Ensure a stable connection to your device during the procedure.
 Step 5: DroidKit will thoroughly check the removed data from your Android device once the rooting process is complete.
 Step 6: You can inspect the scanned data after the scanning procedure is finished.
 Step 7: As soon as the recovering process ends, you can restore the data by clicking on ‘To Device’ or ‘To PC’. By choosing the ‘To PC’ option, you can make the required changes in the settings.
 The recovered data will be restored in any format in which you need it. Wait until the recovery process is ongoing.
 After the completion of recovery process, you can click ‘View Files’ to have a look at the restored data.
 DroidKit is capable of processing these two types of recoveries and supports WhatsApp Data Quick Recovery and Recovers Data from SD Card. In both cases, you can recover data without undergoing the rooting process. The SD Data Card Recovery process is available only for Windows users, and Mac version support is coming soon.
We have discussed the DroidKit version of Data Recovery, but it is not only limited to data recovery. DroidKit is a one-stop solution for all your issues related to Android devices and it has various features that can help you operate your phone more easily. The various features of DroidKit are Recover Lost Data, Extract Needed Data, Unlock Screen, Fix System Issues, Bypass FRP Lock, Screen Unlocker, Reinstall/ Upgrade OS, and Clean System Junk. Check these various features on DroidKit Recover Feature Page. You can try any of these tools to make your Android device work more effectively and efficiently.
For the latest gadget and tech news, and gadget reviews, follow us on Twitter, Facebook and Instagram. For newest tech & gadget videos subscribe to our YouTube Channel. You can also stay up to date using the Gadget Bridge Android App. You can find the latest car and bike news here.
DroidKit is capable of processing these two types of recoveries and supports WhatsApp Data Quick Recovery and Recovers Data from SD Card. In both cases, you can recover data without undergoing the rooting process. The SD Data Card Recovery process is available only for Windows users, and Mac version support is coming soon.
We have discussed the DroidKit version of Data Recovery, but it is not only limited to data recovery. DroidKit is a one-stop solution for all your issues related to Android devices and it has various features that can help you operate your phone more easily. The various features of DroidKit are Recover Lost Data, Extract Needed Data, Unlock Screen, Fix System Issues, Bypass FRP Lock, Screen Unlocker, Reinstall/ Upgrade OS, and Clean System Junk. Check these various features on DroidKit Recover Feature Page. You can try any of these tools to make your Android device work more effectively and efficiently.
For the latest gadget and tech news, and gadget reviews, follow us on Twitter, Facebook and Instagram. For newest tech & gadget videos subscribe to our YouTube Channel. You can also stay up to date using the Gadget Bridge Android App. You can find the latest car and bike news here. 


")


 PCs with wireless charging support launched in India")