If you’re a Snapchat user, we know how much a Snap Streak is important to you. Snap Streaks are not just about maintaining a higher score. They signify how close you are to a person. If your Snap Streak with a friend is a high number, it highlights the effort that both you and your friend made consistently towards each other.
Clicking and sharing pictures on an everyday basis without failing even once may seem like a cakewalk to many, but it’s not. Taking out time amongst your busy schedules for someone else once in a while is not a big deal. However, maintaining that ritual consistency gets difficult over time. Many factors may sweep in and pose an interruption in your daily snap sharing.
But if you were successful in maintaining a Snap Streak for a longer period with your friend and still lost it without there being any fault from your or your friend’s side, it is certainly a little heartbreaking. You lose all the effort that you and your friend put in together and hence have to start from scratch. Snapchat does understand the value and emotions behind your effort and hence, provides a workaround for you to get your Snap Streak back in such cases. Here is a step-by-step guide on how to get your Snap Streak back in case you lost it due to a technical glitch or due to circumstances out of your control. Read also: How to Enable Dark Mode in Snapchat on Android and iOS?
In This Article
Restore your Snap streak
Snapchat has introduced an option to restore your Snap streak with a friend. Every user gets a certain number of free restores. Once they are used up, Snapchat charges $0.99 per restoration.
Step 1: Launch Snapchat on your device and switch to the Chats tab.
Step 2: Hit the Restore option next to the name of the friend with whom you want to restore the Snap streak.
Step 3: Tap on Restore. If you’ve run out of your free restoration options, you will need to pay $0.99 to get back the Snap streak.
Contact Snapchat Support to get back your Snap streak
Step 1: Open the Snapchat app on your device, tap on your Bitmoji and then tap on the Settings icon on the top right corner of the interface. Step 2: Under the Support section, tap on I Need Help.Step 3: Click on the Snapstreaks category under the Popular topics sectionStep 4: Click on the ‘let us know’ link given within the text. Step 5: Select the I’ve lost my Snapstreak option in the checklist Step 6: Scroll down and fill in the details in the form provided Step 7: Click on the Send buttonRead also: How To Change Your Snapchat Username In 2022?If the company listens to your appeal and considers your request, you may get your lost Snap Streak back.Moreover, there are certain conditions while using this method as well. Your Snap Streak won’t be reinstated if you or your friend lost it naturally by forgetting to send a snap. Also, you won’t be able to use this method regularly. It’s not a good idea to frequently keep losing your Snap Streaks and appeal to Snapchat. Even if it’s genuinely not your fault and you lost multiple Snap Streaks, this method is likely to work with only one contact. Reportedly, there seems to be a limit of one username per submission. Hence, it is recommended to make your longest-running Snap Streak a priority while appealing.
Frequently Asked Questions (FAQs)
How do I restore my Snap streak on Snapchat?
Snapchat now gives you the option to restore your Snap streak. Every user gets a certain number of free restores, following which Snapchat charges $0.99 to restore a streak.
What is a Snapchat streak?
A Snapchat streak is a counter of how many consecutive days you and your friend have sent Snaps to each other on the app.
How do I contact Snapchat Support to restore a streak?
Go to Settings>I need help>Snapstreaks>I’ve lost my Snapstreak and fill in your account details. Hit Send once you’re done.
Hi, you all fitness freaks! The latest fitness tracker in town comes the Fitbit Charge 5 smartwatch. From the number of steps you take to the number of calories you burn during the day, it monitors everything right from your wrist. What’s more with the Charge 5 is that you even get to wear it to sleep comfortably to know your sleep duration, quality and sleep score. Feeling stressed? Try taking an EDA scan through your smart sidekick to track your stress levels and keep them at bay. From automatic screen waking and an Always-On display to detailed tracking of workouts like swimming sessions and whatnot, the Charge 5 is your all-rounder fitness buddy. Here is a complete review of the Fitbit Charge 5 smartwatch, covering its design, display, performance and applications. Why not weigh its pros and cons yourself and make an informed buying decision?
In This Article
Fitbit Charge 5 Review: Design And Display
The Fitbit Charge 5 comes in a cleverly designed package with navigations displayed within for quick and efficient unboxing. It will make you realise how important the little things are. It is offered in 3 dual-tone colour themes, namely Black with Graphite Stainless Steel, Lunar White with Soft Gold Stainless Steel and Steel Blue with Platinum Stainless Steel. We were able to get our hands on its Steel Blue version. The package consists of the Fitbit Charge 5 smartwatch, an extra strap, a charging cable with a magnetic pin, a quick start guide and a product information guide. Opening the box, the first thing that your eyes will set on is the shiny black display of the smartwatch. Moreover, its innovative sloping-inwards resting case, which looks quite fascinating, increases your temptation even further to pick the device up. Once in your hand, you’ll feel the Fitbit Charge 5 to be quite light weighted. Moreover, the syncing proportions of the smartwatch, with its main body being perfectly in line with the width of its band is hard to miss. The black touchscreen display is mounted on its platinum stainless steel body. On both the left and right sides of the display, you will observe separate longitudinal button-like sections. These actually are its EDA (Electrodermal Activity) sensors, which detect tiny electrical responses on your skin to track your stress levels. Flip it over and you will notice more sensors fixated beneath the display in order to track health metrics such as your heart rate, ECG and relative SpO2 through your wrist. The smartwatch is also equipped with a 3-axis accelerometer, GPS and a vibration motor. The Fitbit Charge 5 comes with a 1.04-inch AMOLED display with a 326ppi pixel density. It has a black display theme and the colours on the screen appear quite bright, full of vibrance and high contrast which appeals to the eye. When taken in sunlight, the screen is fairly legible. The smartwatch straps are made up of silicone and have a smooth texture. The thickness of the Charge 5 band is slimmer than that of the Charge 4 model and is hence more wearable. However, wearing the watch for a prolonged period may get a bit uncomfortable. Hence, it is advised to remove the smartwatch from time to time, to give your wrist a little break. Overall, the Fitbit Charge 5 design looks quite sporty while its display is a visual treat for the eyes. Read also: Xiaomi Redmi Watch 2 Lite Review: Elegant Design With A Thorough Health Check System
Fitbit Charge 5 Review: Performance And Applications
Before coming to its performance and applications, let us elaborate a little further upon the Fitbit Charge 5 specs. Its main body of the smartwatch excluding its wrist band comes with dimensions of 36.7mm x 22.7mm x 11.2mm. It weighs about 28g in total and is equipped with Bluetooth 4.0, NFC and GPS. It is 5 ATM water-resistant and is sweat, rain and splash-proof. Its battery life can vary based on the extent and type of usage. It can last for about 7 days or more upon mild usage and for about 5 days upon mediocre to extensive usage. On its home screen is visible the date and time along with five metrics displayed one at a time. These include the no. of steps taken, distance covered, active zone time, calories burnt and heart rate. Tapping on the respective metric displayed on the screen changes it to show the next in line out of the five. There is also a meter colour coded like a heat map which represents your daily metric data visually. From the home screen, you can swipe left and right to access applications like ECG, EDA Scan, Timers, Alarms, Exercises and Notifications. Swiping up takes you to the dashboard along with a pictorial representation of the fitness goals you achieved, including hourly activity, heart rate, sleep score, SpO2, exercises and more. Swiping down from the home screen displays the Payments section, DND mode, Sleep mode, Screen Auto Wake, Water Lock and the Settings app. Swiping left to right on any screen other than the home screen acts as a back command whereas a double-tap takes you back to the home screen. The Fitbit Charge 5 offers many features but works best when used with the Fitbit mobile application. To start with, it monitors the number of steps that you take with great accuracy. It displays both your current heart rate as well as your resting heart rate. Moreover, high or low heart rate notifications can be set, when outside the workout mode, so that you are warned in time, like during a walk, etc. Its ECG application, however, doesn’t seem to be functional yet. The various exercises that the Fitbit Charge 5 allows you to monitor include Run, Bike, Swim, Treadmill, Weights and Interval workouts. You make changes to this list via the Fitbit app on your smartphone. Detailed reports are shown on the Fitbit app for each exercise or workout you undergo or for each health application that you use. You can set exercise goals for each exercise and time them as well. The smartwatch gives automatic reminders to you for making hourly movements, completing your exercise goals and more. Moreover, you can also track your menstrual cycle through the device as well as its mobile app. For monitoring your stress levels, the smartwatch is equipped with on-wrist EDA sensors on both sides. It requires you to touch the sensors with the fingertips of your thumb and forefinger on either side. However, you have to keep extremely still for 3 minutes for the EDA sensors to record observations. Otherwise, it won’t work. The Charge 5 also provides a sleep monitoring application. It requires you to switch on the Sleep mode and wear your smartwatch to bed. In the morning, you can sync your smartwatch with the Fitbit app. You will be given a sleep score based on the total time you spent sleeping and the quality of your sleep. Through the Fitbit app, you can get access to your detailed sleep records. You even get to monitor your time spent in sleep bifurcated into the different sleep stages, namely Deep, Light and REM sleep. One of the highlights of the Fitbit Charge 5 smartwatch is the provision of its 24-hour always-on display setting. What’s even more fascinating is its Screen Auto Wake mode, which you can set to switch ‘On’ or keep it on ‘Manual’ mode. If you switch it on, its display will turn on automatically without touching as soon as you bring the watch towards yourself. Whereas if you move your wrist away from you, the smartwatch detects that it’s no longer in use and the display turns off automatically. However, if you don’t want the screen to go on and off automatically, you can opt for the Manual mode. To take it to the next level, the Charge 5 allows you to set the display to Always On mode specifically during workouts, after which it will return back to its normal setting. Read also:OnePlus Nord CE 2 Review: Super Stylish Design With Excellent Performance
Verdict
After reviewing the Fitbit Charge 5, along with its sporty design and well-lit display, the range of fitness tracking and display features that the smartwatch comes with is great. It even sends you email updates providing your weekly/monthly fitness reports, battery logs, and more. However, its price seems to be a bit on the higher end, although it comes with the best set of features in the Fitbit range. The Fitbit Charge 5 price in India starts from Rs 13,999. So if the cost is not a problem, we would recommend you to go for it.
Fitbit Charge 5 Pros
Sporty Design
Always On Display And Screen Auto Wake
Stress Levels And Sleep Monitoring
Fitbit Charge 5 Cons
ECG doesn’t seem to be functional yet
Battery life could be improved
For EDA tracking, one has to remain completely still for 3 minutes, otherwise, it won’t work.
The user interface of Netflix is updated on a regular basis. In a new update, the streaming service behemoth has introduced a new feature called “Category Hub” in the TV menu. This functionality will make it easier for viewers to find their favourite content on the streaming platform. Previously the company brought a thumbs-based recommendation system that allows users to suggest what they’ve been watching.In a blog post, Netflix announced the launch of the new Category Hub. “Are you an action junkie who craves car chases? A horror buff in constant need of a scare? Or a comedy nerd always looking for the punchline? We all have our go-to genres on Netflix. No matter what you’re in the mood for, what you don’t want is to scroll through endless rows or type in a long title via search.” The company further added, “That’s why we’re rolling out a new Category Hub in the TV menu so our members around the world can easily find their favourite genres and discover new categories of films, series and specials, all in one place.”With the addition of the new Category Hub, Netflix subscribers will be able to search for their preferred genres and explore new categories of movies. The latest Hub can be found on the left-hand menu of both kids’ and adults’ profiles. You’ll find your personalised Top 3 categories based on what you like to watch on a regular basis there. This new immersive experience will also include curated collections to commemorate local holidays such as Earth Day or International Women’s Day, as well as globally popular categories such as anime, drama, and children & family for when you want to try something new.As we mentioned earlier Netflix added Two thumbs up, a third option to the thumbs up and down rating system. The additional Double Thumbs Up is a new way for members to tell what kinds of shows and movies they want to see more of. This option is available next to the Thumbs Up and Thumbs Down buttons on your TV, Web, Android, and iOS mobile devices.A Thumbs Up tells the streaming platform what members liked so that similar recommendations can be made in the future. A Double Thumbs Up, on the other hand, indicates what viewers enjoyed and allows Netflix to be more specific with its recommendations. If you liked Bridgerton, for example, you might enjoy other shows or films starring the cast or from Shondaland.
For the latest gadget and tech news, and gadget reviews, follow us on Twitter, Facebook and Instagram. For newest tech & gadget videos subscribe to our YouTube Channel. You can also stay up to date using the Gadget Bridge Android App. You can find the latest car and bike news here.
In India, a slew of mid-range smartphones have recently been launched. Samsung’s M Series lineup was also refreshed with the launch of the Samsung Galaxy M53 5G in India. The device, which has a quad rear camera setup, is powered by the MediaTek Dimensity 900 SoC. In addition, the handset has an AMOLED display with a refresh rate of 120Hz. The device directly competes with the OnePlus Nord 2 5G, which was released last year, with these high-end specs. The following is a detailed comparison of the Samsung Galaxy M53 5G Vs OnePlus Nord 2 5G to help you understand the differences and decide which to buy.
In This Article
Samsung Galaxy M53 5G Vs OnePlus Nord 2
Display
Samsung Galaxy M53 5G: 6.7-inch Infinity-O Super AMOLED+ displayOnePlus Nord 2: 6.43-inch full-HD+ Fluid AMOLED display
Samsung Galaxy M53 5G: A quad-camera system with a 108-megapixel primary sensor, an 8-megapixel ultra-wide sensor, a 2-megapixel depth sensor, and a 2-megapixel macro sensorOnePlus Nord 2: Triple rear camera set-up that includes a 50-megapixel IMX766 primary sensor with OIS. Under the hood, there is an 8-megapixel secondary sensor and a 2-megapixel tertiary sensor
Selfie camera
Samsung Galaxy M53 5G: 32-megapixel front-facing camera.OnePlus Nord 2: 32-megapixel selfie camera
RAM and storage
Samsung Galaxy M53 5G: 6GB RAM with a 128GB storage/ 8GB RAM with 128GB storage optionOnePlus Nord 2: 6GB RAM with 128GB/ 8GB RAM with 128GB/ 12GB RAM with 256GB
Battery
Samsung Galaxy M53 5G: 5,000mAh batteryOnePlus Nord 2: 4,500mAh battery
Operating system
Samsung Galaxy M53 5G: Android 12 and One UI 4.1OnePlus Nord 2: OxygenOS 11.3 based on top of Android 11
Starting Price
Samsung Galaxy M53 5G: Rs 23,999OnePlus Nord 2: Rs 27,999
Our Take
The MediaTek Dimensity 900 SoC is used in the Samsung Galaxy M53 5G, making it faster than the MediaTek Dimensity 1200-AI SoC used in the Nord 2. The Galaxy M53 has an advantage over the Nord 2 because it has a 108MP quad-camera setup with a depth sensor for portrait capture, which the opponent appears to lack. The Android 12 operating system is also installed on the device. So In terms of software, we prefer Samsung’s OneUI, which is a clutter-free Android skin that is more user-friendly and the best available. The M53’s battery is 5,000mAh and supports 25W fast charging, whereas the Nord 2’s battery is 4500mAh and supports 65W fast charging.For the money, the M53 comes with high-end features like a bezel-less Super AMOLED edge-to-edge display with 120Hz refresh rate support, elevating it to the status of a premium device. The Nord, on the other hand, has a 90Hz refresh rate and a smaller AMOLED screen.The Samsung Galaxy M53 5G is an undoubtedly feature-packed device that comes at a significantly lower price. As a result, we recommend that you purchase Samsung’s most recent phone.
For the latest gadget and tech news, and gadget reviews, follow us on Twitter, Facebook and Instagram. For newest tech & gadget videos subscribe to our YouTube Channel. You can also stay up to date using the Gadget Bridge Android App. You can find the latest car and bike news here.
The launch date for the Xiaomi Smart TV 5A in India has been set for April 27. On the same day, the company will also unveil the Xiaomi 12 Pro 5G smartphone and the Xiaomi Pad 5 tablet. The Chinese company has not yet revealed the key specifications of the upcoming TV but it is likely to equip an unnamed processor with Cortex-A55 cores. Read on to know more about the company’s smart TV lineup.Xiaomi took to Twitter to tease its upcoming Xiaomi Smart TV 5A. As per the announcement, the new smart tv will arrive in the country on April 27. An online launch event will be hosted at 12 noon where not only the new TV will be presented but the more products will be unveiled. Xiaomi has also created a dedicated webpage to tease the Television.
The Xiaomi Smart TV 5A will be released in India alongside the Xiaomi 12 Pro 5G smartphone and the Xiaomi Pad 5 tablet. To recall both the devices have already debuted worldwide and are now set to arrive in the country.The Xiaomi 12 Pro has a 6.73-inch WQHD+ E5 AMOLED display with a 1,4403,200-pixel resolution. The panel has a 120Hz dynamic refresh rate and 1,500 nits of peak brightness. Under the hood, the Snapdragon 8 Gen 1 SoC has up to 12GB of LPDDR5 RAM and 256GB of UFS 3.1 storage.A 50-megapixel main Sony IMX707 sensor with OIS and an f/1.9 aperture, a 50-megapixel portrait sensor, and a 50-megapixel ultra-wide-angle lens comprise the Xiaomi 12 Pro’s triple rear camera setup. A 32-megapixel selfie camera sensor is located on the front of the phone. A 4,600mAh battery is also included, with 120W rapid wired charging.The Xiaomi Pad 5, on the other hand, has an 11-inch WQHD+ TrueTone display with a resolution of 1,6002,560 pixels. The display supports Dolby Vision and HDR10. It has a 120Hz refresh rate and a 16:10 aspect ratio. It is powered by Android 11 and MIUI 12.5 for the Pad. The phone has a Qualcomm Snapdragon 860 processor, 6GB of LPDDR4X RAM, and up to 256GB of UFS 3.1 storage onboard.For optics, the tablet has a single 13-megapixel camera sensor on the back and an LED flash. It also has an 8-megapixel selfie camera on the front.The tablet is powered by an 8,720mAh battery that supports 33W fast charging.
For the latest gadget and tech news, and gadget reviews, follow us on Twitter, Facebook and Instagram. For newest tech & gadget videos subscribe to our YouTube Channel. You can also stay up to date using the Gadget Bridge Android App. You can find the latest car and bike news here.
Samsung has officially announced yet another 5G smartphone in the Indian market. The Samsung Galaxy M53 5G has debuted in the country today. The device is the successor to the Galaxy M52 5G which was released last year. It comes preloaded with One UI 4.1, which is based on Android 12. The device features a 120Hz Super AMOLED+ display and is powered by MediaTek Dimensity 900 SoC. Additionally, the handset boasts a 5,000mAh battery with 25W fast charging support.
In This Article
Samsung Galaxy M53 5G price in India and sale details
Samsung Galaxy M53 5G has been launched in India with a price tag of Rs 23,999 for the base 6GB RAM with a 128GB storage model. There is an 8GB RAM with 128GB storage option which will cost Rs 25,999. The device will be available in two colour options of Blue and Green. The smartphone is scheduled to go on sale from April 29 through Amazon from 12 noon onwards.
Samsung Galaxy M53 5G specifications
The Samsung Galaxy M53 5G features a 6.7-inch Infinity-O Super AMOLED+ display with a resolution of 1,0802,400 pixels. It has a 120Hz peak refresh rate and is Gorilla Glass 5 protected. The phone comes pre-installed with Android 12 and One UI 4.1. There’s an octa-core MediaTek Dimensity 900 SoC under the hood, along with up to 8GB of RAM and 128GB of internal storage that can be expanded to 1TB. Samsung’s RAM Plus feature, which uses unused storage space as virtual RAM, is also available on the device.A quad-camera system with a 108-megapixel primary sensor, an 8-megapixel ultra-wide sensor, a 2-megapixel depth sensor, and a 2-megapixel macro sensor distinguishes the Samsung Galaxy M53 5G. For selfies and video chats, it also has a 32-megapixel front-facing camera.Furthermore, the new phone is equipped with a 5,000mAh battery that supports 25W fast charging. Customers can use the phone’s Auto data switching feature to stay connected to their secondary SIM for calls or data streaming. There will also be all-new cool features like Object Eraser, Video Call Effects, and Photo Remaster. Object Eraser removes unwanted objects from your photos, resulting in perfect photos. You can use Video Call Effects to change the background during video calls. Users can use the Photo Remaster feature to bring old or low-quality photos back to life.The phone has 5G, 4G LTE, Wi-Fi 802.11ac, Bluetooth 5.2, GPS/ A-GPS, and a USB Type-C port for connectivity. An accelerometer, ambient light sensor, gyroscope, magnetometer, and proximity sensor are among the phone’s sensors. For biometrics, a side-mounted fingerprint sensor is also included.
For the latest gadget and tech news, and gadget reviews, follow us on Twitter, Facebook and Instagram. For newest tech & gadget videos subscribe to our YouTube Channel. You can also stay up to date using the Gadget Bridge Android App. You can find the latest car and bike news here.
Garena Free Fire is a battle royale game with regular awards and tournaments to keep players interested. If you play Garena Free Fire, you should be aware of the redeem codes that are released on a daily basis. However, because the battle royale game is banned in India, players from other countries can use the Free Fire Redeem codes daily. If you’re unfamiliar with the Garena Free Fire redeem codes or don’t know how to get them, we’ve put together a step-by-step guide to help you redeem them.The Free Fire redeem codes are a great way to get free stuff. These are 12-digit codes that contain alphabets and numbers, as well as an expiration date and time. Because the Garena FF redeem codes cannot be used more than once, you should hurry to the redemption page to claim your free reward before someone else does. To get a free reward, all you have to do is go to reward.ff.garena.com/en, which is the official redemption page. Also, keep an eye on this space for daily updates on Garena Free Fire redemption codes and rewards.
In This Article
Garena Free Fire Redeem Codes for April 22
X99TK56XDJ4X
SARG886AV5GR
GCNVA2PDRGRZ
4ST1ZTBE2RP9
B3G7A22TWDR7X
FF7MUY4ME6SC
8F3QZKNTLWBZ
J3ZKQ57Z2P2P
3IBBMSL7AK8G
WEYVGQC3CT8Q
TFF9VNU6UD9J
RRQ3SSJTN9UK
PACJJTUA29UU
TJ57OSSDN5AP
FFICDCTSL5FT
FFPLUED93XRT
FFAC2YXE6RF2
How to Get Free Fire Redeem Codes for Garena on April 22?
Do you have any call recording apps on your phone? Then this information is for you. According to Google’s most recent change in developer policies, all call recording apps will be prohibited. As a result, all third-party apps on the Google Play Store will stop working as of May 11. However, the recording feature that comes pre-installed on some phones will not be affected by this change.According to a post on the Google Play Console support website, due to a change in the policy of the Accessibility API, which is used to provide call recording functionality, Google will prohibit all call recording apps on the Google Play Store. For the sake of privacy and security, this is done. It’s important to keep in mind that call recording laws differ dramatically from country to country. In India, for example, call recording is not permitted.As per the policy change, the Accessibility UPI now cannot be used to:
Change user settings without their permission or prevent the ability for users to disable or uninstall any app or service unless authorised by a parent or guardian through a parental control app or by authorised administrators through enterprise management software;
Workaround Android built-in privacy controls and notifications; or
Change or leverage the user interface in a way that is deceptive or otherwise violates Google Play Developer Policies.
Furthermore, the Accessibility API, which is designed to assist users with disabilities on Android, cannot be used or requested for remote call audio recording. The use of the accessibility API in the Google Play store listing must be documented.Google has been working to remove call recording from Android for a long time. Notably, On Android 10, call recording is turned off by default.As previously stated, the policy change will have no impact on native call recording on phones that come preinstalled, and system apps can basically get any permission they want that third-party apps cannot.We believe that the decision to completely eliminate call recording apps for the sake of user privacy is unjustified, as many people, including women, journalists, and businesses, need call recording. As a result, removing these apps forces users to download apps from unknown sources.As the May 11 deadline approaches, let us know what you think about this change and how you plan to record calls in the future in the comments section.
For the latest gadget and tech news, and gadget reviews, follow us on Twitter, Facebook and Instagram. For newest tech & gadget videos subscribe to our YouTube Channel. You can also stay up to date using the Gadget Bridge Android App. You can find the latest car and bike news here.
22 April 2022 Amazon Quiz has gone live on its mobile app platform. Customers from different parts of the country are participating in the daily quiz. The daily quiz is conducted by the company brings an opportunity for the customers to win exciting prizes. The quiz begins from 12 AM to 11:59 PM. In today’s quiz participants have a chance to win Rs 20,000 Amazon Pay Balance by answering all the questions correctly.Every day Amazon brings a fresh set of questions for its customers that contains five easy questions. Amazon quiz brings an opportunity for its customers to win Amazon Pay Balance ranging from Rs 1,000 to Rs 50,000. which consists of five questions related to general knowledge and current affairs.The participants need to answer all the questions correctly and their names will be selected for a lucky draw. The winner will be announced at the end of the month. One wrong answer could eliminate you from the quiz. If you manage to answer all the questions correctly you can stand a chance to win Rs 20,000 Amazon Pay Balance today. Only app users are eligible to participate in the Quiz. Check Out 22 April 2022 Amazon Quiz Answers.Amazon Quiz Today Prize – Rs 20,000 Amazon Pay BalanceQuiz Date – 22 April 2022Daily Timing – 12 AM to 11:59 PMWinner Announcement – Today at 12 PM
In This Article
Amazon Quiz Answers Today 22 April 2022
Question 1: Bartholomew Ogbeche, winner of the ISL 2021-22 Golden Boot, represented which side this season?
Answer: Hyderabad FC
Question 2: The Tom Holland starer ‘Unchartered’, also stars which famous actor in the role of Victor Sullivan?
Answer: Mark Wahlberg
Question 3: BA.2 is the latest subvariant of which strain of the SARS-CoV-2 virus causes COVID-19?
Answer: Omicron
Question 4: This company is headquartered in which German city?
Answer: Munich
Question 5: This famous scientist won the Nobel Prize for _______ in 1921. Fill in the blanks
Answer: Physics
How To Play Amazon Quiz
Only app users are eligible to play the Amazon quiz every morning from 12 AM to 11:59 PM. The quiz is not available on the desktop. For those who are unaware of how to play the Amazon quiz below are the steps, you can follow to take the quiz.
Firstly download the Amazon app from Google Play Store or App Store
Now fill in the required information through the Sign Up option.
You need to log in to the Amazon app and scroll down on the home screen to find the Amazon Quiz banner.
Tap on the Amazon Quiz banner and tap on the Start button to start the Quiz.
Now you will get 5 questions and you need to answer them correctly. One wrong answer will eliminate you from the Quiz.
After answering all the questions correctly you are now eligible for a Lucky Draw.
The winner’s name will be announced today at 12 PM.
Let’s be honest – raising a child can sometimes be a full-time job. For instance, if your kids are teenagers or young adults, then you need to make some extra efforts to monitor the use of their smart devices. That’s why it is recommended to block apps on iPhone to make sure your kids won’t be exposed to any inappropriate content at an early age. Don’t worry – in this post, I’m going to let you know how to block websites on iPhone by applying website blocker, including an official one and a third-party tool.
In This Article
Part 1: How to Block Websites and Apps on iPhone with its Parental Control Feature?
One of the best things about iOS devices is that they come with inbuilt parental control settings. While the inbuilt app or website blocking feature of iOS devices is not that reliable, you can give it a try to meet your basic requirements. Using it, you can set up content restrictions on the target iOS device that your kids can only bypass by entering its dedicated password.
Therefore, if you know your kids won’t be able to guess the passcode or bypass it, then you can learn how to block websites on iPhone by following these instructions.
Block Any Website on an iOS Device
To block certain websites on an iOS device, you can just go to its Settings > Screen Time and tap on the “Content & Privacy Restrictions” feature.
You can now enter the passcode of your iPhone to get dedicated content restriction features. Here, you can go to the “Web Content” restrictions feature to enable an automatic filter or tap on the “Add Website” button to add specific websites manually.
That’s it! Now, to blockwebsites on iPhone, you just have to enter URLs of the designated websites and add them to the blocking list.
How to Block Apps on iPhone?
Similarly, you can also take the assistance of the Screen Time feature to block apps on iPhone. To access it, you can just go to its Settings > Screen Time > Content & Privacy Restrictions and set up a dedicated Screen Time passcode.
Here, you can simply enable the “Content & Privacy” feature and go to the “Allowed Apps” screen. You can now just disable any app that you don’t want to run on the iOS device, and it would automatically be blocked on it.
Limitations
The native Screen Time lock on an iPhone can easily be bypassed by your kids.
If the target iOS device has been restored, then its Screen Time restrictions will also reset.
Part 2: How to Block Websites/Apps on iPhone more Effectively with FamiSafe?
Since the native website or app blocker feature of iOS devices has so many limitations and can easily be bypassed, you can consider using FamiSafe instead. Developed by Wondershare, it is one of the most reliable parental control and device monitoring tools for iOS and Android devices out there. Using it, you can not only set restrictions on the target device but can also access its activities remotely.
After linking both the devices, you can easily block websites or apps on the target iOS device.
If you want, you can also check the detailed activities on the target phone (like the screen time for apps and websites, phone activities, etc.).
Parents can also use options like Safe Search and automatic Content Filtering to make sure their kids won’t access any inappropriate content.
FamiSafe also offers dedicated features to set time-based restrictions on the target iOS device.
Besides that, FamiSafe also offers tons of other features like live location tracking, geofencing, explicit content detection, browser history, and more.
To learn how to block websites on iPhone with the help of Wondershare FamiSafe, you can simply follow these steps:
Step 1: Set up Your FamiSafe Account
Whenever you want to block apps on iPhone, you can just install the FamiSafe app on your device (iPhone or Android) or visit its official website. Here, you can enter your email ID and other details to set up your FamiSafe account and get an active subscription.
Once you have completed the setup process, FamiSafe would display a one-time generated code that you can later use to pair both the devices.
Step 2: Install FamiSafe on the Target Device and Link it
Great! Now, whenever you want to block apps on iPhone, you can just install the FamiSafe app on the target iOS device. You can now just log in to your email ID and set up your kid’s profile by entering some basic details.
Furthermore, to link the target iOS device with your account, you need to enter a unique pairing code on the app.
To proceed, you need to grant all the vital permissions to the FamiSafe app, letting it track and monitor the target device.
Afterwards, you also have to go to your phone’s settings to check the downloaded profiles and install the FamiSafe profile on it.
Lastly, you just have to go to your phone’s Settings > Safari > Content Blocker and allow FamiSafe to block content on it.
Step 3: Set up Restrictions and Monitor the Target Device
That’s it! After setting up the app on the target device, you can go to the FamiSafe app on your device (iOS or Android). To block apps on iPhone, just go to the “App Blocker” feature of FamiSafe and manually block (or unblock) any app of your choice.
Besides that, FamiSafe also has a dedicated Web Filter option that would let you manually enter the website that you wish to block. You can also filter content based on certain keywords here.
There are tons of other features that you can further access on FamiSafe. For instance, you can instantly turn on a Safe Search option on the device, set up screen limits, and enable all kinds of restrictions on it.
Conclusion
That’s it a wrap, everyone! I’m sure that after reading this guide, you can easily learn how to block websites on iPhone like a pro. As you can see, I have listed two dedicated solutions to block apps or websites on iPhone. Since the native parental control feature of iPhones is not that reliable, I would recommend using FamiSafe instead. It will let you block certain websites or apps on the target iPhone from your iOS/Android device and set up all kinds of content restrictions on it that won’t be bypassed by your kids.
For the latest gadget and tech news, and gadget reviews, follow us on Twitter, Facebook and Instagram. For newest tech & gadget videos subscribe to our YouTube Channel. You can also stay up to date using the Gadget Bridge Android App. You can find the latest car and bike news here.
Those concerned about their privacy online aren’t paranoid. The reality is that big businesses and criminals profit from people’s personal information online. Whether it’s a major search engine learning about its users to sell more advertising or a hacker committing fraud through identity theft, everyone who has ever used the internet should be thinking about online privacy.
With the internet of things and smart gadgets, we are more connected than ever. Even if we don’t use social media, those that do can unintentionally increase our digital footprint online. It may seem like privacy online is impossible, but it’s not.
Follow these 7 tips every time you go online to help protect your identity and your privacy.
In This Article
1. Use a Virtual Private Network (VPN)
A virtual private network covers your tracks online. It hides your IP address, which is a number that uniquely identifies your device when you go online.
Once associated only with criminals, many people now use VPNs routinely to shield themselves from fraudsters, scammers, data-hungry internet service providers (ISPs) and search providers, and marketers.
While a VPN hides your device name, it also hides your location, which can make it easier to access websites and services overseas – such as some movie and radio streaming services – that are normally location-specific.
2. Activate Your Firewall and Virus Checker
A firewall monitors data going toward your device and any data attempting to leave your device. This is an essential part of internet safety. Without a firewall, you are prone to fake attachments in emails (trojans) that could damage your device, restrict access, or threaten your security and privacy.
If you use Windows, it comes with a firewall as standard. Make sure it’s turned on. If you’re still concerned about your device’s safety and security, it may be well worth investing in a firewall beyond the free versions to enhance your protection.
A virus checker monitors and routinely checks all the files on your device to identify potential threats. It will then prompt you to reject them, delete them, or quarantine them to keep your data safe and protect other devices on your network. Along with a firewall, a virus checker is essential to keep your device running safely.
3. Notice Identify Scammers
Despite firewalls and virus checkers, malicious files may still get through from time to time. And sometimes criminals aren’t trying to infiltrate your data through software and files but through you. In these cases, you can protect yourself by learning to identify fraudulent and suspicious activity and knowing what to do about it.
Spam refers to unsolicited marketing sent indiscriminately, far and wide. It is often a gateway to fraudulent activity, unwanted marketing, and scams, including bogus products and services.
You can identify spam and scams by:
a) their typically terrible spelling and grammar,
b) the use of variations on real business names (such as TheFacebook, instead of Facebook), and
c) pressure tactics that demand recipients act urgently.
Government organizations like the IRS and businesses like your postal service or telecommunications provider will not demand personal details in emails. And professional businesses are unlikely to ask for private details via a messaging app. Never send passwords, address details, account details, or other personally identifying, sensitive data if you are suspicious.
If you’re unsure whether or not you are being contacted by a real organization or a scammer, you can verify their details using Nuwber. Thus, you can determine whether the details they give are real or not. If you are still unsure, do not respond to the message or email. Report it as spam and/or delete it.
4. Look for HTTPS or a Padlock Symbol for Transactions
If you are performing a financial transaction online, look for at least one of two signs that your session is secure.
The web address should have an S after the http. Https signifies that the page is secure. Any information you send via that page will be encrypted. Without a secure connection, third parties may be able to see and intercept your data.
For ease, secure websites also display a padlock in the address bar. If you see a padlock, you know that any data sent from that page, such as your contact details or card details, will be sent encrypted. This makes it much more difficult for anyone to steal that data.
5. Log Out and Use Passwords
This is a simple tip that will help you keep yourself safe online. Log out whenever you have finished with a service online. Then log out of your device before leaving it. This is particularly important if other people use your device.
If you don’t log out of a web service, the next person to use your device could enter that service – for example, Amazon or your online banking – as you. Logging out of your machine can prevent unauthorized access to your online activity, as long as a password is required to log back in.
Use a strong password to protect access to your device. The best password is a complete sentence or a long, seemingly nonsensical string of characters. Include at least one number, one symbol, and one capital letter. Avoid something that people will identify with you, such as the names of your children, a memorable birthday, or a favorite sports team.
6. Delete Your Browsing History and Cookies
Most search engines store your search activity to provide you with a better search service and, in some cases, to market products and services to you more accurately. To protect your online privacy, you’ll want to get rid of this history regularly. In your browser settings, you will normally find the option to delete your browser history and cookies. Do it.
When browsing, only accept necessary cookies. Delete them regularly. Alternatively, use a browser such as DuckDuckGo, which prides itself on never tracking your searches or storing your search history. This does not make you invisible online, but it will help protect your online privacy.
7. Avoid Public and/or Unsecured Wifi
If you’re concerned about online privacy, avoid connecting to public wifi, such as you may find in a cafe or hotel. Also, if you can connect to the internet without a password, it’s not secure and neither are your subsequent searches, conversations, or transactions. Only use private, secure wifi connections that demand passwords for access.
These 7 tips should help keep you safe online. In an age in which we are increasingly connected, these tips will help you find balance – keeping safe without impacting your freedom.
For the latest gadget and tech news, and gadget reviews, follow us on Twitter, Facebook and Instagram. For newest tech & gadget videos subscribe to our YouTube Channel. You can also stay up to date using the Gadget Bridge Android App. You can find the latest car and bike news here.
The April Update for New State Mobile is now available on Android and iOS. Krafton has made popular BR: Extreme Mode available on the Erangel map, as well as a new Survivor Pass, the new MCX weapon, and a variety of other weapons and items.New State Mobile’s collaboration with Among Us is now live in-game, in addition to these updates. Players can embrace their inner Impostor through an Among Us-themed mini-game, a suite of new in-game items, newly added props on the Troi map, and more through May 19.New State Mobile’s collaboration with Among Us is now live in-game, in addition to these updates. Players can now embrace their inner Impostor with an Among Us-themed mini-game, a suite of new in-game items, newly added props on the Troi map, and more from April 21 to May 19 in New State Mobile. A plethora of weapon customization options and new items have been added to the game with the April Update.Here is a complete list of the April Update’s other major additions to the game:The MCX is a new weapon that has been added to the game. It is the most powerful weapon yet. The weapon is a rapid-firing AR that fires 5.56mm ammo and comes with the option of adding an enhanced suppressor to give players a stealthier option in addition to its impressive damage output. The front attachment slot will be removed in exchange for the improved suppressor, and the recoil will be increased.BR: Extreme Mode is now available in Erangel, where 48 players can engage in battle with an abundance of initial starting items such as the Skorpion, a level one helmet and vest, a First Aid Kit, Bandages, a Pain Killer, Energy Drinks, a Smoke Grenade, and 500 Drone Credits. After a maximum of 15 minutes, the last player standing wins the Chicken Dinner! To commemorate the launch of Erangel Extreme, players will receive double tier points for each victory in the new mode, so bring your A-game.The DSR-1 and Crossbow both have a customization slot that allows the DSR-1 to use a Tank Flash Hider and the Crossbow to use magnetic bomb ammunition. For guns like the M416 and Beryl M762, a Grenade Launcher Attachment has been added. A 10x Deca Vision scope is now available in the Drone Store for players, and it can be adjusted from 3x to 10x. A Poison Grenade and a new healing item, the T-RS, will be introduced to the game. Use the Poison Grenade to smoke out players who are hiding in one spot or to counter a Smoke Grenade, then use the T-RS to recover HP and boost to 100%.Lastly, the April Update brings a new Survivor Pass to New State Mobile, with Marion from the Hunters faction. By completing all of the Story Missions, players can earn Marion’s costumes and character appearance.
For the latest gadget and tech news, and gadget reviews, follow us on Twitter, Facebook and Instagram. For newest tech & gadget videos subscribe to our YouTube Channel. You can also stay up to date using the Gadget Bridge Android App. You can find the latest car and bike news here.
The Redmi 10A, Xiaomi’s latest budget smartphone, has been released in India. In a similar price range, the device competes with the Samsung Galaxy M02. The device has a single 13-megapixel camera on the back. The phone has a 5,000mAh battery and is powered by the MediaTek Helio G25 SoC. We compared the Redmi 10A to the Samsung Galaxy M02 to see how the Redmi stacks up against Samsung’s budget smartphone.
Redmi 10A: single 13-megapixel cameraSamsung Galaxy M02: Dual rear camera setup that includes a 13-megapixel primary sensor and a 2-megapixel macro lens
Selfie camera
Redmi 10A: 5-megapixel sensorSamsung Galaxy M02: 5-megapixel selfie camera
RAM and storage
Redmi 10A: 3GB RAM with 32GB storage/4GB RAM with 64GB storageSamsung Galaxy M02: 2GB RAM with 32GB storage and 3GB with 32GB storage options
Although Samsung is a strong competitor to the Redmi smartphone, one significant advantage that the Redmi has over the M02 is that it is a year newer. It also has LPDDR4X RAM and a MediaTek Helio G25 processor, which is energy efficient. There is also a fingerprint sensor included. The Redmi 10A runs the latest Android 11 OS, which is an upgrade over the Android 10 OS found on the Galaxy M02.So, if you’re looking for a good affordable smartphone, the latest Redmi 10A is a good option.
For the latest gadget and tech news, and gadget reviews, follow us on Twitter, Facebook and Instagram. For newest tech & gadget videos subscribe to our YouTube Channel. You can also stay up to date using the Gadget Bridge Android App. You can find the latest car and bike news here.
The dark mode, also known as the night mode, is a display setting on your smartphone which gives it a dark coloured theme. It shows text and other content in a light colour on a dark background, instead of the default dark coloured content shown on a light background. The idea behind the dark mode is to reduce blue light exposure to the eyes so that health problems like eyestrain and headaches that come with prolonged screen time may be avoided. While enabling dark mode in SnapchatiOS is a cakewalk, however, Snapchat’s Android version does not yet support it. But there’s no need to worry, as there is a workaround for that as well. Here is a step-by-step guide on how to enable dark mode in Snapchat on Android as well as iPhone.
In This Article
How to Enable Dark Mode in Snapchat on iPhone
Step 1: Open the Snapchat application from your iPhone, tap on your Bitmoji (My Profile) icon in the top left corner of the interface and tap on the Settings icon in the top right corner. Step 2: Under the My Account section, go to App Appearance.Step 3: You will be provided with three options. Select the Always Dark option to enable the dark mode and that’s it! Read also: How To Change Your Snapchat Username In 2022?
How to Enable Dark Mode in Snapchat on Android
Step 1: Switch on the Dark mode of your phone from the Quick Settings panel or from the Settings app. Step 2: If you have the latest version of Snapchat installed on your Android device, you would need to downgrade the app to its version 10.72.0.0 or below, since the forced dark mode feature does not apply on the newer versions of Snapchat. Download Snapchat version 10.72.0.0 from here.Read also: Snapchat introduced Dynamic Stories to its Discover feed in IndiaStep 3: Go to the Settings app from your Android device, scroll down to the last and click on the About phone option. Step 4: Tap on Software informationStep 5: Tap on the Build number option seven times. Your Android device will then enter into the Developer mode.Step 6: Move back to the Settings home page and tap on the ‘Developer options’ optionthat now appears on the last. Step 7: The list of settings provided in the Developer options section is quite long. You may have to scroll down a couple of times to reach the Force Dark mode option and toggle it on.This will force apps like Snapchat (its older version) which does not support dark mode natively, to successfully enable the same within their apps. Android achieves this by inverting the colours of such apps, which however will not affect the legibility of any content displayed within them.In this way, you can enable dark mode in Snapchat on any Android device. As of now, this is the only walk around for achieving the same within Android while it remains a cakewalk in iOS devices like iPhones. In case you know of any other method to enable dark mode in Snapchat on Android or on iOS, we would be absolutely delighted to hear it. Do write to us in the comments section below. For the latest gadget and tech news, and gadget reviews, follow us on Twitter, Facebook and Instagram. For newest tech & gadget videos subscribe to our YouTube Channel. You can also stay up to date using the Gadget Bridge Android App. You can find the latestcar and bike news here.
The Switch to Android app is now available for iOS users. This app is beneficial for users who want to move their data from their iPhones to Android smartphones. Currently, the app is available for free to download on Apple’s platform. To transfer files from an Android smartphone to an iPhone, Apple even has an identical app called Move to iOS. Google’s Switch to Android app allows you to move your most important data types – photos, videos, contacts, and calendar events – to a new Android device quickly and securely without the use of cumbersome cables.The Switch to Android app is listed on the App Store as being 39MB in size. It allows users to wirelessly move data from iPhones to Android phones, including photos, videos, and contacts, among other things. In addition to this, the application also enables users to disable iMessage in order to receive text messages on their Android phones.One can easily download the Switch to Android app from the App Store. iPhones running iOS 12.0 or later, as well as Apple iPod Touches running iOS 12.0 or later, are required to run the app. Moreover, the platform supports a variety of languages, including English, Arabic, Dutch, German, Hindi, and Spanish. So that the users can easily export contacts, calendars, photos, and videos from an iPhone to an Android device without the use of a cable.For data transfer, the new app will at first support Google Pixel phones, but more smartphone brands will be added at a later stage. To carry out the data transfer from an iPhone to an Android device, users must enable a list of permissions in the Switch to Android app.Other important steps in setting up your device are also covered by the app, such as turning off iMessage so you don’t miss text messages from friends and family. Moreover, a cable could also be used to move photos and videos stored in iCloud, DRM-free music, non-iTunes music, call logs, alarms, device settings, audio, wallpapers, and free apps.As we mentioned earlier, Apple already has a Move to iOS app that automatically migrates content from an Android device to an iPhone.For the latest gadget and tech news, and gadget reviews, follow us on Twitter, Facebook and Instagram. For newest tech & gadget videos subscribe to our YouTube Channel. You can also stay up to date using the Gadget Bridge Android App. You can find the latest car and bike news here.
Garena Free Fire is a battle royale game with regular awards and tournaments to keep players interested. If you play Garena Free Fire, you should be aware of the redeem codes that are released on a daily basis. However, because the battle royale game is banned in India, players from other countries can use the Free Fire Redeem codes daily. If you’re unfamiliar with the Garena Free Fire redeem codes or don’t know how to get them, we’ve put together a step-by-step guide to help you redeem them.The Free Fire redeem codes are a great way to get free stuff. These are 12-digit codes that contain alphabets and numbers, as well as an expiration date and time. Because the Garena FF redeem codes cannot be used more than once, you should hurry to the redemption page to claim your free reward before someone else does. To get a free reward, all you have to do is go to reward.ff.garena.com/en, which is the official redemption page. Also, keep an eye on this space for daily updates on Garena Free Fire redemption codes and rewards.
In This Article
Garena Free Fire Redeem Codes for April 21
FG6H 68G7 6YTA
GQ5B N3M4 LTO9
876Y TXRA DCQV
B2K3 ORG9 8U7Y
FJ6U 876T G345
6UPJ 09GI UJ76
A5QR F12B 3N4R
KOG9 V87C 6X5S
RWFE V4B5 N67L
U8J9 B8G7 FDYT
WGN5 M6YU LJP9
87FD 6S5T RF6V
E34B N5MT YLHN
O9B8 V7C6 D5SR
FE4B N56Y UJNB
GFR5 67U8 HYT5
DQE2 ER3F E8GH
FJU7 65ZR EAD8
F3GL 56OY G87V
6TGW 3BN4 56LY
How to Get Free Fire Redeem Codes for Garena on April 21?
Xiaomi has announced the launch of yet another pocket-friendly smartphone in the Indian market under its sub-brand Redmi. The company has introduced Redmi 10 Power in the country which is the successor to the Redmi 9 that was launched last year. The device features an LCD display and comes with a 50-megapixel dual-camera setup on the back. There is a massive 6,000mAh battery inside the phone and it comes integrated with a Snapdragon 680 SoC. Alongside, the company has also introduced Redmi 10A under its budget segment.
In This Article
Redmi 10 Power price in India, sale details
Redmi 10 Power has been introduced in a lone 8GB RAM with 128GB storage option in India priced at Rs 14,999. The device will be available in two colour options of Power Black and Sporty Orange. The company has not stated when the smartphone will be available for purchase. But the phone can be purchased through Mi.com, Mi Home, Amazon, and retail partners in the country.On the other hand, Redmi 10A was launched in India at Rs 8,499 for the 3GB RAM with 32GB storage while the 4GB RAM with 64GB storage variant was introduced at Rs 9,499. The phone comes in three colours: Charcoal Black, Sea Blue, and Slate Grey.
Redmi 10 Power specifications
Redmi 10 Power features a 6.7-inch HD+ IPS LCD display. The screen comes with 400 nits of peak brightness and Corning Gorilla Glass 3 protection. The device runs on Android 11 with MIUI 13 on top. It has an octa-core Qualcomm Snapdragon 680 processor, as well as an Adreno 610 GPU and 8GB of LPDDR4x RAM. Users can also use up to 3GB of inbuilt storage to virtually expand available RAM, according to the company. The smartphone comes with 128GB of built-in UFS 2.2 storage that can be expanded up to 512GB via a dedicated microSD card slotThe Redmi 10 Power has a dual rear camera setup that includes a 50-megapixel primary sensor with an f/1.8 aperture and a 2-megapixel portrait sensor with an f/2.4 aperture for photos and videos. For selfies and video calls, the phone has a 5-megapixel selfie camera with an f/2.0 aperture lens.The Redmi 10 Power has 4G LTE, Wi-Fi, Bluetooth v5, GPS/ A-GPS, USB Type-C, and a 3.5mm headphone jack for connectivity. An accelerometer, ambient light sensor, proximity sensor, and a rear-mounted fingerprint sensor for biometric authentication are among the sensors onboard. The smartphone houses a 6,000mAh battery that supports 18W fast charging, but it comes with a 10W charger.
For the latest gadget and tech news, and gadget reviews, follow us on Twitter, Facebook and Instagram. For newest tech & gadget videos subscribe to our YouTube Channel. You can also stay up to date using the Gadget Bridge Android App. You can find the latest car and bike news here.
Hey, all Snapchat users! For those of you who don’t know yet, you can now change your username on Snapchat. Snapchat rolled out an update of its app last year, enabling users to change their usernames. Changing the username won’t affect any other aspect of a user’s account, such as their friend list, snap scores, memories, etc. However, the only catch here is that you can change your username only once a year. Here is a step-by-step guide that we have provided below on how to change your Snapchat username in 2023. Another note that Snapchat makes is that you can change your username to one that has not been previously owned by anyone else, including yourself. This implies that once you change your username, you won’t be able to revert it back. Hence, it is advised to choose a username wisely. Read also: Snapchat introduced Dynamic Stories to its Discover feed in India
In This Article
Change your Snapchat username
Step 1: Open the Snapchat app on your device, tap on your Bitmoji (My Profile) icon in the top left corner and then tap on the Settings icon in the top right corner of the interface. Step 2: Go to My Account > Username.Step 3: Tap on the Change Username option.Step 4: A pop-up appears giving you the warning that you can change your username only once a year. Click on Continue and then enter your new username in the space provided.Step 5: Enter your password to confirm your username change and tap on Confirm.That’s it! Your Snapchat username gets changed within a snap, which the app confirms via a pop-up on your screen. To get your hands on this handy feature, you would need to ensure that you are using the latest version of the Snapchat application on your Android or iOS device. If not, then you can update the app via Play Store or App Store.
Change your Snapchat display name
Step 1:Launch the Snapchat app on your phone and tap the Bitmoji/profile icon at the top left corner of the screen.
Step 2: Hit the Settings icon at the top right corner of the screen.
Step 3: Tap on Name.
Step 4: Hit the text field and type in a new name.
Step 5: Hit Save.
Frequently Asked Questions (FAQs)
How do I change my Snapchat username?
Go to Profile>Settings>Username and select ‘Change Username’. Enter your password before typing your new username.
How many times can I change my username on Snapchat?
You can change your Snapchat username only once a year.
As mentioned before, the username can be changed only once a year. However, if you have changed it already and still need to change it again before 1 year, your only other option is to delete your Snapchat account and create a new one. But the catch here would be that you won’t be able to transfer data from your old account to your new account. Hence, you would have to start your Snapchat journey afresh through your new account.In case you know of any other way to change your Snapchat username in 2023, do let us know in the comments section below. For the latest gadget and tech news, and gadget reviews, follow us on Twitter, Facebook and Instagram. For newest tech & gadget videos subscribe to our YouTube Channel. You can also stay up to date using the Gadget Bridge Android App. You can find the latestcar and bike news here.
21 April 2022 Amazon Quiz has gone live. Customers from different parts of the country are participating in the daily quiz. The quiz begins from 12 AM to 11:59 PM. Those participating in the quiz can win exciting prizes by answering all the questions correctly. Today participants have a chance to win a Rs 30,000 Amazon Pay Balance.Amazon quiz brings an opportunity for its customers to win Amazon Pay Balance ranging from Rs 1,000 to Rs 50,000. The Quiz can be played from 12 AM to 11:59 PM. The e-commerce platform brings a fresh quiz on a daily basis which consists of five questions related to general knowledge and current affairs. The participants need to answer all the questions correctly and their names will be selected for a lucky draw. The winner will be announced at the end of the month.One wrong answer could eliminate you from the quiz. If you manage to answer all the questions correctly you can stand a chance to win a Rs 30,000 Amazon Pay Balance today. Only app users are eligible to participate in the Quiz. Check Out 21 April 2022 Amazon Quiz Answers.Amazon Quiz Today Prize – Rs 30,000 Amazon Pay BalanceQuiz Date – 21 April 2022Daily Timing – 12 AM to 11:59 PMWinner Announcement – Today 12 PM
In This Article
Amazon Quiz Answers Today 21 April 2022
Question 1: Atharva – MS Dhoni recently stepped down as the captain of the Chennai Super Kings. Who would be captain in his place?
Answer: Ravindra Jadeja
Question 2: Avatar 2 which is set to release in December 2022, is a sequel of a movie released in which year?
Answer: 2009
Question 3: The Reserve Bank Innovation hub was recently inaugurated in which city?
Answer: Bengaluru
Question 4: This bird was the sacred animal of which Greek goddess?
Answer: Athena
Question 5: Which famous city is shown here?
Answer: Istanbul
How To Play Amazon Quiz
Only app users are eligible to play the Amazon quiz every morning from 12 AM to 11:59 PM. The quiz is not available on the desktop. For those who are unaware of how to play the Amazon quiz below are the steps, you can follow to take the quiz.
Firstly download the Amazon app from Google Play Store or App Store
Now fill in the required information through the Sign Up option.
You need to log in to the Amazon app and scroll down on the home screen to find the Amazon Quiz banner.
Tap on the Amazon Quiz banner and tap on the Start button to start the Quiz.
Now you will get 5 questions and you need to answer them correctly. One wrong answer will eliminate you from the Quiz.
After answering all the questions correctly you are now eligible for a Lucky Draw.
The winner’s name will be announced today at 12 PM.
HP today announced the launch of Pavilion laptops with Intel Core 12th Gen processors in India. The series includes 2022 models of HP Pavilion 15, HP Pavilion 14, and HP Pavilion x360. The new HP Pavilion 15 comes with an EyeSafe certified display and Amazon Alexa integration.
In This Article
Pricing and availability
In India, the price of the HP Pavilion 15 starts at Rs 65,999. The laptop is available in three colours: Fog Blue, Natural Silver, and Warm Gold. Whereas the HP Pavilion 14 AMD model price starts at Rs 55,999, the Pavilion 15 AMD 5000 series variant starts at Rs 59,999, and the Pavilion 14 x360 starts at Rs 55,999, and the Pavilion 14 Intel model starts at Rs 60,999. These laptops can be purchased through HP’s online and offline channels across the country.
HP Pavilion 15 specifications
The new HP Pavilion 15 comes with an EyeSafe certified display that was created in collaboration with doctors. It is highlighted with a 15.6-inch screen. By displaying an always-on blue light filter, the new technology, which is embedded in the display, keeps users’ eyes comfortable. The Pavilion 15 has a screen-to-body ratio (STBR) of 85 percent, 100 percent sRBG Panels, and TNR capabilities. For a more vibrant viewing experience, the device also supports Microsoft High Dynamic Range (HDR) streaming and comes pre-installed with High-Efficiency Video Coding (HEVC) on FHD panel options. The HP laptop is equipped with the latest 12th-generation Intel Core processors and Nvidia GeForce MX550 graphics.HP Pavilion 15 is compact, portable, and easy to use, weighing only 1.75kg. Its full-size, backlit keyboard has a premium feel to it. The audio system’s power is supplied by Bang & Olufsen, ensuring a clear and crisp volume output. There’s also a webcam with TNR for video calls that reduces background noise. In addition, the laptop has dual array digital microphones built-in. Additionally, the laptop also includes temporal noise reduction and integrated dual array digital microphones.A preloaded Adaptive Battery Optimiser is also included that’s supposed to help you get the most out of your battery.
For the latest gadget and tech news, and gadget reviews, follow us on Twitter, Facebook and Instagram. For newest tech & gadget videos subscribe to our YouTube Channel. You can also stay up to date using the Gadget Bridge Android App. You can find the latest car and bike news here.
Owning an air conditioner comes with responsibilities. Air conditioners (ACs) need regular maintenance from time to time. From cleaning their air filters yourself to calling a technician for inspecting any gas leakages within the system, you have to meet all ends to keep it up and running in the scorching heat of summers. And if you chose to neglect their servicing needs, then even if it is a brand-new model, your AC is bound for a steady decline in its performance and lifespan. Hence, we provide you with our complete AC guide, including our AC maintenance checklist, in case you’re wondering how to keep your old ACs running like new. And even if you have already decided to invest in a new one, there’s no need to go anywhere else. We have also provided below the top 5 best inverter Split ACs in India in 2022 for you to pick this season. Read also:Summer Gadgets 2022: Top 10 Gadgets To Keep Yourself Cool This Summer
In This Article
AC Maintenance Checklist
Cleaning the Air Filters
The first and the foremost thing that comes to mind while talking about the maintenance of ACs is their air filters. The air filter of an AC helps keep the airflow clean and dust-free. Since their job is to trap and filter out dust and dirt, they tend to get clogged pretty easily, usually after two or three months of usage. Cleaning the air filter out improves the cooling efficiency of an AC to a good extent. You can use a brush with soft bristles or a soft textured cloth along with warm water to clean your AC’s air filter (as these are very delicate).
Checking For Leakages
Next on our AC maintenance checklist comes checking for leakages. Leakages in any part of an air conditioner prevent it from running efficiently. In case of a leakage, an AC would tend to consume more electricity and not provide as much cooling as it would have in ideal conditions. And if you fail to detect and get the leakage serviced, prolonged usage of your AC in such conditions may even result in its breakdown altogether. Hence you should get your AC checked for any leakages before the cooling season begins.
Unclogging The Drain Pipe
The third part in our AC maintenance checklist that needs to be taken care of is its drain channel. An AC’s drain pipe removes moisture from its indoor unit. A clogged drain pipe would prevent the unit from reducing humidity which may result in excess moisture in the air, making you feel relatively uncomfortable. For unclogging the drain channel, it is recommended to pass a stiff wire or use a thin stiff brush through it along with warm water.
Cleaning The AC Coils And Coil Fins
Air conditioners have evaporator and condenser coils which after months and years of usage may collect dirt in them. Their outdoor units, which consist of a compressor, a condenser and a fan, may also get affected over time if the environment they’re kept in is dusty or has debris, foliage, etc. around. It is advised to give the condenser unit as much room as possible and keep it at a good distance from any kind of dust, debris or foliage. You should also give a quick check to the aluminium fins of the evaporator and condenser coils. They can be easily bent and cause blockage in the airflow through the coil. You can use a tool known as ‘fin comb’ available with AC wholesalers to get these back into shape.
Using Correct Temperature Settings
This one can be considered one of the most important points on our AC maintenance checklist. Now, don’t we all agree on having done the crime of setting the temperature of our ACs to the lowest possible setting? However, it is not the correct way to use your AC and can actually reduce its lifespan. Not only that but it will also result in higher electrical consumption. The ideal temperature setting for ACs that is recommended in India is around 24 degrees Celsius.
Preparing Your AC For Off-Season
Leaving your air conditioner as it is during off-seasons like in winters is not good. You should either cover your AC along with its outdoor unit or remove it and store it to keep it well protected.
Getting Your AC Serviced
Finally on our AC maintenance checklist comes its servicing. It is always recommended to get your AC regularly serviced by a well-trained technician. The technician should check for the correct amount of refrigerant in the system, detect any leakages, seal any duct leakages in the central system, measure the airflow through the coils, check all electrical connections and inspect for any further wear and tear signs.If you will be able to follow all these measures, we are sure even your oldest AC would start running like new. In case you have made up your mind to invest in a brand-new air conditioner, the following are the top 5 Split ACs to pick up this season. Read also: Schools Reopen: Best Gadgets For Teenagers To Help In Their Studies
Top 5 Split ACs For The Summer Of 2022
As you may already know, there are two types of ACs, namely Split ACs and window ACs, that are available in the market. Out of the two, Split ACs are designed typically for cooling larger spaces. They work comparatively quieter than their window AC counterparts and cool the room much faster. Here are the top 5 Split ACs of 2022 that we recommend you buy this summer.
LG 1.5 Ton 5 Star AI Dual Inverter Wi-Fi Split AC
The one to make it to the top of our list of the top 5 best Split ACs in India 2022 had to be this one from LG. It comes with a 5-star energy rating, AI dual inverter compressor, an antibacterial and dust filter, 6-in-1 AI convertible technology for cooling, dehumidifier, intelligent safety sensors, R32 refrigerant and much more. It provides a 5-years warranty on PCB and 10-years for its compressor including gas charging. It has coils made up of copper with ocean black protection that prevents rust and corrosion. It is stated as the number 1 bestselling AC model on Amazon and is priced at Rs 58,990.Buy from here.
Lloyd 1.5 Ton 5 Star Inverter Split AC
The next on our list comes the Lloyd 1.5 ton 5-star inverter Split AC model. It has a 5-star energy rating, comes with an antiviral and a PM 2.5 filter, a 100% copper condenser coil for better cooling, a smart 4-way swing, R32 refrigerant, turbo cool technology, and low gas detection. It comes with a 10-year warranty on its compressor and is priced at Rs 40,500. Buy from here.
Carrier 1.5 Ton 5 Star Inverter Split AC
Next up is an AC model equivalent to that of Lloyd’s but from the brand Carrier. It is a 1.5-ton inverter Split AC with a 5-star energy rating that comes with 6-in-1 Flexicool technology, R32 refrigerant, a PM 2.5 filter and more. It comes with a 10-year warranty on its compressor and is priced at Rs 42,999.Buy from here.
Blue Star 1.5 Ton 5 Star Inverter Split AC
Fourth on our list of the top 5 best Split ACs in India in 2022 to pick this season comes this one from Blue Star. It has a 1.5-ton capacity, 5-star energy rating, copper condenser coil, turbo cool technology, eco mode and 4-way swing. It comes with a 10-years warranty on its inverter compressor and provides a 1-year plus 4-years extended warranty covering repairs like the rectification of components, electrical circuits, PCB, gas charging, et. al. It is priced at Rs 41,990. Buy from here.
Panasonic 1.5 Ton 5 Star Wi-Fi Twin Cool Inverter Split AC
The final one to make it to our list is from the brand Panasonic. Rated with a 5-star energy rating, it comes with an auto convertible inverter compressor which adjusts power based on the heat load. It supports Wi-Fi as well as voice control with auto convertible Alexa and Google Assistant. It also comes with a PM 2.5 filter, a copper condenser coil with Shield Blu anti-corrosion technology along with a 10-year warranty on its compressor and 5 years on PCB. It is priced at Rs 39,990. Buy from here.So those were our top picks for the 5 best Split ACs in India in 2022 to pick up this season. In case we missed out on your favourites, do let us know in the comments section below. Have a happy summer you all!For the latest gadget and tech news, and gadget reviews, follow us on Twitter, Facebook and Instagram. For newest tech & gadget videos subscribe to our YouTube Channel. You can also stay up to date using the Gadget Bridge Android App. You can find the latestcar and bike news here.
Xiaomi has announced yet another budget smartphone in the Indian market under its sub-brand Redmi. The company has rolled out Redmi 10A which is the successor to Redmi 9A which was announced two years back. The device features a single 13-megapixel rear camera. The phone is powered by MediaTek Helio G25 SoC and houses a 5,000mAh battery.
In This Article
Redmi 10A price in India and availability
Redmi 10A has been launched in India in two variants. The 3GB RAM with 32GB storage variant of the pocket-friendly phone costs Rs 8,499. Whereas the 4GB RAM with 64GB storage version is available for Rs 9,499. The phone will come in three colours: Charcoal Black, Sea Blue, and Slate Grey.In terms of availability, Redmi 10A will go on sale in the country via the company’s official website,Amazon as well as offline stores.The smartphone was first released in China late last month for CNY 699 (roughly Rs 8,300) for the 4GB RAM with 64GB storage model. A 4GB RAM with 128GB storage option costs CNY 799, which is roughly Rs 9,500, while a 6GB RAM with 128GB memory option costs CNY 899, which is roughly Rs 10,700.
Redmi 10A specifications
The Redmi 10A features a waterdrop-style notch and a 6.53-inch HD+ display with a resolution of 720×1,600 pixels. The peak brightness is 400 nits, with a 20:9 aspect ratio. Android runs the show, with MIUI 12.5 on top. In addition to this, the device comes with a rear-mounted fingerprint sensor.It features an octa-core MediaTek Helio G25 processor, up to 4GB of RAM, and 64GB of internal storage that can be expanded up to 512GB with a microSD card.The Redmi 10A has a single 13-megapixel camera sensor with an LED flash. Xiaomi’s AI Camera 5.0 also powers the camera, which can recognise up to 27 different scenes. The budget smartphone has a 5-megapixel selfie camera sensor on the front for selfies and video chats.The Redmi 10A is powered by a 5,000mAh battery that can be charged at a standard 10W. An accelerometer, ambient light sensor, and proximity sensor are among the onboard sensors. 4G LTE, Wi-Fi, Bluetooth v5.0, GPS/ A-GPS, Micro-USB, and a 3.5mm headphone jack are among the connectivity options.
For the latest gadget and tech news, and gadget reviews, follow us on Twitter, Facebook and Instagram. For newest tech & gadget videos subscribe to our YouTube Channel. You can also stay up to date using the Gadget Bridge Android App. You can find the latest car and bike news here.
Photo sharing app Instagram owned by Meta has announced a new product-tagging feature on its platform. This feature was previously available only to creators and business accounts but now it has been expanded to all Instagram users. So anyone can now tag products in their Instagram posts.While announcing the ability to add product tags to Feed posts Instagram said, “Today, we’re expanding the ability to add product tags in Feed posts to everyone in the U.S. Creators and brands have been sharing how they use and style their favourite products on Instagram and inspiring their communities. Now we’re giving access to everyone to inspire those closest to them by enabling product tagging in posts. From supporting brands you love to helping your friends and family discover new products they may like, sharing products on Instagram just got easier.”The ability to add product tags to Instagram Feed posts is initially being rolled out in the United States to public accounts. Use the tagging feature to tag a brand before specifying a product when creating a post. When someone taps on your product tag in a published Feed post, they’ll be taken to a product detail page on Instagram, where they can get more information about the product and buy it directly in the app or through the brand’s product detail page.
How to add a product tag is as follows:
Begin creating a Feed post.
Select ‘Tag people.’
First, search for and tag the brand. At the bottom, there should be two options labelled ‘People’ and ‘Products.’
Choose ‘Products’ from the drop-down menu.
To begin tagging products, tap the photo. To locate a product, use descriptors. After you’ve found the product, add any styles and/or colours you want, then tap to tag it.
Indian Telecom company Reliance Jio has announced that starting April 22, it would offer a slew of new postpaid JioFiber broadband internet plans. Interestingly the new Jio broadband plans namely entertainment bonanza will be offered with no setup fees and up to fourteen OTT apps while Disney+ Hotstar, Zee5, Sonyliv, and Voot, for an additional Rs 100-Rs 200 per month. According to the company, the plan starts at Rs 399 per month and includes unlimited high-speed internet.In addition to this Reliance, Jio will not charge you for installation or hardware. This means when users sign up for a JioFiber Postpaid connection, they will receive a free Internet Box (Gateway Router), Set-Top Box, and Installation worth Rs 10,000.Furthermore, users will continue to have access to unlimited high-speed internet as part of the new JioFiber plans, which start at Rs 399 per month. They can also access the content of their choice through a collection of up to 14 OTT apps for an additional Rs 100 or 200 per month.Users get access to 14 leading entertainment apps on large and small screens (multiple devices included), allowing them to watch their favourite movies, TV shows, originals, news, sports, and much more. Disney+ Hotstar, Zee5, Sonyliv, Voot, Sunnxt, Discovery+, Hoichoi, Altbalaji, Eros Now, Lionsgate, ShemarooMe, Universal+, Voot Kids, JioCinema, and Hoichoi, Altbalaji, Eros Now, Lionsgate, ShemarooMe, Universal+, Voot Kids, and JioCinema are among the 14 apps.How do I sign up for new JioFiber Entertainment Bonanza plans?JioFiber Postpaid customers:
Go to MyJio and choose your entertainment plan.
Pay the first month’s rent in advance for the new plan you’ve chosen.
Garena Free Fire is a battle royale game with regular awards and tournaments to keep players interested. If you play Garena Free Fire, you should be aware of the redeem codes that are released on a daily basis. However, because the battle royale game is banned in India, players from other countries can use the Free Fire Redeem codes daily. If you’re unfamiliar with the Garena Free Fire redeem codes or don’t know how to get them, we’ve put together a step-by-step guide to help you redeem them.The Free Fire redeem codes are a great way to get free stuff. These are 12-digit codes that contain alphabets and numbers, as well as an expiration date and time. Because the Garena FF redeem codes cannot be used more than once, you should hurry to the redemption page to claim your free reward before someone else does. To get a free reward, all you have to do is go to reward.ff.garena.com/en, which is the official redemption page. Also, keep an eye on this space for daily updates on Garena Free Fire redemption codes and rewards.
In This Article
Garena Free Fire Redeem Codes for April 20
VFHH NCBUSADF
MNHG OLDU AXDV
BMNC EDHC SENC
KCKD DXDD GVGV
JHND CXSD DDGF
XFDD GDFG BBBB
SSFF EGBF BHFG
VDGF CVBF DGVD
VFGV JMCK DMHN
JCDK CNJE 5RTR
3RXG 5T54 4E3E
FDDF VVVF DCDD
EDXX DSZS SDFG
KLLP DJHD DBJD
HDFH DNBH NDJL
NDJD FBGJ FJFK
XJDJ GFVD FKVH
XKDN 98ND DMNJ
CDDF DGCD FGTD
JDCJ FJGG DSHO
DJHD GSDU EHJP
DJHN DSBB BGFR
KILO LOJH UYOP
How to Get Free Fire Redeem Codes for Garena on April 20?


 Step 3: Tap on Restore. If you’ve run out of your free restoration options, you will need to pay $0.99 to get back the Snap streak.

 Step 2: Under the Support section, tap on I Need Help.
 Step 3: Click on the Snapstreaks category under the Popular topics section
 Step 4: Click on the ‘let us know’ link given within the text.
 Step 5: Select the I’ve lost my Snapstreak option in the checklist
 Step 6: Scroll down and fill in the details in the form provided
 Step 7: Click on the Send button
 Read also: How To Change Your Snapchat Username In 2022?
If the company listens to your appeal and considers your request, you may get your lost Snap Streak back.
Moreover, there are certain conditions while using this method as well. Your Snap Streak won’t be reinstated if you or your friend lost it naturally by forgetting to send a snap. Also, you won’t be able to use this method regularly. It’s not a good idea to frequently keep losing your Snap Streaks and appeal to Snapchat.
Even if it’s genuinely not your fault and you lost multiple Snap Streaks, this method is likely to work with only one contact. Reportedly, there seems to be a limit of one username per submission. Hence, it is recommended to make your longest-running Snap Streak a priority while appealing.
Read also: How To Change Your Snapchat Username In 2022?
If the company listens to your appeal and considers your request, you may get your lost Snap Streak back.
Moreover, there are certain conditions while using this method as well. Your Snap Streak won’t be reinstated if you or your friend lost it naturally by forgetting to send a snap. Also, you won’t be able to use this method regularly. It’s not a good idea to frequently keep losing your Snap Streaks and appeal to Snapchat.
Even if it’s genuinely not your fault and you lost multiple Snap Streaks, this method is likely to work with only one contact. Reportedly, there seems to be a limit of one username per submission. Hence, it is recommended to make your longest-running Snap Streak a priority while appealing.


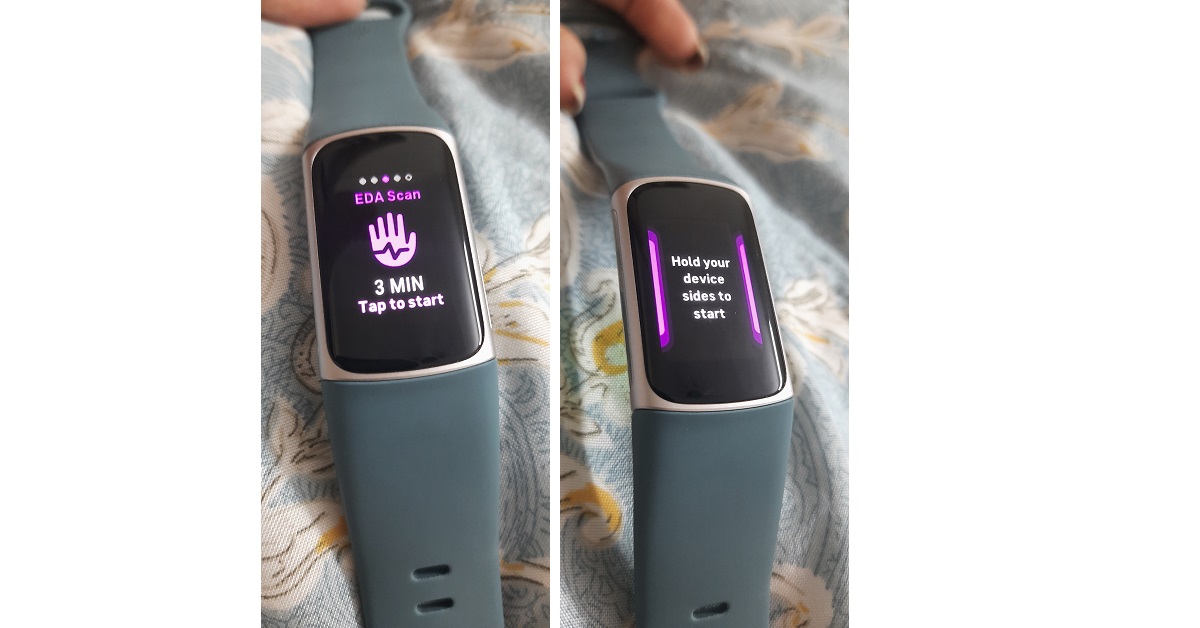


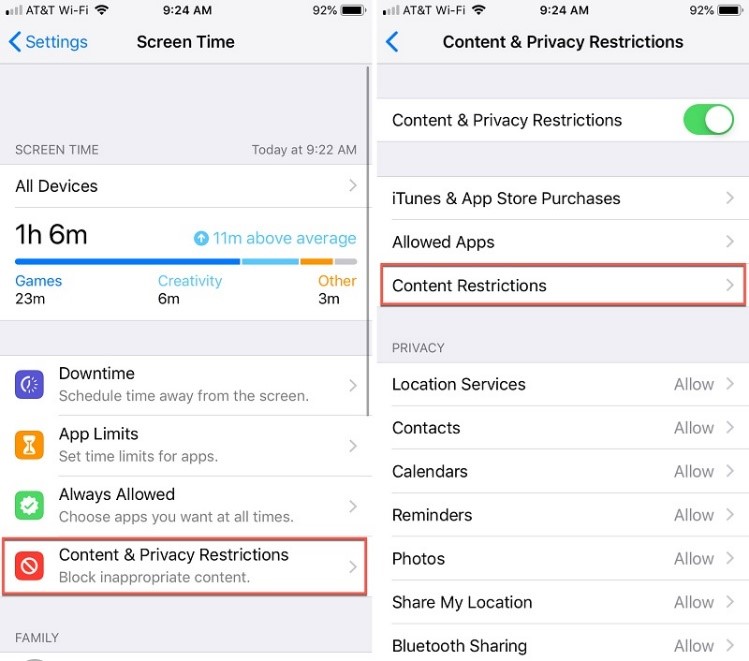 You can now enter the passcode of your iPhone to get dedicated content restriction features. Here, you can go to the “Web Content” restrictions feature to enable an automatic filter or tap on the “Add Website” button to add specific websites manually.
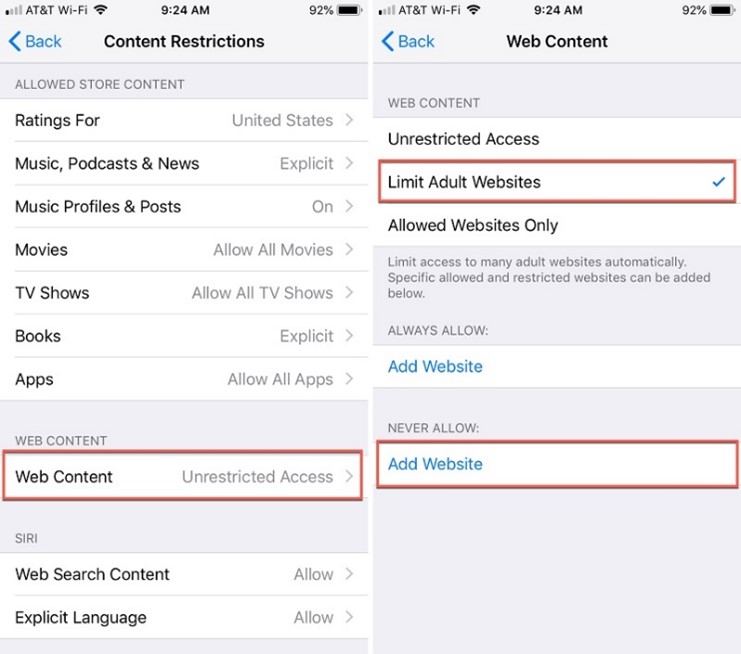 That’s it! Now, to block websites on iPhone, you just have to enter URLs of the designated websites and add them to the blocking list.

 Here, you can simply enable the “Content & Privacy” feature and go to the “Allowed Apps” screen. You can now just disable any app that you don’t want to run on the iOS device, and it would automatically be blocked on it.

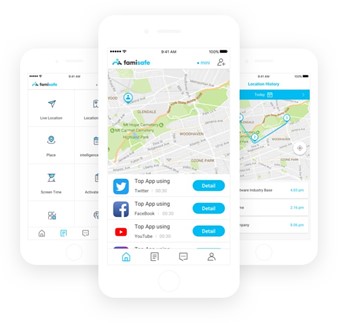 To learn how to block websites on iPhone with the help of Wondershare FamiSafe, you can simply follow these steps:

 To proceed, you need to grant all the vital permissions to the FamiSafe app, letting it track and monitor the target device.
Afterwards, you also have to go to your phone’s settings to check the downloaded profiles and install the FamiSafe profile on it.
To proceed, you need to grant all the vital permissions to the FamiSafe app, letting it track and monitor the target device.
Afterwards, you also have to go to your phone’s settings to check the downloaded profiles and install the FamiSafe profile on it.
 Lastly, you just have to go to your phone’s Settings > Safari > Content Blocker and allow FamiSafe to block content on it.

 Besides that, FamiSafe also has a dedicated Web Filter option that would let you manually enter the website that you wish to block. You can also filter content based on certain keywords here.
 There are tons of other features that you can further access on FamiSafe. For instance, you can instantly turn on a Safe Search option on the device, set up screen limits, and enable all kinds of restrictions on it.


 A
A  This is a simple tip that will help you keep yourself safe online. Log out whenever you have finished with a service online. Then log out of your device before leaving it. This is particularly important if other people use your device.
If you don’t log out of a web service, the next person to use your device could enter that service – for example, Amazon or your online banking – as you. Logging out of your machine can prevent unauthorized access to your online activity, as long as a password is required to log back in.
Use a strong password to protect access to your device. The best password is a complete sentence or a long, seemingly nonsensical string of characters. Include at least one number, one symbol, and one capital letter. Avoid something that people will identify with you, such as the names of your children, a memorable birthday, or a favorite sports team.
This is a simple tip that will help you keep yourself safe online. Log out whenever you have finished with a service online. Then log out of your device before leaving it. This is particularly important if other people use your device.
If you don’t log out of a web service, the next person to use your device could enter that service – for example, Amazon or your online banking – as you. Logging out of your machine can prevent unauthorized access to your online activity, as long as a password is required to log back in.
Use a strong password to protect access to your device. The best password is a complete sentence or a long, seemingly nonsensical string of characters. Include at least one number, one symbol, and one capital letter. Avoid something that people will identify with you, such as the names of your children, a memorable birthday, or a favorite sports team.


 Step 1:
 Step 2:
  Read also:
  Step 4:
  Step 5:
  Step 6:
  Step 7:


")
 Step 3:
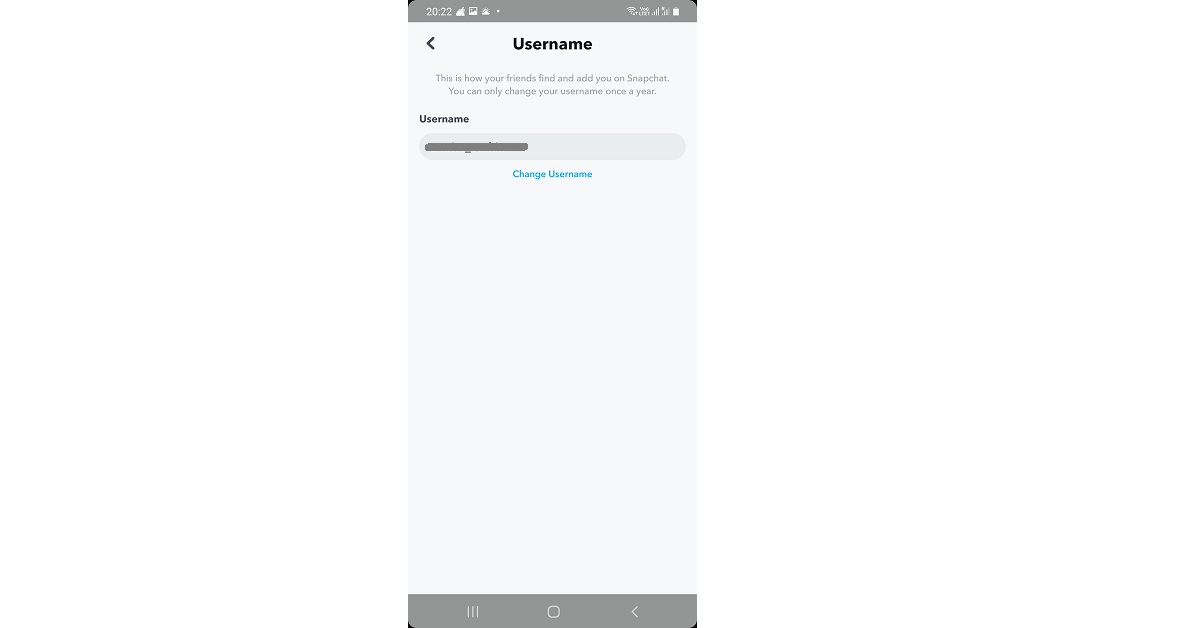 Step 4:
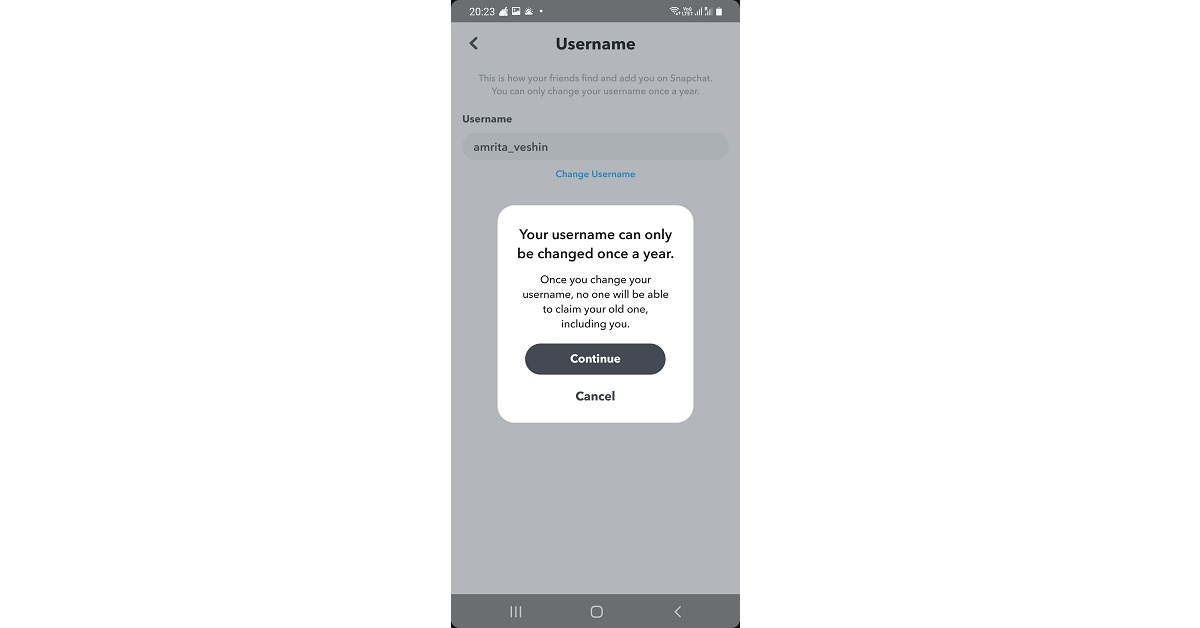 Step 5:
 Step 4: Hit the text field and type in a new name.
 Step 5: Hit Save.


 For the latest