In This Article
GBA4iOS
 Often touted as the best Gameboy emulator for iOS devices, GBA4iOS gives you the complete Gameboy experience on your iPhone. Once you’ve installed GBA4iOS on your iPhone, you get access to all games compatible with GBA and GBC. It allows multiplayer mode and controller support. GBA4iOS also creates a backup of your game data on Dropbox so you can sync it across devices.
On top of that, GBA4iOS comes with other features like, event distribution, sustain button, controller vibration, and cheat code support. The higher versions of the emulator also let you download custom controller skins.
Often touted as the best Gameboy emulator for iOS devices, GBA4iOS gives you the complete Gameboy experience on your iPhone. Once you’ve installed GBA4iOS on your iPhone, you get access to all games compatible with GBA and GBC. It allows multiplayer mode and controller support. GBA4iOS also creates a backup of your game data on Dropbox so you can sync it across devices.
On top of that, GBA4iOS comes with other features like, event distribution, sustain button, controller vibration, and cheat code support. The higher versions of the emulator also let you download custom controller skins.
Delta Emulator
 Made by the same team as GBA4iOS, Delta Emulator supports Nintendo Entertainment System (NES), Nintendo 64 (N64), GBA, and GBC. It is considered to be an all-in-one emulator for iPhone. Delta Emulator’s friendly and seamless UI make the gaming experience immersive across formats. You can even PlayStation or Xbox controller to play games on the Delta Emulator.
Like GBA4iOS, Delta also offers Dropbox synchronization. You can also use cheat codes and download custom skins.
Made by the same team as GBA4iOS, Delta Emulator supports Nintendo Entertainment System (NES), Nintendo 64 (N64), GBA, and GBC. It is considered to be an all-in-one emulator for iPhone. Delta Emulator’s friendly and seamless UI make the gaming experience immersive across formats. You can even PlayStation or Xbox controller to play games on the Delta Emulator.
Like GBA4iOS, Delta also offers Dropbox synchronization. You can also use cheat codes and download custom skins.
Happy Chick
 One of the more popular Gameboy emulators around, Happy Chick can run games across 18 formats. It supports DC, WS, FAB/MAME/MAME+, PS, GBA, GBC, MD, NDS, FC(NES), SFC(SNEC).
Street Fighter 97, Super Mario, Monster Hunter, and Pokemon are some of the games you can play on Happy Chick. By using Happy Chick you can probably get the most out of your device without jailbreaking it. Like other emulators on the list, Happy Chick also synchronizes your data across devices and supports external controllers.
One of the more popular Gameboy emulators around, Happy Chick can run games across 18 formats. It supports DC, WS, FAB/MAME/MAME+, PS, GBA, GBC, MD, NDS, FC(NES), SFC(SNEC).
Street Fighter 97, Super Mario, Monster Hunter, and Pokemon are some of the games you can play on Happy Chick. By using Happy Chick you can probably get the most out of your device without jailbreaking it. Like other emulators on the list, Happy Chick also synchronizes your data across devices and supports external controllers.
Provenance
 One of the oldest emulators around, Provenance supports up to 30 consoles including Nintendo, Sega, Atari, and Sony. Provenance lets you record your gameplay and save the footage in iCloud. You can even back up your game data online. The controller can be customised according to your liking as well. It also allows you to auto-save your progress, which gives it a big advantage over its peers.
RetroArch
 RetroArch is an open-source Gameboy emulator for iPhone. It is also available for Windows, macOS, Linux, and Android. RetroArch supports a large number of consoles including Atari, DOS, MSX, Neo Geo Pocket, PC Engine, Sega Genesis, and more. What sets RetroArch apart from other emulators on this list is that it uses one controller for all the platforms it emulates. You can even remap controls if you cant get comfortable with the presets.
RetroArch also lets you play with other users online, using Netplay. Since the emulator is available for all major platforms, you can play with Windows, Android, and Linux users as well.
RetroArch is an open-source Gameboy emulator for iPhone. It is also available for Windows, macOS, Linux, and Android. RetroArch supports a large number of consoles including Atari, DOS, MSX, Neo Geo Pocket, PC Engine, Sega Genesis, and more. What sets RetroArch apart from other emulators on this list is that it uses one controller for all the platforms it emulates. You can even remap controls if you cant get comfortable with the presets.
RetroArch also lets you play with other users online, using Netplay. Since the emulator is available for all major platforms, you can play with Windows, Android, and Linux users as well.
Eclipse
 Eclipse is a lightweight emulator that is very easy to install. Its neat and minimal interface makes it easy to navigate and reduces any lags or processing time.
Eclipse lets you import ROMs from Files or Google Drive to get started with your gaming experience. Currently, it only supports NES, SNES, Game Boy and Game Boy Colour, Sega Master System, and Sega Game Gear.
Eclipse is a lightweight emulator that is very easy to install. Its neat and minimal interface makes it easy to navigate and reduces any lags or processing time.
Eclipse lets you import ROMs from Files or Google Drive to get started with your gaming experience. Currently, it only supports NES, SNES, Game Boy and Game Boy Colour, Sega Master System, and Sega Game Gear.
PPSSPP
 PPSSPP is an emulator that’s built solely for the purpose of playing PlayStation Portable (PSP) games on iPhone. It lets you save your gameplay on your device but it doesn’t back your data up in iCloud, so you won’t be able to resume your progress on another device.
However, you can transfer existing current saves from your PSP to your iPhone using PPSSPP. This means you’ll be able to resume your game on your iPhone exactly where you left off in PSP.
Read Also: How to run PUBG Mobile on your PC or laptop?
With these emulators, you will be able to run most of the old console games seamlessly on your iPhone. You will not find any major bugs or experience any significant lag in any of these emulators. If you use an Android or a Windows device you will be able to find different versions of these emulators for your device on their website. If there are any other emulators you like to use, let us know in the comments!
For the latest gadget and tech news, and gadget reviews, follow us on Twitter, Facebook and Instagram. For newest tech & gadget videos subscribe to our YouTube Channel. You can also stay up to date using the Gadget Bridge Android App.
PPSSPP is an emulator that’s built solely for the purpose of playing PlayStation Portable (PSP) games on iPhone. It lets you save your gameplay on your device but it doesn’t back your data up in iCloud, so you won’t be able to resume your progress on another device.
However, you can transfer existing current saves from your PSP to your iPhone using PPSSPP. This means you’ll be able to resume your game on your iPhone exactly where you left off in PSP.
Read Also: How to run PUBG Mobile on your PC or laptop?
With these emulators, you will be able to run most of the old console games seamlessly on your iPhone. You will not find any major bugs or experience any significant lag in any of these emulators. If you use an Android or a Windows device you will be able to find different versions of these emulators for your device on their website. If there are any other emulators you like to use, let us know in the comments!
For the latest gadget and tech news, and gadget reviews, follow us on Twitter, Facebook and Instagram. For newest tech & gadget videos subscribe to our YouTube Channel. You can also stay up to date using the Gadget Bridge Android App. 


![How To Transfer LINE from Android to iPhone [2022]](https://www.gadgetbridge.com/wp-content/uploads/2022/06/how-to-transfer-line-from-android-to-iphone-768x402.jpg "How To Transfer LINE from Android to iPhone [2022]")

 5. Now unlock your iPhone and use it to sign in to your LINE account. Remember, you need to ensure that you use the same number used on your Android device.
6. Voila! Tenorshare iCareFone for LINE will transfer all the data to your iPhone device in just a few minutes. Make sure you check if the data is successfully transferred to your iPhone before plugging the USB out.
5. Now unlock your iPhone and use it to sign in to your LINE account. Remember, you need to ensure that you use the same number used on your Android device.
6. Voila! Tenorshare iCareFone for LINE will transfer all the data to your iPhone device in just a few minutes. Make sure you check if the data is successfully transferred to your iPhone before plugging the USB out.


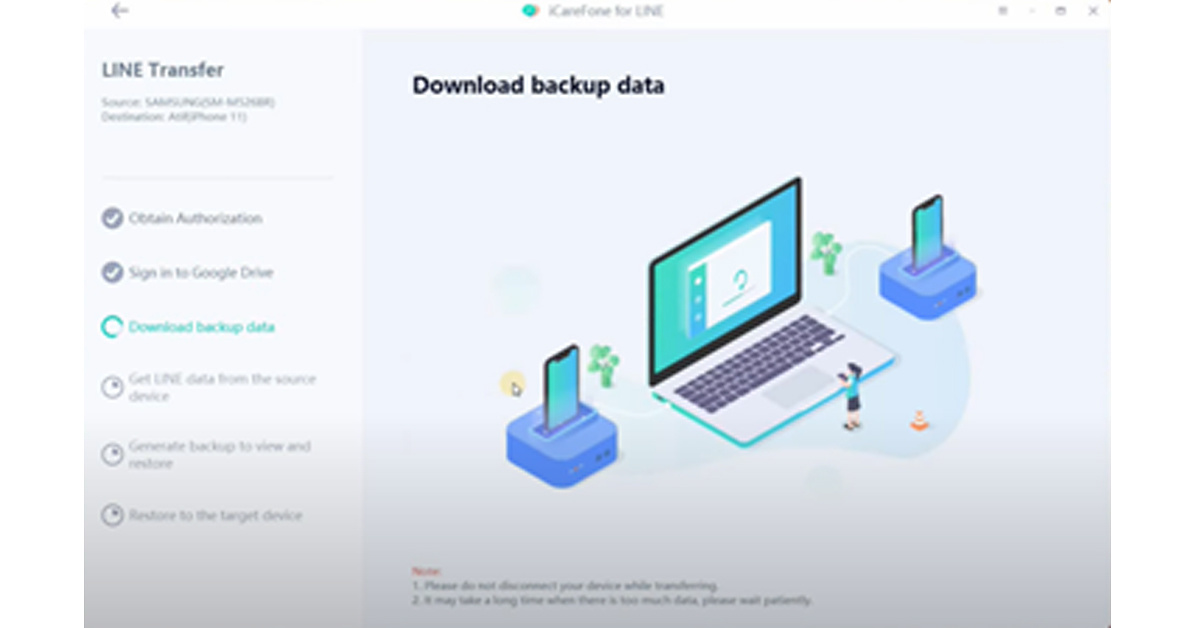
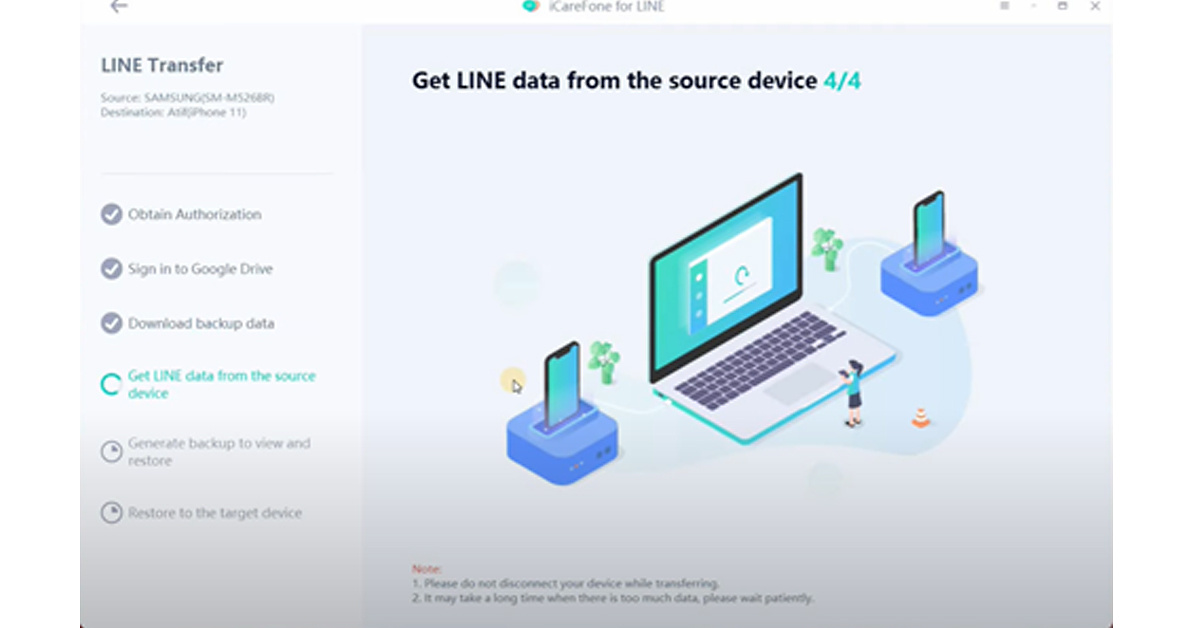
 Like the email method, the LINE chats you access from Google Drive can’t be restored to your LINE app on iPhone. Therefore, When you want to check LINE chats, you need to open the Google Drive app and check the LINE chats from there.


 Step 2:
 Read also:
  Step 2:
 Step 3:


 Step 3:
 Step 4:
 Step 5:
 Step 6:
 Step 7:
 Step 8:
 Step 9:
")


?")
 Step 1:
 Step 4:
 Step 5:
 Step 7:
 Step 8:
 Step 9:
 Step 3: Select ‘Add reel to your story’.
 Step 4: Tap the ellipses (three dots) at the top right corner of the screen.
 Step 5: Select ‘Save’.
 Step 6: Hit back and discard the Story.
The Instagram Reel will be downloaded to your Android Phone’s gallery.
Step 6: Hit back and discard the Story.
The Instagram Reel will be downloaded to your Android Phone’s gallery.
 Step 2:
 Step 5:
 Step 6:
 Step 3: Go to
  Step 4: Paste the Reel URL in the box and hit ‘Download’.
 Step 5: Click on the ‘mp4’ icon.
 The Instagram Reel will be saved on your device. If you are using this online tool on your Android smartphone, make sure you open the ‘Desktop Website’ on Chrome.

 Go to the Phone Transfer tab in the MobileTrans interface and then click on Phone to Phone.
Step 3: Connect the Two Devices to the Computer
Go to the Phone Transfer tab in the MobileTrans interface and then click on Phone to Phone.
Step 3: Connect the Two Devices to the Computer
 You can now plug both phones into different USB ports in your computer. Once that’s done, check on the screen to see if both devices are being displayed properly.
Step 4: Complete the Phone to Phone Transfer
All you need to do now is check the data types that will be transferred – you can uncheck anything that you don’t need. Prior to that, see if the source device is on the left side; if not, you can use the Flip button to interchange their positions.
You can now plug both phones into different USB ports in your computer. Once that’s done, check on the screen to see if both devices are being displayed properly.
Step 4: Complete the Phone to Phone Transfer
All you need to do now is check the data types that will be transferred – you can uncheck anything that you don’t need. Prior to that, see if the source device is on the left side; if not, you can use the Flip button to interchange their positions.
 Finally, click Start and wait for the success message to appear. Depending on how much data you have on the old device, this should take a few seconds to a few minutes. You can unplug your phones from the computer once you see the final confirmation message.
 In this step, launch the app on both devices, then select Old Phone and New Phone in the respective devices.
Choose the transfer option called QR code on the new phone, and then scan this from the old phone using the MobileTrans app.
Step 3: Establish Connection and Transfer Selected Data
In this step, launch the app on both devices, then select Old Phone and New Phone in the respective devices.
Choose the transfer option called QR code on the new phone, and then scan this from the old phone using the MobileTrans app.
Step 3: Establish Connection and Transfer Selected Data
 On the old phone or source device, select the items (data types) that you want to transfer and hit the Send button.
 Wait for the success message to appear on the target device (the new phone) and then close the apps once you see that.