

In This Article
Quick Cursor
 With a massive 6.8-inch display, the Samsung Galaxy S23 Ultra is one of the biggest phones around. While big phones are certainly the norm when it comes to flagship products, some users may find it hard to use them with one hand. Reaching the top edges of the phone with your thumb without registering an accidental touch can be a tough ask at times. Quick Cursor solves this problem by offering one-handed accessibility with the help of a computer-like cursor. All you need to do is swipe from one edge of the screen and use the tracker to access contents on the farther end of the screen.
Samsung Good Lock
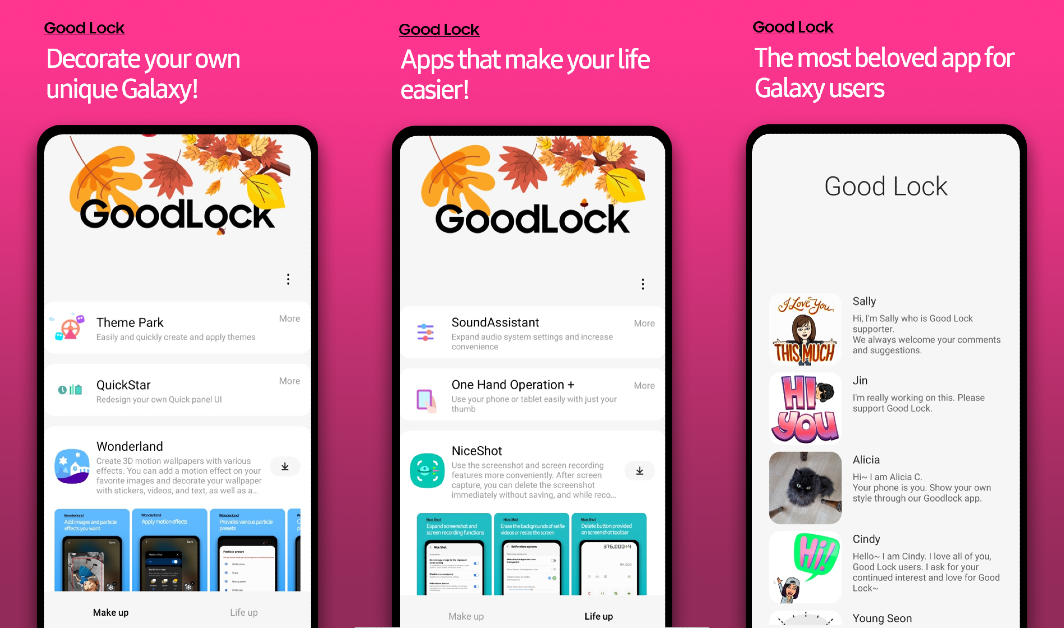 Samsung’s very own Good Lock is the one app you need to unlock the true potential of your Galaxy S23 Ultra. With Good Lock, you get tons of customisation options that significantly elevate the user experience. One of our favourite features of this app is ‘Edge Touch’. If your Samsung Galaxy S23 is too big for your hands and you accidentally keep hitting its curved edges, this feature lets you manually add ‘edge zones’ that are the most vulnerable to those touches.
Snapseed
 You’ve probably already heard about the S23 Ultra’s impressive 200MP primary rear lens. Some users may be getting the smartphone for the cameras alone. While we’re still awaiting what the 200MP camera is capable of doing, we’re pretty certain you’d want a great photo editing app to along with it. Google’s Snapseed app offers a wide array of photo editing tools that give you greater control over the final product. The app’s interface makes it easy to navigate and the tools are very accessible to the average photography enthusiast.
Material Notes: Colourful Notes
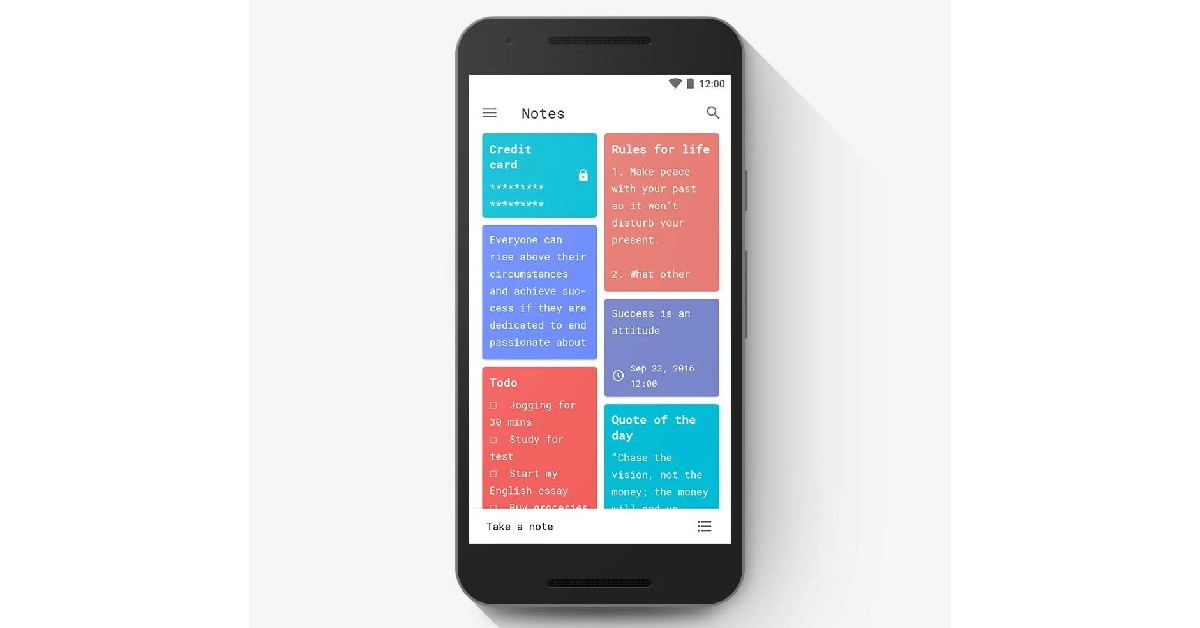 The Samsung Galaxy S23 Ultra comes with a stylus that works pretty well for taking notes, among other things. While the native Samsung Notes app works fine to jot down a quick note, Material Notes takes the entire experience one level higher. You can choose a colour theme for your note and even stick it to the home screen and protect it with a pin. Material Notes offers a very pleasant interface and extensive options to customise your notes. This includes multiple font options and different colour themes. Easily one of the top 12 apps for your Samsung Galaxy S23 Ultra.
Always On: Edge Music Lighting
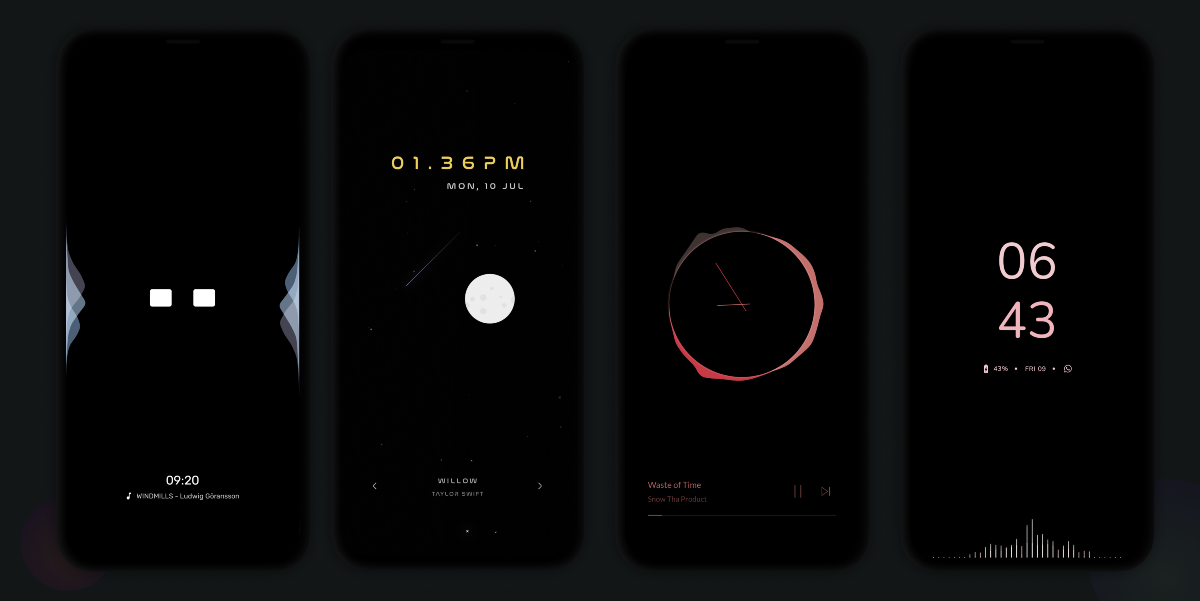 This music companion app displays a stunning visualiser on your smartphone’s curved edges whenever you play music on the device. It also offers unique AOD screensavers that offer something more than the generic ones that come pre-installed on your phone. There are a bunch of customisation options on offer. You can use them to add a splash of personality to your device and make it stand apart from the rest.
Sketchbook
 The stylus on your Samsung Galaxy S23 Ultra can be used for more than just taking notes. The pen offers a very low latency which makes it ideal for amateur and professional digital artists. If you dont want to carry your tablet around everywhere, you can always use your S23 Ultra to bring a sketch idea to life. The Sketchbook app is very popular among artists and offers a wide range of tools for you to play with. These include a wide range of highly customisable brushes, guides, rulers, and stroke tools.
Apex Legends
 If you’re not using your Samsung Galaxy S23 Ultra to run some high-end games then you’re really letting its potential go to waste. The S23 Ultra is powered by the newest Snapdragon 8 Gen 2 SoC, and it has now been confirmed that the European version of the phone will be equipped with this processor as well. Previously, Samsung used its own Exynos process for the European variants of the S22 series. The S8G2 SoC has already been garnering high praise for its excellent performance and high benchmark scores. What better way to test its limits than playing the graphically demanding Apex Legends? This FPS game offers legendary character-based gameplay, best-in-class squad battles, and fast-paced combat.
Pocket: Read. Save. Grow.
 If you like to read while on the go, there is no app we would suggest more than Pocket. Pocket makes it incredibly easy to save articles, blogs, news items, videos, and other web content so you can view them later. The app offers a very clean and clutter-free reading experience. Don’t have the time to read an engrossing article you came across online? Save it in Pocket and read it while you’re commuting to work. You’d be surprised at the versatility of this app and the different formats it can save. You can even save Twitter threads on Pocket and read them whenever you want.
Universal Copy
 Universal Copy is another nifty app that is very easy to incorporate into your daily usage. Ever wanted to copy a caption on Instagram but couldn’t? That’s because certain apps don’t allow users to copy the text on their platform. You can easily bypass this problem by using the Universal Copy app. You don’t even need to launch this app every time you need to copy something. Just give it the necessary permissions and simply turn on the Universal Copy mode from your S23 Ultra’s notification bar.
Zedge
 Zedge lets you download full HD and 4K wallpapers for your smartphone. The app contains a large library of eye-catching wallpapers and themes that bring the best out of your phone. This is a must-have app for people who love to customise their smartphones. On top of wallpapers, the Zedge app also offers free ringtones, alarm tones, and stickers.
Stellarium
 If you’re interested in astronomy or just stargazing in general, Stellarium is one app you should have on your smartphone. If the name Stellarium sounds familiar, it’s because it is already a massively popular open-source astronomy software for desktops. The smartphone app is just as good. Stellarium uses GPS to map out the sky above your current location and gives you detailed information about all the celestial objects in the night sky. You can use the free version of the app to overlay information on the night sky using AR. The Stellarium Plus app is also capable of controlling the scope of a telescope.
Manual Camera: DSLR Camera Pro
 If you want to unlock the true potential of the 200MP lens on your Samsung Galaxy S23 Ultra, we highly recommend the Manual Camera app. While the Pro version costs Rs 330, there is also a ‘Lite’ version you can download for free on the Google Play Store. Manual Camera gives you total control over the raw power of your phone’s camera. You can control the ISO, shutter speed, exposure, and manual focus of the camera, among other things. If you’re a professional photographer or even an enthusiast, we believe the features offered by this app justify its price tag.
Read Also: Oppo Reno 8T 5G confirmed to launch in India on February 3
If you want to unlock the true potential of the 200MP lens on your Samsung Galaxy S23 Ultra, we highly recommend the Manual Camera app. While the Pro version costs Rs 330, there is also a ‘Lite’ version you can download for free on the Google Play Store. Manual Camera gives you total control over the raw power of your phone’s camera. You can control the ISO, shutter speed, exposure, and manual focus of the camera, among other things. If you’re a professional photographer or even an enthusiast, we believe the features offered by this app justify its price tag.
Read Also: Oppo Reno 8T 5G confirmed to launch in India on February 3


 Step 2:
 Step 3:
 Step 4:
 Step 5:
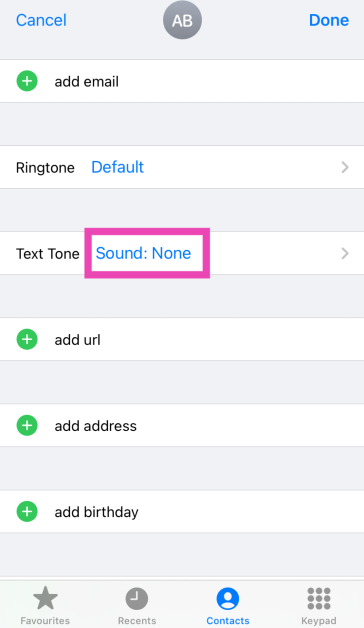 Step 3: Assign the contact a tone.
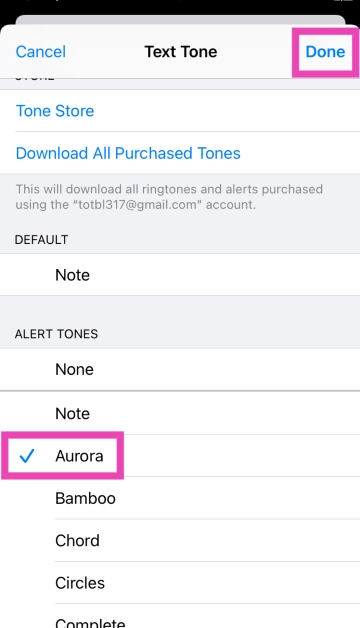 Step 4: Hit Done.
 Step 3:
 Step 2: Tap on Text Message Forwarding and turn off its toggle switch for all devices.
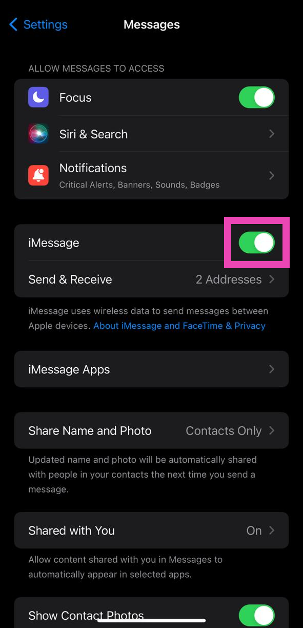
 Step 2: Turn off the toggle switch next to iMessage.
 Step 3: Turn the toggle switch back on.

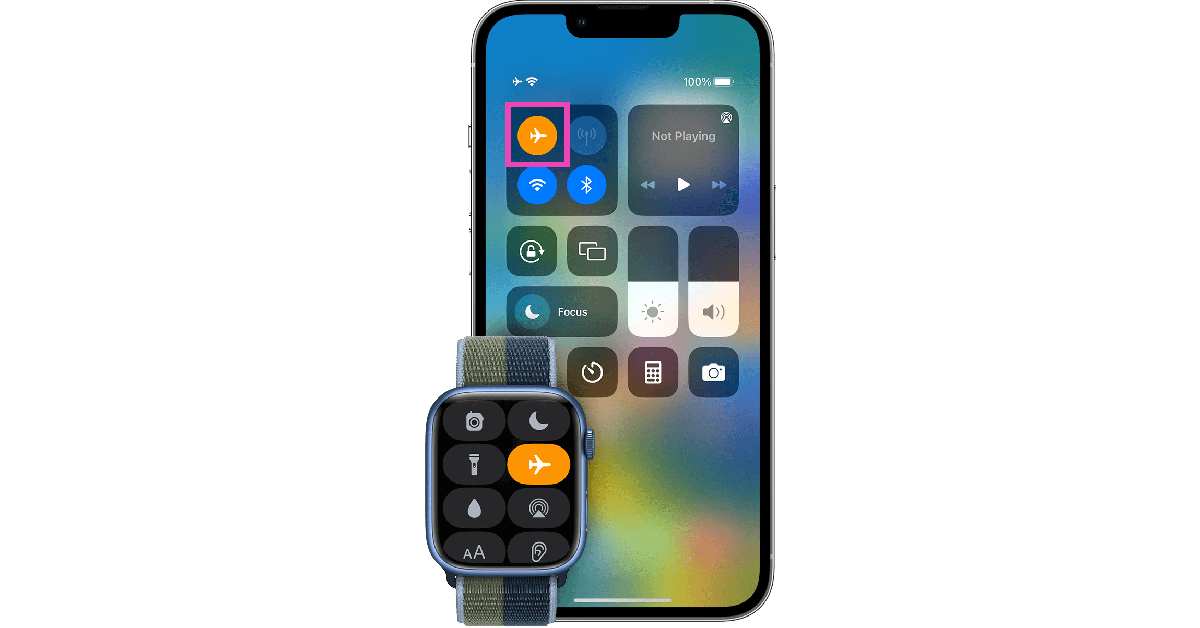
 If you forgot to disconnect your iPhone from your AirPods or any other Bluetooth audio device, you will not be able to hear any notifications or alerts on your phone as long as it is connected to the device. Always make sure there are no active audio devices connected to your iPhone. To disconnect a device, use the Bluetooth tile from the Control Centre.
 One of the best functions of the Apple Watch is that it notifies you of any incoming messages and lets you view them on your wrist. However, sometimes a software glitch can cause this function to mute the notifications on your iPhone. Until this glitch is fixed, it is a good idea to disable text notifications on your Apple Watch. Launch the Watch app on your iPhone, tap on Notifications in the My Watch tab and disable them for the Apple Watch.
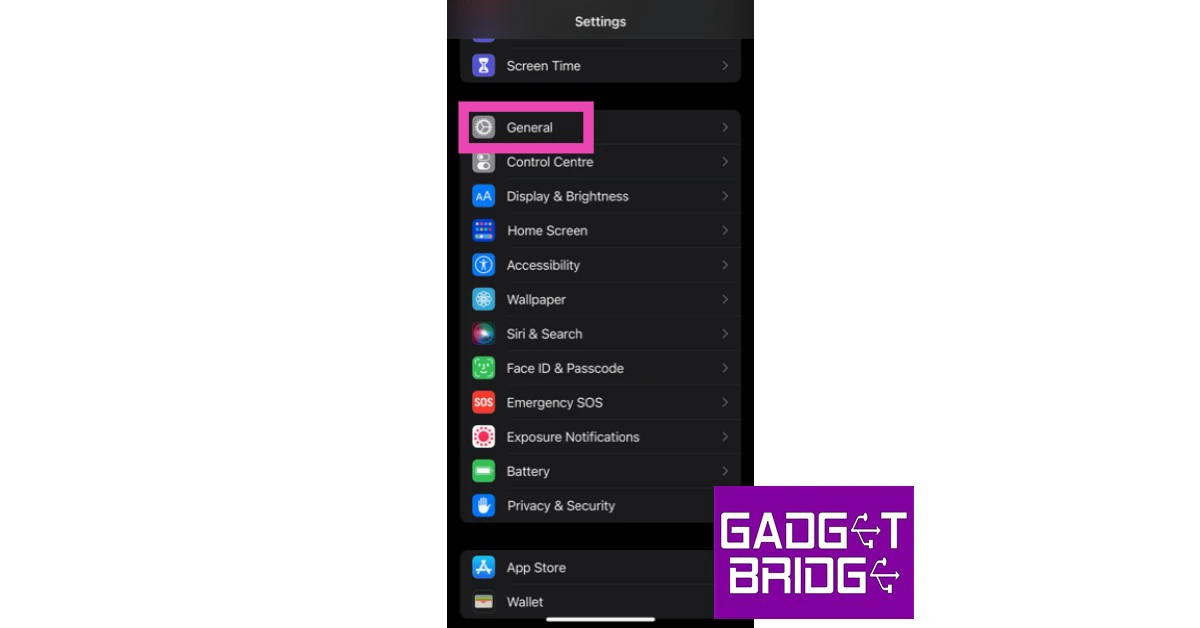
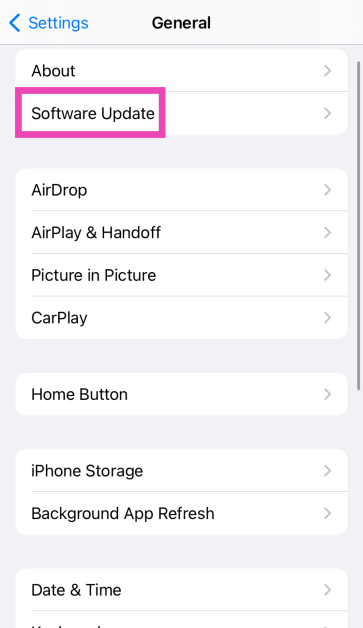
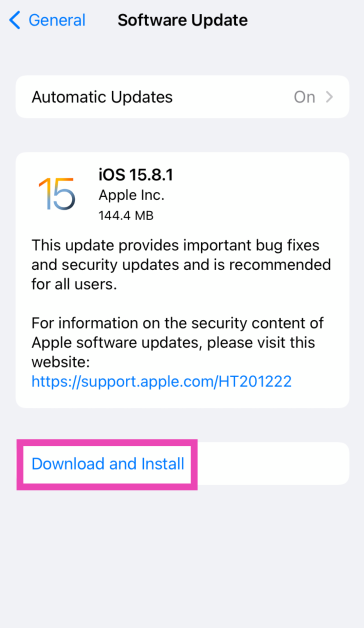
 If you’re using an older version of iOS, it is possible that the bug in the software that is causing this issue has now been resolved. Update your phone’s OS to the latest version in order to fix this issue. Go to Settings>General>Software Update to install the latest version of iOS.


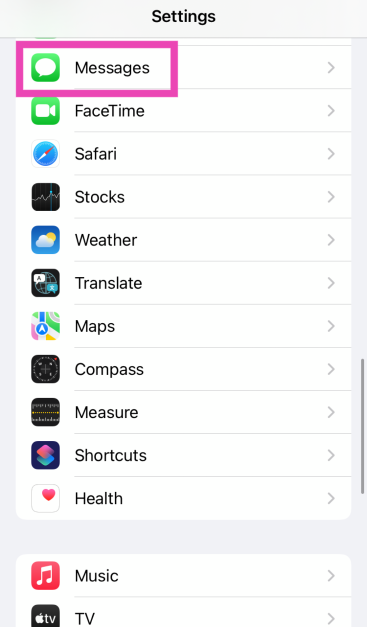
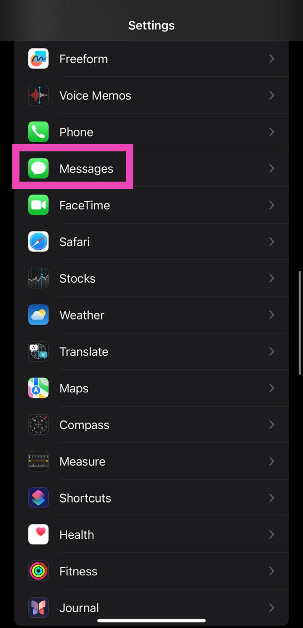
 Step 1:
 Step 3:
 Step 5:
 Read Also:
 Step 3:
 Step 3:


 Step 3:
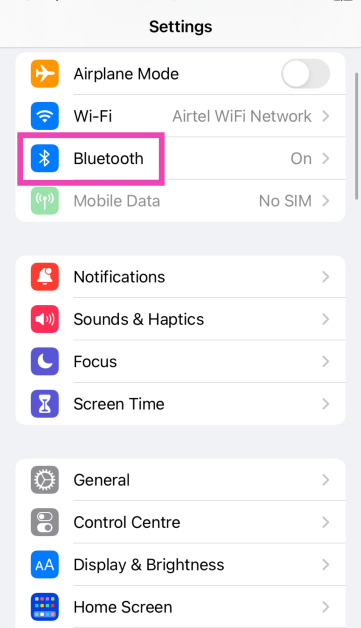 Step 2: Turn on the toggle switch for Bluetooth.
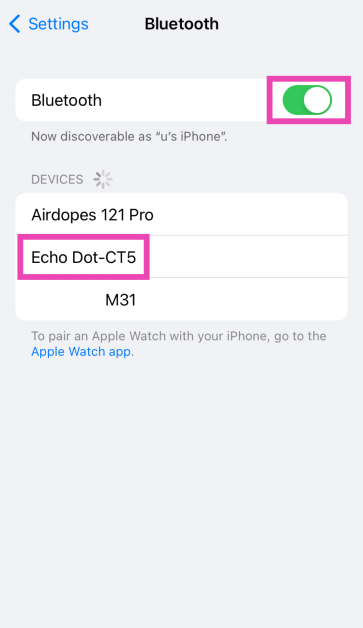
Step 3: Your iPhone will search for nearby devices.
Step 4: Select your Echo device from the list.
Step 2: Turn on the toggle switch for Bluetooth.
Step 3: Your iPhone will search for nearby devices.
Step 4: Select your Echo device from the list.
 Step 5: Once the two devices are connected, go to the YouTube Music app on your iPhone and play the song you want.
 Step 3:
 Step 4:
  Step 5:
")
 Step 2:
 Step 3:
 Step 2:
 Step 3:
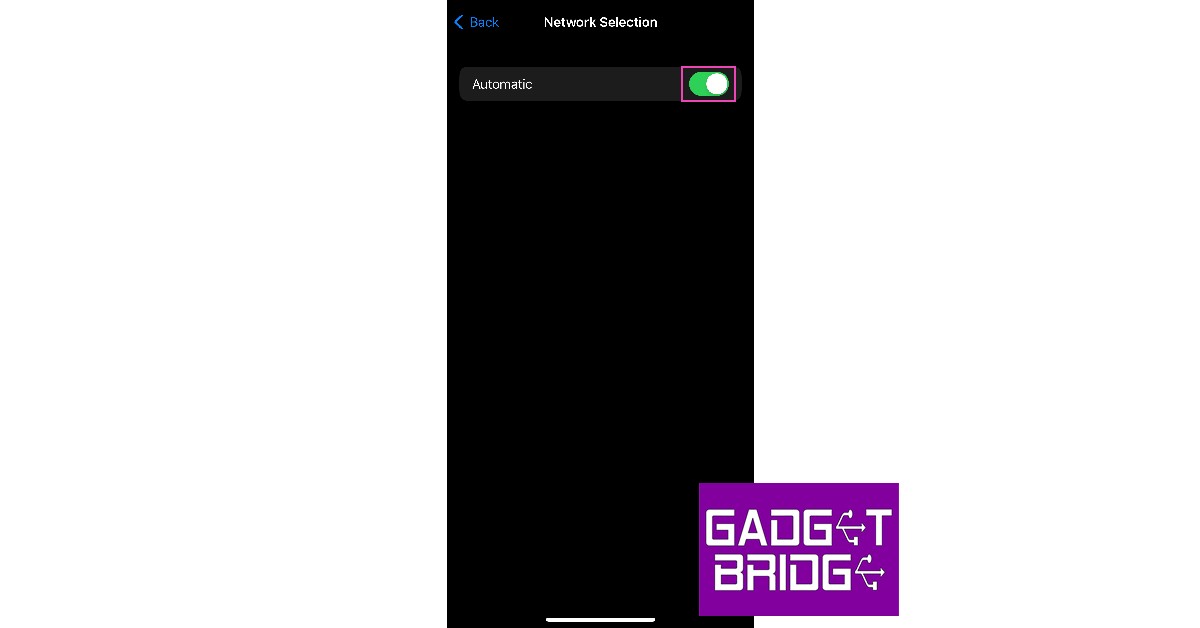
 Step 4:
 Step 2: Scroll down and select ‘Transfer or reset iPhone’.
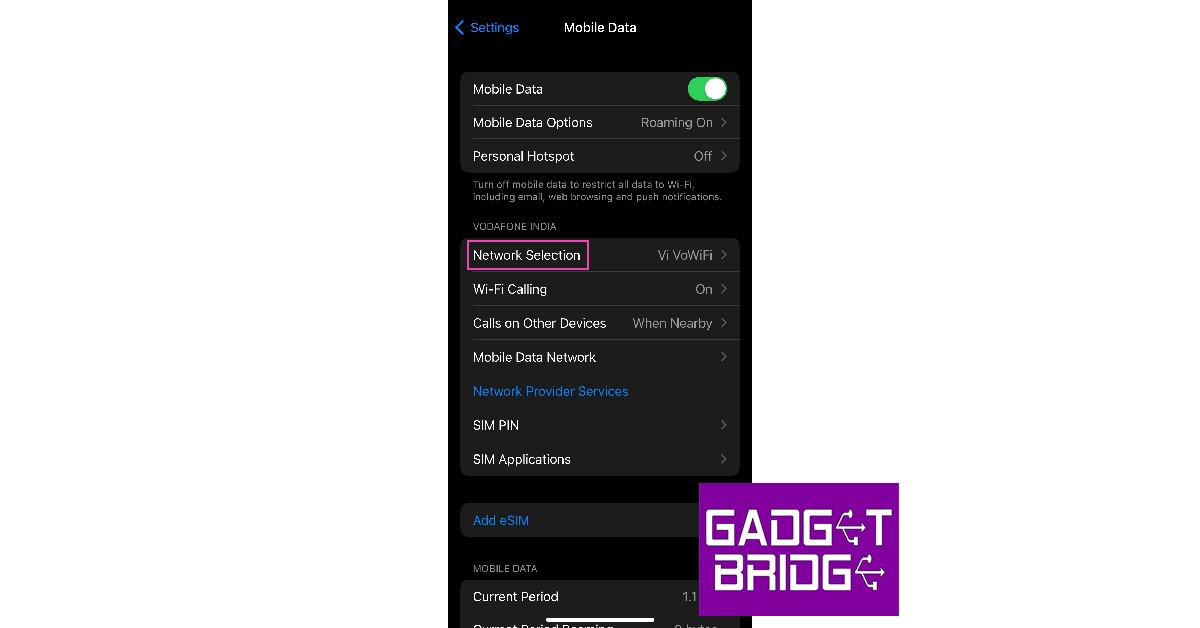
 Step 3: Select ‘Reset’ followed by ‘Reset Network Settings’.

 Reinserting the SIM card on your iPhone is a good way to manually reset the network. If the methods mentioned above do not work for you, this could be worth giving a try. Sometimes a SIM card may shift its position when your iPhone absorbs an impact. This fix will take care of it. Once you take out the SIM card, inspect it for any physical defects and then reinsert it into your iPhone. SIM cards rarely ever develop any physical issues, but sometimes network providers phase out SIM cards that are decades old. If this is the case, your network provider will issue you a new SIM card with the same phone number. Skip this step if you are using an eSIM on your iPhone.


 Step 3:
 Step 5:
")
 Step 2:
 Step 3:

 If you don’t want to switch off your iPhone while charging, the next best thing you can do is turn on the Airplane Mode. Receiving a cellular network all the time consumes a lot of power on your device. The power consumption increases when you use the 5G network for streaming videos or just browsing the internet. Turning on Airplane Mode ensures that you don’t use the battery faster than it is being charged.
 Turning on Low Power Mode on your iPhone cuts down the battery drain by limiting certain tasks. Once it is turned on, the display brightness, refresh rate, and some visual effects will be dialled down. Features like Auto Lock, background app refresh, and automatic downloads will also be disabled. This ensures that your iPhone doesn’t consume power faster than the incoming charge. When the Low Power Mode is turned on, the battery bar turns yellow.

 Sometimes, the external case covering your iPhone can cause its temperature to rise. This is more likely to happen when the surrounding temperature is high. Taking off the case lets your iPhone cool down faster. While charging, the battery inside your iPhone can get warmer, leading to a simultaneous loss of charge. Take off the case to keep the iPhone’s temperature in check and boost its charging speed.

 Step 3: Select Software Update.
 Step 4: Tap on Download and Install.

 Step 2:
 Step 3:
 Step 4:
 Step 3:
 Step 4:

 Step 3:
 Step 4:
 Step 3:
 Step 3:
 Step 4:


")
 Step 2:
 Step 3:
 Step 4:
 Step 4:
 Step 5:
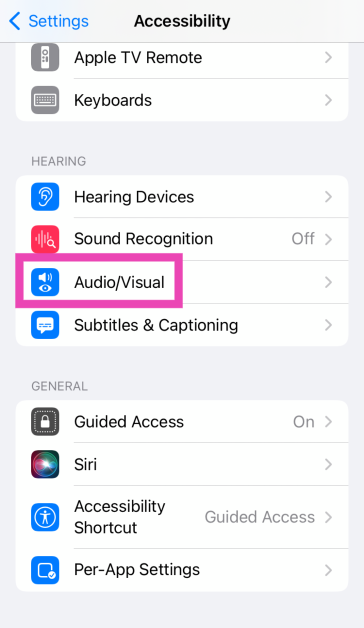
 Step 2: Scroll down and tap on Audio/Visual.
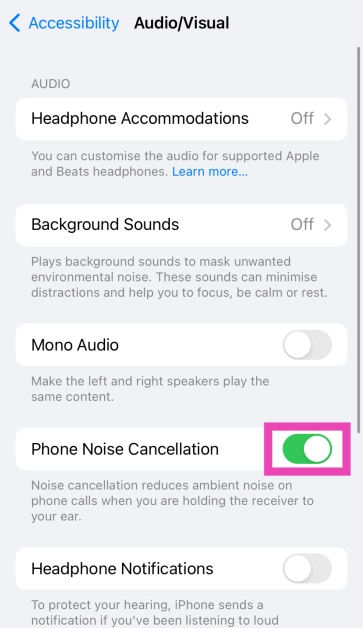
 Step 3: Turn off the toggle switch for Phone Noise Cancellation.
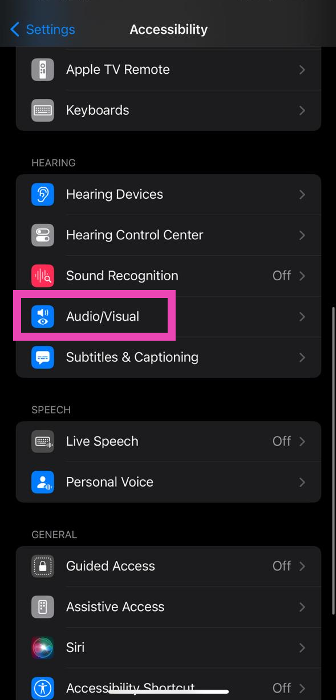
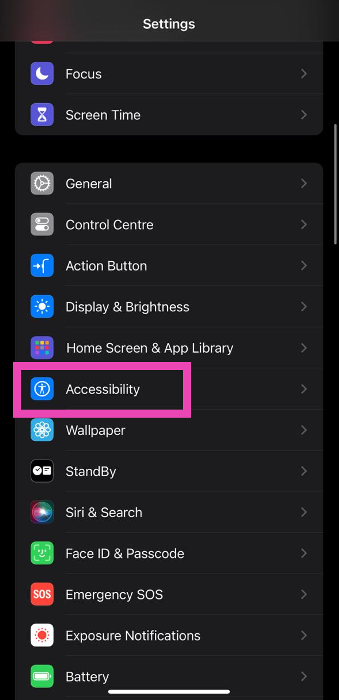 Step 2: Select Audio/Visual.
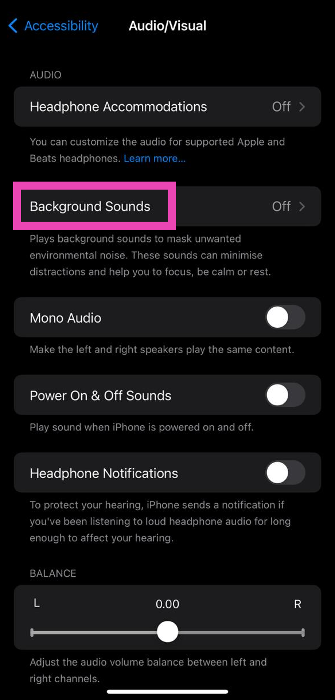
 Step 3: Tap on Background Sounds.
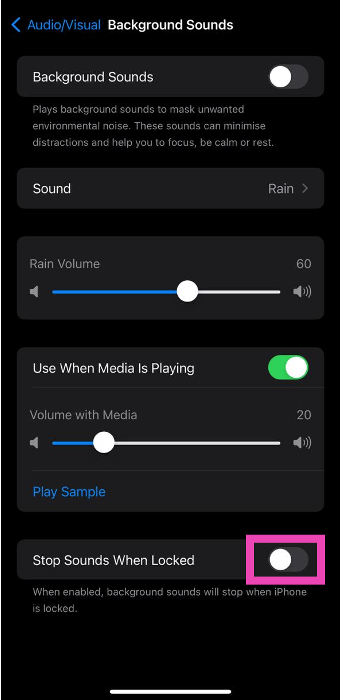
 Step 4: Turn off the toggle switch for Stop Sounds When Locked.
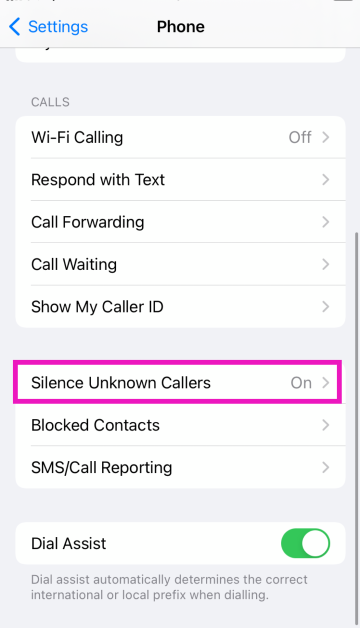
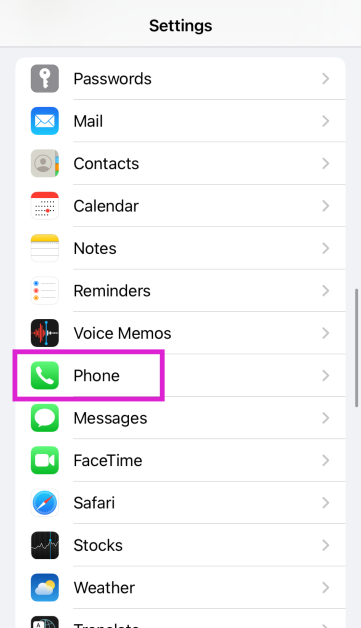 Step 2: Scroll down and tap on Silence Unknown Callers.
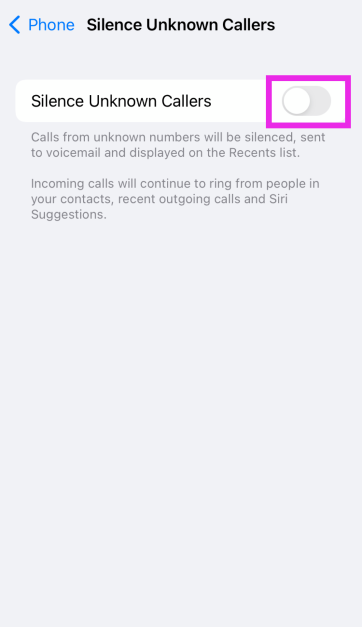
 Step 3: Turn off the toggle switch.

 Step 2:
 Step 3: