Acer has upgraded its Gaming portfolio with the launch of the Acer Predator Helios 16 professional gaming laptop in India. The machine comes equipped with a 13th Gen Intel Core i9 processor. It also includes NVIDIA GeForce RTX 4080 Series GPU. Furthermore, there is a 16-inch IPS display that supports a 240Hz refresh rate. It also includes an FHD camera and a Mini LED per-key backlit keyboard. For more details keep on reading.
Acer Predator Helios 16 price in India
Acer Predator Helios 16 has been launched in India at Rs 199990. The gaming laptop will be available for purchase via store.acer.com and Acer Exclusive Stores.
Acer Predator Helios 16 specifications
Acer Predator Helios 16 features a 16-inch IPS (In-Plane Switching) display with a WQXGA resolution of 2560 x 1600. It offers 500 nits of brightness with a 240Hz refresh rate. It also includes Acer ComfyView LED-backlit TFT LCD technology that keeps the display crystal clear even in brightly lit environments. The laptop is powered by up to 13th Gen Intel Core i9 processor having 24 cores, made up of up to eight performance cores (P-core) and 16 efficient cores supporting DDR4/DDR5 and PCIe 4.0/5.0. It also includes NVIDIA GeForce RTX 4080 Series GPU with 175W MGP, up to 32GB of 5600MHz DDR5 memory, and high-speed PCIe storage.
The Acer Predator Helios 16 includes 5th Gen AeroBlade 3D fans, vector heat pipes, and liquid metal thermal grease, ensuring seamless performance even during extended gaming sessions, without encountering any heat-related issues. One can also customise the per-key RGB backlit keyboard with Mini LED backlights. The company recommends using PredatorSense software to further tailor the RGB lighting to your preference.
The Acer laptop further comes with an Intel Killer E2600 Ethernet Controller, Intel Killer Wi-Fi 6E AX1675i, full range of USB 3.2 Gen2, including two Thunderbolt™ 4 USB-C ports HDMI 2.1 and a Micro SD Card reader.
Lastly, the gaming laptop has a customisable thermal deco, FHD camera and DTS:X Ultra sound ecosystem. It uses liquid metal thermal grease so that the laptop stays cool even during heavy gaming sessions.
Nothing might be a young company, but they have come a long way in a short period of time. More so because they are listening to what the customers are saying. They are regularly hearing the social media chants and otherwise banter, including ours, to make their devices better. After Nothing Ear (1), the company is out with Nothing Ear (2), which we got over for an assessment. We took them through our rigorous test bench and this is the Nothing Ear (2) review you need to read before purchasing.
Let’s first address the elephant in the room. So, the second iteration of the Nothing Ear are very similar to the first one and consumers can easily mistake them for the previous edition. For a moment, even we did. But when you look closely, you will find subtle yet good differences. For starters, both the Nothing Ear (2) and its case have become smaller and lighter. But does that mean they also have a lesser battery? We shall find out in the next section, for now, let’s talk more about its form factor.
Packaged in an eco-friendly cardboard outer package, you get a transparent charging case in which the Nothing Ear (2) lie, magnetically cocooned in their respective hollows. The lid of the charging case also slams shuts into place using a magnet, which has a nice thud to it when shut. The façade is very similar to the previous edition, except the charging case’s battery now protrudes out from the bottom. Again, to keep its weight low and to sport a smaller design, this has been done. We thought the case might wobble on a flat surface due to this, but it does not.
Moving to the build of the Nothing Ear (2) audio ear plugs, you get a smaller transparent stem on each with white audio driver enclosures and white silicon tips. Users also get additional silicon tips in the box to fit into different ear cavities. For us, the default ones were just fine. We quite liked what we saw and these half-transparent earphones sure look yummy for the taking. Each earpiece has multiple microphones to keep the noise out up to 40-decibel levels. More on that a little later.
Consumers also get a strung USB Type-C charging cable in the box. To connect it to any charger, users can use the supplied USB Type-C charging port located on the charging case, which also has the BlueTooth pair button next to it. Also, on this case, there is a LED light indicator, which supports different functionalities, like when you are connected to a device or when it is in pairing mode etc.
Let’s move to the fun part — its resonance. Each Nothing Ear (2) earphone hides an 11.6mm audio driver to provide exquisite sound. Download the Nothing X app from the Play Store, turn on the BlueTooth on the smartphone and head straight into the setup. It will take about 5-10 mins for the initial setup, but it is worth the wait. The app will take into consideration a few factors and accordingly set a sound that is best suited for you.
For us, we love a more bassy setup. If you do not like what the app has to provide (which we doubt) you can also head into the equaliser part of the app and play around with different modes. And there are 4-5 of them. We loved every beat the Nothing Ear (2) provided us with. These are spectacular in the resonance department and we were not expecting the brilliant thump they provide. The bass can put some of the over-the-ear headphones to shame.
We listened to quite a few tracks we are drooling over these days and when we tuned into them with the Nothing Ear (2), we heard newer never heard before beats in the same songs. Jaws Dropped!
After we collected ourselves back up by just getting a great music beat down, or up, whatever you want to call it, we charged towards the gaming section of our smartphone. We turned on the low lag mode in the Nothing X app and it did manage to reduce the sound lag by quite a few milliseconds. Overall, the gaming experience was not bad either with the Nothing Ear (2).
The Nothing Ear (2) come with Active Noise Cancelation (ANC), too. You get three modes (off, transparency and noise cancellation) which can be accessed using the app. The ANC can also be controlled by pinching and holding the stem of the earphones. Talking about which, there are pinch controls on the Nothing Ear (2) as well.
You can triple or double pinch to skip back or forward a track, single pinch to play/pause a track or answer or cut a call. 9 out of 10 times these worked as marketed. However, you cannot control the volume with them. For that, you would need to bring out the smartphone.
Moving to the battery life of the Nothing Ear (2), these sport a 33mAh battery in the earphones and an additional 485mAh battery in the case. The company says you can get 6.3 hours of battery from the earbuds and 36 hours of additional playback with the charging case (ANC off).
This is more or less right. We were able to squeeze in 5.75 hours of playback and got another 33 hours using the charging case. With the ANC turned on we got 3.5 hours of music playback from the earpieces and additional 20 hours from the charging case. This, overall, is not bad coming from such a small contraption.
Talking a little bit more about the Nothing Ear (2), the earphones have an IP54 rating for water and dust resistance and the case has an IP55 rating. The case also supports wireless Qi charging of up to 2.5w. Over that, these also support multi-device connectivity. You can pair them with your mobile phone as well as the laptop at the same time enabling you to take calls and listen to music from the laptop without switching Bluetooth. Lastly, Bluetooth version 5.2 is what these earbuds use.
Verdict
So, it all bubbles down to if at Rs 9,999 are the Nothing Ear (2) worth buying? That is an astounding yes. You get exquisite sound, good ANC, lightweight, good looks, IP rating and also wireless charging. These are a well-packaged set of earphones. If you have a budget of Rs 5-7 thousand for new wireless earphones, we suggest extending it by a few thousand and buy these.
Vivo has expanded its Y-Series portfolio with the addition of Vivo Y100A in India. The device features a colour-changing design which is similar to its sibling Y100. The newly launched smartphone comes in three variants Pacific Blue, Twilight Gold and Metal Black.
Also, there are two camera modules at the back of the phone. In addition to this, the device features a 90Hz AMOLED display. Additionally, it runs on Android 13 with FunTouch OS 13 on top and is powered by Qualcomm Snapdragon 695 SoC.
Vivo Y100A price in India and sale details
Vivo Y100A has been launched in India and the price is yet to be announced. However, the phone is listed on Croma with 8GB RAM and 256GB storage option at Rs 26,999. The handset comes in three colour options – Metal Black, Twilight Gold, and Pacific Blue. It is currently available for purchase via the company’s official online store and Croma in the country.
Vivo Y100A specifications
Vivo Y100 features a 6.38-inch full-HD+ AMOLED display with 2400 × 1080 resolution. The screen of the phone offers 1300 nits of peak brightness. In addition to this, the display comes with 90Hz refresh rate support. The device operates on Android 13-based FunTouch OS 13 out of the box. Under the hood, there is an octa-core Qualcomm Snapdragon 695 SoC with an expandable RAM feature. The device comes in a single 8GB RAM with up to 128GB storage option. The internal memory is expandable via a microSD card.
For photos and videos, the Vivo Y100A features a triple rear camera setup that includes a 64-megapixel primary sensor with OIS support. Additionally, the setup also consists of 2-megapixel sensors along with an LED flash. The device comes with a 16-megapixel front-facing camera for taking selfies and video calling.
The newly launched phone also houses a 4,500mAh battery with support for 44W flash charging. For connectivity, it includes dual-SIM card support, 5G, 4G, dual-band WiFi, Bluetooth 5.2, USB Type-C, GPS, OTG, and 3.5mm audio jack.
OnePlus Pad was launched in India at the Cloud 11 event alongside OnePlus 11 5G and OnePlus 11R 5G. The pricing and availability details of the tablet were not revealed at the time of the launch. The only thing the company disclosed was that it was scheduled to go on sale in April. While there is still no update on this, the expected price and availability details have now surfaced on the web. The screen on the OnePlus Pad is big, and it looks expensive. The 11.6-inch display on the front of the OnePlus tablet has tiny bezels surrounding it.
Tipster Piyush Bhasarkar via Twitter revealed that the OnePlus Pad is scheduled to go on sale between April 28 and April 30. Apart from revealing the potential release dates he also shared information regarding the price of the tablet. According to the tipster the OnePlus Pad is likely to be priced at Rs 23,099 after applying offers. The tablet is expected to cost Rs 30,000 in the country.
In addition to India, the OnePlus tab was also announced North America, Europe and the Middle East.
The OnePlus Pad features an 11.61-inch display with a refresh rate of 144Hz, a resolution of 2,800×2,000, a pixel density of 296 ppi, and a brightness of 500 nits. The device has a 2.5D curved glass, a 7:5 screen ratio, and an 88 percent screen-to-body ratio.
The OnePlus Pad comes with quad-speaker setup that are said to provide an Omnibearing sound field, and depending on how the tablet is held, the speakers can switch between the left and right channels. Dolby Atmos and Dolby Vision are also supported on the tablet. The
OnePlus tablet also comes with a 9,510mAh battery with 67W SUPERVOOC capability, which is said to provide up to one month of standby time. It has an 8-megapixel selfie camera and a single 13-megapixel back camera with an LED flash. In addition to this, the device is supplied with a magnetic keyboard and a stylus.
The Device has 5G cellular sharing with smartphones and comes equipped with a MediaTek Dimensity 9000 chipset, which supports up to 12GB of LPDDR5 RAM. The Tab runs on Android 13 out of the box and should get at least the 2 next OS updates with security updates.
Most Instant Messaging apps these days offer all the communication features you need. You can share images, texts, & locations, and even make payments on some IM apps. One of the underrated features of instant messaging is the ability to send voice notes or voice messages. Voice messaging comes in clutch when you are driving or occupied with some other task that keeps you from texting. While it may seem like a standard feature, every app has its own unique spin on voice notes. In this article, we bring you the best voice messaging apps in 2023.
There is a reason why WhatsApp is the preferred messaging app among Android users. The messaging platform is the be-all and end-all of instant messaging for Android users. From video calls to personal emojis – WhatsApp has it all. Voice messaging wasn’t a part of the app when it first launch, but was later added as the app grew in popularity and tried to beat its competition at every turn. Now that voice messaging has been on the platform for a while, WhatsApp has perfected it entirely.
To begin with, you can listen to voice messages on WhatsApp even when you minimise the app and return to the home screen. This isn’t a common feature in other apps and severely limits your phone’s functionality while playing voice notes. Another helpful feature offered by WhatsApp is switching the audio from the main speaker to the earpiece speaker as soon as you bring the phone closer to your ear. This makes it convenient to listen to your voice notes when you’re out in public.
Voxer Walkie Talkie Messenger
If you’re looking for an app that prioritises voice communication over everything else, you should consider downloading Voxer. With Push-to-Talk integrated into the app, Voxer essentially gives you the Walkie-Talkie experience. You can either have a live chat with someone or simply leave a voice message for them to listen to later.
All voice messages on Voxer are end-to-end encrypted, making it the first walkie-talkie app to offer that feature. Apart from voice messaging, Voxer also allows you to send multimedia and create groups within the app.
LINE
Line is one of the most versatile messaging apps around, offering all the features of a regular messaging app along with features like public profiles, payments and more. You can easily get on a voice call with a group of friends or leave them voice notes for free.
One of the better parts of using Line is that you get a lot of control over how the app looks on your phone. There are a bunch of themes that you can use to customise the app.
HeyTell
Similar to Voxer, HeyTell is also a walkie-talkie app that lets you connect with your friends and family over voice messages. HeyTell also uses Push-to-Talk to carry out instantaneous voice communication. HeyTell has a bunch of privacy features that you can select to choose who is able to contact you.
In order to initiate communication with someone, you will have to accept their invitation first. One of the unique features of HeyTell is that it lets you change your voice with a filter while communicating with the other person.
Zello PTT Walkie Talkie
Zello is primarily a Push-to-Talk voice messaging app that also lets users send messages, images, and locations on its platform. The app has a unique hands-free mode that lets you send voice messages while you’re driving.
Using Zello, you can either talk to a contact privately or join a group voice chat with up to 6,000 users. For workplace and professional teams, Zello is a great app for sending voice alerts.
NuovoTeam
For a more professional setting, NuovoTeam is a great Push-to-talk voice messaging app to connect with your workmates. NuovoTeam makes remote communication more efficient and secure.
With Android compatibility, you can turn any tablet or smartphone on the platform into a walkie-talkie with NuovoTeam. The app lets you broadcast your voice messages to an audience or simply chat personally with a contact.
These are the best voice messaging apps in 2023. WhatsApp users will be pleased to know that the platform is working on a new ‘Audio Chats’ feature that will allow users to listen to ongoing conversations within groups and even jump in to contribute as a speaker. This is similar to Twitter Spaces and Clubhouse.
Dell and Alienware have announced the launch of their first-ever Gaming store in the Indian market. The country’s first Alienware gaming experience centre will be a place for gamers to meet, interact, play, and buy Dell’s newest products while allowing free walk-ins. The “Battle Zone,” is the store’s main attraction which offers a holistic multiplayer gaming experience. Additionally, the Dell gaming store will provide product display, experience, sales, service, and maintenance, providing players with a comprehensive, personalised and intelligent gaming experience.
Commenting on the opening of the store, Rosandra Silveira, Sr. Vice President, Global Channel Sales, Dell Technologies, said, “It’s incredible to see the rate at which the Indian gaming landscape is expanding. Alienware has always been at forefront at reshaping the gaming experience and the new Alienware Experience Store embodies the legacy of the Alienware brand by enabling the use of cutting-edge technology and innovative design elements to create what we refer to as ‘the gamers’ paradise. Providing a completely new entertainment experience, the store will further strengthen our engagement with the Indian gaming community and create quality experiences for all gamers.”
Dell Technologies and Alienware announced the opening of India’s first gaming experience store. This Gaming Store will be located in New Delhi at Nehru Place. Dell Technologies’ executives Rosandra Silveira, Sr. Vice President, Global Channel Sales, and Raj Kumar Rishi, Vice President and Managing Director, Consumer and Small Business, inaugurated the store.
It is a hub for gamers and enthusiasts to meet, interact, and play their favourite games on Dell’s latest devices. According to the company, Store will be offering product display and experience areas, an e-sports game section along with a peripheral and accessories unit to the players.
The Dell Alienware gaming store has a distinctive colour scheme, metallic design, and iconic Alienware features. The store is designed with digital screens that create interesting dynamic content that enables visitors to dive right into an extraterrestrial gaming experience.
As said earlier “Battle Zone,” is the main attraction of the gaming store which enables players to face off with their opponent and test-drive the entire available ecosystem. All these elements are enhanced by clean lines and monochromatic colouring that serve as stark reminders of the Alienware world. In order to provide a cosy ambiance the store has subtle lighting that takes the customer into a futuristic setting.
“Everything is prepared keeping the gamers at the core further creating a complete game ecosystem for them in one place,” the company said.
“Alienware has always been the ‘legacy’ for gaming enthusiasts, and the Alienware Experience Store demonstrates a vigorous ambition for players to experience unique avant-garde style and high-performance gaming equipment. The store will be a hub for e-sports game leagues and community gathering for game developers and enthusiasts alike further demonstrating Dell Technologies and Alienware’s innovation and leadership in the industry”, said Raj Kumar Rishi, Vice President and Managing Director, Consumer and Small Business, Dell Technologies, India.
Garena Free Fire is a battle royale game with regular awards and tournaments to keep players interested. If you play Garena Free Fire, you should be aware of the redeem codes that are released on a daily basis. However, because the battle royale game is banned in India, players from other countries can use the Free Fire Redeem codes daily. If you’re unfamiliar with the Garena Free Fire redeem codes or don’t know how to get them, we’ve put together a step-by-step guide to help you redeem them. Check out Garena Free Fire Redeem Codes for 13 April 2023.
The Free Fire redeem codes are a great way to get free stuff. These are 12-digit codes that contain alphabets and numbers, as well as an expiration date and time. Because the Garena FF redeem codes cannot be used more than once, you should hurry to the redemption page to claim your free reward before someone else does. To get a free reward, all you have to do is go to reward.ff.garena.com/en, which is the official redemption page. Also, keep an eye on this space for daily updates on Garena Free Fire redemption codes and rewards.
Garena Free Fire Redeem Codes Today 13 April 2023
FFCMCPSBN9CU
FFAC2YXE6RF2
ZZATXB24QES8
U8S47JGJH5MG
VNY3MQWNKEGU
NPYFATT3HGSQ
FFCMCPSGC9XZ
MCPW2D2WKWF2
FFIC33NTEUKA
FFBBCVQZ4MWA
UVX9PYZV54AC
BR43FMAPYEZZ
How to Get Free Fire Redeem Codes for Garena on 13 April 2023?
13 April 2023 Amazon Quiz has gone live. Customers from different parts of the country are participating in the daily quiz. The quiz begins from 12 AM to 11:59 PM. Those participating in the quiz can win exciting prizes by answering all the questions correctly. Today participants have a chance to win a Rs 5,000 Amazon Pay Balance.
Amazon quiz brings an opportunity for its customers to win Amazon Pay Balance ranging from Rs 1,000 to Rs 50,000. The Quiz can be played from 12 AM to 11:59 PM. The e-commerce platform brings a fresh quiz on a daily basis which consists of five questions related to general knowledge and current affairs. The participants need to answer all the questions correctly and their names will be selected for a lucky draw. The winner will be announced at the end of the month.
One wrong answer could eliminate you from the quiz. If you manage to answer all the questions correctly you can stand a chance to win a Rs 5,000 Amazon Pay Balance today. Only app users are eligible to participate in the Quiz. Check Out 13 April 2023 Amazon Quiz Answers.
Question 1: In 2023, which nation has the potential to add 15% to the global growth, as per the IMF chief?
Answer: India
Question 2: Which actor is the new Creative Director and TV pitchman for Salesforce?
Answer: Matthew McConaughey
Question 3: Vicky Kaushal recently wrapped the shooting of which film directed by Meghna Gulzar?
Answer: Sam Bahadur
Question 4: What is the closest genetic relative of this animal?
Answer: Camel
Question 5: What ballet performance was this dancer most famous for?
Answer: The Dying Swan
How To Play Amazon Quiz
Only app users are eligible to play the Amazon quiz every morning from 12 AM to 11:59 PM. The quiz is not available on the desktop. For those who are unaware of how to play the Amazon quiz below are the steps, you can follow to take the quiz.
Firstly download the Amazon app from Google Play Store or App Store
Now fill in the required information through the Sign Up option.
You need to log in to the Amazon app and scroll down on the home screen to find the Amazon Quiz banner.
Tap on the Amazon Quiz banner and tap on the Start button to start the Quiz.
Now you will get 5 questions and you need to answer them correctly. One wrong answer will eliminate you from the Quiz.
After answering all the questions correctly you are now eligible for a Lucky Draw.
The winner’s name will be announced today at 12 PM.
Steam’s voice chat feature is a small but underrated feature that vastly contributes to its popularity among gamers. It can get pretty annoying when you are connected on a call but your voice doesn’t get through. There can be several things causing this issue. In this article, we bring you the top 6 ways to fix Steam voice chat if it isn’t working on your Windows device.
Make sure your microphone is set as the default device
Step 1: Right-click on the Volume icon in the taskbar at the bottom of the screen. Select Sounds.
Step 2: Switch to the Recording tab.
Step 3: Select your microphone and set it as the defaultdevice.
Set your Microphone as the default device on Steam
Step 1: Open Steam and select Friends. Click on View Friends List.
Step 2: Click on the gear icon.
Step 3: Click on the Voice section in the side menu.
Step 4: Click on Voice Input Device and select your microphone.
Disable audio enhancements
Step 1: Right-click on the Volume icon in the taskbar at the bottom of the screen. Select Sounds.
Step 2: Switch to the Playback tab.
Step 3: Click on your audio output device and select Properties.
Step 4: Go to the Enhancementstab and click the checkbox for Disable all enhancements.
Step 5: Apply your changes and then click on OK.
Give microphone access to the apps on your PC
Step 1: Go to Settings and select Privacy.
Step 2: Select Microphone from the side menu.
Step 3: Make sure the toggle bar under the Allow apps to use your microphone section is switched on. You can also scroll down and check if the Steam app has individual permission to use your microphone.
Make sure Steam is allowed to record your microphone
Step 1: Log into your Steam account and select Settings.
Step 2: Switch to the Broadcasting tab.
Step 3: Check the box for Record my Microphone.
Step 4: Click on OK.
Make sure you are not signed into your Steam account on any other PC
If you are signed into your Steam account on another PC, it may conflict with the voice chat on your current device. Your account may be accessing the microphone of the other PC, leading to complications on your current device. Sign out of Steam on the other device and restart your current device to fix this issue.
Frequently Asked Questions
How do I enable voice chat on Steam?
To initiate a voice chat with a friend on Steam, simply right-click on their name and select ‘Start Voice Chat’.
How do I fix my voice chat in Steam?
Make sure your microphone is set as default on your PC and on Steam. Also, make sure that Steam has permission to access and record your microphone.
Why is my microphone not working on Steam?
If your microphone isn’t working on Steam, make sure you have disabled all audio enhancements.
These are the top 6 ways to fix the Steam voice chat if it is not working on your Windows device. If the issue still persists after trying these fixes, it is possible that your microphone may be at fault. Try plugging in a new headset or external microphone to check if that’s the case.
YouTube is rolling out a new update that brings Premium features for pro users. It now gives more control and access to ads-free, offline, background play and an uninterrupted music listening experience for premium users of iOS and Android apps. It has released features like smart downloads, enhanced 1080p HD Video, and more
According to the latest blog post, YouTube Premium subscribers are getting a fresh update that brings a number of features for a better user experience. The very first feature is this Queuing videos which allows users to set up videos to watch next without interrupting their current watching session.
Search for videos you need to add to your queue first.
Then click on More next to the video title.
Select Add to Queue.
You can also add videos to your Queue by hovering over the video and selecting Add to Queue.
In order to make sharing easier through Meet Live Sharing on Android devices, Premium members will be able to host Google Meet sessions where all attendees, regardless of whether they are Premium or free users, can watch YouTube videos together. This ability will also be rolled out for FaceTime users on iOS via SharePlay.
Now premium members of Android, iOS and Web app can resume watching YouTube videos wherever they previously left off even as they switch between devices, allowing you to resume watching without missing a thing.
Even when you are not connected to the internet the latest feature Smart Downloads will automatically add recommended videos straight to your library for offline viewing. Even if you forgot to download videos you can always watch them whenever you want.
“With Smart Downloads, while you’re connected to Wi-Fi, we automatically add recommended videos straight to your library, ready for offline viewing. Forgot to download your favourite content before boarding that long flight? Don’t worry! With this feature, you can watch videos on the go, whenever you want, while also discovering new content without the hassle of searching,” YouTube blog post said.
YouTube in the coming weeks will also be rolling out an enhanced bitrate version of 1080p HD video quality starting on iOS (and an experiment coming to the Web soon too.) According to the Video streaming platform users still, be able to access videos in 1080p. Note that in order to access these features one needs to be a Premium Subscriber.
Sony India has officially unveiled its new set of affordable headphones in India. The Sony WH-CH520 headphones have debuted in the country. The headset offers up to 50 hours of battery life and comes with fast charging tech. In addition to this, they are lightweight and comfortable for all-day use. The new headset includes a built-in mic for hands-free calling. The audio device comes with 360 Reality Audio and DSEE. One can also customise music according to their liking with the EQ Custom on the Sony| Headphones Connect App. They can also switch between two devices at once as there is a multipoint connection.
Sony WH-CH520 headphones features
The Sony WH-CH520 headphones come with a Swivel design that allows compact and easy carrying. They have an adjustable headband with padding, soft earpads and a lightweight design for a comfortable and perfect fit. The on-ear headphones by Sony come equipped with 30mm drivers. It also includes DSEE Ultimate for upscaling music in WH-CH520 whether it is Wi-Fi streamed or downloaded.
The Sony headphones have a Multipoint connection that lets users quickly switch between two devices at once. There is a dedicated button for easy operation and can be accessed with a voice command. In addition to this Sony WH-CH520 headphones also allow sound customisations using the equalizer in the Sony Headphones Connect app. It offers several settings to match sound quality with the music genre.
For better call quality Sony WH-CH520 is integrated with beamforming microphones with Precise Voice Pickup technology. The microphones are covered with a newly developed wind noise reduction structure to reduce background noise. They also support the Fast Pair feature, giving you the edge to connect the headphones with your Android device on the go. While the Swift Pair also quickly pair these headphones with Windows 10 computer via Bluetooth. The WH-CH520 provides a battery life of up to 35 hours with Noise Cancelling and 50 hours without Noise Cancelling with quick charging. According to the company, 3 minutes of charge provides 1 hour of playback.
Sony WH-CH520 headphones price and sale details
Sony WH-CH520 headphones have been launched in India with a price tag of Rs 4,490. They come in Black, White, Blue and Beige colour options. The headset will be available for purchase via Sony retail stores (Sony Center and Sony Exclusive), www.ShopatSC.com portal, major electronic stores, and other e-commerce websites in India.
Indian smartphone brand Lava officially announced the launch of a new smartphone in the Indian market. The company has introduced Lava Blaze 2. The entry-level phone comes under the 10k price segment. It includes a 6.5-inch LCD display that supports a 90Hz refresh rate. The budget smartphone is powered by an octa-core Unisoc T616 processor and runs Android 12 out-of-the-box. There is support for RAM expansion as well. The phone also houses a 5,000mAh battery.
Lava Blaze 2 price in India and sale details
The Lava Blaze 2 has been introduced in India in a single 6GB RAM with a 128GB storage option. The phone comes with a price tag of Rs 8,999. The device will be available in three colour options of Glass Black, Glass Blue, and Glass Orange. It is scheduled to go on sale from April 18 via Amazon and other online and offline stores in the country. The sale will begin at 12 noon IST.
Lava Blaze 2 specifications
In terms of specifications, the Lava Blaze 2 features a 6.5-inch IPS LCD display with 720×1600 pixels of resolution. The 2.5D curved screen has a punch-hole cutout to house a selfie camera and supports a 90Hz refresh rate. The budget smartphone runs on Android 12. Under the hood, there is an octa-core Unisoc T616 processor SoC with up to 6GB RAM and 128GB storage. There is a RAM expansion feature that virtually expands the RAM to an additional 5GB. In addition to this, the internal storage can also be expanded via a microSD card.
Lava Blaze 2 comes with a dual rear camera setup that includes a 13-megapixel primary sensor and a secondary 2-megapixel lens. There is an 8-megapixel front-facing camera for taking selfies and video calling.
The Lava smartphone includes a 5,000mAh battery that supports 18W charging. The phone also includes 4G LTE, Wi-Fi, Bluetooth, GPS, and a micro-USB port as well as 3.5mm headphone jack for connectivity. The Lava Blaze 2 also boasts a side-mounted fingerprint sensor, as well as face unlock.
With over 2.7 billion people actively using the platform on a monthly basis, Facebook is, without a doubt, one of the most widely used social media platforms currently available. On the other hand, there are times when Facebook on your smartphone will not load correctly, leaving you feeling frustrated and cut off from your social network. You are not the only person who is having problems with Facebook on their mobile app not loading correctly on their phone. The good news is that there are some straightforward solutions that you can test out which fix Facebook Not Loading Properly problem once more.
In this article, we will go over nine quick solutions that can assist in fixing the problem where Facebook does not load correctly on your mobile device. If you’ve been having issues with Facebook, like slow loading times, errors, or glitches, these fixes should help you get back to using the platform as you normally would.
Cache and cookies are likely to be responsible if Facebook does not load correctly on your mobile device. This is one of the most common causes of this problem. These files are in charge of storing temporary data on your device, which over time, may become obsolete and lead to problems with the application. Clear your cache and cookies in order to bring the app back to life and get it functioning normally again.
Go to Settings > Apps & notifications > Facebook > Storage & cache > Clear cache/Clear storage on an Android device. This will clear your cache as well as your cookies.
Keep the Facebook app up to date
An older version of the Facebook app may also be to blame for your mobile device’s inability to load web pages from Facebook properly. Updates are frequently made available by Facebook in order to address app stability and performance issues. It’s possible that the problems you’re experiencing with the app are due to the fact that you haven’t updated it in a while. It may be possible to resolve any issues that are preventing your Facebook app from loading properly by installing the latest update.
To update Facebook on an Android device, navigate to the Google Play Store, select “My apps & games,” then select “Facebook,” and finally select “Update.”
Check Your Connection to the Internet
If Facebook does not load correctly on your mobile device, one possible explanation is that you have a slow internet connection. If you find that the app loads slowly or gives you errors, it’s possible that the problem lies with the strength of your internet connection rather than the app itself. If the performance of the application is poor, try changing to a different network or restarting your Wi-Fi to see if either of these solutions helps.
On an Android device, navigate to Settings > Network & Internet> Wi-Fi > Connected network > Speed test to check the status of your internet connection.
The Virtual Private Network (VPN) or the proxy server you use may be the source of the problems you are experiencing with the Facebook app. Because of the ability of these tools to change your IP address, it will be more difficult for Facebook to identify your device and location. It may be possible to fix the issue and enable Facebook to load properly on your mobile device by turning off your virtual private network (VPN) or proxy server.
To turn off VPN on an Android device, navigate to the Settings menu, select Network & Internet > VPN, and tap the toggle switch to the off position. To delete the VPN configuration on an iOS device, navigate to Settings > General > VPN > tap the I next to the VPN configuration > and then tap Delete VPN configuration.
Reinstall the application
In the event that none of those mentioned above solutions is successful, there may be an issue with the installation of your Facebook app. Reinstalling the application may be able to resolve any problems that are preventing it from loading in the correct manner. Make sure that you have your Facebook login details and any other important data saved before reinstalling the app, as uninstalling the app will delete all of its data. Reinstalling the app will restore all of its data.
To reinstall Facebook on an Android device, navigate to the Google Play Store, type Facebook into the search bar, and tap the Install button. On an iOS device, navigate to the App Store, then search for Facebook and tap the Get button.
There is a possibility that Facebook will not function properly on your mobile device if the most recent version of the app is not compatible with your handset. If your device is dated, it is possible that it will not be able to manage the most recent features of the app or meet its requirements. Visit the app’s description page on the Google Play Store or the App Store and look for compatibility information to determine if Facebook can run on your device. If your device is not compatible with the app’s most recent version, you may need to upgrade to a newer device that is capable of supporting the app’s most recent version.
Delete all Data from the Facebook App
If deleting the cache and cookies did not solve the problem, you can try erasing the app’s data instead. When you clear the app’s data, all of the app’s settings, preferences, and stored data will be deleted. This can help resolve any problems that may be preventing Facebook from loading properly. Clearing the app’s data, however, will also sign you out of Facebook, so if you want to use Facebook again, you will need to log in again.
On an Android device, navigate to Settings > Apps & notifications > Facebook > Storage & cache > Clear storage to clear the data stored by the Facebook app. To delete the app data for Facebook on an iOS device, navigate to Settings > General > iPhone Storage > Facebook > Delete App Data.
Restart Your Smartphone
There are times when the most straightforward approaches deliver the greatest outcomes. Simply restarting your mobile device can help fix a wide variety of software-related problems, including those that may be preventing Facebook from loading properly. Your device’s memory can be refreshed, and any lingering bugs or errors can be removed if you restart it. After your device has finished restarting, attempt to open Facebook once more to check if it loads correctly.
To restart your smartphone on Android, press and hold the power button until the Power menu appears. On iOS, press and hold the power button until the slide to power off screen appears. Slide the power off button to the right, wait for your device to turn off, then press and hold the power button again to turn it back on. Tap on Restart to restart your device.
Get in touch with Facebook’s Support Team
If you’ve tried all of these solutions and are still having problems with Facebook not loading correctly on your mobile device, it may be time to get in touch with Facebook’s customer support team. A dedicated support team at Facebook is available to assist you with any problems you may be having with the application. You can get in touch with the Facebook support team through the website or the app by going to the Help Center and submitting a question or concern. After that, someone from the Facebook support team will review your request and assist you to help you solve the problem.
In conclusion, Facebook is an integral part of our social lives, which is why it is so annoying and frustrating when it does not function as it must. The solutions we have discussed in this article are all simple and easy to implement; whether it be deleting your cache and cookies, updating the Facebook app, or checking your internet connection, each of these steps can be taken independently.
Always begin with the simplest solutions first before moving on to more complex fixes, as this will ensure the best possible outcome. Keep in mind that you should always keep the Facebook app up to date, and check for software updates on your smartphone regularly. You can ensure that your Facebook app runs without any errors by following these easy steps, enabling you to maintain a steady connection with your loved ones and friends.
Viewing a saved WiFi password on your Chromebook is not a straightforward task. There are a couple of hoops you’ll need to go through. If you’re looking for an easier solution, you should try viewing the WiFi password on your Android or Windows device, given you are connected to the same network. Read this article to find out how you can do that. You can also share the Wi-Fi password with another device directly from your Android phone. Here are all the different ways you can do that. If you’re still intent on viewing the saved WiFi password on your Chromebook, read along to know how you can go about it.
Before you begin, you will need to enter Developer Mode on your Chromebook. This will wipe out all data, profiles, and saved networks on your device. Since all the saved networks will be deleted from your Chromebook, you will only be able to view the passwords that are saved after turning on this mode. Entering Developer Mode on your Chromebook is similar to rooting your Android device.
Here’s how you can enter Developer Mode on your Chromebook.
Step 1: Press Escape, Refresh, and Power Button to boot your Chromebook in recovery mode.
Step 2: Press CTRL+D.
Step 3: Press Enter to confirm you want to enter Developer Mode.
Step 4: Wait for 10-20 minutes. All data will be wiped from your Chromebook as it enters Developer Mode.
Find the saved WiFi Password
Once you start using your Chromebook in Developer Mode, you will be able to view the password of any WiFi network that it is connected to. Here’s how.
Step 1: Press Ctrl+Alt+T. Doing this will allow you to enter Crosh shell.
Step 2: Now, type the following code:
shell
sudo su
cd/home root
ls
Step 3: A string code will appear on the screen. Copy it.
Step 4: Type cd and paste the string code. Press Enter.
Step 5: Now, type the following command:
shill/shill.profile
Step 6: Hit Enter.
Step 7: A list of WiFi networks will appear on the screen. Find the network you want.
Step 8: Look for Passphrase=rot47: below the network. This is the encrypted password.
Step 9: To decrypt the password enter the following command. Replace wifipassword with the encrypted text.
echo wifipassword | tr ‘!-~’ ‘P-~!-O’
The WiFi password will appear on the screen.
Frequently Asked Questions
How do I find my WiFi password on a Chromebook?
To find your WiFi password on a Chromebook you will need to enter developer mode and then access Crosh shell. Use the lines of code mentioned above to view your password.
Is it possible to view my WiFi password on a Chromebook without entering Developer Mode?
No. The only way you can view your WiFi password on a Chromebook is by entering developer mode and then accessing Crosh shell.
Where are the WiFi settings on Chromebook?
To access WiFi settings on your Chromebook, go to Settings>Network>WiFi.
This is how you can view a saved WiFi password on your Chromebooks. Chromebooks are generally very safe devices, which is why there is no straightforward way to view a password. The only downside to this method is that you will lose all your saved data.
Summer is already upon us, and by the looks of things it seems like it’ll be a scorcher. It’s time to get your air conditioners serviced and perhaps look into some more cooling options to beat the heat. You may be surprised by some novelty cooling products out there. Luckily, you don’t have to venture into the depths of the Internet to find what you are looking for. Here are our picks for the top summer gadgets of 2023 that will keep you cool all season.
This mini portable fridge makes a great addition to your desk and your car. With a 5-litre capacity and removable shelves, this fridge can fit up to 2 bottles or 6 cans. The PortaChill requires minimal maintenance since it doesn’t use a compressor or refrigerant gas to carry out the cooling. It comes with an AC as well as a DC outlet which makes it perfect for home and car use. If you’re a slow drinker and like to sip on your drink for hours, this device will help you keep your drink cooled while you’re at your desk!
Gaiatop Desk Fan
Price: Rs 569
This inexpensive desk fan should be on top of your summer buying list. The Gaiatop Desk Fan is USB powered and can be plugged into your desktop, PC, USB outlet in your car, and even a power bank to provide instant cooling. The fan weighs 8 ounces and is portable enough to carry around in a backpack. It can operate at three speeds that can be adjusted with the click of a button. The fan can rotate vertically from 0 to 30 degrees and doesn’t exceed the 50dB noise level even when operating at full blast.
Geeky Portable Handheld Fan
Price: Rs 679
Taking portability to another level, this battery-operated handheld fan weighs just 135g and has dimensions of 9 x 3.5 x 19cm. You can easily carry the Geeky Portable Handheld Fan in your backpack or purse. For days when it gets scorching hot, you can hold this fan against your face for some instant cooling. This device is ideal for when you’re out and don’t have access to a fan or an AC. You can charge this fan using a DC outlet, a PC, or even a power bank. The 1,200mAh battery offers 3-4 hours of battery life. Geeky handheld fan is one of the best portable summer gadgets around.
Daybetter Mini USB AC
Price: Rs 449
While we’re talking about portable cooling options, we cannot leave out this mini desk AC. The Daybetter Mini USB AC can be plugged into any USB outlet (including your laptop or a power bank) for some instant ultra cooling. You can also use this device to get rid of any bad odour in your room by adding some perfume to the bottom tray that holds water.
Kitchenif Digital Ice Cream Maker
Price: Rs 4,263
Ice cream is an essential part of the summer experience. If it is your go-to dessert during the summer, there’s no better way to have ice cream on demand than making it at home! The Kitchenif Digital Ice Cream Maker can make a fresh batch of ice cream in just 25 to 30 minutes. This handy device can also prepare slush, sorbets, frozen yoghurts, and more. The best part about having an ice cream maker at home is that you control all the ingredients and can play around with a bunch of flavours that you won’t usually find in store-bought ice cream. This is one of the best summer gadgets you can buy in 2023.
Aloe Cooling Gel Memory Foam Pillow
Price: Rs 899
Do you find yourself constantly flipping the pillow at night to rest your head on the cooler side? The Aloe Cooling Gel Pillow by The White Willow will make sure you don’t any more. This pillow is available in five sizes: X-Small, Small, Standard, Queen, and King. The different contours give you the option to rest your head on an elevated level or a flat surface. The aloe cooling gel keeps your pillow fresh and cool throughout the night, ensuring a refreshing sleep.
Kuen Pack of 4 Cooling Towels
Price: Rs 2,635
This Pack of 4 Cooling Towels by Kuen is ideal for runners who don’t let the scorching summer sun get in their way. These towels provide instant cooling and can be used as a cooling bandana, scarf, or neckband. All you need to do is soak it in water, wring it, snap it, and let it rest on your body to absorb all the sweat and bring instant cooling. You can easily let this towel rest around your neck while exercising in hot outdoor conditions. While they are not ‘summer gadgets’ in the strictest sense, these towels by Kuen will certainly help you beat the heat.
Hoox Car Smart Cup Holder
Price: Rs 2,009
The Hoox Car Smart Cup Holder will keep your drinks chilled while you’re on the go. Cars can get ridiculously hot during the summer. Even with the AC turned on, your drink can go warm over a period of time. This cooling cup holder by Hoox plugs into your car’s 12V power outlet and gives you the option to keep your drink warm or hot. The inside of the holder is made of an aluminium alloy. You will find different buttons for heating and cooling on the rim of the holder.
Samsung Side-By-Side Refrigerator
Price: Rs 1,13,000
Thinking of upgrading your old refrigerator this summer? It may be time to go big. The recently launched Samsung Side-By-Side Refrigerator has been specifically designed for Indian consumers and comes with unique features like Convertible 5-in-1 FamilyHub and Curd Maestro+. The fridge has a storage capacity of 653 litres and comes in four BESPOKE glass finish colour variants – Clean White, Clean Navy, Clean Pink, and Glam Deep Charcoal. This fridge is WiFi enabled and can be controlled through Samsung’s SmartThings app.
Voltas Split AC
Price: Rs 30,990
This Split AC by Voltas has a 1.4-ton capacity and comes with a decent 3-star energy rating. The noise level doesn’t exceed 46dB which means you can get ultra cooling with bare minimum noise. There are 4 cooling modes on offer that can be controlled through the remote. Annual energy consumption by this AC is 4,600 units, as claimed by Voltas. You get a 1-year warranty on the product and a 10-year warranty for the compressor. There’s an LED display on the AC to monitor the cooling temperature. It also comes with features like anti-dust protection, self-diagnosis, sleep mode, and more.
These are our picks for the top summer gadgets of 2023 that will keep you cool. We’ve made sure to include all cooling options across different price points. Thinking of buying something on this list? Do let us know in the comments!
Last week Apple revealed that its first retail store in India is set to open in Mumbai. It was also speculated that the next Apple Store is likely to open in New Delhi. The company has now officially confirmed that its next Apple BKC Store will be located right in the nation’s capital, New Delhi just two days after the Mumbai debut.
The Apple BKC Store, the company’s first official retail location in India will welcome the public inside, in Mumbai on April 18 at 11 AM IST. It has been revealed that the second retail location in India would open on April 20 in New Delhi at 10 AM IST.
Apple’s first retail store will be located in Mumbai at Jio World Drive Mall. While its second official store in New Delhi will be accessible at Saket. According to the iPhone maker, these latest retail locations mark a significant expansion in India that will offer great new ways to browse, discover, and buy Apple products with exceptional service and experiences for customers.
As mentioned earlier last week the Cupertino-based tech giant revealed the first picture of the store barricade in advance of the opening revealing the iconic Kaali Peeli taxi art. This time the company revealed the barricade for Apple Saket which features a unique design that takes inspiration from Delhi’s many gates, each signifying a new chapter to the city’s storied past. The New Delhi Apple Store looks vibrant with colourful artwork to celebrate its second store in India. Apple fans and users can easily explore the Apple latest product lineup, find creative inspiration, and get personalised service and support from the store’s team.
In advance, the company has also launched custom Apple BKC and Apple Saket wallpapers, specially curated playlists on Apple Music to move to the sounds of Mumbai and Delhi that can be downloaded from apple.com/in/retail/bkc and apple.com/in/retail/saket.
Just days before the company opens the door of its first Apple Store in India to the public in Mumbai, the company announced a special Today at Apple session — “Mumbai Rising” running from opening day through the summer. It is going to be an online-only event where visitors, local artists, and creatives will be brought together with sessions offering hands-on activities with Apple’s products and services that celebrate the local community and culture in Mumbai.
French consumer electronics brand Thomson has announced the launch of 65-inch Google TV in India. The Television is the latest addition to the company’s existing Oath Pro Max series. The Smart TV comes with a bezel-less design. It includes Google TV and Dual Band (2.4 + 5) GHz Wi-Fi for connectivity. There is support for Dolby Vision with HDR 10+ on the Oath Pro Max 65-inch Google TV. In addition to this, there is Dolby Atmos, Dolby Digital Plus, DTS Trusurround with 40W Dolby Audio Stereo Box Speaker. The Thomson Oath Pro Max TV offers 2GB RAM and 16GB ROM.
Thomson Oath Pro Max 65-inch Google TV price in India and availability
The Oath Pro Max 65-inch Google TV has been launched in India with a price tag of Rs 43,999. The device will come with a Rose Gold finish. It will be available for purchase via Flipkart in the country. The TV is scheduled to go on sale from April 13 in the country. Apart from this, the company will also put several Televisions on sale during Flipkart Summer Saving Days which will also begin on April 13 and will go on till April 17. They will be available at attractive pricing during the sale period.
Below is the Thomson TV discounted price list:
FSN
Brand
Model
April BAU
Summer Saving Day Sale
TVSF66GTGDHUNH8T
Thomson
24TM2490
6999
5999
TVSGMGWWZYMMPG83
Thomson
24Alpha001
6999
6499
TVSGMGWWMFGBU8FF
Thomson
40Alpha009BL
13999
13499
TVSGEMQV7R4CMTGA
Thomson
32ALPHA007BL
8999
8499
TVSFUYG8KB8GZAZA
Thomson
32PATH0011
10999
9499
TVSFUYG8YZFZBBRX
Thomson
32PATH0011BL
11499
9999
TVSF66GTBYHHZHAM
Thomson
32TM3290
8499
7999
TVSFUYG8PRFJRFGB
Thomson
40PATH7777
16999
15499
TVSFZAH3GHFXYQYX
Thomson
42PATH2121
17999
15999
TVSG6P49GSVUVVQU
Thomson
43 OP MAX9099
24999
22999
TVSFZAH37T8FCAWK
Thomson
43PATH0009 BL
18999
16999
TVSG6TJEFQMUSQTE
Thomson
43PATH4545BL
20999
19499
TVSG6P49TZXRM2WB
Thomson
50 OP MAX9077
29999
29999
TVSG6TJEE2CH4XGU
Thomson
50PATH1010BL
27999
24999
TVSG6P49DH7HWDHP
Thomson
55 OP MAX9055
31999
29999
TVSG6TJEJBQYGPQ6
Thomson
55PATH5050BL
30999
28999
TVSFT4FJSHYV7ZBE
Thomson
65 OATHPRO 2020
53999
53999
TVSFUYGQTGAHCNTN
Thomson
75 OATHPRO2121
79999
79999
TVSGHADTWZAWZXSF
Thomson
Q50H1000
33999
31999
TVSGHADTWPTJCMP7
Thomson
Q55H1001
40999
35999
TVSGHADTPGMHTJMH
Thomson
Q65H1100
59999
56999
TVSFUYG8VGNNVEAF
Thomson
43PATH0009
18999
18999
TVSFUYGQ7HTRRZHG
Thomson
50OATHPRO1212
27999
27999
TVSFT4FJABVZFRHT
Thomson
55 OATHPRO 0101
29999
29999
TVSFT4FJQ4YYXTKY
Thomson
43OATHPRO 2000
22999
22999
TVSFUYG8ATYPYRJR
Thomson
43PATH4545
19999
19999
TVSFUYG8Y7EEZCSD
Thomson
50PATH1010
24999
24999
Thomson Oath Pro Max 65-inch Google TV specifications
The Thomson Oath Pro Max 65-inch TV comes with a 4K IPS display and a bezel-less design. The screen comes with HDR10+ and Dolby Vision support. It also offers 500 nits of peak brightness. In addition to this, it also includes dual 40W Dolby Audio Stereo Box speakers that also support Dolby Atmos, Dolby Digital Plus, and DTS TrueSurround. The Thomson Oath Pro Max also includes four sound modes: Standard, Sport, Movie, and Music.
According to the company, the Television comes with an in-built Chromecast and Airplay supports 10000 Plus Apps and Games Like Netflix, Prime Video, Hotstar, Zee5, Apple TV, Voot, Sony LIV, and Google Play Store with 500,000 Plus TV Shows.
The Television is powered by an MT9062 processor with Mali-G52 GPU. It offers 2GB of RAM and 16GB of storage. In terms of connectivity, the Smart TV includes Dual-band Wi-Fi, Bluetooth version 5.0, USB 2.0, and HDMI. It also supports Speakers/headphones, Game Controller, Mouse, Keyboard.
Lastly, the Thomson Oath Pro Max 65-inch Google TV also shipped with Google Assistant-enabled remote. It includes dedicated keys for Netflix, YouTube and more.
All of us use or have used Instagram at any given point in time. With over 1 billion active monthly users, Instagram is one of the world’s most widely used social media sites. Instagram’s key feature is the ability to follow other users and view their posts, stories or reels. However, if you have a lot of Instagram followers, it can be hard to tell if someone has started following you. If you are in the same boat of not knowing who is following you, then fret not, today we are going to tell you 2 ways to check if a person follows you on Instagram. Check them out below:
Finding out if an Instagram user is following you is as simple as visiting their profile. You should be able to unfollow that user if they follow you back. If they are not following you back when you don’t have that choice.
To do that follow the below-mentioned steps:
Log in to your Instagram account.
Go to their profile and open it up.
Access the menu by clicking the three dots in the top right of their profile page.
Options will appear on a pop-up menu. You should be allowed to unfollow that user if they follow you.
You can see who you’re following in the “Following” section of your profile, and those who follow you back will be listed in the “Followers” section. So, check to see if the user’s name appears in your list of followers to determine if they are following you back.
Follow the procedures below to Check if a Person Follows You on Instagram:
Login to your Instagram account.
Next, select the profile icon in the lower right corner.
Navigate to your profile and select the “Followers” tab.
Your list of followers will appear.
In the top-right search box, type the user’s name to find them.
It is expected that their profile will show up in the results. If you don’t, they don’t follow your profile.
Conclusion
In conclusion, managing your Instagram followers doesn’t have to be difficult. There are numerous methods for determining who is following you. But let’s not get too engrossed in the numbers game; what matters most is creating a group of engaged, encouraging, and content-loving followers. Therefore, focus on creating posts that accurately reflect who you are and what you care about rather than worrying about how many people follow you.
Garena Free Fire is a battle royale game with regular awards and tournaments to keep players interested. If you play Garena Free Fire, you should be aware of the redeem codes that are released on a daily basis. However, because the battle royale game is banned in India, players from other countries can use the Free Fire Redeem codes daily. If you’re unfamiliar with the Garena Free Fire redeem codes or don’t know how to get them, we’ve put together a step-by-step guide to help you redeem them. Check out Garena Free Fire Redeem Codes for 12 April 2023.
The Free Fire redeem codes are a great way to get free stuff. These are 12-digit codes that contain alphabets and numbers, as well as an expiration date and time. Because the Garena FF redeem codes cannot be used more than once, you should hurry to the redemption page to claim your free reward before someone else does. To get a free reward, all you have to do is go to reward.ff.garena.com/en, which is the official redemption page. Also, keep an eye on this space for daily updates on Garena Free Fire redemption codes and rewards.
Garena Free Fire Redeem Codes Today 12 April 2023
BR43FMAPYEZZ
8F3QZKNTLWBZ
WEYVGQC3CT8Q
FFCMCPSUYUY7E
EYH2W3XK8UPG
UVX9PYZV54AC
X99TK56XDJ4X
B3G7A22TWDR7X
6KWMFJVMQQYG
FF7MUY4ME6SC
NPYFATT3HGSQ
FFCMCPSGC9XZ
MCPW2D2WKWF2
GCNVA2PDRGRZ
4ST1ZTBE2RP9
How to Get Free Fire Redeem Codes for Garena on 12 April 2023?
Amazon is back with another quiz on its mobile platform. The Amazon Quiz is conducted every day for its customers. Customers from different parts of the country are participating in the daily quiz. Today’s Amazon quiz is now live on the Amazon App. The customers who participate in the 12 April 2023 Amazon Quiz will get a chance to win Rs 1,250 Amazon pay Balance.
The Amazon Quiz can be played from 12 AM to 11:59 PM. For those who are unaware of the quiz, the e-commerce platform brings a fresh quiz on a daily basis which consists of five questions related to general knowledge and current affairs. The participants need to answer all the questions correctly and their names will be selected for a lucky draw. The winner will be announced at the end of the month. One wrong answer could eliminate you from the quiz. Only app users are eligible to participate in the Quiz. Check Out 12 April 2023 Amazon Quiz Answers.
Question 1: Who plays Mrs. Chatterjee in “Mrs Chatterjee Vs Norway” and battles the Norwegian government to reunite with her children?
Answer: Rani Mukerji
Question 2: Which singer’s “BZRP Music Sessions Vol. 53” broke the record for the fastest Latin track to reach 100 million views on YouTube?
Answer: Shakira
Question 3: In which city of Uttar Pradesh will the state’s third international cricket stadium be built, following Lucknow and Kanpur?
Answer: Varanasi
Question 4: Where did this breed of horse originate from?
Answer: Iceland
Question 5: This fortress was built by which Renaissance Italian state?
Answer: Tuscany
How To Play Amazon Quiz
Only app users are eligible to play the Amazon quiz every morning from 12 AM to 11:59 PM. The quiz is not available on the desktop. For those who are unaware of how to play the Amazon quiz below are the steps, you can follow to take the quiz.
Smartphones have evolved to the point where they are now an essential component of our everyday lives. We use our smartphones for nearly everything, from watching videos to listening to music, and everything in between. However, there are times when the sound output of our Android smartphones might not be adequate, which can lead to a frustrating experience for the user. It’s possible that you would feel the need for the phone volume booster in these kinds of circumstances.
On an Android-based smartphone, the volume can, fortunately, be increased via a number of different methods. Today, we will go over the top five ways to make your Android smartphone louder. These methods include everything from utilizing the features that come pre-installed on your smartphone to download third-party applications.
When you have finished reading this article, you will have a better understanding of how to maximize the sound output of your Android smartphone, which will allow you to enjoy the music and videos that are stored on your device at a higher volume level. Now that we have that out of the way, let’s get into the top five ways to make your Android smartphone louder.
Way 1: Use External Speakers to Amplify Your Android Smartphone’s Audio While Dusting It Off
Step 1: Adding external speakers is one of the simplest ways to increase the volume on your Android smartphone, which you can do if you are interested in doing so. The sound quality of your device may be improved by using external speakers, which also makes the experience of listening to audio more immersive.
Step 2: It is essential to make certain that any external speakers that you intend to use are clean and free of dust before you begin using them. The sound output from the speakers may become muffled or distorted if dust and debris are allowed to accumulate on the speakers over time. Therefore, before using your external speakers, it is absolutely necessary to brush off any dust that may be present on them.
Step 3: To accomplish this, all that is required is the use of a brush with soft bristles or a cloth made of microfiber to carefully clean the speaker grilles. It is important to steer clear of any liquids or abrasive substances when working with the speakers.
Step 4: After giving your external speakers a thorough cleaning, you can then attach them to your Android smartphone via Bluetooth or an audio cable using one of these two methods. Be sure to adjust the volume levels on your smartphone as well as the external speakers in order to avoid causing any distortion or damage to the speakers on your device.
Way 2: Increase By Volume Button
The next way to make your Android smartphone louder is by using the volume buttons. Adjusting the volume on your Android device is a simple task that can enhance your audio experience.
Step 1: To begin, press either the volume up or volume down button on your device, located on the side of your phone. As you do so, a volume slider should appear on the right-hand side of the screen.
Step 2: Next, tap on the three dots located at the top of the volume slider. This will open the volume menu, which includes four different volume sliders. These sliders are for Ringer, Media, Alarm, and System sounds.
Step 3: To increase the volume of media, such as music or videos, make sure that the Media Volume slider is at its maximum level. You can slide the volume marker all the way to the right to make your Android smartphone louder.
If you’re looking to enhance your audio experience on your Android phone, one of the best ways to do so is by customizing your sound effects. This process is easy and can significantly improve the overall quality of sound on your device.
Step 1: To begin, go to your phone’s settings by either tapping the setting icon or swiping down the notification bar and selecting the setting icon. From there, select the “Sound and Vibration” option.
Step 2: Next, scroll down until you see the “Ear-customized sound effects” option and tap on it. If this feature is turned off, you’ll need to allow it by toggling the switch to the “on” position.
Step 3: Once you’ve enabled ear-customized sound effects, you’ll be prompted to select your age group. This step is essential as different age groups have varying levels of sensitivity to certain frequencies.
Step 4: Select the appropriate age group you belong to ensure that the sound is tailored to your hearing needs.
Way 4: Install Volume Booster
One of the most popular volume booster apps available for Android phones is the “Volume Booster” app, which can be easily downloaded from the Google Play Store. This app is designed to increase the volume output of your device’s speakers and headphones, allowing you to enjoy your audio content at a higher volume without distortion.
Step 1: Install the “Volume Booster” application from Play Store.
Step 2: Now increase the volume as per your preference.
Way 5: Switch to new Headphones
If you have tried all of the software solutions, such as adjusting the volume settings and installing apps that boost the volume, but you still find that the sound output is insufficient, then switching out your headphones might be the solution you need.
Your Android device’s sound quality and volume output can both be significantly improved by upgrading your headphones to a higher-quality set. Because headphones of higher quality are typically designed to handle a wider range of frequencies and to produce a sound that is both clearer and louder, the quality of the headphones that you use can have a significant impact on the sound that is output.
When choosing headphones, you should take into consideration a number of different aspects, including the sound quality, the size and shape of the earbuds or ear cups, and the type of connector. While some headphones, such as noise-cancelling headphones, are built with a particular purpose in mind — for example, to block out background noise — others are created with portability and convenience.
Conclusion
It is essential to keep in mind that while a phone volume booster may improve the sound quality, it may also have adverse effects on your device’s speakers, and in some cases, this may cause damage that cannot be reversed. Because of this, it is extremely important to take extra precautions whenever you raise the volume on your smartphone.
You will be able to significantly improve the audio output of your Android smartphone if you follow the advice and recommendations provided in this article. As a result, you will be able to listen to and watch your preferred music and videos at a volume level that is more satisfying to you.
Amazon’s Audible has been a go-to for audiobook fans for years due to its broad range and original shows. However, some Audible members may be looking to cancel their cancel Amazon Audible membership subscriptions due to the emergence of competing services and the shift in consumer preferences. If you’re one of them, you might be wondering how to cancel your Audible subscription most easily. In this article, we’ll be sharing the best ways to cancel Amazon Audible membership.
Step 1: Sign in using your Audible/Amazon account credentials. If you are not already logged in, visit the Audible website and enter your account details.
Step 2: In the upper-right corner of the homepage, hover over “Hi, (name),” then click Account Details. This link will navigate you to your account details page.
Step 3: Tap Cancel membership beneath the text box containing your current membership details. This link will take you to the page where you can cancel your subscription.
Step 4: Email Confirmation will be sent. Once you have cancelled your membership, Audible will send you an email confirming your cancellation. If you do not receive this email, be sure to contact Audible customer support to ensure that your cancellation has been processed correctly.
Keep in mind that, Audible does not offer a self-service cancellation option yet on its mobile app or website. Cancel Amazon Audible Membership is only accessible when logged into the desktop version of the Audible website from any device. So, whether you’re taking a break from audiobooks or looking for a new provider, be sure to follow these steps to cancel your Amazon Audible membership successfully.
When it comes to utilising AI language models on existing services, Microsoft has been ahead of the curve. In February, the tech giant integrated the Bing AI chatbot into Bing Search, Microsoft Edge, and Skype. Now, users will be able to access the chatbot on the SwiftKey keyboard as well. Using Bing AI on SwiftKey, users can make basic Internet searches, interact with the AI chatbot, and even get it to change the tone of their texts. Here’s how you can enable and use Bing AI on the Microsoft SwiftKey keyboard for Android.
Follow these steps to use Bing AI on Microsoft SwiftKey keyboard
Step 1: Install Microsoft SwiftKey Beta from Google Play Store. This Beta app is different from the regular SwiftKey app that may be preinstalled on your phone.
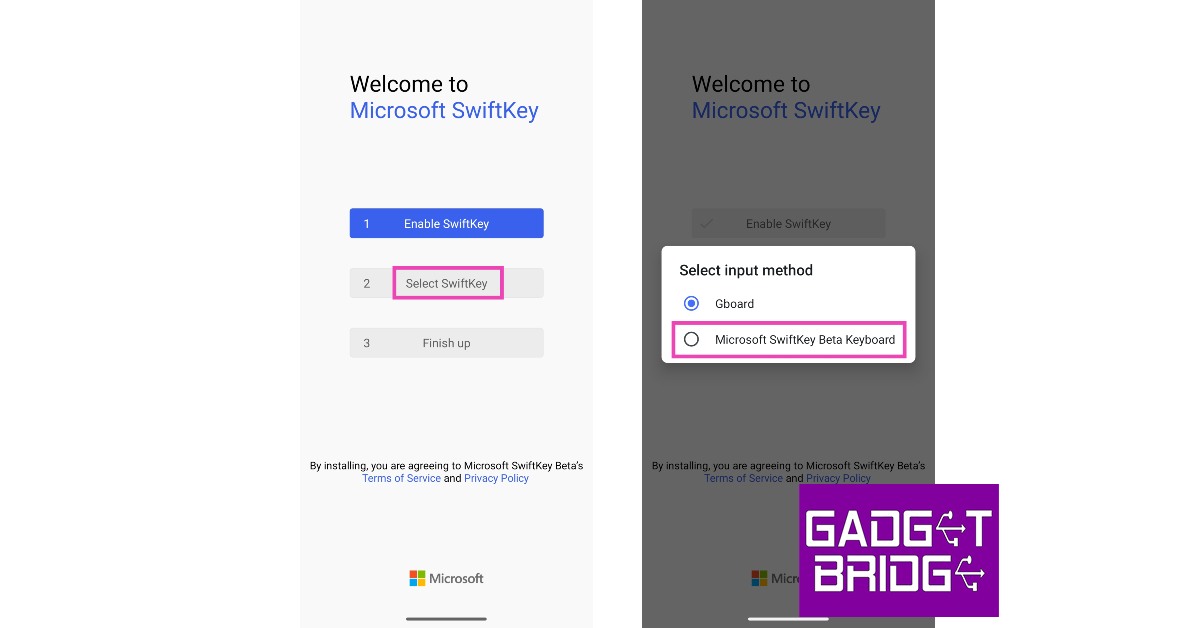
Step 2: Launch the app and enable Microsoft SwiftKey Beta Keyboard on your device.
Step 3: Select SwiftKey as the default input method.
Step 4: Go back to the app and sign in to SwiftKey Beta using your Microsoft Account to use Bing AI.
Step 5: Tap on the Bing icon on the top left corner of the keyboard.
Step 6: You will see three options on top of the keyboard: Search, Tone, and Chat.
The search option lets you perform a Bing search from your keyboard. The ‘Tone’ option uses Bing AI to change the tone of your text. You can choose from a range of tones like casual, formal, polite, professional, and social post. If you want to access the Bing AI chatbot, you can do so by tapping on ‘Chat’.
Frequently Asked Questions
Does SwiftKey use AI?
SwiftKey has always used AI and language models for its predictive text feature. Recently, Microsoft announced that the SwiftKey keyboard will come with unique Bing AI functionalities that will let users access the AI chatbot from the keyboard itself, and even get it to change the tone of their text messages.
Is Bing AI for SwiftKey available on iPhone?
As of now, Bing AI for SwiftKey is only available on the Android platform. iPhone users will have to wait for Microsoft to roll out the feature for iOS.
Why can’t I use Bing AI on my SwiftKey keyboard?
To access Bing AI on your SwiftKey keyboard you will have to install the SwiftKey Beta app from the Play Store. This Beta app is different from the regular SwifKey app. You will also need to sign in using your Microsoft Account to access the exclusive Bing AI features.
This is how you can use Bing AI on the Microsoft SwiftKey keyboard for Android. Bing AI unlocks a lot of fun and useful features. Apart from changing the tone of your texts, you use the AI chatbot directly from your onscreen keyboard to get important information related to any conversation.
Travelling is an enriching experience that broadens one’s horizon and offers a much-needed break from the monotony of daily life. However, for many people, flight ticket prices are a significant barrier to travel. Finding cheap airline tickets departing from India is surprisingly simple with a little effort and some helpful tips.
Today, we will explore some proven strategies and insider tips that can help you score the best deals on airfare. Read on for tips on how to book flights without breaking the bank.
Make use of the specialised offers available from your debit and credit cards
Saving money on airfare can be as simple as taking advantage of a credit or debit card’s special offer. When booking a flight, many airlines provide discounts to customers who use certain credit or debit cards. These deals can be anything from a percentage off the total price to cash back on your purchase. Some credit cards even let you earn points or other travel perks you can later use to pay for plane tickets. As a result, before booking flight tickets, you should always verify if your bank or credit card issuer provides any such incentives.
Some banks even let you pay for your flight ticket in monthly instalments if you use a credit card. Instead of paying for your tickets simultaneously, you can spread the cost over several months. There may, however, be additional fees associated with using this service. Therefore, to find the best deal on your airline tickets, you should consider the benefits and drawbacks of using such offers.
Use flights that depart at odd hours. This is due to the fact that these flights are less popular and, as a result, have a lower demand. When flights have empty seats, airlines frequently reduce their fares in an effort to fill those seats. Therefore, if you can be flexible with your travel plans, you should think about taking a flight at an odd time to save money.
However, keep in mind that flying at odd hours might not always be the most convenient option, particularly if you have to travel a significant distance to get to the airport. Before making a choice, it is important to consider both the advantages of the cheaper fare and the drawbacks of the altered flight schedule.
Bookings should be made within 30–90 days in advance
When you book your flight within the 30-to-ninety-day window prior to the date of your departure, you will typically be able to get the best deals on airline tickets. When you book too early or wait too long, it can often result in higher fares. If you book too far in advance, the airline might not have yet released their lowest possible fares. On the other hand, if you leave it too late to make a booking, there is a possibility that you will be required to pay a higher price than the standard rate.
If you book your trip within the 30-90 day window, you will have sufficient time to compare prices offered by a variety of airlines and travel websites, as well as to take advantage of any discounts or deals that may be currently being offered. Therefore, the best way to save money on your trip is to organise it in advance as much as possible and book your tickets as soon as possible.
Delete all your cookies
When you search for airline tickets online, the websites you visit may store cookies in your browser that can later be used to track your search history. These cookies can be tracked and tailor future search results to your preferences. This can result in dynamic pricing, in which the airline websites may show you a higher price for the same flights you searched for earlier, even though you searched them earlier.
This is because airlines keep a record of your search history to determine how urgently you are interested in purchasing a ticket. Then they adjust the prices of their tickets accordingly. Either delete all cookies stored on your computer before beginning your search for flight tickets or try using a different web browser. This can assist you in finding comparable flights at a more affordable price.
Make your booking through the airline’s official website
You can save money by booking your flight directly through the airline rather than through a third-party travel website. This is because airlines often provide unique discounts and deals to customers who book their flights directly with them. Booking directly through the airline’s website also grants you access to the airline’s loyalty programs and rewards, both of which can help you save money on bookings in the future.
However, before you make a decision, you should check the prices offered by a number of different airlines and online travel agencies or applications. Sometimes, a third-party travel website can save you money on your trip because of discounts on bulk bookings or other deals. Therefore, before you buy airline tickets, you should do some research and compare the prices offered by a variety of different sources.
Check for coupons and offers
Check for coupons and offers: Coupon websites, social media, and email newsletters are good places to look for deals like these coupons and offers. Make it a point to look into these deals before purchasing your plane tickets, as doing so could end up saving you a significant amount of money. There are times when airlines will also provide discounts for passengers who use a particular credit or debit card. As a result, before making a reservation, you should always look for deals and coupons that could lower the cost of your trip.
Use incognito browsing mode
When you search for flights online, airlines and travel websites may use cookies to track your search history and show you more expensive fares for the same flights you searched for earlier. To avoid this, use the anonymous browsing mode. This is because they can determine that you are interested in a particular flight, and as a result, they may increase the prices.
When looking into flight options, it is best to do so while your web browser is set to either anonymous or private browsing mode. Because of this, the websites won’t be able to track your history of searches and increase the prices they show you. Because of the history of your searches, you will not experience any increase in the cost of the flights you book.
Avoid booking tickets on weekends
It is best to avoid booking tickets on the weekends because this is typically the busiest time of the week for the sale of airline tickets. This is because more travellers tend to book flights on the weekends due to the increased availability of seats on those days. Because of this, airline prices may be higher on weekends compared to those charged during the week. If you want to get the best deals on airline tickets, it is best to try to book your cheap flights in India during the week.
You should also take into consideration flying during the shoulder seasons or off-peak times of the year. During these times, the demand for flights is lower, and airlines offer cheaper prices in an effort to fill their seats. In addition to this, purchasing airline tickets in advance can also help you save money on your trip. For this reason, you should make every effort to plan your trip well in advance and book your tickets at least 30–90 days in advance if you want to get the best deals.
Finding cheap tickets in India can be a real challenge; however, this process can be simplified with the use of the appropriate tactics. It is essential to keep a close eye on the prices of airline tickets before making a reservation for them because the prices are subject to frequent changes. Because of this, it is important to remember that airline ticket prices can fluctuate frequently. You can make your travel more affordable and enjoyable by following these tips and tricks, and you won’t have to sacrifice the quality of your experience while travelling.
Mivi, a homegrown electronics firm has announced the launch of new K7 TWS earbuds in India. The device comes with AI-enabled ENC and a dual mic system for better call clarity. In addition to this, the earphones support AAC and SBC audio codecs. These are compatible with both Android and iOS devices.
Mivi K7 TWS earbuds price in India and sale details
Mivi K7 TWS earbuds have been launched in India with a price tag of Rs 1,499. The device comes in five different colour options – Black, Beige, Pink, Blue, and Green. The earbuds will be available for purchase via Both Flipkart and Mivi websites in the country.
Mivi K7 TWS earbuds features and specifications
The Mivi K7 TWS earbuds feature a ‘Starry Night Effect’ that provides a shimmering effect to the case. While the earbuds come with a metallic finish.
Mivi TWS earbuds feature 13 mm drivers that produce a strong bass effect. It is compatible with a wide range of frequencies (20 Hz to 20 KHz). In addition to this, the TWS earphones have a gaming mode that has a 50ms latency. The K7 is sweatproof and comes with an IPX4.0 rating.
The Mivi TWS earbuds have an in-built Bluetooth 5.3 with a range of 10 meters (or 32.8 feet). It comes with AI-Enabled Environmental Noise Cancellation (ENC) system that reduces background noise for enhanced call clarity. K7 also supports AAC and SBC audio codecs. There is a dual-mic system on the gadget for improved call quality even in noisy environments.
Each bud comes with a battery capacity of 402mAh that is claimed to provide 60 hours of playtime. It also includes a type C charging cable, users can charge both the buds and the capsule in just an hour.
Ms. Midhula Devabhaktuni, Co-founder and CMO of Mivi, said, At Mivi, we are passionate about delivering exceptional audio products that enrich the lives of our customers. We are thrilled to unveil the K Series, crafted with unwavering attention to detail and a commitment to excellence. The K7 is a testament that Made In India brands are well equipped to contribute to the country’s tech industry with innovative and high-quality products. As we strive to exceed our customers’ expectations, we will continue to push the boundaries of technology and deliver products that inspire and delight.


 review: They have hit the ball (hard) out of the park!")


")


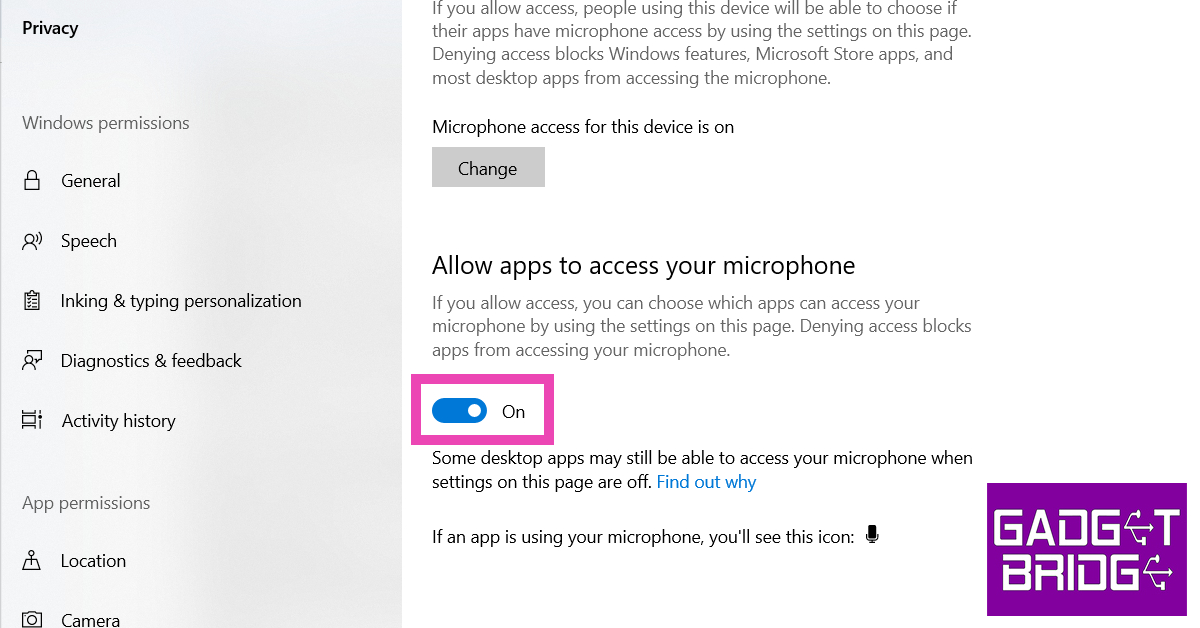


![9 easy fixes for Facebook Not Loading Properly on smartphone [Solved]](https://www.gadgetbridge.com/wp-content/uploads/2023/04/無標題2-768x402.jpg "9 easy fixes for Facebook Not Loading Properly on smartphone [Solved]")