Online casinos have made many gamblers play various games in their comfort. Choosing the best casino may be challenging because you must consider essential things and see if that particular casino has them.
With the rise of the
best online casinos worldwide, most people choose a casino with many issues, such as fraud, which is frustrating and ruins the playing experience. This guide will teach you seven ways to choose the best online casino.
So, keep reading as we explore!
1. License And Registration
Before you choose an online casino, it is crucial to know if that casino has a license and registration. A casino with a right will guarantee that its functions are legal.
In addition, registration enables online casinos to adhere to the rules and regulations of gambling. You’ll not have to worry about your data being exposed and fraud issues.
Most online casinos provide their license and registration at the bottom of the casino site. You can also see when that casino got the permit and the registration date.
If a casino needs the right and registration, go to another with the request. Some popular licenses are the Malta Gaming Authority, Curacao Gaming Authority, and the UK Gambling Commission.
2. Check For Gifts and Bonuses
The rise of online casinos has led to high competition. Therefore, most casinos provide gifts and bonuses to their players. However, these gifts depend on the casino because some come with terms and conditions for using them. For instance, a casino may require you to pay a certain fee to get gifts and bonuses.
Keep an eye on the various types of bonuses, such as welcome bonuses, no-deposit bonuses, loyalty bonuses, free spins, and others.
The advantages and rewards save you money as you get to enjoy playing and betting without the need to deposit your money. It also helps you refund your money if you lose a bet.
3. Check The Payment Options
When choosing an online casino, looking at their payment options is significant as you’ll not want issues with your deposit and withdrawals. In addition, the best online casino should have a wide variety of payment options that you can choose from them.
Ensure you know the maximum and the minimum amount you can withdraw or deposit. Some standard payment options are credit cards, debit cards, cryptocurrency, e-Wallet, and prepaid cards.
The more banking options a casino has, the better. Most casinos have a list of payment options on their website.
4. Customer Support
It is essential to check customer support as it is possible for problems to occur when playing. Therefore, you’ll need customer support that is readily available and reliable.
To check whether a casino’s customer support has good services, you can ask them queries and see how they respond and if you are comfortable with their answer.
The best online casino should offer support 24/7 and communicate with customers using different platforms such as phone, emails, and live chats.
5. The Casino’s Reputation
Apart from customer support, it is also significant to know the reputation of an online casino as it will reveal more about what to expect from it. You can learn the importance of a particular casino by reading the reviews to see what different players say about that casino.
Moreover, try to see if any news article has featured that casino.
6. Variety Of Games Available
Before you select an online casino, it’s crucial to see its various games. Most online casinos offer a wide selection of games, such as roulette, baccarat, blackjack, poker, slot machines, and craps. Some casinos have a list of games on their website to help players browse through them.
7. Device Compatibility
It is crucial to consider the device compatibility that a particular casino supports because some casinos support only a few devices. Whether you like playing games on a smartphone, laptop, or tablet, ensure the casino site supports it. Also, check the device operating system to learn the requirements of having games installed for easy playing.
Verdict
How you choose an online casino will determine your experience when playing your games. Therefore, do proper research to make the selection process a breeze.
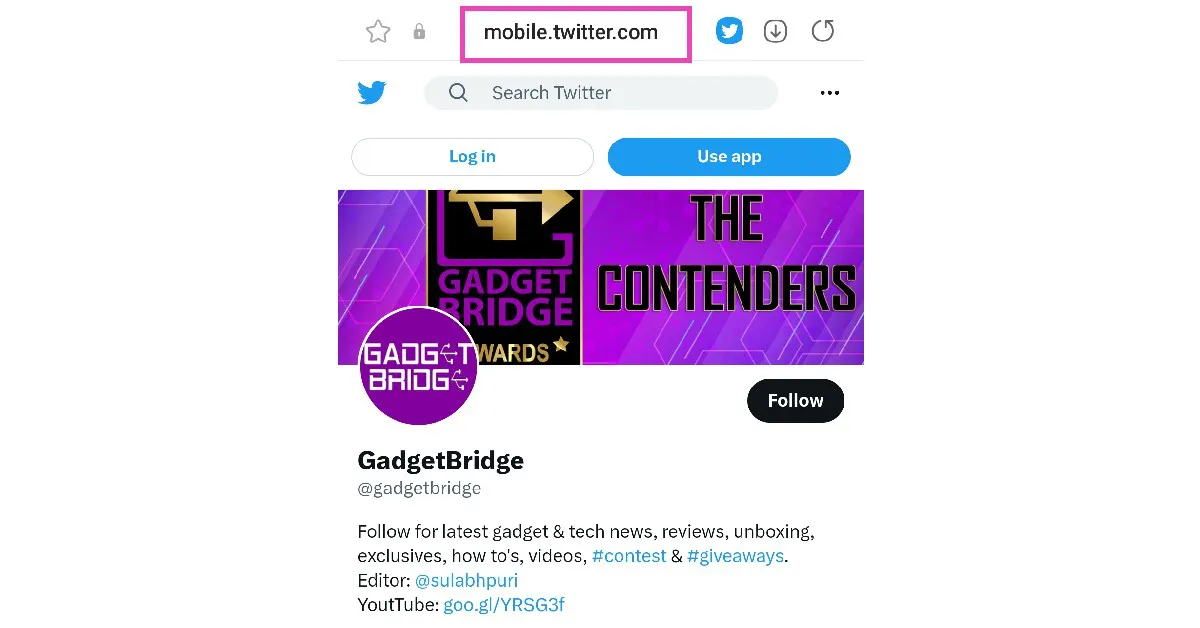
For the latest
gadget and tech news, and
gadget reviews, follow us on
Twitter,
Facebook and
Instagram. For
newest tech & gadget videos subscribe to our
YouTube Channel. You can also stay up to date using the
Gadget Bridge Android App. You can find the latest
car and bike news here.


 Step 3:
 Step 5:
")
 Step 2:
 Step 3:

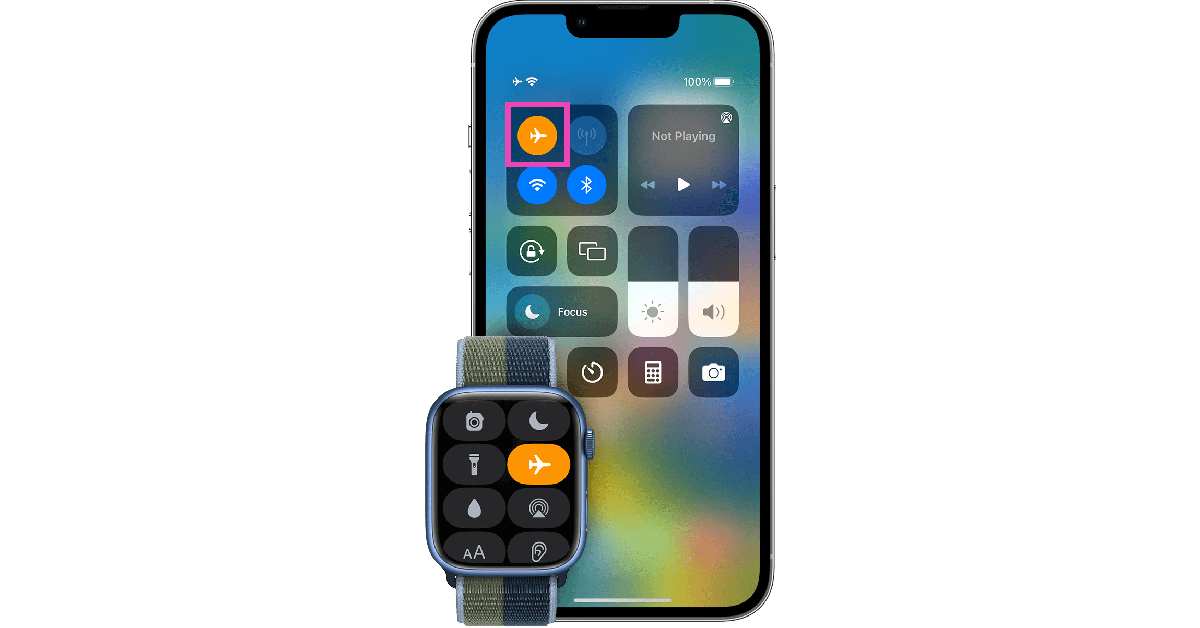 If you don’t want to switch off your iPhone while charging, the next best thing you can do is turn on the Airplane Mode. Receiving a cellular network all the time consumes a lot of power on your device. The power consumption increases when you use the 5G network for streaming videos or just browsing the internet. Turning on Airplane Mode ensures that you don’t use the battery faster than it is being charged.
 Turning on Low Power Mode on your iPhone cuts down the battery drain by limiting certain tasks. Once it is turned on, the display brightness, refresh rate, and some visual effects will be dialled down. Features like Auto Lock, background app refresh, and automatic downloads will also be disabled. This ensures that your iPhone doesn’t consume power faster than the incoming charge. When the Low Power Mode is turned on, the battery bar turns yellow.

 Sometimes, the external case covering your iPhone can cause its temperature to rise. This is more likely to happen when the surrounding temperature is high. Taking off the case lets your iPhone cool down faster. While charging, the battery inside your iPhone can get warmer, leading to a simultaneous loss of charge. Take off the case to keep the iPhone’s temperature in check and boost its charging speed.

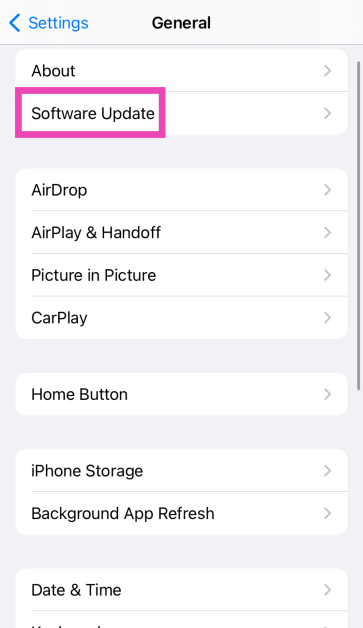
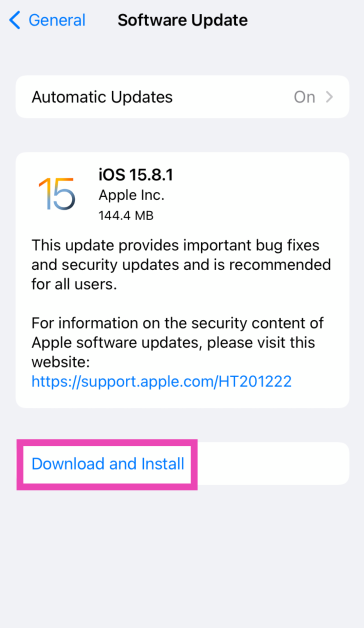
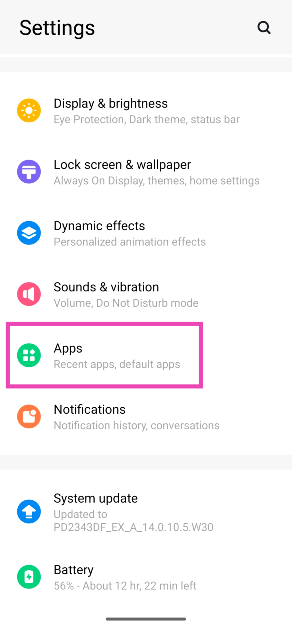
 Step 3: Select Software Update.
 Step 4: Tap on Download and Install.

 Step 2:
 Step 3:
 Step 4:
 Step 3:
 Step 4:

 Step 3:
 Step 4:
 Step 3:
 Step 3:
 Step 4:


")
 Step 2:
 Step 3:
 Step 4:
 Step 4:
 Step 5:
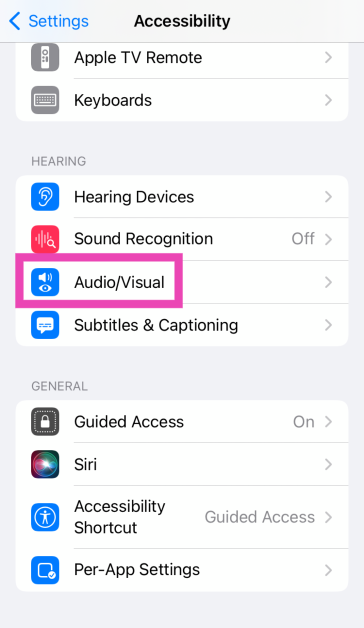
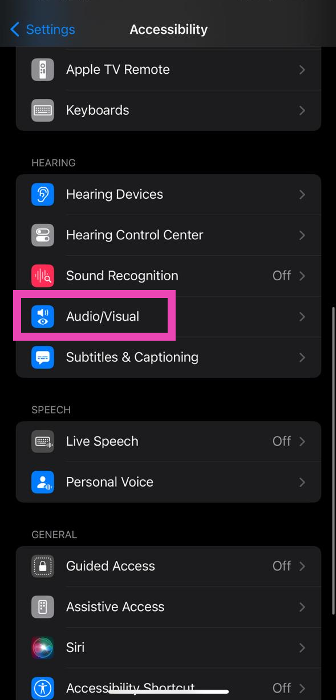
 Step 2: Scroll down and tap on Audio/Visual.
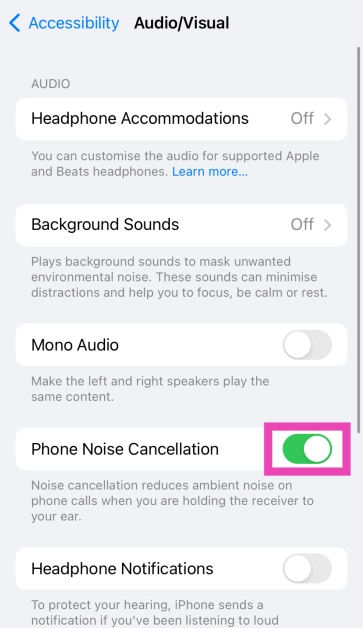
 Step 3: Turn off the toggle switch for Phone Noise Cancellation.
 Step 2: Select Audio/Visual.
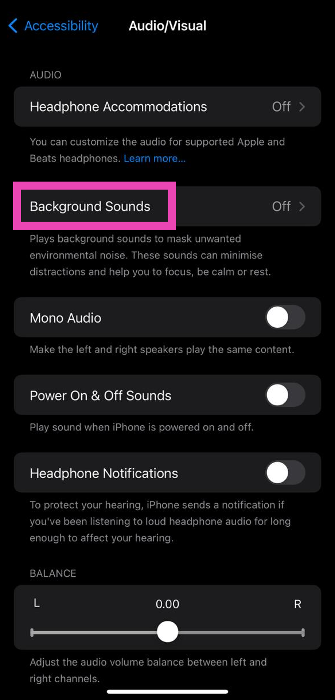
 Step 3: Tap on Background Sounds.
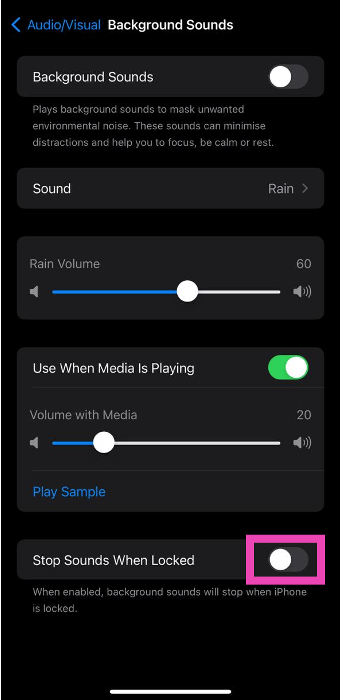
 Step 4: Turn off the toggle switch for Stop Sounds When Locked.
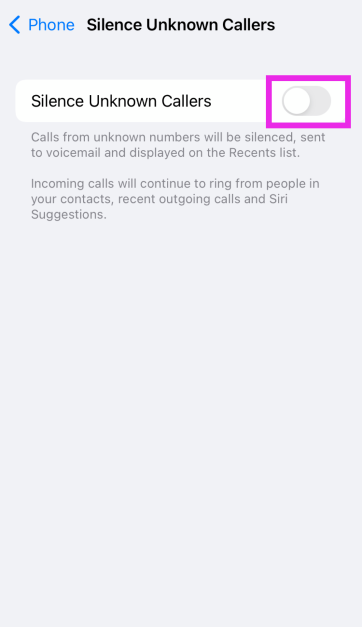
 Step 2: Scroll down and tap on Silence Unknown Callers.
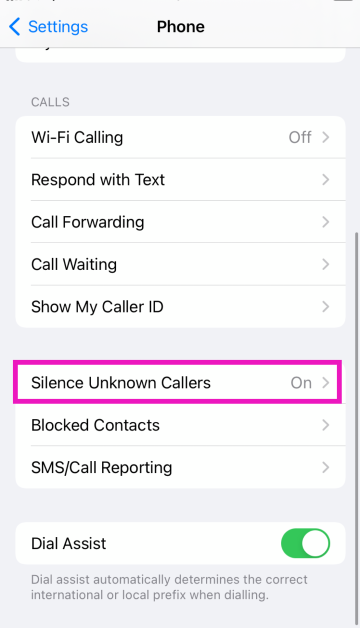 Step 3: Turn off the toggle switch.
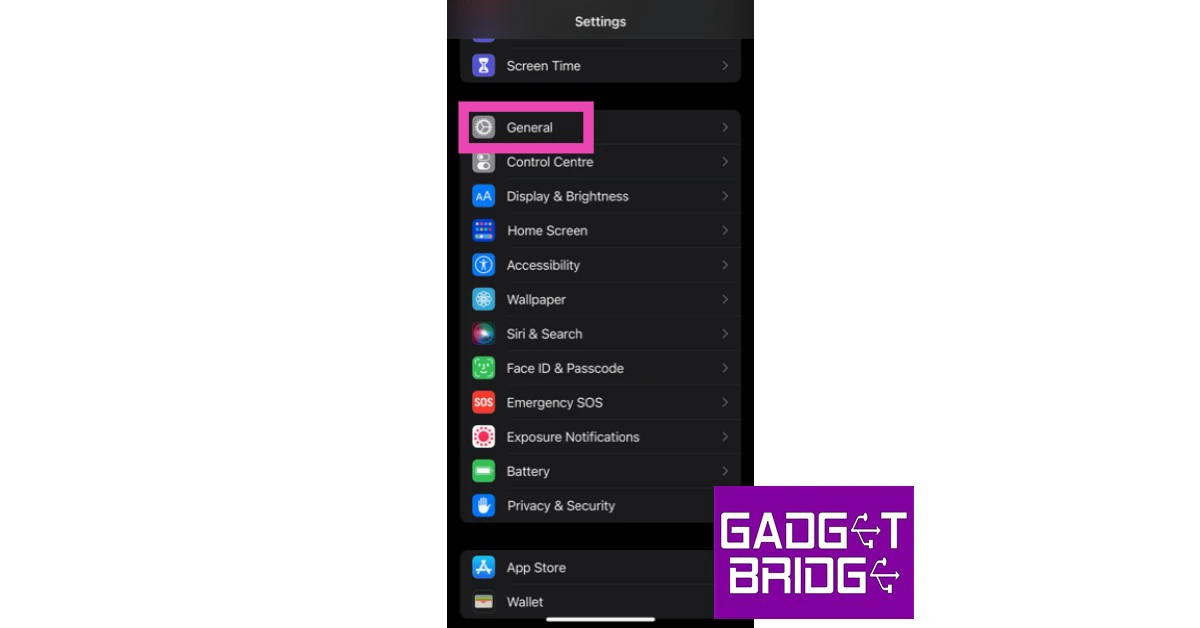
 An older version of iOS may have a software bug that’s keeping certain apps from pushing their notifications. These bugs are quickly resolved by a software update. If your iPhone is running an older version of iOS, go to Settings>General>Software Update to install the latest version.
 Step 2:

 Step 2:
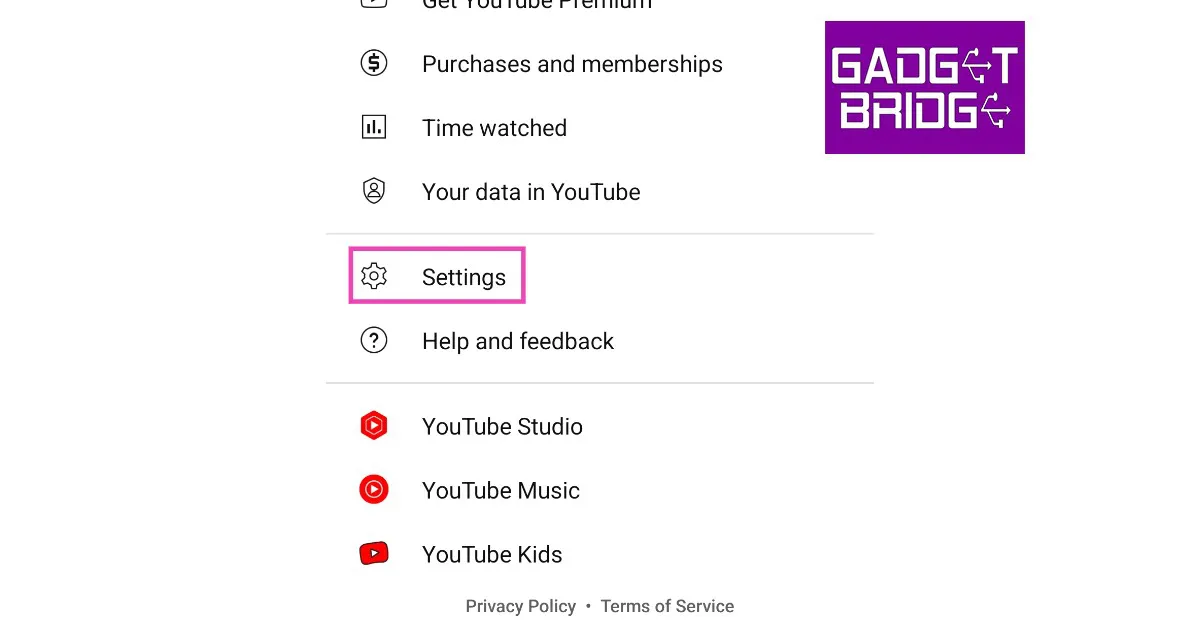 Step 3:


 Step 2:
 Step 3:
 Step 2: Tap on Optimize iPhone Storage.
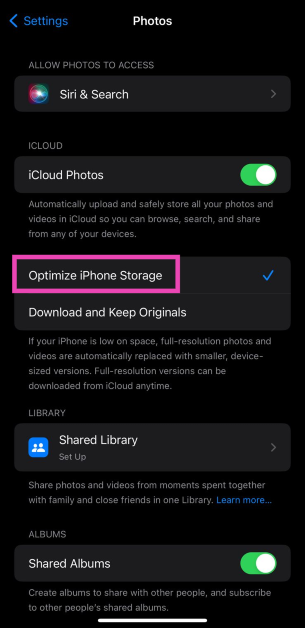 The images on your iPhone will be compressed to save storage space. The optimised images occupy less space and are perfect to be viewed on your iPhone. You won’t notice much difference. If you want to access the full-resolution images, you can download them from iCloud.
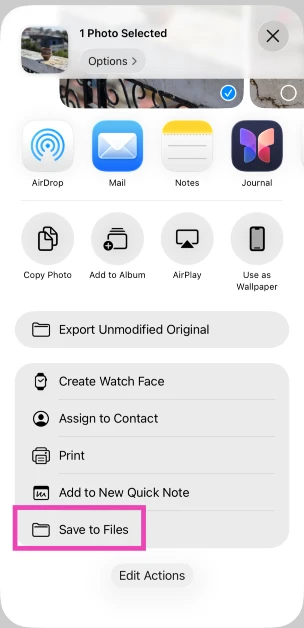
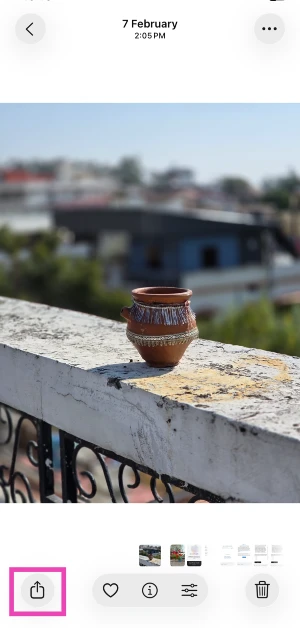 Step 3: Select Save to Files.
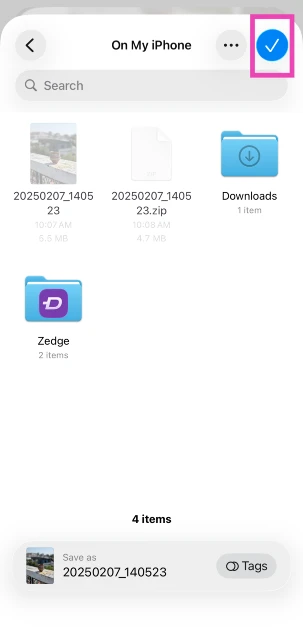
 Step 4: Choose the destination and hit the tick icon.
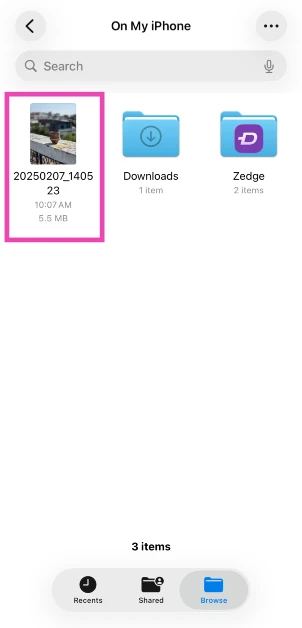
 Step 5: Launch the Files app and go to the image.
 Step 6: Long-press the image icon and select Compressed.
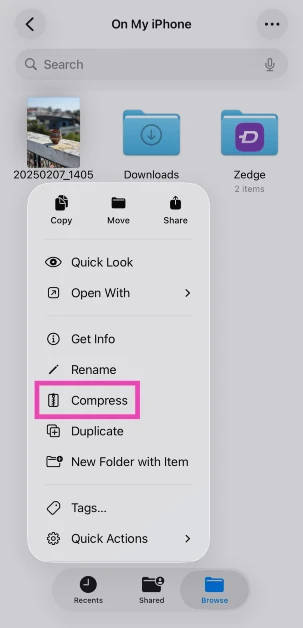 Step 7: A compressed version of the image will appear next to it.


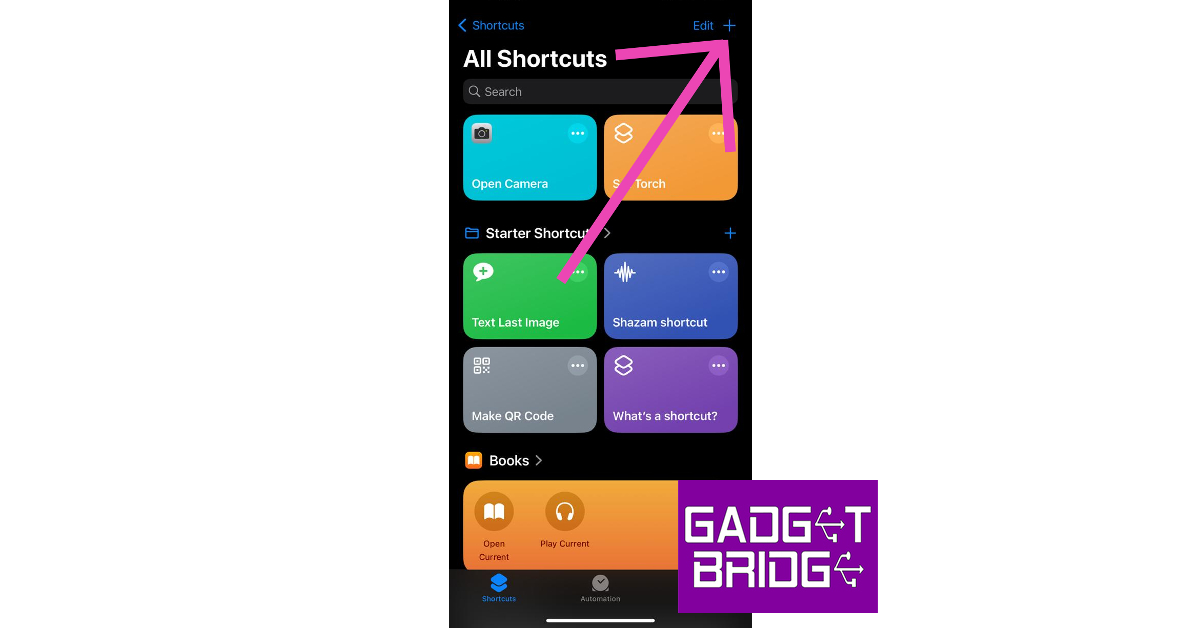 Step 2: Give your shortcut a name.
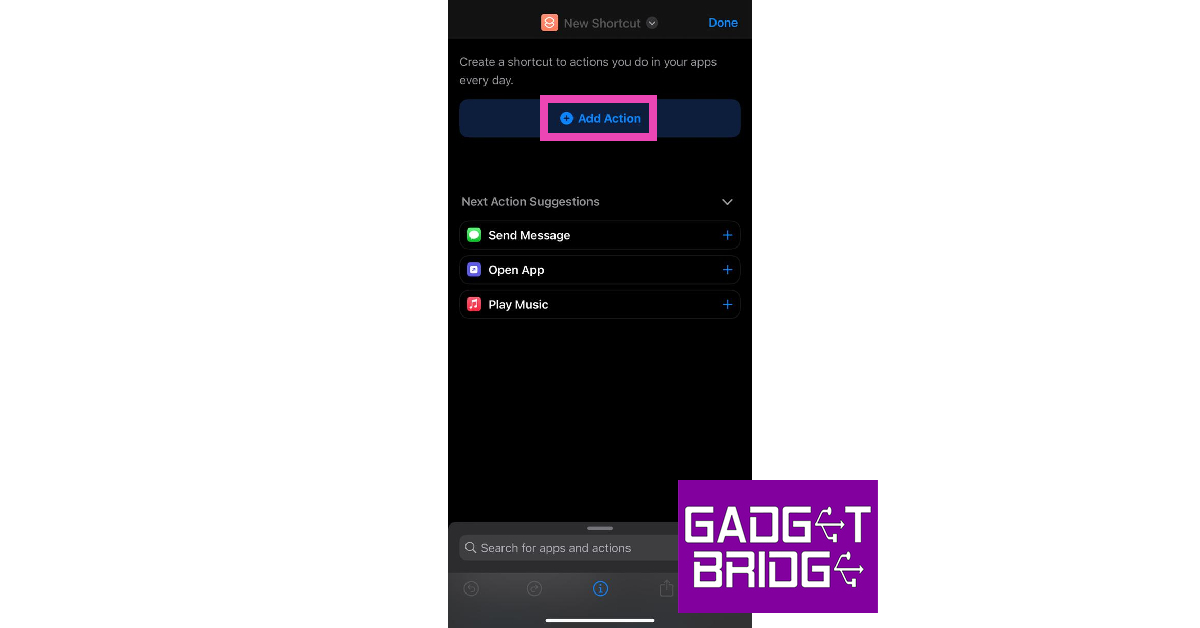
Step 3: Select Add Action.
Step 2: Give your shortcut a name.
Step 3: Select Add Action.
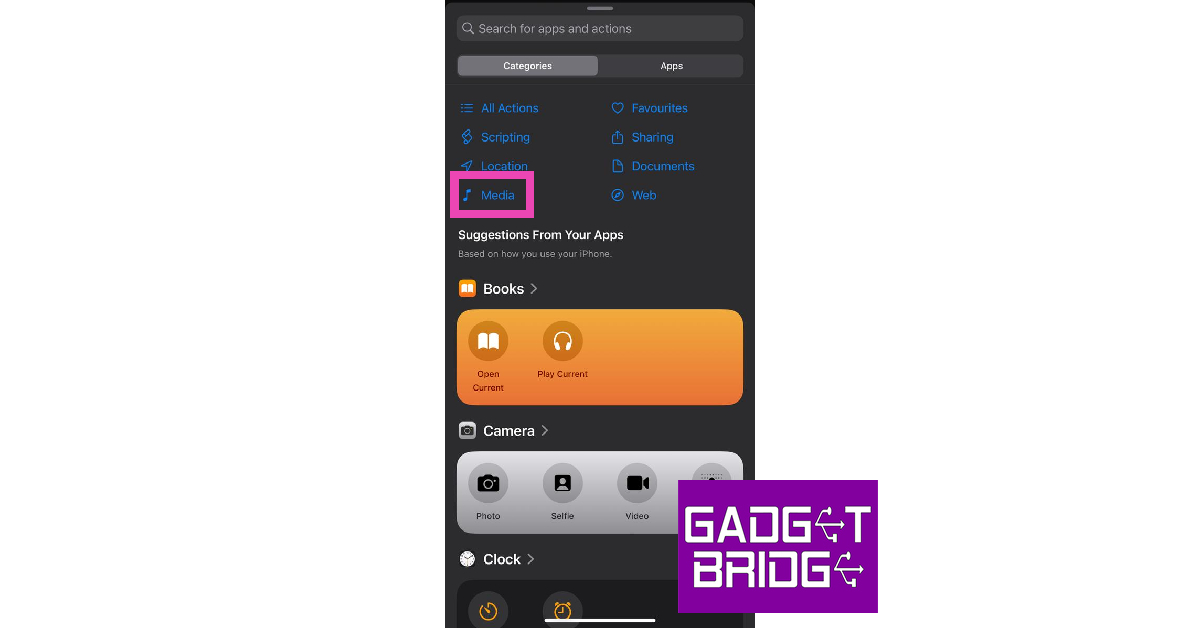
 Step 4: Go to Categories and select Media.
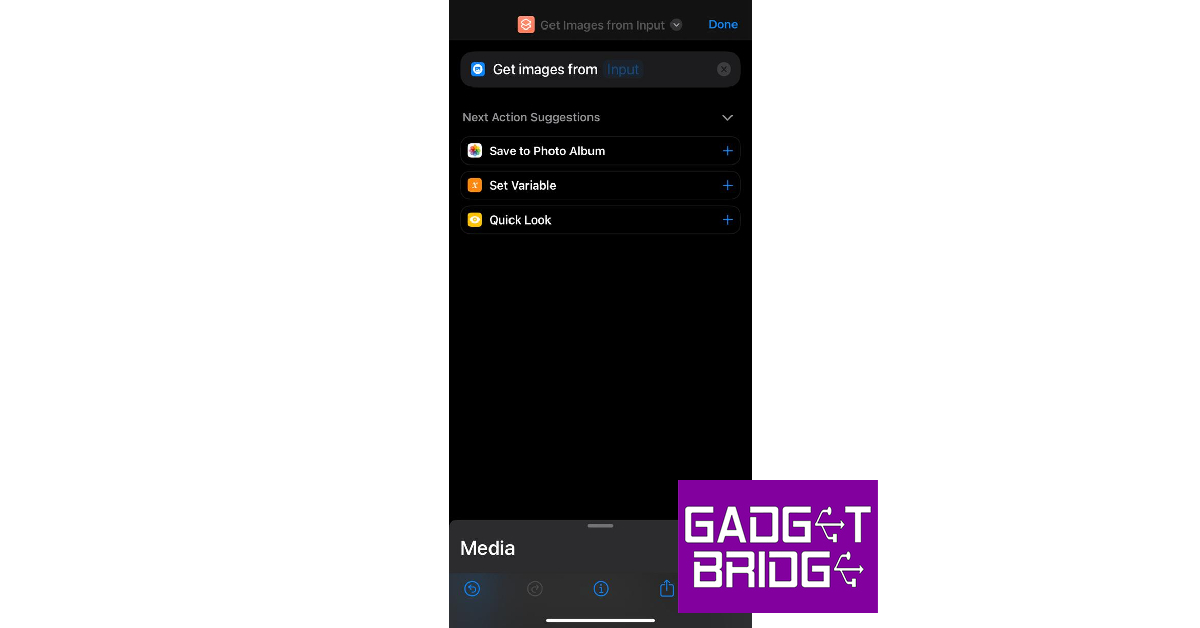
 Step 5: Under the Images category, select Get Images from Input.
 Step 6: Hit the blue icon at the top right corner of the screen and turn on the toggle switch for Show in Share Sheet.
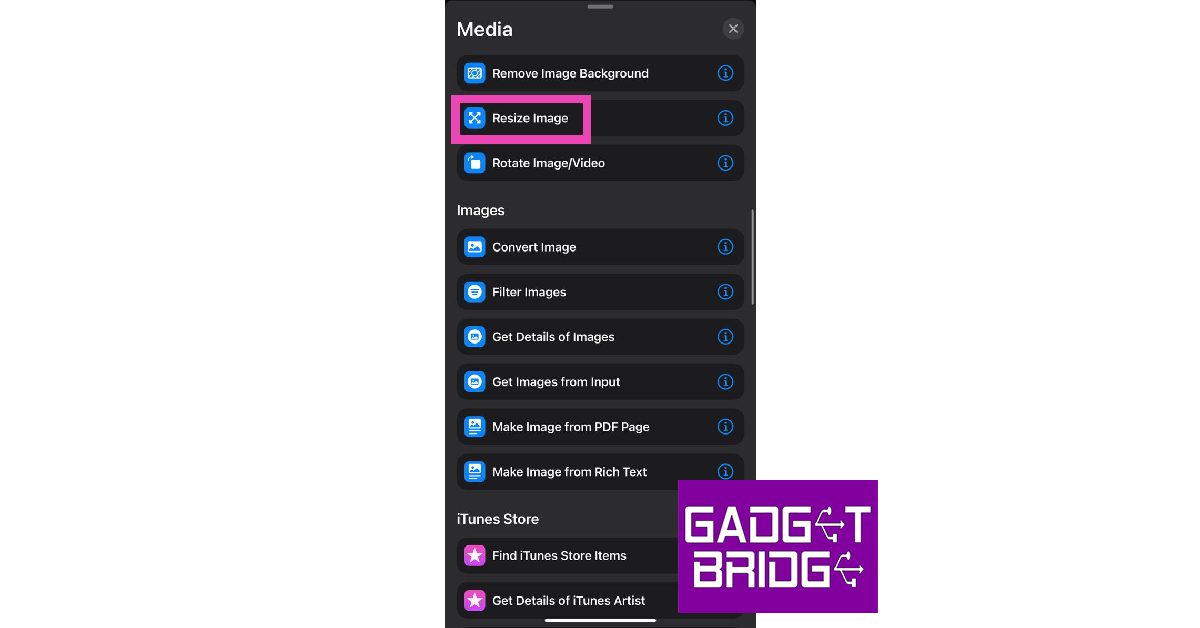
Step 7: Drag the Media page and select Resize Image.
Step 6: Hit the blue icon at the top right corner of the screen and turn on the toggle switch for Show in Share Sheet.
Step 7: Drag the Media page and select Resize Image.
 Step 8: Tap on size to set the default metrics or select Ask Each Time.
Step 9: Hit Done.
Step 10: Select the Media page again and tap on Convert Image.
Step 11: Choose the file format for the resized images.
Step 12: Drag the Media page again and tap on Save to Photo Album.
Step 13: Select a destination album for the resized images.
Step 14: Hit the cross icon.
Step 15: To resize an image, open it in the Photos app, hit the Share icon, and select the shortcut from the list.
Step 8: Tap on size to set the default metrics or select Ask Each Time.
Step 9: Hit Done.
Step 10: Select the Media page again and tap on Convert Image.
Step 11: Choose the file format for the resized images.
Step 12: Drag the Media page again and tap on Save to Photo Album.
Step 13: Select a destination album for the resized images.
Step 14: Hit the cross icon.
Step 15: To resize an image, open it in the Photos app, hit the Share icon, and select the shortcut from the list.
 Step 3:
 Step 4:
 Step 5:


 Step 3:
 Step 4:
 Step 5:
 Step 7:
 Step 3:
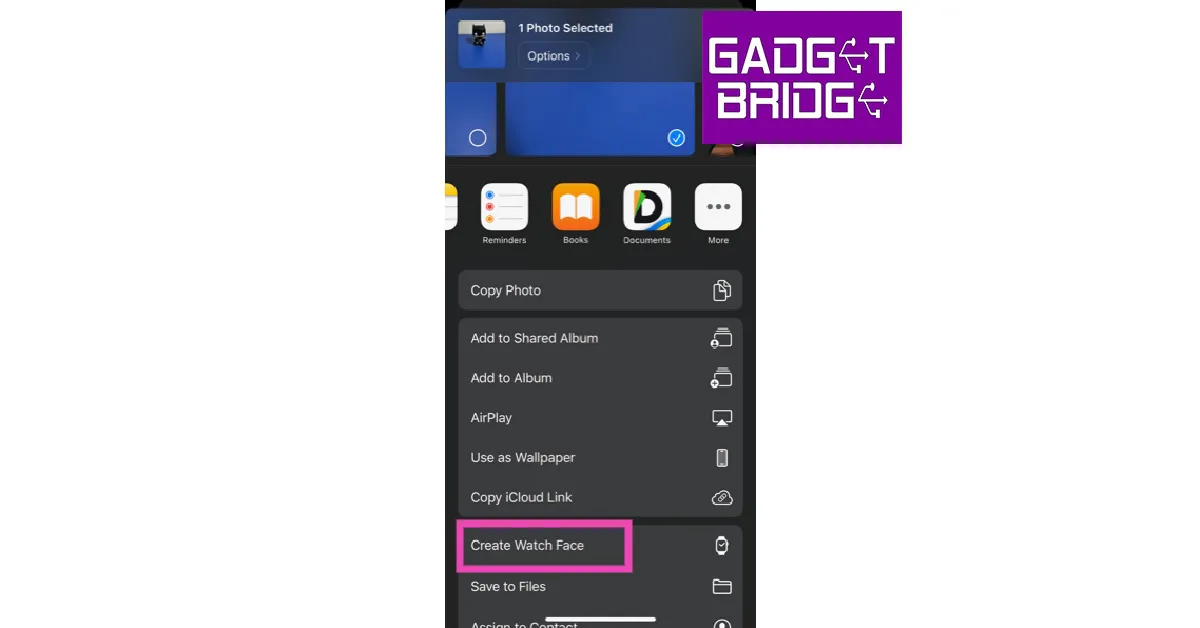 Step 4:
 Step 5:
 Step 6:
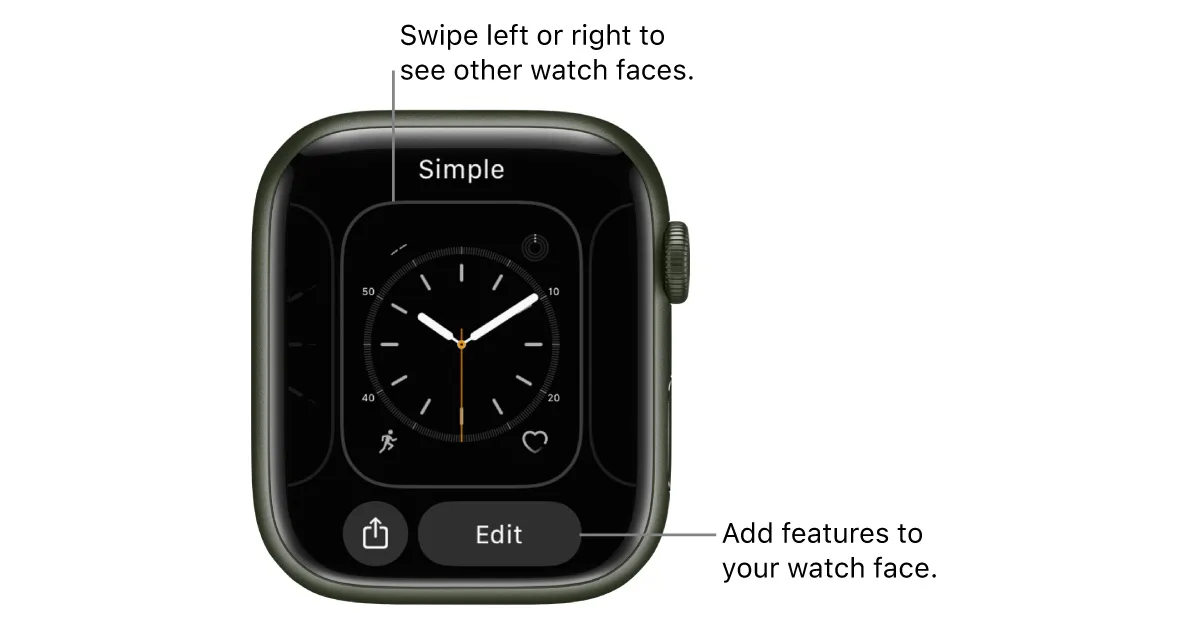 Step 3:
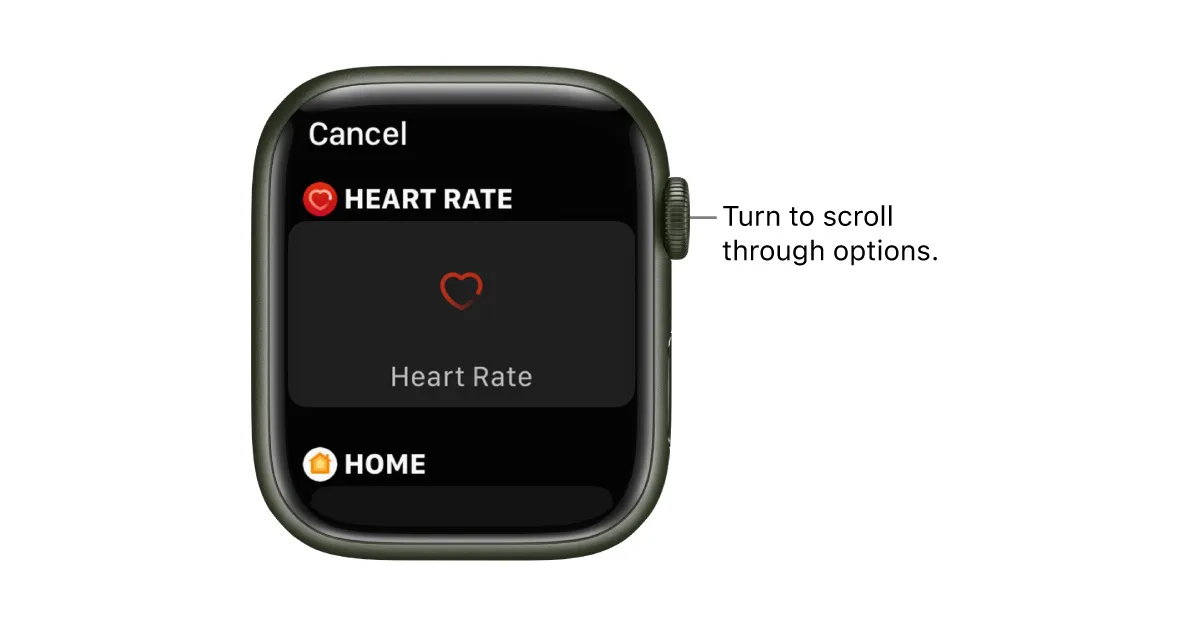 Step 5:
 also added")
")
 Step 2:
 Step 3:
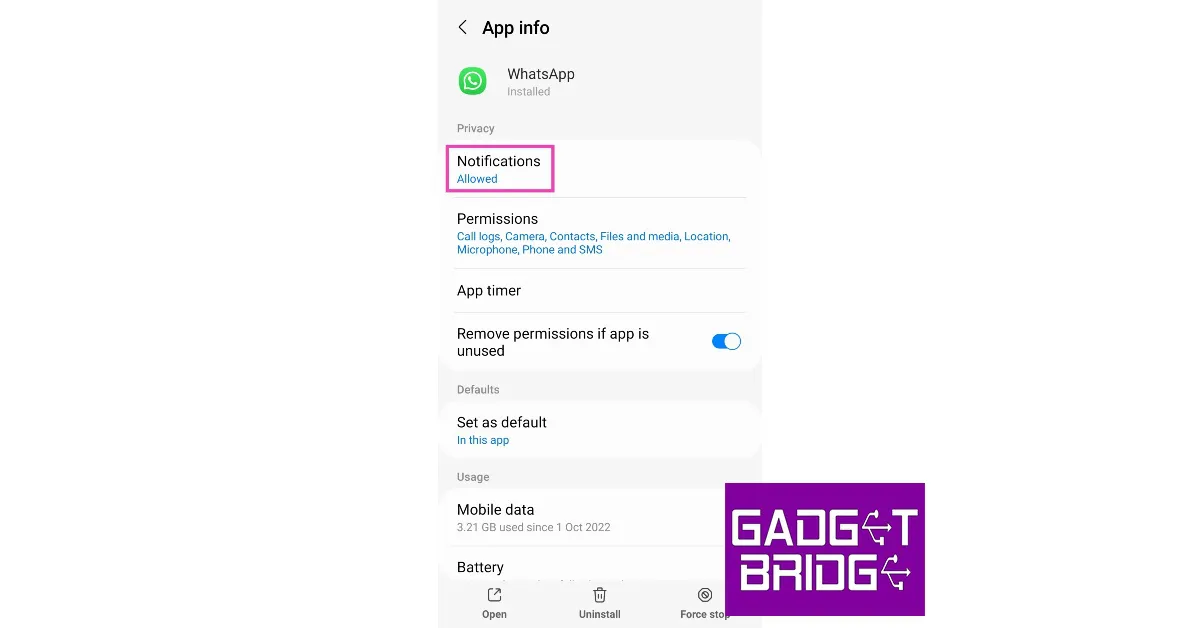 Step 4:

 If you’re connected to a weak network, WhatsApp won’t notify you of incoming calls. Instead, you will receive a notification when the caller hangs up. Perform a quick internet speed test to confirm whether the fault lies with your network. Load other web pages to see if the network is acting sluggish on your device. Switch to a stronger network to receive WhatsApp calls again.
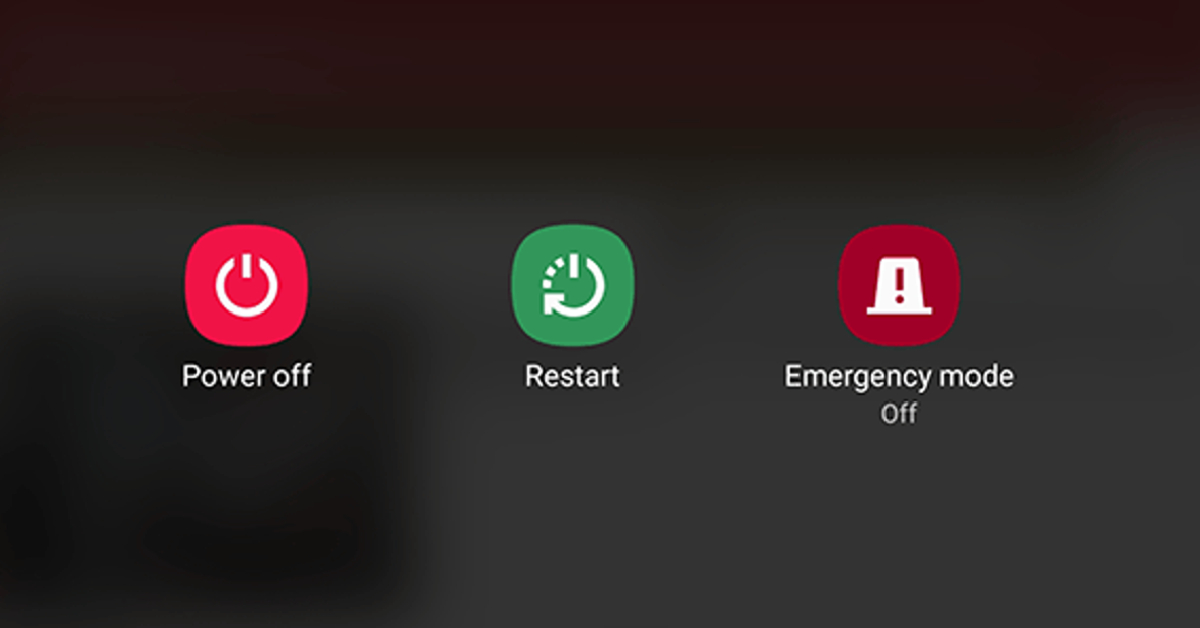 Restarting your device refreshes the network and resolves any background glitches that may be causing WhatsApp to malfunction. Long-press the side key and select ‘Restart’ from the power menu. If long-pressing the side key triggers the voice assistant, press it along with the volume-up button to open the power menu.
 Step 5:
 Step 4:
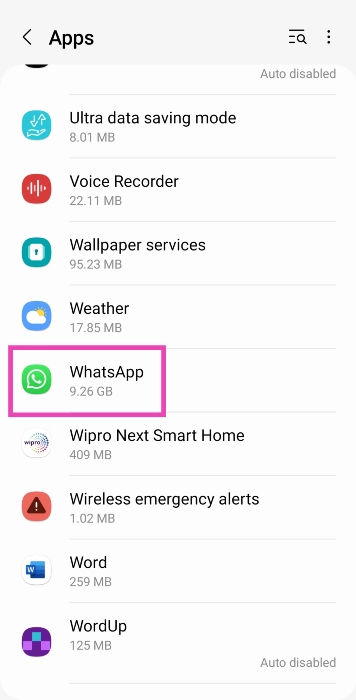
 Step 2: Select WhatsApp.
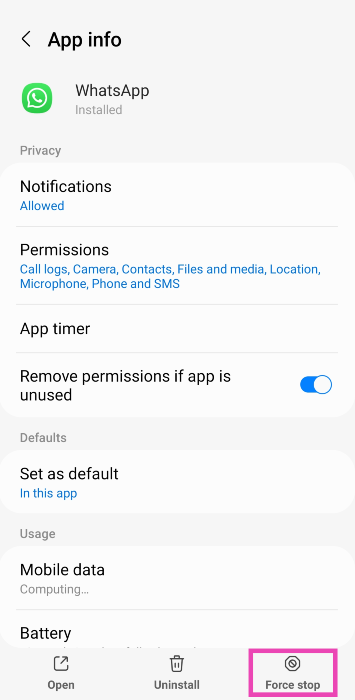
 Step 3: Hit Force Stop at the bottom of the screen.
 Step 2: Select WhatsApp.
 Step 3: Tap on Permissions.
 Step 4: Make sure WhatsApp has access to Phone and Microphone.

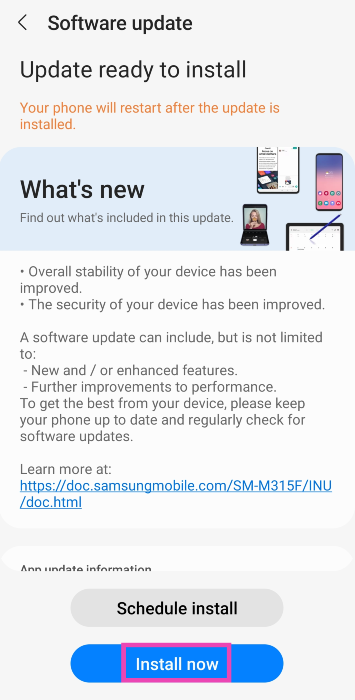
 Step 2: Tap on Download and Install.
 Step 3: Once the update has been downloaded, tap on Install Now.


 Also Read:


")

 Step 2:
 Step 3:
 Step 4:
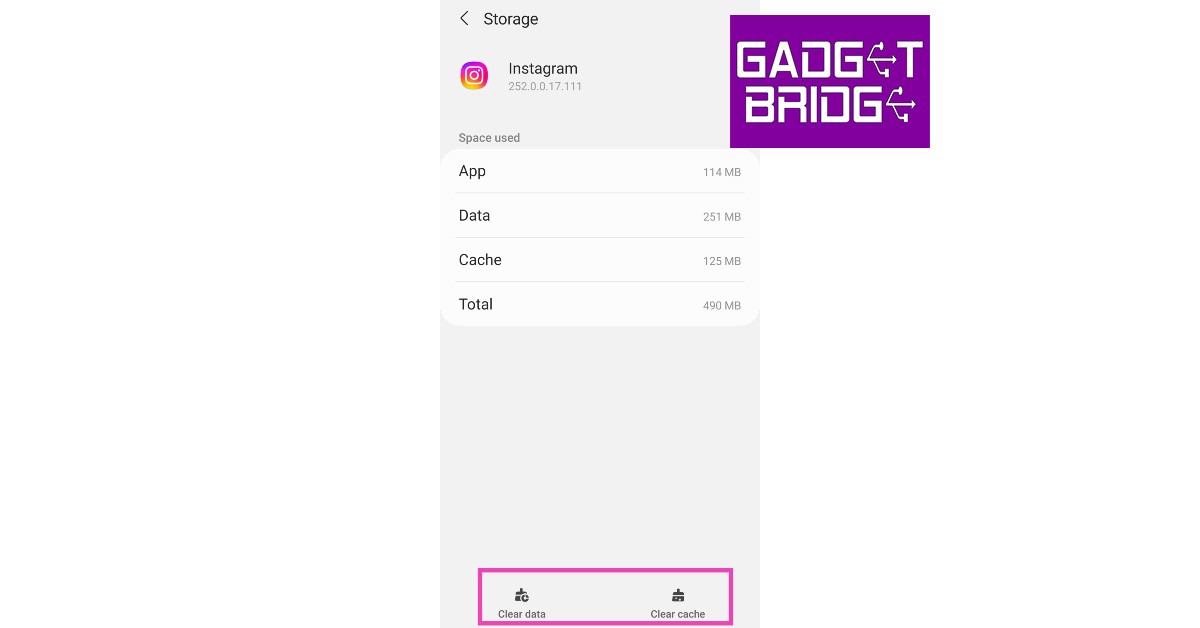

 Sometimes, installation issues can cause an app to malfunction on your phone. If you just installed the Instagram app and can’t get it to work, uninstall and reinstall it again on your device. You can use the Google Play Store or your OEM’s exclusive app marketplace for this task.

 It is possible that the problem may lie with Instagram’s mobile app and not the DM service itself. In this case,
  If you’re not a fan of Instagram Web, use the Instagram Lite app instead. This lightweight app uses less data and loads faster than the regular Instagram app. The issues plaguing the regular app may not persist on the Lite version. If your Instagram DMs are not working, the Lite app is worth giving a shot.