Recently, Xiaomi’s spinoff Poco unveiled the Poco F4 5G in India. The smartphone has a vibrant screen, an effective camera, and a strong battery. The 870 SoC powers the smartphone. The phone has a 120Hz AMOLED screen, three rear cameras, and other features. Here, the iQoo Neo 6 Vs Poco F4 5G are compared. See how the Poco F4 compares to the iQoo Neo 6 to determine which one is the better investment for you.
Poco F4 5G: A triple-back camera arrangement with a 64-megapixel primary sensor and an optical image stabilisation (OIS) with an f/1.8 lens. A 2-megapixel macro camera and an 8-megapixel ultra-wide camera are also part of the camera arrangement.iQoo Neo 6: A triple-back camera arrangement for images and videos, which includes a 64-megapixel Samsung ISOCELL GW1P primary sensor with an f/1.89 aperture and optical image stabilisation. There is a 2-megapixel macro camera with an f/2.4 aperture and an 8-megapixel wide-angle camera with an f/2,2 aperture
Selfie camera
Poco F4 5G: 20-megapixel front camera sensoriQoo Neo 6: 16-megapixel sensor
RAM and storage
Poco F4 5G: 6GB RAM with 128GB storage / 8GB RAM with 128GB storage/ 12GB RAM with 256GB storage modeliQoo Neo 6: 8GB RAM with 128GB storage/ 12GB RAM with 256GB storage
Battery
Poco F4 5G: 4,500mAh batteryiQoo Neo 6: 4,700mAh battery
Operating system
Poco F4 5G: Android 12 with MIUI 13iQoo Neo 6: Android 12-based Funtouch OS 12
The Poco smartphone has a slightly bigger screen than the iQoo handset. Although the screen’s resolution, type and refresh rate is the same on both phones. In terms of performance both the devices are powered by Snapdragon 870 SoC and operate on Android 12 out of the box. Apart from that, Neo 6 houses a bigger 4,700 mAh battery with 80W fast charging whereas Poco F4 5G supports 67W fast charging with 4,500mAh under its hood.Speaking of the cameras, both have a similar triple rear camera set up but Poco features a 20MP selfie camera whereas there is a 16MP front-facing camera on the iQoo smartphone. Most of the specifications of both the handsets are similar even the pricing is the same, however, Poco has more storage and RAM options than iQoo. So if you are looking for a 5G phone with a bigger battery and fast charging then you can go for the iQoo Neo 6, else the iQoo Neo 6
For the latest gadget and tech news, and gadget reviews, follow us on Twitter, Facebook and Instagram. For newest tech & gadget videos subscribe to our YouTube Channel. You can also stay up to date using the Gadget Bridge Android App. You can find the latest car and bike news here.
Chinese electronics giant TCL is all set to announce the launch of its new Mini LED 4K Google TV in the Indian market soon. The upcoming 4K television will have HDR10+ with 144 Hz VRR. It is also said to support Dolby Vision and Dolby Atmos.The company via press release said, “Cementing its position as a leader in the TV electronics industry, TCL, the global number-1 android smart TV brand 2021, is all set to introduce a new Mini LED 4K Google TV. Working strenuously towards reaching its ultimate goal to provide high-powered TV sets that fit perfectly with modern-age customers, TCL has integrated several unparalleled TV technologies in its latest innovation.”The forthcoming LED Mini LED 4K Google TV is said to have a number of important features. The list also contains IMAX Enhanced, QLED, HDR10+, AiPQ Engine with AISR, Dolby Vision & Dolby Atmos, and a lot more. 144 Hz VRR (for reduced screen tearing and better visual output) is also included.The newest innovation in the TCL TV world, according to the manufacturer, will set the bar for future TV advancements. The sources further asserted that the TV is the pinnacle of clever, stylish, and futuristic technology that gives people comfort and amusement. By June 28, this ground-breaking invention will be made public. TCL is now finishing up preparations to introduce this excellent but very affordable TV technology.The first Mini LED TVs (C825) were released in India last year by the Chinese electronics manufacturer TCL. Quantum Dot Technology, a 120Hz MEMC, and compatibility for Dolby Vision and Dolby Vision IQ are all included in the TCL Mini LED QLED 4K C825 TV. Along with other cutting-edge technologies, the range supports voice control. The TCL Mini LED QLED 4K C825 comes in two different sizes 55-inches and 65-inches.The 120Hz MEMC and TCL’s proprietary algorithm in the TCL Mini LED QLED 4K C825 enable Dolby Vision IQ and ensure smooth playback of action-packed content.
For the latest gadget and tech news, and gadget reviews, follow us on Twitter, Facebook and Instagram. For newest tech & gadget videos subscribe to our YouTube Channel. You can also stay up to date using the Gadget Bridge Android App. You can find the latest car and bike news here.
Discord is one of the most popular Voice over IP (VoIP) instant messaging social platforms, especially amongst gamers. Users have the ability to communicate with each other through voice calls and texts as well as share media and files, both privately or as a part of communities with a common interest, called “servers”. The application is also becoming widely popular for streaming movies, TV shows or gaming sessions so that peers can enjoy watching or playing together while recording each others’ reactions live. Below is a step-by-step guide on how to stream Netflix on Discord in 2022, along with some common issues you might face and how to tackle them.
In This Article
Streaming Netflix On Discord By Screen Share
Step 1: Visit the Netflix website through your web browser and log in to your account. Step 2: Load the Netflix TV show or movie that you want to stream on Discord.Step 3: Open the Discord app on your system and connect to a server. Step 4: Click on the User Settings (gear) icon at the bottom left corner of the interface besides your username.Step 5: Choose the Activity Status option under the Activity Settings section according to your preference. Step 6: Click on Add it and then select the tab in your browser on which you have loaded Netflix. For example, if you used Google Chrome to open the Netflix website, then select Google Chrome.Step 7: Click on Add Game.Step 8: Close the User Settings menu and click on the Stream Google Chrome icon in the lower-left corner beside the Google Chrome tab.Step 9: A Screen Share pop-up window will appear on the screen. Select the browser tab with Netflix and adjust the stream settings accordingly.Step 10: Click on Go Live. Step 11: Now, all you have to do is head back to the Netflix tab in your browser and click on the play button!Read also: What Is Discord Nitro and should you buy it in 2022?
Common Streaming Issues Faced On Discord
You might face some issues when you use the screen share option on Discord for live streaming a movie, TV series or gaming session. Some of the common ones include a stream without audio or that with a black screen. Below are mentioned the different possible causes for such issues along with some remedies that you can use in such situations.
How To Stream Netflix On Discord With Audio
Audio issues are common amongst players and viewers while streaming on Discord. Some of the reasons reported for the same include lack of administrative access to the Discord application, lack of stability in its screen share feature, and corrupt or out-of-date audio drivers. For giving administrative access to the Discord app, right-click on it and go to Properties. Under the Compatibility tab, check the ‘Run this program as an administrator‘ box, click on Apply and then press OK to save changes. You can also try directly clicking on the ‘Run as administrator’ option under the context (right-click) menu. Make sure that all the audio drivers on your PC are up-to-date. Enable all audio devices and grant Discord all the permissions it requires to work efficiently on your system. Read also: Top 10 Movies And TV Series To Watch On Netflix In June 2022
How To Stream Netflix On Discord Without A Black Screen
Streaming a black screen is another common issue faced by users on Discord. Players are said to have a much higher probability of encountering this problem. The reasons attributing to this error may primarily include outdated or corrupted graphics drivers. For fixing this issue, you can try updating the graphics drivers on your system. You can also try updating the Discord application, running Discord in compatibility mode, disabling hardware acceleration or clearing the Discord cache. In this way, you can stream Netflix on Discord in 2022 while eradicating any issues you face. In case you encounter any other errors while streaming on Discord, do let us know about them in the comments section below. We will try our best to find a solution and get back to you on them as soon as possible. For the latest gadget and tech news and gadget reviews, follow us on Twitter, Facebook and Instagram. For newest tech & gadget videos subscribe to our YouTube Channel. You can also stay up to date using the Gadget Bridge Android App. You can find the latestcar and bike news here.
After being launched in 2020, Instagram Reels rose to immense popularity in India, especially after the nationwide TikTok ban. Like TikTok, Instagram Reels lets users create and share short-duration videos, typically lasting up to 15 seconds. Users create Reels to participate in cultural trends, collaborate with the community, and discover new ideas. While you can save the Reels you like on your Instagram profile, there is no way of downloading them to your phone. Luckily, there are a few third-party apps that allow you to save Instagram reels to your phone gallery. Today, we’ll show you how to download Instagram reels in gallery on Android.Read Also:Audio not working in Instagram reels and Instagram stories? Top 5 ways to fix it.
In This Article
Download a Reel on your Android phone without using a third-party app
Step 1: Launch the Instagram app and open the Reel you wish to download.
Step 2: Tap the Share icon.
Step 3: Select ‘Add reel to your story’.
Step 4: Tap the ellipses (three dots) at the top right corner of the screen.
Step 5: Select ‘Save’.
Step 6: Hit back and discard the Story.
The Instagram Reel will be downloaded to your Android Phone’s gallery.
Download Instagram Reels on an Android device using a third-party app
Step 1: Install ‘Video Downloader For Instagram’ from the Play Store to your Android device.Step 2: Open the app and set it up. It will require access to your gallery and a few other permissions. Step 3: Go to Instagram and open the Reel you want to download.Step 4: Click on the three dots at the bottom right and copy the link to the Reel.Step 5: Open the ‘Video Downloader for Instagram’ app and it will automatically start the download.Step 6: The Reel will be downloaded and saved to your phone gallery.You can also click “Share” on the Instagram Reel and choose ‘Video Downloader for Instagram’. The video will be automatically downloaded on your phone.
Use an online tool to download a Reel
This method works on smartphones as well but it will come in particularly handy if you are using your PC to browse Reels.Step 1: Open Instagram on your PC browser and select the Reel you want to download.
Step 2: Click on the ellipses (three dots) and select ‘Copy Link’.
Step 3: Go to Savefrom.net and select ‘Instagram Downloader’ from the top menu.
Step 4: Paste the Reel URL in the box and hit ‘Download’.
Step 5: Click on the ‘mp4’ icon.
The Instagram Reel will be saved on your device. If you are using this online tool on your Android smartphone, make sure you open the ‘Desktop Website’ on Chrome.
Frequently Asked Questions
Can I download Instagram Reels?
While there is no direct way to download Reels from the Instagram app, there are a couple of workarounds you can use. Sharing the Reel as your Story and then saving it to your device is the quickest way to go about it. You don’t have to publish the Story to save it on your phone. You can also use a third-party app like Video Downloader For Instagram to save Reels on your phone’s gallery.
What is the best Instagram Reels downloader?
There are a bunch of great apps to download Reels on your phone. Instore, Video Downloader for Instagram, and Video Downloader & Story Saver are some of the best Reel downloaders around.
Video Downloader for Instagram also lets you download IGTV videos, Instagram Stories, and photos directly to your phone. You can also use other apps like ‘Instore’ and ‘Video Downloader & Story Saver’ to download Reels. If you do not wish to download a third-party app to your phone, you can simply screen record while the Reel plays on your phone. If you want to save a reel in-app, simply open the reel and tap the ‘Save’ button and it will be saved to your profile.
For the latest gadget and tech news, and gadget reviews, follow us on Twitter, Facebook and Instagram. For newest tech & gadget videos subscribe to our YouTube Channel. You can also stay up to date using the Gadget Bridge Android App.
Switching to a new phone can be exciting, but the experience is often dampened by the fact that there aren’t that many phone transfer applications out there that can do the job properly. In some cases, your phone data doesn’t get transferred in full; in others, some data may get corrupted or lost in the process; in yet other cases, only certain data types can be moved. That’s why you need a robust app to transfer data from Android to Android, iPhone to Android, or any combination of the two most popular mobile operating systems in the world. Today, we’ll talk about MobileTrans, an excellent phone to phone transfer app that you can use both on your desktop as well as directly on your mobile phone when moving from one device to another.
In This Article
What is MobileTrans – Phone Transfer?
MobileTrans is actually a set of modules that allow you to seamlessly do a phone data transfer regardless of what operating system your device uses. Among these modules is the phone-to-phone transfer module, but there are also several other tools in this versatile utility, such as WhatsApp Transfer, iCloud transfer, import to phone, export to PC, backup & restore, and many more.
MobileTrans works on your PC or Mac and requires a quick installation of the app on your desktop computer. Using this and connector cables for your phones (one per device), you can then transfer all phone data from one device to another in a matter of minutes. In the next section, we’ll show you how to move an impressive 18+ data types from one phone to another regardless of the OS. Once you have installed MobileTrans on your desktop (Windows or macOS), please proceed with the steps shown in the following section.
How to Do a Full Phone Data Transfer from Android to Android
In this example, we’ll show you how to move all your data from one Android device to another. You can use the same process to transfer phone data from iPhone to iPhone or even between an iPhone and an Android smartphone – in either direction.
Step 1: Install the App on your PC or Mac
The first step is to get the installation completed, as mentioned before. Installing MobileTrans is as easy as downloading the EXE or DMG file and running it on your desktop to finish the installation.
Step 2: Select the Phone to Phone Module
Go to the Phone Transfer tab in the MobileTrans interface and then click on Phone to Phone.
Step 3: Connect the Two Devices to the Computer
You can now plug both phones into different USB ports in your computer. Once that’s done, check on the screen to see if both devices are being displayed properly.
Step 4: Complete the Phone to Phone Transfer
All you need to do now is check the data types that will be transferred – you can uncheck anything that you don’t need. Prior to that, see if the source device is on the left side; if not, you can use the Flip button to interchange their positions.
Finally, click Start and wait for the success message to appear. Depending on how much data you have on the old device, this should take a few seconds to a few minutes. You can unplug your phones from the computer once you see the final confirmation message.
What Other Methods are Available for Phone to Phone Transfers?
As you probably know, there are other methods to transfer data from Android to Android, such as Samsung Switch. Unfortunately, this only works with premium Samsung devices such as the Flip and some of the top-range Galaxy S devices. There are also other drawbacks because you can only transfer some types of data rather than do a full phone data transfer. Nevertheless, if your device is eligible, this is an option to consider since it’s basically free.
Another way to transfer data from one phone to another is to use Google Drive or another cloud storage service. Sadly, you can only move documents and media files because app files won’t work if you transfer them this way. Still, if you already have access to Drive or OneDrive, you can move your most important media and document files this way.
Email is another option but with obvious restrictions because there are limits to how much data you can attach per email. Generally, if you sync your Google account, you can access your mobile contacts on your desktop, after which you can transfer them to another mobile using the same Google account. It’s not very convenient but, in a pinch, it can be quite useful.
The Best Option for a “No Computer” Phone to Phone Transfer
The unfortunate reality is that you need a special application that can do phone-to-phone full-data transfers if you don’t want to leave anything behind on your old phone. And Wondershare MobileTrans is one of the few desktop applications that can do this. You can also use the MobileTrans mobile apps for phone data transfer if you don’t want to use a desktop app. These mobile apps are equally versatile. Moreover, they’re equally easy to use. Here’s a quick overview of the process:
How to Transfer Data from Android to Android without a PC or Mac
Step 1: Install the App on Both Devices
Install the MobileTrans mobile app for Android on both your phones – the old and the new.
Step 2: Choose the Source and Target Devices
In this step, launch the app on both devices, then select Old Phone and New Phone in the respective devices.
Choose the transfer option called QR code on the new phone, and then scan this from the old phone using the MobileTrans app.
Step 3: Establish Connection and Transfer Selected Data
On the old phone or source device, select the items (data types) that you want to transfer and hit the Send button.
Wait for the success message to appear on the target device (the new phone) and then close the apps once you see that.
The Bottom Line
Why struggle with inadequate solutions when you have two 100% working answers to the problem of phone data transfers? You can move all your data with zero errors from one device to any other device irrespective of whether these are iDevices or Android phones. All you need is either the MobileTrans Phone Transfer desktop app for Windows or Mac, or the mobile app versions of the software for iOS and Android, and you can confidently switch phones knowing that no data will be left behind on the old device.
For the latest gadget and tech news and gadget reviews, follow us on Twitter, Facebook and Instagram. For newest tech & gadget videos subscribe to our YouTube Channel. You can also stay up to date using the Gadget Bridge Android App. You can find the latest car and bike news here.
The introduction of the OnePlus Nord 2T 5G in India will occur shortly. The brand has not yet formally confirmed the date but the company has confirmed it will be announced very soon. However, the device is tipped for July 1 launch. In the UK and other European regions, OnePlus debuted the OnePlus Nord 2T, a new member of the Nord line, back in May. Ahead of the official launch Price information about the OnePlus Nord 2T 5G in the nation has also leaked. The competitive sub-Rs 30,000 price range is where the OnePlus Nord 2T 5G is anticipated to launch.After the device’s recent global reveal, OnePlus is prepared to further develop its Nord category with the introduction of the OnePlus Nord 2T 5G in India. The OnePlus Nord 2T significantly improves upon the OnePlus Nord 2’s well-liked flagship features to give users an improved experience.According to the company OnePlus Nord 2T includes OxygenOS 12.1, a faster MediaTek Dimensity 1300 chipset, the same flagship 80W SUPERVOOC fast charging that debuted on the OnePlus 10 Pro, an AI-enhanced flagship camera from the OnePlus 10R, and other features to provide a quicker and smoother experience at a great price. The eagerly awaited addition to the Nord category’s number series will soon be offered for purchase in India.It will replace the OnePlus Nord 2, which was introduced in July of last year. Recently, the MediaTek Dimensity 1300 SoC-powered phone debuted internationally. It features an inbuilt storage capacity of up to 256GB and a display with a refresh rate of 90Hz.According to reports, the OnePlus Nord 2T will be available in the nation in versions of 8GB with 128GB and 12GB with 256GB. The Nord 2T’s 128GB version will cost Rs 28,999, according to information that has been released. The Nord 2T 12GB RAM version, meanwhile, will cost Rs 33,999.With a 90Hz refresh rate and a punch hole notch, the Nord 2T’s 6.43-inch Full HD+ fluid AMOLED display is stunning. A Corning Gorilla Glass layer is included on the display panel, which also has space for an optical in-display fingerprint scanner.A 50MP Sony IMX766 sensor is one of three rear cameras included in the Nord 2T’s configuration. It is accompanied by a dual-tone LED light, a 2MP mono camera, and an 8MP ultra-wide-angle lens. A 32MP selfie camera is available on the device.The most recent Nord series phone features an 80W SuperVOOC fast-charging 4500mAh battery unit.As we said earlier the company has not yet revealed a specific launch timeline but Abhishek Yadav, a tipster, has asserted that the Nord 2T will debut in India on July 1. The tipster has now given a marketing image for the impending launch, which confirms that the Nord 2T will launch on July 1 in the Indian market, validating his assertion.The info is not official but it can be taken with a grain of salt.
For the latest gadget and tech news, and gadget reviews, follow us on Twitter, Facebook and Instagram. For newest tech & gadget videos subscribe to our YouTube Channel. You can also stay up to date using the Gadget Bridge Android App. You can find the latest car and bike news here.
We recently got a chance to catch up with Mr Sunish Raghavan, Senior Director, Printing Systems, HP India Market, who gave us some great insights into the HP India’s printing business and their new innovations. We did throw some curve balls at him, but he did not flinch even once. Here is how the HP business is performing and what all to expect.
HP has been number 1 in a lot of segments in India, how is the overall printer business doing in India?
HP’s leadership in printing has always been at the back of customer-centric innovations. In India, almost every 2nd printer sold is an HP printer. According to the data released by IDC (Q3 2021). – HP maintained its leadership in the overall HCP market with a share of 46.9% and a YoY growth in shipment of 2.3%. HP will continue to innovate to meet the ever-evolving printing demands of our consumers.
On the 2nd part of your question; In the new hybrid world, Printers have become more critical for businesses and homes and consumers have realized and acknowledged that printers are more important to daily life than they have ever been in the last 2 years. We are seeing strong demand and a surge in printer demand in India owing to many new use cases largely led by small and medium-sized businesses needing high-volume printing and consumers clearly prefer efficient, affordable, and easy-to-manage printing devices.
There also has been an uptick in printer demand due to the hybrid learning models involving a mix of both digital and physical learning. Parents have been relying heavily on the print medium as they recognize that children need to learn in more playful, creative, and holistic ways. This has transformed the market for Printers, and we expect to see growth in this segment.
Read Also:HP LaserJet Tank series with duplex printing launched in IndiaRecently, there have been good innovations coming by the HP printer team globally and in India. Can you tell our readers what new is HP offering and how it will change the lives of home and WFH (work from home) users?
With an increased ambit of home printing needs, be it from the home learning segment or the work from home professionals and SMBs, the industry is witnessing a consistent shift towards hybrid patterns. Consumers are looking for intelligent solutions to help them cope with the newer ways of learning and working. Picking cues from the same, HP is constantly innovating to deliver efficient, affordable, secure, self-reliant, and easy-to-use printing devices with a specific focus on consumer needs and use cases for small to medium businesses and home printing.
HP in the recent past has introduced several printers in the affordable home print segment. With such pocket-friendly innovations, we are helping home users, jobbers, learners, and small-medium businesses enjoy high-quality printing with best-in-class innovative features. Further, the current innovations in the home printing segment are focused on ink and laser technologies.
For instance, HP’s Smart Tank printers offer the lowest per-page cost-optimized for high volume printing, powered with smart guided lighting, low ink and paper sensors with mobile alerts that inform users before the ink runs out and help improve productivity with capabilities like duplex printing. In the laser segment, HP’s new LaserJet Tank Printer portfolio is a unique package that offers affordability, self-reliance, and a hassle-free printing experience for high-volume printing needs.
SMB is a big segment in India. A lot of new start-ups cropping here, how is HP helping them deliver the best prints and any programs HP is running to accelerate their growth?
Understanding that the SMBs are the backbone of the economy, HP began the reimagination of its small business printing category more than three years ago where the company connected with thousands of small business owners in more than 20 countries identifying areas where HP innovation and creativity could help achieve their goals.
A global HP study on SMBs revealed that small businesses are constantly on the lookout for products and printing solutions that are affordable, sustainable and deliver a high number of pages in the box to reduce the number of interventions.
Using these customer insights and to meet the evolving printing demands of small business owners, HP is constantly building dedicated SMB-focused products and solutions to help SMBs unlock innovation and further its commitment to support their revival in India. One such recent introduction is the industry’s First LaserJet Tank Printer portfolio to allow high-quality, low-cost printing for improved business efficiency. The new LaserJet Tank comes with a 40-sheet auto document feed support and a 50,000-page long-life imaging drum to ensure consistent, exceptional printing, even with daily use. With the toner alert system and 15-second mess-free self-reload, the Laser Tank printers allow users to enjoy a hassle-free installation and setup experience with the convenience of self-reliance to reduce common printing interruptions. The LaserJet Tank printer is also the most secure and sustainable product in its category.
Since saving costs is a top priority for small to medium businesses, this game-changing technology offers the lowest cost per page for laser print. HP’s latest innovations and intuitive features in the new LaserJet portfolio aim to better support the next generation of entrepreneurs and business owners by streamlining their print management. We are confident that this revolutionary technology will be able to serve the market of value-conscious users with high-volume printing needs looking to do more in terms of innovation, creativity, and productivity.
Read Also: Cheapest Wireless Colour Laser Printers in India (2022)How can one get their hands on the new HP LaserJet printers? How are HP printers reaching the masses, experience zones, online/offline retailers and can people expect discounts or exchange options at any of these sales points?
We have 600+ HP World Stores spread across India offering a wide range of HP’s Print and PS portfolio. Additionally, we have HP products available at all leading large format retail stores and thousands of multi-brand stores. HP also caters to online customers by making the products available on leading e-commerce platforms. Our customers can also purchase our entire print catalogue from HP India’s official website which is capable to deliver PAN India.
What is the HP India Road map looking like for the year 2022 and any last words?
Doubling our focus on insights-based innovation, we are looking at introducing product portfolios across all sectors to cater to the evolving needs of our users across all segments. We have a wide range of products lined up for the coming year which is guaranteed to elevate our users’ experience. In terms of print needs, we will continue to work on providing ways for consumers to access innovations that are user-friendly, cost-effective, and increases business efficiency.
For the latest gadget and tech news, and gadget reviews, follow us on Twitter, Facebook and Instagram. For newest tech & gadget videos subscribe to our YouTube Channel. You can also stay up to date using the Gadget Bridge Android App. You can find the latest car and bike news here.
iPhone SE 3 users often find themselves searching for the Night Mode on their camera. Even though iPhone SE has an A15 bionic processor and a 12 MP camera, it does not offer a Night Mode, unlike its flagship counterparts. While the camera quality on the iPhone SE 2022 is impeccable, the lack of Night Mode can prove to be a hindrance in taking high-quality pictures in low lighting. Luckily there are a few apps that will allow you to get Night Mode on your iPhone SE 2022. Today, we show you the best and easiest ways to get Night Mode on iPhone SE 3.Read Also:How To Clear Cookies On iPhone (iOS 16)?
In This Article
Use these apps to get Night Mode on iPhone SE 2022
Neural Cam
Using unique AI and computational photography technology, Neural Cam lets you show high-quality pictures in low lighting. The app works for both, front and rear cameras. Neural Cam also lets you take videos in Night Mode. Apart from Night Mode, Neural Cam offers a bunch of other tools and modes you can use to take better photos from your iPhone. You can adjust brightening levels, exposure, and the number of frames to take the ideal shot. Once you’ve taken a picture, Neural Cam also lets you edit it using its wide variety of tools.What sets Neural Cam apart from other apps in this list is the SmartCAPTURE technology that uses AI deep learning to assess the information from every shot and brighten it accordingly. Neural Cam is a paid app and is currently listed for $4.99 on the App Store.
Night Camera
Night Camera is a pretty straightforward and easy-to-use app that lets you shoot high-quality pictures in low lighting. The app boosts overall light and exposure to create a massive improvement in pictures taken at night. You can even control the light received by your iPhone lens by adjusting the shutter speed and exposure manually. You can install and use Night Cam for free from the App Store.
Pro Cam 8
Pro Cam 8 offers you a host of manual controls to take better shots in low lighting. With the ability to change exposure, shutter speed, ISO, and white balance, you will be able to overcome the difficulty of shooting pictures at night on your iPhone SE 3. Pro Cam also has an anti-shake feature, which comes in handy when you don’t have a tripod and need to hold the camera for an extended duration to take pictures with high exposure. Pro Cam 8 is currently available for $7.99 on the App Store.Read Also:How to Download and Install iOS 16 Developer Beta on iPhone?These are the best and easiest ways to get Night Mode on your iPhone SE 2022. While Neural Cam and Pro Cam 8 are paid apps, you may be able to find a free trial version either on the App Store or the app website. You will not be able to use advanced features on the trial version but it will come equipped with Night Mode. If there are other camera apps you like to use on your iPhone SE 3, let us know in the comments!
For the latest gadget and tech news, and gadget reviews, follow us on Twitter, Facebook and Instagram. For newest tech & gadget videos subscribe to our YouTube Channel. You can also stay up to date using the Gadget Bridge Android App. You can find the latest car and bike news here.
Everything done in this day and age, including ordering meals, clothing, submitting job applications, and interacting with friends on social media, is done online. Many times when we lose internet connectivity we cannot perform any of these things because they can be done online but for Gmail messages, though, this won’t be the case. Users of Gmail should be aware of a new feature that makes it unnecessary to have an internet connection in order to access messages. Thanks to this new functionality, you can now read, reply to, and search your Gmail messages even if there is no internet connection.Gmail has developed a function that makes it unnecessary to have an internet connection in order to access messages. Simply told, you may access your Gmail messages offline and still read, reply to, and search them.By going to mail.google.com, you may access the new function known as Google Support, which allows you to read, reply to, and search your Gmail messages even when you aren’t connected to the Internet.Google advises bookmarking the mentioned site in Chrome to enable offline access to Gmail. You may then need to seek your admin for assistance in changing your settings if you use Gmail with your work or school account.
Here’s how, per Google, to activate Gmail offline
You must first download Chrome to your computer or laptop. Gmail may only be used offline in a Chrome browser window; Incognito mode is not supported.
Next, navigate to the Gmail offline settings.
Select the “Enable offline mail” checkbox.
In your preferences, you can choose things like how many days’ worth of messages you want to sync.
then select “Save changes.”
You must open the link and look for the star symbol to the right of the URL bar in order to bookmark the Gmail so that you may use the portal offline. You must click “Done” after being prompted to bookmark the link after clicking the star. By doing this, you can quickly get to the Gmail inbox link in Chrome.
For the latest gadget and tech news, and gadget reviews, follow us on Twitter, Facebook and Instagram. For newest tech & gadget videos subscribe to our YouTube Channel. You can also stay up to date using the Gadget Bridge Android App. You can find the latest car and bike news here.
The world of Instagram is fascinating and full of surprises. The best thing about it is that it has become free space and community, where people can openly share their creative initiatives. It is the clearest example of how interconnected the world has become and how many opinions can now co-exist in our big world. Any kind of creativity and any view of art can easily find its supporters and fans all around the world. That’s why Instagram has become a perfect place for those who are looking for recognition.
However, nothing is as perfect as it seems. Instagram is a free and widely available application almost everyone can find and download. This fact has become the reason for an incredible level of competition. The market has a huge number of representatives, who are trying hard to win the attention of the audience. Standing out from the crowd is vital if you want to be noticed and attract that attention you’re craving. Instagram has a lot of engrained tools to edit photos and videos and create memorable, catchy stories.
Nevertheless, it’s not enough, and you need to do some research to find a perfect app to create unique posts and stories. Some additional services and apps can even improve your whole Instagram experience. For example, Instagram save story by Toolzu. The service will provide you with Instagram story video download. You won’t have to worry about the 24-hour limit anymore. The service is free, user-friendly and anonymous.
In This Article
A Design Kit
A Design Kit is not that app with unrealistic stickers, which make your photos look a bit childish. A Design Kit as an advanced service, which will help you to make beautiful unique photos and stories with the help of more than 50 customized fonts and more than 150 collage layouts. You are allowed to change the backgrounds and textures to make your photo even more unusual. The main disadvantage of the app is that it’s only available on the App Store. For that reason, if you’re an Android user, you’ll have to search for quality alternatives.
GoPro
GoPro cameras were popular some years ago. They have started the tendency of panoramic videos, which definitely look epic. The GoPro app is a decent alternative for an expensive camera. It is perfect, when you’re planning to record outdoors. Some adjustments are also available on the app. You can cut your video, change the speed, use the slow-motion effect. You can find the app both on the App Store and Play Market, which is one of its main advantages.
Magistro
The main highlight of Magistro is that this application is powered by Artificial Intelligence. The algorithm is basically doing all the job for you. It captures the best parts of your video to use for editing and creating the final result. The most fascinating part is the effects. The app chooses the best options itself. Different transitions and filters are available as well.
Read Also:Instagram launches ‘Do Your Thing’ campaign in India
Command
Created a nice post or story and want to keep up with the statistics? Well, it’s not a problem. Command is the app, which collects all the metrics connected to your account you can imagine. The service will give you a lot of insights of how often you make posts, your outreach and engagement rates. You can also keep track of the number of your followers’ activity and the way they interact with your profile and content.
Canva
Yes, old-fashioned Canva. It’s hard to find a more user-friendly and efficient alternative. Famous for its amazing tools for making presentations, Canva will also help you to create beautiful templates for your Instagram stories. You can use more than 50 fonts to decorate your templates and a great variety of stickers to make your posts and stories funkier.
Snapseed
Snapseed is a nice alternative for those who don’t know how to use Photoshop. This app has a user-friendly interface, which is not as scary as its older brother’s. Snapseed has a huge number of functions. It’s great for adjusting colours and the atmosphere of the photo. On the app you will also find some pre-made effects to make your experience easier.
Now you know which apps will help you to express your creative nature and improve your professional experience. We wish you luck in achieving your goals, both personal and professional!
For the latest gadget and tech news, and gadget reviews, follow us on Twitter, Facebook and Instagram. For newest tech & gadget videos subscribe to our YouTube Channel. You can also stay up to date using the Gadget Bridge Android App.
Garena Free Fire is a battle royale game with regular awards and tournaments to keep players interested. If you play Garena Free Fire, you should be aware of the redeem codes that are released on a daily basis. However, because the battle royale game is banned in India, players from other countries can use the Free Fire Redeem codes daily. If you’re unfamiliar with the Garena Free Fire redeem codes or don’t know how to get them, we’ve put together a step-by-step guide to help you redeem them. Check out Garena Free Fire Redeem Codes for June 27.The Free Fire redeem codes are a great way to get free stuff. These are 12-digit codes that contain alphabets and numbers, as well as an expiration date and time. Because the Garena FF redeem codes cannot be used more than once, you should hurry to the redemption page to claim your free reward before someone else does. To get a free reward, all you have to do is go to reward.ff.garena.com/en, which is the official redemption page. Also, keep an eye on this space for daily updates on Garena Free Fire redemption codes and rewards.
Google has always impressed us with the improved security in the upgraded versions of Android smartphones and tablets. So now, no more intruders can gain access to an Android device even after formatting it. This is possible due to the Google FRP lock and it’s available mostly in the Samsung and LG device models.
It prevents any fraudulent activity from being performed on your device. However, it creates a problem for the real owner if he forgets the Google credential or purchases a formatted used phone. If that’s the case with you too, then you have to know the trick to bypass Google account. Here, you are going to know it using an FRP bypass tool.
Part 1: How to Bypass FRP
Wondering how to bypass FRP lock? Well, many people like you are looking for a solution. Earlier, it was too tough to break the FRP security in Android devices. And guess now? It has become a lot easier due to the existence of the FRP bypass tool.
Gone were the days when bypassing Google FRP was a next to impossible task. It has now been simplified with the introduction of Dr.Fone – Screen Unlock (Android), a Android lock screen removal tool. This tool comes with the potential to break the 4 types of screen locks – PIN, Password, Pattern, and Fingerprints. No more you will need the PIN or Google account to bypass the FRP lock. Even someone with no technical background can use this Android lock screen removal software.
Steps to Use Dr.Fone – Screen Unlock for Android to Bypass FRP Samsung
If you have bought a second-hand device Samsung device, which still contains the previous owner’s Google account, bypass it with Dr. Fone – Screen Unlock (Android) conveniently. Especially in the case of S7/S8 devices, the methods are pretty helpful when you don’t know about the OS version. You can go through the steps below to find out how to do it:
Step 1: Power Off the Device
Before proceeding with the Samsung FRP bypass, you have to download the Dr.Fone – Screen Unlock on your PC. Next, connect your locked Samsung device to it. Make sure your Samsung device is turned off. Now, you have to press and hold three buttons together – “Volume Up”, “Bixby”, and “Power” buttons. As soon as the Samsung logo appears on the screen, release the keys immediately.
Step 2: Boot into Recovery
Now, your device will start booting in the recovery mode after you release the keys. Just click on the “Next” button and move on to the next step. The tool will display your device’s OS version in a big numerical size. To bypass the Google account verification lock, you need to pick the system version of your phone. Once identified, you can use the Dr.Fone “Unlock Android Screen and FRP” feature to bypass the FRP lock.
Part 2: Is There Any Risk Related to this FRP Bypass tool?
In short, no! If you’re hesitant about trying out this software, there’s nothing to fear. However, we know whenever a person tries something new, the risk is always there but don’t let it stop you from doing what’s right.
Dr.Fone – Screen Unlock (Android) is completely safe and promises to be a useful tool for breaking free from your phone maker’s restrictions. It is available for both iOS and Android smartphones. It’s a completely risk-free solution to remove the screen lock or bypass the FRP lock. Lost your Google account or forgotten the PIN code? Don’t worry! Let Dr.Fone handle it alone.
Advantages of Using Dr. Fone Screen Unlock Tool
Requires only 5 minutes to break the security of your phone including screen and FRP lock
No need to reset your device in your locked Samsung or LG phone to bypass FRP
Provides the support for more than 15 brands and 2000 smartphone and tablet models
Runs on any PC with the basic requirements such as 1Ghz CPU, 256 MB RAM, 200 MB Hard Disk Space, and Windows 7/8/8.1/10/11.
Closing Words
So, there you have it. In this post, we’ve demonstrated a way to bypass the Google account verification lock that is free and easy to implement. And we’ve done so in a way that doesn’t rely on any dodgy ADB commands or nefarious software.
Dr. Fone – Screen Unlock is a trustworthy unlocking application, which bypasses FRP lock without any hassle. While there have been other ways to bypass the security prompt implemented by Google, this method is the most reliable way to do so with zero damage to your phone.
But a simple tip to remember is that you should take a backup of your device data to avoid any problems in the future. For more tutorials, keep reading our blogs, and appreciate by sharing.
For the latest gadget and tech news, and gadget reviews, follow us on Twitter, Facebook and Instagram. For newest tech & gadget videos subscribe to our YouTube Channel. You can also stay up to date using the Gadget Bridge Android App. You can find the latest car and bike news here.
27 June 2022 Amazon Quiz has gone live. Customers from different parts of the country are participating in the daily quiz. The quiz begins from 12 AM to 11:59 PM. Those participating in the quiz can win exciting prizes by answering all the questions correctly. Today participants have a chance to win a Rs 15,000 Amazon Pay Balance.Amazon quiz brings an opportunity for its customers to win Amazon Pay Balance ranging from Rs 1,000 to Rs 50,000. The Quiz can be played from 12 AM to 11:59 PM. The e-commerce platform brings a fresh quiz on a daily basis which consists of five questions related to general knowledge and current affairs. The participants need to answer all the questions correctly and their names will be selected for a lucky draw. The winner will be announced at the end of the month.One wrong answer could eliminate you from the quiz. If you manage to answer all the questions correctly you can stand a chance to win a Rs 15,000 Amazon Pay Balance today. Only app users are eligible to participate in the Quiz. Check Out 27 June 2022 Amazon Quiz Answers.Amazon Quiz Today Prize – Rs 15,000 Amazon Pay BalanceQuiz Date – 27 June 2022Daily Timing – 12 AM to 11:59 PMWinner Announcement – Today 12 PM
In This Article
Amazon Quiz Answers Today 27 June 2022
Question 1: Who struck a hundred in 77 balls as England chased 299 to take a 2-0 lead against New Zealand in the recent Test series?Answer: Jonny BairstowQuestion 2: Which of these organizations recently agreed to temporarily lift patents on COVID-19 vaccines?
Answer: WTO
Question 3: The Lost City’ is a recent adventure movie that stars who among these in the lead role?Answer: Sandra BullockQuestion 4: The people shown here are draped in colours associated with which of these countries?Answer: EthiopiaQuestion 5: The term Pisa in the name of this monument, is derived from which language?Answer: Greek
How To Play Amazon Quiz
Only app users are eligible to play the Amazon quiz every morning from 12 AM to 11:59 PM. The quiz is not available on the desktop. For those who are unaware of how to play the Amazon quiz below are the steps, you can follow to take the quiz.
Firstly download the Amazon app from Google Play Store or App Store
Now fill in the required information through the Sign Up option.
You need to log in to the Amazon app and scroll down on the home screen to find the Amazon Quiz banner.
Tap on the Amazon Quiz banner and tap on the Start button to start the Quiz.
Now you will get 5 questions and you need to answer them correctly. One wrong answer will eliminate you from the Quiz.
After answering all the questions correctly you are now eligible for a Lucky Draw.
The winner’s name will be announced today at 12 PM.
For a long time, WhatsApp users had been requesting the feature to exclude some contacts from seeing their last seen, profile picture, about, and status. Finally, on June 16th, WhatsApp announced new privacy options, which allowed users to hide certain profile features. In this article, we’ll show you how to hide WhatsApp last seen, profile picture, about, and status from some contacts in your list.Read Also:How to download an image or video from WhatsApp status using an Android device?
Here’s how you can hide WhatsApp Last Seen, Profile Picture, About, and Status from some contacts
Step 1: Open WhatsApp on your smartphone and click on the three dots at the top right corner.Step 2: Select Settings.Step 3: Select Account.Step 4: Select Privacy.Step 5: Select whether you want to change the visibility of Last Seen, Profile Photo, About, or Status.Step 6: Once you click on either one of them, you’ll be presented with three visibility options. If you want to exclude certain contacts from seeing your Last Seen, Profile Photo, About, or Status, click on ‘My Contacts, except…’Step 7: Select the contacts you want to exclude from viewing your Last Seen, Profile Photo, About, or Status.Step 8: Save your changes by tapping the Tick sign at the bottom right corner of your screen. Your changes will be saved.Read Also:WhatsApp’s new feature will let you share your status on FacebookThese updates are immensely helpful for users who only wish to reserve personal information from a few contacts, without wanting to change their visibility for all contacts. Since WhatsApp rolls out its new updates in phases, you might have to wait a while if this update isn’t already available on your device. On top of that, the new WhatsApp update also allows users to respond to messages with emojis.
For the latest gadget and tech news, and gadget reviews, follow us on Twitter, Facebook and Instagram. For newest tech & gadget videos subscribe to our YouTube Channel. You can also stay up to date using the Gadget Bridge Android App. You can find the latest car and bike news here.
Your Android Smart TV comes with a collection of pre-installed apps that are frequently used by most of its users. You can also download a wide variety of apps and games on your Android Smart TV using the Google Play Store. While basic apps like YouTube and Netflix may come pre-installed on your Smart TV, there are a whole bunch of other apps which will enhance your Smart TV experience. Today, we’ll show you how to install new apps on your Android Smart TV.Read Also:How to block YouTube channels from appearing on your Smart TV?
Here’s how you can install new apps on your Android Smart TV
Firstly, you need to make sure your TV is connected to the WiFi and has a stable internet connection. Secondly, you need a Google Account in order to download apps from the Google Play Store.Step 1: Go to the Android TV home screen and scroll to Apps.Step 2: Open the Google Play Store app.Step 3: Click on the Search bar.Step 4: Search for the App you want to download using the onscreen keyboard or the microphone.Step 5: Select the App you want to download and press Install.Read Also:The best 4K smart TVs under Rs 50,000 to watch Netflix, Prime Video and other OTT platformsFollowing these easy steps, you’ll be able to download any app you want on your Android Smart TV. App availability may depend on the manufacturer and the Smart TV model. If you wish to uninstall a certain app from your Smart TV, go to Settings>Apps. Select the app you wish to delete, then press Uninstall.
For the latest gadget and tech news, and gadget reviews, follow us on Twitter, Facebook and Instagram. For newest tech & gadget videos subscribe to our YouTube Channel.
The speed of your mouse pointer is set at a standard setting by default. Most users rarely ever need to change this speed. However, you may need to speed up the mouse pointer when your mouse slows down or when you attach another monitor to your system and need to customise the mouse accordingly. Today, we show you how to change your mouse pointer speed in Windows 11.Read Also:5 wireless mice under Rs 5,000 for work from home.
In This Article
How to change mouse pointer speed using Settings
Step 1: Open Settings.Step 2: Select Bluetooth & Devices.Step 3: Select the Mouse option in the window that opens.Step 4: Use the slider next to ‘Mouse Pointer Speed’ to change the speed of your mouse pointer according to your liking.
How to change mouse pointer speed using the Control Panel
Step 1: Open Control Panel.Step 2: Select the Mouse option.Step 3: In the small window that opens up, click on the ‘Pointer Options’ tab.Step 4: Use the slider in the ‘Motions’ sections to change the mouse pointer speed according to your liking.Read Also:5 best Ergonomic mice for working from homeFollowing the steps above you will be able to change the mouse pointer speed in Windows 11. You can also change your mouse pointer speed through the Registry Editor, but this can be a risky process and isn’t ideally advised when there are much easier ways to carry out your task. Once you enter Mouse settings, you can also customise your mouse icon and add other functionalities to your mouse. You can also change the visibility of the pointer by adding a trail to its movement or by choosing to hide it while you’re typing.
For the latest gadget and tech news, and gadget reviews, follow us on Twitter, Facebook and Instagram. For newest tech & gadget videos subscribe to our YouTube Channel. You can also stay up to date using the Gadget Bridge Android App. You can find the latest car and bike news here.
WhatsApp now allows you to link up to four devices to your account, excluding your phone. WhatsApp Web and the WhatApp desktop app can come in quite handy if you want to use the instant messenger on your PC or laptop. While using WhatsApp for their desktop, users sometimes report an issue where they aren’t able to receive any notifications from the app or the web page. Today, we’ll show you how to enable desktop notifications for WhatsApp Web and the WhatsApp desktop app. Read Also:How to migrate your WhatsApp data from Android to iPhone?
How to enable desktop notifications for Whatsapp
Step 1: Turn on the Whatsapp desktop app or Whatsapp Web.Step 2: Tap the three dots on the top left part of the screen, next to your display name.Step 3: Click on Settings.Step 4: Click on Notifications.Step 5: Select which notifications you want to mute and which ones you want to turn on.Step 6: Close the Settings. Read Also:How To Set Up And Use WhatsApp On iPad (2022)?Using these easy steps you can enable desktop notifications for WhatsApp web and the WhatsApp app. If you’re still not receiving any notifications from Whatsapp, it might be because your browser is blocking the notifications. In order to resolve this go to the Chrome menu and then select Settings>Privacy and Security>Site Settings>Notifications. Search for web.whatsapp.com in the web bar and allow notifications. Sometimes Google Chrome blocks notifications from websites by default so you may want to allow Whatsapp Web notifications before you continue.
For the latest gadget and tech news, and gadget reviews, follow us on Twitter, Facebook and Instagram. For newest tech & gadget videos subscribe to our YouTube Channel. You can also stay up to date using the Gadget Bridge Android App. You can find the latest car and bike news here.
25 June 2022 Amazon Quiz has gone live on its platform. The quiz timings are 12 AM to 11:59 PM. The Amazon App users can participate in the quiz daily and all they have to do is submit correct answers to the questions asked on the e-commerce platform. Today’s participants can get a chance to win Rs 25,000 Amazon Pay Balance.By participating in the Amazon Quiz the participants can win Amazon Pay Balance ranging from Rs 1,000 to Rs 50,000 every day while sitting at home. To win the participants must answer five questions correctly that are based on current events and general knowledge. One wrong answer can eliminate you from the quiz. The results will be announced at the end of the month. Today’s question will let you win Rs 25,000 Amazon Pay Balance. Check below for today’s Amazon quiz answers.Amazon Quiz Today Prize – Rs 25,000 Amazon Pay BalanceQuiz Date – 25 June 2022Daily Timing – 12 AM to 11:59 PMWinner Announcement – Today 12 PM
Amazon Quiz Answers Today 25 June 2022
Question 1: Hardik Pandya recently got named the Indian captain for a T20I series to be held in which country?
Answer: IrelandQuestion 2: The Prime Minister will lead a mass yoga event from which historical place on the occasion of International Day of Yoga?Answer: Mysuru PalaceQuestion 3: Javicia Leslie is known for playing which of these superhero characters in a series?Answer: BatwomanQuestion 4: In which country would you find this famous bridge, that ‘breathes fire’ on special occasions?Answer: VietnamQuestion 5: This is a skeleton of which dinosaur?
Answer: Tyrannosaurus RexHow To Play Amazon QuizOnly app users are eligible to play the Amazon quiz every morning from 12 AM to 11:59 PM. The quiz is not available on the desktop. For those who are unaware of how to play the Amazon quiz below are the steps, you can follow to take the quiz.
Firstly download the Amazon app from Google Play Store or App Store
Now fill in the required information through the Sign Up option.
You need to log in to the Amazon app and scroll down on the home screen to find the Amazon Quiz banner.
Tap on the Amazon Quiz banner and tap on the Start button to start the Quiz.
Now you will get 5 questions and you need to answer them correctly. One wrong answer will eliminate you from the Quiz.
After answering all the questions correctly you are now eligible for a Lucky Draw.
The winner’s name will be announced today at 12 PM.
If you use your PC for gaming or video editing, chances are you may have encountered an overheated CPU on several occasions. While CPUs are bound to get heated up while carrying out heavy tasks, constant high temperatures can diminish the performance of your PC. It is highly advisable to constantly monitor the temperature of your CPU, especially while carrying out heavy tasks. In this article, we will show you how to check the CPU temperature in Windows 11.Read Also:Best ways to free up hard disk space in Windows10
In This Article
Top 3 Ways to check the CPU Temperature in Windows 11
Windows 11 does not have any built-in tool to monitor the CPU temperature. However, you can check the temperature of your CPU by entering BIOS. While this may be the only way to check the CPU temperature without using third-party software, it has its drawbacks. Firstly, BIOS is not suited to monitor the CPU temperature while you’re carrying out tasks in real-time. Secondly, entering BIOS every time you want to monitor your CPU can be quite the hassle and is not generally advised.There are a large number of tools present online that will help you monitor your CPU performance and temperature. We’ve selected two of the best and easy-to-use tools: Core Temp and NZXT CAM.
Check CPU Temperature using BIOS
Step 1: Open the Start menu and click on Restart.Step 2: As soon as your system reboots and the display turns on, press the BIOS key for your motherboard. Depending on the manufacturer, the BIOS key of your system could be either F10, F12, F2, F1, or DEL. Press the BIOS key multiple times to make sure it works.Step 3: Your system will enter BIOS. Scan the interface to see the CPU Performance tab. This may be located in different places for different manufacturers. Within this tab, you will be able to see your CPU temperature.
Use Core Temp to check CPU Temperature
It is not ideal to enter BIOS every time you want to check the CPU temperature. If you want to keep regular checks on your CPU temperature it is advisable to install third-party software. One such tool is Core Temp. With Core Temp, you can monitor the fluctuations in your CPU temperature, and also keep tabs on the temperature of individual components within your CPU. Follow these steps to install and use Core Temp.Step 1: Visit the Core Temp website and click on the Download button.Step 2: Open the downloaded file and install Core Temp on your system.Step 3: Once installation is complete, launch the Core Temp tool. You will be able to view the CPU temperature along with additional information in the main window.
Use NZXT Cam to check CPU Temperature
NZXT Cam is another easy-to-use third-party software that helps you check the temperature of your CPU. Follow these steps to install and use NZXT Cam on your system.Step 1: Visit the NZXT website and download the CAM software.Step 2: Open the downloaded file and install it on your system.Step 3: Launch NZXT CAM.Step 4: The software will prompt you to sign up, but you can continue in guest mode as well.Step 5: After accepting the Terms of Use, you will be able to see the PC Monitoring window. Find the CPU window. The CPU temperature will be listed on it, along with additional information.Read Also:7 reasons why you are getting the blue screen of death (BSOD) in Windows 10 and its fixesThe ideal CPU temperature depends on a lot of factors, such as system configuration, quality of CPU cooling fans, the position of the CPU and ventilation around it. The ideal CPU temperature could be anywhere between 30-60°C. This can increase up to 65-70°C when your CPU is carrying a heavy load. Anything in the range of 80-90°C is considered dangerous for your PC.If you keep facing overheating issues with your CPU, you should consider upgrading the fans, cleaning any traces of dust, and ensuring no external object is restricting the airflow towards the CPU. If the issue still persists, you should take your CPU to a professional for further diagnosis.
For the latest gadget and tech news, and gadget reviews, follow us on Twitter, Facebook and Instagram. For newest tech & gadget videos subscribe to our YouTube Channel. You can also stay up to date with the Gadget Bridge Android App.
Apple announced iOS 16 at its Worldwide Developer’s Conference on June 6th 2022. Since then there has been a buzz around the new operating system and Apple users are highly anticipating its arrival. If you can’t wait to use it, you can download the iOS 16 Developer Beta software on your iPhone. Since the software is still under development, Apple has launched the beta profile for members registered in the Apple Developer Program to try out on their devices and report any bugs they come across. This helps in strengthening the software and creating a well-rounded finished product. Today, we’ll show you how you can download and install the iOS 16 developer beta on your iPhone.Read Also:How to Change Your Apple ID Email Address?
Follow these steps to download and install the iOS 16 Developer Beta profile on your iPhone
Step 1: Download the iOS 16 configuration profile from this page.Step 2: Connect your iPhone to a power chord and make sure it’s charging.Step 3: Connect your iPhone to the WiFi.Step 4: Go to Settings>General>Software update.Step 5: Tap on ‘Download and Install’.Step 6: If you want to install the right away, tap on Install. If you want to schedule the update for later, select Install Tonight or Remind me Later. Make sure your iPhone is connected to the power chord whenever the installation begins.Your iOS 16 Developer Beta software will be installed on your iPhone.Read Also:How to Pay Someone With Apple Pay on Your iPhone?Only devices that have been registered under the Apple Developer Program have access to beta software. If you download an unauthorised copy of the software, it carries the risk of posing a serious threat to your device and is in direct violation of Apple policy. Before you download beta software, make sure you’ve created a backup of the data on your device.You can report any bugs your encounter or even suggest improvements with the built-in Feedback Assistant app.
For the latest gadget and tech news, and gadget reviews, follow us on Twitter, Facebook and Instagram. For newest tech & gadget videos subscribe to our YouTube Channel. You can also stay up to date using the Gadget Bridge Android App. You can find the latest car and bike news here.
Through the decades, Craiglist has become a household name when it comes to buying and selling goods online. The local listing website makes it easy for a user to put up a listing for either selling a product or requesting a service. From used cars to job opportunities, you can find almost anything on Craiglist. However, with its massive popularity, Craiglist is also a hunting ground for scammers and corrupt sellers. It can become quite annoying trying to navigate a sea of listings and frequently coming across something suspicious. Luckily, there are some equally good alternatives to Craiglist out there. Today, we bring you the top 7 websites like Craigslist to find used items for sale in the USA.Read Also:7 best alternatives to Omegle
OfferUp is one of the best services to sell or buy goods locally. Currently operating only within the US, OfferUp focuses more on local sellers and buyers. OfferUp also allows its users to communicate with the sellers directly on the app so they don’t have to risk sharing their personal contact information.The website is well designed and easy to use. OfferUp also allows users to rate the sellers, so you know well in advance what kind of a person you’re dealing with.
One of the better alternatives to Craigslist, Oodle has an old-school interface, quite similar to Craigslist itself. Oodle allows you to make listings in order to sell goods and services. It also lets you add other people to your network. You can Oodle for anything, ranging from looking for employers to selling pets online.
Facebook Marketplace may be one of the newer entries on this list but it is already used by millions of people worldwide. You can browse the website for used items for sale, go through listings of new products, or even create a classified-like posting yourself. If you’re looking for something specific, there are several groups that might offer products suited to your needs or at least guide you in the right direction. It is advised to make sure the seller is verified. If they aren’t, it might be a good idea to browse their Facebook profile for any suspicious activity. You can even send them a message if you want a better price for the product. Conversely, selling an item on Facebook Marketplace is quite easy as well. All you need to do is snap a picture of the item you want to sell and make a post mentioning the price and additional details about the product.
Locanto operates across 60 countries worldwide and is one of the more popular alternatives to Craigslist. Apart from selling items, you can also use Locanto to look up tutoring classes, local events, jobs, real estate, vehicles, household help, rideshare opportunities, music artists, and even pet sitters.Similar to Craiglist, Locanto also allows you to post personal ads. You need to manually enter your location on the website in order to browse used items for sale around your area. Locanto also accepts money to boost your listing, so you might see paid ads on the website.
eBay is probably the biggest website in the world for browsing used items for sale. You can find just about anything from eBay, with products ranging from cellphones to automobile parts. Since eBay is a popular website and gets a lot of traffic, it can attract a lot of scammers and corrupt sellers. Therefore, one must proceed with caution and only buy from verified sellers or the ones with favourable ratings.
Decluttr is a buying and selling website designed specifically for electronic goods. Instead of linking you with a buyer, Decluttr buys the item from you. Decluttr also provides a free instant valuation for the product you’re trying to sell. On top of that, it also provides free shipping.You can use Decluttr not only for electronic devices, but also for CDs, DVDs, books, and games. You can even sell tech items in bulk.
Poshmark is a marketplace designed for buying and selling clothes. Once you’ve signed up, you’ll be able to browse several categories of clothing products and even look up sellers that offer something you like. If you’re a seller, Poshmark offers you free shipping, making it easier for you to ship your products. Buyers, however, have to incur the cost of shipping on top of Poshmark’s 20% commission. Read Also:Best websites to shop and get international gadgets to India from?These 7 websites will cover everything you want when it comes to looking for used items for sale. Although these websites are generally safe and have created helpful communities, it is always better to be on the side of caution when dealing with sellers online. Always avoid giving out your personal information, and always select a public place when arranging for a spot to pick up an item.
For the latest gadget and tech news, and gadget reviews, follow us on Twitter, Facebook and Instagram. For newest tech & gadget videos subscribe to our YouTube Channel. You can also stay up to date using the Gadget Bridge Android App. You can find the latest car and bike news here.
HP has announced the launch of 2022 models of Omen 16, Omen 17, Victus 15, Victus 16 Gaming Laptops in the Indian market. The laptops are powered by AMD Ryzen 6000 series and Intel Core 12th generation CPUs. Additionally, the company has also introduced the Omen 45L, 40L, 25L, and Victus 15L desktops with Intel and AMD Ryzen processors.HP OMEN 16
In This Article
HP Omen 16 price in India and specifications
The 16.1-inch IPS QHD display on the HP Omen 16 has a 16:9 aspect ratio with a refresh rate of 165 Hz. It is equipped with an Intel Core i7-12700H or AMD Ryzen RX 6650M processor that supports up to 12th generation, Nvidia GeForce RTX 3080 Ti graphics, 32GB of DDR5 RAM, and up to 2TB of PCIe SSD storage. Additionally, the laptop has a keyboard with up to RGB lighting. In terms of pricing the HP Omen 16 comes with a starting price of Rs 1,09,999. It will be available in a single Shadow black colour option.
HP Omen 17 price in India and specifications
While the 17.3-inch screen on the OMEN 17’s micro-edge bezel display provides edge-to-edge immersion for a higher screen-to-chassis ratio. The OMEN family of products offers exceptional cooling and power together with an additional thermal outlet and heat pipe that boosts GPU and CPU performance. Its specs are comparable to those of the Omen 16.Starting in August, the HP Omen 17 will be available for purchase for Rs. 1,99,999.HP VICTUS 15
HP Victus 15 price in India and specifications
The 15.6-inch HP Victus 15 has a 15.5-inch display and is equipped with Nvidia RTX 3050Ti graphics and up to a 12th-generation Intel Core i7 processor. A Temporal Noise Reduction (TNR) technology is also built into the laptop, which is said to assist reduce background noise in videos with Super Resolution Auto Scene Setting. Beginning in July, the HP Victus 15 will be sold for a starting price of Rs. 67,999.HP VICTUS 16
HP Victus 16 price in India and specifications
For convenient everyday carrying, the 16.1-inch display on the HP Victus 16 offers settings up to FHD 144 Hz and Eyesafe low-blue light. With graphics driven by an AMD RyzenTM 7 6800H processor and up to an NVIDIA GeForce RTXTM 3050Ti laptop GPU. Up to 32 GB of DDR5-4800 MHz memory with choices for lightning-fast speed and responsive gameplay. A backlit keyboard printed in the recognisable font used on OMEN devices, and built-in fast keys for the OCC, power button, and calculator.Wide back vents improve thermal efficiency while also adding visual flair. Four-way airflow and a two-heat pipe design help to keep things running cool when the action heats up. Gaming and other tasks can be completed quickly and easily with a single SSD up to 512 GB PCIe NVMeTM TLC storage.Victus 16 is currently offered at a starting price of Rs. 84,999.
HP OMEN 45L, 40L and 25L desktops price in India and Specifications
The OMEN 45L, 40L, and 25L desktops are powered by Intel processors with up to 12 cores and up to 10GB of memory, as well as HyperX 32GB (2x16GB) DDR4 3733 XMP RGB for the 40L model and up to 10GB of memory for the 45L model. This guarantees fluid gaming.Omen 45L desktops use cutting-edge, patent-protected cooling technology that uses outside air to maintain the perfect temperature within the machine. Even when your games get hot, overheating is minimised by the careful arrangement of the fans.HP Omen 45LThe machine is aesthetically beautiful because of its tempered glass panels, full metal body, tool-free entrance, and full RGB control. Users may adjust every aspect thanks to the straightforward technology, including RAM frequency, intelligent overclocking, SW-based fan control, BIOS access, and RBG with OMEN gaming hub.The starting price for the HP Omen 45L, Omen 40L, and Omen 25L PCs is Rs. 1,49,999.
HP Victus 15L desktops price in India and Specifications
The Victus 15L’s Intel i7- 12700F 12 CORES processor and either an AMD Ryzen 7 5700G 8 CORES or an NVIDIA GeForce RTX 3060 Ti 8GB graphics card guarantee fluid gameplay and more. It has a small overall footprint and an interchangeable RBG logo for a unique lifestyle expression.The new desktop PC line’s considerable customization capabilities improve consumers’ gaming experiences. The Victus 15L desktop is being offered for a starting price of Rs. 93,999.
For the latest gadget and tech news, and gadget reviews, follow us on Twitter, Facebook and Instagram. For newest tech & gadget videos subscribe to our YouTube Channel. You can also stay up to date using the Gadget Bridge Android App. You can find the latest car and bike news here.
Garena Free Fire is a battle royale game with regular awards and tournaments to keep players interested. If you play Garena Free Fire, you should be aware of the redeem codes that are released on a daily basis. However, because the battle royale game is banned in India, players from other countries can use the Free Fire Redeem codes daily. If you’re unfamiliar with the Garena Free Fire redeem codes or don’t know how to get them, we’ve put together a step-by-step guide to help you redeem them. Check out Garena Free Fire Redeem Codes for June 24.The Free Fire redeem codes are a great way to get free stuff. These are 12-digit codes that contain alphabets and numbers, as well as an expiration date and time. Because the Garena FF redeem codes cannot be used more than once, you should hurry to the redemption page to claim your free reward before someone else does. To get a free reward, all you have to do is go to reward.ff.garena.com/en, which is the official redemption page. Also, keep an eye on this space for daily updates on Garena Free Fire redemption codes and rewards.
In This Article
Garena Free Fire Redeem Codes Today 24 June 2022
FF9MJ31CXKRG
FFCO8BS5JW2D
PCNF5CQBAJLK
FFAC2YXE6RF2
FFICJGW9NKYT
WEYVGQC3CT8Q
3IBBMSL7AK8G
FV5BNJ45IT8U
F4N5K6LYOU9I
FH2GYFDHE34G
F7YGT1BE456Y
FJBHVFS4TY23
F87GYF3DGE6B
How to Get Free Fire Redeem Codes for Garena on June 24?
Logitech G has expanded its gaming product portfolio with the introduction of two new gaming keyboards in the Indian market. The company has announced Logitech G413 SE and Logitech G413 TKL SE Mechanical Gaming Keyboards. The keyboards feature a basic design and support LED lighting. These devices incorporate PBT keycaps which are believed to be long-lasting due to their design.The G413 SE Mechanical Gaming Keyboard and the G413 TKL (Tenkeyless) SE Mechanical Gaming Keyboard have been released in India. These new, inexpensive keyboards, which are designed for accuracy and performance, feature gaming-grade mechanical switches and incredibly hard PBT keycaps that are resistant to wear, fading, and shining.The Tactile Mechanical Switches included on the G413 SE Mechanical Gaming Keyboards provide gamers who desire immediate feedback with uncompromised performance. The keyboards also include PBT keycaps, which are among the most resilient PBT keycaps on the market thanks to their superior construction, durability over time, heat resistance, and wear resistance. The keyboard has a minimalist appearance combined with features that make it a must-have for gamers, like white LED lighting and a top case made of an aluminium-magnesium alloy with a black-brushed finish.With the addition of the six-key rollover anti-ghosting performance, which enables multiple keys to be pressed simultaneously and all register at the same time to initiate a specific game move, the keyboards were also created to deliver reliable key input in comparison to other non-gaming mechanical keyboards.The retail price of the Logitech G413 SE is INR 6,995, and the price of the Logitech G413 TKL SE Mechanical Gaming Keyboards is INR 5,995.Mr. Roopak Krishnan, Head of Marketing and Category, Logitech India said, “We spent a lot of time carefully designing keyboards that deliver advanced performance with just the right feature set. Made with strong, durable materials and high-performance features, these keyboards are an excellent option for gamers who want a mechanical keyboard at a great price.”
For the latest gadget and tech news, and gadget reviews, follow us on Twitter, Facebook and Instagram. For newest tech & gadget videos subscribe to our YouTube Channel. You can also stay up to date using the Gadget Bridge Android App. You can find the latest car and bike news here.
A cookie is a piece of data that a site puts on your device so that the website can remember you the next time you make a visit. Cookies play a vital role in personalising your browsing experience, as they keep a track of your web activity and preferences. For example, a shopping website would store cookies on your system which would help it to save your cart information so that you don’t have to start afresh the next time. However, cookies also pose privacy risks, as they might store your sensitive information which can get into the wrong hands if targeted by hackers or people with malicious intent. Moreover, if they pile up over time, they may take up space and slow the performance of your device. Here are the various ways how to clear cookies on your iPhone (iOS 16) in 2022.
In This Article
To Clear Both Your History And Cookies
If you want to clear all your browser history, cookies and cache, all you need to do is go to Settings > Safari and tap on Clear History and Website Data. In case you’re worried that this would remove or change all your AutoFill information from Safari, then let us assure you that it does not. Read also: How to Change Your Apple ID Email Address?
To Clear Your Cookies But Keep Your History
If you don’t wish to clear your history but only want to remove cookies, go to Settings > Safari > Advanced > Website Data and then tap on Remove All Website Data.
Block Cookies
If you want to block cookies for websites you visit in the future, go to Settings > Safari and toggle on Block All Cookies. Blocking cookies might hinder the performance efficiency of certain websites. For example, some features on a website might not work properly. You might not be able to sign in even with your correct username and password. Read also: How To Turn On AirDrop On iPhone (2022)?
Use Third-Party Content Blockers
Content blockers are third-party apps that let Safari block cookies, pop-ups and other such content. There are numerous content blocker apps available on the App Store, such as AdBlock Pro for Safari, BlockBear, Roadblock, and more. These help block ads, trackers, and unnecessary resources to speed up your browsing in Safari. To set up a content blocker:Step 1: Download a content blocker from the App Store.Step 2: Go to Settings > Safari > Extensions.Step 3: Tap to turn on a listed content blocker application. That’s it!You can even use more than one content blocker if you wish to. In this way, you can clear cookies on your iPhone (iOS 16). In case you know of any other methods for the same, do share with us in the comments section below. For the latest gadget and tech news and gadget reviews, follow us on Twitter, Facebook and Instagram. For newest tech & gadget videos subscribe to our YouTube Channel. You can also stay up to date using the Gadget Bridge Android App. You can find the latestcar and bike news here.


?")
 Step 1: Visit the Netflix website through your web browser and log in to your account.
Step 2: Load the Netflix TV show or movie that you want to stream on Discord.
Step 3: Open the Discord app on your system and connect to a server.
Step 1: Visit the Netflix website through your web browser and log in to your account.
Step 2: Load the Netflix TV show or movie that you want to stream on Discord.
Step 3: Open the Discord app on your system and connect to a server.
 Step 4: Click on the User Settings (gear) icon at the bottom left corner of the interface besides your username.
 Step 5: Choose the Activity Status option under the Activity Settings section according to your preference.
Step 6: Click on Add it and then select the tab in your browser on which you have loaded Netflix. For example, if you used Google Chrome to open the Netflix website, then select Google Chrome.
Step 5: Choose the Activity Status option under the Activity Settings section according to your preference.
Step 6: Click on Add it and then select the tab in your browser on which you have loaded Netflix. For example, if you used Google Chrome to open the Netflix website, then select Google Chrome.
 Step 7: Click on Add Game.
 Step 8: Close the User Settings menu and click on the Stream Google Chrome icon in the lower-left corner beside the Google Chrome tab.
 Step 9: A Screen Share pop-up window will appear on the screen. Select the browser tab with Netflix and adjust the stream settings accordingly.
Step 10: Click on Go Live.
Step 11: Now, all you have to do is head back to the Netflix tab in your browser and click on the play button!
Read also: What Is Discord Nitro and should you buy it in 2022?
Step 9: A Screen Share pop-up window will appear on the screen. Select the browser tab with Netflix and adjust the stream settings accordingly.
Step 10: Click on Go Live.
Step 11: Now, all you have to do is head back to the Netflix tab in your browser and click on the play button!
Read also: What Is Discord Nitro and should you buy it in 2022?

 Step 3: Select ‘Add reel to your story’.
 Step 4: Tap the ellipses (three dots) at the top right corner of the screen.
 Step 5: Select ‘Save’.
 Step 6: Hit back and discard the Story.
The Instagram Reel will be downloaded to your Android Phone’s gallery.
Step 6: Hit back and discard the Story.
The Instagram Reel will be downloaded to your Android Phone’s gallery.
 Step 2: Open the app and set it up. It will require access to your gallery and a few other permissions.
Step 3: Go to Instagram and open the Reel you want to download.
Step 4: Click on the three dots at the bottom right and copy the link to the Reel.
Step 2: Open the app and set it up. It will require access to your gallery and a few other permissions.
Step 3: Go to Instagram and open the Reel you want to download.
Step 4: Click on the three dots at the bottom right and copy the link to the Reel.
 Step 5: Open the ‘Video Downloader for Instagram’ app and it will automatically start the download.
 Step 6: The Reel will be downloaded and saved to your phone gallery.
 You can also click “Share” on the Instagram Reel and choose ‘Video Downloader for Instagram’. The video will be automatically downloaded on your phone.
 Step 3: Go to Savefrom.net and select ‘Instagram Downloader’ from the top menu.
 Step 4: Paste the Reel URL in the box and hit ‘Download’.
 Step 5: Click on the ‘mp4’ icon.
 The Instagram Reel will be saved on your device. If you are using this online tool on your Android smartphone, make sure you open the ‘Desktop Website’ on Chrome.

 Go to the Phone Transfer tab in the MobileTrans interface and then click on Phone to Phone.
Step 3: Connect the Two Devices to the Computer
Go to the Phone Transfer tab in the MobileTrans interface and then click on Phone to Phone.
Step 3: Connect the Two Devices to the Computer
 You can now plug both phones into different USB ports in your computer. Once that’s done, check on the screen to see if both devices are being displayed properly.
Step 4: Complete the Phone to Phone Transfer
All you need to do now is check the data types that will be transferred – you can uncheck anything that you don’t need. Prior to that, see if the source device is on the left side; if not, you can use the Flip button to interchange their positions.
You can now plug both phones into different USB ports in your computer. Once that’s done, check on the screen to see if both devices are being displayed properly.
Step 4: Complete the Phone to Phone Transfer
All you need to do now is check the data types that will be transferred – you can uncheck anything that you don’t need. Prior to that, see if the source device is on the left side; if not, you can use the Flip button to interchange their positions.
 Finally, click Start and wait for the success message to appear. Depending on how much data you have on the old device, this should take a few seconds to a few minutes. You can unplug your phones from the computer once you see the final confirmation message.
 In this step, launch the app on both devices, then select Old Phone and New Phone in the respective devices.
Choose the transfer option called QR code on the new phone, and then scan this from the old phone using the MobileTrans app.
Step 3: Establish Connection and Transfer Selected Data
In this step, launch the app on both devices, then select Old Phone and New Phone in the respective devices.
Choose the transfer option called QR code on the new phone, and then scan this from the old phone using the MobileTrans app.
Step 3: Establish Connection and Transfer Selected Data
 On the old phone or source device, select the items (data types) that you want to transfer and hit the Send button.
 Wait for the success message to appear on the target device (the new phone) and then close the apps once you see that.


 Using unique AI and computational photography technology, Neural Cam lets you show high-quality pictures in low lighting. The app works for both, front and rear cameras. Neural Cam also lets you take videos in Night Mode. Apart from Night Mode, Neural Cam offers a bunch of other tools and modes you can use to take better photos from your iPhone. You can adjust brightening levels, exposure, and the number of frames to take the ideal shot. Once you’ve taken a picture, Neural Cam also lets you edit it using its wide variety of tools.
What sets Neural Cam apart from other apps in this list is the SmartCAPTURE technology that uses AI deep learning to assess the information from every shot and brighten it accordingly. Neural Cam is a paid app and is currently listed for $4.99 on the App Store.
Using unique AI and computational photography technology, Neural Cam lets you show high-quality pictures in low lighting. The app works for both, front and rear cameras. Neural Cam also lets you take videos in Night Mode. Apart from Night Mode, Neural Cam offers a bunch of other tools and modes you can use to take better photos from your iPhone. You can adjust brightening levels, exposure, and the number of frames to take the ideal shot. Once you’ve taken a picture, Neural Cam also lets you edit it using its wide variety of tools.
What sets Neural Cam apart from other apps in this list is the SmartCAPTURE technology that uses AI deep learning to assess the information from every shot and brighten it accordingly. Neural Cam is a paid app and is currently listed for $4.99 on the App Store.
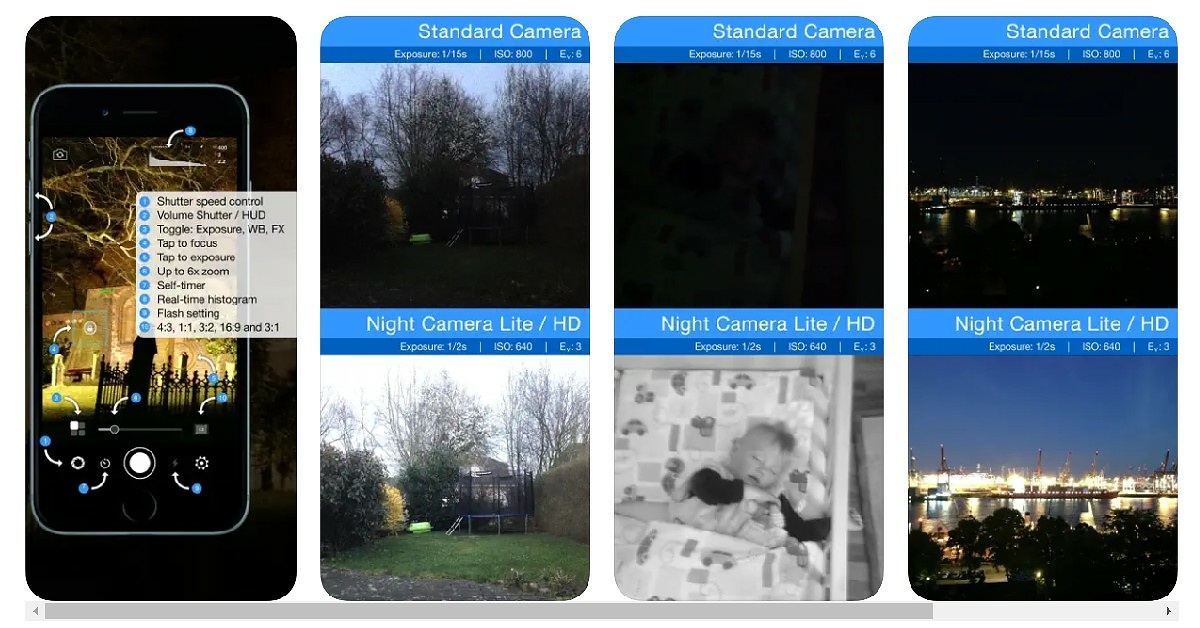 Night Camera is a pretty straightforward and easy-to-use app that lets you shoot high-quality pictures in low lighting. The app boosts overall light and exposure to create a massive improvement in pictures taken at night. You can even control the light received by your iPhone lens by adjusting the shutter speed and exposure manually. You can install and use Night Cam for free from the App Store.
 Pro Cam 8 offers you a host of manual controls to take better shots in low lighting. With the ability to change exposure, shutter speed, ISO, and white balance, you will be able to overcome the difficulty of shooting pictures at night on your iPhone SE 3. Pro Cam also has an anti-shake feature, which comes in handy when you don’t have a tripod and need to hold the camera for an extended duration to take pictures with high exposure. Pro Cam 8 is currently available for $7.99 on the App Store.
Read Also: How to Download and Install iOS 16 Developer Beta on iPhone?
These are the best and easiest ways to get Night Mode on your iPhone SE 2022. While Neural Cam and Pro Cam 8 are paid apps, you may be able to find a free trial version either on the App Store or the app website. You will not be able to use advanced features on the trial version but it will come equipped with Night Mode. If there are other camera apps you like to use on your iPhone SE 3, let us know in the comments!
For the latest gadget and tech news, and gadget reviews, follow us on Twitter, Facebook and Instagram. For newest tech & gadget videos subscribe to our YouTube Channel. You can also stay up to date using the Gadget Bridge Android App. You can find the latest car and bike news here.
Pro Cam 8 offers you a host of manual controls to take better shots in low lighting. With the ability to change exposure, shutter speed, ISO, and white balance, you will be able to overcome the difficulty of shooting pictures at night on your iPhone SE 3. Pro Cam also has an anti-shake feature, which comes in handy when you don’t have a tripod and need to hold the camera for an extended duration to take pictures with high exposure. Pro Cam 8 is currently available for $7.99 on the App Store.
Read Also: How to Download and Install iOS 16 Developer Beta on iPhone?
These are the best and easiest ways to get Night Mode on your iPhone SE 2022. While Neural Cam and Pro Cam 8 are paid apps, you may be able to find a free trial version either on the App Store or the app website. You will not be able to use advanced features on the trial version but it will come equipped with Night Mode. If there are other camera apps you like to use on your iPhone SE 3, let us know in the comments!
For the latest gadget and tech news, and gadget reviews, follow us on Twitter, Facebook and Instagram. For newest tech & gadget videos subscribe to our YouTube Channel. You can also stay up to date using the Gadget Bridge Android App. You can find the latest car and bike news here. 

 Step 2: Boot into Recovery
Now, your device will start booting in the recovery mode after you release the keys. Just click on the “Next” button and move on to the next step. The tool will display your device’s OS version in a big numerical size. To bypass the Google account verification lock, you need to pick the system version of your phone. Once identified, you can use the Dr.Fone “Unlock Android Screen and FRP” feature to bypass the FRP lock.
Step 2: Boot into Recovery
Now, your device will start booting in the recovery mode after you release the keys. Just click on the “Next” button and move on to the next step. The tool will display your device’s OS version in a big numerical size. To bypass the Google account verification lock, you need to pick the system version of your phone. Once identified, you can use the Dr.Fone “Unlock Android Screen and FRP” feature to bypass the FRP lock.
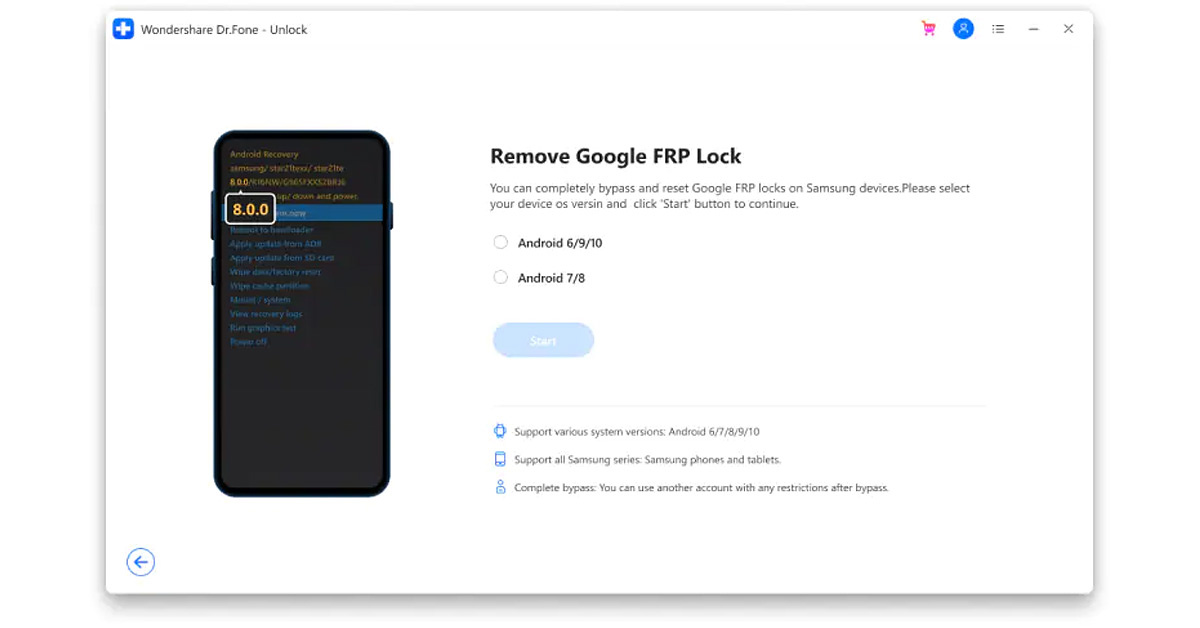


 Step 2:
 Step 3:
 Step 4:
 Step 5:
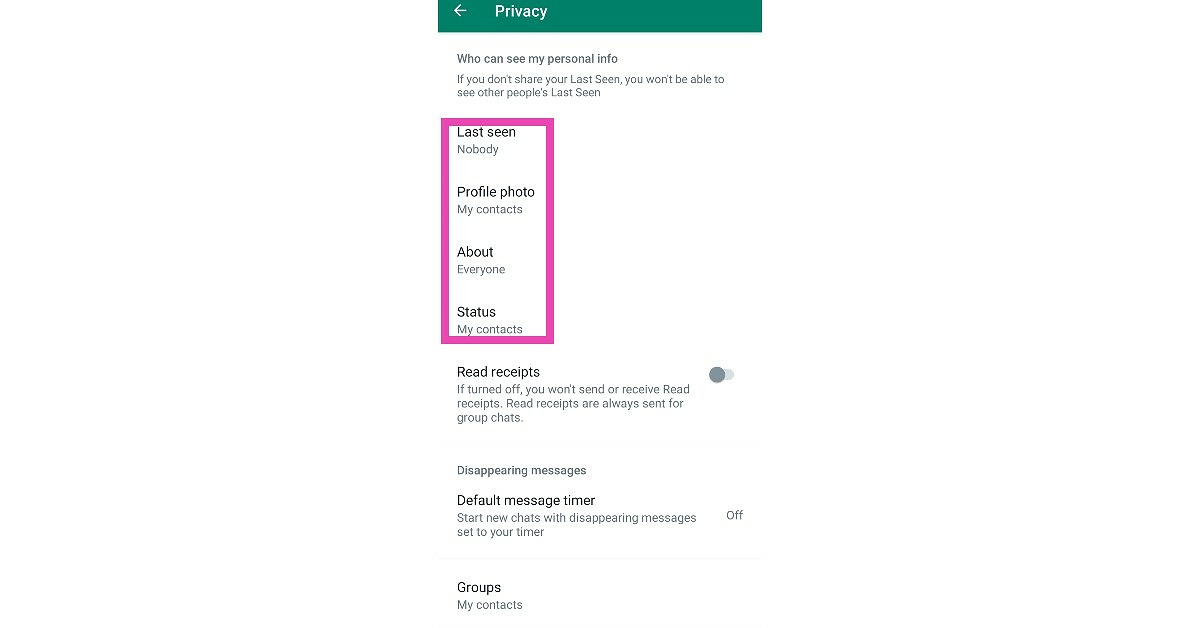 Step 6:
 Step 7:

 Step 3: Click on the Search bar.
 Step 4: Search for the App you want to download using the onscreen keyboard or the microphone.
 Step 5: Select the App you want to download and press Install.
 Read Also: The best 4K smart TVs under Rs 50,000 to watch Netflix, Prime Video and other OTT platforms
Following these easy steps, you’ll be able to download any app you want on your Android Smart TV. App availability may depend on the manufacturer and the Smart TV model. If you wish to uninstall a certain app from your Smart TV, go to Settings>Apps. Select the app you wish to delete, then press Uninstall.
For the latest gadget and tech news, and gadget reviews, follow us on Twitter, Facebook and Instagram. For newest tech & gadget videos subscribe to our YouTube Channel.
Read Also: The best 4K smart TVs under Rs 50,000 to watch Netflix, Prime Video and other OTT platforms
Following these easy steps, you’ll be able to download any app you want on your Android Smart TV. App availability may depend on the manufacturer and the Smart TV model. If you wish to uninstall a certain app from your Smart TV, go to Settings>Apps. Select the app you wish to delete, then press Uninstall.
For the latest gadget and tech news, and gadget reviews, follow us on Twitter, Facebook and Instagram. For newest tech & gadget videos subscribe to our YouTube Channel. 
 Step 3: Select the Mouse option in the window that opens.
 Step 4: Use the slider next to ‘Mouse Pointer Speed’ to change the speed of your mouse pointer according to your liking.

 Step 2: Select the Mouse option.
 Step 3: In the small window that opens up, click on the ‘Pointer Options’ tab.
 Step 4: Use the slider in the ‘Motions’ sections to change the mouse pointer speed according to your liking.
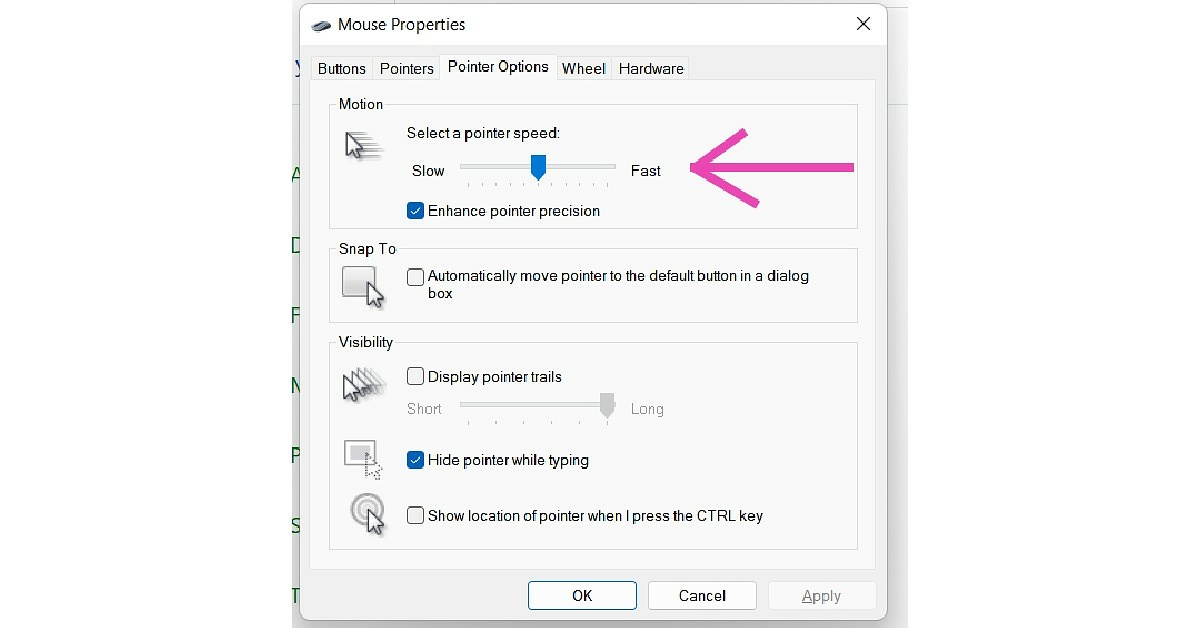 Read Also: 5 best Ergonomic mice for working from home
Following the steps above you will be able to change the mouse pointer speed in Windows 11. You can also change your mouse pointer speed through the Registry Editor, but this can be a risky process and isn’t ideally advised when there are much easier ways to carry out your task. Once you enter Mouse settings, you can also customise your mouse icon and add other functionalities to your mouse. You can also change the visibility of the pointer by adding a trail to its movement or by choosing to hide it while you’re typing.
For the latest gadget and tech news, and gadget reviews, follow us on Twitter, Facebook and Instagram. For newest tech & gadget videos subscribe to our YouTube Channel. You can also stay up to date using the Gadget Bridge Android App. You can find the latest car and bike news here.
Read Also: 5 best Ergonomic mice for working from home
Following the steps above you will be able to change the mouse pointer speed in Windows 11. You can also change your mouse pointer speed through the Registry Editor, but this can be a risky process and isn’t ideally advised when there are much easier ways to carry out your task. Once you enter Mouse settings, you can also customise your mouse icon and add other functionalities to your mouse. You can also change the visibility of the pointer by adding a trail to its movement or by choosing to hide it while you’re typing.
For the latest gadget and tech news, and gadget reviews, follow us on Twitter, Facebook and Instagram. For newest tech & gadget videos subscribe to our YouTube Channel. You can also stay up to date using the Gadget Bridge Android App. You can find the latest car and bike news here. 
 Step 3: Click on Settings.
 Step 4: Click on Notifications.
 Step 5: Select which notifications you want to mute and which ones you want to turn on.
 Step 6: Close the Settings.
Read Also: How To Set Up And Use WhatsApp On iPad (2022)?
Using these easy steps you can enable desktop notifications for WhatsApp web and the WhatsApp app. If you’re still not receiving any notifications from Whatsapp, it might be because your browser is blocking the notifications. In order to resolve this go to the Chrome menu and then select Settings>Privacy and Security>Site Settings>Notifications. Search for web.whatsapp.com in the web bar and allow notifications. Sometimes Google Chrome blocks notifications from websites by default so you may want to allow Whatsapp Web notifications before you continue.
For the latest gadget and tech news, and gadget reviews, follow us on Twitter, Facebook and Instagram. For newest tech & gadget videos subscribe to our YouTube Channel. You can also stay up to date using the Gadget Bridge Android App. You can find the latest car and bike news here.
Step 6: Close the Settings.
Read Also: How To Set Up And Use WhatsApp On iPad (2022)?
Using these easy steps you can enable desktop notifications for WhatsApp web and the WhatsApp app. If you’re still not receiving any notifications from Whatsapp, it might be because your browser is blocking the notifications. In order to resolve this go to the Chrome menu and then select Settings>Privacy and Security>Site Settings>Notifications. Search for web.whatsapp.com in the web bar and allow notifications. Sometimes Google Chrome blocks notifications from websites by default so you may want to allow Whatsapp Web notifications before you continue.
For the latest gadget and tech news, and gadget reviews, follow us on Twitter, Facebook and Instagram. For newest tech & gadget videos subscribe to our YouTube Channel. You can also stay up to date using the Gadget Bridge Android App. You can find the latest car and bike news here. 


 Step 2: Open the downloaded file and install Core Temp on your system.
Step 3: Once installation is complete, launch the Core Temp tool. You will be able to view the CPU temperature along with additional information in the main window.
Step 2: Open the downloaded file and install Core Temp on your system.
Step 3: Once installation is complete, launch the Core Temp tool. You will be able to view the CPU temperature along with additional information in the main window.

 Step 2: Open the downloaded file and install it on your system.
Step 3: Launch NZXT CAM.
Step 4: The software will prompt you to sign up, but you can continue in guest mode as well.
Step 5: After accepting the Terms of Use, you will be able to see the PC Monitoring window. Find the CPU window. The CPU temperature will be listed on it, along with additional information.
Step 2: Open the downloaded file and install it on your system.
Step 3: Launch NZXT CAM.
Step 4: The software will prompt you to sign up, but you can continue in guest mode as well.
Step 5: After accepting the Terms of Use, you will be able to see the PC Monitoring window. Find the CPU window. The CPU temperature will be listed on it, along with additional information.
 Read Also: 7 reasons why you are getting the blue screen of death (BSOD) in Windows 10 and its fixes
The ideal CPU temperature depends on a lot of factors, such as system configuration, quality of CPU cooling fans, the position of the CPU and ventilation around it. The ideal CPU temperature could be anywhere between 30-60°C. This can increase up to 65-70°C when your CPU is carrying a heavy load. Anything in the range of 80-90°C is considered dangerous for your PC.
If you keep facing overheating issues with your CPU, you should consider upgrading the fans, cleaning any traces of dust, and ensuring no external object is restricting the airflow towards the CPU. If the issue still persists, you should take your CPU to a professional for further diagnosis.
For the latest gadget and tech news, and gadget reviews, follow us on Twitter, Facebook and Instagram. For newest tech & gadget videos subscribe to our YouTube Channel. You can also stay up to date with the Gadget Bridge Android App.
Read Also: 7 reasons why you are getting the blue screen of death (BSOD) in Windows 10 and its fixes
The ideal CPU temperature depends on a lot of factors, such as system configuration, quality of CPU cooling fans, the position of the CPU and ventilation around it. The ideal CPU temperature could be anywhere between 30-60°C. This can increase up to 65-70°C when your CPU is carrying a heavy load. Anything in the range of 80-90°C is considered dangerous for your PC.
If you keep facing overheating issues with your CPU, you should consider upgrading the fans, cleaning any traces of dust, and ensuring no external object is restricting the airflow towards the CPU. If the issue still persists, you should take your CPU to a professional for further diagnosis.
For the latest gadget and tech news, and gadget reviews, follow us on Twitter, Facebook and Instagram. For newest tech & gadget videos subscribe to our YouTube Channel. You can also stay up to date with the Gadget Bridge Android App. 
 Step 2: Connect your iPhone to a power chord and make sure it’s charging.
Step 3: Connect your iPhone to the WiFi.
Step 4: Go to Settings>General>Software update.
Step 2: Connect your iPhone to a power chord and make sure it’s charging.
Step 3: Connect your iPhone to the WiFi.
Step 4: Go to Settings>General>Software update.
 Step 5: Tap on ‘Download and Install’.
Step 6: If you want to install the right away, tap on Install. If you want to schedule the update for later, select Install Tonight or Remind me Later. Make sure your iPhone is connected to the power chord whenever the installation begins.
Your iOS 16 Developer Beta software will be installed on your iPhone.
Read Also: How to Pay Someone With Apple Pay on Your iPhone?
Only devices that have been registered under the Apple Developer Program have access to beta software. If you download an unauthorised copy of the software, it carries the risk of posing a serious threat to your device and is in direct violation of Apple policy. Before you download beta software, make sure you’ve created a backup of the data on your device.
You can report any bugs your encounter or even suggest improvements with the built-in Feedback Assistant app.
For the latest gadget and tech news, and gadget reviews, follow us on Twitter, Facebook and Instagram. For newest tech & gadget videos subscribe to our YouTube Channel. You can also stay up to date using the Gadget Bridge Android App. You can find the latest car and bike news here.
Step 5: Tap on ‘Download and Install’.
Step 6: If you want to install the right away, tap on Install. If you want to schedule the update for later, select Install Tonight or Remind me Later. Make sure your iPhone is connected to the power chord whenever the installation begins.
Your iOS 16 Developer Beta software will be installed on your iPhone.
Read Also: How to Pay Someone With Apple Pay on Your iPhone?
Only devices that have been registered under the Apple Developer Program have access to beta software. If you download an unauthorised copy of the software, it carries the risk of posing a serious threat to your device and is in direct violation of Apple policy. Before you download beta software, make sure you’ve created a backup of the data on your device.
You can report any bugs your encounter or even suggest improvements with the built-in Feedback Assistant app.
For the latest gadget and tech news, and gadget reviews, follow us on Twitter, Facebook and Instagram. For newest tech & gadget videos subscribe to our YouTube Channel. You can also stay up to date using the Gadget Bridge Android App. You can find the latest car and bike news here. 
 OfferUp is one of the best services to sell or buy goods locally. Currently operating only within the US, OfferUp focuses more on local sellers and buyers. OfferUp also allows its users to communicate with the sellers directly on the app so they don’t have to risk sharing their personal contact information.
The website is well designed and easy to use. OfferUp also allows users to rate the sellers, so you know well in advance what kind of a person you’re dealing with.
OfferUp is one of the best services to sell or buy goods locally. Currently operating only within the US, OfferUp focuses more on local sellers and buyers. OfferUp also allows its users to communicate with the sellers directly on the app so they don’t have to risk sharing their personal contact information.
The website is well designed and easy to use. OfferUp also allows users to rate the sellers, so you know well in advance what kind of a person you’re dealing with.
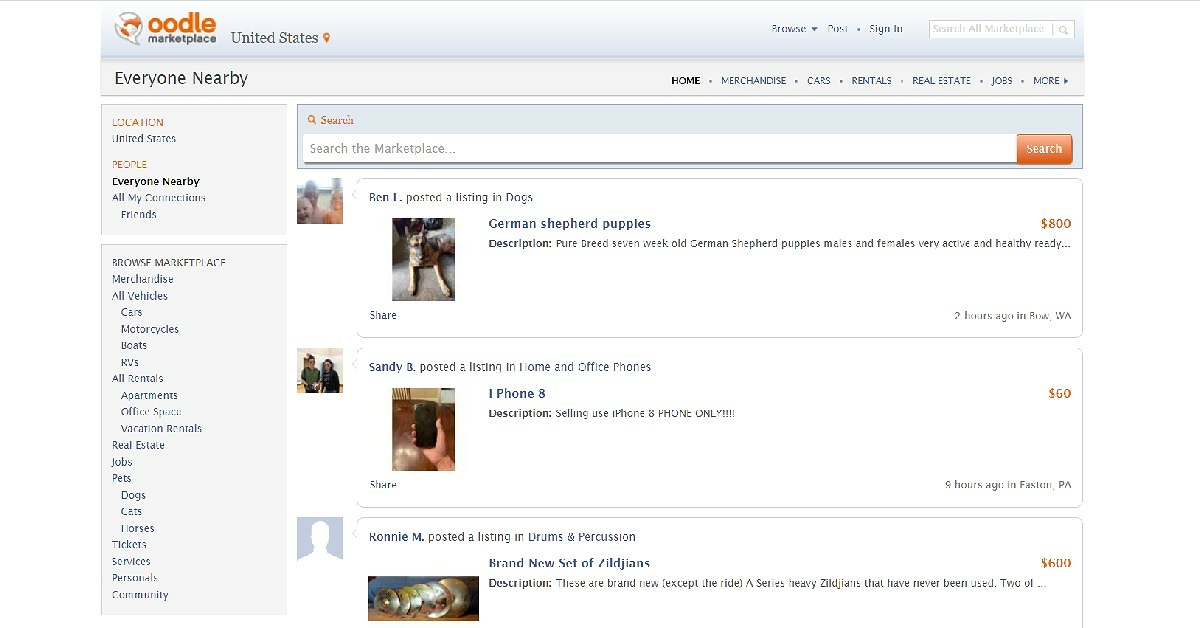 One of the better alternatives to Craigslist, Oodle has an old-school interface, quite similar to Craigslist itself. Oodle allows you to make listings in order to sell goods and services. It also lets you add other people to your network. You can Oodle for anything, ranging from looking for employers to selling pets online.
 Facebook Marketplace may be one of the newer entries on this list but it is already used by millions of people worldwide. You can browse the website for used items for sale, go through listings of new products, or even create a classified-like posting yourself. If you’re looking for something specific, there are several groups that might offer products suited to your needs or at least guide you in the right direction.
It is advised to make sure the seller is verified. If they aren’t, it might be a good idea to browse their Facebook profile for any suspicious activity. You can even send them a message if you want a better price for the product.
Conversely, selling an item on Facebook Marketplace is quite easy as well. All you need to do is snap a picture of the item you want to sell and make a post mentioning the price and additional details about the product.
Facebook Marketplace may be one of the newer entries on this list but it is already used by millions of people worldwide. You can browse the website for used items for sale, go through listings of new products, or even create a classified-like posting yourself. If you’re looking for something specific, there are several groups that might offer products suited to your needs or at least guide you in the right direction.
It is advised to make sure the seller is verified. If they aren’t, it might be a good idea to browse their Facebook profile for any suspicious activity. You can even send them a message if you want a better price for the product.
Conversely, selling an item on Facebook Marketplace is quite easy as well. All you need to do is snap a picture of the item you want to sell and make a post mentioning the price and additional details about the product.
 Locanto operates across 60 countries worldwide and is one of the more popular alternatives to Craigslist. Apart from selling items, you can also use Locanto to look up tutoring classes, local events, jobs, real estate, vehicles, household help, rideshare opportunities, music artists, and even pet sitters.
Similar to Craiglist, Locanto also allows you to post personal ads. You need to manually enter your location on the website in order to browse used items for sale around your area. Locanto also accepts money to boost your listing, so you might see paid ads on the website.
Locanto operates across 60 countries worldwide and is one of the more popular alternatives to Craigslist. Apart from selling items, you can also use Locanto to look up tutoring classes, local events, jobs, real estate, vehicles, household help, rideshare opportunities, music artists, and even pet sitters.
Similar to Craiglist, Locanto also allows you to post personal ads. You need to manually enter your location on the website in order to browse used items for sale around your area. Locanto also accepts money to boost your listing, so you might see paid ads on the website.
 eBay is probably the biggest website in the world for browsing used items for sale. You can find just about anything from eBay, with products ranging from cellphones to automobile parts. Since eBay is a popular website and gets a lot of traffic, it can attract a lot of scammers and corrupt sellers. Therefore, one must proceed with caution and only buy from verified sellers or the ones with favourable ratings.
 Decluttr is a buying and selling website designed specifically for electronic goods. Instead of linking you with a buyer, Decluttr buys the item from you. Decluttr also provides a free instant valuation for the product you’re trying to sell. On top of that, it also provides free shipping.
You can use Decluttr not only for electronic devices, but also for CDs, DVDs, books, and games. You can even sell tech items in bulk.
Decluttr is a buying and selling website designed specifically for electronic goods. Instead of linking you with a buyer, Decluttr buys the item from you. Decluttr also provides a free instant valuation for the product you’re trying to sell. On top of that, it also provides free shipping.
You can use Decluttr not only for electronic devices, but also for CDs, DVDs, books, and games. You can even sell tech items in bulk.
 Poshmark is a marketplace designed for buying and selling clothes. Once you’ve signed up, you’ll be able to browse several categories of clothing products and even look up sellers that offer something you like.
If you’re a seller, Poshmark offers you free shipping, making it easier for you to ship your products. Buyers, however, have to incur the cost of shipping on top of Poshmark’s 20% commission.
Read Also: Best websites to shop and get international gadgets to India from?
These 7 websites will cover everything you want when it comes to looking for used items for sale. Although these websites are generally safe and have created helpful communities, it is always better to be on the side of caution when dealing with sellers online. Always avoid giving out your personal information, and always select a public place when arranging for a spot to pick up an item.
For the latest gadget and tech news, and gadget reviews, follow us on Twitter, Facebook and Instagram. For newest tech & gadget videos subscribe to our YouTube Channel. You can also stay up to date using the Gadget Bridge Android App. You can find the latest car and bike news here.
Poshmark is a marketplace designed for buying and selling clothes. Once you’ve signed up, you’ll be able to browse several categories of clothing products and even look up sellers that offer something you like.
If you’re a seller, Poshmark offers you free shipping, making it easier for you to ship your products. Buyers, however, have to incur the cost of shipping on top of Poshmark’s 20% commission.
Read Also: Best websites to shop and get international gadgets to India from?
These 7 websites will cover everything you want when it comes to looking for used items for sale. Although these websites are generally safe and have created helpful communities, it is always better to be on the side of caution when dealing with sellers online. Always avoid giving out your personal information, and always select a public place when arranging for a spot to pick up an item.
For the latest gadget and tech news, and gadget reviews, follow us on Twitter, Facebook and Instagram. For newest tech & gadget videos subscribe to our YouTube Channel. You can also stay up to date using the Gadget Bridge Android App. You can find the latest car and bike news here. 


?")
 If you want to clear all your browser history, cookies and cache, all you need to do is go to Settings > Safari and tap on Clear History and Website Data. In case you’re worried that this would remove or change all your AutoFill information from Safari, then let us assure you that it does not.
Read also: How to Change Your Apple ID Email Address?
If you want to clear all your browser history, cookies and cache, all you need to do is go to Settings > Safari and tap on Clear History and Website Data. In case you’re worried that this would remove or change all your AutoFill information from Safari, then let us assure you that it does not.
Read also: How to Change Your Apple ID Email Address?
 If you want to block cookies for websites you visit in the future, go to Settings > Safari and toggle on Block All Cookies. Blocking cookies might hinder the performance efficiency of certain websites. For example, some features on a website might not work properly. You might not be able to sign in even with your correct username and password.
Read also: How To Turn On AirDrop On iPhone (2022)?
If you want to block cookies for websites you visit in the future, go to Settings > Safari and toggle on Block All Cookies. Blocking cookies might hinder the performance efficiency of certain websites. For example, some features on a website might not work properly. You might not be able to sign in even with your correct username and password.
Read also: How To Turn On AirDrop On iPhone (2022)?
 Content blockers are third-party apps that let Safari block cookies, pop-ups and other such content. There are numerous content blocker apps available on the App Store, such as AdBlock Pro for Safari, BlockBear, Roadblock, and more. These help block ads, trackers, and unnecessary resources to speed up your browsing in Safari. To set up a content blocker:
Step 1: Download a content blocker from the App Store.
Step 2: Go to Settings > Safari > Extensions.
Step 3: Tap to turn on a listed content blocker application. That’s it!
You can even use more than one content blocker if you wish to.
In this way, you can clear cookies on your iPhone (iOS 16). In case you know of any other methods for the same, do share with us in the comments section below.
For the latest gadget and tech news and gadget reviews, follow us on Twitter, Facebook and Instagram. For newest tech & gadget videos subscribe to our YouTube Channel. You can also stay up to date using the Gadget Bridge Android App. You can find the latest car and bike news here.
Content blockers are third-party apps that let Safari block cookies, pop-ups and other such content. There are numerous content blocker apps available on the App Store, such as AdBlock Pro for Safari, BlockBear, Roadblock, and more. These help block ads, trackers, and unnecessary resources to speed up your browsing in Safari. To set up a content blocker:
Step 1: Download a content blocker from the App Store.
Step 2: Go to Settings > Safari > Extensions.
Step 3: Tap to turn on a listed content blocker application. That’s it!
You can even use more than one content blocker if you wish to.
In this way, you can clear cookies on your iPhone (iOS 16). In case you know of any other methods for the same, do share with us in the comments section below.
For the latest gadget and tech news and gadget reviews, follow us on Twitter, Facebook and Instagram. For newest tech & gadget videos subscribe to our YouTube Channel. You can also stay up to date using the Gadget Bridge Android App. You can find the latest car and bike news here.