

In This Article
Relaunch The Spotify App
Sometimes the bugs or errors that you might be dealing with in your Spotify desktop app go away merely by relaunching the application. So you might want to try your luck taking the easiest remedy first. Just click on the red cross button on the top right corner and then relaunch the app again from the Start menu on your taskbar.
Force Shut The App Using Task Manager
In case the app is not closing by simply clicking on the red cross button, you can force shut the app using Task Manager. To do so, just follow the steps mentioned below: Step 1: Right-click on the Windows icon on your taskbar and click on Task Manager. You can also use the keyboard shortcut Ctrl+Shift+Esc to open the Task Manager window directly. Step 2: Click on the Spotify app and then click on the End task button at the bottom right corner of the window. This will force shut the app and you can then start afresh with opening Spotify again. But we would recommend you give it a couple of seconds before relaunching the app.
 Read also: Spotify Web Player: How To Best Access And Use All Its Features
Turn Off Hardware Acceleration In Your Spotify Desktop App
If relaunching the app does not work, then the next method you can try is turning off the Hardware Acceleration feature in the Spotify app. To do so, just follow the steps mentioned below. Step 1: Open the Spotify desktop app and press the Alt key on your keyboard. This will automatically click open the drop-down list from the 3 dots on the top left corner of its interface. Step 2: Click on the View option
 Step 3: Tap on the Hardware Acceleration option to uncheck it and close Spotify. Then wait for a few more moments before relaunching the app again.
 This would hopefully remove any bugs or errors and resume Spotify’s functioning normally.
Restart Your PC
If any of the above methods don’t work, then what you can try next is to restart your PC by clicking on Restart in the power options given within the Start menu (accessed by clicking the Windows icon on the taskbar). Read also: How To Log Out Of Spotify From Android And Windows PC
Uninstall and Reinstall The Spotify App
The last option for you remains now to uninstall and reinstall the Spotify app on your PC, which is pretty easy to execute. Just hit the Windows key on your keyboard, right-click on Spotify and select the Uninstall option from the drop-down list. Now, to reinstall the app, Spotify recommends you to download and install the Spotify app via its complete installer package. Download the Spotify installer package for Windows from here.
Clear browser cache
If you’re using the Spotify web player on your PC’s web browser, try clearing the cache to get rid of any corrupted temporary files that may be causing it to malfunction. Here’s how you can go about it. Step 1: Click on the ellipses (three dots) at the right corner of your browser window. Step 2: Select Settings.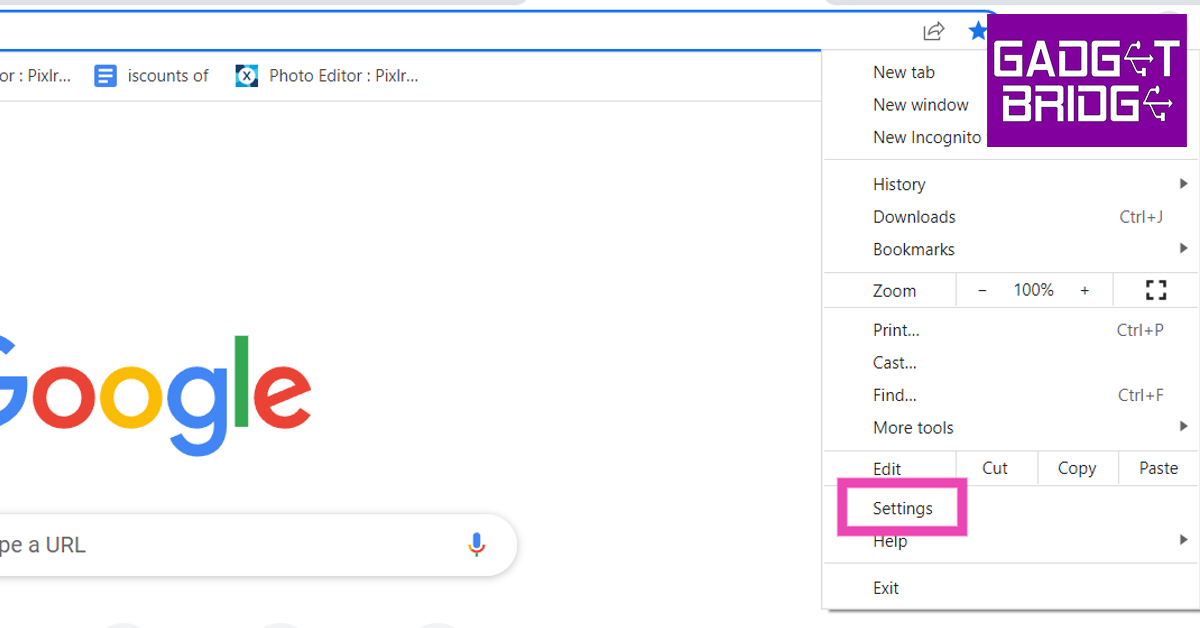 Step 3: Click on ‘Privacy and Security’ on the side menu.
 Step 4: Select ‘Clear browsing data’.
 Step 5: Select the checkbox for ‘Cached images and files’. You can also choose to delete other data like cookies, browsing history, and more.
 Step 6: Click on ‘Clear data’.
Reset Your Browser
If none of these fixes work, a browser reset may be in order. Here’s how you can perform a browser reset on Chrome. A browser reset disables all your extensions, deletes cookies, and resets the settings to default. Step 1: Click on the ellipses (three dots) at the right corner of your browser window. Step 2: Select Settings.
Step 3: Select ‘Reset Settings’ from the side menu.
 Step 4: Click on ‘Restore settings to their original defaults’.
 So those were the top 7 ways we recommend you to fix the Spotify desktop app when it is not working. In case you’re still facing any issues, or if you know of any other remedy to fix the problem, do let us know in the comments section below.
For the latest gadget and tech news, and gadget reviews, follow us on Twitter, Facebook and Instagram. For newest tech & gadget videos subscribe to our YouTube Channel. You can also stay up to date using the Gadget Bridge Android App. You can find the latest car and bike news here.
So those were the top 7 ways we recommend you to fix the Spotify desktop app when it is not working. In case you’re still facing any issues, or if you know of any other remedy to fix the problem, do let us know in the comments section below.
For the latest gadget and tech news, and gadget reviews, follow us on Twitter, Facebook and Instagram. For newest tech & gadget videos subscribe to our YouTube Channel. You can also stay up to date using the Gadget Bridge Android App. You can find the latest car and bike news here. 


 Talking a bit more about the aesthetics of the smartphone, the Asus ROG Phone 5S comes with a glass back (CG 3) with a metal side frame. On the frame, you get two air triggers on the right side along with the volume rocker and power buttons, which are placed perfectly well and within reach when using the phone with one hand. The left side has the secondary charging USB Type-C port along with the power point for the Aero Active cooler (sold separately). The dual SIM tray can also be found here.


 At the bottom of the


 The next one is the 13MP ultrawide lens, which is okay-ish. It is there in case you need it, but all your primary work will be done by the 64MP one. The third sensor is a 5MP macro lens, which is quite good. We took close shots of food and plants from a few centimetres away and it delivered very good shots, just not in low light. Videos here can be recorded in 8K at 30 FPS, which are not the best so we moved it down to 4K at 60FPS and that was where we squeezed out realistic moving pictures.
On the front, users get a 24MP wide sensor which is good for basic selfie use. Remember, this is a gaming smartphone so do not expect the best shots to come from the front camera. Saying that, we did manage to get good shots in daylight. Again, at night the rear camera with the LED flash on will give you better results.
The company supplies the Asus ROG Phone 5s with two speakers with stereo sound. That is good if you watching a movie with a friend, but when gaming you would want to connect the 3.5mm wired earphones for the best results. For security, there is an in-display fingerprint sensor, which is not the best in class, but 7 out of 10 times will work.
The next one is the 13MP ultrawide lens, which is okay-ish. It is there in case you need it, but all your primary work will be done by the 64MP one. The third sensor is a 5MP macro lens, which is quite good. We took close shots of food and plants from a few centimetres away and it delivered very good shots, just not in low light. Videos here can be recorded in 8K at 30 FPS, which are not the best so we moved it down to 4K at 60FPS and that was where we squeezed out realistic moving pictures.
On the front, users get a 24MP wide sensor which is good for basic selfie use. Remember, this is a gaming smartphone so do not expect the best shots to come from the front camera. Saying that, we did manage to get good shots in daylight. Again, at night the rear camera with the LED flash on will give you better results.
The company supplies the Asus ROG Phone 5s with two speakers with stereo sound. That is good if you watching a movie with a friend, but when gaming you would want to connect the 3.5mm wired earphones for the best results. For security, there is an in-display fingerprint sensor, which is not the best in class, but 7 out of 10 times will work.


 Step 2:
 Step 3:
 Read also:
  Step 2:
  Step 3:
 Step 2:
  Step 3:
  Step 4:
  Step 5:
  Step 6:
  Step 7:
  Read also:
  Step 2:
  Step 3:


 Read also:


 Step 2:
 Read also:

 Read also: