Amazon Echo devices are notorious for lacking native support for YouTube Music. While you may be able to use Alexa Skills to play music from Spotify, Apple Music, Amazon Music, and other streaming services, you cannot do the same with YouTube Music. While Google may be absent from Echo’s platform, there is a quick workaround that can resolve this issue. In this article, we show you how to play YouTube Music on Amazon Echo devices.
Play YouTube Music on Amazon Echo via Bluetooth (Android)
Amazon Echo may not support YouTube Music but it still functions like any other Bluetooth speaker. You can play songs on it using the YouTube Music app simply by pairing your smartphone to the device. Here’s how.
Step 1: Scroll down from the status bar and long-press the Bluetooth icon.
Step 2: Scan for a new Bluetooth device and select the Echo device from the list of available connections.
Step 3: Once the device has been paired, open the YouTube Music app on your phone and play the song you want.
Play YouTube Music on Amazon Echo via Bluetooth (iOS)
Step 1: Go to Settings and select Bluetooth.
Step 2: Turn on the toggle switch for Bluetooth.
Step 3: Your iPhone will search for nearby devices.
Step 4: Select your Echo device from the list.
Step 5: Once the two devices are connected, go to the YouTube Music app on your iPhone and play the song you want.
How to play songs on Echo from other music platforms
While Amazon Echo may not have native support for YouTube Music, you can still use Alexa Skills to play music from several other streaming services like Spotify, Amazon Music, TuneIn, and Apple Music. Here’s how you can do that.
Step 1: Launch the Amazon Alexa app on your smartphone.
Step 2: Tap on Play.
Step 3: Scroll down and select Manage your Services.
Step 4: Tap on Link New Service.
Step 5: Select the music streaming platform you want to link.
You will be redirected to the music platform to link your account to Alexa. Your Echo device uses Amazon Music to play songs by default. You can change this by going to Amazon Alexa>Play>Manage Your Services>Default Services and selecting the streaming platform you desire. Once you’ve set this up, every time you request Alexa to play music, it will use the music platform you’ve set as the default player.
Frequently Asked Questions (FAQs)
Does my Amazon Echo device support YouTube Music?
While Echo Devices can link to and play music from streaming platforms like Spotify, Apple Music, Amazon Music, Pandora, iHeart Radio, TuneIn Radio, and more, YouTube Music is strangely missing from the list.
How do I play YouTube Music on my Echo speaker?
If you want to play YouTube Music on your Amazon Echo Device, you will need to connect it to your phone as a Bluetooth speaker. Once that is done, go to the YouTube Music app and play the song you want.
How do I connect my Echo speaker to my phone via Bluetooth?
Give your Echo speaker the voice command to turn on its Bluetooth. Then go to Settings>Bluetooth on your phone and select the Echo speaker from the list of available devices.
This is how you can play songs using YouTube Music on Amazon Echo devices. You can also use this trick to play YouTube videos on Amazon Echo. However, the audio may stop once you lock your smartphone’s screen. You can subscribe to YouTube Premium to get unhindered playback even when your smartphone display is locked. If you found this article helpful, let us know in the comments!
iPhone users may be familiar with the ‘SOS Only’ message that pops up on the status bar from time to time. In iOS 16 this message is displayed on the right side of the status bar but all previous iOS versions have displayed it on the left. So what does ‘SOS Only’ mean? What are your options once your iPhone displays that message? In this article, we explain what the ‘SOS Only’ message means and how you can turn it off.
Whenever your iPhone is unable to receive network coverage, the ‘SOS Only’ text appears on the top-right corner of the screen. In iOS 15 or earlier, this text used to appear on the top-left corner of the screen. iPhone users outside of North America may receive a ‘No Service’ text whenever they are out of network coverage.
However, lack of cellular service may not be the only reason why the SOS text pops up on your phone. It may also appear if the SIM card isn’t inserted properly or is malfunctioning due to some reason. You may also receive this message when you’re on cellular roaming and haven’t subscribed to a data or calling package. To put it simply, anytime your iPhone does not receive network reception, it displays the ‘SOS Only’ text.
When you’re out of network coverage you can still make emergency calls. Apple also rolled out the Emergency SOS via Satellite feature with the iPhone 14 last year. This allows iPhone users to directly connect to a satellite in case of an emergency. The satellite then relays all the necessary information to an emergency service. You are read more about Emergency SOS via Satellite here.
How to turn off ‘SOS Only’?
The ‘SOS Only’ text only goes away when your iPhone is able to receive a cellular network. There are a few steps you can take to make it happen.
Restart your phone
If you are facing a network issue on your phone, a simple restart will most likely fix it. This will take care of any background glitches and resolve any bug-related issues. To restart your iPhone, simply press and hold either volume button and the side button and drag the slider once it appears on the screen.
Turn Off and turn on Mobile Data
Step 1: Go to Settings and select Mobile Data.
Step 2: Turn the toggle bar for Mobile Data off. Turn it back on after a few seconds.
You can also do this by disabling and enabling the ‘Mobile Data’ icon from the Control Centre.
Turn on Data Roaming
Step 1: Go to Settings and select Mobile Data.
Step 2: Select Mobile Data options.
Step 3: Turn the toggle bar on for ‘Data Roaming’.
Update Network Carrier Settings
The network carrier settings are updated periodically on your iPhone. If you missed an update, it may create issues with the network reception on your phone. Here’s how you can update them manually.
Step 1: Go to Settings and select General.
Step 2: Select ‘About’.
This is where you’ll see any impending updates. If there is a software update pending, update it as well.
Turn on Automatic Network Selection
You may have selected the wrong network by mistake. Turn on ‘Automatic network selection’ to avoid any future hangups. Here’s how.
Step 1: Go to Settings and select Mobile Data.
Step 2: Select ‘Network Selection’.
Step 3: Turn the toggle bar on for ‘Automatic’.
Switch to LTE/4G
Tried switching to 5G recently? Maybe your network provider hasn’t rolled out its 5G services in your area yet. In this case, switch back to 4G. Here’s how.
Step 1: Go to Settings and select Mobile Data.
Step 2: Select Mobile Data Options.
Step 3: Tap on ‘Voice and Data’.
Step 4: Select 4G.
Update iOS version
It is possible that a software bug may be keeping your iPhone from receiving network coverage. If this is the case, Apple will quickly sort it out with a software update. To update iOS on your iPhone, simply go to Settings>General>Software Update and install the latest software version on your device.
Reset Network Settings
Restore all your customised network settings to the factory default by performing a reset. This will fix any issues caused by your customisations. Performing a network settings reset will unpair all WiFi and Bluetooth connections. You will need to reenter the password to connect to previously paired networks and devices. Here’s how you can perform network settings reset on your iPhone.
Step 1: Go to Settings and select General.
Step 2: Scroll down and select ‘Transfer or reset iPhone’.
Step 3: Select ‘Reset’ followed by ‘Reset Network Settings’.
Reinsert the SIM card
Reinserting the SIM card on your iPhone is a good way to manually reset the network. If the methods mentioned above do not work for you, this could be worth giving a try. Sometimes a SIM card may shift its position when your iPhone absorbs an impact. This fix will take care of it. Once you take out the SIM card, inspect it for any physical defects and then reinsert it into your iPhone. SIM cards rarely ever develop any physical issues, but sometimes network providers phase out SIM cards that are decades old. If this is the case, your network provider will issue you a new SIM card with the same phone number. Skip this step if you are using an eSIM on your iPhone.
Move to a different area
If you’re in an area with a low network coverage, your iPhone will display the ‘SOS only’ text. This often happens in enclosed areas like elevators. Sometimes, the surrounding network towers can get overwhelmed with more activity than usual, leading to poor network reception on your iPhone. This is why phones aren’t able to receive a strong signal in football stadiums and concert arenas. To resolve this problem, move to an open area with strong network coverage.
Check if the network provider is facing an outage
If your network provider is experiencing an outage or power disruption, your phone will stop receiving coverage. To make sure this is the case, try contacting a friend who uses the same carrier to see if they are facing similar issues. You can also go to Downdetector to check the status of your network provider. If you see a spike in recent user report, it means the fault lies with the network provider.
Contact your network provider
If you’ve tried all the methods in this list and still aren’t able to get network reception on your iPhone, contact your network provider. Major network providers like Airtel and Jio have customer service centres across India. Find the nearest service centre and don’t forget to take basic documentation (like a driver’s license or AADHAR card) with you.
Frequently Asked Questions (FAQs)
What does SOS Only mean on iPhone?
If your iPhone is displaying ‘SOS Only’ next to the signal bar, it means that it is not receiving any network signal and can only make emergency calls.
How do I get rid of the ‘SOS Only’ message on my iPhone?
Move to an area with a better signal and make sure your SIM is inserted properly. If that doesn’t fix it, restart your iPhone and reset the network settings.
How do I check if my network provider is experiencing an outage?
To check if your network provider’s services are down, go to Downdetector and search for it. If you see a spike in user reports, it means the service is temporarily down.
These methods will help you regain network coverage on your iPhone and turn off the ‘SOS Only’ text. If you’re receiving a network signal on your phone but are unable to make calls or send texts, check your account balance and recharge it if necessary. If you found this article helpful, let us know in the comments!
The Android version of Google Chrome’s Incognito Mode will soon be more secretive for Android users. The search giant has announced the rollout of a biometric new feature where users can now create a fingerprint lock for Incognito tabs using the new feature. The Incognito tabs will now be automatically locked when the browser is minimised or cancelled or when not in use. The function is already present on the iOS version of the Chrome app.
While announcing the feature the company via blog post said, “As online risks have grown, our “privacy by design” approach with Chrome means that you can complete a purchase online, get work done, or pay off a bill with a little more peace of mind. Built-in features like Google Password Manager makes signing in safe and seamless across your devices and helps catch compromised passwords. Along with providing strong security default protections, we make privacy controls easy to find, understand, and use in Chrome. While many of these features are widely known, Chrome includes many privacy settings and security features that may be new to you.”
When you resume an interrupted Incognito session, you can require biometric authentication. On iOS, this is accessible to all Chrome users, and Android users are currently receiving it. Simply enable “Lock incognito tabs when you close Chrome” by going to Chrome Settings Privacy & Security.
Tabs that are incognito automatically lock when the browser is minimised or ended. After restarting the web browser, users must unlock them using their fingerprint scan.
When you enable history sync or choose Enhanced Safe Browsing for quicker, proactive protection against risky websites, downloads, and extensions, Google Chrome’s Privacy Guide will walk you through your privacy options step-by-step.
If unsafe extensions or compromised passwords are found, Safety Check will notify you. Additionally, it notifies you when updates need to be installed so that you can keep up with proactive security measures. To make it stronger still Google is extending Safety Check by introducing more tailored recommendations and reminders about the information you have previously given with websites. You can also discover all of the tools you need to revoke permissions and protect your privacy in one convenient location.
As Google has already stated, Android users can now access the fingerprint lock for Incognito tabs. Your smartphone might already have the feature, or it might be in the works but not yet available. You could also visit Google Play Store and see if there are any new updates.
Garena Free Fire is a battle royale game with regular awards and tournaments to keep players interested. If you play Garena Free Fire, you should be aware of the redeem codes that are released on a daily basis. However, because the battle royale game is banned in India, players from other countries can use the Free Fire Redeem codes daily. If you’re unfamiliar with the Garena Free Fire redeem codes or don’t know how to get them, we’ve put together a step-by-step guide to help you redeem them. Check out Garena Free Fire Redeem Codes for 30 January 2023.
The Free Fire redeem codes are a great way to get free stuff. These are 12-digit codes that contain alphabets and numbers, as well as an expiration date and time. Because the Garena FF redeem codes cannot be used more than once, you should hurry to the redemption page to claim your free reward before someone else does. To get a free reward, all you have to do is go to reward.ff.garena.com/en, which is the official redemption page. Also, keep an eye on this space for daily updates on Garena Free Fire redemption codes and rewards.
Garena Free Fire Redeem Codes Today 30 January 2023
X99TK56XDJ4X
FF7MUY4ME6SC
WEYVGQC3CT8Q
3IBBMSL7AK8G
FFCMCPSUYUY7E
NPYFATT3HGSQ
MCPW2D2WKWF2
V427K98RUCHZ
MCPW2D1U3XA3
FFCMCPSJ99S3
6KWMFJVMQQYG
BR43FMAPYEZZ
UVX9PYZV54AC
XZJZE25WEFJJ
HNC95435FAGJ
J3ZKQ57Z2P2P
FFDBGQWPNHJX
TDK4JWN6RD6
4TPQRDQJHVP4
GCNVA2PDRGRZ
XFW4Z6Q882WY
HFNSJ6W74Z48
HHNAT6VKQ9R7
2FG94YCW9VMV
4ST1ZTBE2RP9
8F3QZKNTLWBZ
V44ZZ5YY7CBS
WD2ATK3ZEA55
E2F86ZREMK49
B3G7A22TWDR7X
MCPW3D28VZD6
FFCMCPSGC9XZ
FFCMCPSEN5MX
ZZZ76NT3PDSH
EYH2W3XK8UPG
How to Get Free Fire Redeem Codes for Garena on 2 January 2023?
30 January 2023 Amazon Quiz has gone live on its platform. The quiz timings are 12 AM to 11:59 PM. The Amazon App users can participate in the quiz daily and all they have to do is submit correct answers to the questions asked on the e-commerce platform. Today’s participants can get a chance to win Rs 1250 Amazon Pay Balance.
By participating in the Amazon Quiz the participants can win Amazon Pay Balance ranging from Rs 1,000 to Rs 50,000 every day while sitting at home. To win the participants must answer five questions correctly that are based on current events and general knowledge. One wrong answer can eliminate you from the quiz. The results will be announced at the end of the month. Today’s question will let you win Rs 1250 Amazon Pay Balance. Check below for today’s Amazon quiz answers.
Question 1: What tissue connects muscles to bones?
Answer: Tendon
Question 2: Which scientist proposed the three laws of motion?
Answer: Isaac Newton
Question 3: Albania’s national tree is?
Answer: Olive
Question 4: This character is part of which fictional universe?
Answer: Marvel Cinematic Universe
Question 5: This is the flag of which country?
Answer: Nepal
How To Play Amazon Quiz
Only app users are eligible to play the Amazon quiz every morning from 12 AM to 11:59 PM. The quiz is not available on the desktop. For those who are unaware of how to play the Amazon quiz below are the steps, you can follow to take the quiz.
Firstly download the Amazon app from Google Play Store or App Store
Now fill in the required information through the Sign Up option.
You need to log in to the Amazon app and scroll down on the home screen to find the Amazon Quiz banner.
Tap on the Amazon Quiz banner and tap on the Start button to start the Quiz.
Now you will get 5 questions and you need to answer them correctly. One wrong answer will eliminate you from the Quiz.
After answering all the questions correctly you are now eligible for a Lucky Draw.
The winner’s name will be announced today at 12 PM.
If your work requires you to be connected to the Internet at all times, then a power outage is a cause of serious concern. Since Wi-Fi routers aren’t usually backed up by an inverter, a loss in power can immediately shut off your access to the Internet. While you can always create a personal hotspot using your smartphone, it isn’t feasible when you require a large amount of data over an extended period of time. Creating a mobile hotspot also drains your smartphone’s battery rather quickly. Power outages are pretty common in India, and for people who need Internet access 24×7, this can lead to some sticky situations. Luckily, D-Link has the answer you are looking for. The D-Link portable mini UPS is a handy device that plugs into your Wi-Fi router and provides emergency power backup in case of an outage. We recently got our hands on this mini UPS and used it for over a week. Here is our review of the D-Link DPS-FU1211 Portable mini UPS.
D-Link DPS-FU1211 Portable mini UPS review: Design
The D-Link Portable mini UPS comes in a sturdy rectangular box that contains the UPS adapter, connector/converter, a quick installation guide, and a warranty card. The device has dimensions of 10.2 x 7.3 x 2.7cm and weighs 175 grams. The mini UPS has a power rating of 12V.
The mini UPS is pretty compact and you won’t have any issue fixing it next to your Wi-Fi router, CCTV camera, or even a set-top box. The UPS can rest along its edges or sides pretty easily. Up top, you will find the power switch, a small LED notification light, a power input port, and a power output cable. D-Link has also provided a connector for the power input port.
The D-Link portable mini UPS is entirely plug-and-play and can be installed in three simple steps. First, you need to unplug your Wi-Fi router’s power adapter. Next, you need to plug in the power adapter to the power input port of the mini UPS. Finally, connect the power output cable of the UPS of the mini UPS to your Wi-Fi router. Turn on the power adapter switch and the mini UPS switch and you are good to go.
The compactness and portability of this device allow you to easily carry it around wherever you go. Thinking of working out of a friend’s place for the day? You can simply slide this mini UPS into your pocket and take it wherever you want. It can easily fit into your luggage without consuming too much space.
D-Link DPS-FU1211 Portable mini UPS: Performance
The D-Link mini UPS is packed with a 2,000 mAh battery that can provide up to 4 hours of power backup, as claimed by the company. We put this to the test and used the mini UPS with the main adapter of the Wi-Fi router turned off. On a full charge, we got just under 4 hours of power backup. Under ordinary usage, we didn’t get to hit this limit as power outages are usually resolved within an hour. However, if you experience frequent shortages that last multiple hours, this device will be of tremendous help.
Power backup aside, there were multiple aspects of the D-Link mini UPS that we found quite useful. Firstly, once you plug the device in, you can practically forget about it. The UPS draws power from your wall outlet and charges up while relaying the current to the Wi-Fi router. When not providing power backup, the UPS offers current and surge protection for your Wi-Fi router or CCTV camera. On standby mode, the mini UPS takes 4-5 hours to fully charge. Its smart charging feature ensures that the device does not overcharge. One small drawback here is that there is no battery level indicator on this device, except for a little notification light.
The switch from the main power supply to emergency power backup was seamless and did not cause the Wi-Fi router to turn off even for a bit. This is perhaps the most helpful feature of the device as you won’t have to wait for the router to reboot in case the power goes out. If you’re attending an online meeting or connected to a video call, you can carry on with your task without a hiccup. The UPS provides a power output of 18W.
The D-Link DPS-FU1211 Portable mini UPS is currently available at Rs 1,700. While this price may seem a little steep to some, it is a good investment if 24×7 internet access is something that is important to you. The seamless transition to emergency power backup and smart charging are additional features that make this product a decent buy.
Pros
Seamless transition to emergency backup without disrupting the internet connection
Connecting your iPhone and accessing its contents is really easy ever since Apple ditched iTunes as the intermediary to the connection. Now you can simply plug in your iPhone to your Mac and access it from the Finder itself. However, things can get tricky when the iPhone doesn’t show up on the Finder sidebar. Luckily, there are several methods to remedy this problem. In this article, we bring you the top 7 easy fixes for the ‘iPhone not showing up in Finder’ issue on Mac.
You won’t be able to see the contents of your iPhone on your Mac if your phone is locked. This added layer of security ensures no one will be able to break into your phone simply by connecting it to a Mac. In order to view your iPhone you will need to unlock it first. Enter your passcode or use the FaceID or fingerprint to unlock your iPhone and then connect it to your Mac.
Restart your iPhone
Restarting your iPhone can fix any minor background glitches and issues that may be keeping it from connecting to your Mac. To restart your iPhone, simply press and hold one of the volume buttons and the side button until the power-off slider appears on the screen. Drag the slider to turn off your phone. Then, press the side key to turn it back on.
Check the USB cable
A faulty USB cable will be unsuccessful in connecting your iPhone to your Mac. In this scenario, your iPhone won’t show up on the Finder at all. Try using the USB with a power adapter to check if it is charging your iPhone. In some cases, a USB cable may charge your iPhone but it may not connect it to a Mac. Try using a different USB cable to check whether the fault lies with your phone or the cable.
Force quit and relaunch Finder
It is possible that the issue lies with the Finder and not your iPhone. To fix this, force quit the Finder and then restart it. Here’s how.
Step 1: Click on the Apple icon at the top left corner of the screen.
Step 2: Click on Force Quit.
Step 3: Click on Finder and select Relaunch.
Restart your Mac
If relaunching Finder does not work, try restarting your Mac. Here’s how.
Step 1: Click on the Apple icon at the top left corner of the screen.
Step 2: Select Restart.
Once your Mac restarts, connect your iPhone and see if it shows up on the Finder.
Enable CDs, DVDs, and iOS devices from Finder preferences
If your iPhone still isn’t showing up on the Finder’s sidebar, try updating its preferences. Here’s how.
Step 1: Click on Finder and select Preferences.
Step 2: Select Sidebar from the top menu.
Step 3: Make sure all the entries in the Location section are enabled.
Step 4: Reconnect your iPhone and check if it shows up on the Finder.
Check your Mac’s USB connection
If your iPhone doesn’t show up in the Finder after trying all the fixes mentioned above, the issue may lie with your Mac’s USB connection. Here’s how you can check if there’s a connection issue with your Mac.
Step 1: Connect your iPhone with your Mac and click on the Apple icon at the top left corner of the screen.
Step 2: Select ‘About this Mac’.
Step 3: Click on ‘System Report’.
Step 4: Select USB from the side menu.
Step 5: Check your iPhone under USB Device Tree. If your iPhone is not listed, it means your Mac’s USB port may be faulty.
These are the top 7 fixes for the ‘iPhone not showing up in Finder’ issue on your Mac. If the problem still persists after you’ve tried all the fixes mentioned above, you will need to take your iPhone and Mac to the Apple Store for further diagnosis. If you found this article helpful, let us know in the comments!
No matter how conservatively you use your smartphone, its battery life is something that is out of your control. After years of usage, your smartphone’s battery level is bound to go down. This may result in a lower power backup and slow charging speeds. You may even notice the battery drain out even when your phone is plugged in to charge. While you may have to change the battery eventually, there are a few things you can do to boost the charging speed. In this article, we bring you the top 12 easy methods to fix the ‘iPhone battery draining while charging’ issue.
Optimised charging ensures that your iPhone charges at a slower pace when it is plugged in overnight. Keeping your iPhone plugged in to charge for long intervals can damage battery health over a period of time. When optimised charging is turned on, the current passing through your iPhone’s battery is limited after it hits a certain amount of charge. While this works fine for the most part, it can lead to a battery drain if you are using your iPhone while charging. Here’s how you can turn off optimised charging.
Step 1: Go to Settings and select Battery.
Step 2: Select ‘Battery Health’.
Step 3: Turn the toggle bar off for ‘Optimised Battery Charging’.
Close all background apps
Your iPhone charges at a slower pace when it is carrying out a lot of background tasks. If you are using an older iPhone, it could even lead to the battery level dropping down when your phone is charging. To fix this, clear all the background apps on your phone. The app switcher will allow you to see which apps are currently working in the background. You can easily close all background apps from the app switcher itself.
Switch off your phone while charging
If your iPhone is charging slowly even after you have closed all the background apps, turn it off and then put it on charge. Even when you’ve killed all background activity, your iPhone still consumes the battery by receiving the network signal.
Turn on Airplane Mode
If you don’t want to switch off your iPhone while charging, the next best thing you can do is turn on the Airplane Mode. Receiving a cellular network all the time consumes a lot of power on your device. The power consumption increases when you use the 5G network for streaming videos or just browsing the internet. Turning on Airplane Mode ensures that you don’t use the battery faster than it is being charged.
Enable Low Power Mode
Turning on Low Power Mode on your iPhone cuts down the battery drain by limiting certain tasks. Once it is turned on, the display brightness, refresh rate, and some visual effects will be dialled down. Features like Auto Lock, background app refresh, and automatic downloads will also be disabled. This ensures that your iPhone doesn’t consume power faster than the incoming charge. When the Low Power Mode is turned on, the battery bar turns yellow.
Use an Apple-authorised power adapter
Power adapters play a significant role in determining the rate at which your iPhone charges up. An old adapter will typically not be able to deliver your desired charging speed. This can lead to the battery draining out while your iPhone is charging. To fix this, buy a new power adapter. Make sure you use an original Apple adapter or a ‘Made for iPhone’ adapter for best results.
Use a fast charger
Apple doesn’t ship a power adapter with iPhones anymore. If you have an old iPhone adapter lying around, chances are that it is not a fast charger. Over the years, smartphones have improved their charging speed. While the iPhone may not be able to charge at the ridiculous rate that some Android phones can, a charging speed of 20W is still pretty decent. If you’re using one of those old 5W power adapters, it will take a long time to boost your iPhone’s battery. Switch to a fast charger for better results.
Remove the cover or case while charging
Sometimes, the external case covering your iPhone can cause its temperature to rise. This is more likely to happen when the surrounding temperature is high. Taking off the case lets your iPhone cool down faster. While charging, the battery inside your iPhone can get warmer, leading to a simultaneous loss of charge. Take off the case to keep the iPhone’s temperature in check and boost its charging speed.
Use a different power outlet
It is possible that the fault may not lie with your iPhone but with the low power supply from the power outlet. Try connecting your iPhone to a different wall outlet to check if this is the issue. You can also try using a power bank to check if your iPhone is charging at the desired pace.
Do not charge your iPhone under direct sunlight
If your desk is set up near a window that lets in a lot of sunlight, it can cause your iPhone to get warmer than usual. Find another spot to charge your iPhone, preferable at a place that is cool, ventilated, and away from sunlight. You will immediately notice a boost in charging speed.
Check your iPhone’s battery health
No matter how conservatively you use your phone, the battery health is bound to drop down over a period of time. Your iPhone lets you check the battery health and gives you an idea of its remaining lifespan. Here’s how you can check it.
Step 1: Go to Settings and tap on Battery.
Step 2: Select ‘Battery Health’.
This is where you can have a look at your iPhone’s battery insights. If your battery capacity has dropped down so low that it needs replacement, instead of maximum capacity, you will be shown a message that your battery health has degraded.
Update iOS
Keep your phone’s OS updated at all times to limit the bugs and tap into its maximum potential. Here’s how you can update your iPhone to the latest iOS version.
Step 1: Make sure your iPhone is connected to a WiFi network and plug in its charger.
Step 2: Go to Settings and select General.
Step 3: Select Software Update.
Step 4: Tap on Download and Install.
Frequently Asked Questions (FAQs)
Why is my iPhone’s battery going down while charging?
If your iPhone’s battery is draining while it is being charged, it is most likely because the battery is old and has lost its power to retain charge.
How do I stop my iPhone’s battery from going down while charging?
The easiest way to reduce battery drain while charging your phone is by turning it off. If you can’t turn it off, close all the background apps and put it on Airplane Mode.
What speed does an iPhone charge its battery?
The maximum speed for wired charging on an iPhone is 20W.
These are the top 12 easy methods to fix the ‘iPhone battery draining while charging’ issue. To increase your iPhone’s battery’s lifespan, only plug it in to charge when the battery hits a low level and always make sure you do not overcharge it. If you want it to charge rapidly, do not use your iPhone while charging.
Discord is one of the biggest platforms preferred by gamers for voice calls, streaming gameplay, and instant messaging. If you’re a fan of a video game, chances are it has its own thriving community on Discord. Once you sign up on Discord, you have to choose a username for yourself. This username along with the user tag is your profile’s identifier on the app. While providing a username is mandatory, Discord also lets you have different screen names or ‘nicknames’ for the servers you are a part of. You can have a different nickname for every server. In this article, we show you how to change your username and nickname on Discord.
This is how you can change your username and nickname on Discord. Regular Discord users can only change their username on the app, but Nitro subscribers get to change their user tag as well. To learn about other exclusive features offered by Discord Nitro, read our article here. If found this article helpful, let us know in the comments!
If you search your name on Twitter, chances are that it may not show up in the top results. If a lot of users share your name, it becomes difficult for others to look up your profile. This is why sharing your Twitter profile link is the quickest and most efficient way of sharing your profile and it takes the receiver directly to your page. In this article, we bring you the top 4 simple ways to copy and share a Twitter profile link on a smartphone or desktop.
Copy and share a Twitter profile link from the Android app
Step 1: Open the Twitter app for Android and visit the profile you want to share.
Step 2: Tap on the ellipses (three dots) at the top right corner of the screen.
Step 3: Select ‘Share’.
Step 4: Tap on ‘Copy URL’ to copy the profile link. You can also quickly share the profile link via any messaging app.
Copy a share a Twitter profile link on a web browser
Step 1: Open the Twitter profile you want to share on a web browser.
Step 2: Tap the address bar to highlight the link.
Step 3: Long press and select ‘Copy’. The profile link will be copied to the clipboard and can be shared by pasting on any text field. You can also tap on the clipboard icon next to the address bar to copy the profile link.
Copy and share a Twitter profile link on a desktop
Step 1: Open the desired Twitter profile on your desktop’s web browser.
Step 2: Tap on the ellipses (three dots) on the profile page.
Step 3: To simply copy the link to the Twitter profile, click on ‘Copy link to profile’.
Step 4: To share the profile link, click on ‘Share profile via’.
Copy and share your own Twitter profile link
If you don’t feel like opening the Twitter app or webpage, you can still share your profile link quite easily. Your Twitter profile link is nothing but your handle added to the Twitter web address. To quickly share your Twitter profile link anywhere, simply type www.twitter.com/yourusername. In the above format, substitute ‘yourusername’ with your actual username. For example, if your Twitter handle is sports123, then your Twitter profile link becomes www.twitter.com/sports123.
These are the top 4 ways to copy and share a Twitter profile link. Always remember that if you change your Twitter handle, your profile link will change accordingly. Any previous links to your profile will not work as soon as you change your Twitter username. If you found this article helpful, let us know in the comments!
One of the early players in the ‘smart wearables’ category, Fitbit quickly gained a reputation for putting out the best fitness tracking gadgets to the point that the name ‘Fitbit’ became synonymous with a health tracking band. However, in the last few years, smartwatches have been on the ascendancy, offering ‘smarter’ features on top of health & fitness tracking. Brands like OnePlus, Noise, Oppo, and Xiaomi have also been successful in bringing smart wearables to the masses with their highly competitive pricing. In January 2021, Google acquired Fitbit for $2.1 billion, opening the door to a range of possibilities. We recently got our hands on the recently launched Fitbit Versa 4 and set out to test whether Fitbit still holds its own in a rapidly developing smartwatch category. After using the Fitbit Versa 4 for over a week, here is our review.
Opening the box, you’ll find the Fitbit device housed in the centre with the charger and additional strap on either side. The box also contains a quick start guide and a product information booklet. The Fitbit Versa 4 does not ship with a power adapter.
Fitbit has provided an additional 209mm strap with the Versa 4 which is longer than the default one (175mm) that the watch comes fitted with. The watch wraps snugly around the wrist, and the strap does not irritate the skin even after hours of use. The square AMOLED dial is bordered by thick bezels on all sides. Fitbit has reintroduced the physical button on the Versa 4 which was missing in its previous iteration.
At the bottom of the watch, you will find the charging point, optical heart rate sensor, red and infrared sensors for SpO2 monitoring, an altimeter, and more. The Versa 4 also houses a microphone, speaker, and vibration motor. Overall, Fitbit has kept things simple with the Versa 4. The design isn’t flashy but is practically suited to a fitness tracker. You can add also customised straps to the Versa 4.
The Fitbit Versa 4 is water resistant up to 50 metres, which means you can easily wear it while swimming. The watch remains unfazed during sweaty workouts as well. While Fitbit hasn’t mentioned the exact specifications for the watch display, it is bright enough to be legible in direct sunlight. Weighing around 40g (with the straps), you can easily wear the Versa 4 all day without feeling any discomfort.
Fitbit Versa 4 review: Performance
Pairing the Fitbit Versa 4 with your smartphone takes no time, irrespective of the platform you are using it with. All you need to do is install the Fitbit app on your smartphone and turn on Bluetooth to scan the watch. After exchanging the painting codes, you are good to go. While many were expecting Fitbit to incorporate Google’s Wear OS for its devices, the company is sticking with its own Fitbit OS.
While we were quite satisfied with Fitbit Versa 4’s design, there were certain aspects of the OS and the general functions that left a little more to be desired. Let’s begin with the good bits – health and fitness tracking.
Having been at the top of the game for fitness tracking, Fitbit wasn’t going to let us down on the Versa 4. This is Fitbit’s home territory, where it sets the benchmark performance for other fitness trackers and smartwatches to follow. The Fitbit Versa 4 follows through on the company’s reputation and delivers rock-solid performance.
The smartwatch can track up to 40 workout routines, covering all sorts of exercises like weightlifting, treadmill and CrossFit to sports like martial arts, tennis, and snowboarding. The automatic workout detection works smoothly as well. What we were impressed by was the altimeter, which was pretty accurate in its readings of the stairs climbed and elevation gained. The heart rate monitor works constantly in the background, providing readings in real-time during workouts and updating every five seconds in regular mode. The fact that Fitbit is able to achieve this without a significant drop in battery levels is quite impressive.
The Versa 4 has a built-in GPS which allows you to leave your phone at home when you go for a walk or a run. The step counter takes a little time to adapt but the readings are close to accurate. The watch also lets you know how many calories you burned during a workout, which is a stat that should be taken with a grain of salt – not just for Versa 4 but for every other smartwatch.
The sleep tracking function on the Fitbit Versa 4 is up there with some of the premium smartwatches in the market. After tracking your sleeping pattern, the Fitbit app assigns you a sleep score, determining the quality of your sleep. You also get access to a full breakdown of your sleep cycle with a chart that tracks REM sleep, light sleep, deep sleep, and the periods you were awake. Along with this, you also get a graph of your blood oxygen level during the sleep period.
For fitness-oriented users, the Fitbit app provides detailed health metrics along with all the fitness data that the Versa 4 tracks over the course of a day. Through ‘Active Zone Minutes’ the app lets you know how much time you spent in a heart-pumping activity. These metrics are compared to the ideal benchmarks set by WHO and American Heart Association. For more detailed metrics, you will need to subscribe to Fitbit Premium. The Versa 4 comes with a free 6-month Fitbit Premium package, after which you will be charged Rs 999/year or Rs 99/month.
Moving on to the not-so-impressive parts, we feel that Fitbit needs to step up its software and ‘smart’ functionalities if it wants to go against other smartwatches in this category. Firstly, Fitbit Versa 4 offers no support for third-party apps. This means the only apps you can use with this smartwatch are the native ones like Alarms, Find My Phone, Weather, and a handful of Fitbit’s fitness apps. There is no music player support on the Versa 4, something that every other smartwatch in this budget is equipped with.
While the OS is pretty clean, it feels very limiting in certain scenarios. For example, you cannot view the detailed breakdown of your activities from the watch itself. You will need to switch to the Fitbit app on your phone to go through all the tracked data. Need to change the watch face? You will need to access the app again, as the watch does not let you long press and swap through the available watch faces. And while the Fitbit Versa 4 comes with Alexa support, it lacks Google’s very own voice assistant.
These drawbacks seriously hinder Versa 4’s ‘smart’ capabilities. The experience is much better when it is paired with a smartphone via Bluetooth connection. You can receive calls on the Versa 4 and the call quality is quite satisfactory. You can also go through the notifications and respond to incoming messages by using speech-to-text for replies or choosing from a list of preset auto replies and emojis.
Ending on a positive note, the battery life of the Fitbit Versa 4 is impeccable. The smartwatch easily lasts just over 4 days with moderate to heavy use. Even with ‘Always On Display’ turned on, we got almost two and a half days of battery life. A quick 15-minute charge can last you an entire day and a full charge takes just under 2 hours. Quick charging time and extensive battery life allow you to keep the watch on for a longer period of time, resulting in a better quality of data.
The Fitbit Versa 4 is currently available at a price of Rs 16,999. When it comes to fitness tracking and data evaluation, there aren’t many smartwatches better than the Versa 4. But the OS experience and limited ‘smart’ functions is where the Fitbit Versa 4 falls a step behind its competition in this price category. We’d suggest the Versa 4 to fitness-oriented users that are looking for a comprehensive fitness tracker and don’t mind giving up a few fancier functions.
There’s nothing more annoying than missing an important call because WhatsApp didn’t send you a ringing alert. This is one of the more common issues that people face with WhatsApp, and there isn’t one final fix for it. It can arise due to several network or app-related issues. Sometimes, it may be your iPhone’s accessibility settings that are at fault. Luckily, there are a few fixes that will take care of this situation. In this article, we bring you 12 easy ways to fix the ‘WhatsApp call not ringing when iPhone is locked’ issue.
When enabled, Do Not Disturb prevents calls, texts, or notifications from delivering to your iPhone. This includes any calls you receive on WhatsApp. If the WhatsApp calls aren’t ringing on your iPhone, it may be because you accidentally enabled DND from the Control Centre or turned it on earlier and forgot to turn it off. Here’s how you can disable Do Not Disturb on your iPhone.
Step 1: Scroll down the status bar to access the Control Centre.
Step 2: Tap on ‘Focus’ and disable DND.
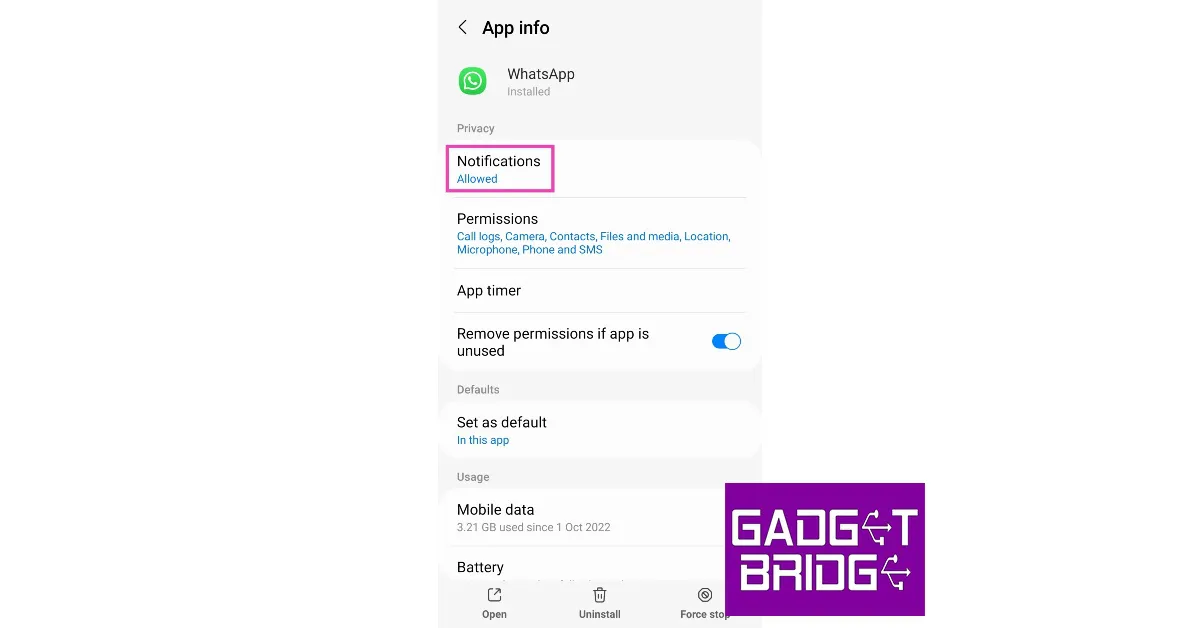
Check if WhatsApp notifications are turned on
You may have disabled WhatsApp’s notifications and forgotten to turn them on. Here’s how you can enable the instant messenger’s notifications on your iPhone.
Step 1: Go to Settings, scroll down and select WhatsApp.
Step 2: Tap on Notifications.
Step 3: Ensure the toggle bar for Allow Notifications is turned on.
Step 4: Ensure that the lock screen, notification centre, and banner alerts are turned on. Additionally, make sure that the toggle bar for Sounds is turned on as well.
Reset Notification Settings
If turning on notifications didn’t work, you can try resetting them instead. Here’s how.
Step 1: Go to Settings, scroll down and select WhatsApp.
Step 2: Tap on Notifications.
Step 3: Select WhatsApp Notification Settings.
Step 4: Tap on Reset Notification Settings.
Step 5: Confirm your selection in the popup box.
Turn on Background App Refresh
To make sure WhatsApp is running on your iPhone at all times, make sure that Background App Refresh is turned on. If it isn’t turned on, WhatsApp will not refresh when it is minimised, leading to missed messages and calls. You will only be able to catch up on the messages and calls when you launch the app. Go to Settings>General>Background App Refresh and turn it on. Also, make sure that the toggle bar for WhatsApp is switched on.
Turn off Silent Mode
If your iPhone is in silent mode, it will not make a ringing sound every time you receive a call. To disable silent mode, switch the ringer key on the top-left side of your iPhone. If you can see the orange colour on the switch, it means your iPhone is in silent mode. Flick it the other way to switch to a Loud profile.
Turn off Noise Cancellation
Step 1: Go to Settings and select Accessibility.
Step 2: Scroll down and tap on Audio/Visual.
Step 3: Turn off the toggle switch for Phone Noise Cancellation.
Turn off Low Power Mode
Once your iPhone goes into Low Power Mode, it cuts down on power consumption by sticking to its essential functions. You may not receive WhatsApp notifications once your iPhone switches to Low Power Mode. To turn it off, go to Settings>Battery and switch off the toggle bar for Low Power Mode.
Enable Background Sounds
Step 1: Go to Settings and select Accessibility.
Step 2: Select Audio/Visual.
Step 3: Tap on Background Sounds.
Step 4: Turn off the toggle switch for Stop Sounds When Locked.
Turn off Silence Unknown Callers
Step 1: Go to Settings and select Phone.
Step 2: Scroll down and tap on Silence Unknown Callers.
Step 3: Turn off the toggle switch.
Update WhatsApp
If the issue is bug-related, WhatsApp may have patched it with an update. In order to update WhatsApp, go to the app store and search for WhatsApp. From the app page, select ‘Update’. Whenever any bug pops up on the app, the developers quickly fix it with an update. This is why it is essential to keep your apps updated at all times.
Update iOS
An older version of iOS may have a software bug that’s keeping certain apps from pushing their notifications. These bugs are quickly resolved by a software update. If your iPhone is running an older version of iOS, go to Settings>General>Software Update to install the latest version.
Reset Network Settings
It is possible that the issue lies with your iPhone’s network reception and not the WhatsApp app itself. To fix this, reset the network settings on your phone. Here’s how.
Step 1: Go to Settings and select General.
Step 2: Scroll down and select Transfer or reset iPhone.
Step 3: Select Reset followed by Reset Network Settings.
Frequently Asked Questions (FAQs)
Why can’t I view WhatsApp calls on my iPhone?
A faulty internet connection is the most likely reason behind your iPhone not notifying you of WhatsApp calls. You may also have accidentally turned on the silent mode or DND on your iPhone.
How do I fix the ‘WhatsApp calls not ringing’ issue on my iPhone?
Check if there’s a pending update for WhatsApp and install it on your phone. Also make sure that Background App Refresh is turned on for WhatsApp.
If I mute someone on WhatsApp does it mute their calls as well?
No, muting someone on WhatsApp does not mute their calls.
These are the top 12 ways to fix the ‘WhatsApp calls not ringing when iPhone is locked’ issue. If none of these methods worked for you, you can try performing a factory settings reset on your iPhone as a last-ditch effort. Before resetting the iPhone to factory settings, make sure you’ve backed up all your data as it will be erased in the process. If you found this article helpful, let us know in the comments!
‘Smart Downloads’ is one of the underrated features of YouTube Premium. While a Premium subscription to YouTube allows you to download unlimited videos and music at the highest quality possible, ‘Smart Download’ automatically saves your most played songs to your device. It also saves new videos from your most watched content creators to your device. In this article, we show you how to enable or disable Smart Downloads on YouTube and YouTube Music.
How to Enable or Disable Smart Downloads on YouTube
Step 1: Open the YouTube app and tap on your profile icon at the top right corner of the screen.
Step 2: Scroll down and select Settings.
Step 3: Select ‘Background and downloads’.
Step 4: This is where you’ll find the ‘Smart downloads’ option. Turn the toggle bar on enable smart downloads for YouTube and turn it off to disable it.
You can also select the resolution you want to save the videos in by tapping on ‘Download quality’. To save mobile data you can choose to download videos only when your phone is connected to a WiFi network.
How to Enable or Disable Smart Downloads on YouTube Music
Step 1: Open the YouTube Music app and tap on the profile icon at the top right corner of the screen.
Step 2: Scroll down and select Settings.
Step 3: Tap on ‘Library and downloads’.
Step 4: This is where you’ll find the ‘Smart downloads’ option. Turn the toggle bar on enable smart downloads for YouTube Music and turn it off to disable it.
You can even decide how many songs you want the YouTube Musicapp to download automatically for you. The limit is set to 100 songs by default but you can expand it to 500 songs.
How to access and remove Smart Downloads?
The YouTube app opens the downloads folder when it is not connected to the internet. However, if you are connected to the internet, you can access your Smart Downloads by tapping on the ‘Library’ option at the bottom right corner of the screen and selecting ‘Downloads’. To remove a video, simply tap on the ellipses next to it and select ‘Delete from downloads’.
To access your downloaded songs in the YouTube Music app, tap on the ‘Library’ icon at the bottom right corner of the screen and select the Downloads folder. To remove any download, simply tap on the ellipses next to the song and select ‘Remove download’.
This is how you can enable or disable Smart Downloads on YouTube and YouTube Music. Smart Download is a feature that is exclusive to YouTube Premium. Regular YouTube users can download YouTube videos manually but with the video quality capped at 360p. If you found this article helpful, let us know in the comments!
Infinix has expanded its Note lineup with the launch of Infinix Note 12i in India. The smartphone has a MediaTek Helio G85 SoC under its hood. It comes packed with a 5,000mAh battery with 33W fast charging support. In addition to this, the device also features a 50MO ultra night camera and an FHD+ AMOLED display.
Infinix Note 12i price in India and sale details
Infinix Note 12i has been launched in a single 4GB RAM with 64GB storage priced at Rs 9,999. The device will be available in three colour options of Force Black, Metaverse Blue, and Alpine White. Beginning on January 30, the smartphone will be offered for purchase on Flipkart.
Additionally, users can benefit from the Jio Exclusive Program to receive Rs 1000 cashback on Note 12i within 30 days from the date of purchase.
Infinix Note 12i specifications
The 6.7-inch full-HD+ AMOLED display on the Infinix Note 12i has a resolution of 1,080×2,400 pixels. The screen boasts 100 percent coverage of the DCI:P3 colour gamut and has a peak brightness of 1,000 nits. It also has a 180Hz touch sampling rate. Gorilla Glass 3 is installed as protection for the display. The screen also supports Widevine L1 certification. With 4GB of RAM and a MediaTek Helio G85 SoC, the handset is powered. The smartphone’s 64GB of internal storage can be increased to 512GB by using a MicroSD card slot. The device comes pre-installed with the company’s XOS 12.0 skin over Android 12.
It has a 5,000mAh battery and 33W fast charging is supported. The triple camera system on the Infinix Note 12i consists of a 50-megapixel primary sensor with an f/1.6 aperture, a 2-megapixel depth sensor, and a QVGA camera. For selfies and video calls, the Infinix Note 12i’s front-facing 8-megapixel camera has a dual-LED flash.
A USB Type-C port, 4G, Wi-Fi, Bluetooth 5.0, GPS, and other connectivity options are available on the smartphone. In addition, a fingerprint sensor is included for biometric verification, along with an ambient light sensor, g-sensor, proximity sensor, gyroscope, magnetometer, and other sensors.
The pictures shot using your iPhone’s camera capture an incredible amount of detail. This also means they carry a decent amount of file size. Sometimes users run into a problem when they need to upload an image to an official document, and the image exceeds the stipulated file size. Luckily, there are several ways you can compress an image and bring its size down to a desirable limit. In this article, we bring you the top 9 methods to reduce the photo file size on an iPhone. Using these methods, you can easily compress any photo on your iPhone.
The easiest way to reduce the file size of a photo is by cropping it ever so slightly in the Photos app on your iPhone. This will alter the image resolution by a tiny amount, but the size of your image will be reduced significantly. To crop an image, open it in the Photos app and select the Edit option at the bottom of the screen. Tap on Crop/Rotate and use the frame to slightly crop the image.
Change the image format in the iPhone Camera settings
Changing the image format from JPEG to HEIF (High-Efficiency Image Format) will help reduce the file size of the resulting image. The JPEG format stores a lot of information, which can lead to a bloated file size. On the other hand, the HEIF format offers a lower file size without compromising the quality of the image. Here’s how you can switch to the HEIF format.
Step 1: Open Settings on your iPhone and select Camera.
Step 2: Tap on Formats.
Step 3: Select ‘High Efficiency’.
Optimise iPhone Storage
Step 1: Go to Settings and select Photos.
Step 2: Tap on Optimize iPhone Storage.
The images on your iPhone will be compressed to save storage space. The optimised images occupy less space and are perfect to be viewed on your iPhone. You won’t notice much difference. If you want to access the full-resolution images, you can download them from iCloud.
Compress a photo using the Files app
Step 1: Go to the Photos app on your iPhone and open the image you want to compress.
Step 2: Hit the Share icon in the bottom left corner of the screen.
Step 3: Select Save to Files.
Step 4: Choose the destination and hit the tick icon.
Step 5: Launch the Files app and go to the image.
Step 6: Long-press the image icon and select Compressed.
Step 7: A compressedversion of the image will appear next to it.
Use a third-party app
There are several third-party apps on the App Store that will help you resize your images. ‘Image Size’ is one of the highly rated apps for this purpose. Once you’ve installed the app on your iPhone, open it and load the image you want to resize. Now you can resize the image by pixels, inches, mm, cm, or any other metric. Save the image once you’re happy with the result. The saved image will have a significantly smaller file size than the original image.
Send the image to yourself on WhatsApp
Instant Messengers like WhatsApp automatically downsize the images you send on the platform. This is done to increase the speed and reduce the storage space. While some may see it as a flaw, it can come in handy if you want to reduce the file size of an image. WhatsApp also recently launched the ‘Message Yourself’ feature. You can use this function to send yourself the images you want to downsize. Simply select your name from the contacts and attach and send the images you want.
Use Apple Mail to compress images
While you may not have a say in downsizing the images when sending them through an instant messenger, Apple Mail lets you choose a particular file size before you attach the image to your mail. This is helpful because it gives you three options for the file size: Small, Medium, and Large. You can mail the image to yourself via the Photo app. All you need to do is tap on the share icon and select ‘Mail’. Once the mail has been sent you can download the resized image from the Mail app.
Use a Shortcut
Step 1:Launch the Shortcuts app on your iPhone and hit the Plus icon.
Step 2: Give your shortcut a name.
Step 3: Select Add Action.
Step 4: Go to Categories and select Media.
Step 5: Under the Images category, select Get Images from Input.
Step 6: Hit the blue icon at the top right corner of the screen and turn on the toggle switch for Show in Share Sheet.
Step 7: Drag the Media page and select Resize Image.
Step 8: Tap on size to set the default metrics or select Ask Each Time.
Step 9: Hit Done.
Step 10: Select the Media page again and tap on Convert Image.
Step 11: Choose the file format for the resized images.
Step 12: Drag the Media page again and tap on Save to Photo Album.
Step 13: Select a destination album for the resized images.
Step 14: Hit the cross icon.
Step 15: To resize an image, open it in the Photos app, hit the Share icon, and select the shortcut from the list.
Use an online tool
There are several online tools you can use to reduce the file size of any image. Img2Go is one of the most popular online compression tools. Here’s how you can use it.
Step 3: Tap on ‘Choose file’ to select the image you want to resize. This image will be uploaded to the website’s servers. Apart from your iPhone’s local storage, you can also choose an image from Google Drive or Dropbox.
Step 4: Choose the image quality you want for the resulting image. If you want to compress the image to the lowest possible size, there will be some loss in quality.
Step 5: Select ‘Start’.
Step 6: Tap on ‘Download’ to save the resized image.
Why should you compress the images on your iPhone?
If you own an entry-level storage variant of the iPhone, you should be all over photo compression. Not only does it help you save precious storage space, but it also makes the images faster to post on social media or send to your friends. After compression, the images do lose some detail, but the differences are negligible if you’re viewing them on a smartphone. And let’s be honest, most of our social media consumption happens on a mobile device.
If you still want to preserve the full-resolution images, optimising your iPhone’s storage is the ideal way to go about it. Using this method, you will be able to access the original images from iCloud while storing the compressed versions on your iPhone. This makes it easier to manage the storage on your device. If you like to take a lot of photos but don’t want to buy additional iCloud storage, we would suggest creating a hard backup of all your images on an external storage device.
Frequently Asked Questions (FAQs)
How do I reduce the file size of a photo on my iPhone without downloading an app?
There are a few native ways to reduce a photo’s file size on your iPhone. You can slightly crop the image to bring down its size. Changing the image format from JPEG to HEIF also brings down the file size of the images you click. Lastly, you can use any instant messaging app to compress the image by simply sending it to yourself.
Does WhatsApp compress my pictures before sending them?
Yes, WhatsApp compresses pictures before sending them. You can choose to send images in HD, but some compression will still take place. To bypass this compression, you can send a picture as a document.
How do I compress a photo on my iPhone to a file in zip format?
Go to the photo, hit the ‘Share’ icon, and save it to the Files app. Launch the Files app, long-press the saved photo, and hit ‘Compress’. The compressed version of the image will appear next to it in zip format. Tapping it will uncompress the file.
What are some good apps to compress a photo on an iPhone?
Compress Photos 7 Pictures, Photo Compress – Shrink Pics, and Image Size are some of the best apps you can use to bring down the file size of any image on your iPhone.
What are the benefits of image compression?
Reducing the file size of an image makes it easier to share on social media and messaging apps while also freeing up some much-needed space on your phone’s internal memory.
These are the 9 simple ways you can reduce photo file size on an iPhone. While some methods may lower the image quality, the changes won’t be significantly noticeable. If you are resizing an image to upload to an official document, any of these methods will work just fine. Do you have a go-to method when it comes to compressing the images on your phone? Let us know in the comments!
OnePlus 11, Buds Pro 2, Keyboard and OnePlus TV 65 Q2 Pro are scheduled to launch in India on February 7. All of these products will make their public premiere at the company’s Cloud 11 launch event in Delhi, but there are still more devices scheduled to launch on February 7. The company has now confirmed that the OnePlus 11R 5G will also get released on the same day. Recently the price of the just-confirmed phone was also tipped. Previously the smartphone was also spotted listed on the BIS certification site indicating the India launch.
Fast just got fastR. It's time to get ready for a new way to experience the #ShapeofPower with the all-new #OnePlus11R 5G.
The OnePlus 11R 5G will be introduced in India on February 7 during the Cloud 11 event. The event will be hosted in New Delhi at 7:30 PM. As of now the company has only confirmed the impending launch, other details of the upcoming smartphone are yet to be made public. The event will introduce the OnePlus 11 5G, OnePlus Buds Pro 2, OnePlus Keyboard, and the OnePlus TV 65 Q2 Pro.
Mukul Sharma, a tipster for @stufflistings, has already revealed the anticipated price and storage options for the OnePlus 11R in India. A device with 8GB RAM and 128GB of storage space, according to his estimation, may cost between Rs 35,000 and Rs 40,000 in the country. It is also expected to include 16GB of RAM and 512GB of storage, and it would probably cost around Rs 45,000.
The smartphone would sport a 6.7-inch full-HD+ AMOLED screen with a resolution of 1,080 x 2,412 pixels and a refresh rate of 120Hz, according to the source. Up to 16GB of RAM and a Qualcomm Snapdragon 8+ Gen 1 SoC are expected to power the upcoming gadget. The OnePlus 11R has two RAM (8GB and 16GB) and two storage (128GB and 256GB) configurations, according to rumours. An alleged 5000mAh battery from OnePlus will reportedly support 100W SuperVOOC charging. A 50-megapixel primary sensor, an 8-megapixel super-wide-angle sensor, and a 2-megapixel macro lens are among the three cameras that the phone is anticipated to include on the back. At the front, there might be a 16-megapixel selfie camera for taking pictures of oneself.
At the OnePlus Cloud 11 Event On February 7 the Chinese tech firm is going to present a couple of products including the OnePlus 11 5G, Buds Pro 2 and the OnePlus Keyboard. The company is also planning to expand its Smart TV portfolio with the launch of its premium TV called the OnePlus TV 65 Q2 Pro at the same event.
The company via its announcement said, “The new OnePlus TV serves as an extension of the premium Q Series portfolio which debuted in 2019, with the launch of the OnePlus TV Q1 and Q1 Pro. The product is set to be unveiled along with OnePlus 11 and OnePlus Buds Pro 2 on 7th February 2023 at the Cloud 11 launch event in Delhi.” OnePlus further added, “The OnePlus TV Q series symbolises the brand’s efforts to bring industry-leading technology with premium visual and sound features to users in India. The OnePlus TV 65 Q2 Pro is expected to make a significant leap towards these efforts.”
The new OnePlus TV 65 Q2 Pro is planned to offer a number of superior hardware and software features and act as the centre of a more upscale, smarter connected ecosystem, according to the firm. The Television is expected to be available for purchase via Amazon in the country.
To recall, OnePlus forayed into the TV industry with the launch of OnePlus TV Q1 Pro and OnePlus TV Q1 in India in 2019. Both TVs offer a 55-inch 4K display with a QLED panel. The televisions have Dolby Atmos, Dolby Vision, and HDR10+ capabilities. It is important to note that the OnePlus TV Q1 Pro includes a motorised soundbar that extends from the unit downward. The TV’s soundbar includes 8 speakers with a 50W total sound output. Four of the speakers are facing forward, while two are facing back. The devices have built-in casting and a very plain-looking remote control with a limited number of buttons that comes with them. However, it contains dedicated buttons for frequently used services like Google Assistant, Amazon Prime Video, and others.
One of the advantages of owning an Apple Watch is the greater level of customisation options that come with it. With only a little effort, you can create a Watch Face that is unique to your device. On top of that, you can find several third-party apps that offer a plethora of paid and free Apple Watch Faces. In this article, we show you how to create a custom Apple Watch Face.
The Facer app for iPhone has a range of watch faces for your Apple Watch and provides a bunch of customisation options as well. Here’s how you can use the Facer app to create a custom Apple Watch face.
Step 4: Tap the ‘Watch’ icon to load the watch face on the Apple Watch app.
Step 5: Select the watch face from ‘My Faces’.
Step 6: This is where you can customise the watch face. You can choose the base colour from a range of shades.
Step 7: Tap on options to add widgets (Complications) like blood oxygen level, activity insights, and more to the watch face.
Step 8: Save all the changes once you’re done customising the watch face.
Use a Photo to create a custom Apple Watch Face
There’s nothing more unique than setting a picture you took as the customised watch face on your Apple Watch. You can easily do this from the Photos app itself. Here’s how.
Step 1: Open the Photos app on your iPhone and select the photo you want to set as your Watch Face.
Step 2: Tap on the Share icon.
Step 3: Select ‘Create Watch Face’.
Step 4: You can either use the photo as it is or apply a Kaleidoscope effect to it. Make your choice before proceeding further.
Step 5: Add your desired Complications to the watch face. You can also alter the position of the clock.
Step 6: Tap on ‘Add’ once you’re done. Your new Apple Watch Face will be saved.
Create a customised watch face from the Apple Watch itself
Once you have a bunch of saved watch faces in the Apple Watch app, you can easily customise them from your Apple Watch itself. Here’s how.
Step 1: To view all the watch faces in your collection, press and hold the watch face and swipe through your options. Tap on the one your want to set as the watch face.
Step 2: Customise the watch face by adding your desired Complications. To do this touch and hold the display and select Edit.
Step 3: Swipe left until you reach the end. This is where the complications will show up.
Step 4: Tap the Complication to add it to the watch face. Turn the crown to browse through the compilations.
Step 5: Once you’re done, press the crown to save all changes.
This is how you can create a custom Apple Watch Face. You can also use Shortcuts to change the watch face based on the time. All you need to do is select ‘Time of day’ from the Automation section and add the action to set a particular watch face. If you found this article helpful, let us know in the comments!
iOS 16.3 and iPadOS 16.3 updates for compatible iPhone and iPad models have started to arrive. The new OS update brings Security Keys for Apple ID, enhancements, bug fixes, and security updates for iPhones and iPads.
Here is everything that you are getting with the iOS 16.3 and iPadOS 16.3 updates
iOS 16.3 update
The iOS 16.3 update brings Security Keys for Apple ID, a new Unity wallpaper honouring Black history and culture in observance of Black History Month, as well as additional improvements, bug fixes, and security upgrades for your iPhone.
Also included are Security Keys for Apple ID, which let users increase the security of their account by requiring a physical security key as part of the two-factor authentication sign-in process on new devices. Support for HomePod (2nd generation) has also been added.
With iOS 16.3, the Emergency SOS call mechanism has also been updated in order to avoid accidental emergency calls. The emergency SOS calls now require holding the side button with the up or down volume button and then releasing it.
The new iOS update also fixes a problem in Freeform where some sketching strokes made with your finger or an Apple Pencil might not show up on shared boards. A problem where the wallpaper can appear black on the lock screen is fixed.
A bug that could cause a temporary appearance of horizontal lines while starting up the iPhone 14 Pro Max has also been removed. Fixes a problem where the Home Lock Screen widget misrepresents the status of the Home app. A problem where Siri might not respond appropriately to music requests is fixed.
Fixes issues wherein CarPlay’s Siri requests might not have been properly understood.
Along with other improvements, bug fixes, and security updates for your iPad, the iPadOS 16.3 update introduces Security Keys for Apple ID as well.
Support for the new HomePod (2nd Gen) is included in this version, making it simple to pair iPhone devices with the Apple HomePod (2nd Gen) and share music between them.
Additionally, the iPadOS 16.3 update resolves a problem in Freeform where some drawing strokes made with an Apple Pencil or your finger might not show up on shared boards. An issue where Siri may not respond properly to music requests has also been addressed.
Every WhatsApp user knows that the app sometimes does not show the ringing alert for an incoming call. Instead, you get notifications for a bunch of missed calls instead. Sometimes, you may miss an important call because of this issue. Luckily, there are a few ways you can take care of this problem. In this article, we bring you 12 easy methods to fix the ‘WhatsApp calls not ringing when Android phone is locked’ issue on your smartphone.
Disabling background notifications for an app prevents it from sending alerts to your phone. Here’s how you can check if WhatsApp’s background notifications are disabled.
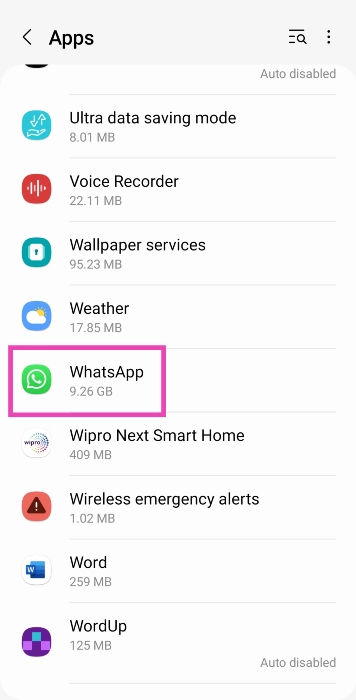
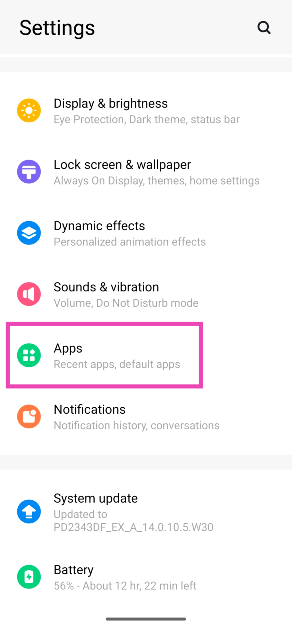
Step 1: Go to Settings and select Apps.
Step 2: Scroll down and select WhatsApp.
Step 3: Tap on Notifications.
Step 4: Make sure that the toggle bar to Show notifications is turned on. Additionally, make sure you have selected Allow sound and vibration under Alerts instead of Deliver quietly.
Make sure Do Not Disturb is turned off
Do Not Disturb does what it implies. Once you turn it on, you will not be ‘disturbed’ by text notifications or call alerts. If someone is calling you on WhatsApp, it won’t show up on your screen. If your WhatsApp calls are not ringing, it is possible that you may have turned on DND but forgotten to turn it off. In order to disable Do Not Disturb, simply drag the drop-down menu and tap on the DND icon.
Check your internet connection
If you’re connected to a weak network, WhatsApp won’t notify you of incoming calls. Instead, you will receive a notification when the caller hangs up. Perform a quick internet speed test to confirm whether the fault lies with your network. Load other web pages to see if the network is acting sluggish on your device. Switch to a stronger network to receive WhatsApp calls again.
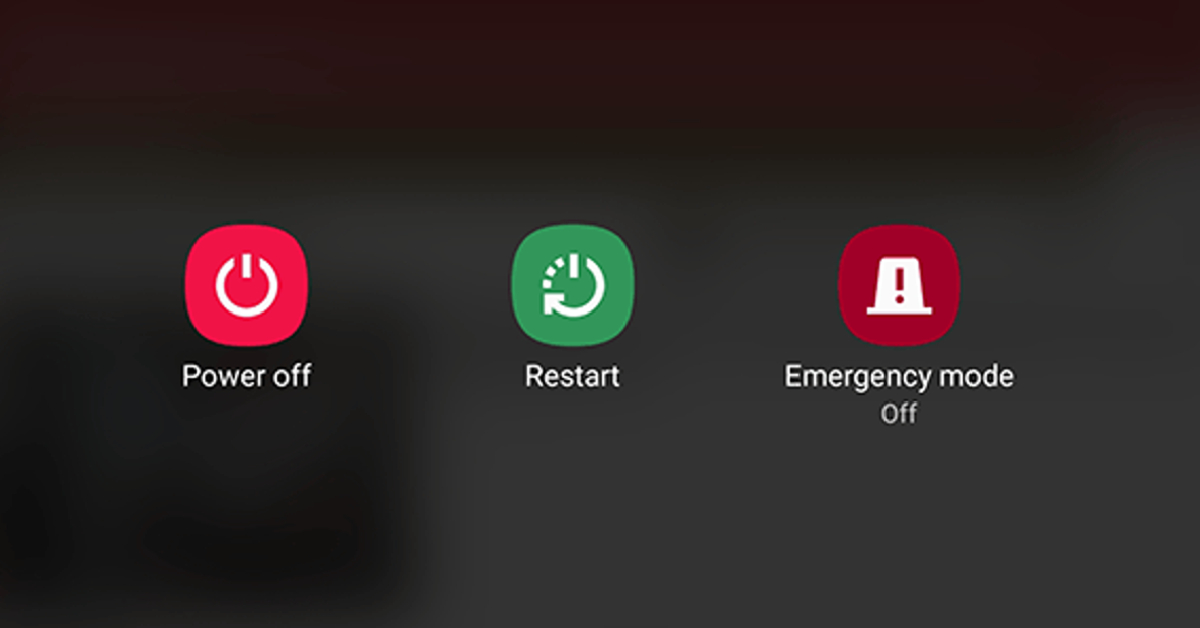
Restart your device
Restarting your device refreshes the network and resolves any background glitches that may be causing WhatsApp to malfunction. Long-press the side key and select ‘Restart’ from the power menu. If long-pressing the side key triggers the voice assistant, press it along with the volume-up button to open the power menu.
Clear app cache
Corrupted files in the cache memory can keep an app from carrying out its most basic functions. Here’s how you can clear WhatsApp’s app cache.
Step 1: Go to Settings.
Step 2: Select Apps.
Step 3: Select WhatsApp.
Step 4: Tap on Storage.
Step 5: Select Clear Cache.
Make sure background data is turned on for WhatsApp
When your phone is locked, WhatsApp still keeps working in the background to notify you of any incoming calls or messages. If WhatsApp calls aren’t ringing when your phone is locked, it may be because the app does not have access to background data. Here’s how you can ensure that background mobile data for WhatsApp is turned on.
Step 1: Go to Settings and select Apps.
Step 2: Scroll down and select WhatsApp.
Step 3: Tap on Mobile Data under Usage.
Step 4: Turn the toggle bar on for Allow background data usage and Allow data usage while Data saver is on.
Update WhatsApp
Sometimes an older version of WhatsApp may encounter an issue that is fixed in later updates. This is why it is essential you keep the app updated. In order to update WhatsApp, simply go to the Google Play Store and search for WhatsApp. Open the app page and select ‘Update’.
Reinstall WhatsApp
If you’re using the latest version of WhatsApp, uninstall it from your device and reinstall it from the Google Play Store. Tap and hold the icon for WhatsApp from the app drawer on your device. In the pop-up menu, select Uninstall. Now, go to the Google Play Store, search for WhatsApp, and hit Install.
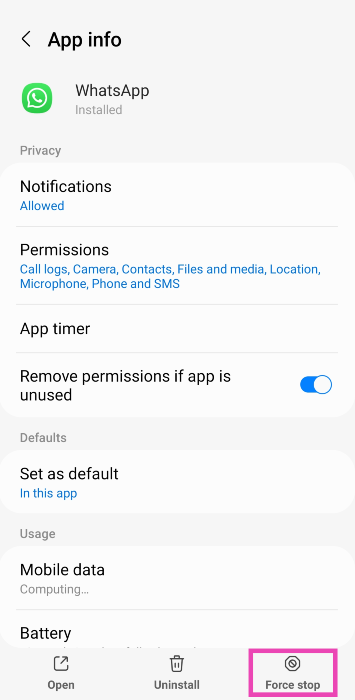
Force Stop WhatsApp
Step 1: Go to Settings and select Apps.
Step 2: Select WhatsApp.
Step 3: Hit Force Stop at the bottom of the screen.
Give WhatsApp the necessary permissions
If the incoming WhatsApp calls on your Android phone aren’t ringing, check the app’s permissions. Make sure it has access to Phone and Microphone.
Step 1: Go to Settings and select Apps.
Step 2: Select WhatsApp.
Step 3: Tap on Permissions.
Step 4: Make sure WhatsApp has access to Phone and Microphone.
Update your phone’s OS
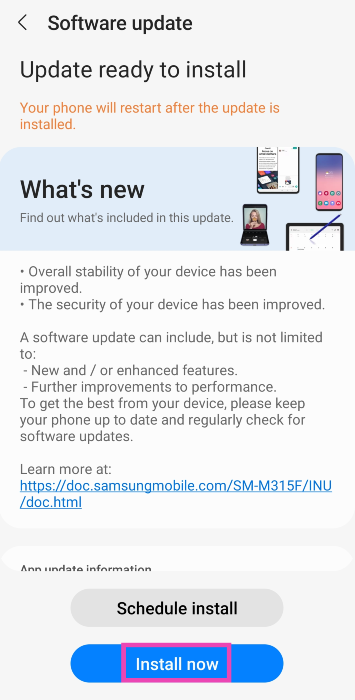
Step 1: Go to Settings and hit Software update.
Step 2: Tap on Download and Install.
Step 3: Once the update has been downloaded, tap on Install Now.
Turn off battery saver mode
When your smartphone’s battery drops below a certain threshold, it automatically turns on the battery-saver mode. When enabled, the battery-saver mode kills a lot of background activity for most of the apps on your phone to preserve the battery. This may be the reason why you are not receiving WhatsApp calls on your phone. You can disable the battery saver mode by simply opening the drop-down menu and deselecting ‘Power Saver’. You can also disable it by going to Settings>Battery and device care>Battery>Power saver.
Frequently Asked Questions (FAQs)
How much data do WhatsApp calls use?
Voice calls on WhatsApp use up to 500 kB – 750 kB per minute. If you’re using a strong network connection, the quality of the call will improve significantly, leading to more data usage.
Do I need to keep my phone unlocked to receive WhatsApp calls?
No, you can receive WhatsApp calls even when your phone is locked.
Is it safe to use WhatsApp?
WhatsApp provides end-to-end encryption for texts and calls, making it one of the safest instant messengers in the world.
These are the top 12 ways to fix the ‘WhatsApp calls not ringing when Android phone is locked’ issue on your smartphone. If the methods mentioned in this article do not work for you, try performing a complete factory reset of your device as a last-ditch measure. If you found this article helpful, let us know in the comments!
Ahead of the official launch, OnePlus has disclosed some of the features of its upcoming TWS in India. According to the firm, the OnePlus Buds Pro 2 truly wireless earbuds will be the first wireless earbuds to include Google’s Spatial Audio technology created for Android 13. In addition to this, the device will instantly pair with other Android devices with just a single tap thanks to support for Android’s Fast Pair function.
On February 7, the OnePlus Cloud 11 event will introduce the TWS earphones to the world along with the OnePlus 11 and other products from the brand. According to the company with the OnePlus Buds Pro 2 launch, it will establish a new benchmark for spatial audio stability and compatibility with exciting new capabilities for Android users.
The OnePlus Buds Pro 2 are the first TWS earbuds to incorporate Google’s renowned spatial audio capability developed for Android 13. This produces a multi-dimensional experience inside a pair of tiny earbuds. Because of this, the sound always emanates from a set location regardless of movement and has the same 3D audio quality as in a movie theatre.
The company has further revealed that the OnePlus Buds Pro 2’s spatial audio has been enhanced by them in collaboration with Google to replicate the immersive, multi-dimensional experience enjoyed in cinemas. The OnePlus Buds Pro 2 elevates the spatial audio capability by utilising OnePlus’ spatial rendering algorithm and IMU sensor, adding stability, compatibility with app expansions, and opening up its technology to other applications.
The Android Fast Pair feature, which enables you to swiftly connect to neighbouring Android devices in one tap, helps the Buds Pro 2 in its pursuit of establishing seamless connections by increasing its effectiveness. The Buds Pro 2 can connect to two Android smartphones at once and seamlessly switch the audio between them based on your actions, all without having to fuss with Bluetooth settings thanks to Android’s audio switching feature.
Furthermore, OnePlus created a bespoke stereo up-mixing algorithm to produce multi-dimensional sound from popular music and video apps, taking into account the compatibility of the majority of audio sources on the market.
The OnePlus Buds Pro 2 has already been introduced in China on January 4. It comes with an 11mm woofer and a 6mm tweeter. The TWS also supports the MelodyBoost twin driver system that was jointly developed with Dynaudio. It also comes with three Dynaudio-co-tuned equaliser choices Bold, Serenade, and Bass.
The Poco C50 has an initial retail price of Rs 6,499, making it an amazing smartphone for people who are upgrading to a budget 5G mobile. It would be exorbitant to ask for too much of a phone in this price range. However, it should at least be capable of handling all of your regular chores, such as watching movies, sending emails, and using WhatsApp, while also sporing a long battery life. So let’s put everything we just said to the test in this Poco C50 review and decide whether or not this phone is worth purchasing.
Poco C50 Review: Design and Display
The smartphone is quite lightweight and comfortable to hold in your hand. The Poco C50 has a very simple design. The material used for its back, polycarbonate, has a matte appearance that resembles leather. The nicest element is that it is resistant to fingerprints and smudges, and it has a pleasant texture. Additionally, there is a fingerprint sensor on the back panel. Although it is an outdated technology, it unlocks the device really quickly and works quite well.
Another plastic component is the side frames. A dedicated micro SD card (up to 512 GB) and a SIM tray slot, which can hold two nano SIM cards each, are located on the left side of the device, while the volume rocker and power buttons are located on the right. A speaker grille and a micro USB port for charging are located on the top and bottom frame, respectively.
A selfie camera is located in a teardrop-shaped notch on the front. The Poco C50 has a 6.52-inch HD+ display with a 1,600 x 700-pixel resolution. The touch sampling rate on the screen is 120 Hz. Although the phone’s glass is protected by Panda Glass, it is still highly advised that you put a cover on it to shield the front and rear.
The text and graphics are incredibly sharp and clear even though the quality is not full HD. Impressive colour reproduction is another feature. Watching movies and videos is wonderful. The YouTube videos’ maximum resolution is FHD, yet some 60 frames per second films lag. We experienced minor frame drops while watching FHD 30 fps videos. Because the phone doesn’t support Widevine L1, OTT apps like Netflix and others will only support a maximum resolution of 540p. Not surprising; it is a budget phone, but the content is still crisp and very watchable.
Reels scrolling on Instagram and Facebook feeds is very fluid, too. You won’t be disappointed by this display, for sure.
The Poco C50 has a single top-firing speaker, therefore the audio quality is above average. On the plus side, the speaker is not obscured when holding the phone. On the other hand, holding the phone in landscape mode runs the risk of accidentally covering the speaker. The sound actually sounds extremely amazing and is clear and loud.
Poco C50 Review: Performance and Cameras
The Poco C50 is powered by a MediaTek Helio A22 SoC with eight cores and up to 3GB of LPDDR4X RAM. The model we now have has 32 GB of storage, 22 GB of which are usable, and 3 GB of RAM. Which, in our opinion, is adequate to install all necessary programmes. Although this smartphone’s app launch speed is not the fastest, it is remarkably reliable.
The phone’s overall performance is really good considering the price it is being sold for. It only supports one band of WiFi (2.4 GHz), which is more than sufficient to stream videos and use all of your social media apps. However, due to the 32GB of capacity, there is a lengthy wait when downloading large apps and games.
In terms of the operating system, the Poco C50 runs Android 12 Go Edition, which is a toned-down version of the original Android OS. Absolutely no bloatware is present. Even while it isn’t the smoothest, it is often extremely responsive.
Now, we’re assuming that the majority of your daily duties will be accomplished on this phone if you decide to purchase it. In fact, you can even engage in the majority of the basic games, such as Subway Surfer. However, we advise you to search elsewhere if you intend to play graphically intensive games like COD Mobile.
The device also includes an FM radio. Use your wired earphones to listen to music while travelling. But keep in mind that in order for the radio to function, the earphone cable must be plugged in.
The Poco C50’s dual rear camera system, which features an 8-megapixel primary sensor, adds AI capability. The front of the gadget has a 5-megapixel sensor for selfies and video calls.
Regular daylight shot
Although the camera’s performance is somewhat basic, HDR, it manages to take some fairly decent shots. Also favourable is the dynamic range. Since you get to see real colours, you really can’t complain. However, selfies with and without portraits perform brilliantly in well-lit settings.
Portrait shot
Additionally, you can capture Full HD videos, which while not the best, nevertheless serve their purpose.
The battery is really powerful. A very effective 5,000 mAh battery is included with the device, which works well with the processor. With moderate usage, the battery lasts for roughly two days. The main drawback is the slow (10W) charger, which needs more than three hours to fully charge. The manufacturer might have included this smartphone with an 18-watt charger and a USB Type-C port.
Verdict
Okay, final remarks. The price is perhaps really important, and you can get a really excellent display for roughly Rs 6,499. Additionally, it provides a pure Android experience. Also cool are the design and the back panel that looks like leather. Moreover excellent are the 5,000 mAh battery and general performance.
Although we are aware that this is a low-cost smartphone, a Micro USB port and a 10W charger are so antique in 2023. Definitely, Poco ought to have improved this. We should have expected a minimum of a USB Type C port and an 18W charger from every phone in 2023. Basically, it’s the perfect phone for newbies, the elderly, and even your young teenagers that you want to stay in touch with.
Garena Free Fire is a battle royale game with regular awards and tournaments to keep players interested. If you play Garena Free Fire, you should be aware of the redeem codes that are released on a daily basis. However, because the battle royale game is banned in India, players from other countries can use the Free Fire Redeem codes daily. If you’re unfamiliar with the Garena Free Fire redeem codes or don’t know how to get them, we’ve put together a step-by-step guide to help you redeem them. Check out Garena Free Fire Redeem Codes for 25 January 2023.
The Free Fire redeem codes are a great way to get free stuff. These are 12-digit codes that contain alphabets and numbers, as well as an expiration date and time. Because the Garena FF redeem codes cannot be used more than once, you should hurry to the redemption page to claim your free reward before someone else does. To get a free reward, all you have to do is go to reward.ff.garena.com/en, which is the official redemption page. Also, keep an eye on this space for daily updates on Garena Free Fire redemption codes and rewards.
Garena Free Fire Redeem Codes Today 25 January 2023
FFAC2YXE6RF2
PCNF5CQBAJLK
FFCMCPSBN9CU
FFBBCVQZ4MWA
FFCMCPSJ99S3
MCPW3D28VZD6
ZZZ76NT3PDSH
XZJZE25WEFJJ
B3G7A22TWDR7X
6KWMFJVMQQYG
FFCMCPSUYUY7E
UVX9PYZV54AC
BR43FMAPYEZZ
FF7MUY4ME6SC
8F3QZKNTLWBZ
WEYVGQC3CT8Q
NPYFATT3HGSQ
FFCMCPSGC9XZ
MCPW2D2WKWF2
How to Get Free Fire Redeem Codes for Garena on 25 January 2023?
25 January 2023 Amazon Quiz has gone live on its platform. The quiz timings are 12 AM to 11:59 PM. The Amazon App users can participate in the quiz daily and all they have to do is submit correct answers to the questions asked on the e-commerce platform. Today’s participants can get a chance to win Rs 500 Amazon Pay Balance.
By participating in the Amazon Quiz the participants can win Amazon Pay Balance ranging from Rs 1,000 to Rs 50,000 every day while sitting at home. To win the participants must answer five questions correctly that are based on current events and general knowledge. One wrong answer can eliminate you from the quiz. The results will be announced at the end of the month. Today’s question will let you win Rs 500 Amazon Pay Balance. Check below for today’s Amazon quiz answers.
Question 1: Which science fiction movie is about the human colonization of a distant moon called Pandora?
Answer: Avatar
Question 2: Which is this largest living animal?
Answer: Blue whale
Question 3: The 36th edition of the National Games of India took place in which state?
Answer: Gujarat
Question 4: What animal is this?
Answer: Sloth Bear
Question 5: This is the jersey of which cricket team?
Answer: England
How To Play Amazon Quiz
Only app users are eligible to play the Amazon quiz every morning from 12 AM to 11:59 PM. The quiz is not available on the desktop. For those who are unaware of how to play the Amazon quiz below are the steps, you can follow to take the quiz.
Firstly download the Amazon app from Google Play Store or App Store
Now fill in the required information through the Sign Up option.
You need to log in to the Amazon app and scroll down on the home screen to find the Amazon Quiz banner.
Tap on the Amazon Quiz banner and tap on the Start button to start the Quiz.
Now you will get 5 questions and you need to answer them correctly. One wrong answer will eliminate you from the Quiz.
After answering all the questions correctly you are now eligible for a Lucky Draw.
The winner’s name will be announced today at 12 PM.
Online casinos have made many gamblers play various games in their comfort. Choosing the best casino may be challenging because you must consider essential things and see if that particular casino has them.
With the rise of the best online casinos worldwide, most people choose a casino with many issues, such as fraud, which is frustrating and ruins the playing experience. This guide will teach you seven ways to choose the best online casino.
So, keep reading as we explore!
1. License And Registration
Before you choose an online casino, it is crucial to know if that casino has a license and registration. A casino with a right will guarantee that its functions are legal.
In addition, registration enables online casinos to adhere to the rules and regulations of gambling. You’ll not have to worry about your data being exposed and fraud issues.
Most online casinos provide their license and registration at the bottom of the casino site. You can also see when that casino got the permit and the registration date.
If a casino needs the right and registration, go to another with the request. Some popular licenses are the Malta Gaming Authority, Curacao Gaming Authority, and the UK Gambling Commission.
2. Check For Gifts and Bonuses
The rise of online casinos has led to high competition. Therefore, most casinos provide gifts and bonuses to their players. However, these gifts depend on the casino because some come with terms and conditions for using them. For instance, a casino may require you to pay a certain fee to get gifts and bonuses.
Keep an eye on the various types of bonuses, such as welcome bonuses, no-deposit bonuses, loyalty bonuses, free spins, and others.
The advantages and rewards save you money as you get to enjoy playing and betting without the need to deposit your money. It also helps you refund your money if you lose a bet.
3. Check The Payment Options
When choosing an online casino, looking at their payment options is significant as you’ll not want issues with your deposit and withdrawals. In addition, the best online casino should have a wide variety of payment options that you can choose from them.
Ensure you know the maximum and the minimum amount you can withdraw or deposit. Some standard payment options are credit cards, debit cards, cryptocurrency, e-Wallet, and prepaid cards.
The more banking options a casino has, the better. Most casinos have a list of payment options on their website.
4. Customer Support
It is essential to check customer support as it is possible for problems to occur when playing. Therefore, you’ll need customer support that is readily available and reliable.
To check whether a casino’s customer support has good services, you can ask them queries and see how they respond and if you are comfortable with their answer.
The best online casino should offer support 24/7 and communicate with customers using different platforms such as phone, emails, and live chats.
5. The Casino’s Reputation
Apart from customer support, it is also significant to know the reputation of an online casino as it will reveal more about what to expect from it. You can learn the importance of a particular casino by reading the reviews to see what different players say about that casino.
Moreover, try to see if any news article has featured that casino.
6. Variety Of Games Available
Before you select an online casino, it’s crucial to see its various games. Most online casinos offer a wide selection of games, such as roulette, baccarat, blackjack, poker, slot machines, and craps. Some casinos have a list of games on their website to help players browse through them.
7. Device Compatibility
It is crucial to consider the device compatibility that a particular casino supports because some casinos support only a few devices. Whether you like playing games on a smartphone, laptop, or tablet, ensure the casino site supports it. Also, check the device operating system to learn the requirements of having games installed for easy playing.
Verdict
How you choose an online casino will determine your experience when playing your games. Therefore, do proper research to make the selection process a breeze.


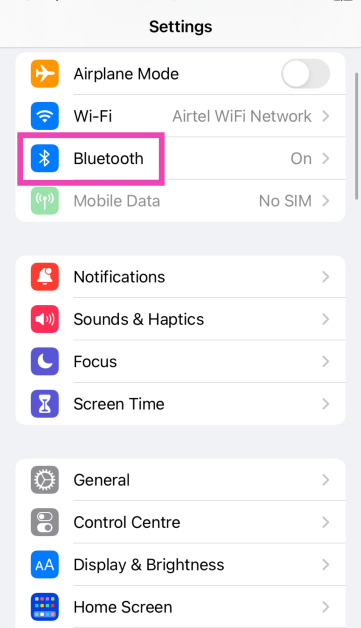
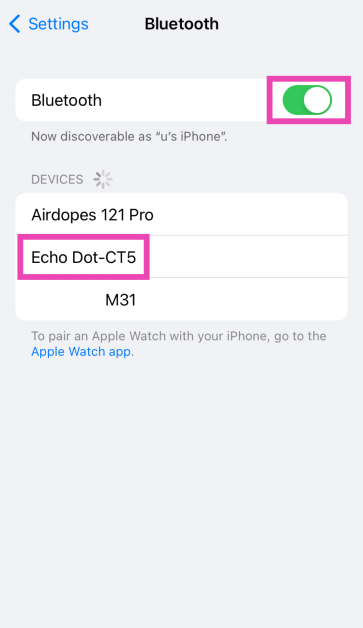


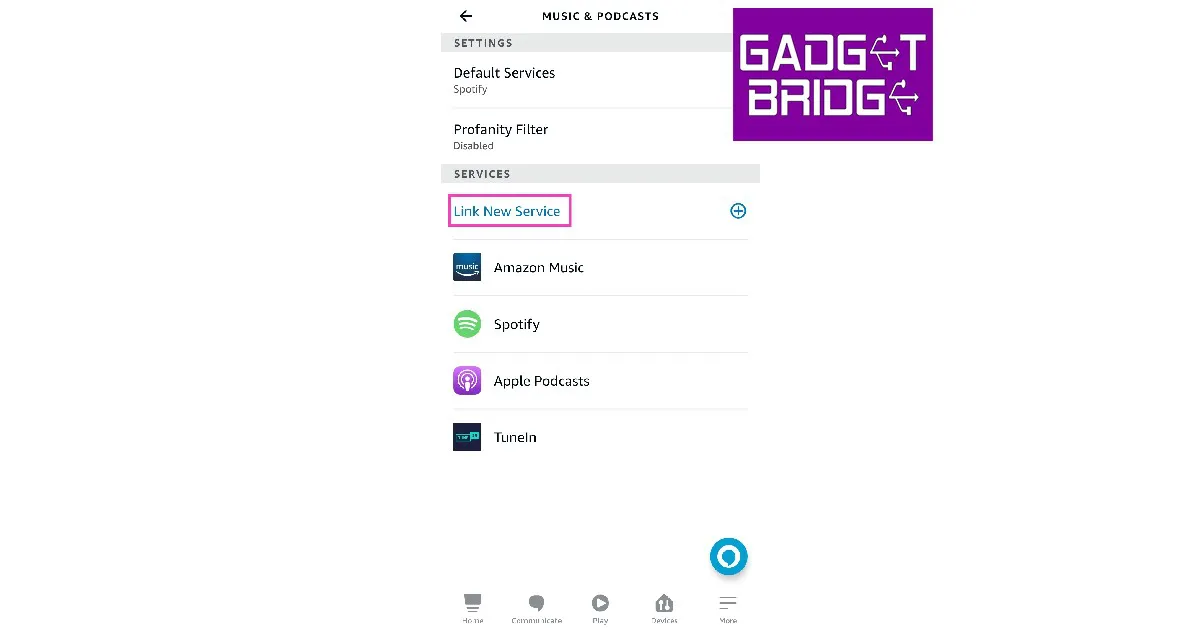

")

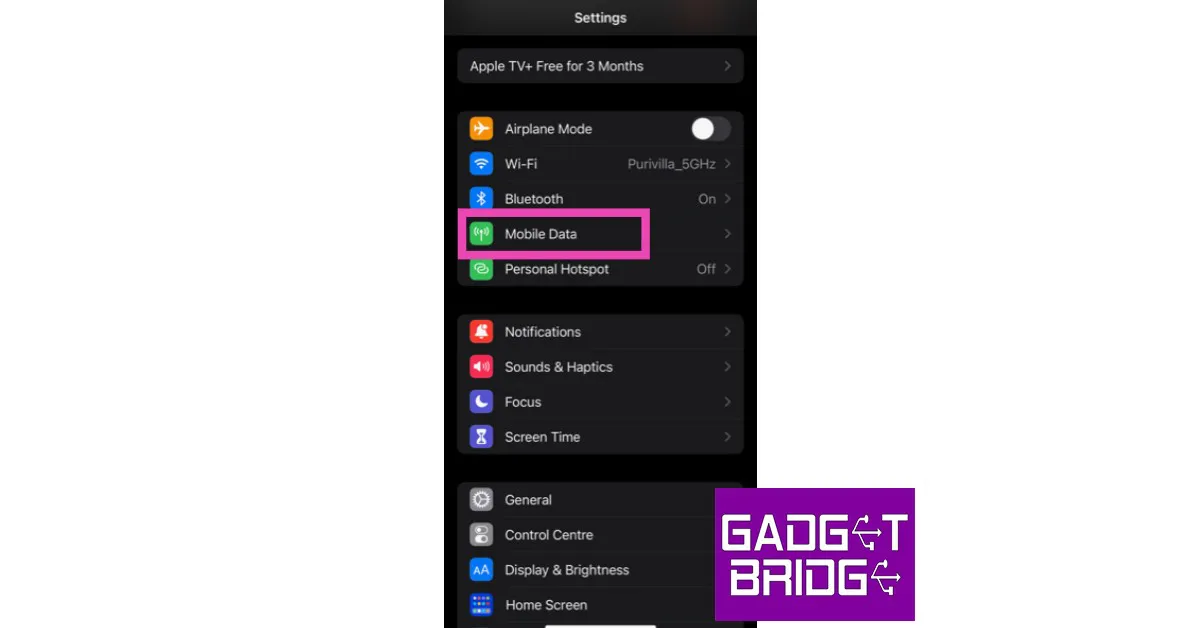
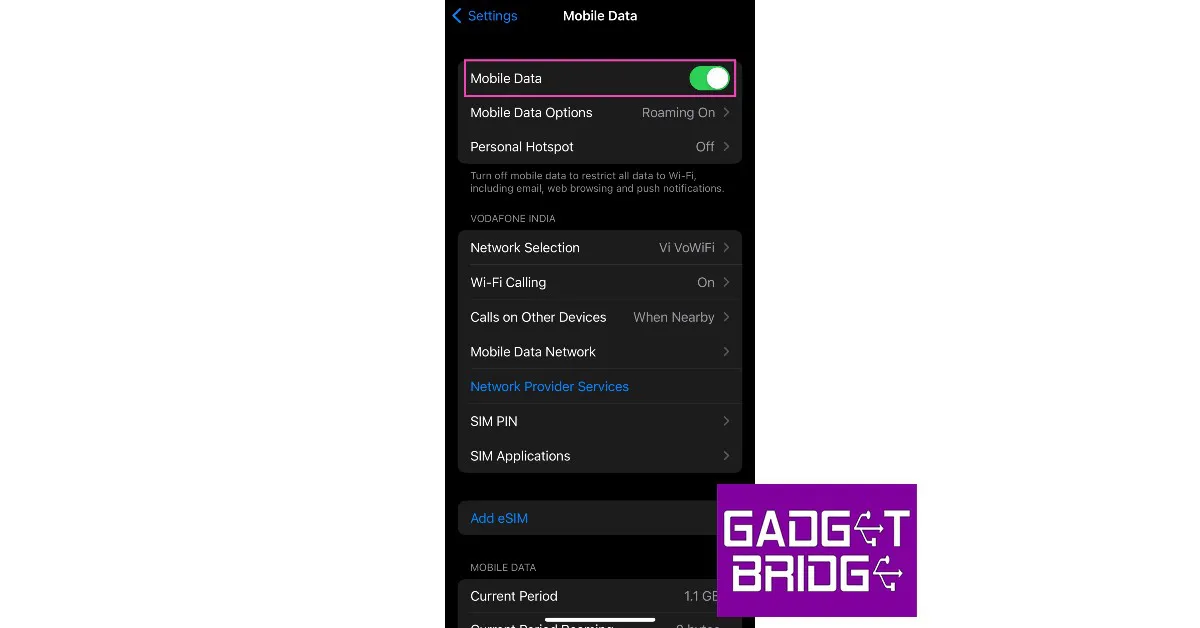
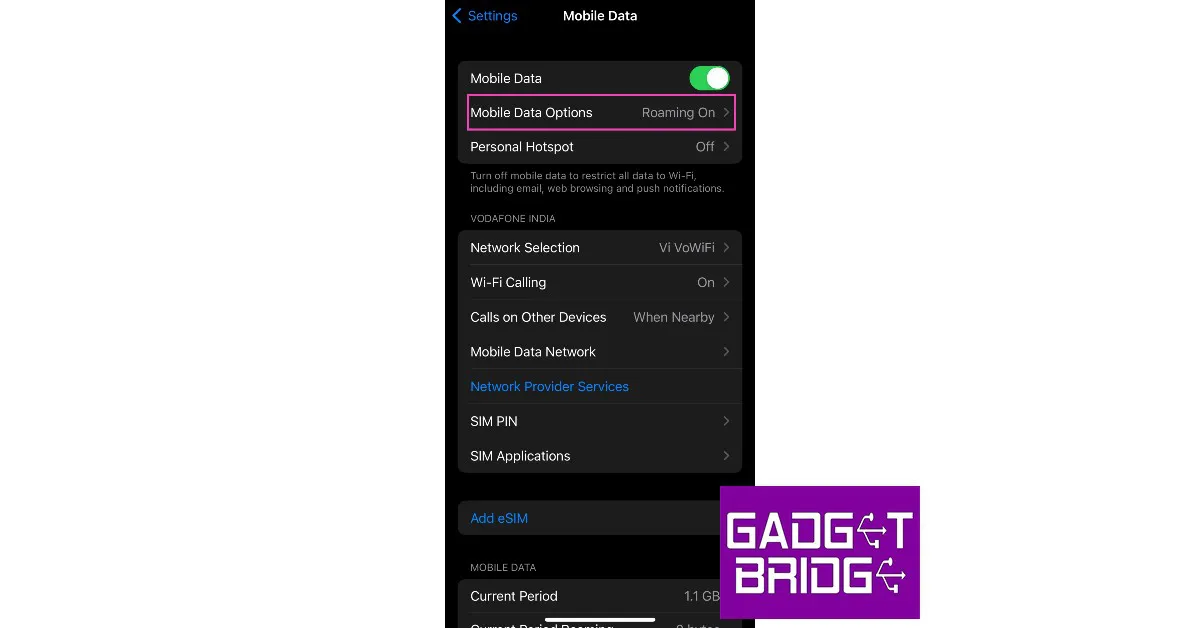

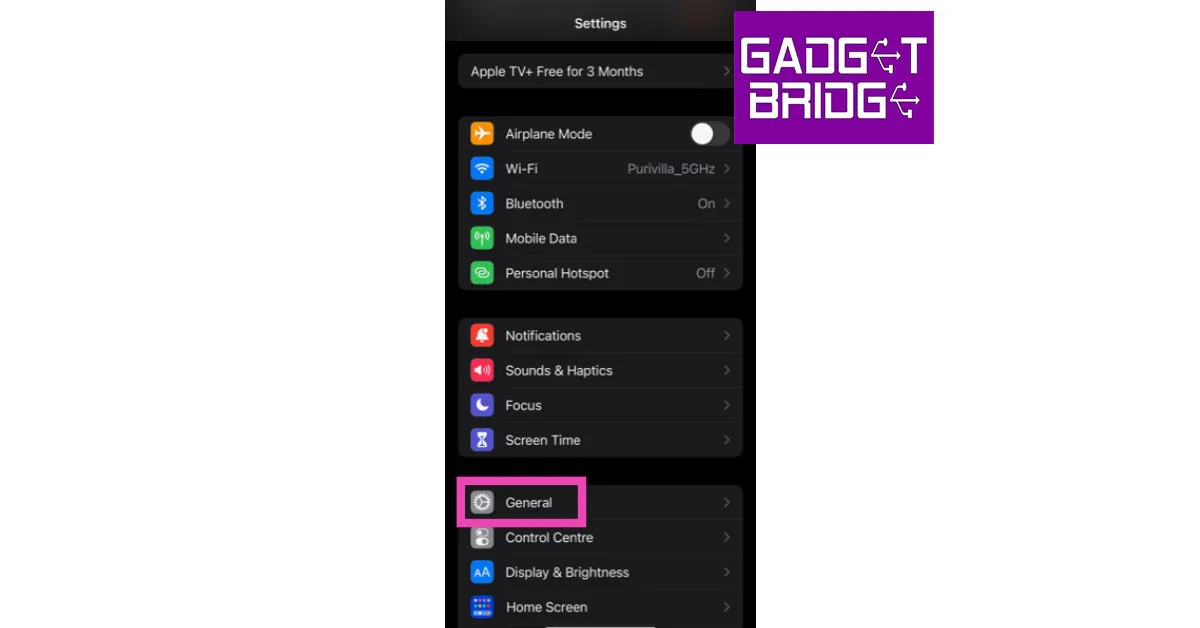
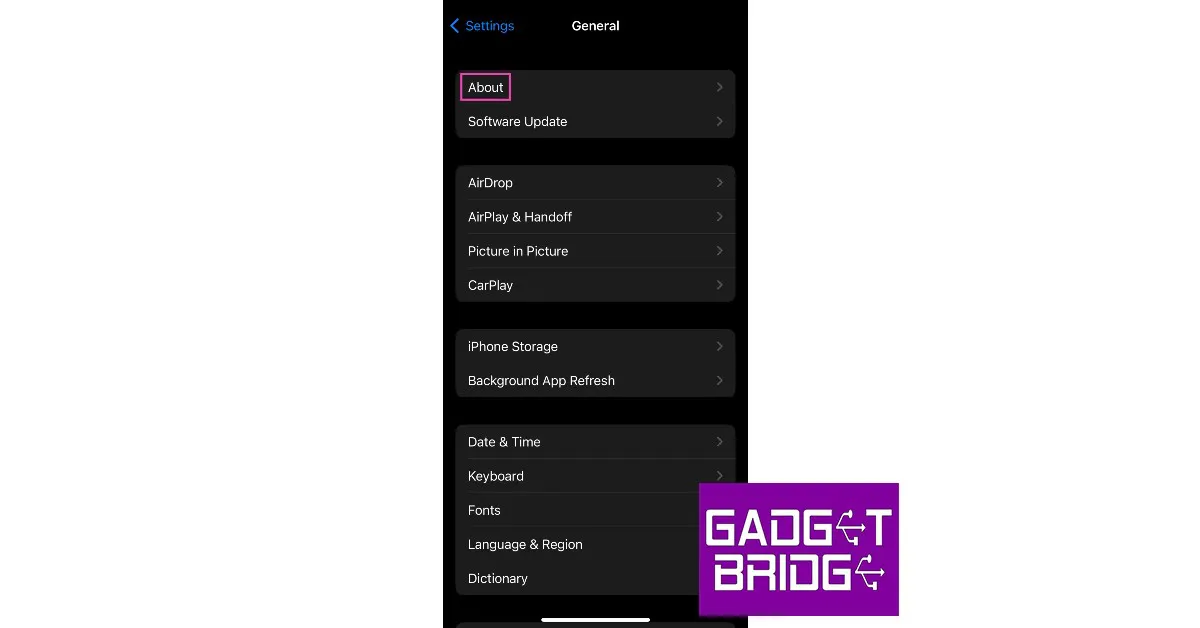
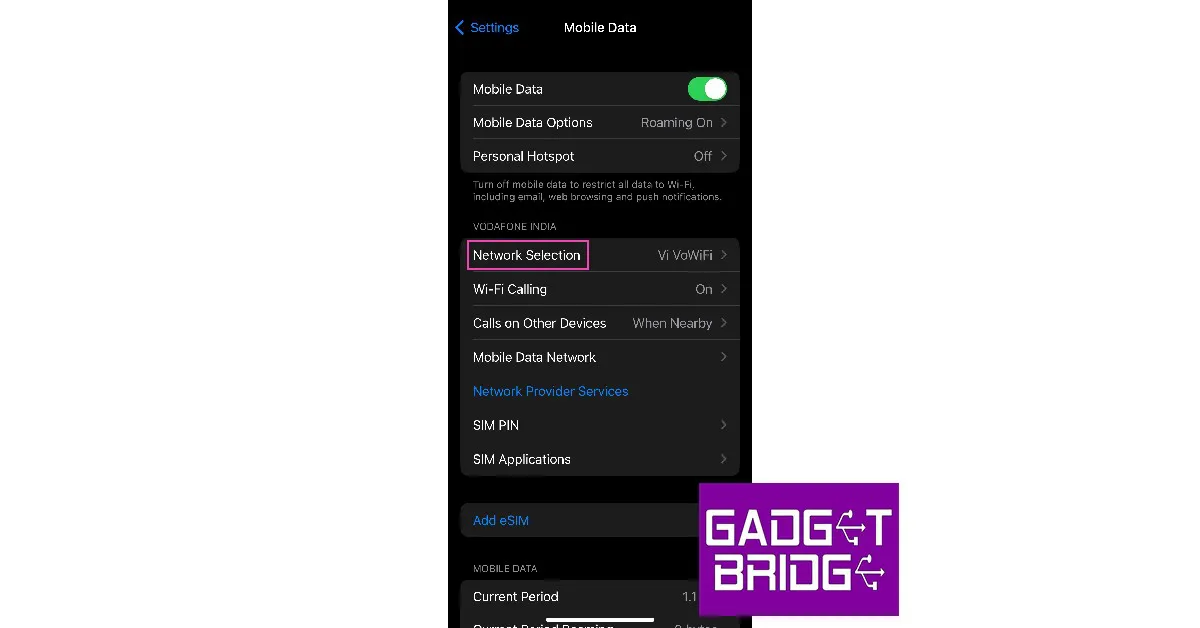

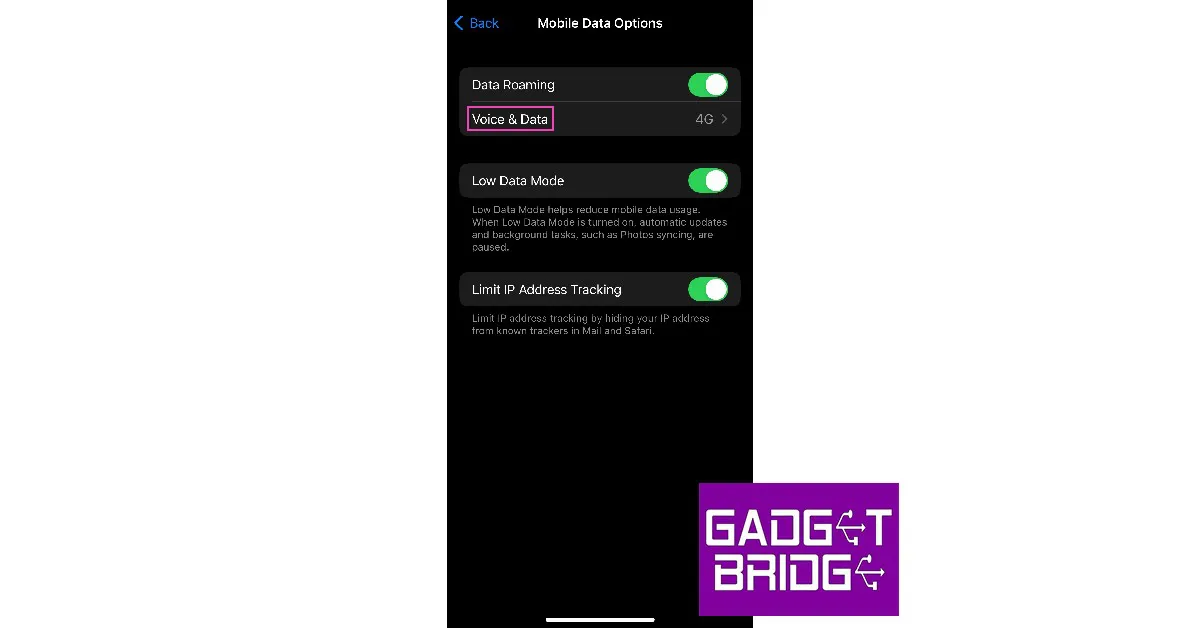
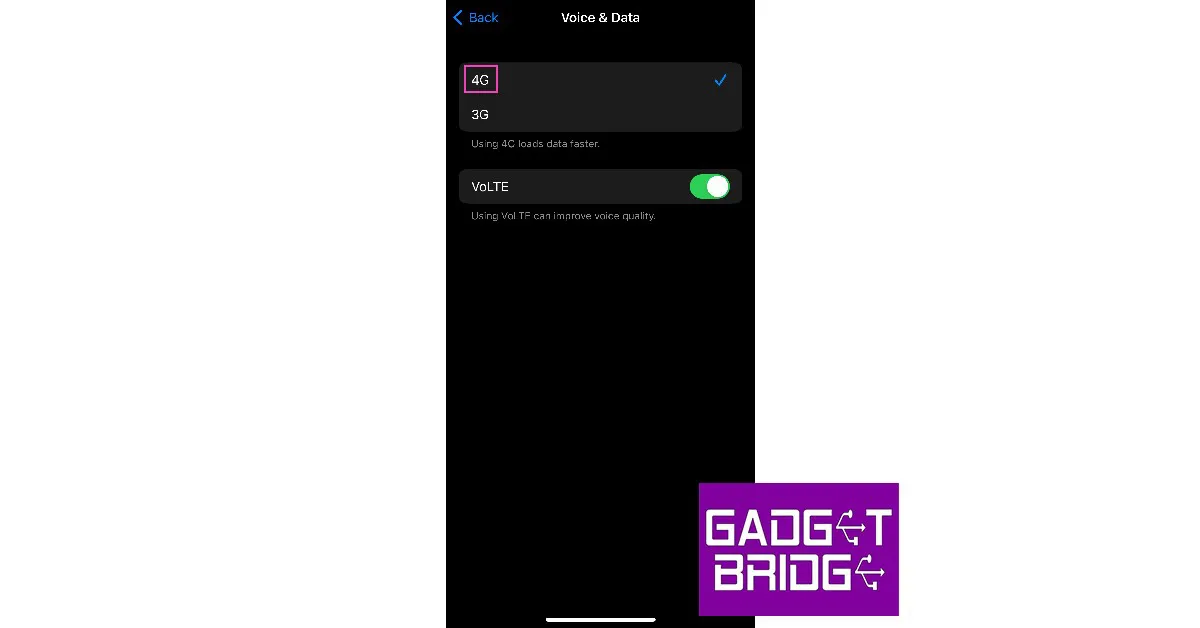

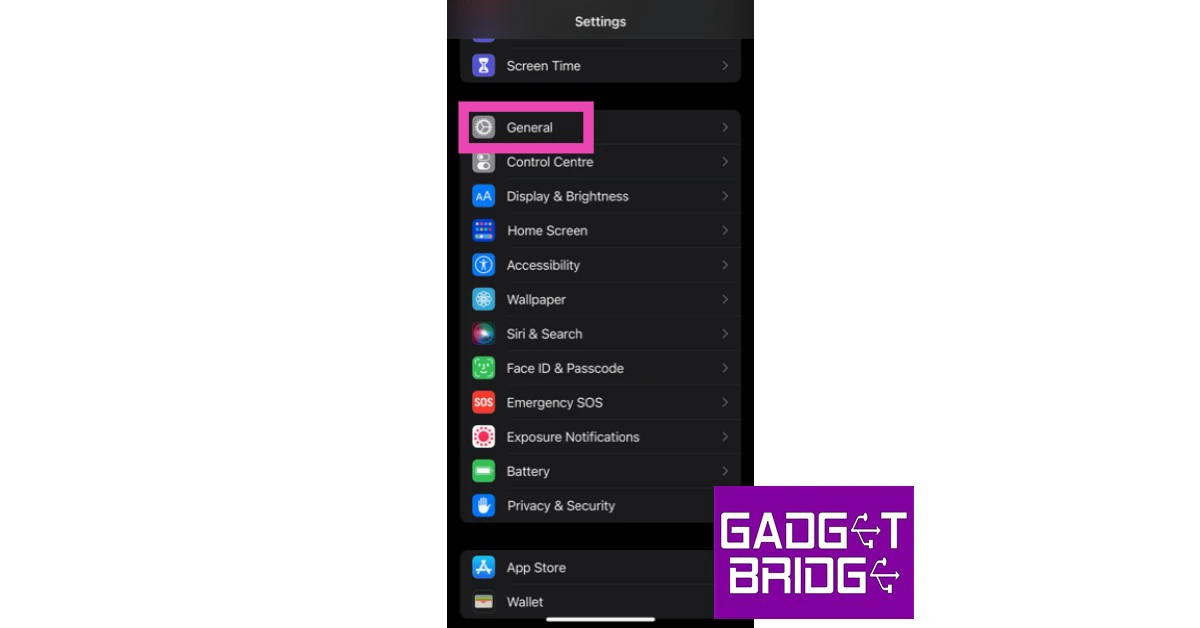


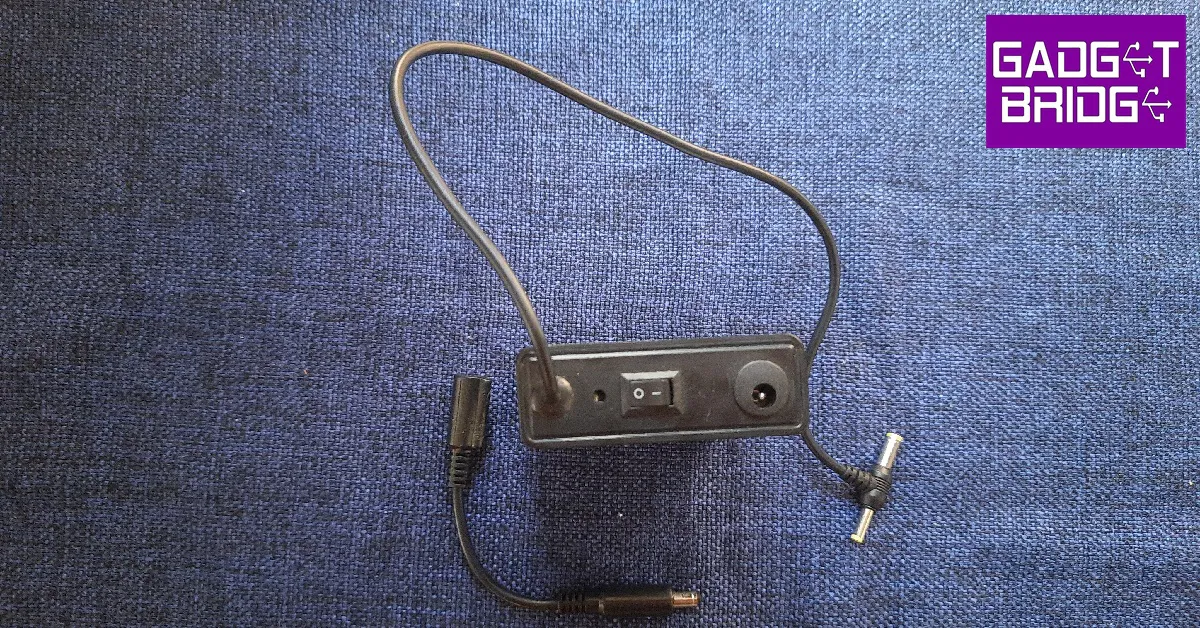
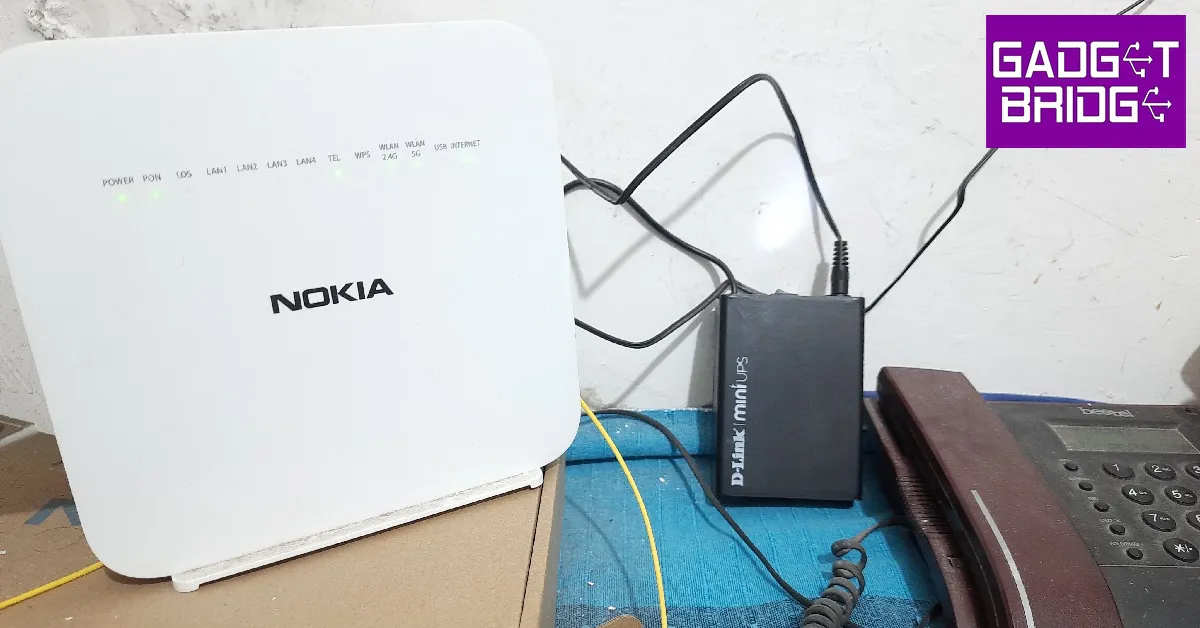
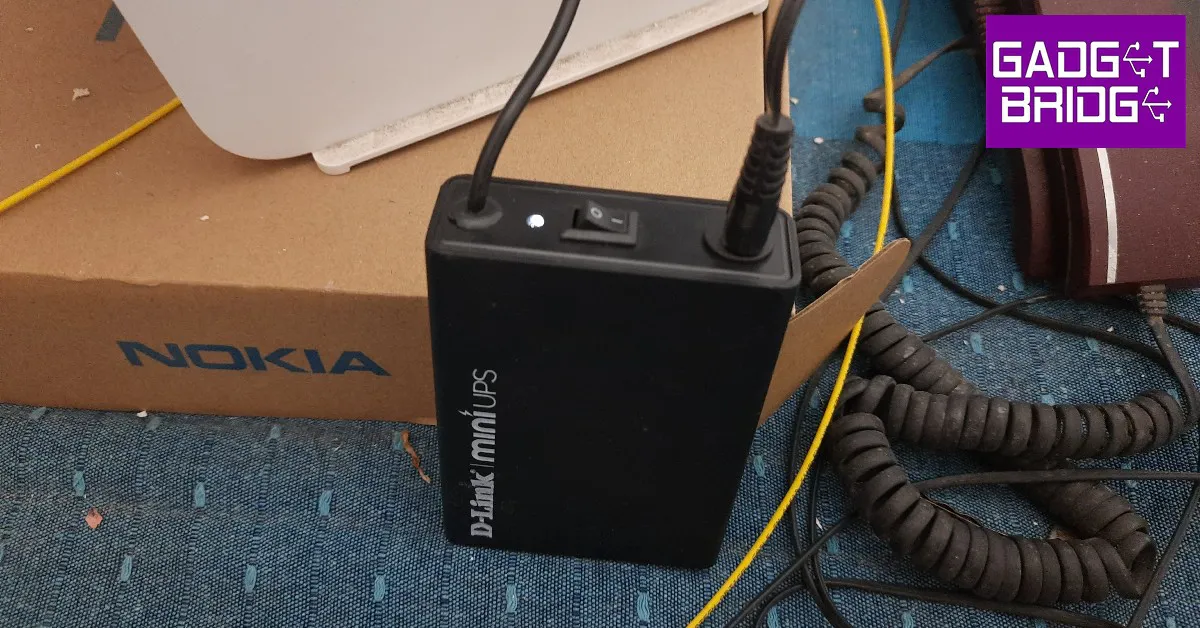


")


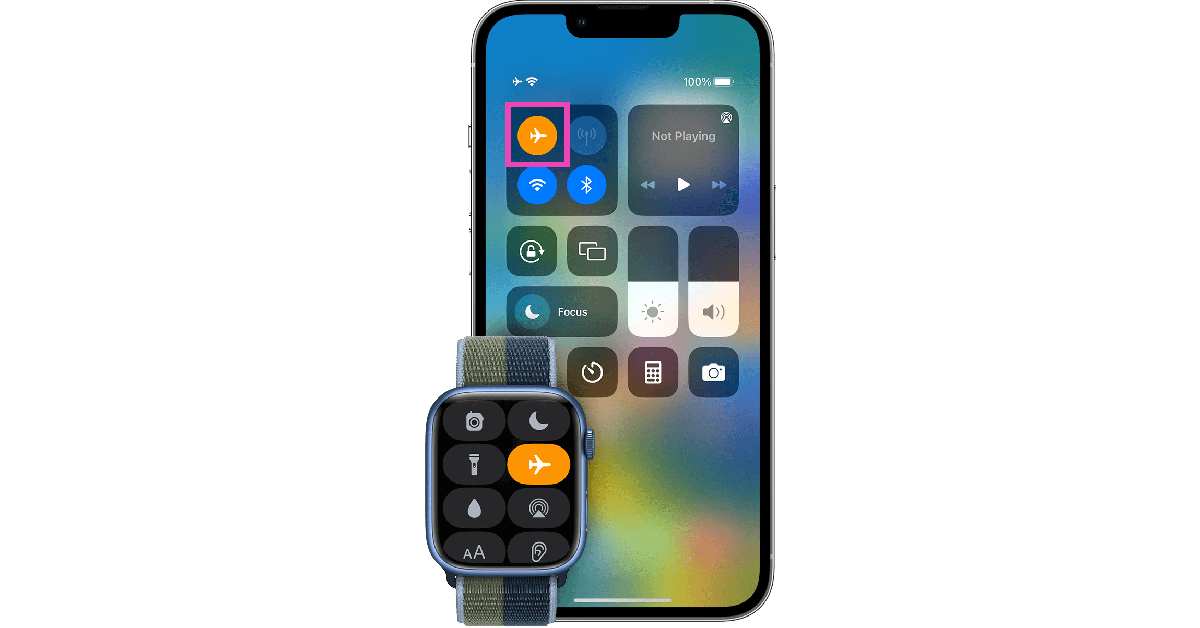


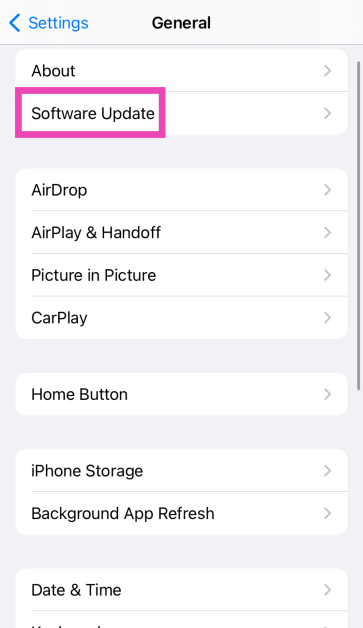
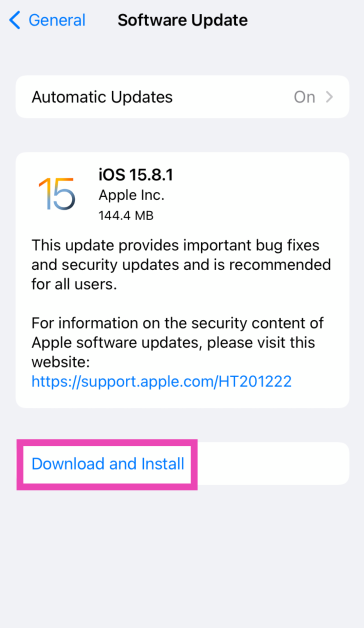


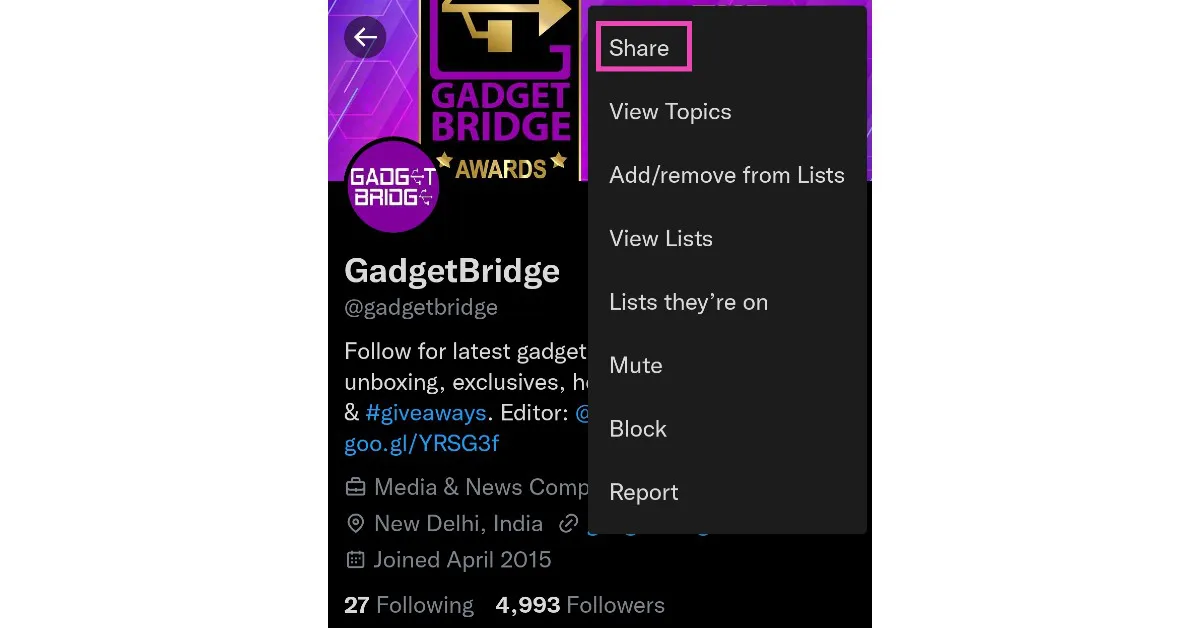


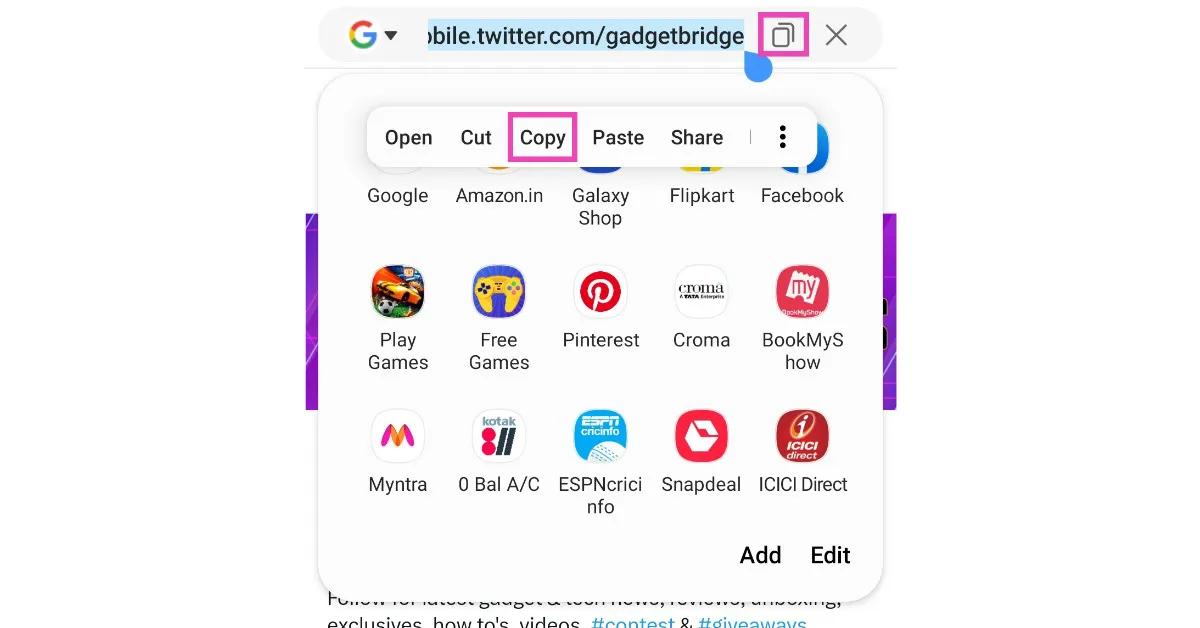

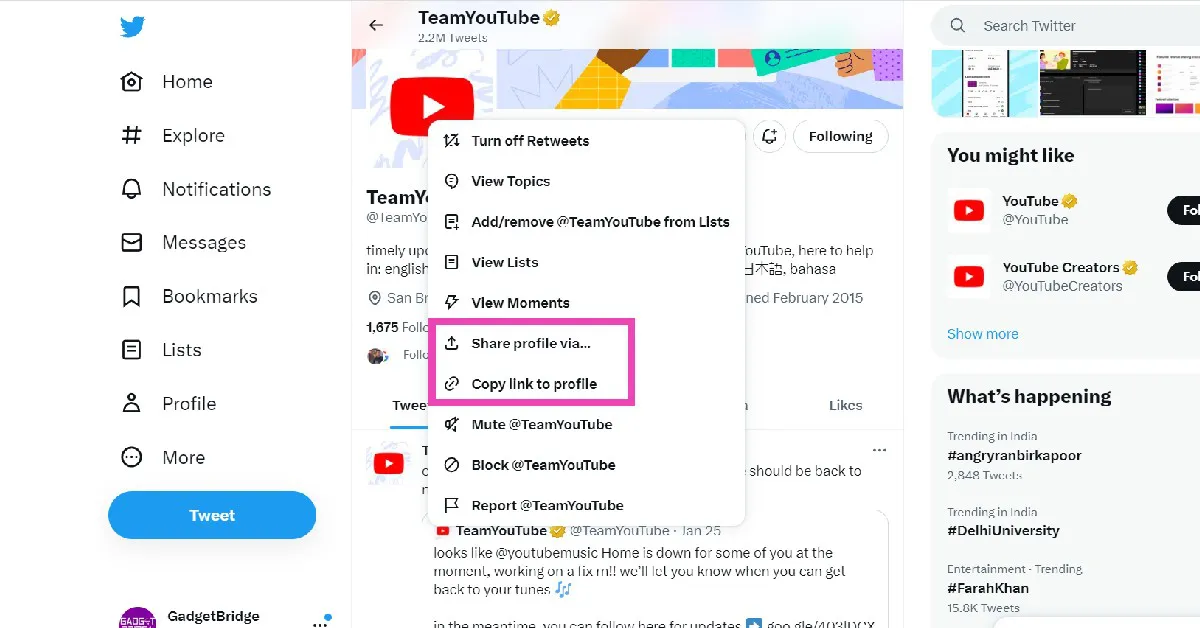


")


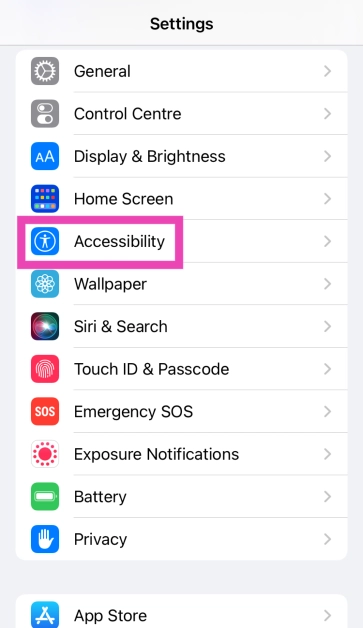
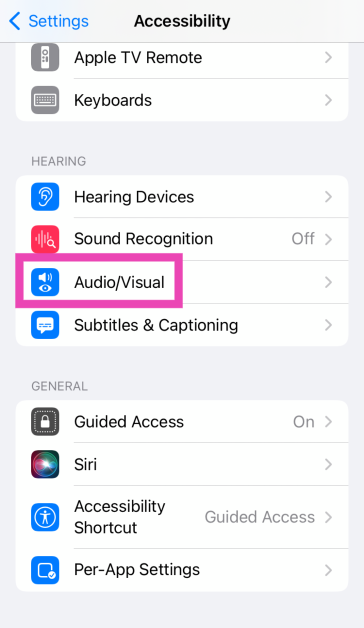
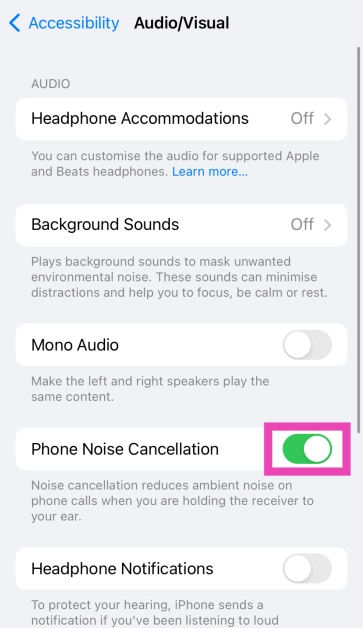
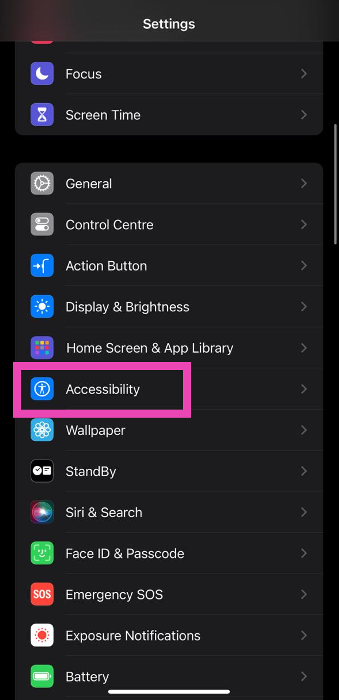
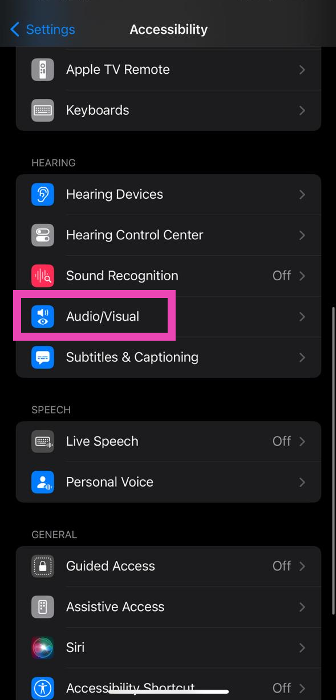
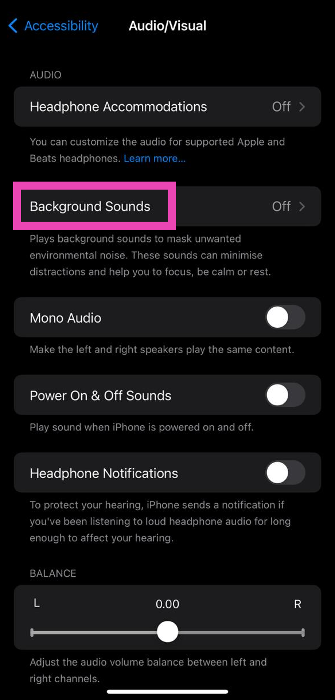
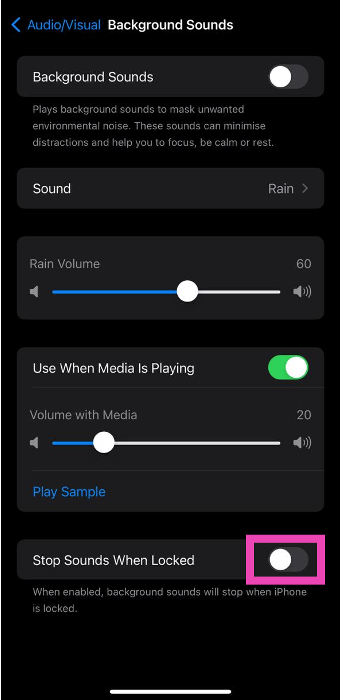
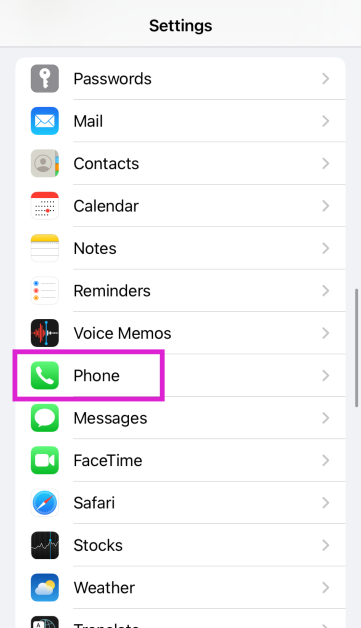
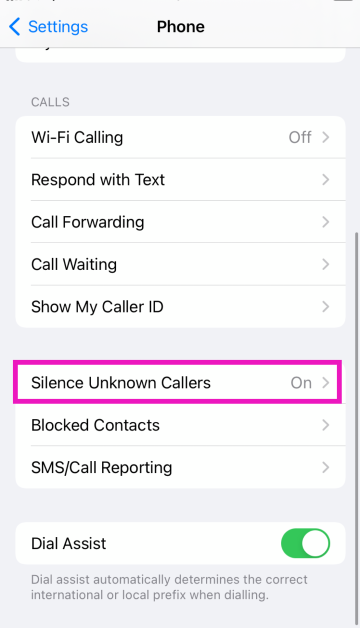
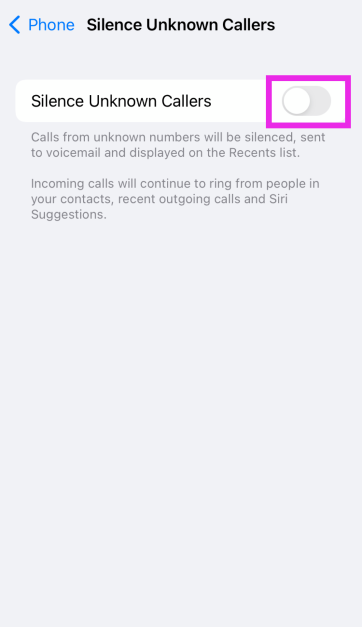


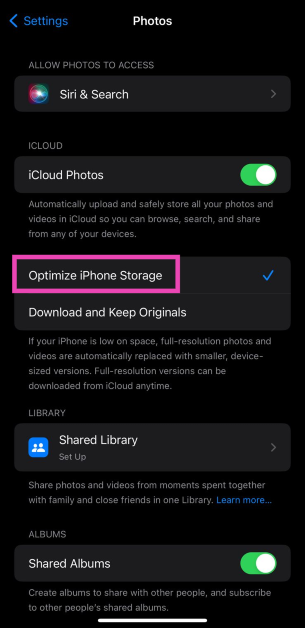
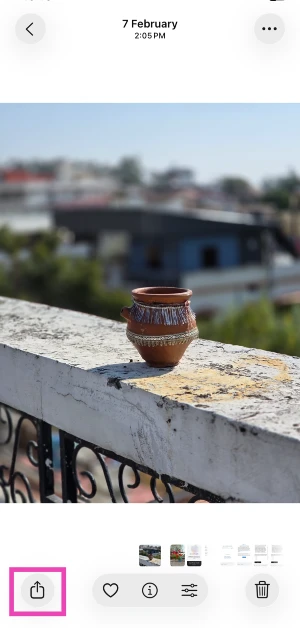
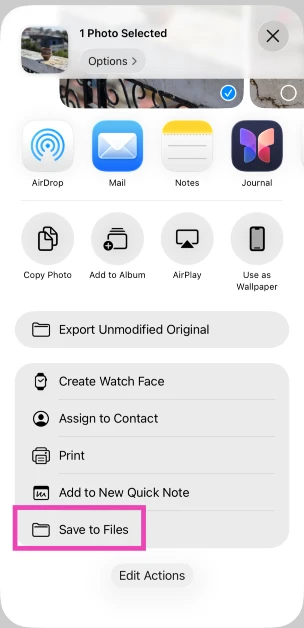
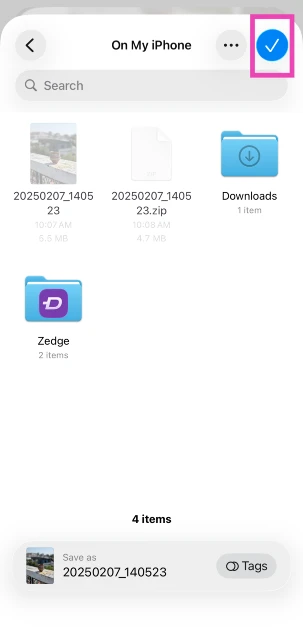
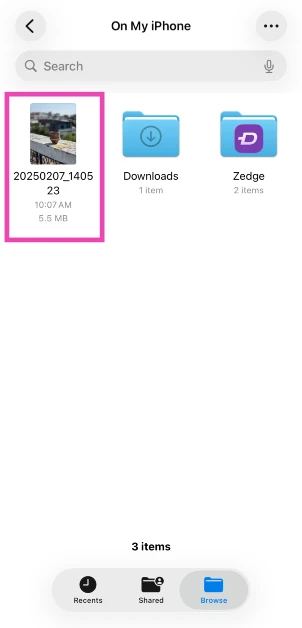
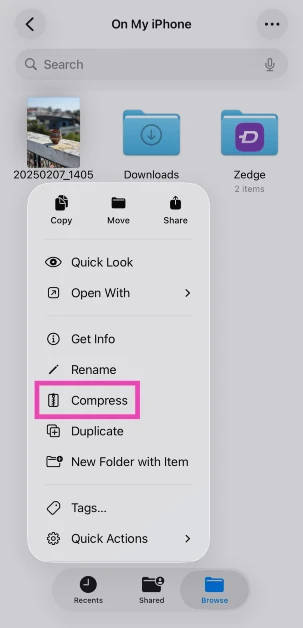


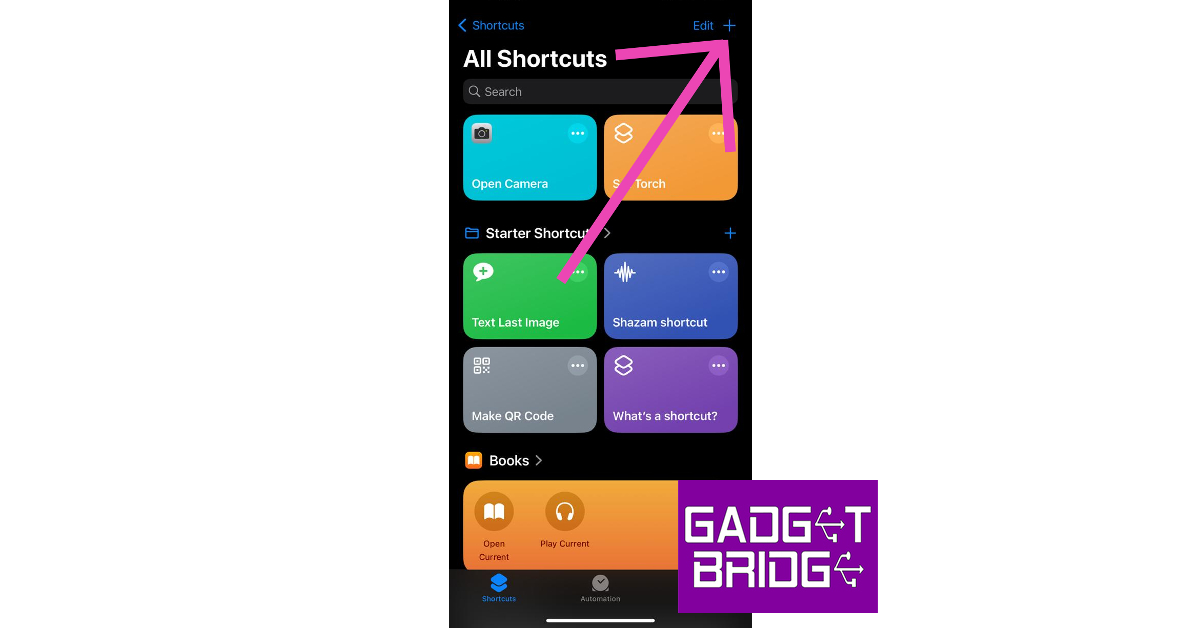
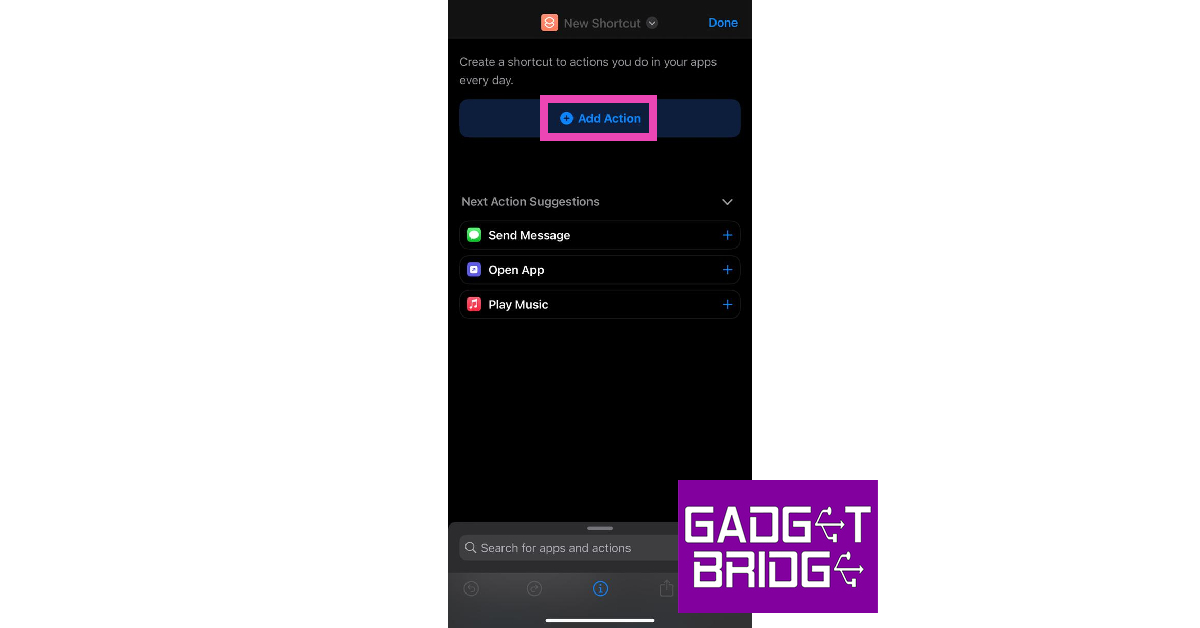
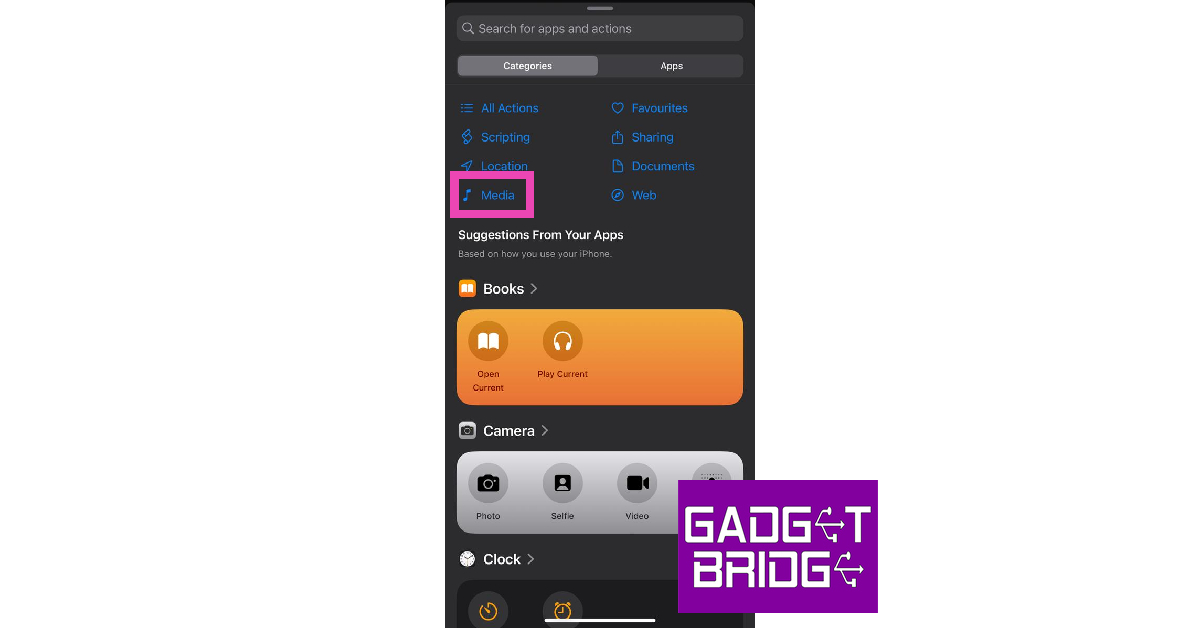
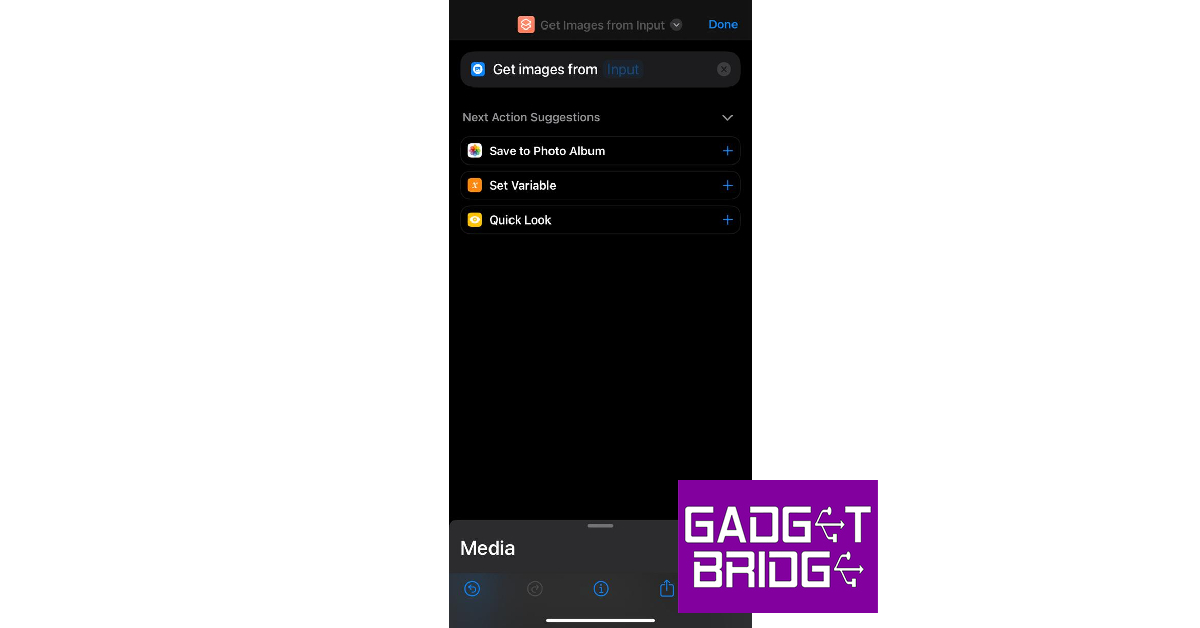
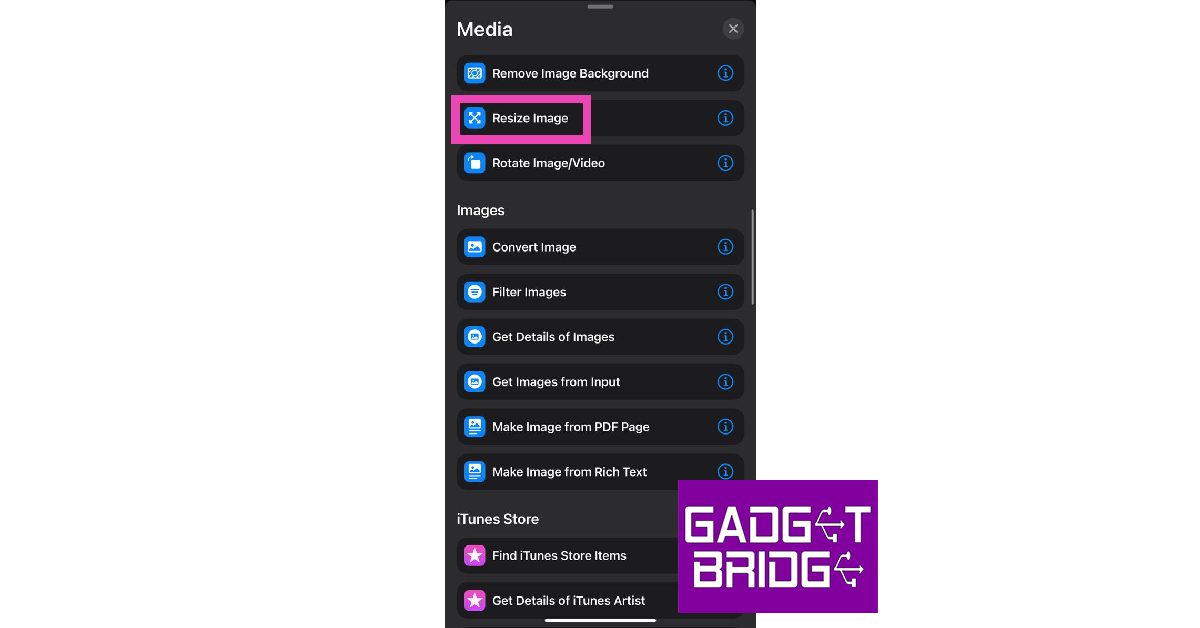


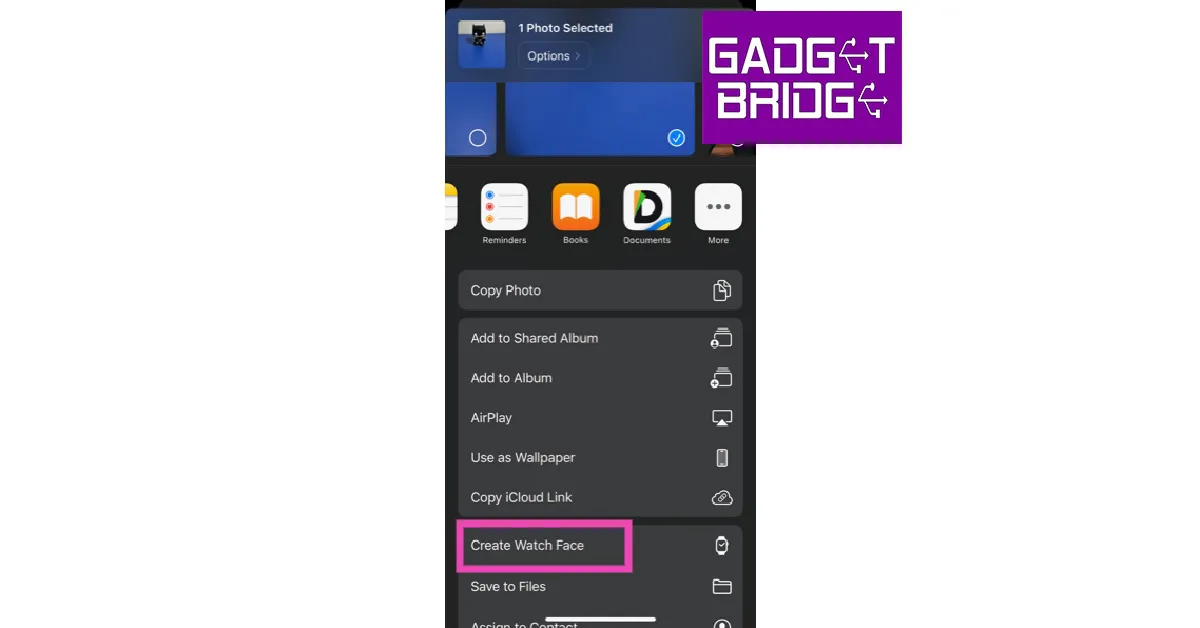


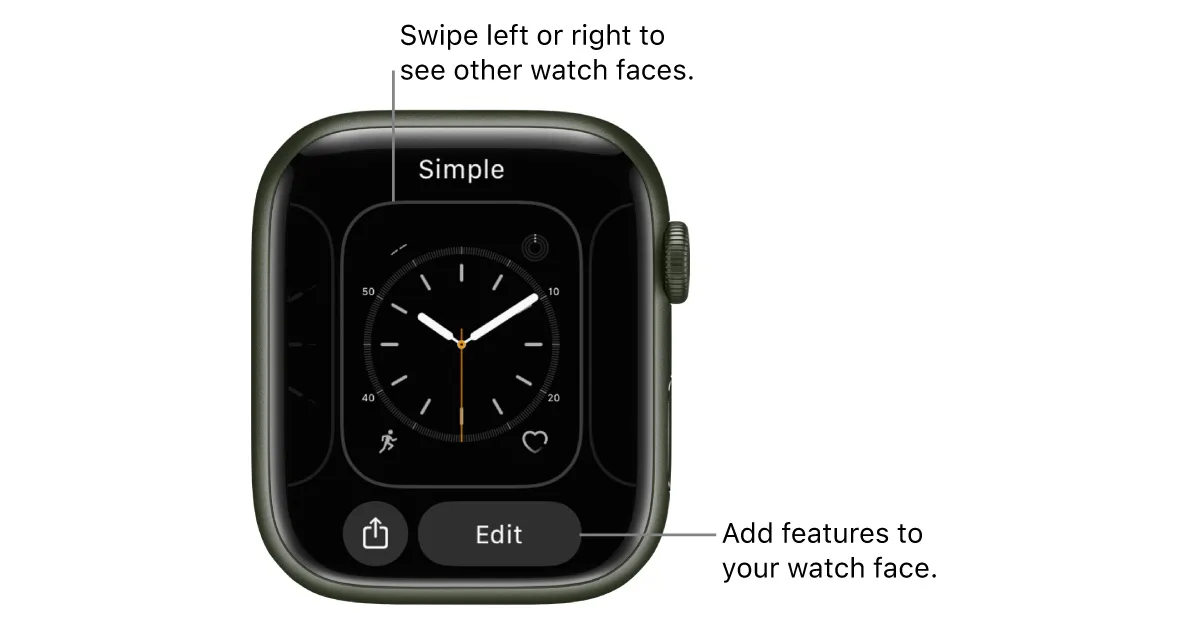
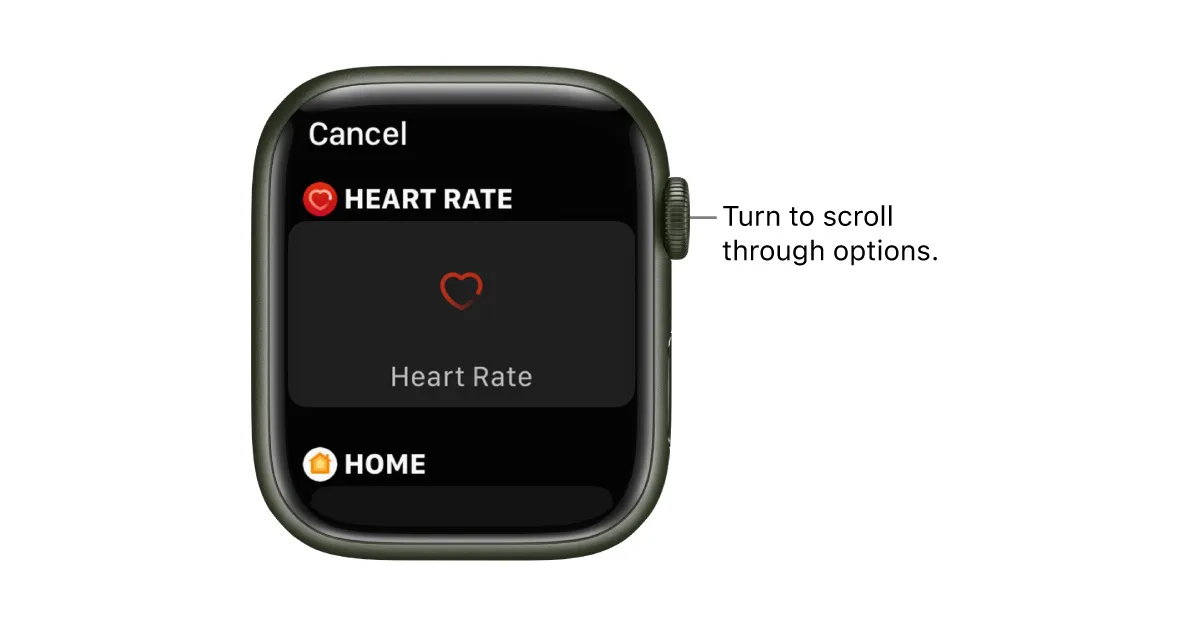
 also added")
")