Garena Free Fire is a battle royale game with regular awards and tournaments to keep players interested. If you play Garena Free Fire, you should be aware of the redeem codes that are released on a daily basis. However, because the battle royale game is banned in India, players from other countries can use the Free Fire Redeem codes daily. If you’re unfamiliar with the Garena Free Fire redeem codes or don’t know how to get them, we’ve put together a step-by-step guide to help you redeem them. Check out Garena Free Fire Redeem Codes for December 14.
The Free Fire redeem codes are a great way to get free stuff. These are 12-digit codes that contain alphabets and numbers, as well as an expiration date and time. Because the Garena FF redeem codes cannot be used more than once, you should hurry to the redemption page to claim your free reward before someone else does. To get a free reward, all you have to do is go to reward.ff.garena.com/en, which is the official redemption page. Also, keep an eye on this space for daily updates on Garena Free Fire redemption codes and rewards.
Garena Free Fire Redeem Codes Today 14 December 2022
14 December 2022 Amazon Quiz has gone live on its mobile app platform. Customers from different parts of the country are participating in the daily quiz. The daily quiz is conducted by the company brings an opportunity for the customers to win exciting prizes. The quiz begins from 12 AM to 11:59 PM. In today’s quiz participants have a chance to win Rs 1,000 Amazon Pay Balance by answering all the questions correctly.
Every day Amazon brings a fresh set of questions for its customers that contains five easy questions. Amazon quiz brings an opportunity for its customers to win Amazon Pay Balance ranging from Rs 1,000 to Rs 50,000. which consists of five questions related to general knowledge and current affairs.
The participants need to answer all the questions correctly and their names will be selected for a lucky draw. The winner will be announced at the end of the month. One wrong answer could eliminate you from the quiz. If you manage to answer all the questions correctly you can stand a chance to win Rs 1,000 Amazon Pay Balance today. Only app users are eligible to participate in the Quiz. Check Out 14 December 2022 Amazon Quiz Answers.
Question 1: In which country have 24 well-preserved bronze statues, dating back 2300 years, been excavated from a spa?
Answer: Italy
Question 2: After Elon Musk’s acquisition of Twitter, many users have jumped to which open-source alternative social app that started in 2016?
Answer: Mastodon
Question 3: Which science fiction movie is about the human colonization of a distant moon called Pandora?
Answer: Avatar
Question 4: In which US state did this movement start from?
Answer: Florida
Question 5: Which sultan began the construction of this fortress?
Answer: Saladin
How To Play Amazon Quiz
Only app users are eligible to play the Amazon quiz every morning from 12 AM to 11:59 PM. The quiz is not available on the desktop. For those who are unaware of how to play the Amazon quiz below are the steps, you can follow to take the quiz.
Firstly download the Amazon app from Google Play Store or App Store
Now fill in the required information through the Sign Up option.
You need to log in to the Amazon app and scroll down on the home screen to find the Amazon Quiz banner.
Tap on the Amazon Quiz banner and tap on the Start button to start the Quiz.
Now you will get 5 questions and you need to answer them correctly. One wrong answer will eliminate you from the Quiz.
After answering all the questions correctly you are now eligible for a Lucky Draw.
The winner’s name will be announced today at 12 PM.
Nowadays, smartphones are on their way to replacing personal computers. You can do much more on the phone, and it’s easier to carry around than a laptop or desktop.
But did you know that there is one area where your smartphone has an even better advantage over traditional PCs?
Gambling halls of all kinds must provide great & handy gaming experience in order to get loyal players. Most gamblers prefer playing online slots on phones, without wasting their precious time on bulk PCs. There are even casino game developers who don’t create games for laptops anymore! A bit crazy, but it’s 2022, darling.
If you want to know why let’s look at some of the features and advantages of mobile gambling:
More Flexible than a PC
The main advantage of playing in an online casino from a smartphone is that you can do it anywhere. From your phone, you can play online slots, roulette, blackjack, and even make sports predictions.
All this is from the app or the mobile version of the casino. Besides, mobiles are way too easy to carry around, more compact, and lighter.
Immersive Experience
Touch screens are more accessible and intuitive than your regular keyboard or mouse. This technology is also more responsive since it can adapt the website’s graphics and formats to your screen’s size, making it more immersive.
There are many types of smartphone screens. However, OLED technology is recommended if you want to play in an online casino.
These screens are brighter, have better colour saturation, and have less power consumption. This way, you can enjoy your casino games with a better resolution.
Fast Games Response
When you play in an online casino, especially at a live dealer table, you need that the game works lightly but fast.
The Snapdragon processor is the best option to play in an online casino, offering up to 4K graphics at 60 FPS. The latest Snapdragon processor, the 8 Gen 1, allows fast game response and avoids lag.
The best features of this processor are:
Low latency engine.
An anti-ageing engine.
A smart memory engine to improve system fluidity, prevent ageing, and allow more applications to remain active in the background.
Better Wi-Fi Compatibility
When playing at an online casino, it’s essential to have a good internet connection to enjoy the whole experience.
Many factors can make your phone’s internet faster than your PC—for example, WI-FI standards.
If you have a computer with limited resources, your PC won’t have enough internet speed to support games. On the other hand, if your smartphone is WI-FI 6 standard, the connection will be much faster.
It also matters the WiFi bands. Modern devices can now connect to the 2.4 GHz and 5 GHz bands.
The first band has the widest coverage, although the speed is more limited. On the other hand, the second band has a higher speed, but only if you are close to the router.
Your computer may not be dual-band and work on the 2.4 GHz band. This makes it slower than smartphones that connect to the 5 GHz band.
Cheaper Than a PC
You don’t have a high-end PC to play casino games. Yet, having a fast PC that can handle long blackjack matches, online slots, or poker opened in multiple tabs while doing work or anything else can be costly.
Instead, a high-end smartphone can be more affordable, offering a more flexible gaming experience.
Playing Casino Games with Your Smartphone
After knowing all the advantages of playing at an online casino with your smartphone, you should try one.
Playing casino games with your smartphone can offer you a fun and rewarding experience while using a comfortable device in your hands.
With the release of the OnePlus Monitors, the OnePlus has entered the monitor market. The two monitors, the OnePlus Monitor X27 and the OnePlus Monitor E24 have been introduced in 27-inch and 24-inch sizes, respectively.
OnePlus Monitor X27
The OnePlus Monitor X27 offers a fast and smooth gaming experience with a 165Hz refresh rate and an amazingly fast 1ms reaction time, providing ultra-clear visuals with minimal lags and blurring. Users may experience professional-level gaming with AMD Freesync Premium, which provides smooth visuals free of screen tearing and jittering, as well as variable frame rates tuned to each specific game.
With clear 2K QHD visual resolution, users may enjoy their favourite games, stream material, and much more. The OnePlus Monitor X27 also provides an excellent viewing experience, with its brilliant HDR 400 colour and broad 178° IPS panel providing exceptional views from all angles.
With vibrant 10-bit colour and a wide DCI-P3 95% colour gamut that adds life-like colours and details, the OnePlus Monitor X27 immerses users in an immersive visual experience. With vibrant 10-bit colour and a wide DCI-P3 95% colour gamut that adds life-like colours and details, the OnePlus Monitor X27 immerses users in an immersive visual experience.
The OnePlus Monitor X27 easily adapts to user activities because of its efficient rotatable viewing angle. The monitor’s effective tilt, rotation, and pivot angles are -5° to 21°, -20° to 20°, and -90° to 90°, respectively. Furthermore, the monitor’s height may be adjusted from 0-130mm.
The OnePlus Monitor X27 features a unique type-C connector that can charge users’ laptops with up to 65W rapid charging while also transmitting their display feed. The OnePlus Monitor X27’s Type-C connection allows power delivery of up to 65W via the USB PD standard (5V-3A, 9V-3A, 12V-3A,15V-3A,20V-3.25A). Users can also share content by displaying their phone or tablet screen. Users must utilise the Type-C cable included in the package to communicate display feed with their device, and their device must support DisplayPort Alt Mode.
Users can tailor their viewing experience with five different modes: Standard, Movie, Picture, Web, and Game, which function flawlessly whether users are working, gaming, or browsing the web. The Game mode also includes four optimised sub-modes with beautiful visuals: MOBA mode, FPS mode, RTS mode, and RPG mode.
The dual PbP and PiP split-screen modes allow users to multitask effectively in a clutter-free environment without the need for extra displays. Users can see papers from two separate devices side by side on the OnePlus Monitor X27, as well as stream any video from their phone in the upper right corner of their monitor screen, while finishing up that important work document.
OnePlus Monitor E24
The OnePlus Monitor E24 provides an excellent visual experience with a Full HD display, 16.7 million life-like colours, and a wide 178° IPS panel, providing customers with top-notch imaging in its price range. A 75 Hz refresh rate and Adaptive Sync technology, which offers dynamic frame rate management, allow users to see their favourite material with less lag and greater clarity. The OnePlus Monitor E24, like the OnePlus Monitor X27, offers a healthy viewing experience thanks to TUV Rheinland certification, with reduced blue light and flicker-free graphics.
It also includes a robust metal stand to keep it stable on its feet. The device features a superior three-sided bezel-less design and a remarkable adjustable stand angle (-5° to 15°) with effective tilt and rotation. The OnePlus Monitor E24, like the OnePlus Monitor X27, includes a built-in wire management feature to keep customers’ desks clutter-free. Furthermore, like the OnePlus Monitor X27, the OnePlus Monitor E24 features type-C port connectivity.
Availability and Offers
The OnePlus Monitor X27 will cost INR 27,999 and will be available for purchase on OnePlus.in beginning December 15th.
Pricing and availability for the OnePlus Monitor E24 will be announced soon.
Additionally, when purchasing the OnePlus Monitor X27 on OnePlus.in, consumers may receive an attractive instant bank discount worth INR 1000 with ICICI Bank Credit Card/Debit EMI and Net Banking transactions. Customers can also get a free EMI for up to 6 months when they buy the OnePlus Monitor X27.
Did you know that you can see all the comments you’ve ever posted on Instagram? Instagram’s profile activity feature allows users to view their comments, likes, story replies, and reviews on the app. Accessing ‘your activity’ on Instagram is pretty simple and won’t take any time. In this article, we show you how to find and see all the comments you’ve made on Instagram in case you want to revisit or delete/amend them.
Step 1: Open the Instagram app and go to your Profile.
Step 2: Tap the hamburger menu icon at the top right corner of the screen.
Step 3: Select ‘Your activity.’
Step 4: Tap on ‘Interactions’ and select ‘Comments.’
Step 5: This is where you can see all the comments you have made on Instagram posts. You can sort your comments by oldest to newest if you want to see them in chronological order. You can even see your comments from a particular time period by entering the start and end dates.
Step 6: You can easily remove comments by tapping on them and selecting ‘Delete.’ You can also remove multiple comments by tapping on ‘Select’ at the top right corner of the screen and then tapping on ‘Delete.’
Download your Instagram data
Instagram maintains a folder of your personal data that contains all your activity on the platform since the day you joined. This includes comments, messages, posts, settings, and more. You can request Instagram to provide you with your compiled data and use it to view all your comments. Here’s how you can do that.
Step 1: Open the Instagram app and go to your Profile.
Step 2: Tap on the hamburger menu.
Step 3: Select ‘Your Activity.’
Step 4: Scroll down and go to ‘Download Your Information.’
Step 5: In the following window, enter your email address and your Instagram password.
Step 6: Instagram will send you your data in the email you provided earlier.
Step 7: Download the data file and look for your comments in the ‘Comments’ folder.
Bonus Tip
How to find all the posts you’ve liked on Instagram
Step 1: Open the Instagram app and go to your Profile.
Step 2: Tap the hamburger menu icon at the top right corner of the screen.
Step 3: ‘Your activity.’
Step 4: Tap on ‘Interactions’ and select ‘Likes.’
You will be able to view all the posts that you’ve liked on Instagram. You can sort the posts by time, date, and author.
This is how you can find and see all the comments you’ve made on Instagram. If you are not able to find a particular comment you are looking for, it may be because the user either deleted the post or blocked your account. It is also possible that the user set their profile to private and you are not following them. If you found this article helpful, let us know in the comments!
Recently Xiaomi teased the Redmi Note 12 5G series debut in India, indicating the smartphone’s forthcoming arrival in the nation. The company has officially made the announcement that Redmi Note 12 Pro+ 5G will be launching in India on January 5.
Redmi has announced that the Redmi Note 12 Pro+ will be launching in India on January 5. To recall, the launch of the device took place in China in October. Its range includes the Redmi Note 12, Note 12 Pro, and Note 12 Pro Plus. Xiaomi teased the Redmi Note 12 5G series debut in India just a few days back and also invited interested consumers to sign up for further device updates.
Based on Xiaomi’s promo, the smartphones are likely to have a similar appearance in India with promotional images showing a triple back camera configuration. It’s said to have a 200-megapixel triple back camera set.
Previously, it was thought that the Redmi Note 12 Pro+ would be rebranded as the Xiaomi 12i HyperCharge in India. However, the latest teaser now reveals that the Note 12 Pro+ will keep its current branding in India.
Redmi Note 12 Pro+ specifications
The 6.67-inch full-HD OLED display on the Redmi Note 12 Pro+ boasts a refresh rate of up to 120Hz. The screen has a maximum brightness of 900 nits and a touch sampling rate of 240Hz. The monitor supports HDR10+ and Dolby Vision. The Note 12 Pro+ features an octa-core 6nm MediaTek Dimensity 1080 SoC, up to 12GB LPDDR4X RAM, and a Mali-G68 GPU. It comes with MIUI 13 pre-installed, which runs on Android 12.
The Note 12 Pro+’s triple rear cameras have a 200-megapixel main sensor with OIS. A 2-megapixel macro lens and an 8-megapixel ultra wide-angle camera are also included. The phone sports a 16-megapixel front-facing camera sensor for selfies.
The new Redmi Pro+ smartphone is backed by a 5,000mAh battery with 120W rapid charging capability.
Redmi Note 12 Pro+ price
The Redmi Note 12 Pro+ is available in China for CNY 2,099 (about Rs 23,000) for the 8GB RAM with 256GB storage option, and CNY 2,299 (approximately Rs 26,000) for the 12GB RAM with 256GB storage option.
After the success of short video platforms like TikTok and Instagram Reels, YouTube introduced its own category of vertical short-form videos aptly named ‘Shorts.’ Users can upload short-form videos of up to 60 seconds on YouTube Shorts. While there was a lack of original content on YouTube Shorts when it first started, more creators are quickly switching to the platform and creating exclusive content for Shorts. In this article, we bring you 2 easy ways to download YouTube Shorts on any smartphone.
Shortsnoob is a website that is dedicated to downloading YouTube Shorts. This website works smoothly on a smartphone browser, and the process is pretty easy to follow. Here’s how you can download YouTube Shorts using Shortsnoob.
Step 1: Open the YouTube app and select the Short your want to download.
Step 2: Tap the Share button and copy the video link.
Step 4: Paste the Short’s link in the URL box on the homepage and hit ‘Search.’
Step 5: Shortsnoob will process the video and open it in the same window.
Step 6: Tap the ellipses (three dots) on the video player.
Step 7: Select ‘Download.’
The Short will be saved to your device and can be accessed from the Downloads folder on your smartphone.
Use PasteDownload
PasteDownload is one of the most used video downloaders on the Internet, letting users save videos from platforms like YouTube, Facebook, Twitter, Vimeo and more on their devices. To download a YouTube Short on your device, you need to copy the link of the Short and open https://pastedownload.com/27/ on your smartphone’s web browser. Paste the Short’s link in the URL box on the website and hit ‘Download.’ PasteDownload will save the video on your device.
This is how you can download a YouTube Shorts video on any smartphone. Both the tools mentioned in this video are free to use and do not require any additional software to download a video. They will work on Android as well as iOS platforms. You can also use other websites like KeepVid, Free Video Downloader, Snaptube, and Video Grabber to download YouTube Shorts to your device.
Blocking your SIM card is one of the first things you should do if your phone gets lost or stolen. Your SIM card can provide someone access to your bank accounts, social media login credentials, contacts, and other data. It can even be used to carry out malicious and illegal activities in your name since your SIM card is tied to your identity. Fortunately, blocking a SIM card does not take a long time. In this article, we show you how to block an Airtel SIM card or number easily.
Step 1: Connect to the Airtel Customer Care helpline by calling 198 or 121 using an Airtel number. If you don’t have an Airtel number, call 9849098490 or 1800 103 4444 to reach Airtel Customer Care.
Step 2: Speak to a customer care executive and make a request to block your Airtel number.
Step 3: The customer care executive will ask you for certain details to verify that you are the owner of the SIM card you wish to block. Once you establish your identity, your Airtel number will be blocked.
Block an Airtel SIM from an Airtel Store
Step 1: Go to your nearest Airtel Store and contact an agent about your query.
Step 2: Verify your SIM card number and present additional details like the last recharge amount, FNF number, Date of Birth, address and ID proof, etc.
Step 3: Once all details are verified, the agent will begin the process of blocking your Airtel number.
This is how you can block an Airtel SIM card. You can get a new SIM card from the Airtel Store or any local vendor. SIM activation takes negligible time, so you will be able to use your new Airtel number right away. If you find your lost SIM card that you blocked, you can easily unblock it by connecting to an Airtel customer executive using the customer care helpline or by visiting a nearby Airtel Store.
Sony India today unveiled its latest A-Series Home Theatre Systems, including the HT-A5000 and HT-A3000 soundbars. These provide a multi-dimensional sound experience with Dolby Atmos and DTS:X. The soundbar works well with devices that support Google Assistant or Amazon Alexa. It comes with 360-degree Spatial Sound Mapping and Sound Field Optimization Technology.
The new HT-A5000 and HT-A3000 home theatre systems will be available on Amazon.in on December 12th, 2022, and in all Sony Centers, www.shopatsc.com, and major electronics retailers across India on December 14.
In terms of design minimalist Omnidirectional Block design of the Sony HT-A5000 features beautiful rounded edges. The Omnidirectional Block concept is also used in the design of the HT-A3000 and optional speakers. The HDMI eARC, optical-in, and USB ports make installation of the soundbars a breeze.
Both soundbars include Sound Field Optimization, which cleverly measures the relative height and position of the soundbar and rear speakers to provide an even more personalised and immersive sound experience. It then synthesises sound waves to produce several phantom speakers based on the positional information.
The HT-A5000 also has S-Force PRO Front Surround, which creates a broader horizontal sound field. When connected to Sony’s wireless rear speakers SA-RS5 and SA-RS3S, the HT-A5000 and HT-A3000 provide access to Sony’s breakthrough 360 Spatial Sound Mapping technology.
The HT-A5000 5.1.2 channel soundbar has a dual subwoofer built in for deep bass and two up-firing speakers that reflect sound off the ceiling for immersive overhead music. The HT-A3000 has 3.1 channels, three front speakers, one of which is dedicated to clear conversation, and a built-in dual subwoofer for deep bass. It also has two side beam tweeters, which bounce sound off the side walls and augment surround sound to provide an immersive experience.
Sony’s X-Balanced Speaker Unit is used in the up-firing speakers, built-in dual subwoofer, and front speakers. The HT-A5000 and HT-A3000 are equipped with Sony’s Vertical Surround Sound Engine technology, which allows viewers a theatre like experience at home by supporting audio formats such as Dolby Atmos and DTS:X.
The front speakers and up-firing speakers, together with Sony’s proprietary signal processing, generate “vertical” music, allowing the soundbar to position sound vertically. Now you can enjoy realistic, multi-dimensional sound without the need for in-ceiling speakers.
360 Reality Audio is available on Amazon Music HD, Deezer, nugs.net, and TIDAL. DSEE Extreme use Edge-AI to upscale compressed digital files in real-time, restoring lost high-frequency sound for a richer, more compelling listening experience. When used in conjunction with compatible BRAVIA TVs, it enhances the immersive audio-visual experience. The soundbar and TV become one with the BRAVIA Acoustic Center sync. The TV becomes the centre speaker in the home theatre system, ensuring that action and sound are perfectly matched for complete immersion. Furthermore, BRAVIA Acoustic Center Sync collaborates with the 360 Spatial Sound Mapping setup to give a more immersive viewing experience and clearer speech.
The HT-A5000 supports Spotify Connect, Chromecast built-in, Apple Airplay 2, Bluetooth, and Wi-Fi, making it simple to listen to music. You get all the connections you need to enjoy a breathtaking surround sound experience, with USB, optical in, HDMI out (eARC), and S-CENTER OUT for compatible BRAVIA TVs. The soundbar is compatible with voice assistants, such as Google Assistant with built-in Chromecast or Amazon Alexa-enabled devices. Simply connect the soundbar to the speaker group using the Google Home app to begin playing music, changing the volume, or doing a variety of other tasks with your voice.
Garena Free Fire is a battle royale game with regular awards and tournaments to keep players interested. If you play Garena Free Fire, you should be aware of the redeem codes that are released on a daily basis. However, because the battle royale game is banned in India, players from other countries can use the Free Fire Redeem codes daily. If you’re unfamiliar with the Garena Free Fire redeem codes or don’t know how to get them, we’ve put together a step-by-step guide to help you redeem them. Check out Garena Free Fire Redeem Codes for December 13.
The Free Fire redeem codes are a great way to get free stuff. These are 12-digit codes that contain alphabets and numbers, as well as an expiration date and time. Because the Garena FF redeem codes cannot be used more than once, you should hurry to the redemption page to claim your free reward before someone else does. To get a free reward, all you have to do is go to reward.ff.garena.com/en, which is the official redemption page. Also, keep an eye on this space for daily updates on Garena Free Fire redemption codes and rewards.
Garena Free Fire Redeem Codes Today 13 December 2022
Updating Soon
How to Get Free Fire Redeem Codes for Garena on December 13?
13 December 2022 Amazon Quiz has gone live. Customers from different parts of the country are participating in the daily quiz. The quiz begins from 12 AM to 11:59 PM. Those participating in the quiz can win exciting prizes by answering all the questions correctly. Today participants have a chance to win a Rs 500 Amazon Pay Balance.
Amazon quiz brings an opportunity for its customers to win Amazon Pay Balance ranging from Rs 1,000 to Rs 50,000. The Quiz can be played from 12 AM to 11:59 PM. The e-commerce platform brings a fresh quiz on a daily basis which consists of five questions related to general knowledge and current affairs. The participants need to answer all the questions correctly and their names will be selected for a lucky draw. The winner will be announced at the end of the month.
One wrong answer could eliminate you from the quiz. If you manage to answer all the questions correctly you can stand a chance to win a Rs 500 Amazon Pay Balance today. Only app users are eligible to participate in the Quiz. Check Out 13 December 2022 Amazon Quiz Answers.
Question 1: A drop in the water level in which river has led to the discovery of German warships from the World War 2 era?
Answer: Danube
Question 2: Naomi Biden is the first presidential granddaughter to wed at the what exclusive venue?
Answers: White House
Question 3: Which planet made its closest approach to Earth since 1963?
Answer: Jupiter
Question 4: Which is the main hub airport of this airways?
Answer: Heathrow
Question 5: In which German city was this famous composer born?
Answer: Bonn
How To Play Amazon Quiz
Only app users are eligible to play the Amazon quiz every morning from 12 AM to 11:59 PM. The quiz is not available on the desktop. For those who are unaware of how to play the Amazon quiz below are the steps, you can follow to take the quiz.
Firstly download the Amazon app from Google Play Store or App Store
Now fill in the required information through the Sign Up option.
You need to log in to the Amazon app and scroll down on the home screen to find the Amazon Quiz banner.
Tap on the Amazon Quiz banner and tap on the Start button to start the Quiz.
Now you will get 5 questions and you need to answer them correctly. One wrong answer will eliminate you from the Quiz.
After answering all the questions correctly you are now eligible for a Lucky Draw.
The winner’s name will be announced today at 12 PM.
Consumer tech brand Poco has announced exciting year-end offers as the Flipkart Big Savings Days kicks off today. Buyers can avail of discount offers on several Poco smartphones throughout the Big Savings Days. Poco is offering discounts on Poco F4 5G, POCO X4 Pro 5G, POCO M4 5G, POCO M4 Pro AMOLED, POCO C31, and POCO M4 Pro 5G.
Here are all the discounts you can avail on Poco’s smartphones during Flipkart’s Big Savings Days
Smartphone
Variant
Launch Price
Bigs Savings Day Discount
Big Savings Day Price
Bank Offers
POCO F4 5G
6GB + 128GB
Rs 27,999
Rs 5,000
Rs 22,999
Including 2000 off on SBI Debit and Credit cards
POCO F4 5G
8GB + 128GB
Rs 29,999
Rs 5,000
Rs 24,999
Including 2000 off on SBI Debit and Credit cards
POCO F4 5G
12GB + 256GB
Rs 33,999
Rs 5,000
Rs 28,999
Including 2000 off on SBI Debit and Credit cards
POCO X4 Pro 5G
6GB + 64GB
Rs 17,999
Rs 3,500
Rs 14,499
Including upto 1500 off on SBI Debit and Credit cards
POCO X4 Pro 5G
6GB + 128GB
Rs 18,999
Rs 3,000
Rs 15,999
Including upto 1500 off on SBI Debit and Credit cards
POCO X4 Pro 5G
8GB + 128GB
Rs 20,999
Rs 3,500
Rs 17,499
Including upto 1500 off on SBI Debit and Credit cards
POCO M4 5G
4GB+64GB
Rs 12,999
Rs 2,750
Rs 10,249
Including 750 off on Kotak Credit card
POCO M4 5G
4GB+64GB
Rs 14,999
Rs 2,750
Rs 10,249
Including 750 off on Kotak Credit card
POCO M4 Pro AMOLED
6GB+64GB
Rs 14,999
Rs 5,000
Rs 9,999
Including 1000 off on Kotak Credit card
POCO M4 Pro AMOLED
6GB+128GB
Rs 16,499
Rs 5,500
Rs 10,999
Including 1000 off on Kotak Credit card
POCO M4 Pro AMOLED
8GB+128GB
Rs 17,999
Rs 5,000
Rs 12,999
Including 1000 off on Kotak Credit card
POCO C31
3GB+32GB
Rs 8,499
Rs 2,000
Rs 6,499
Additional 250 off on Supercoins
POCO C31
4GB+64GB
Rs 9,499
Rs 2,000
Rs 7,499
Additional 250 off on Supercoins
POCO M4 Pro 5G
4GB+64GB
Rs 14,999
Rs 2,750
Rs 12,249
Including 750 off on Kotak Credit card
POCO M4 Pro 5G
6GB+128GB
Rs 16,999
Rs 2,750
Rs 14,249
Including 750 off on Kotak Credit card
POCO M4 Pro 5G
8GB + 128GB
Rs 18,999
Rs 2,750
Rs 16,249
Including 750 off on Kotak Credit card
POCO F4 5G
The POCO F4 5G is powered by the Snapdragon 870 flagship chipset and features a 6.67-inch E4 AMOLED screen and 2.76mm dot display. It is also equipped with Dolby Vision and Dolby Atmos, making it an ideal smartphone to watch content on. The F4 5G also gets a 4,500mAh battery along with 67W Sonic charging.
POCO X4 Pro 5G
Powered by Snapdragon 695, the POCO X4 Pro 5G also flaunts a 120Hz Super AMOLED screen with a 360Hz touch sampling rate. The X4 Pro 5G also gets a 5,000mAh battery and 67W MMT Sonic charging. The rear camera unit comprises a 64MP primary camera, an 8MP Ultrawide sensor and a 2MP macro sensor.
POCO M4 5G
POCO M4 5G comes with a 90Hz FHD+ Smart display and is powered by MediaTek Dimensity 700 processor. The smartphone also gets a 50MP primary camera and a 5,000mAh battery. The swirl design on the back panel also adds to the premium look of the phone.
POCO M4 Pro AMOLED
The POCO M4 Pro AMOLED gets a 90Hz Super AMOLED display, the first in an M-series smartphone by POCO. The 64MP primary lens is the star of the triple camera setup, and a 16MP selfie sensor finds its way to the front. The smartphone is powered by MediaTek Helio G96 and gets a 5,000mAh battery along with 33W MMT fast charging.
POCO C31
POCO’s budget smartphone, C31, is powered by the MediaTek Helio G35 processor and features a triple camera setup with a 13MP lens as the primary sensor. It also gets a 5,000mAh battery, which is quite impressive for the price. The smartphone is available in two shades – Royal Blue and Shadow Grey.
POCO M4 Pro 5G
Powered by the MediaTek Dimensity 810 processor, the POCO M4 Pro 5G features a 90Hz 6.6-inch FHD+ display with a touch sampling rate of 240Hz. The dual camera setup consists of a 50MP primary lens and an 8MP ultrawide lens. The smartphone is equipped with a 5,000mAh battery and a 33W fast charger.
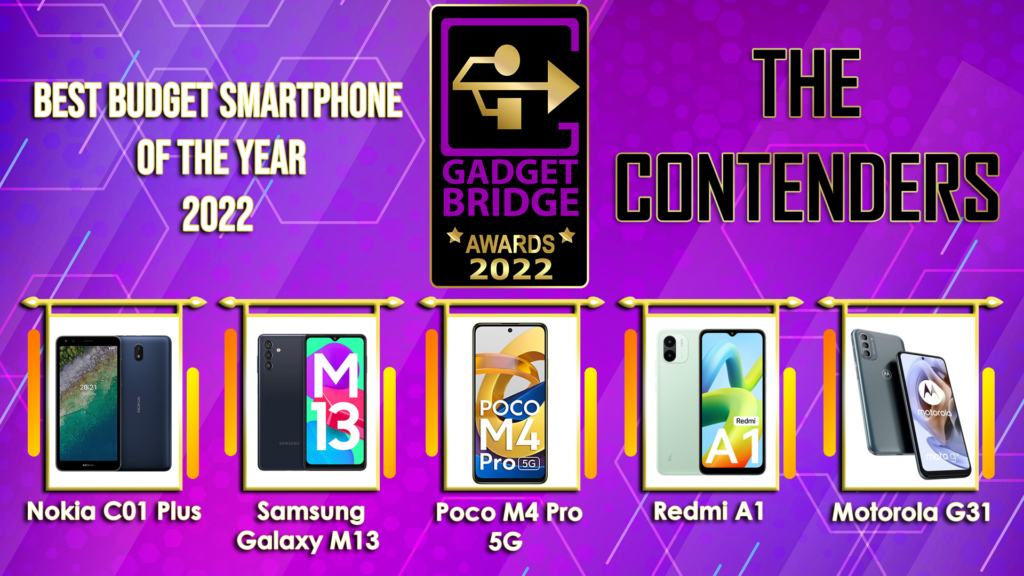
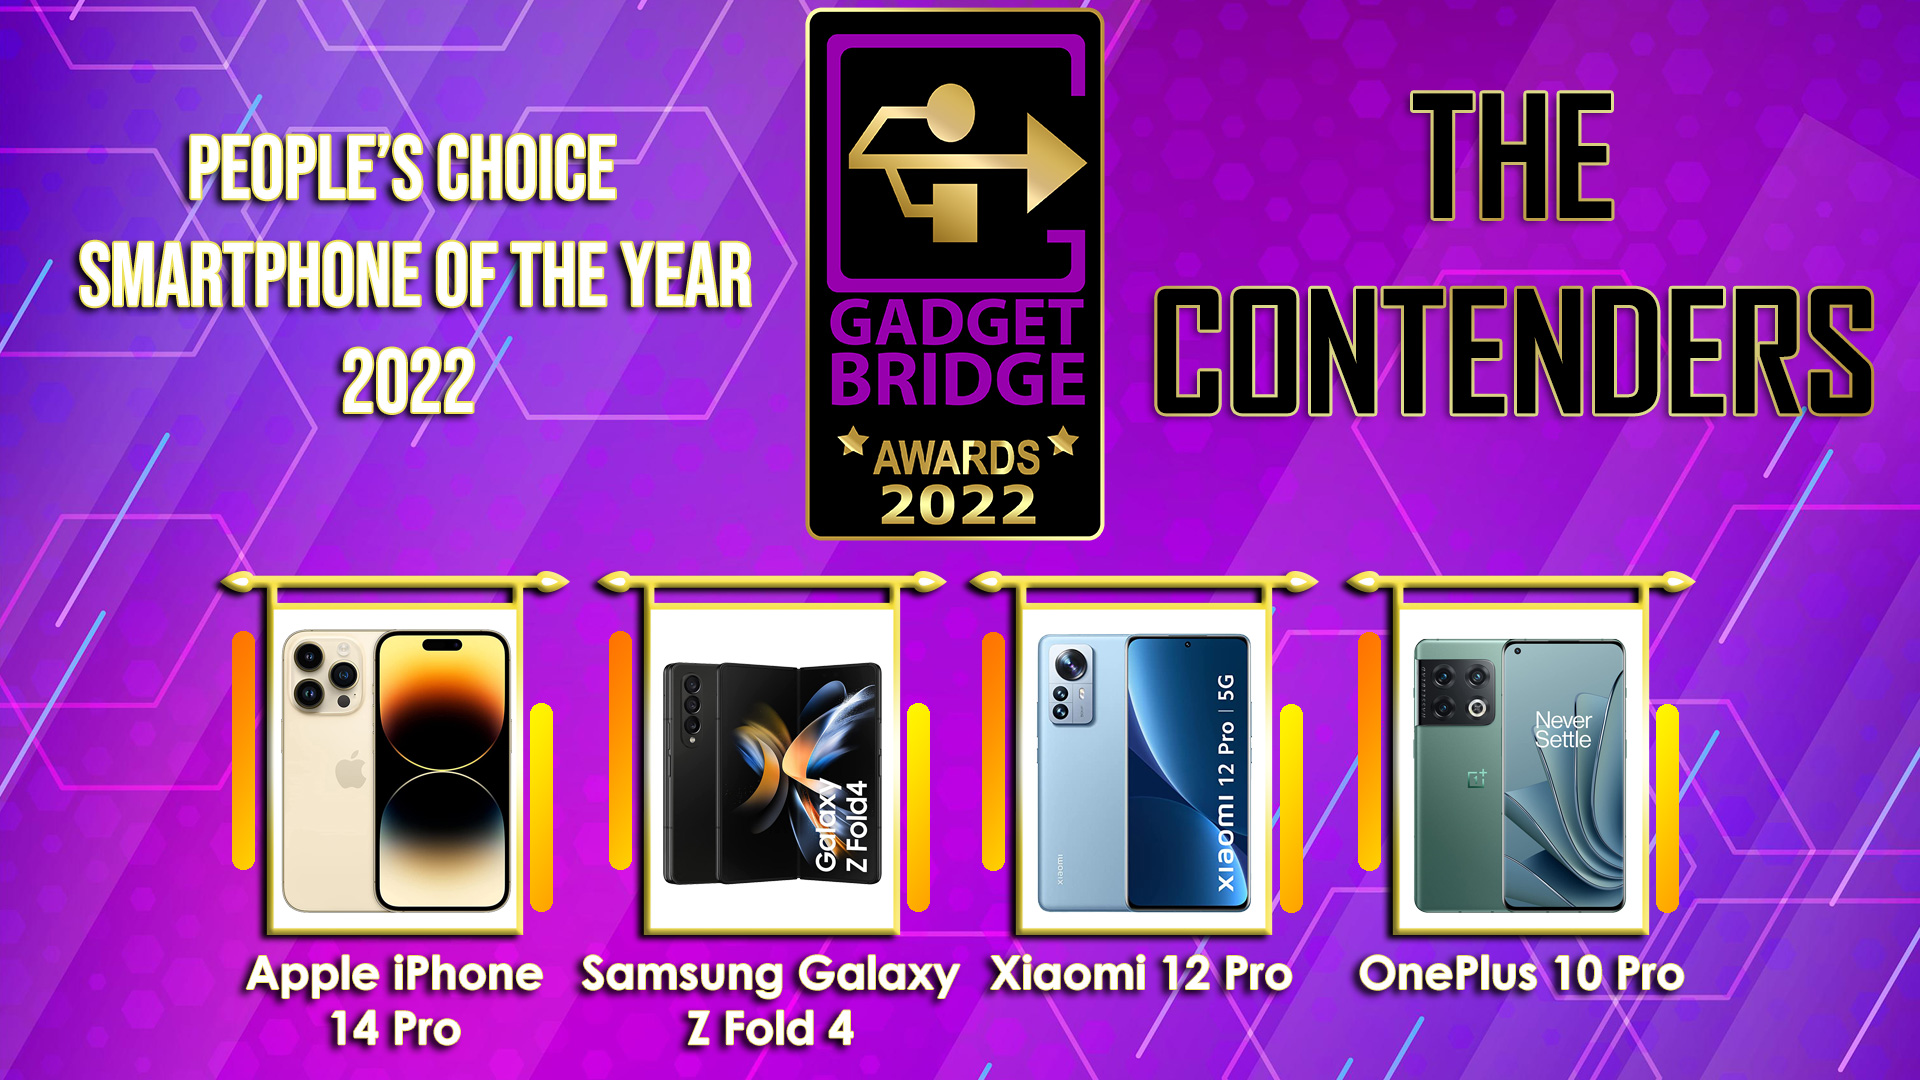
We have come a long way! We conducted our first consumer tech and gadgets awards in 2019, and we were overwhelmed by the positive response. As I stated back then, I always intended to establish Gadgets and Tech Awards to recognise the best of the best, and I am incredibly honoured by the promoters and the industry as we enter our fourth year. The team and I will continue the tradition in 2022 with the 4.0 edition of the Gadget Bridge Awards.
This year, as the world finally emerges from the pandemic and businesses thrive, we saw several unique devices and technology emerge from the different factories. We all pushed through and welcomed the year 2022 with much-needed optimism. You, our readers, watchers, listeners, and well-wishers, have been an unwavering source of support for us. We appreciate each and every one of you.
We are delighted to vaunt that we are the largest Consumer Tech Awards not just in Asia but on the planet. We’ll be bringing over 41 award categories from the world of consumer technology. Despite the unusualness in the air, several outstanding devices were released in 2022. So, my team and I sat down and took inspiration from last year to create even more categories for 2022. As there is so much more in the field of technology that we would like to recognise, we created over 41 categories where the deserving compete for the top honours.
We have a number of wonderful award categories this year, as well as three special sections of awards where we will requireyour help to pick the winners. Yes, Gadget Bridge readers, watchers, and listeners will be required to vote in the Gadget Bridge People’s Choice Awards 2022. The voting is now open (you may vote here) on GagdetBridge.com as well as on our Twitter page on three different posts, which can be found here, here, and here. Finally, the total number of votes cast on Gadget Bridge Twitter and on Gadget Bridge Web/Mobile/App will be totalled, and the winners of these categories will be declared. Remember that voting ends on December 14, 2022, at midnight IST.
So, without further ado, here are the 42 categories, including three where people can vote, which are the #GadgetBridgeAwards22 people’s choice honours.
While most e-commerce websites have a strict set of regulations to weed out disreputable vendors from their platforms, it is not uncommon for buyers to receive counterfeit or refurbished products, especially when it comes to electronic goods. If you notice something off about a smartphone you recently bought, there are a couple of ways you can check whether the product you received is authentic. These methods are also applicable when you’re buying a used smartphone and want to ensure that you are not being sold a fake product. In this article, we show you how to check whether your smartphone is original or not.
Check if your Android smartphone is original or not
Step 1: Dial *#066# USSD code on your smartphone to reveal the IMEI code of your device. You can also use these 7 methods to find the IMEI code of your Android smartphone.
Step 2: Go to imei.info and enter your phone’s IMEI number.
Step 3: Your phone’s information will be displayed on the screen. If the information does not corroborate with your unit, your phone is likely fake. You can also see if your device has been blacklisted. Stolen units are usually the ones that get blacklisted through their IMEI number.
Check if your iPhone is original or not
Step 1: Dial *#066# USSD code on your iPhone dialer to reveal the IMEI code and the serial number of your device. You can also use one of these methods to find the IMEI code and the serial number of your iPhone.
Step 2: Go to Apple’s warranty coverage page and enter the serial number of your iPhone. If the webpage says your IMEI number is invalid, you probably have a fake iPhone.
Step 3: To check if your iPhone is refurbished, check the model number by going to Settings>General>About>Model Number. The first alphabet of the model number signifies the device status. If it starts with M, it means your iPhone is new. The model number of refurbished units starts with ‘F’. If you got a replacement unit from Apple, the model number will start with ‘N’.
This is how you can check whether your smartphone is original or not. You can also visit your smartphone manufacturer’s official website and enter the IMEI code on the warranty page to check whether your device is original. In order to limit the possibility of being sold counterfeit products, only buy from verified vendors on e-commerce websites like Amazon and Flipkart.
Similar to Android Auto, CarPlay is Apple’s interface for your car’s infotainment system. Apps designed for Apple CarPlay are meant to reduce any distractions while driving and make use of Siri to carry out most of the tasks through voice commands. Almost every major navigation and music app is now compatible with your car’s infotainment system. So, which are the best Apple CarPlay apps for iPhone? Here is our list.
While there are a lot of navigation apps you can use on Apple CarPlay, Google Maps is unanimously agreed to be the best out of the lot, even surpassing Apple’s own Maps app. A good navigation app is the first thing drivers look for after connecting their phone to the car. Google Maps checks all boxes for the ideal navigation app. One of the better features of Google Maps is that it offers voice navigation while driving, so you don’t have to look at the screen to follow the directions.
Spotify
Once you’ve selected a navigation app, you will need a music app to make your drive more fun. With millions of artists on its app, Spotify is one of the biggest music platforms in the world. The Spotify app works smoothly with Apple CarPlay and offers accessible controls that you can easily use while driving. You can even use Siri to play your preferred song, playlist, or podcast on Spotify.
Apple Music
Don’t have a Spotify subscription? Use Apple Music. The Apple Music app is native to your iPhone. In terms of functionality, it is pretty evenly matched with Spotify, offering a similar range of artists. You can use Siri to control Apple Music as well. Since Spotify and Apple Music do not have much separating them, all it comes down to is your personal preference.
Stitcher
Stitcher has been the go-to app for podcast listeners for over a decade now. With over 100,000 podcasts, you are bound to find your favourite show on this app. Some of the popular podcasts on Stitcher are NPR, This American Life, Radiolab, and more. Listening to a podcast before getting into your car? With just a few taps on Apple CarPlay, you can resume from where you left off. Stitcher also has a premium subscription service that offers advanced features.
WhatsApp
Any infotainment system is incomplete if it does not let you access messages on WhatsApp. Luckily, WhatsApp is compatible with Apple CarPlay and lets you access your messages while driving. The best part of using WhatsApp on CarPlay is that you don’t have to look at the screen while reading and responding to your messages. Siri reads out all your pending messages and even sends replies when you dictate them to it.
PlugShare
If you own an electric car, PlugShare is an essential app that you need to download right now. Using the PlugShare you can find public charging stations for your EV near you. Community contribution is a big part of PlugShare. You will find detailed reviews of most charging stations on the app itself. You can even filter the charging station map by plug type and charging speed. You can even pay for your EV’s charging using the PlugShare app itself.
Waze
Waze is an excellent alternative to Google Maps and Apple Maps for Apple CarPlay. Waze is a crowdsourced app so it lets you know if users have reported any recent accidents or other events on the path you’re on. Apart from that, Waze also gives you additional information about your route like the gas stations on the way, police checks, and traffic status.
TuneIn
With over 100,000 AM and FM stations, TuneIn takes care of all things radio. TuneIn has been one of the most popular internet radio apps ever since radio apps started rolling out. The stations offered on TuneIn range from music, news, sport, and talk radio. You can even listen to the major podcasts on this app.
SpotHero
Live in a crowded city where it’s near-impossible to find parking space? SpotHero is the app you’re looking for. Using SpotHero you can easily find parking space even during rush hours. The app works best in major US cities. You can even enter the time and date in advance and reserve your spot in the parking garage. Using SpotHero you can save up to 50% on the parking fee.
Audible
The largest audiobook library app, Audible, is also available for Apple CarPlay. Now you don’t have to miss out on precious reading time while driving. Simply open the Audible app on CarPlay and you can pick up where you left off. While this app is extremely beneficial to the driver, passengers who suffer from motion sickness while reading will enjoy it just as much. Apart from audiobooks, Audible also offers an impressive collection of podcasts.
This is our list of the 10 best Apple CarPlay apps for iPhone. This list has been specially curated to include navigation, music, radio, and messaging apps. Which is your favourite Apple CarPlay app? Let us know in the comments!
Downloading a Windows ISO image is essential to upgrading and repairing your PC, or creating a Windows bootable drive. Microsoft allows users to download the ISO image legally for free from its website. However, there’s one small catch. If you are a Windows user, you cannot directly download Windows 10 ISO from the Windows website. Microsoft makes you download its media creation tool in order to get the Windows 10 ISO file. Luckily, there is a quick workaround you can use if you do not want to download the media creation tool. In this article, we show you how to download Windows 10 ISO legally for free without downloading the media creation tool first.
Here’s how you can download the Windows 10 ISO file
As we mentioned earlier, Microsoft makes you download the media creation tool if you are a Windows user. The trick to accessing the Windows 10 ISO file directly is by changing your browser’s user agent so the Microsoft website does not know you are using a Windows OS. Here’s how you can do this.
Step 1: Open Microsoft’s Windows 10 ISO download page on Google Chrome. Click here to get directed to the page.
Step 2: Now, click on the ellipses (three dots) at the top right corner of your web browser, scroll down to More Tools, and select Developer Tools. You can also use the Ctrl+Shift+I shortcut to open Developer Tools directly.
Step 3: Now click on the ellipses on the Developer Tools panel, scroll down to More Tools, and select Network Conditions.
Step 4: Go to the User Agent section and untick the ‘Select Automatically’ box. In the selection box below, choose a non-Windows OS.
Step 5: Now, refresh the download page on Microsoft’s website. You will be able to download the Windows 10 ISO directly.
Step 7: Select the Windows edition you want from the drop-down box and confirm your choice.
Step 8: Choose your desired product language and confirm your selection.
Step 9: Choose whether you want to download the 32-bit or 64-bit version of the Windows 10 ISO file.
This is how you can download a Windows 10 ISO file legally and for free without downloading the media creation tool. You can use this ISO image to install Windows on your computer. You can also use it to run Windows on a virtual machine or on a Mac. If you wish to create a Windows 10 bootable USB drive, you will need to download the media creation tool first.
While there is certainly no dearth of Instant Messaging apps for smartphones, there are only two apps that enjoy massive popularity among the masses – WhatsApp and Telegram. When it comes down to features and basic functionality, both apps are almost alike. However, there are certain aspects that set them apart. For example, if you want to establish a community or an online club, Telegram would be the more ideal app due to its larger group size and the option to not make your phone number public to everyone. WhatsApp, on the other hand, is more suited for communicating with people you know closely. In this article, we draw a comparison between WhatsApp and Telegram so you can decide which one is the ideal app for you.
The most important factor when deciding on which instant messenger to use is its popularity. No matter how great an IM is, it won’t be of much use if you don’t have any contacts on it. With over 2 billion monthly active users, WhatsApp dwarfs every other instant messaging app in terms of popularity. With over a billion downloads and 500 million monthly active users, Telegram is still pretty popular but is easily beaten by WhatsApp.
Privacy
In terms of privacy, both apps are pretty evenly matched with Telegram nearly edging out WhatsApp by a slim margin. Both apps provide end-to-end encryption for messages. Recently, WhatsApp also introduced end-to-end encryption for status updates. Telegram also offers a ‘secret chat’ feature, where the messages are encrypted and can be set to self-destruct after a certain period of time. Users are not allowed to forward or take screenshots of messages sent in a secret chat. While WhatsApp also offers self-disappearing messages, Telegram offers more timer options. Finally, Telegram gives the user an option to keep their phone number private. You can set up a username and let other people add you through it. Making your phone number public is not necessary, although it is required to sign up for Telegram. This makes group chats more secure for users who are not comfortable with their phone numbers being displayed to everyone in the chat.
File Sharing and Groups
For the longest time, WhatsApp was trailing behind Telegram when it came to the file sharing limit. Earlier this year, WhatsApp announced that users can share files up to 2GB in size, matching Telegram’s limit. However, if you’re a Telegram Premium subscriber, you can share files up to 4GB in size. Telegram users also get free cloud storage.
WhatsApp also recently increased the group limit to 1,024 members. In comparison, Telegram allows 200,000 members to be a part of a group. This is what makes Telegram a great platform to host communities and online clubs. Many online personalities use Telegram as a platform to directly communicate with their community. Since you have the option to make your phone number private, group chats on Telegram work really well. You can even use several bots to moderate the groups.
Other Features
Both apps offer some exclusive features that may appeal to different users. To start with, Telegram lets users upload more than one profile picture. While WhatsApp may not have this feature, it makes up for it by letting users post images and videos as status updates.
WhatsApp is also quickly becoming a platform for businesses to directly get in contact with consumers. You can use the platform to order products, book tickets, and even get in touch with customer support. With WhatsApp rolling out its own payment portal recently, it has gotten incredibly easy for users to utilise the e-commerce services on the platform. Telegram does not have anything to match up with WhatsApp in this regard.
Telegram lets users access one account on multiple devices. WhatsApp will be offering multi-device connectivity in the future, but as of now, you can only use one account on one smartphone. However, you can access your account on a web browser using WhatsApp’s web portal.
These are the major points of difference between WhatsApp and Telegram. While Telegram offers a wider range of features, WhatsApp’s popularity works massively in its favour. If you want an app to communicate with your family and friends, there is no better alternative to WhatsApp. However, if you want an app to host a community on, Telegram is the way to go.
McAfee’s suite of antivirus products comes pre-installed in most Windows PCs these days. One of these products is McAfee LiveSafe. With its antivirus, privacy, and identity tools, LiveSafe helps in protecting your PC against viruses and ransomware. Even though it is a useful product, it is still bloatware. If you want to download another antivirus on your PC, you can easily remove McAfee’s products. In this article, we bring you two simple methods to uninstall and remove McAfee LiveSafe on a Windows PC.
Step 3: Select McAfee Livsafe and give the app permission to make changes to your system.
Step 4: Click on the McAfee LivSafe box in the uninstaller and then select ‘Remove.’
Step 5: The Uninstaller will remove McAfee LivSafe from your PC. Restart your PC to finish the uninstallation process.
Use the McAfee Consumer Product Removal Tool (MCPR)
Oftentimes, users report that Windows uninstaller is not able to remove the McAfee LivSafe software from their PC. If you get an error at the end of uninstallation and are unable to remove LivSafe for your PC, try using the McAfee Consumer Product Removal Tool (MCPR). Here’s how.
Step 1: Download a new copy of MCPR from here. Make sure you download a new copy every time you want to remove McAfee software. This ensures you have the latest version of the tool.
Step 2: Install the tool on your PC.
Step 3: Run the MCPR on your PC and accept the End User License Agreement.
Step 4: Type the CAPTCHA at the Security Validation window and click Next.
Step 5: The uninstalling process will begin and McAfee products will be removed from your PC. Restart your PC to finish the process.
These are the two simple ways to uninstall and remove McAfee LiveSafe from your Windows PC. If the standard removal process does not work, use the MCPR tool to carry out the uninstallation process. Always restart your PC after uninstalling the software to finish the process. You can also use other uninstallers like Revo to remove McAfee LivSafe from your PC.
If you’re tired of the default and preset ringtones on your iPhone’s tone gallery, you can create a fresh ringtone all for yourself. Sampling a song or other kinds of audio is a pretty simple process but it can take some time. If you want to get really creative, you can also create a new ringtone from scratch using Garage Band! In this article, we show you how to create a ringtone for your iPhone using iTunes and Garage Band.
Step 1: Open iTunes on your desktop and select the song you want to set as the ringtone.
Step 2: Right-click on the song and select ‘Song info’ from the list of options. Go to the ‘Options’ tab.
Step 3: Apple allows you to create 30-second ringtones for iPhone. If you leave your phone ringing for more than 30 seconds, the 30-second clip of the song will play in a loop. In the options tab, you need to specify which 30-second part of the song you want as your ringtone. You can do this by filling in the exact time in the ‘start’ and ‘stop’ fields.
Step 4: Now that you’ve decided on the part of the song you want as your ringtone, go to File>Convert and select ‘Create AAC Version.’ iTunes will create an audio file of the 30-second clip you just selected.
Step 5: Right-click on the audio file and select ‘Show in Finder.’ Change the file’s format from ‘m4a’ to ‘m4r’. m4r is Apple’s preferred format for ringtones.
Step 6: Plug your iPhone into your desktop. iTunes will show the device name in the left sidebar. Drag the ringtone you just created to the ‘Tones’ folder under your iPhone.
Step 7: Unlock your iPhone and go to Settings. Select ‘Sounds & Haptics.’
Step 8: Scroll down and select ‘Ringtone.’ Choose the ringtone you just created.
Create a ringtone using Garage Band
If you don’t want to go through the hassle of editing a song on your desktop, you can easily do the same on your iPhone. All you need is the Garage Band app. Using the Garage Band app, you can either clip a 30-second segment of a song and use it as a ringtone or create a new ringtone from scratch. Here’s how.
Step 1: Install the Garage Band app from the App Store on your iPhone. Open the app.
Step 2: Select an instrument and tap on the track editor option at the top left corner of the screen. You will find this icon to the left of the equaliser.
Step 3: Now, select the loop icon on the top-right side of the screen.
Step 4: In the following window, select the ‘Music’ tab and go to ‘Songs.’
Step 5: Find the song you wish you set as your ringtone. Tapping on the song will simply play it. In order to edit the song you need to long-press it and then drag it to the track editor. Make sure you place the song in the second track, as the first track belongs to the instrument you picked after opening the Garage Band app.
Step 6: Use the sliders on the track to select the 30-second segment of the song you want as your ringtone. Since Garage Band does not have a timer, you will need to guess the length of the edit. You can play the selected part and time it using a secondary watch.
Step 7: Once you’re satisfied with the result, tap the arrow at the top-left corner of the screen and select ‘My Songs.’
Step 8: Long press on the song file and select ‘Share.’
Step 9: Select the ‘Ringtone’ format.
Step 10: Name your ringtone and hit ‘Export’ at the top right corner of the screen.
Step 11: In the following pop-up box select ‘Use Sound As…’ followed by ‘Standard Ringtone.’
To create a ringtone from scratch, use the keyboard, guitar, and other percussive instruments on different tracks to create a 30-second tune, and then export it to your phone as a ringtone.
This is how you can create a ringtone for your iPhone using iTunes or Garage Band. Want to change your Alarm tone as well? Read our article here to find out how. Let us know in the comments if you found this article helpful!
The iQOO Quest Days have been announced on Amazon. The sale has already begun and will run until December 12. During the iQOO Quest Days, shoppers may take advantage of substantial price drops as well as enticing bank offers from SBI and HDFC on the iQOO 9 series, Neo 6 series, and Z6 series smartphones.
iQOO today unveiled iQOO Quest Days on Amazon.in. During the sale time, the price of iQOO smartphones will be reduced. In addition, Amazon will provide card offers and discounts on a variety of iQOO gadgets. The Neo 6, Z6, and iQOO 9 series smartphones are currently eligible for the iQOO Quest Days offer. Let’s have a look at the offer that will be available during the iQOO Quest Days sale.
Because of partnerships with ICICI Bank, Citi Bank, and Axis Bank, Amazon is offering additional discounts on iQOO devices.
During the deal, the iQOO 9 Pro 5G, which normally starts at Rs 64,990, can be acquired for an effective price of Rs 49990. This includes a Rs 7,000 price cut and bank card discounts. The iQOO 9T 5G is now available for Rs 45,999, a discount from its original price of Rs 49,999 on Amazon.
The iQOO 9 SE is priced at Rs 33,990 at launch, but iQOO is offering a Rs 4,000 immediate discount. ICICI, Citi, and Axis bank cardholders will receive a Rs 2,000 discount.
The base model of the iQOO Neo 6 5G, which is normally offered for Rs 29,999, is available for Rs 26,999 during the iQOO Quest Days promotion. This promotion includes an additional Rs 2,000 in bank card discounts.
The iQOO Z6 5G is now available for Rs 14,499, a discount from the usual starting price of Rs 15,499 on Amazon.
Customers can take advantage of the following deals during ‘iQOO Quest Day.
Reverse image search is a handy function that comes in use quite often. Can’t find the artist of an artwork you came across online? Reverse image search for the art and you will be able to track down the person who created it. A simple reverse image search is also helpful in finding products and identifying unknown objects. All you need to do is click a picture and search for it. In this article, we bring you the top 4 simple methods to reverse image search on iPhone and iPad.
Step 2: Select ‘Take Photo’ and click on the gallery icon to upload the image you want to search for. If you want to search for an object or a product, you can take a live picture and upload it.
Bing will present the relevant results for the source of the image.
Use Google Lens
Download the Google app on your iPhone or iPad and tap the camera icon to search by image using Google Lens. You can take an image of any object in your surroundings or upload an image from your device’s gallery. Google will come up with relevant results about the source of the image or details about the object in the image. You can download the Google app for your iPhone or iPad here.
Use the Reverse Image Search app
Don’t want to use Google Lens? The Reverse Image Search is a great alternative. All you need to do is upload an image from your phone’s gallery and the Reverse Image Search app will look for relevant results across Google, Bing, Tineye and Yandex. The in-app editor also allows you to crop the image before you upload it. You can also directly search images from your Gallery, Camera, Clipboard, and Files using this app’s handy extension. You can download the Reverse Image Search app here.
These are the top 4 simple methods to reverse image search on an iPhone or iPad. Non-Apple users can read our guide to using Google’s reverse image search function here. Apart from the methods mentioned above, you can also find several third-party apps on the App Store to perform a reverse image search. You can also use websites like Berify and Tineye to reverse search for videos.
Lenovo has announced the expansion of its unique ‘custom to order’ (CTO) functionality to PCs in India. The Legion 5i Tower desktop now has a customization option previously reserved for IdeaPad, Legion, and Yoga laptops.
Hiral Somaiya, Head – Category Management, Consumer Business, Lenovo India, said “At Lenovo, we are extremely focused on our customers’ requirements, and we recognize that each person uses the PC for a different purpose. With our ‘custom to order’ purchase option, gamers and creators will have the liberty to build their desktops according to their gameplay, preferences and budget.
The Legion 5i Tower is the country’s first desktop that allows buyers to upgrade their base model setup to a high-performance battle station with a more immersive experience.
As per the company, customers can get end-to-end customisation with the CTO option, which includes upgrading the CPU, graphics card, RAM, hard disc drive, screen type, keyboard, and operating system (OS) type at the time of purchase. Customers will receive their personalised device within 4-6 weeks of purchase. All Legion laptops, including the Legion 5, Legion 5 Pro, Legion 7, and Legion Slim 7, can be similarly configured during the purchase process.
It has a 12th Generation Intel Core i5-12400F processor and Nvidia GeForce GTX 1650 Super 4 GB GDDR6 graphics card. There is 8 GB of UDIMM DDR5 4800 MHz RAM and a 256 GB SSD M.2 2280 PCIe Gen4 TLC.
Lenovo has provided amazing promotions to entice users to try its CTO desktops. Customers can save Rs 15000 by upgrading to the Nvidia RTX 3070 8GB from the Nvidia RTX 3060 Ti. They can also get a three-year extended warranty for Rs 99 until December 15.
The Legion 5i tower desktop’s base model costs Rs 81,225. The desktop is equipped with an Intel Core i5-124005 processor. Moreover, the PC also includes RTX 1650 Super GPU, 8GB DDR5 RAM, a 256GB SSD and B660 motherboard. The desktop PC might cost as much as Rs 1,85,155. For an extra Rs 9000, Lenovo would update consumers’ operating systems from Windows 11 Home Single Language 64 to Windows 11 Pro 64.
If you’re currently in the process of building a gaming rig, a good mouse is something you should not overlook. A light, fast-tracking, precise mouse can make all the difference in those intense gaming battles. To make your search simpler, we’ve picked some of the best gaming mice out there. Here is our list of the top 5 gaming mice under Rs 15,000.
Logitech G502 has held the mantle of the ‘best gaming mouse’ for quite some time now. Currently, the G502 series offers three variants – the G502 X Plus, G502 X Lightspeed, and the G502 X Wired gaming mouse. The G502 X Plus is the high-end variant, which is currently priced slightly above Rs 15,000. What sets the G502 X Plus apart from its predecessors is the RGB light strip running across the palm rest. This light strip can be customised using the G Hub app to display different colours. In terms of performance, the G502 X Plus has a 68% faster response rate than its predecessors and has a lighter design along with low-friction PTFE feet. Logitech has retained the Hero 25K sensor on the G502 X Plus. If Rs 15,495 is a bit steep for you, the Logitech G502 X Lightspeed is a great alternative that retains all the performance aspects of the X Plus variant but comes without the RGB Lightstrip. Read our full review here.
ASUS ROG Gladius III
Price: Rs 4,999
ASUS ROG Gladius III sports all the great specs you want to see in a gaming mouse. With a 400 ips optical sensor, 1000Hz polling rate, and 19,000 dpi, the Gladius III is a rock-solid wired gaming mouse. Asus claims a near-zero latency on the Gladius III, making it one of the most precise gaming mice out there. The ergonomic design along with 100% TPFE mouse feet offer a great glide. The Gladius III is also 30% lighter than the Gladius II and can track up to 400 inches per second at 50g acceleration.
Logitech G102
Price: Rs 1,495
The Logitech G102 comes with a powerful 8,000 dpi sensor and 6 customisable buttons. One of the better features of this mouse is its form factor. The sleek and light design along with the 6-button layout gives off a very classic vibe. The look of the mouse is further accentuated by the light strip running along the bottom of the panel. This light strip can be programmed to display different colours using the G Hub app. Logitech G102 fits the bill of a no-nonsense, good-looking mouse that gets the job done.
Razer DeathAdder Essential
Price: Rs 1,499
As the name suggests, the Razer DeathAdder has been an ‘essential’ part of gaming rigs for years. This ergonomic mouse is not only known for its superior performance, but also for its pocket-friendly price. The DeathAdder Essential provides an ergonomic form that is specially designed for hours of rigorous gaming sessions. On top of that, you get 5 Hyperresponse buttons that can be easily customised, a 6,400 dpi optical sensor for advanced precision and tracking, and a lifespan of up to 10 million clicks. This little device offers everything you want in a gaming mouse at a very reasonable price.
Zebronics Zeb-Transformer-M
Price: Rs 349
If you are just starting out in your gaming journey, you don’t need to splurge excessively on a gaming mouse. We would recommend saving as much money as you can for the processor, and getting an entry-level gaming mouse that you can easily upgrade in future. The Zebronics Zeb-Transformer-M is one of the best starter gaming mice you can buy right now, and at a price of Rs 349, it is an absolute steal. This mouse comes with a 3200 dpi sensor and a dedicated dpi switch that can toggle between 1000/1600/2400/3200 dpi levels. On top of that, the build quality of this mouse feels premium for the price, and it even comes with attractive LED lights!
These are the top 5 gaming mice under Rs 15,000 you can buy right now. We’ve covered various price points in this list and picked the undisputed best from every category. Do you have a personal favourite that you’d like to shout out? Let us know in the comments!
Google Pixel 7 and Pixel 7 Pro have now been released in India. The company took almost four years to make its premium smartphones available to Indian customers at the same time as they were launched globally. The Pixel 7 has been launched in India, with prices starting at roughly Rs 59,999. It does seem on the pricey side at first, but we will take you through it in this review. One feature that stands out when it comes to Google Pixel devices is the camera capability. As a result, the Pixel has constantly been rated as one of the best gadgets for photography performance. So, after using this product for a month, here is our review.
Google Pixel 7 review:Design and Display
The Pixel 7’s design hasn’t seen any significant modifications from Google, but we don’t mind that at all. On the front and back of the device, Gorilla Glass Victus is provided for durability, and the camera module has an aluminium construction. Moreover, it has matte metal frames on the sides. Additionally, the gadget is IP68-rated, which is excellent in this price range as most of the phones in this segment still don’t provide any IP rating. The colour we have for review is Snow but the device is available in two more options — Obsidian and Lemongrass. Since we have the lighter colour option, it does not attract fingerprints.
The Pixel’s camera module, which makes it distinctive and easy to spot, is the one aspect of its design that we really appreciate. In contrast to other places, this camera module is raised, however, it does not wobble when set down on a flat surface. Contrary to most phones, those with elevated camera bumps are very shaky. The camera module’s drawback is that it tends to collect a lot of dust, necessitating periodic cleaning.
The Google Pixel 7 is also somewhat bulky but was comfortable to hold in the hand because of its compact size. It has oddly placed buttons on the side; when unlocking the phone, we accidentally hit the volume button because it is positioned a little higher than where our thumb normally rests.
Regarding the display, the bezels on the sides give it a more mid-range phone appearance because they are rather pronounced. With a resolution of 2,400 x 1,080 pixels, the phone has a 6.32-inch full-HD+ OLED display. The device supports HDR 10+, which performs admirably across all streaming services. It is also notable how accurate the colours are.
The display’s overall quality is decent. It’s very bright because the max brightness is at 1,400 nits. Sadly, the screen only refreshes at 90Hz, and the display was not as fluid as we had expected. We had anticipated a 120Hz refresh rate, just like the pro edition, for that extra smoothness. Because of the excellent haptic feedback, we also enjoyed typing on the Pixel 7.
Google Pixel 7 review:Performance and camera
Moving on to performance, this year’s new Tensor G2 chip, which was created in collaboration with Samsung, is more than capable of handling daily chores.
The Tensor G2 can play games with higher graphics settings and good stability, but it still has a long way to go before it can match Qualcomm chipset performance.
Pixel 7 runs on Android 13 out of the box and Google also guarantees the Pixel 7 with three years of OS updates and five years of security patches. Here you get a clean stock android experience and a couple of Google-exclusive features.
Many of the most notable Google-only AI-related features include reducing background noise while you are still on a call. It also allows you to fix blurry photos and extract texts and messages from photos.
Without a doubt, the Pixel 7’s cameras are the best available in their price range. The majority of the photographs will provide you with the best photography experience possible with wonderfully natural colour science. The dynamic range is great, and the white balance is consistently accurate.
The Pixel 7 maintains the high level of colour fidelity that Google Pixel is recognised for. The colours in the images are neutral and kept in their natural state; they can be further improved in editing to the viewer’s preference. The dynamic range is perfect and yields excellent pictures, and the highlights and shadows are equally accurate. However, one thing we would want to emphasise is that because the focus tracking isn’t very excellent, you’ll wind up with blurry pictures of your dogs and flowers.
From the primary sensor, the portrait photos are simply outstanding. In this department, Google excels once more with its stunning portraits. In terms of edge recognition and skin tones, the photographs you receive are superb. This is unquestionably one of the best in this area, with the facial details appearing quite natural. In this setting, Google has also supplied 2x, which in our opinion is not optimised and results in soft photos.
Portrait
Moving on to the close-up photographs, we noticed outstanding details and images with excellent colours that are true to life.
The quality of the selfies falls a bit short of what the main camera is capable of. However, the front camera provides crispness and superb details all around. The skin tone is nearly natural, which we found to be appealing. Although the edge detection appears adequate, we wouldn’t describe it as exceptional. The same holds true for photographs taken at ultra wide angles. The field of view seemed a little restricted to us.
Because the ultra wide’s sensor is smaller than the primary lens, it occasionally struggles and requires a little bit of extra processing time, especially in low light.
Long-exposure photography can also produce pleasing effects and original pictures. Additionally, there is the Action Pan creative mode, which allows you to capture fantastic panning photography.
Given the cost, we also believe that the Google Pixel 7’s videos are acceptable. They have nice steadiness and good colours, which is great for filming Instagram reels, in our opinion. When it comes to resolution, the front camera delivers both full HD and 4k quality. While 4K and HD films can both reach 60 frames per second, only HD resolution offers the Auto option.
The Cinematic Mode allows you to capture videos in HD definition, rather than the adequate 1080p, but not in 4K. In this setting, the focus is extremely accurate and quick. However, we weren’t overly impressed by edge detection.
For the cost, the speaker quality is standard. We appreciate the overall sound system despite the fact that it is not particularly loud. Clear vocals, good treble, and a slightly noticeable bass are produced.
Regarding battery life, it is fairly average as it comes with a 4,270mAh battery. We always had to charge the phone before going to bed when we used mobile data in our regular usage throughout the day. The smartphone only supports 20-watt power charging, which charges the phone from zero to fifty percent in around 30 minutes and from fifty to one hundred percent in another 45 minutes.
Verdict
The Pixel 7 is a fairly well-built phone in terms of design. The battery life of the Pixel 7 is not particularly impressive. Even with its few drawbacks for us, the Pixel 7 is still a fantastic semi-flagship device. Any person seeking a great camera performance at this price point won’t be let down by the camera because it is so amazing. The Pixel 7 is likely to be a great upgrade for anyone looking to move up from a mid-range device. Also, keep checking back to our website since we’ll shortly be publishing another in-depth analysis of the Pixel 7 Pro.
Instagram Account Status will soon be expanded, enabling professional account holders to determine if their content qualifies for recommendations in areas like Reels, Explore, and Feed suggestions to users who aren’t followers and what they can do if it doesn’t.
While announcing the new update Instagram via its blog post said, “Instagram is expanding Account Status to help people with professional accounts understand if their account’s content is eligible to be recommended to non-followers, and what they can do if it’s not.”
This upgrade allows you to Check if your account’s content can be suggested. Check to see if your content qualifies for non-follower recommendations in locations like Explore, Reels, and Feed Recommendations.
It will also enable you to understand issues like if your account’s content is not eligible to be suggested, you can view a sample of content or components of your profile that may go against its Recommendations Guidelines and any content that has been removed for violating Community Guidelines.
It can help fix problems like Edit or delete posts that may go against our Recommendations Guidelines. You can also request for the review staff to take another look if you think Instagram made a mistake.
According to the Meta-owned photo-sharing app, getting Instagram to recommend your work is a wonderful method to expand your fan base.
In order for its review staff to rapidly take another look and for Instagram to keep advancing its detection technology, it has now included the option to disagree with their decision. “With these updates, we want to help you understand issues with your account and better explain how our systems and rules work,” the company added.
Account Status is still being improved by Instagram to include new areas (like Search and Suggested Accounts) and to give users more opportunities to identify and resolve problems that can affect how they connect with non-followers. You can visit Account Status by tapping into Settings, tapping Account, and then tapping Account Status.


")


")